61
Training User Guide Introduction to Employee Self-Service
Training User Guide
Introduction to Employee Self-Service

1
All Employee Self-Service users will find the following chapters useful:
• About This Guide
• Getting Started with Employee Self-Service
• Personal
• Pay and Benefits
Dependent on your level of access the below chapters may also apply to you:
• Leave of Absence
• Time and Expenses Claims
• Employment
• Career Development

2
Contents
1. About This Guide ................................................................................................................ 6
How to Use This Guide .............................................................................................. 6
Objectives of This User Guide .................................................................................... 6
2. Getting Started With Employee Self-Service ......................................................................... 7
What is iTrent and Self-Service................................................................................... 7
Security Matters ........................................................................................................ 7
Logging onto Self-Service ........................................................................................... 7
The Main Menu ......................................................................................................... 9
Setting your Memorable Information ....................................................................... 10
What to do if you forget your username? ................................................................. 11
What to do if you forget your password? ................................................................. 12
What’s In Employee Self-Service .............................................................................. 14
3. Personal ........................................................................................................................... 15
View and Update Personal Information .................................................................... 15
Update Personal Details .......................................................................................... 15
View and Update Sensitive Information ................................................................... 16
Contact information ................................................................................................ 17
Add and Amend Contact details ............................................................................... 18
Add/Update your Address ....................................................................................... 19
Emergency Contacts ................................................................................................ 20
View your emergency contacts................................................................................. 20
Update your Existing Contacts ................................................................................. 20
Add a New Means of Contact ................................................................................... 21
Bank Details ............................................................................................................ 22
Update Bank Accounts ............................................................................................ 22
Private Vehicles ....................................................................................................... 23
View your private vehicles ....................................................................................... 23
4. Leave of Absence .............................................................................................................. 25
View and amend your absence ................................................................................ 25
Annual Leave Entitlement Calculation ...................................................................... 26
Flexi Leave Entitlement Calculation .......................................................................... 26
Viewing your Holiday Entitlement ............................................................................ 27
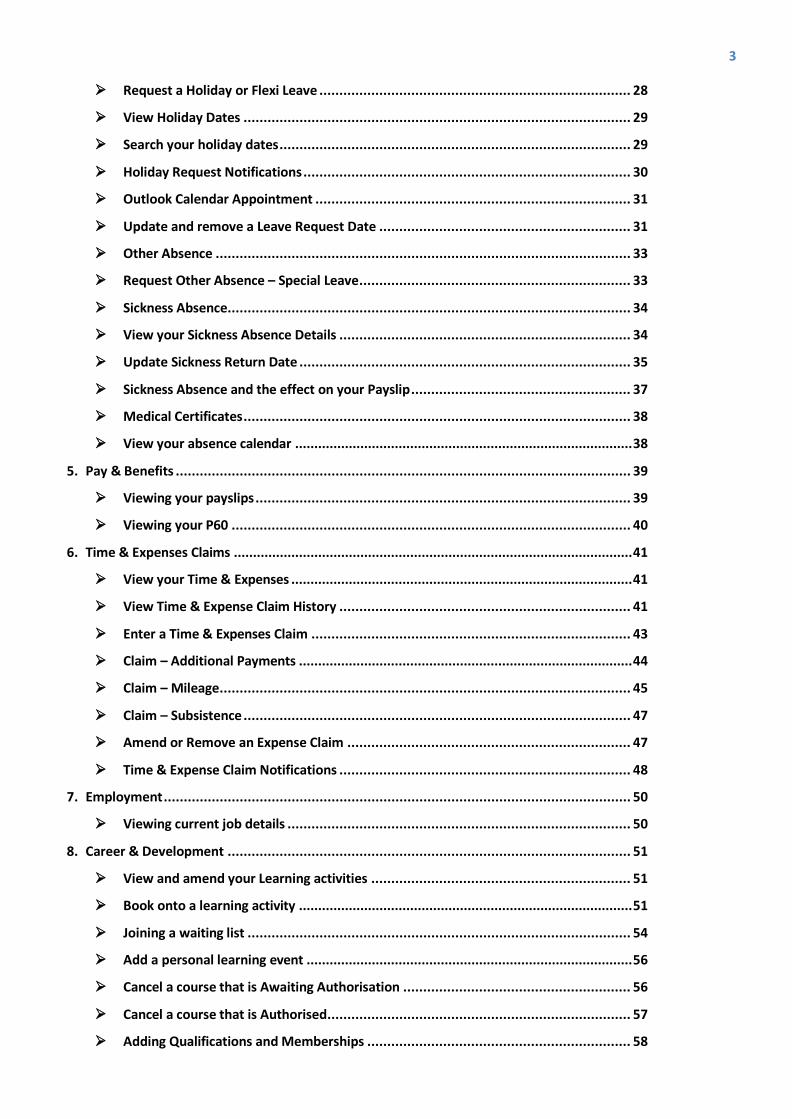
3
Request a Holiday or Flexi Leave .............................................................................. 28
View Holiday Dates ................................................................................................. 29
Search your holiday dates ........................................................................................ 29
Holiday Request Notifications .................................................................................. 30
Outlook Calendar Appointment ............................................................................... 31
Update and remove a Leave Request Date ............................................................... 31
Other Absence ........................................................................................................ 33
Request Other Absence – Special Leave .................................................................... 33
Sickness Absence ..................................................................................................... 34
View your Sickness Absence Details ......................................................................... 34
Update Sickness Return Date ................................................................................... 35
Sickness Absence and the effect on your Payslip ....................................................... 37
Medical Certificates ................................................................................................. 38
View your absence calendar ........................................................................................ 38
5. Pay & Benefits .................................................................................................................. 39
Viewing your payslips .............................................................................................. 39
Viewing your P60 .................................................................................................... 40
6. Time & Expenses Claims ........................................................................................................ 41
View your Time & Expenses ......................................................................................... 41
View Time & Expense Claim History ......................................................................... 41
Enter a Time & Expenses Claim ................................................................................ 43
Claim – Additional Payments ....................................................................................... 44
Claim – Mileage ....................................................................................................... 45
Claim – Subsistence ................................................................................................. 47
Amend or Remove an Expense Claim ....................................................................... 47
Time & Expense Claim Notifications ......................................................................... 48
7. Employment ..................................................................................................................... 50
Viewing current job details ...................................................................................... 50
8. Career & Development ..................................................................................................... 51
View and amend your Learning activities ................................................................. 51
Book onto a learning activity ....................................................................................... 51
Joining a waiting list ................................................................................................ 54
Add a personal learning event ..................................................................................... 56
Cancel a course that is Awaiting Authorisation ......................................................... 56
Cancel a course that is Authorised ............................................................................ 57
Adding Qualifications and Memberships .................................................................. 58

4
View qualifications and memberships ...................................................................... 58
Add Qualifications ................................................................................................... 58
Add Memberships ................................................................................................... 60

5
Document History
Version Date of Change Initials Notes
2.0 01/10/2015 HJ Revised ESS manual, added L&D manual
2.1 25/01/2015 HJ Included Flexi, Special and Unpaid Leave
2.2 10/10/2016 EM Updated for mobile access
2.3 08/11/2017 LM Removal of disability description and special requirement
Document Title • ITUG - ESS User Guide Issued 24/10/2016
Document Type • End User Guide
Version • 2.3
Document Author • iTrent Systems Support Team
6
1. About This Guide
This guide gives you comprehensive information about how to use employee self-service and acts as a reference point in case you need to know about any particular feature.
How to Use This Guide
You can use the contents page to find a specific topic or, you can work through the entire guide to support your learning. Within this guide we have used screen shots to illustrate the self-service screens and icons to highlight the following.
Key information, take note
Bullets indicate an action or step you need to make
Action being performed by the system
Navigation route to reach a screen
Additional guidance notes
Warning, apply caution
Objectives of This User Guide
After working through this guide you will be able to operate ESS and do the following activities:
Get started with Employee Self-Service
View and update your personal information
Request Annual Leave and view your holiday balance
Enter your sickness absence end date
View pay history / payslips
View your P60
Submit and view time & expense claims
View current and previous jobs
Book onto a learning activity
Update your Qualifications and Memberships
7
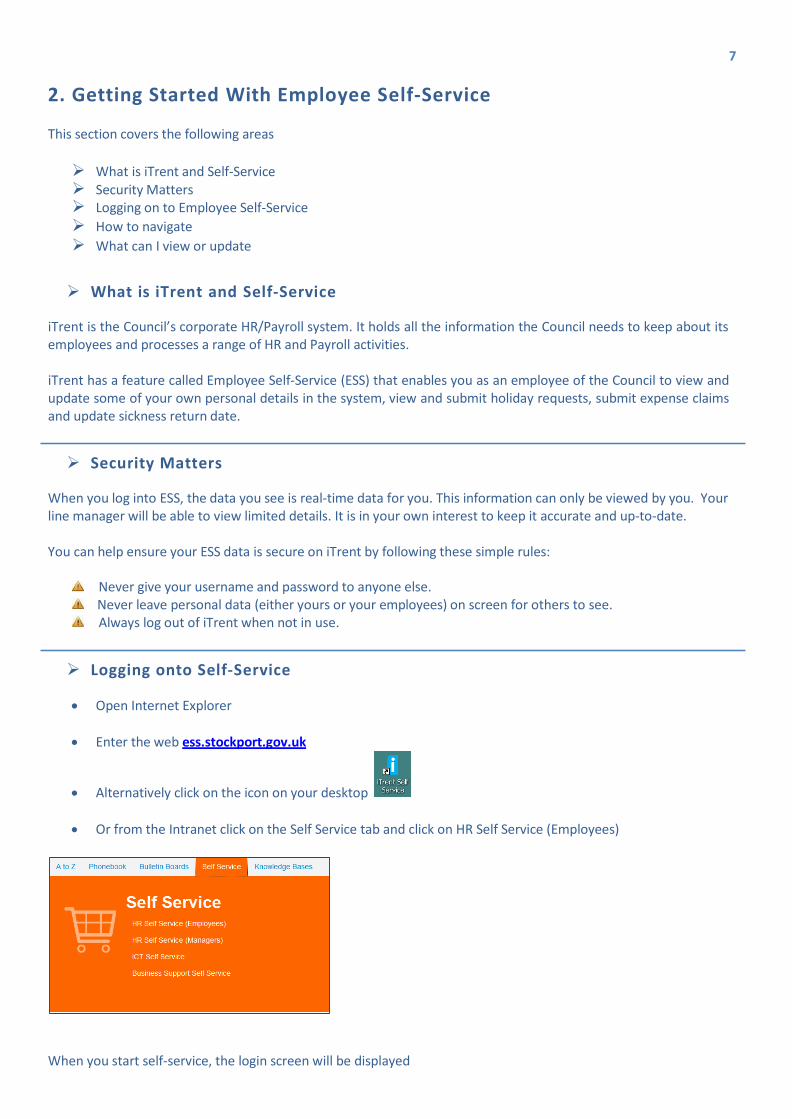
2. Getting Started With Employee Self-Service
This section covers the following areas
What is iTrent and Self-Service Security Matters Logging on to Employee Self-Service How to navigate What can I view or update
What is iTrent and Self-Service
iTrent is the Council’s corporate HR/Payroll system. It holds all the information the Council needs to keep about its employees and processes a range of HR and Payroll activities.
iTrent has a feature called Employee Self-Service (ESS) that enables you as an employee of the Council to view and update some of your own personal details in the system, view and submit holiday requests, submit expense claims and update sickness return date.
Security Matters
When you log into ESS, the data you see is real-time data for you. This information can only be viewed by you. Your line manager will be able to view limited details. It is in your own interest to keep it accurate and up-to-date.
You can help ensure your ESS data is secure on iTrent by following these simple rules:
Never give your username and password to anyone else. Never leave personal data (either yours or your employees) on screen for others to see. Always log out of iTrent when not in use.
Logging onto Self-Service
• Open Internet Explorer
• Enter the web ess.stockport.gov.uk
• Alternatively click on the icon on your desktop
• Or from the Intranet click on the Self Service tab and click on HR Self Service (Employees)
When you start self-service, the login screen will be displayed
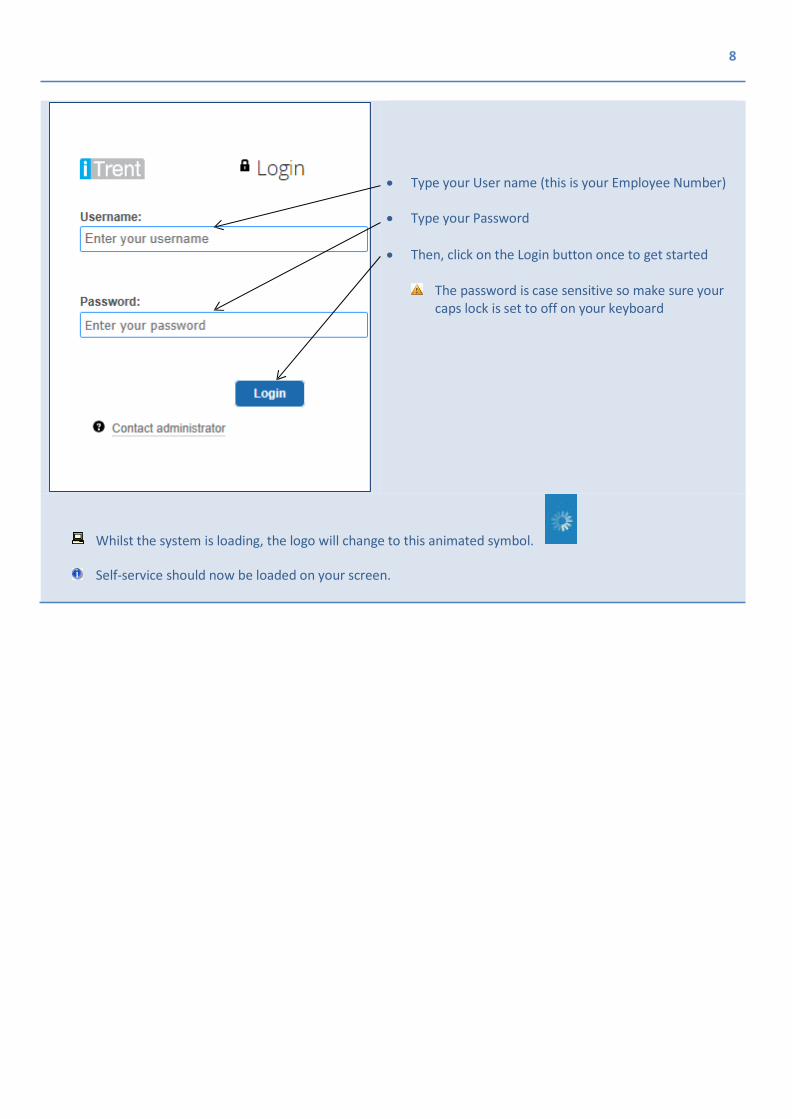
8
• Type your User name (this is your Employee Number) • Type your Password • Then, click on the Login button once to get started
The password is case sensitive so make sure your caps lock is set to off on your keyboard
Whilst the system is loading, the logo will change to this animated symbol. Self-service should now be loaded on your screen.

9
The Main Menu
In the mobile version your view is different, instead of the tabs appearing horizontally they will appear vertically.
4
1 2 3
10
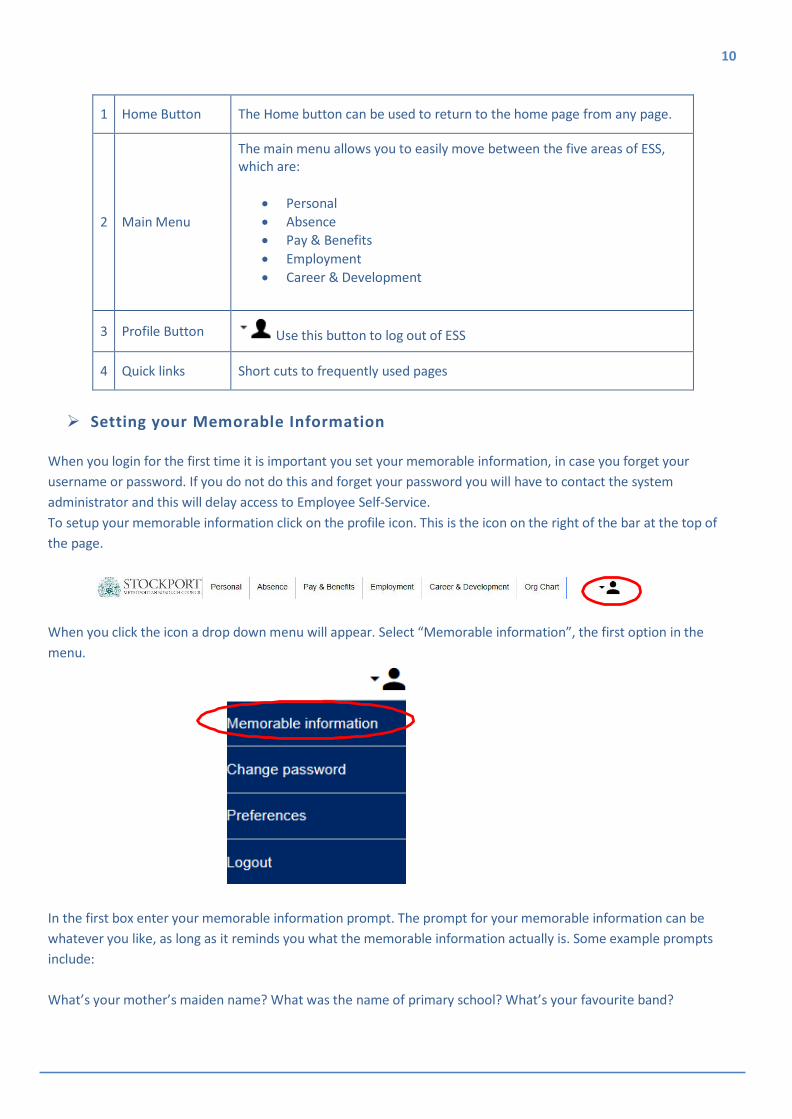
1 Home Button The Home button can be used to return to the home page from any page.
2
Main Menu
The main menu allows you to easily move between the five areas of ESS, which are:
• Personal • Absence • Pay & Benefits • Employment • Career & Development
3 Profile Button Use this button to log out of ESS
4 Quick links Short cuts to frequently used pages
Setting your Memorable Information
When you login for the first time it is important you set your memorable information, in case you forget your username or password. If you do not do this and forget your password you will have to contact the system administrator and this will delay access to Employee Self-Service. To setup your memorable information click on the profile icon. This is the icon on the right of the bar at the top of the page.
When you click the icon a drop down menu will appear. Select “Memorable information”, the first option in the menu.
In the first box enter your memorable information prompt. The prompt for your memorable information can be whatever you like, as long as it reminds you what the memorable information actually is. Some example prompts include:
What’s your mother’s maiden name? What was the name of primary school? What’s your favourite band?

11
The memorable information itself has to
• Contain between six and 25 characters • It cannot contain spaces • It cannot be the same as your prompt, your password or your username (the system will prevent
this) • It can only include letters (which can either be lowercase, uppercase or both) and number.
Enter your memorable information in the memorable information box and confirm this by entering the memorable information again in the “confirm memorable information” box.
To save your memorable information press “Save”.
If you wish to edit or change your memorable information at any time, you can do so by following the above process but it is vital you do this on first login in case you misplace your password information.
What to do if you forget your username?
You cannot change your username. The system will not allow this. If you forget your username you can find it on your pay slip, or if you have set your memorable information you can follow the steps to retrieve this information. If you have not set your memorable information, please contact your line manager who will be able to provide you with your employee number.
If you forget your username and have set your memorable information then you can follow the steps below to retrieve your username.
Click on the “forgotten username” link
You will then be asked to enter your forename, surname, date of birth and e-mail address. Enter the information in the boxes and press “next”

12
A box will then appear with your prompt in asking you to set your memorable information. Enter your memorable information and press “next”
Your username will then appear on screen. Make note of this information as you will need it each time you login.
What to do if you forget your password?
If you have entered your password incorrectly, you will receive a message to inform you.
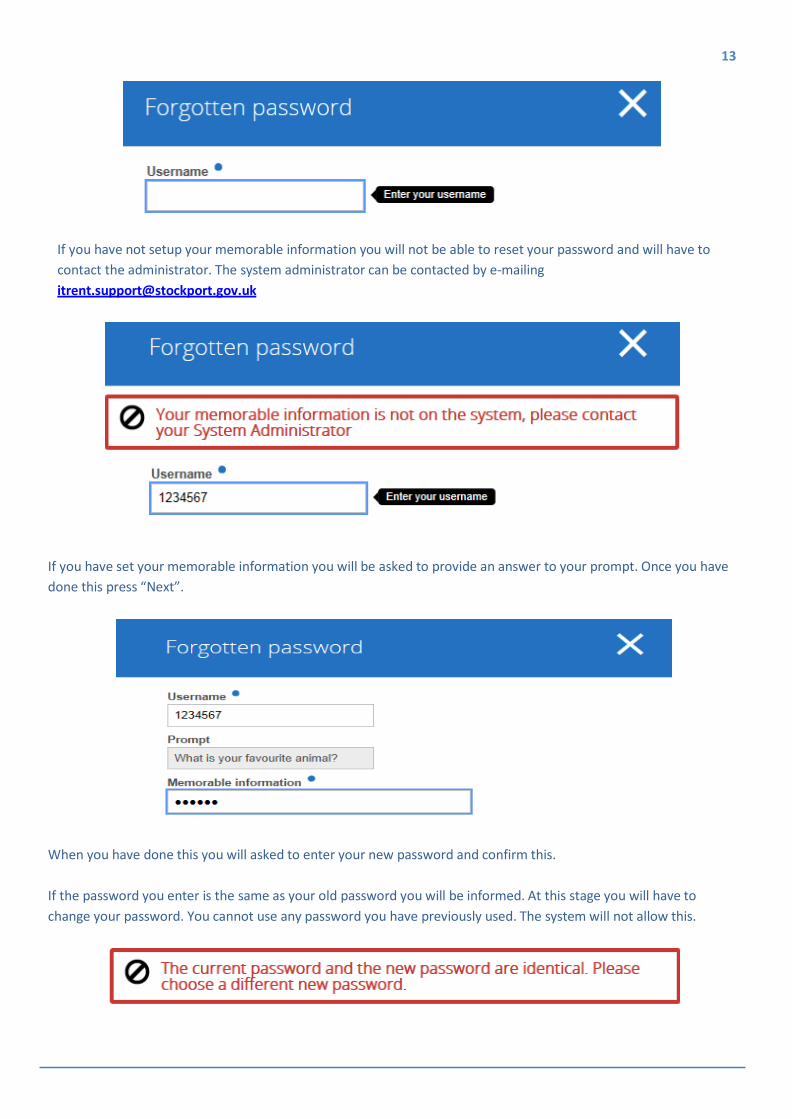
If you forget your password click the “forgotten password?” link.
A page will appear asking your username. Enter your username (employee number) in the box and press “next”.
13
If you have not setup your memorable information you will not be able to reset your password and will have to contact the administrator. The system administrator can be contacted by e-mailing [email protected]
If you have set your memorable information you will be asked to provide an answer to your prompt. Once you have done this press “Next”.
When you have done this you will asked to enter your new password and confirm this.
If the password you enter is the same as your old password you will be informed. At this stage you will have to change your password. You cannot use any password you have previously used. The system will not allow this.

14
What’s In Employee Self-Service
There are five menus in Employee Self-Service:
Personal Absence Pay & Benefits Employment Career & Development
Each menu is divided into sub-headings. In each sub-heading there are a series of cards. For example, below shows the cards from the ‘Personal’ menu in the sub heading ‘Contact information’.
If you click on cards with this symbol the card opens to a tab in which you can edit information.
Blue data fields are mandatory and you will not be allowed to save information if blue field are left blank.
When you enter data you will be required to click on the save button

15
3. Personal
The Personal section looks at how to view, add and change certain information held about you in the Council’s HR/Payroll system.
View and change your personal information View, change and add your Contact information View, change and add your means of emergency contacts View, change and add your Bank details View your private vehicles
Update Personal Details
In this card you can change your name and your marital status as well as the date of your appraisal and when you completed your induction.
• Click on the card you wish to amend. Observe screen layout below.
• In the Personal Details Screen, update your personal information
• Click on the Save Button
View and Update Personal Information
From the Employee Self-Service Main Menu, click on Personal tab
16
You are unable to change your date of birth. In the event it is incorrect and it requires changing, please email HR Directorate Services Team at [email protected] When you change your name, an email notification will be sent to you.
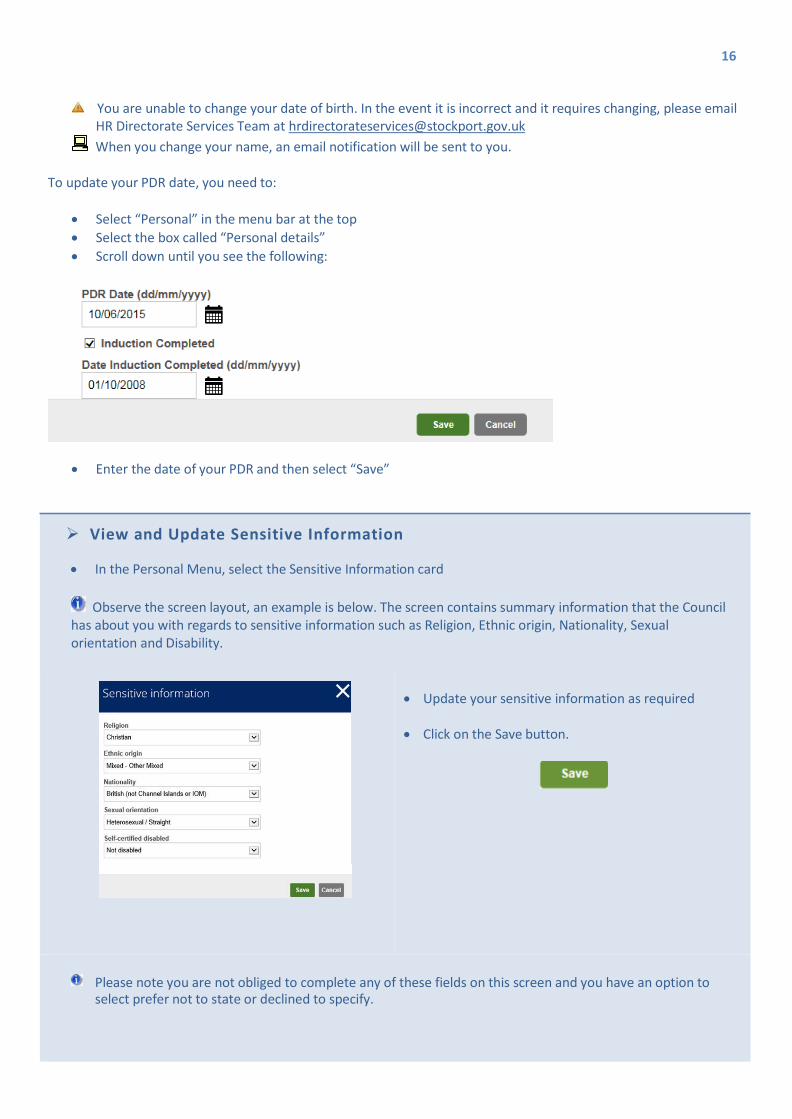
To update your PDR date, you need to:
• Select “Personal” in the menu bar at the top • Select the box called “Personal details” • Scroll down until you see the following:
• Enter the date of your PDR and then select “Save”
View and Update Sensitive Information • In the Personal Menu, select the Sensitive Information card
Observe the screen layout, an example is below. The screen contains summary information that the Council
has about you with regards to sensitive information such as Religion, Ethnic origin, Nationality, Sexual orientation and Disability.
• Update your sensitive information as required • Click on the Save button.
Please note you are not obliged to complete any of these fields on this screen and you have an option to select prefer not to state or declined to specify.
17
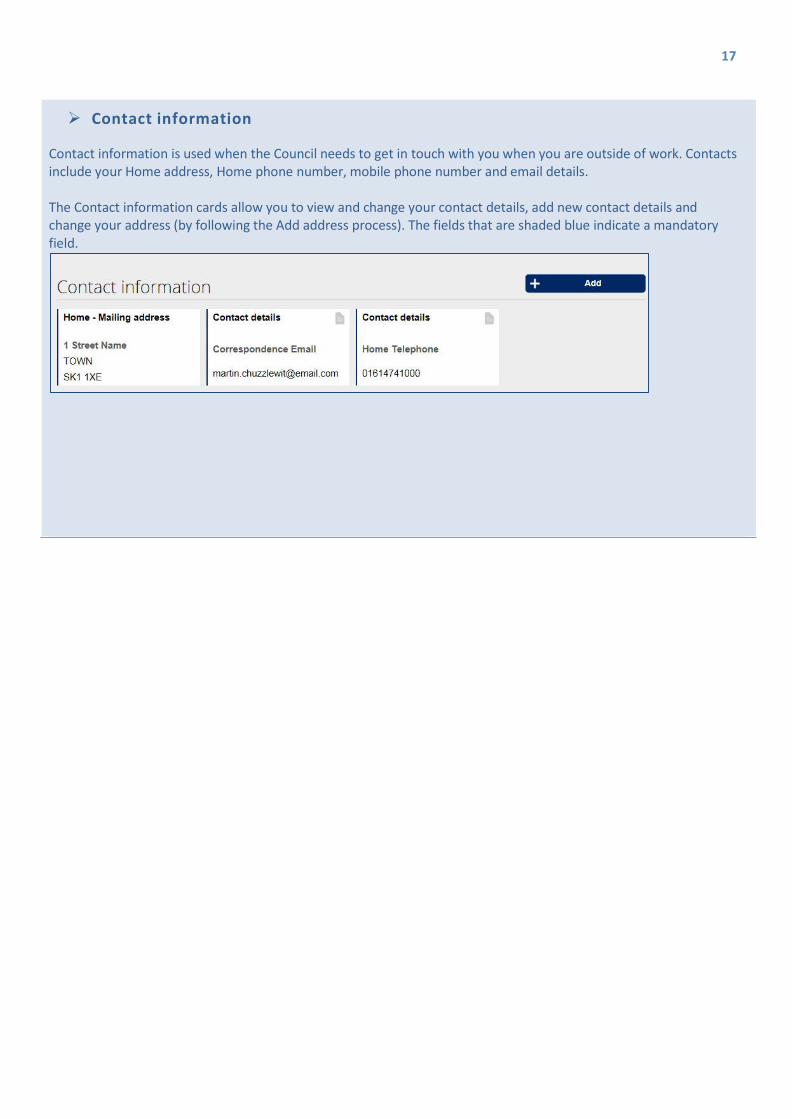
Contact information
Contact information is used when the Council needs to get in touch with you when you are outside of work. Contacts include your Home address, Home phone number, mobile phone number and email details.
The Contact information cards allow you to view and change your contact details, add new contact details and change your address (by following the Add address process). The fields that are shaded blue indicate a mandatory field.

18
Add and Amend Contact details
To amend your contact details
• Click on the card of the contact details you wish to amend.
• Amend the appropriate fields.
• Click on Save button
To add new contact details
• Click add button on the top right of the panel
• Select Add contact details. • Complete fields as appropriate. • Click on Save button

19
Add/Update your Address
You can update when your address has changed.
• Click add button on the top right of the panel
• Select Add Address and panel will open as shown below. Use this screen to enter your new home address.
• Enter your new home address in the fields provided
• Click on the Save button
Please note that any address can be inserted and used as a mailing address. In addition, when you insert a new address and you don’t select mailing address, it automatically assumes that this will be the mailing address. In the event you want to assign a new mailing address, you need to create a new address and then tick the field called Mailing address
• When you select the Address Type, your correspondence is directed to that location. For the majority this will be your home address, however, for those people who are governors or councillors there is an option to redirect mail to their chosen location.

20
Emergency Contacts
This page allows you to maintain your emergency contact details held in iTrent. Emergency contacts are used when the Council needs to get in touch with your nominated contact (friend or family member) in the event of an emergency.
Update your Existing Contacts
Use this feature if you wish to correct or update a displayed emergency contact
• Click on the Emergency contact card you wish to amend
• Amend fields as required
• Click on the Save button
View your emergency contacts
From the Employee Self-Service Main Menu, click on Personal tab. View under Friends & Family heading
• Observe screen layout below. This is a summary of the emergency contacts the Council has on record for you.

21
Add a New Means of Contact
Use this feature if you wish to add a new emergency contact
• Click on add Emergency contact button
• Update your emergency contact details
• If the contact you are adding is to be the primary contact please tick the box.
• By ticking the ‘Use my home address’ box, your home address will automatically be inserted if recorded in iTrent.
• Click on the Save button
You must always have at least one emergency contact. You are unable to delete contacts. You can only amend the details.
Primary Contact - Only one primary contact is allowed. If you create a new contact and make it Primary, then previously ticked boxes will become un-ticked

22
Bank Details
From the Employee Self-Service Main Menu, click on the Personal tab
This page shows the bank details that are used to pay you.
Update Bank Accounts If you change your bank account, you can change the details we hold for you on Employee Self-Service. • Click on the Bank Details card
Observe the screen layout below. It shows a summary of your current bank account details (the account that your salary is paid into by the Council). Do not worry if the bank name field is blank.
• Overtype with the correct details • Click on the Save button
When you change the bank sort code, the bank name will change on the screen.
The field called Roll number is only used for those accounts that are from certain Building Societies.
If your sort code is not recognised a message will appear saying invalid sort code. If this happens please contact HR Directorate Services Team at [email protected] for them to check your sort code on your behalf. If your payroll has already been processed, this change will take effect from the next payroll. In the event the payroll has not been processed, a message will appear at the top of the screen saying ‘any changes will take immediate effect’.

23
Private Vehicles
Please make sure that when you make a claim for mileage, you select the correct vehicle for the claim. Details of how to make a claim are in section 8 – Pay & Benefits
You can share a car with another employee of the Council. The system does not restrict the amount of people
a car can be attached to.
Please take care when entering your new bank details. If incorrect details are entered this could result in additional recovery work and possible bank charges.
When you change your bank information, an email notification will be sent to you.
View your private vehicles
From the Employee Self-Service Main Menu, click on the Personal tab
View the Private vehicles card under the Private Vehicle heading
• To view the details of the Private Vehicle on record, click on the card.
Observe the screen layout, an example is below. This is a summary screen that lists the private vehicles the Council has on record that you own and/or use for business travel. You cannot make any changes on this screen.
24
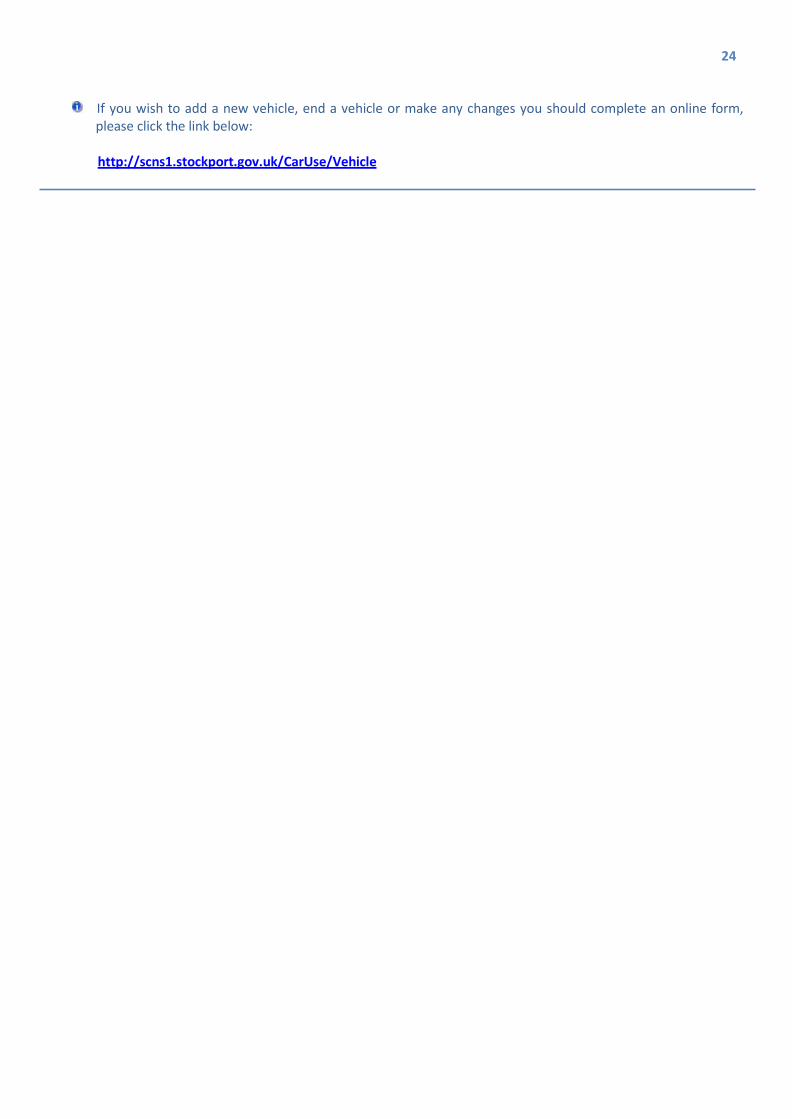
If you wish to add a new vehicle, end a vehicle or make any changes you should complete an online form, please click the link below:
http://scns1.stockport.gov.uk/CarUse/Vehicle

25
4. Leave of Absence
This section looks at how to view, add and change your leave requests as well as viewing your balance. Also in this section you can view your sickness record and add sickness end dates.
It is very important to record your leave and sickness accurately as this may affect your pay.
The section shows you how to:
View, add and change a holiday or flexi request View your holiday (annual leave) balances View your Sickness record Add sickness end date View your absence calendar
View and amend your absence
From the Employee Self-Service Main Menu, click on the Absence tab
Observe the Absence menu below. This screen shows a summary of your Annual Leave, Flexi Leave,
Sickness absence and finally at the bottom any Special Leave requests that you may have had.
As Flexi is another kind of holiday this will show in the same list but the ‘Type’ will indicate which type of leave it is. The balance page separates the leave from the Flexi.

26
Annual Leave Entitlement Calculation
Annual Leave is displayed in hours and total entitlement will also include Statutory Bank Holidays. This will
typically be 8 days per year, however this figure is variable depending on the dates of the Easter Bank Holidays or if any extra Bank Holidays are granted.
Annual Leave is calculated as follows
Each time there is a Bank Holiday the system will automatically deduct the hours you usually work on that day.
The balance outstanding to employees will always show with the deduction for the years bank holidays deducted.
Number of daysleave
Employees Contracted
Hours
Hours per day
Bank
5 days per week
Total days leave per
year
Total days leave per
year
Hours per day
Total entitlement
in hours
Flexi Leave Entitlement Calculation
In order for requests to be able to go through for flexi a balance has been available. This balance is the equivalent of 13 days pro rata to hours worked.
13 x 7.4 hours = 96.2 hours
For Part time workers this balance is divided by full time hours and x by actual working hours.
E.g. Employee works 30 hours
96.20 / 37 x 30 = 78 hours
The hours will be pro rata for every hours change.
27
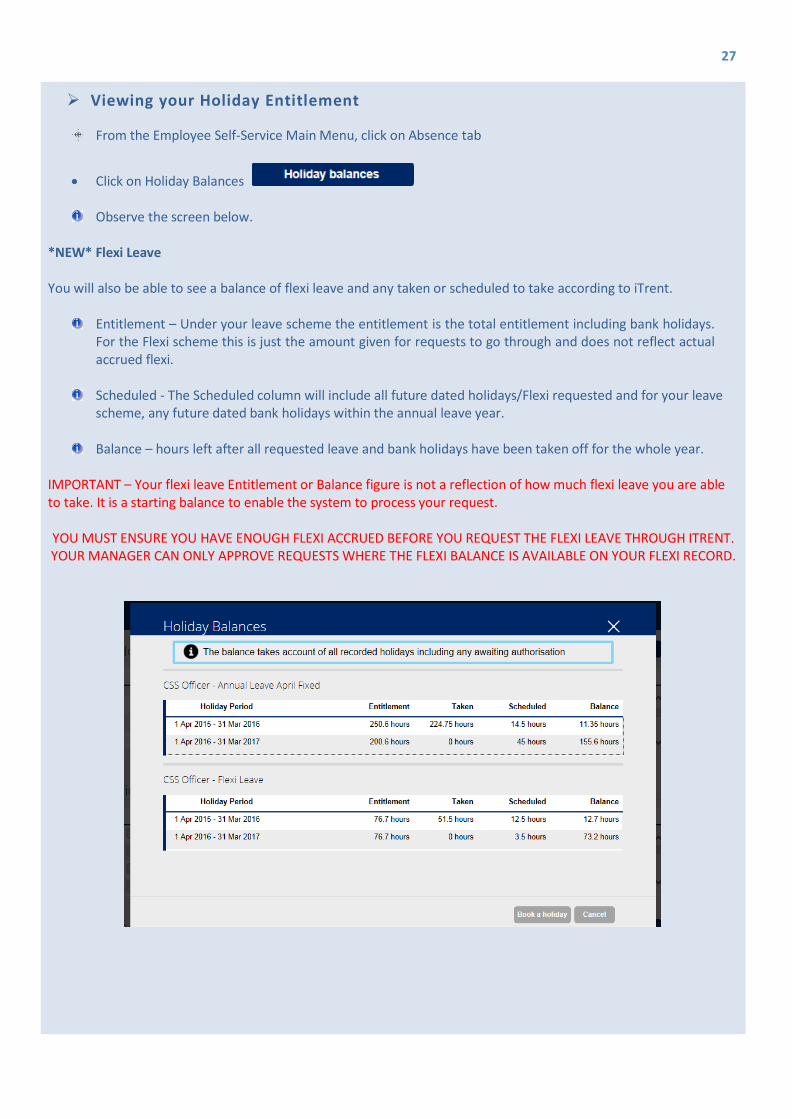
Viewing your Holiday Entitlement
From the Employee Self-Service Main Menu, click on Absence tab
• Click on Holiday Balances
Observe the screen below.
*NEW* Flexi Leave
You will also be able to see a balance of flexi leave and any taken or scheduled to take according to iTrent.
Entitlement – Under your leave scheme the entitlement is the total entitlement including bank holidays. For the Flexi scheme this is just the amount given for requests to go through and does not reflect actual accrued flexi.
Scheduled - The Scheduled column will include all future dated holidays/Flexi requested and for your leave scheme, any future dated bank holidays within the annual leave year.
Balance – hours left after all requested leave and bank holidays have been taken off for the whole year.
IMPORTANT – Your flexi leave Entitlement or Balance figure is not a reflection of how much flexi leave you are able to take. It is a starting balance to enable the system to process your request.
YOU MUST ENSURE YOU HAVE ENOUGH FLEXI ACCRUED BEFORE YOU REQUEST THE FLEXI LEAVE THROUGH ITRENT. YOUR MANAGER CAN ONLY APPROVE REQUESTS WHERE THE FLEXI BALANCE IS AVAILABLE ON YOUR FLEXI RECORD.
28
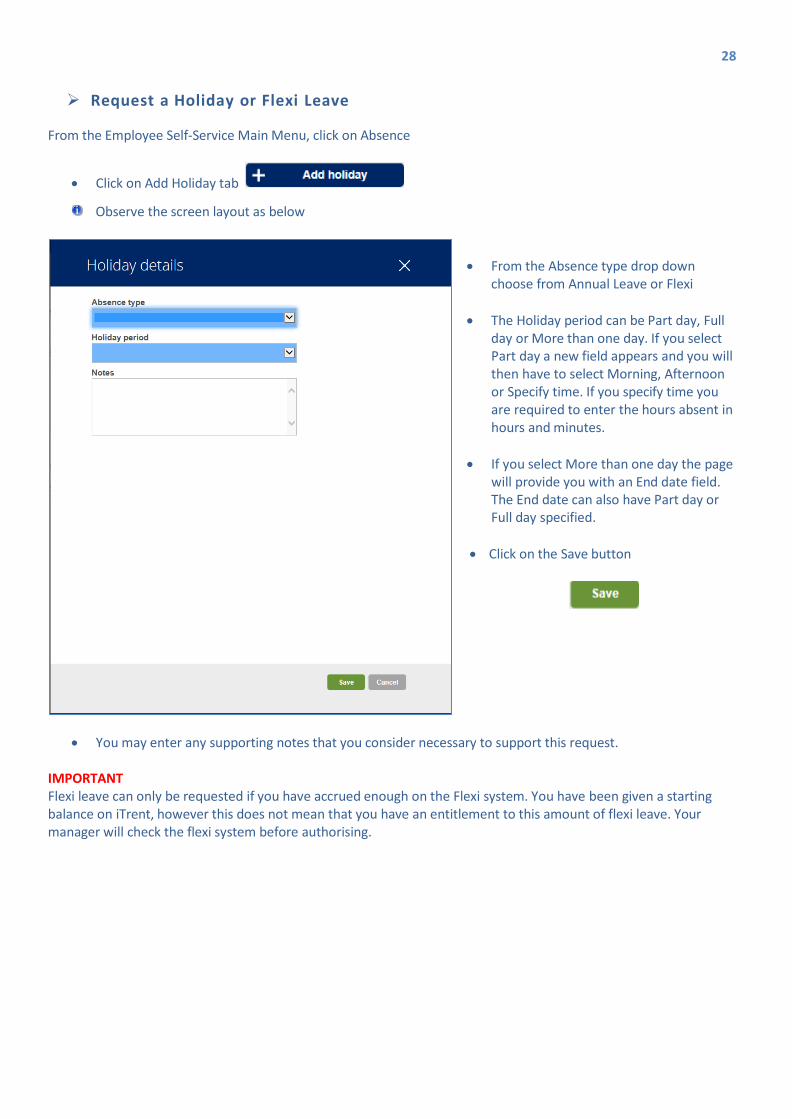
Request a Holiday or Flexi Leave
From the Employee Self-Service Main Menu, click on Absence
• Click on Add Holiday tab
Observe the screen layout as below
• From the Absence type drop down
choose from Annual Leave or Flexi
• The Holiday period can be Part day, Full day or More than one day. If you select Part day a new field appears and you will then have to select Morning, Afternoon or Specify time. If you specify time you are required to enter the hours absent in hours and minutes.
• If you select More than one day the page
will provide you with an End date field. The End date can also have Part day or Full day specified.
• Click on the Save button
• You may enter any supporting notes that you consider necessary to support this request.
IMPORTANT Flexi leave can only be requested if you have accrued enough on the Flexi system. You have been given a starting balance on iTrent, however this does not mean that you have an entitlement to this amount of flexi leave. Your manager will check the flexi system before authorising.

29
View Holiday Dates
Holiday dates are displayed on cards under the Holidays heading if you only have a couple of requests, this will revert to a list once a few requests have been made.
Observe the screen layout. The Holiday dates page initially defaults to showing recent holidays first.
Please note, claims are sent to the manager who is listed as having authorising responsibility on the claim start date. Therefore it is possible that a manager may receive a claim beyond the date when they stopped having line management responsibility for the claimant. Managers can redirect claims via the to-do list (see point 45).
Search your holiday dates
You can search for a particular date or range of dates to view any absence you have on your record.
• On the Absence screen, click on the magnifying glass
A new window will open for you to input search criteria as below.
• Complete all fields as required
• Click on Search
The results will be shown on the same screen.

30
If you click on the card it will open the holiday details screen.
Holiday Request Notifications
A system generated email will be sent to your reporting manager for them to review and either authorise or not authorise your holiday date request. When you manager deals with your request you will receive an email notifying you of the outcome.
Acknowledgement message
Approved message
Not approved message

31
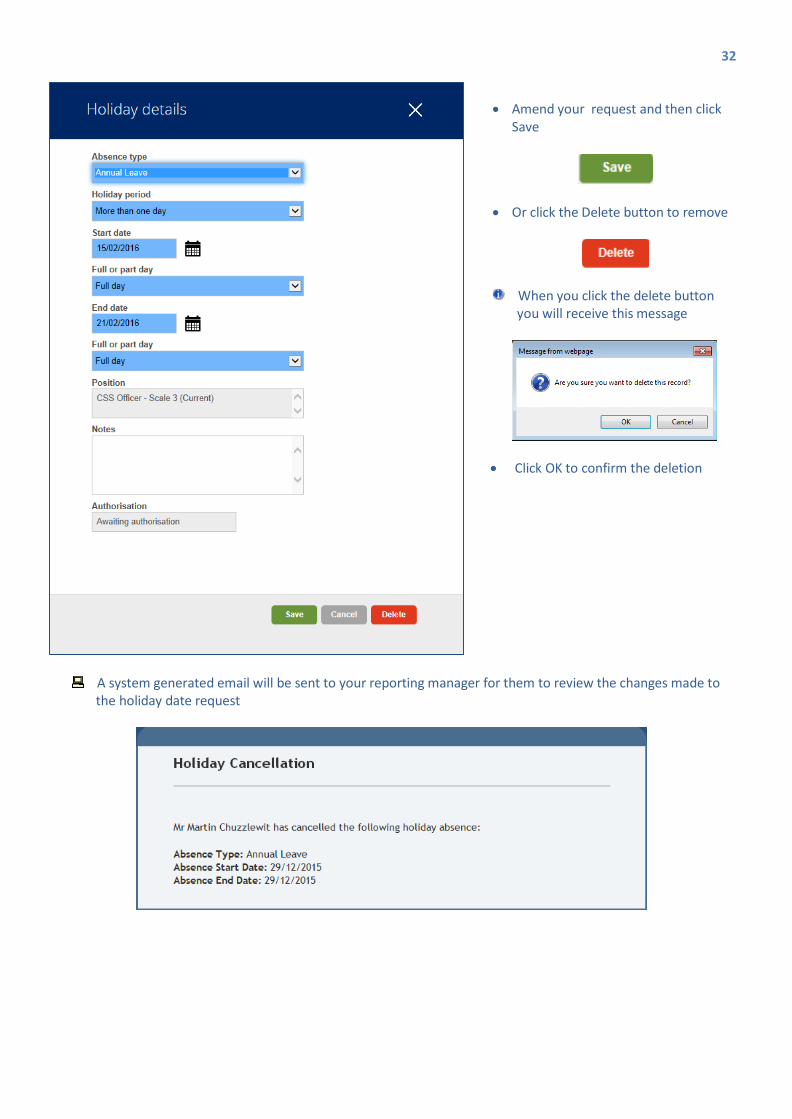
Update and remove a Leave Request Date
Please note - The option to update or remove your leave request/s are only available for a date that hasn’t passed i.e. future dated leave. If you need to update or remove a date that has already passed, then your reporting/authorising manager will need to do this for you.
• From the Employee Self-Service Main Menu, click on Absence
Observe the screen layout. It contains your holiday request details. It will show as a summary once there
are more than four holidays submitted.
• Click on the absence you wish to amend
Outlook Calendar Appointment
An authorised leave request will automatically send you and your manager an Outlook meeting request.
• When you receive the email, click on the attached calendar appointment. It will open the appointment. Click on Accept, and Do Not Send A Response.
• The day will then be marked in your calendar.
32
• Amend your request and then click Save
• Or click the Delete button to remove
When you click the delete button you will receive this message
• Click OK to confirm the deletion
A system generated email will be sent to your reporting manager for them to review the changes made to the holiday date request
33
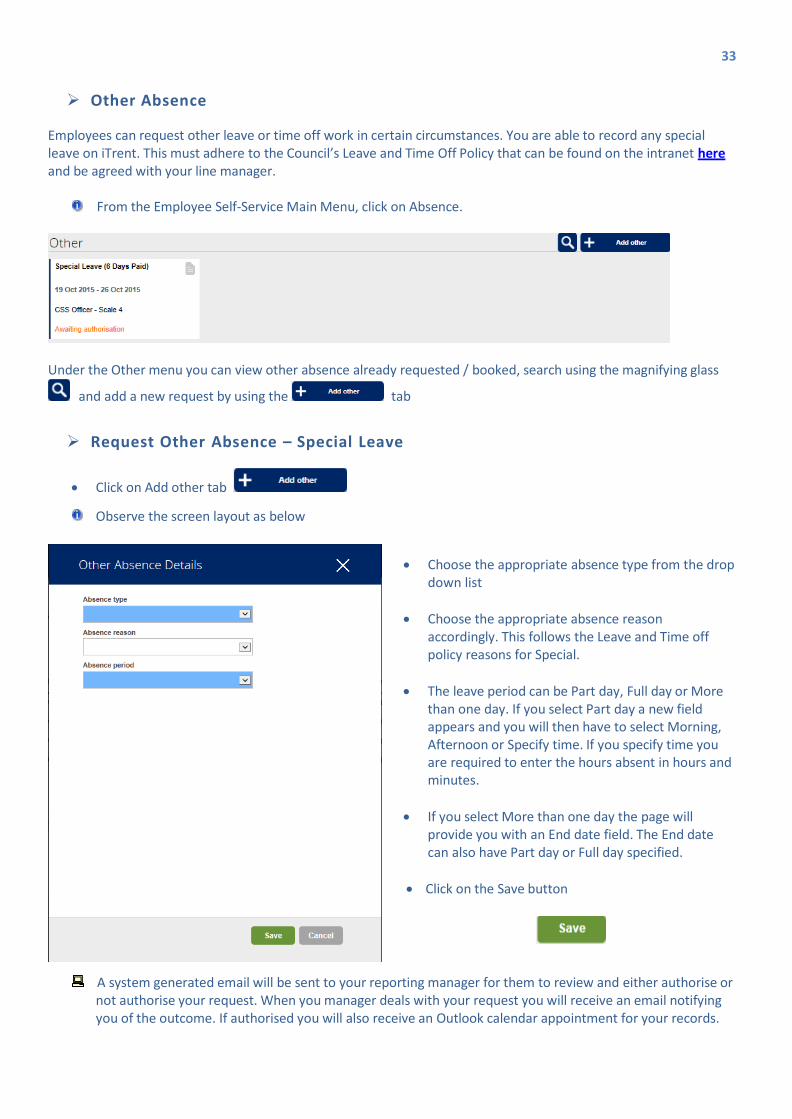
Other Absence
Employees can request other leave or time off work in certain circumstances. You are able to record any special leave on iTrent. This must adhere to the Council’s Leave and Time Off Policy that can be found on the intranet here and be agreed with your line manager.
From the Employee Self-Service Main Menu, click on Absence.
Under the Other menu you can view other absence already requested / booked, search using the magnifying glass
and add a new request by using the tab
Request Other Absence – Special Leave
• Click on Add other tab
Observe the screen layout as below
• Choose the appropriate absence type from the drop
down list
• Choose the appropriate absence reason accordingly. This follows the Leave and Time off policy reasons for Special.
• The leave period can be Part day, Full day or More
than one day. If you select Part day a new field appears and you will then have to select Morning, Afternoon or Specify time. If you specify time you are required to enter the hours absent in hours and minutes.
• If you select More than one day the page will
provide you with an End date field. The End date can also have Part day or Full day specified.
• Click on the Save button
A system generated email will be sent to your reporting manager for them to review and either authorise or
not authorise your request. When you manager deals with your request you will receive an email notifying you of the outcome. If authorised you will also receive an Outlook calendar appointment for your records.

34
Sickness Absence
This section looks at how to view, add and change your sickness absence records.
From the Employee Self-Service Main Menu, click on Absence.
Observe the screen layout. It contains your sickness record summary under the Sickness heading.
View your Sickness Absence Details • Click on the Sickness date you wish to view. Observe screen layout as below.
35
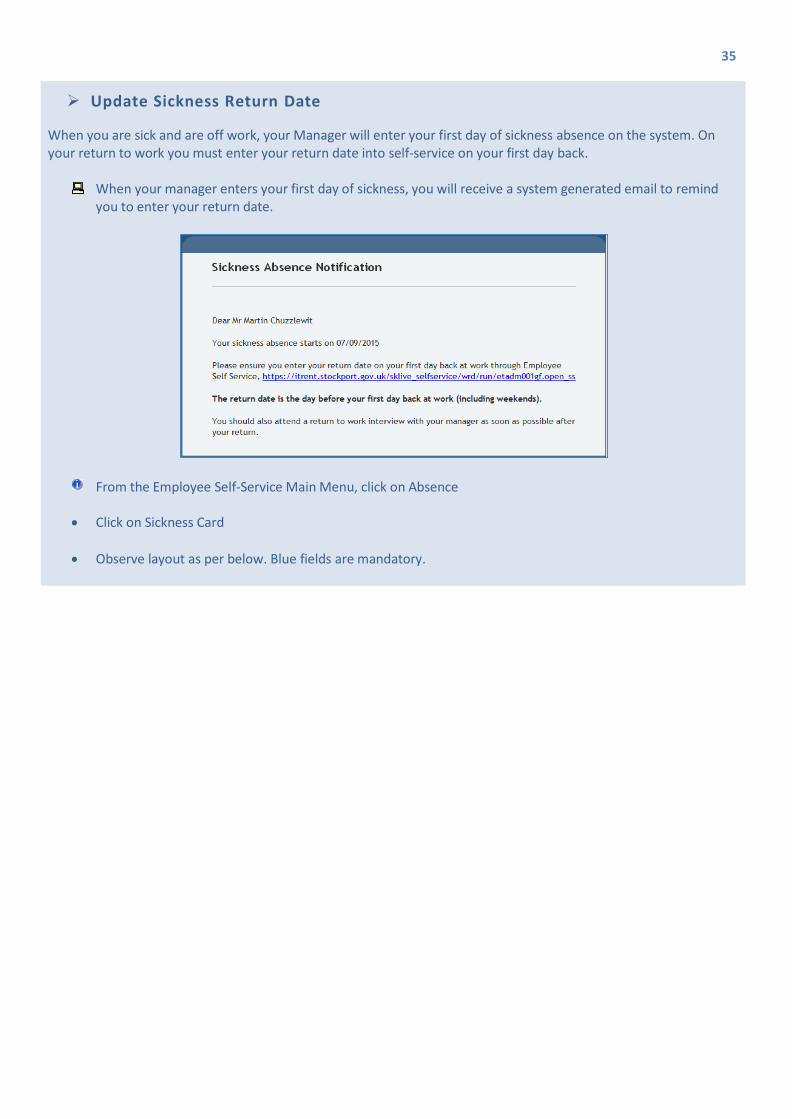
Update Sickness Return Date When you are sick and are off work, your Manager will enter your first day of sickness absence on the system. On your return to work you must enter your return date into self-service on your first day back.
When your manager enters your first day of sickness, you will receive a system generated email to remind you to enter your return date.
From the Employee Self-Service Main Menu, click on Absence • Click on Sickness Card • Observe layout as per below. Blue fields are mandatory.
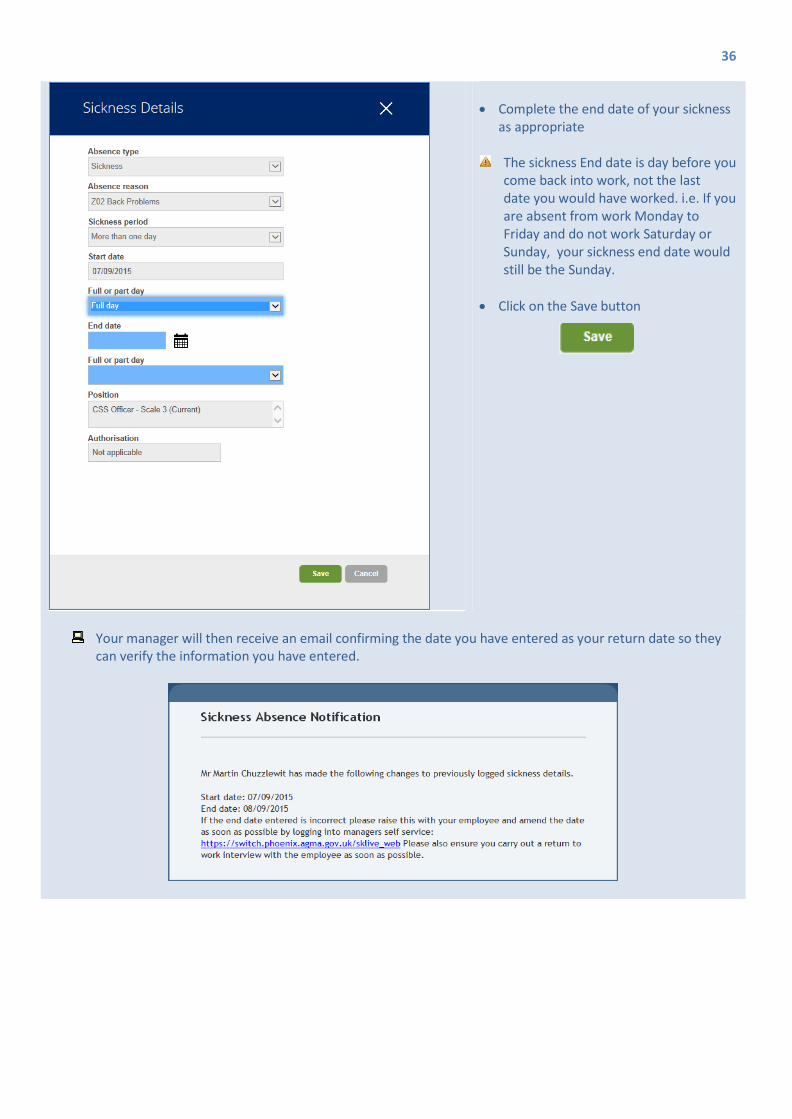
36
• Complete the end date of your sickness as appropriate
The sickness End date is day before you come back into work, not the last date you would have worked. i.e. If you are absent from work Monday to Friday and do not work Saturday or Sunday, your sickness end date would still be the Sunday.
• Click on the Save button
Your manager will then receive an email confirming the date you have entered as your return date so they can verify the information you have entered.
37
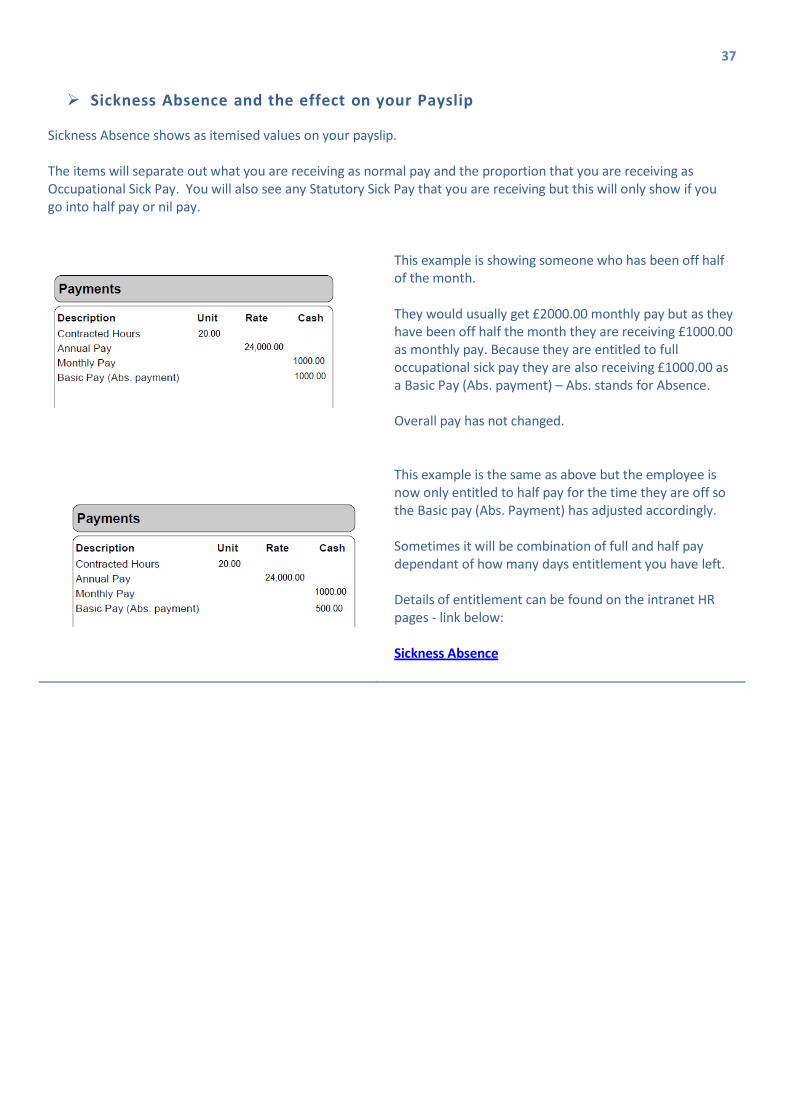
Sickness Absence and the effect on your Payslip
Sickness Absence shows as itemised values on your payslip.
The items will separate out what you are receiving as normal pay and the proportion that you are receiving as Occupational Sick Pay. You will also see any Statutory Sick Pay that you are receiving but this will only show if you go into half pay or nil pay.
This example is showing someone who has been off half of the month.
They would usually get £2000.00 monthly pay but as they have been off half the month they are receiving £1000.00 as monthly pay. Because they are entitled to full occupational sick pay they are also receiving £1000.00 as a Basic Pay (Abs. payment) – Abs. stands for Absence.
Overall pay has not changed.
This example is the same as above but the employee is now only entitled to half pay for the time they are off so the Basic pay (Abs. Payment) has adjusted accordingly.
Sometimes it will be combination of full and half pay dependant of how many days entitlement you have left.
Details of entitlement can be found on the intranet HR pages - link below:
Sickness Absence
38
Medical Certificates
Sickness absences of longer than 7 days need to be certified and you must obtain a Medical Certificate from your Doctor/Hospital.
You no longer need to send Medical Certificates to Human Resources, please forward all Medical Notes to your Manager.
If you need copies of notes for any reason please contact your Manager.
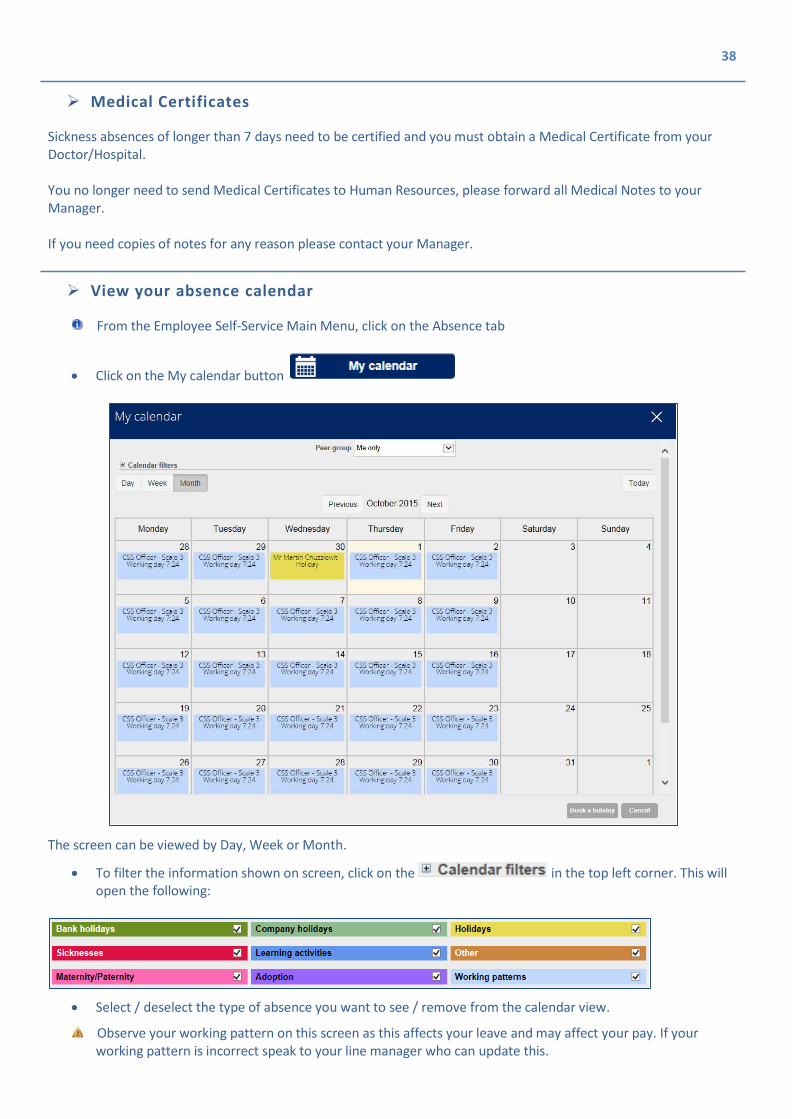
View your absence calendar
From the Employee Self-Service Main Menu, click on the Absence tab
• Click on the My calendar button
The screen can be viewed by Day, Week or Month.
• To filter the information shown on screen, click on the in the top left corner. This will open the following:
• Select / deselect the type of absence you want to see / remove from the calendar view.
Observe your working pattern on this screen as this affects your leave and may affect your pay. If your working pattern is incorrect speak to your line manager who can update this.
39
Viewing your payslips
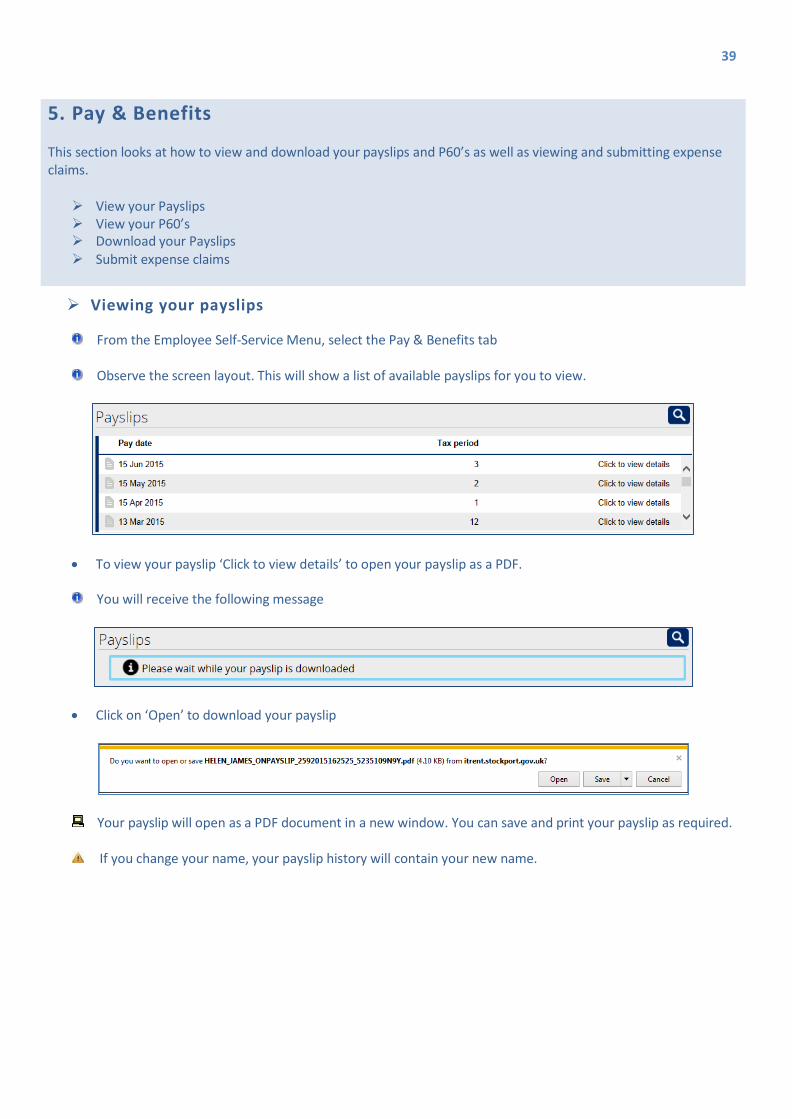
From the Employee Self-Service Menu, select the Pay & Benefits tab
Observe the screen layout. This will show a list of available payslips for you to view.
• To view your payslip ‘Click to view details’ to open your payslip as a PDF.
You will receive the following message
• Click on ‘Open’ to download your payslip
Your payslip will open as a PDF document in a new window. You can save and print your payslip as required.
If you change your name, your payslip history will contain your new name.
5. Pay & Benefits
This section looks at how to view and download your payslips and P60’s as well as viewing and submitting expense claims.
View your Payslips View your P60’s Download your Payslips Submit expense claims

40
Viewing your P60
• From the Employee Self-Service Menu, select the Pay & Benefits tab
Observe the screen layout under P60. This will show you a list of available P60’s for you to view. Previous years will be stored here where available.
The previous tax year will be available once the tax year has ended and all the necessary returns are complete.
• To view your P60 click on the card you wish to view.
You will receive the following message
• Click on ‘Open’ to download your payslip.
Your payslip will open as a PDF document in a new window. You can save and print your P60 as required.
41
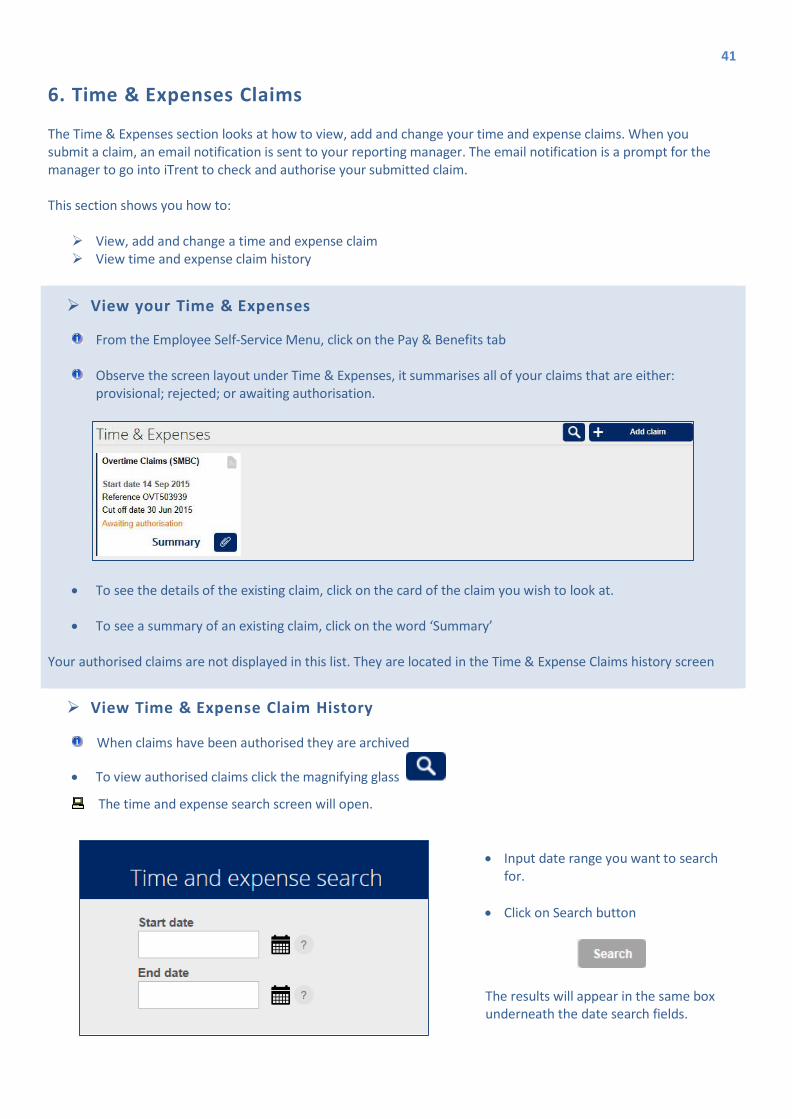
6. Time & Expenses Claims
The Time & Expenses section looks at how to view, add and change your time and expense claims. When you submit a claim, an email notification is sent to your reporting manager. The email notification is a prompt for the manager to go into iTrent to check and authorise your submitted claim.
This section shows you how to:
View, add and change a time and expense claim View time and expense claim history
View Time & Expense Claim History
When claims have been authorised they are archived
• To view authorised claims click the magnifying glass
The time and expense search screen will open.
• Input date range you want to search
for.
• Click on Search button
The results will appear in the same box underneath the date search fields.
View your Time & Expenses
From the Employee Self-Service Menu, click on the Pay & Benefits tab
Observe the screen layout under Time & Expenses, it summarises all of your claims that are either: provisional; rejected; or awaiting authorisation.
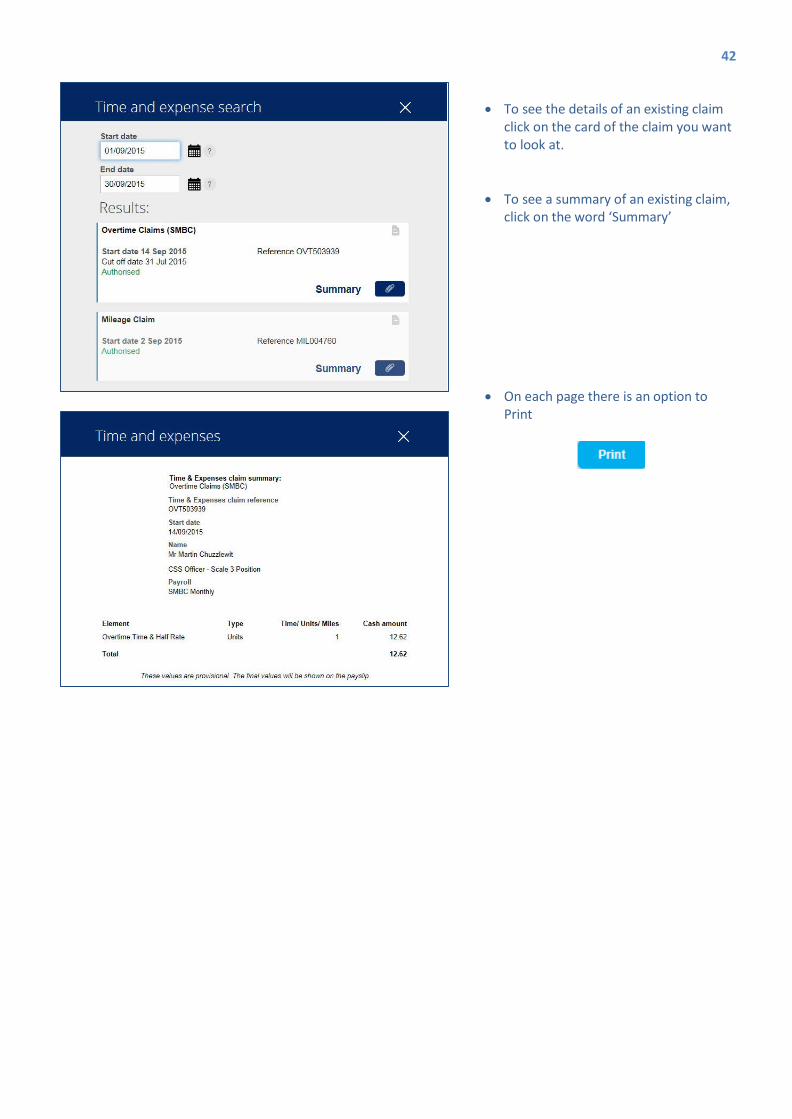
• To see the details of the existing claim, click on the card of the claim you wish to look at.
• To see a summary of an existing claim, click on the word ‘Summary’ Your authorised claims are not displayed in this list. They are located in the Time & Expense Claims history screen
42
• To see the details of an existing claim click on the card of the claim you want to look at.
• To see a summary of an existing claim, click on the word ‘Summary’
• On each page there is an option to Print
43
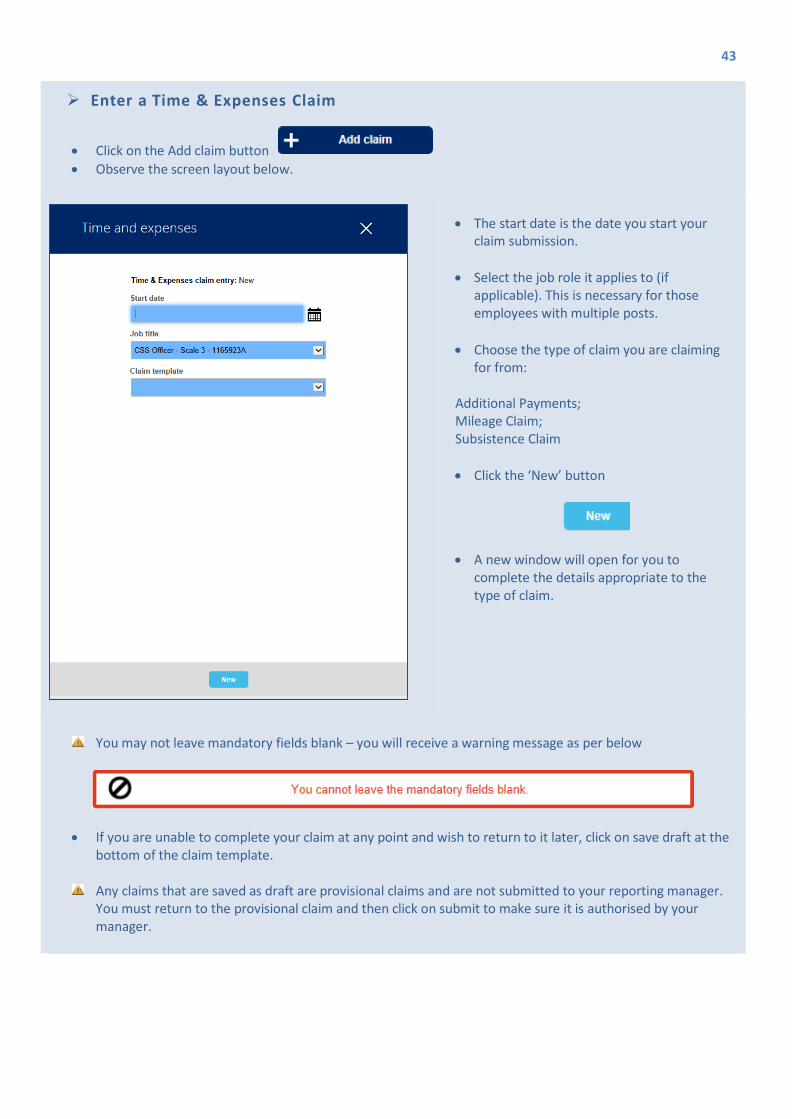
Enter a Time & Expenses Claim
• Click on the Add claim button • Observe the screen layout below.
• The start date is the date you start your claim submission.
• Select the job role it applies to (if applicable). This is necessary for those employees with multiple posts.
• Choose the type of claim you are claiming for from:
Additional Payments; Mileage Claim; Subsistence Claim
• Click the ‘New’ button
• A new window will open for you to complete the details appropriate to the type of claim.
You may not leave mandatory fields blank – you will receive a warning message as per below
• If you are unable to complete your claim at any point and wish to return to it later, click on save draft at the
bottom of the claim template.
Any claims that are saved as draft are provisional claims and are not submitted to your reporting manager. You must return to the provisional claim and then click on submit to make sure it is authorised by your manager.

44
Claim – Additional Payments
• Select the additional payment type from the drop down list
• The date you enter is for the date the additional payment relates to.
When you enter the time From and To, it must be entered in a 24 hour clock format (20:00 is 8pm). In addition, Hours should be entered in a decimal format (e.g. ½ hour should be entered as 0.50 and ¾ hour should be 0.75). A conversion table is available on the HR Self Service Learning Zone.
http://i.stockport.gov.uk/documents/css/10791/10795/DecimalTimeConverter
Please leave the budget code field blank
If your overtime extends into another day (e.g. past midnight) then you will need to enter an additional row
for the following day overtime.
If your overtime claim includes any break activity such as a meal break, you will need to exclude this from your claim. For example if you take an hour for lunch during one overtime period, two lines are required on the claim entry screen.
• Click on the to add a new line for input
• Click on the to remove a line
• Click on the to clear the contents of the fields
• To save the claim as a draft click on the Save Draft button
• To Submit click on the Submit button
• You will be required to review your claim and complete your logon password in the disclaimer screen. This is a security measure to ensure that you have read the disclaimer and agree to its contents.
45
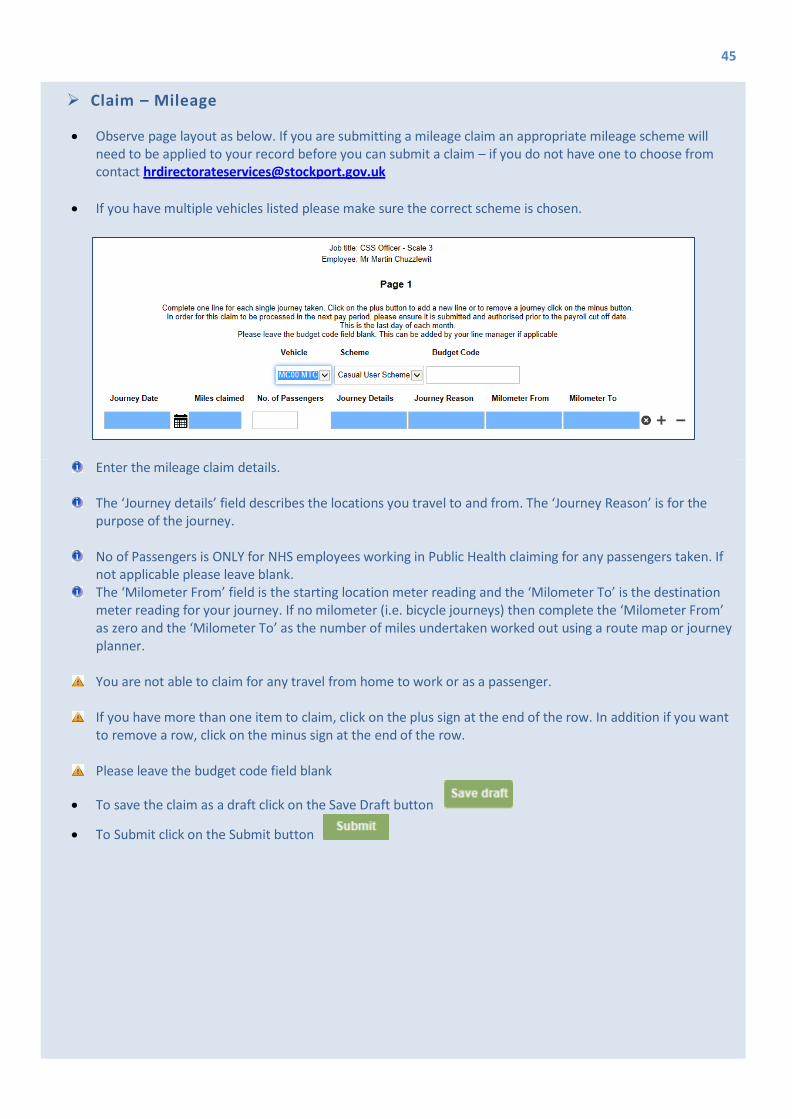
Claim – Mileage
• Observe page layout as below. If you are submitting a mileage claim an appropriate mileage scheme will need to be applied to your record before you can submit a claim – if you do not have one to choose from contact [email protected]
• If you have multiple vehicles listed please make sure the correct scheme is chosen.
Enter the mileage claim details.
The ‘Journey details’ field describes the locations you travel to and from. The ‘Journey Reason’ is for the purpose of the journey.
No of Passengers is ONLY for NHS employees working in Public Health claiming for any passengers taken. If not applicable please leave blank. The ‘Milometer From’ field is the starting location meter reading and the ‘Milometer To’ is the destination meter reading for your journey. If no milometer (i.e. bicycle journeys) then complete the ‘Milometer From’ as zero and the ‘Milometer To’ as the number of miles undertaken worked out using a route map or journey planner.
You are not able to claim for any travel from home to work or as a passenger.
If you have more than one item to claim, click on the plus sign at the end of the row. In addition if you want to remove a row, click on the minus sign at the end of the row.
Please leave the budget code field blank
• To save the claim as a draft click on the Save Draft button
• To Submit click on the Submit button

46
• Enter your network password. • Click on Submit button
You will be required to review your claim and complete your logon password in the disclaimer screen. This is a security measure to ensure that you have read the disclaimer and agree to its contents. When your claim has been submitted the status changes to provisional as per below.
47
Claim – Subsistence
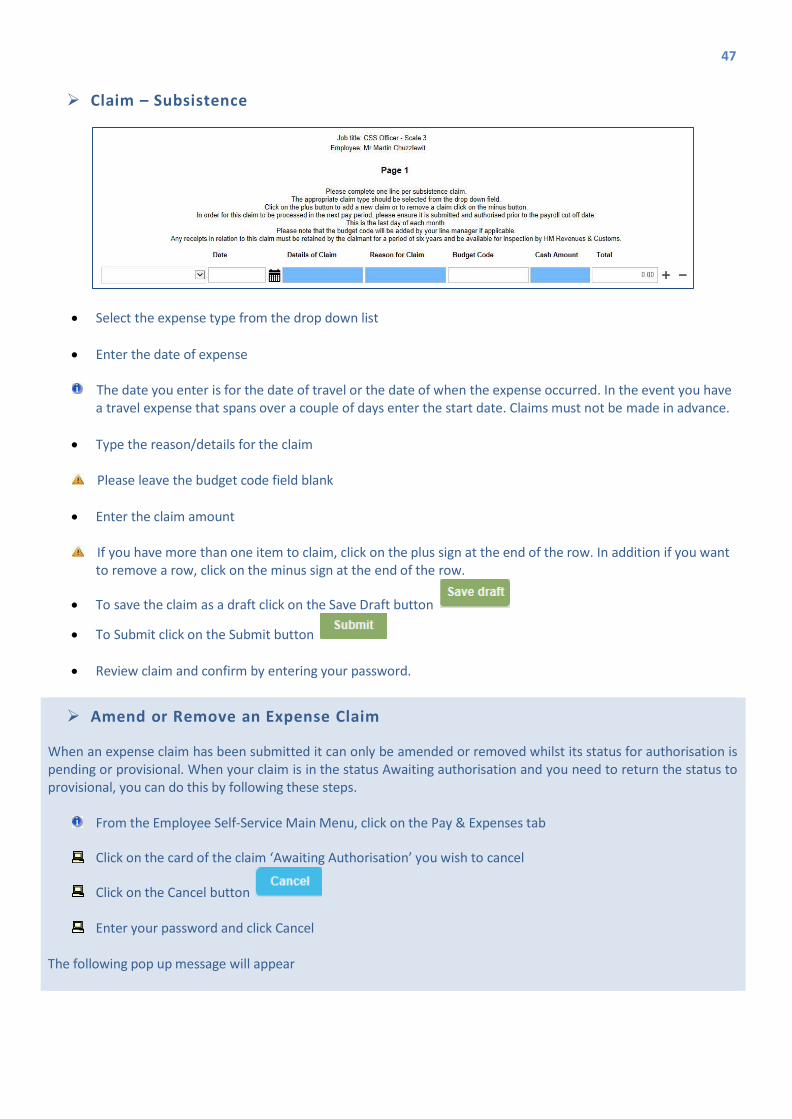
• Select the expense type from the drop down list
• Enter the date of expense
The date you enter is for the date of travel or the date of when the expense occurred. In the event you have a travel expense that spans over a couple of days enter the start date. Claims must not be made in advance.
• Type the reason/details for the claim
Please leave the budget code field blank
• Enter the claim amount
If you have more than one item to claim, click on the plus sign at the end of the row. In addition if you want
to remove a row, click on the minus sign at the end of the row.
• To save the claim as a draft click on the Save Draft button
• To Submit click on the Submit button
• Review claim and confirm by entering your password.
Amend or Remove an Expense Claim
When an expense claim has been submitted it can only be amended or removed whilst its status for authorisation is pending or provisional. When your claim is in the status Awaiting authorisation and you need to return the status to provisional, you can do this by following these steps.
From the Employee Self-Service Main Menu, click on the Pay & Expenses tab
Click on the card of the claim ‘Awaiting Authorisation’ you wish to cancel
Click on the Cancel button
Enter your password and click Cancel
The following pop up message will appear

48
Time & Expense Claim Notifications
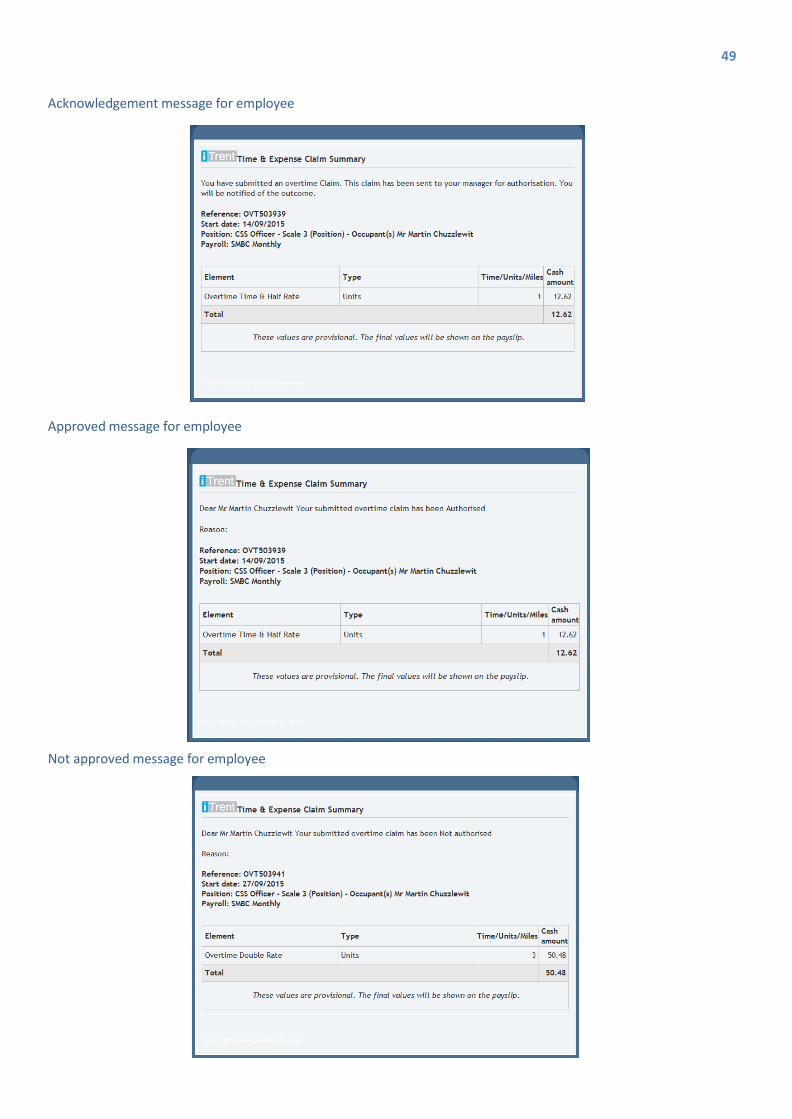
System generated emails are sent to you and your manager when any Time or Expenses Claims are made. Below are some examples of notifications sent to you and your manager.
Acknowledgement message for manager
Your expense claim status should now have changed to Provisional. In addition, an automated email is sent to notify you of the status change.
• To delete a Provisional claim click on the claim card • Click on the Delete button.
A pop up box will ask if you want to continue. Click OK
The claim will now be removed from your list of claims in your Time & Expenses menu
49
Acknowledgement message for employee
Approved message for employee
Not approved message for employee

50
7. Employment
This section looks at how to view and verify your job history and details about your current job including:
Your position name Your Payroll reference Your contracted hours Your reporting manager
Viewing current job details
From the Employee Self-Service Home Menu, select the Employment tab
Your employment history as recorded in iTrent will be shown here. This may not therefore be a comprehensive record of your employment history.
• Click on your Current job card to view the details
Your current job details are read only. If you believe the details to be incorrect please contact HR Services Directorate Services Team at [email protected].
If your reporting manager is incorrect please ask them to contact HR Establishments at

51
View and amend your Learning activities
From the Employee Self-Service Menu, click on the Career & Development tab
Observe the screen layout as below.
To search your record for learning activities and events use the drop down box next to the magnifying glass.
Career & Development
This section looks at how to book on to training courses, and add qualifications and memberships.
Book onto a learning activity Join a waiting list Add a personal learning event Update your Qualifications record Update your Memberships record
Book onto a learning activity
You can use iTrent to book onto courses provided by Workforce Development.
From the Employee Self-Service Menu, click on the Career & Development tab
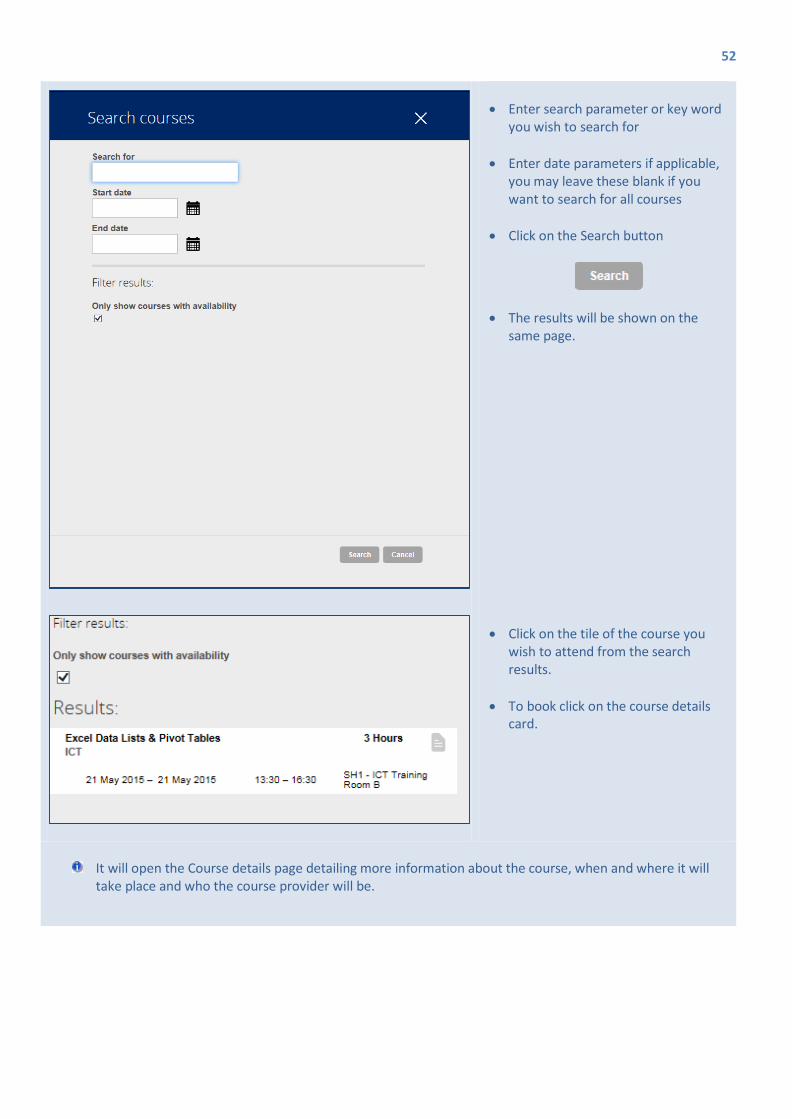
• Click on the magnifying glass to search for a training course
52
• Enter search parameter or key word you wish to search for
• Enter date parameters if applicable, you may leave these blank if you want to search for all courses
• Click on the Search button
• The results will be shown on the same page.
• Click on the tile of the course you wish to attend from the search results.
• To book click on the course details card.
It will open the Course details page detailing more information about the course, when and where it will take place and who the course provider will be.

53
An automated email will be sent to your line manager for authorisation.
If the course gets fully booked by the time your Manager authorises the request, your place is no longer available and you will need to select an alternative date.
You will receive a calendar appointment to add it to your Outlook calendar.
• Complete all fields as required
• Click on the Save button
This will now show in your Learning activities list on your Career & Development tab
54
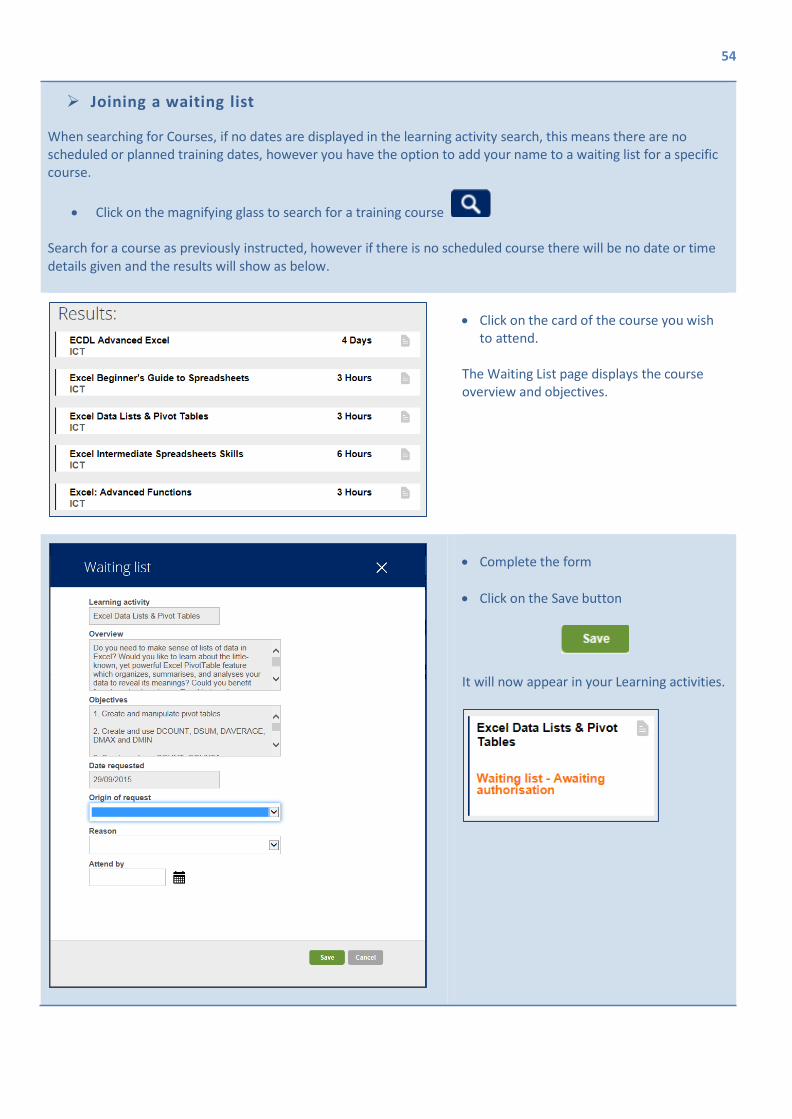
• Click on the card of the course you wish to attend.
The Waiting List page displays the course overview and objectives.
Joining a waiting list
When searching for Courses, if no dates are displayed in the learning activity search, this means there are no scheduled or planned training dates, however you have the option to add your name to a waiting list for a specific course.
• Click on the magnifying glass to search for a training course
Search for a course as previously instructed, however if there is no scheduled course there will be no date or time details given and the results will show as below.
• Complete the form
• Click on the Save button
It will now appear in your Learning activities.

55
An automated email will be sent to your line manager for authorisation.
If you use the Attend by field, it will not guarantee you a place on your chosen date but it will help the Workforce Development teams for future scheduling of course dates.

56
Add a personal learning event
The Personal learning section is a space to record the learning you have undertaken internally, externally, formally, informally and by e-learning that isn’t automatically recorded by Employee Self-Service.
From the Employee Self-Service Menu, click on the Career & Development tab
• Click on the Add personal learning tab
Observe the screen layout as per below.
• Complete all the fields as appropriate. The blue fields are mandatory.
• Click on the Save button
If you do not tick the ‘Completed’ box, iTrent does not record this personal learning event as a finished event.
An automated email will be sent to your line manager for authorisation.
Cancel a course that is Awaiting Authorisation
• To cancel your course you have requested that has not yet been authorised click on the card you are looking to cancel to open the Course booking details.
• Click on the Delete button
The system will ask ‘Are you sure you want to delete this record?’
• Click OK
It will be removed from your Learning events
57
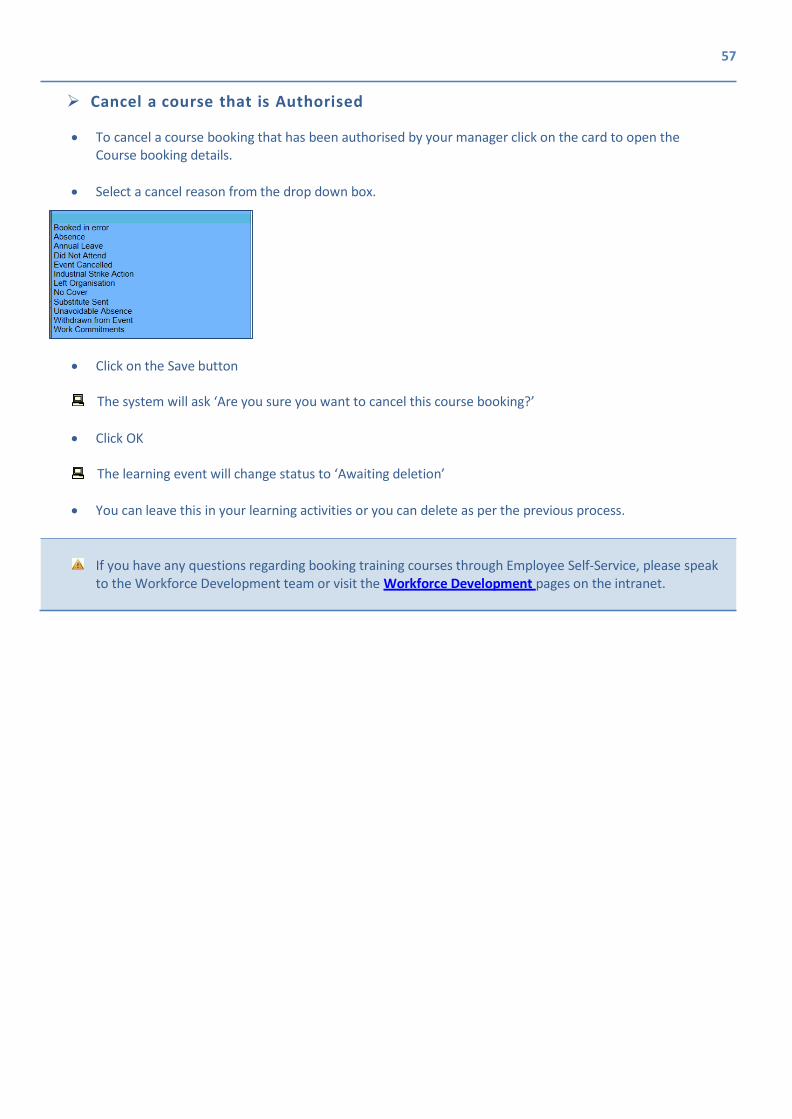
Cancel a course that is Authorised
• To cancel a course booking that has been authorised by your manager click on the card to open the Course booking details.
• Select a cancel reason from the drop down box.
• Click on the Save button
The system will ask ‘Are you sure you want to cancel this course booking?’
• Click OK
The learning event will change status to ‘Awaiting deletion’
• You can leave this in your learning activities or you can delete as per the previous process.
If you have any questions regarding booking training courses through Employee Self-Service, please speak to the Workforce Development team or visit the Workforce Development pages on the intranet.
58
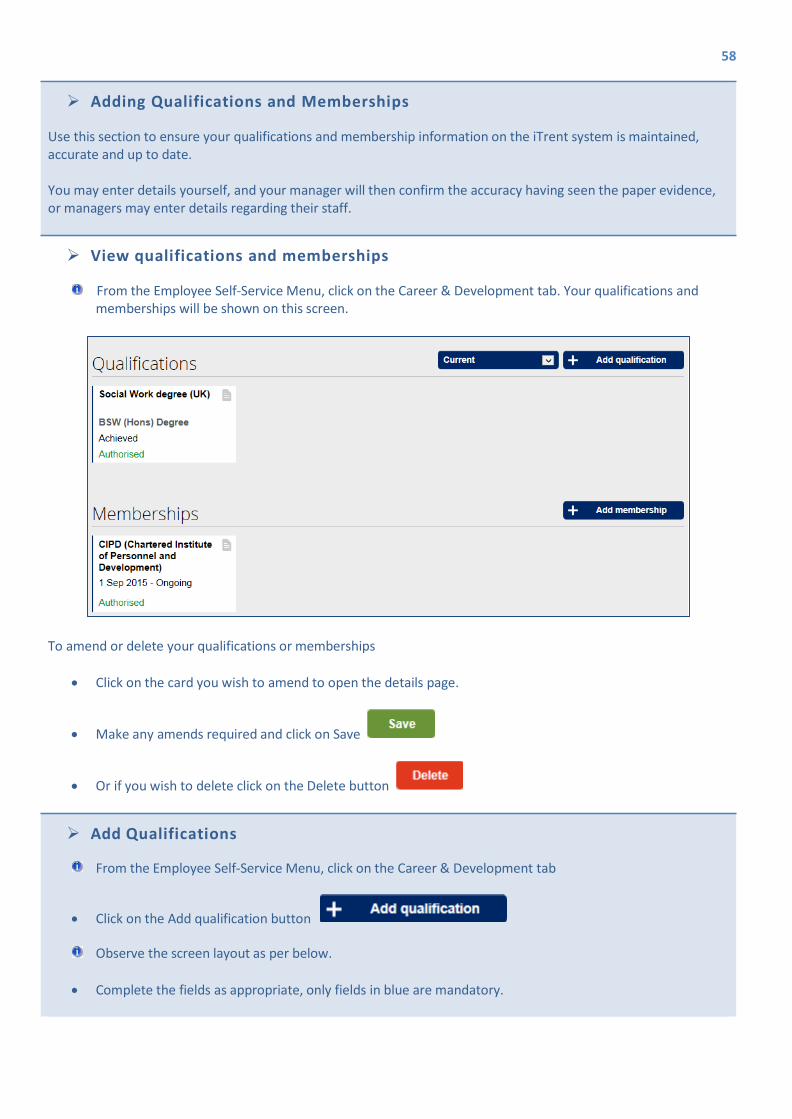
View qualifications and memberships
From the Employee Self-Service Menu, click on the Career & Development tab. Your qualifications and memberships will be shown on this screen.
To amend or delete your qualifications or memberships
• Click on the card you wish to amend to open the details page.
• Make any amends required and click on Save
• Or if you wish to delete click on the Delete button
Adding Qualifications and Memberships
Use this section to ensure your qualifications and membership information on the iTrent system is maintained, accurate and up to date.
You may enter details yourself, and your manager will then confirm the accuracy having seen the paper evidence, or managers may enter details regarding their staff.
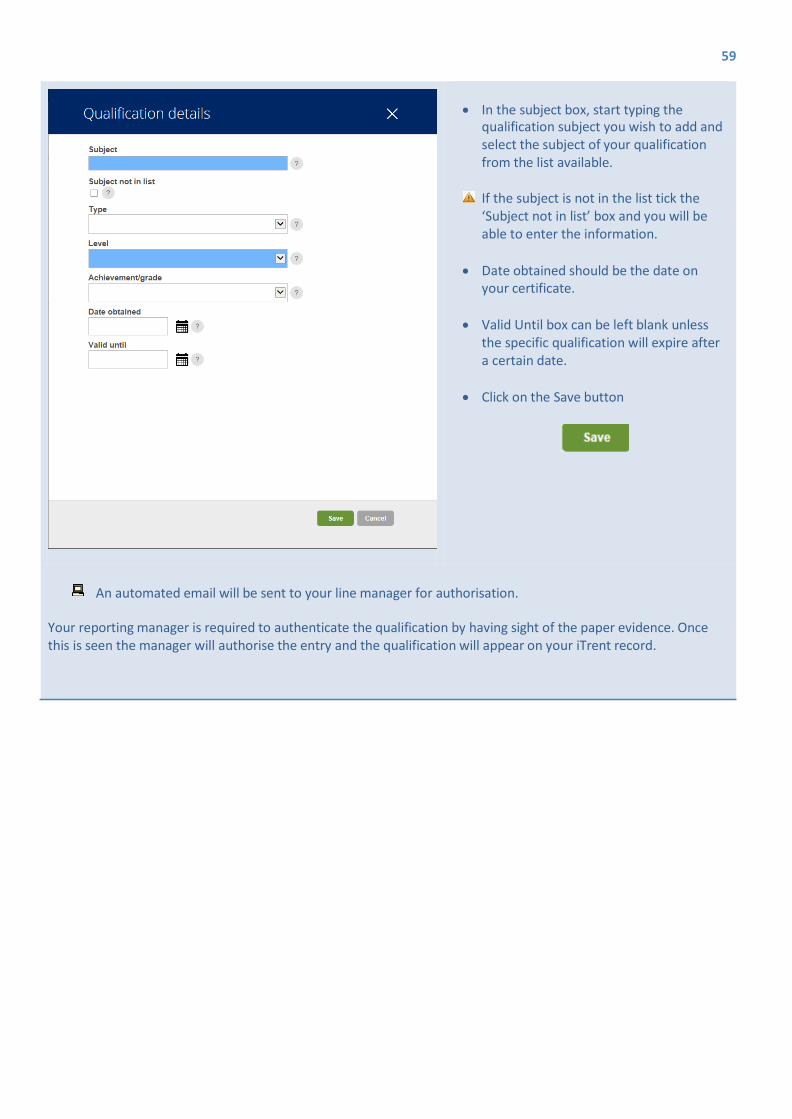
Add Qualifications
From the Employee Self-Service Menu, click on the Career & Development tab
• Click on the Add qualification button
Observe the screen layout as per below. • Complete the fields as appropriate, only fields in blue are mandatory.
59
• In the subject box, start typing the qualification subject you wish to add and select the subject of your qualification from the list available.
If the subject is not in the list tick the ‘Subject not in list’ box and you will be able to enter the information.
• Date obtained should be the date on
your certificate. • Valid Until box can be left blank unless
the specific qualification will expire after a certain date.
• Click on the Save button
An automated email will be sent to your line manager for authorisation. Your reporting manager is required to authenticate the qualification by having sight of the paper evidence. Once this is seen the manager will authorise the entry and the qualification will appear on your iTrent record.

60
Add Memberships
From the Employee Self-Service Menu, click on the Career & Development tab
• Click on Add membership
Observe the screen layout below.
• From the drop down box choose the
relevant membership.
• Enter the membership number if applicable.
• Enter the start date the level of
membership commenced
• If the membership has an expiry date please complete this field.
• Click on Save
An automated email will be sent to your line manager for authorisation.
Your reporting manager is required to authenticate the membership by having sight of the paper evidence. Once this is seen the manager will authorise the entry and the membership will appear on your iTrent record.
If your membership is not on the list please email [email protected]


