“MAIN” 2004/5/11 page i ✐ ✐ ✐ ✐ ✐ ✐ Introduction to Programming in Java: A Multimedia Approach Mark Guzdial and Barbara Ericson College of Computing/GVU Georgia Institute of Technology PRENTICE HALL, Upper Saddle River, New Jersey 07458
Transcript
“MAIN”2004/5/11page i
ii
i
ii
i
Introduction to Programming inJava:
A Multimedia Approach
Mark Guzdial and Barbara Ericson
College of Computing/GVUGeorgia Institute of Technology
PRENTICE HALL, Upper Saddle River, New Jersey 07458
“MAIN”2004/5/11page ii
ii
i
ii
i
ii
Copyright held by Mark Guzdial and Barbara Ericson, 2004.
“MAIN”2004/5/11page iii
ii
i
ii
i
iii
Dedicated to our children Matthew, Katherine, and Jennifer
1.1 Eight wires with a pattern of voltages is a byte, which gets inter-preted as a pattern of eight 0’s and 1’s, which gets interpreted as adecimal number. . . . . . . . . . . . . . . . . . . . . . . . . . . . . . 10
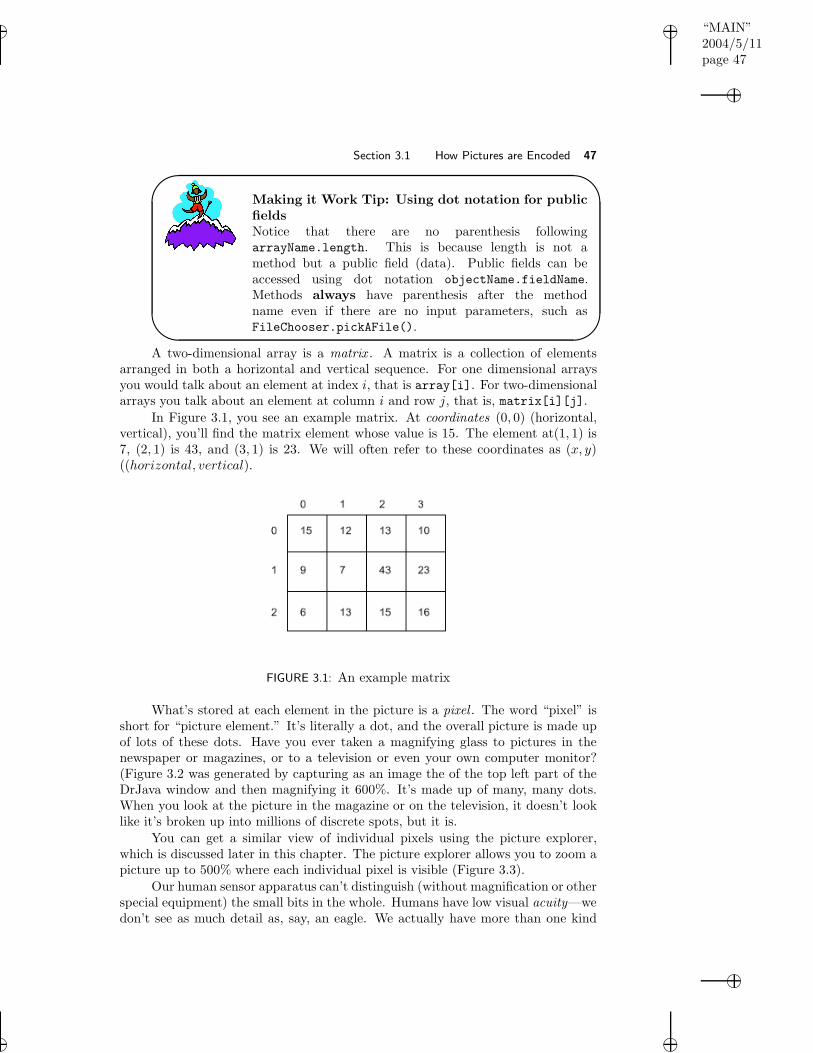
method in the next method . . . . . . . . . . . . . . . . . . . . . . . 292.7 Picking, making, and showing a picture, when naming the pieces . . 312.8 Defining and executing pickAndShow() . . . . . . . . . . . . . . . . 373.1 An example matrix . . . . . . . . . . . . . . . . . . . . . . . . . . . . 473.2 Upper left corner of DrJava window with part magnified 600% . . . 483.3 Image shown in the picture explorer: 100% image on left and 500%
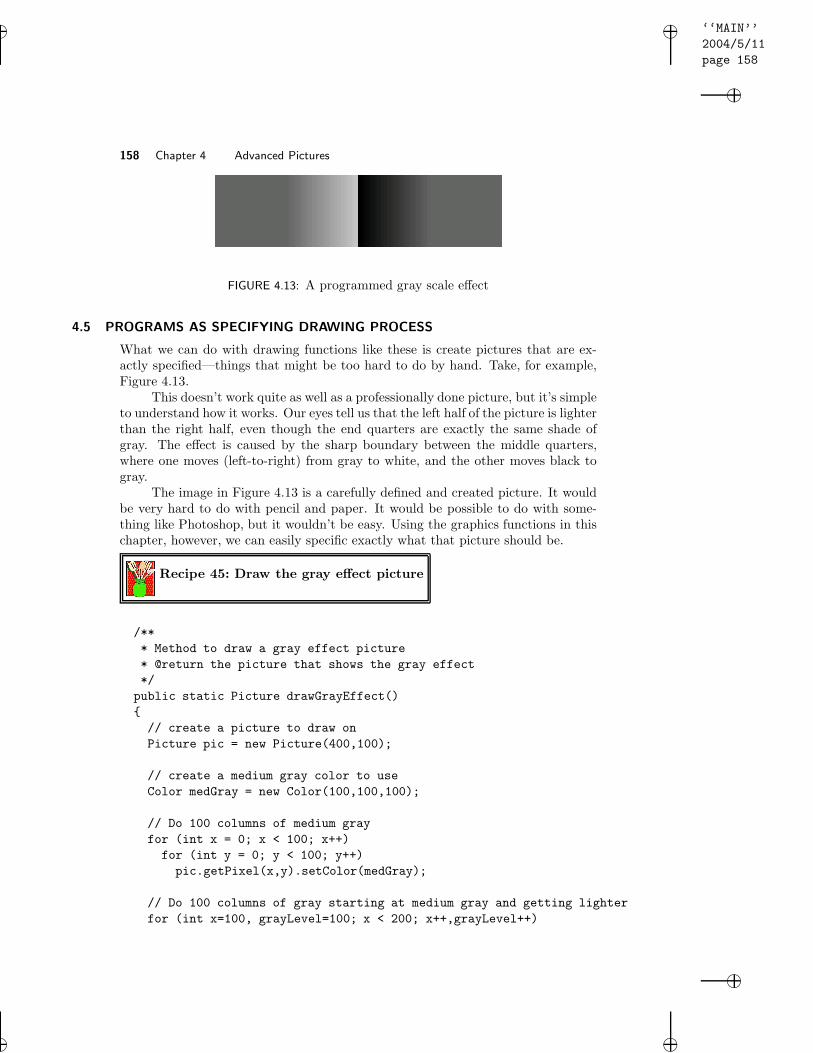
on right . . . . . . . . . . . . . . . . . . . . . . . . . . . . . . . . . . 483.4 Merging red, green, and blue to make new colors . . . . . . . . . . . 493.5 The ends of this figure are the same colors of gray, but the middle
two quarters contrast sharply so the left looks darker than the right 503.6 The Macintosh OS X RGB color picker . . . . . . . . . . . . . . . . 513.7 Picking a color using RGB sliders from Java . . . . . . . . . . . . . . 513.8 RGB triplets in a matrix representation . . . . . . . . . . . . . . . . 523.9 Directly modifying the pixel colors via commands: Note the small
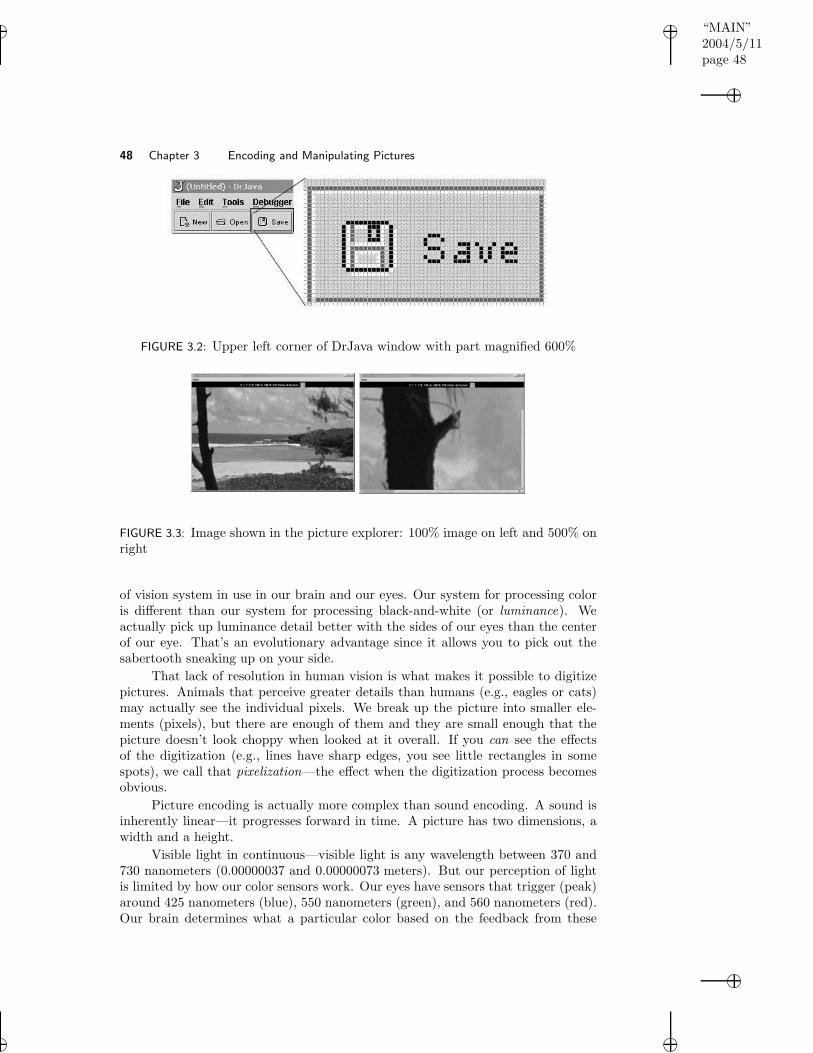
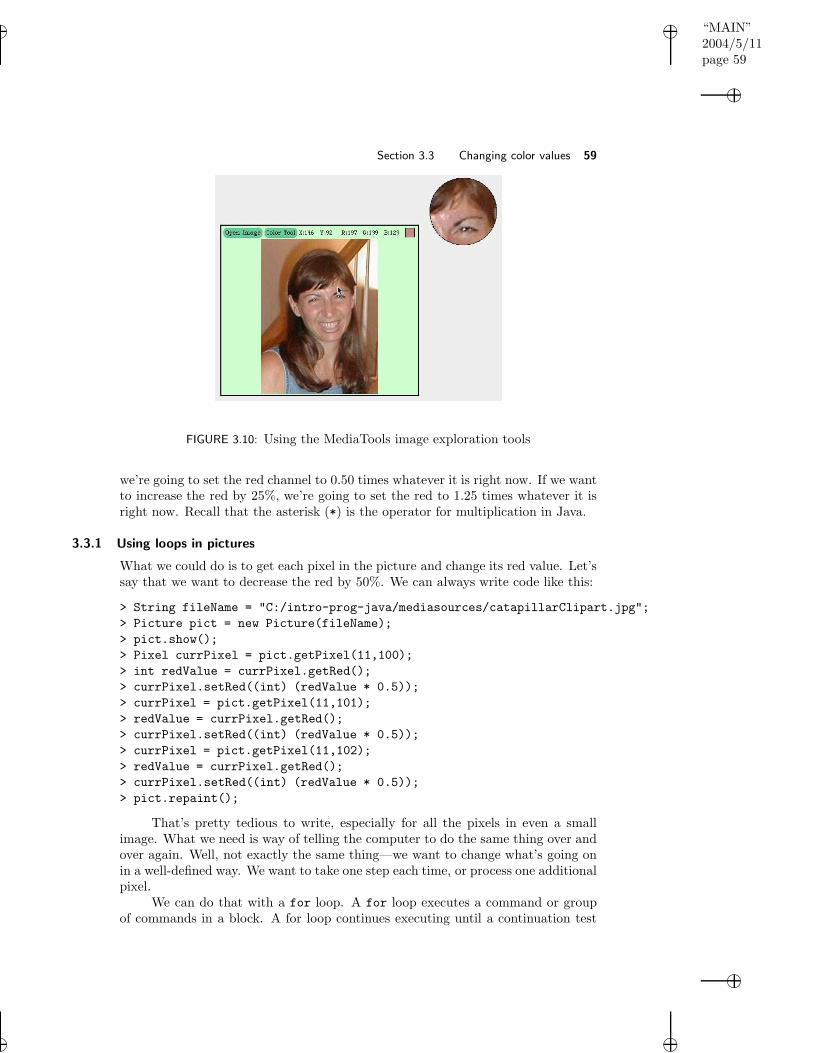
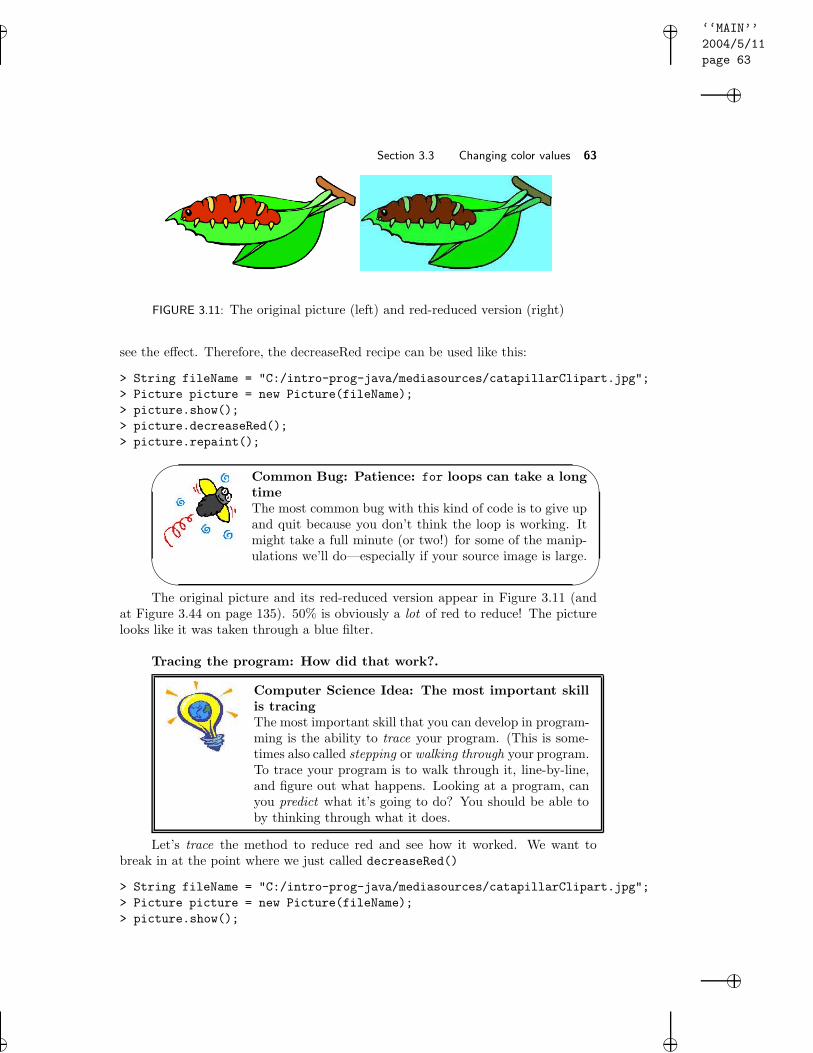
black line on the left under the leaf . . . . . . . . . . . . . . . . . . . 573.10 Using the MediaTools image exploration tools . . . . . . . . . . . . . 593.11 The original picture (left) and red-reduced version (right) . . . . . . 633.12 Using the picture explorer to convince ourselves that the red was
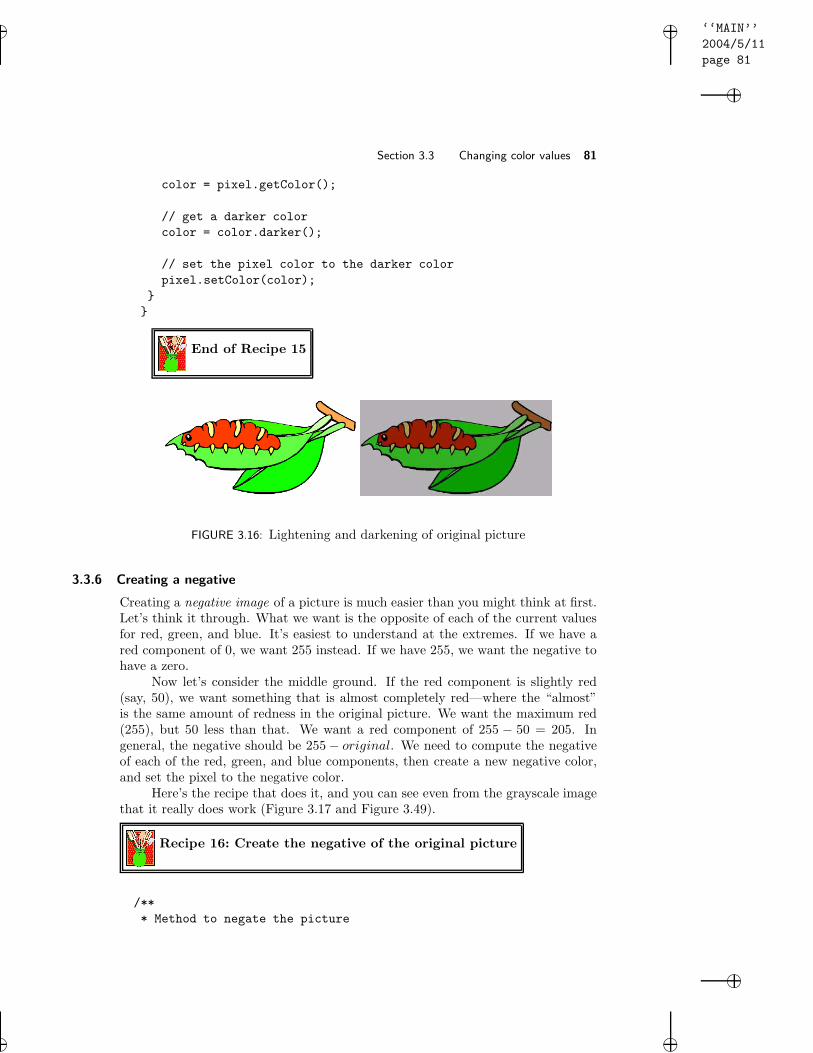
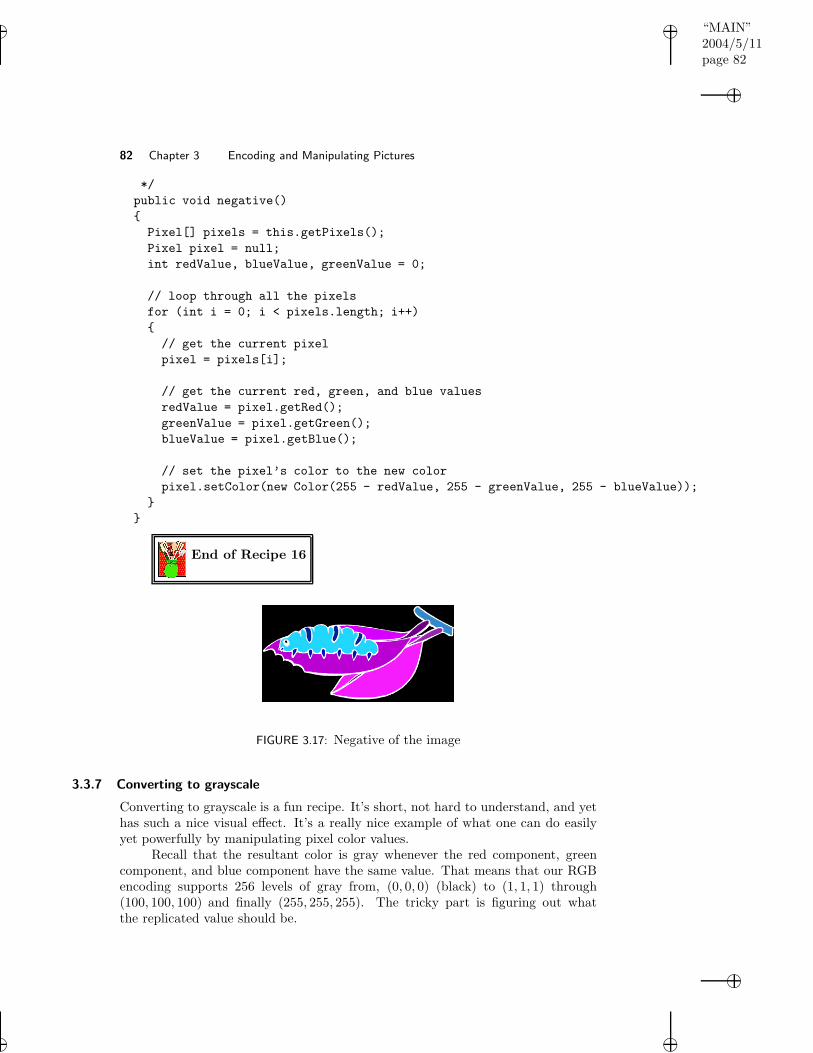
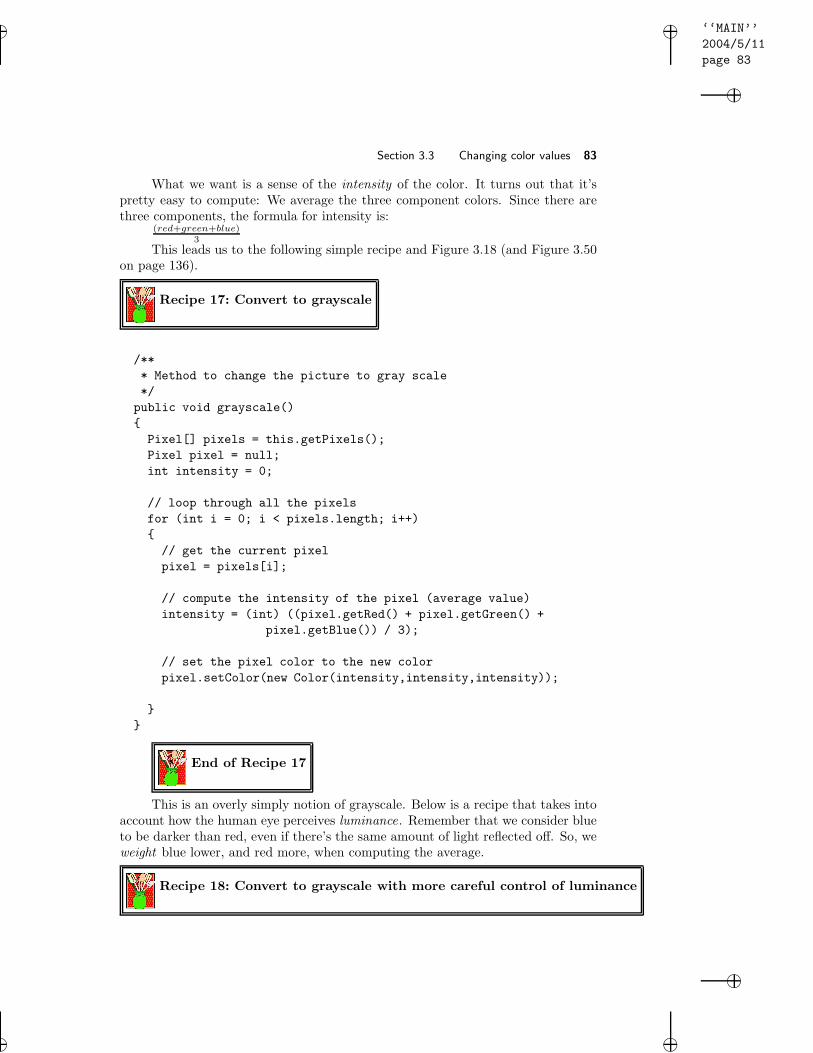
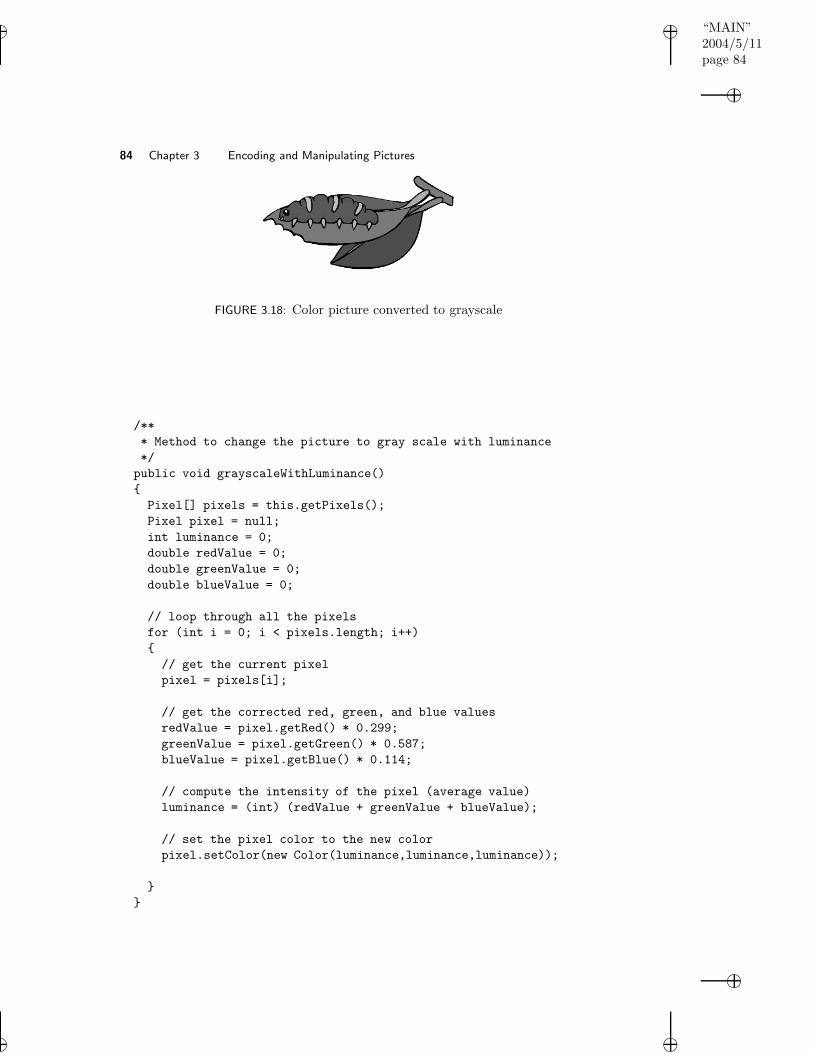
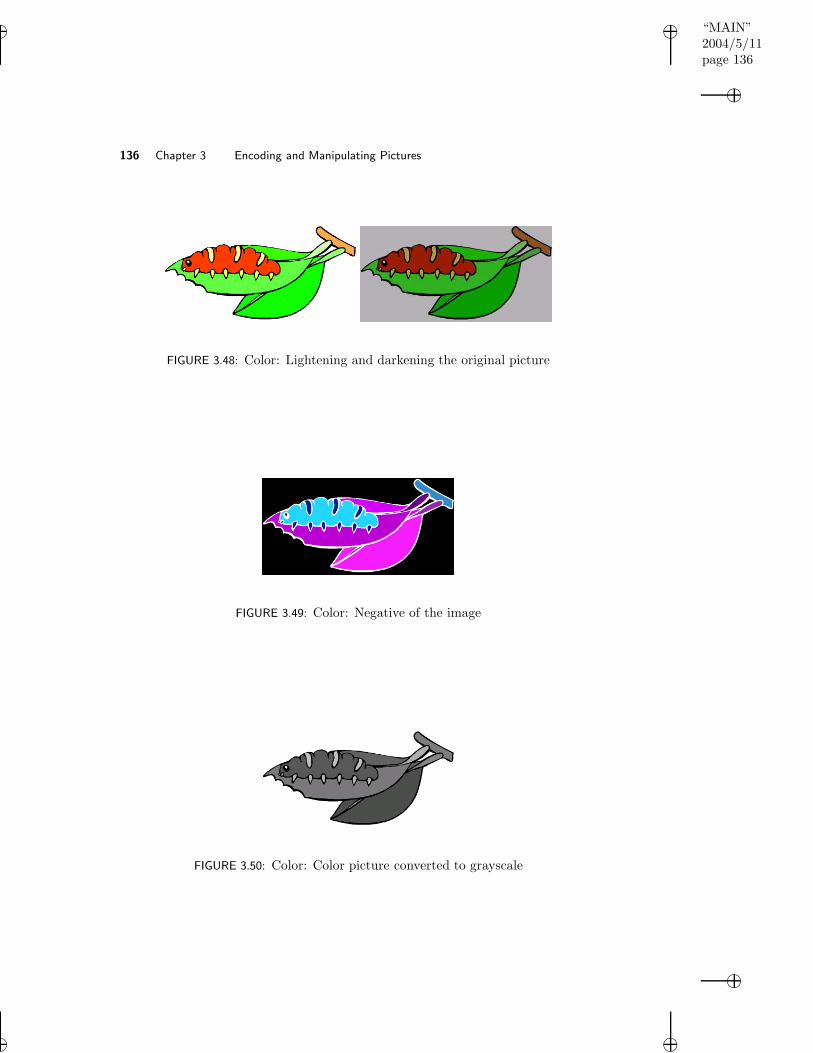
decreased . . . . . . . . . . . . . . . . . . . . . . . . . . . . . . . . . 683.13 Overly blue (left) and red increased by 30% (right) . . . . . . . . . . 693.14 Original (left) and blue erased (right) . . . . . . . . . . . . . . . . . 703.15 Original beach scene (left) and at (fake) sunset (right) . . . . . . . . 713.16 Lightening and darkening of original picture . . . . . . . . . . . . . . 813.17 Negative of the image . . . . . . . . . . . . . . . . . . . . . . . . . . 823.18 Color picture converted to grayscale . . . . . . . . . . . . . . . . . . 843.19 Once we pick a mirror point, we can just walk x halfway and sub-
tract/add to the mirror point . . . . . . . . . . . . . . . . . . . . . . 883.20 Original picture (left) and mirrored along the vertical axis (right) . . 893.21 Santa mirrored horizontally, bottom to top (left) and top to bottom
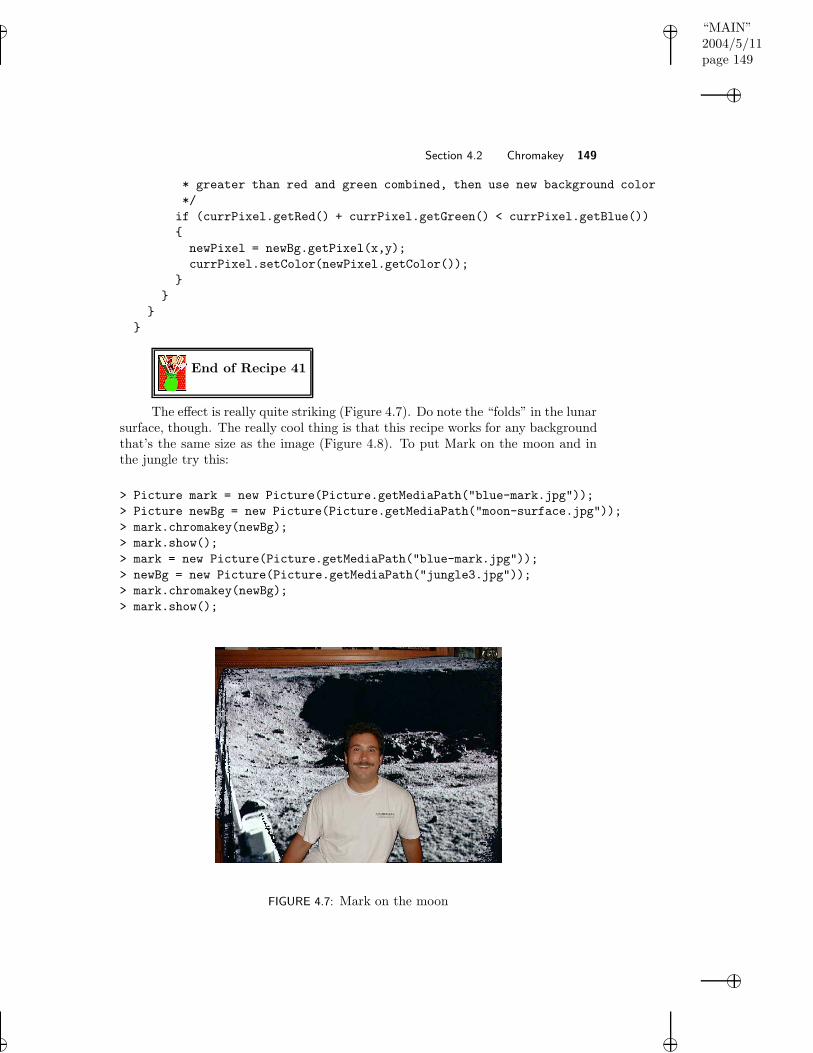
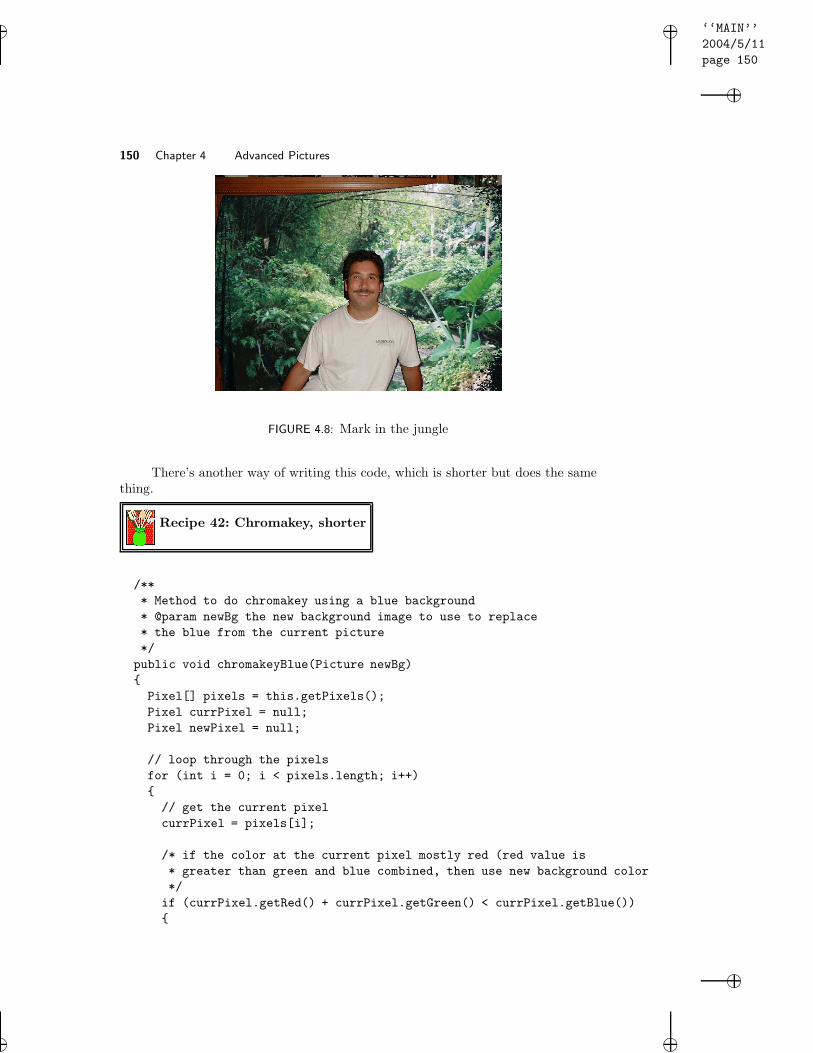
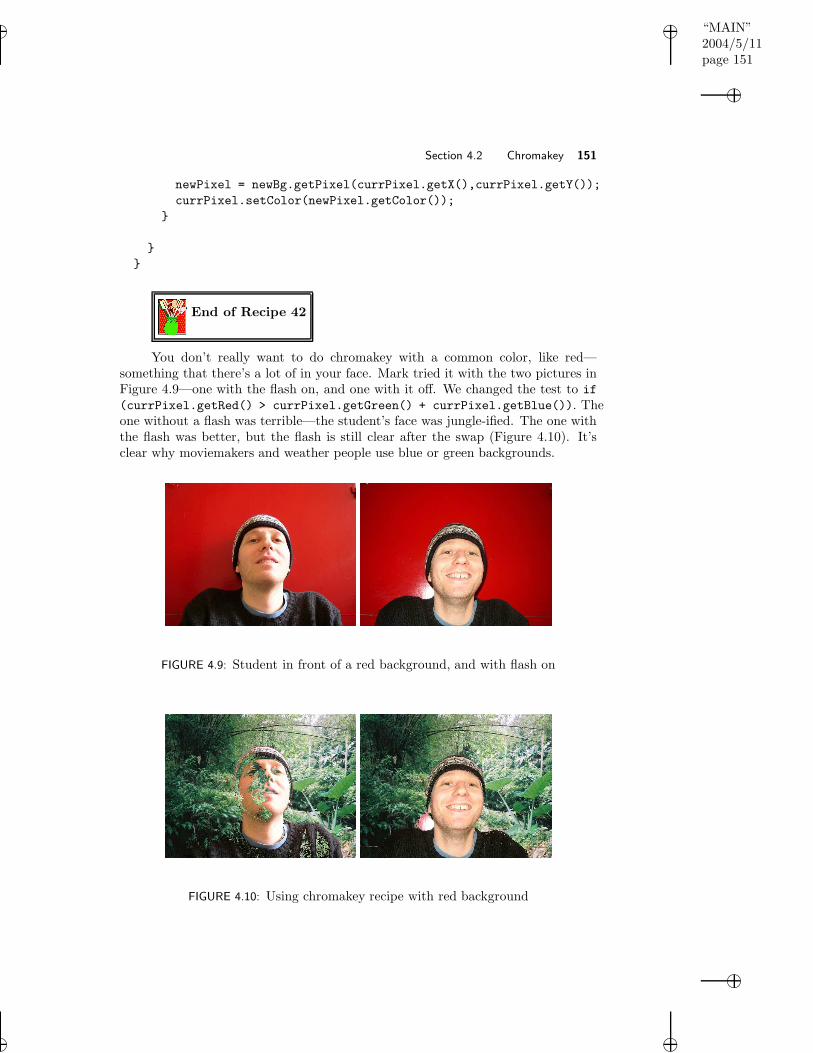
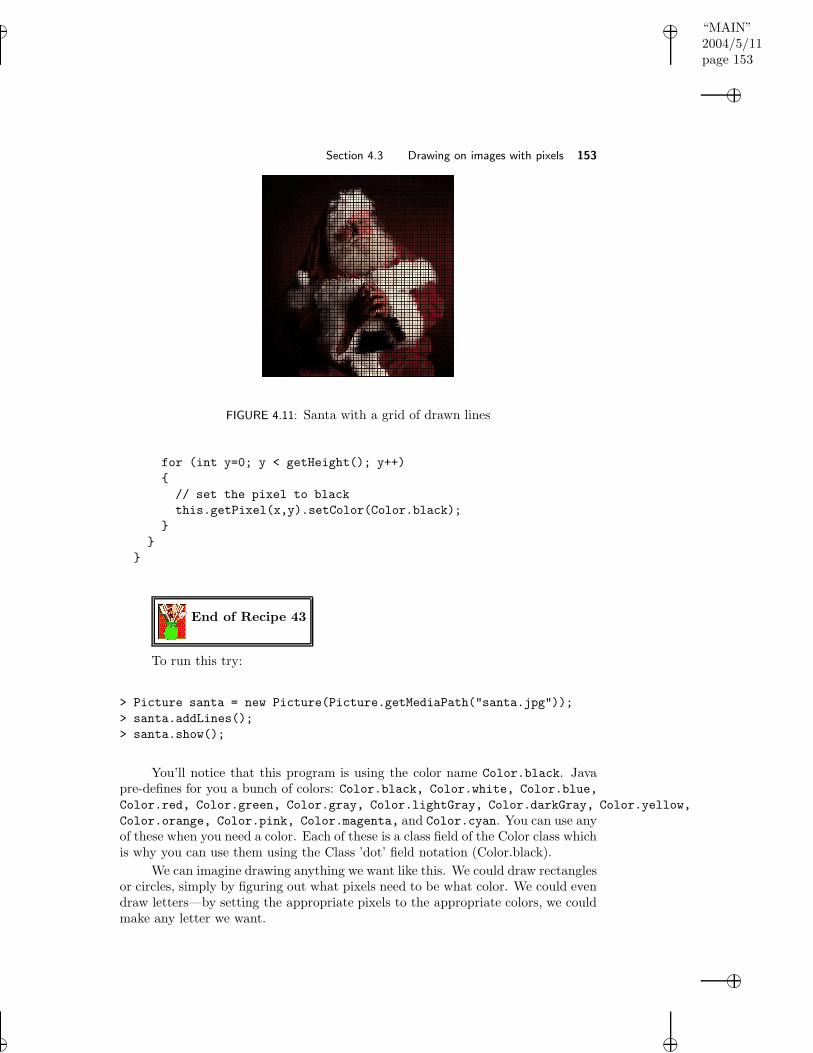
4.6 Mark in front of a blue sheet . . . . . . . . . . . . . . . . . . . . . . 1484.7 Mark on the moon . . . . . . . . . . . . . . . . . . . . . . . . . . . . 1494.8 Mark in the jungle . . . . . . . . . . . . . . . . . . . . . . . . . . . . 1504.9 Student in front of a red background, and with flash on . . . . . . . 1514.10 Using chromakey recipe with red background . . . . . . . . . . . . . 1514.11 Santa with a grid of drawn lines . . . . . . . . . . . . . . . . . . . . 1534.12 A small, drawn picture . . . . . . . . . . . . . . . . . . . . . . . . . . 1564.13 A programmed gray scale effect . . . . . . . . . . . . . . . . . . . . . 1584.14 Nested filled rectangles image . . . . . . . . . . . . . . . . . . . . . . 1614.15 Nested rectangles image . . . . . . . . . . . . . . . . . . . . . . . . . 162
“MAIN”2004/5/11page 1
ii
i
ii
i
Preface
This book is based on the proposition that the best way to learn to programis to have something interesting to program. Most educated people want to use acomputer, and the task that they most want to do with a computer is communicate.Alan Perlis first made the claim in 1961 that computer science, and programmingexplicitly, should be part of a liberal education [8]. What we’ve learned since then isthat one doesn’t just “learn to program.” One learns to program something [3, 9],and the motivation to do that something can make the difference between learningto program or not [4].
The philosophies which drive the structure of this book include:
• People learn from concrete examples to abstract ideas, driven by need. Teach-ing structure before content is painful and results in brittle knowledge thatcan’t be used elsewhere [5]. Certainly, one can introduce structure (and the-ory and design), but students won’t really understand the structure until theyhave the content to fill it with – and a reason to need the structure. Thus,this book doesn’t introduce debugging or design (or complexity or most ofcomputer science) until the students are doing complex enough software tomake it worthwhile learning.
• Repetition is good. Variety is good. Marvin Minsky once said, “If you knowsomething only one way, you don’t know it at all.” The same ideas come backfrequently in this book. The same idea is framed in multiple ways. I will usemetaphor, visualizations, mathematics, and even computer science to expressideas in enough different ways that hopefully one of the ways will ring truefor the individual student.
• The computer is the most amazingly creative device that humans have everconceived of. It is literally completely made up of mind-stuff. The notion“Don’t just dream it, be it” is really possible on a computer. If you can imag-ine it, you can make it “real” on the computer. Playing with programmingcan be and should be enormous fun.
TYPOGRAPHICAL NOTATIONS
Examples of Java code look like this: x = x + 1;. Longer examples look look likethis:
public class Greeter {
public static void main(String[] argv)
{
// show the string "Hello World" on the console
System.out.println("Hello World");
}
}
1
“MAIN”2004/5/11page 2
ii
i
ii
i
2 LIST OF FIGURES
When showing something that the user types in the interactions pane withDrJava’s response, it will have a similar font and style, but the user’s typing willappear after a DrJava prompt (>):
> 3 + 4
7
User interface components of DrJava will be specified using a smallcaps font,like File menu item and the Compile All button.
There are several special kinds of sidebars that you’ll find in the book.
Recipe 1: An Example Recipe
Recipes (programs) appear like this:
public static void main(String[] argv)
{
// show the string "Hello World" on the console
System.out.println("Hello World");
}
End of Recipe 1
Computer Science Idea: An Example IdeaKey computer science concepts appear like this.
�
�
�
�
Common Bug: An Example Common BugCommon things that can cause your recipe to fail appearlike this.
Debugging Tip: An Example Debugging TipIf there’s a good way to keep those bugs from creeping intoyour recipes in the first place, they’re highlighted here.
“MAIN”2004/5/11page 3
ii
i
ii
i
LIST OF FIGURES 3�
�
�
�Making it Work Tip: An Example How To MakeIt WorkBest practices or techniques that really help are highlightedlike this.
FOR THE TEACHER
The programming language used in this book is Java. Java is a high-level object-oriented programming language that runs on most computers and many small elec-tronic devices. It is widely used in industry and in universities.
The development environment used in this book is DrJava. It is a free andeasy to use development environment. DrJava lets the student focus on learning toprogram in Java and not on how to use the development environment. An advantageof DrJava is that you can try out Java code in the interactions pane without havingto write a ”main” method. You don’t have to use this development environment.There are many development environments that are available for use with Java.If you use another development environment just include the book classes in theclasspath.
It’s possible to teach a class where students learn the algorithms from thisbook, but apply them in another language. The media manipulations described inthis book can easily be used in other languages. Examples from this book havebeen successfully used in classes using Scheme1, and Squeak2.
ACKNOWLEDGEMENTS
Our sincere thanks go out to the following:
• Adam Wilson built the MediaTools that are so useful for exploring soundsand images and processing video.
• Jeff Pierce reviewed and advised us on the design of the media language usedin the book.
• Picture of Alan Perlis from http://www.cs.cmu.edu/afs/cs.cmu.edu/Web/
csd/perlis.html. Most of the clip art is used with permission from the ArtExplosion package by Nova Development.
• Thanks for permission to use their snapshots from class in examples are for-mer Media Computation students Constantino Kombosch, Joseph Clark, andShannon Joiner.
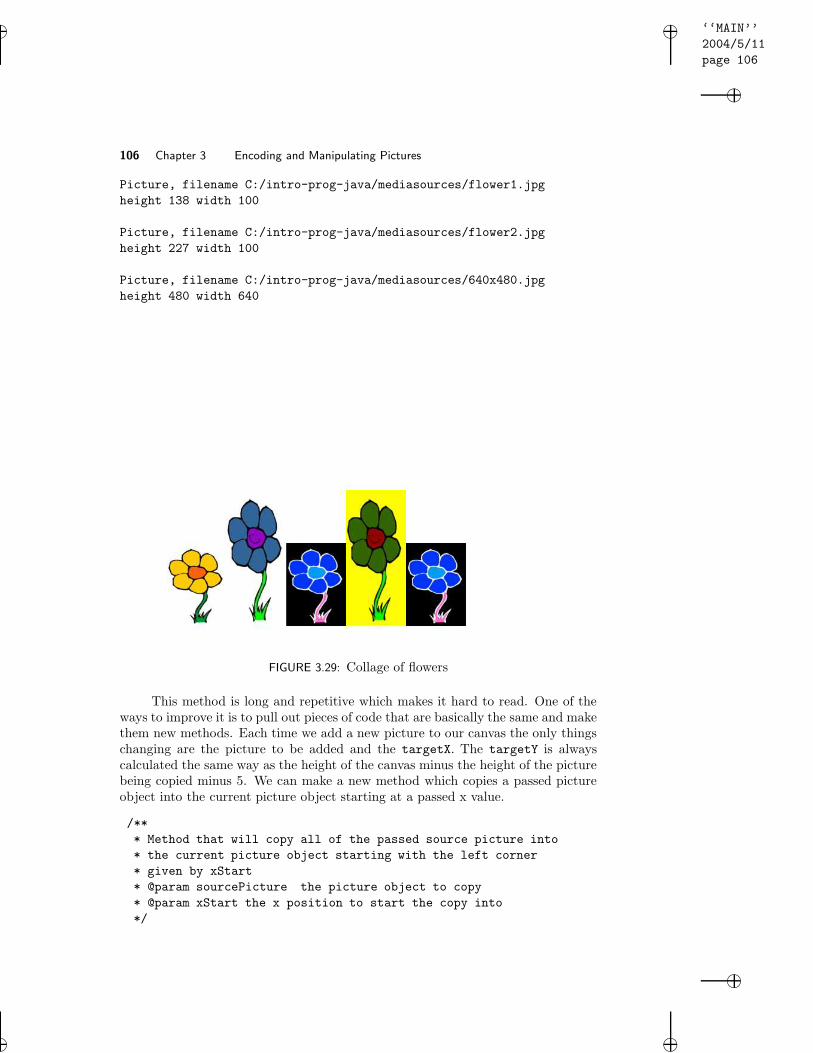
The cover image was created by Rachel Cobb who was a first year Architecturestudent at Georgia Institute of Technology in Spring 2003 when she created theimage for a homework assignment to build a collage. The original arch image camefrom the National Park Service gallery at http://www.nps.gov/arch/gallery/
index.htm. The original image and the collage are both used with permission, andmy thanks!
INTRODUCTIONChapter 1 Introduction to Media Computation
Chapter 2 Introduction to Programming
5
“MAIN”2004/5/11page 6
ii
i
ii
i
C H A P T E R 1
Introduction to MediaComputation
1.1 WHAT IS COMPUTER SCIENCE ABOUT?
1.2 WHAT COMPUTERS UNDERSTAND
1.3 MEDIA COMPUTATION: WHY DIGITIZE MEDIA?
1.4 COMPUTER SCIENCE FOR NON-COMPUTER SCIENTISTS
1.1 WHAT IS COMPUTER SCIENCE ABOUT?
Computer science is the study of process : How we do things, how we specify whatwe do, how we specify what the stuff is that you’re processing. But that’s a prettydry definition. Let’s try a metaphorical one.
Computer Science Idea: Computer science is thestudy of recipesThey’re a special kind of recipe—one that can be executedby a computational device, but that point is only of impor-tance to computer scientists. The important point overallis that a computer science recipe defines exactly what’s tobe done.
If you’re a biologist who wants to describe how migration works or how DNAreplicates, or if you’re a chemist who wants to explain how an equilibrium is reachedin a reaction, or if you’re a factory manager who wants to define a machine-and-belt layout and even test how it works before physically moving heavy things intoposition, then being able to write a recipe that specifies exactly what happens, interms that can be completely defined and understood, is very useful. This exactnessis part of why computers have radically changed so much of how science is doneand understood.
It may sound funny to call programs or algorithms a recipe, but the analogygoes a long way. Much of what computer scientists study can be defined in termsof recipes:
• Some computer scientists study how recipes are written: Are there better orworse ways of doing something? If you’ve ever had to separate whites fromyolks in eggs, you know that knowing the right way to do it makes a worldof difference. Computer science theoreticians worry about the fastest andshortest recipes, and the ones that take up the least amount of space (you can
6
“MAIN”2004/5/11page 7
ii
i
ii
i
Section 1.1 What is computer science about? 7
think about it as counter space — the analogy works). How a recipe works,completely apart from how it’s written, is called the study of algorithms .Software engineers worry about how large groups can put together recipesthat still work. (The recipe for some programs, like the one that keeps trackof Visa/MasterCard records has literally millions of steps!)
• Other computer scientists study the units used in recipes. Does it matterwhether a recipe uses metric or English measurements? The recipe may workin either case, but if you have the read the recipe and you don’t know whata pound or a cup is, the recipe is a lot less understandable to you. There arealso units that make sense for some tasks and not others, but if you can fit theunits to the tasks well, you can explain yourself more easily and get thingsdone faster—and avoid errors. Ever wonder why ships at sea measure theirspeed in knots? Why not use things like meters per second? There are places,like at sea, where more common terms aren’t appropriate or don’t work aswell. The study of computer science units is referred to as data structures .Computer scientists who study ways of keeping track of lots of data in lots ofdifferent kinds of units are studying databases .
• Can recipes be written for anything? Are there some recipes that can’t bewritten? Computer scientists actually do know that there are recipes thatcan’t be written. For example, you can’t write a recipe that can absolutelytell, for any other recipe, if the other recipe will actually work. How aboutintelligence? Can we write a recipe that, when a computer followed it, thecomputer would actually be thinking (and how would you tell if you got itright)? Computer scientsts in theory, intelligent systems , artificial intelli-gence, and systems worry about things like this.
• There are even computer scientists who worry about whether people like whatthe recipes produce, like the restauraunt critics for the newspaper. Someof these are human-computer interface specialists who worry about whetherpeople like how the recipes work (those “recipes” that produce an interfacethat people use, like windows, buttons, scrollbars, and other elements of whatwe think about as a running program).
• Just as some chefs specialize in certain kinds of recipes, like crepes or bar-beque, computer scientists also specialize in special kinds of recipes. Com-puter scientists who work in graphics are mostly concerned with recipes thatproduce pictures, animations, and even movies. Computer scientists who workin computer music are mostly concerned with recipes that produce sounds (of-ten melodic ones, but not always).
• Still other computer scientists study the emergent properties of recipes. Thinkabout the World Wide Web. It’s really a collection of millions of recipes(programs) talking to one another. Why would one section of the Web getslower at some point? It’s a phenomena that emerges from these millionsof programs, certainly not something that was planned. That’s somethingthat networking computer scientists study. What’s really amazing is thatthese emergent properties (that things just start to happen when you have
“MAIN”2004/5/11page 8
ii
i
ii
i
8 Chapter 1 Introduction to Media Computation
many, many recipes interacting at once) can also be used to explain non-computational things. For example, how ants forage for food or how termitesmake mounds can also be described as something that just happens when youhave lots of little programs doing something simple and interacting.
The recipe metaphor also works on another level. Everyone knows that somethings in recipe can be changed without changing the result dramatically. Youcan always increase all the units by a multiplier to make more. You can alwaysadd more garlic or oregano to the spaghetti sauce. But there are some things thatyou cannot change in a recipe. If the recipe calls for baking powder, you may notsubstitute baking soda. If you’re supposed to boil the dumplings then saute’ them,the reverse order will probably not work well.
Similarly, for software recipes. There are usually things you can easily change:The actual names of things (though you should change names consistently), someof the constants (numbers that appear as plain old numbers, not as variables), andmaybe even some of the data ranges (sections of the data) being manipulated. Butthe order of the commands to the computer, however, almost always has to stayexactly as stated. As we go on, you’ll learn what can be changed safely, and whatcan’t.
Computer scientists specify their recipes with programming languages . Dif-ferent programming languages are used for different purposes. Some of them arewildly popular, like Java and C++. Others are more obscure, like Squeak and T.Others are designed to make computer science ideas very easy to learn, like Schemeor Python, but the fact that they’re easy to learn doesn’t always make them verypopular nor the best choice for experts building larger or more complicated recipes.It’s a hard balance in teaching computer science to pick a language that is easy tolearn and is popular and useful enough that students are motivated to learn it.
Why don’t computer scientists just use natural languages, like English orSpanish? The problem is that natural languages evolved the way that they didto enhance communications between very smart beings, humans. As we’ll go intomore in the next section, computers are exceptionally dumb. They need a level ofspecificity that natural language isn’t good at. Further, what we say to one anotherin natural communication is not exactly what you’re saying in a computationalrecipe. When was the last time you told someone how a videogame like Doomor Quake or Super Mario Brothers worked in such minute detail that they couldactually replicate the game (say, on paper)? English isn’t good for that kind oftask.
There are so many different kinds of programming languages because there areso many different kinds of recipes to write. Programs written in the programminglanguage C tend to be very fast and efficient, but they also tend to be hard toread, hard to write, and require units that are more about computers than aboutbird migrations or DNA or whatever else you want to write your recipe about. Theprogramming language Lisp (and its related languages like Scheme, T, and CommonLisp) is very flexible and is well suited to exploring how to write recipes that havenever been written before, but Lisp looks so strange compared to languages likeC that many people avoid it and there are (natural consequence) few people whoknow it. If you want to hire a hundred programmers to work on your project, you’re
“MAIN”2004/5/11page 9
ii
i
ii
i
Section 1.2 What Computers Understand 9
going to find it easier to find a hundred programmers who know a popular languagethan a less popular one—but that doesn’t mean that the popular language is thebest one for your task!
The programming language that we’re using in this book is Java (http://java.sun.com for more information on Java). Java is a very popular pro-gramming language. Delta uses it to handle its web site (http://www.delta.com). NASA used it on the Mars Rover ”Spirit” (http://www.sun.com/aboutsun/media/features/mars.html). It has been used in touchscreen kiosks for SuperBowl fans (http://java.sun.com/features/1998/01/superbowl.html).
Java is known for being object-oriented, platform neutral (runs on many com-puters and electronic devices), robust, and secure. An early drawback to Java wasthat programs written in Java often had a slower execution time than ones writtenin C or C++. However, current Java compilers and interpreters have essentiallyeliminated this problem.
1.2 WHAT COMPUTERS UNDERSTAND
Computational recipes are written to run on computers. What does a computerknow how to do? What can we tell the computer to do in the recipe? The answeris “Very, very little.” Computers are exceedingly stupid. They really only knowabout numbers.
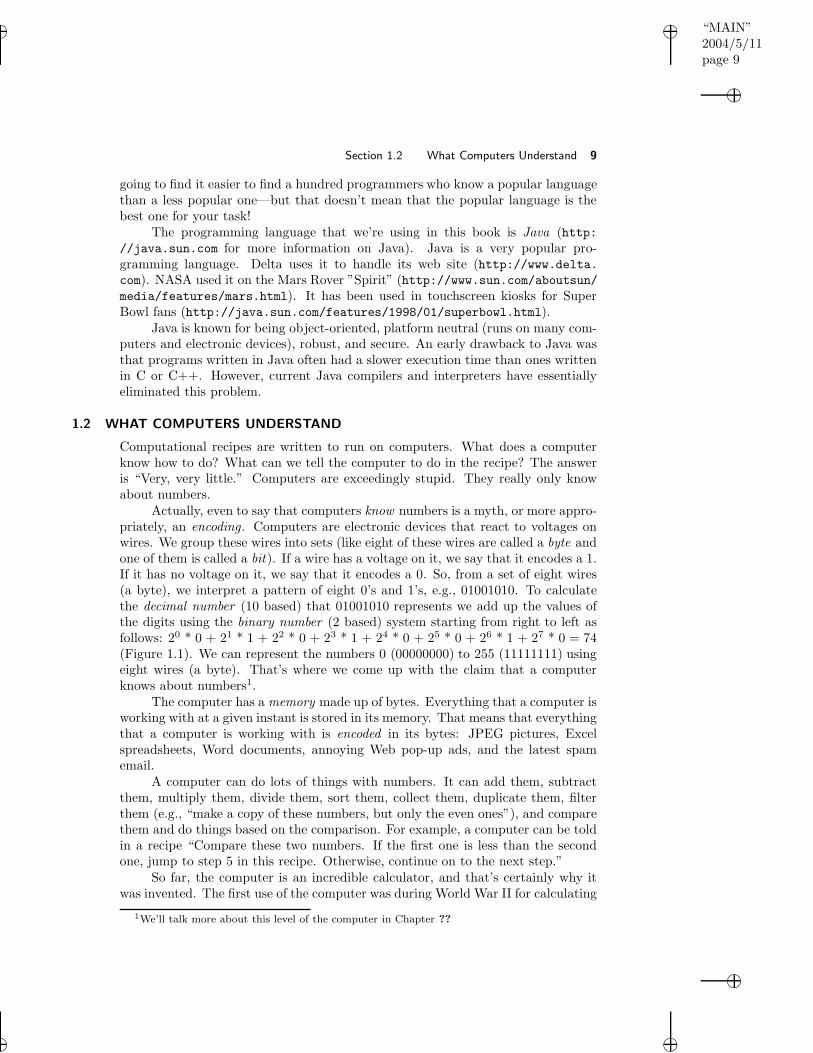
Actually, even to say that computers know numbers is a myth, or more appro-priately, an encoding. Computers are electronic devices that react to voltages onwires. We group these wires into sets (like eight of these wires are called a byte andone of them is called a bit). If a wire has a voltage on it, we say that it encodes a 1.If it has no voltage on it, we say that it encodes a 0. So, from a set of eight wires(a byte), we interpret a pattern of eight 0’s and 1’s, e.g., 01001010. To calculatethe decimal number (10 based) that 01001010 represents we add up the values ofthe digits using the binary number (2 based) system starting from right to left asfollows: 20 * 0 + 21 * 1 + 22 * 0 + 23 * 1 + 24 * 0 + 25 * 0 + 26 * 1 + 27 * 0 = 74(Figure 1.1). We can represent the numbers 0 (00000000) to 255 (11111111) usingeight wires (a byte). That’s where we come up with the claim that a computerknows about numbers1.
The computer has a memory made up of bytes. Everything that a computer isworking with at a given instant is stored in its memory. That means that everythingthat a computer is working with is encoded in its bytes: JPEG pictures, Excelspreadsheets, Word documents, annoying Web pop-up ads, and the latest spamemail.
A computer can do lots of things with numbers. It can add them, subtractthem, multiply them, divide them, sort them, collect them, duplicate them, filterthem (e.g., “make a copy of these numbers, but only the even ones”), and comparethem and do things based on the comparison. For example, a computer can be toldin a recipe “Compare these two numbers. If the first one is less than the secondone, jump to step 5 in this recipe. Otherwise, continue on to the next step.”
So far, the computer is an incredible calculator, and that’s certainly why itwas invented. The first use of the computer was during World War II for calculating
1We’ll talk more about this level of the computer in Chapter ??
“MAIN”2004/5/11page 10
ii
i
ii
i
10 Chapter 1 Introduction to Media Computation
FIGURE 1.1: Eight wires with a pattern of voltages is a byte, which gets interpretedas a pattern of eight 0’s and 1’s, which gets interpreted as a decimal number.
trajectories of projectiles (“If the wind is coming from the SE at 15 MPH, and youwant to hit a target 0.5 miles away at an angle of 30 degrees East of North, thenincline your launcher to . . .”). The computer is an amazing calculator. But whatmakes it useful for general recipes is the concept of encodings.
Computer Science Idea: Computers can layer en-codingsComputers can layer encodings to virtually any level ofcomplexity. Numbers can be interpreted as characters,which can be interpreted in sets as Web pages, which canbe interpreted to appear as multiple fonts and styles. Butat the bottommost level, the computer only “knows” volt-ages which we intepret as numbers.
If one of these bytes is interpreted as the number 65, it could just be thenumber 65. Or it could be the letter A using a standard encoding of numbers-to-letters called the American Standard Code for Information Interchange (ASCII). Itcould also be the letter A in Unicode which is a more recent standard encoding ofnumber to characters which supports a wide range of languages . If that 65 appearsin a collection of other numbers that we’re interpreting as text, and that’s in a filethat ends in “.html” it might be part of something that looks like this <a href=. . .,which a Web browser will interpret as the definition of a link. Down at the levelof the computer, that A is just a pattern of voltages. Many layers of recipes up, atthe level of a Web browser, it defines something that you can click on to get moreinformation.
If the computer understands only numbers (and that’s a stretch already), howdoes it manipulate these encodings? Sure, it knows how to compare numbers, but
“MAIN”2004/5/11page 11
ii
i
ii
i
Section 1.3 Media Computation: Why digitize media? 11
how does that extend to being able to alphabetize a class list. Typically, each layerof encoding is implemented as a piece or layer of software. There’s software thatunderstands how to manipulate characters. The character software knows how todo things like compare names because it has encoded that a comes before b andso on, and that the numeric comparison of the order of numbers in the encodingof the letters leads to alphabetical comparisons. The character software is used byother software that manipulates text in files. That’s the layer that something likeMicrosoft Word or Notepad or TextEdit would use. Still another piece of softwareknows how to interpret HTML (the language of the Web), and another layer ofthat software knows how to take HTML and display the right text, fonts, styles,and colors.
We can similarly create layers of encodings in the computer for our specifictasks. We can teach a computer that cells contain mitochondria and DNA, and thatDNA has four kinds of nucleotides, and that factories have these kinds of pressesand these kinds of stamps. Creating layers of encoding and interpretation so thatthe computer is working with the right units (recall back to our recipe analogy)for a given problem is the task of data representation or defining the right datastructures .
If this sounds like a lot of software, it is. When software is layered like this,it slows the computer down some. But the amazing thing about computers is thatthey’re amazingly fast—and getting faster all the time!
Computer Science Idea: Moore’s LawGordon Moore, one of the founders of Intel (maker of com-puter processing chips used by computers running Win-dows operating systems), made the claim that the numberof transistors (a key component of computers) would dou-ble at the same price every 18 months, effectively meaningthat the same amount of money would buy twice as muchcomputing power every 18 months. This Law has contin-ued to hold true for decades.
Computers today can execute literally BILLIONS of recipe steps per second!They can hold in memory literally encyclopediae of data! They never get tired norbored. Search a million customers for a particular card holder? No problem! Findthe right set of numbers to get the best value out of an equation? Piece of cake!
Process millions of picture elements or sound fragments or movie frames?That’s media computation.
1.3 MEDIA COMPUTATION: WHY DIGITIZE MEDIA?
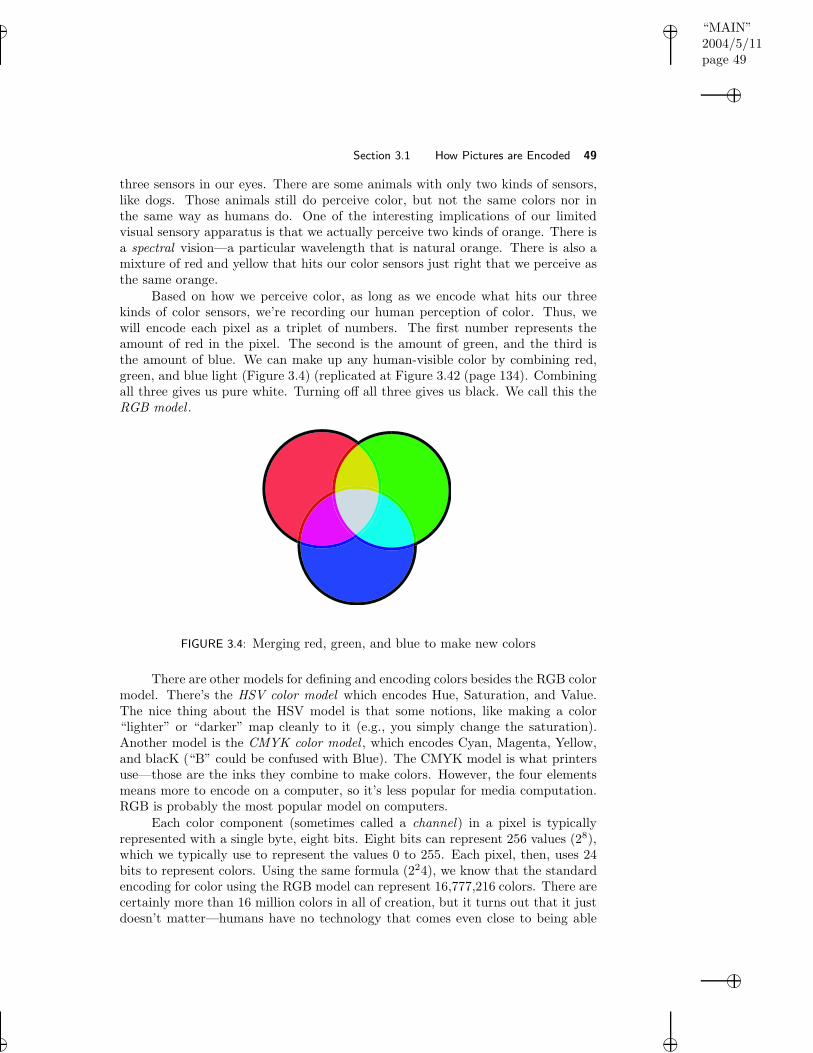
Let’s consider an encoding that would be appropriate for pictures. Imagine thatpictures were made up of little dots. That’s not hard to imagine: Look really closelyat your monitor or at a TV screen and see that your images are already made up oflittle dots. Each of these dots is a distinct color. You may know from physics thatcolors can be described as the sum of red , green, and blue. Add the red and greento get yellow. Mix all three together to get white. Turn them all off, and you geta black dot.
“MAIN”2004/5/11page 12
ii
i
ii
i
12 Chapter 1 Introduction to Media Computation
What if we encoded each dot in a picture as collection of three bytes, one eachfor the amount of red, green, and blue at that dot on the screen? And we collect abunch of these three-byte-sets to determine all the dots of a given picture? That’s apretty reasonable way of representing pictures, and it’s essentially how we’re goingto do it in Chapter 3.
Manipulating these dots (each referred to as a pixel or picture element) cantake a lot of processing. There are thousands or even millions of them in a picturethat you might want to work with on your computer or on the Web. But thecomputer doesn’t get bored and it’s mighty fast.
The encoding that we will be using for sound involves 44,100 two-byte-sets(called a sample) for each second of time. A three minute song requires 158,760,000bytes. Doing any processing on this takes a lot of operations. But at a billionoperations per second, you can do lots of operations to every one of those bytes injust a few moments.
Creating these kinds of encodings for media requires a change to the media.Look at the real world: It isn’t made up of lots of little dots that you can see.Listen to a sound: Do you hear thousands of little bits of sound per second? Thefact that you can’t hear little bits of sound per second is what makes it possibleto create these encodings. Our eyes and ears are limited: We can only perceive somuch, and only things that are just so small. If you break up an image into smallenough dots, your eyes can’t tell that it’s not a continuous flow of color. If youbreak up a sound into small enough pieces, your ears can’t tell that the sound isn’ta continuous flow of auditory energy.
The process of encoding media into little bits is called digitization, sometimesreferred to as “going digital .” Digital means (according to the American HeritageDictionary) “Of, relating to, or resembling a digit, especially a finger.” Makingthings digital is about turning things from continuous, uncountable, to somethingthat we can count, as if with our fingers.
Digital media, done well, feel the same to our limited human sensory appa-ratus as the original. Phonograph recordings (ever seen one of those?) capturesound continuously, as an analogue signal. Photographs capture light as a contin-uous flow. Some people say that they can hear a difference between phonographrecordings and CD recordings, but to my ear and most measurements, a CD (whichis digitized sound) sounds just the same—maybe clearer. Digital cameras at highenough resolutions produce photograph-quality pictures.
Why would you want to digitize media? Because it’s easier to manipulate,to replicate exactly, to compress, and to transmit. For example, it’s hard to ma-nipulate images that are in photographs, but it’s very easy when the same imagesare digitized. This book is about using the increasingly digital world of media andmanipulating it—and learning computation in the process.
Moore’s Law has made media computation feasible as an introductory topic.Media computation relies on the computer doing lots and lots of operations on lotsand lots of bytes. Modern computers can do this easily. Even with slower (buteasy to understand) languages, even with inefficient (but easy to read and write)recipes, we can learn about computation by manipulating media.
“MAIN”2004/5/11page 13
ii
i
ii
i
Section 1.4 Computer Science for Non-Computer Scientists 13
1.4 COMPUTER SCIENCE FOR NON-COMPUTER SCIENTISTS
But why should you? Why should anyone who doesn’t want to be a computerscientist learn about computer science? Why should you be interested in learningabout computation through manipulating media?
Most professionals today do manipulate media: Papers, videos, tape record-ings, photographs, drawings. Increasingly, this manipulation is done with a com-puter. Media are very often in a digitized form today.
We use software to manipulate these media. We use Adobe Photoshop formanipulating our images, and Macromedia SoundEdit to manipulate our sounds,and perhaps Microsoft PowerPoint for assembling our media into slideshows. Weuse Microsoft Word for manipulating our text, and Netscape Navigator or MicrosoftInternet Explorer for browsing media on the Internet.
So why should anyone who does not want to be a computer scientist studycomputer science? Why should you learn to program? Isn’t it enough to learn touse all this great software? The following two sections provide two answers to thesequestions.
1.4.1 It’s about communication
Digital media are manipulated with software. If you can only manipulate mediawith software that someone else made for you, you are limiting your ability tocommunicate. What if you want to say something or say it in some way thatAdobe, Microsoft, Apple, and the rest don’t support you in saying? If you knowhow to program, even if it would take you longer to do it yourself, you have thatfreedom.
What about learning those tools in the first place? In my years in computers,I’ve seen a variety of software come and go as the package for drawing, painting,word-processing, video editing, and beyond. You can’t learn just a single tool andexpect to be able to use that your entire career. If you know how the tools work,you have a core understanding that can transfer from tool to tool. You can thinkabout your media work in terms of the algorithms, not the tools.
Finally, if you’re going to prepare media for the Web, for marketing, for print,for broadcast, for any use whatsoever, it’s worthwhile for you to have a sense ofwhat’s possible, what can be done with media. It’s even more important as aconsumer of media that you know how the media can be manipulated, to knowwhat’s true and what could be just a trick. If you know the basics of mediacomputation, you have an understanding that goes beyond what any individualtool provides.
1.4.2 It’s about process
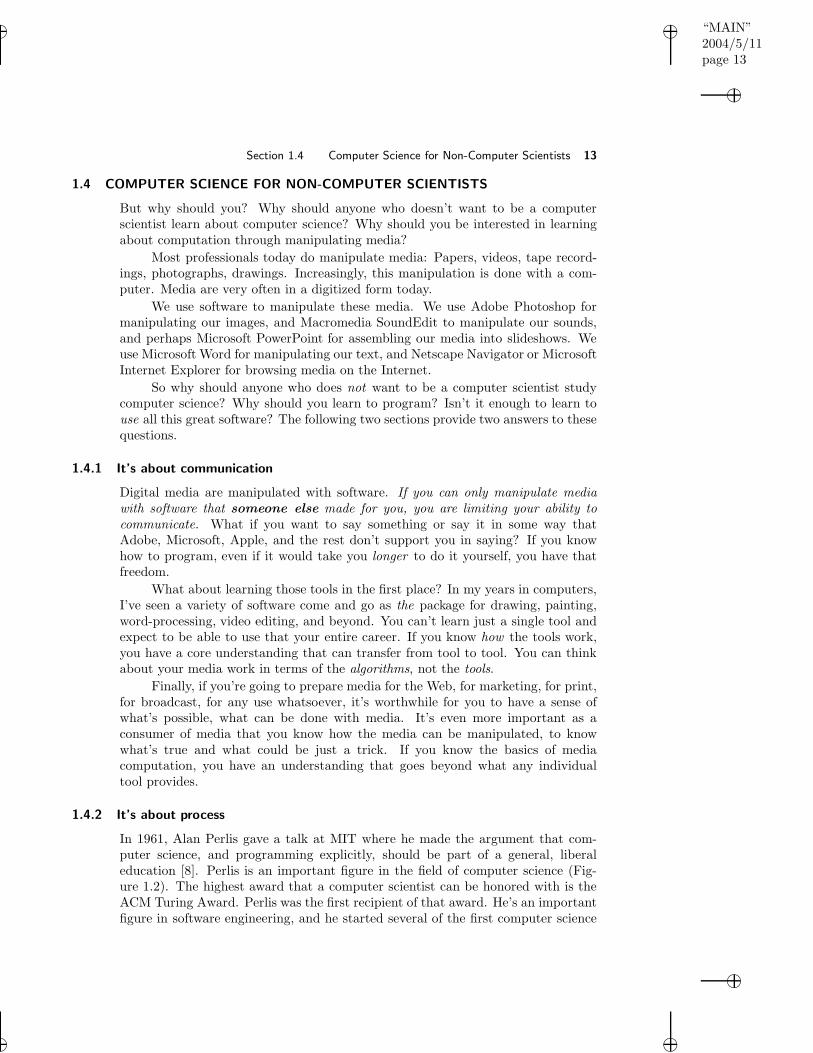
In 1961, Alan Perlis gave a talk at MIT where he made the argument that com-puter science, and programming explicitly, should be part of a general, liberaleducation [8]. Perlis is an important figure in the field of computer science (Fig-ure 1.2). The highest award that a computer scientist can be honored with is theACM Turing Award. Perlis was the first recipient of that award. He’s an importantfigure in software engineering, and he started several of the first computer science
“MAIN”2004/5/11page 14
ii
i
ii
i
14 Chapter 1 Introduction to Media Computation
FIGURE 1.2: Alan Perlis
departments in the United States.Perlis’ argument can be made in comparison with calculus. Calculus is gen-
erally considered part of a liberal education: Not everyone takes calculus, but ifyou want to be well-educated, you will typically take at least a term of calculus.Calculus is the study of rates, which is important in many fields. Computer science,as we said before (page 6), is the study of process. Process is important to nearlyevery field, from business to science to medicine to law. Knowing process formallyis important to everyone.
PROBLEMS
1.1. Find an ASCII table on the Web: A table listing every character and its corre-sponding numeric representation. Write down the sequence of numbers whoseASCII values make up your name.
1.2. Find a Unicode table on the Web. What’s the difference between ASCII andUnicode?
1.3. Consider the representation for pictures described in Section 1.3, where each“dot” (pixel) in the picture is represented by three bytes, for the red, green,and blue components of the color at that dot. How many bytes does it taketo represent a 640x480 picture, a common picture size on the Web? How manybytes does it take to represent a 1024x768 picture, a common screen size? (Whatdo you think is meant now by a “3 megapixel” camera?)
1.4. How many different numbers can be represented by one byte? In other words,eight bits can represent from zero to what number? What if you have two bytes?Four bytes?
*1.5. How might you represent a floating point number in terms of bytes?1.6. Look up Alan Kay and the Dynabook on the Web. Who is he, and what does he
have to do with media computation?
“MAIN”2004/5/11page 15
ii
i
ii
i
Section 1.4 Computer Science for Non-Computer Scientists 15
1.7. Look up Alan Turing on the Web. Who was he, and what does he have to dowith our notion of what a computer can do and how encodings work?
1.8. Look up Kurt Goedel on the Web. Who was he, and what amazing things didhe do with encodings?
TO DIG DEEPER
James Gleick’s book Chaos describes more on emergent properties–how small changescan lead to dramatic effects, and the unintended impacts of designs because ofdifficult-to-foresee interactions.
Mitchel Resnick’s book Turtles, Termites, and Traffic Jams: Explorations inMassively Parallel Microworlds [12] describes how ants, termites, and even trafficjams and slime molds can be described pretty accurately with hundreds or thou-sands of very small programs running and interacting all at once.
Beyond the Digital Domain [2] is a wonderful introductory book to computa-tion with lots of good information about digital media.
“MAIN”2004/5/11page 16
ii
i
ii
i
C H A P T E R 2
Introduction to Programming
2.1 PROGRAMMING IS ABOUT NAMING
2.2 PROGRAMMING IN JAVA
2.3 PROGRAMMING IN DRJAVA
2.4 MEDIA COMPUTATION IN DRJAVA
2.5 MAKING A RECIPE
2.1 PROGRAMMING IS ABOUT NAMING
Computer Science Idea: Much of programming isabout namingA computer can associate names, or symbols , with justabout anything: With a particular byte; with a collectionof bytes making up a numeric variable or a bunch of let-ters; with a media element like a file, sound, or picture; oreven with more abstract concepts, like a named recipe (aprogram or method or a named encoding (a type or class).A computer scientist sees a choice of names as being highquality in the same way that a philosopher or mathemati-cian might: If the naming scheme (the names and whatthey name) are elegant, parsimonious, and usable.
Obviously, the computer itself doesn’t care about names. Names are for thehumans. If the computer were just a calculator, then remembering words and thewords’ association with values would be just a waste of the computer’s memory.But for humans, it’s very powerful. It allows us to work with the computer ina natural way, even a way that extends how we think about recipes (processes)entirely.
A programming language is really a set of names that a computer has en-codings for, such that those names make the computer do expected actions andinterpret our data in expected ways. Some of the programming language’s namesallow us to define new namings—which allows us to create our own layers of encod-ing. Assigning a variable to a value is one way of defining a name for the computer.Defining a method (function) is giving a name to a recipe. In Java you can alsoassign a name to a group of related data and methods (functions) when you definea class (type).
16
“MAIN”2004/5/11page 17
ii
i
ii
i
Section 2.1 Programming is about Naming 17
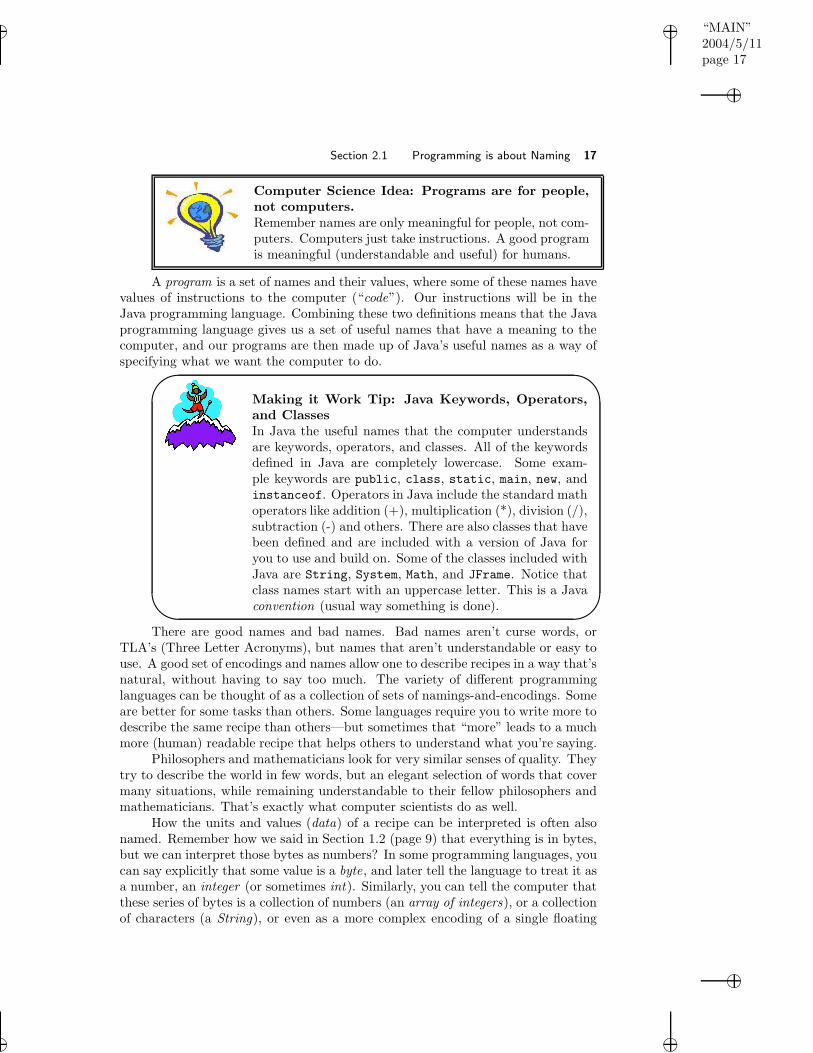
Computer Science Idea: Programs are for people,not computers.Remember names are only meaningful for people, not com-puters. Computers just take instructions. A good programis meaningful (understandable and useful) for humans.
A program is a set of names and their values, where some of these names havevalues of instructions to the computer (“code”). Our instructions will be in theJava programming language. Combining these two definitions means that the Javaprogramming language gives us a set of useful names that have a meaning to thecomputer, and our programs are then made up of Java’s useful names as a way ofspecifying what we want the computer to do.'
&
$
%
Making it Work Tip: Java Keywords, Operators,and ClassesIn Java the useful names that the computer understandsare keywords, operators, and classes. All of the keywordsdefined in Java are completely lowercase. Some exam-ple keywords are public, class, static, main, new, andinstanceof. Operators in Java include the standard mathoperators like addition (+), multiplication (*), division (/),subtraction (-) and others. There are also classes that havebeen defined and are included with a version of Java foryou to use and build on. Some of the classes included withJava are String, System, Math, and JFrame. Notice thatclass names start with an uppercase letter. This is a Javaconvention (usual way something is done).
There are good names and bad names. Bad names aren’t curse words, orTLA’s (Three Letter Acronyms), but names that aren’t understandable or easy touse. A good set of encodings and names allow one to describe recipes in a way that’snatural, without having to say too much. The variety of different programminglanguages can be thought of as a collection of sets of namings-and-encodings. Someare better for some tasks than others. Some languages require you to write more todescribe the same recipe than others—but sometimes that “more” leads to a muchmore (human) readable recipe that helps others to understand what you’re saying.
Philosophers and mathematicians look for very similar senses of quality. Theytry to describe the world in few words, but an elegant selection of words that covermany situations, while remaining understandable to their fellow philosophers andmathematicians. That’s exactly what computer scientists do as well.
How the units and values (data) of a recipe can be interpreted is often alsonamed. Remember how we said in Section 1.2 (page 9) that everything is in bytes,but we can interpret those bytes as numbers? In some programming languages, youcan say explicitly that some value is a byte, and later tell the language to treat it asa number, an integer (or sometimes int). Similarly, you can tell the computer thatthese series of bytes is a collection of numbers (an array of integers), or a collectionof characters (a String), or even as a more complex encoding of a single floating
“MAIN”2004/5/11page 18
ii
i
ii
i
18 Chapter 2 Introduction to Programming
point number (a floating point number—any number with a decimal point in it).
In Java, we will explicitly tell the computer how to interpret our values.Languages such as Java, C++, and C# are strongly typed . Their names are stronglyassociated with certain types or encodings. They require you to say that this namewill only be associated with integers, and that one will only be a floating pointnumber. In Java, C++, and C# you can also create your own types which ispart of what makes object-oriented languages so powerful. We do this in Java bydefining classes such as Picture which represents a simple digital picture. An objectof the Picture class has a width and height and you can get and set the pixels ofthe Picture object. This isn’t a class that is part of the Java language but a classthat we have defined using Java to make it easier for students to work with digitalpictures.
2.1.1 Files and their Names
A programming language isn’t the only place where computers associate names andvalues. Your computer’s operating system takes care of the files on your disk, andit associates names with those files. Operating systems you may be familiar withor use include Windows 95, Windows 98 (Windows ME, NT, XP. . .), MacOS, andLinux. A file is a collection of values (bytes) on your hard disk (the part of yourcomputer that stores things after the power gets turned off). If you know the nameof a file, you can tell it to the operating system, and it can give you the valuesassociated with that name.
You may be thinking, “I’ve been using the computer for years, and I’ve never’given a file name to the operating system.’ ” Maybe you didn’t realize that youwere doing it, but when you pick a file from a file choosing dialog in Photoshop,or double-click a file in a directory window (or Explorer or Finder), you are askingsome software somewhere to give the name you’re picking or double-clicking tothe operating system, and get the values back. When you write your own recipes,though, you’ll be explicitly getting file names and asking for their values.
Files are very important for media computation. Disks can store acres andacres of information on them. Remember our discussion of Moore’s Law (page 11)?Disk capacity per dollar is increasing faster than computer speed per dollar! Com-puter disks today can store whole movies, hours (days?) of sounds, and the equiv-alent of hundreds of film rolls of pictures.
These media are not small. Even in a compressed form, screen size picturescan be over a million bytes large, and songs can be three million bytes or more. Youneed to keep them someplace where they’ll last past the computer being turned offand where there’s lots of space.
In contrast, your computer’s memory is impermanent (disappears when thepower does) and is relatively small. Computer memory is getting larger all thetime, but it’s still just a fraction of the amount of space on your disk. When you’reworking with media, you will load the media from the disk into memory so you canwork with it, but you wouldn’t want it to stay in memory after you’re done. It’stoo big.
Think about your computer’s memory as a dorm room. You can get to thingseasily in a dorm room—they’re right at hand, easy to reach, easy to use. But you
“MAIN”2004/5/11page 19
ii
i
ii
i
Section 2.2 Programming in Java 19
wouldn’t want to put everything you own (or everything you hope to own) in thatone dorm room. All your belongings? Your skis? Your car? Your boat? That’ssilly. Instead, you store large things in places designed to store large things. Youknow how to get them when you need them (and maybe take them back to yourdorm room if you need to or can).
When you bring things into memory, you usually will name the value, so thatyou can retrieve it and use it later. In that sense, programming is something likealgebra. To write generalizable equations and functions (those that work for anynumber or value), you wrote equations and functions with variables , like PV = nRTor e = Mc2 or f(x) = sin(x). Those P’s, V’s, R’s, T’s, e’s, M’s, c’s, and x’s werenames for values. When you evaluated f(30), you knew that the x was the namefor 30 when computing f . We’ll be naming media (as values) in the same way whenusing them when programming.
2.2 PROGRAMMING IN JAVA
The programming language that we’re going to be using in this book is called Java.It’s a language invented by James Gosling (http://java.sun.com/people/jag/)at Sun Microsystems.
2.2.1 History of Java
Back in 1990 Sun created project Green to try and predict the next big thing incomputers. The goal of the project was to try and develop something to positionSun ahead of its competitors. They thought that the next big thing would benetworked consumer electronics devices like set-top boxes for downloading video ondemand. They tried to develop a prototype using C++ but after many problemsdecided to develop a new object-oriented language which they originally namedOak, after a tree outside James Gosling’s office. They created a demonstration butthe cable companies weren’t really interested and the future of the project was indoubt.
At a brainstorming session they decided to try to reposition the languagefor use with the internet. They created a web browser that had Java programs(applets) embedded in HTML pages to do 3D rotation of a molecule and animationof a sorting algorithm. They showed this at a conference. At that time web pagesdidn’t respond to user action. They simply displayed text and unchanging graphics.The audience was amazed to see the user rotate the 3d molecule on a web page.Later they renamed Oak to Java and released it for free in 1995. Since then it hasbecome one of the fastest adopted technologies of all times. It is now used for morethan just web pages. It is used in many devices from cell phones to web servers.For more on the history of Java see http://java.sun.com/features/1998/05/
birthday.html.
2.2.2 Introduction to Objects and Classes
Java is an object-oriented programming language. This means that the focus forprogrammers is on objects (who) as well as procedures (what). Objects are persons,places, or things that are doing the action in a situation or being acted upon.
“MAIN”2004/5/11page 20
ii
i
ii
i
20 Chapter 2 Introduction to Programming
An example might help you to understand what focusing on the objects means.When customers enter a restaurant a greeter will welcome them to the restaurantand show them to their table. A waiter will take the order and bring the drinksand food. One or more chefs will cook the food. The waiter will create the bill andgive it to the customers. The customers will pay the bill.
How many people does it take to get a customer fed in a restaurant? Well,you need at least a customer, greeter, waiter, and a chef. What other things aredoing action or being acted upon? We mentioned order, table, drink, food, andbill. Each of these are objects. The objects in this situation are working togetherto feed the customer.
What types of objects are they? We have given names to each thing wementioned: customer, waiter, food, etc. The names we gave are how we classifythese objects. You probably know what I mean by a customer or food. But thecomputer doesn’t know what we mean by these things. The way that we get thecomputer to understand what we mean is by defining a class . A class in Java tellsthe computer what data we expect objects of the class to have and what things itcan do. We would expect that food will have a name, a price, and a way to prepareit. We would expect that a customer would know what they can afford to pay andhow to pay a bill.
Each object of a class will have the same skills or operations (things it cando) and data (things it knows about). For example, each object of the order classshould know which customer placed that order and what food is in the order. Anobject of the chef class should know how to prepare the food.
There can be many objects of a class. A restaurant might have 3 chefs, 10waiters, 2 greeters, and 100 food objects on its menu. On a given day and time itmight have 100 customers.
Why don’t restaurants just have one type of employee? One person couldgreet the customers, take the orders, cook the food and deliver the food. Thatmight be okay if there is only one customer but what about when there are manycustomers? You can imagine that one person wouldn’t be able to handle so manytasks and food would get burnt, orders would take too long to fill, and customerswouldn’t be happy. Restaurants break the tasks into different jobs so that they canbe efficient and effective. Object-oriented programs also try to distribute the tasksto be done so that no one object does all the work.
2.2.3 Introduction to DrJava
You’ll actually be programming using a tool called DrJava. DrJava is a simpleeditor (tool for entering program text) and interaction space so that you can trythings out in DrJava and create new recipes within it. DrJava is available for freeunder the DrJava Open Source License, and it is under active development by theJavaPLT group at Rice University.
To install DrJava, you’ll have to do these things:
1. Make sure that you have Java 1.4 or above installed on your computer. Ifyou don’t have it load it from the CD or you can get it from the Sun site athttp://www.java.sun.com.
“MAIN”2004/5/11page 21
ii
i
ii
i
Section 2.3 Programming in DrJava 21
2. You’ll need to install DrJava. You can either load it from the CD or get itfrom http://drjava.org/.
3. Add the Java classes that come with the book to the extra classpaths forDrJava. Start DrJava (see the next section for how to do this), click on Edit
and then Preferences. This will show the Preferences window. Click onthe Add button below the Extra Classpath textarea and add the followingpath: c:/intro-prog-java/bookClasses.
FIGURE 2.1: DrJava Preferences Window
2.3 PROGRAMMING IN DRJAVA
How you start DrJava depends on your platform. In Linux, you’ll probably cd intoyour DrJava directory and type a command like java -jar drjava-DATE-TIME.jar
where DATE-TIME are values for the release of DrJava that you are using. In Win-dows, you’ll have a DrJava icon that you’ll simply double-click. On the Macintosh,you’ll probably have to type commands in your Terminal application where you cd
to the correct directory then type ./DrJava. See the instructions on the CD forwhat will work for your kind of computer.�
�
�
�
Common Bug: DrJava is slow to startDrJava will take a while to load on all platforms. Don’tworry—you’ll see the splash screen for a long time, but ifyou see the splash screen (Figure 2.2), it will load.
“MAIN”2004/5/11page 22
ii
i
ii
i
22 Chapter 2 Introduction to Programming
FIGURE 2.2: DrJava Splash Screen
'
&
$
%
Common Bug: Making DrJava run fasterAs we’ll talk more about later, when you’re running Dr-
Java, you’re actually running Java. Java needs memory. Ifyou’re finding DrJava running slowly, give it more memory.You can do that by quitting out of other applications thatyou’re running. Your email program, your instant mes-senger, and your digital music player all take up memory(sometimes lots of it!). Quit out of those and DrJava willrun faster.
Once you start DrJava, it will look something like Figure 2.3. There are threemain areas in DrJava (the bars between them move so that you can resize theareas):
• The top left window pane is the files pane. It has a list of the open filesin DrJava. In Java each class that you create is usually stored in its ownfile. Java programs often consist of more than one file. You can click on afile name in the Files pane to view the contents of that file in the top rightwindow pane (definitions pane).
• The top right part is the definitions pane. This where you write your classes:The collection of related data and methods. This area is simply a text editor—think of it as Microsoft Word for your programs. The computer doesn’tactually try to interpret the names that you type up in the program areauntil you compile it. You can compile all the current files open in the filespane by clicking on the Compile All button near the top of the DrJavawindow.
Don’t worry if you hit Compile All before you save changes to a file. DrJavawon’t compile files until they are saved, so it will give you the chance to savethe changes then.
• The bottom part is the interactions pane. This is where you literally commandthe computer to do something. You type your commands at the > prompt,and when you hit return, the computer will interpret your words (i.e., applythe meanings and encodings of the Java programming language) and do whatyou have told it to do. This interpretation will include whatever you typedand compiled in the definitions pane as well. In English you end sentenceswith a period. In Java you typically end a programming statement with asemicolon. However, in the interactions pane you can leave off the semicolonand it will print the result of whatever you have typed. If you do add the
“MAIN”2004/5/11page 23
ii
i
ii
i
Section 2.3 Programming in DrJava 23
semicolon at the end of a Java statement in the interations pane it will do thestatement but not automatically print the result in the interactions pane.
FIGURE 2.3: DrJava (with annotations)
There are other features of DrJava visible in Figure 2.3. The Open buttonwill let you open a file and will add the file name to the files pane and show thecode in that file in the definitions pane. The Save button will save the file thatis currently displayed in the definitions pane. The Javadoc button creates theHTML documentation from the Javadoc comments in your files (comments thatstart with ’/**’ and end with ’*/’.'
&
$
%
Making it Work Tip: Get to know your Help!An important feature to already start exploring is theHelp. If you click on Help and then click on Help againwhen a menu is displayed you will see a help window. Startexploring it now so that you have a sense for what’s therewhen you start writing your own programs.
“MAIN”2004/5/11page 24
ii
i
ii
i
24 Chapter 2 Introduction to Programming
2.4 MEDIA COMPUTATION IN DRJAVA
We’re going to start out by simply typing commands in the interactions pane—notdefining new names yet, but simply using the names that the computer alreadyknows from within Java (keywords, operators, and classes that come with a releaseof Java).
The phrase System.out.println() is an important one to know. The mean-ing for System.out.println() is “Use the PrintStream object known as out onthe System class to display a readable representation of whatever is in the paren-theses on the console window, followed by an end-of-line character.” You can havenothing in the parentheses which will just move the output to a new line, or it canbe a name that the computer knows, or an expression (literally, in the algebraicsense). Try typing System.out.println(34 + 56) by clicking in the interactionsarea, typing the command, and hitting return—like this:
> System.out.println(34 + 56)
90
34 + 56 is a numeric expression that Java understands. Obviously, it’s com-posed of two numbers and an operation (in our sense, a name) that Java knowshow to do, + meaning “add.” Java understands other kinds of expressions, not allnumeric. In Java we call math symbols like ’+’ and ’-’ operators .
> System.out.println(34.1/46.5)
0.7333333333333334
> System.out.println(22 * 33)
726
> System.out.println(14 - 15)
-1
> System.out.println(5 % 2)
1
> System.out.println("Hello")
Hello
> System.out.println("Hello" + "Mark")
HelloMark
Java understands a bunch of standard math operations. As you might expect’/’ is divide, ’*’ is multiply, ’-’ is subtract. Java also uses ’%’ for remainder as in5 divided by 2 has a remainder of 1. This is also called the modulo operator. Javaknows how to recognize different kinds of numbers, both integer and floating point.It also knows how to recognize strings (lists of characters) that are started andended with " (double quotes). It even knows what it means to “add” two stringstogether: It simply puts one right after the other (appends them).
“MAIN”2004/5/11page 25
ii
i
ii
i
Section 2.4 Media Computation in DrJava 25'
&
$
%
Common Bug: Java’s types can produce odd re-sultsJava takes types seriously. If it sees you using integers, itthinks you want an integer result from your expressions. Ifit sees you use floating point numbers, it thinks you wanta floating point result. Sounds reasonable, no? But howabout:
> System.out.println(1.0/2.0)
0.5
> System.out.println(1/2)
0
1/2 is 0? Well, sure! 1 and 2 are integers. There is nointeger equal to 1/2, so the answer must be 0! Simplyby adding “.0” to an integer convinces Java that we’retalking about floating point numbers (specifically the Javaprimitive type double), so the result is in floating pointform.
Java also understands about functions . Remember functions from algebra?They’re a “machine or box” into which you put one value, and out comes another.Java calls these methods .
However, you can’t just call a function or method in Java like you can inprocedural languages. Every method or function must be defined in a class. Thereare two types of methods in Java: class methods or object methods . Class methodscan be invoked (executed) by using the class name followed by a period and thenthe method name. By convention class names in Java start with an uppercaseletter: like Character.
One of the class methods for the Character class takes a character as the inputvalue (the value that goes into the box) and returns (the value that comes out ofthe box) the number that is the Unicode mapping for that character. Charactersin Java are specified between single quotes: ’A’. The name of that function isgetNumericValue() and you can use System.out.println to display the valuethat the method getNumericValue() returns:
Another class method that’s built in to the Math class in Java is namedabs—it’s the absolute value function. It returns the absolute value of the inputvalue.
> System.out.println(Math.abs(1))
1
> System.out.println(Math.abs(-1))
1
“MAIN”2004/5/11page 26
ii
i
ii
i
26 Chapter 2 Introduction to Programming
FIGURE 2.4: The File Chooser
Debugging Tip: Common typosIf you type a class name and Java can’t figure out whatclass you are taking about you will get an undefined classerror.
> Mat.abs(-3)
Error: Undefined class ’Mat’
If you mistype a method (function) name you will get thefollowing error:
> Math.ab(-3)
Error: No ’ab’ method in ’java.lang.Math’
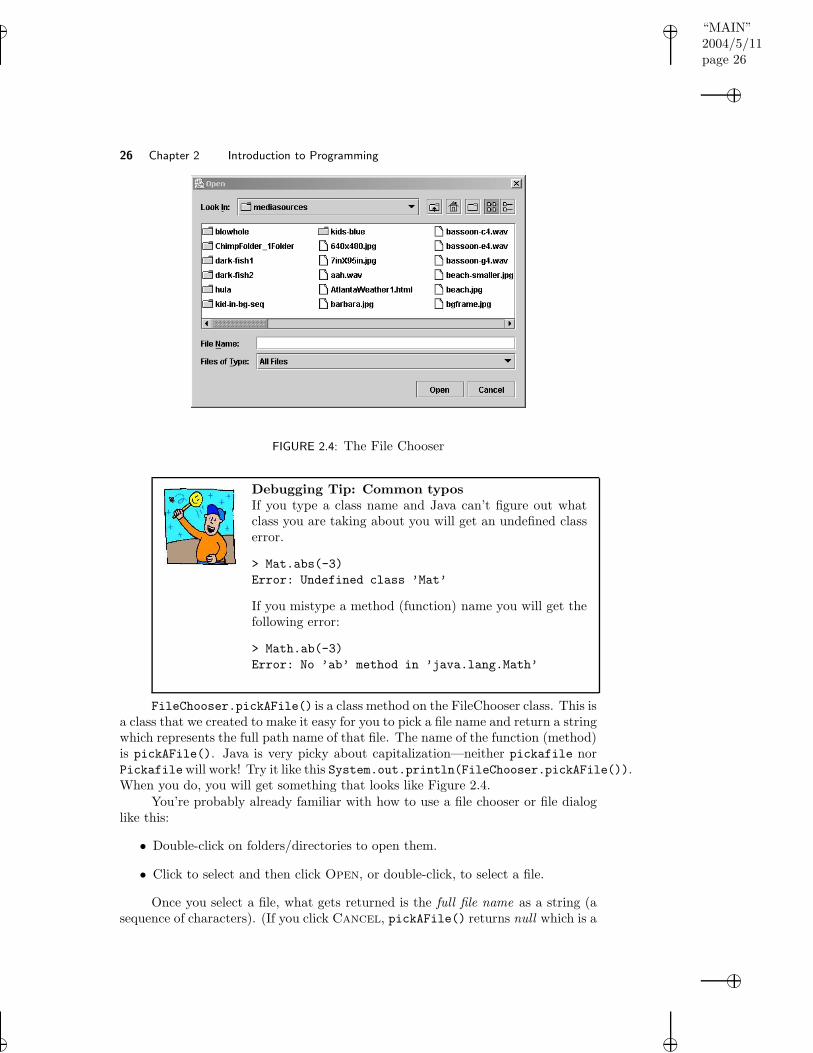
FileChooser.pickAFile() is a class method on the FileChooser class. This isa class that we created to make it easy for you to pick a file name and return a stringwhich represents the full path name of that file. The name of the function (method)is pickAFile(). Java is very picky about capitalization—neither pickafile norPickafilewill work! Try it like this System.out.println(FileChooser.pickAFile()).When you do, you will get something that looks like Figure 2.4.
You’re probably already familiar with how to use a file chooser or file dialoglike this:
• Double-click on folders/directories to open them.
• Click to select and then click Open, or double-click, to select a file.
Once you select a file, what gets returned is the full file name as a string (asequence of characters). (If you click Cancel, pickAFile() returns null which is a
“MAIN”2004/5/11page 27
ii
i
ii
i
Section 2.4 Media Computation in DrJava 27
Java keyword that means nothing. Try it: Do System.out.println(FileChooser.pickAFile())and Open a file.
> System.out.println(FileChooser.pickAFile())
C:\intro-prog-java\mediasources\cat.jpg
What you get when you finally select a file will depend on your operatingsystem. On Windows, your file name will probably start with C: and will havebackslashes in it (e.g., “). On Linux or MacOS, it will probably look something likethe above. There are really two parts to this file name:
• The character between words (e.g., the \ between “intro-prog-java” and “me-diasources”) is called the path separator . Everything from the beginning ofthe file name to the last path separator is called the path to the file. Thatdescribes exactly where on the hard disk (in which directory) a file exists.
• The last part of the file (e.g. “cat.jpg”) is called the base file name. When youlook at the file in the Finder/Explorer/Directory window (depending on youroperating system), that’s the part that you see. Those last three characters(after the period) is called the file extension. It identifies the encoding of thefile.
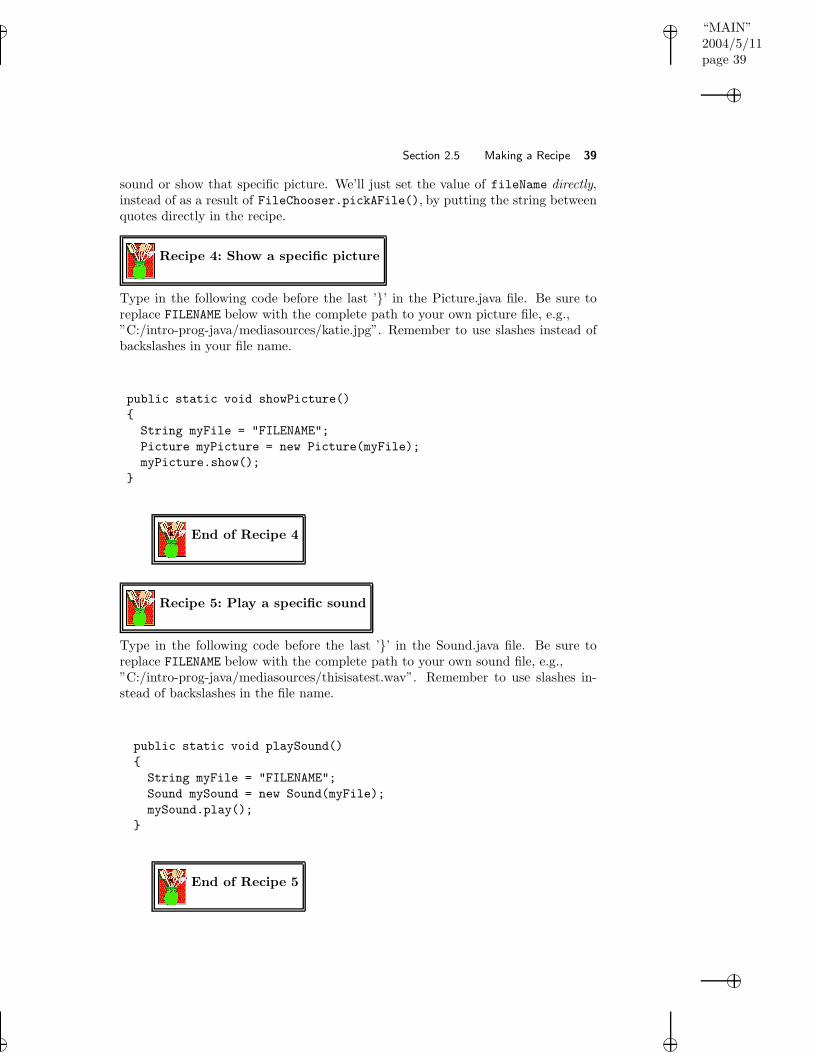
Files that have an extension of “.jpg” are JPEG files. They contain pictures.(To be picky, they contain data that can be interpreted to be a representation of apicture – but that’s close enough to “they contain pictures.”) JPEG is a standardencoding (a representation) for any kind of images. The other kind of media filesthat we’ll be using frequently are “.wav” files (Figure 2.5). The “.wav” extensionmeans that these are WAV files. They contain sounds. WAV is a standard encodingfor sounds. There are many other kinds of extensions for files, and there are evenmany other kinds of media extensions. For example, there are also GIF (“.gif”)files for images and AIFF (“.aif” or “.aiff”) files for sounds. We’ll stick to JPEGand WAV in this text, just to avoid too much complexity.
2.4.1 Showing a Picture
So now we know how to get a complete file name: Path and base name. This doesn’tmean that we have the file itself loaded into memory. To get the file into memory, wehave to tell Java how to interpret this file. We know that JPEG files are pictures,but we have to tell Java explicitly to read the file and make a Picture object fromit (an object of the Picture class). The way we create new objects in Java is to askthe class to create a new object by new ClassName(parameters). So, to createa new object of the Picture class from a file name use new Picture(fileName).The fileName is the name of a file as a string. We know how to get a file nameusing FileChooser.pickAFile().
FIGURE 2.5: File chooser with media types identified
The result from System.out.println suggests that we did in fact make apicture object, from a given filename and with a given height and width. Success!Oh, you wanted to actually see the picture? We’ll need another method! (Did Imention somewhere that computers are stupid?) The method to show the pictureis named show().
You ask a picture object to show itself using the method show(). It mayseem strange to say that a picture knows how to show itself but in object-orientedprogramming we treat objects as intelligent beings that know how to do the thingsthat we would expect an object to be able to do or that someone would want to doto it. We typically show pictures so in object-oriented programming picture objectsknow how to show themselves (make themselves visible).
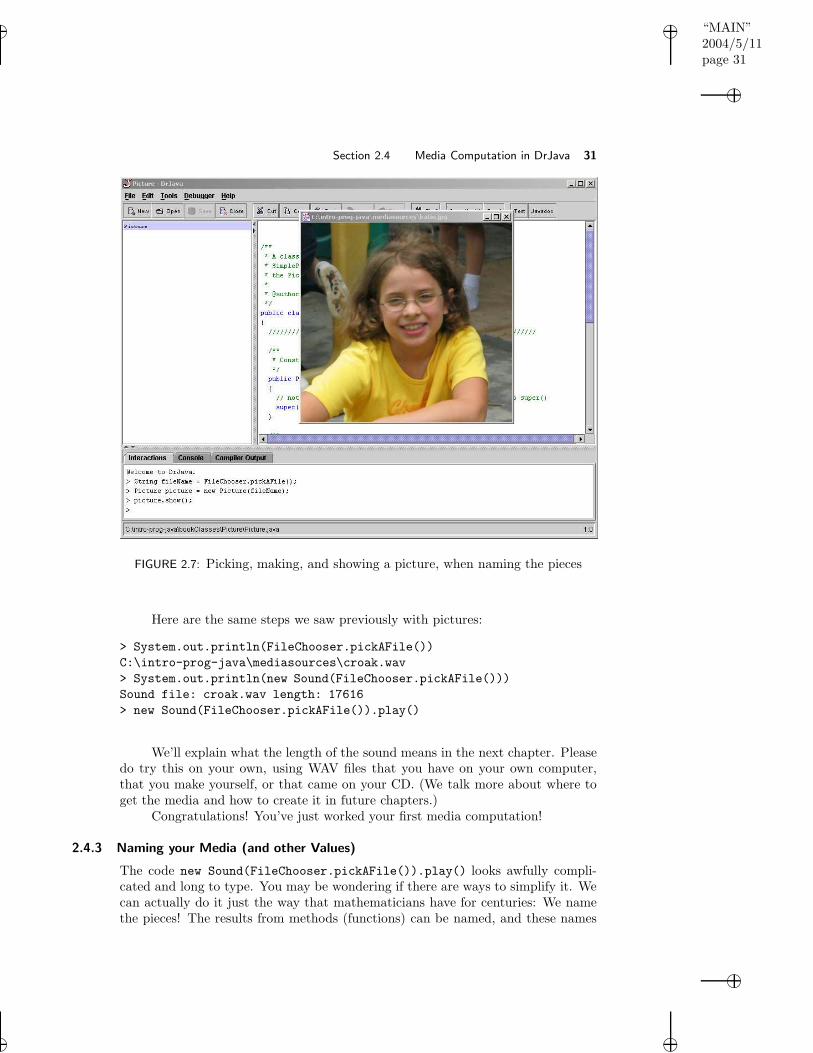
We can now pick a file, make a picture, and show it in a couple of differentways.
• We can do it all at once because the result from one method can be used in thenext method: new Picture(FileChooser.pickAFile()).show(). That’swhat we see in figure 2.6. This code will first invoke the pickAFile() classmethod of the class FileChooser and that will return the selected file as astring. Next it will create a new picture object with the selected file name.And finally it will ask the created picture object to show itself.
• The second way is to name each of the pieces by using =. However, in Javawe can’t just use new names without saying what type of thing we expect thename to represent. We call this declaring a variable. To declare a variable (aname for data) use Type name; or Type name=something;.
“MAIN”2004/5/11page 29
ii
i
ii
i
Section 2.4 Media Computation in DrJava 29
FIGURE 2.6: Picking, making, and showing a picture, using the result of each methodin the next method
'
&
$
%
Making it Work Tip: Types in JavaA type in Java can be any of the predefined primitive types(char, byte, int, short, long, float, double, or boolean)or the name of a class. Java is not a completely object-oriented language in that the primitive types are not ob-jects. Why are there so many primitive types? The answerhas to do with how many bits you want to use to representa value. The more bits you use the larger the number thatyou can store. We will typically use only int, double, andboolean in this book. The type int is for integer numbersand takes up 32 bits. The type double is for floating pointnumbers and takes up 64 bits. The type boolean is forthings that are just true or false so it takes up 1 bit. Javauses primitive types to speed calculations.A class name can be either a class defined as part of theJava language like (String, JFrame, or BufferedImage) ora class that you or someone else created (like the Picture
class we created).
We can name the file ( String fileName =) that we get from FileChooser.pickAFile().
“MAIN”2004/5/11page 30
ii
i
ii
i
30 Chapter 2 Introduction to Programming
This says that the name “fileName” will be of type String (will represent an object ofthe String class) and that the String object that it will refer to will be returned fromFileChooser.pickAFile(). In a similar fashion we can create a name picture
that will represent an object of the Picture class that we get from creating a newPicture object with the fileName Picture picture = new Picture(fileName).We can then ask that Picture object to show itself by sending it the show() mes-sage using picture.show(). That’s what we see in figure 2.7.'
&
$
%
Making it Work Tip: Java ConventionsBy convention all class names in Java begin with an up-percase letter, all variable and method names begin witha lowercase letter. This will help you tell the differencebetween a class name and a variable or method name. So,Picture is a class name since it starts with a uppercaseletter and picture is a variable name since it starts with alowercase letter. If a name has several words in it the con-vention is to uppercase the first letter of each additionalword like pickAFile(). A convention is the usual way of do-ing something which means that the compiler won’t careif you don’t do it this way but other programmers will beupset with you because it will make your programs harderto understand.
Debugging Tip: Methods names must be followedby parentheses!In Java all methods (functions) have to have parenthesesafter the method name both when you declare the methodand when you use it. You can’t leave off the parentheseseven if the method doesn’t take any parameters. So, youmust type picture.show() not picture.show.
If you try picture.show(), you’ll notice that there is no output from thismethod. Methods in Java don’t have to return a value, unlike real mathematicalfunctions. A method may just do something (like opening up a picture in a window).
2.4.2 Playing a Sound
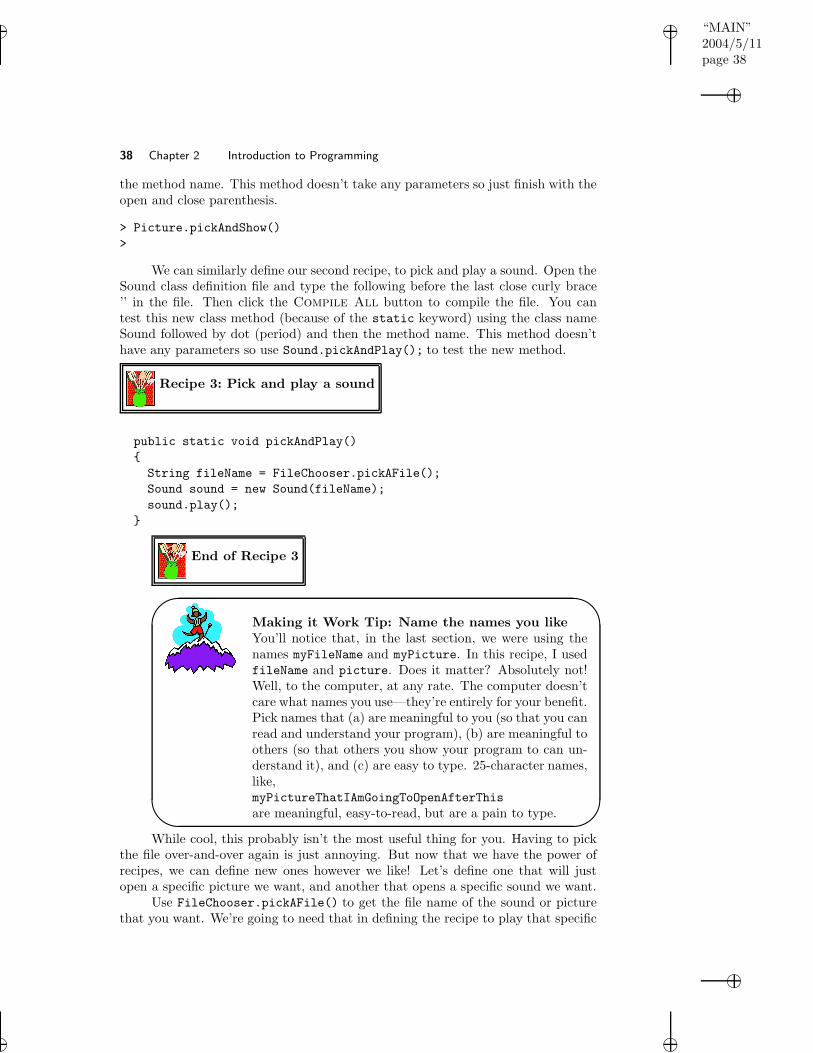
We can replicate this entire process with sounds.
• We still use FileChooser.pickAFile() to find the file we want and get itsfile name.
• We now use new Sound(fileName) to make a Sound object. new Sound(fileName),as you might imagine, takes a name of a file as input.
• We will use play() to play the sound. The method play() is an objectmethod (invoked on a sound object). It plays the sound one time. It doesn’treturn anything.
“MAIN”2004/5/11page 31
ii
i
ii
i
Section 2.4 Media Computation in DrJava 31
FIGURE 2.7: Picking, making, and showing a picture, when naming the pieces
Here are the same steps we saw previously with pictures:
We’ll explain what the length of the sound means in the next chapter. Pleasedo try this on your own, using WAV files that you have on your own computer,that you make yourself, or that came on your CD. (We talk more about where toget the media and how to create it in future chapters.)
Congratulations! You’ve just worked your first media computation!
2.4.3 Naming your Media (and other Values)
The code new Sound(FileChooser.pickAFile()).play() looks awfully compli-cated and long to type. You may be wondering if there are ways to simplify it. Wecan actually do it just the way that mathematicians have for centuries: We namethe pieces! The results from methods (functions) can be named, and these names
“MAIN”2004/5/11page 32
ii
i
ii
i
32 Chapter 2 Introduction to Programming
can be used as the inputs to other functions.
Since we have already mentioned naming so often, it probably doesn’t comeas any surprise that you can create your own names. Later, we’ll show how to nameyour own methods (functions). Right now, let’s name our data. We call our namesfor data variables
We name data using =. We can check our namings using System.out.println(),just as we have been doing.
> int myVariable=12;
> System.out.println(myVariable);
12
> double anotherVariable=34.5;
> System.out.println(anotherVariable);
34.5
> String myName="Mark";
> System.out.println(myName);
Mark
Don’t read = as “equals.” That’s what it means in mathematics, but that’s notat all what we’re doing here. Read = as “becomes a name for.” myVariable=12 thusmeans “myVariable becomes a name for 12.” The reverse (putting the expressionon the left and the name on the right) thus makes no sense: 12 = myVariable
would then mean “12 becomes a name for myVariable.”
> int x = 2 * 8;
> System.out.println(x);
16
> 2 * 8 = x;
Syntax Error: ";"
We can easily reuse names.
> String myName = "Mark";
> System.out.println(myName);
Mark
> myName = "Barb";
> System.out.println(myName);
Barb
You can’t declare the same variable name twice. Declare the name one time(by specifying the type and name) and then you can use it many times.
> String myName = "Mark";
> System.out.println(myName);
Mark
> String myName = "Sue";
Error: Redefinition of ’myName’
“MAIN”2004/5/11page 33
ii
i
ii
i
Section 2.4 Media Computation in DrJava 33
The binding between the name and the data only exists (a) until the name getsassigned to something else or (b) you quit DrJava or (c) you reset the interactionspane. The relationship between names and data (or even names and functions)only exist during a session of DrJava.
Remember that data do have encodings or types. How the data act in ex-pressions depends in part of their types. Notice how the integer : the primitivetype int 12 and the string: an object of the String class “12” act differently foraddition below. Both are doing something reasonable for their type, but they arevery different actions.
> int myVariable=12;
> System.out.println(myVariable+4);
16
> String myOtherVariable="12";
> System.out.println(myOtherVariable+4);
124
We can assign names to the results of methods (functions). If we name theresult from FileChooser.pickAFile(), each time we print the name, we get thesame result. We don’t re-run FileChooser.pickAFile(). Naming code in order tore-execute it is what we’re doing when we define methods (functions), which comesup in Section ??
> String fileName = FileChooser.pickAFile();
> System.out.println(fileName);
C:\intro-prog-java\mediasources\beach-smaller.jpg
> System.out.println(fileName);
C:\intro-prog-java\mediasources\beach-smaller.jpg
In the below example, we assign names to the file name and picture.
Notice that the algebraic notions of subsitution and evaluation work hereas well. Picture myPicture = new Picture(myFileName) causes the exact samepicture to be created as if we had executed Picture myPicture = new Picture(FileChooser.pickAFile())1,because we set myFileName to be equal to the result of FileChooser.pickAFile().The values get substituted for the names when the expression is evaluated. new
Picture(myFileName) is an expression which, at evaluation time, gets expandedintonew Picture ("C:\intro-prog-java\mediasources\katie.jpg")
1Assuming, of course, that you picked the same file.
‘‘MAIN’’
2004/5/11
page 34
ii
i
ii
i
34 Chapter 2 Introduction to Programming
because “C:“intro-prog-java“mediasources“katie.jpg” is the name of the file thatwas picked when FileChooser.pickAFile() was evaluated and the returned valuewas named myFileName.
We can also replace the method (function) invocations (“function calls”) withthe value returned. FileChooser.pickAFile() returns a String object—a bunchof characters enclosed inside of double quotes. We can make the last example worklike this, too.'
&
$
%
Common Bug: Backslashes and SlashesYou have seen the names of files dis-played with backslashes in them, such asC:\intro-prog-java\mediasources\beach-smaller.jpg.However, when you create an object of the String classin Java you can’t use backslashes for they are used tocreate special characters like tab. You can use slashes ’/’instead as a path separator. Java can still figure out thepath name when you use slashes. Actually, you can usebackslashes in the full path name but you would need todouble each one.
Computer Science Idea: We can substitute names,values, and methods.We can substitute a value, a name assigned to that value,and the method returning that value interchangeably. Thecomputer cares about the values, not if it comes from astring, a name, or a method (function) call.
We actually don’t need to use System.out.println() every time we askthe computer to do something. If we want to call a function that doesn’t returnanything (and so is pretty useless to System.out.println()), we can just call the
“MAIN”2004/5/11page 35
ii
i
ii
i
Section 2.5 Making a Recipe 35
method (function) by typing its name and its input (if any) in parentheses andhitting return.
> aPicture.show();
We tend to call these statements to the computer that are telling it to dothings commands . System.out.println(aPicture) is a command. So is String
myFileName = FileChooser.pickAFile(), and aPicture.show(). These are morethan expressions: They’re telling the computer to do something.
2.5 MAKING A RECIPE
We have now used names to stand for values. The values get substituted for thenames when the expression is evaluated. We can do the same for recipes. We canname a series of commands, so that we can just use the name whenever we wantthe commands to be executed. This is exactly what defining a recipe or programis about.
Remember when we said earlier that just about anything can be named incomputers? We’ve seen naming values. Now we’ll see naming recipes.'
&
$
%
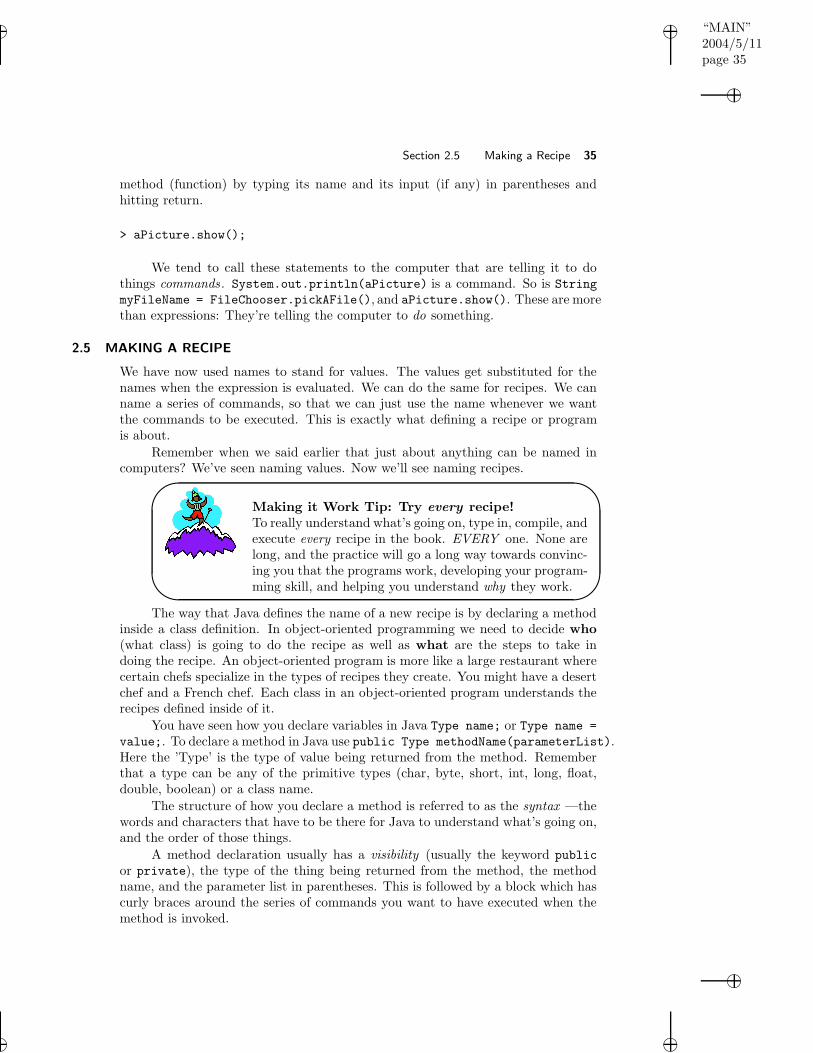
Making it Work Tip: Try every recipe!To really understand what’s going on, type in, compile, andexecute every recipe in the book. EVERY one. None arelong, and the practice will go a long way towards convinc-ing you that the programs work, developing your program-ming skill, and helping you understand why they work.
The way that Java defines the name of a new recipe is by declaring a methodinside a class definition. In object-oriented programming we need to decide who(what class) is going to do the recipe as well as what are the steps to take indoing the recipe. An object-oriented program is more like a large restaurant wherecertain chefs specialize in the types of recipes they create. You might have a desertchef and a French chef. Each class in an object-oriented program understands therecipes defined inside of it.
You have seen how you declare variables in Java Type name; or Type name =
value;. To declare a method in Java use public Type methodName(parameterList).Here the ’Type’ is the type of value being returned from the method. Rememberthat a type can be any of the primitive types (char, byte, short, int, long, float,double, boolean) or a class name.
The structure of how you declare a method is referred to as the syntax —thewords and characters that have to be there for Java to understand what’s going on,and the order of those things.
A method declaration usually has a visibility (usually the keyword public
or private), the type of the thing being returned from the method, the methodname, and the parameter list in parentheses. This is followed by a block which hascurly braces around the series of commands you want to have executed when themethod is invoked.
“MAIN”2004/5/11page 36
ii
i
ii
i
36 Chapter 2 Introduction to Programming
Visibility means who can invoke the method (ask for the method to be done).If the keyword public is used this method can be invoked by any code in any classdefinition. If the keyword private is used then the method can only be accessedfrom inside the class definition. You can think of this as a security feature. If yourphone number is public (listed) then anyone can look it up and call you. If yourphone number is private (unlisted) then only the people that live at the same housewill be able to call you.
There are two types of methods in Java. One is a class method and the otheran object method. Class methods operate on class fields and object methods operateon class and object fields. Object methods are implicitly passed the current object(accessed by the this keyword). To declare a class method you add the keywordstatic to the method declaration. To declare an object method you leave off thestatic keyword. The static keyword is usually given after the visibility.
The code to declare an object method such as show() for the Picture classwhich doesn’t return a value and has no input parameters would be public void
show(). The class method pickAFile which is a class method in the FileChooserclass and returns a String object is declared as public static String pickAFile().
The return type is required and is given before the method name. If you leaveoff a return type you will get a compiler error. If your method returns a value thereturn type must match the type of the value returned. Remember that types canbe any of the primitive types (char, byte, int, short, long, float, double, or boolean)or a class name. Methods that don’t return any value use the Java keyword void
for the return type.
By convention method names start with a lowercase letter and the first letterof each additional word is uppercase: FileChooser.pickAFile(). The name ofthis method is pickAFile. The first word is all lowercase and the first letter of eachadditional word is capitalized.
A method must have parentheses following the method name. If any param-eters are passed to the method then they will be declared inside the parenthesesseparated by commas. To declare a parameter you must give a type and name.
We create a collection of commands by defining a block . A block is codebetween an open curly brace ’’and a close curly brace ’}’. The block of commandsthat follow a method declaration are the ones associated with the name of themethod (function).
Most real programs that do useful things, especially those that create userinterfaces, require the definition of more than one method (function). Imagine thatin the definitions pane you have several method declarations. How do you thinkJava will figure out that one function has ended and a new one begun? Java needssome way of figuring out where the method body ends: Which statements are partof this method and which are part of the next? Java uses curly braces to do this.All statements between the open curly brace and close curly brace are part of themethod body.
We can now define our first recipe! Open Picture.java by clicking on the Open
button near the top of the window and using the file chooser to pick Picture.java.Type the following code into the definitions pane of DrJava before the last closingcurly brace (which ends the class definition). When you’re done, save the file and
“MAIN”2004/5/11page 37
ii
i
ii
i
Section 2.5 Making a Recipe 37
FIGURE 2.8: Defining and executing pickAndShow()
click the Compile All button near the top of the window (Figure 2.8).
Recipe 2: Pick and show a picture
public static void pickAndShow()
{
String fileName = FileChooser.pickAFile();
Picture picture = new Picture(fileName);
picture.show();
}
End of Recipe 2
Now you can execute your recipe (Figure ??). Click on the Interactions
tab in the interactions pane (near the bottom of the window). Since this is a classmethod (because of the keyword static in the method declaration) you can executethe method by using the class name (Picture) followed by a dot (period) and then
“MAIN”2004/5/11page 38
ii
i
ii
i
38 Chapter 2 Introduction to Programming
the method name. This method doesn’t take any parameters so just finish with theopen and close parenthesis.
> Picture.pickAndShow()
>
We can similarly define our second recipe, to pick and play a sound. Open theSound class definition file and type the following before the last close curly brace’’ in the file. Then click the Compile All button to compile the file. You cantest this new class method (because of the static keyword) using the class nameSound followed by dot (period) and then the method name. This method doesn’thave any parameters so use Sound.pickAndPlay(); to test the new method.
Recipe 3: Pick and play a sound
public static void pickAndPlay()
{
String fileName = FileChooser.pickAFile();
Sound sound = new Sound(fileName);
sound.play();
}
End of Recipe 3
'
&
$
%
Making it Work Tip: Name the names you likeYou’ll notice that, in the last section, we were using thenames myFileName and myPicture. In this recipe, I usedfileName and picture. Does it matter? Absolutely not!Well, to the computer, at any rate. The computer doesn’tcare what names you use—they’re entirely for your benefit.Pick names that (a) are meaningful to you (so that you canread and understand your program), (b) are meaningful toothers (so that others you show your program to can un-derstand it), and (c) are easy to type. 25-character names,like,myPictureThatIAmGoingToOpenAfterThis
are meaningful, easy-to-read, but are a pain to type.
While cool, this probably isn’t the most useful thing for you. Having to pickthe file over-and-over again is just annoying. But now that we have the power ofrecipes, we can define new ones however we like! Let’s define one that will justopen a specific picture we want, and another that opens a specific sound we want.
Use FileChooser.pickAFile() to get the file name of the sound or picturethat you want. We’re going to need that in defining the recipe to play that specific
“MAIN”2004/5/11page 39
ii
i
ii
i
Section 2.5 Making a Recipe 39
sound or show that specific picture. We’ll just set the value of fileName directly,instead of as a result of FileChooser.pickAFile(), by putting the string betweenquotes directly in the recipe.
Recipe 4: Show a specific picture
Type in the following code before the last ’}’ in the Picture.java file. Be sure toreplace FILENAME below with the complete path to your own picture file, e.g.,”C:/intro-prog-java/mediasources/katie.jpg”. Remember to use slashes instead ofbackslashes in your file name.
public static void showPicture()
{
String myFile = "FILENAME";
Picture myPicture = new Picture(myFile);
myPicture.show();
}
End of Recipe 4
Recipe 5: Play a specific sound
Type in the following code before the last ’}’ in the Sound.java file. Be sure toreplace FILENAME below with the complete path to your own sound file, e.g.,”C:/intro-prog-java/mediasources/thisisatest.wav”. Remember to use slashes in-stead of backslashes in the file name.
public static void playSound()
{
String myFile = "FILENAME";
Sound mySound = new Sound(myFile);
mySound.play();
}
End of Recipe 5
“MAIN”2004/5/11page 40
ii
i
ii
i
40 Chapter 2 Introduction to Programming'
&
$
%
Making it Work Tip: Copying and pastingText can be copied and pasted between the inter-actions pane and definitions pane. You can useSystem.out.println(FileChooser.pickAFile())
to print a filename, then select it and copy it (fromthe Edit menu), then click in the definitions pane andpaste it. Similarly, you can copy whole commands fromthe interactions pane up to the definitions pane: That’san easy way to test the individual commands, and thenput them all in a recipe once you have the order rightand they’re working. You can also copy text within thedefinitions pane. Instead of re-typing a command, selectit, copy it, paste it into the bottom line (make surethe cursor is at the end of the line!), and hit return toexecute it.
2.5.1 Variable Recipes: Real functions that Take Input
How do we create a method (function) with inputs out of our stored recipe, likeMath.abs(-1) or new Picture(fileName)? Why would you want to?
An important reason for using input variables is to make a program moregeneral. Consider Recipe 4, Picture.showPicture(). That’s for a specific filename. Would it be useful to have a function that could take any file name, thenmake and show the picture? That kind of function handles the general case ofmaking and showing pictures. We call that kind of generalization abstraction.Abstraction leads to general solutions that work in lots of situations.
Defining a recipe that takes input is very easy. It continues to be a matter ofsubstitution and evaluation. We’ll put a name inside those parentheses on the def
line. That name is sometimes called the parameter or input variable.
When you evaluate the function, by specifying its name with an input value(also called the argument) inside parentheses (like new Picture(myFileName) ornew Sound(aFileName)), the input value is assigned to the input variable. We saythat the input variable “takes on” the input value. During the execution of thefunction (recipe), the input value will be substituted for the value.
Here’s what a recipe would look like that takes the file name as an inputvariable:
Recipe 6: Show the picture file whose file name is input
public static void showNamed(String fileName)
{
Picture myPicture = new Picture(fileName);
myPicture.show();
}
“MAIN”2004/5/11page 41
ii
i
ii
i
Section 2.5 Making a Recipe 41
End of Recipe 6
When I typePicture.showNamed("C:/intro-prog-java/mediasources/katie.jpg")
and hit return, the variable fileName takes on the value"C:/intro-prog-java/mediasources/katie.jpg".myPicture will then be assigned to the picture resulting from reading and inter-preting the file at‘‘C:/intro-prog-java/mediasources/katie.jpg’’
Then the picture is shown.We can do a sound in the same way.
Recipe 7: Play the sound file whose file name is input
public static void playNamed(String fileName)
{
Sound mySound = new Sound(fileName);
mySound.play();
}
End of Recipe 7
We can also write recipes that take pictures or sounds in as the input values.Here’s a recipe that shows a picture but takes the picture object as the input value,instead of the filename.
Recipe 8: Show the picture provided as input
public static void showPicture(Picture myPicture)
{
myPicture.show();
}
End of Recipe 8
Now, what’s the difference between the method (function) showPicture()
and the provided method show()? Nothing at all. We can certainly create afunction that provides a new name to another function. If that makes your codeeasier for you to understand, than it’s a great idea.
What’s the right input value for a function? Is it better to input a filename ora picture? And what does “better” mean here, anyway? You’ll read more about all
“MAIN”2004/5/11page 42
ii
i
ii
i
42 Chapter 2 Introduction to Programming
of these later, but here’s a short answer: Write the function that is most useful toyou. If defining showPicture() is more readable for you than show(), then that’suseful. If what you really want is a method that takes care of making the pictureand showing it to you, then that’s more useful and you might find the showNamed()method the most useful.
OBJECTS AND FUNCTIONS SUMMARY
In this chapter, we talk about several kinds of encodings of data (or objects).
Integers Java primitive type int e.g., 3 Numbers without a decimalpoint—they can’t representfractions.
Floating pointnumbers
Java primitive type double e.g.,5.2, 3.01
Numbers with a fractional pieceto them.
Strings Java String object e.g., ”Hello!” A sequence of characters (includ-ing spaces, punctuation, etc.) de-limited on either end with a dou-ble quote character.
File name Java String object A filename is just a string whosecharacters represent a path, pathseparators, and a base file name.
Pictures object of our Picture class Pictures are encodings of images,typically coming from a JPEGfile.
Sounds object of our Sound class Sounds are encodings of sounds,typically coming from a WAV file.
Here are the functions introduced in this chapter:
“MAIN”2004/5/11page 43
ii
i
ii
i
Section 2.5 Making a Recipe 43
Character.getNumericValue(character) Returns the equivalent numericvalue in Unicode for the inputcharacter.
Math.abs(number) Takes a number and returns theabsolute value of it.
FileChooser.pickAFile() Lets the user pick a file and re-turns the complete path name asa string.
new Picture(fileName) Takes a name of a file as input,reads the file, and creates a pic-ture from it. Returns the createdpicture object.
picture.show() Shows the picture object that itis invoked on. No return value.
new Sound(fileName) Takes a filename as input, readsthe file, and creates a sound fromit. Returns the sound object.
sound.play() Plays the sound object that it isinvoked on.
PROBLEMS
2.1. Try some other operations with strings in Java. What happens if you add anumber to a string, like 3 + "Hello"?
2.2. You can combine the sound playing and picture showing commands in the samerecipe. Trying playing a sound and then show a picture while a sound is playing.Try playing a sound and opening several pictures while the sound is still playing.The hardest decision is where to put this method. It could go on the Sound orPicture class or perhaps it would go on a new MixedMedia class. Where does itmake sense to put it?
2.3. We evaluated the expression FileChooser.pickAFile() when we wanted to ex-ecute the function named pickAFile(). But what is the name pickAFile()
anyway? You could open the FileChooser class and find that method declara-tion.
2.4. Try the Sound.playNamed() method. You weren’t given any examples of its use,but you should be able to figure it out from Picture.showNamed().
TO DIG DEEPER
The best (deepest, most material, most elegant) computer science textbook is Struc-ture and Interpretation of Computer Programs [1], by Abelson, Sussman, and Suss-man. It’s a hard book to get through, though. Somewhat easier, but in the samespirit is the new book How to Design Programs [6].
Neither of these books are really aimed at students who want to programbecause it’s fun or because they have something small that they want to do. They’rereally aimed at future professional software developers. The best books aimed atthe less hardcore user are by Brian Harvey. His book Simply Scheme uses the
“MAIN”2004/5/11page 44
ii
i
ii
i
44 Chapter 2 Introduction to Programming
same programming language as the earlier two, Scheme, but is more approachable.My favorite of this class of books, though, is Brian’s three volume set ComputerScience Logo Style [10] which combine good computer science with creative and funprojects.
There is a wealth of material for Java on Sun’s Java web site http://java.
sun.com including tutorials, papers, and APIs. To learn more about DrJava seethe web site http://www.drjava.org/. Thinking in Java by Bruce Eckel is a greatbook for those who have some coding experience and like to understand a languagedeeply. Beginners might want to start with Beginning Java by Ivor Horton, orHeadfirst Java by Kathy Sierra and Bert Bates.
“MAIN”2004/5/11page 45
ii
i
ii
i
P A R T T W O
PICTURESChapter 3 Encoding and Manipulating Pictures
Chapter 4 Advanced Pictures
Chapter 5 Advanced Sounds
Chapter 6 Design and Debugging
45
“MAIN”2004/5/11page 46
ii
i
ii
i
C H A P T E R 3
Encoding and ManipulatingPictures
3.1 HOW PICTURES ARE ENCODED
3.2 MANIPULATING PICTURES
3.3 CHANGING COLOR VALUES
3.4 COPYING PIXELS
3.5 COPYING AND TRANSFORMING PICTURES
3.6 REPLACING COLORS
3.7 COMBINING PIXELS: BLURRING
3.8 COLOR FIGURES
Pictures (images, graphics) are an important part of any media communi-cation. In this chapter, we discuss how pictures are represented on a computer(mostly as bitmap images—each dot or pixel is represented separately) and howthey can be manipulated. The next chapter will discuss more about other kinds ofrepresentations, such as vector images.
3.1 HOW PICTURES ARE ENCODED
Pictures are two-dimensional arrays of pixels . In this section, each of those termswill be described.
For our purposes, a picture is an image stored in a JPEG file. JPEG is aninternational standard for how to store images with high quality but in little space.JPEG is a lossy compression format. That means that it is compressed , madesmaller, but not with 100% of the quality of the original format. Typically, though,what gets thrown away is stuff that you don’t see or don’t notice anyway. For mostpurposes, a JPEG image works fine.
An array is a sequence of elements, each with an index number associatedwith it. The first element in an array is at index 0, the second at index 1, the thirdat index 2, and so on. The last element of the array will always be at the length ofthe array minus one. An array with 5 elements will have its last element at index4. It may sound strange to say that the first element of an array is at index 0 butthe index is based on the distance from the beginning of the array to the element.Since the first item of the array is at the beginning of the array the distance is 0.
You can access elements of an array in Java using arrayName[index]. Forexample, to access the first element in an array named pixels use pixels[0]. Youcan get the number of items in an array using arrayName.length.
46
“MAIN”2004/5/11page 47
ii
i
ii
i
Section 3.1 How Pictures are Encoded 47'
&
$
%
Making it Work Tip: Using dot notation for publicfieldsNotice that there are no parenthesis followingarrayName.length. This is because length is not amethod but a public field (data). Public fields can beaccessed using dot notation objectName.fieldName.Methods always have parenthesis after the methodname even if there are no input parameters, such asFileChooser.pickAFile().
A two-dimensional array is a matrix . A matrix is a collection of elementsarranged in both a horizontal and vertical sequence. For one dimensional arraysyou would talk about an element at index i, that is array[i]. For two-dimensionalarrays you talk about an element at column i and row j, that is, matrix[i][j].
In Figure 3.1, you see an example matrix. At coordinates (0, 0) (horizontal,vertical), you’ll find the matrix element whose value is 15. The element at(1, 1) is7, (2, 1) is 43, and (3, 1) is 23. We will often refer to these coordinates as (x, y)((horizontal, vertical).
FIGURE 3.1: An example matrix
What’s stored at each element in the picture is a pixel . The word “pixel” isshort for “picture element.” It’s literally a dot, and the overall picture is made upof lots of these dots. Have you ever taken a magnifying glass to pictures in thenewspaper or magazines, or to a television or even your own computer monitor?(Figure 3.2 was generated by capturing as an image the of the top left part of theDrJava window and then magnifying it 600%. It’s made up of many, many dots.When you look at the picture in the magazine or on the television, it doesn’t looklike it’s broken up into millions of discrete spots, but it is.
You can get a similar view of individual pixels using the picture explorer,which is discussed later in this chapter. The picture explorer allows you to zoom apicture up to 500% where each individual pixel is visible (Figure 3.3).
Our human sensor apparatus can’t distinguish (without magnification or otherspecial equipment) the small bits in the whole. Humans have low visual acuity—wedon’t see as much detail as, say, an eagle. We actually have more than one kind
“MAIN”2004/5/11page 48
ii
i
ii
i
48 Chapter 3 Encoding and Manipulating Pictures
FIGURE 3.2: Upper left corner of DrJava window with part magnified 600%
FIGURE 3.3: Image shown in the picture explorer: 100% image on left and 500% onright
of vision system in use in our brain and our eyes. Our system for processing coloris different than our system for processing black-and-white (or luminance). Weactually pick up luminance detail better with the sides of our eyes than the centerof our eye. That’s an evolutionary advantage since it allows you to pick out thesabertooth sneaking up on your side.
That lack of resolution in human vision is what makes it possible to digitizepictures. Animals that perceive greater details than humans (e.g., eagles or cats)may actually see the individual pixels. We break up the picture into smaller ele-ments (pixels), but there are enough of them and they are small enough that thepicture doesn’t look choppy when looked at it overall. If you can see the effectsof the digitization (e.g., lines have sharp edges, you see little rectangles in somespots), we call that pixelization—the effect when the digitization process becomesobvious.
Picture encoding is actually more complex than sound encoding. A sound isinherently linear—it progresses forward in time. A picture has two dimensions, awidth and a height.
Visible light in continuous—visible light is any wavelength between 370 and730 nanometers (0.00000037 and 0.00000073 meters). But our perception of lightis limited by how our color sensors work. Our eyes have sensors that trigger (peak)around 425 nanometers (blue), 550 nanometers (green), and 560 nanometers (red).Our brain determines what a particular color based on the feedback from these
“MAIN”2004/5/11page 49
ii
i
ii
i
Section 3.1 How Pictures are Encoded 49
three sensors in our eyes. There are some animals with only two kinds of sensors,like dogs. Those animals still do perceive color, but not the same colors nor inthe same way as humans do. One of the interesting implications of our limitedvisual sensory apparatus is that we actually perceive two kinds of orange. There isa spectral vision—a particular wavelength that is natural orange. There is also amixture of red and yellow that hits our color sensors just right that we perceive asthe same orange.
Based on how we perceive color, as long as we encode what hits our threekinds of color sensors, we’re recording our human perception of color. Thus, wewill encode each pixel as a triplet of numbers. The first number represents theamount of red in the pixel. The second is the amount of green, and the third isthe amount of blue. We can make up any human-visible color by combining red,green, and blue light (Figure 3.4) (replicated at Figure 3.42 (page 134). Combiningall three gives us pure white. Turning off all three gives us black. We call this theRGB model .
FIGURE 3.4: Merging red, green, and blue to make new colors
There are other models for defining and encoding colors besides the RGB colormodel. There’s the HSV color model which encodes Hue, Saturation, and Value.The nice thing about the HSV model is that some notions, like making a color“lighter” or “darker” map cleanly to it (e.g., you simply change the saturation).Another model is the CMYK color model , which encodes Cyan, Magenta, Yellow,and blacK (“B” could be confused with Blue). The CMYK model is what printersuse—those are the inks they combine to make colors. However, the four elementsmeans more to encode on a computer, so it’s less popular for media computation.RGB is probably the most popular model on computers.
Each color component (sometimes called a channel) in a pixel is typicallyrepresented with a single byte, eight bits. Eight bits can represent 256 values (28),which we typically use to represent the values 0 to 255. Each pixel, then, uses 24bits to represent colors. Using the same formula (224), we know that the standardencoding for color using the RGB model can represent 16,777,216 colors. There arecertainly more than 16 million colors in all of creation, but it turns out that it justdoesn’t matter—humans have no technology that comes even close to being able
“MAIN”2004/5/11page 50
ii
i
ii
i
50 Chapter 3 Encoding and Manipulating Pictures
to replicate 16 million distinct colors. Printing technology, color pictures, colormonitors—none of these technologies can represent anything close to 16 millioncolors. So, the 24 bit RGB model is just fine for most purposes.
There are computer models that use more bits per pixel. For example, thereare 32 bit models which use the extra 8 bits to represent transparency—how muchof the color “below” the given image should be blended with this color? Theseadditional 8 bits are sometimes called the alpha channel . There are other modelsthat actually use more than 8 bits for the red, green, and blue channels, and whilethey do capture (encode) more color information, we don’t usually need that muchinformation.
We actually perceive borders of objects, motion, and depth through a sep-arate vision system. We perceive color through one system, and luminance (howlight/dark things are) through another system. Luminance is not actually theamount of light, but our perception of the amount of light. We can measure theamount of light (e.g., the number of photons reflected off the color) and show thata red and a blue spot each are reflecting the same amount of light, but we’ll per-ceive the blue as darker. Our sense of luminance is based on comparisons withthe surroundings—the optical illusion in Figure 3.5 highlights this. The two endquarters are actually the same level of gray, but because the two mid quarters endin a sharp contrast of lightness and darkness, we perceive that one end is darkerthan the other.
FIGURE 3.5: The ends of this figure are the same colors of gray, but the middle twoquarters contrast sharply so the left looks darker than the right
Most tools for allowing users to pick out colors let the users specify the coloras RGB components. The Macintosh offers RGB sliders in its basic color picker(Figure 3.6). The color chooser in Java offers a similar set of sliders (Figure 3.7).
As mentioned a triplet of (0, 0, 0) (red, green, blue components) is black,and (255, 255, 255) is white. (255, 0, 0) is pure red, but (100, 0, 0) is red, too—justdarker. (0, 100, 0) is a dark green, and (0, 0, 100) is a dark blue.
When the red component is the same as the green and as the blue, the resul-tant color is gray. (50, 50, 50) would be a fairly dark gray, and (150, 150, 150) is alighter gray.
The Figure 3.8 (replicated at Figure 3.43 (page 134) in the color pages at theend of this chapter) is a representation of pixel RGB triplets in a matrix represen-tation. Thus, the pixel at (1, 0) has color (30, 30, 255) which means that it has ared value of 30, a green value of 30, and a blue value of 255—it’s a mostly bluecolor, but not pure blue. Pixel at (2, 1) has pure green but also more red and blue
“MAIN”2004/5/11page 51
ii
i
ii
i
Section 3.1 How Pictures are Encoded 51
FIGURE 3.6: The Macintosh OS X RGB color picker
FIGURE 3.7: Picking a color using RGB sliders from Java
((150, 255, 150)), so it’s a fairly light green.
Images on disk and even in computer memory are usually stored in some kindof compressed form. The amount of memory needed to represent every pixel ofeven small images is pretty large (Table 3.1). A fairly small image of 320 pixelsacross by 240 pixels wide, with 24-bits per pixel, takes up nearly 2 million bits. Acomputer monitor with 1024 pixels across and 768 pixels vertically with 32-bits perpixel takes up a whopping 25 million bits of data or over 3 million bytes of data (Abyte is 8 bits).
TABLE 3.1: Number of bits needed to store pixels at various sizes and formats
FIGURE 3.8: RGB triplets in a matrix representation
3.2 MANIPULATING PICTURES
We manipulate pictures in DrJava by making a picture object out of a JPEG file,then changing the pixels in that picture. We change the pixels by changing the colorassociated with the pixel—by manipulating the red, green, and blue components.
We make pictures using new Picture(fileName). We make the picture ap-pear with the Picture method show(). We can also explore a picture with themethod explore().
What new Picture(fileName) does is to scoop up all the bytes at the in-put filename, bring them in to memory, reformat them slightly, and place a signon them “This is a picture object!” When you execute Picture picture = new
Picture(fileName), you are saying “The name picture is referring to a Pictureobject created from the contents of the file.”
Picture objects know their width and their height. You can query them withthe methods getWidth() and getHeight().
> System.out.println(picture.getWidth());
360
> System.out.println(picture.getHeight());
181
“MAIN”2004/5/11page 53
ii
i
ii
i
Section 3.2 Manipulating Pictures 53
We can get any particular pixel from a picture using getPixel(x,y)where xand y are the coordinates of the pixel desired. The x coordinate starts at 0 at the topleft of the picture and increasing horizontally. The y coordinate starts at 0 at thetop left of the picture and increases vertically. We can also get a one-dimensionalarray containing all the pixels in the picture using the method getPixels().
> Pixel pixel = picture.getPixel(0,0);
> System.out.println(pixel);
Pixel red=255 green=255 blue=255
> Pixel[] pixels=picture.getPixels();
> System.out.println(pixels[0]);
Pixel red=255 green=255 blue=255
Pixels know where they came from. You can ask them their x and y coordi-nates with getX() and getY().
> System.out.println(pixel.getX());
0
> System.out.println(pixel.getY());
0
Each pixel knows how to getRed() and setRed(redValue). (Green and bluework similarly.)
> System.out.println(pixel.getRed());
255
> pixel.setRed(0);
> System.out.println(pixel.getRed());
0
You can ask a pixel for its color with getColor(), and you can ask the pixel toset the color with setColor(color). Color objects know their red, green, and bluecomponents. You can also create new color objects with new Color(redValue,greenValue,blueValue).The Color class also has several colors predefined that you can use. If you need acolor object that represents the color black you can use Color.black, for yellowuse Color.yellow. Other colors that are predefined are: Color.blue, Color.green,Color.red, Color.gray, Color.orange, Color.pink, Color.cyan, Color.magenta, andColor.white.
“MAIN”2004/5/11page 54
ii
i
ii
i
54 Chapter 3 Encoding and Manipulating Pictures'
&
$
%
Making it Work Tip: Importing Classes from Pack-agesColor is a Java class in the package java.awt. A package isa group of related classes. To use classes in packages otherthan java.lang (which contains System and Math) you willneed to import them. Importing a class or all classes ina package allows you to use the name of a class withoutfully qualifying it by using the package name followed by aperiod (dot) and the class name. The fully qualified namefor the Color class is java.awt.Color. You can alwaysuse the fully qualified name instead of importing but peo-ple don’t usually want to type that much. To import allclasses in the package java.awt use import java.awt.*;.To import just the Color class from the package java.awtuse import java.awt.Color;.
Debugging Tip: Undefined Class ErrorIf you get the message Error: Undefined class ’Color’it means that you didn’t import the class Color. Youmust either import classes that are in packages other thanjava.lang or fully qualify them. To import just the classColor so that you can refer to it using just the class nameuse import java.awt.Color;. If you are using severalclasses from the same package you can import all classesin a package using import java.awt.*;. You can typethe import statement in the interactions pane. When youwrite class files the import statements go before the classdefinition at the beginning of the file.
> import java.awt.Color;
> Color color=pixel.getColor();
> System.out.println(color);
java.awt.Color[r=255,g=255,b=255]
> Color newColor=new Color(0,100,0);
> System.out.println(newColor);
java.awt.Color[r=0,g=100,b=0]
> pixel.setColor(newColor);
> System.out.println(pixel.getColor());
java.awt.Color[r=0,g=100,b=0]
If you change the color of a pixel, the picture that the pixel is from does getchanged. However you won’t see the change until the picture repaints.
> System.out.println(picture.getPixel(0,0));
Pixel red=0 green=100 blue=0
“MAIN”2004/5/11page 55
ii
i
ii
i
Section 3.2 Manipulating Pictures 55
'
&
$
%
Common Bug: Seeing changes in the pictureIf you show your picture, and then change the pixels, youmight be wondering, “Where are the changes?!?” Picturedisplays don’t automatically update. If you ask the pic-ture to repaint using picture.repaint(), the picture willupdate.
One of the important things that you can do with colors is to compare them.Some recipes for manipulating pictures will do different things with pixels depend-ing on the color of the pixel. There are several ways of comparing pictures.
One way of comparing colors is the same way that one would compare num-bers. We can subtract the red, green, and blue values of two colors. If we dothat, we can create a new color whose red, green, and blue components are theamount of difference between the colors for those components. We can also usecolor1.equals(color2) to compare colors to see if they have the same red, green,and blue values. We would use the operator == to test if they are the same colorobject.
Debugging Tip: == and .equalsThe operator ’==’ tests to see if two objects are the sameobject or if two primitive types have the same value. Useobject1.equals(object2) to test if two objects have the samedata. To test if two String objects have the same charactersin them use string1.equals(string2) not (string1 ==
string2). The test string1 == string2will only be trueif both variables refer to the same String object.
> Color color1 = new Color(10,10,10);
> System.out.println(color1);
java.awt.Color[r=10,g=10,b=10]
> Color color2 = new Color(20,20,20);
> System.out.println(color2);
java.awt.Color[r=20,g=20,b=20]
> int diffRed = Math.abs(color1.getRed() - color2.getRed());
> int diffGreen = Math.abs(color1.getGreen() - color2.getGreen());
> int diffBlue = Math.abs(color1.getBlue() - color2.getBlue());
> Color colorDiff = new Color(diffRed,diffGreen,diffBlue);
> System.out.println(colorDiff);
java.awt.Color[r=10,g=10,b=10]
> System.out.println(color1.equals(color2));
false
> System.out.println(color1.equals(colorDiff));
true
> System.out.println(color1 == colorDiff);
false
Another method of comparing pictures is with a notion of color distance.
“MAIN”2004/5/11page 56
ii
i
ii
i
56 Chapter 3 Encoding and Manipulating Pictures
You often won’t care about an exact match of colors—two shades of blue might beclose enough for your purposes.
The distance between two colors is the Cartesian distance between the colorsas points in a three-dimensional space, where red, green, and blue are the threedimensions. Recall that the distance between two points (x1, y1) and (x2, y2) is:
√
(x1 − x2)2 + (y1 − y2)2
The similar measure for two colors (red1, green1, blue1) and (red2, green2, blue2)is:
You can automatically get a darker or lighter color from a current color objectwith color.darker() or color.brighter(). (Remember that this was easy inHSV, but not so easy in RGB. These functions do it for you.)
> Color testColor = new Color(168,131,105);
> System.out.println(testColor);
java.awt.Color[r=168,g=131,b=105]
> testColor = testColor.darker();
> System.out.println(testColor);
java.awt.Color[r=117,g=91,b=73]
> testColor = testColor.brighter();
> System.out.println(testColor);
java.awt.Color[r=167,g=130,b=104]
Notice that even though we darken the color and then brighten it the finalcolor doesn’t exactly match the original color. This is due to rounding errors . Arounding error is when calculations are done in floating point but the answer isstored in an integer. The floating point result can’t fit in the type of the result(integer) and so some of the detail is lost .
You can also get a color using ColorChooser.pickAColor(), which gives youa variety of ways of picking a color. ColorChooser is a class that we have createdto make it easy for you to pick colors using the Java class JColorChooser.
> import java.awt.Color;
> Color pickedColor = ColorChooser.pickAColor();
> System.out.println(pickedColor);
java.awt.Color[r=51,g=255,b=102]
When you have finished manipulating a picture, you can write it out to a filewith picture.write(fileName).
> picture.write("newPicture.jpg");�
�
�
�
Common Bug: End with .jpgBe sure to end your filename with “.jpg” in order to getyour operating system to recognize it as a JPEG file.
“MAIN”2004/5/11page 57
ii
i
ii
i
Section 3.2 Manipulating Pictures 57'
&
$
%
Common Bug: Saving a file quickly—and how tofind it again!What if you don’t know the whole path to a directory ofyour choosing? You don’t have to specify anything morethan the base name. The problem is finding the file again!In what directory did it get saved? This is a pretty simplebug to resolve. The default directory (the one you get ifyou don’t specify a path) is wherever DrJava is.
We don’t have to write new functions to manipulate pictures. We can do itfrom the command area using the functions just described.
The result showing a small black line on the left side appears in Figure 3.9.The black line is 100 pixels down, and the pixels 10 though 19 from the left edgehave been turned black.
FIGURE 3.9: Directly modifying the pixel colors via commands: Note the small blackline on the left under the leaf
“MAIN”2004/5/11page 58
ii
i
ii
i
58 Chapter 3 Encoding and Manipulating Pictures
3.2.1 Exploring pictures
On your CD, you will find the MediaTools application with documentation forhow to get it started. You can also open a picture explorer in DrJava. Both theMediaTools application and the picture explorer will let you get pixel informationfrom a picture. You saw the picture explorer in Figure 3.3 and the MediaToolsapplication appears in Figure 3.10. Both of these will display the x, y, red, green,and blue values for a pixel. They will also both let you zoom in or out.
The picture explorer can be opened on a picture object. Picture p = new
Picture(FileChooser.pickAFile());will allow you to define a picture and nameit p. You can open a picture explorer on the picture using p.explore(). The pictureexplorer will make a copy of the current picture and show it. The copy will notbe affected by any changes you make to the picture.
The picture explorer allows you to zoom at various levels of magnification, bychoosing one in the Zoom menu. As you move your cursor around in the picture,press down with the mouse button. You’ll be shown the (x, y) (horizontal, vertical)coordinates of the pixel your mouse cursor is currently over, and the red, green,and blue values at that pixel.
The MediaTools application works from files on the disk. If you want to checkout a file before loading into DrJava, use the MediaTools application. Click on thePicture Tools box in MediaTools, and the tools will open. Use the Open buttonto bring up a file selection box—you click on directories you want to explore on theleft, and images you want on the right, then click OK. When the image appears,you have several different tools available. Move your cursor over the picture andpress down with the mouse button.
• The red, green, and blue values will be displayed for the pixel you’re pointingat. This is useful when you want to get a sense of how the colors in yourpicture map to numeric red, green, and blue values. It’s also helpful if you’regoing to be doing some computation on the pixels and want to check thevalues.
• The x and y position will be display for the pixel you’re point at. This isuseful when you want to figure out regions of the screen, e.g., if you want toprocess only part of the picture. If you know the range of x and y coordinateswhere you want to process, you can tune your program to reach just thosesections.
• Finally, a magnifier is available to let you see the pixels magnified. (Themagnifier can be clicked and dragged around.)
3.3 CHANGING COLOR VALUES
The easiest thing to do with pictures is to change the color values of their pixelsby changing the red, green, and blue components. You can get radically differenteffects by simply tweaking those values. Many of Adobe Photoshop’s filters do justwhat we’re going to be doing in this section.
The way that we’re going to be manipulating colors is by computing a per-centage of the original color. If we want 50% of the amount of red in the picture,
“MAIN”2004/5/11page 59
ii
i
ii
i
Section 3.3 Changing color values 59
FIGURE 3.10: Using the MediaTools image exploration tools
we’re going to set the red channel to 0.50 times whatever it is right now. If we wantto increase the red by 25%, we’re going to set the red to 1.25 times whatever it isright now. Recall that the asterisk (*) is the operator for multiplication in Java.
3.3.1 Using loops in pictures
What we could do is to get each pixel in the picture and change its red value. Let’ssay that we want to decrease the red by 50%. We can always write code like this:
That’s pretty tedious to write, especially for all the pixels in even a smallimage. What we need is way of telling the computer to do the same thing over andover again. Well, not exactly the same thing—we want to change what’s going onin a well-defined way. We want to take one step each time, or process one additionalpixel.
We can do that with a for loop. A for loop executes a command or groupof commands in a block. A for loop continues executing until a continuation test
“MAIN”2004/5/11page 60
ii
i
ii
i
60 Chapter 3 Encoding and Manipulating Pictures
is false. Each time through the loop one or more variables can be changed.The syntax for a for loop is:
for (initialization area; continuation test; change area)
Let’s talk through the pieces here.
• First comes the required Java keyword for.
• Next we have a required opening parenthesis
• Next is the initialization area. You can declare and initialize variables here.For example, you can have int i=0 which declares a variable i of the primitivetype int and initializes it to 0. You can initialize more than one variable hereby separating the initializations with commas.
• Next comes the required semicolon.
• Next is the continuation test. This holds an expression that returns true orfalse. When this expression is true the loop will continue to be executed.When this test is false the loop will finish and the statement following theloop will be executed.
• Next comes the required semicolon.
• Next is the change area. Here you usually increment or decrement variables,such as i++ to increment i. i++ is a shorthand way of saying i = i + 1. Youcan use either i++ or i=i+1, they both will increment the value in i by 1. Thestatements in the change area actually take place after each execution of thebody of the loop.
• Next is the required closing parenthesis.
If you just want to execute one statement (command) in the body of the loopit can just follow on the next line. It is normally indented to show that it is part ofthe for loop. If you want to execute more than one statements in the body of thefor loop you will need to enclose the statements in a block (a set of open and closecurly braces).
For example, here is the for loop that simply sets each pixel’s color to blackin a picture.
> import java.awt.Color;
> Pixel[] pixels = pict.getPixels();
> for (int i=0; i<pixels.length; i++)
pixels[i].setColor(Color.black);
>pict.repaint();
Let’s talk through this code.
• We are using the Color class so we need to either use the fully qualified name(java.awt.Color) or import the Color class using import java.awt.Color;.
‘‘MAIN’’
2004/5/11
page 61
ii
i
ii
i
Section 3.3 Changing color values 61
• Next we declare a variable pixels that references an array of Pixel objects(Pixel[]). We get the array of Pixel objects by asking the picture objectfor them using the getPixels() method.
• Next we have a for loop. In the for loop initialization area a variable i isdeclared of type int and the value of it is set to 0. The continuation test willbe true as long as variable i is less than the length of the pixels array. Sincearrays are indexed starting at 0 the last element that we want to process isat index (length - 1). The change area will increment the value of i each timewe finish executing the body of the loop.
• The body of the for loop simply tells the current pixel (element of the pixelarray at index i) to set its color to the color black.
• The statement after the body of the for loop will ask the picture object torepaint so that we can see the color change.
Debugging Tip: Loops and Variable DeclarationsRemember that you can’t declare a variable more thanonce so you shouldn’t put variable declarations insideloops. Declare any variables that you will need before youstart the loop or in the initialization area of the for loop.
You don’t actually have to put loops into functions to use them. You cantype them into the command area of DrJava. However, you will need to put thewhole loop on one line.
> for (int i=0; i<pixels.length; i++) pixels[i].setColor(Color.black);
Now that we see how to get the computer to do thousands of commandswithout writing thousands of individual lines, let’s do something useful with this.
3.3.2 Increasing/decreasing red (green, blue)
A common desire when working with digital pictures is to shift the redness (orgreenness or blueness—but most often, redness) of a picture. You might shift ithigher to “warm” the picture, or to reduce it to “cool” the picture or deal withoverly-red digital cameras.
The below recipe reduces the amount of red 50% in the current picture. Ituses the variable p to stand for the pixel (where we used the variable pixel before).It doesn’t matter—the names are merely our choices.
Recipe 9: Reduce the amount of red in a picture by 50%
/**
* Method to decrease the red by half in the current picture
*/
“MAIN”2004/5/11page 62
ii
i
ii
i
62 Chapter 3 Encoding and Manipulating Pictures
public void decreaseRed()
{
Pixel[] pixels = this.getPixels();
Pixel p = null;
int value = 0;
// loop through all the pixels
for (int i = 0; i < pixels.length; i++)
{
// get the current pixel
p = pixels[i];
// get the value
value = p.getRed();
// set the red value to half what it was
p.setRed((int) (value * 0.5));
}
}
End of Recipe 9
Go ahead and type the above into your DrJava definitions pane before the lastcurly brace in the Picture.java file. Click Compile All to get DrJava to compilethe new method.'
&
$
%
Making it Work Tip: Comments in JavaYou may notice that there are some interesting charactersin the reduceRed recipe. The ’/**’ and ’//’ are commentsin Java. Comments are descriptions of what your codeis doing. Use comments to make the code easier to readand understand (not only for yourself but also for others).There are actually three kinds of comments in Java. The’//’ starts a comment and tells the computer to ignore ev-erything following till the end of the line. You can use’/*’ followed at some point by ’*/’ for a multi-line com-ment. The ’/**’ followed at some point by ’*/’ createsa JavaDoc comment. JavaDoc is a utility that pulls theJavaDoc comments from your class files and creates hy-perlinked documentation from them. All of the Java classfiles written by Sun have JavaDoc comments in them andthat is how the API documentation was created.
This recipe works on a picture object—the one that we’ll use to get the pixelsfrom. To get a picture, we need a filename then we need to make a picture fromit. After we ask the picture to decreaseRed(), we’ll want to repaint the picture to
‘‘MAIN’’
2004/5/11
page 63
ii
i
ii
i
Section 3.3 Changing color values 63
FIGURE 3.11: The original picture (left) and red-reduced version (right)
see the effect. Therefore, the decreaseRed recipe can be used like this:
Common Bug: Patience: for loops can take a longtimeThe most common bug with this kind of code is to give upand quit because you don’t think the loop is working. Itmight take a full minute (or two!) for some of the manip-ulations we’ll do—especially if your source image is large.
The original picture and its red-reduced version appear in Figure 3.11 (andat Figure 3.44 on page 135). 50% is obviously a lot of red to reduce! The picturelooks like it was taken through a blue filter.
Tracing the program: How did that work?.
Computer Science Idea: The most important skillis tracingThe most important skill that you can develop in program-ming is the ability to trace your program. (This is some-times also called stepping or walking through your program.To trace your program is to walk through it, line-by-line,and figure out what happens. Looking at a program, canyou predict what it’s going to do? You should be able toby thinking through what it does.
Let’s trace the method to reduce red and see how it worked. We want tobreak in at the point where we just called decreaseRed()
What happens now? picture.decreaseRed() really means invoking the de-creaseRed method which you have just added to the Picture.java file on the Pictureobject referred to by the variable picture.
/**
* Method to decrease the red by half in the current picture
*/
public void decreaseRed()
{
Pixel[] pixels = this.getPixels();
Pixel p = null;
int value = 0;
// loop through all the pixels
for (int i = 0; i < pixels.length; i++)
{
// get the current pixel
p = pixels[i];
// get the value
value = p.getRed();
// set the red value to half what it was
p.setRed((int) (value * 0.5));
}
}
The first line we execute is Pixel[] pixels = this.getPixels(). Let’sbreak this down.
• The Pixel[] pixels = is a declaration of a variable ’pixels’ that referencesan array of Pixel objects. The ’=’ means that the variable pixels will be ini-tialized to the result of the right side expression which is this.getPixels().
• The this is a keyword that represents the current object. Since the methoddeclaration doesn’t have the keyword static in it this is an object method.Object methods are always implicitly passed the current object (the objectthe method was invoked on). In this case the method decreaseRed() wasinvoked by picture.decreaseRed(); so the Picture object referenced by thevariable picture is the current object. We could leave off the this and getthe same result. If you don’t reference any object when invoking a methodthe compiler will assume you mean the current object (referenced by the thiskeyword).
• The this.getPixels() invokes the method getPixels() on the current ob-ject. This method returns a one-dimensional array of Pixel objects which arethe pixels in the current Picture object.
“MAIN”2004/5/11page 65
ii
i
ii
i
Section 3.3 Changing color values 65
So at the end of the first line we have a variable pixels that is referring toan array of Pixel objects. The pixel objects came from the Picture object whichwas referred to as picture in the interaction pane and as this in the methodreduceRed().
Next is a declaration of a couple of variables that we will need in the for loop.We will need something to represent the current Pixel object Pixel p = null;.We start it off referring to nothing by using the keyword null. We also will needa variable to hold the current red value and we declare that as int value = 0;.We initialize the variable ’value’ to be 0. Variables that you declare inside methodsare not automatically initialized for you so you should initialize them when youdeclare them.
Computer Science Idea: ScopeThe names inside a method like p and value are completelydifferent than the names in the Command Area or anyother method. We say that they have a different scope.The scope of a variable is the area of a program in whichthe variable is known. The variables that we declare insideof a method are only known from where they are declareduntil the end of the method. Variables declared in theinitialization area of a for loop are only known until theend of the body of the for loop.
Next comes the for loop for (int i = 0; i < pixels.length; i++). Thisdeclares a variable i of the type int and initializes it to 0. It tests that the valueof i is less that the length of the pixels array and if so will execute the statementsin the body of the loop.
In the body of the loop we have p = pixels[i];. This will set the p variableto point to a Pixel object in the pixels array with an index equal to the current
“MAIN”2004/5/11page 66
ii
i
ii
i
66 Chapter 3 Encoding and Manipulating Pictures
value of i. Since i is initialized to 0 in the for loop the first time through this loopthe pixel variable will point to the first Pixel object in the pixels array.
Next in the body of the loop is value = p.getRed();. This sets the variablevalue to the amount of red in the current pixel.
Next in the body of the loop is p.setRed((int) (value * 0.5));. Thischanges the amount of red in the pixel to half of its original value. The (int)
(value * 0.5) is needed because the variable value is declared of type int andyet the calculation of (value * 0.5) contains a floating point number and so willautomatically be done in floating point. However, a floating point result (say of 1.5)won’t fit into a variable of type int. So, the compiler won’t let us do this withouttelling it that we really want it to by including the (int). This is called castingand is required whenever a larger value is being placed into a smaller variable. Soif the result of the multiplication has a fractional part that fractional part will justbe thrown away so that the result can fit in an int.
After the statements in the body of the loop are executed the i++ will beexecuted which will add one to the current value of i. The value of i will change to1.
What happens next is very important. The loop starts over again. Thecontinuation test will check that the value in i is less than the length of the pixelsarray and since the value of i is less the statements in the body of the loop will beexecuted again. The variable p will be set to the pixel object in the pixels array atindex 1.
“MAIN”2004/5/11page 67
ii
i
ii
i
Section 3.3 Changing color values 67
The value variable is updated to get the red value for the pixel pointed toby p (this happens to have the same value as the previous pixel but it could havechanged).
The red value for the pixel pointed to by p will be changed to 50% the originalvalue.
At the end of each loop body the commands in the change area will be executedagain (so the value in i will increment). Next, the continuation test will be evaluatedand if the result is true the commands in the loop body will be executed again.If the continuation test evaluates to false execution will continue with the firststatement after the body of the loop.
Eventually, we get Figure 3.11 (and at Figure 3.44 on page 135). We keepgoing through all the pixels in the sequence and changing all the red values.
Testing the program: Did that really work?.
How do we know that that really worked? Sure, something happened to thepicture, but did we really decrease the red? By 50%?'
&
$
%
Making it Work Tip: Don’t just trust your pro-grams!It’s easy to mislead yourself that your programs worked.After all, you told the computer to do a particular thing,you shouldn’t be surprised if the computer did what youwanted. But computers are really stupid—they can’t fig-ure out what you want. They only do what you tell them.It’s pretty easy to get it almost right. Actually check.
We can check it several ways. One way is with the picture explorer. Create twopicture objects: Picture p = new Picture(FileChooser.pickAFile()); and Picture
‘‘MAIN’’
2004/5/11
page 68
ii
i
ii
i
68 Chapter 3 Encoding and Manipulating Pictures
FIGURE 3.12: Using the picture explorer to convince ourselves that the red wasdecreased
p2 = new Picture(FileChooser.pickAFile()); and pick the same picture eachtime. Decrease red in one of them. Then open a picture explorer on each of thepicture objects using p.explore(); and p2.explore();.
We can also use the functions that we know in the Command Area to checkthe red values of individual pixels.
Increasing red.Let’s increase the red in the picture now. If multiplying the red component
by 0.5 reduced it, multiplying it by something over 1.0 should increase it. I’m goingto apply the increase to the exact same picture, to see if we can reduce the blue(Figure 3.13 and Figure 3.45).
Recipe 10: Increase the red component by 30%
/**
* Method to increase the amount of red by 1.3
*/
public void increaseRed()
{
Pixel[] pixels = this.getPixels();
Pixel pixel = null;
int value = 0;
‘‘MAIN’’
2004/5/11
page 69
ii
i
ii
i
Section 3.3 Changing color values 69
FIGURE 3.13: Overly blue (left) and red increased by 30% (right)
// loop through all the pixels
for (int i = 0; i < pixels.length; i++)
{
// get the current pixel
pixel = pixels[i];
// get the value
value = pixel.getRed();
// set the red value to 1.3 times what it was
pixel.setRed((int) (value * 1.3));
}
}
End of Recipe 10
We can even get rid of a color completely. The below recipe erases the bluecomponent from a picture by setting the blue value to 0 in all pixels(Figure 3.14and Figure 3.46).
Recipe 11: Clear the blue component from a picture
/**
* Method to clear the blue from the picture (set
* the blue to 0 for all pixels)
*/
public void clearBlue()
{
Pixel[] pixels = this.getPixels();
Pixel pixel = null;
// loop through all the pixels
‘‘MAIN’’
2004/5/11
page 70
ii
i
ii
i
70 Chapter 3 Encoding and Manipulating Pictures
FIGURE 3.14: Original (left) and blue erased (right)
for (int i = 0; i < pixels.length; i++)
{
// get the current pixel
pixel = pixels[i];
// set the blue on the pixel to 0
pixel.setBlue(0);
}
}
End of Recipe 11
3.3.3 Creating a sunset
We can certainly do more than one picture manipulation at once. One that I wantedto do was to try to generate a sunset out of a beach scene. My first attempt was toincrease the red, but that doesn’t work. Some of the red values in a given pictureare pretty high. If you go past 255 for a channel value, you wrap-around. If yousetRed of a pixel to 256, you’ll actually get zero! So, increasing red created brightblue-green (no red) spots.
My second thought was that maybe what happens in a sunset is that there isless blue and green, thus emphasizing the red, without actually increasing it. Herewas the program that I wrote for that:
Recipe 12: Making a sunset
/**
* Method to simulate a sunset by reducing the green and blue
*/
public
public void makeSunset()
{
“MAIN”2004/5/11page 71
ii
i
ii
i
Section 3.3 Changing color values 71
FIGURE 3.15: Original beach scene (left) and at (fake) sunset (right)
Pixel[] pixels = this.getPixels();
Pixel pixel = null;
int value = 0;
// loop through all the pixels
for (int i = 0; i < pixels.length; i++)
{
// get the current pixel
pixel = pixels[i];
// change the blue value
value = pixel.getBlue();
pixel.setBlue((int) (value * 0.7));
// change the green value
value = pixel.getGreen();
pixel.setGreen((int) (value * 0.7));
}
}
End of Recipe 12
What we see happening in Recipe 12 is that we’re changing both the blueand green channels—reducing each by 30%. The effect works pretty well, as seenin Figure 3.15 (and in the color section at Figure 3.47).
3.3.4 Making sense of methods
You probably have lots of questions about methods at this point. Why did wewrite these methods in this way? How is that we’re reusing variable names likepixel in both the method and Command Area? Are there other ways to writethese methods? Is there such a thing as a better or worse method?
Since we’re always picking a file (or typing in a filename) then making a pic-ture, before calling one of our picture manipulation functions, and then showing or
‘‘MAIN’’
2004/5/11
page 72
ii
i
ii
i
72 Chapter 3 Encoding and Manipulating Pictures
repainting the picture, it’s a natural question why we’re not building those in. Whydoesn’t every method have String fileName = FileChooser.pickAFile(); andnew Picture(fileName); in it?
We actually want to write the methods to make them more general andreusable. We want our methods to do one and only one thing, so that we canuse the method again in a new context where we need that one thing done. An ex-ample might make that clearer. Consider the recipe to make a sunset (Recipe 12).That works by reducing the green and blue, each by 30%. What if we rewrote thatmethod so that it called two smaller methods that just did the two pieces of themanipulation? We’d end up with something like Recipe 13.
Recipe 13: Making a sunset as three methods
/**
* Method to reduce the green in the picture by 30%
*/
public void reduceGreen()
{
Pixel[] pixels = this.getPixels();
Pixel pixel = null;
int value = 0;
// loop through all the pixels
for (int i = 0; i < pixels.length; i++)
{
// get the current pixel
pixel = pixels[i];
// get the value
value = pixel.getGreen();
// set the green value to 70% of what it was
pixel.setGreen((int) (value * 0.7));
}
}
/**
* Method to reduce the blue in the picture by 30%
*/
public void reduceBlue()
{
Pixel[] pixels = this.getPixels();
Pixel pixel = null;
int value = 0;
“MAIN”2004/5/11page 73
ii
i
ii
i
Section 3.3 Changing color values 73
// loop through all the pixels
for (int i = 0; i < pixels.length; i++)
{
// get the current pixel
pixel = pixels[i];
// get the value
value = pixel.getBlue();
// set the blue value to 70% of what it was
pixel.setBlue((int) (value * 0.7));
}
}
/**
* Method to make a picture look like it was taken at sunset
* by reducing the blue and green to make it look more red
*/
public void makeSunset()
{
reduceGreen();
reduceBlue();
}
End of Recipe 13
The first thing to note is that this actually does work. makeSunset() does thesame thing here as in the previous recipe. It’s perfectly okay to have one method(makeSunset() in this case) use other methods in the same class (reduceBlue()and reduceGreen()). You use makeSunset() just as you had before. It’s the samerecipe (it tells the computer to do the same thing), but with different methods.The earlier recipe did everything in one method, and this one does it in three.In fact, you can also use reduceBlue() and reduceGreen()—make a picture inthe Command Area and pass it as input to either of them. They work just likedecreaseRed().
What’s different is that the function makeSunset() is much simpler to read.That’s very important.
“MAIN”2004/5/11page 74
ii
i
ii
i
74 Chapter 3 Encoding and Manipulating Pictures
Computer Science Idea: Programs are for people.Computers don’t care about how a program looks. Pro-grams are written to communicate with people. Makingprograms easy to read and understand means that they aremore easily changed and reused, and they more effectivelycommunicate process to other humans. Notice that firstwe had a method called decreaseRed() that reduced thered in the picture by 50% Later we added reduceBlue()
that reduced the blue in the picture by 30%. Wouldn’t itbe better to use similar names for methods that do sim-ilar things? We could rename the method that reducedthe red as reduceRed(). What about the differences inthe amount of reduction? Should we call the method thatreduces the red 50% reduceRed50Percent?
What if we had written reduceBlue() and reduceGreen() so that each askedyou to pick a file and created the picture before changing the color. We would beasked for the picture twice—once in each function. Because we wrote these functionsto only reduce the blue and reduce the green (“one and only one thing”), we canuse them in new functions like makeSunset()1
Now, let’s say that we asked you to pick a picture and created the picture inmakeSunset() before calling the other methods. The methods reduceBlue() andreduceGreen() are completely flexible and reusable again. But makeSunset() isnow less flexible and reusable. Is that a big deal? No, not if you only care abouthaving the ability to give a sunset look to a single picked picture. But what if youlater want to build a movie with a few hundred frames, to each of which you wantto add a sunset look? Do you really want to pick out each of those few hundredframes? Or would you rather write a method to go through each of the frames(which we’ll learn how to do in a few chapters) and send each of these pictures themessage makeSunset(). That’s why we make methods general and reusable—younever know when you’re going to want to use that method again, in a larger context.
1There is an issue that the new makeSunset() will take twice as long to finish as the original
one, since every pixel gets changed twice. We address that issue in a later chapter on speed and
complexity. The important issue is still to write the code readably first, and worry about efficiency
later.
‘‘MAIN’’
2004/5/11
page 75
ii
i
ii
i
Section 3.3 Changing color values 75'
&
$
%
Making it Work Tip: Don’t start by trying to writeapplicationsThere’s a tendency for new programmers to want to writecomplete applications that a non-technical user can use.You might want to write a makeSunset() application thatgoes out and fetches a picture for a user and generates asunset for them. Building good user interfaces that anyonecan use is hard work. Start out more slowly. It’s hardenough to make a method just operates on a picture. Youcan work on user interfaces later.
We could also write these functions with explicit filenames, by saying at thebeginning of one of the programs:
String fileName = "C:/intro-prog-java/mediasources/catapillarClipart.jpg";)That way, we wouldn’t get prompted for a file each time. But then the
methods only work for the one file, and if we want them to work for some other file,we have to modify the function. Do you really want to change the method eachtime you use it? It’s easier to leave the method alone, and change the picture thatyou use to invoke the method.
Of course, we could change any of our methods to be handed a filename ratherthan a picture. For example, we could write:
/**
* Method to create a picture from the passed file name and
* reduce the green in it
* @param fileName the name of the file to create the picture from
* @return the created picture
*/
public static void reduceGreen(String fileName)
{
Picture picture = new Picture(fileName);
Pixel[] pixels = picture.getPixels();
Pixel pixel = null;
int value = 0;
// loop through all the pixels
for (int i = 0; i < pixels.length; i++)
{
// get the current pixel
pixel = pixels[i];
// get the value
value = pixel.getGreen();
// set the green value to 70% of what it was
pixel.setGreen((int) (value * 0.7));
}
“MAIN”2004/5/11page 76
ii
i
ii
i
76 Chapter 3 Encoding and Manipulating Pictures
}
/**
* Method to create a picture and reduce the blue in it
* @param fileName the name of the file to use to create the picture
* @return the created picture
*/
public static void reduceBlue(String fileName)
{
Picture picture = new Picture(fileName);
Pixel[] pixels = picture.getPixels();
Pixel pixel = null;
int value = 0;
// loop through all the pixels
for (int i = 0; i < pixels.length; i++)
{
// get the current pixel
pixel = pixels[i];
// get the value
value = pixel.getBlue();
// set the blue value to 70% of what it was
pixel.setBlue((int) (value * 0.7));
}
}
/**
* Method to simulate a sunset by reducing the green and blue
* @param fileName the name of the file to use
*/
public static void makeSunset(String fileName)
{
reduceGreen(fileName);
reduceBlue(fileName);
}
Notice that the methods are now class methods (because they have the statickeyword in the method declarations). They are class methods because they nolonger operate on the current picture object. Instead they create a picture objectinside the method and work on that.
Is this better or worse than the code we saw before? At some level, it doesn’tmatter – we can work with pictures or filenames, whichever makes more sense tous. The filename version does have several disadvantages, though. For one, itdoesn’t work—the picture object gets made in each of reduceGreen(fileName)
and reduceBlue(fileName), but then it doesn’t get saved, so it gets lost at the
‘‘MAIN’’
2004/5/11
page 77
ii
i
ii
i
Section 3.3 Changing color values 77
end of the function. We could fix that by saving the file out to disk after we’re donewith each method, but then the functions are doing more than “one and only onething.” There’s also the inefficiency of making the picture twice, and if we were toadd in the saving, saving the picture twice. Again, the best functions do “one andonly one thing.” Also in doing object-oriented programming the idea is to createobjects and have the objects do the work. It isn’t a good idea put most of the workinto class methods.
Even larger methods, like makeSunset(), do “one and only one thing.” makeSunset()
makes a sunset-looking picture. It does that by reducing green and reducing blue.It calls two other methods to do that. What we end up with is a hierarchy ofgoals—the “one and only one thing” that is being done. makeSunset() does itsone thing, by asking two other methods to do their one thing. We call this hi-erarchical decomposition (breaking down a problem into smaller parts, and thenbreaking down those smaller parts until you get something that you can easily pro-gram), and it’s very powerful for creating complex programs out of pieces that youunderstand.
Names in methods are completely separate from names in the interactionspane. The only way to get any data (pictures, sounds, filenames, numbers) fromthe interactions pane into a function is by passing it in as input to the function.Within the function, you can use any names you want–names that you first definewithin the method (like pixel in the last example) or names that you use to standfor the input data (like fileName) only exist while the method is running. Whenthe method is done, those variable names literally do not exist anymore.
This is really an advantage. Earlier, we said that naming is very importantto computer scientists: We name everything, from data to methods to classes. Butif each name could mean one and only one thing ever, we’d run out of names. Innatural language, words mean different things in different contexts (e.g., “What doyou mean?” and “You are being mean!”.) A method is a different context—namescan mean something different than they do outside of that method.
Sometimes, you will compute something inside a method that you want toreturn to the interactions pane or to a calling method. We’ve already seen methodsthat output a value, like FileChooser.pickAFile() which outputs a filename. Ifyou did a new Picture(fileName) inside a method, you might want to output thepicture object that you created inside the function. You can do that by using thereturn keyword, which we’ll talk more about later.
The name that you give to a method’s input can be thought of as a placeholder .Whenever the placeholder appears, imagine the input data appearing instead. So,in a method like:
/**
* Method to simulate a sunset by reducing the green and blue
* @param fileName the name of the file to use
*/
public static void makeSunset(String fileName)
{
reduceGreen(fileName);
reduceBlue(fileName);
‘‘MAIN’’
2004/5/11
page 78
ii
i
ii
i
78 Chapter 3 Encoding and Manipulating Pictures
}
We are going to call makeSunset()with a statement like // makeSunset("C:/intro-prog-java/mediasources/catWhatever string is in // makeSunset("C:/intro-prog-java/mediasources/catapillarClipart.jpg")becomes known as fileName while makeSunset() is running.
We’ve now talked about different ways of writing the same method—somebetter, some worse. There are others that are pretty much equivalent, and othersthat are much better. Let’s consider a few more ways that we can write methods.
We can pass in more than input at a time. Consider this version of decreaseRed:
/**
* Method to decrease the red by an amount
* @param amount the amount to change the red by
*/
public void decreaseRed(double amount)
{
Pixel[] pixels = this.getPixels();
Pixel pixel = null;
int value = 0;
// loop through all the pixels
for (int i = 0; i < pixels.length; i++)
{
// get the current pixel
pixel = pixels[i];
// get the value
value = pixel.getRed();
// set the red value to the original value times the passed amount
pixel.setRed((int) (value * amount));
}
}
We would use this one by saying something like myPicture.decreaseRed(0.25).That particular use would reduce the red by 75%. We could say myPicture.decreaseRed(1.25)
and increase red by 25%. Perhaps this function should be better named changeRed,because that’s what it is now—a general way of changing the amount of red forevery pixel in a picture. That’s a pretty useful and powerful function.
Recall seeing in Recipe 11 this code:
/**
* Method to clear the blue from the picture (set
* the blue to 0 for all pixels)
*/
public void clearBlue()
{
Pixel[] pixels = this.getPixels();
‘‘MAIN’’
2004/5/11
page 79
ii
i
ii
i
Section 3.3 Changing color values 79
Pixel pixel = null;
// loop through all the pixels
for (int i = 0; i < pixels.length; i++)
{
// get the current pixel
pixel = pixels[i];
// set the blue on the pixel to 0
pixel.setBlue(0);
}
}
We could also write that same recipe like this:
/**
* Method to clear the blue from the picture (set
* the blue to 0 for all pixels)
*/
public void clearBlue()
{
Pixel[] pixels = this.getPixels();
// loop through all the pixels
for (int i = 0; i < pixels.length; i++)
pixels[i].setBlue(0);
}
It’s important to note that this function achieves the exact same thing as theearlier recipe did. Both set the blue channel of all pixels to zero. An advantage ofthe second method is that it is shorter and doesn’t require a variable declarationfor a pixel. However, it may be harder for someone to understand. A shorter recipeisn’t necessarily better.
3.3.5 Lightening and darkening
To lighten or darken a picture is pretty simple. It’s the same pattern as we sawpreviously, but instead of changing a color component, you change the overall color.Here’s lightening and then darkening as recipes. Figure 3.16 (Figure 3.48) showsthe lighter and darker versions of the original picture seen earlier.
Recipe 14: Lighten the picture
/**
* Method to lighten the colors in the picture
*/
‘‘MAIN’’
2004/5/11
page 80
ii
i
ii
i
80 Chapter 3 Encoding and Manipulating Pictures
public void lighten()
{
Pixel[] pixels = this.getPixels();
Color color = null;
Pixel pixel = null;
// loop through all the pixels
for (int i = 0; i < pixels.length; i++)
{
// get the current pixel
pixel = pixels[i];
// get the current color
color = pixel.getColor();
// get a lighter color
color = color.brighter();
// set the pixel color to the lighter color
pixel.setColor(color);
}
}
End of Recipe 14
Recipe 15: Darken the picture
/**
* Method to darken the color in the picture
*/
public void darken()
{
Pixel[] pixels = this.getPixels();
Color color = null;
Pixel pixel = null;
// loop through all the pixels
for (int i = 0; i < pixels.length; i++)
{
// get the current pixel
pixel = pixels[i];
// get the current color
‘‘MAIN’’
2004/5/11
page 81
ii
i
ii
i
Section 3.3 Changing color values 81
color = pixel.getColor();
// get a darker color
color = color.darker();
// set the pixel color to the darker color
pixel.setColor(color);
}
}
End of Recipe 15
FIGURE 3.16: Lightening and darkening of original picture
3.3.6 Creating a negative
Creating a negative image of a picture is much easier than you might think at first.Let’s think it through. What we want is the opposite of each of the current valuesfor red, green, and blue. It’s easiest to understand at the extremes. If we have ared component of 0, we want 255 instead. If we have 255, we want the negative tohave a zero.
Now let’s consider the middle ground. If the red component is slightly red(say, 50), we want something that is almost completely red—where the “almost”is the same amount of redness in the original picture. We want the maximum red(255), but 50 less than that. We want a red component of 255 − 50 = 205. Ingeneral, the negative should be 255 − original. We need to compute the negativeof each of the red, green, and blue components, then create a new negative color,and set the pixel to the negative color.
Here’s the recipe that does it, and you can see even from the grayscale imagethat it really does work (Figure 3.17 and Figure 3.49).
Recipe 16: Create the negative of the original picture
Converting to grayscale is a fun recipe. It’s short, not hard to understand, and yethas such a nice visual effect. It’s a really nice example of what one can do easilyyet powerfully by manipulating pixel color values.
Recall that the resultant color is gray whenever the red component, greencomponent, and blue component have the same value. That means that our RGBencoding supports 256 levels of gray from, (0, 0, 0) (black) to (1, 1, 1) through(100, 100, 100) and finally (255, 255, 255). The tricky part is figuring out whatthe replicated value should be.
‘‘MAIN’’
2004/5/11
page 83
ii
i
ii
i
Section 3.3 Changing color values 83
What we want is a sense of the intensity of the color. It turns out that it’spretty easy to compute: We average the three component colors. Since there arethree components, the formula for intensity is:
(red+green+blue)3
This leads us to the following simple recipe and Figure 3.18 (and Figure 3.50on page 136).
Recipe 17: Convert to grayscale
/**
* Method to change the picture to gray scale
*/
public void grayscale()
{
Pixel[] pixels = this.getPixels();
Pixel pixel = null;
int intensity = 0;
// loop through all the pixels
for (int i = 0; i < pixels.length; i++)
{
// get the current pixel
pixel = pixels[i];
// compute the intensity of the pixel (average value)
This is an overly simply notion of grayscale. Below is a recipe that takes intoaccount how the human eye perceives luminance. Remember that we consider blueto be darker than red, even if there’s the same amount of light reflected off. So, weweight blue lower, and red more, when computing the average.
Recipe 18: Convert to grayscale with more careful control of luminance
“MAIN”2004/5/11page 84
ii
i
ii
i
84 Chapter 3 Encoding and Manipulating Pictures
FIGURE 3.18: Color picture converted to grayscale
/**
* Method to change the picture to gray scale with luminance
*/
public void grayscaleWithLuminance()
{
Pixel[] pixels = this.getPixels();
Pixel pixel = null;
int luminance = 0;
double redValue = 0;
double greenValue = 0;
double blueValue = 0;
// loop through all the pixels
for (int i = 0; i < pixels.length; i++)
{
// get the current pixel
pixel = pixels[i];
// get the corrected red, green, and blue values
redValue = pixel.getRed() * 0.299;
greenValue = pixel.getGreen() * 0.587;
blueValue = pixel.getBlue() * 0.114;
// compute the intensity of the pixel (average value)
We can only get so far in our image processing with getPixels() before we needto know where a pixel is. For example, if we want to process only some of the pixelsin a picture (say, just the red in someone’s eyes, but not the red in her dress), weneed to control which pixels we’re manipulating.
3.4.1 Looping across the pixels with a nested loop
Unlike sounds and samples (as we’ll see later), we can’t use just a single for loopif we want to address every pixel. We have to use two for loops—one to movehorizontally across the pixels, and the other to move vertically to get every pixel.The function getPixels() did this inside itself, to make it easier to write simplepicture manipulations. But if you want to access each individual pixel, you’ll needto use two loops, one for each dimension of the picture. The inner loop will benested inside the outer loop, literally, inside its block.
Your loops will look something like this:
// loop through the columns (x direction)
for (int x = 0; x < getWidth(); x++)
{
// loop through the rows (y direction)
for (int y = 0; y < getHeight(); y++)
{
// get the current pixel
pixel = getPixel(x,y);
// do something to the color
// set the new color
pixel.setColor(aColor);
}
}
For example, here’s Recipe 14 (page 79), but using explicit pixel references.
Recipe 19: Lighten the picture using nested loops
/**
* Method to lighten the colors in the picture
*/
public void lighten()
{
“MAIN”2004/5/11page 86
ii
i
ii
i
86 Chapter 3 Encoding and Manipulating Pictures
Color color = null;
Pixel pixel = null;
// loop through the columns (x direction)
for (int x = 0; x < getWidth(); x++)
{
// loop through the rows (y direction)
for (int y = 0; y < getHeight(); y++)
{
// get pixel at the x and y location
pixel = getPixel(x,y);
// get the current color
color = pixel.getColor();
// get a lighter color
color = color.brighter();
// set the pixel color to the lighter color
pixel.setColor(color);
}
}
}
End of Recipe 19
Let’s walk through (trace) how it would work. Imagine that we just executedpicture.lighten().
1. picture.lighten() maps to the object method in the Picture class publicvoid lighten(). The method is implicitly passed the current picture object(you can refer to the current picture object using the keyword this).
2. java.awt.Color color = null; and Pixel pixel = null; declare the vari-ables color (an object of the Color class) and pixel (an object of the Pixelclass). Both of these are initialized to null (not referring to any object yet).These variables will be needed when we are looping through the pixels. Wecould declare these in the for loop but then they would be redeclared eachtime through the loop. We can declare them once before the loop and reusethem each time through the loop.
3. for (int x = 0; x < getWidth(); x++) declares a variable x of type int
which will be initialized to 0 and then a check will be made to see if x is lessthan the width of the current picture object. If x is less than the width thenthe body of this for loop will be executed. After the body of the loop hasbeen executed one time the value in x will be incremented and the continuationcondition will be tested again.
4. for (int y = 0; y < getHeight(); y++)This declares a variable y of type
‘‘MAIN’’
2004/5/11
page 87
ii
i
ii
i
Section 3.4 Copying pixels 87
int which will be initialized to 0. The continuation condition checks that y
is less than the height of the current picture object. If y is less than theheight then the body of this for loop will be executed. After the body hasexecuted the value in y will be incremented and the continuation conditionwill be tested again.
5. pixel = getPixel(x,y); This sets the variable pixel to refer to the Pixelobject at the given x and y location in the picture.
6. color = pixel.getColor(); This sets the variable color to refer to theColor object at the current pixel.
7. color = color.brighter(); This creates a new lighter (brighter) color ob-ject based on the original color object and sets the variable color to refer tothat new color object.
8. pixel.setColor(color);This sets the current pixel’s color to be the lightercolor.
9. Each time we reach the end of the inner for loop the y value will be incrementedby 1 and then the value of y will be compared to the height of the picture. Ifthe value of y is less than the height the statements in the body of the loopwill be executed again. If the value of y is equal or greater than the heightthen execution will move to the next statement (the outer loop).
10. Each time we reach the end of the outer for loop the x value will be incre-mented by 1 and then the value of x will be compared to the width of thepicture. If the x value is less than the width of the picture the commands inthe loop body will be executed. If the value of x is equal or greater than thewidth of the picture then execution will continue at the statement followingthe body of the loop.
3.4.2 Mirroring a picture
Let’s start out with an interesting effect that is only occasionally useful, but it isfun. Let’s mirror a picture along its vertical axis. In other words, imagine thatyou have a mirror, and you place it on a picture so that the left side of the pictureshows up in the mirror. That’s the effect that we’re going to implement. We’ll doit in a couple of different ways.
First, let’s think through what we’re going to do. We’ll pick a horizontalmirrorPoint—halfway across the picture, (int) (picture.getWidth()/2). (Wewant this to be an integer, a whole number, so we’ll apply (int) to it.) We’ll havethe x value increment from 1 to the mirrorPoint. At each value of x, we want tocopy the color at the pixel x pixels to the left of the mirrorPoint to the pixel xpixels to the right of the mirrorPoint. The left would be mirrorPoint-x and theright would be mirrorPoint+x. Take a look at Figure 3.19 to convince yourselfthat we’ll actually reach every pixel using this scheme. Here’s the actual recipe.
Recipe 20: Mirror pixels in a picture along a vertical line
/**
“MAIN”2004/5/11page 88
ii
i
ii
i
88 Chapter 3 Encoding and Manipulating Pictures
a b c d e
mirrorpointmirrorpoint-1 mirrorpoint+1
FIGURE 3.19: Once we pick a mirror point, we can just walk x halfway and sub-tract/add to the mirror point
* Method to mirror around a vertical line in the middle of the picture
* based on the width
*/
public void mirrorVertical()
{
int mirrorPoint = (int) (getWidth() / 2);
Pixel leftPixel = null;
Pixel rightPixel = null;
// loop through the rows
for (int y = 0; y < getHeight(); y++)
{
// loop from 1 to just before the mirror point
for (int x = 1; x < mirrorPoint; x++)
{
leftPixel = getPixel((mirrorPoint - x), y);
rightPixel = getPixel((mirrorPoint + x), y);
rightPixel.setColor(leftPixel.getColor());
}
}
}
End of Recipe 20
We’d use it like this, and the result appears in Figure 3.20.
Another way to code this would be to copy the colors for the pixels startingwith the left-most x (x=0) into the right-most pixel (width - 1). To do this copyhave x range from 0 to less than the mirrorPoint and copy it to (width - 1 - x).
“MAIN”2004/5/11page 89
ii
i
ii
i
Section 3.4 Copying pixels 89
FIGURE 3.20: Original picture (left) and mirrored along the vertical axis (right)
* Method to mirror around a horizontal line in the middle based
* on the height. It copies the top mirrored to the bottom
*/
public void mirrorHorizontal()
{
int mirrorPoint = (int) (getHeight() / 2);
Pixel topPixel = null;
Pixel bottomPixel = null;
// loop through the columns
for (int x=0; x < getWidth(); x++)
{
// loop from 1 to just before the mirror point
for (int y=1; y < mirrorPoint; y++)
{
topPixel = getPixel(x,(mirrorPoint - y));
bottomPixel = getPixel(x,(mirrorPoint + y));
bottomPixel.setColor(topPixel.getColor());
}
}
}
‘‘MAIN’’
2004/5/11
page 90
ii
i
ii
i
90 Chapter 3 Encoding and Manipulating Pictures
End of Recipe 21
Now this last recipe copies from the top of the picture onto the bottom (seeFigure 3.21). You can see that we’re getting the color from topPixel which is frommirrorPoint - y–that will always be above mirrorPoint since smaller values of yare nearer the top of the picture. To copy from the bottom up, simply change thecolor at the top pixel to the color of the bottom pixel. (Figure 3.21).
* Method to mirror around a horiztonal line in the middle
* based on the height of the picture. It copies the bottom
* to the top.
*/
public void mirrorHorizontalBottomToTop()
{
int mirrorPoint = (int) (getHeight() / 2);
Pixel topPixel = null;
Pixel bottomPixel = null;
// loop through the columns
for (int x=0; x < getWidth(); x++)
{
// loop from 1 to just before the mirror point
for (int y=1; y < mirrorPoint; y++)
{
topPixel = getPixel(x,(mirrorPoint - y));
bottomPixel = getPixel(x,(mirrorPoint + y));
topPixel.setColor(bottomPixel.getColor());
}
}
}
public void mirrorHorizontalBottomToTop()
{
int mirrorPoint = (int) (getHeight() / 2);
Pixel topPixel = null;
Pixel bottomPixel = null;
// loop through the columns
for (int x=0; x < getWidth(); x++)
{
// loop from 1 to just before the mirror point
for (int y=1; y < mirrorPoint; y++)
‘‘MAIN’’
2004/5/11
page 91
ii
i
ii
i
Section 3.4 Copying pixels 91
{
topPixel = getPixel(x,(mirrorPoint - y));
bottomPixel = getPixel(x,(mirrorPoint + y));
topPixel.setColor(bottomPixel.getColor());
}
}
}
End of Recipe 22
FIGURE 3.21: Santa mirrored horizontally, bottom to top (left) and top to bottom(right)
Mirroring usefully.While mirroring is probably mostly used for interesting effects, occasionally
it has some more serious (but still fun!) purposes. I took a picture of the Templeof Zeus in the ancient agora in Athens, Greece, when traveling to a conference(Figure 3.22). By sheer luck, I got the pediment dead horizontal. The Temple ofZeus had its pediment damaged. I wondered if I could “fix” it by mirroring thegood part onto the broken part.
I used the picture explorer to figure out the range of values where I wouldneed to do the mirroring and the point where I should mirror (Figure 3.23). Thefunction I wrote to do the repair is below, and the final picture is in (Figure 3.24)–itworked pretty well! Of course, it is possible to tell that it was digitally manipulated.For example, if you check the shadows, you can see that the sun must have beenon the left and the right at the same time.
Recipe 23: Mirror the Temple of Zeus
‘‘MAIN’’
2004/5/11
page 92
ii
i
ii
i
92 Chapter 3 Encoding and Manipulating Pictures
FIGURE 3.22: Temple of Zeus from the ancient agora in Athens, Greece
FIGURE 3.23: Coordinates where we need to do the mirroring
/**
* Method to mirror the piedmont of the temple
* @return the corrected picture
*/
public static Picture mirrorTemple()
{
Picture picture = new Picture(getMediaPath("temple.jpg"));
In this recipe, we’re using Picture.getMediaPath(fileName). The func-tion Picture.getMediaPath(fileName) is a shorthand. If you keep your mediain one place, and you’d like to refer to it just by its base name, you can usePicture.getMediaPath(fileName), which actually just generates a complete pathfor you. However, before you use it you should Picture.setMediaPath(directory)
first!. Picture.setMediaPath(directory) lets you specify that place (directory)where you store your media. Picture.setMediaPath(directory) tells Picture.getMediaPath(fileName)what directory to use to construct the full path name.
FIGURE 3.24: The manipulated temple
The temple example is a good one to ask ourselves about. If you reallyunderstand, you can answer questions like “What’s the first pixel to be mirroredin this function?” and “How many pixels get copied anyway?” You should be ableto figure these out by thinking through the program–pretend you’re the computerand execute the program in your mind.
“MAIN”2004/5/11page 94
ii
i
ii
i
94 Chapter 3 Encoding and Manipulating Pictures
If that’s too hard, you can insert System.out.println() statements, likethis:
/**
* Method to mirror the piedmont of the temple
* @return the corrected picture
*/
public static Picture mirrorTemple()
{
Picture picture = new Picture(getMediaPath("temple.jpg"));
int mirrorPoint = 276;
int lengthToCopy = mirrorPoint - 13;
Pixel leftPixel = null;
Pixel rightPixel = null;
// loop through the columns
for (int x = 1; x < lengthToCopy; x++)
{
// loop through the rows
for (int y = 27; y < 97; y++)
{
System.out.print("Copying color from " + (mirrorPoint - x) + "," + y);
When we run this version, it takes a long time to finish. Hit Reset after alittle bit since we only really care about the first few pixels. Here’s what I got:
> Picture.mirrorTemple();
Copying color from 275,27 to 277,27
Copying color from 275,28 to 277,28
Copying color from 275,29 to 277,29
Copying color from 275,30 to 277,30
It copies from just to the left of the mirror point (276), since x is 1 at first,and we copy from mirrorpoint-x to mirrorpoint+x. Thus, we copy down the
“MAIN”2004/5/11page 95
ii
i
ii
i
Section 3.4 Copying pixels 95
column before the mirror point to the column of pixels to the right of the mirrorpoint. Then we move back one column to the left, and copy one column further tothe right.
How many pixels did we process? We can have the computer figure that oneout, too.
/**
* Method to mirror the piedmont of the temple
* @return the corrected picture
*/
public static Picture mirrorTemple()
{
Picture picture = new Picture(getMediaPath("temple.jpg"));
This one comes back with We copied 18340 pixels. Where did that numbercome from? You can calculate how many times you execute the commands in a forloop with end - start + 1. We copy 70 rows of pixels (y goes from 27 to 96 (becauseof the ¡ 97) which is 96 - 27 + 1). We copy 262 columns of pixels (x goes from 1 to¡ 263 (276 - 13) which is 262 - 1 + 1 = 262). 70 ∗ 262 is 18, 340.
‘‘MAIN’’
2004/5/11
page 96
ii
i
ii
i
96 Chapter 3 Encoding and Manipulating Pictures
3.5 COPYING AND TRANSFORMING PICTURES
We can create wholly new pictures when we copy pixels across pictures. We’regoing to end up keeping track of a source picture that we take pixels from anda target picture that we’re going to set pixels in. Actually, we don’t copy thepixels–we simply make the pixels in the target the same color as the pixels in thesource. Copying pixels requires us keep track of multiple index variables: The (x, y)positions in the source and the (x, y) in the target.
What’s exciting about copying pixels is that making some small changes inhow we deal with the index variables leads to not only copying the image but trans-forming it. In this section, we’re going to talk about copying, cropping, rotating,and scaling pictures.
We’re going to make use of the utility function Picture.getMediaPath(fileName)
to make our coding of methods with several files easier. We’ve seen it before.It’s particularly helpful when you want to deal with several pieces of media inthe same directory but don’t want to spell out the whole directory name. Youjust have to remember to use Picture.setMediaPath(directory) first! All thatPicture.getMediaPath(fileName)does is to prepend the directory found in Picture.setMediaPathdirectory)
> Picture temple = new Picture(Picture.getMediaPath("temple.jpg"));
Our target will be the paper-sized JPEG file in the mediasources directory,which is 7x9.5 inches, which will fit on a 9x11.5 inch lettersize piece of paper withone inch margins.
To copy a picture from one file to another, we simply make sure that we incrementsourceX and targetX variables (the source and target index variables for the Xaxis) together, and the sourceY and targetY variables together. We can initializemore than one variable in the initialization area of a for loop and change more thanone variable in the change area.
Here’s a recipe for copying a picture of Katie to the canvas.
Recipe 24: Copying a picture to a canvas
“MAIN”2004/5/11page 97
ii
i
ii
i
Section 3.5 Copying and transforming pictures 97
/**
* Method to copy the picture of Katie to the canvas
* @return the canvas after the picture of Katie has been copied
This program copies a picture of Katie to the canvas (blank picture) (Fig-ure 3.25). Here’s how it works:
• The first few lines are just setting up the source (sourcePicture) and target(targetPicture) pictures.
• Next comes the loop for managing the x index variables, sourceX for thesource picture and targetX for the target picture. The for loop declares both
“MAIN”2004/5/11page 98
ii
i
ii
i
98 Chapter 3 Encoding and Manipulating Pictures
FIGURE 3.25: Copying a picture to a canvas
variables and initializes them to 0. You can have more than one variabledeclared and initialized in the initialization area of a for loop, if you separatethem with commas. Next the continuation test checks if the sourceX is lessthan the width of the source picture. Finally in the change area we incrementboth the sourceX and targetX variables each time after the statements inthe body of the loop have been executed. You can change more than onevariable in the change area as long as you separate the changes with commas.The for loop for looping through the columns is:
for (int sourceX = 0, targetX=0;
sourceX < sourcePicture.getWidth();
sourceX++, targetX++)
• Inside the loop for the X variables is the loop for the Y variables. It has avery similar structure, since it’s goal is to keep targetY and sourceY in synchin exactly the same way.
for (int sourceY = 0, targetY =0;
sourceY < sourcePicture.getHeight();
sourceY++, targetY++)
It’s inside the Y loop that we actually get the color from the source pixel andset the corresponding pixel in the target to the same color.
Of course, we don’t have to copy from (0, 0) in the source to (0, 0) in thetarget. We can easily copy somewhere else in the canvas, too. All we have to do is
‘‘MAIN’’
2004/5/11
page 99
ii
i
ii
i
Section 3.5 Copying and transforming pictures 99
FIGURE 3.26: Copying a picture midway into a canvas
to change where the target X and Y coordinates start. The rest stays exactly thesame (Figure 3.26).
Recipe 25: Copy elsewhere into the canvas
/**
* Method to copy the picture of Katie to 100, 100 in the canvas
Similarly, we don’t have to copy a whole picture. Cropping is taking only partof a picture out of the whole picture. Digitally, that’s just a matter of changingyour start and end coordinates. To grab just Katie’s face out of the picture, weonly have to figure out what the coordinates are where her face is located, thenuse those on the dimensions of sourceX and sourceY (Figure 3.27). The face is at(70, 3) to (136, 81).
Let’s look at a small example to see what’s going on in the copying recipe.We start out with a source and a target, and copy from x=0,y=0 to x=3 y=1.
We then increment both the sourceY and targetY, and copy again.
We continue down the column, incrementing both Y index variables.
When done with that column, we increment the X index variables and moveon to the next column, until we copy every pixel.
3.5.2 Creating a Collage
In the mediasources folder are a couple images of flowers (Figure 3.28), each 100pixels wide. Let’s make a collage of them, by combining several of our effects tocreate different flowers. We’ll copy them all into the blank image 640x480.jpg. Allwe really have to do is to copy the pixel colors to the right places.
‘‘MAIN’’
2004/5/11
page 103
ii
i
ii
i
Section 3.5 Copying and transforming pictures 103
FIGURE 3.28: Flowers in the mediasources folder
Recipe 27: Creating a collage
/**
* Method to create a collage from the flower pictures. All the flower pictures
* will be lined up near the bottom of the canvas (5 pixels from the bottom)
* @return the collage as a picture object
*/
public static Picture createCollage()
{
// create the three pictures
Picture flower1Picture = new Picture(Picture.getMediaPath("flower1.jpg"));
Picture flower2Picture = new Picture(Picture.getMediaPath("flower2.jpg"));
Picture canvasPicture = new Picture(Picture.getMediaPath("640x480.jpg"));
// declare the source and target pixel variables
Pixel sourcePixel = null;
Pixel targetPixel = null;
// print out the picture information
System.out.println(flower1Picture);
System.out.println(flower2Picture);
System.out.println(canvasPicture);
/* copy the first flower picture to 5 pixels from the bottom
This method is long and repetitive which makes it hard to read. One of theways to improve it is to pull out pieces of code that are basically the same and makethem new methods. Each time we add a new picture to our canvas the only thingschanging are the picture to be added and the targetX. The targetY is alwayscalculated the same way as the height of the canvas minus the height of the picturebeing copied minus 5. We can make a new method which copies a passed pictureobject into the current picture object starting at a passed x value.
/**
* Method that will copy all of the passed source picture into
* the current picture object starting with the left corner
* given by xStart
* @param sourcePicture the picture object to copy
* @param xStart the x position to start the copy into
*/
‘‘MAIN’’
2004/5/11
page 107
ii
i
ii
i
Section 3.5 Copying and transforming pictures 107
public void copyPictureTo(Picture sourcePicture, int xStart)
Picture flower1Picture = new Picture(Picture.getMediaPath("flower1.jpg"));
Picture flower2Picture = new Picture(Picture.getMediaPath("flower2.jpg"));
Picture canvasPicture = new Picture(Picture.getMediaPath("640x480.jpg"));
// print out the picture information
System.out.println(flower1Picture);
System.out.println(flower2Picture);
System.out.println(canvasPicture);
// copy the first flower picture to near the
// bottom left corner of the canvas
canvasPicture.copyPictureTo(flower1Picture,0);
// copy the flower2 picture starting with x = 100 in the canvas
canvasPicture.copyPictureTo(flower2Picture,100);
‘‘MAIN’’
2004/5/11
page 108
ii
i
ii
i
108 Chapter 3 Encoding and Manipulating Pictures
// copy the flower1 negated to x = 200 in the canvas
flower1Picture.negative();
canvasPicture.copyPictureTo(flower1Picture,200);
// clear the blue in flower 2 picture and add at x=300 in the canvas
flower2Picture.clearBlue();
canvasPicture.copyPictureTo(flower2Picture,300);
// copy the negated flower 1 to x=400
canvasPicture.copyPictureTo(flower1Picture,400);
// show the resulting picture
canvasPicture.show();
return canvasPicture;
}
3.5.3 Blending Pictures
When we create collages by copying, any overlap typically means that one pictureshows over another. The last picture painted on is the one that appears. But itdoesn’t have to be that way. We can blend pictures by multiplying their colors andadding them. This gives us the effect of transparency.
We know that 100% of something is the whole thing. 50% of one and 50% ofanother would also add up to 100%. In the recipe below, we blend a picture of thetwo sisters with an overlap of some 70 (the width of Barbara minus 150) columnsof pixels (Figure 3.30).
Recipe 28: Blending two pictures
/**
* Method to blend pictures of Katie and Jenny
* @return the blended picture
*/
public static Picture blendPictures()
{
// create the three pictures
Picture katiePicture = new Picture(Picture.getMediaPath("KatieFancy.jpg"));
Picture jennyPicture = new Picture(Picture.getMediaPath("JenParty.jpg"));
Picture canvasPicture = new Picture(Picture.getMediaPath("640x480.jpg"));
// declare the source and target pixel variables
Pixel katiePixel = null;
Pixel jennyPixel = null;
‘‘MAIN’’
2004/5/11
page 109
ii
i
ii
i
Section 3.5 Copying and transforming pictures 109
Pixel targetPixel = null;
// declare the target x and source x since we will need the values after the
// for loop
int sourceX = 0;
int targetX = 0;
// copy the first 150 pixels of katie to the canvas
Section 3.5 Copying and transforming pictures 111'
&
$
%
Making it Work Tip: Optional parts of the for loopNotice that we are missing the initialization area in thefor loops in the method blendPictures(). Also notice thatwe moved the declaration of sourceX and sourceY outsidethe for loops. This is because we want to keep the valuesaround after the first for loop ends. The initialization areaof a for loop is optional (the ; is not optional). In fact, theinitialization area, continuation test, and change area areall optional. You could code a for loop as for (;;;) butthat isn’t terribly useful. It would execute the body of thefor loop forever. This is also known as an infinite loop.
3.5.4 Rotation
Transformations to the image occur by using the index variables differently orincrementing them differently, but otherwise keeping the same recipe. Let’s rotateKatie 90 degrees. We’ll do that by simply swapping the X and Y variables in thetarget–we increment them the exact same way, but we’ll use them X for Y and Yfor X (Figure 3.31).
Recipe 29: Rotating a picture
/**
* Method to copy Katie rotated to the left 90 degrees
* @return the picture after Katie has been copied and rotated to the left 90
FIGURE 3.31: Copying a picture to a canvas rotated to the left 90 degrees
How does that work?.
Rotating starts with the same source and target, and even the same variablevalues, but since we use the target X and Y differently, we get a different effect.
“MAIN”2004/5/11page 113
ii
i
ii
i
Section 3.5 Copying and transforming pictures 113
Now, as we increment the Y variables, we’re moving down the source, butacross the target. As we increment the X variables we’re moving across the sourcebut down the target.
When we’re done, we’ve done the same copy, but the result is completelydifferent.
3.5.5 Scaling
A very common transformation for pictures is to scale them. Scaling up means tomake them larger, and scaling them down makes them smaller. It’s common toscale a 1-megapixel or 3-megapixel picture down to a smaller size to make it easierto place on the Web. Smaller pictures require less disk space, and thus less networkbandwidth, and thus are easier and faster to download.
Scaling a picture requires the use of sampling which we’ll also use with soundslater. To scale a picture smaller we are going to take every other pixel when copyingfrom the source to the target. To scale a picture larger we are going to take everypixel twice.
Scaling the picture down is the easier function. We will use the daisyMed.jpgpicture which is 302 (width) by 202 (height). Instead of incrementing the source Xand Y variables by 1, we simply increment by 2. We divide the amount of space by2, since we’ll fill half as much room–our width will be 302/2 and the height will be
“MAIN”2004/5/11page 114
ii
i
ii
i
114 Chapter 3 Encoding and Manipulating Pictures
202/2. The result is a smaller flower in the canvas (Figure 3.32).
Recipe 30: Scaling a picture down (smaller)
/**
* Method to copy the flower but smaller (half as big)
* @return the smaller flower picture
*/
public static Picture copyFlowerSmaller()
{
Picture flowerPicture = new Picture(Picture.getMediaPath("daisyMed.jpg"));
Picture canvasPicture = new Picture(Picture.getMediaPath("640x480.jpg"));
Scaling up the picture (making it larger) is a little trickier. We want to takeevery pixel twice. What we’re going to do is to increment the source index variablesby 0.5. Now, we can’t reference pixel 1.5. But if we reference (int) 1.5 we’ll get1 again, and that’ll work. The sequence of 1, 1.5, 2, 2.5... will become 1,1,2,2...
‘‘MAIN’’
2004/5/11
page 115
ii
i
ii
i
Section 3.5 Copying and transforming pictures 115
FIGURE 3.32: Scaling the picture down
The result is a larger form of the picture (Figure 3.33).
Recipe 31: Scaling the picture up (larger)
/**
* Method to copy a flower but scaled to 2x normal size
* @return the larger flower
*/
public static Picture copyFlowerLarger()
{
Picture flowerPicture = new Picture(Picture.getMediaPath("daisyMed.jpg"));
Picture canvasPicture = new Picture(Picture.getMediaPath("640x480.jpg"));
Pixel sourcePixel = null;
Pixel targetPixel = null;
// loop through the columns
for (double sourceX = 0, targetX=0;
sourceX < flowerPicture.getWidth();
sourceX = sourceX + 0.5, targetX++)
{
// loop through the rows
for (double sourceY=0, targetY=0; sourceY < flowerPicture.getHeight();
You might want to be able to scale a picture to a particular size, instead ofalways using the canvas pictures. There is a constructor that takes a width andheight new Picture(width,height) and creates a picture of a desired width andheight (both specified in pixels). new Picture(640,480) would create a pictureobject that is 640 pixels wide by 480 pixels tall—just like the canvas.
How did that work?.We start from the same place as the original copy.
When we increment sourceY by 0.5, we end up referring to the same pixel inthe source, but the target has moved on to the next pixel.
‘‘MAIN’’
2004/5/11
page 117
ii
i
ii
i
Section 3.6 Replacing Colors 117
When we increment sourceY a second time by 0.5, we now move on to thenext pixel, which we’ll end up copying the same pixel twice.
And eventually, we cover every pixel. Notice that the end result is degraded–it’s choppier than the original.
3.6 REPLACING COLORS
Replacing colors with another color is pretty easy. We can do it broadly, or justwithin a range.
Here’s a recipe that tries to replace the brown color in Katie’s hair with red. Iused the picture explorer to figure out roughly what the RGB values were for Katie’sbrown hair, then wrote a program to look for colors close to that, and increase theredness of those pixels. I played a lot with the value that I used for distance (here,50.0) and the amount of redness increase (here, 100% increase). However, it turnedpart of the couch and carpet red too. (Figure 3.34 and Figure 3.51).
Recipe 32: Color replacement: Turn Katie into a redhead
/**
* Method to turn to turn Katie into a red head
*/
public static Picture turnKatieRedHead()
‘‘MAIN’’
2004/5/11
page 118
ii
i
ii
i
118 Chapter 3 Encoding and Manipulating Pictures
{
Color brown = new Color(42,25,15);
Color currentColor = null;
Picture katiePicture = new Picture(Picture.getMediaPath("KatieFancy.jpg"));
Pixel[] pixels = katiePicture.getPixels();
Pixel pixel = null;
// loop through the pixels
for (int i=0; i<pixels.length; i++)
{
// get the current pixel
pixel = pixels[i];
// check if in distance to brown and if so reduce blue and green
With the picture explorer we can also figure out the coordinates just aroundKatie’s face, and then just do the browns near her face. The effect isn’t too good,though it’s clear that it worked. The line of redness is too sharp and rectangular(Figure 3.35 and Figure 3.52).
Recipe 33: Color replacement in a range
/**
* Method to turn to turn Katie into a red head using a range
*/
public static Picture turnKatieRedHeadInRange()
{
Color brown = new Color(42,25,15);
Color currentColor = null;
Picture katiePicture = new Picture(Picture.getMediaPath("KatieFancy.jpg"));
Pixel pixel = null;
‘‘MAIN’’
2004/5/11
page 119
ii
i
ii
i
Section 3.6 Replacing Colors 119
FIGURE 3.34: Increasing reds in the browns
// loop through the x values
for (int x=63; x < 125; x++)
{
for (int y=6; y < 76; y++)
{
// get the current pixel
pixel = katiePicture.getPixel(x,y);
// check if in distance to brown and if so reduce blue and green
FIGURE 3.35: Increasing reds in the browns, within a certain range
3.6.1 Reducing red eye
“Red eye” is the effect where the flash from the camera bounces off the back of thesubject’s eyes. Reducing red eye is a really simple matter. We find the pixels thatare “pretty close” (we use a distance from red of 165 works well) to red, then inserta replacement color.
We probably don’t want to change the whole picture. In the Figure 3.36, wecan see that Jenny is wearing a red dress—we don’t want to wipe out that red,too. We’ll fix that by only changing the area where Jenny’s eyes are. Using theMediaTools, we find the upper left and lower right corners of her eyes. Those pointswere (109, 91) and (202, 107).
Recipe 34: Remove red eye
“MAIN”2004/5/11page 121
ii
i
ii
i
Section 3.6 Replacing Colors 121
FIGURE 3.36: Finding the range of where Jenny’s eyes are red
/**
* Method to remove red eye from the current picture object in the rectange
* define by startX, startY, endX, endY. The red will be replaced with the
* passed newColor
* @param startX the top left corner x value of a rectangle
* @param startY the top left corner y value of a rectangle
* @param endX the bottom right corner x value of a rectangle
* @param endY the bottom right corner y value of a rectangle
* @param newColor the new color to use
*/
public void removeRedEye(int startX, int startY, int endX,
int endY, Color newColor)
{
Pixel pixel = null;
// loop through the pixels in the rectangle defined by the startX, startY, and
// endX and endY
for (int x = startX; x < endX; x++)
{
for (int y = startY; y < endY; y++)
{
// get the current pixel
pixel = getPixel(x,y);
// if the color is near red then change it
if (pixel.colorDistance(Color.red) < 167)
pixel.setColor(newColor);
}
}
}
“MAIN”2004/5/11page 122
ii
i
ii
i
122 Chapter 3 Encoding and Manipulating Pictures
End of Recipe 34
We call this function with:
> Picture jennyPicture = new Picture("c:/intro-prog-java/mediasources/jenny-red.jpg");
to replace the red with black—certainly other colors could be used for thereplacement color. The result was good, and we can check that the eye really doesnow have all-black pixels (Figure 3.37). (See also Figure 3.53.)
FIGURE 3.37: After fixing red-eye.
3.6.2 Sepia toned and posterized pictures: Using conditionals to choose the color
So far, we’ve done color modification by simply saying “This color replaces thatcolor.” We can be more sophisticated in our color swapping. We can look for arange of colors, by using if, and choosing to replace with some function of theoriginal color or by changing to a specific color. The results are quite interesting.
For example, we might want to generate sepia-toned prints. Older printssometimes have a yellow-ish tint to them. We could just do an overall color change,but the end result isn’t aesthetically pleasing. By looking for different kinds ofcolor–highlights, shadows–and treating them differently, we can get a better effect(Figure 3.38).
The way we do this is to first convert everything to grayscale, both becauseolder prints were in a gray scale, and because it makes it a little easier to workwith. We then look for high and low ranges of color, and change them separately.We want to make the shadows (darkest grays) a bit darker. We want to make mostof the picture (middle grays) into a brownish color. We want to the highlights(lightest grays) a bit yellow. Recall that yellow is a mixture of red and green soone way to make things yellow is to increase the red and green. Another way is toreduce the amount of blue. The advantage to reducing the blue is that you don’t
‘‘MAIN’’
2004/5/11
page 123
ii
i
ii
i
Section 3.6 Replacing Colors 123
FIGURE 3.38: Original scene (left) and using our sepia-tone recipe
have to worry about increasing a value past 255.
Recipe 35: Convert a picture to sepia-tones
/**
* Method to change the current picture to a sepia
* tint (modify the middle colors to a light brown and
* the light colors to a light yellow and make the shadows darker
*/
public void sepiaTint()
{
Pixel pixel = null;
double redValue = 0;
double greenValue = 0;
double blueValue = 0;
// first change the current picture to grayscale
this.grayscale();
// loop through the pixels
for (int x = 0; x < this.getWidth(); x++)
{
for (int y = 0; y < this.getHeight(); y++)
{
// get the current pixel and color values
pixel = this.getPixel(x,y);
redValue = pixel.getRed();
greenValue = pixel.getGreen();
blueValue = pixel.getBlue();
// tint the shadows darker
if (redValue < 60)
“MAIN”2004/5/11page 124
ii
i
ii
i
124 Chapter 3 Encoding and Manipulating Pictures
{
redValue = redValue * 0.9;
greenValue = greenValue * 0.9;
blueValue = blueValue * 0.9;
}
// tint the midtones a light brown
// by reducing the blue
else if (redValue < 190)
{
blueValue = blueValue * 0.8;
}
// tint the highlights a light yellow
// by reducing the blue
else
{
blueValue = blueValue * 0.9;
}
// set the colors
pixel.setRed((int) redValue);
pixel.setGreen((int) greenValue);
pixel.setBlue((int) blueValue);
}
}
}
End of Recipe 35
Posterizing is a process of converting a picture to a smaller number of colors.We’re going to do that by looking for specific ranges of color, then setting the colorto one value in that range. The result is that we reduce the number of colors inthe picture (Figure 3.39).
FIGURE 3.39: Reducing the colors (right) from the original (left)
‘‘MAIN’’
2004/5/11
page 125
ii
i
ii
i
Section 3.6 Replacing Colors 125
Recipe 36: Posterizing a picture
/**
* Method to posterize (reduce the number of colors) in the picture
* The number of reds, greens, and blues will be 4
*/
public void posterize()
{
Pixel pixel = null;
int redValue = 0;
int greenValue = 0;
int blueValue = 0;
// loop through the pixels
for (int x = 0; x < this.getWidth(); x++) {
for (int y = 0; y < this.getHeight(); y++) {
// get the current pixel and colors
pixel = this.getPixel(x,y);
redValue = pixel.getRed();
greenValue = pixel.getGreen();
blueValue = pixel.getBlue();
// check for red range and change color
if (redValue < 64)
redValue = 31;
else if (redValue < 128)
redValue = 95;
else if (redValue < 192)
redValue = 159;
else
redValue = 223;
// check for green range
if (greenValue < 64)
greenValue = 31;
else if (greenValue < 128)
greenValue = 95;
else if (greenValue < 192)
greenValue = 159;
else
greenValue = 223;
‘‘MAIN’’
2004/5/11
page 126
ii
i
ii
i
126 Chapter 3 Encoding and Manipulating Pictures
// check for blue range
if (blueValue < 64)
blueValue = 31;
else if (blueValue < 128)
blueValue = 95;
else if (blueValue < 192)
blueValue = 159;
else
blueValue = 223;
// set the colors
pixel.setRed(redValue);
pixel.setGreen(greenValue);
pixel.setBlue(blueValue);
}
}
}
End of Recipe 36
What’s really going on here, though, is setting up (a) a bunch of levels then(b) setting the value of red, green, or blue to the midpoint of that level. We can dothis more generally using mathematics to compute the ranges for a desired numberof levels and picking the midpoint. Below is the recipe for a flexible number oflevels, and Figure 3.40 shows a couple of examples.
Recipe 37: Posterize by levels
/**
* Method to posterize (reduce the number of colors) in the picture
* @param numLevels the number of color levels to use
// check if current values are in current range and if so
// set them to the middle value
if (bottomValue <= redValue && redValue < topValue)
pixel.setRed(middleValue);
if (bottomValue <= greenValue && greenValue < topValue)
pixel.setGreen(middleValue);
if (bottomValue <= blueValue && blueValue < topValue)
pixel.setBlue(middleValue);
}
}
}
}
End of Recipe 37
FIGURE 3.40: Pictures posterized to two levels (left) and four levels (right)
‘‘MAIN’’
2004/5/11
page 128
ii
i
ii
i
128 Chapter 3 Encoding and Manipulating Pictures
3.7 COMBINING PIXELS: BLURRING
When we make pictures larger (scaling them up), we usually get rough edges: Sharpsteps to lines, which we call pixelation. We can reduce pixelation by blurring theimage. What we do is set each pixel to an average of pixels around it. In thisexample, we go through all pixels (note the large loop that surrounds everything)and then in the X and Y dimensions, compute the average of the pixels to eitherside of the pixel. It takes a picture, and a number (size) of pixels to compute theaverage.
Recipe 38: A simple blur
/**
* Method to blur the pixels
* @param numPixels the number of pixels to average in all directions so if the
* numPixels is 2 then we will average all pixels in the rectange defined by 2 before
* the current pixel to 2 after the current pixel
*/
public void blur(int numPixels)
{
Pixel pixel = null;
Pixel samplePixel = null;
int redValue = 0;
int greenValue = 0;
int blueValue = 0;
int count = 0;
// loop through the pixels
for (int x=0; x < this.getWidth(); x++) {
for (int y=0; y < this.getHeight(); y++) {
// get the current pixel
pixel = this.getPixel(x,y);
// reset the count and red, green, and blue values
count = 0;
redValue = greenValue = blueValue = 0;
// loop through pixel numPixels before x to numPixels after x
for (int xSample = x - numPixels; xSample <= x + numPixels; xSample++) {
for (int ySample = y - numPixels; ySample <= y + numPixels; ySample++) {
// check that we are in the range of acceptable pixels
if (xSample >= 0 && xSample < this.getWidth() &&
ySample >= 0 && ySample < this.getHeight()) {
samplePixel = this.getPixel(xSample,ySample);
“MAIN”2004/5/11page 129
ii
i
ii
i
Section 3.7 Combining pixels: Blurring 129
redValue = redValue + samplePixel.getRed();
greenValue = greenValue + samplePixel.getGreen();
blueValue = blueValue + samplePixel.getBlue();
count = count + 1;
}
}
}
// use average color of surrounding pixels
Color newColor = new Color(redValue / count,
greenValue / count,
blueValue / count);
pixel.setColor(newColor);
}
}
}
End of Recipe 38
Figure 3.41 shows the flower from the collage made bigger, then blurrred.You can see the pixellation in the bigger version—the sharp, blocky edges. Withthe blur, some of that pixellation goes away. More careful blurs take into accountregions of colors (so that edges between colors are kept sharp), and thus are ableto reduce pixellation without removing sharpness.
FIGURE 3.41: Making the flower bigger, then blurring to reduce pixellation
“MAIN”2004/5/11page 130
ii
i
ii
i
130 Chapter 3 Encoding and Manipulating Pictures
FUNCTIONS AND OBJECTS SUMMARY
In this chapter, we talk about several kinds of encodings of data (or objects).
Picture Pictures are encodings of images, typically comingfrom a JPEG file.
Pixel A pixel is a dot in the Picture. It has a color (red,green, and blue) and an (x, y) position associatedwith it. It remembers its own Picture so that achange to the pixel changes the real dot in thepicture.
Color It’s a mixture of red, green, and blue values, eachbetween 0 and 255.
Here are the functions used or introduced in this chapter:
FileChooser.pickAFile() Lets the user pick a file and returns the completepath name as a string. Takes no input.
new Picture(fileName) Takes a filename as input, reads the file, and cre-ates a picture object from it. Returns the pictureobject.
picture.show() Must be called on a Picture object. Shows thepicture object. No return value.
picture.getPixels() Must be called on a Picture object. Returns anarray of Pixel objects in the picture.
picture.getPixel() Must be called on a Picture object. It takes an xposition and a y position (two numbers), and re-turns the Pixel object at that point in the picture.
picture.getWidth() Must be called on a picture object. Returns thewidth of the picture in pixels.
picture.getHeight() Must be called on a picture object. It returns theheight in pixels.
picture.writePictureTo(fileName) Must be called on a picture object. It takses a filename (string) as input, then writes the picture tothe file as a JPEG. (Be sure to end the filenamein “.jpg” for the operating system to understandit well.)
‘‘MAIN’’
2004/5/11
page 131
ii
i
ii
i
Section 3.7 Combining pixels: Blurring 131
pixel.getRed(), pixel.getGreen(), pixel.getBlue() Each of these methods must be called on a Pixelobject. Each method returns the value (between 0and 255) of the amount of redness, greenness, andblueness (respectively) in that pixel.
pixel.setRed(), pixel.setGreen(), pixel.setBlue() Each of these methods must be called on a Pixelobject. Each method takes a value (between 0 and255) and sets the redness, greenness, or blueness(respectively) of that pixel to the given value.
pixel.getColor() Must be called on a Pixel object. Returns theColor object at that pixel.
pixel.setColor() Must be called on a Pixel object. Takes a Colorobject and sets the color for that pixel.
pixel.getX(), pixel.getY() Must be called on a Pixel object. Returns the xor y (respectively) position of where that Pixel isat in the picture.
new Color(red,green,blue) Takes three inputs: For the red, green, and bluecomponents (in order), then creates and returns acolor object.
ColorChooser.pickAColor() Takes no input, but puts up a color picker. Findthe color you want, and the function will returnthe Color object of what you picked.
pixel.colorDistance(color) Takes a Color object and returns a single numberrepresenting the distance between the color andthe current pixel’s color. The red, green, and bluevalues of the colors are taken as a point in (x, y, z)space, and the cartesian distance is computed.
color.darker(),color.brighter() Must be called on a Color object. The methodsreturn a slightly darker or lighter (respectively)version of the color.
There are a bunch of constants that are useful in this chapter. These are vari-ables with pre-defined values. These values are colors: Color.black, Color.white,
3.1. Recipe 9 (page 61) is obviously too much color reduction. Write a version thatonly reduces the red by 10%, then one by 20%. Which seems to be more useful?Note that you can always repeatedly reduce the redness in a picture, but youdon’t want to have to do it too many times, either.
3.2. Write the blue and green versions of Recipe 9 (page 61).3.3. Each of the below is equivalent to Recipe 10 (page 68). Test them and convince
yourself that they are equivalent. Which do you prefer and why?/**
3.4. If you keep increasing the red, eventually the red looks like it disappears, andyou eventually get errors about illegal arguments. What you do think is goingon?
3.5. Write new methods like Recipe 11 (page 69) to clear red and green. For each ofthese, which would be the most useful in actual practice? How about combina-tions of these?
3.6. Write a new method to maximize blue (i.e., setting it to 255) instead of clearingit use Recipe 11 (page 69) as a starting point. Is this useful? Would the red orgreen versions be useful?
3.7. There is more than one way to compute the right grayscale value for a colorvalue. The simple recipe that we use in Recipe 17 (page 83) may not be whatyour grayscale printer uses when printing a color picture. Compare the color (rel-
“MAIN”2004/5/11page 133
ii
i
ii
i
Section 3.7 Combining pixels: Blurring 133
atively unconverted by the printer) grayscale image using our simple algorithmin Figure 3.50 with the original color picture that the printer has converted tograyscale (left of Figure 3.11). How do the two pictures differ?
3.8. Write a method to do mirroring along the diagonal (from (0, 0) to (width −
1, height − 1)?3.9. Think about how the grayscale algorithm works. Basically, if you know the
luminance of anything visual (e.g., a small image, a letter), you can replace apixel with that visual element in a similar way to create a collage image. Tryimplementing that. You’ll need 256 visual elements of increasing lightness, allof the same size. You’ll create a collage by replacing each pixel in the originalimage with one of these visual elements.
TO DIG DEEPER
The bible of computer graphics is Introduction to Computer Graphics [7]. It’s highlyrecommended.
A wonderful new book on how vision works, and how artists have learnedto manipulate it, is Vision and art: The biology of Seeing by Margaret Living-stone [11].
“MAIN”2004/5/11page 134
ii
i
ii
i
134 Chapter 3 Encoding and Manipulating Pictures
3.8 COLOR FIGURES
FIGURE 3.42: Merging red, green, and blue to make new colors
FIGURE 3.43: Color: RGB triplets in a matrix representation
“MAIN”2004/5/11page 135
ii
i
ii
i
Section 3.8 Color Figures 135
FIGURE 3.44: Color: The original picture (left) and red-reduced version (right)
FIGURE 3.45: Color: Overly blue (left) and red increased by 30% (right)
FIGURE 3.46: Color: Original (left) and blue erased (right)
FIGURE 3.47: Original beach scene (left) and at (fake) sunset (right)
“MAIN”2004/5/11page 136
ii
i
ii
i
136 Chapter 3 Encoding and Manipulating Pictures
FIGURE 3.48: Color: Lightening and darkening the original picture
FIGURE 3.49: Color: Negative of the image
FIGURE 3.50: Color: Color picture converted to grayscale
“MAIN”2004/5/11page 137
ii
i
ii
i
Section 3.8 Color Figures 137
FIGURE 3.51: Color: Increasing reds in the browns
“MAIN”2004/5/11page 138
ii
i
ii
i
138 Chapter 3 Encoding and Manipulating Pictures
FIGURE 3.52: Color: Increasing reds in the browns, within a certain range
FIGURE 3.53: Finding the range where Jenny’s eyes are red, then changing them toblack
“MAIN”2004/5/11page 139
ii
i
ii
i
Section 3.8 Color Figures 139
FIGURE 3.54: Frames from the slow sunset movie
FIGURE 3.55: Frames from the slow fade-out movie
“MAIN”2004/5/11page 140
ii
i
ii
i
140 Chapter 3 Encoding and Manipulating Pictures
FIGURE 3.56: Frames from the Mommy watching Katie movie
FIGURE 3.57: Frames from the original too dark movie
“MAIN”2004/5/11page 141
ii
i
ii
i
Section 3.8 Color Figures 141
FIGURE 3.58: Frames from the modified lighter movie
FIGURE 3.59: Frames from the original movie with kids crawling in front of a bluescreen
“MAIN”2004/5/11page 142
ii
i
ii
i
142 Chapter 3 Encoding and Manipulating Pictures
FIGURE 3.60: Frames from the kids on the moon movie
‘‘MAIN’’
2004/5/11
page 143
ii
i
ii
i
C H A P T E R 4
Advanced Pictures
4.1 BACKGROUND SUBTRACTION
4.2 CHROMAKEY
4.3 DRAWING ON IMAGES WITH PIXELS
4.4 DRAWING WITH DRAWING COMMANDS
4.5 PROGRAMS AS SPECIFYING DRAWING PROCESS
In this chapter, we’ll talk about techniques for creating pictures. We’ll com-pose pictures in new ways (essentially, pulling someone out and putting them in anew setting) and create pictures from scratch without explicitly setting every pixel.
4.1 BACKGROUND SUBTRACTION
Let’s imagine that you have a picture of someone, and a picture of where they stoodwithout them there (Figure 4.1). Could you subtract the background of the person(i.e., figure out where the colors are close), and then replace another background?Say, of the moon (Figure 4.2)?
FIGURE 4.1: A picture of a child (Katie), and her background without her
Recipe 39: Subtract the background and replace it with a new one
/**
* Method to replace the background in the current picture with the background
* from another picture
* @param oldBackground a picture with the old background to replace
143
‘‘MAIN’’
2004/5/11
page 144
ii
i
ii
i
144 Chapter 4 Advanced Pictures
FIGURE 4.2: A new background, the moon
* @param newBackground a picture with the new background to use
*/
public void swapBackground(Picture oldBackground, Picture newBackground)
{
Pixel currPixel = null;
Pixel oldPixel = null;
Pixel newPixel = null;
// loop through the columns
for (int x=0; x<getWidth(); x++)
{
// loop through the rows
for (int y=0; y<getHeight(); y++)
{
// get the current pixel and old background pixel
currPixel = this.getPixel(x,y);
oldPixel = oldBackground.getPixel(x,y);
/* if the color at the current pixel is within 15.0 of the old background pixel
* then swap in the new background pixel
*/
if (currPixel.colorDistance(oldPixel.getColor()) < 15.0)
{
newPixel = newBackground.getPixel(x,y);
currPixel.setColor(newPixel.getColor());
}
}
“MAIN”2004/5/11page 145
ii
i
ii
i
Section 4.1 Background subtraction 145
}
}
End of Recipe 39
To test if we can replace an old background with a new background try:
> Picture p = new Picture(Picture.getMediaPath("kid-in-frame.jpg"));
> Picture oldBg = new Picture(Picture.getMediaPath("bgframe.jpg"));
> Picture newBg = new Picture(Picture.getMediaPath("moon-surface.jpg"));
> p.swapBackground(oldBg,newBg);
> p.show();
We can, but the effect isn’t as good as we would like (Figure 4.3). Ourdaughter’s shirt color was too close to the color of the wall. And though the lightwas dim, the shadow is definitely having an effect here.
FIGURE 4.3: Katie on the moon
Mark tried the same thing with a picture of two students in front of a tiledwall. While Mark did use a tripod (really critical to get the pixels to line up), Markunfortunately left autofocus on, so the two original pictures (Figure 4.4) weren’tall that comparable. The background swap (again with the jungle scene) hardlydid anything at all! We changed the threshold value to 50, and finally got someswapping (Figure 4.5).
> Picture p = new Picture(Picture.getMediaPath("wall-two-people.jpg"));
> Picture oldBg = new Picture(Picture.getMediaPath("wall.jpg"));
> Picture newBg = new Picture(Picture.getMediaPath("jungle3.jpg"));
> p.swapBackground(oldBg,newBg);
> p.show();
‘‘MAIN’’
2004/5/11
page 146
ii
i
ii
i
146 Chapter 4 Advanced Pictures
'
&
$
%
Making it Work Tip: Add an input parameter togeneralize a methodNotice that we changed the threshold from 15.0 to 50.0for the second test of the swapBackground(oldBG,newBG)
method. A better thing to do would be to change themethod to take the threshold distance as another inputparameter swapBackground(oldBG,newBG,threshold).This means we won’t have to keep changing the methodeach time we want to change the threshold, which meansthe method can be used in more situations.
Recipe 40: Better Swap Background
/**
* Method to replace the background in the current picture with the background
* from another picture for pixels that have a color distance to the old
* background of under the passed threshold
* @param oldBackground a picture with the old background to replace
* @param newBackground a picture with the new background to use
* @param threshold the distance from the old background color to use
* to figure out which pixels to swap with the new background
*/
public void swapBackgroundForThreshold(Picture oldBackground,
Picture newBackground,
double threshold)
{
Pixel currPixel = null;
Pixel oldPixel = null;
Pixel newPixel = null;
// loop through the columns
for (int x=0; x<getWidth(); x++)
{
// loop through the rows
for (int y=0; y<getHeight(); y++)
{
// get the current pixel and old background pixel
currPixel = this.getPixel(x,y);
oldPixel = oldBackground.getPixel(x,y);
“MAIN”2004/5/11page 147
ii
i
ii
i
Section 4.2 Chromakey 147
/* if the color at the current pixel is within 15.0 of the old background pixel
* then swap in the new background pixel
*/
if (currPixel.colorDistance(oldPixel.getColor()) < threshold)
{
newPixel = newBackground.getPixel(x,y);
currPixel.setColor(newPixel.getColor());
}
}
}
}
End of Recipe 40
FIGURE 4.4: Two people in front of a wall, and a picture of the wall
FIGURE 4.5: Swapping a jungle for the wall, using background subtraction, with athreshold of 50
4.2 CHROMAKEY
The way that weatherpersons do it is to stand before a background of a fixed color(usually blue or green), then subtract that color. This is called chromakey. Mark
‘‘MAIN’’
2004/5/11
page 148
ii
i
ii
i
148 Chapter 4 Advanced Pictures
took our son’s blue sheet, attached it to the entertainment center, then took apicture of himself in front of it using a timer on a camera (Figure 4.6).
FIGURE 4.6: Mark in front of a blue sheet
Recipe 41: Chromakey: Replace all blue with the new background
/**
* Method to do chromakey using a blue background
* @param newBg the new background image to use to replace
* the blue from the current picture
*/
public void chromakey(Picture newBg)
{
Pixel currPixel = null;
Pixel newPixel = null;
// loop through the columns
for (int x=0; x<getWidth(); x++)
{
// loop through the rows
for (int y=0; y<getHeight(); y++)
{
// get the current pixel
currPixel = this.getPixel(x,y);
/* if the color at the current pixel mostly blue (blue value is
“MAIN”2004/5/11page 149
ii
i
ii
i
Section 4.2 Chromakey 149
* greater than red and green combined, then use new background color
*/
if (currPixel.getRed() + currPixel.getGreen() < currPixel.getBlue())
{
newPixel = newBg.getPixel(x,y);
currPixel.setColor(newPixel.getColor());
}
}
}
}
End of Recipe 41
The effect is really quite striking (Figure 4.7). Do note the “folds” in the lunarsurface, though. The really cool thing is that this recipe works for any backgroundthat’s the same size as the image (Figure 4.8). To put Mark on the moon and inthe jungle try this:
> Picture mark = new Picture(Picture.getMediaPath("blue-mark.jpg"));
> Picture newBg = new Picture(Picture.getMediaPath("moon-surface.jpg"));
> mark.chromakey(newBg);
> mark.show();
> mark = new Picture(Picture.getMediaPath("blue-mark.jpg"));
> newBg = new Picture(Picture.getMediaPath("jungle3.jpg"));
> mark.chromakey(newBg);
> mark.show();
FIGURE 4.7: Mark on the moon
‘‘MAIN’’
2004/5/11
page 150
ii
i
ii
i
150 Chapter 4 Advanced Pictures
FIGURE 4.8: Mark in the jungle
There’s another way of writing this code, which is shorter but does the samething.
Recipe 42: Chromakey, shorter
/**
* Method to do chromakey using a blue background
* @param newBg the new background image to use to replace
* the blue from the current picture
*/
public void chromakeyBlue(Picture newBg)
{
Pixel[] pixels = this.getPixels();
Pixel currPixel = null;
Pixel newPixel = null;
// loop through the pixels
for (int i = 0; i < pixels.length; i++)
{
// get the current pixel
currPixel = pixels[i];
/* if the color at the current pixel mostly red (red value is
* greater than green and blue combined, then use new background color
*/
if (currPixel.getRed() + currPixel.getGreen() < currPixel.getBlue())
You don’t really want to do chromakey with a common color, like red—something that there’s a lot of in your face. Mark tried it with the two pictures inFigure 4.9—one with the flash on, and one with it off. We changed the test to if
(currPixel.getRed() > currPixel.getGreen() + currPixel.getBlue()). Theone without a flash was terrible—the student’s face was jungle-ified. The one withthe flash was better, but the flash is still clear after the swap (Figure 4.10). It’sclear why moviemakers and weather people use blue or green backgrounds.
FIGURE 4.9: Student in front of a red background, and with flash on
FIGURE 4.10: Using chromakey recipe with red background
‘‘MAIN’’
2004/5/11
page 152
ii
i
ii
i
152 Chapter 4 Advanced Pictures
4.3 DRAWING ON IMAGES WITH PIXELS
Sometimes you want to create your own images from scratch. We know that thisis just a matter of setting pixel values to whatever we want, but setting individualpixel values to draw a line or a circle or some letters is hard. One way of drawingon images is to simply set the pixels appropriately. Here’s an example that we canuse to create a grid on the picture of Santa (Figure 4.11).
Recipe 43: Draw lines by setting pixels
/**
* Method to add vertical and horizontal lines to the current picture
*/
public void addLines()
{
addHorizontalLines();
addVerticalLines();
}
/**
* Method to add a horizontal line every 5 pixels in the current picture
*/
public void addHorizontalLines()
{
// loop through rows
for (int y = 0; y < getHeight(); y+=5)
{
// loop through the columns
for (int x = 0; x < getWidth(); x++)
{
// set the pixel to black
this.getPixel(x,y).setColor(Color.black);
}
}
}
/**
* Method to add a vertical line every 5 pixels in the current picture
*/
public void addVerticalLines()
{
// loop through the columns
for (int x = 0; x < getWidth(); x+=5)
{
// loop through the rows
“MAIN”2004/5/11page 153
ii
i
ii
i
Section 4.3 Drawing on images with pixels 153
FIGURE 4.11: Santa with a grid of drawn lines
for (int y=0; y < getHeight(); y++)
{
// set the pixel to black
this.getPixel(x,y).setColor(Color.black);
}
}
}
End of Recipe 43
To run this try:
> Picture santa = new Picture(Picture.getMediaPath("santa.jpg"));
> santa.addLines();
> santa.show();
You’ll notice that this program is using the color name Color.black. Javapre-defines for you a bunch of colors: Color.black, Color.white, Color.blue,
Color.orange, Color.pink, Color.magenta, and Color.cyan. You can use anyof these when you need a color. Each of these is a class field of the Color class whichis why you can use them using the Class ’dot’ field notation (Color.black).
We can imagine drawing anything we want like this. We could draw rectanglesor circles, simply by figuring out what pixels need to be what color. We could evendraw letters—by setting the appropriate pixels to the appropriate colors, we couldmake any letter we want.
“MAIN”2004/5/11page 154
ii
i
ii
i
154 Chapter 4 Advanced Pictures
4.4 DRAWING WITH DRAWING COMMANDS
Actually, drawing lines and other shapes by changing the colors of individual pixelsis amazingly painful to even imagine. Fortunately, there’s a much easier way.
Java (like most modern programming languages) provides methods for draw-ing a variety of shapes and text. There are actually two different classes thatyou can use for drawing java.awt.Graphics and java.awt.Graphics2D. The Graphicsclass contains methods for doing simple drawing while the Graphics2D class can beused for more sophisticated drawing. Here are some of the methods in the Graphicsclass:
• drawString(string,x,y) draws the string starting at position (x, y) in thecurrent font and color.
• drawLine(x1,y1,x2,y2) draws a line from position (x1, y1) to (x2, y2) in thecurrent color.
• drawRect(x1,y1,width,height) draws a rectangle with the upper left handcorner at (x1, y1), a width of width, and a height of height in the currentcolor.
• fillRect(x1,y1,width,height) draws a rectangle with the upper left handcorner at (x1, y1), a width of width, and a height of height and filled withthe current color.
• drawOval(x1,y1,width,height) draws an oval that is enclosed by a rect-angle with the upper left hand corner of the rectangle at (x1, y1) a width ofwidth and a height of height in the current color.
• fillOval(x1,y1,width,height) draws a filled oval that is enclosed by arectangle with the upper left hand corner of the rectangle at (x1, y1) a widthof width and a height of height in the current color. The oval is filled withthe current drawing color.
• drawArc(x1,y1,width,height,startAngle,arcAngle) draws an arc whichis part of the oval specified by the enclosing rectangle with a upper left handcorner of the rectangle at (x1, y1) a width of width and a height of height inthe current color. The arc starts at the given start angle and has an angle ofarcAngle. A start angle of 0 means the 3 o’clock position. A negative valueis clockwise rotation and a positive value is counter-clockwise rotation.
• fillArc(x1,y1,width,height,startAngle,arcAngle)draws a filled arc whichis part of the oval specified by the enclosing rectangle with a upper left handcorner of the rectangle at (x1, y1) a width of width and a height of height inthe current color. The arc is filled with the current drawing color.
• setColor(color) sets the current drawing color.
You can get an object of the Graphics class from a Picture object usinggetGraphics(). Then you can do the drawing using the graphics object and repaintthe picture to see the changes.
‘‘MAIN’’
2004/5/11
page 155
ii
i
ii
i
Section 4.4 Drawing with drawing commands 155
Below is an example of using these drawing commands (Figure 4.12).
Recipe 44: An example of using drawing commands
/**
* Method to show using drawing on a picture
* @return the example picture
*/
public static Picture drawExample()
{
// start with a white 640 by 480 picture
Picture p = new Picture(Picture.getMediaPath("640x480.jpg"));
// get the graphics object to use for drawing
Graphics graphics = p.getGraphics();
// start with a black color
graphics.setColor(Color.black);
// draw the string with a upper left corner at x=10, y=75
graphics.drawString("This is a test of drawing a string on a picture",10,75);
// draw a line from (10,20) to (300,50)
graphics.drawLine(10,20,300,50);
// set the color to yellow
graphics.setColor(Color.yellow);
// draw a filled rectangle (filled with yellow) at upper left (0,200) with
// a width of 300 and height 250
graphics.fillRect(0,200,300,250);
// set the color back to black
graphics.setColor(Color.black);
// draw the outline of a rectangle with the upper left at (10,210) and
// a width of 200 and a height of 100
graphics.drawRect(10,210,200,100);
/* draw an oval enclosed by a rectangle with the top left corner at
* (400,10) and a width of 200 and a height of 100
*/
graphics.drawOval(400,10,200,100);
/* draw an arc which is part of an oval enclosed by a rectangle with the
“MAIN”2004/5/11page 156
ii
i
ii
i
156 Chapter 4 Advanced Pictures
FIGURE 4.12: A small, drawn picture
* top left corner at (400,300) a width of 200, and a height of 150. The
* arc starts at 0 (3 o’clock position) and goes 180 degrees counter-clockwise
* to the 9 o’clock position
*/
graphics.fillArc(400,300,200,150,0,180);
// show the picture
p.show();
// return the picture
return p;
}
End of Recipe 44
4.4.1 Vector and Bitmap Representations
Here’s a thought: Which of these is smaller–the picture (Figure 4.12) or theRecipe 44 (page 155)? The picture, on my disk, is about 24 kilobytes (a kilo-byte is about a thousand bytes). The recipe is about 1 kilobyte (calculated bycomparing the Picture.java file size before and after adding the method). But formany purposes, they are equivalent. What if you just saved the program and notthe pixels? That’s what a vector representation for graphics is about.
“MAIN”2004/5/11page 157
ii
i
ii
i
Section 4.4 Drawing with drawing commands 157
Vector-based graphical representations are basically executable programs thatgenerate the picture when desired. Vector-based representations are used in Postscript,Flash, and AutoCAD. When you make a change to an image in Flash or AutoCAD,you are actually making a change to the underlying representation—essentially,you’re changing the program, like the one in Recipe 4.12 (page 156). The programis then executed again to make the image appear. But thanks to Moore’s Law,that execution-and-new-display occurs so fast that it feels like you’re changing thepicture.
Font definitions languages like Postscript and TrueType actually define minia-ture programs (or equations) for each and every letter or symbol. When you wantthe letter or symbol at a particular size, the program is run to figure out whichpixels should be set to what values. (Some actually specify more than one color tocreate the effect of smoother curves.) Because the programs are written to handledesired font size as an input, the letters and symbols can be generated at any size.
Bitmap graphical representations, on the other hand, store every individualpixel, or some compressed representation of the pixels. Formats like BMP, GIF,and JPEG are essentially bitmap representations. GIF and JPEG are compressedrepresentations—they don’t represent each and every pixel with 24 bits. Instead,they use some techniques to represent the same information but with fewer bits.
There are several benefits to vector-based representations over bitmap repre-sentations. If you can represent the picture you want to send (say, over the Internet)using a vector-based representation, it’s much smaller than sending all the pixels.Essentially, you’re sending the instructions for how to make the picture, rather thansending the picture itself. For very complex images, however, the instructions canbe as long as the image itself (imagine sending all the directions on how to paintthe Mona Lisa!), so there is no benefit. But when the images are simple enough,representations like those used in Flash make for faster upload and download timesthan sending the same JPEG images.
The real benefit of vector-based notations come when you want to change theimage. Let’s say that you’re working on an architectural drawing, and you extenda line in your drawing tool. If your drawing tool is only working with bitmappedimages (sometimes called a painting tool) then all you have are more pixels on thescreen that are adjacent to the other pixels on the screen representing the line.There’s nothing in the computer that says that all those pixels represent a line ofany kind—they’re just pixels. But if your drawing tool is working with vector-basedrepresentations (sometimes called a drawing tool) then extending a line means thatyou’re changing an underlying representation of a line.
Why is that important? The underlying representation is actually a specifi-cation of the drawing, and it can be used anywhere that a specification is needed.Imagine taking the drawing of a part, then actually running the cutting and stamp-ing machines based on that drawing. This happens regularly in many shops, and it’spossible because the drawing isn’t just pixels—it’s a specification of the lines andtheir relationships, which can then be scaled and used to determine the behaviorof machines.
You might be wondering, ”But how could we change the program? Canwe write a program that would essentially re-type the program or parts of theprogram?” Yes, we can, and we’ll do that in the chapter on text.
‘‘MAIN’’
2004/5/11
page 158
ii
i
ii
i
158 Chapter 4 Advanced Pictures
FIGURE 4.13: A programmed gray scale effect
4.5 PROGRAMS AS SPECIFYING DRAWING PROCESS
What we can do with drawing functions like these is create pictures that are ex-actly specified—things that might be too hard to do by hand. Take, for example,Figure 4.13.
This doesn’t work quite as well as a professionally done picture, but it’s simpleto understand how it works. Our eyes tell us that the left half of the picture is lighterthan the right half, even though the end quarters are exactly the same shade ofgray. The effect is caused by the sharp boundary between the middle quarters,where one moves (left-to-right) from gray to white, and the other moves black togray.
The image in Figure 4.13 is a carefully defined and created picture. It wouldbe very hard to do with pencil and paper. It would be possible to do with some-thing like Photoshop, but it wouldn’t be easy. Using the graphics functions in thischapter, however, we can easily specific exactly what that picture should be.
Recipe 45: Draw the gray effect picture
/**
* Method to draw a gray effect picture
* @return the picture that shows the gray effect
*/
public static Picture drawGrayEffect()
{
// create a picture to draw on
Picture pic = new Picture(400,100);
// create a medium gray color to use
Color medGray = new Color(100,100,100);
// Do 100 columns of medium gray
for (int x = 0; x < 100; x++)
for (int y = 0; y < 100; y++)
pic.getPixel(x,y).setColor(medGray);
// Do 100 columns of gray starting at medium gray and getting lighter
for (int x=100, grayLevel=100; x < 200; x++,grayLevel++)
“MAIN”2004/5/11page 159
ii
i
ii
i
Section 4.5 Programs as Specifying Drawing Process 159
Making it Work Tip: Class Methods versus ObjectMethodsNotice that both of the methods that create and re-turn pictures are declared as static. This makes themclass methods and means that they can be called (in-voked) using the class name followed by a dot andthen the method name: Picture.drawExample() andPicture.drawGrayEffect(). Why are they class meth-ods instead of object methods (a method called on an ob-ject of the class)? When we call these methods do we havea current picture object to work on? No, these methodscreate a picture object so there is no picture object to callthe methods on. So, when there is no current object tocall the method on use a class method and when there isa current object to call the method on use an objectmethod.
Graphics functions are particularly good at drawings that are repeated wherethe positions of lines and shapes and the selection of colors can be made by math-
‘‘MAIN’’
2004/5/11
page 160
ii
i
ii
i
160 Chapter 4 Advanced Pictures
ematical relationships.
Recipe 46: Draw the picture in Figure 4.14
/**
* Method to draw a picture with a succession of filled rectangles
* with the top left corner the darkest and the bottom right the
* lightest
* @return the picture with the filled rectangles
*/
public static Picture drawFilledRectangles()
{
Picture p = new Picture(250,250);
Graphics g = p.getGraphics();
Color color = null;
// loop 25 times
for (int i = 25; i > 0; i--)
{
color = new Color(i * 10, i * 5, i);
g.setColor(color);
g.fillRect(0,0,i*10,i*10);
}
// show the picture
p.show();
// return the picture
return p;
}
End of Recipe 46
Recipe 47: Draw the picture in Figure 4.15
/**
* Method to draw a picture with a succession of rectangles
* @return the picture with the filled rectangles
*/
public static Picture drawRectangles()
{
“MAIN”2004/5/11page 161
ii
i
ii
i
Section 4.5 Programs as Specifying Drawing Process 161
FIGURE 4.14: Nested filled rectangles image
Picture p = new Picture(Picture.getMediaPath("640x480.jpg"));
Graphics g = p.getGraphics();
Color color = null;
// loop 25 times
for (int i = 25; i > 0; i--)
{
g.setColor(Color.black);
g.drawRect(i,i,i*3,i*4);
g.drawRect(100+i*4,100+i*3,i*8,i*10);
}
// show the picture
p.show();
// return the picture
return p;
}
End of Recipe 47
4.5.1 Why do we write programs?
Why do we write programs, especially to draw pictures like this? Could we drawpictures like these in Photoshop? Certainly we can, but we’d have to know how,and that’s not easy knowledge to come by. Could I teach you how to do this inPhotoshop? Probably, but that may take a lot of effort?
But if I give you these programs, you can create the picture anytime you want.What’s more, by giving you the program, I’m giving you the exact definition that
“MAIN”2004/5/11page 162
ii
i
ii
i
162 Chapter 4 Advanced Pictures
FIGURE 4.15: Nested rectangles image
you can go and change for yourself.
Computer Science Idea: We write programs toencapsulate and communicate process
The reason why we write programs is to exactly specify aprocess and to communicate it to others.
Imagine that you have some process to communicate. It doesn’t have tobe drawing—imagine that it’s a financial process (such that you could do it in aspreadsheet or in a program like Quicken) or something that you do with text (suchas laying out text for a book or a brochure). If you can do something by hand,you should just do it. If you need to teach someone else to do it, consider writinga program to do it. If you need to explain to lots of people how to do it, definitelyuse a program. If you want lots of people to be able to do the process themselves,without someone having to teach them something first, definitely write a programand give the people the program.
FUNCTIONS AND OBJECTS SUMMARY
Here are the functions introduced in this chapter:
“MAIN”2004/5/11page 163
ii
i
ii
i
Section 4.5 Programs as Specifying Drawing Process 163
graphics.drawString(string,x,y) draws the string starting at position (x, y) in thepicture using the graphics object.
graphics.drawLine(x1,y1,x2,y2) draws a line from position (x1, y1) to (x2, y2) us-ing the graphics object.
graphics.drawRect(x1,y1,width,height)draws a rectangle with the upper left hand cor-ner at (x1, y1), a width of width, and a height ofheight using the graphics object.
graphics.fillRect(x1,y1,width,height)draws a rectangle filled with the current color withthe upper left hand corner at (x1, y1), a width ofwidth, and a height of height.
graphics.drawOval(x1,y1,width,height)draws a oval enclosed by the rectangle with the up-per left hand corner at (x1, y1), a width of width,and a height of height using the graphics object.
graphics.fillOval(x1,y1,width,height)draws a filled oval enclosed by the rectangle withthe upper left hand corner at (x1, y1), a width ofwidth, and a height of height using the graphicsobject.
graphics.drawArc(x1,y1,width,height,startAngle,arcAngle)draws a arc which is part of an oval enclosed bythe rectangle with the upper left hand corner at(x1, y1), a width of width, and a height of heightusing the graphics object. The startAngle saysat what angle to start drawing the arc and thearcAngle is what is the total angle of the arc.
graphics.fillArc(x1,y1,width,height,startAngle,arcAngle)draws a filled arc which is part of an oval enclosedby the rectangle with the upper left hand corner at(x1, y1), a width of width, and a height of heightusing the graphics object. The startAngle saysat what angle to start drawing the arc and thearcAngle is what is the total angle of the arc.
graphics.setColor(color) changes the drawing color to the passed in colorobject.
PROBLEMS
4.1. Try doing chromakey in a range—grab something out of its background wherethe something is only in one part of a picture. Now, composite the somethinginto a new picture (new background).
4.2. Using the drawing tools presented here, draw a house—just go for the simple
“MAIN”2004/5/11page 164
ii
i
ii
i
164 Chapter 4 Advanced Pictures
child’s house with one door, two windows, walls, and a roof.4.3. Using the house tool from the last exercise, draw a town with dozens of houses
at different sizes.4.4. Using the drawing tools presented here, draw a face with two eyes, a nose, and
a smile.4.5. Draw a rainbow.
“MAIN”2004/5/11page 165
ii
i
ii
i
C H A P T E R 5
Advanced Sounds:Synthesizing Sounds
165
“MAIN”2004/5/11page 166
ii
i
ii
i
C H A P T E R 6
Design and Debugging
166
“MAIN”2004/5/11page 167
ii
i
ii
i
Bibliography
1. Harold Abelson, Gerald Jay Sussman, and Julie Sussman, Structure and in-tepretation of computer programs – 2nd edition, MIT Press, Cambridge, MA, 1996.
2. Ken Abernethy and Tom Allen, Exploring the digital domain: An introduction tocomputing with multimedia and networking, PWS Publishing, Boston, 1998.
3. Beth Adelson and Elliot Soloway, The role of domain experience in softwaredesign., IEEE Transactions on Software Engineering SE-11 (1985), no. 11, 1351–1360.
4. Amy Bruckman, Situated support for learning: Storm’s weekend with rachael, Jour-nal of the Learning Sciences 9 (2000), no. 3, 329–372.
5. John T. Bruer, Schools for thought: A science of learning in the classroom, MITPress, Cambridge, MA, 1993.
6. Matthias Felleisen, Robert Bruce Findler, Matthew Flatt, and Shriram
Krishnamurthi, How to design programs: An introduction to programming and com-puting, MIT Press, Cambridge, MA, 2001.
7. James D. Foley, Andries Van Dam, and Steven K. Feiner, Introduction tocomputer graphics, Addison Wesley, Reading, MA, 1993.
8. Martin Greenberger, Computers and the world of the future, Transcribed record-ings of lectures held at the Sloan School of Business Administration, April, 1961, MITPress, Cambridge, MA, 1962.
9. Idit Harel and Seymour Papert, Software design as a learning environment, In-teractive Learning Environments 1 (1990), no. 1, 1–32.
10. Brian Harvey, Computer science logo style 2/e vol. 1: Symbolic computing, MITPress, Cambridge, MA, 1997.
11. Margaret Livingstone, Vision and art: The biology of seeing, Harry N. Abrams,Inc., New York, 2002.
12. M. Resnick, Turtles, termites, and traffic jams: Explorations in massively parallelmicroworlds, MIT Press, Cambridge, MA, 1997.
167
“MAIN”2004/5/11page 168
ii
i
ii
i
Index
=, 32==, 55
abstraction, 40ACM Turing Award, 14acuity, 47algebra, 19algorithm, 6algorithms, 7alpha channel, 50American Standard Code for Information Interchange (ASCII), 10analogue, 12applets, 19argument, 40array, 17artificial intelligence, 7ASCII, 10assignment, 32AutoCAD, 157
color replacement, 117color.brighter(), 56color.darker(), 56ColorChooser.pickAColor(), 56commands, 35common bug
An Example Common Bug, 2Backslashes and Slashes, 34DrJava is slow to start, 21End with .jpg, 56Java’s types can produce odd results, 24Making DrJava run faster, 21Patience: for loops can take a long time, 63Saving a file quickly—and how to find it again, 56Seeing changes in the picture, 55
An Example Idea, 2Computer science is the study of recipes, 6Computers can layer encodings, 10Moore’s Law, 11Much of programming is about naming, 16Programs are for people, not computers., 16Programs are for people., 73Scope, 65The most important skill is tracing, 63We can substitute names, values, and methods., 34We write programs to encapsulate and communicate process, 162
== and .equals, 55An Example Debugging Tip, 2Common typos, 25Loops and Variable Declarations, 61Methods names must be followed by parentheses, 30Undefined Class Error, 54
liberal education, 14Lisp, 8lossy compression, 46luminance, 48, 50, 83
making it workAdd an input parameter to generalize a method, 146An Example How To Make It Work, 2Class Methods versus Object Methods, 159Comments in Java, 62Copying and pasting, 39Don’t just trust your programs, 67Don’t start by trying to write applications, 74Get to know your Help, 23Importing Classes from Packages, 53Java Conventions, 30Java Keywords, Operators, and Classes, 17Name the names you like, 38Optional parts of the for loop, 110
“MAIN”2004/5/11page 173
ii
i
ii
i
Index 173
Try every recipe, 35Types in Java, 28Using dot notation for public fields, 46
A simple blur, 128An example of using drawing commands, 155An Example Recipe, 2Better Swap Background, 146Blending two pictures, 108Chromakey, shorter, 150Chromakey: Replace all blue with the new background, 148Clear the blue component from a picture, 69Color replacement in a range, 118Color replacement: Turn Katie into a redhead, 117Convert a picture to sepia-tones, 123Convert to grayscale, 83Convert to grayscale with more careful control of luminance, 83Copy elsewhere into the canvas, 99Copying a picture to a canvas, 96Create the negative of the original picture, 81Creating a collage, 103Cropping a picture onto a canvas, 100Darken the picture, 80Draw lines by setting pixels, 152Draw the gray effect picture, 158Draw the picture in Figure 4.14, 160Draw the picture in Figure 4.15, 160
“MAIN”2004/5/11page 175
ii
i
ii
i
Index 175
Increase the red component by 30%, 68Lighten the picture, 79Lighten the picture using nested loops, 85Making a sunset, 70Making a sunset as three methods, 72Mirror pixels horizontally, bottom-to-top, 90Mirror pixels horizontally, top-to-bottom, 89Mirror pixels in a picture along a vertical line, 87Mirror the Temple of Zeus, 91Pick and play a sound, 38Pick and show a picture, 37Play a specific sound, 39Play the sound file whose file name is input, 41Posterize by levels, 126Posterizing a picture, 125Reduce the amount of red in a picture by 50%, 61Remove red eye, 120Rotating a picture, 111Scaling a picture down (smaller), 114Scaling the picture up (larger), 115Show a specific picture, 39Show the picture file whose file name is input, 40Show the picture provided as input, 41Subtract the background and replace it with a new one, 143