26
INTRODUCTION TO PROJECT SHARING MULTI-USER ENVIRONMENT In VECTORWORKS ARCHITECT
INTRODUCTION TO PROJECT SHARINGMULTI-USER ENVIRONMENT
In VECTORWORKS ARCHITECT

3VECTORWORKS.NET
WHAT’S INSIDE
INTRODUCTION 5
UNDERSTANDING PROJECT SHARING 6
TERMINOLOGY 6
OVERVIEW OF PROJECT SHARING 8
WHEN TO USE PROJECT SHARING 10
HOW TO SET UP FOR PROJECT SHARING 11
UNDERSTANDING AND DETERMINING PERMISSION LEVELS 11
FILE ORGANIZATION AND SETUP 14
HOW TO ACCESS RESOURCES 15
USING PROJECT SHARING 17
LOCATION OF THE PROJECT FILE 17
CLOUD-BASED SHARING 18
LOCATION OF THE WORKING FILE 19
HOW TO CREATE A PROJECT FILE AND WORKING FILES 20
DRAWING IN A WORKING FILE 23
·SpecificObjectandLayerCheckOut 25
·CreatingandEditingResources 29
·Referencing 31
·WorkinginViewports 32
·CreatingDrawingsandSchedules 32
·CommittingChanges 34
·ReleasingCheckedOutObjectsandLayers 34
·RefreshingaWorkingFile 37
·AccessingaBackupFile&WhentoCreateaNewWorkingFile 38
·WorkingoverVPN 40
·WorkingovertheCloud 40
PUBLISHING OR PLOTTING A DRAWING SET 41
ARCHIVING 42
PROJECT SHARING ADMINISTRATIVE RESPONSIBILITIES 43
ADDITIONAL INFORMATION 46

FIGURE 1 Understanding Project Sharing
5VECTORWORKS.NET
Project Sharing is a multi-user environment that streamlines project organization and management. It was developed to help Vectorworks users manage projects involving multiple users fostering effective collaboration and communication within a project team. Project Sharing is a single-file structure providing a mechanism that allows multiple users to work within—and access parts of—a file, simultaneously (FIGURE 1).
Management is done through a robust, permission-based system with options to control access and rights among the design team. Team members are granted access to specific design layers and sheet layers. They have the ability to “check out” those layers to work on and then check them back in. Vectorworks software communicates the status of the files being used along the way, keeping the entire project team informed during the project.
INTRODUCTION TO PROJECT SHARING

FIGURE 2 Working File titlebar
7 6 VECTORWORKS.NETIntroduction to Project Sharing in Vectorworks Architect
The functionality of Project Sharing brings some new terminology that is necessary to understand.
PROJECT SHARINGThe multi-user environment within Vectorworks. Project Sharing creates an environment that streamlines project organization and management by allowing design teams to work concurrently in the same Vectorworks document.
PROJECT FILEA single file that serves as the hub for sharing or collaborating on a project. All team members can access the Project File by way of their Working File. A Project File will be designated with the new file extension .vwxp. When a Project File is opened, a Working File is created. This means that the Project File is always accessed through a Working File. The Project File should be kept on a server that can be accessed by all team members.
WORKING FILEA local copy of a Project File specific to the user who has created it. The Working File is used to add to, subtract from, or modify the Project File. In essence, all modeling and drawing creation is done in a Working File and then is committed back to the Project File. A Working File is designated with the new file extension .vwxw. When a Working File is open, the title bar on the file will include “WORKING FILE” to indicate that you are currently in a Working File (FIGURE 2). The Working File is kept on the hard drive of your local computer.
CHECK OUTReserving design layers and sheet layers for exclusive use. Once a person checks out a layer, they become the owner of that layer and it becomes unavailable to other team members until it is released.
COMMITSaving changes made to a Working File back to the Project File.
UNDERSTANDING PROJECT SHARING
TERMINOLOGY
RELEASERelinquishing your reservation on, or exclusive access to, layers that were previously checked out by you. This will make layers available for others to check out.
REFRESHAn update of all out-of-date parts of your Working File. A refresh can be done when another team member commits their changes to the Project File, thereby making parts of your Working File out-of-date. A refresh does not commit your Working File; nor does it delete any of your uncommitted work.
REVERT Discards any changes in the active Working File and reloads an exact copy of the Project File in its current state. This should be used only when changes to your Working File are to be thrown away and not committed to the Project File.
MASTER LAYERA designated, special layer that changes infrequently over the life of a project. A Master Layer may contain critical information that should not be changed or overwritten. An example of such a layer may be a design layer that holds a project’s structural grid. You can have multiple Master Layers in a project.
OFFLINE MODEWhen a Working File is disconnected from the Project File while maintaining exclusive access to the checked out layers. Offline Mode allows you to continue working without access to the server where the Project File is saved. Layers must be checked out before using Offline Mode in order to maintain exclusive access to them. Once the Working File is reconnected to the server and the Project File, changes made in Offline Mode can be committed back to the Project File.
PERMISSION LEVEL One of the unique features of Vectorworks’ Project Sharing is the ability to assign a Permission level to each member of a project team. Permission levels range from Administrative to Read Only, and allow for greater control and management of resources and editing of the Project File. More about the various permission levels can be found in the How to Set Up for Project Sharing section.
TERMINOLOGY (CONT’D)

FIGURE 3 Project Sharing command in the File Menu.
FIGURE 4 “Save and Commit” in the File Menu
FIGURE 5 “Close and Release” in the File Menu
9 8 VECTORWORKS.NETIntroduction to Project Sharing in Vectorworks Architect
Any existing or new Vectorworks document can be shared as a Project File by simply designating it as a Project File through the new Project Sharing command in the File Menu (FIGURE 3). Once a Vectorworks document has been marked as a Project File, all subsequent file opens on that file will effectively open a clone of the Project File. These clone files are called Working Files.
This means that the Project File itself is never actually opened. Consequently, all changes, edits, and adjustments are done through a Working File.
When a Working File is created, you can check out objects as needed, or an entire layer, which will include all objects on that particular layer. Other team members may check out different layers or objects and work on those in their own Working File. This happens concurrently with the work you are doing in your own Working File.
Each Working File will contain all information, geometry, and data from the Project File, however, users will be restricted in the types of changes they can make in each Working File based on the objects and layers they have checked out and whether they are permitted to make certain changes according to their Permission level.
OVERVIEW OF PROJECT SHARING
Once you reach a point where you want to merge your changes back into the Project File, you will merge those changes by performing a commit through the Save and Commit command in the File Menu (FIGURE 4). Changed objects and layers will, in essence, be inserted back into the Project File, and other, non-drawing data such as resources, will be merged into the Project File. Once you have performed a Save and Commit, others can see your changes by Refreshing their own Working Files.
After you’ve performed a Save and Commit, you can continue to make changes to your Working File, as you still have exclusive access to your checked out layers. If you have no more changes to make, you can perform a Close and Release, which releases the exclusive access that you have on the checked-out layers (FIGURE 5).
11 10 VECTORWORKS.NETIntroduction to Project Sharing in Vectorworks Architect
Because Project Sharing does not change any fundamental aspects of Vectorworks, it can be implemented at any time during a project using any Vectorworks document that will require multiple users. Project Files can also be easily reverted back to regular Vectorworks documents when deemed necessary (for example, when archiving a project).
There is no minimum or maximum size requirement of a project or project team. More importantly, Project Sharing can accommodate the need to increase or decrease the size of the team as necessary.
As Project Sharing can be implemented at any point in time, there are no preset rules or requirements for changing a Vectorworks document to a Project File. What may help determine the need for a Project File will be whether or not more than one person needs to access and edit information within the file. So depending on how a project begins and how it evolves, the point in time at which a Project File is created will vary. For example, if a project begins with one person in the conceptual design phase, a Project File may not be necessary. If after the completion of a schematic design package, a team of three people is formed, the Vectorworks document from the schematic design phase can be changed into a Project File, allowing multiple people to access it and continue developing the design.
WHEN TO USE PROJECT SHARING
Because Project Sharing is based on Vectorworks software’s layer organization, the permission levels that are available vary from the ability to create layers to the ability to only edit existing layers. These layers include both design layers and sheet layers.
Permission is also required to add, edit, or delete a shared resource such as symbols, wall styles, or classes. The restrictions for each permission level will help determine how to assign a permission level to a project team member.
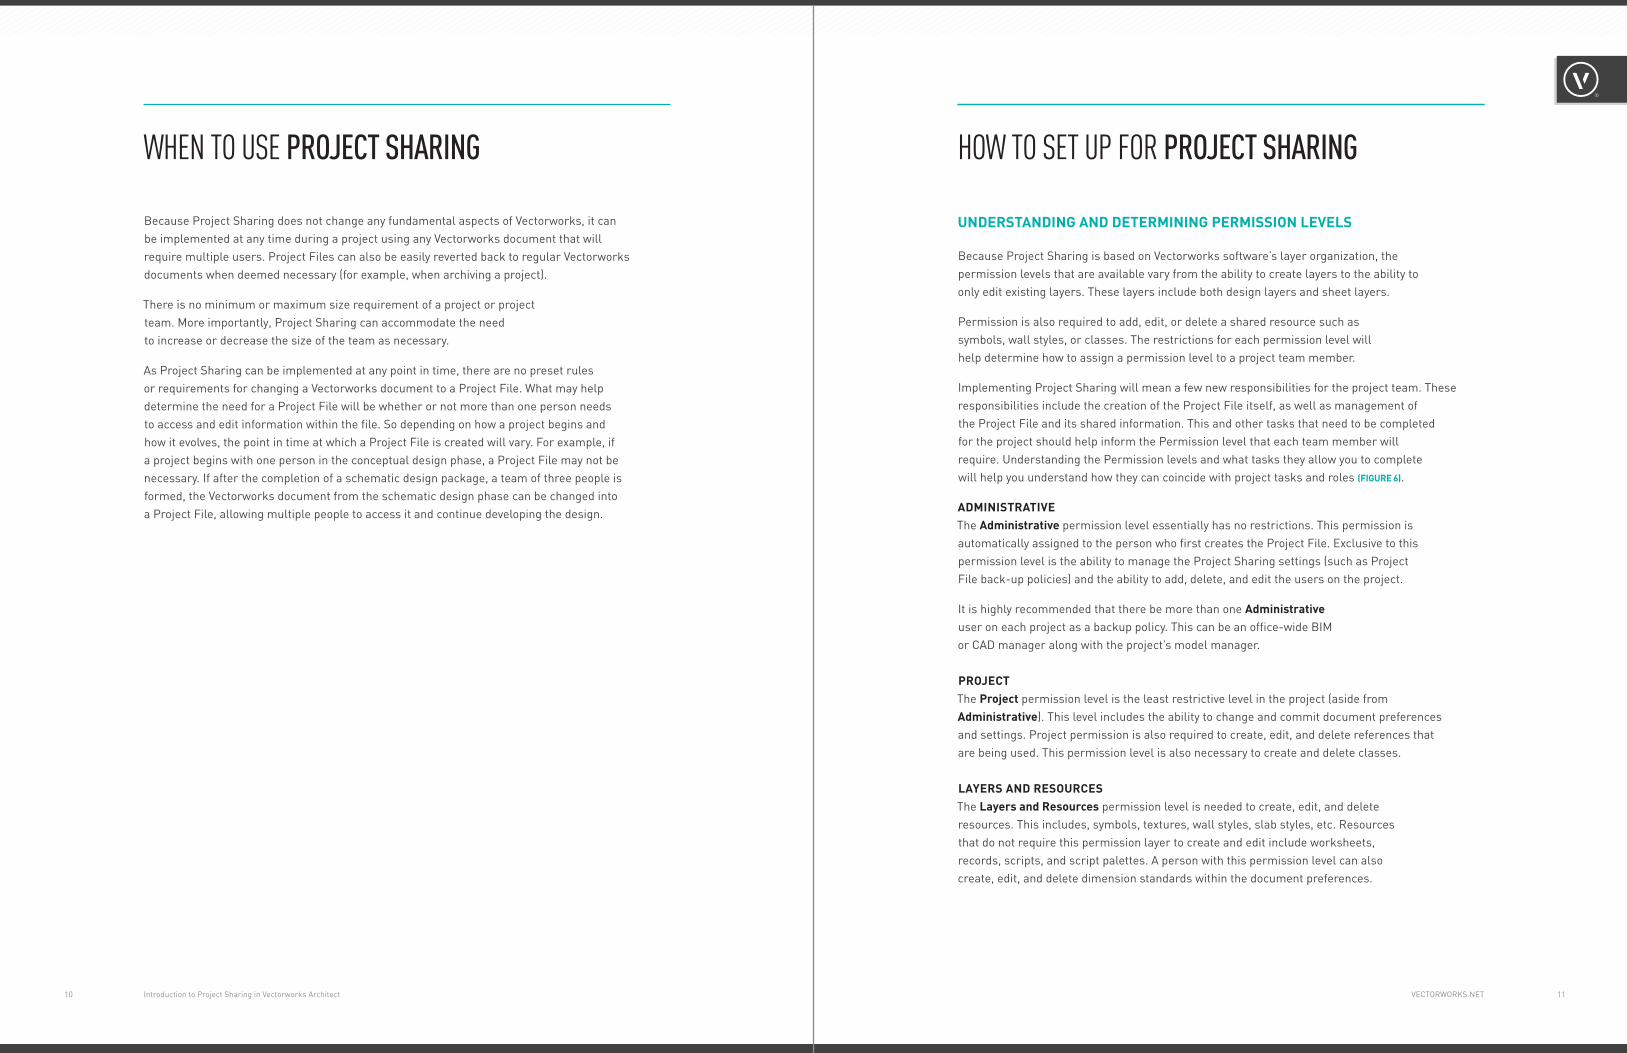
Implementing Project Sharing will mean a few new responsibilities for the project team. These responsibilities include the creation of the Project File itself, as well as management of the Project File and its shared information. This and other tasks that need to be completed for the project should help inform the Permission level that each team member will require. Understanding the Permission levels and what tasks they allow you to complete will help you understand how they can coincide with project tasks and roles (FIGURE 6).
ADMINISTRATIVEThe Administrative permission level essentially has no restrictions. This permission is automatically assigned to the person who first creates the Project File. Exclusive to this permission level is the ability to manage the Project Sharing settings (such as Project File back-up policies) and the ability to add, delete, and edit the users on the project.
It is highly recommended that there be more than one Administrative user on each project as a backup policy. This can be an office-wide BIM or CAD manager along with the project’s model manager.
PROJECTThe Project permission level is the least restrictive level in the project (aside from Administrative). This level includes the ability to change and commit document preferences and settings. Project permission is also required to create, edit, and delete references that are being used. This permission level is also necessary to create and delete classes.
LAYERS AND RESOURCESThe Layers and Resources permission level is needed to create, edit, and delete resources. This includes, symbols, textures, wall styles, slab styles, etc. Resources that do not require this permission layer to create and edit include worksheets, records, scripts, and script palettes. A person with this permission level can also create, edit, and delete dimension standards within the document preferences.
HOW TO SET UP FOR PROJECT SHARING
UNDERSTANDING AND DETERMINING PERMISSION LEVELS
PERMISSION LEVEL DESCRIPTION
Read Only Read and view the content of the file
Navigate in the file
Edit class and layer visibilities (cannot commit)
Layers - Restricted Read Only permissions, plus:
Create, delete, and edit objects on layers
Create, delete, and edit worksheets, scripts, and script palettes
Edit unrestricted document preferences and settings (cannot commit)
Create and edit saved views (cannot commit)
Create and edit working planes (cannot commit)
Layers - Unrestricted Layers-Restricted permissions, plus:
Create, delete, and edit layers
Commit saved views
Create, delete, edit, and commit a Publish Saved Sets
Create, delete, edit, and commit batch render jobs
Layers and Resources Layers-Unrestricted permissions, plus:
Create, delete, and edit resources
Create, delete, and edit dimension standards
Create, delete, and edit patterns
Project Layers and Resources permissions, plus:
Create, delete, and edit classes
Create, delete, and edit story data
Set and edit master layers
Create, delete, and edit references to Vectorworks files
Edit restricted access document preferences and settings
Commit all document preferences and settings
Administrative Project permissions, plus:
Manage Project Sharing settings
Add, delete, and edit users
FIGURE 6 Description of permission levels. FIGURE 7
Insufficient permission dialog.
13 12 VECTORWORKS.NETIntroduction to Project Sharing in Vectorworks Architect
UNDERSTANDING AND DETERMINING PERMISSION LEVELS (CONT’D)
LAYERS-UNRESTRICTEDAside from the ability to create, edit, and delete layers, this permission level also allows you to commit saved views back to the Project File, allowing others to access these views. This permission level or a higher permission is needed to create, edit, delete, and commit a Publish Saved Sets and batch render jobs. Lower permission levels can access Publish Saved Sets and batch render jobs, but cannot create them or commit them to the Project File.
LAYERS-RESTRICTEDThe Layers-Restricted permission level allows you to create, edit, and delete objects and information on layers that already exist in the Project File. Resources that can be created, edited, and deleted with this permission level include worksheets, scripts, and script palettes. It is important to note that this permission level allows you to create saved views, working planes, and edit any unrestricted document preferences so that you can continue to work in your Working File as you like. These types of changes or additions, however, will not be committed to the Project File.
READ ONLYAs indicted by the name, the Read Only permission level only allows you to navigate through the file. You can access and view all layers and information as well as update out-of-date viewports. You can change layers and class visibility in your Working File, but cannot commit these changes. This permission level does allow you to Publish drawings and run export commands.
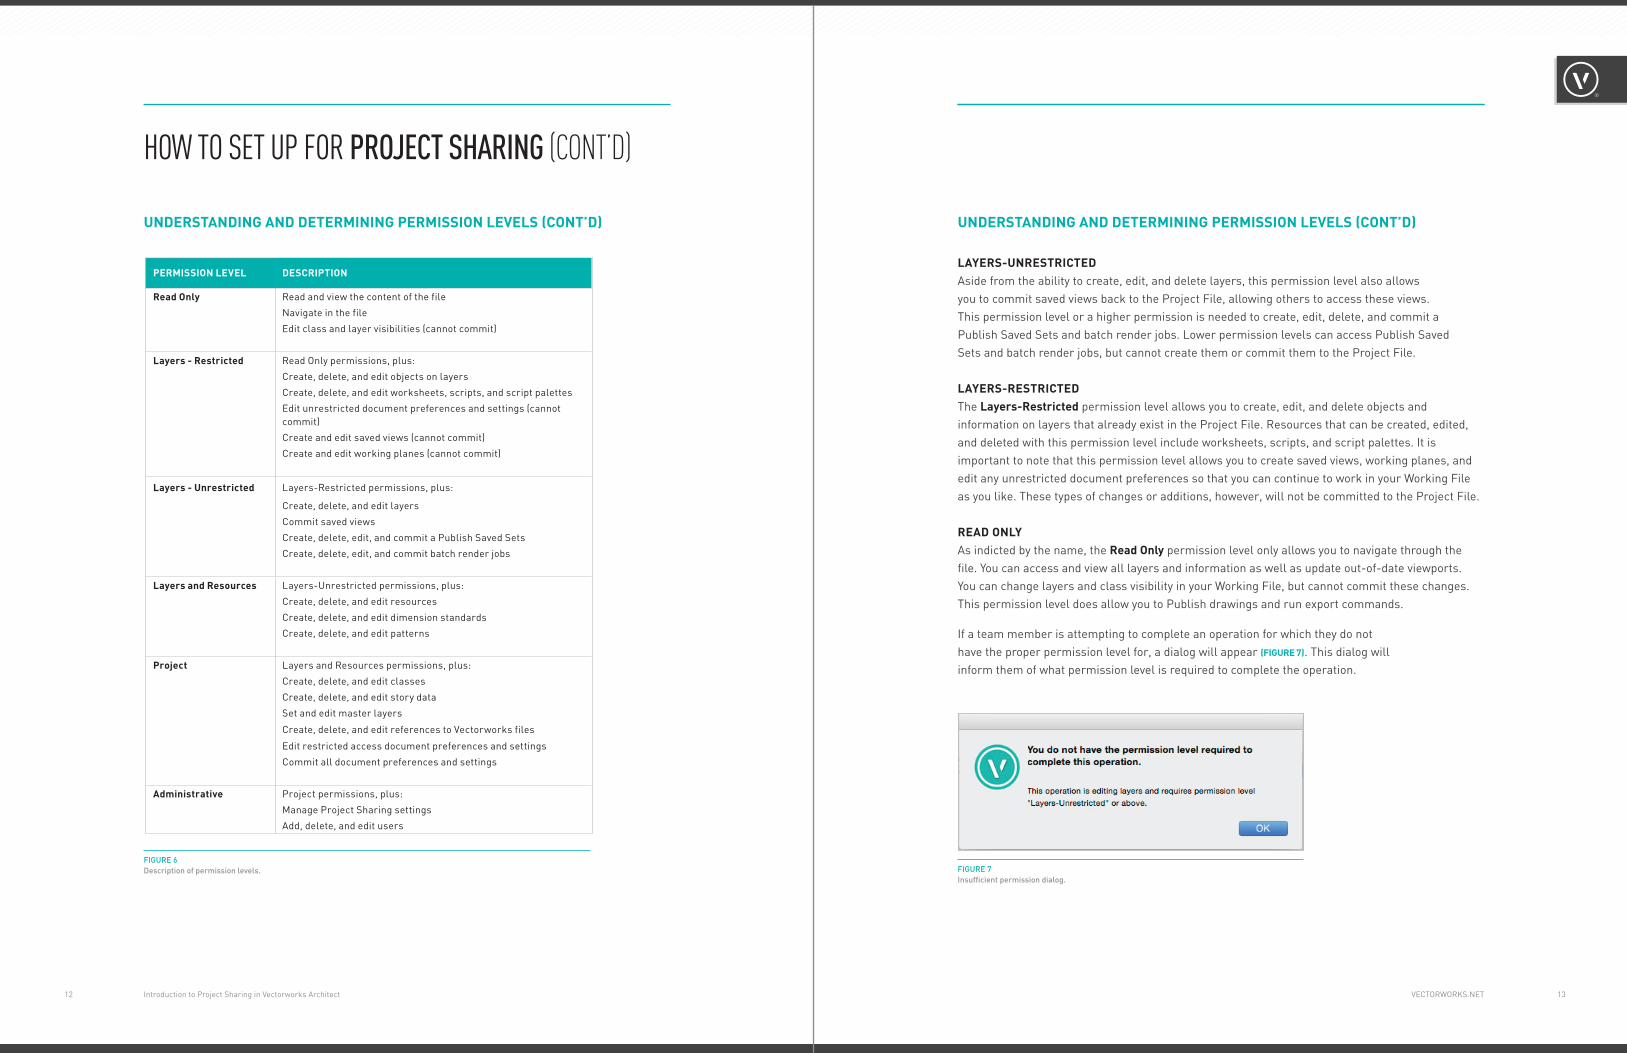
If a team member is attempting to complete an operation for which they do not have the proper permission level for, a dialog will appear (FIGURE 7). This dialog will inform them of what permission level is required to complete the operation.
UNDERSTANDING AND DETERMINING PERMISSION LEVELS (CONT’D)
HOW TO SET UP FOR PROJECT SHARING (CONT’D)
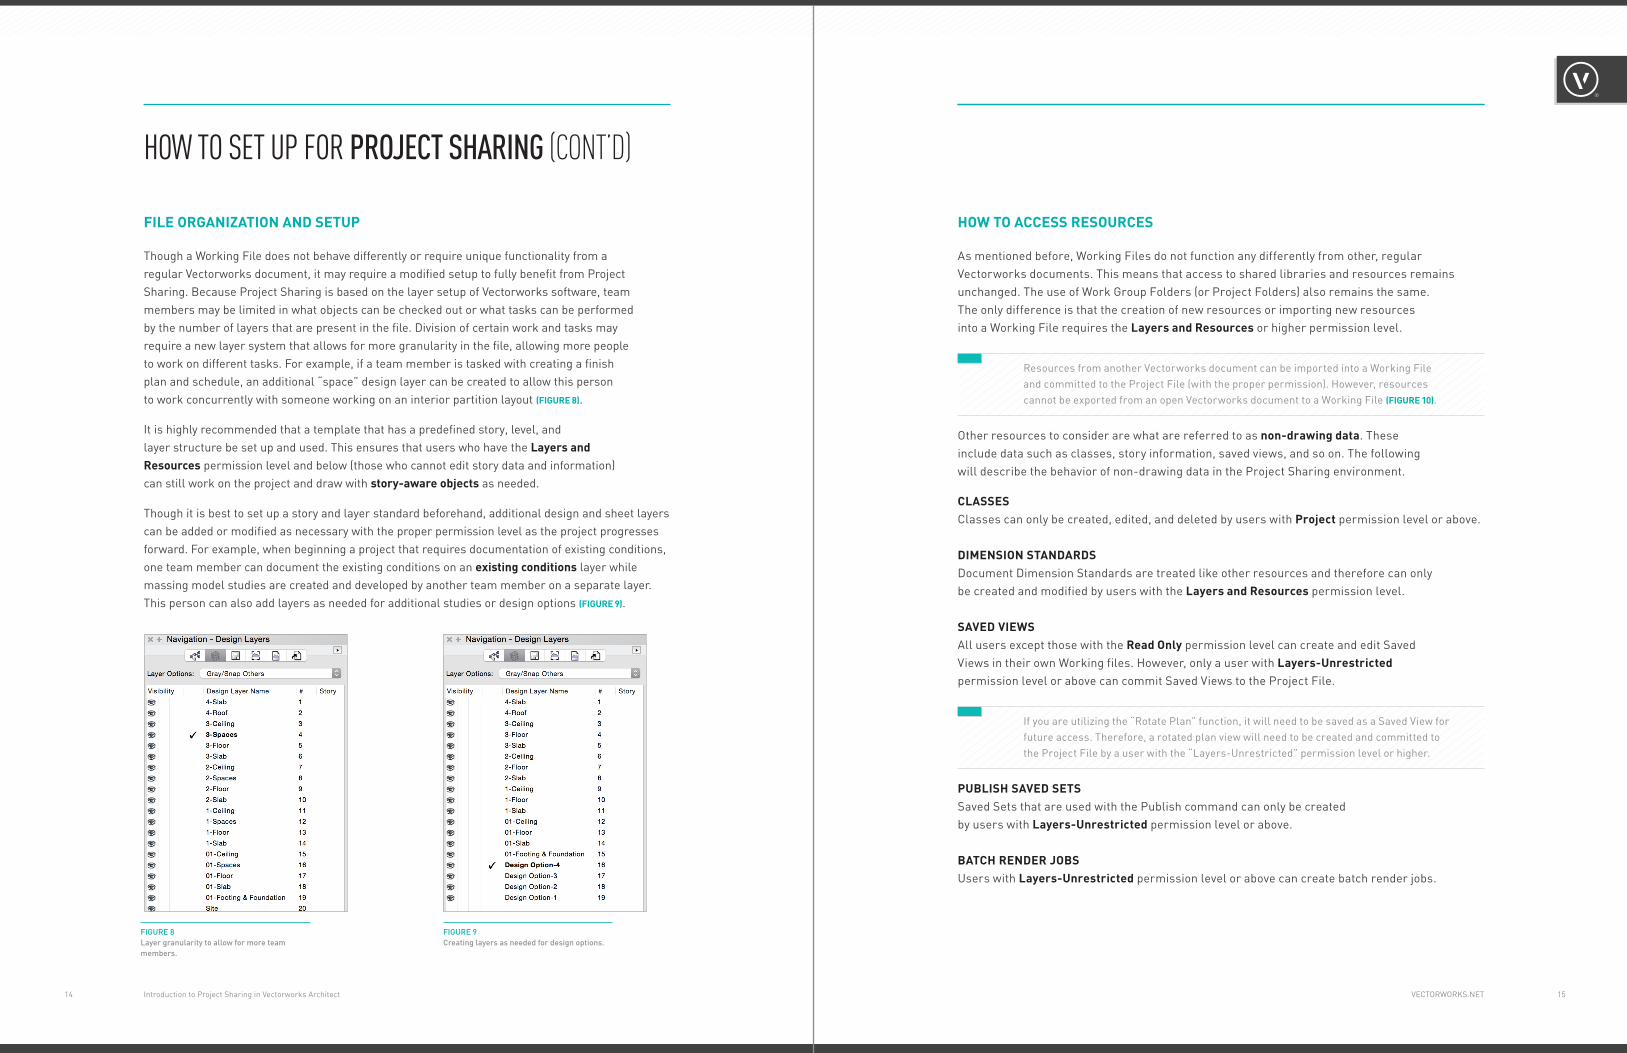
FIGURE 8 Layer granularity to allow for more team members.
FIGURE 9 Creating layers as needed for design options.
15 14 VECTORWORKS.NETIntroduction to Project Sharing in Vectorworks Architect
Though a Working File does not behave differently or require unique functionality from a regular Vectorworks document, it may require a modified setup to fully benefit from Project Sharing. Because Project Sharing is based on the layer setup of Vectorworks software, team members may be limited in what objects can be checked out or what tasks can be performed by the number of layers that are present in the file. Division of certain work and tasks may require a new layer system that allows for more granularity in the file, allowing more people to work on different tasks. For example, if a team member is tasked with creating a finish plan and schedule, an additional “space” design layer can be created to allow this person to work concurrently with someone working on an interior partition layout (FIGURE 8).
It is highly recommended that a template that has a predefined story, level, and layer structure be set up and used. This ensures that users who have the Layers and Resources permission level and below (those who cannot edit story data and information) can still work on the project and draw with story-aware objects as needed.
Though it is best to set up a story and layer standard beforehand, additional design and sheet layers can be added or modified as necessary with the proper permission level as the project progresses forward. For example, when beginning a project that requires documentation of existing conditions, one team member can document the existing conditions on an existing conditions layer while massing model studies are created and developed by another team member on a separate layer. This person can also add layers as needed for additional studies or design options (FIGURE 9).
HOW TO SET UP FOR PROJECT SHARING (CONT’D)
FILE ORGANIZATION AND SETUP
As mentioned before, Working Files do not function any differently from other, regular Vectorworks documents. This means that access to shared libraries and resources remains unchanged. The use of Work Group Folders (or Project Folders) also remains the same. The only difference is that the creation of new resources or importing new resources into a Working File requires the Layers and Resources or higher permission level.
Resources from another Vectorworks document can be imported into a Working File and committed to the Project File (with the proper permission). However, resources cannot be exported from an open Vectorworks document to a Working File (FIGURE 10).
Other resources to consider are what are referred to as non-drawing data. These include data such as classes, story information, saved views, and so on. The following will describe the behavior of non-drawing data in the Project Sharing environment.
CLASSES Classes can only be created, edited, and deleted by users with Project permission level or above.
DIMENSION STANDARDSDocument Dimension Standards are treated like other resources and therefore can only be created and modified by users with the Layers and Resources permission level.
SAVED VIEWSAll users except those with the Read Only permission level can create and edit Saved Views in their own Working files. However, only a user with Layers-Unrestricted permission level or above can commit Saved Views to the Project File.
If you are utilizing the “Rotate Plan” function, it will need to be saved as a Saved View for future access. Therefore, a rotated plan view will need to be created and committed to the Project File by a user with the “Layers-Unrestricted” permission level or higher.
PUBLISH SAVED SETS Saved Sets that are used with the Publish command can only be created by users with Layers-Unrestricted permission level or above.
BATCH RENDER JOBS Users with Layers-Unrestricted permission level or above can create batch render jobs.
HOW TO ACCESS RESOURCES
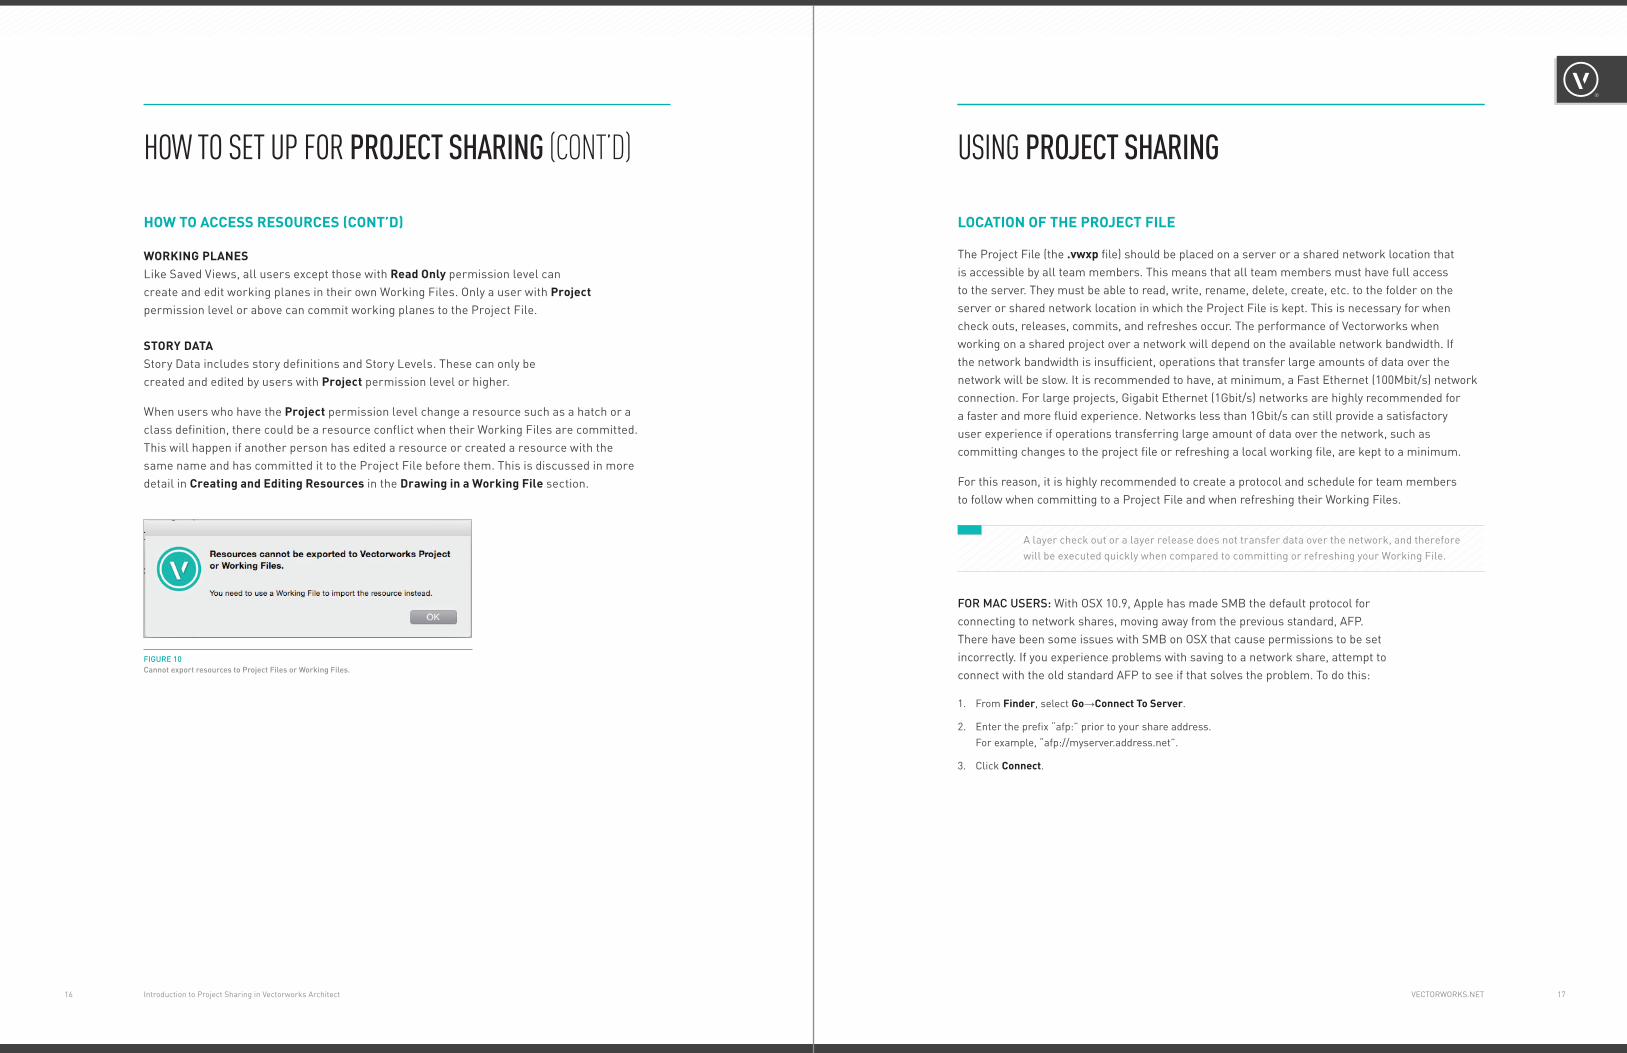
FIGURE 10 Cannot export resources to Project Files or Working Files.
17 16 VECTORWORKS.NETIntroduction to Project Sharing in Vectorworks Architect
WORKING PLANESLike Saved Views, all users except those with Read Only permission level can create and edit working planes in their own Working Files. Only a user with Project permission level or above can commit working planes to the Project File.
STORY DATA Story Data includes story definitions and Story Levels. These can only be created and edited by users with Project permission level or higher.
When users who have the Project permission level change a resource such as a hatch or a class definition, there could be a resource conflict when their Working Files are committed. This will happen if another person has edited a resource or created a resource with the same name and has committed it to the Project File before them. This is discussed in more detail in Creating and Editing Resources in the Drawing in a Working File section.
HOW TO ACCESS RESOURCES (CONT’D)
The Project File (the .vwxp file) should be placed on a server or a shared network location that is accessible by all team members. This means that all team members must have full access to the server. They must be able to read, write, rename, delete, create, etc. to the folder on the server or shared network location in which the Project File is kept. This is necessary for when check outs, releases, commits, and refreshes occur. The performance of Vectorworks when working on a shared project over a network will depend on the available network bandwidth. If the network bandwidth is insufficient, operations that transfer large amounts of data over the network will be slow. It is recommended to have, at minimum, a Fast Ethernet (100Mbit/s) network connection. For large projects, Gigabit Ethernet (1Gbit/s) networks are highly recommended for a faster and more fluid experience. Networks less than 1Gbit/s can still provide a satisfactory user experience if operations transferring large amount of data over the network, such as committing changes to the project file or refreshing a local working file, are kept to a minimum.
For this reason, it is highly recommended to create a protocol and schedule for team members to follow when committing to a Project File and when refreshing their Working Files.
A layer check out or a layer release does not transfer data over the network, and therefore will be executed quickly when compared to committing or refreshing your Working File.
FOR MAC USERS: With OSX 10.9, Apple has made SMB the default protocol for connecting to network shares, moving away from the previous standard, AFP. There have been some issues with SMB on OSX that cause permissions to be set incorrectly. If you experience problems with saving to a network share, attempt to connect with the old standard AFP to see if that solves the problem. To do this:
1. From Finder, select Go→Connect To Server.
2. Enter the prefix “afp:” prior to your share address. For example, “afp://myserver.address.net”.
3. Click Connect.
USING PROJECT SHARING
LOCATION OF THE PROJECT FILE
HOW TO SET UP FOR PROJECT SHARING (CONT’D)

19 18 VECTORWORKS.NETIntroduction to Project Sharing in Vectorworks Architect
Project Files can be placed and shared in cloud storage with online applications. Supported cloud storage applications include:
∙ Dropbox
∙ OneDrive
∙ Google Drive
∙ Box
The corresponding desktop applications for these cloud solutions must be installed and used to create a project folder.
The Project File should be placed in this shared folder that can be accessed by all team members with full read, write, and delete permissions. The individual Project File itself should not be shared.
Never re-upload, move, or copy the Project File or the folder that contains the Project File once it has been placed in the cloud. This will cause connectivity problems between the Project File and the Working File.
CLOUD-BASED SHARING
USING PROJECT SHARING (CONT’D)
Working Files are created when you attempt to open a Project File. The name of the Working File will automatically be appended to include a suffix including the user’s name (FIGURE 2). Consequently, Working Files are unique to each user and should be used only by the designated user.
Though each user can create multiple Working Files, it is not recommended.
When you first create a Working File, it is still unsaved. This means that the file does not have a designated place to be stored – just like a new, Untitled Vectorworks file. For this reason, when a Working File is first created, it should be saved promptly.
The Project File will always be accessed through this Working File. Do not open the Project File again, as it will create a new Working File. Duplication of the Working File can lead to miscommunication and many errors with layer check outs. This will be discussed further in the Drawing in a Working File section.
The Working File should be saved to the user’s computer’s local hard drive. Though it can be saved on a server or in the shared cloud storage folder, it is not recommended to do so. The Project Sharing system is designed to minimize the complications of working over a server network. By saving a Working File on the server, you will not be taking full advantage of the optimization provided by Project Sharing. Saving on a local hard drive also allows the user to disconnect from the server and continue working in their Working File in Offline Mode.
The backup policy of a Working File is the same as the backup policy of a regular Vectorworks file. A backup copy of the file is created after a designated period of time has passed (every 10 minutes, every 15 minutes, etc.) or after the designated number of operations. The backup copy of your Working File should be created and stored on the same computer that the Working File itself is located. The backup copy should not be created or placed on the server or cloud.
LOCATION OF THE WORKING FILE
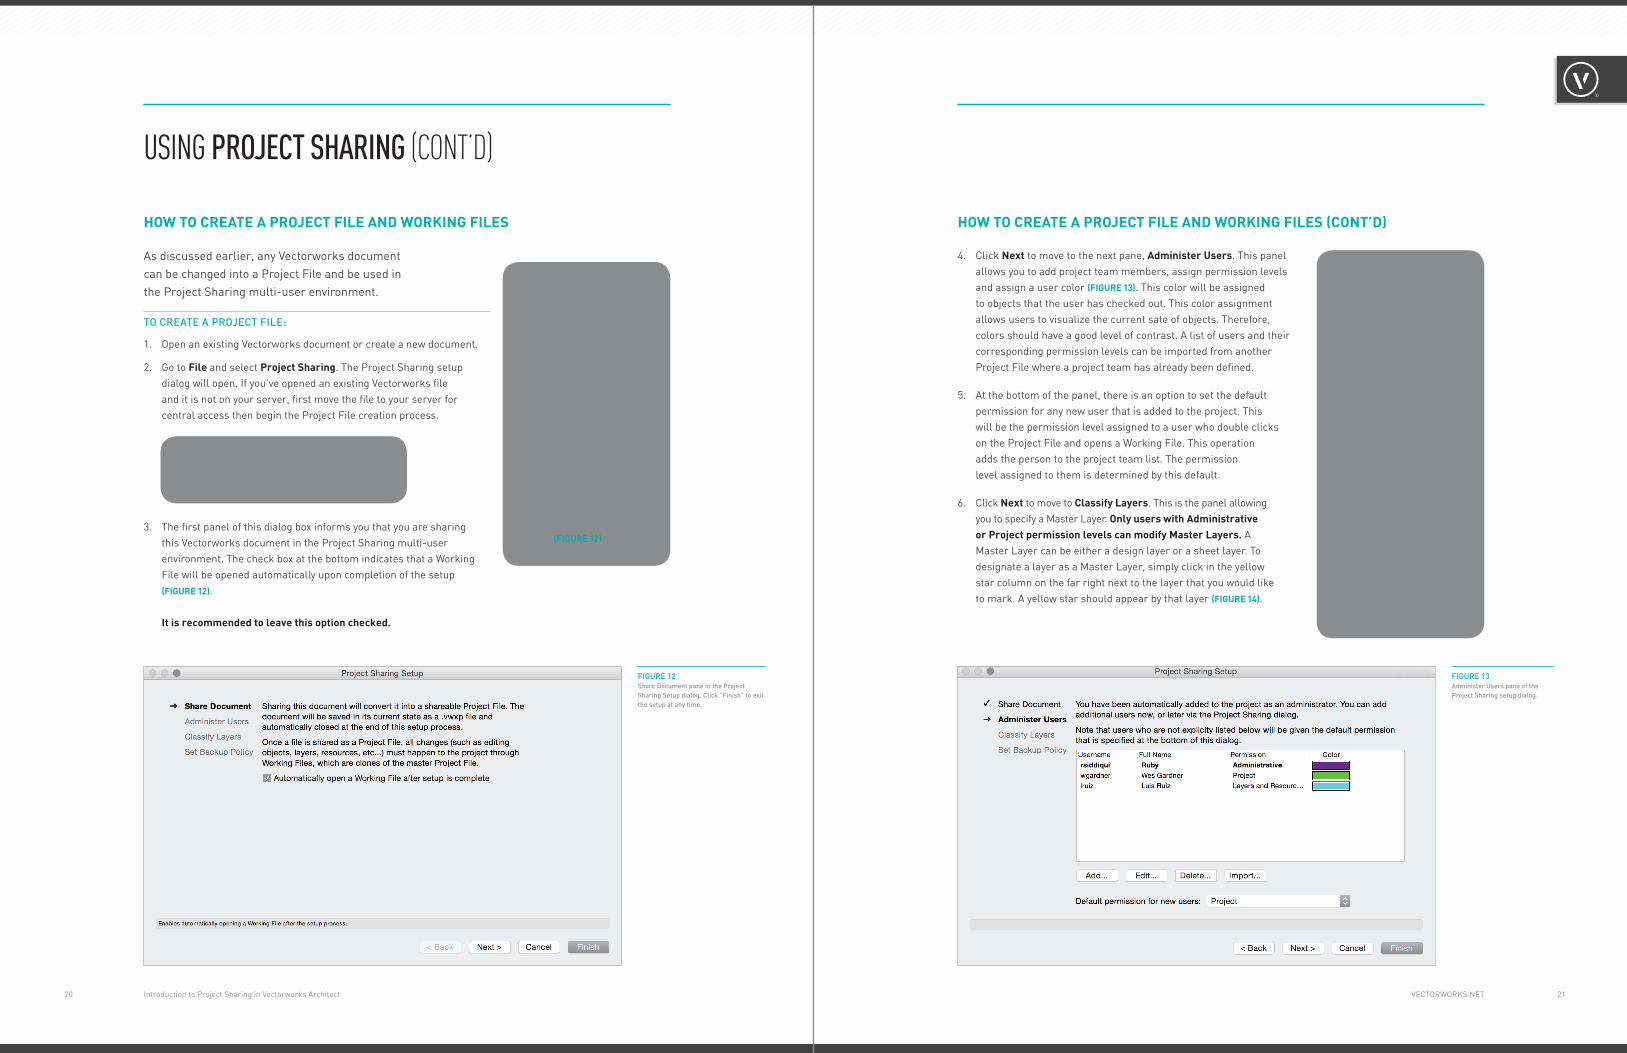
FIGURE 12 Share Document pane in the Project Sharing Setup dialog. Click “Finish” to exit the setup at any time.
FIGURE 13 Administer Users pane of the Project Sharing setup dialog.
Ifyou’vecreatedanewfile,youwillbepromptedtosavethefilebeforecontinuingwiththeProjectFilesetup.Savethefileonaserver/networkthatisaccessiblebyallteammembers.
Thesetupcanbeexitedatanytimebypressing“Finish”atthebottomright.ThiswillskipallsubsequentstepsofthesetupandopenaWorkingFilerightaway(FIGURE 12).
TheusernameisbasedontheUserNameofthecomputerortheUserNamethatisusedtoaccessthecentralserverornetwork.Forthisreason,itisimportantthatallusernamesmatch.
ItishighlyrecommendedthatthedefaultpermissionsettingbesettoRead Only.Thisensuresagainstanyunintentionalchangesbyanon-projectteammemberwhomayopenaWorkingFiletosimplyviewthemodelorprintacheckset.
AprojectcanhavemultipleMasterLayers.
21 20 VECTORWORKS.NETIntroduction to Project Sharing in Vectorworks Architect
As discussed earlier, any Vectorworks document can be changed into a Project File and be used in the Project Sharing multi-user environment.
TO CREATE A PROJECT FILE:
1. Open an existing Vectorworks document or create a new document.
2. Go to File and select Project Sharing. The Project Sharing setup dialog will open. If you’ve opened an existing Vectorworks file and it is not on your server, first move the file to your server for central access then begin the Project File creation process.
FOR CLOUD BASED SHARING: It is best to start with a regular Vectorworks file in a project folder already in your cloud folder.
3. The first panel of this dialog box informs you that you are sharing this Vectorworks document in the Project Sharing multi-user environment. The check box at the bottom indicates that a Working File will be opened automatically upon completion of the setup (FIGURE 12). It is recommended to leave this option checked.
HOW TO CREATE A PROJECT FILE AND WORKING FILES
4. Click Next to move to the next pane, Administer Users. This panel allows you to add project team members, assign permission levels and assign a user color (FIGURE 13). This color will be assigned to objects that the user has checked out. This color assignment allows users to visualize the current sate of objects. Therefore, colors should have a good level of contrast. A list of users and their corresponding permission levels can be imported from another Project File where a project team has already been defined.
5. At the bottom of the panel, there is an option to set the default permission for any new user that is added to the project. This will be the permission level assigned to a user who double clicks on the Project File and opens a Working File. This operation adds the person to the project team list. The permission level assigned to them is determined by this default.
6. Click Next to move to Classify Layers. This is the panel allowing you to specify a Master Layer. Only users with Administrative or Project permission levels can modify Master Layers. A Master Layer can be either a design layer or a sheet layer. To designate a layer as a Master Layer, simply click in the yellow star column on the far right next to the layer that you would like to mark. A yellow star should appear by that layer (FIGURE 14).
HOW TO CREATE A PROJECT FILE AND WORKING FILES (CONT’D)
USING PROJECT SHARING (CONT’D)
BecauseyouhavecreatedtheProjectFile,bydefaultyouhavetheAdministrativepermissionlevel.ThismeansthatyoucancheckoutaMasterLayerandmakechangestodefinedusersinthefileviayourownWorkingFile.
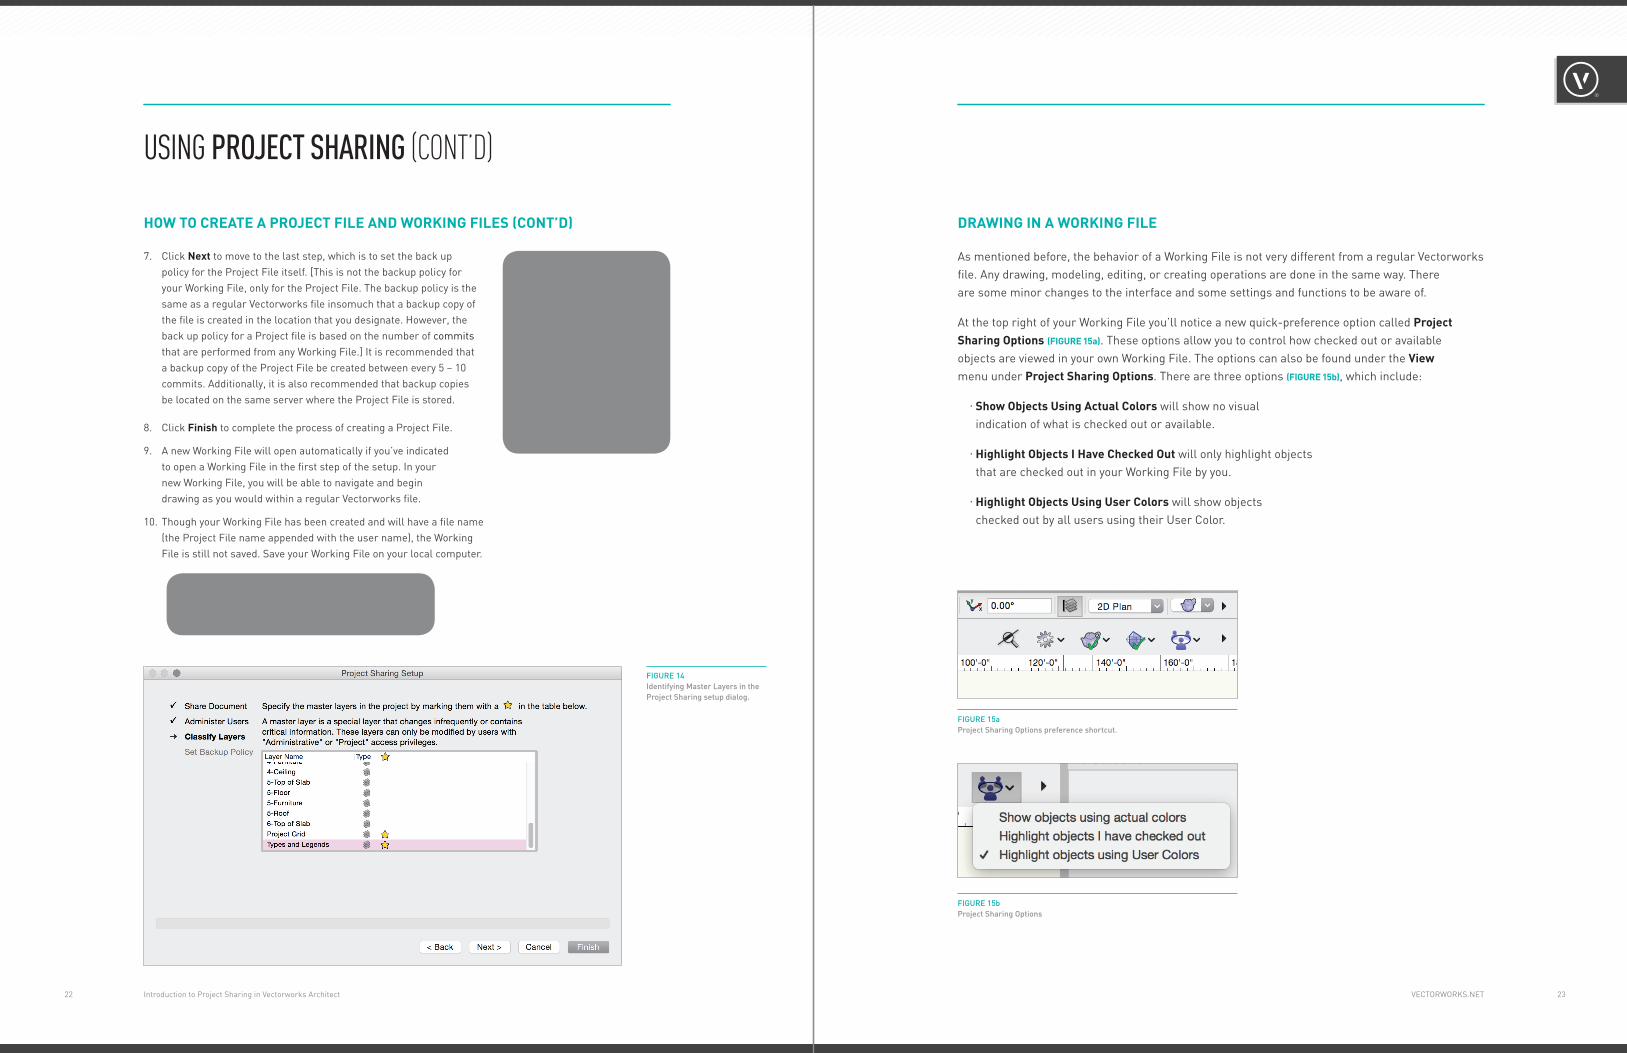
FIGURE 14 Identifying Master Layers in the Project Sharing setup dialog.
FIGURE 15a Project Sharing Options preference shortcut.
FIGURE 15b Project Sharing Options
23VECTORWORKS.NET 22 Introduction to Project Sharing in Vectorworks Architect
7. Click Next to move to the last step, which is to set the back up policy for the Project File itself. [This is not the backup policy for your Working File, only for the Project File. The backup policy is the same as a regular Vectorworks file insomuch that a backup copy of the file is created in the location that you designate. However, the back up policy for a Project file is based on the number of commits that are performed from any Working File.] It is recommended that a backup copy of the Project File be created between every 5 – 10 commits. Additionally, it is also recommended that backup copies be located on the same server where the Project File is stored.
8. Click Finish to complete the process of creating a Project File.
9. A new Working File will open automatically if you’ve indicated to open a Working File in the first step of the setup. In your new Working File, you will be able to navigate and begin drawing as you would within a regular Vectorworks file.
10. Though your Working File has been created and will have a file name (the Project File name appended with the user name), the Working File is still not saved. Save your Working File on your local computer.
FOR CLOUD BASED SHARING: Your Working File should still be saved to your local computer. This includes backups of your Working File.
HOW TO CREATE A PROJECT FILE AND WORKING FILES (CONT’D)
As mentioned before, the behavior of a Working File is not very different from a regular Vectorworks file. Any drawing, modeling, editing, or creating operations are done in the same way. There are some minor changes to the interface and some settings and functions to be aware of.
At the top right of your Working File you’ll notice a new quick-preference option called Project Sharing Options (FIGURE 15a). These options allow you to control how checked out or available objects are viewed in your own Working File. The options can also be found under the View menu under Project Sharing Options. There are three options (FIGURE 15b), which include:
∙ Show Objects Using Actual Colors will show no visual indication of what is checked out or available.
∙ Highlight Objects I Have Checked Out will only highlight objects that are checked out in your Working File by you.
∙ Highlight Objects Using User Colors will show objects checked out by all users using their User Color.
DRAWING IN A WORKING FILE
USING PROJECT SHARING (CONT’D)

FIGURE 16 User colors applied to checked out objects..
FIGURE 17 Object cues for (A) an object owner, (B) an available object, (C) objects that you own.
[A] [B] [C]
FIGURE 18 Unavailable object alert.
FIGURE 19 Alert indicating that check out of available objects is required.
25 24 VECTORWORKS.NETIntroduction to Project Sharing in Vectorworks Architect
By default, the Highlight Objects Using User Colors will be the option selected. Objects that are checked out by others will appear with the user’s designated color (FIGURE 16). There will also be object information cues that show the name of the owner of the object (FIGURE
17a). Objects that are available for check out will appear as normal, without a color highlight, and the objection information cue will read Available (FIGURE 17b). Objects checked out by you in your Working File will be designated as checked out by “me (username)” (FIGURE 17c).
To begin working in your Working File, you can simply begin to draw. You will notice that any new object created will by default take on your user color and be designated as checked out by you. If someone has a specific layer checked out, you will not be able to draw on that layer and will get an alert indicating that the layer is unavailable (FIGURE 18).
DRAWING IN A WORKING FILE DRAWING IN A WORKING FILE
SPECIFIC OBJECT AND LAYER CHECK OUTIn order to edit or modify any existing information or objects, you will need to check the object out or you can check the entire layer out. Checking out the entire layer will, in essence, check out all objects that are placed on that layer, as well as lock other users from placing new information on that layer. You can check out a layer and individual objects from different layers at the same time (meaning you can mix the two types of check outs).
TO CHECK OUT SPECIFIC OBJECTS:
1. Select the available object or objects.
2. Right click on the selected object(s) and select Check Out in the context menu. OR Go to Modify → Check Out. OR Simply begin to edit the object. You will be prompted to check out the available object and any related objects through an alert dialog (FIGURE 19).
Individual viewports on Sheet Layers can also be checked out on a per object basis allowing for multiple people to work on the same sheet layer.
USING PROJECT SHARING (CONT’D)
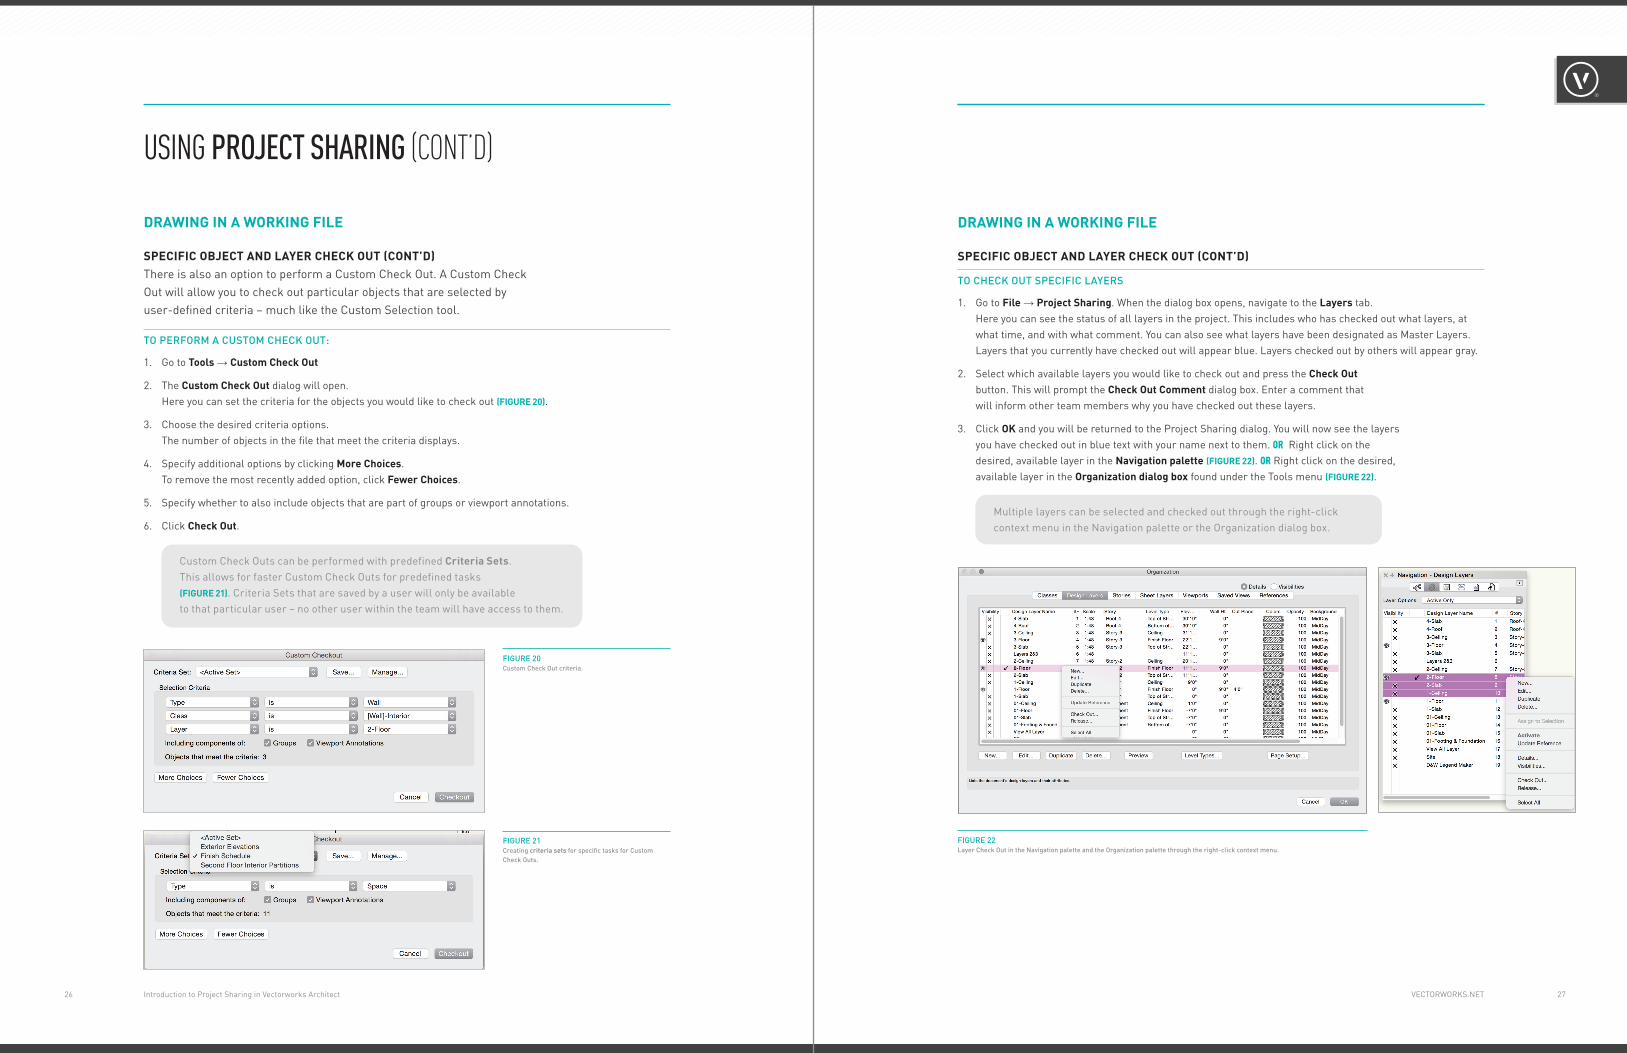
FIGURE 20 Custom Check Out criteria.
FIGURE 21 Creating criteria sets for specific tasks for Custom Check Outs.
FIGURE 22 Layer Check Out in the Navigation palette and the Organization palette through the right-click context menu.
27 26 VECTORWORKS.NETIntroduction to Project Sharing in Vectorworks Architect
DRAWING IN A WORKING FILE
SPECIFIC OBJECT AND LAYER CHECK OUT (CONT’D)There is also an option to perform a Custom Check Out. A Custom Check Out will allow you to check out particular objects that are selected by user-defined criteria – much like the Custom Selection tool.
TO PERFORM A CUSTOM CHECK OUT:
1. Go to Tools → Custom Check Out
2. The Custom Check Out dialog will open. Here you can set the criteria for the objects you would like to check out (FIGURE 20).
3. Choose the desired criteria options. The number of objects in the file that meet the criteria displays.
4. Specify additional options by clicking More Choices. To remove the most recently added option, click Fewer Choices.
5. Specify whether to also include objects that are part of groups or viewport annotations.
6. Click Check Out.
Custom Check Outs can be performed with predefined Criteria Sets. This allows for faster Custom Check Outs for predefined tasks (FIGURE 21). Criteria Sets that are saved by a user will only be available to that particular user – no other user within the team will have access to them.
DRAWING IN A WORKING FILE
SPECIFIC OBJECT AND LAYER CHECK OUT (CONT’D)
TO CHECK OUT SPECIFIC LAYERS
1. Go to File → Project Sharing. When the dialog box opens, navigate to the Layers tab. Here you can see the status of all layers in the project. This includes who has checked out what layers, at what time, and with what comment. You can also see what layers have been designated as Master Layers. Layers that you currently have checked out will appear blue. Layers checked out by others will appear gray.
2. Select which available layers you would like to check out and press the Check Out button. This will prompt the Check Out Comment dialog box. Enter a comment that will inform other team members why you have checked out these layers.
3. Click OK and you will be returned to the Project Sharing dialog. You will now see the layers you have checked out in blue text with your name next to them. OR Right click on the desired, available layer in the Navigation palette (FIGURE 22). OR Right click on the desired, available layer in the Organization dialog box found under the Tools menu (FIGURE 22).
Multiple layers can be selected and checked out through the right-click context menu in the Navigation palette or the Organization dialog box.
USING PROJECT SHARING (CONT’D)
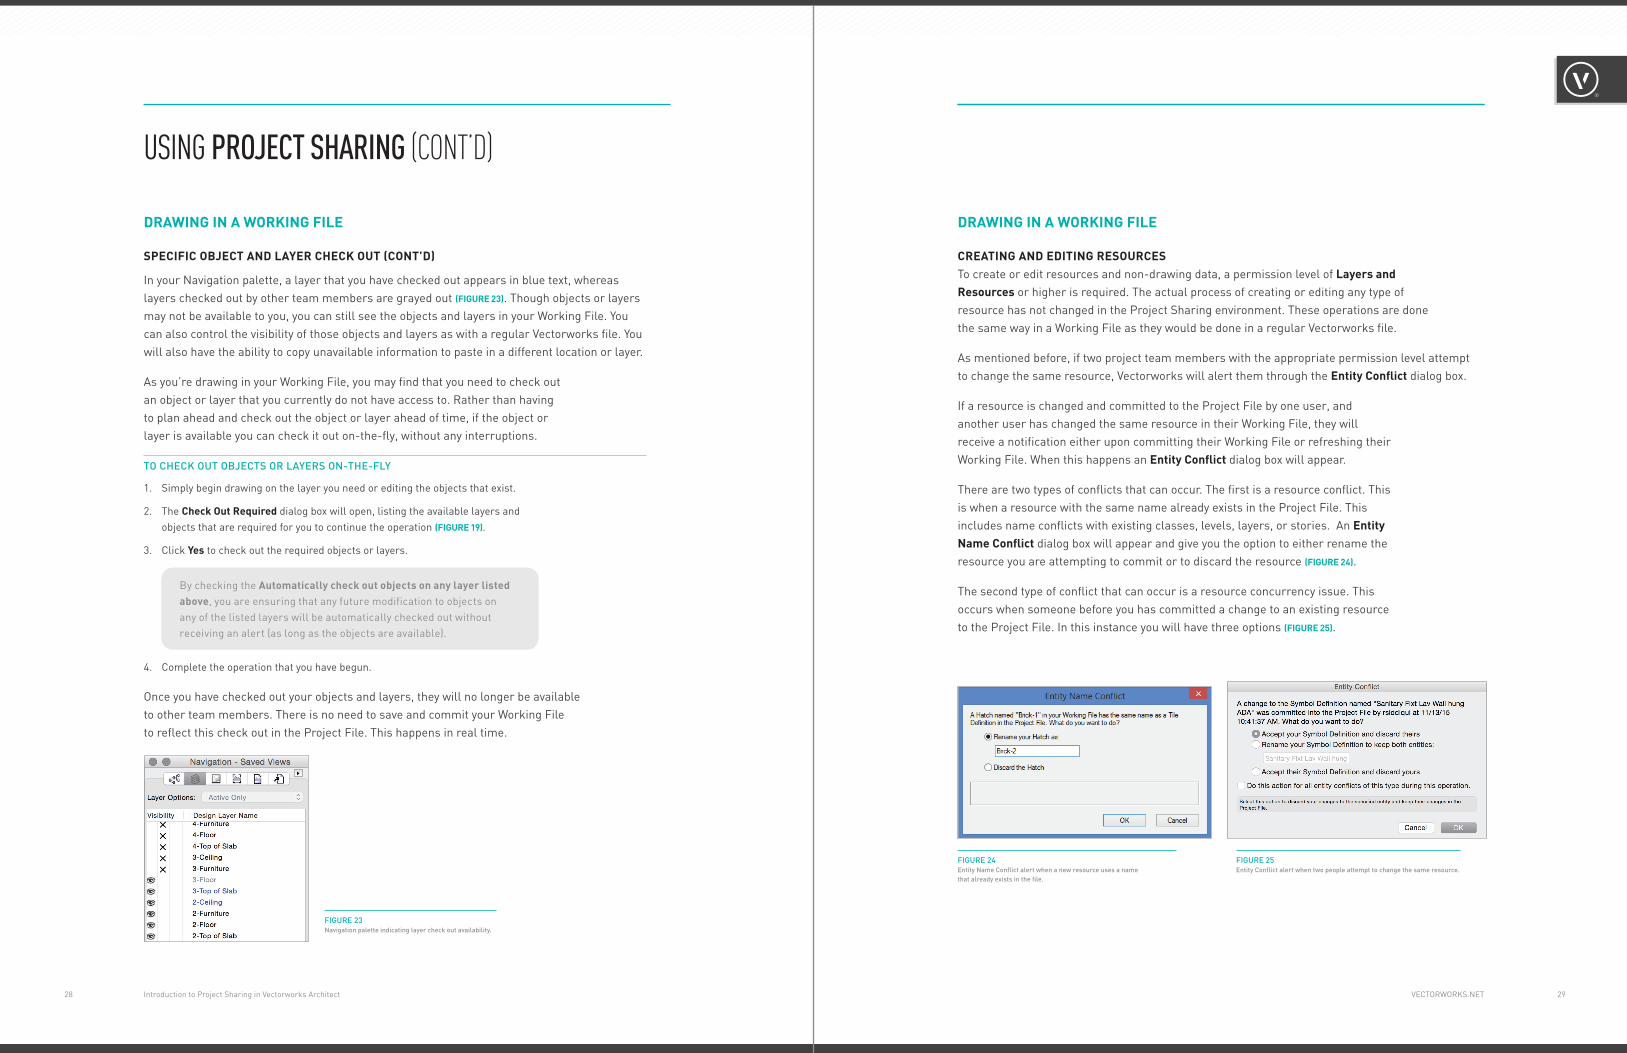
FIGURE 23 Navigation palette indicating layer check out availability.
FIGURE 24 Entity Name Conflict alert when a new resource uses a name that already exists in the file.
FIGURE 25 Entity Conflict alert when two people attempt to change the same resource.
29 28 VECTORWORKS.NETIntroduction to Project Sharing in Vectorworks Architect
SPECIFIC OBJECT AND LAYER CHECK OUT (CONT’D)
In your Navigation palette, a layer that you have checked out appears in blue text, whereas layers checked out by other team members are grayed out (FIGURE 23). Though objects or layers may not be available to you, you can still see the objects and layers in your Working File. You can also control the visibility of those objects and layers as with a regular Vectorworks file. You will also have the ability to copy unavailable information to paste in a different location or layer.
As you’re drawing in your Working File, you may find that you need to check out an object or layer that you currently do not have access to. Rather than having to plan ahead and check out the object or layer ahead of time, if the object or layer is available you can check it out on-the-fly, without any interruptions.
TO CHECK OUT OBJECTS OR LAYERS ON-THE-FLY
1. Simply begin drawing on the layer you need or editing the objects that exist.
2. The Check Out Required dialog box will open, listing the available layers and objects that are required for you to continue the operation (FIGURE 19).
3. Click Yes to check out the required objects or layers.
By checking the Automatically check out objects on any layer listed above, you are ensuring that any future modification to objects on any of the listed layers will be automatically checked out without receiving an alert (as long as the objects are available).
4. Complete the operation that you have begun.
Once you have checked out your objects and layers, they will no longer be available to other team members. There is no need to save and commit your Working File to reflect this check out in the Project File. This happens in real time.
DRAWING IN A WORKING FILE DRAWING IN A WORKING FILE
CREATING AND EDITING RESOURCESTo create or edit resources and non-drawing data, a permission level of Layers and Resources or higher is required. The actual process of creating or editing any type of resource has not changed in the Project Sharing environment. These operations are done the same way in a Working File as they would be done in a regular Vectorworks file.
As mentioned before, if two project team members with the appropriate permission level attempt to change the same resource, Vectorworks will alert them through the Entity Conflict dialog box.
If a resource is changed and committed to the Project File by one user, and another user has changed the same resource in their Working File, they will receive a notification either upon committing their Working File or refreshing their Working File. When this happens an Entity Conflict dialog box will appear.
There are two types of conflicts that can occur. The first is a resource conflict. This is when a resource with the same name already exists in the Project File. This includes name conflicts with existing classes, levels, layers, or stories. An Entity Name Conflict dialog box will appear and give you the option to either rename the resource you are attempting to commit or to discard the resource (FIGURE 24).
The second type of conflict that can occur is a resource concurrency issue. This occurs when someone before you has committed a change to an existing resource to the Project File. In this instance you will have three options (FIGURE 25).
USING PROJECT SHARING (CONT’D)

FIGURE 26 Refresh Icon found in the top left corner of your drawing window indicating your Working File is out of date.
FIGURE 27 Alert indicating the Working File has uncommitted changes saved within it.
31 30 VECTORWORKS.NETIntroduction to Project Sharing in Vectorworks Architect
DRAWING IN A WORKING FILE
CREATING AND EDITING RESOURCES [CONT’D] The first is to override the change that was committed before you. The second option is to rename the resource you have changed in order to keep both resources in the Project File. And the third option is to accept the changes that have already been committed and discard the changes that you have made.
When a resource concurrency dialog box appears, it will report who has committed changes to the same resource as you and when the commit to the Project File occurred. Always communicate with your team members before making decisions to discard others’ changes.
If you have the Layers and Resources permission level or higher, you have the ability to create, edit, or delete resources without checking out layers. For example, if a symbol is placed on a particular layer, a user with the appropriate permissions can edit both data and geometry information of that symbol without checking out the layer on which it is placed. Once the symbol is edited and the change is committed back to the Project File, all other Working Files will be prompted to be refreshed with the refresh icon (FIGURE 26). Once refreshed, Working Files will reflect the changes in the symbol.
There are some resources that are exceptions to this behavior. These include wall styles, slab styles, and roof styles. If an existing wall style that is being used in the model needs to be edited, it will not only require the appropriate permission, but will also require any instance where the wall style is used to be checked out. This means that if a wall of this wall style is checked out by another user (i.e. is unavailable), the wall style cannot be edited.
If symbols or resources have been edited, created, or deleted without checking out any layers, upon saving and closing your Working File, a dialog box will appear notifying you that your Working File contains uncommitted changes (FIGURE 27).
DRAWING IN A WORKING FILE
REFERENCINGIn the Project Sharing environment, references of various file types and references of resources are created in a manner similar to that of a regular Vectorworks file. There are a few rules to keep in mind, including the fact that certain permissions are required to create different types of references within your Working File.
The file that is being referenced must be placed in a location that is accessible by both the Project File and by all team members on the project. This means that it must be kept on the same server volume as the Project File where all team members have the appropriate permissions to read and write to the volume.
If you choose for the reference to follow a relative reference path rather than an absolute reference path, then that path will be relative to the Project File.
Project Files can be referenced into other Project Files and into regular Vectorworks files. For example, if you have a regular Vectorworks file for a site model and a Project File for your building model, you can reference the Project File of the building into the regular Vectorworks file of the site.
You cannot reference a Working File. You will have to navigate to and reference the Project File itself. This is because the Working File is considered a “temporary” file.
Regular Vectorworks files can be referenced into Project Files. From our previous example, the regular Vectorworks file of the site model can be referenced into your Project File. Because the Project File itself is not opened, the reference is created by referencing the site model into your Working File (assuming you have the proper permission level – see below) and then committing the Working File to the Project File.
The permissions required for referencing are as follows:
∙ Layers–Restricted permission level or above is required to create, edit, and delete references to PDF’s, image files, and DWG Files.
∙ Project permission level or above is required to create, edit, and delete references to Vectorworks files – both regular files and Project Files.
If you are using Layer Import Referencing (also known as old style referencing), Project permission level or higher may be required to update the reference, as well. This is because if the update will import new classes, the user must have a permission level that permits creating new classes.
USING PROJECT SHARING (CONT’D)
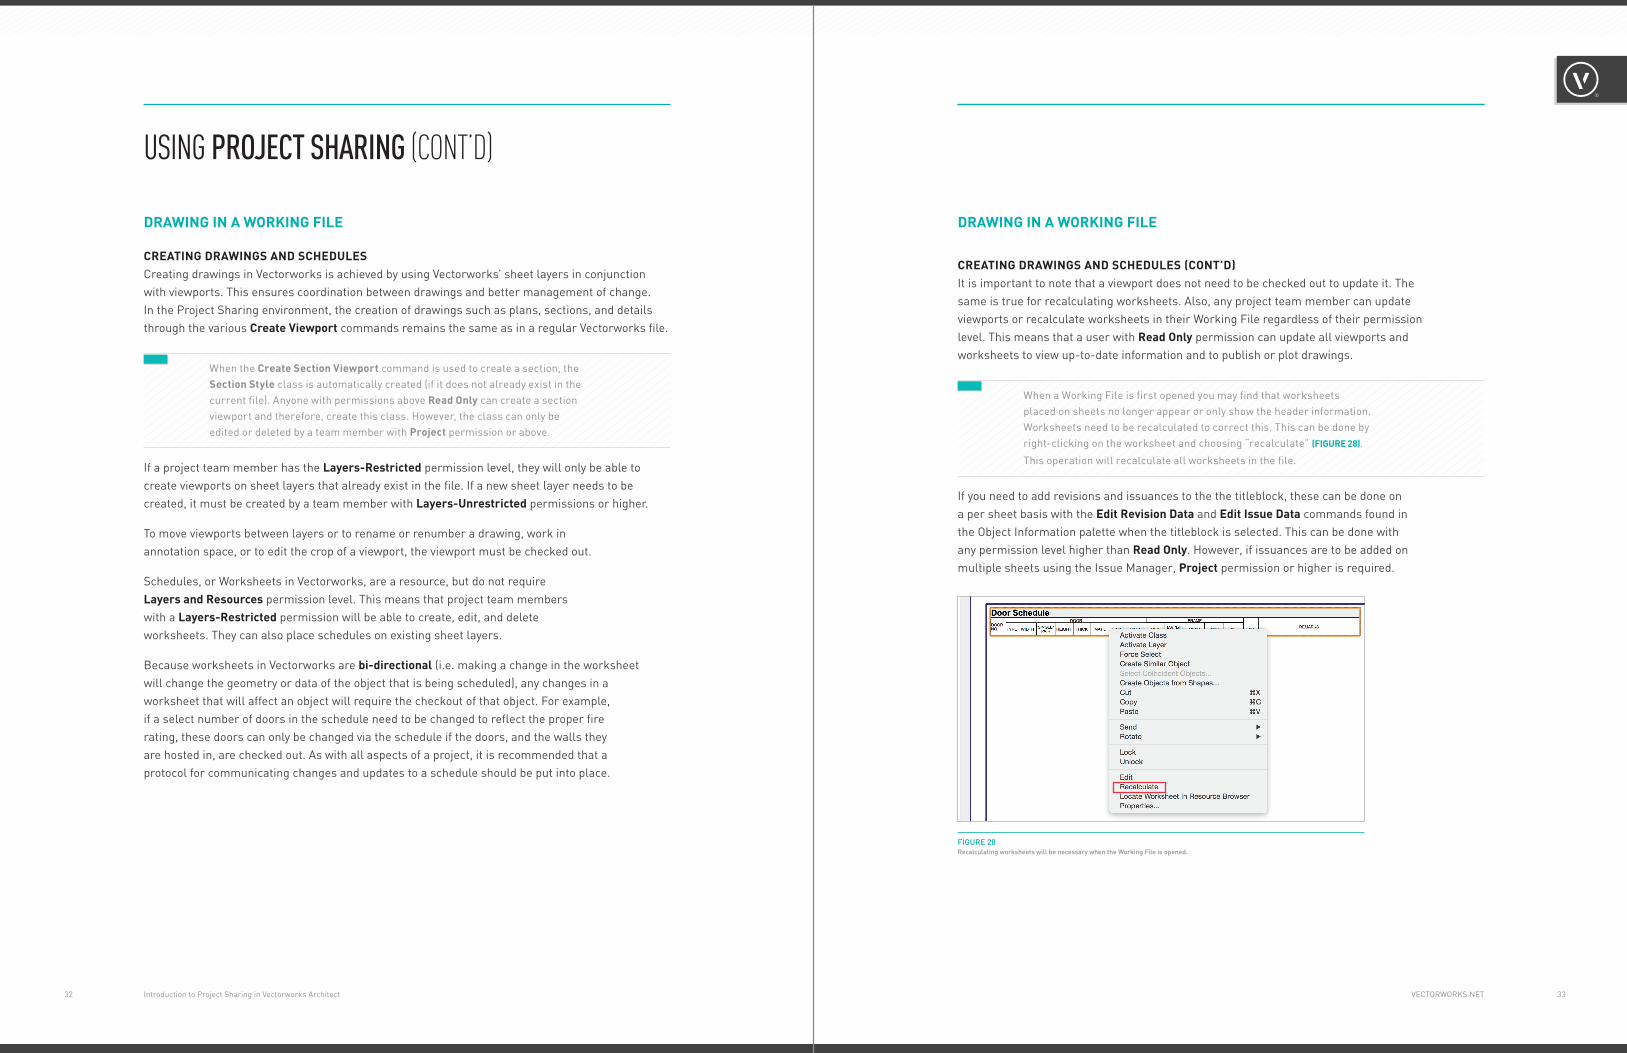
FIGURE 28 Recalculating worksheets will be necessary when the Working File is opened.
33 32 VECTORWORKS.NETIntroduction to Project Sharing in Vectorworks Architect
CREATING DRAWINGS AND SCHEDULES Creating drawings in Vectorworks is achieved by using Vectorworks’ sheet layers in conjunction with viewports. This ensures coordination between drawings and better management of change. In the Project Sharing environment, the creation of drawings such as plans, sections, and details through the various Create Viewport commands remains the same as in a regular Vectorworks file.
When the Create Section Viewport command is used to create a section, the Section Style class is automatically created (if it does not already exist in the current file). Anyone with permissions above Read Only can create a section viewport and therefore, create this class. However, the class can only be edited or deleted by a team member with Project permission or above.
If a project team member has the Layers-Restricted permission level, they will only be able to create viewports on sheet layers that already exist in the file. If a new sheet layer needs to be created, it must be created by a team member with Layers-Unrestricted permissions or higher.
To move viewports between layers or to rename or renumber a drawing, work in annotation space, or to edit the crop of a viewport, the viewport must be checked out.
Schedules, or Worksheets in Vectorworks, are a resource, but do not require Layers and Resources permission level. This means that project team members with a Layers-Restricted permission will be able to create, edit, and delete worksheets. They can also place schedules on existing sheet layers.
Because worksheets in Vectorworks are bi-directional (i.e. making a change in the worksheet will change the geometry or data of the object that is being scheduled), any changes in a worksheet that will affect an object will require the checkout of that object. For example, if a select number of doors in the schedule need to be changed to reflect the proper fire rating, these doors can only be changed via the schedule if the doors, and the walls they are hosted in, are checked out. As with all aspects of a project, it is recommended that a protocol for communicating changes and updates to a schedule should be put into place.
DRAWING IN A WORKING FILE
CREATING DRAWINGS AND SCHEDULES (CONT’D)It is important to note that a viewport does not need to be checked out to update it. The same is true for recalculating worksheets. Also, any project team member can update viewports or recalculate worksheets in their Working File regardless of their permission level. This means that a user with Read Only permission can update all viewports and worksheets to view up-to-date information and to publish or plot drawings.
When a Working File is first opened you may find that worksheets placed on sheets no longer appear or only show the header information. Worksheets need to be recalculated to correct this. This can be done by right-clicking on the worksheet and choosing “recalculate” (FIGURE 28).
This operation will recalculate all worksheets in the file.
If you need to add revisions and issuances to the the titleblock, these can be done on a per sheet basis with the Edit Revision Data and Edit Issue Data commands found in the Object Information palette when the titleblock is selected. This can be done with any permission level higher than Read Only. However, if issuances are to be added on multiple sheets using the Issue Manager, Project permission or higher is required.
DRAWING IN A WORKING FILE
USING PROJECT SHARING (CONT’D)

FIGURE 29 The Comment dialog that appears upon committing allows you to automatically release objects or layers when committing changes. This is on by default.
35 34 VECTORWORKS.NETIntroduction to Project Sharing in Vectorworks Architect
COMMITTING CHANGESOnce you have made changes to your Working File, you will have to commit those changes back to the Project File. In order to commit changes to the Project File you will also have to save your Working File in its local location. For this reason, the command to commit is both a save and a commit.
TO COMMIT YOUR WORKING FILE
1. Go to File → Save and Commit.
When a Working File is committed, the entire file is committed. If you have multiple layers that contain changes, all of the changes will be committed. You cannot selectively commit information on just some of the layers.
If you have made changes to your Working File, but are not yet ready to commit them to the Project File for the entire team to access, you can save your Working File locally through the typical save command. After saving your Working File, upon closing the file you will be alerted through a dialog box that your Working File changes have not been committed (FIGURE 27). This dialog box is a good reminder of whether or not you have committed any changes in your Working File. It is highly recommended that this alert not be dismissed through the Don’t show this dialog again.
DRAWING IN A WORKING FILE
COMMITTING CHANGES (CONT’D)If more than one team member attempts to commit their Working File at the same time, there will be a longer wait time to commit to the Project File. To understand and make this situation more manageable, it is highly recommended to establish a team protocol for when to commit your Working Files. This protocol should include what time of day that commits should occur and after what type of operations or changes in the Working File have been executed should a person commit to the Project File. Communication among the team is vital. Not only should the established protocol be followed, but there should always be constant communication amongst the team.
Your office’s Project Sharing protocol should include an established rule that all team members perform a Save and Commit, as well as a Close and Release of all objects and layers every evening before leaving the office. To ensure that objects and layers are released after committing, the Comment dialog includes a check box to Automatically release checked out layers and objects (FIGURE 29). This box is checked by default.
The only time objects and layers should not be released at the end of the day is if the team member intends to continue working in offline mode. If there are changes that are not ready to be committed to the Project File and the objects and layers must remain checked out by a team member, this must be communicated to the team, especially the project administrator.
DRAWING IN A WORKING FILE
USING PROJECT SHARING (CONT’D)
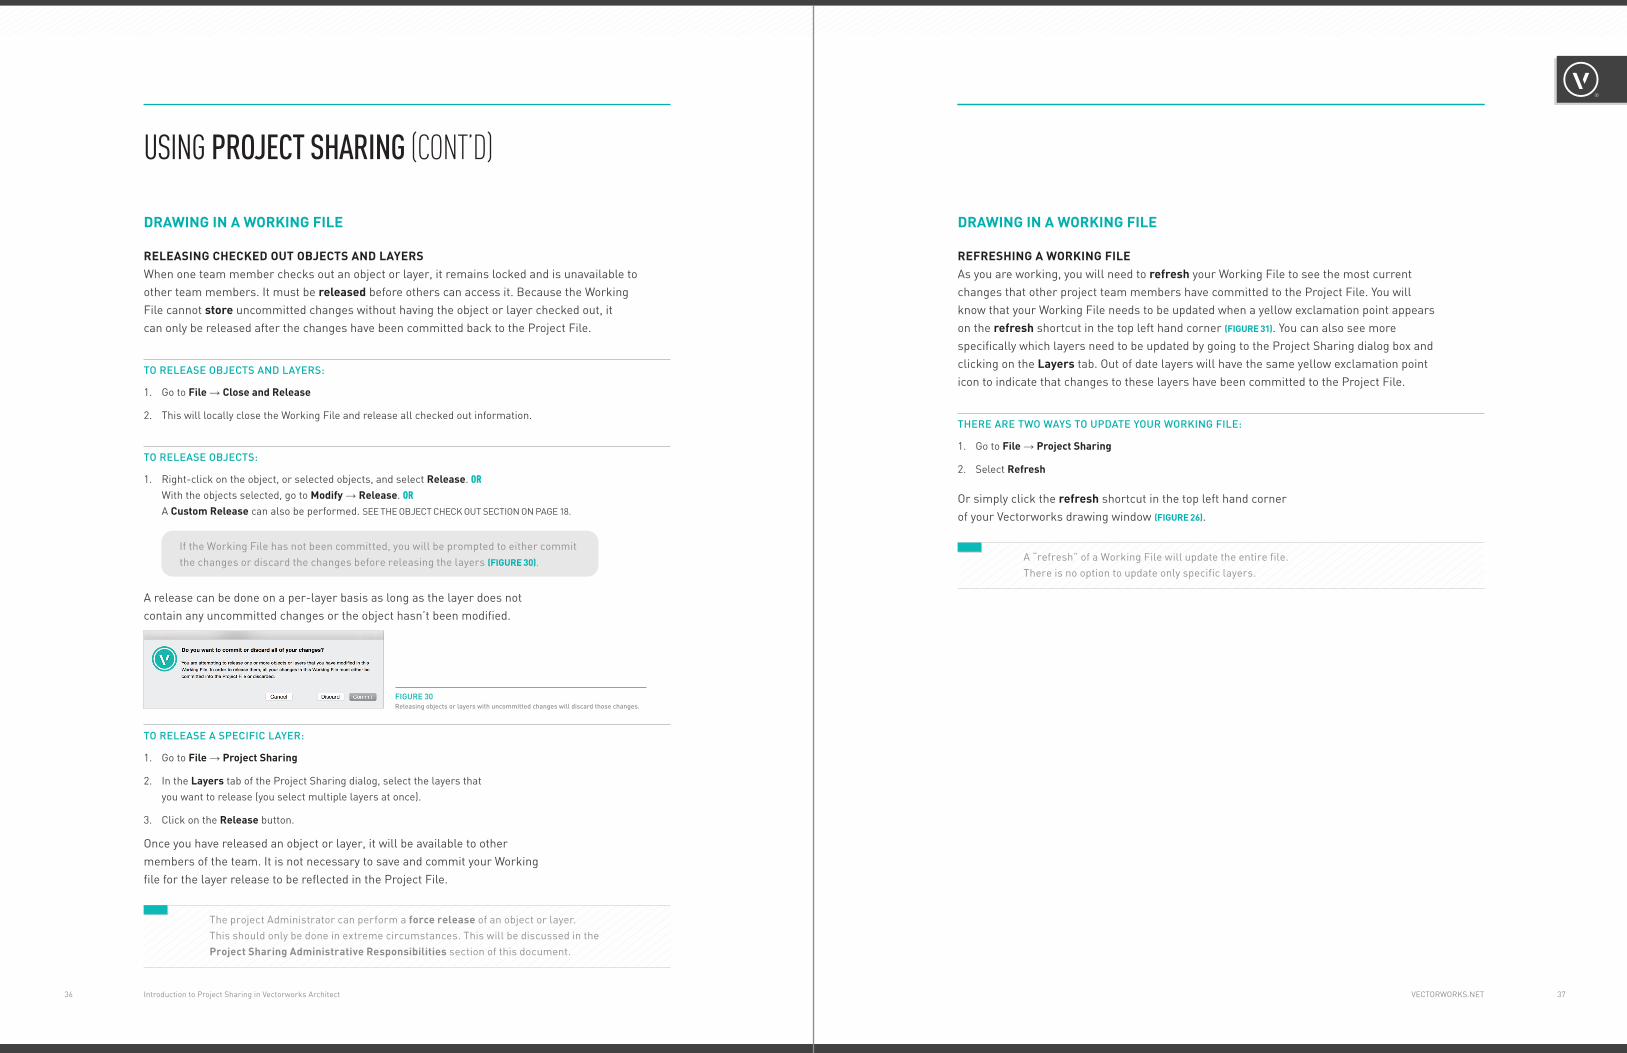
FIGURE 30 Releasing objects or layers with uncommitted changes will discard those changes.
37 36 VECTORWORKS.NETIntroduction to Project Sharing in Vectorworks Architect
RELEASING CHECKED OUT OBJECTS AND LAYERSWhen one team member checks out an object or layer, it remains locked and is unavailable to other team members. It must be released before others can access it. Because the Working File cannot store uncommitted changes without having the object or layer checked out, it can only be released after the changes have been committed back to the Project File.
TO RELEASE OBJECTS AND LAYERS:
1. Go to File → Close and Release
2. This will locally close the Working File and release all checked out information.
TO RELEASE OBJECTS:
1. Right-click on the object, or selected objects, and select Release. OR With the objects selected, go to Modify → Release. OR A Custom Release can also be performed. SEE THE OBJECT CHECK OUT SECTION ON PAGE 18.
If the Working File has not been committed, you will be prompted to either commit the changes or discard the changes before releasing the layers (FIGURE 30).
A release can be done on a per-layer basis as long as the layer does not contain any uncommitted changes or the object hasn’t been modified.
TO RELEASE A SPECIFIC LAYER:
1. Go to File → Project Sharing
2. In the Layers tab of the Project Sharing dialog, select the layers that you want to release (you select multiple layers at once).
3. Click on the Release button.
Once you have released an object or layer, it will be available to other members of the team. It is not necessary to save and commit your Working file for the layer release to be reflected in the Project File.
The project Administrator can perform a force release of an object or layer. This should only be done in extreme circumstances. This will be discussed in the Project Sharing Administrative Responsibilities section of this document.
DRAWING IN A WORKING FILE
REFRESHING A WORKING FILE As you are working, you will need to refresh your Working File to see the most current changes that other project team members have committed to the Project File. You will know that your Working File needs to be updated when a yellow exclamation point appears on the refresh shortcut in the top left hand corner (FIGURE 31). You can also see more specifically which layers need to be updated by going to the Project Sharing dialog box and clicking on the Layers tab. Out of date layers will have the same yellow exclamation point icon to indicate that changes to these layers have been committed to the Project File.
THERE ARE TWO WAYS TO UPDATE YOUR WORKING FILE:
1. Go to File → Project Sharing
2. Select Refresh
Or simply click the refresh shortcut in the top left hand corner of your Vectorworks drawing window (FIGURE 26).
A “refresh” of a Working File will update the entire file. There is no option to update only specific layers.
DRAWING IN A WORKING FILE
USING PROJECT SHARING (CONT’D)

39 38 VECTORWORKS.NETIntroduction to Project Sharing in Vectorworks Architect
ACCESSING A BACKUP FILE AND WHEN TO CREATE A NEW WORKING FILEThere are some instances when an existing Working File should be discarded and a new Working File created from the Project File. These instances include:
∙ You’re unable to commit changes to the Project File
∙ When there’s been an event or error that has caused the Administrator to force release your layers or change your permission levels
∙ The backup of the Working File needs to be accessed for a number of different reasons
Any of the instances listed above can lead to the need to access a backup file of your Working File. A backup file is connected to the Project File since it is a copy of the Working File (this means that the backup file and the Working File share the same file ID number – a number that is assigned in the background by Vectorworks).
TO REPLACE A WORKING FILE WITH A NEW WORKING FILE:
1. Go to File → Save a Copy As
2. Save the Working File as a regular .vwx file and with a new, descriptive name.
3. Release all layers by discarding the changes in your Working File (your changes should be retained in the copy you have saved.)
4. Communicate with your team that though you have released these layers, they should not be checked out by anyone else. You will need to check these layers out again and they need to be available to you.
5. DELETE the original Working File.
6. Double-click on the Project File to create a new Working File.
7. Check out the layers that were previously checked out.
8. Open the regular Vectorworks file that was saved from your old Working File.
9. Copy and Paste changes from the regular Vectorworks file to the new Working File.
DRAWING IN A WORKING FILE
ACCESSING A BACKUP FILE AND WHEN TO CREATE A NEW WORKING FILE (CONT’D)
TO REPLACE A CURRENT WORKING FILE WITH A BACKUP FILE:
1. Release all objects and layers in the current Working File.
a. If there are changes in the current Working File that should not be committed to the Project File: discard all the changes.
b. If there are changes in the current Working File that should be committed to the Project File, but cannot be committed or is causing errors or crashes upon committing:
i. Go to File → Save a Copy As
ii. Save the Working File as a regular .vwx file and with a new, descriptive name.
iii. Release all objects and layers and discard the changes in your Working File (your changes should be retained in the copy you have saved)
2. Communicate with your team that though you have released these objects and layers, they should not be checked out by anyone else. You will need to check these objects or layers out again and they need to be available to you.
3. Open the most recent backup of the Working File.
4. You will receive a message indicating that refreshing this file will cause uncommitted changes to be lost (FIGURE 37). Click on Open Anyway.
5. This backup file will not have any layers or objects checked out.
a. If there are uncommitted changes in this backup file that need to be committed: You must first checkout the layers on which these changes occur. There is no need to check out the objects. You will be able to commit the changes to the Project File once the corresponding layers have been checked out.
b. If there are uncommitted changes in this back file that do not need to be committed: Refresh the file and discard the changes.
6. Save and close the backup file. This is now your most current Working File.
7. DELETE the original Working File (with the .vwxw file extension).
8. Move the backup file to where your Working File should be saved.
9. Rename the backup file to remove the appended timestamp from the file name.
10. Open and use the file as your typical Working File.
11. If you have done a Save a Copy As to retain uncommitted changes, these changes will have to be copied and pasted into your new Working File.
If you are saving multiple backups it is important to know that once a backup file is used, the remaining backups should be archived and put away.
DRAWING IN A WORKING FILE
USING PROJECT SHARING (CONT’D)

FIGURE 31 Referencing model file information into a production file to create drawings and schedules.
FIGURE 32 The model file as well as the production file should be shared as Project Files. This ensures that multiple people can works on all aspects of the project.
41 40 VECTORWORKS.NETIntroduction to Project Sharing in Vectorworks Architect
WORKING OVER VPNWhen working over a VPN (Virtual Private Network) it is important to note that when performing certain operations that require the Working File to access the Project File (committing or refreshing a Working File), there will be a significant slow down in the performance of your file (see the “Location of the Project File” section of this document). For this reason, it is highly recommended that both committing and refreshing a Working File be done more sparingly than when working while directly connected to the server.
A protocol for committing and refreshing should be put into place for working with remote team members who are accessing the server via a VPN connection.
WORKING OVER THE CLOUDWhen working with a Project File stored in a cloud-based storage system, your Working File should be saved on your local machine. Because your Working File will communicate with the Project File over the Internet, the speed of performing Commits and Refreshes will be dependent on the bandwidth of your Internet connection.
USING PROJECT SHARING
DRAWING IN A WORKING FILE
USING PROJECT SHARING
Publishing or plotting a drawing set is done as you would with a regular Vectorworks file. All of the Project Sharing permission levels will have the ability to run the Publish command from their Working File. This includes the Read Only permission.
Be sure that all Working Files have been committed to the Project File to ensure the most current information is reflected in the Project File. The Working File that is being used to plot or publish should be refreshed as well.
There may be some instances where a plot file should be created. A plot file or production file is a separate file used for the creation of drawings. It is distinct from a model file by the fact that all sheet layers are created in the plot file and all design layers are referenced from the model file (FIGURE 31).
Both model file and plot file should be Project Files, allowing multiple team members to access the two files through their own Working Files (FIGURE 32). Though this may add to the responsibilities of file management, this division can help ease file size and performance issues that may arise due to a large number of sheet layers.
PUBLISHING OR PLOTTING A DRAWING SET

43 42 VECTORWORKS.NETIntroduction to Project Sharing in Vectorworks Architect
When it comes time to archive your project, it is recommended that the project not be archived as a Project File. This is especially important if a file is being archived in the middle of a project or at certain milestones during the project. The archive file should be “disassociated” with any existing Working Files. This means that when a project is being archived, the Project File should be changed back into a regular Vectorworks document.
A PROJECT FILE IS MADE A REGULAR VECTORWORKS DOCUMENT BY:
1. Open your Working File – ensure that it is refreshed and contains the most current information or the information needed for the archive file.
2. Go to File → Save A Copy As
3. Navigate to the appropriate folder where your archived file will be located.
4. Name the archive file with the appropriate file naming convention.
5. Be sure to change the File type to Vectorworks Drawing (.vwx).
6. Press Save to complete the process.
This ensures that existing Working Files will maintain their connection with the Project File and not the archived file. Be sure to archive other information such as referenced files and backup files.
USING PROJECT SHARING
ARCHIVING
As mentioned before, it is recommended that each Project File have two team members with the Administrative permission level. This is to ensure that the administrative capabilities are accessible regardless of specific team members’ availability.
Though there are project and document settings that require Administrative permission, there are two main responsibilities that will require a more active role from the project administrator. These responsibilities include archiving the Project Files (discussed in the section above) and managing the project team members. Project team members may need to be added to a project or their permission levels changed. As mentioned before in the How to Create a Project File section, it is recommended that the default permission setting for any new team members should be set to Read Only. This means that any new team member that is added to the project creating a new Working File will have the Read Only permission. This is to protect against any unintentional changes by those who may simply want to open the file to review project progression or information. However, if a new team member needs to be able to check out and modify a layer or resource, they will need their permission level changed.
TO CHANGE A USER’S PERMISSION LEVEL, THE PROJECT ADMINISTRATOR WILL:
1. Make sure that the user’s Working File is closed and all changes have been committed to the Project File.
2. The administrator will open their own Working File.
3. Go to File → Project Sharing
4. Click on the Users tab
5. Select the username whose permission needs to be changed. Click on the Edit button.
6. Select the desired permission level in the drop down menu.
7. Click Ok to exit the Edit User dialog.
8. Click Ok to exit the Project Sharing dialog.
The Working File does not need to be committed for this permission level change to take effect.
If a user’s Working File contains uncommitted changes and their permission level has been modified, they will not be able to commit to the Project File. It is essential that all changes to permissions be communicated appropriately to prevent the loss of information.
USING PROJECT SHARING
PROJECT SHARING ADMINISTRATIVE RESPONSIBILITIES
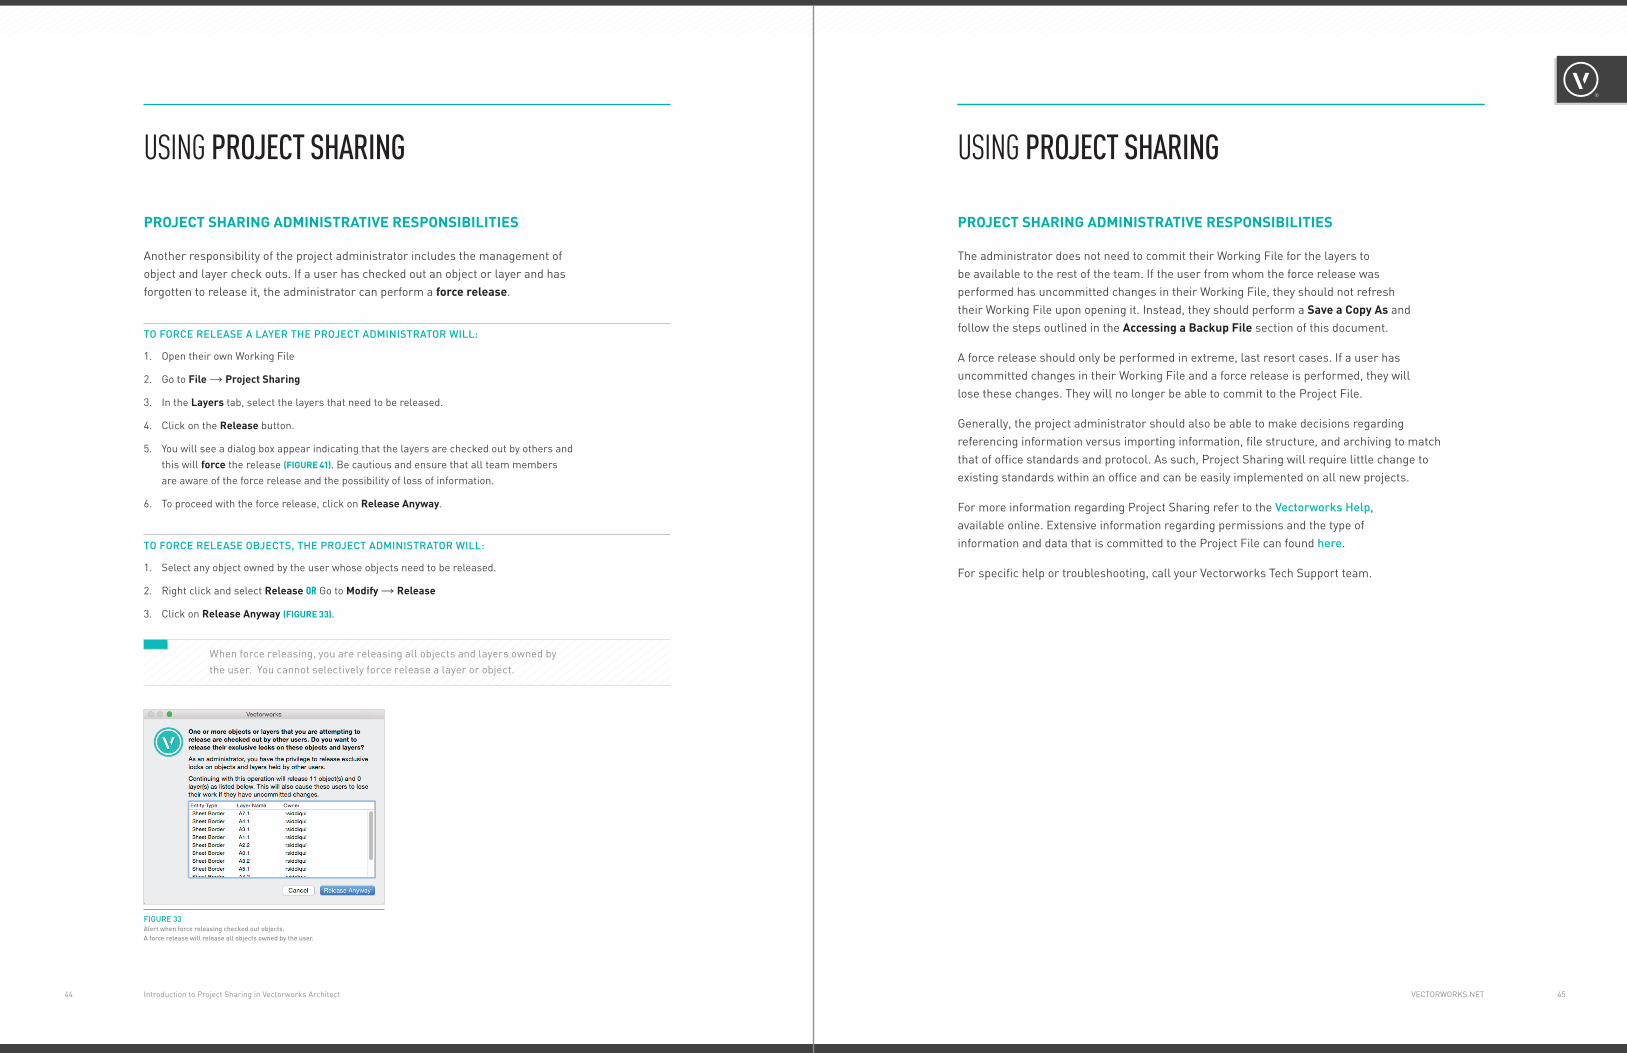
FIGURE 33 Alert when force releasing checked out objects. A force release will release all objects owned by the user.
45 44 VECTORWORKS.NETIntroduction to Project Sharing in Vectorworks Architect
USING PROJECT SHARING
PROJECT SHARING ADMINISTRATIVE RESPONSIBILITIES
Another responsibility of the project administrator includes the management of object and layer check outs. If a user has checked out an object or layer and has forgotten to release it, the administrator can perform a force release.
TO FORCE RELEASE A LAYER THE PROJECT ADMINISTRATOR WILL:
1. Open their own Working File
2. Go to File → Project Sharing
3. In the Layers tab, select the layers that need to be released.
4. Click on the Release button.
5. You will see a dialog box appear indicating that the layers are checked out by others and this will force the release (FIGURE 41). Be cautious and ensure that all team members are aware of the force release and the possibility of loss of information.
6. To proceed with the force release, click on Release Anyway.
TO FORCE RELEASE OBJECTS, THE PROJECT ADMINISTRATOR WILL:
1. Select any object owned by the user whose objects need to be released.
2. Right click and select Release OR Go to Modify → Release
3. Click on Release Anyway (FIGURE 33).
When force releasing, you are releasing all objects and layers owned by the user. You cannot selectively force release a layer or object.
USING PROJECT SHARING
PROJECT SHARING ADMINISTRATIVE RESPONSIBILITIES
The administrator does not need to commit their Working File for the layers to be available to the rest of the team. If the user from whom the force release was performed has uncommitted changes in their Working File, they should not refresh their Working File upon opening it. Instead, they should perform a Save a Copy As and follow the steps outlined in the Accessing a Backup File section of this document.
A force release should only be performed in extreme, last resort cases. If a user has uncommitted changes in their Working File and a force release is performed, they will lose these changes. They will no longer be able to commit to the Project File.
Generally, the project administrator should also be able to make decisions regarding referencing information versus importing information, file structure, and archiving to match that of office standards and protocol. As such, Project Sharing will require little change to existing standards within an office and can be easily implemented on all new projects.
For more information regarding Project Sharing refer to the Vectorworks Help, available online. Extensive information regarding permissions and the type of information and data that is committed to the Project File can found here.
For specific help or troubleshooting, call your Vectorworks Tech Support team.

FIGURE 34 Layers tab in the Project Sharing dialog.
FIGURE 35 History tab in the Project Sharing dialog.
47 46 VECTORWORKS.NETIntroduction to Project Sharing in Vectorworks Architect
ADDITIONAL INFORMATION
THE PROJECT SHARING DIALOGThe Project Sharing dialog box can be accessed at anytime within a Working File. This dialog will provide continuous, up-to-date information regarding the project. You will be able to check on the status of the availability of layers, the permission levels of all project team members, the user colors, access the history of the Project File, and see the backup policy of the Project File itself. Depending on your permission level, you will be able to either view the information in these tabs or edit the information.
LAYERS TABThe Layers Tab allows you to view all the layers of the project. You can see which layers are available, which layers are checked out by others (seen as gray text), and which layers you have checked out in your own working file (seen as blue text) (FIGURE 34). Unavailable layers will include the username of the team member that has exclusive access to the layer, as well as the comment made upon checkout. You can also track the date and time when the layer check out was performed and when the layer was last committed to the Project File.
The project administrator can designate layers as Master Layers within this tab.
ADDITIONAL INFORMATION
HISTORY TABTracking changes and design options as they are added to and subtracted from the project can become difficult in a multi-user environment. The History tab of the Project Sharing dialog box contains a compilation of a change history of the Project File (FIGURE 35).
Information that is tracked and listed in the history tab include the name of the object, the type of entity (such as layers, classes, or resources), the user who has checked out or modified the entity, the action taken (check out, commit, release), and the date and time of the action. The information can be sorted on any column header. For example, all changes to a given layer or all changes made by a particular user. Additionally, a search of the history by keywords can be done using the search control option in the lower right (FIGURE 35).
The entire history of the project can be exported to a comma-separated file by clicking the Export button. This export will generate a CSV file that can then be imported into any data processing application such as Excel, Numbers, etc. The project administrator will be able to clear all the project history by clicking the Clear all History button.

FIGURE 36 User tab in the Project Sharing dialog
FIGURE 37 Backup tab in the Project Sharing dialog. The “Reset Document Preferences” button is found at the bottom left in all tabs.
48 Introduction to Project Sharing in Vectorworks Architect
USER TABThe entire project team can be seen in the User Tab (FIGURE 36). Information found in this tab includes team members’ usernames, permission level, and color. The project administrator is able to add and delete team members, edit their permission level and username, and change the default permission level for new users.
BACKUP TABThe backup policy that has been established for the Project file can be seen in the Backup tab of the Project Sharing dialog (FIGURE 37). The project Administrator is able to change the backup policy for the Project File.
ADDITIONAL INFORMATION ADDITIONAL INFORMATION
RESET DOCUMENT PREFERENCESAs mentioned before, the Vectorworks Document Preferences can be modified within a Working File, but these modifications will only be committed to the Project File with the Project permission level or above. More information regarding Document Preferences can be found here.
In the lower left hand of the Project Sharing dialog is a Reset Document Preferences button (FIGURE 37). This will reset the Working File’s current document preferences to match those of the Project File. This means if a project administrator has made a document preference change, that change will be reflected in the Working File after resetting the document preferences through the Project Sharing dialog.

LEARN MORE about how Vectorworks can help you
implement and develop BIM workflows.
Email us at [email protected].
VECTORWORKS, INC.
7150 Riverwood Drive, Columbia, MD 21046-1295 USA
VECTORWORKS.NET
T 410.290.5114
©2017 Vectorworks, Inc. All rights reserved.


![Collection Soins infirmiers - download2.cerimes.frdownload2.cerimes.fr/canalu/documents/centre_d_enseignement... · Fractures-consolidation ] Cal vicieux = consolidation en mauvaise](https://static.documents.pub/doc/80x56/5bead92e09d3f2cb318b6cad/collection-soins-infirmiers-fractures-consolidation-cal-vicieux-consolidation.jpg)


