21
Introduction to Introduction to PSpice PSpice Simulation Software Simulation Software
| Date post: | 17-Dec-2015 |
| Category: |
Documents |
| Upload: | jeffrey-bell |
| View: | 215 times |
| Download: | 1 times |

Introduction to PSpiceIntroduction to PSpice
Simulation SoftwareSimulation Software
The Origins of SPICEThe Origins of SPICE
• In the 1960’s, simulation software begins– CANCER
• Computer Analysis of Nonlinear Circuits, Excluding Radiation
• Developed at the University of California, Berkley• Funded by United States public funds
The Origins of SPICEThe Origins of SPICE
• From CANCER to SPICE– SPICE developed in the 1970’s
• Simulation Program with Integrated Circuit Emphasis
– Developed to save money• Simulation of circuits, not physically building• Transistor sizes
– Microprocessors vs. 2N2222

The Origins of SPICEThe Origins of SPICE
• From SPICE to SPICE2– SPICE 2 was in response to the wonderful
acceptance of SPICE• Comments, questions, and complaints found their
way back to UC-Berkley
– SPICE 2 was released into the public domain• This means its free to use in the United States
– Commercial versions that offer much more support and features
That Was ThenThat Was Then
• The original way of entering circuit information– A text file with syntax specific to the simulator
• Easy to remember commands and syntax– R – Resistor– C – Capacitor– L – Inductor– {Element} {node1} {node2} {value}
• Entered into any text editor with proper syntax

That Was ThenThat Was Then
• The circuit above is shown in the text file to the right

That Was ThenThat Was Then
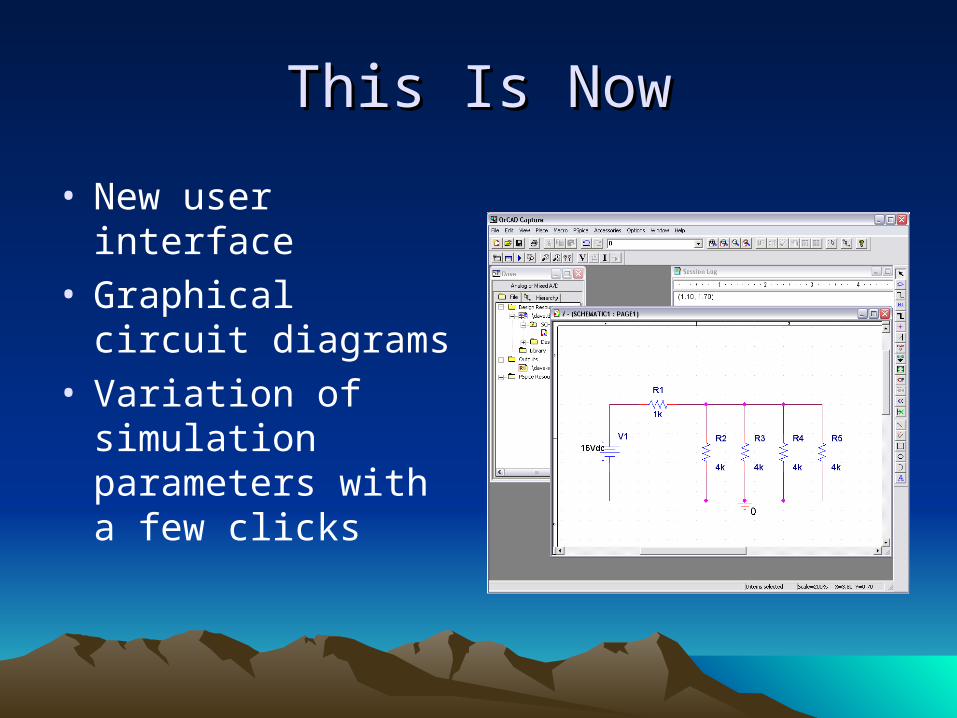
This Is NowThis Is Now
• New user interface• Graphical circuit
diagrams• Variation of simulation
parameters with a few clicks
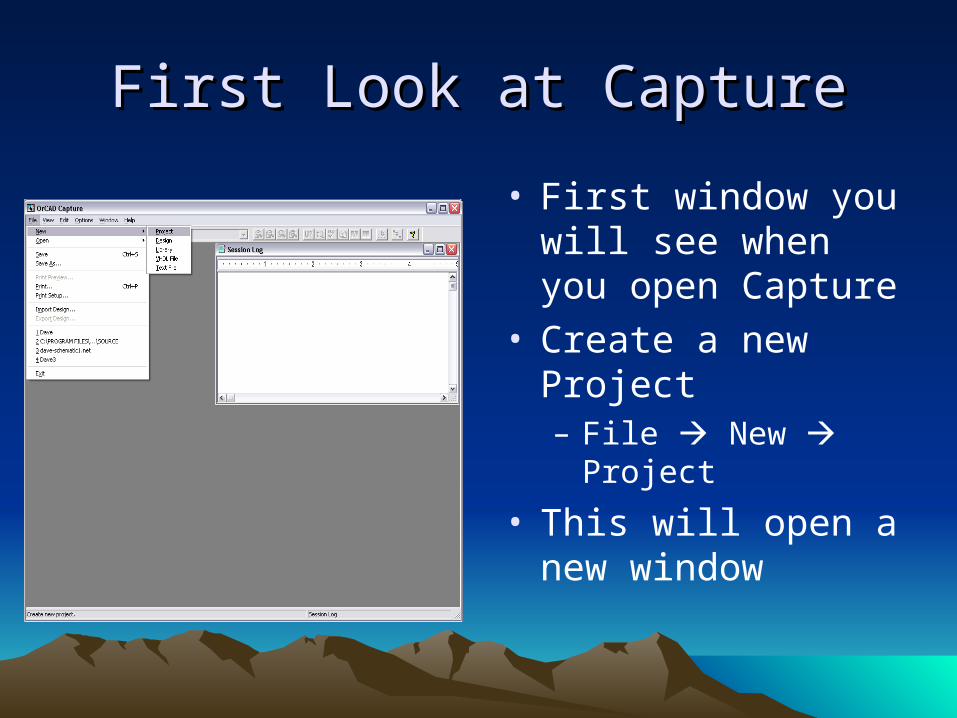
First Look at CaptureFirst Look at Capture
• First window you will see when you open Capture
• Create a new Project– File New Project
• This will open a new window

• Select a project name– PSpice Lab Simulation
• Select a project location– C:\PSpice\{YourName}
• Select what type of project– Analog or Mixed A/D
• Click OK
New Project WindowNew Project Window

Create PSpice ProjectCreate PSpice Project
• This window will open• Select the bottom
option– Create a blank project
• Click OK

The Project WindowsThe Project Windows
• The Main Project Window
• Two other information windows– Session Log Window– Project File Window
• Our main window– Schematic 1: Page 1

Place PartsPlace Parts
• Place the 5 resistors– Using Place Part– Type ‘R’ in Part Field
• Place the Voltage Source– Using Place Part– Type ‘Vdc’ in Part
Field
• Right click and choose “End Mode”

Rotate and Move ResistorsRotate and Move Resistors
• Click on the resistor– Use ‘Ctrl+R’ to rotate– Repeat for 4 resistors
• Move and place the resistors in parallel
• Change the values– Double Click on the
‘1k’ and enter ‘4k’ of the parallel resistors

Change the Voltage and WireChange the Voltage and Wire
• Change DC Voltage– Double Click on ‘0Vdc’
and enter ’16Vdc’
• Now wire the circuit– Using Place Wire– Click on one node, and
‘draw’ to the other and click again
• Right click and select “End Mode”

Placing the GroundPlacing the Ground
• Every PSpice circuit must have a ground
• Use the icons on the right– 9th icon down
• This opens the “Place Ground” window
• Select the ‘0/Source’• Click OK

The Completed CircuitThe Completed Circuit
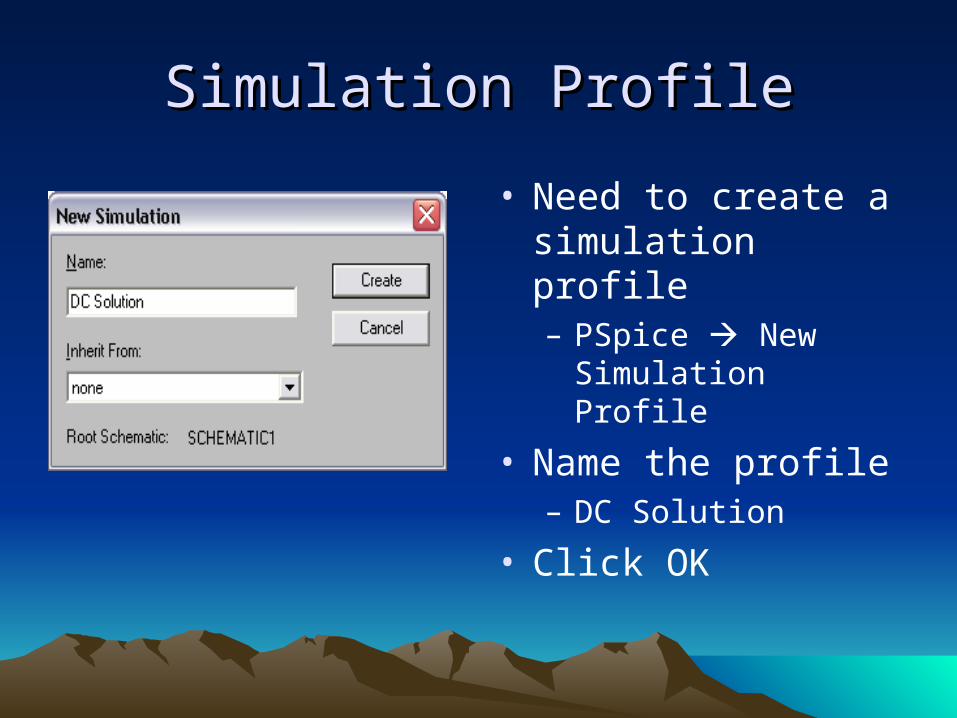
Simulation ProfileSimulation Profile
• Need to create a simulation profile– PSpice New
Simulation Profile
• Name the profile– DC Solution
• Click OK

Edit the Simulation ProfileEdit the Simulation Profile
• Go to the Analysis Tab
• Under the Analysis type, choose Bias Point– This is to find the DC
solution
• Click OK• Ready to Simulate

Running the SimulationRunning the Simulation
• The last step is to RUN the simulation– Do this by selecting PSpice Run
• After running the simulation a new window will open– Close this window and return to the
Schematic 1: Page 1 window
• Use the “V” and “I” (and maybe “W”) icons on the top of the screen – For finding voltages and currents (and power)

Now You KnowNow You Know
• With this basic underlying knowledge– Can change
• Resistor values• Voltage supply values• Resistor configuration
– Can learn• More simulation parameters• More components for simulation
• Time for Lab – Good Luck


