Introduction to Source Control --- Overview Whether your software project is large or small, it is highly recommended that you use source control as early as possible in the lifecycle of your project. Even if you’re working alone on a small project, you can use source control to improve your personal productivity and recover from difficult problems. In fact, there is a lot of benefit from using source control from the beginning of your team project, including the ability to easily revert to previous versions of the codebase. If you work with a team or on complex projects, you should almost certainly work in a shared, version-controlled file system so that you can improve collaboration and transparency. You can also take advantage of integrated automated builds, project planning and tracking, and other Application Lifecycle Management capabilities if you use Visual Studio Online or Team Foundation Server. In this scenario, you’re a developer at a software company. Your company builds a fairly simple WPF application, but has the need for regular changes. Since there are multiple developers who need access to the codebase, access is gated by using the source control provided with Visual Studio Online. Objectives In this hands-on lab, you will learn how to: - Set up a team project using Visual Studio Online - Add a solution to source control - Manage and document the codebase over time - Search, branch, and merge the codebase - Take advantage of source control features of Visual Studio Online Prerequisites The following is required to complete this hands-on lab: - Microsoft Visual Studio 2013 (with Update 2 RC applied) - A Visual Studio Online account Notes Estimated time to complete this lab: 60 minutes. Note: You can log into the virtual machine with user name “User” and password “P2ssw0rd”. Note: This lab may make references to code and other assets that are needed to complete the exercises. You can find these assets on the desktop in a folder named TechEd 2014. Within that folder, you will find additional folders that match the name of the lab you are working on. Exercise 1: Setting up your project and environment In this exercise, you’ll go through the process of setting up a new team project using Visual Studio Online and configuring your development environment to use it.
Transcript
Introduction to Source Control ---
Overview Whether your software project is large or small, it is highly recommended that you use source control as
early as possible in the lifecycle of your project. Even if you’re working alone on a small project, you can
use source control to improve your personal productivity and recover from difficult problems. In fact,
there is a lot of benefit from using source control from the beginning of your team project, including the
ability to easily revert to previous versions of the codebase. If you work with a team or on complex
projects, you should almost certainly work in a shared, version-controlled file system so that you can
improve collaboration and transparency. You can also take advantage of integrated automated builds,
project planning and tracking, and other Application Lifecycle Management capabilities if you use Visual
Studio Online or Team Foundation Server.
In this scenario, you’re a developer at a software company. Your company builds a fairly simple WPF
application, but has the need for regular changes. Since there are multiple developers who need access
to the codebase, access is gated by using the source control provided with Visual Studio Online.
Objectives In this hands-on lab, you will learn how to:
- Set up a team project using Visual Studio Online
- Add a solution to source control
- Manage and document the codebase over time
- Search, branch, and merge the codebase
- Take advantage of source control features of Visual Studio Online
Prerequisites The following is required to complete this hands-on lab:
- Microsoft Visual Studio 2013 (with Update 2 RC applied)
- A Visual Studio Online account
Notes Estimated time to complete this lab: 60 minutes.
Note: You can log into the virtual machine with user name “User” and password “P2ssw0rd”.
Note: This lab may make references to code and other assets that are needed to complete the exercises.
You can find these assets on the desktop in a folder named TechEd 2014. Within that folder, you will
find additional folders that match the name of the lab you are working on.
Exercise 1: Setting up your project and environment In this exercise, you’ll go through the process of setting up a new team project using Visual Studio
Online and configuring your development environment to use it.
Task 1: Creating a Visual Studio Online team project In this task, you’ll create a Visual Studio Online team project. This project will ultimately house the code
for your company’s product, which will be accessed by the other developers and team members at your
company.
1. When you created your Visual Studio Online account, you set up a domain at visualstudio.com.
Navigate to that domain and log in. The URL will be something like https://MYSITE.visualstudio.com.
2. Under the Recent projects & teams panel, click the New link.
3. In the Create new team project dialog, type “Source control” as the Project name and click Create
project. It may take a few minutes for your project to be created. Note that you can use any name
you like for this project, although the screenshots will not match.
Note: This lab uses the default Process template and Version control options. Depending on the
nature of your project, you may opt to use one of the other options. For version control, Visual
Studio Online also fully supports the Git model. While there are some differences between the way
the default Team Foundation Version Control and Git work, the fundamentals of source control are
largely the same, and virtually everything covered in this lab applies to both.
4. After the project has been created, click Navigate to project.
5. On the project’s landing page there are plenty of options for what to do next. The first thing you
should do is create a backlog item to create the initial project. Click Create new | Product Backlog
Item to create your first backlog item for this project.
6. In the New Product Backlog Item dialog, type “Create initial project” and click Save. On a real
project you’d want to fill out more of these fields and assign it to someone, but for the purposes of
this lab you can keep it simple.
7. After the item is saved, it will update the ID near the dialog title. Make note of this ID because you
will use it later to associate the work item with a check in. Press Esc to close the browser dialog.
Task 2: Configuring Visual Studio to work with your project In this task, you’ll configure Visual Studio to work with your project. These steps will need to be
performed for each machine you want to develop on.
1. Launch Visual Studio 2013.
2. In Team Explorer - Home, click the Connect to Team Projects button.
3. Next, click Select Team Projects….
4. In the Connect to Team Foundation Server dialog, click Servers….
5. In the Add/Remove Team Foundation Server dialog, click Add….
6. In the Add Team Foundation Server dialog, type your visualstudio.com domain as the Name or URL
of Team Foundation Server and click OK. If asked to sign in, use the same Microsoft account you
used to create the Visual Studio Online account.
7. In the Add/Remove Team Foundation Server dialog, click Close.
8. In the Connect to Team Foundation Server dialog, check the Source control project and click
Connect. Visual Studio will now connect to your project and perform some basic configuration to
allow access to source code, work items, and other useful project assets.
9. In Team Explorer, there are now several options for interacting with the newly created project. Click
the Home button followed by Source Control Explorer to see the source code.
For a new project, the source code repository is empty, with the exception of some default build
process templates. You’ll also notice that the text for the project is grey, which indicates that you do
not have the latest version. However, before you can get the latest version (or add files), you’ll need
to map a local folder.
10. In Source Control Explorer, right-click the root collection node (which should be
[yoursite].visualstudio.com\DefaultCollection) and select Advanced | Map to Local Folder….
11. In the Map dialog, select a local folder where you’d like all your source to be downloaded to. Note
that this is a folder you can interact with outside Visual Studio, and those changes will be treated the
same as any. Click Map to complete the mapping.
12. After mapping, Visual Studio will provide the option to download the latest version of all files within
the mapped project. Click No to skip this process for now.
13. Right-click the Source control project and select Get Latest Version. This will be the way you get the
latest version of most projects and files.
If you navigate to the folder you mapped earlier using Windows Explorer, you should see that a
Source control project folder has been added to it. Within that folder is a single
BuildProcessTemplates folder with some XAML files.
Task 3: Adding a solution to source control In this task, you’ll use Visual Studio to create a new project and add its solution to source control. After
the project is in source control, other team members will be able to download it, track it, and submit
changes.
1. From the main menu, select File | New | Project….
2. In the New Project dialog, select the Visual C# | Windows category and the WPF Application
template. Leave the default “WpfApplication1” project name and set the Location to the path of
your project folder for the Source control project. Click OK to create the project. Note that there is
an option to add the project to source control immediately, but you won’t do that here.
3. Once the project is created, you can add its solution to source control. In Solution Explorer, right-
click the solution node and select Add Solution to Source Control….
4. In the Choose Source Control dialog, select the Team Foundation Version Control option and then
click OK.
5. In the Add Solution WpfApplication1 to Source Control window, use the default options to add to
the Source control project in a folder named WpfApplication1. Click OK to continue.
6. When a solution is under source control, Visual Studio will indicate the status of files by adding a
glyph, such as the plus signs that indicate which files have been added, but not yet checked in.
7. Right-click the solution node and select Check In…. This will bring up the Team Explorer on its
Pending Changes page. Note that you could have simply navigated to this view using Visual Studio,
although the Solution Explorer method has the benefit of automatically including the files within
the scope of the right-click.
8. In Team Explorer, you can see all the files to be included with this check in under the Included
Changes section. Right now there are fourteen, which is the entire solution. You could decide to
exclude some of these if you desired, although that would potentially break the project for someone
else who downloads it later.
After performing a check in, the included files become known as a changeset. Changesets are a
common way for searching through project history. For example, if the current check in is designed
to update files and fix a bug, you would want it to be easy for someone to understand everything
that was changed as part of the process to address that bug.
9. You can also associate work items to the check in, such as the product backlog item created earlier.
Click Add Work Item by ID and enter the work item ID generated for the product backlog item
created earlier. Click Add to associate it with this check in.
It will now be associated with this check in, and people will be able to easily find the changeset from
the work item later on.
10. Finally, you’re ready to submit the check in. Type “Initial check in” as the Comment and click Check
In. If asked to confirm the check in, click Yes. You may also want to check the Don’t prompt again
box to avoid getting asked every time you check in.
After the check in has succeeded, it will be assigned a changeset ID.
11. In Solution Explorer, you will now notice that the glyphs next to each file icon have turned into little
locks. This indicates that the files are checked in.
12. Switch to the Source Control Explorer window.
13. Navigate to Source control/WpfApplication1/WpfApplication1. You’ll see the list of files included as
part of the server-side project, as well as their current status, whether you currently have the latest
version, and the last time the file was checked in.
Exercise 2: Working with source control in Visual Studio In this exercise, you’ll create a label to make finding a version of the codebase easier to track down.
You’ll also go through the process of checking out files, editing them, and checking them back in. Finally,
you’ll learn about how to undo your most recent changes.
Task 1: Labelling a version in source control In this task, you’ll create a label in source control. A label is simply a marker tracked by the source
control system that enables you to quickly find a snapshot of the project in source control. You’ll also
learn how to search for specific versions of files associated with labels, as well as how to download
them.
1. In Source Control Explorer, right-click the Source control project node in the Folders pane and
select Advanced | Apply Label….
2. In the New Label dialog, type “Initial version” as the Name and select Latest Version from the
Version drop down. Click Create to create the label. Labels are often used to track specific release
versions and might have names like “v1.0” or “June 25 release”. Note that you also have the option
of selecting a version different from the current version, such as if you wanted to create a label for
the code base as of a specific date or after a specific changeset. You could also scope the label in to
a more specific part of the codebase.
3. In Source Control Explorer, right-click the Source control project node in the Folders pane and
select Find | Find Label….
4. In the Find Label dialog, select Source control as the Project and click Find. This will provide a list of
all labels in source control.
5. Double-click the Initial version list item to open a view into that specific version.
6. Navigate to Source control/WpfApplication1/WpfApplication1.
7. Right-click App.config. Note that there are some useful options available for working with this file in
the context of its label in source control. For example, you can change the version of this file that’s
included under this label. This could be useful if you made a change after applying the original label
and needed that change to be included with the labelled version for anyone who might want to
download it.
8. Close the label view.
9. In Source Control Explorer, right-click the Source control project node in the Folders pane and
select Advanced | Get Specific Version….
10. In the Get dialog, select Label from the Type drop down and click the Browse button.
11. The Find Label dialog is the same one you saw earlier. Select Source control as the Project and click
Find.
12. Double-click the Initial version list item to select it for the “get specific version” workflow.
13. In the Get dialog, click Get to get the specific version selected here. Note that you also have the
option to overwrite writeable files that are not checked out, or even to overwrite all files, even if the
local version matches the specified version.
14. In this case, all the files are already up-to-date, so you should be a dialog indicating that. Press Esc to
dismiss.
Task 2: Check out and check in In this task, you’ll check out a file, edit it, and then check it back in. When working with Visual Studio,
you’ll almost always work using your local workspace. Your workspace is your local copy of the team’s
codebase. This is where you develop and test your code in isolation until you are ready to check in your
work. In most cases the only workspace you need is created automatically for you and you don’t have to
edit it. While the process of editing still uses the “check out” concept, the “check out” is entirely local.
As a result, other developers can check in changes to the same files you’re working on, and there is a
process for dealing with merging conflicting changes that you’ll see later on.
Note: If your project is really big (hundreds of thousands of files), there is an alternative workspace
option known as the “server workspace” that may be a better option. For more guidance on using server
3. In the XAML editor, place your cursor just inside the closing bracket of the Window tag. Press Space
to start adding a new attribute.
Since this file is under source control, Visual Studio will automatically check it out for you.
4. From the main menu, select View | Output to bring up the Output panel.
5. Select Source Control - Team Foundation from the Show output from drop down. The last line
printed should show that MainWindow.xaml was checked out silently.
Note: There is a feature known as "Get latest on checkout" that is only available when working with
server workspaces. With this option, Visual Studio will automatically make sure you’re working with
the most recent version of a file when you check it out. If you’re working on a file that may be in
active use by other developers, it’s recommended that you regularly perform a “Get latest” in order
to avoid redundant work or creating additional merge rework later on.
6. After checking the file out, your cursor and focus are returned to where they were before, and
Visual Studio displays the IntelliSense dialog to offer help.
7. Add the following code to set the window background to blue.
XAML Background=”Blue”
8. Press F5 to run the application. The background will be blue. Close the application when satisfied.
9. In Solution Explorer, right-click MainWindow.xaml and select Check In….
10. In Team Explorer, type “Changed background to blue” as the Comment and click Check In.
Note: It's a best practice to perform a “Get latest” before checking in files. Due to the way various
developers can submit overlapping changes, there is a risk that a given checkin will work on your
machine, but that it may “break the build” of the server codebase due to a change made by another
developer since you got the latest version. This lab skips that step for the sake of brevity, but you
should always “get latest” in practice.
Task 3: Undoing pending changes In this task, you’ll undo a pending change. Sometimes you make changes and decide that you don’t want
to keep them. This could be for the entire set of checked-out files, or even just a single one. When you
undo changes, it simply replaces those files with the latest versions from source control. However, keep
in mind that this process is irreversible, so once you undo the changes, they’re gone forever.
1. In MainWindow.xaml, change the background color to red. You’ll need to approve the check out
along the way.
2. Press F5 to run the application. It will have a red background. Close when satisfied.
In this case, it’s clear that you don’t want a red background, and there’s nothing from these current
changes you’d like to keep. This is where “undo pending changes” comes in.
3. There are many places from where you can invoke the “undo pending changes” feature. In this case,
it’s easiest to right-click MainWindow.xaml in Solution Explorer and select Source Control | Undo
Pending Changes….
4. In the Undo Pending Changes dialog, confirm that it only includes the files you want to undo and
click Undo Changes.
5. As part of the process, Visual Studio will also undo the checkout of the files as well. Click Yes to
confirm. If you’re undoing multiple files, it’s easier to select Yes to All.
6. Press F5 to run the application. Note that the background has returned to the pre-checkout blue.
Close when satisfied.
Exercise 3: Advanced source control in Visual Studio In this exercise, you’ll take a look at some of the more advanced features of source control, such as how
to effectively search for code and compare versions. You’ll also learn about shelvesets, as well as how to
branch and merge the codebase.
Task 1: History, compare, and rollback In this task, you’ll use three related features of source control in Visual Studio: history, compare, and
rollback.
History allows you to search, filter, and view the past checkins of a given file. For example, you may
see unexpected behavior in the current codebase and want to understand what changes have been
made that might have caused it. History is also a great way to know who to blame if the build
breaks!
Compare provides an easy way to see the differences between the files. When you compare files,
Visual Studio will infer the adds, deletes, and changes at a per-line level. When possible, it will even
highlight the specific part of a line that has changed.
Rollback enables you to roll back a changeset in order to remove their changes from the codebase.
While that changeset still remains in the history, you can easily undo the effects by accessing the
earlier version and checking it back in as the latest.
1. In MainWindow.xaml, change the background color of the window to green. You’ll need to allow
the file to be checked out along the way.
2. Press F5 to run the application. The background is now green. Close when satisfied.
3. In Solution Explorer, right-click MainWindow.xaml and select Check In….
4. In Team Explorer, type “Changed background to green” and click Check In.
5. After the check in completes, right-click within the MainWindow.xaml file open in the XAML editor
and select Source Control | View History to bring up the history view.
6. The history view provides a list of all the checkins for this file. If you right-click on the second item,
you’ll see a lot of interesting options that allow you to see more details, compare with other
versions, get this specific version, or to even roll back the entire changeset. Select View.
7. Visual Studio will download that specific version of the file, which you can see is saved to a
temporary path and is read-only (the lock icon next to the path). You’ll also notice that the
background of the window is blue, confirming that it’s the previously checked-in version you
wanted.
8. Close the file.
9. In the history view, right-click the second item again and select Compare….
10. Visual Studio downloads the requested version and compares it to the one in your current
workspace, opening it in a diff (“differences”) window. On the right-hand side you can see the red
marker indicating where the earlier file has had lines changed or removed. The green marker
indicates where the later version has changed or added lines. If you look closely at the source files,
you can see that the “Blue” and “Green” text has been subtly highlighted because that is the specific
change detected in that line.
11. Close the diff window.
12. When you selected View earlier, it was noted that the file was downloaded to a temporary location
and set to read-only. However, sometimes you’ll want to pull that version into your project to work
with it directly. To do this, simply right-click that version in the history view and select Get This
Version.
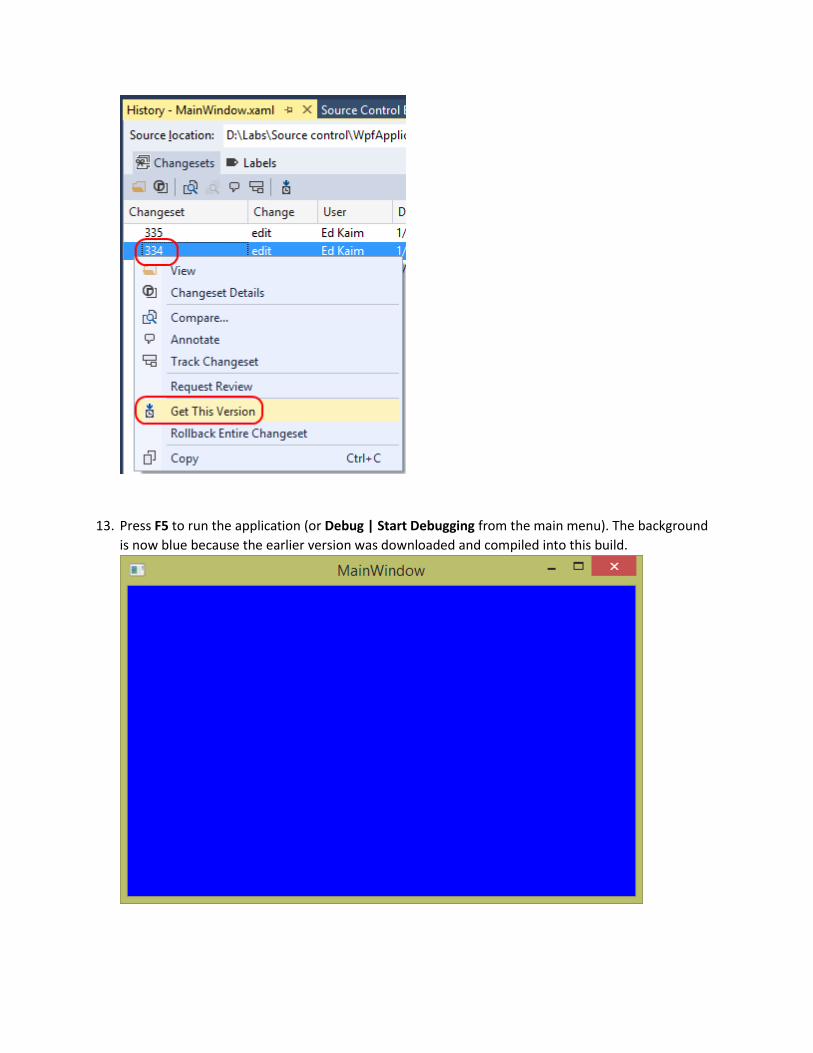
13. Press F5 to run the application (or Debug | Start Debugging from the main menu). The background
is now blue because the earlier version was downloaded and compiled into this build.
Now that you’ve confirmed that this is the version you prefer to the green background, you can
continue working with this file and eventually check it in to become the latest version. However,
sometimes it’s not as easy as dealing with a single file, so it’s more effective to use the rollback
feature.
When you roll back a changeset, you’re effectively getting the latest version, but ignoring that
changeset and anything that came after it. One downside to this approach is that it rolls back the
entire changeset, so you need to pay special attention that you’re not overwriting changes you want
to keep elsewhere.
Note: Rolling back doesn’t actually delete the changeset. Changesets are permanent. Instead, a
rollback pulls down the specified version and treats any changed files like a pending change you’ll
need to check in later.
14. In the History - MainWindow.xaml window, right-click the most recent changeset and select Get
This Version. Ordinarily you wouldn’t need to do this step, but the current state of your workspace
happens to be exactly the same as what it will be after the upcoming rollback. As a result, the
rollback would fail because there would be no changes to make.
15. Right-click the latest changeset (the one where you changed the background to green) and select
Rollback Entire Changeset. If Visual Studio asks if you’d like to reload files that have changed, click
Yes to All. Remember that the version you select is being rolled back, so it’s actually the version
prior to that one that will be downloaded.
16. In Solution Explorer, note that MainWindow.xaml is now treated as a checked-out file (indicated by
the red check glyph next to the file icon). Right-click MainWindow.xaml and select Check In….
17. In Team Explorer, type “Reverted to blue background” as the Comment and click Check In.
18. In the history view for MainWindow.xaml, click the Refresh button. This will update the list to
reflect the most recent check in, which involved an edit and a rollback.
Task 2: Working with shelvesets and conflicts In this task, you’ll learn about working with shelvesets. Shelvesets are a convenient way to suspend and
share your work without checking it into the codebase. With a shelveset, you “save” your changes to the
server where you (or someone else) can pick them up to work on later. This is extremely valuable in
scenarios where you want to pause your work to take on a different task, such as fixing a bug with an
earlier version of the codebase. Another scenario where shelvesets are useful is when you need to share
the state of a project with another developer, whether they’re reviewing your work or continuing it
elsewhere.
1. Edit MainWindow.xaml to have an orange background. You’ll need to check out the file along the
way.
2. Press F5 to run the application. The background will be orange. Close the application when satisfied.
At this point, pretend that word has come down from your management that the orange
background work will have to wait. Purple is now all the rage, so you’ll need to get started on a
purple background. However, orange will eventually be the color the team needs to deliver at some
point, so it would be a waste to throw out all that work. This is a perfect time to create a shelveset
with your current changes.
3. In Solution Explorer, right-click MainWindow.xaml and select Shelve Pending Changes.
4. In Team Explorer, type “Orange background” as the Name and click Shelve. You’ll notice that the
shelveset experience is almost the same as the check in experience.
5. After the shelving process is complete, you’d typically undo changes or get a specific version.
However, since the changes involved in this lab are trivial, you can simply change the orange
background of MainWindow.xaml to purple.
6. Press F5 to run the application. The background will be purple. Close the application when satisfied.
7. In Solution Explorer, right-click MainWindow.xaml and select Check In….
8. Type “Changed background to purple” and click Check In.
After a little time goes by, management has returned to ask you to update the background to
orange, as originally planned. Fortunately, you have a shelveset with that change available, so you
can restore it into your workspace.
9. In Team Explorer, click Actions and select Find Shelvesets. This will bring up a list of your shelvesets.
10. There are two options to help filter down the list of shelvesets: by email and by name. Since you
probably don’t have that many in the list, locate and right-click the Orange background shelveset
and select View Shelveset Details.
11. In the Shelveset Details panel you can see what changes are included with the shelveset, as well as
the comment left, if any. It also provides an Actions list, where you can request a code review. Click
Actions | Request Review.
12. In the New Code Review panel, you can add the name of a reviewer (or pick from the drop down)
and assign an area path for the review. If you submit the request, they will be notified to pull down
your shelveset and review. Click Cancel.
13. To apply these changes back to the current project, click Unshelve Changes followed by Unshelve.
As the shelveset is being unshelved, Visual Studio notices that one of the changes included in the
shelveset conflicts with a more recent change to the same part of the codebase. Since this shelveset
changed the same background color that the more recent check in changed, Visual Studio can’t
automatically merge the changes for you. As a result, you are presented with the Resolve Conflicts
window, which provides as much detail as possible as to the files and versions involved. In some
cases (like this one), the easy answer is to restore either the original workspace or unshelved
versions. However, sometimes the changes are nuanced, and you’ll want to manually decide which
changes to keep from each. That’s where the Merge Tool comes in.
14. Click Merge Changes In Merge Tool. If asked about closing MainWindow.xaml, click Yes.
There are three documents opened in the merge view. The one on the left is the current workspace
version. The one on the right is the unshelved document being merged in. The bottom document is
the “final” version that the selected merges will be applied and shown in. Note that it defaults to the
most recent common ancestor of the two files being merged.
15. Since you want to keep the change from the shelveset, check the box next to that line. The shelveset
will appear in the right panel. Since it has been selected, the alternative option is faded and the
merged document at the bottom reflects the current version to be saved. Note that you can also
edit the bottom document directly if you need to.
16. You can now see that there are no remaining merge conflicts, so click Accept Merge.
17. Press F5 to run the application. The background will be orange. Close the application when satisfied.
At this point, MainWindow.xaml will still be checked out. Do not check it in.
Task 3: Branching and merging In this task, you’ll learn about branching the codebase, and then merging branches back together. In this
scenario, your company has landed a big customer that requires special customization throughout their
version. To begin with, they want their yellow brand to be used as the background color. The best way
to handle significant divergence is to branch the code.
1. In Team Explorer, click the Home button, followed by Source Control Explorer.
2. Expand the Source control project in the left pane, right-click WpfApplication1, and select
Branching and Merging | Branch….
3. In the Branch dialog, replace the “branch” in the Target path with “yellow” and click OK.
4. Open Windows Explorer and navigate to the source control location on your local disk. Notice how
there is now a new folder for the branch just created, and it’s almost the same as your original
branch.
It’s important to note that you still have one pending change in the original branch, which was when
the unshelved change switched the background color from purple to orange. When a branch is
created, it only uses checked-in code, so the new “yellow” branch is actually still operating with the
old purple color because it was copied from the server, not from the local project.
5. In Solution Explorer, right-click the solution node and select Check In….
6. Type “Changed background to orange” as the Comment and click Check In.
Now that you’ve checked in changes to the main branch, it’s time to work on the yellow branch.
Note that this is treated just like opening any different solution, so there is little overlap in the actual
development experience when working on a branch.
7. In Source Control Explorer, select the WpfApplication1-yellow folder and double-click
WpfApplication1.sln to open it.
8. In Solution Explorer, you’ll now see that all the files are checked out, which is because you’ve
opened a completely different solution from the one you just had open. It’s the branched solution,
but it hasn’t been checked in just yet. Open MainWindow.xaml.
9. Change the background color to yellow.
10. Press F5 to run the application. The background will be yellow. Close the application when satisfied.
11. In Solution Explorer, right-click the solution node and select Check In….
12. Type “Changed background to yellow” as the Comment and click Check In.
After a short while, the company has decided that all of the changes made in the yellow branch
should really be applied to the main branch. As a result, it’s time to merge the branches.
13. In Source Control Explorer, right-click the yellow branch and select Branching and Merging |
Merge….
14. In the Source Control Merge Wizard, there are options to select the source and target branches, as
well as which changes should be applied. Leave the defaults, which will merge everything from the
branch you clicked into its parent. Click Next.
15. Next, you can decide the Version type to merge. Accept the default and click Finish.
16. Since there was a conflict over the background color change, Visual Studio can’t automatically
complete the merge. However, you already know that the source branch (the “yellow” one) is the
file you want to keep. Click Take Source Branch Version. Note that you could click Merge Changes In
Merge Tool if you wanted to preview exactly which changes would be kept/lost.
After the differences from the yellow branch have been merged into the main branch, the yellow
branch remains unchanged. In this scenario, you could potentially delete that branch if you know it
will never be used again. However, in many cases a branch lives on, such as when you have branches
set up like “Main”, “QA”, and “Dev”.
17. In Source Control Explorer, select the main branch and double-click WpfApplication1.sln from the
contents pane to open that solution.
18. Press F5 to run the application. The background will be yellow. Close the application when satisfied.
19. Although you merged the branches successfully, you still need to check the changes in.
20. In Team Explorer - Pending Changes, note that the Included Changes section contains
MainWindow.xaml and lists its state as “merge, edit”.
21. Type “Merged yellow branch” as the Comment and click Check In.
22. After the check in succeeds, click the changeset link to view it.
23. In the Changeset Details pane, click Track.
24. The Tracking Changeset dialog enables you to track a changeset across branches. Expand the
Branches tree and check the child branch box. Click Visualize.
25. The default visualization provides a hierarchy tracking view of the changesets. Click Timeline
Tracking to view chronologically.
26. The Timeline Tracking view provides a different view on the same changesets. If you right-click a
changeset, it will provide additional options to manage the changeset itself.
Task 4: Source control settings In this task, you’ll learn about some of the source control settings you can tweak in Visual Studio, as
well as global settings you can configure to improve quality and transparency in the check-in
process.
1. From the main menu in Visual Studio, select Tools | Options.
2. Navigate to Source Control | Environment to bring up local options for source control.
There are a lot of options you can adjust to build your ideal environment. The default preset is Team
Foundation, in which all four options at the top are unchecked. The other preset is Individual
Developer, which checks all four boxes. Of course, you can always pick and choose which features
you want. You can also change the way Visual Studio treats checked-in items during the save and
edit processes.
3. Select the Visual Studio Team Foundation Server node in the left pane. This view offers additional
settings that are specific to working with Team Foundation Server and Visual Studio Online.
Note the option to Show deleted versions in the Source Control Explorer. In Visual Studio Online
source control, items are never discarded. As a result, deleting an item (and checking in the
“delete”) simply hides that file from view. You can still view its versions, content, changesets, etc.
4. Press Esc to close the dialog.
In addition to adjusting environment features, Visual Studio Online provides some great features to
gate the quality of checkins.
5. In Team Explorer, click the Home button, followed by Settings.
6. Click the Source Control link underneath the Team Project section.
7. In the Source Control Settings dialog, select the Check-in Policy tab and click Add….
A check-in policy is a rule that is enforced during the check-in process. There are four policies
available (but not enabled) by default. The Builds policy requires that the most recent build
succeeded. The Changeset Comments Policy (which you’ll add in a moment) requires that the
Comment field is filled out. The Code Analysis policy requires that code analysis be run before
check-in. Finally, the Work Items policy requires that at least one work item be associated with the
check in.
8. Select Changeset Comments Policy and click OK.
9. Select the Check-in Notes tab and click Add….
10. Type “Pair partner” as the Title and click Add. This will provide an additional (and optional) field for
the developer to fill out when checking in. If the developer worked with a pair programming partner
on this check in, they can be associated with it for further questions, etc.
11. Click OK to close the Source Control Settings dialog.
11. Open MainWindow.xaml.
12. Make a minor edit to MainWindow.xaml, such as an additional space in the existing whitespace.
The goal is just to invoke a checkout.
13. In Solution Explorer, right-click MainWindow.xaml and select Check In….
14. Notice that the check in experience now has a policy warning to remind you to include a comment,
as well as a field for the “pair partner” added earlier. Provide some text in each and click Check In.
Exercise 4: Visual Studio Online In this exercise, you’ll take a look at some of the features made available for source control on the Visual
Studio Online project site.
Task 1: Your Visual Studio Online project portal In this task, you’ll take a tour of the source control features available on Visual Studio Online project
portal.
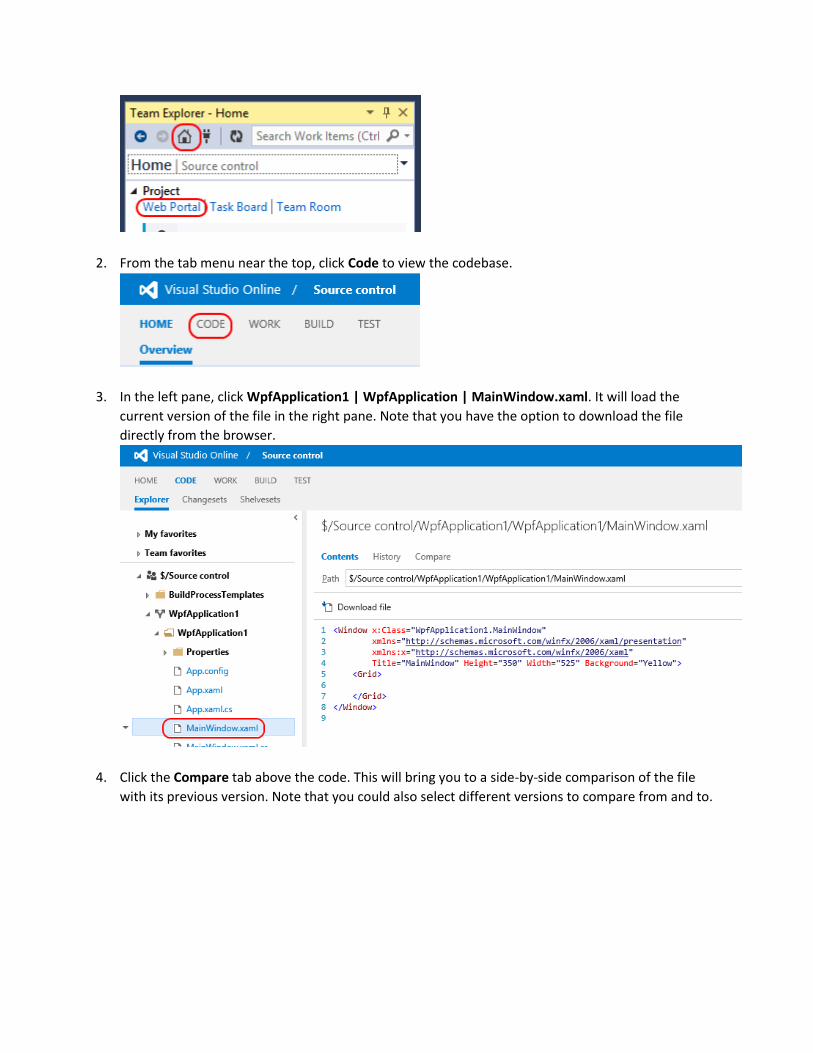
1. In Team Explorer, click the Home button and then click the Web Portal link. Sign in if asked.
2. From the tab menu near the top, click Code to view the codebase.
3. In the left pane, click WpfApplication1 | WpfApplication | MainWindow.xaml. It will load the
current version of the file in the right pane. Note that you have the option to download the file
directly from the browser.
4. Click the Compare tab above the code. This will bring you to a side-by-side comparison of the file
with its previous version. Note that you could also select different versions to compare from and to.
If you click the Mode button on the right side of the toolbar, you can switch from side-by-side to
inline diff mode.
5. Click the History tab to see all the changesets this file was a part of. Expand the Show merge history
link to see details about the recent file merge.
6. This merge was part of a branch merge, so you can click Show branch history to see the details of
the branch itself.
7. Click the Merged yellow branch link from the most recent changeset.
8. Now you can see more details about this recent change. However, you can go a step further and
provide a lightweight code comment to annotate the history of the file. Place your mouse over the
margin to the left of the line numbers and click the Add Comment button that appears.
9. Type “Yellow looks better.” as the comment and press Enter.
This comment is now part of the changeset and can be viewed by anyone reviewing the code. They
can also reply or ask questions, which provides a great way to communicate and document the
project’s history.
10. Click the Changesets tab to bring up the history for this project. Note an icon now appears to
indicate that this changeset has some lightweight code comments attached.