50
INTRODUCTION TO AC/DC Module

INTRODUCTION TO
AC/DC Module

C o n t a c t I n f o r m a t i o nVisit the Contact COMSOL page at www.comsol.com/contact to submit general inquiries, contact
Technical Support, or search for an address and phone number. You can also visit the Worldwide
Sales Offices page at www.comsol.com/contact/offices for address and contact information.
If you need to contact Support, an online request form is located at the COMSOL Access page at
www.comsol.com/support/case. Other useful links include:
• Support Center: www.comsol.com/support
• Product Download: www.comsol.com/product-download
• Product Updates: www.comsol.com/support/updates
• COMSOL Blog: www.comsol.com/blogs
• Discussion Forum: www.comsol.com/community
• Events: www.comsol.com/events
• COMSOL Video Gallery: www.comsol.com/video
• Support Knowledge Base: www.comsol.com/support/knowledgebase
Part number: CM020104
I n t r o d u c t i o n t o t h e A C / D C M o d u l e © 1998–2018 COMSOL
Protected by patents listed on www.comsol.com/patents, and U.S. Patents 7,519,518; 7,596,474; 7,623,991; 8,457,932; 8,954,302; 9,098,106; 9,146,652; 9,323,503; 9,372,673; and 9,454,625. Patents pending.
This Documentation and the Programs described herein are furnished under the COMSOL Software License Agreement (www.comsol.com/comsol-license-agreement) and may be used or copied only under the terms of the license agreement.
COMSOL, the COMSOL logo, COMSOL Multiphysics, COMSOL Desktop, COMSOL Server, and LiveLink are either registered trademarks or trademarks of COMSOL AB. All other trademarks are the property of their respective owners, and COMSOL AB and its subsidiaries and products are not affiliated with, endorsed by, sponsored by, or supported by those trademark owners. For a list of such trademark owners, see www.comsol.com/trademarks.
Version: COMSOL 5.4

Contents
Contents . . . . . . . . . . . . . . . . . . . . . . . . . . . . . . . . . . . . . . . . . . . . . . 3
Introduction . . . . . . . . . . . . . . . . . . . . . . . . . . . . . . . . . . . . . . . . . . . 5
The Use of the AC/DC Module . . . . . . . . . . . . . . . . . . . . . . . . . . . . . 6
The AC/DC Module Physics Interfaces. . . . . . . . . . . . . . . . . . . . 10
Physics Interface Guide by Space Dimension and Study Type . . . 14
Tutorial Example: Modeling a 3D Inductor. . . . . . . . . . . . . . . . . 17
| 3

4 |

Introduction
The AC/DC Module is used by engineers and scientists to understand, predict, and design electric and magnetic fields in static, low-frequency, and transient applications. Simulations of this kind result in more powerful and efficient products and engineering methods. It allows its users to quickly and accurately predict electromagnetic field distributions, electromagnetic forces, and power dissipation in a proposed design. Compared to traditional prototyping, COMSOL helps to lower costs and can evaluate and predict entities that are not directly measurable in experiments. It also allows the exploration of operating conditions that would destroy a real prototype or be hazardous.The AC/DC Module includes stat ionary and dynamic electric and magnetic fields in two-dimensional and three-dimensional spaces along with traditional circuit-based modeling of passive and active devices. All modeling formulations are based on Maxwell’s equations or subsets and special cases of these together with material laws like Ohm’s law for charge transport. The modeling capabilities are accessed via a number of predefined physics interfaces, referred to as AC/DC physics interfaces, which allow you to set up and solve electromagnetic models. The AC/DC interfaces cover electrostatics, DC current flow, magnetostatics, AC and transient current flow, AC and transient magnetodynamics, and AC electromagnetic (full Maxwell) formulations.Under the hood, the AC/DC interfaces formulate and solve the differential form of Maxwell’s equations together with initial and boundary conditions. The equations are solved using the finite element method with numerically stable edge element discretization in combination with state-of-the-art algorithms for preconditioning and solution of the resulting sparse equation systems. The results are presented in the graphics window through predefined plots of electric and magnetic fields, currents and voltages or as expressions of the physical quantities that you can define freely, and derived tabulated quantities (for example resistance, capacitance, inductance, electromagnetic force, and torque) obtained from a simulation.The work flow in the module is straightforward and is described by the following steps: define the geometry, select materials, select a suitable AC/DC interface, define boundary and initial conditions, define the finite element mesh, select a solver, and visualize the results. All these steps are accessed from the COMSOL Desktop. The solver selection step is usually carried out automatically using the default settings, which are already tuned for each specific AC/DC interface.The AC/DC Module application library describes the available features using tutorial and benchmark examples for the different formulations. The library contains models for industrial equipment and devices, tutorial models, and
| 5
benchmark models for verification and validation of the AC/DC interfaces. See Tutorial Example: Modeling a 3D Inductor to start exploring now.This guide will give you a jump start to your modeling work. It has examples of the typical use of the module, a list of all the AC/DC interfaces including a short description for each, and a tutorial example that introduces the modeling workflow.
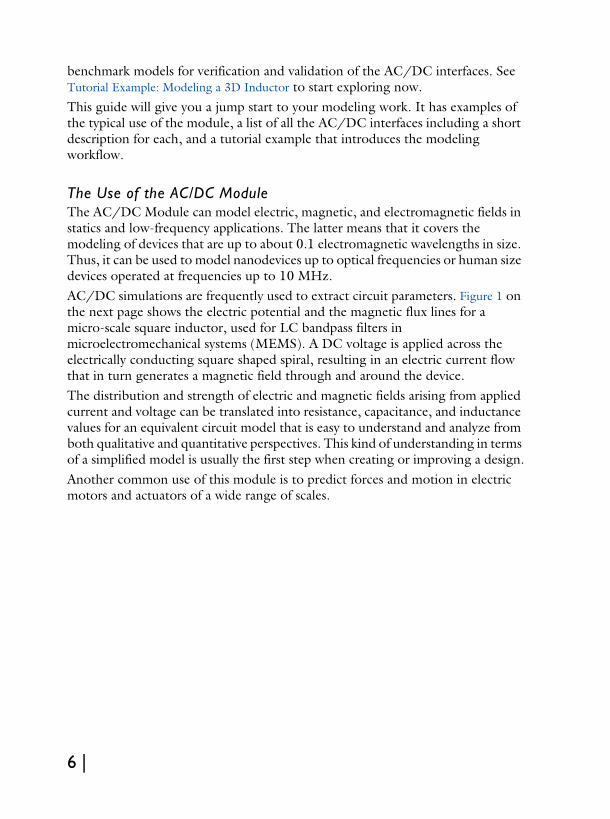
The Use of the AC/DC ModuleThe AC/DC Module can model electric, magnetic, and electromagnetic fields in statics and low-frequency applications. The latter means that it covers the modeling of devices that are up to about 0.1 electromagnetic wavelengths in size. Thus, it can be used to model nanodevices up to optical frequencies or human size devices operated at frequencies up to 10 MHz.AC/DC simulations are frequently used to extract circuit parameters. Figure 1 on the next page shows the electric potential and the magnetic flux lines for a micro-scale square inductor, used for LC bandpass filters in microelectromechanical systems (MEMS). A DC voltage is applied across the electrically conducting square shaped spiral, resulting in an electric current flow that in turn generates a magnetic field through and around the device. The distribution and strength of electric and magnetic fields arising from applied current and voltage can be translated into resistance, capacitance, and inductance values for an equivalent circuit model that is easy to understand and analyze from both qualitative and quantitative perspectives. This kind of understanding in terms of a simplified model is usually the first step when creating or improving a design.Another common use of this module is to predict forces and motion in electric motors and actuators of a wide range of scales.
6 |
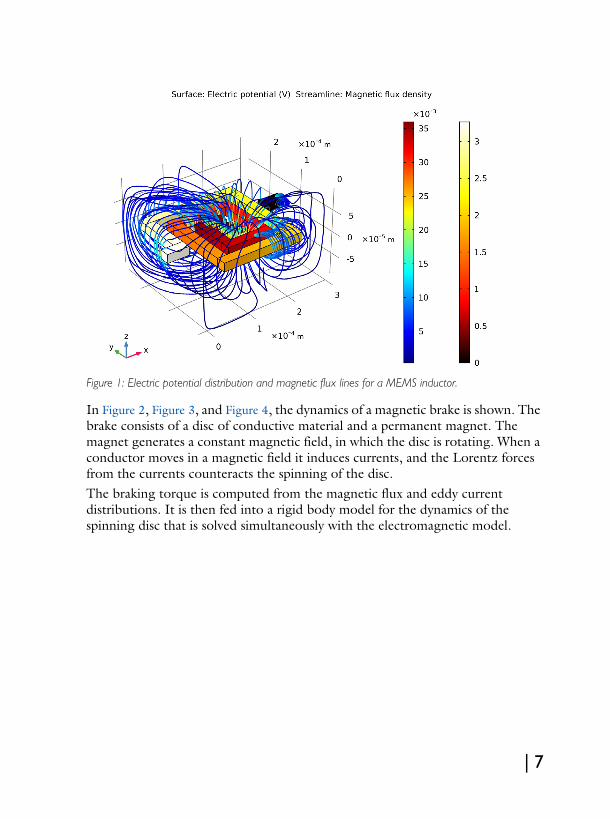
Figure 1: Electric potential distribution and magnetic flux lines for a MEMS inductor.
In Figure 2, Figure 3, and Figure 4, the dynamics of a magnetic brake is shown. The brake consists of a disc of conductive material and a permanent magnet. The magnet generates a constant magnetic field, in which the disc is rotating. When a conductor moves in a magnetic field it induces currents, and the Lorentz forces from the currents counteracts the spinning of the disc.The braking torque is computed from the magnetic flux and eddy current distributions. It is then fed into a rigid body model for the dynamics of the spinning disc that is solved simultaneously with the electromagnetic model.
| 7

Figure 2: The eddy current magnitude and direction in the spinning disc of a magnetic brake.
Figure 3: The time evolution of the braking torque.
8 |

Figure 4: The time evolution of the dissipated power.
The AC/DC Module includes a range of tools to evaluate and export results, for example, the evaluation of force, torque, and lumped circuit parameters like resistance, capacitance, inductance, impedance, and scattering matrices (S-parameters). Lumped parameters can also be exported in the Touchstone file format.The combination of fully distributed electromagnetic field modeling and simplified circuit based modeling is an ideal basis for design, exploration, and optimization. More complex system models can be exploited using circuit-based modeling while maintaining links to full field models for key devices in the circuit allowing for design innovation and optimization on both levels.
| 9

The AC/DC Module Physics Interfaces
The AC/DC interfaces are based upon Maxwell’s equations or subsets and special cases of these together with material laws. Different subsets of Maxwell’s equations in combination with special material laws result in different electric, magnetic, or electromagnetic formulations. In the module, these laws of physics are translated by the AC/DC interfaces to sets of partial differential equations with corresponding initial and boundary conditions.An AC/DC interface defines a number of features. Each feature represents a term or condition in the underlying Maxwell-based formulation and may be defined in a geometric entity of the model, such as a domain, boundary, edge (for 3D components), or point.Figure 5 on the next page shows the Model Builder window and the Settings window for the selected Charge Conservation 1 feature node in the Electrostatics interface. The Charge Conservation 1 node adds the terms representing Electrostatics to the model equations for a selected geometrical domain in the model. Furthermore, the Charge Conservation 1 node may link to the Materials node to obtain physical properties, in this case the relative permittivity of a user-defined dielectric. The properties, defined by the Dielectric material node, may be functions of the modeled physical quantities, such as temperature. The Zero
10 |

Charge 1 boundary condition feature adds the natural boundary conditions that limit the Electrostatics domain.
Figure 5: The Model Builder window (to the left), and the Settings window for Charge Conservation 1 for the selected feature node (to the right). The Equation section in the Settings window shows the model equations and the terms added to the model equations by the Charge Conservation 1 node. The added terms are underlined with a dotted line. The text also explains the link between the material properties represented by the Dielectric node and the values for the Relative permittivity.
The AC/DC Module has several AC/DC interfaces ( ) for different types of electric and magnetic modeling. Figure 6 shows the AC/DC interfaces as well as those under the Heat Transfer branch, which contains the Joule Heating and
| 11
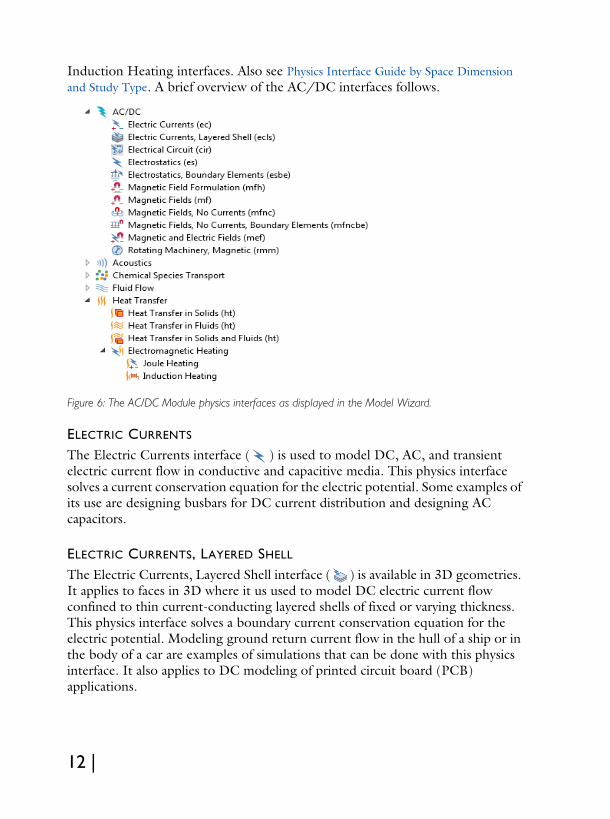
Induction Heating interfaces. Also see Physics Interface Guide by Space Dimension and Study Type. A brief overview of the AC/DC interfaces follows.
Figure 6: The AC/DC Module physics interfaces as displayed in the Model Wizard.
ELECTRIC CURRENTS
The Electric Currents interface ( ) is used to model DC, AC, and transient electric current flow in conductive and capacitive media. This physics interface solves a current conservation equation for the electric potential. Some examples of its use are designing busbars for DC current distribution and designing AC capacitors.
ELECTRIC CURRENTS, LAYERED SHELL
The Electric Currents, Layered Shell interface ( ) is available in 3D geometries. It applies to faces in 3D where it us used to model DC electric current flow confined to thin current-conducting layered shells of fixed or varying thickness. This physics interface solves a boundary current conservation equation for the electric potential. Modeling ground return current flow in the hull of a ship or in the body of a car are examples of simulations that can be done with this physics interface. It also applies to DC modeling of printed circuit board (PCB) applications.
12 |

ELECTRICAL CIRCUIT
The Electrical Circuit interface ( ) has the equations to model electrical circuits with or without connections to a distributed fields model, solving for the voltages, currents, and charges associated with the circuit elements. Circuit models can contain passive elements like resistors, capacitors, and inductors as well as active elements such as diodes and transistors.
ELECTROSTATICS
The Electrostatics interface ( ) solves a charge conservation equation for the electric potential given the spatial distribution of the electric charge. It is used primarily to model charge conservation in dielectrics under static conditions. This physics interface applies also under transient conditions but then it is usually combined with a separate transport model for single species or multispecies charge transport. Such transport models can be found in the Chemical Reaction Engineering Module and in the Plasma Module. AC simulations are supported and used especially together with the Piezoelectric Devices interface in the Acoustics Module, Structural Mechanics Module, and MEMS Module. Some typical applications that are simulated in the Electrostatics interface are capacitors, dielectric sensors, and bushings for high voltage DC insulation.
ELECTROSTATICS, BOUNDARY ELEMENTS
The Electrostatics, Boundary Elements interface( ), solves Laplace’s equation for the scalar electric potential. It is used for computing the potential distribution in dielectrics with constant and isotropic electrical permittivity under conditions where the electric potential distribution on the boundaries is explicitly prescribed. The formulation is based on the boundary element method and the interface is available in 2D and 3D. It can be coupled to the Electrostatics interface to combine the modeling of large open regions (using the boundary element method) and the modeling of complex inhomogeneous and anisotropic dielectrics (using the finite element method).
MAGNETIC FIELD FORMULATION
The Magnetic Field Formulation interface ( ) solves Faraday’s law for the magnetic H-field. It is used to model mainly AC, and transient magnetodynamics in conducting domains. It is especially suitable for modeling involving nonlinear conductivity effects, for example in superconductors.
MAGNETIC FIELDS
The Magnetic Fields interface ( ) solves Ampère’s law for the magnetic vector potential. It is used to model magnetostatics, AC, and transient
| 13

magnetodynamics. Magnets, magnetic actuators, electric motors, transformers, induction based nondestructive testing, and eddy current generation are typical applications for this physics interface. It supports both linear media, media with magnetic saturation and time-domain hysteresis.
MAGNETIC FIELDS, NO CURRENTS
The Magnetic Fields, No Currents interface ( ) is used to efficiently model magnetostatics in current free regions, for example, when designing permanent magnet-based devices. It solves a magnetic flux conservation equation for the magnetic scalar potential. This physics interface supports both linear media, media with magnetic saturation and time-domain hysteresis.
MAGNETIC FIELDS, NO CURRENTS, BOUNDARY ELEMENTS
The Magnetic Fields, No Currents, Boundary Elements interface( ), solves Laplace’s equation for the scalar magnetic potential. It is used to compute magnetostatic fields from permanent magnets and other current free magnetic sources in media with constant and isotropic magnetic permeability. The formulation is based on the boundary element method and the interface is available in 2D and 3D. It can be coupled to the Magnetic Fields, No Currents Interface and the Magnetic Fields Interface to combine the modeling of large open, current free regions (using the boundary element method) and the modeling of complex inhomogeneous and anisotropic magnetic media (using the finite element method).
MAGNETIC AND ELECTRIC FIELDS
The Magnetic and Electric Fields interface ( ) is used to model magnetostatics and AC magnetodynamics. It solves Ampère’s law for the magnetic vector potential together with a current conservation equation for the electric potential. The application areas are mostly the same as for the Magnetic Fields interface. Note: In most cases, using the Magnetic Fields interface with its dedicated coil modeling feature, is the preferred choice over using the Magnetic and Electric Fields interface.
ROTATING MACHINERY, MAGNETIC
The Rotating Machinery, Magnetic interface ( ) combines the magnetic fields (magnetic vector potential) and magnetic fields, no currents (scalar magnetic potential) formulations with a selection of predefined frames for prescribed rotation or rotation velocity—it shares most of its features with the Magnetic Fields interface. This physics interface requires that the geometry is created as an assembly from individual parts for the rotor and stator.
14 |

INDUCTION HEATING
The Induction Heating interface ( ) combines all features from the Magnetic Fields interface in the time-harmonic formulation with the Heat Transfer interface to model induction and eddy current heating. The predefined multiphysics couplings add the electromagnetic power dissipation as a heat source, and the electromagnetic material properties can depend on the temperature. This physics interface is based on the assumption that the magnetic cycle time is short compared to the thermal time scale (adiabatic assumption).
JOULE HEATING
The Joule Heating interface ( ) combines all features from the Electric Currents interface with the Heat Transfer interface to model resistive heating and heating due to dielectric losses. The predefined multiphysics couplings add the electromagnetic power dissipation as a heat source, and the electromagnetic material properties can depend on the temperature.
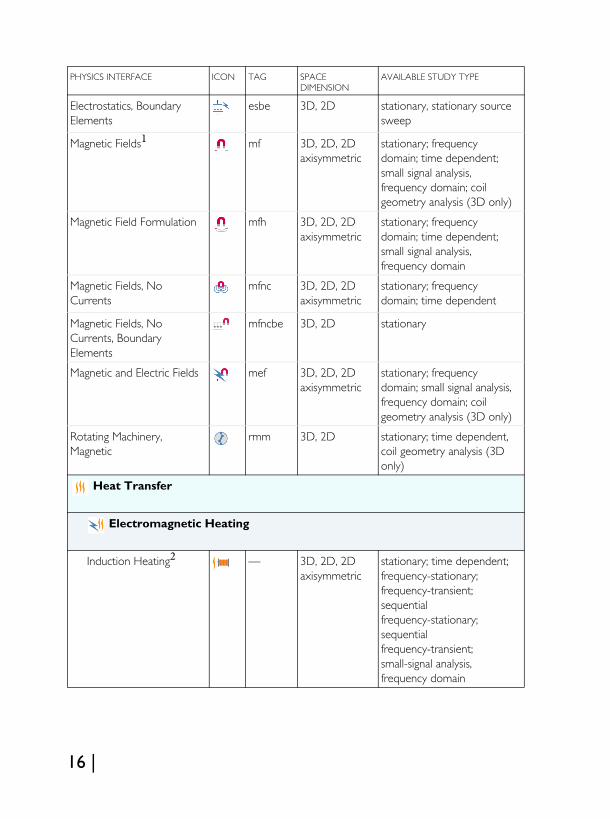
Physics Interface Guide by Space Dimension and Study TypeThe table list the physics interfaces available specifically with this module in addition to the COMSOL Multiphysics basic license.
PHYSICS INTERFACE ICON TAG SPACE DIMENSION
AVAILABLE STUDY TYPE
AC/DC
Electric Currents1 ec all dimensions stationary; stationary source sweep; frequency domain; time dependent; small signal analysis, frequency domain
Electric Currents, Layered Shell
ecs 3D stationary
Electrical Circuit cir Not space dependent
stationary; frequency domain; time dependent; small signal analysis, frequency domain
Electrostatics1 es all dimensions stationary; time dependent; stationary source sweep; eigenfrequency; frequency domain; small signal analysis, frequency domain
| 15
Electrostatics, Boundary Elements
esbe 3D, 2D stationary, stationary source sweep
Magnetic Fields1 mf 3D, 2D, 2D axisymmetric
stationary; frequency domain; time dependent; small signal analysis, frequency domain; coil geometry analysis (3D only)
Magnetic Field Formulation mfh 3D, 2D, 2D axisymmetric
stationary; frequency domain; time dependent; small signal analysis, frequency domain
Magnetic Fields, No Currents
mfnc 3D, 2D, 2D axisymmetric
stationary; frequency domain; time dependent
Magnetic Fields, No Currents, Boundary Elements
mfncbe 3D, 2D stationary
Magnetic and Electric Fields mef 3D, 2D, 2D axisymmetric
stationary; frequency domain; small signal analysis, frequency domain; coil geometry analysis (3D only)
Rotating Machinery, Magnetic
rmm 3D, 2D stationary; time dependent, coil geometry analysis (3D only)
Heat Transfer
Electromagnetic Heating
Induction Heating2 — 3D, 2D, 2D axisymmetric
stationary; time dependent; frequency-stationary; frequency-transient; sequential frequency-stationary; sequential frequency-transient; small-signal analysis, frequency domain
PHYSICS INTERFACE ICON TAG SPACE DIMENSION
AVAILABLE STUDY TYPE
16 |

Joule Heating1,2 — all dimensions stationary; time dependent; frequency-transient; small-signal analysis; frequency domain; frequency-stationary; sequential frequency-stationary; sequential frequency-transient
1 This physics interface is included with the core COMSOL package but has added functionality for this module.
2 This physics interface is a predefined multiphysics coupling that automatically adds all the physics interfaces and coupling features required.
PHYSICS INTERFACE ICON TAG SPACE DIMENSION
AVAILABLE STUDY TYPE
| 17

Tutorial Example: Modeling a 3D Inductor
Inductors are used in many applications for low-pass filtering or for impedance matching of predominantly capacitive loads. They are used in a wide frequency range from near static up to several MHz. An inductor usually has a magnetic core to increase the inductance while keeping its size small. The magnetic core also reduces the electromagnetic interference with other devices as the magnetic flux tends to stay within it. Because there are only crude analytical or empirical formulas available to calculate impedances, computer simulations or measurements are necessary during the design stage. In general, inductor modeling is more complex than modeling resistors and capacitors but similar principles apply. Using an external CAD software to design and draw the model, the geometry is imported into the AC/DC Module for static and frequency domain analysis. The inductor geometry is shown in Figure 7.
Figure 7: The inductor geometry.
First a magnetostatic simulation is performed to get the DC inductance. At low frequencies capacitive effects are negligible. A relevant equivalent circuit model is an ideal inductor in a series with an ideal resistor. The inductance and the resistance are both computed in the magnetostatic simulation. At a high
Core
Feed gap
96 mm
Copper winding
18 |

frequency, capacitive effects become significant. The equivalent circuit model involves connecting an ideal capacitor in parallel with the DC circuit. The circuit parameters are obtained by analyzing the frequency dependent impedance obtained from a frequency domain simulation. In this tutorial, the AC analysis is done up to the point when the frequency dependent impedance is computed.These step-by-step instructions guide you through the detailed modeling of an inductor in 3D. The module also has a physics interface to model electrical circuits, which is detailed in the magnetostatic part of this model. The first step is to perform a DC simulation.
Model Wizard
Note: These instructions are for the user interface on Windows but apply, with minor differences, also to Linux and Mac.
1 To start the software, double-click the COMSOL icon on the desktop. When the software opens, you can choose to use the Model Wizard to create a new COMSOL model or Blank Model to create one manually. For this tutorial, click the Model Wizard button.If COMSOL is already open, you can start the Model Wizard by selecting New from the File menu and then click Model Wizard .
The Model Wizard guides you through the first steps of setting up a model. The next window lets you select the dimension of the modeling space.
2 In the Space Dimension window click 3D .3 In the Select Physics tree under AC/DC, select Magnetic Fields (mf) .4 Click Add then click Study .5 In the Select Study window under General
Studies, click Stationary .6 Click Done .
Geometry 1
The main geometry is imported from a file. Air domains are typically not part of a CAD geometry, so these are added to the model. For convenience, three additional domains are defined in the CAD file and then used to define a narrow feed gap where an excitation is applied.
| 19
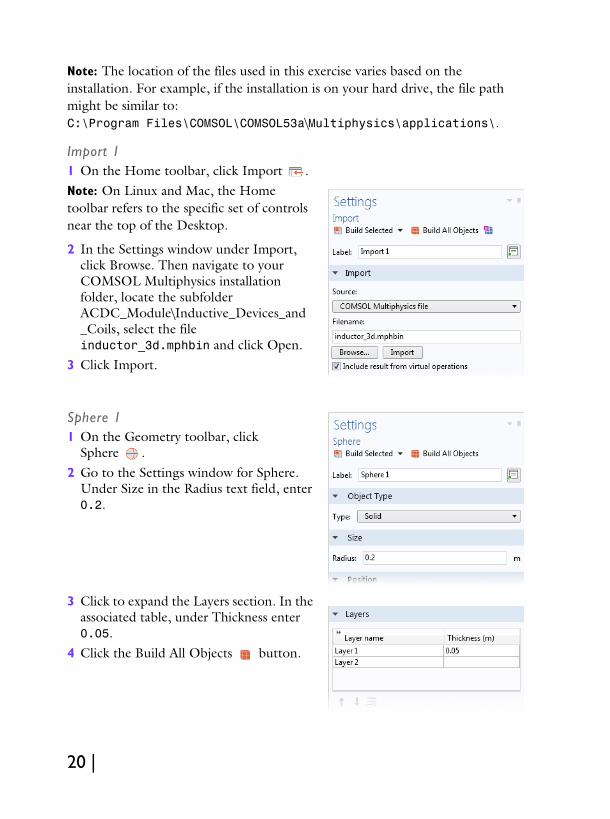
Note: The location of the files used in this exercise varies based on the installation. For example, if the installation is on your hard drive, the file path might be similar to: C:\Program Files\COMSOL\COMSOL53a\Multiphysics\applications\.
Import 11 On the Home toolbar, click Import . Note: On Linux and Mac, the Home toolbar refers to the specific set of controls near the top of the Desktop.
2 In the Settings window under Import, click Browse. Then navigate to your COMSOL Multiphysics installation folder, locate the subfolder ACDC_Module\Inductive_Devices_and_Coils, select the file inductor_3d.mphbin and click Open.
3 Click Import.
Sphere 1 1 On the Geometry toolbar, click
Sphere .2 Go to the Settings window for Sphere.
Under Size in the Radius text field, enter 0.2.
3 Click to expand the Layers section. In the associated table, under Thickness enter 0.05.
4 Click the Build All Objects button.
20 |

Form Union1 In the Model Builder under Geometry 1,
click Form Union .2 In the Settings window for Form
Union/Assembly, click Build All .3 On the Graphics window toolbar, click the
Zoom Extents button and then the Wireframe Rendering button.The geometry should match this figure.
Definit ions - Selections
Use the Selection feature available under the Definitions node to make the set up of materials and physics interfaces easier. Start by defining the domain group for the inductor winding and continue by adding other useful selections. These steps illustrate how to set up the Explicit nodes and rename the geometric selections accordingly. 1 On the Definitions toolbar, click Explicit .
| 21

2 Repeat Step 1 and add a total of six (6) Explicit nodes . Or right-click the first Explicit node and select Duplicate .
The following steps are done one at a time for each node using the table below. 3 In the Model Builder click an Explicit node to open the Settings window.
Note: There are many ways to select geometric entities. When you know the domain to add, such as in this exercise, you can click the Paste Selection button and enter the information in the Selection text field. In this example for the Explicit 1 node, enter 7,8,14 in the Paste Selection window. For more information about selecting geometric entities in the Graphics window, see the COMSOL Multiphysics Reference Manual.
4 In the Settings window under Input Entities, select Domain from the Geometric entity level list. Use the table as a guide, and in the Graphics window, select the domains as indicated. Then rename the node by changing its Label in the Settings window.
DEFAULT NODE NAME
SELECT THESE DOMAINS NEW NAME FOR THE NODE
Explicit 1 7, 8, and 14 Winding
Explicit 2 9 Gap
Explicit 3 6 Core
Explicit 4 1–4 and 10–13 Infinite Elements
Explicit 5 1–6 and 9–13 Non-conducting
Explicit 6 5,6, and 9 Non-conducting without IE
22 |

5 After renaming all the nodes under Definitions, the sequence of nodes should match this figure.
Definit ions - Inf inite Elements
Use the Infinite Element feature available under the Definitions node to emulate an infinite open space surrounding the inductor. The infinite element coordinate scaling is recognized by any physics interface supporting it - other physics interfaces are automatically disabled in the infinite element domains.1 On the Definitions toolbar click Infinite Element Domain . 2 Go to the Settings window for Infinite Elements. Under Domain Selection
select Infinite Elements from the Selection list.3 Under Geometry from the Type list, select Spherical.
Materials
Now define the material settings for the different parts of the inductor. Use the Selections defined in the previous section.
Copper1 On the Home toolbar click Add Material .
| 23

2 Go to the Add Material window. In the Materials tree under AC/DC, right-click Copper and choose Add to Component 1 from the menu.
3 In the Model Builder, click Copper .
4 Go to the Settings window for Material. Under Geometric Entity Selection select Winding from the Selection list.
Air1 Go to the Add Material window.
In the Materials tree under Built-In, right-click Air and choose Add to Component 1 from the menu.
2 Close the Add Material window.3 In the Model Builder click Air
.4 Go to the Settings window for
Material. Under Geometric Entity Selection select Non-conducting from the Selection list.
User-Defined Material 3
The core material is not included in the material library so it is entered as a user-defined material.1 On the Materials toolbar click Blank Material .2 In the Settings window for Material, in the Label text field, type Core.
24 |

3 Under Geometric Entity Selection select Core from the Selection list.
4 Under Material Contents in the table, enter these settings in the Value column:
- 1e3 for the Relative permeability- 0 for the Electrical conductivity- 1 for the Relative permittivity
The node sequence under Materials should match the figure.
Magnetic Fields (mf)
The model is solved everywhere except in the feed gap region. By keeping this void, its default boundary conditions support surface currents closing the current loop. In inductor modeling it is crucial to respect current conservation as this is a law of nature (Ampère’s law).
| 25

1 In the Model Builder click Magnetic Fields .2 In the Settings window for Magnetic Fields, select
domains 1–8 and 10–14 only (all domains except 9). Or first click the Clear Selection button , then click the Paste Selection button and enter 1–8, 10–14 in the Selection text field.
Coil 1A dedicated feature is added for the solid copper winding of the inductor. This feature makes it easier to excite the model in various ways.1 On the Physics toolbar click Domains and choose Coil .2 In the Settings window for Coil, under Domain Selection, choose Winding
from the Selection list.3 In the Model Builder, expand the Coil 1 node.4 Right-click the Geometry Analysis 1 subnode and choose Output . There
is already a default Input node.5 Click the Input 1 node.6 In the Settings window for Input 1, click the Paste Selection button and
enter 58 in the Selection text field. 7 Click OK.8 Click the Output 1 node.9 In the Settings window for Output 1, click the Paste Selection button and
enter 79 in the Selection text field. 10Click OK.
The Coil with default settings will treat it as a solid conductor and apply a current of 1 A flowing from the input to the output.The node sequence under Magnetic Fields should at this point match this figure.
26 |

Mesh 1
The infinite elements region requires a swept mesh to maintain a good effective element quality despite the steep radial scaling. To enable this meshing method, perform the following steps.1 In the Model Builder click Magnetic Fields .2 In the Settings window for Magnetic Fields, locate the Physics-Controlled
Mesh section.
3 Select the Enable check box.On the Mesh toolbar click Build Mesh .
Study 1
Before the magnetostatic model is ready to solve an additional study step needs to be added for computing the exciting coil current.1 Right-click the Study 1 node and select Study steps>Other>Coil Geometry
Analysis . 2 Right-click Coil Geometry Analysis and select Move Up . The Study
node should at this stage match this figure.
3 On the Study toolbar click Compute .
| 27
Results
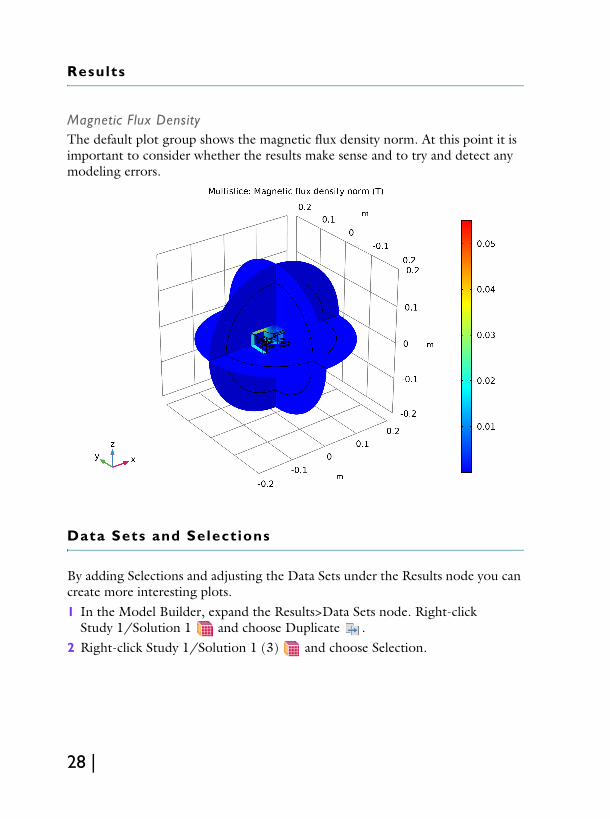
Magnetic Flux Density The default plot group shows the magnetic flux density norm. At this point it is important to consider whether the results make sense and to try and detect any modeling errors.
Data Sets and Selections
By adding Selections and adjusting the Data Sets under the Results node you can create more interesting plots.1 In the Model Builder, expand the Results>Data Sets node. Right-click
Study 1/Solution 1 and choose Duplicate . 2 Right-click Study 1/Solution 1 (3) and choose Selection.
28 |

3 Go to the Settings window for Selection. Under Geometric entity selection:- From the Geometric entity level list, select Domain. - From the Selection list, select Winding.
4 Right-click Study 1/Solution 1 (1) and choose Duplicate .5 Right-click Study 1/Solution 1 (4) and choose Selection. A Selection node
is added to the Model Builder.
6 Go to the Settings window for Selection. Under Geometric Entity Selection:- From the Geometric entity level list, select Domain. - From the Selection list, select Core.
3D Plot Group 21 On the Results toolbar, click 3D Plot
Group . An additional toolbar containing Plot Tools for the 3D Plot Group appears when the 3D Plot Group is selected in the Model Builder.
| 29

2 On the 3D Plot Group 2 toolbar, click Streamline .
3 Go to the Settings window for Streamline. Click Replace Expression
in the upper-right corner of the Expression section. From the menu, choose Component 1>Magnetic Fields>Coil parameters>mf.coil1.eCoilx,...,mf.coil1.eCoilz - Coil direction..
4 Under Selection, click the Paste Selection button and enter 58 in the Selection text field.
5 Click OK6 Right-click 3D Plot Group 2 and choose Volume .
A Volume 1 node is added to the Model Builder.
30 |

7 Go to the Settings window for Volume. Under Data from the Data set list, select Study 1/Solution 1 (4).
8 Click the Plot button.
On the Graphics window toolbar, click the Zoom In button twice.
| 31

Derived Values
Next, evaluate the coil inductance and resistance and compare them respectively to the inductance estimated from the total magnetic energy and to the resistance defined using Ohm’s law.1 On the Results toolbar click Global Evaluation . 2 In the Settings window for Global Evaluation, locate the Expression section.3 In the table, enter the following settings:
4 Click the Evaluate button.
Compare the results in the Table window.
Magnetic Fields (mf)
As shown in the Magnetic Flux Density plot, this is effectively contained within the core. Thus, there should be little need to use infinite elements in this model. Solve the model without the infinite elements to test this hypothesis.
32 |

1 In the Model Builder click Magnetic Fields .2 In the Settings window for Magnetic Fields, select domains 5–8 and 14 only.
Study 1
1 On the Study toolbar click Compute .
Derived Values
1 In the Model Builder under Results>Derived Values, click Global Evaluation 1 .
2 In the Settings window for Global Evaluation, click the Evaluate button.
The Resistance and Inductance values display in the Table window. The results change very little.
| 33

Model Wizard
Next, add a simple circuit to the model.1 On the Physics toolbar click Add
Physics .2 Go to the Add Physics window.
In the tree under AC/DC, click Electrical Circuit (cir) and click Add to Component.
3 Close the Add Physics window.
Magnetic Fields (MF)
Change the field excitation to connect to the circuit part of the model.1 In the Model Builder, under
Component 1 (comp1)>Magnetic Fields (mf), click Coil 1.
2 In the Settings window for Coil , change the Coil excitation to Circuit (current), as in the figure.
34 |

Electrical Circuit (cir)
Add a resistor and a voltage source in series with the inductor.
Voltage Source 11 In the Model Builder select the Electrical
Circuit (cir) node.2 On the Electrical Circuit toolbar click
Voltage Source .
Go to the Settings window for Voltage Source. The default settings correspond to a DC source of 1 V. Under Node Connections enter 1 and 0 in the Node names table as in the figure to the right.
| 35

Resistor 11 On the Electrical Circuit toolbar click
Resistor .2 Go to the Settings window for Resistor.
Under Node Connections enter 1 and 2 in the Node names table as in the figure to the right.
3 Under Device Parameters in the R text field, enter 100[mohm].
External I Vs. U 1There is a special feature for connecting the circuit to the finite elements model.1 On the Electrical Circuit toolbar click
External I Vs. U . 2 In the Settings window for External I Vs.
U under Node Connections, enter Node names as in to the figure to the right.
3 Under External Device, from the Electric potential V list choose Coil voltage (mf/coil1).
The sequence of nodes under Electrical Circuit should match this figure.
Study 1
1 On the Study toolbar click Compute .
36 |

Derived Values
Next, evaluate the current.1 On the Results toolbar click Global Evaluation . 2 In the Settings window for Global Evaluation, locate the Expression section.3 In the table, enter the following settings:
4 Click the Evaluate button.
The current is now limited to approximately 10A by the external resistor which has a much larger resistance than that of the winding. In the previous step, a current of 1A was applied. Thus, the magnetic flux density is about 10 times larger in the latest solution.
| 37

This can also be seen in the 3D Plot Group.
Model Wizard - Add a Second Study
Now, set up the model for computing the frequency-dependent impedance.
38 |

1 On the Home toolbar click Add Study .
2 In the Add Study window click Frequency Domain .
3 In the Physics interfaces in study table, under Solve, click to clear the check mark , which removes the Electrical Circuit (cir) interface.
4 Click Add Study.5 Close the Add Study window.
A Study 2 node with a Frequency Domain study step is added to the Model Builder.
Definit ions
At high frequencies, the skin depth of the copper conductor in the winding becomes difficult to resolve. The solution is to exclude the interior of the copper domain from the simulation and instead represent the winding by a boundary condition, which introduces surface losses via an equivalent surface impedance. For this purpose add a boundary selection and an associated surface material.
Conductor Boundaries1 On the Definitions toolbar click Explicit .
| 39

2 Select Domains 7, 8, and 14 only.3 Go to the Settings window for Explicit.
Under Output Entities from the Output entities list, select Adjacent boundaries.
4 In the Label text field enter Conductor Boundaries.
Materials
Copper 11 On the Home toolbar click Add Material .2 Go to the Add Material window.
In the Materials tree under AC/DC, right-click Copper and choose Add to Component 1 from the menu.
3 Close the Add Material window.4 In the Model Builder, click
Copper 1.
40 |

5 Go to the Settings window for Material. Under Geometric Entity Selection:- From the Geometric entity level list, select Boundary.- From the Selection list, select Conductor Boundaries.
Magnetic Fields (mf)
1 In the Model Builder click Magnetic Fields .
| 41

2 Go to the Settings window for Magnetic Fields. Under Domain Selection from the Selection list, select Non-conducting without IE.
Impedance Boundary Condition 11 On the Physics toolbar click Boundaries and choose Impedance Boundary
Condition .2 Go to the Settings window for Impedance Boundary Condition. Under
Boundary Selection from the Selection list, select Conductor Boundaries.
Disable Coil 1The Coil does not apply to an active domain anymore so it needs to be disabled. 1 In the Model Builder under Magnetic Fields, right-click Coil 1 and choose
Disable . The node is grayed out.
42 |

Lumped Port 1With the Coil replaced by the Impedance Boundary Condition a different boundary feature, which is more appropriate for high frequency modeling, must be used to excite the model.1 On the Physics toolbar click Boundaries and choose Lumped Port .
A Lumped Port node is added to the sequence in the Model Builder.
2 Go to the Settings window for Lumped Port. Select boundaries 59–62 only. The geometrical parameters of the boundary set need to be entered manually.
3 Under Lumped Port Properties from the Type of lumped port list, select User defined.- In the hport text field, enter 0.024.- In the wport text field, enter 0.046.
4 Specify the ah vector as in the figure to the right.
5 From the Terminal type list, select Current.
Ampère's Law 2Apart from the surface losses in the copper conductor, there are also AC losses in the core. The core loss is introduced by specifying an effective complex permeability for the magnetic iron in the core, a quantity which is often available from the manufacturer. There is a specific constitutive relation for this.
| 43

1 On the Physics toolbar click Domains and choose Ampère's Law . A second Ampère's Law node is added to the Model Builder.
2 Go to the Settings window for Ampère's Law. Under Domain Selection, from the Selection list, select Core.
3 In the Settings window for Ampère’s Law, locate the Magnetic Field section.
4 From the Constitutive relation list, choose Magnetic losses.
5 From the μ′ list, choose User defined. In the μ′ text field, type 1200.
6 From the μ′′ list, choose User defined. In the μ′′ text field, type 100.
Study 2
Set up a frequency sweep from 1-10 MHz in steps of 250 kHz.1 In the Model Builder expand the Study 2 node and click Step 1: Frequency
Domain .2 From the Frequency unit list, choose MHz.3 Under Study Settings click the Range button .4 In the Range window, enter these settings:
- In the Start text field, enter 1. - In the Step text field, enter 0.25.- In the Stop text field, enter 10.
5 Click Replace.6 On the Study toolbar click Compute .
44 |
Results
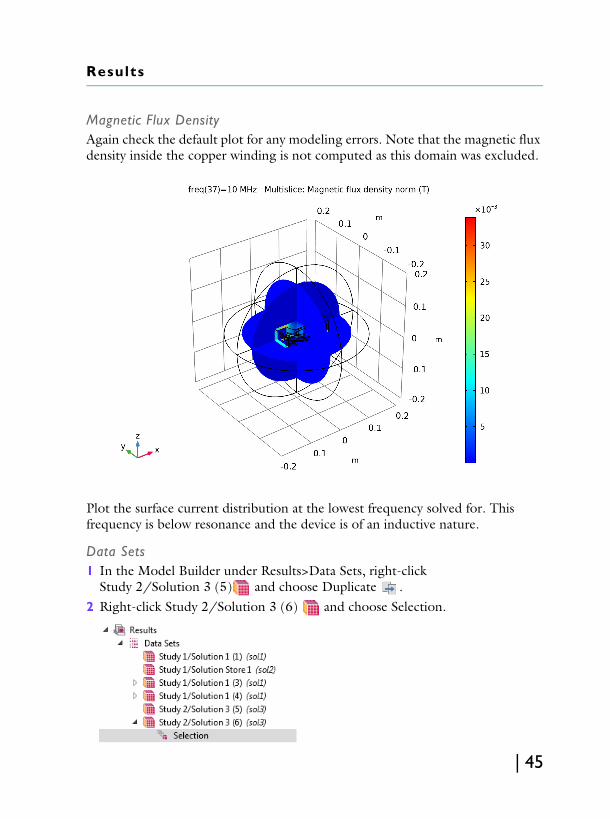
Magnetic Flux Density Again check the default plot for any modeling errors. Note that the magnetic flux density inside the copper winding is not computed as this domain was excluded.
Plot the surface current distribution at the lowest frequency solved for. This frequency is below resonance and the device is of an inductive nature.
Data Sets1 In the Model Builder under Results>Data Sets, right-click
Study 2/Solution 3 (5) and choose Duplicate .2 Right-click Study 2/Solution 3 (6) and choose Selection.
| 45

3 Go to the Settings window for Selection. Under Geometric Entity Selection from the Geometric entity level list, choose Boundary.
4 From the Selection list, choose Conductor Boundaries.
3D Plot Group 41 On the Results toolbar click 3D Plot Group .
A 3D Plot Group 4 node is added to the sequence.
2 Go to the Settings window for 3D Plot Group. Under Data from the Data set list, choose Study 2/Solution 3 (6).
3 From the Parameter value (freq (MHz)) list, choose 1.4 Right-click 3D Plot Group 4 and choose Surface . 5 Go to the Settings window for Surface. In the upper-right corner of the
Expression section, click Replace Expression .
6 From the menu, choose Model>Component 1>Magnetic Fields>Currents and charge>mf.normJs - Surface current density norm (when you know the variable
46 |

name, as in this exercise, you can also enter mf.normJs directly in the Expression text field).
7 Click the Plot button.
The plot shows the surface current distribution and should match this figure.
Change to the highest frequency solved for and compare the results. Finish the modeling session by plotting the real and imaginary parts of the coil impedance.
1D Plot Group 51 On the Results toolbar click 1D Plot Group . 2 In the Settings window for 1D Plot Group under Data, select
Study 2/Solution 3 (5) from the Data set list.3 On the 1D Plot Group 5 toolbar click Global .
| 47
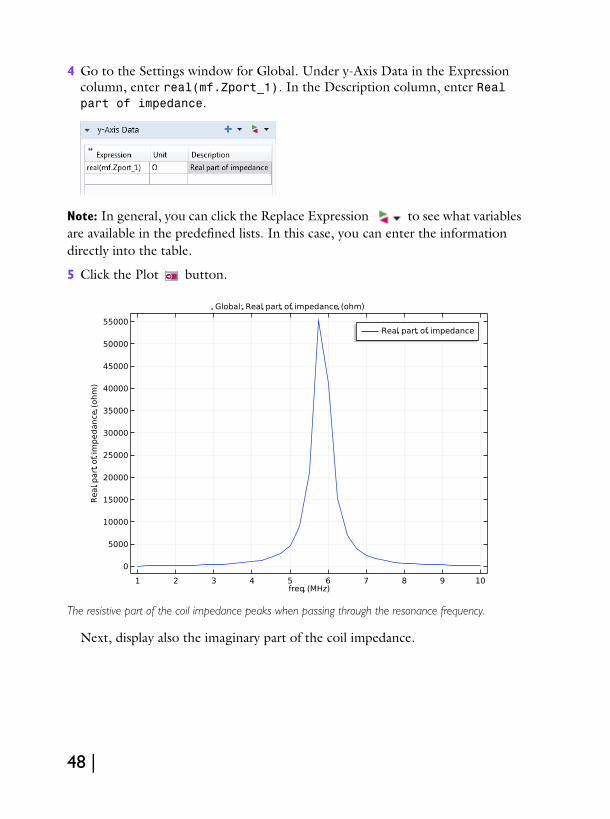
4 Go to the Settings window for Global. Under y-Axis Data in the Expression column, enter real(mf.Zport_1). In the Description column, enter Real part of impedance.
Note: In general, you can click the Replace Expression to see what variables are available in the predefined lists. In this case, you can enter the information directly into the table.
5 Click the Plot button.
The resistive part of the coil impedance peaks when passing through the resonance frequency.
Next, display also the imaginary part of the coil impedance.
48 |

6 Go to the Settings window for Global and modify it according to the figure below.
7 In the Model Builder window, under Results click 1D Plot Group 5.8 In the Settings window for 1D Plot Group, locate the Axis section.9 Select the Manual axis limits check box and apply settings according to the
figure.
10Click the Plot button.
| 49

The reactive part of the coil impedance changes sign when passing through the resonance frequency, going from inductive to capacitive.
As a final step, pick one of the plots to use as a model thumbnail.1 In the Model Builder under Results click 3D Plot Group 2 .2 Click the Root node (the first node in the model tree). On the Settings window
for Root under Presentation>Thumbnail, click Set from Graphics Window.
Make adjustments to the image in the Graphics window using the toolbar buttons until the image is one that is suitable to your purposes.This concludes this introduction.
50 |


