36
iOS User’s Manual for the CamRanger, CamRanger Share, and CamRanger PT Hub & Tripod V 2.0.3

iOS User’s Manual for the CamRanger, CamRanger Share, and
CamRanger PT Hub & Tripod V 2.0.3
© CamRanger – Patent Pending 2
Table of Contents
CamRanger Hardware ............................................................................................................. 4
CamRanger Registration .......................................................................................................... 5
CamRanger Setup .................................................................................................................... 6
Firmware Update .................................................................................................................... 7
CamRanger iOS App ................................................................................................................ 8 Status Bar ........................................................................................................................................ 8 Recent Thumbnails .......................................................................................................................... 9
iPhone Thumbnails .............................................................................................................................. 9 App Start-‐up and Loading Previous Session ........................................................................................ 9
Main Image View ............................................................................................................................ 10 Captured Images ................................................................................................................................ 10 Live View Images ............................................................................................................................... 10
Advanced Tabs ............................................................................................................................... 11 Data ................................................................................................................................................... 11 Focus .................................................................................................................................................. 11 Timer .................................................................................................................................................. 12 HDR .................................................................................................................................................... 13 Tripod ................................................................................................................................................ 14
Camera Properties .......................................................................................................................... 14 Nikon Connection Mode .................................................................................................................... 14 Exposure Compensation & Bracketing .............................................................................................. 15
Camera Actions .............................................................................................................................. 15 Advanced Settings .......................................................................................................................... 16
Connection/Network ......................................................................................................................... 16 Overlays ............................................................................................................................................. 17 Controls ............................................................................................................................................. 19 Ratings ............................................................................................................................................... 20 Watermark ......................................................................................................................................... 20
Current Image Controls .................................................................................................................. 21 iPhone Controls ................................................................................................................................. 21
Card Contents ................................................................................................................................. 22 Compare ......................................................................................................................................... 22 Ratings System ............................................................................................................................... 23
Connection/Network Bridging ............................................................................................... 24
CamRanger Share App ........................................................................................................... 25 CamRanger Controller .................................................................................................................... 26 CamRanger Share Users .................................................................................................................. 27
CamRanger PT Hub and Tripod .............................................................................................. 28 CamRanger PT Hub Hardware ......................................................................................................... 28 MP-‐360 Tripod Head Hardware ...................................................................................................... 29 CamRanger App Additions with the PT Hub .................................................................................... 31
Shoot Move Shoot: ............................................................................................................................ 31

© CamRanger – Patent Pending 3
Bulb Ramping ..................................................................................................................................... 32 Tools .................................................................................................................................................. 33
Tips & Troubleshooting ......................................................................................................... 33 Registration .................................................................................................................................... 34 Connection ..................................................................................................................................... 34 Speed ............................................................................................................................................. 34 Commands ..................................................................................................................................... 35 Images ............................................................................................................................................ 35 CamRanger PT Hub and Tripod ....................................................................................................... 36

© CamRanger – Patent Pending 4
CamRanger Hardware The CamRanger device is turned on by sliding the power switch, located on the side of the unit, towards the front of the device. The green power light will illuminate when the unit is powered on. The charging port is located next to the power switch. The male micro B end of the provided white charging cord is connected to this port. The other end of the charging cord can be connected to a female USB port that provides power, such as a computer or through the provided AC adapter. When the device is charging an additional yellow light will illuminate next to the green power light indicating that it is charging. The yellow light will turn off leaving only the green power light when it is fully charged. A black neoprene case is provided to assist in attaching and securing the CamRanger. The case has a carabineer to facilitate hanging from a tripod, belt loop, etc. Do not just hang the CamRanger by the cable as it will put strain on the USB connectors as well as possibly disconnect. The CamRanger battery is accessible by removing the bottom cover.
The bottom cover is the side with the CamRanger serial number. Simply grasp the side edge/corner of the cover near the USB connector and pull back to remove. To replace the cover, first place the two lower tabs into the slots and then snap in the top. CamRanger is not water-‐resistant in any way and should not get wet. Any switch on the opposite side of the power switch does not currently have any functionality.

© CamRanger – Patent Pending 5
CamRanger Registration Before an iPad, iPhone, or iPod Touch can be used with a CamRanger, it needs to be registered. Registration requires Internet connectivity. Before proceeding, confirm connectivity. (Do not connect to the CamRanger network.) Launch the iOS CamRanger app and the following screen appears.
Press the “Register” button to load the registration view seen below.

© CamRanger – Patent Pending 6
Enter the 8-‐character CamRanger serial number. The serial number is located both on the bottom of the back cover as well as above the battery underneath the back cover. Note: the serial number contains only letters and NO numbers. Press the “Register” button to register. A message box will appear indicating registration was successful and the iOS device can be used with the CamRanger. Exit the app and then proceed with the setup process as detailed below in the CamRanger Setup section. If registration fails, confirm Internet connectivity and the CamRanger serial number before contacting [email protected] for assistance.
CamRanger Setup Power on the CamRanger and confirm all four lights briefly appear. The CamRanger will take approximately 30 seconds until it is fully initialized. The first time the user connects to CamRanger from an iOS device (iPad, iPhone, or iPod Touch), the iOS device needs to be registered. See the CamRanger Registration section above. On the iOS device connect to your CamRanger network. The SSID will be CamRanger-‐###, with the last three characters matching the last 3 characters of the CamRanger’s serial number. The password is the full 8 characters of the CamRanger’s serial number. The password MUST BE ENTERED IN ALL CAPS. The keyboard on newer iOS versions can be put into caps lock by double tapping the shift key. Connect the CamRanger to the camera with the provided black USB cable. The male A end is inserted into the USB port at the end of the CamRanger, and the other end is connected to the USB port of the camera. Then ensure the camera is turned on. When the camera is connected and turned on the green light closest to the edge of the CamRanger device will light.

© CamRanger – Patent Pending 7
Launch the CamRanger iOS app. The application will connect to the CamRanger and the user will be able to control the camera. For common problems with setup and connection refer to the Troubleshooting section at the end of the manual.
Firmware Update It is recommended to check the iOS app and firmware version before using the CamRanger to make sure they are the latest version. The app must be at least 2.0 and the firmware version 6 to support network bridging, sharing features, or the CamRanger PT Hub and MP-‐360 (or MP 101, Bescor, or Hague. To update the CamRanger firmware, visit camranger.com/downloads for further instructions on update. To check the CamRanger app and firmware version, refer to the ‘Help’ tab within the CamRanger settings. The First two digits listed after CamRanger indicate the app version and the third digit indicates the firmware version. For the following example, CamRanger 2.0.4 indicates that the app is version 2.0 and the firmware is version 4.

CamRanger iOS App Note: the CamRanger iOS app supports the iPad, iPhone, and the iPod Touch. For brevity, only the iPad landscape screenshots will be shown as the equivalent portrait or iPhone versions are very similar. Any places where significant differences exist will be called out.
Status Bar
The status bar is located at the top of the screen and provides the user with a number of status elements. From left to right:
• Camera Connection: Indicates if the CamRanger device is currently communicating with the camera
o Connected: o Disconnected:
• Camera Battery Status: Indicates the approximate battery charge on the camera • Camera Model Name • Lens Model Name (Note: not all cameras or lenses are supported) • Shots Remaining: Indicates the number of shots currently remaining on the camera’s
removable media using the current settings

© CamRanger – Patent Pending 9
Recent Thumbnails
• As images are captured, the thumbnails are automatically downloaded and displayed
along the top of the screen. The thumbnails may be scrolled left and right when more are downloaded than can fit.
• A thumbnail may be selected to view the corresponding image for viewing. The image is downloaded and displayed in the main image view. The currently selected thumbnail is indicated with a yellow outline.
• When both a JPG and RAW file format is captured, only the JPG thumbnail is displayed. • JPG and RAW files can be viewed. Nikon TIFF files will display the thumbnail but the
associated image cannot be viewed. It should be noted that the Nikon RAW files simply shows a compressed JPG version. However, if the image is saved it will save the full NEF file.
• A small red “R” icon on the lower right of the thumbnail indicates that it is a RAW image. A small green “T” indicates TIFF, while no icon is used to indicate JPG formatted images.
• Note: only thumbnails for images captured within the current CamRanger session will be displayed.
iPhone Thumbnails The thumbnails on the iPhones or iPod Touches with the original size display (not the iPhone5 size display) are displayed in a different manner. After a picture is taken, the main image view will slide down to reveal a list of thumbnails. Selecting a thumbnail will slide the main image view back in place with the downloaded image. The thumbnail and main image views can be swapped at any time by swiping the screen up or down.
App Start-‐up and Loading Previous Session If one quits and re-‐launches the CamRanger app, the following popup will appear and the user will have the option to load the previous session or star a new session. By selecting “load session,” the thumbnails from the previous session will appear on the recent thumbnail bar while “New Session” will start a new session with no thumbnails present.

© CamRanger – Patent Pending 10
Main Image View Live view and captured images are displayed within the main image view.
Captured Images Images will be displayed in the main image view in one of two ways, by selecting a thumbnail in the thumbnails section or through the Auto-‐View feature. The Auto-‐View feature is described in more depth in the Advanced Settings section. It is important to note that that images displayed in the main view are not saved by default and are simply being displayed. To save the image to the iOS device, refer to the Current Image Controls or Card Contents section. The image may be zoomed in to 100% resolution by double tapping. The image can then be panned by dragging a finger. Double tapping again will return the view to its original state. As indicated in the thumbnails section, TIFF images cannot be viewed. Depending on the amount of memory in your iPad, iPhone, or iPod touch, certain larger image files cannot be viewed. Devices with 1GB of memory, such as the 3rd or 4th generation iPad and the iPhone 5, will have no limitations. Devices with 512MB of memory, such as the 2nd generation iPad, iPad Mini, or iPhone 4, can view nearly all images except for the very largest, such as a large JPG on the D800. Devices with 128MB, such as the 1st generation iPad and older iPhones and iPod Touches, will not be able to view large JPGs on most cameras or medium JPGs on some cameras. When viewing an image, a finger swipe on the image to the left or right will display the previous or next image respectively. By pressing two fingers on an image and rotating 90 degrees either direction, the image can be rotated.
Live View Images In live view, the image is automatically updated as live view images stream in. The exact rate is very much dependent on WiFi signal strength and the camera and iOS device specs. However, assuming a good connection, live view frame rate will be about 7 – 18 fps depending on the camera model. During live view the image may be single tapped to focus at that point. Note that for Canon cameras, the outer edges of the image cannot be focused on. Double tapping will zoom in and double tapping again returns to regular size. A live view histogram may be toggled on or off from the Data tab as described in the Advanced Data section. Toggling the histogram on will generate a histogram for each live view frame; however, at the cost of a decreased frame rate. Toggle the histogram off to maximize the frame rate. Canon cameras can display the live view image on the camera as well as allow physically triggering images by pressing the camera’s live view button after starting it on the CamRanger app. Nikon cameras do not allow any control of the physical camera while live view is active.

© CamRanger – Patent Pending 11
Advanced Tabs There are four tabs providing advanced information or controls: Data, Focus, Timer, and HDR. (The iPhone display has a fifth tab to incorporate the Advanced Settings button.)
Data Tab
The data tab shows an RGB histogram and meta-‐data associated with the image in the main image view. The following meta-‐data is provided:
• Shutter Speed • Aperture • MegaPixels (Note this is not file size, but image resolution) • ISO • Metering Mode • Exposure Compensation Value
Within live view the data tab will simply inform the user that live view is on and provide a toggle switch to toggle the display of the histogram. The histogram is updated in real-‐time, but at the cost of slowing down the frame rate.
Focus Tab
The focus tab is only enabled during live view and provides advanced focusing controls.

© CamRanger – Patent Pending 12
• Focus Adjust o There are two sets of buttons to move the lens’ focal plane nearer or further
from the camera. o Each set has three buttons with different sized arrows to specify a large,
medium, or small step in focus. o Tap the button to move the focus by a single increment, holding down the
button will have no affect. • Focus Stacking
o Focus stacking is a process of taking multiple captures with slight changes in focus and then post processing them to enhance the depth of field. This control allows the user to set the focus step size to take between in each shot and the number of shots to take. Each focus step will move the focal plane further from the camera. So the user will want to set the focus to the nearest plane desired to be in focus and start the stacking process from there. If too few captures were taken, the process can be restarted from where the initial stacking ended. Note: the post processing is not done within the CamRanger app.
Timer Tab
The timer tab allows the use of the CamRanger as an intervalometer as well as specifying exposure times when the camera is in bulb mode.
• Time Lapse o The entry fields are used to specify the initial delay before the first shot, the
number of shots to take, and the delay in between each shot. o After configuring the settings, press the “Start” button to begin the
intervalometer process. o The intervalometer commands are stored on the CamRanger device and the iOS
device does not need to remain on or connected. o The “Shot Delay” should not be used for precision timing, particularly when the
delay is only a few seconds or less. o Canceling time lapse: The intervalometer now provides a countdown of
estimated time to completion as well as the ability to cancel the intervalometer. If one has a current intervalometer active when starting a session, first select the timer tab and then after the next shot the cancellation and countdown info will appear.

© CamRanger – Patent Pending 13
o Time Lapse – HDR § If the camera is in manual exposure mode, a small HDR toggle button will
appear allowing the combination of a time lapse and HDR sequence. § If the HDR toggle button is set to on for each time lapse capture,
CamRanger will actually take a sequence of bracketing images using the bracket parameters as specified within the HDR tab.
o Time Lapse – Bulb § If the camera is in bulb mode/shutter speed and the camera supports
bulb shots, CamRanger will take Bulb shots during the time lapse. The bulb duration is specified by the Shot Duration, located within the Bulb section immediately below the Time Lapse section.
o Before starting the time lapse sequence, a dialog will appear informing the user of the time lapse parameters and provide an opportunity to cancel.
• Bulb o The Bulb controls are only enabled when the camera is in bulb mode and the
camera supports remote bulb shots. o The entry fields are used to specify the initial delay before the first shot and the
length of the exposure. o After configuration, press the “Start” button to begin the bulb process. o The bulb commands are stored on the CamRanger device and the iOS device
does not need to remain on or connected.
HDR Tab
The “HDR”, or Advanced Bracketing, tab can be used to generate a series of photos with varying exposures.
• Advanced Bracketing is only enabled when the camera is in Manual mode. • The Property field specifies the camera property to be varied. There are three options,
Shutter Speed, Aperture, and ISO. • The Initial Delay field specifies the amount of delay, if any, to take before beginning the
bracketing sequence. • The initial value for the selected property is set with the Start Value field. • The total number of images to capture is specified by the Number of Shots field. • The possible Step Size values are up to 3 stop and specify the how many stops to vary
the exposure between each capture.

© CamRanger – Patent Pending 14
o Typically the step size values are in increments of 1/3 stops. However, this can vary based on the camera settings. For example if the camera is configured to only allow ISO values corresponding to full stops, then the step size increment will be 1 stop.
• The valid values for the Number of Shots are automatically determined based on the values specified for Start Value and Step Size. For example a step size of 1/3 stops will allow more shots than a step size of 3 stops.
• The starting point of the bracket is set within the settings and can begin at the shadows (lowest exposure), mid-‐point, or highlights (highest exposure). If the starting point is set to mid-‐point, the resulting sequence will start at the lowest exposure but with the initially set value as the mid-‐point. See the Advanced Settings section for more information on setting the HDR start point.
• After configuration, press the “Start” button to begin the bracketing process. • The bracketing commands are stored on the CamRanger device and the iOS device does
not need to remain on or connected. • Note: the post processing is not done within the CamRanger app.
Tripod Tab When the CamRanger PT Hub and MP-‐360 (MP 101, Bescor, or Hague) are in use with the CamRanger, an additional tap will display for tripod control. Refer to the the CamRanger PT Hub and Tripod section of this document for more details.
Camera Properties
The above diagram indicates each of the camera properties that can be set. Not all properties can be set for all cameras or in all modes. For example, the diagram is from a session with a Canon camera and for most Canons the focus mode and auto exposure mode cannot be set. Disabled properties are indicated with a darker button background.
Nikon Connection Mode Nikon cameras allow connections in two different modes: “PC” and “Camera”. (See the Advanced Settings dialog for how to change between the modes.) The key difference is that PC mode allows the CamRanger user to adjust properties that are controlled via a physical switch

© CamRanger – Patent Pending 15
or dial on the camera, and would otherwise be disabled in Camera mode. However, in PC mode no property changes done physically to the camera will be recognized and any changes made through CamRanger will be lost after disconnecting. PC mode also prevents triggering images from the camera itself, and the CamRanger app must be set to Camera mode to allow physically triggering from the camera. It should also be noted that the connection mode cannot be changed while live view is active.
Exposure Compensation & Bracketing Pressing the bracketing button will display the following control:
Pressing the arrows at the top right and left moves the exposure compensation. Holding down the arrow will move the exposure compensation to its respective limit. The two buttons at the bottom middle control the bracket amount. Pressing the arrows pointing in will reduce the bracketing amount, while pressing the arrows point outward will increase the bracketing amount. The bracketing is not set until the “Set” button is pressed. The “Close” button will dismiss the dialog. Pressing “Close” without pressing “Set” will effectively cancel any adjustments made.
Camera Actions
• Capture
o The “Capture” button initiates the camera trigger. The exact camera behavior is dependent on the camera and camera properties, most importantly the capture mode.
o For most capture modes, such as single, timer, or quiet the button performs the image capture as expected. It should be noted that for some cameras, advanced modes such as remote or timer will behave as single capture mode.
o Continuous capture mode differs between Nikon and Canon. § Nikon: After selecting a continuous drive mode a picker is displayed
allowing the user to select the number of images to capture. When the Capture button is pressed, that number of images will be captured.
§ Canon: When in a continuous mode, pressing and holding the Capture button behaves in the same way as pushing the physical trigger on the camera.
o It is noted that there can be a very slight lag between the pressing of the “Capture” button and the image capture. The delay can be more pronounced

© CamRanger – Patent Pending 16
while live view is active. For time critical applications, a remote trigger, such as an RF trigger, can be used in combination with the CamRanger.
• Auto / Manual Focus Toggle o The AF/MF Focus toggle button allows the user to change the focusing between
auto and manual without having to physically adjust the camera. o This AF/MF adjustment is not possible for all cameras in all modes. For example,
some Nikon cameras are required to be connected in “PC” mode. o After any touch or incremental focusing while in live view, the focus mode will
automatically attempt to switch to manual focus such that the user specified focus is not override by auto focus upon capture.
• Live View o The “Live View” toggle button is used to turn live view on and off. o When live view is on, the main image view is updated with live view images as
well as updating the RGB histogram in the Data tab if the live view histogram is turned on.
o Note: running live view is relatively intensive and there may be slight performance lags in other areas.
• Movie Mode o The “Movie Mode” toggle button is used to turn live view on and off, but within
movie mode. o When movie mode is on, the main image view is updated with the live images. o The “Capture” button changes to “Record” and pressing the “Record” button will
start and then stop the recording of a movie. o Note: movies cannot be downloaded to the iOS device.
Advanced Settings
The advanced settings menu is accessed from the settings button and allows the user to manage the connection, set options and controls, and get help. The above image shows the settings menu with each category that can be tapped to expand.
Connection/Network

© CamRanger – Patent Pending 17
• CamRanger Connection: A state dependent “Connect” or “Disconnect” button is
available to the user as a troubleshooting option to avoid closing the application in the case of connection problems.
• Connection Mode (Nikon Only) o A toggle switch is provided to change the connection mode between “PC” and
“Camera” § PC: PC mode allows more control over properties within CamRanger;
however, some property changes are not maintained and changing settings on the physical camera is not recognized. Additionally, images cannot be physically triggered from the camera.
§ Camera: Allows the camera to be physically used as normal; however, not all properties will be enabled within CamRanger.
• Network Settings: The network setting allows the user to be connected to the CamRanger and an additional Internet network simultaneously. Refer to the “Network Bridging” section of this document on for further details. Note: CamRanger firmware version 6 and above is required.
Overlays

© CamRanger – Patent Pending 18
• Grid Lines: Overlay a grid over the main image view (options of 3x3 or 4x6) • Grid Color: Select either gray, white, black, or red grid line color • Highlights: Blinks solid red over overexposed highlights • Shadows: Blinks solid blue over underexposed shadows • Focus Peaking: During live view/movie will attempt to outline in red areas in focus. The
accuracy of this is greatly depending on your scene and camera parameters such as Aperture and ISO.
• File Name: Displays the images file name at the bottom left of each image • Aspect Ratio: Overlays red lines over the main image view to give the user visual
feedback on common cropping ratios. Note: this information is not saved with the image.
• Focus Points: Displays focus points when reviewing still images. (Canon only) • Night Mode: Will add a red overlay to the app screen to assist with night vision.
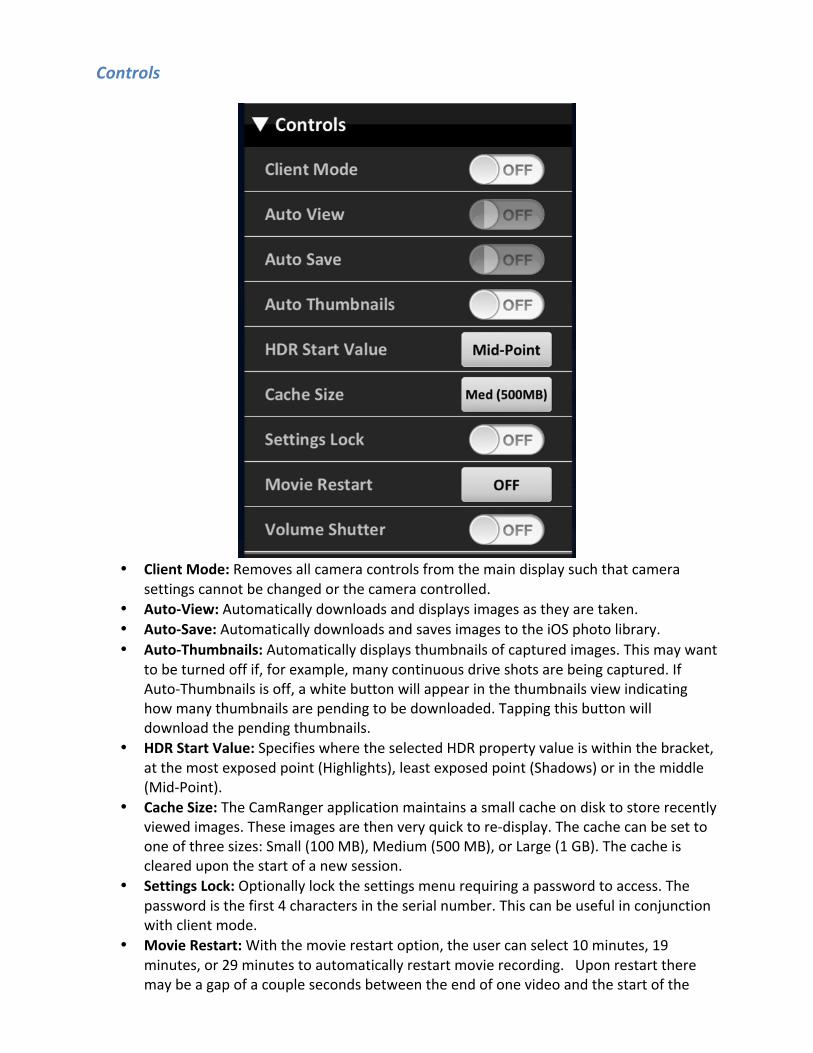
Controls
• Client Mode: Removes all camera controls from the main display such that camera
settings cannot be changed or the camera controlled. • Auto-‐View: Automatically downloads and displays images as they are taken. • Auto-‐Save: Automatically downloads and saves images to the iOS photo library. • Auto-‐Thumbnails: Automatically displays thumbnails of captured images. This may want
to be turned off if, for example, many continuous drive shots are being captured. If Auto-‐Thumbnails is off, a white button will appear in the thumbnails view indicating how many thumbnails are pending to be downloaded. Tapping this button will download the pending thumbnails.
• HDR Start Value: Specifies where the selected HDR property value is within the bracket, at the most exposed point (Highlights), least exposed point (Shadows) or in the middle (Mid-‐Point).
• Cache Size: The CamRanger application maintains a small cache on disk to store recently viewed images. These images are then very quick to re-‐display. The cache can be set to one of three sizes: Small (100 MB), Medium (500 MB), or Large (1 GB). The cache is cleared upon the start of a new session.
• Settings Lock: Optionally lock the settings menu requiring a password to access. The password is the first 4 characters in the serial number. This can be useful in conjunction with client mode.
• Movie Restart: With the movie restart option, the user can select 10 minutes, 19 minutes, or 29 minutes to automatically restart movie recording. Upon restart there may be a gap of a couple seconds between the end of one video and the start of the

© CamRanger – Patent Pending 20
following. One should check the default video length for the camera in use to determine the appropriate time for the movie restart.
• Volume Shutter: When the volume shutter is turned on, the user can capture images using the volume buttons on the iOS device.
Ratings
• Ratings List: Displays a list of all rated images located on the camera’s memory card.
Watermark
• Watermark: The text to use for the watermark. • Show Watermark: Displays a watermark over each full size image. • Watermark Location: Specifies the location of the watermark: Center, Bottom-‐Right or
Bottom-‐Left. • Watermark Size: The user can specify the size of the watermark to be small, medium, or
large. • Save w/Watermark: Specify if images saved to the iOS photo library should have the
watermark embedded within it.

© CamRanger – Patent Pending 21
o Show Manual: View this document. Note: it can be saved to iBooks for easier reading and navigation.
o Email: Email with your questions, problems, comments, etc. o CamRanger version: app and firmware (last digit) version
Current Image Controls
The controls displayed in the toolbar above are used to perform various actions on the current main image view’s content.
• Expand: The “Expand” button makes the image full screen. After expanding, the button changes to “Shrink” and can be pressed to return to the normal screen layout. The “Expand” button can also be used in live view.
• Share:
§ iOS Photo Library: This button will save the currently displayed image to the
user’s photo library on the iOS device. § CamRanger Client: This will appear if a user is connected using the CamRanger
Share app. The number in parentheses indicate the number of users. This option will only appear if sharing is turned on.
• Rate: Pops up the rating dialog allowing the user to rate the image as well as add any comments. See the Ratings section for full details on using the ratings system.
• Delete: After prompting the user to confirm, this button is used to erase the displayed image from the removable media in the camera.
iPhone Controls The iPhone does not have a separate tool bar with these controls. The “Expand” button is located in the lower left of the main image view. The “Save” and “Delete” buttons are overlaid in the top left and right corners, respectively, of the main image view. The “Save” and “Delete” buttons only appear momentarily upon a single touch of the main image view and then disappear a few seconds later so as to not obscure the image.

© CamRanger – Patent Pending 22
Card Contents
The card contents button shown above will transfer to a view displaying thumbnails of the images on the camera’s removable media. The app will initially load the most recent 16 thumbnails on a scrollable window. To load more thumbnails, scroll to the bottom and press the “More” button to download an additional 16 thumbnails. Any number of thumbnails can be selected by pressing a thumbnail. Selected thumbnails will have a yellow border around them. After selecting thumbnails they may either be deleted or saved. The “Delete” button at the lower left will first prompt the user to confirm, and then delete the associated images of the selected thumbnails from the camera’s removable media. The “Save” button at the lower right will save all associated images of the selected thumbnails to the user’s iOS photo library. Images are saved regardless of format. Note: The thumbnails are presented in chronological order beginning with the most recent. However, for Nikon they are grouped first by format, such that all JPG’s will be listed, then TIFF’s, and finally RAW images. Assuming the user has a GPS enabled iOS device and has granted location privileges to the CamRanger app, the app records GPS positions in order to tag images saved to the iOS device. When an image is downloaded, the app attempts to find a GPS position that corresponds with the time the image was taken. If a position is found, the GPS data is added to the file’s EXIF header. Note: GPS data can only be added to JPG images and the image file on the cameras removable media is not updated. Images within the card contents view can also be viewed by double tapping on the image. Similarly to the main screen image viewer, images can be swiped left or right to display the previous or next image respectively.
Compare Comparing multiple images can be done from within the card contents view or the special “Compare” button visible when in Client mode. The “Compare” button is located on the right side of the bottom toolbar and will become active when between 2 and 4 images are selected. Selecting the “Compare” button will show these 2 to 4 images all on the same screen.

© CamRanger – Patent Pending 23
The images displayed within the compare screen are not full resolution, but are scaled down. They can be zoomed in and out with a double tap or pinch zooming. To save, delete, or rate an individual, first tap on image to select it, as indicated by a yellow outline around the image.
Ratings System The built-‐in ratings system allows the user to add a 1, 2, or 3 star rating or as well as a comment to any displayed image. However, because the images are stored on the camera’s memory card and cannot be edited, the ratings list is stored as a separate and distinct list of file names and ratings that can be emailed.
An individual image can be rated by pressing the “Rate” button in the image controls on the bottom. Tapping the desired star can set the number of stars. A comment can be added within the provided “Notes” field.

© CamRanger – Patent Pending 24
The list of all the rated images on the current memory can be accessed from the “Settings” button (see the Advanced Settings section for more details).
The Ratings list displays all the ratings associated with images on the camera’s memory card. Ratings can be edited by tapping a new star rating or by changing the text in the notes field. Images can be viewed by double tapping on an item in the ratings list. An individual rating can be deleted by selecting it and then pressing the “Remove “ button in the bottom right. The entire list can be cleared by pressing the “Clear” button on the bottom left. The entire list can also be emailed by pressing the “Email List”. The email will contain a listing of the ratings with each rating consisting of the filename, star rating, and any comment. (As a reminder any email sent will not actually be sent until the iOS device is connected to the Internet).
Connection/Network Bridging The network bridging features only works with CamRanger firmware 6 and up and the CamRanger app 2.0 and up. Refer to the Firmware Update section of this document for further details about the firmware update. By clicking on the Connection/Network tab within the CamRanger Settings, the following will appear in the dropdown.
The network setting allows the user to be connected to the CamRanger and an additional Internet network simultaneously. Previously when using the CamRanger, the iOS device could only be connected to the CamRanger WiFi network, making it so the user could not use any other network when the CamRanger was in use. Note that connection to an additional network may slow down the performance of the CamRanger.

© CamRanger – Patent Pending 25
To join an existing network, first connect to the CamRanger network from within the iOS settings and then start the CamRanger app. Select the ‘Settings’ button from within the CamRanger app and click on the ‘View/Edit’ tab. A dialog will appear listing any networks that the CamRanger sees. One can join a particular network by selecting the network of interest and then entering the password if necessary. The CamRanger will then attempt to join that network. Note that while connecting to the additional network the CamRanger network will momentarily disconnect. One should join the additional network before starting a CamRanger session, if attempted to do so during a session, this may disrupt the current session. The CamRanger cannot bridge with hidden Internet networks. Once one has connected to an additional network, this network will automatically be saved in the CamRanger settings. The additional networks will be listed at the bottom of the network dialog, “Known CamRanger Networks,” and can be accessed within the ‘View/Edit’ tab, within the ‘Connection/Network’ tab, found in the CamRanger ‘Settings’. Whenever the CamRanger is turned on, the CamRanger will attempt to join any of the known networks on the “Known CamRanger Networks” dialog list. If multiple networks are within range, it will join the network with the strongest signal. Networks can be added or deleted by selecting the ‘Edit’ button, found next to the “Known CamRanger Network” list. If one does not want the CamRanger to join to any networks on this list, it is recommended to delete them from the list. When the CamRanger is bridged to another network it provides two modes of operation. A device can connect to the CamRanger when that device is connected to either the CamRanger or bridged network. If the CamRanger is bridged to an Internet connected network, devices on the CamRanger network will be able to access the Internet. NOTE: If the CamRanger is not able to join a network, such as due to invalid password, it is possible that CamRanger does not create it its own network and the WiFi light will be off. If this occurs, power on the CamRanger on where it cannot access the bridged network or temporarily turn off the bridged network.
CamRanger Share App When the photographer is in a CamRanger session, others can view images and live view separate devices using the CamRanger Share app. The CamRanger Share app is free and the iOS version is available for download on the Apple app store. Other versions are available from www.camranger.com/downloads. Individuals using the CamRanger Share app can only view images and live view when the CamRanger is connected and the main app has enabled sharing from within the settings.

© CamRanger – Patent Pending 26
CamRanger Controller The CamRanger firmware must be updated to version 6 and above to enable sharing. The photographer has complete control over what is shared to iOS devices with the CamRanger Share app. From within the CamRanger Settings, the main user can select whether to automatically share all images that are viewed on the main device, share all thumbnails, and whether or not to share live view. Individual images can also be shared directly from the main view. Whatever the main devices watermark settings are will be set on all sharing devices.
When viewing an image, the Controller can select the 'Share' button at the bottom of the screen, providing the option of sending the image to the iOS photo library or sharing it with those using the Share app. The number in parentheses after “CamRanger Clients” indicates the number of people using the CamRanger Share app.
From the share settings one can also display a list of all shared devices that are currently connected by clicking ‘Show List’ within the ‘Sharing’ tab.

© CamRanger – Patent Pending 27
The set limit on devices connected to the CamRanger network with the CamRanger Share app is 50 devices. Assuming that all devices have a good connection with the CamRanger, as the number of users increase, the performance decreases slightly; adding 1 second per shared device for each small JPG that is distributed is a good rule of thumb. Similarly, sharing live view with an additional 1 or 2 devices will not significantly degrade performance, but as more devices are added the frame rate will reduce. Additionally, a device with a very poor/slow connection can degrade the performance for everyone. The CamRanger app can always temporarily turn off sharing to kick off all shared devices. As the number of users increases the there are practical performance limits. If the CamRanger Controller is only connected to the CamRanger network, the Share app users will also need to connect to the CamRanger network, using the same password, however no registration is required. If the CamRanger is bridged to an existing Internet network, the Share app user can connect to the same Internet network that the CamRanger is connected to, and still use the Share app.
CamRanger Share Users The iOS CamRanger Share app is free and available for download in the Apple app store. CamRanger share users must first join the CamRanger network (or bridged network if the CamRanger is bridged). Before the CamRanger Share app is started, the main CamRanger controller must start a session and confirm sharing is enabled. Those using the share app should consult the CamRanger Controller about the network connection and should stay within range of the CamRanger or bridged network when using the app.

CamRanger PT Hub and Tripod • To use the CamRanger PT Hub and Motorized tripod, a CamRanger is required. • The CamRanger PT Hub and MP-‐360 (MP 101, Bescor, or Hague) will only work with
CamRanger firmware 4 and up and the CamRanger app 2.0 and up. Refer to the Firmware Update section of this document for further details about the firmware update. The CamRanger must be registered (see CamRanger user manual), the CamRanger PT Hub does not require registration.
CamRanger PT Hub Hardware • The CamRanger PT Hub is powered by the CamRanger.
Serial Connector port (Cable included with Camranger PT Hub)
USB 2.0 A-‐end port (USB 2.0 A to B connector included with CamRanger Hub) USB port (USB cable
included with the CamRanger or Camera)
© CamRanger – Patent Pending 29
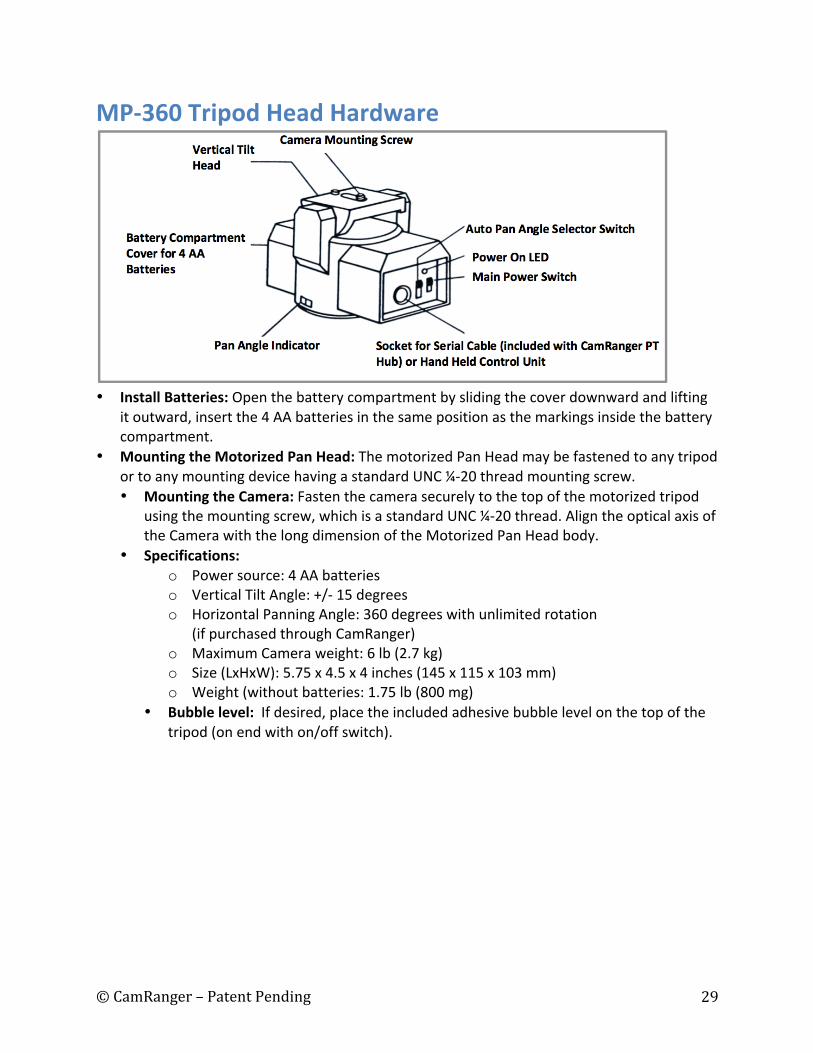
MP-‐360 Tripod Head Hardware
• Install Batteries: Open the battery compartment by sliding the cover downward and lifting
it outward, insert the 4 AA batteries in the same position as the markings inside the battery compartment.
• Mounting the Motorized Pan Head: The motorized Pan Head may be fastened to any tripod or to any mounting device having a standard UNC ¼-‐20 thread mounting screw. • Mounting the Camera: Fasten the camera securely to the top of the motorized tripod
using the mounting screw, which is a standard UNC ¼-‐20 thread. Align the optical axis of the Camera with the long dimension of the Motorized Pan Head body.
• Specifications: o Power source: 4 AA batteries o Vertical Tilt Angle: +/-‐ 15 degrees o Horizontal Panning Angle: 360 degrees with unlimited rotation
(if purchased through CamRanger) o Maximum Camera weight: 6 lb (2.7 kg) o Size (LxHxW): 5.75 x 4.5 x 4 inches (145 x 115 x 103 mm) o Weight (without batteries: 1.75 lb (800 mg)
• Bubble level: If desired, place the included adhesive bubble level on the top of the tripod (on end with on/off switch).

© CamRanger – Patent Pending 30
• Required parts: o CamRanger* o CamRanger PT Hub o Motorized tripod (either the MP-‐360, Bescor, or Hague)* o USB cable (included with CamRanger or camera) o Serial Connector (included with the CamRanger PT Hub) o USB 2.0 A to B connector (included with CamRanger PT Hub) o Camera* o Device* (iPhone, iPad, Android device, Mac, or Windows computer)
*Requires charged battery or connection to AC power • Important tripod setup instructions:
o Set the Auto Pan Angle Selector Switch to 0° and the Main Power Switch to “M”. These settings are required for 360° rotation and control from within the CamRanger app.
o Level the tripod if necessary for your application. o When securing the CamRanger and CamRanger PT Hub to the camera setup, do
not mount to the tripod. Mount the CamRanger and CamRanger PT Hub to the motorized tripod or camera strap and make sure the units can rotate freely around the tripod.

© CamRanger – Patent Pending 31
CamRanger App Additions with the PT Hub When the CamRanger PT Hub and MP-‐360 (or MP 101, Bescor, or Hague Tripod) are used with the CamRanger, a “Tripod” tab will appear including the following display. Within the app one can adjust the speed of the tripod movement, the direction of the movement, and access advanced settings (to perform panoramas and moving timelapse).
The Advanced automation, + button, includes the following tabs when pushed:
Shoot Move Shoot: This is a feature used to make moving timelapses, by taking multiple pictures with a specified amount of incremental movement between each shot. The user inputs the number of shots, the shot delay between each shot, the direction and duration of the movement, and has the option to include HDR.
Single tap for incremental movement Double tap for continuous movement
Additional “Tripod” tab
Press for advanced automation
Adjust to change speed

© CamRanger – Patent Pending 32
§ Num Shots: Enter the total number of shots to take § Shot Delay: Enter the number of seconds to delay between each shot § Move Direction: Select the direction of movement between pictures:up, down,
right, left, or none. § Move duration: Enter the number of milliseconds to move between each shot. § HDR: The HDR settings are inputted within the CamRanger HDR tab. With HDR
initiated, at each shot the HDR series will be captured.
Bulb Ramping Bulb ramping is the process of varying the bulb exposure time to adjust the exposure during the timelapse. The user specifies an initial duration for the bulb, the exposure value change desired over the course of the time lapse, and any max duration of bulb shot. If the bulb duration would need to be greater than the max duration to achieve the desired EV change, the CamRanger will automatically adjust the ISO and the bulb duration appropriately.
§ Bulb ramping: Turn on or off § Ramping mode: Currently USB only § Initial duration: Enter the number of milliseconds for the first bulb shot § EV change: Enter the relative change in exposure value in full stops

© CamRanger – Patent Pending 33
§ Max duration: Enter the max/min number of milliseconds for any bulb shot. If the EV change is positive this will be the maximum bulb length. If the EV change is negative, this will be the minimum bulb length.
Tools
Top line: If a movie is created using 25 fps with the current ‘Shoot Move Shoot’ and ‘Bulb Ramping’ settings in place, this line indicates the length of the movie Tripod Tracker: This is the approximate cumulative motion of the tripod. This will indicates the movement direction and duration. This feature is beneficial when making panorama, to determine the duration of movement between shots.
Practical Tips The minimum movement duration is dependent on a number of variables such as battery life, camera weight, operating temperature, etc. To move the tripod head the smallest possible distance, the tripod speed should be set to the fastest setting. Typically about 10-‐30 ms is the minimum movement duration. Brief testing is recommended before beginning a sequence. A common application is taking panorama shots, however, the first question is what the movement duration should be set to. The tripod tracker can be used to determine the appropriate time between each shot. First position the camera where the initial shot should be taken. After, ensuring the tripod tracker is cleared, move the camera to the desired position of the second shot using the CamRanger. The tripod tracker time will indicate the approximate time to use for the duration between each shot.
Tips & Troubleshooting Below are some tips and troubleshooting for common questions or issues arranged by category:

© CamRanger – Patent Pending 34
Registration
• If the CamRanger iOS app is re-‐installed, the iOS device may need to be re-‐registered. • Most registration issues are due to not having Internet connectivity or entering the
serial number incorrectly. • If you still have issues, please email [email protected] for assistance.
Connection
• Make sure CamRanger is fully powered on and initialized (it should take approximately 30 seconds). The power light and WiFi light should both be on.
• The password to connect to the CamRanger WiFi is the CamRanger serial number in all CAPS. If there are still issues connecting, turning the iOS devices WiFi off and on may help.
• If the CamRanger application is connected to the CamRanger device, but no camera is connected, it will attempt to connect to a camera approximately every 5 seconds.
• If the iOS device is outside of or near the edge of the range of the CamRanger hardware there will be connection problems.
• Use the “Disconnect” and “Connect” buttons in the Advanced Settings to force a new session/connection.
• Power cycling the camera and CamRanger as well as restarting the app will completely refresh the connection.
• When the camera battery begins to get low, certain commands may start to fail or a connection may be refused.
• The CamRanger hardware can only be connected to a single iOS device at a time. • If there is an inconsistent or intermittent connection, the issue is likely related to the
USB connection and different USB cable will often fix the problem.
Speed
• The CamRanger has all the same distance and interference limitations as WiFi. Long distances and solid objects will slow the connection speed.
• The CamRanger app can handle very large image files. However, waiting for those files to transfer from the camera and then over WiFi can be time consuming. A common operating mode is to shoot RAW along with a small or medium sized JPG.
• Newer and faster iOS devices do perform better overall, particularly for intensive tasks such as showing the 100% resolution images.
• Image files can be very large and memory intensive. If the CamRanger app is having stability issues, closing other apps running in the background or even power cycling the iOS device will improve performance.

© CamRanger – Patent Pending 35
Commands
• Depending on the camera and the mode, capture can fail if the camera fails to acquire focus.
• Intervalometer, Bulb, and Advanced Bracketing sequence commands are stored on the CamRanger hardware such that the iOS device does not need to remain on and connected. However, this also means that any changes or actions with the iOS device during one of those advanced operations could result in failure or unexpected outcomes.
• When an operation, command, or setting is not available or not working the issue is often related to the camera setup. For example:
o Toggling to AF is disabled if the camera lens switch is set to MF. o Live view will fail on Canon cameras if Live View Shooting is disabled in the
camera’s menu. o Capture fails because the removable media on the camera is full.
• For Canon cameras, the Live View focus mode within the camera’s menu must be set to “Live View”.
• Adjusting or viewing the number of bracketing shots is not currently supported. The display assumes three shots. However, if the number of shots is actually 2, 5, 7, 9, etc. the bracket amount is still correct it will just incorrectly display 3 shots.
• Some features are simply not supported by some cameras. For example continuous capture mode is not supported on the Canon 40D and most Nikons do not support bulb shots. See the camera capability matrix at www.CamRanger.com for more detailed information.
• There is no way to cancel an Intervalometer, Bulb, or Advanced Bracketing sequence command. The only way to stop it is to power off the CamRanger device.
Images
• The thumbnails are not downloaded until after the image has been recorded to the camera’s card. On most cameras this is relatively quick. However, depending on the camera, speed of removable media and number of shots taken in succession, there can be a lag.
• The maximum sized image that can be viewed is dependent on the iOS hardware. For example, the 1st Generation iPad can only handle large RAW or JPG’s from slightly older cameras, but can handle medium sized images from most current cameras. The 3rd Generation iPad supports all image sizes for all supported cameras. Regardless, all image formats and sizes can be downloaded to the user’s iOS Photo library through the card contents view.
• CamRanger can be used to view and download pictures captured through other means. So a separate photographer could be capturing images, or a RF or light trigger could capture images and the CamRanger app would automatically download the thumbnails.

© CamRanger – Patent Pending 36
CamRanger PT Hub and Tripod • If the tripod head becomes unresponsive, securely reconnect the serial connector to the
tripod head. • The speed of the tripod may vary depending on the weight of the camera and battery
life of the tripod head. • When using the CamRanger PT Hub, the CamRanger battery will drain more quickly.


