38
– Issue 01c - (22 March 2011) 1100/1200 Series Phone Installation IP Office Release 7.0

– Issue 01c - (22 March 2011)
1100/1200 Series Phone Installation
IP Office Release 7.0
1100/1200 Series Phone Installation Page 2– Issue 01c (22 March 2011)IP Office Release 7.0
© 2011 AVAYA All Rights Reserved.
NoticesWhile reasonable efforts have been made to ensure that the information inthis document is complete and accurate at the time of printing, Avayaassumes no liability for any errors. Avaya reserves the right to make changesand corrections to the information in this document without the obligation tonotify any person or organization of such changes.
Documentation disclaimerAvaya shall not be responsible for any modifications, additions, or deletionsto the original published version of this documentation unless suchmodifications, additions, or deletions were performed by Avaya.
End User agree to indemnify and hold harmless Avaya, Avaya's agents,servants and employees against all claims, lawsuits, demands and judgmentsarising out of, or in connection with, subsequent modifications, additions ordeletions to this documentation, to the extent made by End User.
Link disclaimerAvaya is not responsible for the contents or reliability of any linked Web sitesreferenced within this site or documentation(s) provided by Avaya. Avaya isnot responsible for the accuracy of any information, statement or contentprovided on these sites and does not necessarily endorse the products,services, or information described or offered within them. Avaya does notguarantee that these links will work all the time and has no control over theavailability of the linked pages.
WarrantyAvaya provides a limited warranty on this product. Refer to your salesagreement to establish the terms of the limited warranty. In addition, Avaya’sstandard warranty language, as well as information regarding support for thisproduct, while under warranty, is available to Avaya customers and otherparties through the Avaya Support Web site: http://www.avaya.com/support.Please note that if you acquired the product from an authorized Avaya reselleroutside of the United States and Canada, the warranty is provided to you bysaid Avaya reseller and not by Avaya.
LicensesTHE SOFTWARE LICENSE TERMS AVAILABLE ON THE AVAYA WEBSITE,HTTP://SUPPORT.AVAYA.COM/LICENSEINFO/ ARE APPLICABLE TO ANYONEWHO DOWNLOADS, USES AND/OR INSTALLS AVAYA SOFTWARE,PURCHASED FROM AVAYA INC., ANY AVAYA AFFILIATE, OR AN AUTHORIZEDAVAYA RESELLER (AS APPLICABLE) UNDER A COMMERCIAL AGREEMENTWITH AVAYA OR AN AUTHORIZED AVAYA RESELLER. UNLESS OTHERWISEAGREED TO BY AVAYA IN WRITING, AVAYA DOES NOT EXTEND THISLICENSE IF THE SOFTWARE WAS OBTAINED FROM ANYONE OTHER THANAVAYA, AN AVAYA AFFILIATE OR AN AVAYA AUTHORIZED RESELLER, ANDAVAYA RESERVES THE RIGHT TO TAKE LEGAL ACTION AGAINST YOU ANDANYONE ELSE USING OR SELLING THE SOFTWARE WITHOUT A LICENSE. BYINSTALLING, DOWNLOADING OR USING THE SOFTWARE, OR AUTHORIZINGOTHERS TO DO SO, YOU, ON BEHALF OF YOURSELF AND THE ENTITY FORWHOM YOU ARE INSTALLING, DOWNLOADING OR USING THE SOFTWARE(HEREINAFTER REFERRED TO INTERCHANGEABLY AS “YOU” AND “ENDUSER”), AGREE TO THESE TERMS AND CONDITIONS AND CREATE ABINDING CONTRACT BETWEEN YOU AND AVAYA INC. OR THE APPLICABLEAVAYA AFFILIATE (“AVAYA”).
Avaya grants End User a license within the scope of the license typesdescribed below. The applicable number of licenses and units of capacity forwhich the license is granted will be one (1), unless a different number oflicenses or units of capacity is specified in the Documentation or othermaterials available to End User. "Designated Processor" means a singlestand-alone computing device. "Server" means a Designated Processor thathosts a software application to be accessed by multiple users. "Software"means the computer programs in object code, originally licensed by Avayaand ultimately utilized by End User, whether as stand-alone products orpre-installed on Hardware. "Hardware" means the standard hardwareoriginally sold by Avaya and ultimately utilized by End User.
License typesDesignated System(s) License (DS). End User may install and use each copyof the Software on only one Designated Processor, unless a different numberof Designated Processors is indicated in the Documentation or other materialsavailable to End User. Avaya may require the Designated Processor(s) to beidentified by type, serial number, feature key, location or other specificdesignation, or to be provided by End User to Avaya through electronic meansestablished by Avaya specifically for this purpose.
CopyrightExcept where expressly stated otherwise, no use should be made of materialson this site, the Documentation(s) and Product(s) provided by Avaya. Allcontent on this site, the documentation(s) and the product(s) provided byAvaya including the selection, arrangement and design of the content isowned either by Avaya or its licensors and is protected by copyright and otherintellectual property laws including the sui generis rights relating to theprotection of databases. You may not modify, copy, reproduce, republish,upload, post, transmit or distribute in any way any content, in whole or inpart, including any code and software. Unauthorized reproduction,transmission, dissemination, storage, and or use without the express writtenconsent of Avaya can be a criminal, as well as a civil, offense under theapplicable law.
Third Party Components Certain software programs or portions thereof included in the Product maycontain software distributed under third party agreements ("Third PartyComponents"), which may contain terms that expand or limit rights to usecertain portions of the Product ("Third Party Terms"). Information regardingdistributed Linux OS source code (for those Products that have distributed theLinux OS source code), and identifying the copyright holders of the ThirdParty Components and the Third Party Terms that apply to them is availableon the Avaya Support Web site: http://support.avaya.com/Copyright.
Preventing toll fraud"Toll fraud" is the unauthorized use of your telecommunications system by anunauthorized party (for example, a person who is not a corporate employee,agent, subcontractor, or is not working on your company's behalf). Be awarethat there can be a risk of toll fraud associated with your system and that, iftoll fraud occurs, it can result in substantial additional charges for yourtelecommunications services.
Avaya fraud interventionIf you suspect that you are being victimized by toll fraud and you needtechnical assistance or support, call Technical Service Center Toll FraudIntervention Hotline at +1-800-643-2353 for the United States and Canada.For additional support telephone numbers, see the Avaya Support Web site:http://support.avaya.comSuspected security vulnerabilities with Avaya products should be reported toAvaya by sending mail to: [email protected].
TrademarksAvaya and Aura are trademarks of Avaya, Inc.The trademarks, logos and service marks (“Marks”) displayed in this site, thedocumentation(s) and product(s) provided by Avaya are the registered orunregistered Marks of Avaya, its affiliates, or other third parties. Users arenot permitted to use such Marks without prior written consent from Avaya orsuch third party which may own the Mark. Nothing contained in this site, thedocumentation(s) and product(s) should be construed as granting, byimplication, estoppel, or otherwise, any license or right in and to the Markswithout the express written permission of Avaya or the applicable third party.Avaya is a registered trademark of Avaya Inc. All non-Avaya trademarks arethe property of their respective owners.
Downloading documentsFor the most current versions of documentation, see the Avaya Support Website: http://www.avaya.com/support
Contact Avaya SupportAvaya provides a telephone number for you to use to report problems or toask questions about your product. The support telephone number is1-800-242-2121 in the United States. For additional support telephonenumbers, see the Avaya Web site: http://www.avaya.com/support
1100/1200 Series Phone Installation Page 3– Issue 01c (22 March 2011)IP Office Release 7.0
Contents
Contents1100/1200 Phone Installation1.
..................................................................... 81.1 Installation Pre-Requisites
..................................................................... 101.2 Known Limitations
IP Office Configuration2...................................................................... 132.1 Loading Software Files
..................................................................... 162.2 Enable SIP Phone Support
..................................................................... 182.3 IP Office File Server Settings
..................................................................... 192.4 Checking System Short Codes
..................................................................... 212.5 User/Extension Creation
..................................................................... 222.6 Licensing
............................................................................ 222.6.1 Checking the Dongle Serial Number
............................................................................ 222.6.2 Adding Licenses
............................................................................ 232.6.3 Reserving Licenses
Phone Installation3...................................................................... 273.1 Method 1
..................................................................... 283.2 Method 2
..................................................................... 293.3 Method 3
..................................................................... 313.4 Method 4
..................................................................... 323.5 Method 5
..................................................................... 333.6 Factory Reset
..................................................................... 343.7 Recovery Process
...............................................................................0Index


1100/1200 Series Phone Installation Page 5– Issue 01c (22 March 2011)IP Office Release 7.0
1100/1200 Phone Installation
Chapter 1.


1100/1200 Series Phone Installation Page 7– Issue 01c (22 March 2011)IP Office Release 7.0
1100/1200 Phone Installation:
1. 1100/1200 Phone InstallationFor IP Office Release 6.1 and higher, selected phones from the Avaya 1100 Series and 1200 Series are supported on IP500 and IP500v2 systems. The following 1100 Series and 1200 Series are supported. These are the only phones fromthe 1100 and 1200 Series that are supported by IP Office.
1120E Telephone 1140E Telephone
1220 Telephone 1230 Telephone
· 1100 Series The 1120E and 1140E are supported. The 1100 Series 18 button Key Expansion Module is supported, with up to 3modules attached to a phone.
· 1200 Series The 1220 and 1230 are supported. The 1200 Series 12 button LCD Key Expansion Module is supported, with up to7 modules attached to a phone. The 1200 Series 18 button Key Expansion Module is also supported, with up to 3modules attached to a phone.

1100/1200 Series Phone Installation Page 8– Issue 01c (22 March 2011)IP Office Release 7.0
1.1 Installation Pre-RequisitesFor IP Office Release 6.1 and higher, selected phones from the Avaya 1100 Series and 1200 Series are supported on IP500 and IP500v2 systems.
Supported PhonesThe 1120E, 1140E, 1220 and 1230 are the only phones supported. Other phones in the 1100 Series and 1200 Series suchas the 1165E, 1210 and 1110 are not supported.
Supported FirmwareOnly phones with the following existing firmware can be installed with IP Office:
· The basic boot loader BootC. This normally applies to new (out of the box) 1220 and 1230 phones. New 1120E and1140E phones are shipped with Unistim firmware. However, all phones can be made to invoke the BootC loaderif required.
· Nortel BCM6.0 UNISTIM GA F/W level 06XXC7M. The firmware name is briefly displayed on the screen at startup. Ifan earlier version than C7M is displayed, refer to the recovery process .
· SIP firmware.
Supported Hardware RevisionsThe phones must have the following hardware revision numbers. These are found on the white label on the back of thephone. The two digit revision number is the middle number on the second row of the label, after the NTYS product code.
· 1120E: Revision 09 or higher.
· 1140E: Revision 06 or higher.
· 1220: Revision 03 or higher.
· 1230: Revision 03 or higher.
Supported SIP SoftwareOnly the SIP firmware supplied with an IP Office Administration software release should be used. Other software shouldonly be used is specifically documented as supported. Software obtain from other sources may not have been tested andvalidated for IP Office operation.
· For IP Office Release 6.1, 1100/1200 Series SIP firmware release 4.0 is supported.
· For IP Office Release 7.0, 1100/1200 Series SIP firmware release 4.1 is supported.
Supported IP Office SystemsThe 1100/1200 Series phones are supported on the following IP Office systems:
· The IP Office must be an IP500 or IP500v2 running IP Office Release 6.1 or higher software.
· If installed with earlier versions of IP Office software, these phones will operate as third-party IP end points. Theywill require a 3rd Party IP Endpoint license, will only support basic telephony features (equivalent to an analogueextension) and are not supported by Avaya.
· For IP500v2 systems, the IP Office system must be running in IP Office standard mode. SIP Extensions are notsupported by systems running in IP Office Essential Edition - Norstar Edition, IP Office Essential Edition - PARTNEREdition or IP Office Essential Edition - Quick Edition modes.
34
34

1100/1200 Series Phone Installation Page 9– Issue 01c (22 March 2011)IP Office Release 7.0
1100/1200 Phone Installation: Installation Pre-Requisites
Voice Compression ChannelsThe system must be fitted with voice compression channels, also known as VCM channels. Channels can be added up tothe system maximum of 148 channels. In summary, an available voice compression channel is required:
· During incoming or outgoing call setup with the IP Office.
· During any call to or from a non-IP trunk or phone.
· During any call to or from an IP trunk or phone that is using a different codec than the 1100/1200 phone.
Voice compression channels can be added to a system using a combination of the following options:
· IP500 VCM Base Cards For IP500 and IP500v2 systems, installation of up to 2 IP500 VCM base cards. There are 2 types of card areavailable, the IP500 VCM 32 and the IP500 VCM 64, each providing 32 and 64 VCM channels respectively. Note thateach IP500 VCM card also enables 12 Avaya IP endpoints without requiring licenses (see license below).
· IP500 Combination Cards For IP500v2 systems only, installation of up to 2 IP500 Combination cards. These cards provide a mix of digitalextension ports, analog trunk ports and trunk ports. Each card also provides 10 voice compression channels. Thesecards do not enable any unlicensed Avaya IP endpoints.
· IP400 VCM Cards For IP500 and IP500v2 systems, installation of up to 2 legacy IP400 VCM cards using an IP500 Legacy Card Carrier.The IP400 VCM cards supported 4, 8, 16, 24, or 30 voice compression channels.
Avaya IP Endpoint LicensesEach IP end point supported by the IP Office system requires a license, either an Avaya IP Endpoint license or a 3rdParty IP Endpoint license.
· 1100 Series and 1200 Series SIP phones use Avaya IP Endpoint licenses.
· The licenses are added to the IP Office configuration and are based on the unique feature key serial number. ForIP500v2 systems this is the FK number of the System SD card fitted to the control unit. For IP500 systems this isthe serial number of the smart media card fitted to the control unit.
· Note that each IP500 VCM 32 and IP500 VCM64 card installed in the system enables 12 Avaya IP endpoint withoutrequiring licenses.
Power SupplyEach phone requires a power supply. They can either use power over ethernet (PoE) or use a separate power supply unitand mains power outlet. The IP Office system does not supply power to the phones.
File Server OperationDuring boot up the phones use HTTP to request files from a provisioning file server.
· For IP Office operation, installation is only supported using the IP Office control unit's memory card as the fileserver for the phones.
· For IP500v2 control units, the System SD card is used. This is a mandatory card that is present in all IP500v2systems.
· For IP500 control units, the optional Compact Flash card slot is used. If no card is present, a suitable CompactFlash card should be obtained for use.
· Only 1100/1200 Series phone software supplied as part of an IP Office core software release should be used.
DHCP Server OperationThe use of DHCP is recommend for ease of installation and maintenance. Note however that for DHCP, only use of the IPOffice system as the DHCP server is supported for installation of 1100/1200 phones.
1100/1200 Series Phone Installation Page 10– Issue 01c (22 March 2011)IP Office Release 7.0
1.2 Known LimitationsThe following are known limitations in the current IP Office support for 1100/1200 Series telephones:
· Other phones such as the 1110, 1165E and 1210 are not supported.
· For 1100 Series phones, the BlueTooth integration feature is not supported.
· For IP Office Release 6.1, no IP Office directory integration is supported.
· For IP Office Release 7.0, the Address Book directory includes IP Office system directory plus other IP Office usersand groups. However, it does not include the user personal directory from the IP Office system. Personal directoryentries created and edited on the phone are stored locally on the phone only.
1100/1200 Series Phone Installation Page 11– Issue 01c (22 March 2011)IP Office Release 7.0
IP Office Configuration
Chapter 2.
1100/1200 Series Phone Installation Page 12– Issue 01c (22 March 2011)IP Office Release 7.0
2. IP Office ConfigurationThe recommended method of installation is to use the IP Office system as the DHCP server for the phones. This simplifiesboth installation and maintenance. Other methods should only be used if the customer does not want the IP Office systemto perform DHCP.
Before installing any 1100 or 1200 Series phones, the following processes should be completed to prepare the IP Office tosupport those phones:
1.Ensure that the installation pre-requisites have been meet .
2.Load the 1100/1200 Software Files onto the IP Office system .
3.Enable IP Office SIP Phone Support .
4.Check the IP Office File Server Settings .
5.Check the IP Office Short Codes .
6.IP Office User and Extension Creation .
7.Add licenses .
8.Once the above steps have been completed, installation of individual phones can be started.
8
13
16
18
19
21
22
26
1100/1200 Series Phone Installation Page 13– Issue 01c (22 March 2011)IP Office Release 7.0
IP Office Configuration:
2.1 Loading Software FilesThe 1100/1200 Series firmware suitable for IP Office operation is supplied as part of the IP Office Administration softwareand is copied onto the PC when IP Office Manager is installed. No other firmware should be used with IP Office unlessspecifically documented.
There are a number of methods by which the firmware installed with IP Office Manager can be copied onto the IP Officesystems memory card. The method used depends mainly on the type of control unit.
· ! WARNING
A memory card should never be removed from a running IP Office system without first being shutdown. IP OfficeManager should be used to shutdown the memory card before it is removed from the system.
· For IP Office operation, only the 1100/1200 Series phone .bin files and .lng files need to be present on the memorycard. Other files (.cfg and .txt) required by the phones are automatically generated by the IP Office system inresponse to requests from the phones.
IP500v2 Control UnitThe System SD card is used to store the files. This is a mandatory card that is present in all IP500v2 systems. Thefirmware files are loaded onto the card in a number of ways:
· If the IP500v2 was upgraded to IP Office Release 6.1 or higher using the Recreate SD Card option in IP OfficeManager, the firmware is copied onto the card as part of that process.
· If the IP500v2 was upgraded to IP Office Release 6.1 or higher using IP Office Manager's Upgrade Wizard, if the Upload System Files option was selected, the firmware is copied onto the card as part of that process. TheUpload System Files option is enabled by default.
If you think the correct files are not present, you can use the same methods as supported for an IP500 control unit tocheck the files on the card and to copy the files onto the card if necessary.
IP500 Control UnitThe compact flash memory card is used to store the files. This is an option card that may only be present if the system isusing embedded voicemail. The files need to be copied manually onto the memory card. This can be done in a number ofways:
· Files can be copied remotely onto the card in a running system using IP Office Manager's embedded filemanagement.
· The card can be shutdown and removed from the system. Files can then be copied onto the card using a PC with asuitable memory card slot.
1100/1200 Series Phone Installation Page 14– Issue 01c (22 March 2011)IP Office Release 7.0
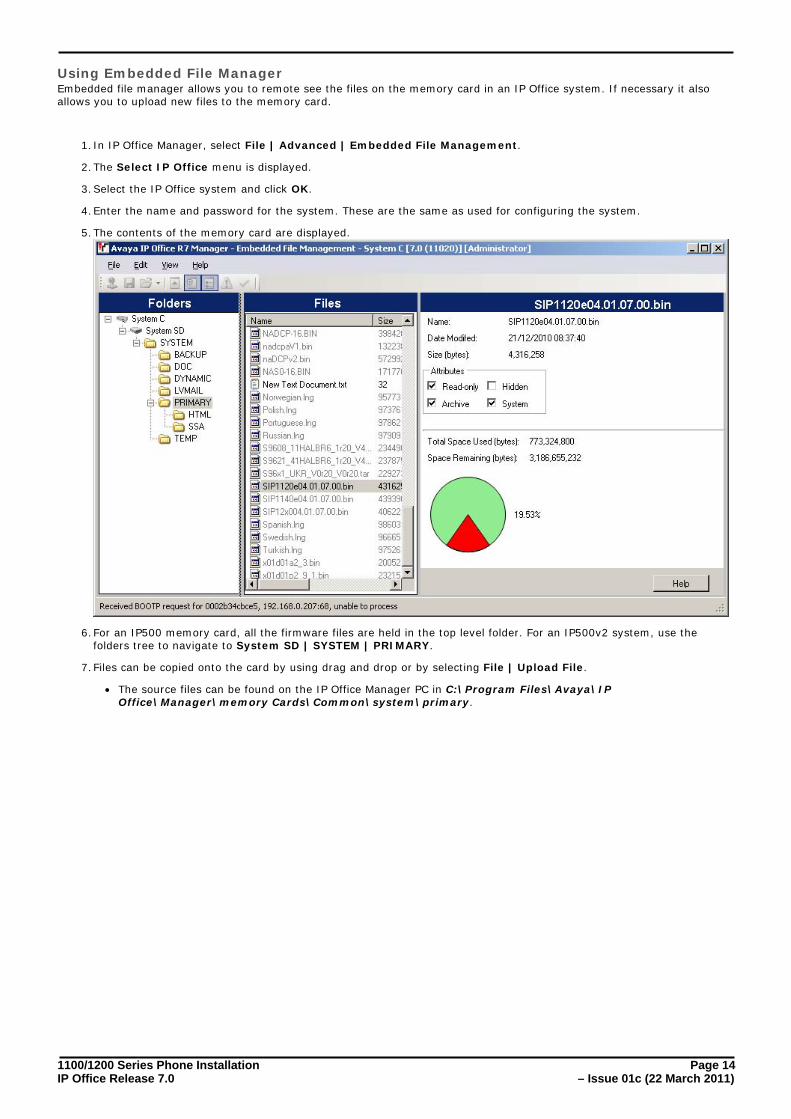
Using Embedded File ManagerEmbedded file manager allows you to remote see the files on the memory card in an IP Office system. If necessary it alsoallows you to upload new files to the memory card.
1.In IP Office Manager, select File | Advanced | Embedded File Management.
2.The Select IP Office menu is displayed.
3.Select the IP Office system and click OK.
4.Enter the name and password for the system. These are the same as used for configuring the system.
5.The contents of the memory card are displayed.
6.For an IP500 memory card, all the firmware files are held in the top level folder. For an IP500v2 system, use thefolders tree to navigate to System SD | SYSTEM | PRIMARY.
7.Files can be copied onto the card by using drag and drop or by selecting File | Upload File.
· The source files can be found on the IP Office Manager PC in C:\Program Files\Avaya\IPOffice\Manager\memory Cards\Common\system\primary.
1100/1200 Series Phone Installation Page 15– Issue 01c (22 March 2011)IP Office Release 7.0
IP Office Configuration: Loading Software Files
Manually Copying FilesFiles can be copied onto the memory card by placing it into a PC with a suitable memory card slot.
· ! WARNING
A memory card should never be removed from a running IP Office system without first being shutdown. IP OfficeManager should be used to shutdown the memory card before it is removed from the system.
1.Using IP Office Manager, select File | Advanced | Memory Card Command | Shutdown.
2.The Select IP Office menu is displayed.
3.Select the IP Office system and click OK.
4.Enter the name and password for the system. These are the same as used for configuring the system.
5.For an IP500v2 system you may be prompted for which card you want to shutdown. Select System and click OK.
6.On the back of the control unit, check that the LED for the memory card slot is off before removing the memorycard.
7.Place the card into the PC's memory card slot and examine the contents.
8.For an IP500 memory card, all the firmware files are held in the top level folder. For an IP500v2 system, use thefolders tree to navigate to System SD | SYSTEM | PRIMARY. The source files can be found on the IP OfficeManager PC in C:\Program Files\Avaya\IP Office\Manager\memory Cards\Common\system\primary.
9.When the card is reinserted into the system, card usage is automatically restarted.
1100/1200 Series Phone Installation Page 16– Issue 01c (22 March 2011)IP Office Release 7.0
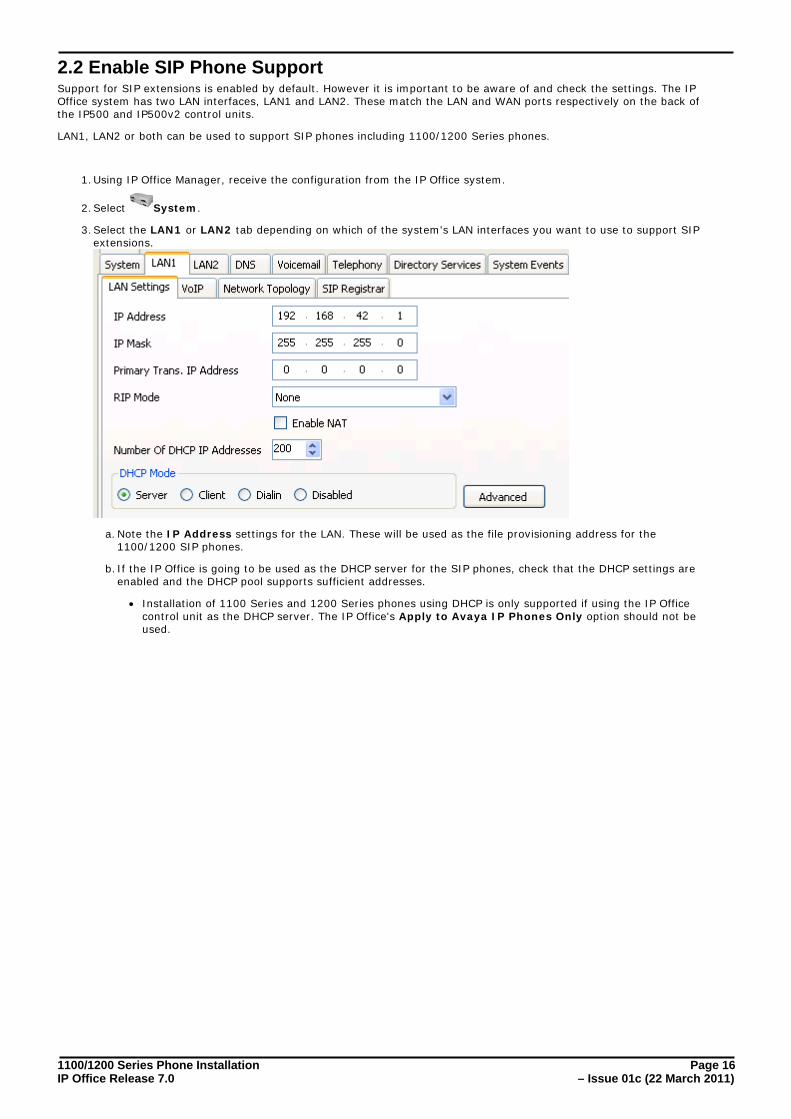
2.2 Enable SIP Phone SupportSupport for SIP extensions is enabled by default. However it is important to be aware of and check the settings. The IPOffice system has two LAN interfaces, LAN1 and LAN2. These match the LAN and WAN ports respectively on the back ofthe IP500 and IP500v2 control units.
LAN1, LAN2 or both can be used to support SIP phones including 1100/1200 Series phones.
1.Using IP Office Manager, receive the configuration from the IP Office system.
2.Select System.
3.Select the LAN1 or LAN2 tab depending on which of the system's LAN interfaces you want to use to support SIPextensions.
a.Note the IP Address settings for the LAN. These will be used as the file provisioning address for the1100/1200 SIP phones.
b. If the IP Office is going to be used as the DHCP server for the SIP phones, check that the DHCP settings areenabled and the DHCP pool supports sufficient addresses.
· Installation of 1100 Series and 1200 Series phones using DHCP is only supported if using the IP Officecontrol unit as the DHCP server. The IP Office's Apply to Avaya IP Phones Only option should not beused.
1100/1200 Series Phone Installation Page 17– Issue 01c (22 March 2011)IP Office Release 7.0
IP Office Configuration: Enable SIP Phone Support
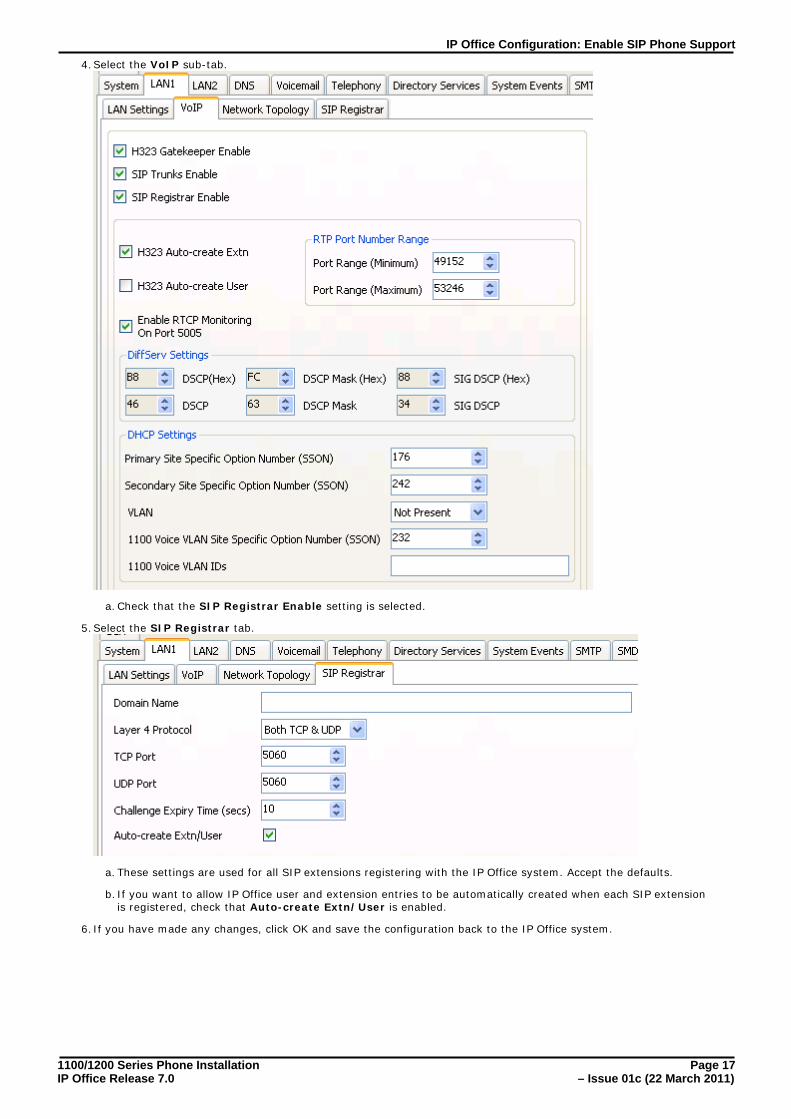
4.Select the VoIP sub-tab.
a.Check that the SIP Registrar Enable setting is selected.
5.Select the SIP Registrar tab.
a. These settings are used for all SIP extensions registering with the IP Office system. Accept the defaults.
b. If you want to allow IP Office user and extension entries to be automatically created when each SIP extensionis registered, check that Auto-create Extn/User is enabled.
6.If you have made any changes, click OK and save the configuration back to the IP Office system.
1100/1200 Series Phone Installation Page 18– Issue 01c (22 March 2011)IP Office Release 7.0
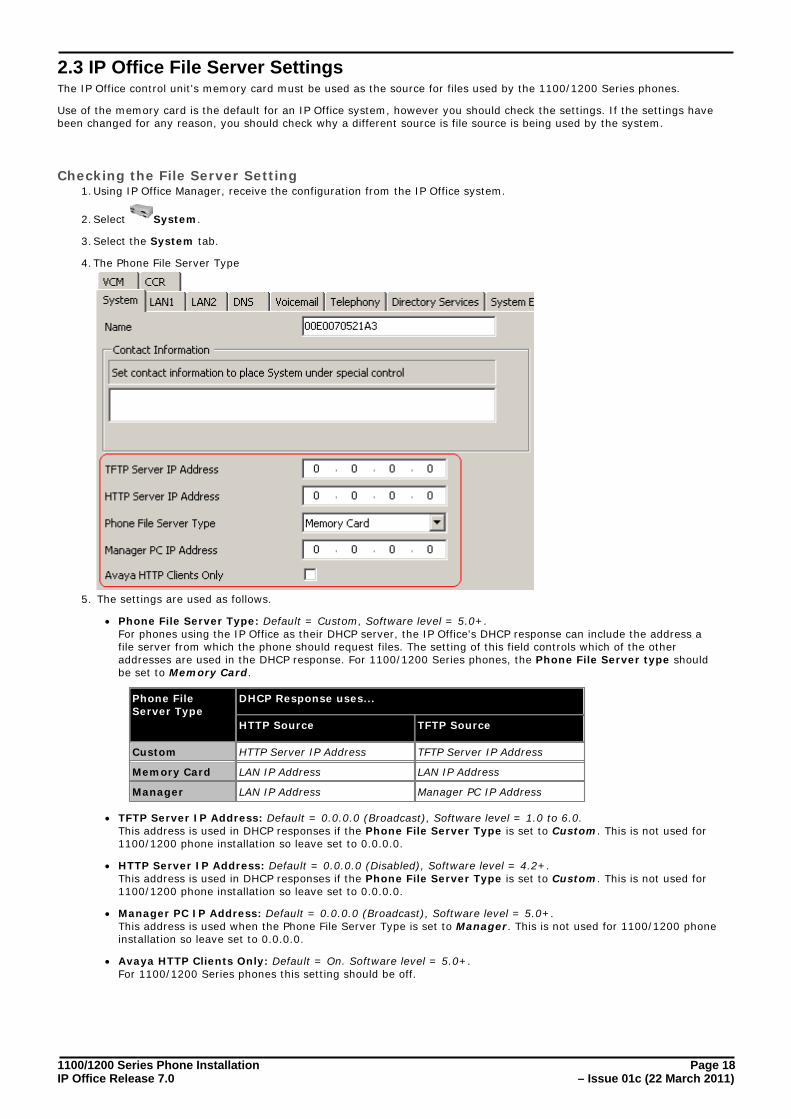
2.3 IP Office File Server SettingsThe IP Office control unit's memory card must be used as the source for files used by the 1100/1200 Series phones.
Use of the memory card is the default for an IP Office system, however you should check the settings. If the settings havebeen changed for any reason, you should check why a different source is file source is being used by the system.
Checking the File Server Setting1.Using IP Office Manager, receive the configuration from the IP Office system.
2.Select System.
3.Select the System tab.
4.The Phone File Server Type
5. The settings are used as follows.
· Phone File Server Type: Default = Custom, Software level = 5.0+. For phones using the IP Office as their DHCP server, the IP Office's DHCP response can include the address afile server from which the phone should request files. The setting of this field controls which of the otheraddresses are used in the DHCP response. For 1100/1200 Series phones, the Phone File Server type shouldbe set to Memory Card.
Phone FileServer Type
DHCP Response uses...
HTTP Source TFTP Source
Custom HTTP Server IP Address TFTP Server IP Address
Memory Card LAN IP Address LAN IP Address
Manager LAN IP Address Manager PC IP Address
· TFTP Server IP Address: Default = 0.0.0.0 (Broadcast), Software level = 1.0 to 6.0. This address is used in DHCP responses if the Phone File Server Type is set to Custom. This is not used for1100/1200 phone installation so leave set to 0.0.0.0.
· HTTP Server IP Address: Default = 0.0.0.0 (Disabled), Software level = 4.2+. This address is used in DHCP responses if the Phone File Server Type is set to Custom. This is not used for1100/1200 phone installation so leave set to 0.0.0.0.
· Manager PC IP Address: Default = 0.0.0.0 (Broadcast), Software level = 5.0+. This address is used when the Phone File Server Type is set to Manager. This is not used for 1100/1200 phoneinstallation so leave set to 0.0.0.0.
· Avaya HTTP Clients Only: Default = On. Software level = 5.0+. For 1100/1200 Series phones this setting should be off.

1100/1200 Series Phone Installation Page 19– Issue 01c (22 March 2011)IP Office Release 7.0
IP Office Configuration: IP Office File Server Settings
2.4 Checking System Short CodesFor IP Office Release 7.0, a range of Feature codes are supported for use from the 1100/1200 Series phones.
Some of these 1100/1200 phone features are mapped onto IP Office short code features. When such a feature code isinvoked from the phone, the first (historically) user short code, or if none, system short code found that uses the requiredfeature is used for the call.
Feature 1100/1200Feature Code
Short CodeFeature
System Short Code
Conference Feature 3 Conference Add Use default system short code *47, otherwise add a shortcode.
Call Forward On Feature 4 None required. None required.
Call Forward Off Feature #4 None required. None required.
Last Number Redial Feature 5 Last NumberRedial
None present, add a short code.
Page Feature 60 Dial Paging None present, add a short code.
Dial Voice Call Feature 66 Dial Direct None present, add a short code.
Call Park Feature 74 Park Call Use default system short code *37*N#, otherwise add ashort code.
Retrieve Feature #74 Unpark Call Use default system short code *38*N#, otherwise add ashort code.
Call Pickup Group Feature 75 Call PickupGroup
Use default system short code *31, otherwise add a shortcode.
Call PickupExtension
Feature 76 Call Pickup Extn Use default system short code *32*N#, otherwise add ashort code.
Do Not Disturb On Feature 85 None required. None required.
Do Not Disturb Off Feature #85 None required. None required.
Voicemail Access Feature 981 VoicemailCollect
Use default system short code *17, otherwise add a shortcode.
Button Self-Administration
Feature *3 None required. None required.
Button Inspect Feature *0 None required. None required.
Program Auto Dial Feature *1 None required. None required.
Feature *2 None required. None required.
The short code matching is done by scanning the available users and then system short codes. When such a feature codeis invoked from the phone, the first (historically) user short code, or if none, system short code found that uses therequired feature is used for the call. This can cause a potential issue if multiple short codes are present, for example:
1.The system short code *98 / Dial Paging / 203 is added to allow direct paging of user extension 203.
2.The system short code *99*N# / Dial Paging / N is added to allow general paging of any user or hunt groupextension number.
3.When Feature 60 is invoked, the 1100/1200 phone prompts the user for the paging target extension. However,regardless of the number entered, the historically first short code found using the Dial Paging feature is *98 whichis set for a specific target and so the call pages that target.
4.To resolve this, the *98 short code should be deleted and then reinserted.

1100/1200 Series Phone Installation Page 20– Issue 01c (22 March 2011)IP Office Release 7.0
Adding/Checking the System Short CodesThis process assumes that all short codes are being done as system short codes. If required they could be done as usershort codes, user rights shorts codes or a mix of user, user rights and system short codes.
1.Using IP Office Manager receive the configuration from the IP Office system.
2.Select Short Code.
3. In the group pane (select View | Group Pane if the group pane is not shown), check that the following defaultsystem short codes are present.
Code Feature Telephone Number
*47 Conference Add None
*37*N# Park Call N
*38*N# Unpark Call N
*31 Call Pickup Group None
*32*N# Call Pickup Extn N
*17 Voicemail Collect None
· If any are missing, add them to the list of new short codes to be added in the table below.
4.In the group pane, click on the Feature column to sort the short codes.
5.Add the following short codes.
· If a short code using the Feature already exists, note its Code and Telephone Number. Delete the code by
selecting it and clicking on the delete icon. After adding the short codes below, recreate the deleted shortcode.
· The Code values used below are examples only. They can be substituted for other values if they are already inuse for other features.
Code Feature Telephone Number
*97 Last Number Redial None
*98*N# Dial Paging N
*99*N# Dial Direct N
1.Click on the icon and select Short Code.
2.Enter the Code and Telephone Number and select the required Feature from the drop down list.
3.Click OK.
4.Repeat the process for any other short codes required.
6.Click on the save icon.
1100/1200 Series Phone Installation Page 21– Issue 01c (22 March 2011)IP Office Release 7.0
IP Office Configuration: Checking System Short Codes
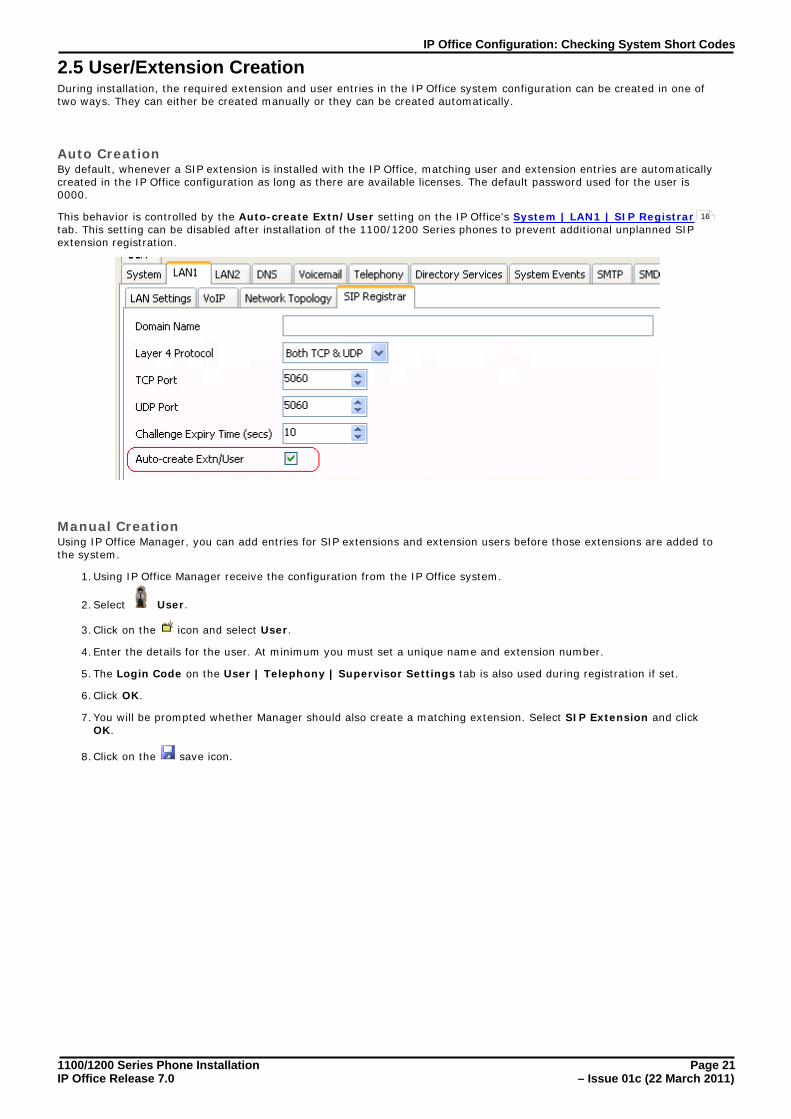
2.5 User/Extension CreationDuring installation, the required extension and user entries in the IP Office system configuration can be created in one oftwo ways. They can either be created manually or they can be created automatically.
Auto CreationBy default, whenever a SIP extension is installed with the IP Office, matching user and extension entries are automaticallycreated in the IP Office configuration as long as there are available licenses. The default password used for the user is0000.
This behavior is controlled by the Auto-create Extn/User setting on the IP Office's System | LAN1 | SIP Registrartab. This setting can be disabled after installation of the 1100/1200 Series phones to prevent additional unplanned SIPextension registration.
Manual CreationUsing IP Office Manager, you can add entries for SIP extensions and extension users before those extensions are added tothe system.
1.Using IP Office Manager receive the configuration from the IP Office system.
2.Select User.
3.Click on the icon and select User.
4.Enter the details for the user. At minimum you must set a unique name and extension number.
5.The Login Code on the User | Telephony | Supervisor Settings tab is also used during registration if set.
6.Click OK.
7.You will be prompted whether Manager should also create a matching extension. Select SIP Extension and clickOK.
8.Click on the save icon.
16
1100/1200 Series Phone Installation Page 22– Issue 01c (22 March 2011)IP Office Release 7.0
2.6 LicensingEach 1100 Series or 1200 Series phone uses an Avaya IP Endpoint license. Installation cannot be completed withoutavailable licenses.
· Avaya IP Endpoint Licenses Each IP end point supported by the IP Office system requires a license, either an Avaya IP Endpoint license or a3rd Party IP Endpoint license. 1100 Series and 1200 Series SIP phones use Avaya IP Endpoint licenses.
· Phones can be licensed up to the system's 384 extensions limit for all phones of any type.
· Note that each IP500 VCM 32 and IP500 VCM 64 card installed in the system enables 12 Avaya IP endpointwithout requiring licenses.
· Licenses are normally automatically assigned to phones in order of phone registration. However, existingextensions can be configured to reserve a license. This ensures that they do not become unlicensed whennewly added extensions manage to register first following a system reboot.
2.6.1 Checking the Dongle Serial NumberThe licenses are issued against a unique feature key/dongle serial number. For IP500v2 control units that number isunique to the System SD card fitted to the system. For IP500 control units that number is unique to the smart media cardinserted in the back of the control unit. For any licenses entered into the system configuration to be valid, they must belicenses issued against that serial number.
1.Using IP Office Manager, receive the configuration from the IP Office system.
2.Select System.
3.Select the System tab.
4.The feature key serial number is shown by the Dongle Serial Number field.
2.6.2 Adding LicensesUse the following process to add licenses to the IP Office configuration. Multiple licenses can be added for a cumulativenumber of license instances.
1.Using IP Office Manager, receive the configuration from the IP Office system.
2.Select License.
3.The current licenses in the system configuration are displayed.
4.To add a license, click on and select License.
5.Enter the license which you have been supplied into the field and click OK.
6.The type of the license should be displayed but with its License Status set to Unknown. If the License Type wasnot recognized, check that it has been entered correctly.
7.Save the configuration back to the IP Office system and then receive the configuration from the IP Office systemagain.
8.The License Status should now be Valid.
1100/1200 Series Phone Installation Page 23– Issue 01c (22 March 2011)IP Office Release 7.0
IP Office Configuration: Licensing
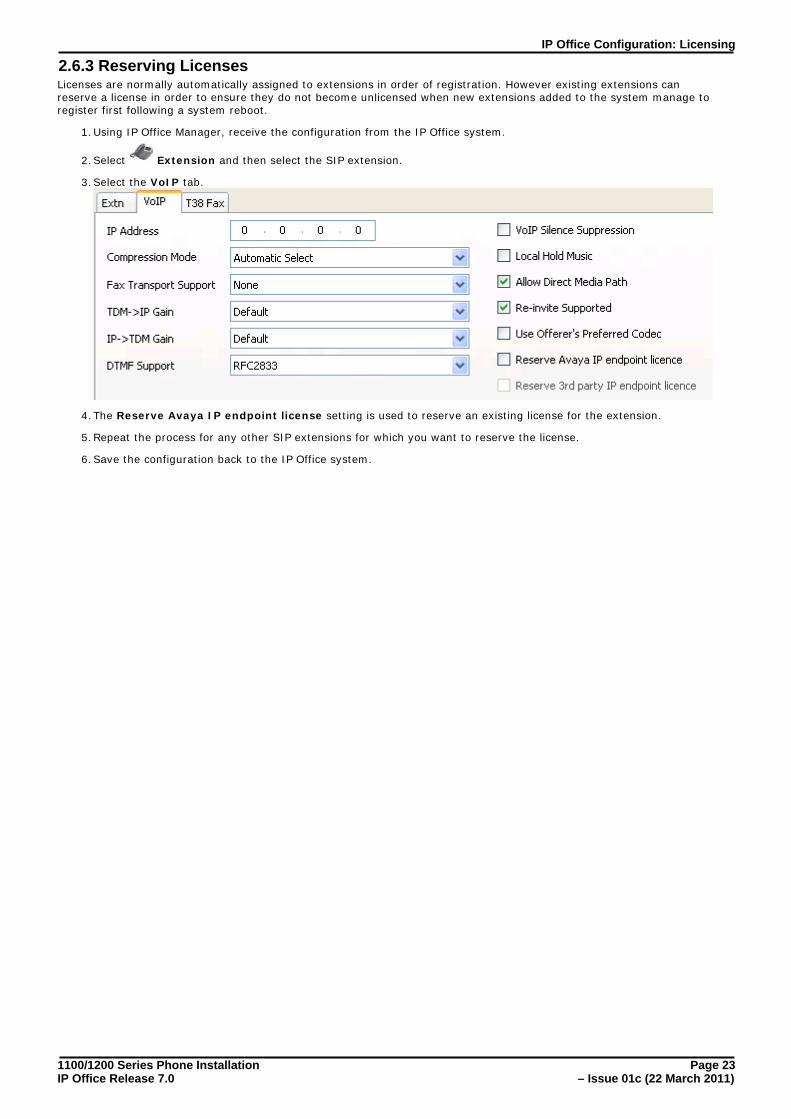
2.6.3 Reserving LicensesLicenses are normally automatically assigned to extensions in order of registration. However existing extensions canreserve a license in order to ensure they do not become unlicensed when new extensions added to the system manage toregister first following a system reboot.
1.Using IP Office Manager, receive the configuration from the IP Office system.
2.Select Extension and then select the SIP extension.
3.Select the VoIP tab.
4.The Reserve Avaya IP endpoint license setting is used to reserve an existing license for the extension.
5.Repeat the process for any other SIP extensions for which you want to reserve the license.
6.Save the configuration back to the IP Office system.


1100/1200 Series Phone Installation Page 25– Issue 01c (22 March 2011)IP Office Release 7.0
Phone Installation
Chapter 3.
1100/1200 Series Phone Installation Page 26– Issue 01c (22 March 2011)IP Office Release 7.0
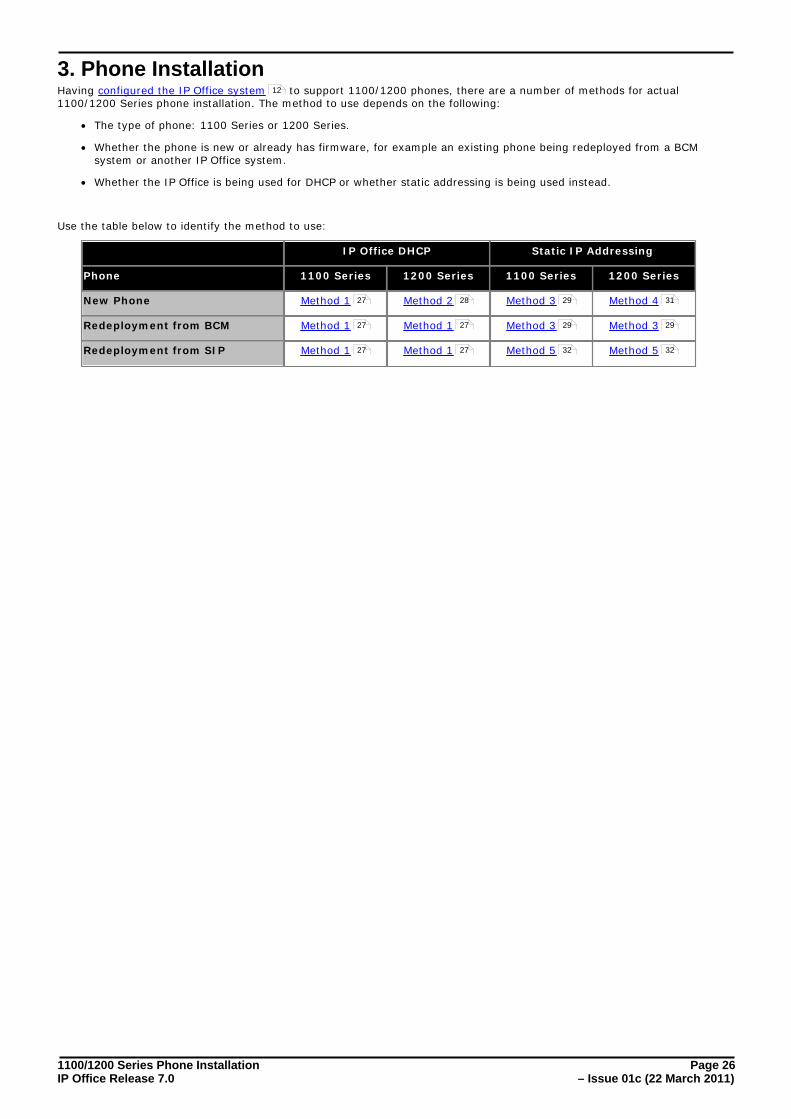
3. Phone InstallationHaving configured the IP Office system to support 1100/1200 phones, there are a number of methods for actual1100/1200 Series phone installation. The method to use depends on the following:
· The type of phone: 1100 Series or 1200 Series.
· Whether the phone is new or already has firmware, for example an existing phone being redeployed from a BCMsystem or another IP Office system.
· Whether the IP Office is being used for DHCP or whether static addressing is being used instead.
Use the table below to identify the method to use:
IP Office DHCP Static IP Addressing
Phone 1100 Series 1200 Series 1100 Series 1200 Series
New Phone Method 1 Method 2 Method 3 Method 4
Redeployment from BCM Method 1 Method 1 Method 3 Method 3
Redeployment from SIP Method 1 Method 1 Method 5 Method 5
12
27 28 29 31
27 27 29 29
27 27 32 32
1100/1200 Series Phone Installation Page 27– Issue 01c (22 March 2011)IP Office Release 7.0
Phone Installation:
3.1 Method 1This method requires the IP Office system to act as both the DHCP and file provisioning server for the phone. Theobjective is then to configure the phone as a DHCP client. It will then learn the IP address, IP netmask, IP gateway and fileprovisioning server parameters from the IP Office DHCP server.
This method applies to:
· New 1100 Series phones.
· 1100 Series and 1200 Series phones being redeployed from a BCM system.
· 1100 Series phones being redeployed from another SIP system.
· 1200 Series phones being redeployed from another SIP system.
1.Connect the phone to the LAN port. If the LAN port supports Power over Ethernet (PoE) the phone will start upimmediately. Otherwise connect a separate power supply.
· The phone comes up with UNISTIM firmware 06XXC7M. The firmware name is briefly displayed on the screenat startup. If an earlier version than C7M is displayed, refer to the recovery process .
· If the firmware name comes up as 04.xx.xx.xx and the terminal has not been reconfigured, it means thephone is already running SIP firmware. If this is suspected not to be IP Office SIP firmware, then it isrecommended to do a factory reset of the phone. Following the factory reset, the User Login prompt shouldshow the IP Office SIP domain on the screen and the user is ready to login; No additional phone configurationis required.
2.Once the phone has booted follow the steps below.
a. Press the Service key (English labeled set) or the globe icon key (icon labeled set).
b.Navigate down to item 3 Network configuration.
c. Soft keys display Apply Auto -- Cancel.
d.Press Auto.
e. Right navigate until you see DHCP Enable.
f. If deselected, select the check box by pressing the Auto soft key.
g.Navigate down to item 12 Provision Server.
h. If deselected, select the check box by pressing the Auto soft key.
i. Press Apply.
3.The phone reboots twice and shows SIP firmware name 04.xx.xx.xx on the second reboot. A set of files getdownloaded by the phone.
a.When the User Login prompt screen shows up and the SIP domain on the screen matches the IP Office IPaddress, the upgrade process is complete. If the SIP domain shows avaya.com then there was a problem withthe value of the option 66 parameter provided by the DHCP server.
b.The SIP phone is ready to login a SIP user.
i. The phone displays ID:. Enter the extension number that the phone should use. You can use the right andleft cursor keys to move the digit entry cursor. Use the up cursor to delete the previous digit.
ii. Press Login.
iii.The phone displays Password:.
iv.If logging in to a pre-configured user/extension , match the IP Office Login Code set for that user.
v. If using the IP Office's Auto-Create Extn/User function, enter 0000.
vi.Press Next twice.
c. The SIP user should now be logged in. If not, then verify the licenses and the user configuration.
34
33
21
1100/1200 Series Phone Installation Page 28– Issue 01c (22 March 2011)IP Office Release 7.0
3.2 Method 2This method requires the IP Office system to act as both the DHCP and file provisioning server for the phone. Theobjective is then to configure the phone as a DHCP client. It will then learn the IP address, IP netmask, IP gateway and fileprovisioning server parameters from the IP Office DHCP server.
This method applies to:
· New 1200 Series phones. These phones come up with a special basic boot loader called BootC.
1.Connect the phone to the LAN port. If the LAN port supports Power over Ethernet (PoE) the phone will start upimmediately. Otherwise connect a separate power supply.
· The phone comes up with Unistim firmware 06XXC7M. The firmware name is briefly displayed on the screen atstartup. If an earlier version than C7M is displayed, refer to the recovery process .
2.Once the phone has booted, the phone asks if you want Manual Configuration?
a. Press the 4 buttons under the LCD from left to right one after the other.
b.The phone displays DHCP? [0=N 1=Y]. Enter 1 to enable DHCP.
c. Navigate down to Provision Server. The phone displays 0.0.0.0.
d.Press the backspace soft key to clear the value. Then enter the IP Address of IP Office, for example192.168.43.1. Press OK.
e. If the phone prompts for a DNS IP address, enter a valid DNS server IP address. If none is available use the IPaddress of IP Office. Press OK.
f. Press Apply.
3.The phone reboots twice and shows SIP firmware name 04.xx.xx.xx on the second reboot. A set of files getdownloaded by the phone.
4.When the User Login prompt screen shows up and the SIP domain on the screen matches the IP Office IP address,the upgrade process is not yet completed. Follow the additional steps below:
a. Press the Service key (English labeled set) or the globe icon key (icon labeled set).
b.Select Device Settings. Enter the default password: 26567*738 (color*set).
c. Navigate down to item 9 Provision Server.
d.Make sure the check box is selected. If not, press Auto.
e. Press Apply.
5.The phone reboots twice and shows SIP firmware name 04.xx.xx.xx on the second reboot. A set of files getdownloaded by the phone.
a.When the User Login prompt screen shows up and the SIP domain on the screen matches the IP Office IPaddress, the upgrade process is complete. If the SIP domain shows avaya.com then there was a problem withthe value of the option 66 parameter provided by the DHCP server.
b.The SIP phone is ready to login a SIP user.
i. The phone displays ID:. Enter the extension number that the phone should use. You can use the right andleft cursor keys to move the digit entry cursor. Use the up cursor to delete the previous digit.
ii. Press Login.
iii.The phone displays Password:.
iv.If logging in to a pre-configured user/extension , match the IP Office Login Code set for that user.
v. If using the IP Office's Auto-Create Extn/User function, enter 0000.
vi.Press Next twice.
c. The SIP user should now be logged in. If not, then verify the licenses and the user configuration.
34
21

1100/1200 Series Phone Installation Page 29– Issue 01c (22 March 2011)IP Office Release 7.0
Phone Installation: Method 2
3.3 Method 3This method manually configures the phone parameters with static values for IP address, IP netmask, IP gateway and fileprovisioning server.
This method applies to:
· New 1100 Series phones.
· 1100 Series phones being redeployed from another SIP system.
· 1200 Series phones being redeployed from another SIP system.
1.Connect the phone to the LAN port. If the LAN port supports Power over Ethernet (PoE) the phone will start upimmediately. Otherwise connect a separate power supply.
· The phone comes up with UNISTIM firmware 06XXC7M. The firmware name is briefly displayed on the screenat startup. If an earlier version than C7M is displayed, refer to the recovery process .
· If the firmware name comes up as 04.xx.xx.xx and the terminal has not been reconfigured, it means thephone is using SIP firmware. If this is suspected not to be IP Office SIP firmware, then it is recommended to doa factory reset of the phone.
2.Once the phone has booted, follow the steps below.
a. Press the Service key (English labeled set) or the globe icon key (icon labeled set).
b.Select item 3 Network configuration.
c. The soft keys display Apply Auto -- Cancel. Press Auto.
d.Right navigate until you see: DHCP Enable.
e. If selected, deselect the check box by pressing the Man soft key.
f. Navigate down to item 9 Provision Server.
g. If selected, deselect the check box by pressing the Man soft key.
h.Press the Cfg soft key.
i. Scroll down through the options until you see DHCP? [0=N 1=Y].
j. Enter 0 to disable DHCP and press the down arrow.
k. Populate: Set IP address, IP netMask and IP gateway values as appropriate to your network (e.g. Set IP =192.168.43.114, Netmask = 255.255.255.0, Gateway=192.168.1.1).
l. Navigate down to Prov:. Enter the IP Address of the IP Office, for example 192.168.43.1. Press OK.
m.Navigate down to Protocol. Check that the protocol is set to TFTP.
n.Press Apply.
3.The phone reboots and shows the SIP firmware name 04.xx.xx.xx. A set of files get downloaded by the phone.
4.When the User Login prompt screen shows up and the SIP domain on the screen matches the IP Office IP address,the upgrade process is not yet completed. Follow the additional steps below.
a. Press the Service key (English labeled set) or the globe icon key (icon labeled set).
b.Select Device Settings.
c. Enter the default password: 26567*738 (color*set).
d.Navigate down to item 9 Provision Server.
e.Make sure the check box is deselected. If not, then press “Man” softkey.
f. Press the Cfg softkey.
g.Navigate down to the Prov: prompt. Validate that the IP address is that of IP Office. Then press the downarrow.
h.For protocol change TFTP to HTTP. Either use the right arrow twice (1200 Series) or use the pull-down menu(1100 Series).
i. Press Apply.
5.The phone reboots twice and shows SIP firmware name 04.xx.xx.xx on the second reboot. A set of files getdownloaded by the phone.
a.When the User Login prompt screen shows up and the SIP domain on the screen matches the IP Office IPaddress, the upgrade process is complete. If the SIP domain shows avaya.com then there was a problem withthe value of the option 66 parameter provided by the DHCP server.
34
33

1100/1200 Series Phone Installation Page 30– Issue 01c (22 March 2011)IP Office Release 7.0
b.The SIP phone is ready to login a SIP user.
i. The phone displays ID:. Enter the extension number that the phone should use. You can use the right andleft cursor keys to move the digit entry cursor. Use the up cursor to delete the previous digit.
ii. Press Login.
iii.The phone displays Password:.
iv.If logging in to a pre-configured user/extension , match the IP Office Login Code set for that user.
v. If using the IP Office's Auto-Create Extn/User function, enter 0000.
vi.Press Next twice.
c. The SIP user should now be logged in. If not, then verify the licenses and the user configuration.
21
1100/1200 Series Phone Installation Page 31– Issue 01c (22 March 2011)IP Office Release 7.0
Phone Installation: Method 3
3.4 Method 4This method manually configures the phone parameters with static values for IP address, IP netmask, IP gateway and fileprovisioning server.
This method applies to:
· New 1200 Series phones. These phones come up with a special basic boot loader called BootC.
1.Connect the phone to the LAN port. If the LAN port supports Power over Ethernet (PoE) the phone will start upimmediately. Otherwise connect a separate power supply.
· The phone comes up with Unistim firmware 06XXC7M. The firmware name is briefly displayed on the screen atstartup. If an earlier version than C7M is displayed, refer to the recovery process .
2.Once the phone has booted, the phone asks if you want Manual Configuration?
a. Press the 4 buttons under the LCD from left to right one after the other.
b.The phone displays DHCP? [0=N 1=Y]. Enter 0 to enable DHCP.
· Populate: Set IP address, IP netMask and IP gateway values as appropriate to your network, for exampleIP = 192.168.43.114, Netmask = 255.255.255.0, Gateway=192.168.1.1.
c. Navigate down to Provision Server. The phone displays 0.0.0.0.
d.Press the backspace soft key to clear the value. Then enter the IP Address of IP Office, for example192.168.43.1. Press OK.
e. If the phone prompts for a DNS IP address, enter a valid DNS server IP address. If none is available use the IPaddress of IP Office. Press OK.
f. Press Apply.
3.The phone reboots twice and shows SIP firmware name 04.xx.xx.xx on the second reboot. A set of files getdownloaded by the phone.
4.When the User Login prompt screen shows up and the SIP domain on the screen matches the IP Office IP address,the upgrade process is not yet completed. Follow the additional steps below:
a. Press the Service key (English labeled set) or the globe icon key (icon labeled set).
b.Select Device Settings. Enter the default password: 26567*738 (color*set).
c. Navigate down to item 9 Provision Server.
d.Make sure the check box is not selected. If not, then press the Man softkey.
e. Press the Cfg softkey.
f. Navigate down to the Prov: prompt. Check that the IP address is that of IP Office. Then press the down arrow.
g.For protocol, change TFTP to HTTP. Either use the right arrow twice (1200 Series) or use the pull-down menu(1100 Series).
h.Press Apply.
5.The phone reboots twice and shows SIP firmware name 04.xx.xx.xx on the second reboot. A set of files getdownloaded by the phone.
a.When the User Login prompt screen shows up and the SIP domain on the screen matches the IP Office IPaddress, the upgrade process is complete. If the SIP domain shows avaya.com then there was a problem withthe value of the option 66 parameter provided by the DHCP server.
b.The SIP phone is ready to login a SIP user.
i. The phone displays ID:. Enter the extension number that the phone should use. You can use the right andleft cursor keys to move the digit entry cursor. Use the up cursor to delete the previous digit.
ii. Press Login.
iii.The phone displays Password:.
iv.If logging in to a pre-configured user/extension , match the IP Office Login Code set for that user.
v. If using the IP Office's Auto-Create Extn/User function, enter 0000.
vi.Press Next twice.
c. The SIP user should now be logged in. If not, then verify the licenses and the user configuration.
34
21
1100/1200 Series Phone Installation Page 32– Issue 01c (22 March 2011)IP Office Release 7.0
3.5 Method 5This method manually configures the phone parameters with static values for IP address, IP netmask, IP gateway and fileprovisioning server.
This method applies to:
· 1200 Series phones being redeployed from another SIP system.
1.Connect the phone to the LAN port. If the LAN port supports Power over Ethernet (PoE) the phone will start upimmediately. Otherwise connect a separate power supply.
· The phone should display F/W Version: 04.xx.xx.xx. if it already has SIP firmware.
· If the phone firmware looks like 06XXC7M, use Method 3 . If an earlier version than C7M is displayed,refer to the recovery process .
· If the terminal displays manual configuration, use Method 4 ).
2.Perform a factory reset of the phone. Once the phone has rebooted, follow the steps below.
a.Select Service key (English labeled set) or globe icon (icon labeled set).
b.Select Device Settings. Enter the default password: 26567*738 (color*set).
c. The soft keys display Apply Auto -- Cancel. Press Auto.
d.Right navigate until you see: DHCP Enable.
e. If selected, deselect the check box by pressing the Man soft key.
f. Navigate down to item 9 Provision Server.
g. If selected, deselect the check box by pressing the Man soft key.
h.Press the Cfg soft key.
i. Scroll down through the options until you see DHCP? [0=N 1=Y].
j. Enter 0 to disable DHCP and press the down arrow.
k. Populate: Set IP address, IP netMask and IP gateway values as appropriate to your network (e.g. Set IP =192.168.43.114, Netmask = 255.255.255.0, Gateway=192.168.1.1).
l. Navigate down to Prov:. Enter the IP Address of the IP Office, for example 192.168.43.1. Press OK.
m.Navigate down to Protocol. Check that the protocol is set to TFTP.
n.Press Apply.
3.The phone reboots and shows the SIP firmware name 04.xx.xx.xx. A set of files get downloaded by the phone.
a.When the User Login prompt screen shows up and the SIP domain on the screen matches the IP Office IPaddress, the upgrade process is complete. If the SIP domain shows avaya.com then there was a problem withthe value of the option 66 parameter provided by the DHCP server.
b.The SIP phone is ready to login a SIP user.
i. The phone displays ID:. Enter the extension number that the phone should use. You can use the right andleft cursor keys to move the digit entry cursor. Use the up cursor to delete the previous digit.
ii. Press Login.
iii.The phone displays Password:.
iv.If logging in to a pre-configured user/extension , match the IP Office Login Code set for that user.
v. If using the IP Office's Auto-Create Extn/User function, enter 0000.
vi.Press Next twice.
c. The SIP user should now be logged in. If not, then verify the licenses and the user configuration.
29
34
31
33
21
1100/1200 Series Phone Installation Page 33– Issue 01c (22 March 2011)IP Office Release 7.0
Phone Installation: Method 5
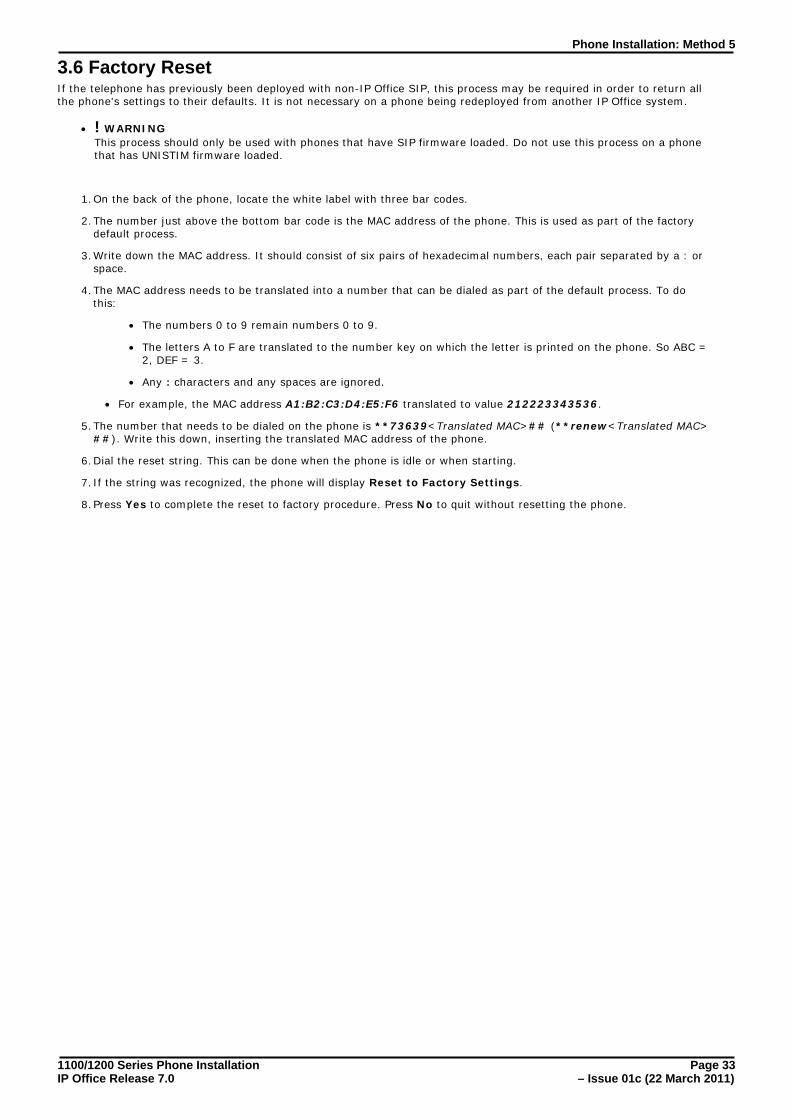
3.6 Factory ResetIf the telephone has previously been deployed with non-IP Office SIP, this process may be required in order to return allthe phone's settings to their defaults. It is not necessary on a phone being redeployed from another IP Office system.
· ! WARNING
This process should only be used with phones that have SIP firmware loaded. Do not use this process on a phonethat has UNISTIM firmware loaded.
1.On the back of the phone, locate the white label with three bar codes.
2.The number just above the bottom bar code is the MAC address of the phone. This is used as part of the factorydefault process.
3.Write down the MAC address. It should consist of six pairs of hexadecimal numbers, each pair separated by a : orspace.
4.The MAC address needs to be translated into a number that can be dialed as part of the default process. To dothis:
· The numbers 0 to 9 remain numbers 0 to 9.
· The letters A to F are translated to the number key on which the letter is printed on the phone. So ABC =2, DEF = 3.
· Any : characters and any spaces are ignored.
· For example, the MAC address A1:B2:C3:D4:E5:F6 translated to value 212223343536.
5.The number that needs to be dialed on the phone is **73639<Translated MAC>## (**renew<Translated MAC>##). Write this down, inserting the translated MAC address of the phone.
6.Dial the reset string. This can be done when the phone is idle or when starting.
7.If the string was recognized, the phone will display Reset to Factory Settings.
8.Press Yes to complete the reset to factory procedure. Press No to quit without resetting the phone.
1100/1200 Series Phone Installation Page 34– Issue 01c (22 March 2011)IP Office Release 7.0
3.7 Recovery ProcessThe two processes below can be used to attempt to recover a phone to a known state in order to upgrade or install. TheBootC method is preferred as it can be used on all supported 1100 and 1200 Series phones. The second method can beused with phones that already have Unistim firmware but which is an earlier than firmware version than 06XXC7M.
Invoking the BootC Loader1.Power off the phone.
2.Press and hold the keypad 2 button and the up arrow.
3.Connect the phone power (either through PoE or power adapter) while the buttons above for about 7 seconds whilethe phone is powered up.
· On a 1100 Series phone, release the buttons immediately after the blue and red light go off.
· On a 1200 Series phone, release the button immediately Loading BootC is displayed.
4.After releasing the buttons, the phone screen shows Manual configuration. Here you have 2 options:
· Option 1 - Upgrade Firmware and Settings Press the 4 soft keys consecutively one after the other from left to right. This will enter the configuration menuwhere you can configure the DHCP/static IP address and provisioning server parameters. The parameters canbe configured as per Method 2 (DHCP) or Method 4 (static addressing) depending if DHCP is used ornot.
· Option 2 - Resume Previous Operation Let the phone continue its boot up process. The phone will resume its previously configured parameters andfirmware.
28 31
1100/1200 Series Phone Installation Page 35– Issue 01c (22 March 2011)IP Office Release 7.0
Phone Installation: Recovery Process
Loading Unistim C7M FirmwareIn this process we use a TFTP file server to upgrade the Unistim firmware already on a phone to Unistim firmware 06XXC7M. The firmware is includes as part of the installation of IP Office Manager for IP Office Release 7.0 and higher. IPOffice Manager can also be used as a TFTP server if one is not available.
1.Prepare the TFTP Server:
· If using IP Office Manager:
a.Start IP Office Manager:
b.Select File | Preferences.
c. On the Preferences tab, check that Enable BootP and TFTP Servers is selected.
d.On the Directories tab, note the current setting of the Binary Directory (.bin files) file path. Changethe path to C:\Program Files\Avaya\IP Office\Manager\IPSET-UNISTIM-C7M.
e. Click OK.
f. Leave IP Office Manager running.
· If using another TFTP Server:
1.Copy the files from C:\Program Files\Avaya\IP Office\Manager\IPSET-UNISTIM-C7M to the rootfolder of the TFTP server.
2.Check that the TFTP server application is running.
2.Enter the phone configuration menu:
a.Either press the Services button twice or use the BootC procedure above.
b. If prompted for a password, try 26567*738 (color*set).
c. In the configuration menus, manually configure the provisioning server to the IP address of the PC running theTFTP server (that is IP Office Manager) and apply the settings. If using the SIP firmware configuration menu,make sure to configure the provisioning server protocol to TFTP. If using the SIP firmware, this protocol settingappears when OK is pressed after entering the provisioning server IP address.
3.The phone reboots and attempts to do a TFTP download to the TFTP server IP address. The phone will download the.cfg and .bin files appropriate to the phone type and then reboot.
· If the TFTP download does not work, try disabling the firewall on the PC.
· If still not working, use Wireshark to trace the TFTP traffic coming to the PC IP address. Verify that the DHCPsettings or the static IP address used by the IP set can reach the PC IP address.
4.After one or two consecutive reboots the phone will show Contacting S1… followed by Server unreachable.
5.The IP set is now loaded with Unistim C7M firmware that is supported for the upgrade process to IP Office firmware. Enter the configuration menu by following Method 1 (DHCP) or Method 3 (static addressing) for the
Unistim to SIP migration procedure.
· If using IP Office Manager:
a.Select File | Preferences.
b.On the Preferences tab, disable Enable BootP and TFT Servers is it was only enabled for this process.
c. On the Directories tab, change the Binary Directory (.bin files) path back to its original settings(normally C:\Program Files\Avaya\IP Office\Manager).
26 27 29


1100/1200 Series Phone Installation Page 37– Issue 01c (22 March 2011)IP Office Release 7.0

1100/1200 Series Phone Installation Page 38– Issue 01c (22 March 2011)IP Office Release 7.0
Performance figures and data quoted in this document are typical, and must bespecifically confirmed in writing by Avaya before they become applicable to anyparticular order or contract. The company reserves the right to make alterationsor amendments to the detailed specifications at its discretion. The publication of
information in this document does not imply freedom from patent or otherprotective rights of Avaya or others.
All trademarks identified by the ® or ™ are registered trademarks or trademarks,respectively, of Avaya Inc. All other trademarks are the property of their
respective owners.
This document contains proprietary information of Avaya and is not to bedisclosed or used except in accordance with applicable agreements.
© 2011 Avaya Inc. All rights reserved.


