IP Telephony Contact Centers Mobility Services T3 Basic – Analog Phone Bedienungsanleitung Operating Instructions Notice d’utilisation Istruzioni d’uso Manual de manejo Bedieningshandleiding Руководство пользователя
Transcript
IP Telephony
Contact Centers
Mobility Services T3 Basic – Analog Phone
Bedienungsanleitung
Operating Instructions Notice d’utilisation Istruzioni d’uso Manual de manejo
Systems to which the telephone may be connectedThis telephone may only be connected to telecommunication systems fromTenovis. It must not be connected directly to a public telephone network.
Declaration of ConformityWe, Avaya−Tenovis GmbH & Co. KG, declare that the T3 Basic telephone fulfillsthe basic requirements and other relevant provisions stipulated in the Directive1999/5/EU (Radio and Telecommunication Terminal Equipment, R&TTE).This telephone is designed for connection to analogue ports on Avaya−Tenovistelecommunication systems and fulfills the basic requirements in compliance withthe EU Directive 1999/5/EU (Radio and Telecommunication Terminal Equipment,R&TTE). The telephone has not been designed for operation on ports connected topublic telecommunication networks.If problems occur during operation, please contact the sales outlet where youpurchased the equipment or the Avaya−Tenovis Service department.The Declaration of Conformity can be viewed at the following Internet address: www.tenovis.com/deutsch/verzeichis/conformance.htm or search using“Conformity” as the key word.
Telephone installation locationPlace the telephone on a non−slip surface, taking particular care when placing on newor recently polished furniture. Paints and cleaning agents can contain substanceswhich soften the footpads of the telephone and the softened footpads could leaveunwanted marks on the surface of furniture. Avaya−Tenovis does not assume liabilityfor such damage.Select a location which is protected from direct sunlight.The telephone is designed for use in rooms indoors with a temperature range from−10 °C to 50 °C.Choose an installation location so that even when the telephone cord is at full length,the telephone cannot be moved to areas subject to moisture, such as bathtub, showerand wash basin. Prevent it being placed in the vicinity of sources of heat, such asradiators.Do not use the telephone in potentially explosive areas. Prevent excessive exposureto smoke, dust, vibration, chemicals, humidity, heat or direct sunlight.
Continued
19
Important Information
Material suppliedCheck that all the parts are enclosed after opening the package. It contains:
− a telephone base− a receiver− a coiled cord for the receiver− a telephone line connection cable (UAE)− this instruction manual
Notes on disposalThe implementation of European law in national laws and directives obliges you todispose of consumer goods appropriately. This serves to protect persons and theenvironment.
The adjacent symbol indicates that old electrical and electronic devices and batteries must be disposed of separately from domestic waste.Equipment which is old or no longer in service must be disposed of at the collection point provided by the appropriate public waste disposal authority.Batteries and power packs must be disposed of at the sales outlet or the appropriate pubic waste authority collection point who provide the necessary container.Packaging material must be disposed of according to local regulations.
Familiarizing Yourself with the Telephone
20
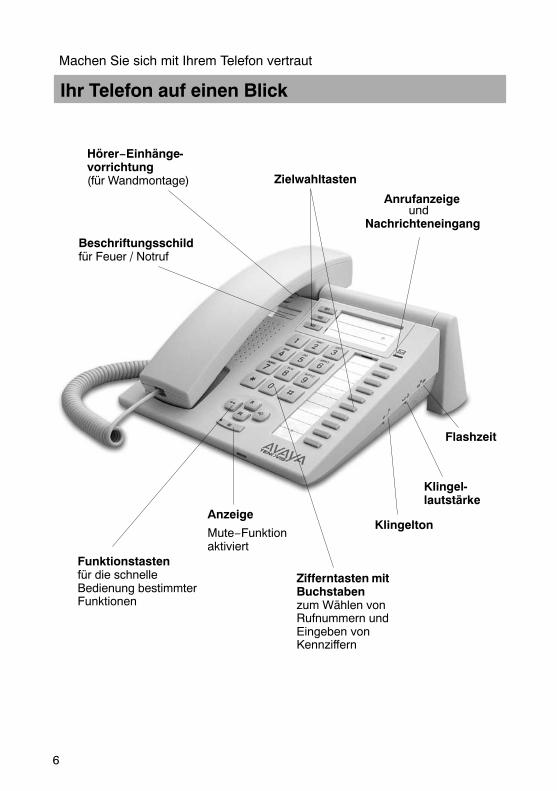
Your Telephone at a Glance
Digit keys with lettersto dial phone numbers andenter codes
Function keysfor direct access tocertain functions
One−touchdialling keys
Labelsfor emergency numbers
Call indicator
Flashtime
Ringingvolume
Ringingmelody
Receiver hook(for wall installation)
Indicator lampmuting functionactive
and message waiting indication
Familiarizing Yourself with the Telephone
21
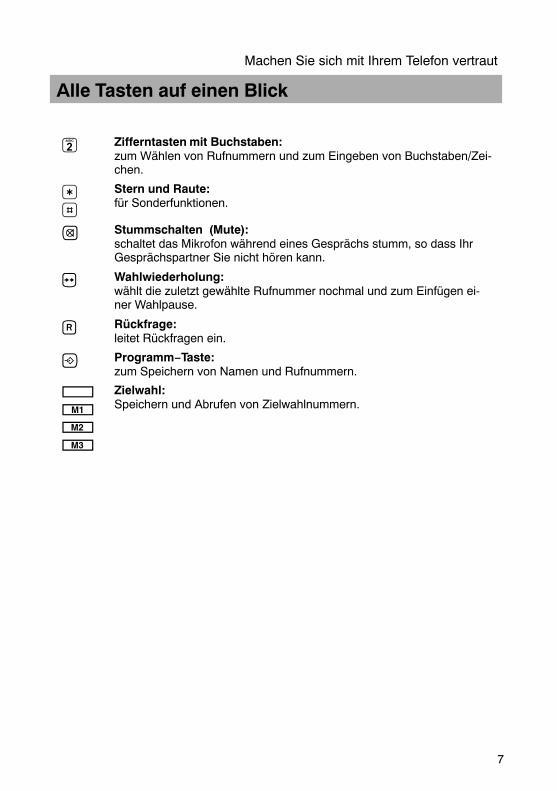
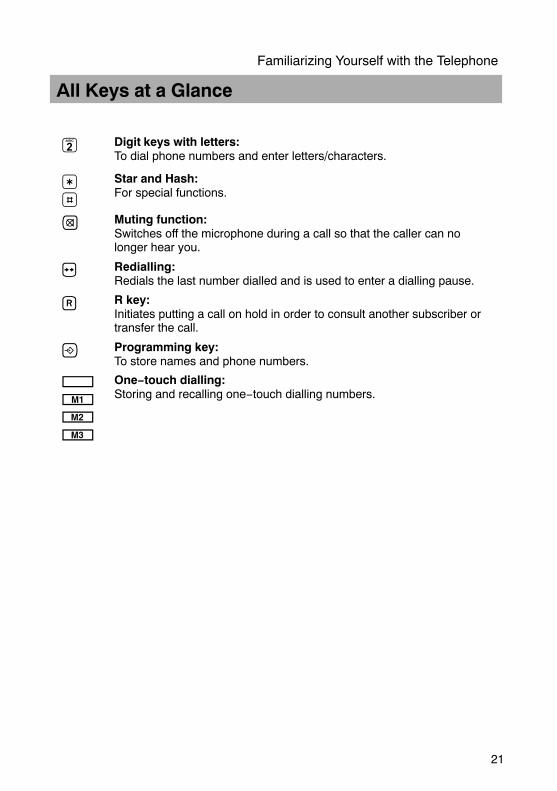
All Keys at a Glance
� Digit keys with letters:To dial phone numbers and enter letters/characters.
��
Star and Hash:For special functions.
� Muting function:Switches off the microphone during a call so that the caller can no longer hear you.
� Redialling:Redials the last number dialled and is used to enter a dialling pause.
� R key:Initiates putting a call on hold in order to consult another subscriber ortransfer the call.
� Programming key:To store names and phone numbers.
��
One−touch dialling:Storing and recalling one−touch dialling numbers.
Familiarizing Yourself with the Telephone
22
Starting Up
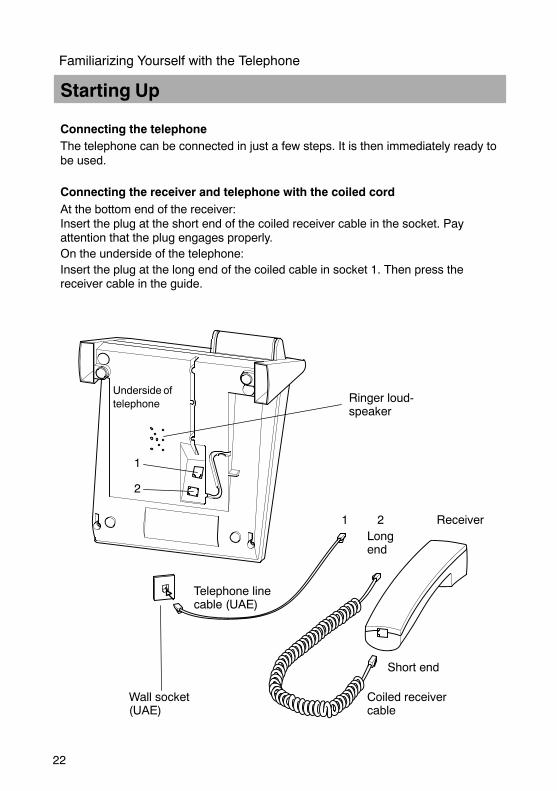
Connecting the telephoneThe telephone can be connected in just a few steps. It is then immediately ready tobe used.
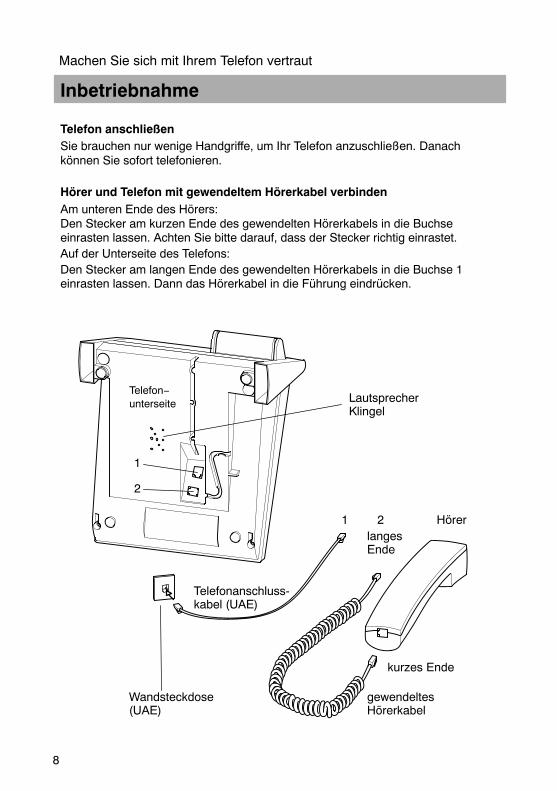
Connecting the receiver and telephone with the coiled cordAt the bottom end of the receiver:Insert the plug at the short end of the coiled receiver cable in the socket. Payattention that the plug engages properly.On the underside of the telephone:Insert the plug at the long end of the coiled cable in socket 1. Then press thereceiver cable in the guide.
Underside oftelephone
2Longend
1
Short end
Receiver
Coiled receivercable
Wall socket (UAE)
Telephone line cable (UAE)
1
2
Ringer loud-speaker
Continued
Familiarizing Yourself with the Telephone
23
Starting Up
Connecting the telephone to the telephone line cableConnect a plug at the end of the telephone line cable in socket 2. Then press thecable in the guide.Insert the plug at the other end of the telephone line cable in the wall socket / UAE.
Setting the callback function (Flash time)
Set the sliding switch at the side of the telephone to the “100 ms” setting(short Flash).
LabelsLabels are available on the telephone with which to label the phone numbersassigned to the one−touch keys and for emergency service numbers.To print a label:Prize the cover up at the tab using your fingernail then remove the label.To reinsert the printed label:Insert the printed label, slide the cover into place and press down on the other sideuntil it snaps into place.
Wall assemblyThe telephone is also suitable to be installed on a wall. You need the optionallyavailable wall bracket for T3 telephones to do this. In order to prevent the receiverfrom falling when placed on−hook, the receiver cradle is equipped with a smallhook device. Use a small screwdriver to turn the hook device 180° until a smallhook is produced at the top end.
Telephoning
24
Telephoning as Normal
Taking callsThe telephone rings as soon as a call is received. The call can be taken by liftingthe receiver.
Incoming calls are also indicated by a flashing lamp (below the � symbol).
Making callsLift the receiver and wait for the dialling tine.
�..� Dial the phone number you require.Replace the receiver to end the call.
RediallingIf the number you dial is engaged or no−one answers the call, replace the receiver.The last number dialled with maximally 32 digits is automatically stored in thetelephone.
Lift the receiver.
Press �. The phone number stored in the redialling memory is redialled.
Dialling pauseIn the case of some private branch exchanges, there is a short pause betweendialling the number for the outside line (usually 0 or 9) and hearing the dialling tone.When dialling manually, this pause can be entered so that the following phonenumber is not dialled too quickly.
Lift the receiver.Dial the number for an outside line.
Press �. Dial the actual phone number required.After dialling the number for the outside line, the telephone then waits 3 secondsbefore dialling the actual phone number.This dialling pause is also stored in the redialling and one−touch dialling functions.
Continued
Telephoning
25
Telephoning as Normal
Callback and transferring callsDepending on the telephone line connection, it is possible to put a call in progresson hold to consult another subscriber or transfer the call to another subscriber. Alsorefer to the operating instructions for your telephone system.
You are in the middle of a call.
Press � to initiate the callback function. The caller is put on hold.
�..� Dial the number of the subscriber you wish to contact.You are consulting with the second caller.
Option 1
Press � to end the callback function. Continue the call with the first caller.
Option 2Inform the second subscriber you are connecting the first caller.Transfer the call by replacing the receiver.
Muting function
Use the Muting key � to switch off the microphone in the receiver during a call.You can then consult with someone nearby without the caller being able to hear butyou can still hear the caller because the loudspeaker in the receiver remains on.
After pressing the Muting button � once, the microphone is switched off and the
indicator lamp � lights up.
After pressing the Muting button � again, the microphone is switched on again
and the indicator lamp � goes out; continue with the call as normal.
� It is also possible to forward calls without giving advanced notice as soon as thetelephone of the subscriber called rings.
Telephoning
26
Convenience and Special Functions
One−touch dialling
The telephone is equipped with 13 one−touch dialling memories ( and ,
�, �) in which to store frequently used phone numbers. You only thenneed to press the respective key to dial the phone number assigned to it.
Storing and modifying one−touch dialling phone numbersLift the receiver and wait for the dialling tine.
Press �.
�..� Enter the phone number to be stored and assigned to this key (max.16 digits).
Press the one−touch dialling key in which the phone number should bestored. A new entry deletes a number already assigned to a specific one−touchdialling key.
Making calls with the one−touch dialling keysLift the receiver and wait for the dialling tine.
Press the one−touch dialling key to which the phone number required isassigned; the number is dialled.Replace the receiver to end the call.
Message waitingIf the telephone is integrated in a hotel telephone system, for example, the LED canbe activated from a central exchange to indicate a message has been left for you.Lift the receiver and the message is played. On replacing the receiver, the LEDgoes out.
Telephoning
27
Ringing Tone
Setting the ringing tone volumeThe telephone has three different volume levels for the ringing tone (low/mid/high).
Adjust the volume setting to the one required by means of the sliding switch �at the side of the telephone.
Setting the ringing melodyThe telephone has three different ringing melodies available for selection. Adjustthe ringing melody setting to the one required by means of the sliding switch �at the side of the telephone.
Suitability for hearing aidsThe telephone is suitable for hearing aids. Select T mode on the hearing aid, asnecessary, to activate the function.
Refer below as necessary
28
Troubleshooting
Not every fault necessarily means the equipment is defect. Maybe one of the tipsbelow can help make the telephone operational again. Refer to the faults below andcheck the causes and corrective action according to the operating manual.
Fault Possible Cause Corrective Measures
Receiver lifted, nodialling tone.
Telephone line or re-ceiver cable not pluggedin correctly.
Connect telephone line andreceiver cable properly.
No calls. Receiver is not placedon−hook properly.Ringing tone is set tooquiet.
Place receiver properly on thehook.Increase the ringing volume.
In PBX systems:No or incorrect con-nection after diallingfrom a memory, e.g.one−touch dialling.
Number for an outsideline not dialled.
Enter the number for an out-side line, inserting a diallingpause if necessary.
� key does notwork.
Flash time is set incor-rectly.
Use the sliding switch to ad-just the Flash time.
Red LED lights upcontinuously when inStandby.
The a/b connection wireson the telephone lineconnection have beenmistakenly swappedover.
The a/b wires in the UAEmust be changed over.Please contact the Avaya−Tenovis Service department.
Фиксатор трубки (для инсталляции на стену) Клавиши прямого набора
Этикетки
Индикатор вызова
для экстренных номеров
или сообщения на голосовом сервере
Длительность импульса удержания Индикатор
отключения микрофона
Уровень громкости звонка
Мелодия звонка
Клавиша повторного набора Цифровые клавиши с буквами для набора
номера и ввода кодов
*
W
R
$
P M N O
#
Обзор всех клавиш
Цифровые клавиши с буквами: для набора номера и ввода букв/символов. «Звезда» и «решётка»: для специальных функций.
Выключение микрофона: выключает микрофон во время разговора, если вы не хотите, чтобы Вас слышали. Повторный набор: повтор последнего набранного номера, включая использованные паузы. Клавиша удержания: инициирует постановку вызова на удержание для консультации с другим абонентом или перевода вызова. Режим программирования: для ввода в память телефонных номеров и имён (для аппаратов с дисплеем). Клавиши прямого набора: прямой набор введённых в память телефонных номеров. 89
Включение
Подключение телефонаТелефон подключается в несколько шагов. После этого он немедленно готов кработе.
Подключение трубки к телефону Включите витой кабель стороной с коротким участком до вилки в разъём на нижней части трубки, а стороной с длинным участком – в разъём 1 на нижней крышке телефонного аппарата. Убедитесь в надёжности подключения.
Нижняя крышка телефонного аппарата
Динамик звонка
1
2
1 2Длинный участок
Трубка
Кабель телефонной линии (UAE)
Короткий участок
Настенная розетка(UAE)
Витой кабель трубки
90
Включение продолжение
Подключение линейного кабеля к телефону Включите вилку линейного кабеля в розетку 2 на нижней крышке телефонного аппарата. Затем уложите кабель в кабельный канал крышки телефона. Включите другой конец кабеля в настенную розетку UAE.
Настройка функции обратного вызова (Flash) Установите ползунок переключателя на боковой панели телефона в положение “100 ms” (короткий Flash).
Этикетки Этикетки, устанавливаемые в телефон, используются для указания телефонных номеров, назначенных на целевые клавши, и для указания номеров аварийных служб. Установленные на аппарате этикетки закрываются гибкими прозрачными пластинами, которые для маркировки этикеток можно извлечь ногтём.
Настенный монтаж Телефонный аппарат может также монтироваться на стену. Для этого Вам необходим опционально доступный набор для настенного монтажа для аппаратов серии T3. Для предотвращения выпадения трубки ниша, в которой помещается верхняя часть трубки, оборудована специальной удерживающей защёлкой, которую необходимо при помощи небольшой отвёртки повернуть на 180°.
91
.
.
Работа в нормальном режиме
Приём вызоваПри поступлении вызова телефон звонит.
Вызов принимается поднятием трубки.
Входящие вызовы индицируются также миганием светодиода
Исходящий вызов
Снимите трубку и дождитесь сигнала готовности станции. Наберите телефонный номер, используя клавиши 0..9. По окончании разговора положите трубку на рычаг.
Повторный набор
Если набранный Вами номер не отвечает или занят, положите трубку на рычаг. Последний набранный номер до 32 цифр автоматически занесётся в память телефона. Снимите трубку.
Нажмите
Занесённый в память повторного набора номер будет снова набран.
Пауза при набореПауза при наборе бывает необходима, например, при занятии
внешней линии, когда нужно дождаться готовности удалённой станции. Снимите трубку. Наберите код занятия внешней линии.
Нажмите . Далее наберите актуальный телефонный номер. 92
( ,
е
Расширенные функции
Набор одной клавишейТелефон оборудован 13 клавишами прямого набора и и , память которых содержит используемые телефонные номера. Для набора номера вы должны только нажать кнопку, в память которой этот номер занесён.
Запись и изменение телефонных номеров на клавишахпрямого набора
Снимите трубку и дождитесь сигнала готовности станции. Нажмите Используя 0..9 , введите необходимый телефонный номер (макс. 16 цифр) Нажмите соответствующую ему клавишу прямого набора . Положите трубку.
Новый ввод стирает предыдущую запись на данной клавише.
Исходящий вызов при помощи клавиши прямого набора
Снимите трубку и дождитесь сигнала готовности станции. Нажмите клавишу прямого набора , на которую записан нужный номер. Номер будет набран. По окончании разговора положите трубку.
Сообщение на голосовом сервере
Если аппарат подключён к офисной (учрежденческой) АТС, оборудованной сервером голосовых сообщений, Ваша АТС при помощи активации индикатора может автоматически информировать Вас о том, что на сервере для Вас имеется голосовое сообщение. Снимите трубку и прослушайте голосовое сообщение. После того, как Вы положите трубку, индикатор погаснет. 93
Уровень и мелодия звонка
Установка уровня громкости звонка Аппарат имеет три различных уровня громкости звонка (низкий/средний/высокий). Регулировка уровня производится перемещением переключателя на правой боковой панели аппарата.
Установка мелодии звонкаАппарат имеет возможность выбора трёх различных мелодий звонка. Выбор мелодии производится перемещением переключателя на правой боковой панели аппарата. . 94
Возможные неисправности
Не каждая неисправность вызвана дефектом аппарата. Возможно, один из пунктов нижеследующего списка поможет Вам восстановить работоспособность аппарата.
Ошибка Возможная причина Мероприятия по устранению
Подключите трубку и линейный кабель правильно.
Трубка снята, но зуммера не слышно.
Некорректно подключен линейный кабель или трубка.
Положите трубку.Увеличьте громкость звонка.
Нет звонка. Плохо положена трубка. Выключен звонок.
В телефонной станции: Нет или некорректный набор из памяти целевых кнопок.
Не работает клавиша . Постоянно горит красный индикатор.
Нет набора во внешней линии. Некорректно время Flash.
Неверная полярность подключения телефонной линии.
Введите код занятия внешней линии. Добавьте, если необходимо, паузу при наборе после кода занятия. Используя ползунок переключателя на боковой панели, настройте таймер Flash. Поменять провода телефонной линии в розетке UAE. Пожалуйста, обратитесь в сервисный центр Avaya− Tenovis.