17
1 iPhoto with a Twist North Syracuse Central School District Enhancing Teaching Through Technology Fall 2010 Presented by Linda Kurdziel Integration Technology Specialist

1
iPhoto with a TwistNorth Syracuse Central School District
Enhancing Teaching Through Technology
Fall 2010
Presented byLinda Kurdziel
Integration Technology Specialist

2
iPhoto with a TwistOpening iPhoto for the First Time
• Uncheck the box. You can always get the Welcome to iPhoto back by clicking Help in the Menu Bar.
• Click YES to both.• Not all cameras have GPS settings• Can set locations manually
North Syracuse Central School DistrictFall 2010

3
Importing Photos
Importing from the CD• Insert CD on right side of iMAC. The CD appears on Desktop. Double Click to open CD.• There is one folder called iPhoto class. Double click to open the folder on the CD.• There are six sub-folders. We are going to transfer three folders into iPhoto
• EETT Training Movies• EETT Training Lab Pics• iPhoto Edit Pict
• Drag each folder to the viewing area (big gray area)• What is happening? Hopefully something is!
IMPORTANT to KNOW! BACK to CD to GET INFO!• Open the folder titled EETT Sample Slideshows - there are four files• Question: How do we find out information about those files including how big they are?• Right Click (RC) on the first file - and click on Get Info• A hugh Get Info window opens. Why is this so important?BACK to Right Click MenuWhat else can you learn from the RC menu?
For this class, we are importing pictures and video from a CD.• Pictures and video can be
imported from multiple types of digital cameras, movie cameras, Flip cameras and from the Internet.
• Open iPhoto from the DOCK

4
Get to Know the iPhoto Screen
Create Information Enter full Screen
Edit/organize tools
above
Product to create Size bar for pictures
• Blue/gray pane (Source List) on left of pictures is very important. Shows your Library, Recent, Albums, Keepsakes when created and picture info section.
• iPhoto has its own trash bin. Delete from there not from computer Dock.• Yellow frame around picture indicated picture is selected. Can have one - more than one - or all
pictures selected. • Look at the Source List. What pictures are we viewing?
The Inspector symbol appears on the picture you have highlighted. Click the symbol and the picture flips around and you can enter information You can rate a picture (stars), change title and identify locations.

5
Working with Events
The Event thumbnails represent a collection of photos usually related to each other.• Camera imports Events by dates, but you can organize events to fit your purposes.• Events can be Split, Merged and Reordered.• To skim an event with multiple pictures, move mouse horizontally across Event.
• If thumbnails are too small use size bar at right bottom of screen.• When an Event is open and all images are visible, top bar of viewing area shows name
and date of event. • You can change the name of the Event by clicking on it, it turns blue then type
Lets practice Split and Merge• Click on first picture of the new Event > click Split.
• You can name new Event• Click on first of pictures to merge > Click Merge• Merge the EETT Training Movies and EETT Training Lab Picts into one large Event.
• Click and drag movies on to the picts and they merge. Rename EETTTIP:A photo or movie can only be in one Event at a time but can be in multiple albums. You can move them between Events.

6
Preparing Events - Letʼs Get Organized
Organize Photos• Open the EETT Event and organize
photos and movies. Click and drag items to correct spot.
• Rename two or three of the picture/movie titles under each picture.
Adding Descriptions• We are also going to add descriptions to
two or three of the items - show up in some iPhoto slideshows.
• Single Click on photo - yellow border. Click on the symbol.
• The Information pane appears at bottom of the Source List. Type a good description in the box.

7
Viewing the Entire Photo Library
• Click Photos in Source List on left of viewing area.• If picture titles do not appear under the photo or movie - Choose View > Titles from iPhoto
Menu Bar• If you also want to see the Event titles - Choose View > Event Titles from Menu Bar
• Click size slider to resize the photos.
• Click on one or two picture titles and change them.
TIP: Selecting Photos to Move
• Shift - Click: Selects pictures in a row.
• Command - Click: can choose selected pictures - not in order
• Command - A: select all

8
Editing Pictures
Open Picture• Go to Event View - Open iPhoto Edit Pic• Double click on picture to open.• Enlarge photo by sliding size bar.
Editing Picture: Click on Edit tool below picture• Click Enhance from Edit tools below picture. Not happy - then • Click on Adjust tool and work with both the pointers under the graph or use the slider bars to adjust your picture. • Click on Crop, remove the people and tree.
• What is the best way to crop this picture?• How many crops would work best. Remember to click DONE.
TIP:• Duplicate picture: You can right click on the picture before you begin, choose duplicate
and make a back-up.

9
Creating Albums
Albums are similar to playlists on iTunes. They help organize your items into smaller more focused bundles. Albums help when creating Slideshows and Keepsakes in iPhoto and help to organize when preparing to create an iMovie. A photo or movie can be in multiple albums.
Making a Photo Album: 3 ways• Go to Menu bar > File > New Album; type the name EETT; click Create and it appears appears in
the Source List• In Picture view - click on pictures you want in new album. Go to Menu bar > File > New Album from
Selection; same as above• Click on the + at the bottom of the Source List - follow directions above.
Moving Pictures to an Album• Drag the merged EETT Event to the new EETT album• Better to organize in the Album area• You can also drag an EVENT to the Album area and one is created.
10
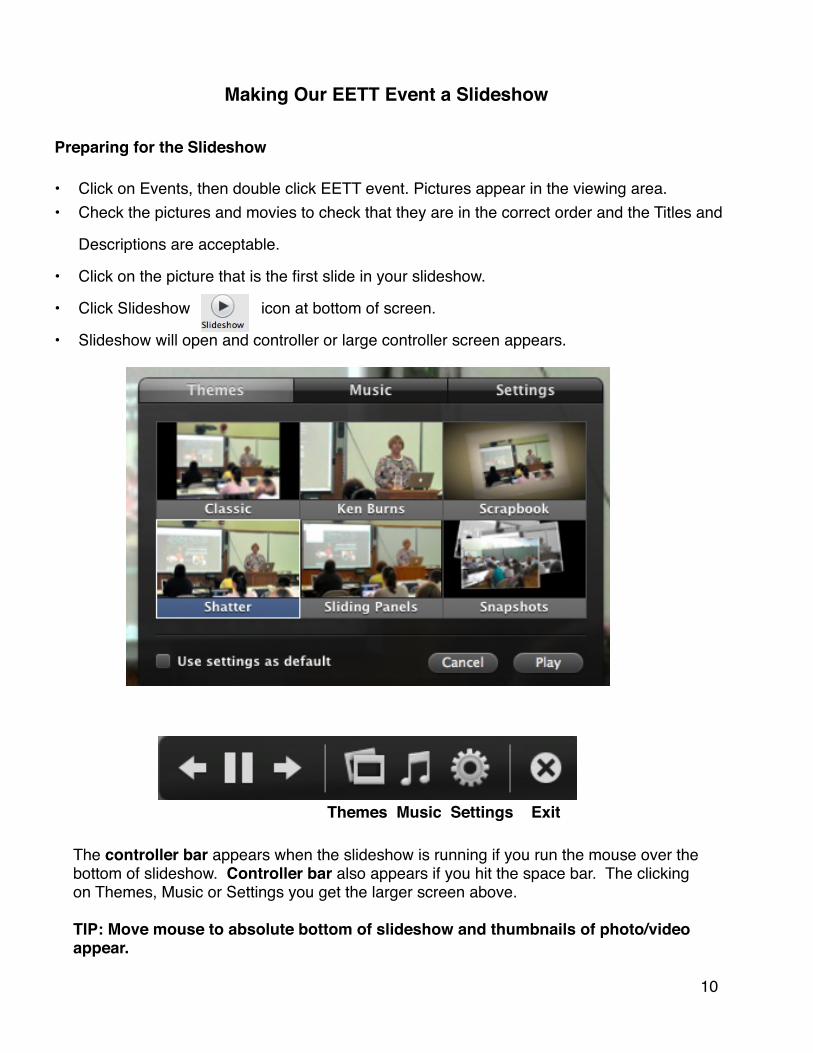
Making Our EETT Event a Slideshow
Themes Music Settings Exit
Preparing for the Slideshow
• Click on Events, then double click EETT event. Pictures appear in the viewing area.• Check the pictures and movies to check that they are in the correct order and the Titles and
Descriptions are acceptable.
• Click on the picture that is the first slide in your slideshow.
• Click Slideshow icon at bottom of screen.
• Slideshow will open and controller or large controller screen appears.
The controller bar appears when the slideshow is running if you run the mouse over the bottom of slideshow. Controller bar also appears if you hit the space bar. The clicking on Themes, Music or Settings you get the larger screen above.
TIP: Move mouse to absolute bottom of slideshow and thumbnails of photo/video appear.
11
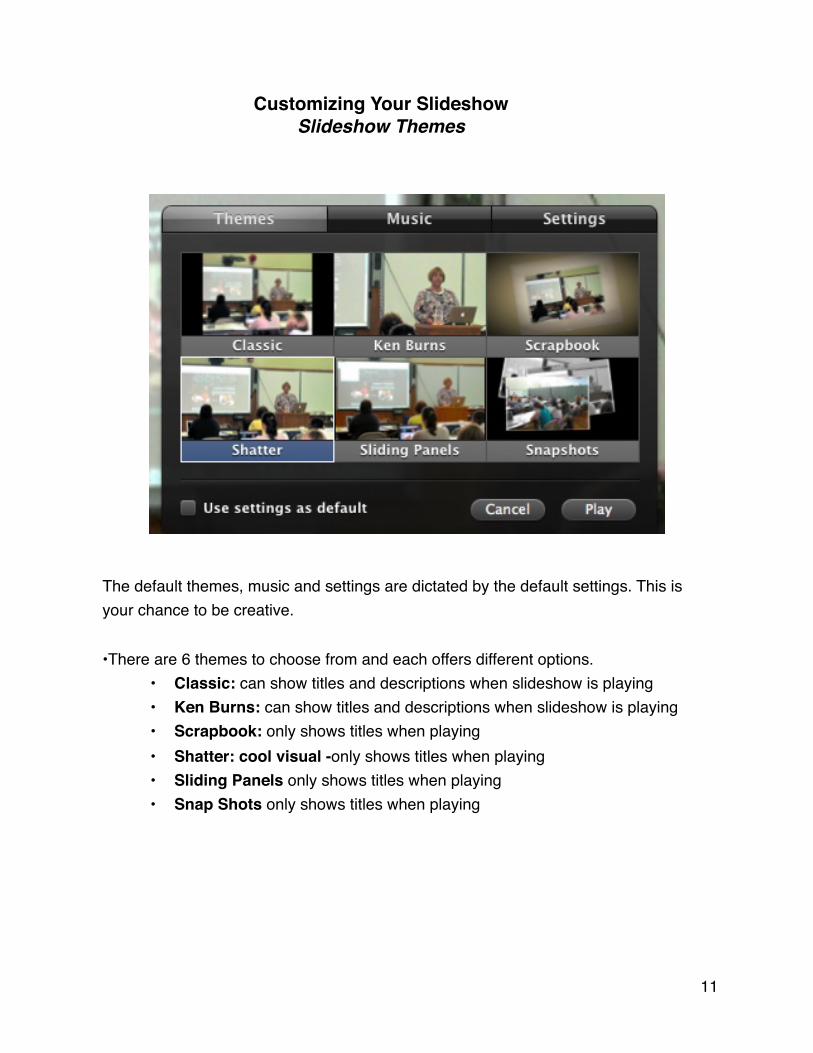
Customizing Your SlideshowSlideshow Themes
The default themes, music and settings are dictated by the default settings. This is your chance to be creative.
•There are 6 themes to choose from and each offers different options. • Classic: can show titles and descriptions when slideshow is playing• Ken Burns: can show titles and descriptions when slideshow is playing• Scrapbook: only shows titles when playing• Shatter: cool visual -only shows titles when playing• Sliding Panels only shows titles when playing• Snap Shots only shows titles when playing

12
Customizing Your SlideshowSlideshow Music
iPhoto has a list of music samples to choose from. You can also choose from songs in iTunes.• Click drop down in the Source menu.• Choose song, click on Play, song changes.
The songs you put into iTunes are specifically for your account on that specific machine.
iTunes can be added by importing from a CD plus songs can be brought in on a Flash Drive.
Caution: iTunes will prohibit some songs from being moved from machine to machine.

13
Customizing Your SlideshowSlideshow Themes
There are multiple setting options• Choose length of seconds each slide should appear. • If you choose to fit slide to music, the slides adjust to the length of the music. 2 minute
song with 10 slides is 12 seconds per slide. • Transitions are fun! Pick one and see an example.• Show Caption is an important check: This is where you can pick titles and descriptions to
appear in the slideshow. Both only show in Classic and Ken Burns themes.• Choose other settings that fit your use of slideshow.

14
Saving & Sharing a SlideshowExporting
Once your students creation is complete, they have to share their product with you and possibly with the class. So, we have to figure out the best way to move the slideshow from the machine they are working on to you and to the teacher station to present. The BIGGEST concern is the SIZE of the file. It would be helpful if students had flash drives to store their products.
Lets Export• Go to iPhoto Menu and click File• Scroll to Export and click• The screen below appears.Exporting Photos• This screen has multiple offerings• After testing all the settings try
• Slideshow - Medium size• Shows the Titles and Descriptions• The 16 picture EETT Slideshow was
13.3 MB .m4V file (MPEG 4 - video file)• Can send copy to iTunes - good idea?

15
Saving & Sharing a SlideshowExporting - Quicktime
You can also choose a Quicktime movie from same screen above.• A Quicktime Movie does not show the Titles and Descriptions• The same EETT Slideshow turns into a 2.8 MB Quicktime movie.
• Transferring Files from Students to Teachers - Your Ideas

16
Capturing Pictures from the Internet
• Opening Choices:• Right click (Control - mouse click) on picture• Choose where and how you want to save/capture the image.
• Add Image to iPhoto: • Good idea when gathering files and organizing for future project - not good if
students want to work at home or in PC lab. Image can be transferred to flash drive or U-Drive
• Save Image As...• Option to export image as a .jpg to a place of your choice.
• IMPORTANT: • Picture files can vary in size - storage can become an issue.• Remember to not download pictures just for the fun of it - focus on project goals.• Delete from U-Drive when projects completed.
See iPhoto Student Tip Sheet for a more specifics directions.

17
Any Other Cool Products/Keepsakes?
A Cool Book:• Organize Event or Album before you begin a book.• Choose book type: Default is large - drop down shows other choices.• Can be exported same as a slideshow• Book can be saved as a pdf: Can take time to save this way.
• Right click in gray area of layout region to get pdf choice
Also makes Calendars and Cards
Eject CD: Multiple ways • Drag CD to Trash- eject symbol appears CD pops out.• Right click on CD and eject.


