81
Commercial in Confidence ©CPD LTD 2013 Page | 1 IAM TECH iPlan Sap User Manual Issue Date: 30/06/2015 Version: 1.1

Commercial in Confidence
©CPD LTD 2013
P a g e | 1
IAM TECH
iPlan Sap User Manual
Issue Date: 30/06/2015
Version: 1.1

Commercial in Confidence
©CPD LTD 2013
P a g e | 2
Contents
1. Login ............................................................................................................................................... 6
2. Dashboard ..................................................................................................................................... 6
2.1. Estimates Awaiting Approval .................................................................................................. 6
2.2. Operations Awaiting Estimate ................................................................................................. 7
3. Events ............................................................................................................................................. 8
3.1. Event Form .................................................................................................................................. 9
3.2. Delete Event .............................................................................................................................. 10
3.3. Event Sub-menu ........................................................................................................................ 10
4. Orders ........................................................................................................................................... 10
4.1. Order Form ................................................................................................................................ 11
4.2. Order Sub-menu ....................................................................................................................... 13
5. Operations ................................................................................................................................... 13
5.1. Operation Form ......................................................................................................................... 14
5.2. Operation Sub-menu................................................................................................................. 15
5.3. Services Grid.............................................................................................................................. 15
6. Services ........................................................................................................................................ 16
6.1. Service Form ............................................................................................................................. 17
6.2. Labour Services ......................................................................................................................... 17
6.2.1. Rate Type Change ................................................................................................................. 18
7. Norms ........................................................................................................................................... 19
8. Pictures & Attachments ............................................................................................................. 23
9. Job Cards ..................................................................................................................................... 24
10. Estimate Approval ................................................................................................................... 26
10.1. Ready for Approval ............................................................................................................... 26
10.2. Send Estimate for Approval .................................................................................................. 27
10.3. Approve/Reject the Estimate ................................................................................................ 28
10.4. Unapprove the Estimate ....................................................................................................... 29
11. Variations ................................................................................................................................. 30
12. Work Pack ................................................................................................................................ 31
12.1. Order Filter ............................................................................................................................ 31
12.2. Include ................................................................................................................................... 31

Commercial in Confidence
©CPD LTD 2013
P a g e | 3
12.3. Generate Work Pack ............................................................................................................. 32
13. Actual Time .............................................................................................................................. 32
13.1. Add/Edit Time Entry Record ................................................................................................. 32
13.2. Supervisor/Trade Mismatch ................................................................................................. 34
13.3. Duplicate Time Entry Record ................................................................................................ 34
13.4. Remove Time Entry Record ................................................................................................... 35
13.5. Add Time Entry at Service Level ............................................................................................ 35
13.6. Time Entry Validation Rules .................................................................................................. 35
14. Non-productive Time ............................................................................................................. 36
14.1. Add/Edit Non-productive Time Entry Record ....................................................................... 36
14.2. Duplicate Non-productive Record ........................................................................................ 38
14.3. Remove Non-productive Record ........................................................................................... 38
14.4. Add Non-productive Time at Service Level ........................................................................... 38
14.5. Non-productive Time Validation Rules ................................................................................. 39
15. Hours in Holding..................................................................................................................... 39
15.1. Add/Edit Hours Holding Time Entry Record.......................................................................... 40
15.2. Duplicate Hours Holding Record ........................................................................................... 41
15.3. Remove Hours Holding Record ............................................................................................. 42
15.4. Transfer Hours Holding ......................................................................................................... 42
15.5. Manual Transfer .................................................................................................................... 42
15.6. Automated Transfer on Approval ......................................................................................... 44
16. View Time .................................................................................................................................. 44
17. Expenditure .............................................................................................................................. 45
17.1. Add/Edit Expenditure Record ............................................................................................... 45
17.2. Duplicate Expenditure Record .............................................................................................. 46
17.3. Remove Expenditure Record ................................................................................................ 47
17.4. Add Expenditure at Service Level.......................................................................................... 47
17.5. Expenditure Validation Rules ................................................................................................ 47
17.6. View Expenditure .................................................................................................................. 48
18. Progress ................................................................................................................................... 48
18.1. Add/Edit Progress Record ..................................................................................................... 49
18.2. Duplicate Progress Record .................................................................................................... 49
18.3. Remove Progress Record ...................................................................................................... 50

Commercial in Confidence
©CPD LTD 2013
P a g e | 4
18.4. Add Progress at Service Level ............................................................................................... 50
18.5. Progress Validation Rules ...................................................................................................... 50
18.6. View Progress ........................................................................................................................ 51
19. Scaffold .................................................................................................................................... 51
19.1. Add Scaffold Dates ................................................................................................................ 52
19.2. Edit Scaffold Dates ................................................................................................................ 53
19.3. Delete Scaffold Dates ............................................................................................................ 54
20. Reports ..................................................................................................................................... 54
21. Administration ......................................................................................................................... 57
21.1. Baseline Actuals .................................................................................................................. 58
21.2. Manage Drop-down Lists .................................................................................................. 59
21.2.1. Delete Drop-down List Item .................................................................................................. 60
21.3. Manage File Import Mappings ......................................................................................... 60
21.3.1. Priority to Trade Rate Type ................................................................................................... 61
21.3.2. Service Numbers to Service Types ........................................................................................ 62
21.4. Manage Trades ................................................................................................................... 64
21.5. Manage Trade Rates........................................................................................................... 65
21.5.1. Create Trade Rates ................................................................................................................ 66
21.5.2. View/Edit Rates ..................................................................................................................... 66
21.6. Manage Work Centres ....................................................................................................... 67
21.6.1. Create/Edit Work Centre ...................................................................................................... 68
21.7. Refactor Trade Rates .......................................................................................................... 69
21.8. Roles ..................................................................................................................................... 71
21.8.1. Create/Edit Roles .................................................................................................................. 71
21.8.2. Delete a Role ......................................................................................................................... 72
21.9. Supervisors .......................................................................................................................... 73
21.10. Users ..................................................................................................................................... 74
21.10.1. Create/Edit Users .............................................................................................................. 74
‘User Details’ Pod .................................................................................................................................. 75
‘Roles’ Pod ............................................................................................................................................. 75
‘Password’ Pod ...................................................................................................................................... 76
21.11. Valuations ............................................................................................................................ 76

Commercial in Confidence
©CPD LTD 2013
P a g e | 5
21.12. View File Import/Export History ........................................................................................ 78
21.12.1. File Import ......................................................................................................................... 78
21.12.2. File Export ......................................................................................................................... 79
21.12.3. Manual Triggers ................................................................................................................ 79
22. Filtering Grids in iPlan ............................................................................................................... 79

Commercial in Confidence
©CPD LTD 2013
P a g e | 6
1. Login
To login to iPlan Sap, load http://www.cpd-limited.com/iplansap into your browser.
Enter your unique username and password into the form provided, and select ‘Login’.
You will be redirected to the ‘Dashboard’ (home) screen.
If you are experiencing any problems with the login process, please contact IAM Tech Technical
Support:
Tel: 01642 438131
Email: [email protected] (Helpdesk ticket will be created)
2. Dashboard
The Dashboard is the landing page after login and provides access to the rest of the system.
Users will only see features they have permission to view. Users’ permissions are controlled via
Administration and maintained by administrator users.
The Dashboard is built up of a number of useful widgets. These widgets will be built on over time.
2.1. Estimates Awaiting Approval
This widget is useful for users who are authorised estimate approvers.
It will display all estimates currently awaiting approval by the logged-in user. Double-clicking the
estimate will load the ‘Estimate Approval’ screen for the selected estimate.

Commercial in Confidence
©CPD LTD 2013
P a g e | 7
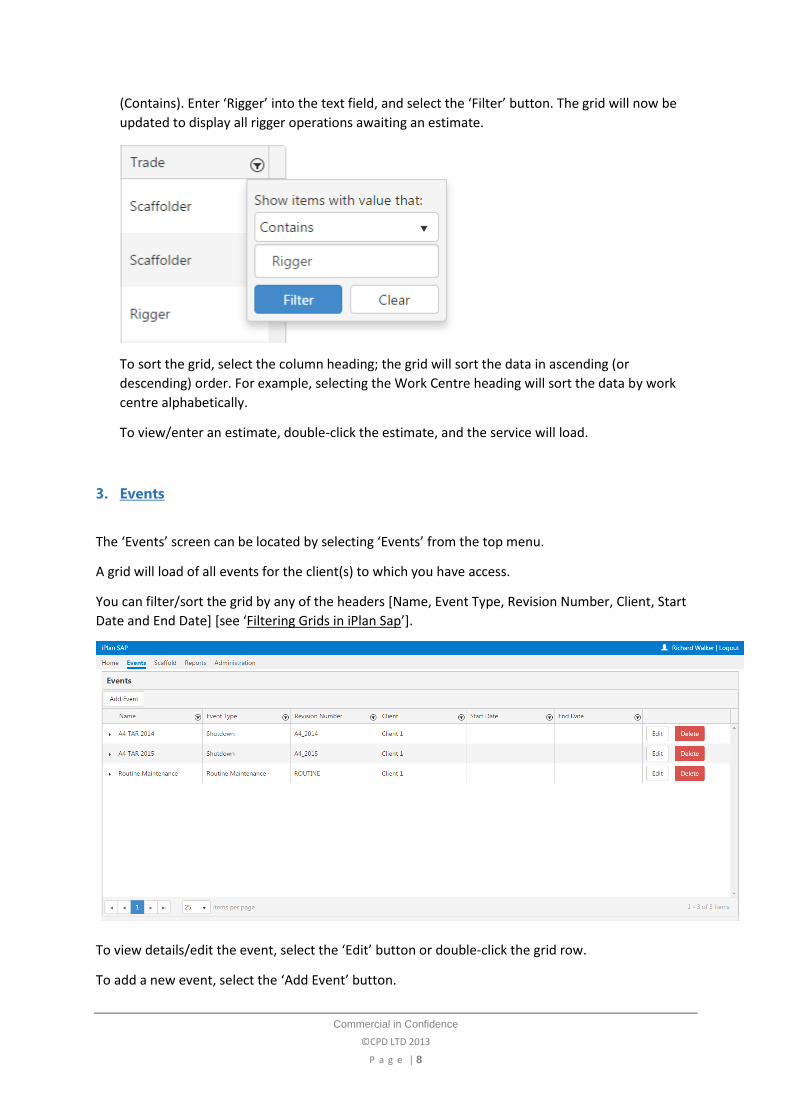
2.2. Operations Awaiting Estimate
This widget is useful for estimators; it displays all operations that do not have an estimate.
Estimators can filter/sort the grid by any of the headers [Event, Order Number, Operation,
Priority, Work Centre and Trade].
To filter, select the filter icon next to the column on which you would like to filter. Select the
type of filter from the drop-down list [see ‘Filtering Grids in iPlan Sap’], and enter your search
term. Select the ‘Filter’ button to update the data shown in the grid. For example, to see all
rigger estimates, select the filter icon next to Trade, and leave the default filter type selected
Commercial in Confidence
©CPD LTD 2013
P a g e | 8
(Contains). Enter ‘Rigger’ into the text field, and select the ‘Filter’ button. The grid will now be
updated to display all rigger operations awaiting an estimate.
To sort the grid, select the column heading; the grid will sort the data in ascending (or
descending) order. For example, selecting the Work Centre heading will sort the data by work
centre alphabetically.
To view/enter an estimate, double-click the estimate, and the service will load.
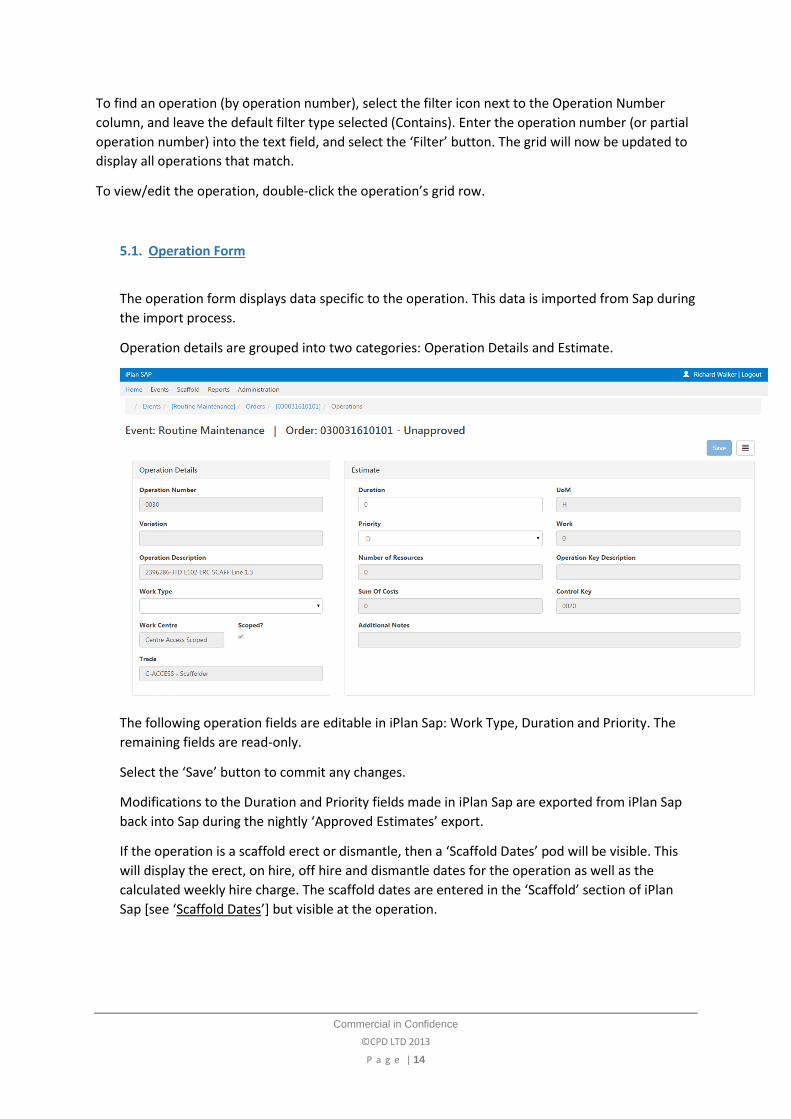
3. Events
The ‘Events’ screen can be located by selecting ‘Events’ from the top menu.
A grid will load of all events for the client(s) to which you have access.
You can filter/sort the grid by any of the headers [Name, Event Type, Revision Number, Client, Start
Date and End Date] [see ‘Filtering Grids in iPlan Sap’].
To view details/edit the event, select the ‘Edit’ button or double-click the grid row.
To add a new event, select the ‘Add Event’ button.

Commercial in Confidence
©CPD LTD 2013
P a g e | 9
3.1. Event Form
The event form will facilitate the creation of/update to iPlan Sap events.
The event groups orders into a logical collection of work.
Events are defined by Description, Personnel, Dates & LLT Materials, Status and Systems.
Complete the form fields, and select the ‘Save’ button to commit the changes.
Revision Number dictates the orders that are associated to an event through the import process.
In this example, any orders (in the import file) that have a revision number of ‘ROUTINE’ will be
associated to the ‘Routine Maintenance’ event in iPlan. Modifying the revision number will alter
the routing of the import process.
Orders that do not have a revision number will be imported into a default event. This can be
changed by updating the revision number in Sap. The next import will move the order to the
correct event.
To navigate back to the events grid, select the ‘Grid’ button at the top-right of the event form.

Commercial in Confidence
©CPD LTD 2013
P a g e | 10
3.2. Delete Event
To delete an event from iPlan, select the ‘Delete’ button next to the event in the events grid. You
will be asked to confirm the deletion. On confirmation, the event will be deleted from iPlan and
removed from the grid.
3.3. Event Sub-menu
An Event sub-menu will be displayed when you select an event from the events grid.
This menu is made up of a series of icon links that will enable you to explore details of the event.
Hover over the icon to get a tooltip description of the link.
Select the icon to navigate to the chosen screen.
The Event sub-menu consists of links to:
Orders
Work Pack
Time Entry
Expenditure
Progress
4. Orders
The ‘Orders’ screen can be located by selecting the icon from the Event sub-menu.

Commercial in Confidence
©CPD LTD 2013
P a g e | 11
All of the orders for the chosen event will load in a grid.
Orders are categorised by approval status: Unapproved, Ready for Approval, Awaiting Approval,
Approved and Rejected.
By default, ‘All’ orders are displayed; selecting any of the status types will update the grid to show
orders that fall into that category. For example, selecting ‘Unapproved’ will only show orders that
are unapproved.
You can filter/sort the grid by any of the headers [Order Number, Order Description, #Scoped,
#Unscoped, Priority, Project Type, Functional Location, WIN Number, Approval Status, Order Created
Date, Order Modified Date] [see ‘Filtering Grids in iPlan Sap’].
To find an order (by order number), select the filter icon next to the Order Number column, and
leave the default filter type selected (Contains). Enter the order number (or partial order number)
into the text field, and select the ‘Filter’ button. The grid will now be updated to display all orders
that match.
To view details of the order, double-click the order’s grid row.
4.1. Order Form
The order form displays data specific to the order. This data is imported from Sap during the
import process.
Order details are grouped into categories: Description, Equipment, Location & Status, Key Dates,
Supervisor, Systems, Revision History and Valuation History.

Commercial in Confidence
©CPD LTD 2013
P a g e | 12
With the exception of ‘Systems’, all data relating to an order is read-only. Sap is the master, and
iPlan receives order data via the import process.
Plant systems can be chosen from a pre-defined list. Please note – if there are no plant systems
in the list, it is because systems have not been linked to the associated event. The order form
will only load systems that have been selected at the event level.
Select the ‘Save’ button to commit the changes.
To navigate back to the orders grid, select the ‘Grid’ button at the top-right of the order form.

Commercial in Confidence
©CPD LTD 2013
P a g e | 13
4.2. Order Sub-menu
An Order sub-menu will be displayed when you select an order from the orders grid.
This menu is made up of a series of icon links that will enable you to explore details of the order.
Hover over the icon to get a tooltip description of the link.
Select the icon to navigate to the chosen screen.
The Order sub-menu consists of links to:
Operations
Estimate Approval
Pictures & Attachments
Norms
5. Operations
The ‘Operations’ screen can be located by selecting the icon from the Order sub-menu.
All operations for the chosen order will load in a grid.
You can filter/sort the grid by any of the headers [Operation Number, Operation Description, Work
Centre, Scoped/Unscoped, Duration, Number of Resources, Priority, Sum of Costs, Estimate
Complete, Variation] [see ‘Filtering Grids in iPlan Sap’].
Commercial in Confidence
©CPD LTD 2013
P a g e | 14
To find an operation (by operation number), select the filter icon next to the Operation Number
column, and leave the default filter type selected (Contains). Enter the operation number (or partial
operation number) into the text field, and select the ‘Filter’ button. The grid will now be updated to
display all operations that match.
To view/edit the operation, double-click the operation’s grid row.
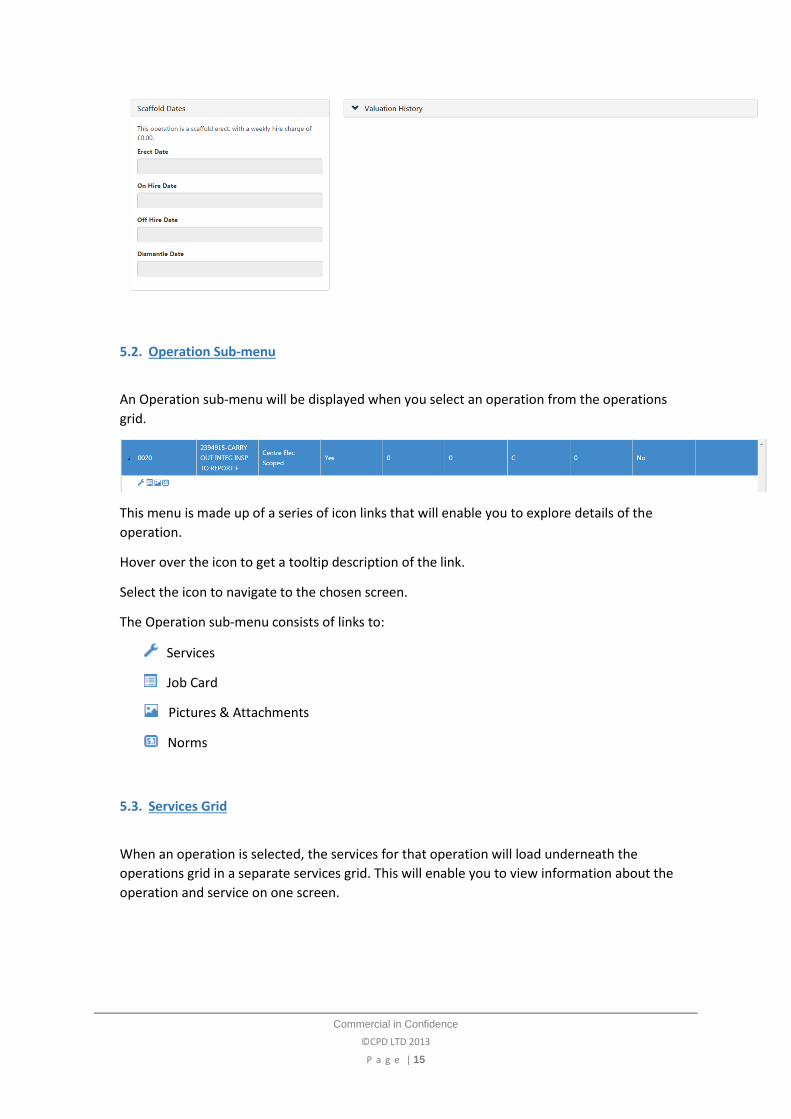
5.1. Operation Form
The operation form displays data specific to the operation. This data is imported from Sap during
the import process.
Operation details are grouped into two categories: Operation Details and Estimate.
The following operation fields are editable in iPlan Sap: Work Type, Duration and Priority. The
remaining fields are read-only.
Select the ‘Save’ button to commit any changes.
Modifications to the Duration and Priority fields made in iPlan Sap are exported from iPlan Sap
back into Sap during the nightly ‘Approved Estimates’ export.
If the operation is a scaffold erect or dismantle, then a ‘Scaffold Dates’ pod will be visible. This
will display the erect, on hire, off hire and dismantle dates for the operation as well as the
calculated weekly hire charge. The scaffold dates are entered in the ‘Scaffold’ section of iPlan
Sap [see ‘Scaffold Dates’] but visible at the operation.
Commercial in Confidence
©CPD LTD 2013
P a g e | 15
5.2. Operation Sub-menu
An Operation sub-menu will be displayed when you select an operation from the operations
grid.
This menu is made up of a series of icon links that will enable you to explore details of the
operation.
Hover over the icon to get a tooltip description of the link.
Select the icon to navigate to the chosen screen.
The Operation sub-menu consists of links to:
Services
Job Card
Pictures & Attachments
Norms
5.3. Services Grid
When an operation is selected, the services for that operation will load underneath the
operations grid in a separate services grid. This will enable you to view information about the
operation and service on one screen.

Commercial in Confidence
©CPD LTD 2013
P a g e | 16
6. Services
The ‘Services’ screen can be located by selecting the icon from the Operation sub-menu. The
services will also load underneath the operations grid (on the ‘Operations’ screen) if an operation
has been selected [see ‘Services Grid’].
Commercial in Confidence
©CPD LTD 2013
P a g e | 17
All services for the chosen operation will load in a grid.
You can filter/sort the grid by any of the headers [Line Number, Service Type, Short Text, Quantity,
Labour Hours, Unit of Measure, Gross Price, Progress %] [see ‘Filtering Grids in iPlan Sap’].
There can be up to six services per operation: Labour, Materials, Bought-in Services, Plant Hire,
Premium Time and Overhead.
To view/edit the service, double-click the service’s grid row.
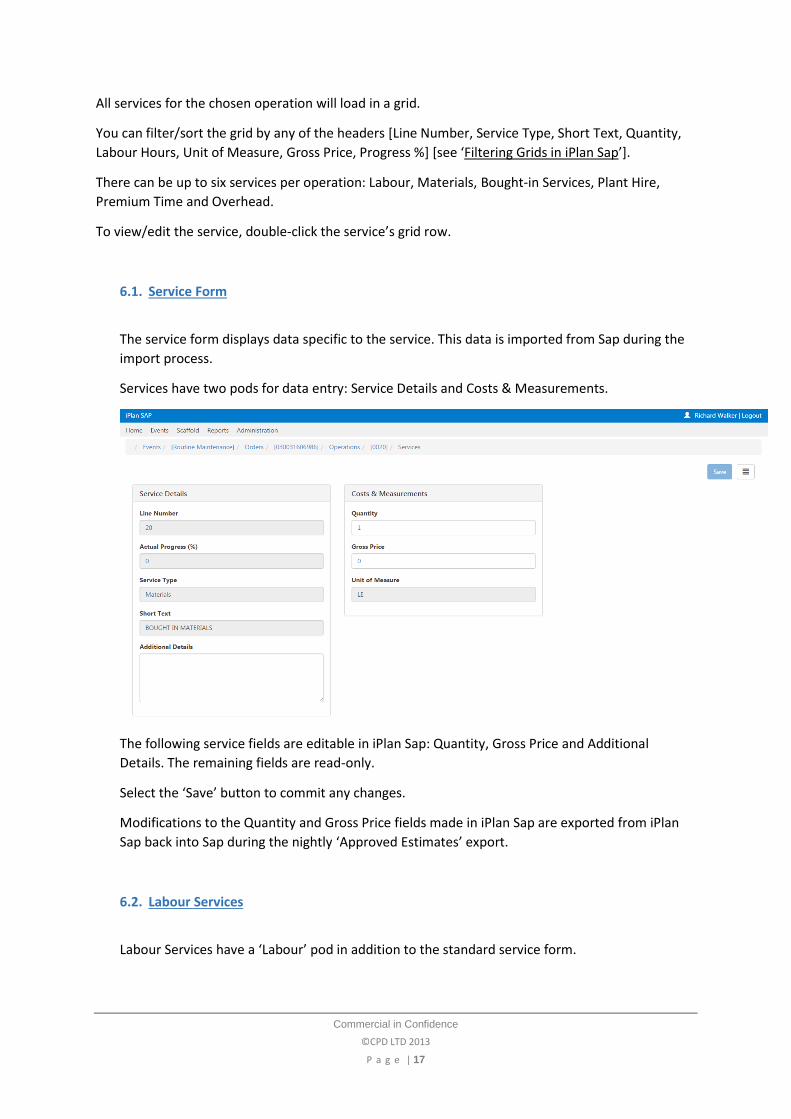
6.1. Service Form
The service form displays data specific to the service. This data is imported from Sap during the
import process.
Services have two pods for data entry: Service Details and Costs & Measurements.
The following service fields are editable in iPlan Sap: Quantity, Gross Price and Additional
Details. The remaining fields are read-only.
Select the ‘Save’ button to commit any changes.
Modifications to the Quantity and Gross Price fields made in iPlan Sap are exported from iPlan
Sap back into Sap during the nightly ‘Approved Estimates’ export.
6.2. Labour Services
Labour Services have a ‘Labour’ pod in addition to the standard service form.

Commercial in Confidence
©CPD LTD 2013
P a g e | 18
The ‘Labour’ pod is used to calculate the resources required for the selected operation.
To estimate, select a resource, and enter the hours for the effort required. Trade, Rate Type and
Rate are read-only fields – they have been generated on import.
The cost is calculated using the hours and rate.
Select the ‘Save’ button to commit any changes.
Entering a figure into the Hours field is classed as ‘manual estimation’; estimation can also be
achieved via the norms (see ‘Norms’). If an estimate has been calculated by a norm, the Hours
field (in the service form) will be read-only. This is to maintain the integrity of the norm
calculation. You can switch to a manual estimation by deleting the norm (the Hours field will
then be editable again).
6.2.1. Rate Type Change
The rate type can be changed (by users with appropriate access rights). To change the rate,
select the ‘Change’ button next to the Rate Type field.

Commercial in Confidence
©CPD LTD 2013
P a g e | 19
Select a new rate type and enter a reason for the change in the Reason text area.
Please note – records of rate type changes and the associated reason(s) are logged and
audited in iPlan.
7. Norms
The ‘Norms’ screen can be located by selecting the icon from the Order, Operation and Service
sub-menus.
There are currently four norms in iPlan Sap: Fabrication, Scaffold, Mechanical and Valve.
Each norm will assist in estimating the labour hours for an operation.
To use a norm, select the appropriate norm from the Add New Norm menu.
The norm will load.

Commercial in Confidence
©CPD LTD 2013
P a g e | 20
Each type of norm will have a different set of form fields to drive the calculation. Complete the form
by choosing from the drop-down lists and entering the appropriate value(s).
Once all required selections have been made, the total hours for each trade will be calculated.
In this example (above), the norm has estimated that it will take a pipefitter 3.99 hours to complete
the activity.
Multiple lines can be included in a single norm calculation. Select the ‘+’ button to duplicate the row.
To add a blank row, select the ‘Add Norm Selection’ button.

Commercial in Confidence
©CPD LTD 2013
P a g e | 21
In this example, there are now two activities in the calculation: Cut and Branch Weld. The original
3.99 hours is still attributed to the pipefitter (Cut), and 84.84 hours are assigned to the welder
(Branch Weld).
Select the ‘Save’ button to commit any changes.
On save, the norm will close, and the following screen will be displayed:
The next step is to save the hours calculated by the norm to operation(s). Each trade’s hours can be
saved to a single operation. For example, the pipefitter hours (3.99) can be assigned to an operation,
and the welder hours (84.84) can be assigned to a different operation.
To assign the hours, select an operation from the list of operations displayed in the drop-down list
(directly under the appropriate trade).
Select the ‘Save’ button to commit any changes.
The Labour service for the selected operation will now show the saved hours calculated in the norm.

Commercial in Confidence
©CPD LTD 2013
P a g e | 22
Each operation can be assigned one trade. For example, you can assign the pipefitter or welder
hours to an operation (not both).
You can edit the norm calculation at any time (pre-approval) by selecting the ‘Edit’ button next to
the norm calculation. The norm will load containing all of the saved selections. Select the ‘Save’
button to commit any changes.
To remove the association between the norm and an operation, de-select the operation from the
‘Trades’ drop-down list. Select the ‘Save’ button to commit any changes.
To remove the norm calculation altogether, select the ‘Remove’ button next to the norm calculation.
Multiple norms can be created per order; this includes multiple norms of the same or different
types.

Commercial in Confidence
©CPD LTD 2013
P a g e | 23
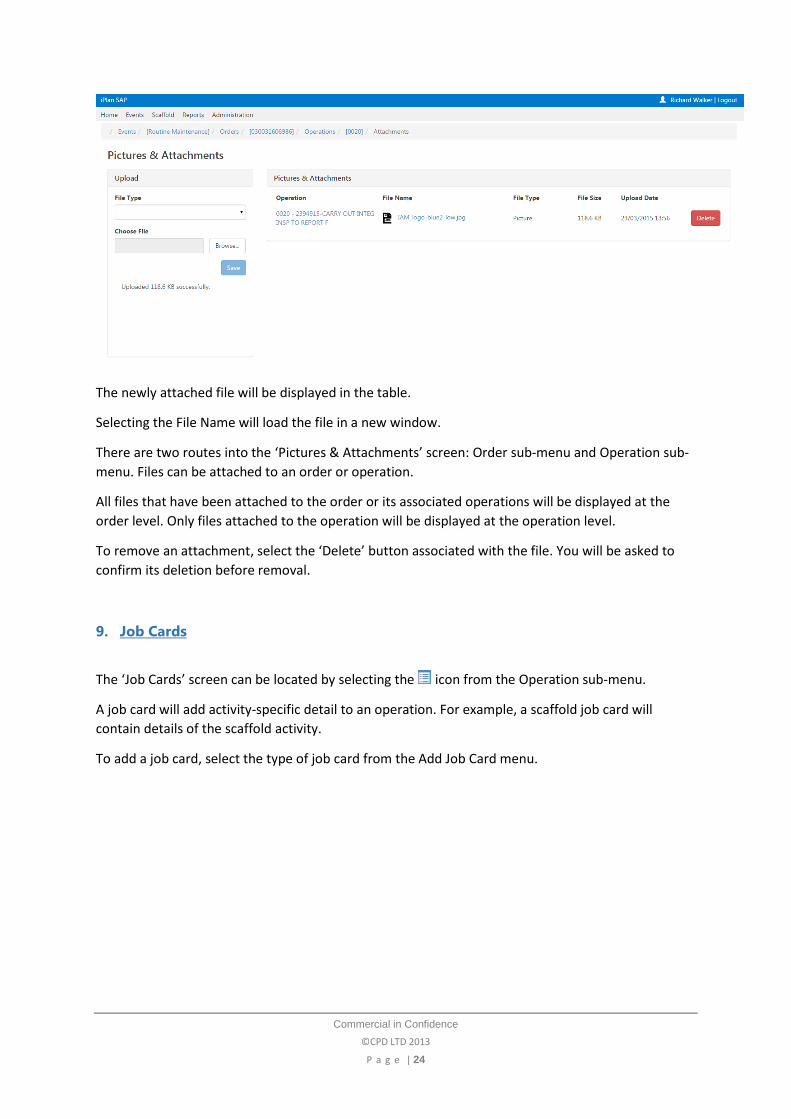
8. Pictures & Attachments
The ‘Pictures & Attachments’ screen can be located by selecting the icon from the Order or
Operation sub-menu.
To upload a picture/attachment, select the File Type, and choose a file using the ‘Browse…’ button.
Select the ‘Save’ button to upload the file.
Commercial in Confidence
©CPD LTD 2013
P a g e | 24
The newly attached file will be displayed in the table.
Selecting the File Name will load the file in a new window.
There are two routes into the ‘Pictures & Attachments’ screen: Order sub-menu and Operation sub-
menu. Files can be attached to an order or operation.
All files that have been attached to the order or its associated operations will be displayed at the
order level. Only files attached to the operation will be displayed at the operation level.
To remove an attachment, select the ‘Delete’ button associated with the file. You will be asked to
confirm its deletion before removal.
9. Job Cards
The ‘Job Cards’ screen can be located by selecting the icon from the Operation sub-menu.
A job card will add activity-specific detail to an operation. For example, a scaffold job card will
contain details of the scaffold activity.
To add a job card, select the type of job card from the Add Job Card menu.

Commercial in Confidence
©CPD LTD 2013
P a g e | 25
A scaffold job card template will load.
Complete the form fields as required, and select the ‘Save’ button to commit any changes.
Once saved, you can remove the job card by selecting the ‘Delete’ button at the top of the screen.

Commercial in Confidence
©CPD LTD 2013
P a g e | 26
You will be asked to confirm the deletion before the job card is removed.
An operation can only have one job card.
10. Estimate Approval
The ‘Estimate Approval’ screen can be located by finding the correct order in the orders grid and
selecting the icon from the Order sub-menu.
The estimate approval workflow enables the following:
Order is sent to an estimate approver for review
Estimate is approved/rejected by the estimate approver
Estimate can be unapproved by the estimate approver (if no actuals have been assigned)
10.1. Ready for Approval
Before an estimate can be sent for approval, it should be marked as ‘Ready for Approval’. This
signifies that the order is fully scoped/estimated and is now ready for approval.
Each operation within an order should be marked as ‘Ready for Approval’; only then can the
estimate be sent for approval.
To mark an operation as ‘ready for approval’, navigate to the operations form.

Commercial in Confidence
©CPD LTD 2013
P a g e | 27
Check the ‘Estimate Complete’ checkbox.
Select the ‘Save’ button to commit any changes.
When all operations within an order are marked as ‘Estimate Complete’, the order will appear in
the ‘Ready for Approval’ status on the orders grid.
From there, orders can be sent for approval.
10.2. Send Estimate for Approval
The first part of the estimate approval process is to send the estimate to an estimate approver
for review and approval.
The ‘Estimate Approval’ screen contains all costs grouped by operation and service for the order.

Commercial in Confidence
©CPD LTD 2013
P a g e | 28
To send the estimate to an estimate approver, select the ‘Approver’ from the drop-down list
provided (please note – only authorised estimate approvers will appear in this list). Select the
‘Submit for Approval’ button.
The estimate approver will receive an email informing them that an estimate in iPlan is awaiting
their review.
10.3. Approve/Reject the Estimate
Estimate approvers have the authority to approve/reject an estimate that has been sent for
approval.
There are multiple ways an estimate approver can navigate to the ‘Estimate Approval’ screen to
review an order:
An estimate approver will receive an email informing them that an estimate requires
their approval. The approver can select the link within the email to open.
The Dashboard (homepage) contains a widget that lists links to all estimates awaiting
approval for the logged-in user. Select the link to open.
Navigate to the order awaiting approval [see ‘Orders Grid’], and select the icon from
the Order sub-menu.
Once within the ‘Estimate Approval’ screen, the user can see the breakdown of costs.

Commercial in Confidence
©CPD LTD 2013
P a g e | 29
To approve the estimate, select the ‘Approve’ button.
To reject the estimate, select the ‘Reject’ button. A ‘Rejection Reason’ screen will load. Select
the ‘Reason’ from the drop-down list provided, and enter a comment describing why the
estimate has been rejected.
Select the ‘Reject’ button to confirm the decision.
The user who sent the estimate for approval will receive an email informing them of the
decision.
10.4. Unapprove the Estimate
After an estimate has been approved, there may be a requirement to retract the estimate and
make some modifications to it. It is possible to do this by ‘unapproving’ the estimate. This
feature is only available if there are no actuals recorded against the estimate (work has not
started).

Commercial in Confidence
©CPD LTD 2013
P a g e | 30
To unapprove an estimate, navigate to the ‘Estimate Approval’ screen for the order [see ‘Orders
Grid’]. Please note – this action can only be performed by the original estimator or the estimate
approver.
Select the ‘Unapprove’ button to change the estimate approval status back to ‘Unapproved’.
11. Variations
Variations are operations that have been added to the estimate post-approval.
An operation can be sent from Sap to iPlan against an order that has already been approved. If this
happens, a ‘variation’ is created in iPlan.
The variation can be viewed/edited from the ‘Operations’ screen [see ‘Operations’].

Commercial in Confidence
©CPD LTD 2013
P a g e | 31
The variation is distinguished by a yellow background, and the Variation column will contain the
variation’s name. Estimate the variation in the same way an operation is estimated [see
‘Operations’].
Once fully estimated (and marked as ‘Ready for Approval’), send the variation for approval [see
‘Estimate Approvals’].
12. Work Pack
The ‘Work Pack’ screen can be located by selecting the icon from the Events sub-menu.
A work pack combines the scope and estimates of selected orders into a detailed document that
describes the work to be undertaken.
The ‘Work Pack’ screen is split into two sections: ‘Order Filter’ and ‘Include’.
12.1. Order Filter
The ‘Order Filter’ is a grid that contains all orders to be included in the work pack. By default, all
orders within the selected event are displayed. The user can choose the orders to include in the
work pack by filtering the grid [see ‘Filtering Grids in iPlan Sap’]. Orders can be filtered by order
number, approval status, work type, system and order description.
All orders that are displayed in this grid will be included in the work pack.
12.2. Include

Commercial in Confidence
©CPD LTD 2013
P a g e | 32
‘Include’ section allows the user to decide what detail should be included in the work pack.
The user should select the checkbox’s of the items to include.
For example, there are five sections to a work pack [Technical Details, Estimated Hours,
Materials, Bought-in Services and Plant Hire]; check the box of the sections to include. This
should be repeated for Attachment Types and Job Card Types.
12.3. Generate Work Pack
Once the ‘Order Filter’ and ‘Include’ sections have been defined, select the ‘Generate Work
Pack’ button.
The work pack will load in a new window as a pdf document.
This document can be viewed, saved, emailed or printed as appropriate.
13. Actual Time
The ‘Actual Time’ screen can be located by selecting the icon from the Events sub-menu.
The ‘Actual Time’ tab is selected by default.
This screen is used to enter actual hours worked for a given order/operation/service.
13.1. Add/Edit Time Entry Record
To add/edit a time entry record, select a week ending date using the date picker (last week’s
week ending date will be selected by default).
Select the ‘Add Time’ button.

Commercial in Confidence
©CPD LTD 2013
P a g e | 33
Select a supervisor from the drop-down list provided.
Enter an order number. A list of all the order’s operations will load into the ‘Operation’ drop-
down list.
Select an operation. The Labour and Premium Time services will load in the ‘Service’ drop-down
list.
Select a service. The time type(s) will load for the selected service.
Select a time type.
Any existing time against the service/time type for the selected week ending date will load in the
grid. An empty grid will load if time entry records do not exist.
For new records, enter the hours worked into the timesheet for the selected week ending date.
For existing records, modify the Time Worked fields within the timesheet for the selected week
ending date.
Select the ‘Save’ button to commit any changes.

Commercial in Confidence
©CPD LTD 2013
P a g e | 34
Once saved, the supervisor cannot be changed.
13.2. Supervisor/Trade Mismatch
When saving actual time, iPlan will check to see if the supervisor is linked to the trade of the
service [see ‘Supervisors’].
If the supervisor is linked to the trade, the timesheet will save.
If the supervisor does not have the trade of the service, a ‘Supervisor Trade Mismatch’ dialog
will load.
This is a warning message. You are still permitted to save (select ‘Save Anyway’ button) or cancel
(select ‘Cancel’ button) to discard the change.
13.3. Duplicate Time Entry Record
To duplicate the time entry row, select the ‘+’ icon on the row you would like to duplicate.
Modify the duplicated row accordingly.
Select the ‘Save’ button to commit any changes.

Commercial in Confidence
©CPD LTD 2013
P a g e | 35
13.4. Remove Time Entry Record
To remove the time entry record, select the ‘-‘ icon on the row you would like to remove.
Select the ‘Save’ button to commit any changes.
13.5. Add Time Entry at Service Level
You can also access the ‘Actual Time’ screen by selecting the icon from the Service sub-menu.
The ‘Actual Time’ tab is selected by default.
The timesheet will load with the order/operation/service/time type selected.
Ensure that the week ending date is selected, and enter the hours for that week.
Select the ‘Save’ button to commit any changes.
Entering time at the service level is good for individual time entry records; for multiple records
across different orders/operations, it is more efficient to enter actual time at the event level
(faster data entry).
13.6. Time Entry Validation Rules
There are a number of rules to prevent actual time being entered incorrectly.
Actual time cannot be entered against orders that are not approved.
Actual time cannot be added if the operation control key is not 0020.
Actual time cannot be added if the order status is CLSD.
If you attempt to assign time to an order/operation/service that falls into one of the above
categories, a validation message will be displayed and data entry will be prohibited.

Commercial in Confidence
©CPD LTD 2013
P a g e | 36
A padlock will be displayed next to the row, and all timesheet fields will be greyed out.
14. Non-productive Time
The ‘Non-productive Time’ screen can be located by selecting the icon from the Events sub-
menu.
Select the ‘Non-productive Time’ tab.
This screen is used to enter non-productive hours for a given order/operation.
14.1. Add/Edit Non-productive Time Entry Record

Commercial in Confidence
©CPD LTD 2013
P a g e | 37
To add/edit a non-productive time entry record, select a week ending date using the date picker
(last week’s week ending date will be selected by default).
Select the ‘Add Time’ button.
Select a supervisor from the drop-down list provided.
Enter an order number. A list of all the order’s operations will load into the ‘Operation’ drop-
down list.
Select an operation. The non-productive time codes will load in the ‘Code’ drop-down list.
Select a code.
Any existing non-productive time against the service/time type for the selected week ending
date will load in the grid. An empty grid will load if non-productive time entry records do not
exist.
For new records, enter the non-productive time into the timesheet for the selected week ending
date.
For existing records, modify the non-productive time within the timesheet for the selected week
ending date.
Select the ‘Save’ button to commit any changes.

Commercial in Confidence
©CPD LTD 2013
P a g e | 38
Once saved, the supervisor cannot be changed.
14.2. Duplicate Non-productive Record
To duplicate the non-productive time entry row, select the ‘+’ icon on the row you would like to
duplicate.
Modify the duplicated row accordingly.
Select the ‘Save’ button to commit any changes.
14.3. Remove Non-productive Record
To remove the non-productive record, select the ‘-‘ icon on the row you would like to remove.
Select the ‘Save’ button to commit any changes.
14.4. Add Non-productive Time at Service Level
You can also access the ‘Non-productive Time’ screen by selecting the icon from the Service
sub-menu.
Select the ‘Non-productive Time’ tab.
The timesheet will load with the order/operation selected.
Ensure that the week ending date is correct.
Select a non-productive code.

Commercial in Confidence
©CPD LTD 2013
P a g e | 39
Enter the non-productive hours for the week.
Select the ‘Save’ button to commit any changes.
Entering non-productive time at the operation level is good for individual non-productive time
entry records; for multiple records across different orders/operations, it is more efficient to
enter non-productive time at the event level (faster data entry).
14.5. Non-productive Time Validation Rules
There are a number of rules to prevent non-productive time being entered incorrectly.
Non-productive time cannot be entered against orders that are not approved.
Non-productive time cannot be added if the operation control key is not 0020.
Non-productive time cannot be added if the order status is CLSD.
If you attempt to assign non-productive time to an order/operation that falls into one of the
above categories, a validation message will be displayed and data entry will be prohibited.
A padlock will be displayed next to the row, and all timesheet fields will be greyed out.
15. Hours in Holding
The ‘Hours Holding’ screen can be located by selecting the icon from the Events sub-menu.
Select the ‘Hours Holding’ tab.
This screen is used to enter hours into a holding area within iPlan until the hours can be transferred
to the appropriate order/operation/service.

Commercial in Confidence
©CPD LTD 2013
P a g e | 40
There are various reasons hours may be put into holding (e.g., Awaiting Estimate, Digits Missing,
Incorrect Order Number etc.).
By default, all hours in holding will load into the timesheet for the selected week ending date.
15.1. Add/Edit Hours Holding Time Entry Record
To add/edit an hours holding record, select a week ending date using the date picker (last
week’s week ending date will be selected by default).
The timesheet will update to display all hours in holding within iPlan for the selected week
ending date.
Modify the time entry row accordingly.
Select the ‘Save’ button to commit any changes.
To add a new record, select the ‘Add Time’ button. A new time entry row will load.

Commercial in Confidence
©CPD LTD 2013
P a g e | 41
Select a supervisor from the drop-down list provided.
Enter the order number (if available).
Enter the operation number (if available).
Enter a reference. This must be a unique reference to identify the hours holding record.
Select a reason the hours are in holding.
Enter the hours into the timesheet for the selected week.
Select the ‘Save’ button to commit any changes.
Once saved, the supervisor cannot be changed.
15.2. Duplicate Hours Holding Record
To duplicate the hours holding time entry row, select the ‘+’ icon on the row you would like to
duplicate.

Commercial in Confidence
©CPD LTD 2013
P a g e | 42
Modify the duplicated row accordingly.
Select the ‘Save’ button to commit any changes.
15.3. Remove Hours Holding Record
To remove the hours holding record, select the ‘-‘ icon on the row you would like to remove.
Select the ‘Save’ button to commit any changes.
15.4. Transfer Hours Holding
There are two ways to transfer hours to an order:
Manual transfer
Automated transfer on approval
15.5. Manual Transfer
To manually transfer hours out of holding to an order, select the ‘View Time’ tab.
A grid of all time entered in the last month (all hours in holding) will be displayed.

Commercial in Confidence
©CPD LTD 2013
P a g e | 43
Locate the record you would like to transfer [see ‘Filtering Grids in iPlan Sap’].
Select the ‘Transfer Hours’ button next to the time record.
A form will load containing details of the hours in holding.
If an order number has been entered (and the order is within iPlan), then a list of operations will
load in the ‘Operation Number’ drop-down list.
Select an operation number.
A list of services (Labour and Premium Time) will load in the ‘Service Number’ drop-down list.
Select a service number.

Commercial in Confidence
©CPD LTD 2013
P a g e | 44
Once an order, operation and service have been selected, select the ‘Transfer’ button. This will
move the hours out of holding and against the relevant service.
15.6. Automated Transfer on Approval
Any hours in holding that have been assigned an order and operation will be automatically
transferred to the operation’s labour service on approval.
Please note – both the order and operation must be entered for auto transfer to work.
16. View Time
The ‘View Time’ screen can be located by selecting the icon from the Events sub-menu.
Select the ‘View Time’ tab.

Commercial in Confidence
©CPD LTD 2013
P a g e | 45
A grid of all actual and non-productive time entered in the last month (for the selected event) will be
displayed, as well as all existing hours in holding.
You can sort/filter the grid to locate a time record [see ‘Filtering Grids in iPlan Sap’].
17. Expenditure
The ‘Expenditure’ screen can be located by selecting the icon from the Events sub-menu.
The ‘Enter Expenditure’ tab will be selected by default.
This screen is used to enter actual expenditure spent for a given order/operation/service.
17.1. Add/Edit Expenditure Record
To add/edit an expenditure record, select a week ending date using the date picker (last week’s
week ending date will be selected by default).
Select the ‘Add New Expenditure’ button.

Commercial in Confidence
©CPD LTD 2013
P a g e | 46
Enter an order number. A list of all the order’s operations will load into the ‘Operation’ drop-
down list.
Select an operation. The services will load in the ‘Service’ drop-down list.
Select a service.
Any existing expenditure against the service for the selected week ending date will load in the
grid. An empty grid will load if expenditure records do not exist.
For new records, enter a description and cost for the selected week ending date.
For existing records, modify the description and cost for the selected week ending date.
Select the ‘Save’ button to commit any changes.
17.2. Duplicate Expenditure Record
To duplicate the expenditure row, select the ‘+’ icon on the row you would like to duplicate.

Commercial in Confidence
©CPD LTD 2013
P a g e | 47
Modify the duplicated row accordingly.
Select the ‘Save’ button to commit any changes.
17.3. Remove Expenditure Record
To remove the expenditure record, select the ‘-‘ icon on the row you would like to remove.
Select the ‘Save’ button to commit any changes.
17.4. Add Expenditure at Service Level
You can also access the ‘Expenditure’ screen by selecting the icon from the Service sub-menu.
The ‘Enter Expenditure’ tab is selected by default.
The grid will load with the order/operation/service selected.
Ensure that the week ending date is selected, and enter the description and cost.
Select the ‘Save’ button to commit any changes.
Entering expenditure at the service level is good for individual expenditure records; for multiple
records across different orders/operations, it is more efficient to enter expenditure at the event
level (faster data entry).
17.5. Expenditure Validation Rules
There are a number of rules to prevent expenditure being entered incorrectly.
Expenditure cannot be entered against orders that are not approved.
Expenditure cannot be added if the operation control key is not 0020.
Expenditure cannot be added if the order status is CLSD.
Expenditure cannot be added if the operation is scoped.
If you attempt to assign expenditure to an order/operation/service that falls into one of the
above categories, a validation message will be displayed and data entry will be prohibited.

Commercial in Confidence
©CPD LTD 2013
P a g e | 48
17.6. View Expenditure
The ‘View Expenditure’ screen can be located by selecting the icon from the Events sub-
menu.
Select the ‘View Expenditure’ tab.
A grid of all expenditures entered in the last month (for the selected event) will be displayed (if
you view expenditure at the service level, all costs for the selected service will be displayed in
the grid).
You can sort/filter the grid to locate an expenditure record [see ‘Filtering Grids in iPlan Sap’].
To edit the expenditure record, select the ‘Edit’ button. The selected record will load in the
‘Enter Expenditure’ tab ready for edit.
To delete the expenditure record, select the ‘Delete’ button. After confirming the deletion, the
selected record will be removed from the grid.
18. Progress
The ‘Progress’ screen can be located by selecting the icon from the Events sub-menu.
The ‘Enter Progress’ tab will be selected by default.
This screen is used to enter actual progress achieved for a given order/operation/service.

Commercial in Confidence
©CPD LTD 2013
P a g e | 49
18.1. Add/Edit Progress Record
To add/edit a progress record, select a week ending date using the date picker (last week’s week
ending date will be selected by default).
Select the ‘Add New Progress’ button.
Select a supervisor from the list.
Enter an order number. A list of all the order’s operations will load into the ‘Operation’ drop-
down list.
Select an operation. The services will load in the ‘Service’ drop-down list.
Select a service.
Any existing progress against the service for the selected week ending date will load in the grid.
An empty grid will load if progress records do not exist.
For new records, enter a % complete for the selected week ending date.
For existing records, modify the % complete for the selected week ending date.
Select the ‘Save’ button to commit any changes.
18.2. Duplicate Progress Record
To duplicate the progress row, select the ‘+’ icon on the row you would like to duplicate.

Commercial in Confidence
©CPD LTD 2013
P a g e | 50
Modify the duplicated row accordingly.
Select the ‘Save’ button to commit any changes.
18.3. Remove Progress Record
To remove the progress record, select the ‘-‘ icon on the row you would like to remove.
Select the ‘Save’ button to commit any changes.
18.4. Add Progress at Service Level
You can also access the ‘Progress’ screen by selecting the icon from the Service sub-menu.
The ‘Enter Progress’ tab is selected by default.
The grid will load with the order/operation/service selected.
Ensure that the week ending date is selected, and enter the supervisor and % complete.
Select the ‘Save’ button to commit any changes.
Entering progress at the service level is good for individual progress records; for multiple records
across different orders/operations, it is more efficient to enter progress at the event level (faster
data entry).
18.5. Progress Validation Rules
There are a number of rules to prevent progress being entered incorrectly.
Progress cannot be entered against orders that are not approved.
Progress cannot be added if the operation control key is not 0020.
Progress cannot be added if the order status is CLSD.
Progress cannot be added if the operation is unscoped.
If you attempt to assign progress to an order/operation/service that falls into one of the above
categories, a validation message will be displayed and data entry will be prohibited.
Commercial in Confidence
©CPD LTD 2013
P a g e | 51
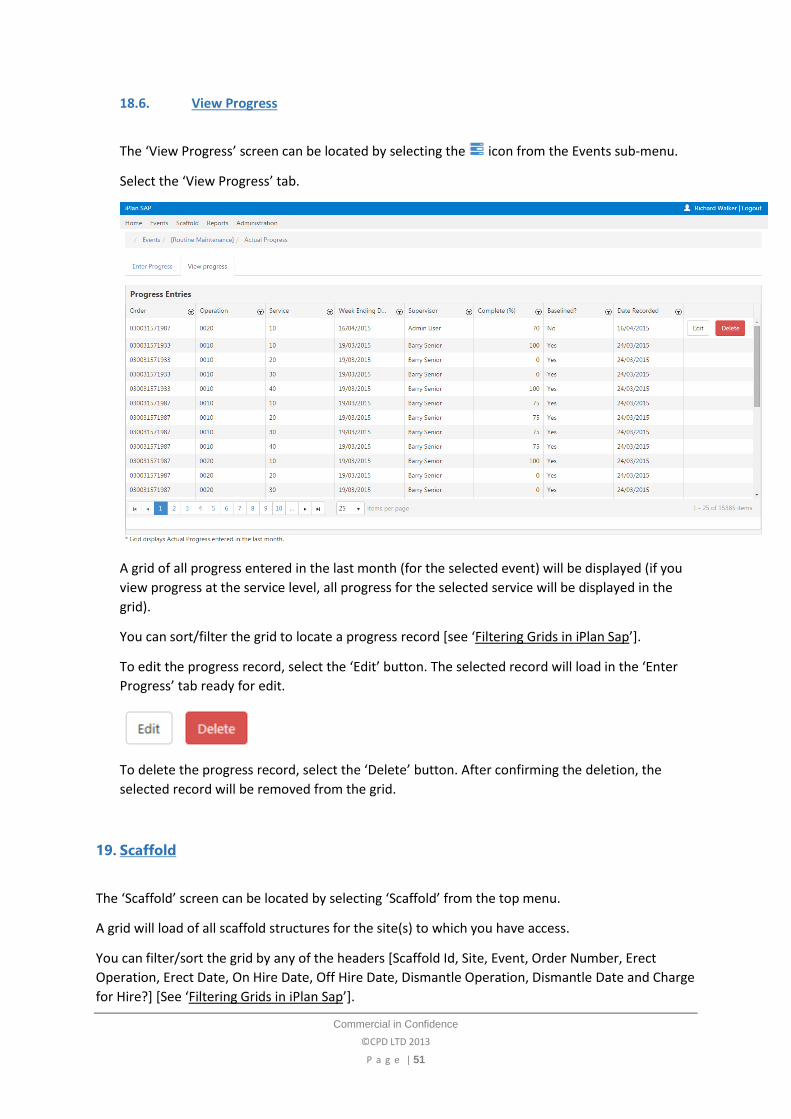
18.6. View Progress
The ‘View Progress’ screen can be located by selecting the icon from the Events sub-menu.
Select the ‘View Progress’ tab.
A grid of all progress entered in the last month (for the selected event) will be displayed (if you
view progress at the service level, all progress for the selected service will be displayed in the
grid).
You can sort/filter the grid to locate a progress record [see ‘Filtering Grids in iPlan Sap’].
To edit the progress record, select the ‘Edit’ button. The selected record will load in the ‘Enter
Progress’ tab ready for edit.
To delete the progress record, select the ‘Delete’ button. After confirming the deletion, the
selected record will be removed from the grid.
19. Scaffold
The ‘Scaffold’ screen can be located by selecting ‘Scaffold’ from the top menu.
A grid will load of all scaffold structures for the site(s) to which you have access.
You can filter/sort the grid by any of the headers [Scaffold Id, Site, Event, Order Number, Erect
Operation, Erect Date, On Hire Date, Off Hire Date, Dismantle Operation, Dismantle Date and Charge
for Hire?] [See ‘Filtering Grids in iPlan Sap’].

Commercial in Confidence
©CPD LTD 2013
P a g e | 52
19.1. Add Scaffold Dates
To add a new scaffold structure, select the ‘Add Scaffold Dates’ button.
A scaffold form will load.
Complete the form as appropriate.
Select the site. A list of events for the selected site will load in the ‘Event’ drop-down list.
Select an event.

Commercial in Confidence
©CPD LTD 2013
P a g e | 53
Enter an order number. A list of scaffold erect operations will load in the ‘Erect Operation’ drop-
down list. A list of scaffold dismantle operations will load in the ‘Dismantle Operation’ drop-
down list.
Select a scaffold erect operation.
Select a scaffold dismantle operation.
Enter the following dates: erect, on hire, off hire, dismantle.
Select the ‘Save’ button to commit any changes. On save, the scaffold id is generated by iPlan.
This is a combination of the order number and the erect operation number.
Please note – you can only save one scaffold structure per operation. A warning message will be
displayed if the user attempts to save a structure against an order/operation that is already
assigned a structure.
19.2. Edit Scaffold Dates
To edit a scaffold structure, locate the record in the scaffold grid [see ‘Filtering Grids in iPlan
Sap’].
Select the corresponding ‘Edit’ button. The scaffold dates form will load with the form’s fields
filled out and ready for edit.
Modify the form appropriately.
Select the ‘Save’ button to commit any changes.
The Erect Weekly Charge and Dismantle Weekly Charge fields are calculated fields based on the
labour estimate (unscoped) or actual time worked (scoped).
Commercial in Confidence
©CPD LTD 2013
P a g e | 54
19.3. Delete Scaffold Dates
To delete a scaffold structure, locate the record in the scaffold grid [see ‘Filtering Grids in iPlan
Sap’].
Select the corresponding ‘Delete’ button. After confirming the deletion, the structure will be
removed from the grid.
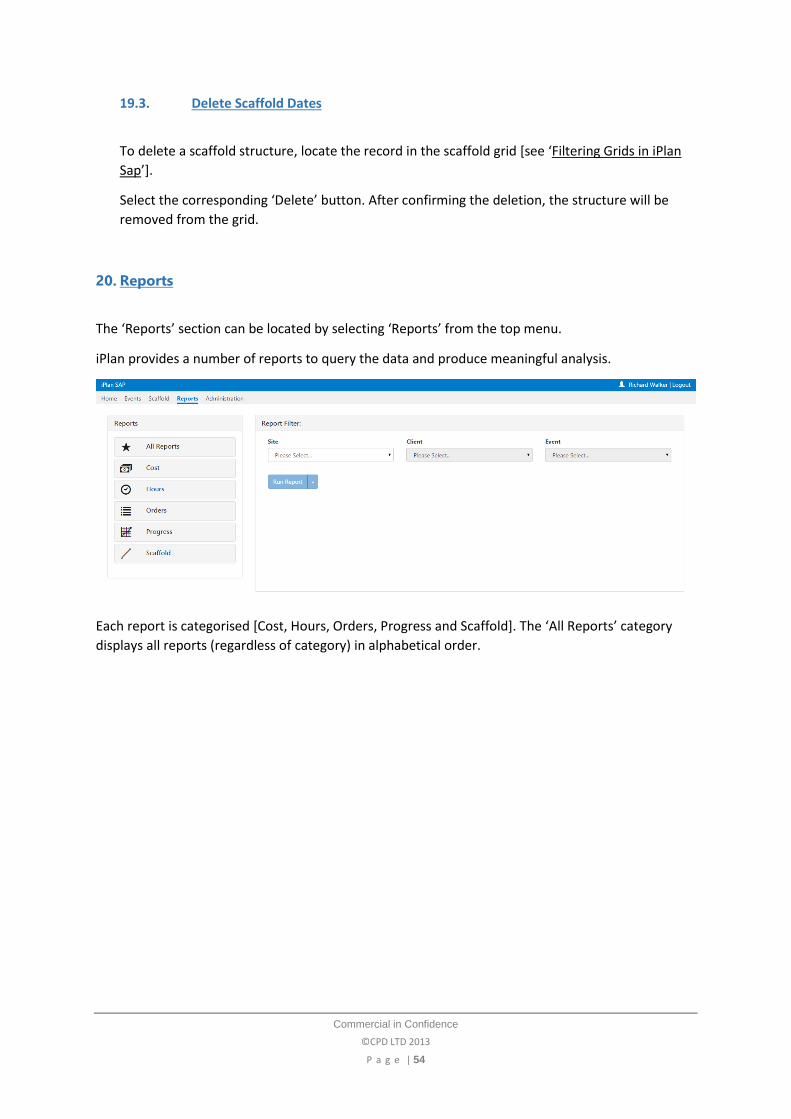
20. Reports
The ‘Reports’ section can be located by selecting ‘Reports’ from the top menu.
iPlan provides a number of reports to query the data and produce meaningful analysis.
Each report is categorised [Cost, Hours, Orders, Progress and Scaffold]. The ‘All Reports’ category
displays all reports (regardless of category) in alphabetical order.

Commercial in Confidence
©CPD LTD 2013
P a g e | 55
To run a report, select a report from the ‘Reports’ pod.
The ‘Report Filter’ will update to display all filters applicable for the selected report.
A description of the report will also be displayed.

Commercial in Confidence
©CPD LTD 2013
P a g e | 56
Select a site from the ‘Site’ drop-down list.
Select a client from the ‘Client’ drop-down list.
Select an event from the ‘Event’ drop-down list.
The remaining selections are optional and vary from report to report.
In this example (Activity Summary Report), select all orders to include in the report – to include all,
leave blank.

Commercial in Confidence
©CPD LTD 2013
P a g e | 57
Select the approval status – to include all, leave blank.
Select a scoped flag – to include all, leave blank.
Select the arrow on the ‘Run Report’ button. A list of report formats will be displayed [Excel, Word
and pdf]. Select the report format of choice.
A report will be generated. Select the report to open.
21. Administration
The ‘Administration’ section can be located by selecting ‘Administration’ from the top menu.
This section manages all of the data that drives iPlan as well as restricted information such as trade
rates. User accounts and roles are controlled from ‘Administration’.

Commercial in Confidence
©CPD LTD 2013
P a g e | 58
21.1. Baseline Actuals
‘Baseline Actuals’ is available from the Administration menu.
This feature allows the user to close the actual time, expenditure and progress for the selected
week ending date. This will essentially prevent that record from being modified after baseline.
Some reports/valuations require the records to be baselined.
Select a site from the ‘Site’ drop-down list. A list of clients for that site will load.
Select the checkbox next to the client(s) you would like to baseline.

Commercial in Confidence
©CPD LTD 2013
P a g e | 59
Choose the week ending date to baseline.
Select the ‘Show Open Actuals’ button to view a table of all actuals for the selected
site/client/week ending date.
Select the ‘Baseline Clients’ button to close the week.
The client(s) will now be baselined for the selected week.
21.2. Manage Drop-down Lists
‘Manage Drop-down Lists’ is available from the Administration menu.
This feature allows the user to update the data in drop-down lists throughout iPlan.
The following lists can be updated: ‘Clients’, ‘Resources’, ‘Non-productive Codes’, ‘Hours Holding
Reasons’ and ‘Plant Systems’.
Select a list from the left-hand menu; in this example, we have selected ‘Clients’.
A grid of all existing items in the drop-down list will load.
To add a new record, select the ‘Add’ button.

Commercial in Confidence
©CPD LTD 2013
P a g e | 60
A blank entry will be displayed.
Complete the form fields as appropriate. For clients, enter a name, code, site, week ending day
and scaffold erect factor.
Once all fields are complete, select the ‘Save’ button to commit any changes.
To modify an existing record, change the data of the row as appropriate. Select the ‘Save’ button
to commit any changes.
21.2.1. Delete Drop-down List Item
To remove an item from the list, select the ‘Delete’ button next to the record you wish to
delete.
A message will be displayed asking you to confirm the deletion. Select ‘Ok’.
The deleted record will be greyed out.
Select the ‘Save’ button to commit any changes. The deleted record will now be removed.
21.3. Manage File Import Mappings
‘Manage File Import Mappings’ is available from the Administration menu.
This feature allows the user to update the mappings between Sap and iPlan. There are two
mappings that can be updated: ‘Priority to Trade Rate Type’ and ‘Service Numbers to Service
Types’.

Commercial in Confidence
©CPD LTD 2013
P a g e | 61
21.3.1. Priority to Trade Rate Type
This mapping defines the trade rate that is assigned to an operation (on import) based on its
priority.
To change the mapping, select the appropriate rate type for each priority [A, B, C, D & F].
Select ‘Unmapped’ if the priority does not have a rate type. Please note – if left ‘unmapped’,
the importer will use the rate type from the work centre [Scoped/Unscoped].
Select the ‘Save’ button to commit any changes.

Commercial in Confidence
©CPD LTD 2013
P a g e | 62
21.3.2. Service Numbers to Service Types
This mapping links service types to a service number.
Sap assigns services a service number; each service can have one or many service numbers.
iPlan needs to interpret the service number as a service type. Service types in iPlan are as
follows: Labour, Materials, Bought-in Services, Plant Hire, Overhead and Premium Time.
This mapping will link each service type to any of the service numbers that Sap sends to iPlan
in the import.
All existing mappings will load in the table.
To add a new service type, select the ‘Add Service Type’ drop-down button and select a
service type.
A blank row will appear in the table.
Enter the service number to which the service type is to be connected.

Commercial in Confidence
©CPD LTD 2013
P a g e | 63
Select the ‘Save’ button to commit any changes.
To modify a service mapping, select the ‘Edit’ button for the corresponding record.
The service number will become editable for the selected service type. Make the changes as
required.
Select the ‘Save’ button to commit any changes.
To delete a mapping, select the ‘Delete’ button for the corresponding record.

Commercial in Confidence
©CPD LTD 2013
P a g e | 64
A message will be displayed asking you to confirm the deletion. Select ‘Ok’.
The deleted record will now be removed.
21.4. Manage Trades
‘Manage Trades’ is available from the Administration menu.
This feature allows the user to view all trades as well as view/update the resources associated
with trades.
To view/edit a trade record, double-click the row or select the ‘Edit’ button.
There are two resource lists: ‘Associated Resources’ and ‘Available Resources’.

Commercial in Confidence
©CPD LTD 2013
P a g e | 65
‘Associated Resources’ is a list of all resources currently associated with the trade.
‘Available Resources’ is a list of all resources within iPlan.
To associate a resource to the trade, select the resource(s) from the ‘Available Resources’ list.
Select the ‘Associate Selected’ button. The resources will now be displayed under the
‘Associated Resources’ list.
Similarly, to remove a resource from the associated resources, select the resource(s) from the
‘Associated Resources’ list. Select the ‘Unassociated Selected’ button. The resources will now be
displayed under the ‘Available Resources’ list.
21.5. Manage Trade Rates
‘Manage Trade Rates’ is available from the Administration menu.
This feature allows the user to create a new set of rates as well as update the most recent trade
rates. Older sets of trade rates are also available for reference.

Commercial in Confidence
©CPD LTD 2013
P a g e | 66
21.5.1. Create Trade Rates
To create a new set of trade rates, select a site from the ‘Sites’ drop-down list.
Select a client from the ‘Clients’ drop-down list.
Choose an effective date and end date (leave the End Date field blank if required, as it will
be automatically populated when a new set of rates is created for the client).
Enter a trade rate period name.
Select the ‘Create New Period’ button to create a new rate period.
A form will load containing a list of all trades and a blank set of rates.
Update the rates for each trade as required.
Select the ‘Save Rates’ button to commit any changes.
Please note – creating a new set of rates for a client will archive the previous set (no longer
editable); however, the new rates will only take effect from the effective date specified in
the rate period definition.
21.5.2. View/Edit Rates

Commercial in Confidence
©CPD LTD 2013
P a g e | 67
To view a set of rates, select a site from the ‘Sites’ drop-down list.
Select a client from the ‘Clients’ drop-down list.
Select a set of rates from the ‘Trade Rate Periods’ drop-down list.
Select the ‘View Rates’ button.
A list of all rates for the selected period will be displayed in a table.
Update the rates for each trade as appropriate.
Select the ‘Save Rates’ button to commit any changes.
Please note – only the latest set of trade rates (most recent) can be modified. Older sets are
available for reference but cannot be updated.
21.6. Manage Work Centres
‘Manage Work Centres’ is available from the Administration menu.
Work centres define the type of activity to be performed (per operation).

Commercial in Confidence
©CPD LTD 2013
P a g e | 68
This feature allows the user to view, create and modify work centres within iPlan.
A grid of all work centres within iPlan will be displayed. Filter the grid to locate a particular work
centre [see ‘Filtering Grids in iPlan Sap’].
21.6.1. Create/Edit Work Centre
To create a new work centre, select the ‘Add Work Centre’ button.
A blank form will load.
Enter a code and description.

Commercial in Confidence
©CPD LTD 2013
P a g e | 69
Select the ‘Scoped’ checkbox if the work centre is scoped (leave unchecked for unscoped).
Select the ‘Include in File Exports’ checkbox if the work centre should be included in exports
from iPlan to Sap.
Select an appropriate trade from the ‘Associated Trade’ drop-down list.
Select an appropriate resource from the ‘Default Resource’ drop-down list.
Select the ‘Save’ button to commit any changes.
To modify a work centre, locate the work centre in the work centres grid. Double-click the
row or select the ‘Edit’ button.
Update the work centre definition as appropriate.
Select the ‘Save’ button to commit any changes.
21.7. Refactor Trade Rates
‘Refactor Trade Rates’ is available from the Administration menu.
This feature allows the user to retrospectively bulk update the trade rates applied to an
event/order.
Only unapproved orders can be updated in this way.
To refactor trade rates, select a site from the ‘Site’ drop-down list.
Select a client from the ‘Client’ drop-down list.
Select an event from the ‘Event’ drop-down list.
Select the ‘View Orders’ button.
A form containing all unapproved orders within the selected event will load. Orders are grouped
by trade.

Commercial in Confidence
©CPD LTD 2013
P a g e | 70
Enter the correct trade rates for each rate type (leave blank if no updates are required).
Select the ‘Update Rates?’ checkbox for each order that should be included in the update. For
example, to update the electrician rate for order number 030031548999, select the ‘Update
Rates?’ checkbox associated to that order (under the ‘Electrician’ section).
Select the ‘Save’ button to apply that rate change.
Please note – only selected orders will be updated; all unchecked orders will remain unchanged.

Commercial in Confidence
©CPD LTD 2013
P a g e | 71
21.8. Roles
‘Roles’ is available from the Administration menu.
A role within iPlan defines a user’s access rights. A role is made up of a series of access features.
Each feature permits a task. For example, ‘Edit an Operation’ is a feature that permits the
modification of operations in iPlan.
Roles should mirror a user’s role within iPlan. For example, an estimator role will be made up of
a series of features that enable estimators to perform estimation tasks within iPlan.
A user can be assigned multiple roles. A single role can be assigned to multiple users.
The ‘Roles’ section allows the user to create, edit and delete roles.
21.8.1. Create/Edit Roles
To create a new role, select the ‘Add Role’ button. A blank form will load.
To view/edit a role record, double-click the row or select the ‘Edit’ button. A form will load
containing the existing role selections.
There are two feature lists: ‘Associated Features’ and ‘Available Features’.

Commercial in Confidence
©CPD LTD 2013
P a g e | 72
‘Associated Features’ is a list of all features currently associated with the role (this will be
blank when creating a new role).
‘Available Features’ is a list of all features within iPlan.
To associate a feature to the role, select the feature(s) from the ‘Available Features’ list.
Select the ‘Associate Selected’ button. The features will now be displayed under the
‘Associated Features’ list.
Similarly, to remove a feature from the associated features, select the feature(s) from the
‘Associated Features’ list. Select the ‘Unassociated Selected’ button. The features will now
be displayed under the ‘Available Features’ list.
Select the ‘Save’ button to commit any changes.
21.8.2. Delete a Role
To delete a role, select the ‘Delete’ button next to the role from the ‘Roles’ grid view.

Commercial in Confidence
©CPD LTD 2013
P a g e | 73
A message will be displayed asking you to confirm the deletion. Select ‘Ok’.
The deleted role will now be removed.
21.9. Supervisors
‘Supervisors’ is available from the Administration menu.
Within the ‘Users’ section of Administration, a user can be assigned supervisor privileges [see
‘Users’]. Supervisors are named individuals who are responsible for a team of workers. Within
iPlan, supervisors are recorded against actual time and progress entry.
Each supervisor will be responsible for one or more trades.
The ‘Supervisor’ section permits the association of trades to supervisors. This is especially useful
when recording time. When time is recorded against an order, iPlan will check whether the
supervisor is assigned responsibility for the trade of that order.
To view/modify the trade association for a supervisor, select a supervisor from the ‘Supervisor’
drop-down list.
There are two lists: ‘Associated Trades’ and ‘Available Trades’.
‘Associated Trades’ is a list of all trades currently associated with the supervisor.
‘Available Trades’ is a list of all trades within iPlan.
To associate a trade to the supervisor, select the trade(s) from the ‘Available Trades’ list. Select
the ‘Associate Selected’ button. The trades will now be displayed under the ‘Associated Trades’
list.
Commercial in Confidence
©CPD LTD 2013
P a g e | 74
Similarly, to remove a trade from the associated trades, select the trade(s) from the ‘Associated
Trades’ list. Select the ‘Unassociated Selected’ button. The trades will now be displayed under
the ‘Available Trades’ list.
Select the ‘Save’ button to commit any changes.
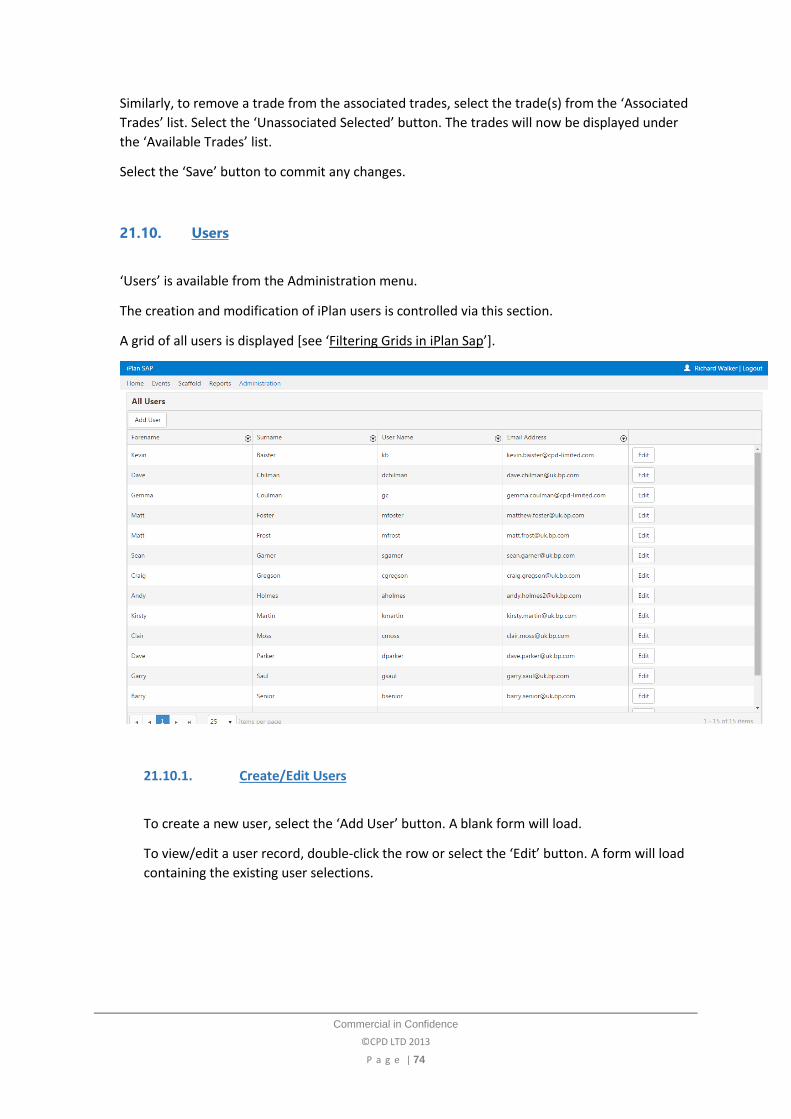
21.10. Users
‘Users’ is available from the Administration menu.
The creation and modification of iPlan users is controlled via this section.
A grid of all users is displayed [see ‘Filtering Grids in iPlan Sap’].
21.10.1. Create/Edit Users
To create a new user, select the ‘Add User’ button. A blank form will load.
To view/edit a user record, double-click the row or select the ‘Edit’ button. A form will load
containing the existing user selections.

Commercial in Confidence
©CPD LTD 2013
P a g e | 75
‘User Details’ Pod
Complete the form fields in the ‘User Details’ pod:
Provide a distinct user name (used for login)
Enter the user’s forename
Enter the user’s surname
Enter the user’s email address
Select a site from the ‘Sites’ drop-down list
Choose the clients to which this user has access
Select any appropriate user types (e.g., supervisor, estimate approver). Each user
may have no or multiple user types
‘Roles’ Pod
Select a role(s) from the ‘Available Roles’ drop-down list.
Select the ‘Add’ button to assign the role to the user.

Commercial in Confidence
©CPD LTD 2013
P a g e | 76
Each user can have one or multiple roles assigned.
The features for each role added will be displayed under the ‘Features’ pod [see ‘Roles’ for
more details on role definition].
To delete a role from a user, select the ‘-‘ button next to the ‘Assigned Role’. The role will be
removed from the ‘Assigned Roles’ section, and the ‘Features’ pod will update to remove
the features for that role.
‘Password’ Pod
Enter a password into the New Password field. This password will be used to login to iPlan.
Once all fields and selections have been made, select the ‘Save’ button to commit any changes.
21.11. Valuations
‘Valuations’ is available from the Administration menu.
This section enables users to run valuation reports as well as view previous reports.

Commercial in Confidence
©CPD LTD 2013
P a g e | 77
To run a new valuation, select a site from the ‘Site’ drop-down list.
Choose a date from the ‘Run up to’ date picker to limit the data to be included in the report.
Select the ‘Run Valuation’ button to generate the report.
A new row will be generated in the ‘Valuation History’ table.
The following buttons are available:
‘Download’ the valuation report (Excel file generated)
‘View’ the valuation report (html page)
‘Delete’ the valuation report
‘Finalise’ the valuation report (baseline and keep the valuation)
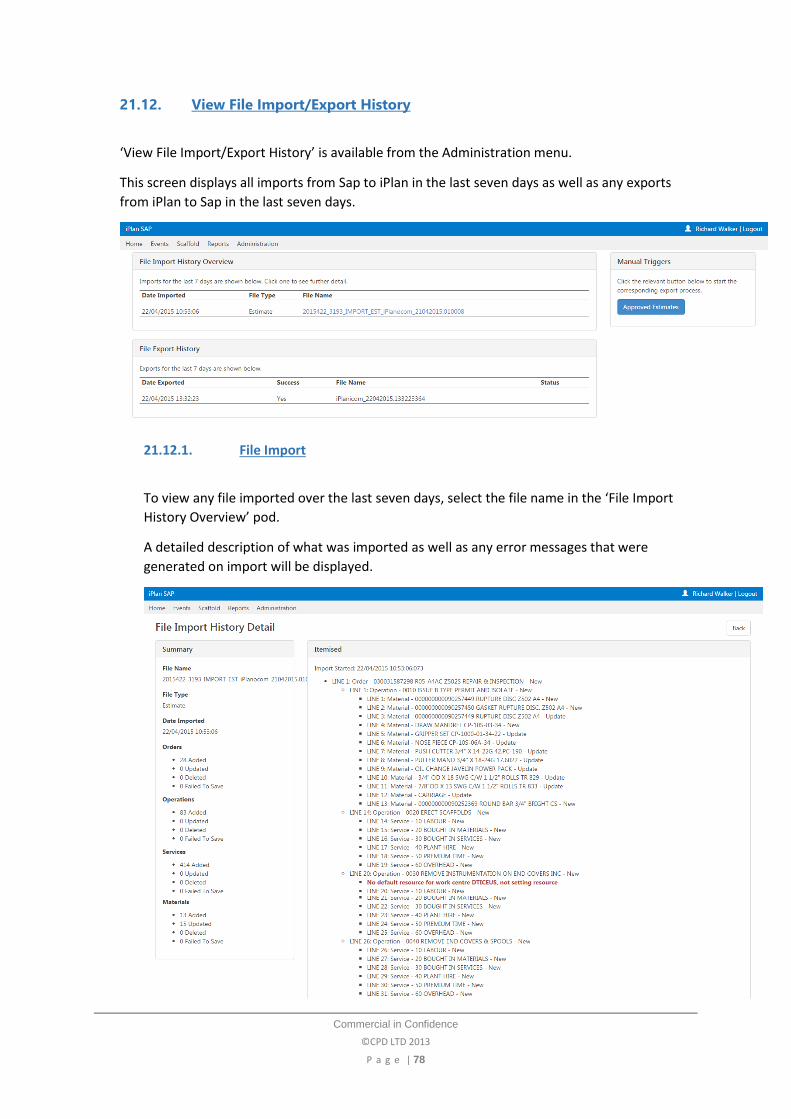
Commercial in Confidence
©CPD LTD 2013
P a g e | 78
21.12. View File Import/Export History
‘View File Import/Export History’ is available from the Administration menu.
This screen displays all imports from Sap to iPlan in the last seven days as well as any exports
from iPlan to Sap in the last seven days.
21.12.1. File Import
To view any file imported over the last seven days, select the file name in the ‘File Import
History Overview’ pod.
A detailed description of what was imported as well as any error messages that were
generated on import will be displayed.

Commercial in Confidence
©CPD LTD 2013
P a g e | 79
The ‘Import Detail’ screen should be referred to when looking for any problems with the
import (missing data). A summary of each error generated is displayed in red.
The ‘Summary’ pod details the file name, file type (estimate or status), date and time of
import as well as a breakdown of the number of rows (Orders, Operations, Services and
Materials) added, updated, deleted and failed to save.
The ‘Itemised’ pod displays a description of each row imported into iPlan.
21.12.2. File Export
The ‘File Export History’ pod displays all exports to Sap that have run over the last seven
days.
The date exported, success, file name and status are displayed for each export.
21.12.3. Manual Triggers
The ‘Manual Triggers’ pod enables the user to manually run the ‘Approved Estimates’
export. This export runs automatically overnight.
However, if you would like to run the export manually, select the ‘Approved Estimates’
button (this will not affect the overnight export).
A file will be generated and stored on the iPlan server. If you would like a copy of the file,
contact IAM Tech Service Desk at [email protected].
22. Filtering Grids in iPlan
iPlan has a number of ‘grids’ that are used to display large amounts of data.

Commercial in Confidence
©CPD LTD 2013
P a g e | 80
The grids enable data to be filtered, sorted and organised in a standardised way.
All grids work in the same way. Data is displayed in a table format. The number of items per page
can be specified by the user; for example, show me 100 items per page. All grids have a ‘pager’ at
the bottom of the grid to move between screens.
To ‘sort’ the grid, select the column heading for the type of data you would like to sort by.
In this example, to sort by priority, select the Priority column heading to sort by priority in ascending
order. Select the column again to sort in descending order.
To filter the grid (reduce the number of items displayed), select the filter icon on the column heading
you wish to filter by.
A filter popup will be displayed. By default, ‘Contains’ is selected. This type of filter will return any
records that contain the search result entered.
Other filter types are as follows: ‘Does Not Contain’, ‘Is Equal To’, ‘Is Not Equal To’, ‘Starts With’ and
‘Ends With’.
Once a file type is selected, enter a search term in the free text field provided.
Select the ‘Filter’ button to apply the filter and update the grid.
Multiple filters across any grid column can be applied at a time.

Commercial in Confidence
©CPD LTD 2013
P a g e | 81
This is a powerful tool to return a very specific set of data.
To clear a filter, select the filter icon next to the filtered column. A filter popup will be displayed.
Select the ‘Clear’ button to remove the filter and update the grid results.


