ISaGRAF Quick Start, V1.0, Mar. 2010 ICP DAS 1 ISaGRAF Quick Start The "ISaGRAF Quick Start" is suitable for ICP DAS ISaGRAF PAC. Legal Liability ICP DAS CO., LTD. assumes no liability for any and all damages that may be incurred by the user as a consequence of this product. ICP DAS CO., LTD. reserves the right to change this manual at any time without notice. ICP DAS CO., LTD. constantly strives to provide our customers with the most reliable and accurate information possible regarding our products. However, ICP DAS CO., LTD. assumes no responsibility for its use, or for any infringements of patents or other rights of third parties resulting from its use. 泓格科技股份有限公司對於因為使用本系列產品所造成的任何損害並不負任何法律 上的責任,本公司並保留在任何時候修訂本書且不需通知的權利。 泓格科技股份有限公司將儘可能地提供本系列產品可靠而詳盡的資訊。然而,本公 司並無義務需提供此系列產品詳盡的應用資訊,或對因非法使用本系列產品所遭受 的損害負任何責任。 Trademark & Copyright Notice The names of products and name of company are used for identification purposes only, and are the registered trademarks of their respective owners or companies. 本書所提所有公司商標,商標名稱及產品名稱分別屬於該商標或名稱的擁有者所有。 Development Software - ISaGRAF:Ver. 3.4x(or Ver. 3.5x), IEC 61131-3 standard. LD,ST,FBD,SFC,IL & FC Reference Guide - ISaGRAF PAC Getting Started Manual and English User’s Manual : http://www.icpdas.com/products/PAC/i-8000/getting_started_manual.htm Model ISaGRAF PAC Getting Started WP-8xx7 WinPAC-8xx7 CD:\napdos\isagraf\wp-8xx7\english_manu\ getting_started_wp-8xx7.pdf VP-2xW7 VP-2xW7 CD:\napdos\isagraf\vp-25w7-23w7\english_manu\ getting-started-vp-2xw7.pdf XP-8xx7-CE6 XP-8xx7-CE6 CD:\napdos\isagraf\xp-8xx7-ce6\english-manu\ getting-started-xp-8xx7-ce6-english.pdf
Transcript
ISaGRAF Quick Start, V1.0, Mar. 2010 ICP DAS 1
ISaGRAF Quick Start The "ISaGRAF Quick Start" is suitable for ICP DAS ISaGRAF PAC.
Legal Liability
ICP DAS CO., LTD. assumes no liability for any and all damages that may be incurred by the user as a consequence of this product. ICP DAS CO., LTD. reserves the right to change this manual at any time without notice.
ICP DAS CO., LTD. constantly strives to provide our customers with the most reliable and accurate information possible regarding our products. However, ICP DAS CO., LTD. assumes no responsibility for its use, or for any infringements of patents or other rights of third parties resulting from its use.
泓格科技股份有限公司對於因為使用本系列產品所造成的任何損害並不負任何法律
上的責任,本公司並保留在任何時候修訂本書且不需通知的權利。
泓格科技股份有限公司將儘可能地提供本系列產品可靠而詳盡的資訊。然而,本公
司並無義務需提供此系列產品詳盡的應用資訊,或對因非法使用本系列產品所遭受
的損害負任何責任。
Trademark & Copyright Notice
The names of products and name of company are used for identification purposes only, and are the registered trademarks of their respective owners or companies.
2.1 Writing A Simple ISaGRAF Program ............................................................ 6
2.1.1 Open ISaGRAF-Project Management ................................................... 7
2.1.2 Creating An ISaGRAF User’s Group ..................................................... 7
2.1.3 Creating A New ISaGRAF Project ......................................................... 7
2.1.4 Declaring the ISaGRAF Project Variables ........................................... 8
2.1.5 Create the LD - "LD1" Program ............................................................ 11
2.1.6 Edit the "LD1" Program ......................................................................... 12
2.1.7 Connecting the I/O ................................................................................. 15
2.2 Compiling & Simulating the Example Project ............................................ 17
2.3 Download & Debug the Example Project ................................................... 18
2.3.1 Download Project via RS-232 ............................................................... 18
2.3.2 Download Project via Ethernet ............................................................. 20
2.3.3 Downloading the Example Project ....................................................... 21
2.3.4 Starting the Downloading Process ....................................................... 22
2.3.5 Running the Example LD Program ...................................................... 23
ISaGRAF Quick Start, V1.0, Mar. 2010 ICP DAS 4
Chapter 1 Software Installation
1.1 Step 1 - Installing the ISaGRAF Software
The user needs to install the following two kinds of software before he can program the ICP DAS ISaGRAF PAC system. They are A. ISaGRAF Workbench & B. ICP DAS Utilities For ISaGRAF User has to purchase at least one pcs. of ISaGRAF (Ver. 3.4x or Ver. 3.5x ISaGRAF-256-E or ISaGRAF-256-C or ISaGRAF-32-E or ISaGRAF-32-C) to install on his PC to edit, download, monitor and debug the controller system. Item (B) is free and it is burned inside the CD-ROM which is delivered with the ISaGRAF PAC. Operating System Requirements:
One of the following computer operating systems must be installed on the target computer system before you can install the ISaGRAF Workbench software program. Windows 95 / Windows 98 / Windows 2000 Windows NT Version 3.51 or Windows NT Version 4.0 Windows XP or Vista or Windows 7 (Please refer to
www.icpdas.com > FAQ > Software >ISaGRAF Ver.3 > FAQ117) Steps to Installing the ISaGRAF Workbench:
Insert the ISaGRAF Workbench CD into your CD-ROM drive. If your computer does not have the auto-start feature active, use the Windows Explorer and go to the CD-ROM drive where the Workbench CD is installed, then double-click on the "install.bat" file listed on the ISaGRAF CD. If the "install.bat" file is not found on your ISaGRAF CD, then double-click on the "ISaGRAF.exe" file to start the installation process.
Select the language. Recommend to use "English" because this manual uses English version.
To begin the ISaGRAF 3.x software program, click on the Windows "Start" button, then on "Programs", and you should see the ISaGRAF program group as illustrated below.
1.2 Step 2 - Installing the ICP DAS Utilities for ISaGRAF
The "ICP DAS Utilities For ISaGRAF" consists of 3 major items. I/O libraries (for all ICP DAS ISaGRAF controllers) Modem_Link utility Auto-scan I/O utility
Note: The ISaGRAF Workbench software program must be installed before attempting to install the "ICP DAS Utilities for ISaGRAF". If you have not already installed the ISaGRAF Workbench program, please refer to step 1 before continuing. There is a CD-ROM supplied with each of the ISaGRAF PAC with the "ICP DAS Utilities for ISaGRAF". Please insert the CD-ROM into your CD-ROM drive. Then run CD-ROM: \napdos\isagraf\setup.exe . Follow the steps to install it.
Note: If "ICP DAS Utilities for ISaGRAF" is not in your CD-ROM, please refer to website of http://www.icpdas.com/products/PAC/i-8000/isagraf-link.htm , then find "ICP DAS Utilities For ISaGRAF" to download "io_lib.zip".
If you haven’t installed "ISaGRAF" & "ICP DAS Utilities for ISaGRAF", please go back to read Chapter 1.
2.1 Writing A Simple ISaGRAF Program
We are going to use ISaGRAF Workbench to write a simple ISaGRAF example program, then download it to the ISaGRAF PAC (with one I-87055W I/O board in its slot 1) to make it work. This example contains one Ladder program. Variables Declaration:
Name Type Attribute Description
OUT01 Boolean Output Output 1 in the I-87055W
OUT02 Boolean Output Output 2 in the I-87055W
K1 Boolean Input Input 1 in the I-87055W
K2 Boolean Input Input 2 in the I-87055W
T1 Timer Internal Time Period of blinking, initial value set as T#8s
Ladder Logic Program Outline:
Project name – "example1"
Name of your project group –"Test"
Ladder program name – "LD1"
ISaGRAF Quick Start, V1.0, Mar. 2010 ICP DAS 7
2.1.1 Open ISaGRAF-Project Management
Click on the Windows "Start" button, then click on "All Programs" > "ISaGRAF 3.4", (or ISaGRAF 3.5) and then click on "Projects" as shown below.
2.1.2 Creating An ISaGRAF User’s Group
First, click on "Select Project Group" tool button. Next, click on "New Group", then enter the name for the new user's group you wish to create (ex. Test) and click on "OK". Finally, click on "Select" to get into the group window.
2.1.3 Creating A New ISaGRAF Project
To start a new ISaGRAF project, click on the "Create New Project" tool button and then enter the name for the new project. You can then enter additional information for your project by clicking on the "Edit" and then "Set Comment Text" menu as illustrated below.
1.
2.
5.
3. 4.
Step 4. Click OK, the group name will show here. 名稱
ISaGRAF Quick Start, V1.0, Mar. 2010 ICP DAS 8
You will now see the new project name in the ''Project Management'' window. Double click on the new project name (ex. example1) to open the project.
2.1.4 Declaring the ISaGRAF Project Variables
Before you can start creating an ISaGRAF program, you must first declare the variables. Declare the Boolean Variables
1. Click on the "Dictionary" tool button. 2. Click on the "Boolean" tab to declare the Boolean variables that will be used
in this example program. 3. Double click on the colored area below the "Boolean" tab, and a "Boolean
Variable" window will open.
1.
2..
3.
4.
Double click on the project name to open the window
ISaGRAF Quick Start, V1.0, Mar. 2010 ICP DAS 9
In this example:
4. Enter the variable name (ex. "K1") in "Name" entry box. 5. Enter the notes (ex. "Input 1 in the I-87055W board") in "Comment" entry box. 6. Select the variable attribute (ex. "Input") in "Attribute" item. 7. Press the "Store" button to save it.
Now, the new Boolean variable has been declared.
NOTE:
You MUST make sure that the variable you have declared has the desired Attribute assigned. If you decide that you want to change a project variable’s attribute, just double click on the variable name and you can reassign the attribute for the variable. Please follow the above same step to declare one another Boolean variable – "K2". Then you will have as below.
1.
2.
3.
5.
4.
7.
6.
ISaGRAF Quick Start, V1.0, Mar. 2010 ICP DAS 10
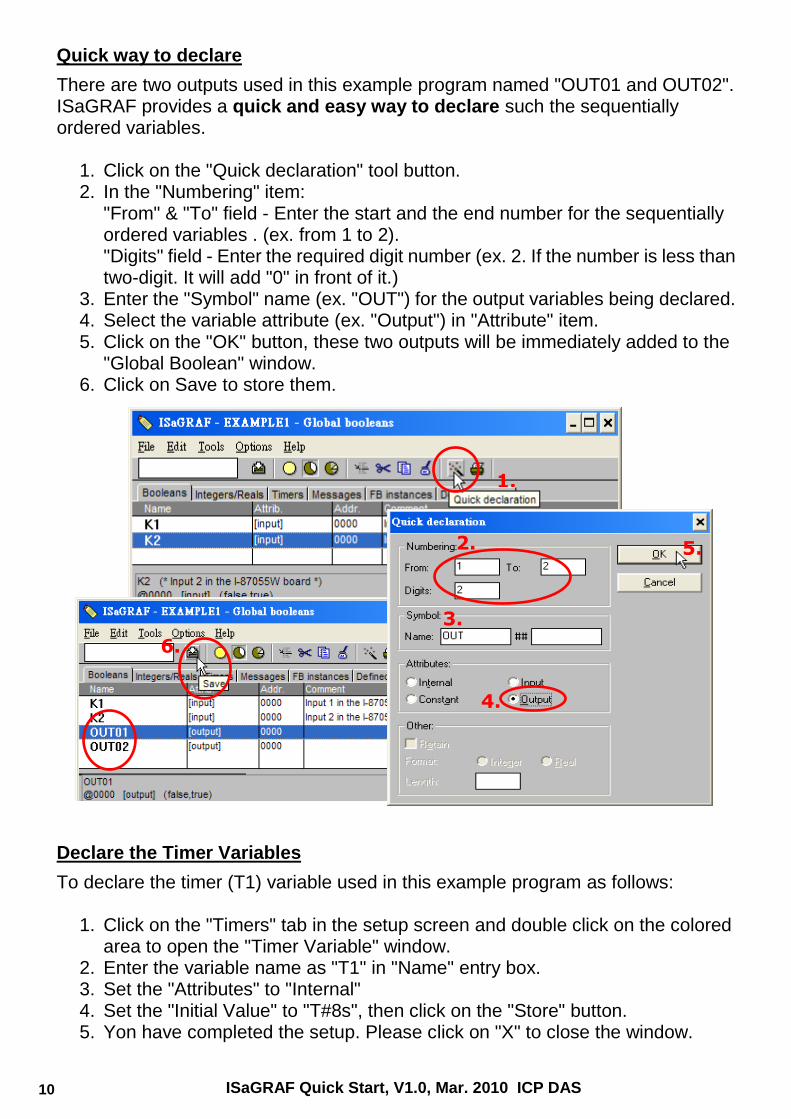
Quick way to declare
There are two outputs used in this example program named "OUT01 and OUT02". ISaGRAF provides a quick and easy way to declare such the sequentially ordered variables.
1. Click on the "Quick declaration" tool button. 2. In the "Numbering" item:
"From" & "To" field - Enter the start and the end number for the sequentially ordered variables . (ex. from 1 to 2). "Digits" field - Enter the required digit number (ex. 2. If the number is less than two-digit. It will add "0" in front of it.)
3. Enter the "Symbol" name (ex. "OUT") for the output variables being declared. 4. Select the variable attribute (ex. "Output") in "Attribute" item. 5. Click on the "OK" button, these two outputs will be immediately added to the
"Global Boolean" window. 6. Click on Save to store them.
Declare the Timer Variables
To declare the timer (T1) variable used in this example program as follows:
1. Click on the "Timers" tab in the setup screen and double click on the colored area to open the "Timer Variable" window.
2. Enter the variable name as "T1" in "Name" entry box. 3. Set the "Attributes" to "Internal" 4. Set the "Initial Value" to "T#8s", then click on the "Store" button. 5. Yon have completed the setup. Please click on "X" to close the window.
1.
2.
3.
4.
6.
5.
ISaGRAF Quick Start, V1.0, Mar. 2010 ICP DAS 11
2.1.5 Create the LD - "LD1" Program
Click on the "Create New Program" tool button and the "New Program" window will appear. Enter the "Name" as "LD1", next, click on the "Language" scroll button and select "Quick LD: Ladder Diagram", and make sure the "Style" is set to "Begin: Main Program". You can add any desired notes to the "Comment" field for the "LD" program, but it doesn't require. Now we have one program inside this project. Please double click on the "LD1" to get into it.
1.
2.
3.
4.
1.
2.
3.
4.
5.
ISaGRAF Quick Start, V1.0, Mar. 2010 ICP DAS 12
2.1.6 Edit the "LD1" Program
As a previous step, when you double click on the "LD1", named the "Quick LD Program" window will appear. To start programming our LD program, click on "Edit" > "Insert Rung" from the main menu bar. "Insert Rung" means to insert a basic LD rung just above the current position. Or, you may just simply click on the "F2 (Contact On The Left)" tool button. The following will appear within the Quick LD Program window. We are going to write the first line of the LD1 program. Move the cursor to the first "contact" and then click on "cut" to delete it.
or
Move the cursor to the "Contact" and click on "cut" to delete it.
ISaGRAF Quick Start, V1.0, Mar. 2010 ICP DAS 13
Click on the "F6 (Block on the left)" tool button and you will create a block on the left of the "coil".
Now we are going to assign the associated variable & constant to each item. Double click anywhere inside the block and the "Function Block" assignment window appears. Select the "BLINK" type function block. To learn how the "BLINK" function operates you can click on the "Info" button for a detailed explanation of its functionality. Now move your cursor to the left of the parameter "CYCLE" of the "BLINK" block. Double click on it, select "Timer" and then double click on variable name - "T1".
Double click on anywhere inside the block
Click on "Info" to get detailed explanation.
1.
2.
3.
ISaGRAF Quick Start, V1.0, Mar. 2010 ICP DAS 14
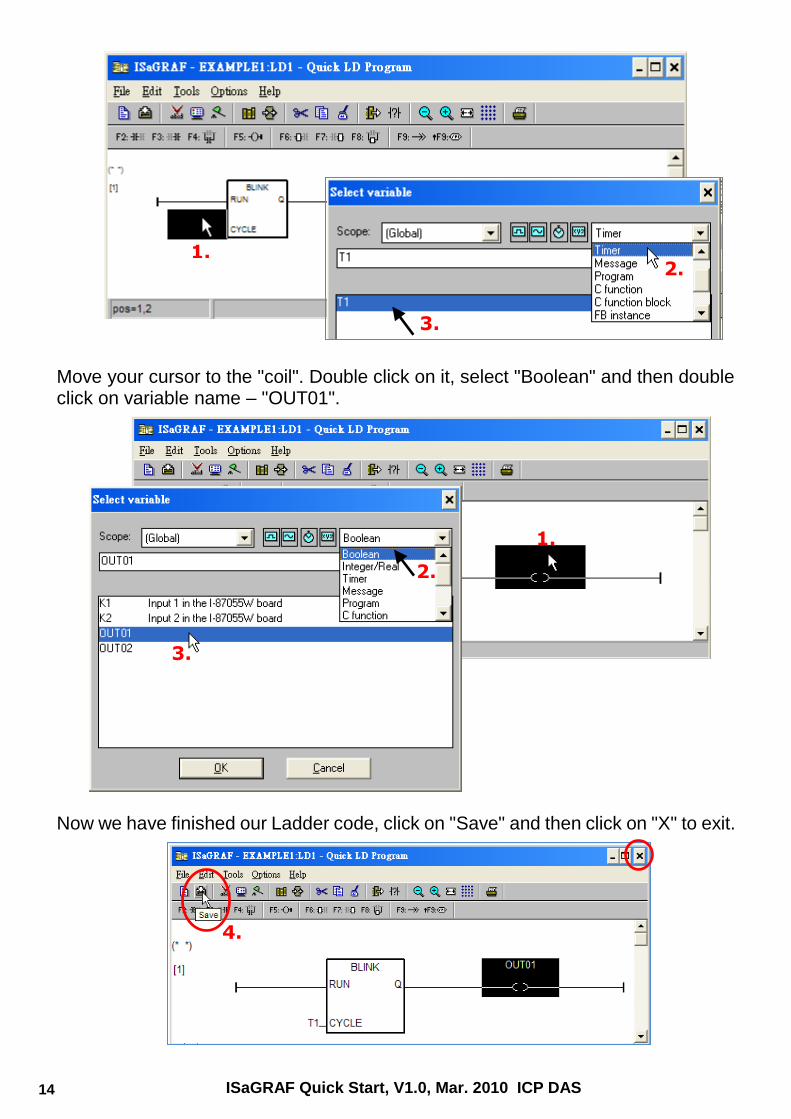
Move your cursor to the "coil". Double click on it, select "Boolean" and then double click on variable name – "OUT01".
Now we have finished our Ladder code, click on "Save" and then click on "X" to exit.
1. 2.
3.
1.
2.
3.
4.
ISaGRAF Quick Start, V1.0, Mar. 2010 ICP DAS 15
2.1.7 Connecting the I/O
We have defined variables name of "OUT01" , "OUT02" as "Output" attribution, while "K1" & "K2" as "Input" attribution in step 2.1.4. These "input" & "output" variables should be map to physical I/O in the controller before they can work. To do that, click on "I/O connection" tool button to get into the "I/O connection" window. Double click on the No. 1 slot (Please make sure your I-87055W I/O board is plug in slot 1 of ISaGRAF PAC) and then check on the "Equipments" and double click on the "I_87055: 8 CH. DI & 8 CH. DO". If you don't have or the ISaGRAF PAC doesn’t support the I-87055W module, you may click the “Real / Virtual board” to make it become virtual board.) To map input variables "K1" & "K2" to the input channel No. 1 & 2 of the "I-87055", click on "DI8" and then double click on channel 1.Then click on "Connect" twice to connect the "K1" & "K2" variables.
1.
2.
Click "Note" for detail information.
3.
4.
ISaGRAF Quick Start, V1.0, Mar. 2010 ICP DAS 16
By the same way, please connect "OUT01" , "OUTPUT02" to output channel 1 to 2. Then we have below window. Click on "Save" and then exit. IMPORTANT NOTICE:
1. I/O Slots 0 through 7 are reserved for REAL I/O boards that will be used in ISaGRAF PAC. You can use slot No. 8 and above for additional functionality.
2. All of the variables with "Input" and "Output" attribute MUST be connected through the I/O connection as described above for any program to be
1. 2.
3.
4.
ISaGRAF Quick Start, V1.0, Mar. 2010 ICP DAS 17
successfully compiled. Only the Input and Output attributed variables will appear in the "I/O Connections" window. In this example we have only 2 boolean output variables - OUT01, OUT02 and 2 boolean input variables – K1 & K2.
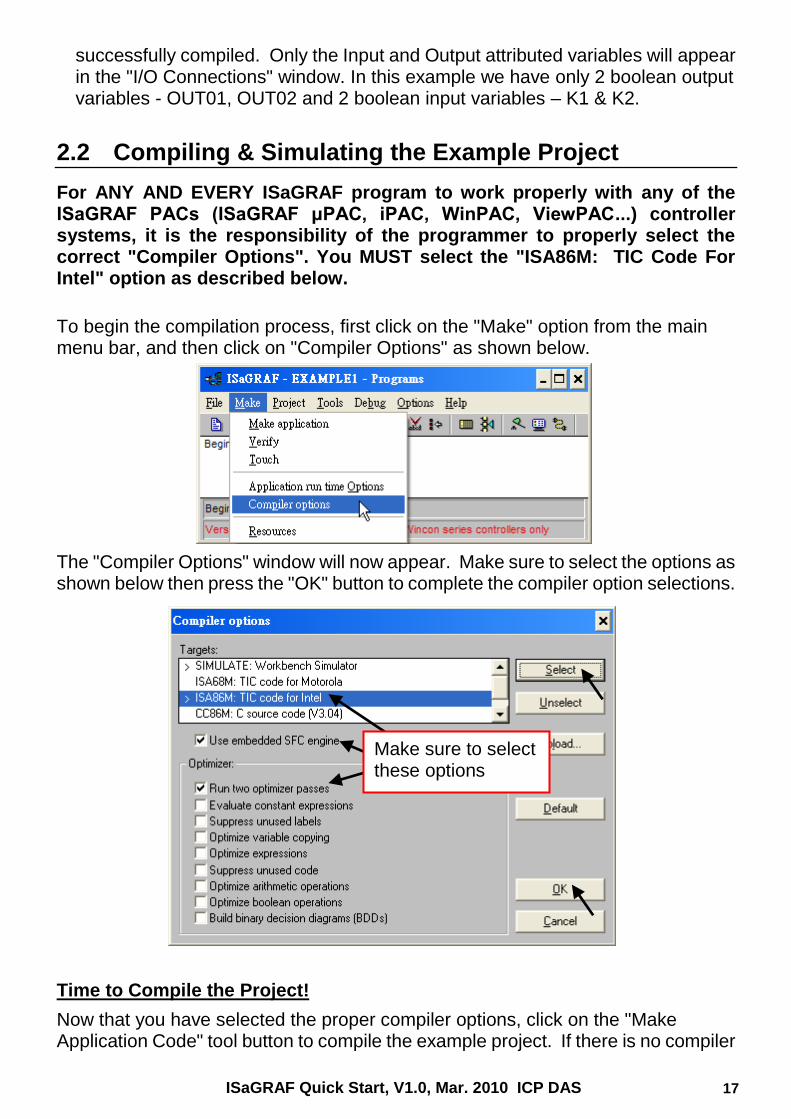
2.2 Compiling & Simulating the Example Project
For ANY AND EVERY ISaGRAF program to work properly with any of the ISaGRAF PACs (ISaGRAF μPAC, iPAC, WinPAC, ViewPAC...) controller systems, it is the responsibility of the programmer to properly select the correct "Compiler Options". You MUST select the "ISA86M: TIC Code For Intel" option as described below.
To begin the compilation process, first click on the "Make" option from the main menu bar, and then click on "Compiler Options" as shown below.
The "Compiler Options" window will now appear. Make sure to select the options as shown below then press the "OK" button to complete the compiler option selections.
Time to Compile the Project!
Now that you have selected the proper compiler options, click on the "Make Application Code" tool button to compile the example project. If there is no compiler
Make sure to select these options
ISaGRAF Quick Start, V1.0, Mar. 2010 ICP DAS 18
errors detected during the compilation process, CONGRATULATIONS, you have successfully created our example program. If errors are detected during the compilation process, just click on the "Continue" button to review the error messages. Return to the Project Editor and correct the errors as outlined in the error message window.
2.3 Download & Debug the Example Project
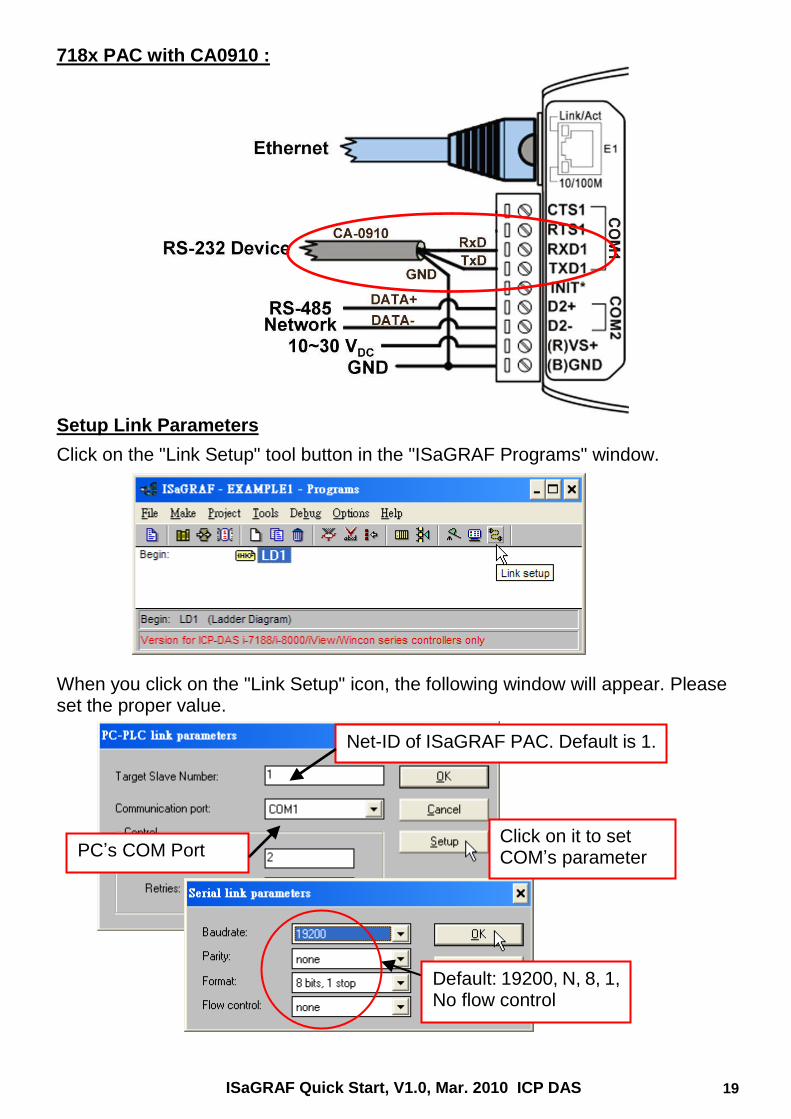
We have two ways to download the project to ISaGRAF PAC. One is using RS-232 cable, another one is using Ethernet cable.
As below, set "Port Number" to "502", then enter the IP address of ISaGRAF PAC.
2.3.3 Downloading the Example Project
Before you can download the project to the controller, you must first verify that your PC and the controller system are communicating with each other. To verify proper communication, click on the "Debug" tool button in the "ISaGRAF Programs" window as shown below. If the development PC and ISaGRAF PAC system are communicating properly with each other, the following window displayed below will appear (or if there is a previous program running in the ISaGRAF PAC , the project name and the word "active" will show on the screen). If the message in the "ISaGRAF Debugger" says "Disconnected", it means that the development PC and the controller system have not established communications with each other.
The most common causes for this problem is either the serial port cable not being properly configured, or the development PC’s serial port communications DO NOT match that of ISaGRAF PAC system.
ISaGRAF project name on the PC
Current running project name inside the controller
ISaGRAF Quick Start, V1.0, Mar. 2010 ICP DAS 22
You may have to either change the serial port communication settings for the development PC (which may require changing a BIOS setting) or change the "Serial Link Parameters" in the ISaGRAF program. If there is a previous program running in the ISaGRAF PAC, you will need to stop that project before you can download the example project. Click on the "STOP" tool button to halt any applications that may be running.
2.3.4 Starting the Downloading Process
Click on the "Download" tool button from the "ISaGRAF Debugger" window. Then click on "ISA86M: TIC Code For Intel" from the "Download" window as shown below.
The example project will now start downloading to ISaGRAF PAC system. A progress bar will appear in the "ISaGRAF Debugger" window showing the project downloading progress.
If "ISA86M: TIC code for Intel" is not found here, Please return to section 2.2 to check this option & re-compile the project again.
To terminate the communication between your PC & the controller, please click on "X"
ISaGRAF Quick Start, V1.0, Mar. 2010 ICP DAS 23
2.3.5 Running the Example LD Program
You can observe the real time I/O status from several ISaGRAF windows while you are running the example project. One of the windows is the "I/O Connections" window, which shows each of the inputs and outputs as assigned. Click on the "I/O Connections" tool button in the ISaGRAF Debugger window to open the "I/O Connections" window. You may switch ON/OFF the DI on the front panel of the I-87055W I/O board to see what happens about "K1" & "K2".
You can adjust the "T1" variable while the program is running. To accomplish this,
1. Click on the "Dictionary" tool button to open the Global window. 2. Click on "Timer" tab and then double click on "T1" area. 3. Set the timer value to "T#4000ms" (this means 4000 ms). Then click on "Write".
Please observe the status of blinking interval.
1.
2.
3.
ISaGRAF Quick Start, V1.0, Mar. 2010 ICP DAS 24
You may also click on "Dictionary" to see the real time variable state. Another VERY helpful window you can open is the "Quick LD Program" window. From this window you can observe the LD program being executed in real time.