48
iSMA-B-FCU User Manual FCU Updater Global Control 5 Sp. z o.o. Warsaw, Poland www.gc5.pl

iSMA-B-FCU User Manual
FCU Updater
Global Control 5 Sp. z o.o. Warsaw, Poland
www.gc5.pl

iSMA-B-FCU /FCU Updater
Version 2.0 www.gc5.pl Page 2 / 48
Table of contents
1 Introduction............................................................................................................................... 3
1.1 Revision history ........................................................................................................... 3
1.2 Software requirements ............................................................................................... 3
1.3 General purpose of FCU Updater software ............................................................ 3
1.4 Naming and its definition ........................................................................................... 5
2 Checking software requirements at application start ...................................................... 6
2.1 Java version ................................................................................................................. 6
2.2 Internet access and firmware availability ............................................................... 7
2.3 After the first run ....................................................................................................... 10
3 Working with projects ........................................................................................................... 11
3.1 Creating a new project ............................................................................................. 11
3.2 Opening an existing project ..................................................................................... 13
4 Start and Stop Transmission .............................................................................................. 16
5 Discover Devices .................................................................................................................... 18
5.1 Discovering Devices for Modbus ............................................................................ 18
5.2 Discovering Devices for BACnet ............................................................................. 20
6 Adding and removing devices manually ........................................................................... 22
7 Lists of devices with list of Errors ...................................................................................... 25
8 Direct connection to device by USB cable ........................................................................ 28
9 Upload and Download ........................................................................................................... 30
10 Restarting Devices................................................................................................................. 35
11 Default Settings ...................................................................................................................... 36
12 How to connect FCU Updater to physical device or bus ............................................... 38
12.1 Direct connection by USB cable ............................................................................. 38
12.2 Connection to RS485 bus ........................................................................................ 41
13 Manage ‘Bootloader’ state on the controller .................................................................... 43
14 SOX Protocol........................................................................................................................... 45
15 Console .................................................................................................................................... 47

iSMA-B-FCU /FCU Updater
Version 2.0 www.gc5.pl Page 3 / 48
1 Introduction
1.1 Revision history
Rev Date Description
1.0 06.12.2016 • First edition
1.2 19.07.2017 • Updated to FCU Updater v.2.0
2.1 30.04.2018 • Updated to FCU Updater v.2.1.1
Table 1 - Revision History
1.2 Software requirements
Windows compatibility – FCU Updater is an application intended for Windows only, which can
be run on Windows 7, 8 and 10 series.
WARNING! To use all features of the FCU Updater the latest Oracle Java 32-bit is required.
Please download the latest Java software from Oracle Download website first.
1.3 General purpose of FCU Updater software
The FCU Updater software is designed to perform a start-up and maintenance operations for
both a single device or for many devices connected to a communication network on the site.
The FCU Updater is ready to communicate with iSMA-B-FCU controller and iSMA-B-LP panel.
The software is free and can be obtained from your distribution partner or downloaded from
support server at www.support.gc5.pl
Note: The FCU Updater has been developed in a way to guarantee the highest level of security
against the loss of an existing application loaded on the devices before any changes are made.
The software always automatically backups the application by downloading it to a local PC
where FCU Updater is running. Moreover, the system always checks compatibility between

iSMA-B-FCU /FCU Updater
Version 2.0 www.gc5.pl Page 4 / 48
the firmware and the uploading application before transferring them to the controller to make
sure they can work together on the device, without problems.
For simplicity and time-saving, the FCU Updater allows, e.g. to upload firmware, upload an
application, reset a device or set it to default settings on more than a single device at a time.
This function can be beneficial as far as updating the firmware on all devices at once, is
concerned. Similarly, a backup of the existing applications from all devices can be
automatically transferred to a local PC from many controllers at once without operator
interactions.
FCU Updater is a project-oriented application which means that whole network configuration
parameters, iSMA-B-FCU controllers with their application backups and firmware versions are
stored locally inside the project folder for later reuse.
FCU Updater offers the following actions:
• Managing projects • Loading the latest firmware versions from a Global Control 5 Sp. z o.o. server • Uploading new firmware on devices • Uploading default or custom application on devices • Performing backups of the existing device's application on a local PC • Restoring earlier saved application to one or more devices • Resetting devices • Resetting to default settings on many devices, • Starting/stopping SOX protocol to support programming on WorkPlace • Viewing internal logs on Console
All functions are available and work in the same way for all three communication types:
• Modbus RTU - using the RS485 port • BACnet MSTP - using the RS485 port • USB - using the direct USB cable connection except for SOX and Console option

iSMA-B-FCU /FCU Updater
Version 2.0 www.gc5.pl Page 5 / 48
1.4 Naming and its definition
FCU Updater communicates to one or more devices and transfers data in both directions. It is crucial to distinguish the direction of data flow as described below.
• Uploading – means transferring data from PC to a controller, for example when a new firmware or custom application flows to the iSMA-B-FCU device.
• Downloading – means transferring data back from the iSMA-B-FCU controller, for example when data flows back from iSMA-B-FCU device to a local PC.
Figure 1 – communication transfer directions
Downloading
Uploading

iSMA-B-FCU /FCU Updater
Version 2.0 www.gc5.pl Page 6 / 48
2 Checking software requirements at application start
2.1 Java version
FCU Updater software requires Oracle Java 32-bit to be installed on user’s PC. Each time the
FCU Updater starts, the system notifies whether the core version of Java is available.
Figure 2 – JAVA not installed
The user can run FCU Updater without having correct Java version installed with limited
functionality, such as opening the SOX protocol and viewing internal and live logs on the
console. The SOX protocol and Console are described in detail in the following chapters herein.
WARNING! In the case when the required Java version is not installed, it is recommended to
close the FCU Updater and download Java SE 32-bit (windows x86) software from the Oracle’s
website.
iSMA-B-FCU /FCU Updater
Version 2.0 www.gc5.pl Page 7 / 48
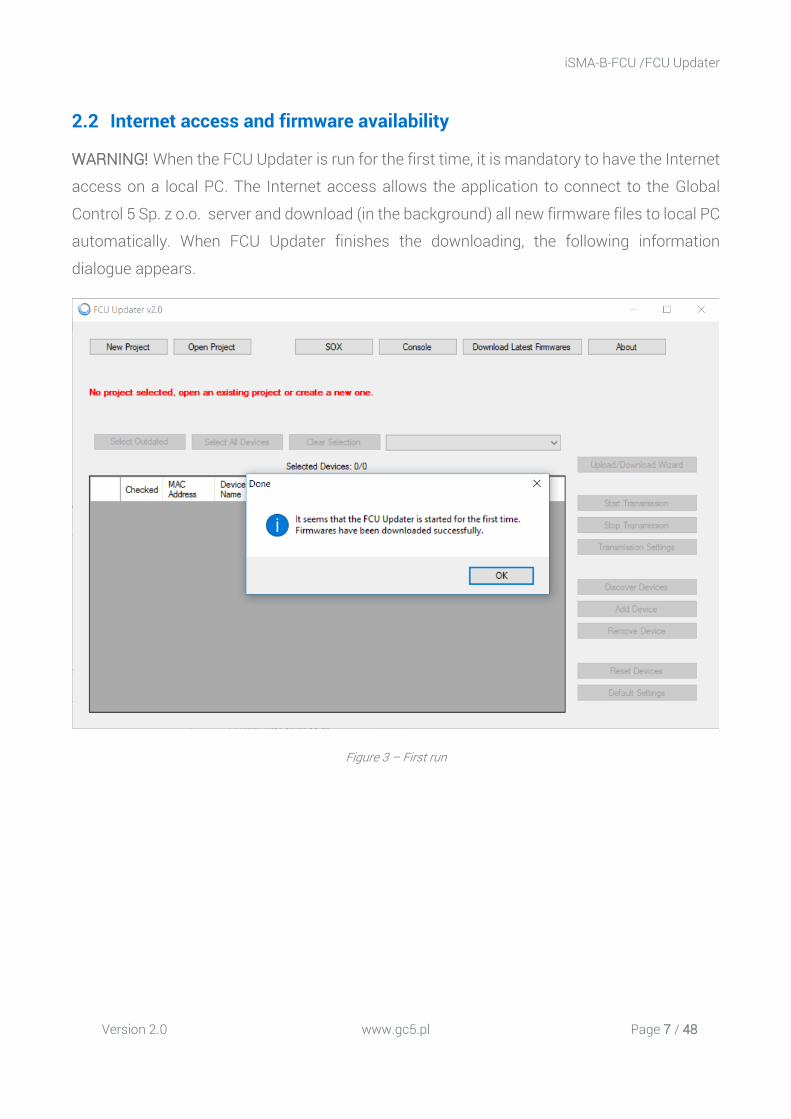
2.2 Internet access and firmware availability
WARNING! When the FCU Updater is run for the first time, it is mandatory to have the Internet
access on a local PC. The Internet access allows the application to connect to the Global
Control 5 Sp. z o.o. server and download (in the background) all new firmware files to local PC
automatically. When FCU Updater finishes the downloading, the following information
dialogue appears.
Figure 3 – First run

iSMA-B-FCU /FCU Updater
Version 2.0 www.gc5.pl Page 8 / 48
Later, after the first start up, each time the FCU Updater is switched on, the system
automatically checks (without downloading it automatically) whether a newer firmware
version is available on the Global Control 5 Sp. z o.o. server. It is recommended to download
the latest available firmware from the server each time when prompted by the system. The
user can check if the newest firmware is available at any time by pressing ‘Download Latest
Firmware’ button.
Figure 3 – Each time FCU Updater runs
After the new firmware files are successfully downloaded, the following confirmation dialogue
is displayed.

iSMA-B-FCU /FCU Updater
Version 2.0 www.gc5.pl Page 9 / 48
Figure 4 – New firmware downloaded successfully
In the case when no new firmware files are available on the server, the below dialogue appears.
Figure 5 – No new firmware available

iSMA-B-FCU /FCU Updater
Version 2.0 www.gc5.pl Page 10 / 48
2.3 After the first run
Each time the FCU Updater is running (except for the first start up as described above), a below
FCU Updater window displays.
Figure 6 – After the first run
Note: FCU Updater has almost all options disabled at this moment. The user has two choices depends on what is expected:
If the user wants to work with external software, e.g. ‘Work Place’, before running the SOX protocol it is essential to configure the connection of iSMA-B-FCU controller directly to the USB port on a local PC. For more details, please refer to a relevant chapter herein.
If the user wants to use any impaired functions of the FCU Updater software, it is required to open or created the project first. Please follow next chapter for more details.
iSMA-B-FCU /FCU Updater
Version 2.0 www.gc5.pl Page 11 / 48
3 Working with projects The FCU Updater is designed to be more consistent and portable through the introduction of a project orientation. Working with projects allows the user to keep all information in regards to the huge number of devices from different sites scored and organised in folders and subfolders. Operating with the projects also allows the system to automatically update project folders with any newly discovered devices or backup, and other features.
Note: At first, it is essential to create a new project or open an existing one by selecting the ‘New Project’ or ‘Open Project’ button respectively.
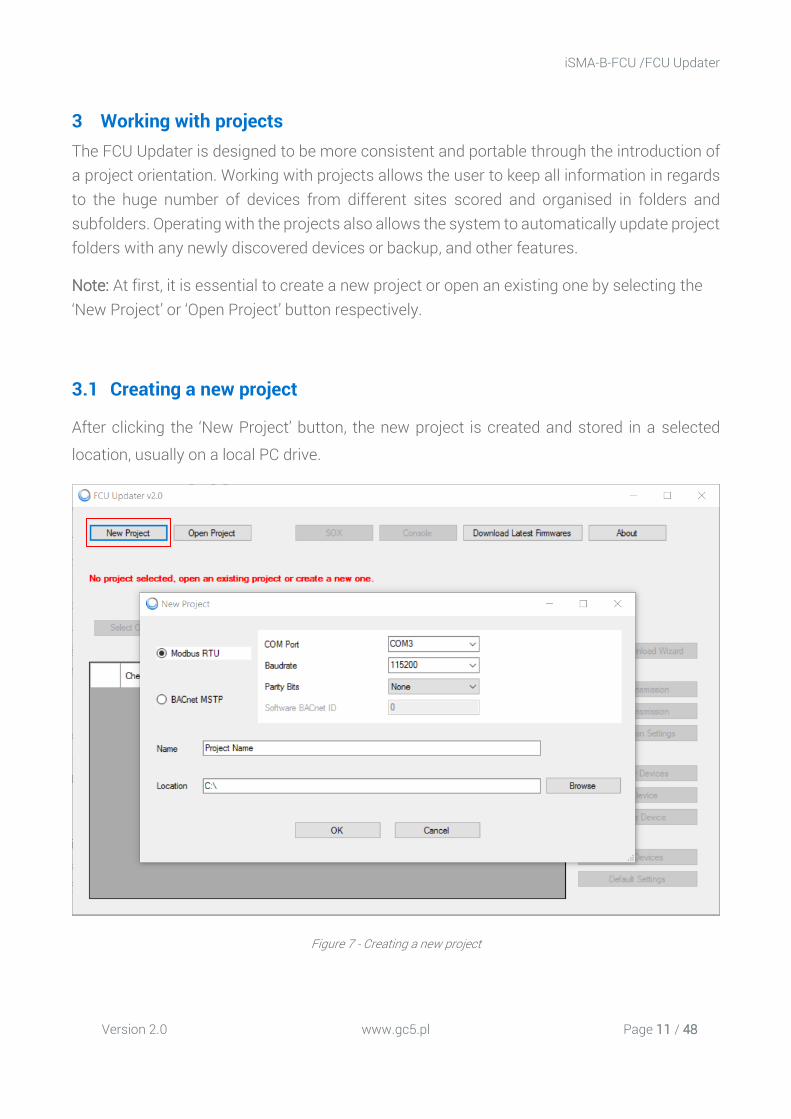
3.1 Creating a new project
After clicking the ‘New Project’ button, the new project is created and stored in a selected
location, usually on a local PC drive.
Figure 7 - Creating a new project

iSMA-B-FCU /FCU Updater
Version 2.0 www.gc5.pl Page 12 / 48
The window with transmission settings and specification of the location appears. Select the protocol type: Modbus RTU or BACnet MSTP with all required communication settings for a chosen protocol. For more details of transmission settings, please refer to relevant chapters describing how to setup Modbus RTU and BACnet MSTP protocols.
If at this point the exact protocol type is not known, the user can change protocol type and its setting later at any time.
Note: It is recommended to connect PC to the required Modbus or BACnet network first which guarantees that the new COM port (other than built-in COM1) appears in the ‘COM Port’ field, for example, ‘COM3’.
Note: If it is required to make a direct connection (via USB on local PC port) to only one device: iSMA-B-FCU or iSMA-B-LP panel, please select a built-in ‘COM1’ in ‘COM Port’ field and leave default values for other settings.
The second part of dialogue asks for a project name and its location on a local PC.
Pressing the ‘OK’ button verifies the typed data and creates a new folder in a particular place. The folder name is the same as the one chosen for Project Name. Thus the user can easily copy and move the folder to any other location or email or even rename it. Before performing any operations with the folder, close the FCU Updater first.
iSMA-B-FCU /FCU Updater
Version 2.0 www.gc5.pl Page 13 / 48
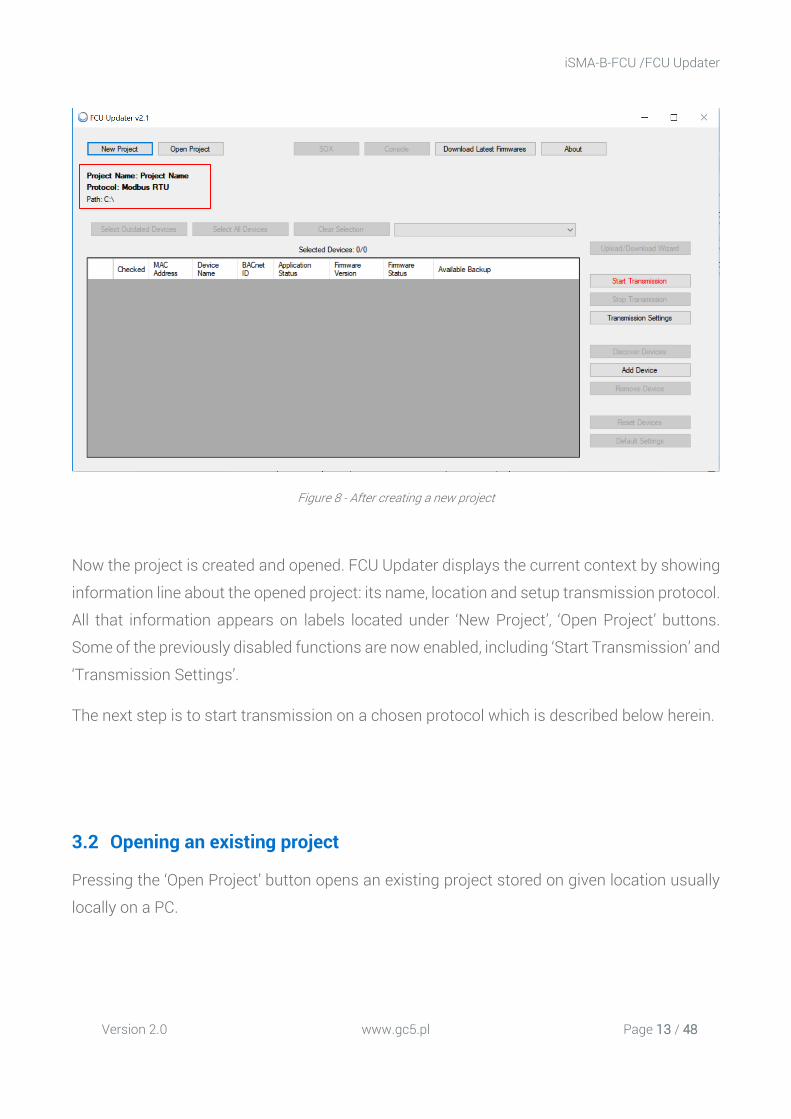
Figure 8 - After creating a new project
Now the project is created and opened. FCU Updater displays the current context by showing
information line about the opened project: its name, location and setup transmission protocol.
All that information appears on labels located under ‘New Project’, ‘Open Project’ buttons.
Some of the previously disabled functions are now enabled, including ‘Start Transmission’ and
‘Transmission Settings’.
The next step is to start transmission on a chosen protocol which is described below herein.
3.2 Opening an existing project
Pressing the ‘Open Project’ button opens an existing project stored on given location usually
locally on a PC.

iSMA-B-FCU /FCU Updater
Version 2.0 www.gc5.pl Page 14 / 48
Figure 9 - Opening an existing project
To open an existing project, the user has two options available:
• selecting the project name directly from the drop-down list in the ‘Recent Project’ field • browsing and finding a folder of an existing project, then pointing out a project's
configuration file ‘config.iSMA’ in the project folder.
After pressing the ‘OK’ button, the existing project opens depending whether the system can
localise the configuration file.
Now the project is opened. FCU Updater displays the current context by showing a
confirmation information about the opened project: its name, location and setup transmission
protocol. All that information appears on labels located under ‘New Project’, ‘Open Project’
buttons. Also, all the information about devices name, type, versions, backups previously
saved in the project folder appears in the main table on the application screen.

iSMA-B-FCU /FCU Updater
Version 2.0 www.gc5.pl Page 15 / 48
Figure 10 - After opening an existing project
Some of the previously disabled functions are now enabled, including ‘Start Transmission’ and
‘Transmission Settings’. The next step is to start transmission on a chosen protocol which is
described in the following part of this manual.
The next step is to start communication with the controllers listed in the project. After pressing
the ‘Start Transmission’ button, the system rechecks the current status of devices and begin
to work with them online.
iSMA-B-FCU /FCU Updater
Version 2.0 www.gc5.pl Page 16 / 48
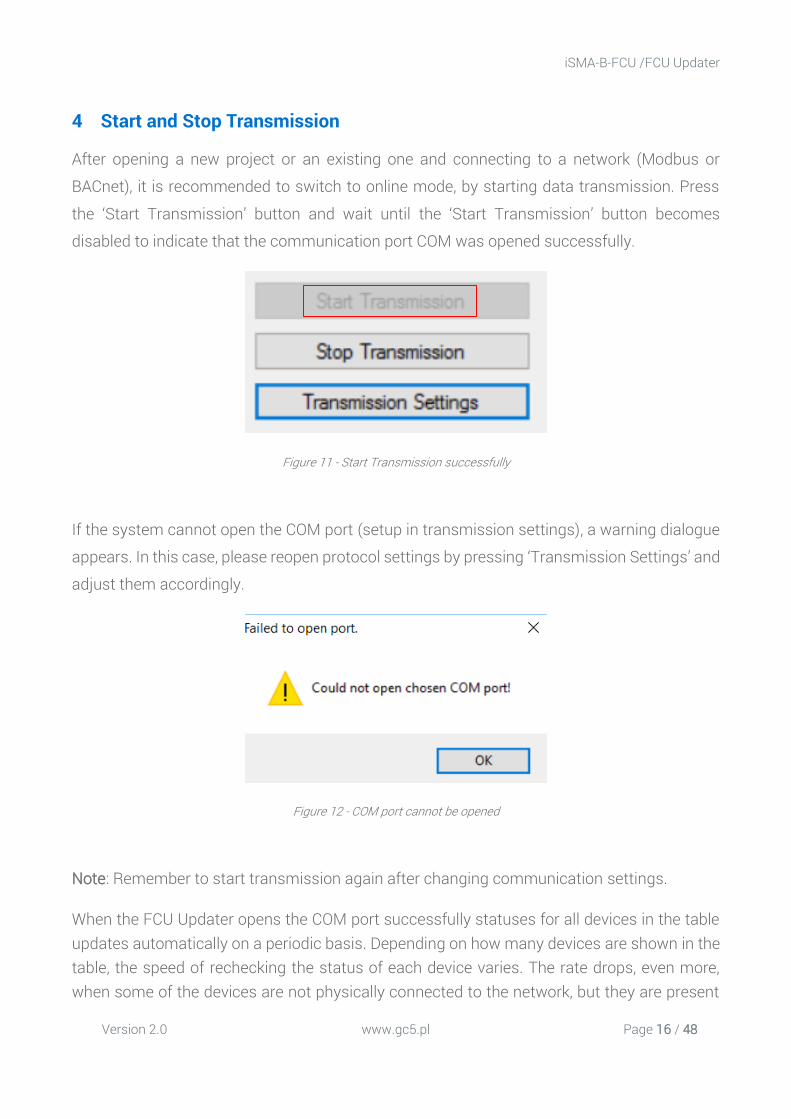
4 Start and Stop Transmission
After opening a new project or an existing one and connecting to a network (Modbus or
BACnet), it is recommended to switch to online mode, by starting data transmission. Press
the ‘Start Transmission’ button and wait until the ‘Start Transmission’ button becomes
disabled to indicate that the communication port COM was opened successfully.
Figure 11 - Start Transmission successfully
If the system cannot open the COM port (setup in transmission settings), a warning dialogue
appears. In this case, please reopen protocol settings by pressing ‘Transmission Settings’ and
adjust them accordingly.
Figure 12 - COM port cannot be opened
Note: Remember to start transmission again after changing communication settings.
When the FCU Updater opens the COM port successfully statuses for all devices in the table updates automatically on a periodic basis. Depending on how many devices are shown in the table, the speed of rechecking the status of each device varies. The rate drops, even more, when some of the devices are not physically connected to the network, but they are present
iSMA-B-FCU /FCU Updater
Version 2.0 www.gc5.pl Page 17 / 48
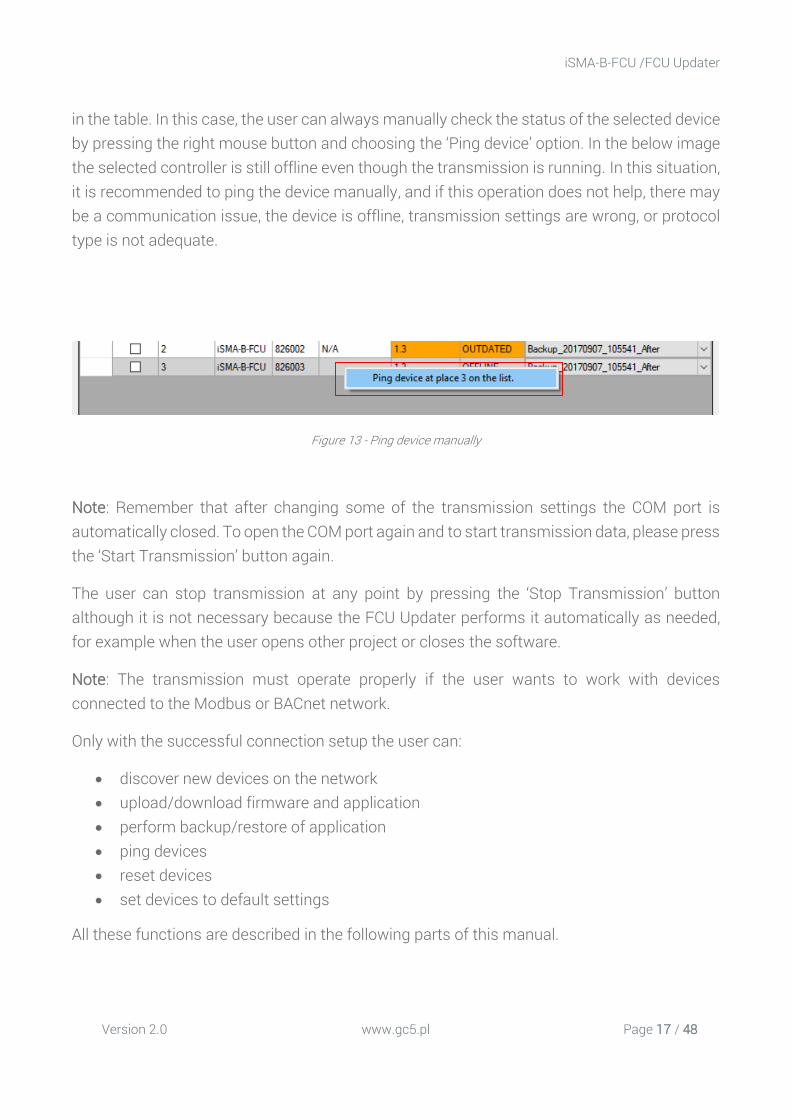
in the table. In this case, the user can always manually check the status of the selected device by pressing the right mouse button and choosing the ‘Ping device’ option. In the below image the selected controller is still offline even though the transmission is running. In this situation, it is recommended to ping the device manually, and if this operation does not help, there may be a communication issue, the device is offline, transmission settings are wrong, or protocol type is not adequate.
Figure 13 - Ping device manually
Note: Remember that after changing some of the transmission settings the COM port is automatically closed. To open the COM port again and to start transmission data, please press the ‘Start Transmission’ button again.
The user can stop transmission at any point by pressing the ‘Stop Transmission’ button although it is not necessary because the FCU Updater performs it automatically as needed, for example when the user opens other project or closes the software.
Note: The transmission must operate properly if the user wants to work with devices connected to the Modbus or BACnet network.
Only with the successful connection setup the user can:
• discover new devices on the network • upload/download firmware and application • perform backup/restore of application • ping devices • reset devices • set devices to default settings
All these functions are described in the following parts of this manual.
iSMA-B-FCU /FCU Updater
Version 2.0 www.gc5.pl Page 18 / 48
5 Discover Devices
If the connection to Modbus or BACnet network is setup properly, it is possible to discover all
the devices physically connected on the bus. The discovering process means recognition of
device type together with its address in the network. Each found device is automatically added
to the table of the current project, so the user does not need to know the type, address and
number of devices connected on the bus. The discovering process is fast, and it is
recommended to run it at the beginning to have an overview of the whole network. It is also
advisable to run it whenever a new physical device is added on the site.
Note: Before starting the discovering process, makes sure that the right project is opened by
checking the project name and its path is shown under ‘New Project’, ‘Open Project’ buttons.
To start the discovering process press the ‘Discover Devices’ button to open a supporting
dialogue with some settings. The discovering process requires some individual settings
depending on a protocol type.
5.1 Discovering Devices for Modbus
For the Modbus protocol, it is required to setup the addresses range. The FCU Updater starts
searching for the first device with the given address in the ‘Start Address’ field until reaching
the last device with the address specified in the ‘Stop Address’ field. Time spent for the
discovering time varies based on the devices range and network's baud rate. To reduce the
discovering time, it is recommended to adjust the range accordingly.
Press the ‘Find’ button to run identification process. During the process, all already detected
devices are listed at the bottom of the dialogue box. It is possible to abort this process without
adding any devices to the table in the project by pressing the ‘Cancel’ button. If the number of
already identified devices is satisfactory, the user can stop the further process and add just
the found devices to the table by pressing the ‘Finish’ button.

iSMA-B-FCU /FCU Updater
Version 2.0 www.gc5.pl Page 19 / 48
Figure 14 - Discovering Devices for Modbus
Figure 15 - Discovering process in progress for Modbus
iSMA-B-FCU /FCU Updater
Version 2.0 www.gc5.pl Page 20 / 48
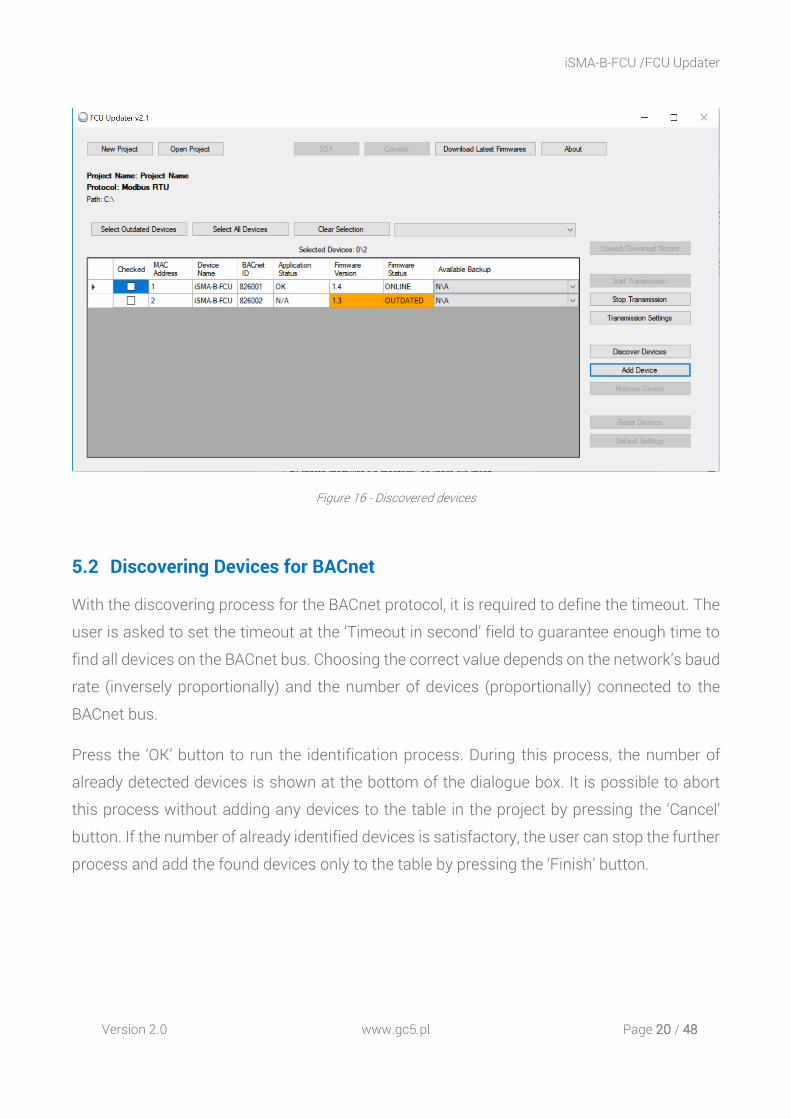
Figure 16 - Discovered devices
5.2 Discovering Devices for BACnet
With the discovering process for the BACnet protocol, it is required to define the timeout. The
user is asked to set the timeout at the ‘Timeout in second’ field to guarantee enough time to
find all devices on the BACnet bus. Choosing the correct value depends on the network’s baud
rate (inversely proportionally) and the number of devices (proportionally) connected to the
BACnet bus.
Press the ‘OK’ button to run the identification process. During this process, the number of
already detected devices is shown at the bottom of the dialogue box. It is possible to abort
this process without adding any devices to the table in the project by pressing the ‘Cancel’
button. If the number of already identified devices is satisfactory, the user can stop the further
process and add the found devices only to the table by pressing the ‘Finish’ button.

iSMA-B-FCU /FCU Updater
Version 2.0 www.gc5.pl Page 21 / 48
Figure 17 - Discovering Devices for BACnet
Figure 18 - Discovering process in progress for BACnet

iSMA-B-FCU /FCU Updater
Version 2.0 www.gc5.pl Page 22 / 48
Note: If all devices are not found after the first scanning process is complete, increase the
timeout value. If some missing controllers are still found, add the missing devices manually
by pressing the ‘Add Device’ button. The procedure of adding the devices manually is
described below herein. Adding and removing devices manually
Adding the device to the table or removing it allows a manual manipulation. Both functions
(adding and removing) can be used either online or offline even without starting the
transmission. This approach allows the user to edit the list of devices on any project before
arriving on the site.
The discovering devices function together with adding and removing option helps the user to
build a virtual list of all physical devices installed on the Modbus or BACnet network.
Figure 19 - Add Device
The adding new device process varies depending on the type of connection chosen for the
project. Both protocol types ask for unique device identification on the bus. In the case of
Modbus, the Modbus address (MAC address filed) is required but in BACnet, the BACnet ID is
needed. To simplify the process, the system automatically calculates and gives proposition of
a BACnet ID based on the typed MAC Address assuming that BACnet net is built with default
82600 sub-net (provided by BACnet organisation to all Global Control 5 Sp. z o.o. devices).

iSMA-B-FCU /FCU Updater
Version 2.0 www.gc5.pl Page 23 / 48
Figure 20 - Manually adding a device on Modbus
Figure 21 - Manually adding a device on BACnet
Removing devices from the project allows to select one or more devices and remove them by
pressing the ‘Remove Device’ button. The FCU updater requires confirmation before removing
anything.

iSMA-B-FCU /FCU Updater
Version 2.0 www.gc5.pl Page 24 / 48
Figure 22 - Manually removing devices
It is possible to add the device to the list automatically (extend the list of devices) as soon as
the physical unit is connected to the FCU Updater directly by the cable. This feature is
convenient when there is the controller that is not yet attached to the bus, but the user can
easily connect USB cable to it. Next chapter describes this process in more detail.
iSMA-B-FCU /FCU Updater
Version 2.0 www.gc5.pl Page 25 / 48
6 Lists of devices with list of Errors The main window of the FCU Updater shows the table with lists of devices. The list represents the physical devices collected either by using the discovery function or manually by adding device option in an opened project. Each row in the table represents one physical device.
The table shows the following information for each instrument:
• ‘MAC address’ - address set inside the device • ‘Device Name’ - type of device • ‘BACnet ID’ - BACnet ID address for BACnet network • ‘Application Status’ – current status of running application on the controller (the
following are available: ANY ERROR (see explanation bellow), N/A, OK) • ‘Firmware Version’ - firmware version running on the device • ‘Firmware Status’ - firmware status (the following are available: offline, online, outdated,
not compatible, bootloader, USB) • ‘Available Backup’ - backup files already stored on the project
ANY ERROR: The FCU Updater from version 2.1.1 can read Application Status from iSMA-B-FCU controller starting from firmware version 1.4.
From now, it is possible to see if the application (‘app’) in the controller is running without any issue even though the controller is ‘online’. The ‘Application State’ shows the current state of SVM (Sedona Virtual Machine) including details information related to bootstrap, image, system, application, component and runtime errors.
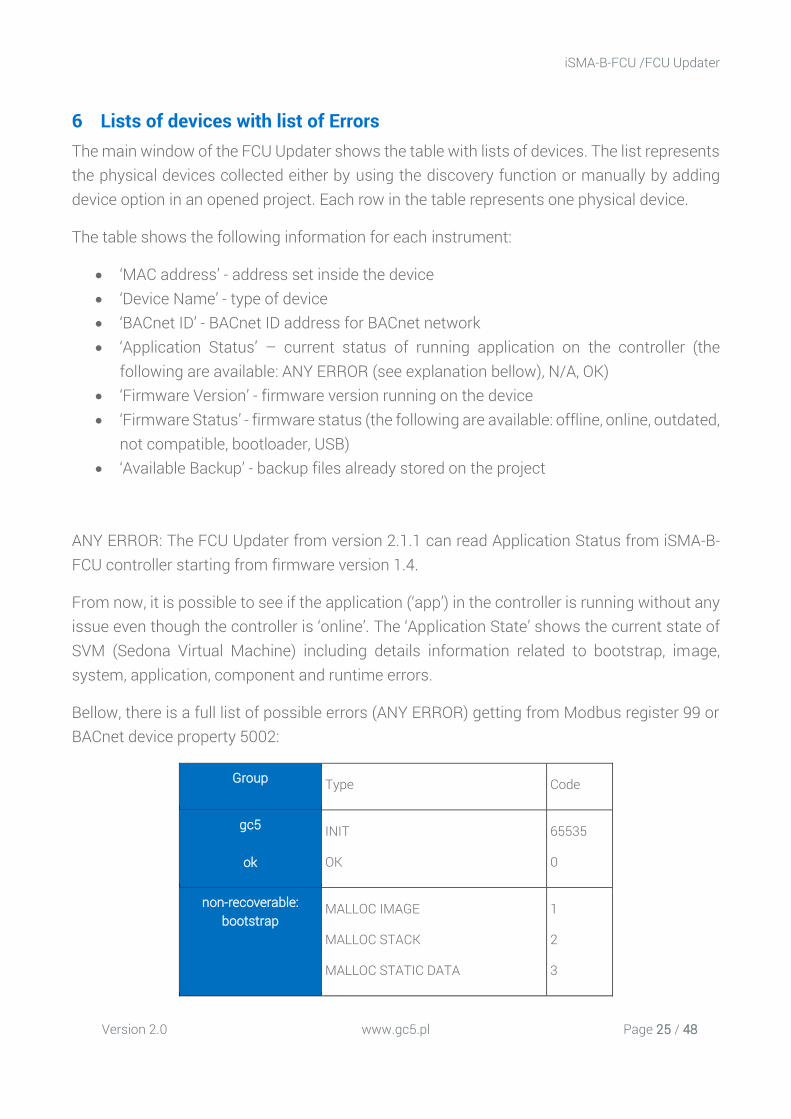
Bellow, there is a full list of possible errors (ANY ERROR) getting from Modbus register 99 or BACnet device property 5002:
Group Type Code
gc5
ok
INIT
OK
65535
0
non-recoverable: bootstrap
MALLOC IMAGE
MALLOC STACK
MALLOC STATIC DATA
1
2
3

iSMA-B-FCU /FCU Updater
Version 2.0 www.gc5.pl Page 26 / 48
INPUT FILE NOT FOUND
CANNOT READ INPUT FILE
4
5
non-recoverable: bad image
BAD IMAGE MAGIC
BAD IMAGE VERSION
BAD IMAGE BLOCK SIZE
BAD IMAGE REF SIZE
BAD IMAGE CODE SIZE
6
7
8
9
10
non-recoverable: runtime errors
UNKNOWN OPCODE
MISSING NATIVE
11
12
non-recoverable: Sys
INVALID ARGS
CANNOT INIT APP
40
41
non-recoverable: App
CANNOT OPEN FILE
INVALID MAGIC
INVALID VERSION
INVALID SCHEMA
UNEXPECTED EOF
INVALID KIT ID
INVALID TYPE ID
CANNOT MALLOC
CANNOT INSERT
CANNOT LOAD LINK
INVALID APP END MARKER
NO PLATFORM SERVICE
BAD PLATFORM SERVICE
42
43
44
45
46
47
48
49
50
51
52
53
54
non-recoverable: Component
INVALID COMP END MARKER
NAME TOO LONG
60
61
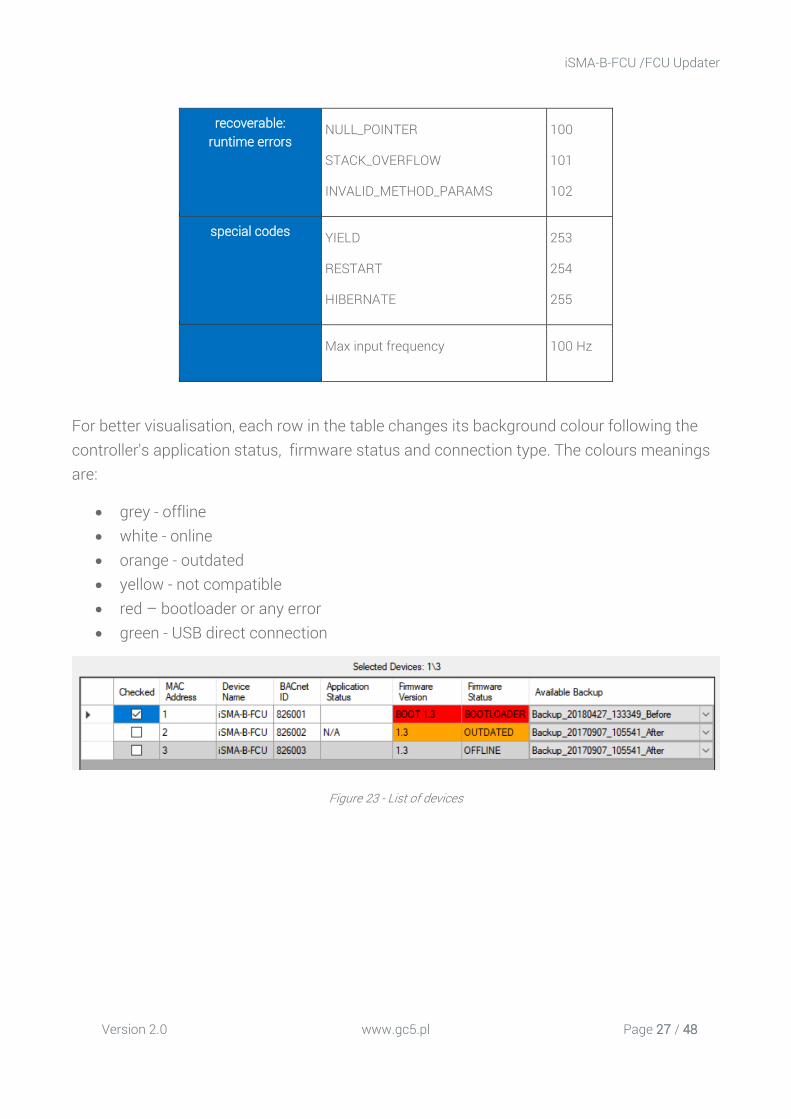
iSMA-B-FCU /FCU Updater
Version 2.0 www.gc5.pl Page 27 / 48
recoverable: runtime errors
NULL_POINTER
STACK_OVERFLOW
INVALID_METHOD_PARAMS
100
101
102
special codes YIELD
RESTART
HIBERNATE
253
254
255
Max input frequency 100 Hz
For better visualisation, each row in the table changes its background colour following the controller's application status, firmware status and connection type. The colours meanings are:
• grey - offline • white - online • orange - outdated • yellow - not compatible • red – bootloader or any error • green - USB direct connection
Figure 23 - List of devices
iSMA-B-FCU /FCU Updater
Version 2.0 www.gc5.pl Page 28 / 48
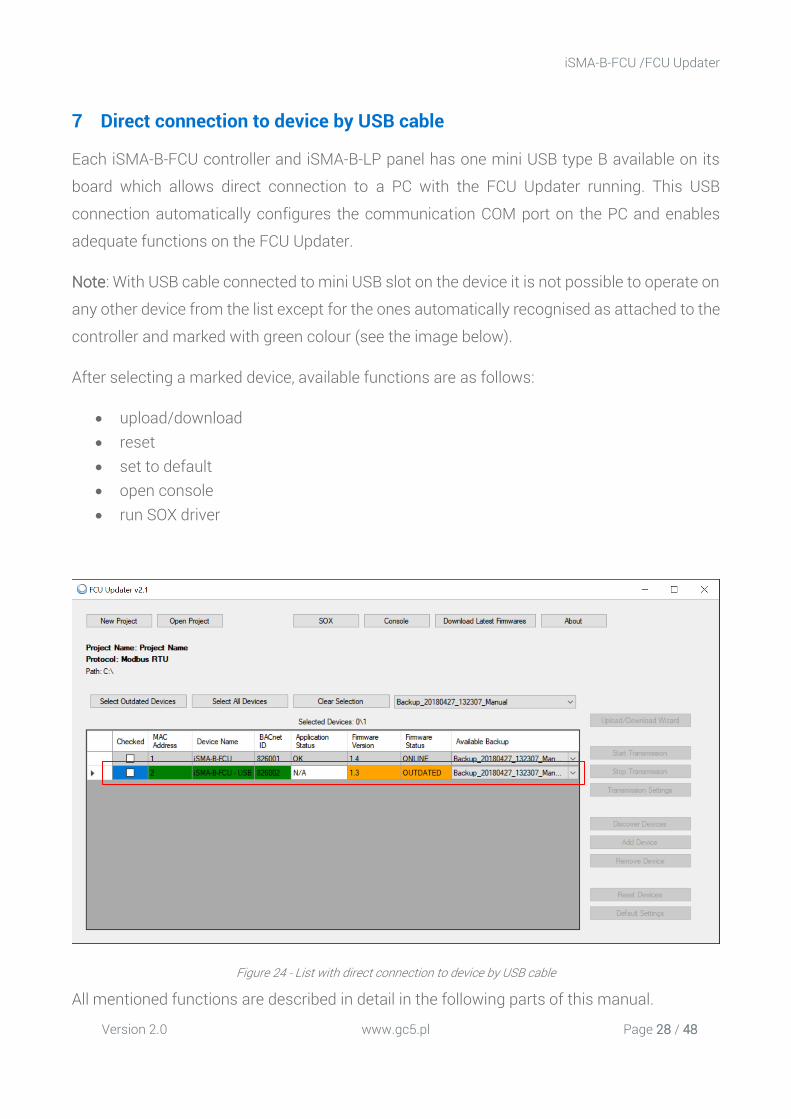
7 Direct connection to device by USB cable
Each iSMA-B-FCU controller and iSMA-B-LP panel has one mini USB type B available on its
board which allows direct connection to a PC with the FCU Updater running. This USB
connection automatically configures the communication COM port on the PC and enables
adequate functions on the FCU Updater.
Note: With USB cable connected to mini USB slot on the device it is not possible to operate on
any other device from the list except for the ones automatically recognised as attached to the
controller and marked with green colour (see the image below).
After selecting a marked device, available functions are as follows:
• upload/download • reset • set to default • open console • run SOX driver
Figure 24 - List with direct connection to device by USB cable
All mentioned functions are described in detail in the following parts of this manual.

iSMA-B-FCU /FCU Updater
Version 2.0 www.gc5.pl Page 29 / 48
Note: Direct connection of the device by USB cable adds this controller automatically to the
project's list for the future use, see the picture below with added iSMA-B-FCU controller. Please
note that after disconnection of the USB cable re-start the connection with the bus by pressing
the ‘Start Transmission’ button.
Note: Only the device with the unique address can be added to the list. Before connecting any
devices by USB, please check that there is no object on the list with the same address as the
unit to be attached.

iSMA-B-FCU /FCU Updater
Version 2.0 www.gc5.pl Page 30 / 48
8 Upload and Download
The Upload and Download functions are available under ‘Upload/Download Wizard’. Before
pressing this button, it is necessary to start transmission and to select device or devices. The
selection can be done by checking the box at the beginning of each table's row or by using
filter buttons (‘Select Outdated’, ‘Select All Devices’, ‘Clear Selection’) at the top of the table.
‘Upload/Download Wizard’ offers the following options:
• Upload firmware and keep application • Upload firmware and default application • Upload custom application and firmware (if outdated) • Restore backup to devices • Backup application from devices.
Figure 25 - Upload and Download options

iSMA-B-FCU /FCU Updater
Version 2.0 www.gc5.pl Page 31 / 48
All upload options are quite sensitive because they transfer some data from a local PC to the
external device and some of them override firmware and application on the controller.
Therefore the FCU updater always does a safety backup of the existing application in the
controller before and after the uploading process. Moreover, it recompiles the application with
dedicated firmware locally on the PC before uploading to the controller. This approach
guarantees that in the case of a failure the user can restore the old program with its firmware
and run the previous version of the application on the controller smoothly.
The upload option has three variations:
• ‘Upload firmware and keep application’ - only firmware and kits are uploaded, the application remains the same and is not overridden. This option updates the firmware to the latest firmware version downloaded from the Global Control 5 Sp. z o.o. server only after a successful recompilation. It takes the existing application from the controller and recompiles it with the newest manifests before replacing the old firmware on the controller. This approach guarantees smooth operation of the current application with the newest firmware.
• ‘Upload firmware and default application’ – firmware, kits and default application are uploaded. The present application on the device is overridden. This option uploads the newest version of the default application together with the newest firmware (*) available on the Global Control 5 Sp. z o.o. server. It is recommended to use this option when the user does not have the custom application. System recompiles the downloaded application with the newest firmware, and if everything goes right, it uploads the firmware and the default application to the device.
WARNING! This option clears the existing application.
• ‘Upload custom application, and firmware (if outdated)’ – firmware, kits and custom application are uploaded. The system asks for the custom application to upload to the device. The current application on the controller is overridden. If firmware on the device is outdated, this option downloads (*) the latest firmware version from the Global Control 5 Sp. z o.o. server. If the firmware on the controller is not outdated, this option keeps the current firmware version. In both cases after verification of the firmware, system recompiles the firmware with the custom application. If the recompilation finishes successfully, the FCU Updater uploads the custom application to the device followed by the firmware.
iSMA-B-FCU /FCU Updater
Version 2.0 www.gc5.pl Page 32 / 48
WARNING! This option clears the existing application.
(*) - During any uploading function, the system will not check what is available
on the server. The FCU Updater transfers the latest and compatible firmware that is
stored locally on the PC. The user must manually download the latest firmware version
from the Global Control 5 Sp. z o.o. server by pressing the ‘Download Latest Firmware’
button after the FCU Updater is run.
Last two options are related to backup operations.
• ‘Restore backup to devices’ - restores the older backup (application with its firmware) to the controller. The stored data for restoring process is chosen from the available backups for each device individually by selecting the backup from the drop-down list in the table. When the system makes the backup, either automatically or by the user, the FCU Updater creates a new folder in the project folder and names it as ‘Backup_xxxxxxxxxxx’, where ‘xx xxxxxxxxxxx’ represents the timestamp. This folder contains the backups taken at the same time for all the selected devices. The FCU Updater explores all backup folders within the project to find out all backups available for each controller. Results are sorted and presented in the drop-down list for each device individually. Before proceeding to the restore option, the user has to select not only the devices but also choose the backup from the drop-down list for each device individually. There is a general choice (in the table column named: ‘Available Backup’) to simplify the selection of backup for all devices. If the controller has no backup made at the time selected by general form, the user should choose any other backup from the device's drop-down list to specify which backup should be used for the restoring process.

iSMA-B-FCU /FCU Updater
Version 2.0 www.gc5.pl Page 33 / 48
Figure 26 - Defining backups for restore process
• ‘Backup applications from devices’ - transfers the application from selected devices to the local PC. First, the FCU Updater creates a backup folder and names it, e.g. as ‘Backup_xxxxxxxxxxx_manual’, where ‘xxxxxxxxxxx’ is the current timestamp and postfix ‘manual’ describes that the user requests it manually. If the system performs the backup automatically, the postfixes are ‘before’ or ‘after’ depending on whether the backups have been made before or after the whole process. When the backup process starts out, the system creates a new backup folder to which the applications from each selected devices are transferred. Finally, the FCU Updater updates the drop down lists in the table according to the latest backup.
After running one of the above-mentioned functions, the progress bar window appears on the
screen. Additionally, it shows the status of the phase the FCU Updater is performing (backup,
upload or restore) and the device number on which it is being executed. The information varies
depending on the protocol and function being performed as shown in the pictures below.

iSMA-B-FCU /FCU Updater
Version 2.0 www.gc5.pl Page 34 / 48
Figure 27 - Performing backup on Upload
Figure 28 - Uploading firmware in progress
When the process finishes, the confirmation box pops up showing all phases and devices. The
user can view the log to verify if the required job has been executed on all selected devices
successfully.
Figure 29 - Confirmation dialogue after download/upload process

iSMA-B-FCU /FCU Updater
Version 2.0 www.gc5.pl Page 35 / 48
9 Restarting Devices
Restarting the device should be the first action that user does in case of problems with the
controller or application functionality in general. The restarting procedure forces the
application to start execution of the program from the beginning and initiates reading raw
values for inputs.
Note: It is recommended to restart the application before contacting technical support.
Restarting the selected device or multiple devices by pressing the ‘Reset Devices’ button
sends a special request by the Modbus or BACnet network or by USB (if the controller is
connected directly). When the device receives the request, it processes the restart, and the
FCU Updater shows the driver status as offline for a moment.
Figure 30 - Restarting device
iSMA-B-FCU /FCU Updater
Version 2.0 www.gc5.pl Page 36 / 48
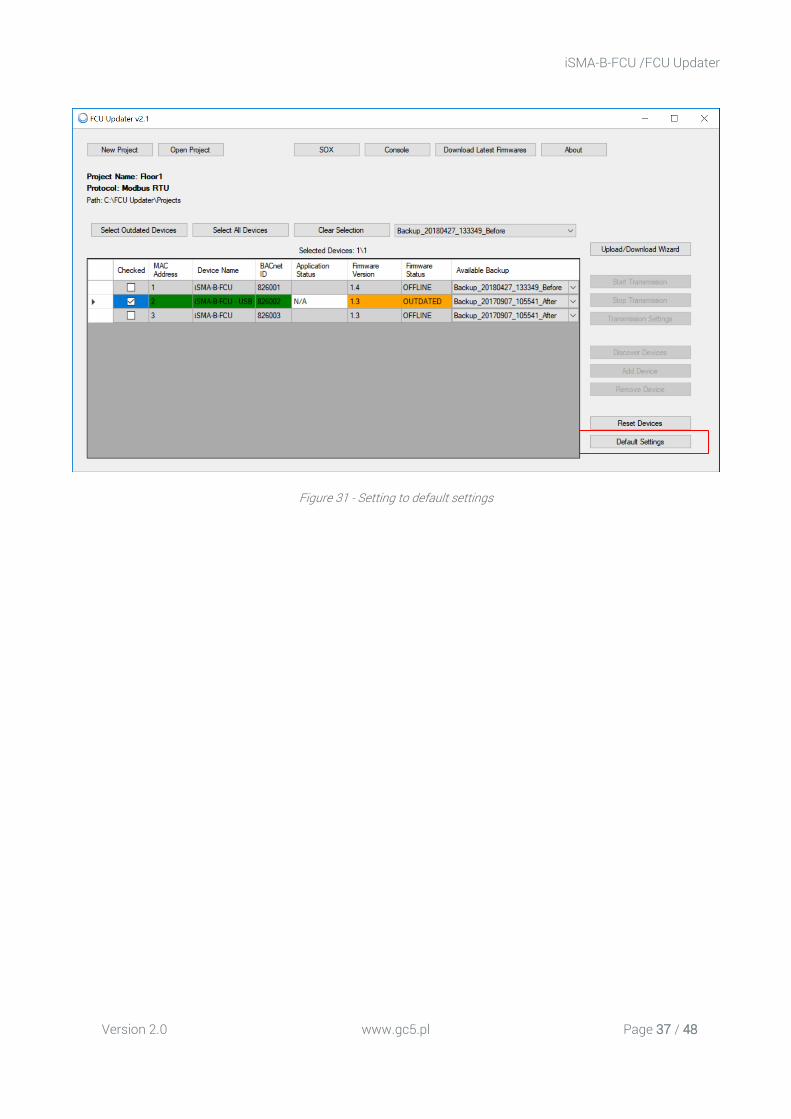
10 Default Settings
The ‘Default Settings’ button sets all selected controller's parameters to their initial (default)
values. In application, all NV parameters are set to their default values. All communication
settings that are not configured by dip switches are set to their default values as well. For
example, RS485 communication parameters are set to the following parameters:
• for the iSMA-B-FCU controller, the COM1 is set to Data bits - 8, Parity bits - 0, Stop bits - 1
• for the iSMA-B-FCU controller, the COM2 is set to Data bits - 8, Parity bits - 0, Stop bits - 1, Baud rate - 115200, Modbus protocol type – 0
Note: It is recommended to perform the setting to default settings procedure in the following
cases:
• the controlled physical object has been replaced, • the role of controller in the network has been changed in regards to master-slave
configuration • the application does not work as presumed and restarting of the application with its
default parameters could help
To perform the set to default action, select one device or multiple devices and press the
‘Default Settings’ button. The FCU Updater sends a special request by the Modbus or BACnet
network or by USB (if the controller is connected directly). When the device receives the
request, it processes it, and the FCU Updater shows the device status as offline for a moment.
iSMA-B-FCU /FCU Updater
Version 2.0 www.gc5.pl Page 37 / 48
Figure 31 - Setting to default settings
iSMA-B-FCU /FCU Updater
Version 2.0 www.gc5.pl Page 38 / 48
11 How to connect FCU Updater to physical device or bus
The FCU Updater is a software that runs under Windows operating system and transmits data
to iSMA-B-FCU controllers or iSMA-B-LP panel. In both cases, the FCU Updater uses COM port
for communication. There are two ways of connecting to the device/s: the direct way by USB
cable to only one device or the whole RS485 bus network to multiple devices.
Note: FCU Updater allows for only one type of connection at a time. The user can setup the
direct connection by USB cable or make the RS485 connection to the whole network. Parallel
connections through the direct USB cable and by the RS485 bus are not allowed.
Note: It is not allowed to interrupt any process performed by FCU Updater like transferring
data to/from device/s by connecting or disconnecting communication cable.
11.1 Direct connection by USB cable
Both iSMA-B-FCU controller and the iSMA-B-LP panel have a mini USB slot on the housing.
The Mini USB slot can be connected to the PC with the FCU Updater software running by the
‘mini USB - USB’ cable.

iSMA-B-FCU /FCU Updater
Version 2.0 www.gc5.pl Page 39 / 48
Figure 32 - Direct connection to iSMA-B-FCU controller
Figure 33 - Direct connection to iSMA-B-LP panel
iSMA-B-FCU /FCU Updater
Version 2.0 www.gc5.pl Page 40 / 48
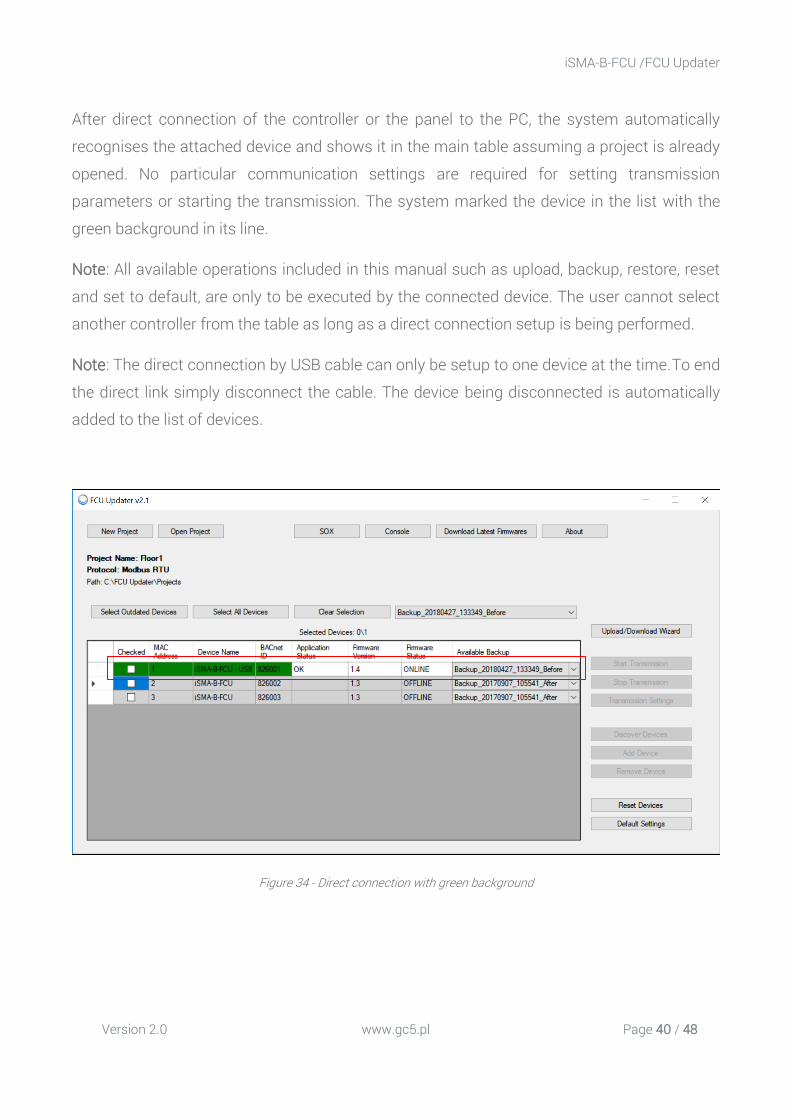
After direct connection of the controller or the panel to the PC, the system automatically
recognises the attached device and shows it in the main table assuming a project is already
opened. No particular communication settings are required for setting transmission
parameters or starting the transmission. The system marked the device in the list with the
green background in its line.
Note: All available operations included in this manual such as upload, backup, restore, reset
and set to default, are only to be executed by the connected device. The user cannot select
another controller from the table as long as a direct connection setup is being performed.
Note: The direct connection by USB cable can only be setup to one device at the time.To end
the direct link simply disconnect the cable. The device being disconnected is automatically
added to the list of devices.
Figure 34 - Direct connection with green background

iSMA-B-FCU /FCU Updater
Version 2.0 www.gc5.pl Page 41 / 48
11.2 Connection to RS485 bus
Connecting the FCU Updater to the RS485 bus is recommended on a site where all devices
are linked together. The RS485 network needs to be connected to the PC with the FCU Updater
software running. If the PC is not equipped with the RS485 communication port, a converter
is required. Global Control 5 Sp. z o.o. company recommends using Mera-Project MP01512A,
sold separately.
Figure 35 - RS485 converter
Note: Before connecting the PC to the FCU Updater running on the RS485 network, it is
recommended to disconnect a master controller. The next step is to connect the PC via the
RS485 converter (if required) and run the FC Updater. After this, the new project needs to be
opened or created. When done, setup all required transmission settings and transmission will
start. The transmission settings for the Modbus and BACnet protocols are described below.
Note: Once operation with the FCU Updater is finished, please remember to disconnect the PC
from the RS485 network and reconnect the master unit.
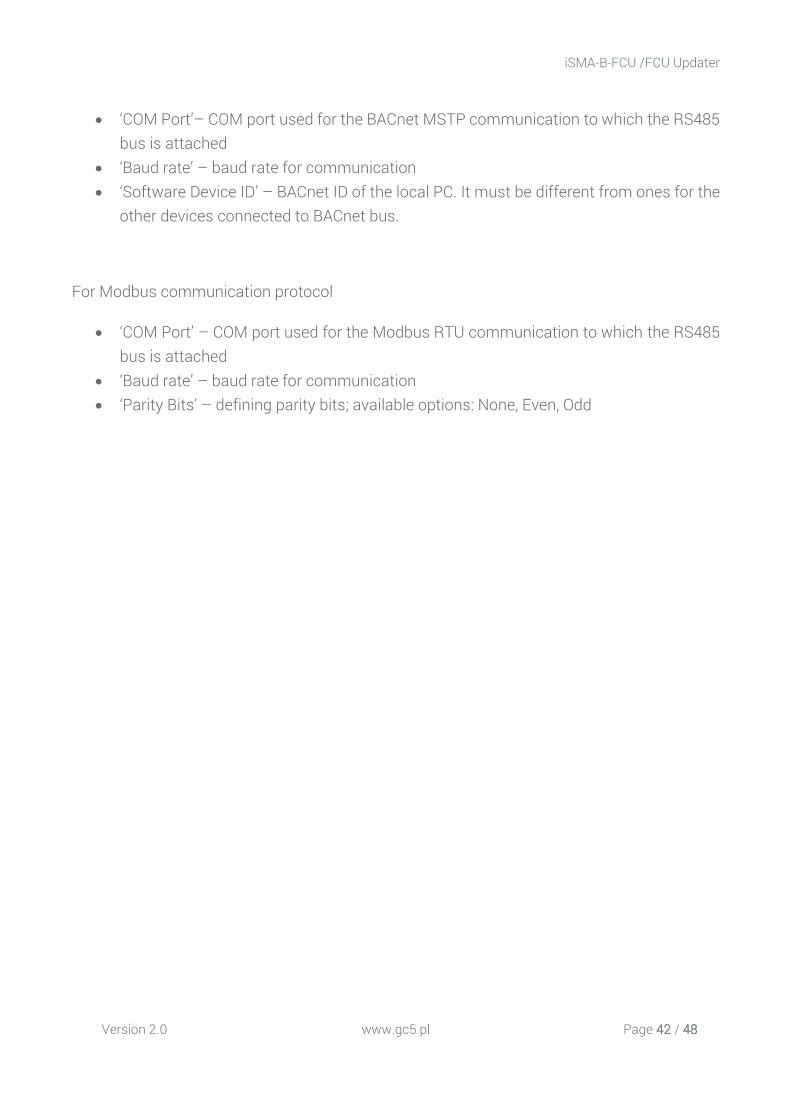
Depending on the chosen protocol, the following transmission settings are required:
for BACnet communication protocol
iSMA-B-FCU /FCU Updater
Version 2.0 www.gc5.pl Page 42 / 48
• ‘COM Port’– COM port used for the BACnet MSTP communication to which the RS485 bus is attached
• ‘Baud rate’ – baud rate for communication • ‘Software Device ID’ – BACnet ID of the local PC. It must be different from ones for the
other devices connected to BACnet bus.
For Modbus communication protocol
• ‘COM Port’ – COM port used for the Modbus RTU communication to which the RS485 bus is attached
• ‘Baud rate’ – baud rate for communication • ‘Parity Bits’ – defining parity bits; available options: None, Even, Odd
iSMA-B-FCU /FCU Updater
Version 2.0 www.gc5.pl Page 43 / 48
12 Manage ‘Bootloader’ state on the controller
In some circumstances, the controller can get to the state of ‘Bootloader’. This state can
happen when the firmware has not been transferred successfully to the device due to any
interruption like disconnecting transmission cable or power failure. In bootloader state, the
controller can not operate properly, and its application is not executed either. To return the
controller to normal operation, the FCU Updater needs to upload the latest firmware without
touching the existing application. This process can be achieved by Modbus or BACnet network
or directly by USB cable. In both cases, the newest firmware will be transferred to the controller
in ‘Bootloader’ state.
Figure 36 - One controller is in the ‘Bootloader’ state
If the iSMA-B-FCU controller is connected directly by USB cable and FCU Updater recognises
its ‘Bootloader’ state then the following dialogue appears.

iSMA-B-FCU /FCU Updater
Version 2.0 www.gc5.pl Page 44 / 48
Figure 37 - FCU Updater recognises the ‘Bootloader’ state for the connected controller
Pressing ‘Yes’ button starts upload of the latest firmware to the controller to returns the controller to normal operation.
Choosing ‘No’ button closes FCU Updater because further work with the controller in ‘Bootloader’ state will result in unpredicted behaviours which can not be properly controlled by FCU Updater.
iSMA-B-FCU /FCU Updater
Version 2.0 www.gc5.pl Page 45 / 48
13 SOX Protocol
The SOX function allows programming of the iSMA-B-FCU controller online (real-time). The
controller must be connected directly via USB cable as described above. The ‘SOX’ button is
always enabled each time the USB cable is connected directly to the iSMA-B-FCU controller,
and moreover, opening of any project is not required.
Figure 38 - Opening SOX protocol
The ‘SOX’ button guides the user to the next window where the SOX protocol can be started
by pressing the ‘Begin Communication’ button. After starting the communication to the
connected controller, the user can edit or build the application inside the iSMA-B-FCU
controller by using the WorkPlace software.
The ‘SOX’ window has the following communication parameters:
• ‘Port’ – port number (usually 1876) used by SOX protocol • ‘Begin Communication’ button – start SOX communication. It is recommended to open
SOX communication with the iSMA-B_FCU controller before running the WorkPlace software.
• ‘Stop Communication’ button – stop SOX communication.
iSMA-B-FCU /FCU Updater
Version 2.0 www.gc5.pl Page 46 / 48
Figure 39 - SOX Protocol console
Note: Only one instance of SOX Protocol console can be opened at a time. If the ‘SOX’ button
in the main application window is disabled, the SOX Protocol console has been already
opened, and probably it is hidden somewhere under other windows on the user’s screen.

iSMA-B-FCU /FCU Updater
Version 2.0 www.gc5.pl Page 47 / 48
14 Console The console allows viewing internal system logs of the directly connected iSMA-B-FCU device. The console can only be used, when the device is connected to the PC directly by USB cable even without opening any project. To open the console, connect the iSMA-B-FCU device to the PC using the USB cable as shown above and press the ‘Console’ button. The new console window appears listing the iSMA-B-FCU controller’s internal logs.
Figure 40 - Opening console logs

iSMA-B-FCU /FCU Updater
Version 2.0 www.gc5.pl Page 48 / 48
Figure 41 - Console with internal logs
Note: Only one instance of Console can be opened at a time. If the ‘Console’ button on main
application window is disabled, it is because the Console has been already opened and
probably it is hidden somewhere under other windows on the user’s screen.


