90
IBM Tivoli Composite Application Manager Version 7.1.0.2 Agent for HTTP Servers Installation and Configuration Guide SC27-2819-00

IBM Tivoli Composite Application ManagerVersion 7.1.0.2
Agent for HTTP Servers Installation andConfiguration Guide
SC27-2819-00
���

IBM Tivoli Composite Application ManagerVersion 7.1.0.2
Agent for HTTP Servers Installation andConfiguration Guide
SC27-2819-00
���
Note:
Before using this information and the product it supports, read the information in “Notices” on page 69.
Edition notice
This edition applies to Version 7.1.0.2 of ITCAM Agent for HTTP Servers and to all subsequent releases andmodifications until otherwise indicated in new editions.
© Copyright IBM Corporation 2007, 2010.US Government Users Restricted Rights – Use, duplication or disclosure restricted by GSA ADP Schedule Contractwith IBM Corp.

Contents
Figures . . . . . . . . . . . . . . . v
Tables . . . . . . . . . . . . . . . vii
About this book . . . . . . . . . . . ixWho should read this book . . . . . . . . . ixWhere to look for more information . . . . . . ix
ITCAM Agent for HTTP Servers library . . . . ixAccessing publications online. . . . . . . . xOrdering publications . . . . . . . . . . x
Accessibility . . . . . . . . . . . . . . xiTivoli technical training . . . . . . . . . . xiSupporting information . . . . . . . . . . xiConventions used in this guide . . . . . . . . xi
Typeface conventions . . . . . . . . . . xiOperating-system-dependent variables and paths xiiTivoli command syntax . . . . . . . . . xii
Documentation conventions . . . . . . . . xiiiPanels and figures . . . . . . . . . . . xiiiVariables and literals in command syntaxexamples . . . . . . . . . . . . . . xiiiSymbols . . . . . . . . . . . . . . xiii
Chapter 1. IBM Tivoli CompositeApplication Manager Agent for HTTPServers . . . . . . . . . . . . . . . 1IBM Tivoli Monitoring components . . . . . . . 1The Tivoli Enterprise Portal . . . . . . . . . 2ITCAM Agent for HTTP Servers . . . . . . . . 2
Monitoring Agent data collection . . . . . . 3How the Monitoring Agent works . . . . . . 3The ITCAM Agent for HTTP Servers TEPworkspaces . . . . . . . . . . . . . . 3
Situations for the Agent . . . . . . . . . . 4How situations work . . . . . . . . . . 4
Take Action commands . . . . . . . . . . . 5Predefined Take Action commands provided withthe ITCAM Agent for HTTP Servers . . . . . 5
Prerequisites to installation . . . . . . . . . 5System and software prerequisites . . . . . . . 6Where to begin . . . . . . . . . . . . . 6
Chapter 2. Installing the TivoliEnterprise Monitoring Agent onWindows . . . . . . . . . . . . . . 7Installing the Tivoli Enterprise Monitoring Agent onWindows . . . . . . . . . . . . . . . 7
Step 1: Invoke setup.exe . . . . . . . . . 7Step 2: Accept the product license . . . . . . 9Step 3: Choose the destination folder for theinstallation files . . . . . . . . . . . . 10Step 4: Define the node's security environment . 11Step 5: Select the product components you wantto install . . . . . . . . . . . . . . 12
Step 6: Select Windows program folder . . . . 13Step 7: Verify selected features . . . . . . . 14Step 8: Select the items to configure . . . . . 15
Configuring the Tivoli Enterprise Monitoring Agenton Windows . . . . . . . . . . . . . . 16
Configure the Tivoli Enterprise MonitoringAgent's TEMS connection. . . . . . . . . 16Configure ITCAM Agent for HTTP Servers . . . 18Configuring the Apache Web Server, IBM HTTPServer, or Sun Web server . . . . . . . . 21
Finalize the installation . . . . . . . . . . 22Adding application support on Windows . . . . 23Ensure that the Eclipse server has been configured 27Performing a silent installation on Windows . . . 29Uninstalling the Tivoli Enterprise Monitoring Agenton Windows . . . . . . . . . . . . . . 30Installing and uninstalling a Language Pack onWindows . . . . . . . . . . . . . . . 30
Installing a Language Pack on Windows. . . . 31Uninstalling a Language Pack on Windows. . . 31
Chapter 3. Installing the TivoliEnterprise Monitoring Agent on UNIXand Linux . . . . . . . . . . . . . 33UNIX and Linux requirements . . . . . . . . 33
Prerequisite APAR for AIX sites . . . . . . 33Historical data collection in Linux . . . . . . 33
Installing the Tivoli Enterprise Monitoring Agent onUNIX and Linux. . . . . . . . . . . . . 34
Step 1: Invoke the installer . . . . . . . . 34Step 2: Supply the name of the installationdirectory . . . . . . . . . . . . . . 34Step 3: Select installation option . . . . . . 34Step 4: Accept the product license agreement . . 35Step 5: Provide an encryption key . . . . . . 35Step 6: Select and install the product software . . 36Step 7: Configure the Tivoli EnterpriseMonitoring Server . . . . . . . . . . . 36
Configuring the Tivoli Enterprise Monitoring Agenton UNIX and Linux . . . . . . . . . . . 37
Configure and start the Tivoli EnterpriseMonitoring Agent using command line . . . . 37Configure and start the Tivoli EnterpriseMonitoring Agent using the GUI . . . . . . 40Configuring the Apache Web Server, IBM HTTPserver, and Sun Java System Web Server. . . . 46
Performing a silent installation on UNIX and Linux 46Silent installation . . . . . . . . . . . 47Silent configuration. . . . . . . . . . . 47
Installing application support on Linux and UNIX 47Uninstalling the Tivoli Enterprise Monitoring Agenton UNIX and Linux . . . . . . . . . . . 51Installing and uninstalling a Language Pack onLinux and UNIX systems . . . . . . . . . . 51
© Copyright IBM Corp. 2007, 2010 iii
Installing a Language Pack on Linux and UNIXsystems. . . . . . . . . . . . . . . 51Uninstalling a Language Pack on Linux andUNIX systems . . . . . . . . . . . . 52
Appendix A. Support information . . . 55Obtaining fixes . . . . . . . . . . . . . 55Receiving support updates . . . . . . . . . 55
Appendix B. ITCAM Agent for HTTPServers attribute groups and sizinginformation for historical warehousing . 57
Appendix C. Configuration parametersfor ITCAM Agent for HTTP Servers. . . 59
Appendix D. Accessibility . . . . . . 61
Glossary . . . . . . . . . . . . . . 63
Index . . . . . . . . . . . . . . . 65
Trademarks. . . . . . . . . . . . . 67
Notices . . . . . . . . . . . . . . 69
iv ITCAM Agent for HTTP Servers: Installation and Configuration Guide
Figures
1. Product architecture . . . . . . . . . . 12. Installation Welcome window . . . . . . . 83. Prerequisites window . . . . . . . . . 94. Software License Agreement window . . . . 105. Choose Destination Location window . . . . 116. User Data Encryption Key window . . . . 127. Encryption Key confirmation window. . . . 128. Select Features window . . . . . . . . 139. Select Program Folder window . . . . . . 14
10. Start Copying Files window . . . . . . . 1511. Setup Type window. . . . . . . . . . 1612. Configuring the Agent connection to the
TEMS, window 1 . . . . . . . . . . 1713. Configuration notebook: Basic tab . . . . . 1814. Configuration notebook: Apache Web Server
Aliases tab . . . . . . . . . . . . . 1915. Configuration notebook: Sun Web Server
Aliases tab . . . . . . . . . . . . . 2016. Configuration notebook: Sun Web Server Conf
tab . . . . . . . . . . . . . . . 2117. Installation complete window . . . . . . 2218. Manage Tivoli Enterprise Monitoring Services
window. . . . . . . . . . . . . . 23
19. Installing application support . . . . . . 2420. Installing application support . . . . . . 2621. Installing application support . . . . . . 2722. Configuring the Eclipse server . . . . . . 2823. Defining the port number for the Eclipse Help
Server . . . . . . . . . . . . . . 2824. Specifying Eclipse help server startup type 2925. Manage Tivoli Enterprise Monitoring Services
on UNIX and Linux. . . . . . . . . . 4026. Configuration of Monitoring Agent for HTTP
Servers: Basic tab on UNIX and Linux . . . 4127. Configuration of Monitoring Agent for HTTP
Servers: Apache Web Server Aliases tab onUNIX and Linux . . . . . . . . . . . 42
28. Configuration of Monitoring Agent for HTTPServers: Sun Web Server Aliases tab on UNIXand Linux . . . . . . . . . . . . . 43
29. Configuration of Monitoring Agent for HTTPServers: Sun Web Server Conf tab on UNIXand Linux . . . . . . . . . . . . . 44
30. TEMS Connection window . . . . . . . 45
© Copyright IBM Corp. 2007, 2010 v

vi ITCAM Agent for HTTP Servers: Installation and Configuration Guide

Tables
1. Symbols in command syntax . . . . . . xiii2. Road map for the Agent on Windows . . . . 63. Communications protocol settings . . . . . 17
4. Information for historical warehousing 575. Configuration parameters . . . . . . . . 59
© Copyright IBM Corp. 2007, 2010 vii

viii ITCAM Agent for HTTP Servers: Installation and Configuration Guide
About this book
This book provides instructions for installing and configuring IBM® Tivoli®
Composite Application Manager Agent for HTTP Servers (ITCAM Agent for HTTPServers) to monitor availability and performance of Apache Web server. IBM HTTPServer, and Sun Java Web server on distributed platforms. The Agent integrates theperformance-monitoring data with the Tivoli Enterprise Portal (TEP) for event andalert management.
Who should read this bookThis book is intended for administrators and application programmers who mustuse the Tivoli Enterprise Portal to monitor the performance of the HTTP servers. Itis also intended for system experts who perform tasks such as performance tuningand troubleshooting.
Where to look for more informationThis section lists publications in the ITCAM Agent for HTTP Servers library andrelated documents. It also describes how to access Tivoli publications online andhow to order Tivoli publications.
ITCAM Agent for HTTP Servers libraryThe following publications are included in the ITCAM for Application Diagnosticslibrary, available at http://publib.boulder.ibm.com/infocenter/tivihelp/v24r1/topic/com.ibm.itcamfad.doc_7101/ic-homepage.html:v IBM Tivoli Composite Application Manager for Application Diagnostics: Prerequisites
Provides the hardware and software requirements for installing ITCAM forApplication Diagnostics components.
v IBM Tivoli Composite Application Manager for Application Diagnostics: User's Guide
Provides the user overview, user scenarios, and Helps for every ITCAM forApplication Diagnostics component.
v IBM Tivoli Composite Application Manager for Application Diagnostics: Planning anInstallation
Provides the user with a first reference point for a new ITCAM for ApplicationDiagnostics installation or upgrade.
v ITCAM Agent for WebSphere® Applications Installation and ConfigurationGuides:– IBM Tivoli Composite Application Manager: Agent for WebSphere Applications
Installation and Configuration Guide
– IBM Tivoli Composite Application Manager: Agent for WebSphere ApplicationsInstallation and Configuration Guide for z/OS
– IBM Tivoli Composite Application Manager: Agent for WebSphere Applications DataCollector Installation and Configuration Guide for IBM i
Provide installation instructions for setting up and configuring ITCAM Agent forWebSphere Applications on distributed, z/OS®, and IBM i systems.
v ITCAM Agent for J2EE Applications Installation and Configuration Guides:– IBM Tivoli Composite Application Manager: Agent for J2EE Data Collector
Installation and Configuration Guide
© Copyright IBM Corp. 2007, 2010 ix
– IBM Tivoli Composite Application Manager: Agent for J2EE Monitoring AgentInstallation and Configuration Guide
Provide installation instructions for setting up and configuring ITCAM Agent forJ2EE.
v IBM Tivoli Composite Application Manager: Agent for HTTP Servers Installation andConfiguration Guide
Provides installation instructions for setting up and configuring ITCAM Agentfor HTTP Servers.
v IBM Tivoli Composite Application Manager for Application Diagnostics ManagingServer Installation Guide
Provides installation instructions for setting up and configuring ITCAM forApplication Diagnostics Managing Server.
v IBM Tivoli Composite Application Manager for Application Diagnostics:Troubleshooting Guide
Provides instructions on problem determination and troubleshooting for ITCAMfor Application Diagnostics.
v IBM Tivoli Composite Application Manager for Application Diagnostics: MessagingGuide
Provides information about system messages received when installing and usingITCAM for Application Diagnostics.
In addition to the publications listed, ITCAM Agent for HTTP Servers has anonline help system that describes all of the available commands and dialogs. Thehelp system is accessed through the ITCAM Agent for HTTP Servers GUI.
Accessing publications onlineThe documentation CD contains the publications that are in the product library.The format of the publications is PDF, HTML, or both.
IBM posts publications for this and all other Tivoli products, as they becomeavailable and whenever they are updated, to the Tivoli software information centerWeb site. Access the Tivoli software information center by viewing the Tivolisoftware library at the following Web address:
http://www.ibm.com/software/tivoli/library/
Note: If you print PDF documents on other than letter-sized paper, set the optionin the File > Print window that enables Adobe Reader to print letter-sized pageson your local paper.
The IBM Software Support Web site provides the latest information about knownproduct limitations and workarounds in the form of technotes for your product.You can view this information at the following Web site:
http://www.ibm.com/software/support
Ordering publicationsYou can order many Tivoli publications online at the following Web site:
http://www.elink.ibmlink.ibm.com/public/applications/ publications/cgibin/pbi.cgi
You can also order by telephone by calling one of these numbers:
x ITCAM Agent for HTTP Servers: Installation and Configuration Guide
v In the United States: 800-879-2755v In Canada: 800-426-4968
In other countries, contact your software account representative to order Tivolipublications.
AccessibilityAccessibility features help users with a physical disability, such as restrictedmobility or limited vision, to use software products successfully. With this product,you can use assistive technologies to hear and navigate the interface. You can alsouse the keyboard instead of the mouse to operate most features of the graphicaluser interface.
Tivoli technical trainingFor Tivoli technical training information, refer to the following IBM TivoliEducation Web site:
http://www.ibm.com/software/tivoli/education/
Supporting informationIf you have a problem with your IBM software, you want to resolve it quickly. IBMprovides the following ways for you to obtain the support you need:v Searching knowledge bases: You can search across a large collection of known
problems and workarounds, Technotes, and other information.v Obtaining fixes: You can locate the latest fixes that are already available for your
product.v Contacting IBM Software Support: If you still cannot solve your problem, and
you need to work with someone from IBM, you can use a variety of ways tocontact IBM Software Support.
For more information about these three ways of resolving problems, seeAppendix A, “Support information,” on page 55
Conventions used in this guideThis guide uses several conventions for special terms and actions, andoperating-system-dependent commands and paths.
Typeface conventionsThis guide uses the following typeface conventions:
Bold
v Lowercase commands and mixed case commands that are otherwisedifficult to distinguish from surrounding text
v Interface controls (check boxes, push buttons, radio buttons, spinbuttons, fields, folders, icons, list boxes, items inside list boxes,multicolumn lists, containers, menu choices, menu names, tabs, propertysheets), labels (such as Tip, and Operating system considerations)
v Keywords and parameters in text
Italic
About this book xi
v Words defined in textv Emphasis of words (for example, "Use the word that to introduce a
restrictive clause.")v New terms in text (except in a definition list)v Variables and values you must provide
Monospace
v Code and other examplesv File names, programming keywords, and other elements that are difficult
to distinguish from surrounding textv Message text and prompts addressed to the userv Text that the user must typev Values for arguments or command options
Operating-system-dependent variables and pathsThe publications in this library use the UNIX convention for specifyingenvironment variables and for directory notation.
When using the Windows command line, replace $variable with %variable% forenvironment variables and replace each forward slash (/) with a backslash (\) indirectory paths. The names of environment variables are not always the same inWindows and UNIX. For example, %TEMP% in Windows is equivalent to $tmp inUNIX.
Note: If you are using the bash shell on a Windows system, you can use the UNIXconventions.
Tivoli command syntaxThe following special characters define Tivoli command syntax:
[ ] Identifies elements that are optional. Required elements do not havebrackets around them.
... Indicates that you can specify multiple values for the previous element.Separate multiple values by a space, unless otherwise directed bycommand information.
If the ellipsis for an element follows a closing bracket, use the syntaxwithin the brackets to specify multiple values. For example, to specify twoadministrators for the option [–a admin]..., use –a admin1 –a admin2.
If the ellipsis for an element is within the brackets, use the syntax of thelast element to specify multiple values. For example, to specify two hostsfor the option [–h host...], use –h host1 host2.
| Indicates mutually exclusive information. You can use the element oneither the left or right of the vertical bar.
{ } Delimits a set of mutually exclusive elements when a command requiresone of them. Brackets ([ ]) are around elements that are optional.
In addition to the special characters, Tivoli command syntax uses the typefaceconventions described in “Typeface conventions” on page xi. The followingexamples illustrate the typeface conventions used in Tivoli command syntax:v wcrtpr [–a admin]... [–s region] [–m resource]... name
xii ITCAM Agent for HTTP Servers: Installation and Configuration Guide
The name argument is the only required element for the wcrtpr command. Thebrackets around the options indicate they are optional. The ellipses after the –aadmin resource option means that you can specify multiple administratorsmultiple times. The ellipses after the –m resource option means that you canspecify multiple resources multiple times.
v wchkdb [–o outfile] [–u] [–x] {–f infile | –i | object...}The –f, –i, and object elements are mutually exclusive. Braces that surroundelements indicate that you are including a required element. If you specify theobject argument, you can specify more than one object.
Documentation conventionsThe documentation adheres to accepted typographical conventions for commandsyntax. Conventions specific to IBM Tivoli Monitoring (ITM) documentation arediscussed in the following sections.
Panels and figuresThe panels and figures in this document are representations. Actual product panelsmight differ.
Variables and literals in command syntax examplesIn examples of command syntax for the OS/390® platform, uppercase lettersindicate actual values (literals) that the user should type as given; lowercase lettersindicate variables that represent data you supply:LOGON APPLID (cccccccc)
However, for the Microsoft Windows and UNIX platforms, variables are shown initalics:-itm.kzy.instrument.control.file=instrumentation_control_file_name-itm.kzy.agent.parms=agent_control_file_name
Note: In ordinary text, variable names appear in italics, regardless of platform.
SymbolsThe following symbols might appear in command syntax:
Table 1. Symbols in command syntax
Symbol Usage
| A vertical bar is used to denote a choice. This means that you canchoose either the argument on the left or the argument on the right.Example:
YES | NO
In this example, YES or NO might be specified.
[ ] Brackets denote optional arguments. Arguments not enclosed inbrackets are required. Example:
APPLDEST DEST [ALTDEST]
In this example, DEST is a required argument and ALTDEST isoptional.
About this book xiii
Table 1. Symbols in command syntax (continued)
Symbol Usage
{ } In some documents, braces are used to denote required arguments, orto group arguments for clarity. Example:
COMPARE {workload} -REPORT={SUMMARY | HISTOGRAM}
The workload variable is required. The REPORT keyword must bespecified with a value of SUMMARY or HISTOGRAM.
_ Default values are underscored. Example:
COPY infile outfile - [COMPRESS={YES | NO}]
In this example, the COMPRESS keyword is optional. If specified, theonly valid values are YES or NO. If omitted, the default is YES.
xiv ITCAM Agent for HTTP Servers: Installation and Configuration Guide
Chapter 1. IBM Tivoli Composite Application Manager Agentfor HTTP Servers
This chapter introduces the Tivoli Enterprise Monitoring Agent provided for ITMcustomers for HTTP Servers and explains how it can help you monitor andadminister your systems that deploy the HTTP Servers.
ITCAM Agent for HTTP Servers places this agent into the context of the IBM TivoliMonitoring (ITM) family, a suite of products used to monitor a mixed-systemsenvironment. With ITM, you can perform the following tasks:v Establish your own performance thresholdsv Create situations, which are conditions you need to monitorv Create and send commands to systems in your managed enterprise using the
Take Action feature; with Take Action commands you can, for instance, restart aprocess that is not functioning correctly or dynamically reconfigure yourenvironment
v Create comprehensive reports about system conditionsv Monitor for alerts on the systems and platforms you are managingv Trace the causes leading up to an alertv Define your own queries, using the attributes provided with the ITCAM Agent
for HTTP Servers, to monitor conditions of particular interest to you
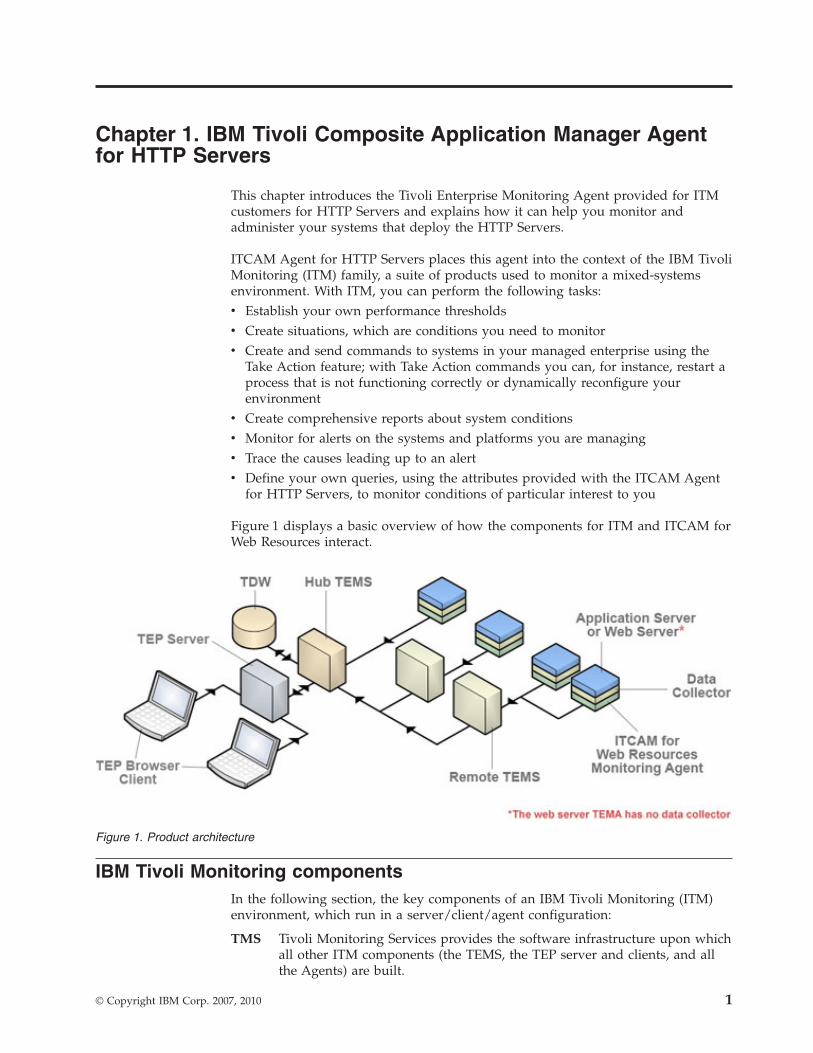
Figure 1 displays a basic overview of how the components for ITM and ITCAM forWeb Resources interact.
IBM Tivoli Monitoring componentsIn the following section, the key components of an IBM Tivoli Monitoring (ITM)environment, which run in a server/client/agent configuration:
TMS Tivoli Monitoring Services provides the software infrastructure upon whichall other ITM components (the TEMS, the TEP server and clients, and allthe Agents) are built.
Figure 1. Product architecture
© Copyright IBM Corp. 2007, 2010 1
TEP The Tivoli Enterprise Portal is the user interface for ITM agents. It providesthe status of your enterprise and views of the data that the various ITCAMAgent for HTTP Servers collect. TEP also gives you access to Take Actionscommands and situations that you can use to further customize datacollection and reporting.
The TEP comprises two pieces: the TEP server, which generally runs on acentrally located server, and the TEP client, which runs on your users'individual computers and with which they directly interact to query andcontrol your enterprise's running systems. Two different TEP clients areprovided:v The Tivoli Enterprise Portal workstation client (usually called the desktop
client)v The TEP browser client, which runs within a Web browser
TEMS The Tivoli Enterprise Monitoring Server provides framework and databaseoperations for the Tivoli Enterprise Portal Server and the various agents.The agents pass data to the TEMS, and then the TEP server requests thedata.
AgentsThe Tivoli Enterprise Monitoring Agents collect performance data aboutmonitored environments such as HTTP Servers and carry out your users'Take Action commands entered using a TEP client. A Monitoring Agentcollects and distributes real-time and historical performance data as neededto a TEMS.
MTMSManage Tivoli Enterprise Monitoring Services provides a full-screenWindows GUI that you can use to check the status of TMS processes suchas the TEMS, the TEP server, and the Agent, to stop or to recycle them,and to reconfigure them.
The Tivoli Enterprise PortalThe TEP is the user interface into your site's ITM environment. It provides a viewof your enterprise from which you can drill down to examine components of yoursystems environment more closely. Its application window consists of a Navigatorthat shows all the systems in your enterprise where Tivoli Enterprise MonitoringAgents are installed and a workspace that includes table and chart views of systemand application conditions.
The TEP runs situations at regular intervals to verify that your applications andsystems are running, and running well. A failed test causes event indicators toappear in the Navigator.
The TEP offers two modes of client operation: desktop and browser. In desktopmode, the application software is installed on your local node. In browser mode,the system administrator installs the application on the TEP server, and you startTivoli Enterprise Portal from your Web browser; the application is thendownloaded to your system the first time you log on to the browser client andthereafter only when there are software updates.
ITCAM Agent for HTTP ServersITCAM Agent for HTTP Servers collects performance data about the HTTP serversrunning on a single node in the following ways:
2 ITCAM Agent for HTTP Servers: Installation and Configuration Guide
v Apache servers and IBM HTTP servers parse the configuration file to get theserver name and collect data using the module. The module handles all HTTPrequests.
v Sun Web Servers collect data by polling SNMP service for Web Server statisticsand parsing Web server configuration files to get information not provided bythe SNMP subagent.
The Agent accumulates data from all these sources. The TEMS then retrieves thisdata and merges it with monitoring data from other agents, including otherITCAM Agent for HTTP Servers agents, and passes the data on to the TEP serverfor display on the various TEP clients attached to it.
Monitoring Agent data collectionIBM Tivoli Composite Application Manager Agent for HTTP Servers enables youto monitor the health and availability of your site's HTTP Servers environment, aswell as the performance of the applications deployed to those HTTP Servers. Inparticular, you can use the ITCAM Agent for HTTP Servers in the following ways:v Track and report the status of the HTTP Servers in your enterprisev Centrally administer HTTP Servers in your enterprise, including starting and
stopping serversv Collect and report the status of the Web sites (virtual hosts) configured for the
Apache Web Server and IBM HTTP serverv Collect and report the status of the Sun Web sites (virtual hosts) configured for
the Sun Web Serverv Invoke Take Action commands to avoid costly downtime and performance
slowdowns
How the Monitoring Agent worksYou can use the TEP interface to view the data and monitor the health andperformance of your HTTP Servers environment.
The Agent performs the following types of monitoring functions.v It obtains data and uses the data to create various views that you can define.
(Numerous views are already available in the predefined workspaces.) Thesegraphic views and reports are useful for examining the performance of theHTTP Servers system.
v It evaluates situations to detect when ITCAM Agent for HTTP Servers attributevalues exceed preset thresholds that you have defined and makes this exceptioninformation available to you.
To monitor exceptions, you must create situations that are meaningful to the HTTPServers conditions you are monitoring. Several predefined situations are providedwith the Monitoring Agent.
The ITCAM Agent for HTTP Servers TEP workspacesWith the TEP workspaces for the ITCAM Agent for HTTP Servers, you can see intothe data reported for HTTP Servers. The workspaces provide you with status,definitions, and statistical information for your HTTP Servers system. ITMprovides two types of workspaces: primary workspaces are directly accessiblethrough the Navigator, whereas you must drill down to secondary workspaces fromthe primary workspace that defines them.
Chapter 1. IBM Tivoli Composite Application Manager Agent for HTTP Servers 3
The Agent provides the following primary workspaces for managing your system.v HTTP Servers Agent: The HTTP Servers Agent workspace displays system-wide
status information that includes enterprise events, product events, and thecurrent status of all the HTTP Servers installed on the node.
v HTTP Servers: The HTTP Servers workspace displays server status and theevent console for all server sessions across your HTTP Servers environment.
v servername: The servername workspace displays server status and memory use fora particular server.
v Apache Web Servers: The Apache Web Sites workspace shows the lists of theWeb sites (virtual hosts) configured for the Apache Web Server and IBM HTTPServer along with their status.
v Apache Web Sites: The Apache Web Sites workspace shows the lists of the Websites (virtual hosts) configured for the Apache Web Server and IBM HTTP Serveralong with their status.
v Sun Web Servers: The Sun Web Sites workspace shows the list of the Sun Websites (virtual servers) configured for the server along with their status.
v Sun Web Sites: The Sun Web Sites workspace shows the list of the Sun Websites (virtual servers) configured for the server along with their status.
Situations for the AgentITCAM Agent for HTTP Servers provides predefined situations to monitor keyHTTP Servers attributes. You can use these situations to perform the followingtasks:v Immediately begin monitoring your HTTP Serversv Monitor and manage widely dispersed HTTP Servers resources through
localized automationv Create your own situations, using the predefined situations as models.
The predefined situations issue a Critical alert whenever they are triggered. Youcan investigate an event by opening its workspace. See the online help providedfor the Agent for detailed information about these predefined situations.
How situations workSituations are expressions of system conditions you want to monitor that areembedded in IF-TRUE statements. If the specified condition exists, this situation istrue. You can use situations to monitor particular conditions on managed systems.For example, you might want to monitor errors for a particular Web application.Situations can monitor conditions on one or more managed systems in yourenterprise.
For more information about using predefined situations and creating your ownsituations, refer to the following product information:v To find information about the predefined situations for provided with ITCAM
Agent for HTTP Servers, see the agent's online help.v To create and use your own situations from the Tivoli Enterprise Portal, refer to
the help for TEP.
4 ITCAM Agent for HTTP Servers: Installation and Configuration Guide
Take Action commandsYou can use the Take Action commands to stop or start a process at any system inyour network where one or more Tivoli Enterprise Monitoring Agents are installed.You can invoke Take Action commands from a workspace, from a situation, in anad hoc mode, or by recalling a saved Take Action command. See the TivoliEnterprise Portal online help for general information about using Take Actioncommands.
Predefined Take Action commands provided with the ITCAMAgent for HTTP Servers
ITCAM Agent for HTTP Servers provides several predefined Take ActioncommandsYou can issue commands from the browser interface to perform thefollowing tasks:v Stop, start, and recycle an Web serverv Adjust the monitoring of various HTTP Servers resources
Because of high overhead, some data is not automatically collected and reported incertain workspaces. Use the Take Action commands to set the monitoring level forcertain attributes and to accumulate request, resource, and garbage-collectioninformation.
Prerequisites to installationThe instructions in the subsequent chapters assume the following prerequisiteshave been met::v You have installed IBM Tivoli Monitoring (ITM) including the following
components:– A Tivoli Enterprise Monitoring Server (TEMS)– A Tivoli Enterprise Portal (TEP) server– The Tivoli Enterprise Portal clients– The IBM Eclipse Help Server (this feature enables your TEP users to search
the provided help files for specific text strings).– “Installing a Language Pack on Linux and UNIX systems” on page 51
v You are familiar with basic TEP functions such as using the Navigator andaccessing secondary workspaces and the definitions of terms like managed objectand subnode.
v You have installed Apache Web Server, IBM HTTP Server, or Sun Java SystemWeb Server, and you are familiar with the configuration.
v For Sun Java System Web Server, you have installed the SNMP service and youknow how to configure SNMP service.
In addition to installing the Agent itself, the installation described in this chapterupdates all these components with the code necessary to support the ITCAMAgent for HTTP Servers.
To obtain the most recent installation updates, review the Release Note informationfor this product. You can find this information online by viewing IBM technotes. Toaccess the technotes, see the IBM Tivoli Composite Application Manager TivoliEnterprise Monitoring Agent Problem Determination Guide.
Chapter 1. IBM Tivoli Composite Application Manager Agent for HTTP Servers 5
System and software prerequisitesThe software and hardware requirements for installing ITCAM Agent for HTTPServers are listed at https://www.ibm.com/developerworks/wikis/display/tivolimonitoring/Prerequisites+for+ITCAM+for+Application+Diagnostics+7.1.
Where to beginBegin at the road map for your Tivoli Enterprise Monitoring Agent installation.
Table 2. Road map for the Agent on Windows
What to do Where to find more information
Obtain the installation You can get the installation files either bydownloading from the Web or using aproduct CD.
Verify that your computer meets the systemand software prerequisites
“System and software prerequisites”
“UNIX and Linux requirements” on page 33
Install the Tivoli Enterprise MonitoringAgent
“Installing the Tivoli Enterprise MonitoringAgent on Windows” on page 7
“Installing the Tivoli Enterprise MonitoringAgent on UNIX and Linux” on page 34
Configure the Tivoli Enterprise MonitoringAgent
“Configuring the Tivoli EnterpriseMonitoring Agent on Windows” on page16“Configuring the Tivoli EnterpriseMonitoring Agent on UNIX and Linux” onpage 37
“Configuring the Apache Web Server, IBMHTTP server, and Sun Java System WebServer” on page 46
Install application support files “Adding application support on Windows”on page 23
“Installing application support on Linux andUNIX” on page 47
(Optional) Install a language pack “Installing a Language Pack on Windows”on page 31
“Installing a Language Pack on Linux andUNIX systems” on page 51
(Optional) Silent install the Tivoli EnterpriseMonitoring Agent
“Performing a silent installation onWindows” on page 29
“Performing a silent installation on UNIXand Linux” on page 46
(Optional) Upgrade the Agent from aprevious version
“Installing the Tivoli Enterprise MonitoringAgent on Windows” on page 7
Uninstall the Tivoli Enterprise MonitoringAgent
“Uninstalling the Tivoli EnterpriseMonitoring Agent on Windows” on page 30
“Uninstalling the Tivoli EnterpriseMonitoring Agent on UNIX and Linux” onpage 51
6 ITCAM Agent for HTTP Servers: Installation and Configuration Guide
Chapter 2. Installing the Tivoli Enterprise Monitoring Agent onWindows
This chapter provides complete instructions for installing the ITCAM Agent forHTTP Servers on Microsoft Windows platforms. The Agent installation can only beperformed by a user with Administrator access. It also includes instructions forinstalling the language packs for users of non-English languages.
Note:
To upgrade from earlier versions of the Agent, run the installer and specify theexisting Agent runtime location. Support files for the TEP, TEPS and TEMS areupgraded in the same way.v “Installing the Tivoli Enterprise Monitoring Agent on Windows”v “Configuring the Tivoli Enterprise Monitoring Agent on Windows” on page 16v “Adding application support on Windows” on page 23v “Performing a silent installation on Windows” on page 29v “Uninstalling the Tivoli Enterprise Monitoring Agent on Windows” on page 30v “Installing and uninstalling a Language Pack on Windows” on page 30
Installing the Tivoli Enterprise Monitoring Agent on WindowsPerform the following steps to install ITCAM Agent for HTTP Servers:v “Step 1: Invoke setup.exe”v “Step 2: Accept the product license” on page 9v “Step 3: Choose the destination folder for the installation files” on page 10v “Step 4: Define the node's security environment” on page 11v “Step 5: Select the product components you want to install” on page 12v “Step 6: Select Windows program folder” on page 13v “Step 7: Verify selected features” on page 14v “Step 8: Select the items to configure” on page 15
Attention: you must install ITCAM Agent for HTTP Servers version 7.1 beforeinstalling version 7.1.0.2.
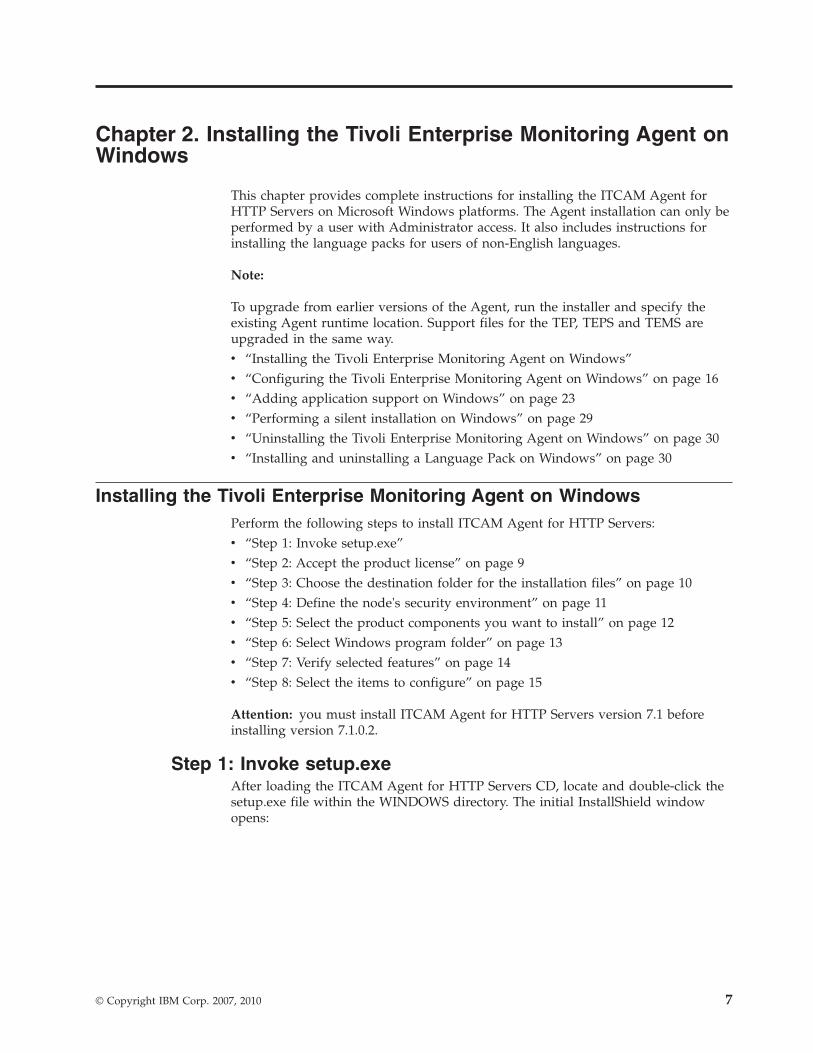
Step 1: Invoke setup.exeAfter loading the ITCAM Agent for HTTP Servers CD, locate and double-click thesetup.exe file within the WINDOWS directory. The initial InstallShield windowopens:
© Copyright IBM Corp. 2007, 2010 7
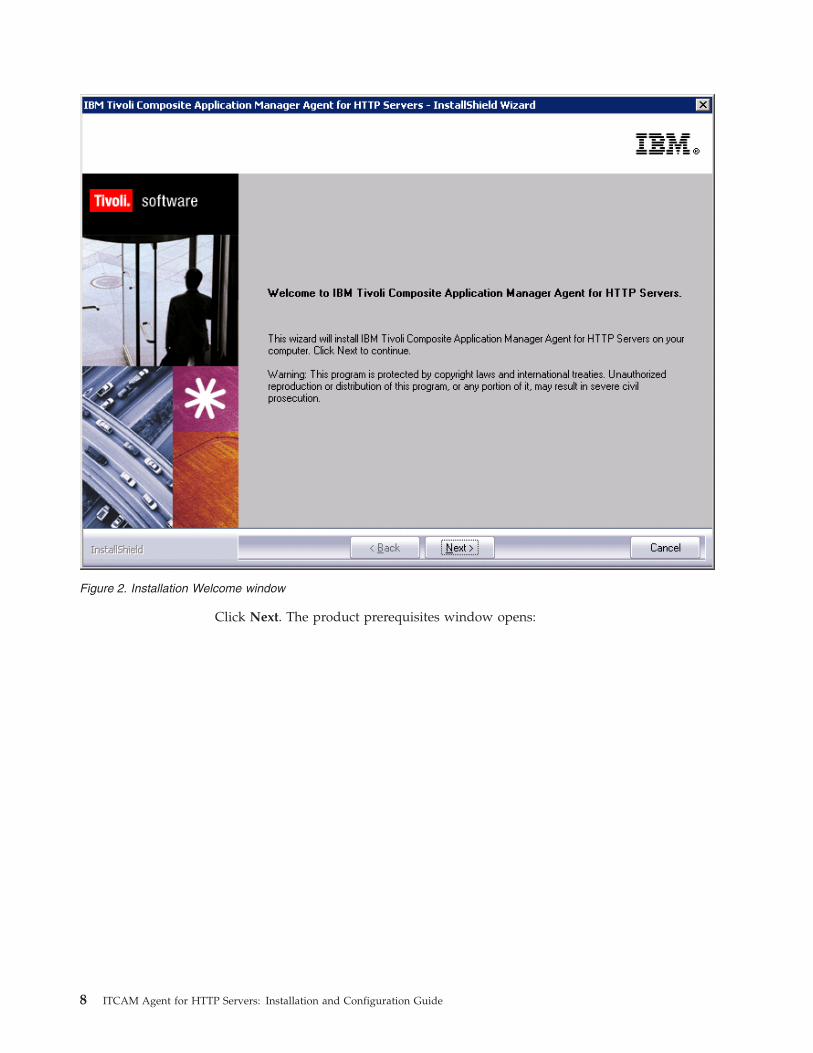
Click Next. The product prerequisites window opens:
Figure 2. Installation Welcome window
8 ITCAM Agent for HTTP Servers: Installation and Configuration Guide
If the environment meets the prerequisites, click Next. If the Tivoli EnterpriseMonitoring Server is not installed, cancel the installation and install the requiredcomponents. After you meet the prerequisites, restart the installation from “Step 1:Invoke setup.exe” on page 7.
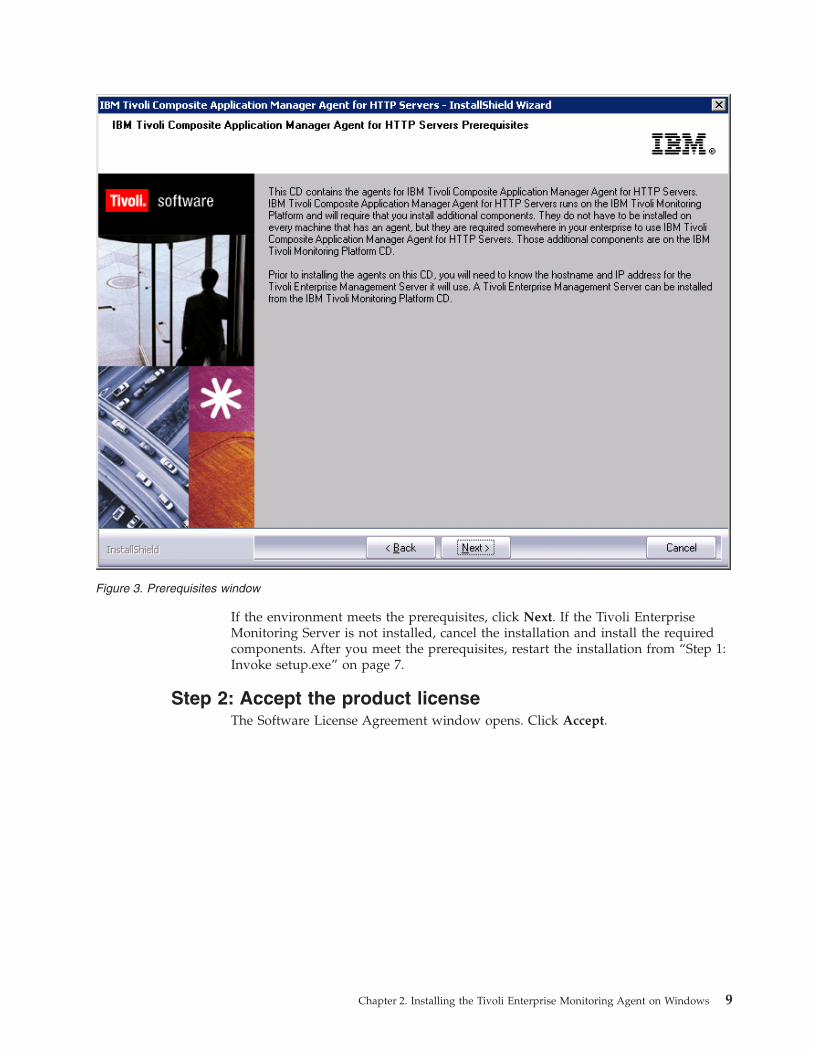
Step 2: Accept the product licenseThe Software License Agreement window opens. Click Accept.
Figure 3. Prerequisites window
Chapter 2. Installing the Tivoli Enterprise Monitoring Agent on Windows 9
Step 3: Choose the destination folder for the installation filesYou are prompted to choose the destination directory for the installation files.
Figure 4. Software License Agreement window
10 ITCAM Agent for HTTP Servers: Installation and Configuration Guide
If you want to use a location other than the default installation location(C:\IBM\ITM), click Browse, and select the folder that you want to use. ClickNext when you have specified the folder. The User Data Encryption Key windowopens.
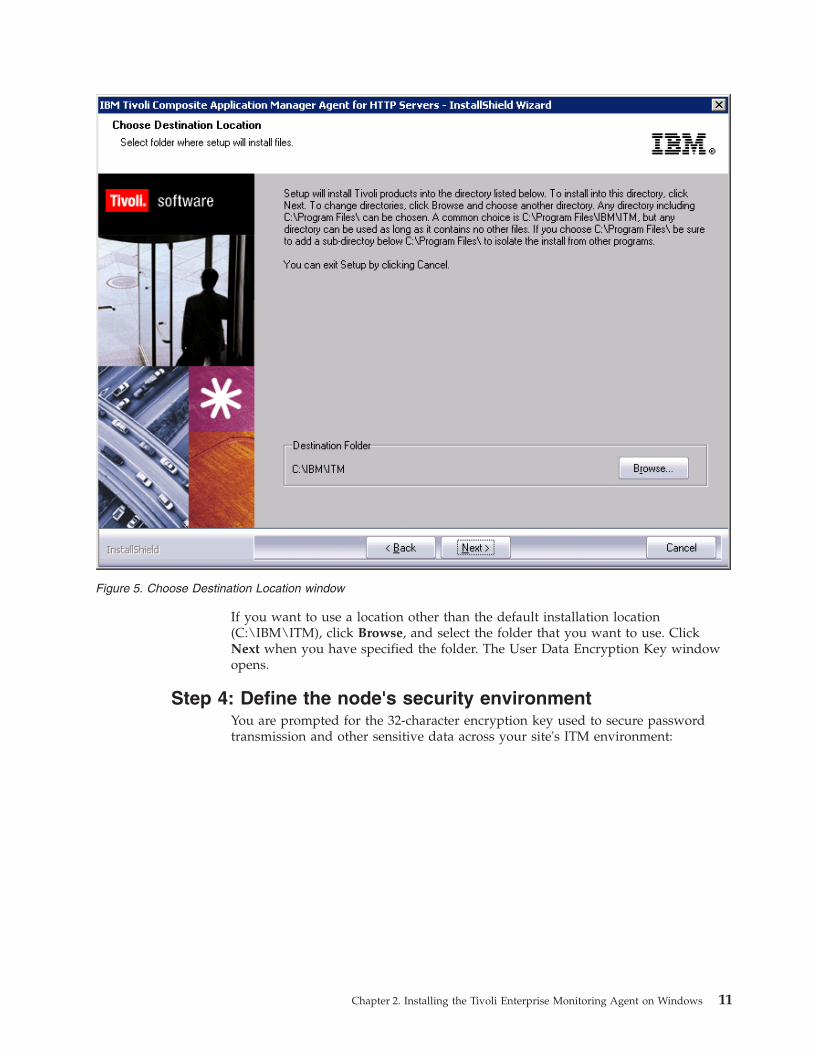
Step 4: Define the node's security environmentYou are prompted for the 32-character encryption key used to secure passwordtransmission and other sensitive data across your site's ITM environment:
Figure 5. Choose Destination Location window
Chapter 2. Installing the Tivoli Enterprise Monitoring Agent on Windows 11
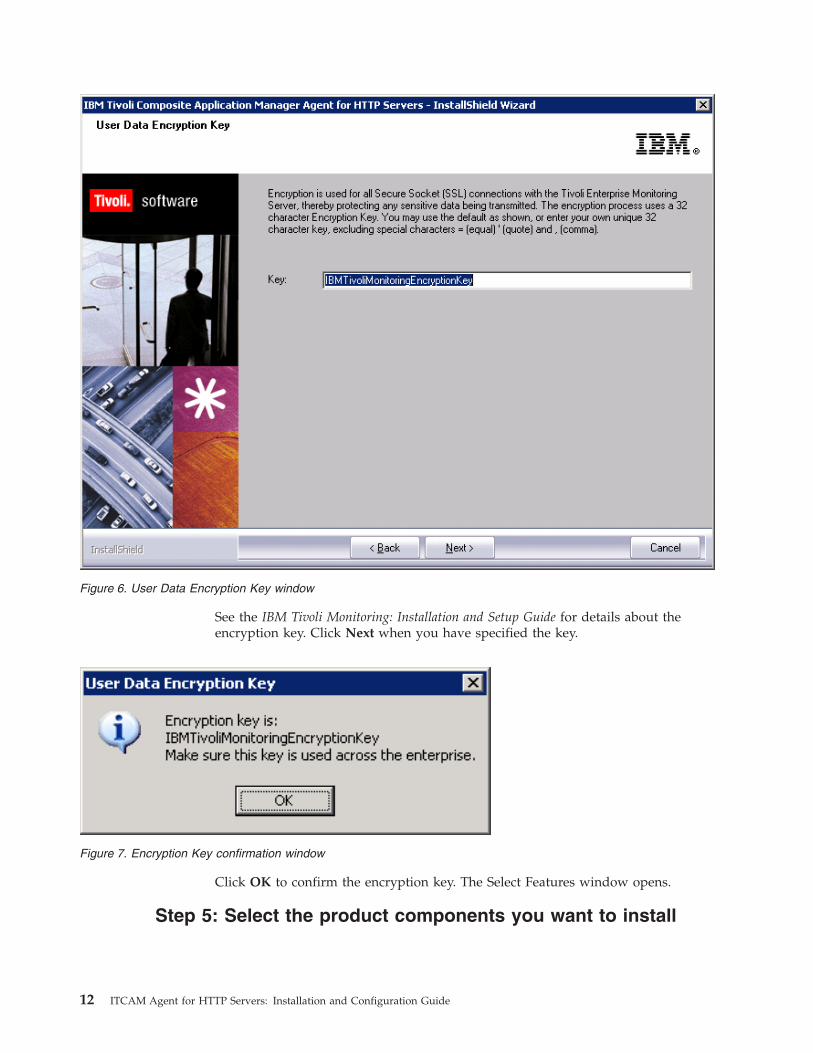
See the IBM Tivoli Monitoring: Installation and Setup Guide for details about theencryption key. Click Next when you have specified the key.
Click OK to confirm the encryption key. The Select Features window opens.
Step 5: Select the product components you want to install
Figure 6. User Data Encryption Key window
Figure 7. Encryption Key confirmation window
12 ITCAM Agent for HTTP Servers: Installation and Configuration Guide
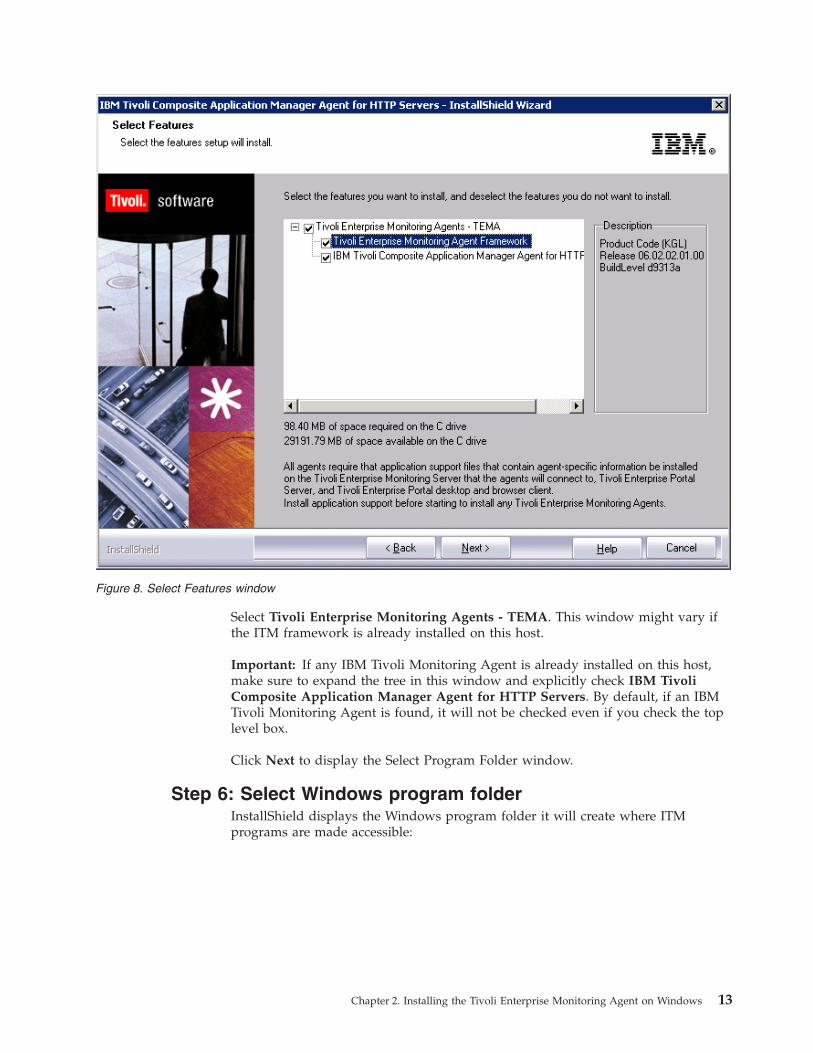
Select Tivoli Enterprise Monitoring Agents - TEMA. This window might vary ifthe ITM framework is already installed on this host.
Important: If any IBM Tivoli Monitoring Agent is already installed on this host,make sure to expand the tree in this window and explicitly check IBM TivoliComposite Application Manager Agent for HTTP Servers. By default, if an IBMTivoli Monitoring Agent is found, it will not be checked even if you check the toplevel box.
Click Next to display the Select Program Folder window.
Step 6: Select Windows program folderInstallShield displays the Windows program folder it will create where ITMprograms are made accessible:
Figure 8. Select Features window
Chapter 2. Installing the Tivoli Enterprise Monitoring Agent on Windows 13
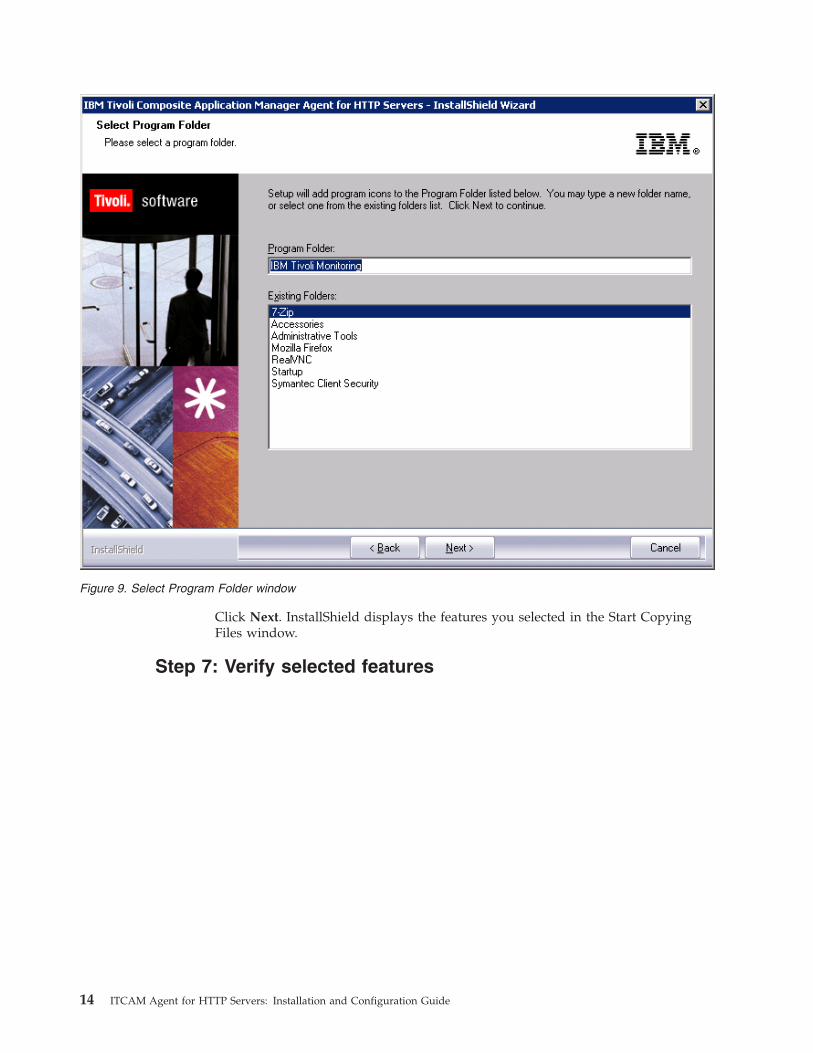
Click Next. InstallShield displays the features you selected in the Start CopyingFiles window.
Step 7: Verify selected features
Figure 9. Select Program Folder window
14 ITCAM Agent for HTTP Servers: Installation and Configuration Guide
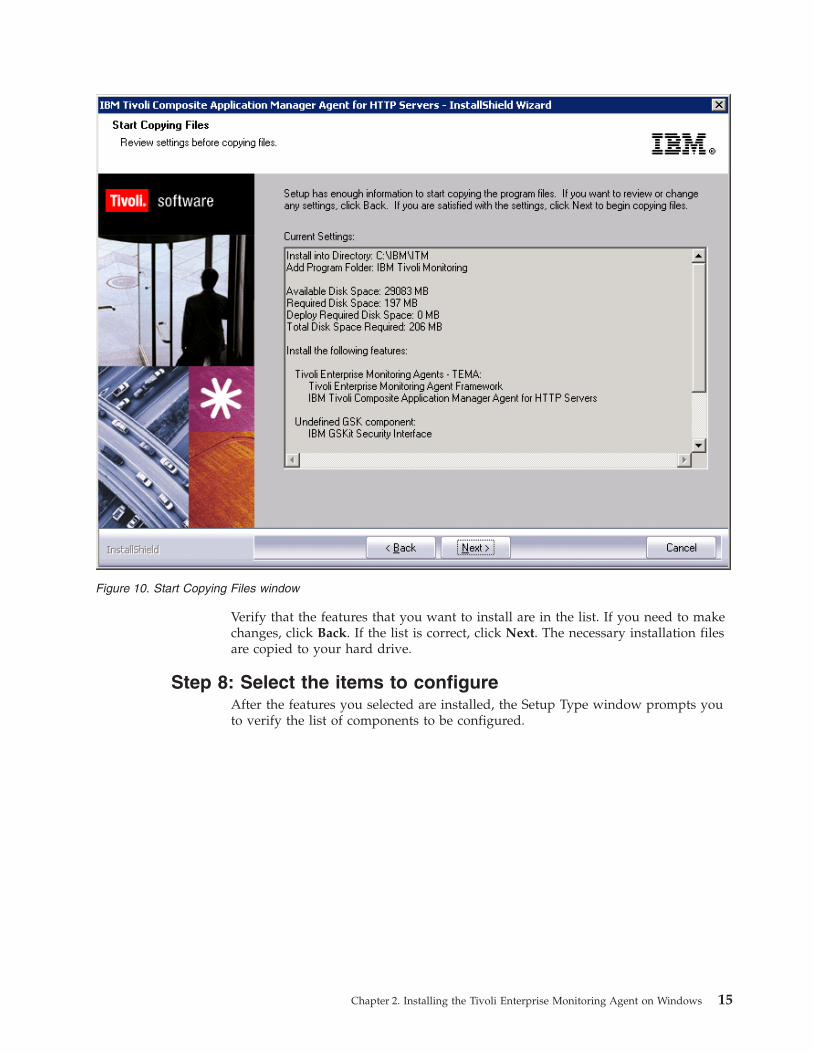
Verify that the features that you want to install are in the list. If you need to makechanges, click Back. If the list is correct, click Next. The necessary installation filesare copied to your hard drive.
Step 8: Select the items to configureAfter the features you selected are installed, the Setup Type window prompts youto verify the list of components to be configured.
Figure 10. Start Copying Files window
Chapter 2. Installing the Tivoli Enterprise Monitoring Agent on Windows 15
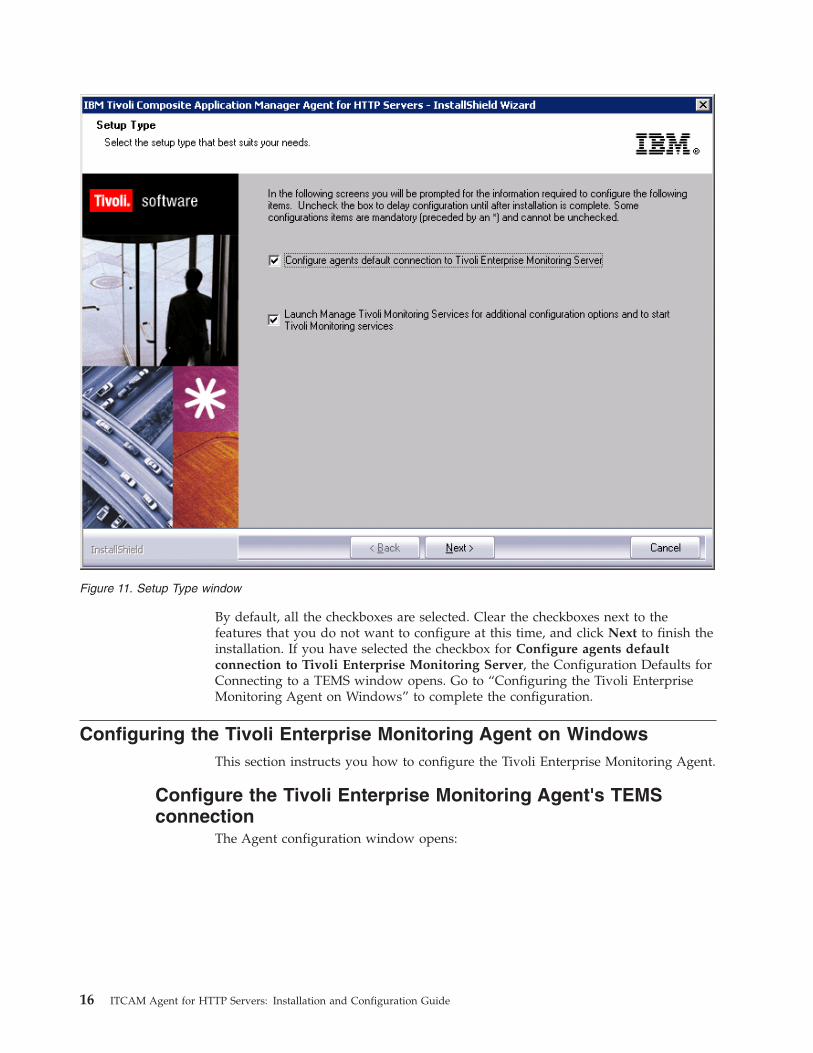
By default, all the checkboxes are selected. Clear the checkboxes next to thefeatures that you do not want to configure at this time, and click Next to finish theinstallation. If you have selected the checkbox for Configure agents defaultconnection to Tivoli Enterprise Monitoring Server, the Configuration Defaults forConnecting to a TEMS window opens. Go to “Configuring the Tivoli EnterpriseMonitoring Agent on Windows” to complete the configuration.
Configuring the Tivoli Enterprise Monitoring Agent on WindowsThis section instructs you how to configure the Tivoli Enterprise Monitoring Agent.
Configure the Tivoli Enterprise Monitoring Agent's TEMSconnection
The Agent configuration window opens:
Figure 11. Setup Type window
16 ITCAM Agent for HTTP Servers: Installation and Configuration Guide
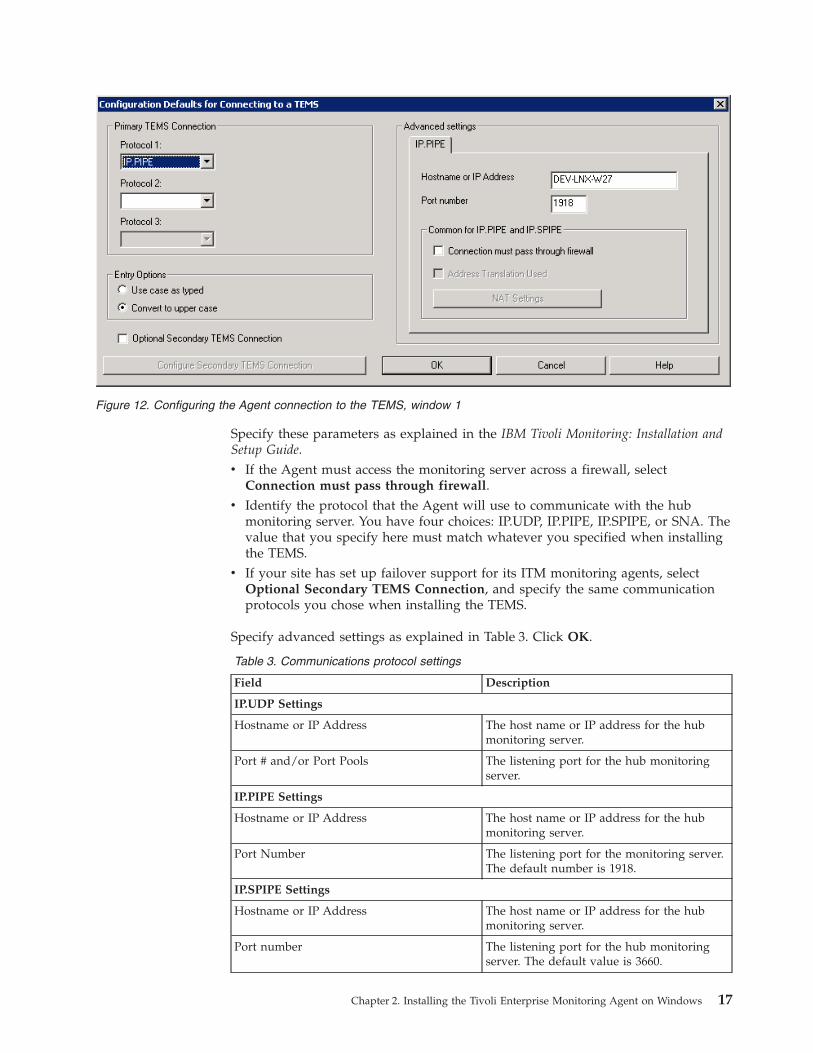
Specify these parameters as explained in the IBM Tivoli Monitoring: Installation andSetup Guide.v If the Agent must access the monitoring server across a firewall, select
Connection must pass through firewall.v Identify the protocol that the Agent will use to communicate with the hub
monitoring server. You have four choices: IP.UDP, IP.PIPE, IP.SPIPE, or SNA. Thevalue that you specify here must match whatever you specified when installingthe TEMS.
v If your site has set up failover support for its ITM monitoring agents, selectOptional Secondary TEMS Connection, and specify the same communicationprotocols you chose when installing the TEMS.
Specify advanced settings as explained in Table 3. Click OK.
Table 3. Communications protocol settings
Field Description
IP.UDP Settings
Hostname or IP Address The host name or IP address for the hubmonitoring server.
Port # and/or Port Pools The listening port for the hub monitoringserver.
IP.PIPE Settings
Hostname or IP Address The host name or IP address for the hubmonitoring server.
Port Number The listening port for the monitoring server.The default number is 1918.
IP.SPIPE Settings
Hostname or IP Address The host name or IP address for the hubmonitoring server.
Port number The listening port for the hub monitoringserver. The default value is 3660.
Figure 12. Configuring the Agent connection to the TEMS, window 1
Chapter 2. Installing the Tivoli Enterprise Monitoring Agent on Windows 17
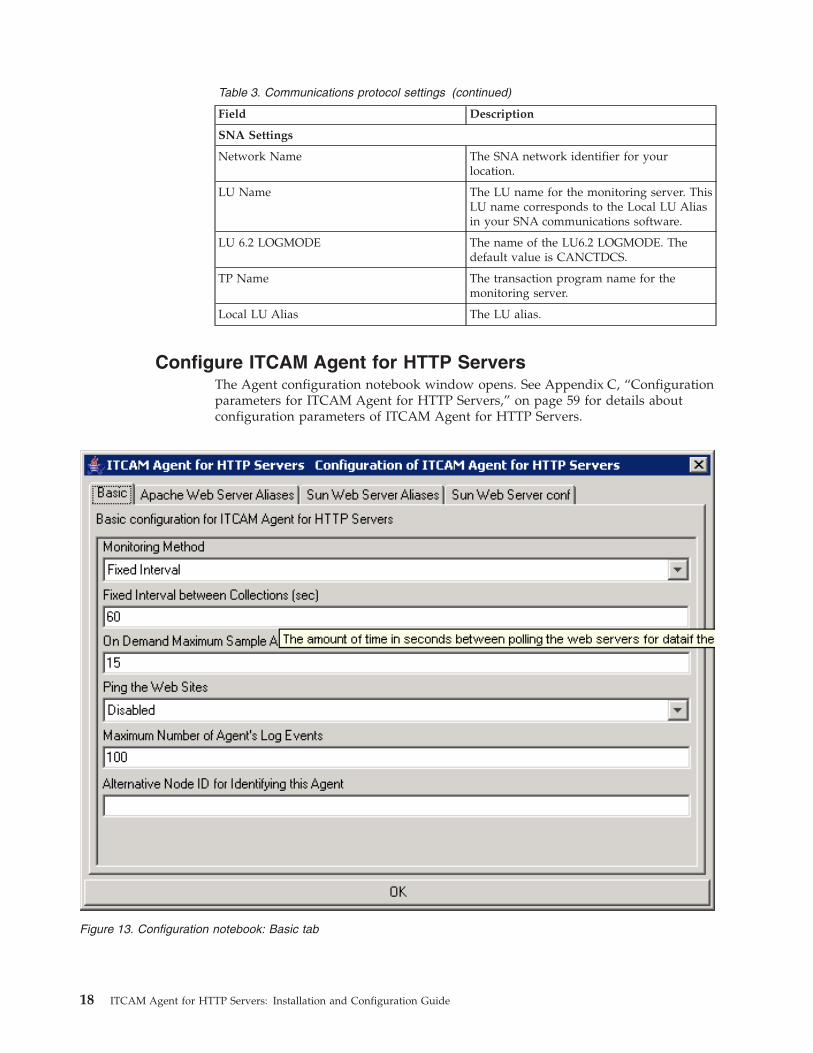
Table 3. Communications protocol settings (continued)
Field Description
SNA Settings
Network Name The SNA network identifier for yourlocation.
LU Name The LU name for the monitoring server. ThisLU name corresponds to the Local LU Aliasin your SNA communications software.
LU 6.2 LOGMODE The name of the LU6.2 LOGMODE. Thedefault value is CANCTDCS.
TP Name The transaction program name for themonitoring server.
Local LU Alias The LU alias.
Configure ITCAM Agent for HTTP ServersThe Agent configuration notebook window opens. See Appendix C, “Configurationparameters for ITCAM Agent for HTTP Servers,” on page 59 for details aboutconfiguration parameters of ITCAM Agent for HTTP Servers.
Figure 13. Configuration notebook: Basic tab
18 ITCAM Agent for HTTP Servers: Installation and Configuration Guide
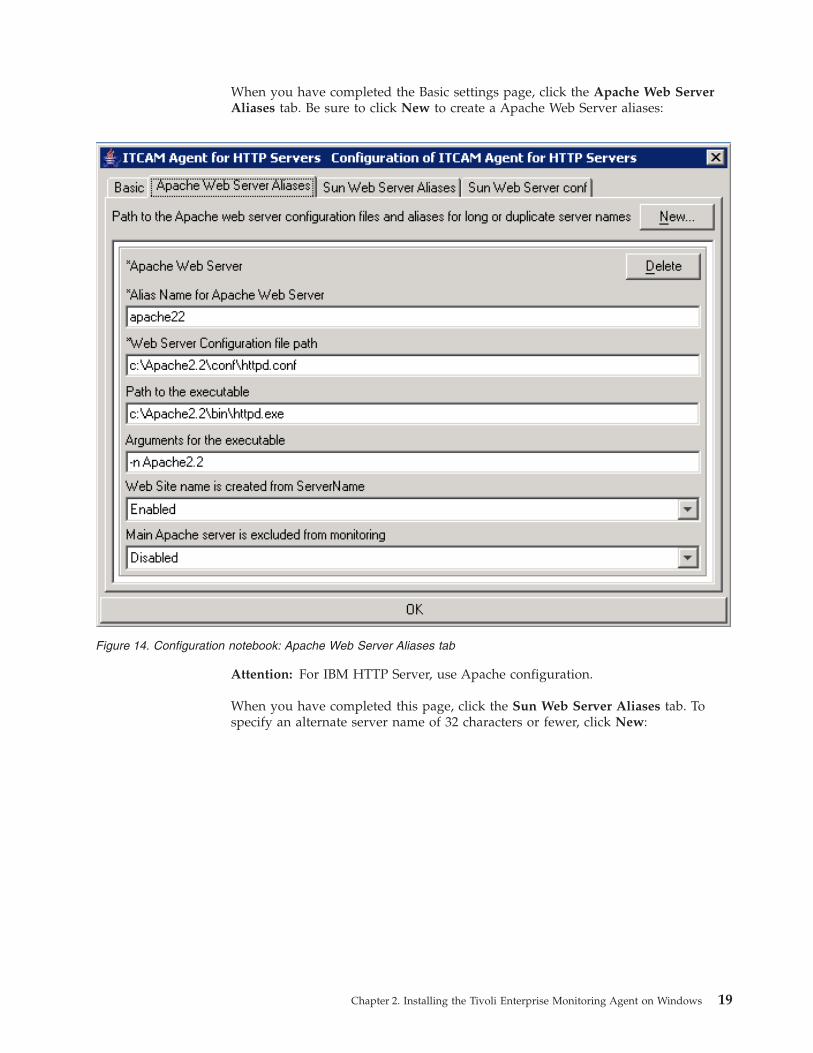
When you have completed the Basic settings page, click the Apache Web ServerAliases tab. Be sure to click New to create a Apache Web Server aliases:
Attention: For IBM HTTP Server, use Apache configuration.
When you have completed this page, click the Sun Web Server Aliases tab. Tospecify an alternate server name of 32 characters or fewer, click New:
Figure 14. Configuration notebook: Apache Web Server Aliases tab
Chapter 2. Installing the Tivoli Enterprise Monitoring Agent on Windows 19
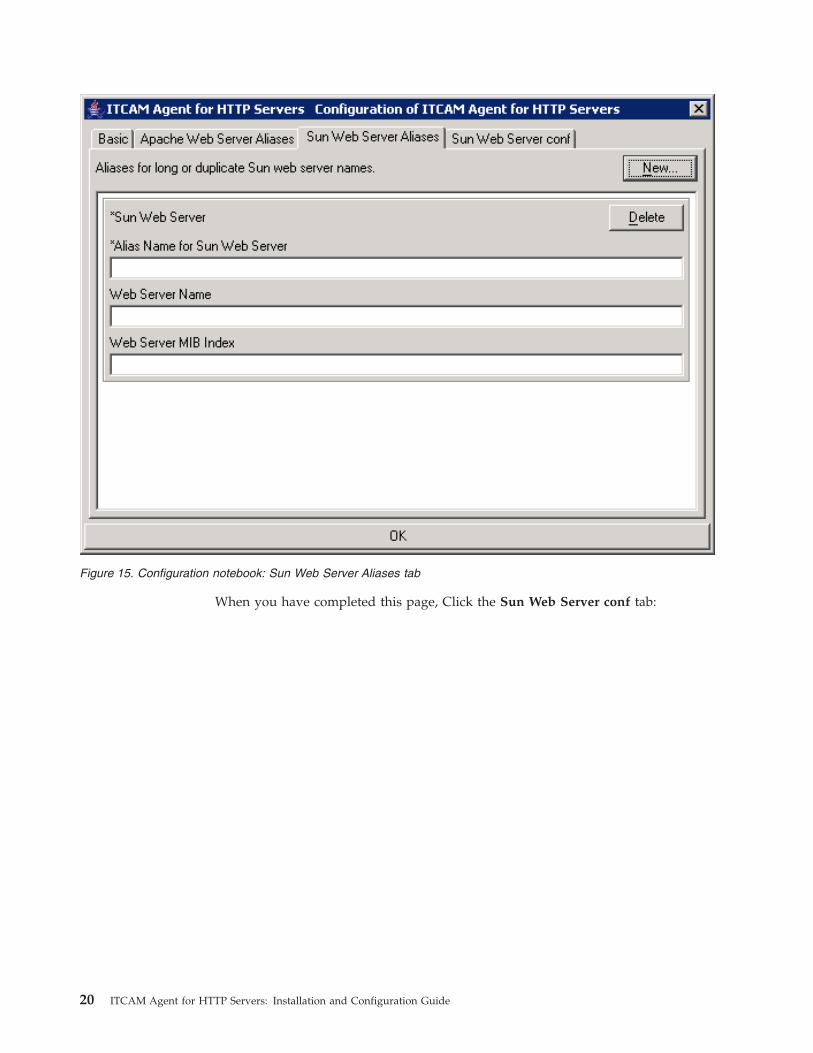
When you have completed this page, Click the Sun Web Server conf tab:
Figure 15. Configuration notebook: Sun Web Server Aliases tab
20 ITCAM Agent for HTTP Servers: Installation and Configuration Guide
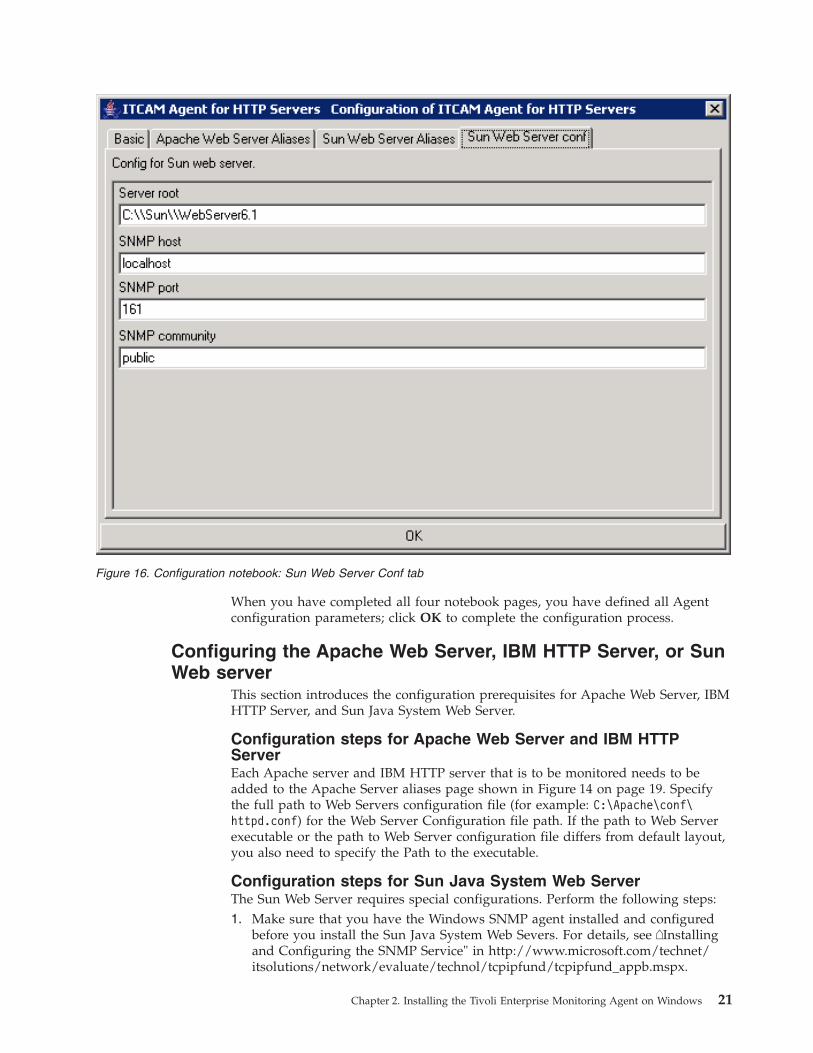
When you have completed all four notebook pages, you have defined all Agentconfiguration parameters; click OK to complete the configuration process.
Configuring the Apache Web Server, IBM HTTP Server, or SunWeb server
This section introduces the configuration prerequisites for Apache Web Server, IBMHTTP Server, and Sun Java System Web Server.
Configuration steps for Apache Web Server and IBM HTTPServerEach Apache server and IBM HTTP server that is to be monitored needs to beadded to the Apache Server aliases page shown in Figure 14 on page 19. Specifythe full path to Web Servers configuration file (for example: C:\Apache\conf\httpd.conf) for the Web Server Configuration file path. If the path to Web Serverexecutable or the path to Web Server configuration file differs from default layout,you also need to specify the Path to the executable.
Configuration steps for Sun Java System Web ServerThe Sun Web Server requires special configurations. Perform the following steps:1. Make sure that you have the Windows SNMP agent installed and configured
before you install the Sun Java System Web Severs. For details, see �Installingand Configuring the SNMP Service" in http://www.microsoft.com/technet/itsolutions/network/evaluate/technol/tcpipfund/tcpipfund_appb.mspx.
Figure 16. Configuration notebook: Sun Web Server Conf tab
Chapter 2. Installing the Tivoli Enterprise Monitoring Agent on Windows 21
2. Configure the community name for SNMP, click Start > Control Panel >Administrative Tools > Services > SNMP Service, the SNMP ServiceProperties window opens. Click the Security tab, and click Add under theAccepted Community Name box. Enter public in the Community name field .Restart SNMP Service.
3. Install the Sun Web Server.4. Enable SNMP monitoring for each server by clicking server > manage > SNMP
Subagent Configuration. Specify the needed information. Select on for theEnable SNMP Statistics Collection field, then click OK and apply changes. Fordetails, see http://docs.sun.com/source/819-0130/agsnmp.html.
5. Restart SNMP service.6. Start/restart configured servers from Sun Web Server web admin console.
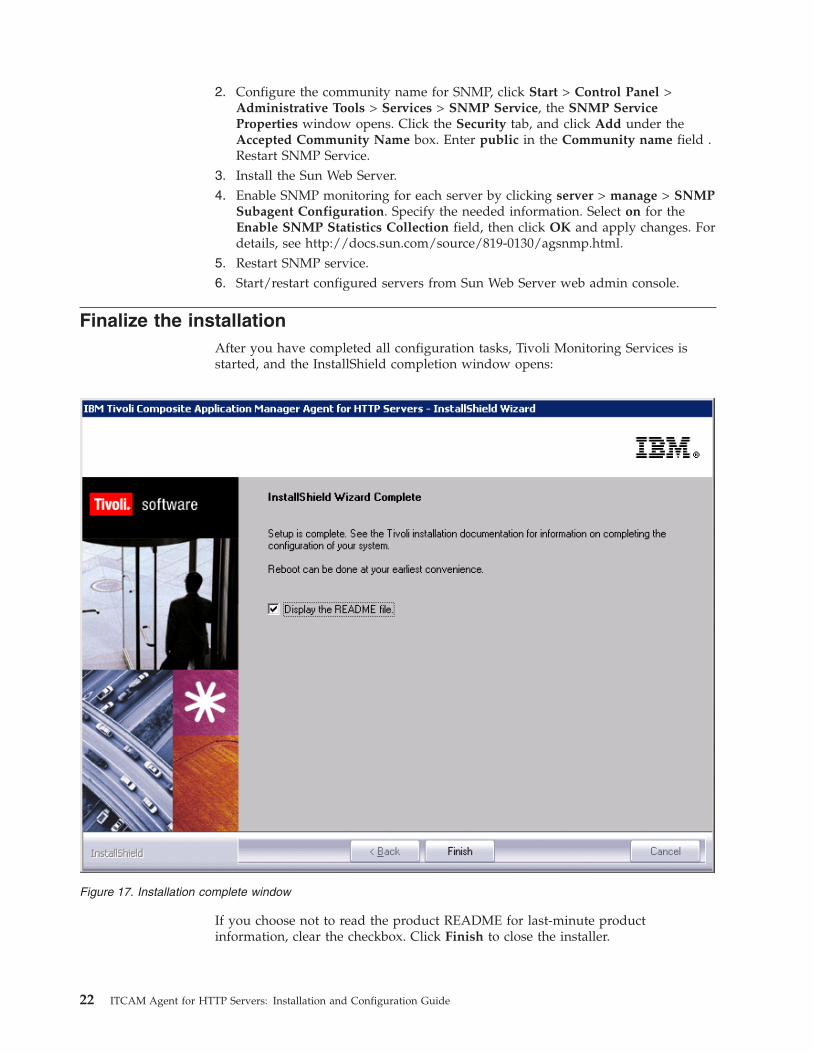
Finalize the installationAfter you have completed all configuration tasks, Tivoli Monitoring Services isstarted, and the InstallShield completion window opens:
If you choose not to read the product README for last-minute productinformation, clear the checkbox. Click Finish to close the installer.
Figure 17. Installation complete window
22 ITCAM Agent for HTTP Servers: Installation and Configuration Guide
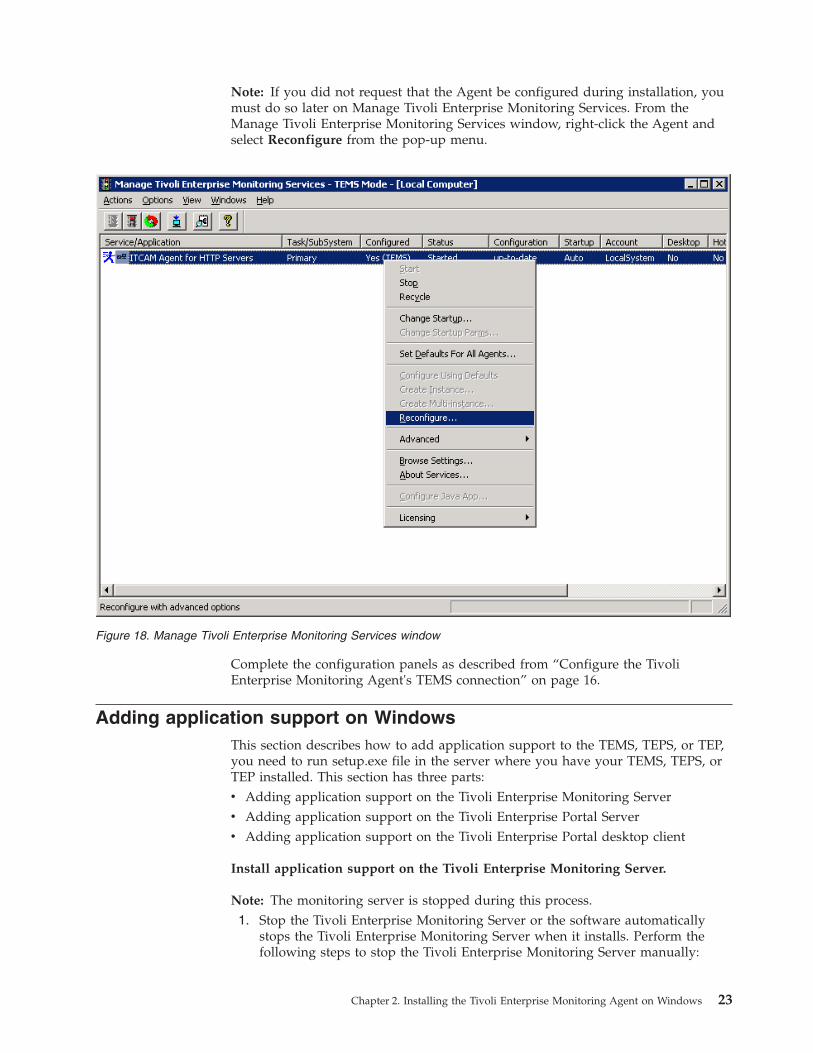
Note: If you did not request that the Agent be configured during installation, youmust do so later on Manage Tivoli Enterprise Monitoring Services. From theManage Tivoli Enterprise Monitoring Services window, right-click the Agent andselect Reconfigure from the pop-up menu.
Complete the configuration panels as described from “Configure the TivoliEnterprise Monitoring Agent's TEMS connection” on page 16.
Adding application support on WindowsThis section describes how to add application support to the TEMS, TEPS, or TEP,you need to run setup.exe file in the server where you have your TEMS, TEPS, orTEP installed. This section has three parts:v Adding application support on the Tivoli Enterprise Monitoring Serverv Adding application support on the Tivoli Enterprise Portal Serverv Adding application support on the Tivoli Enterprise Portal desktop client
Install application support on the Tivoli Enterprise Monitoring Server.
Note: The monitoring server is stopped during this process.1. Stop the Tivoli Enterprise Monitoring Server or the software automatically
stops the Tivoli Enterprise Monitoring Server when it installs. Perform thefollowing steps to stop the Tivoli Enterprise Monitoring Server manually:
Figure 18. Manage Tivoli Enterprise Monitoring Services window
Chapter 2. Installing the Tivoli Enterprise Monitoring Agent on Windows 23
a. Click Start → Programs → IBM Tivoli Monitoring → Manage TivoliMonitoring Services.
b. Right-click Tivoli Enterprise Monitoring Server.c. In the pop-up menu, select Stop.
2. Access the /WINDOWS subdirectory on the agent installation media.3. Double-click setup.exe.4. Click Next on the Welcome window.
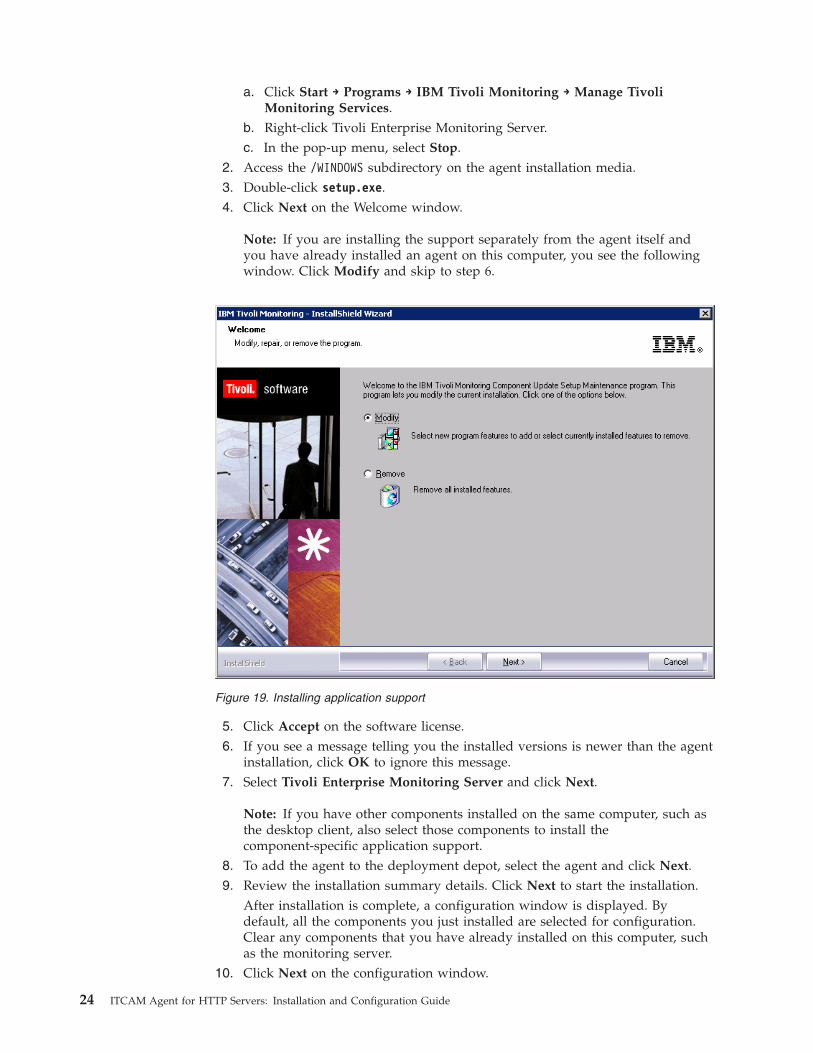
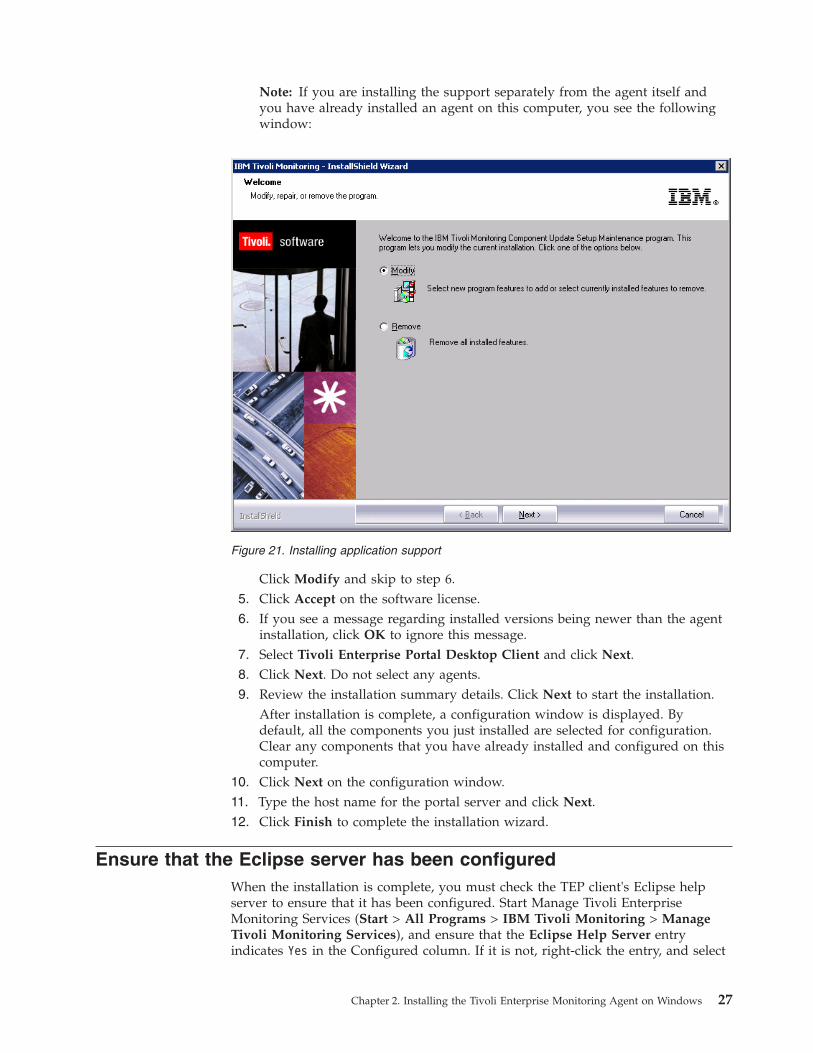
Note: If you are installing the support separately from the agent itself andyou have already installed an agent on this computer, you see the followingwindow. Click Modify and skip to step 6.
5. Click Accept on the software license.6. If you see a message telling you the installed versions is newer than the agent
installation, click OK to ignore this message.7. Select Tivoli Enterprise Monitoring Server and click Next.
Note: If you have other components installed on the same computer, such asthe desktop client, also select those components to install thecomponent-specific application support.
8. To add the agent to the deployment depot, select the agent and click Next.9. Review the installation summary details. Click Next to start the installation.
After installation is complete, a configuration window is displayed. Bydefault, all the components you just installed are selected for configuration.Clear any components that you have already installed on this computer, suchas the monitoring server.
10. Click Next on the configuration window.
Figure 19. Installing application support
24 ITCAM Agent for HTTP Servers: Installation and Configuration Guide
11. Specify the default values for communication with the monitoring server andclick OK.
12. Identify the default communications protocols for agents to use to connect tothe monitoring server and click OK .
13. Specify the location of the monitoring server and click OK. Your choices areThis computer or On a different computer.
Note: Because the monitoring server is not currently running, it is startedautomatically before the process begins.
14. Click OK.15. Select the data to add to the monitoring server and click OK. By default, all
available application support is selected.16. Click Next on the application support message.17. Specify the default values for the agent to use when it communicates with the
monitoring server and click OK.
Note: You can specify three methods for communication to set up backupcommunication methods. If the method you have identified as Protocol 1 fails,Protocol 2 is used.a. If the agent must cross a firewall to access the monitoring server, select
Connection must pass through firewall.b. Identify the type of protocol that the agent uses to communicate with the
monitoring server. You have four choices: IP.UDP, IP.PIPE, IP.SPIPE, orSNA.
18. Define the communications between agents and the monitoring server. Fordetails of the information, see Table 3 on page 17.
19. Click Finish.
Install application support on the Tivoli Enterprise Portal server.
1. Open Manage Tivoli Enterprise Monitoring Services.
2. Stop the portal server by right-clicking it and clicking Stop.3. Access the /WINDOWS subdirectory on the agent installation media.4. Double-click setup.exe.5. Click Next on the Welcome window.
Note: If you are installing the support separately from the agent itself andyou have already installed an agent on this computer, you see the followingwindow:
Chapter 2. Installing the Tivoli Enterprise Monitoring Agent on Windows 25
Click Modify and skip to step 7.6. Click Accept on the software license.7. If you see a message telling you the installed versions is newer than the agent
installation, click OK to ignore this message.8. Select Tivoli Enterprise Portal Server and click Next.
Note: If you have other components installed on the same computer, such asthe desktop client, also select those components to install thecomponent-specific application support.
9. Click Next without selecting any agents.10. Review the installation summary details and click Next.
After installation is complete, a configuration window is displayed. Bydefault, all the components you just installed are selected for configuration.Clear any components that you have already installed and configured on thiscomputer.
11. Click Next on the configuration window.12. Type the host name for the portal server and click Next.13. Click Finish.14. Restart the portal server.
Installing application support on the desktop client
1. Stop the desktop client before performing this procedure.2. Access the /WINDOWS subdirectory on the agent installation media.3. Double-click setup.exe.4. Click Next on the Welcome window.
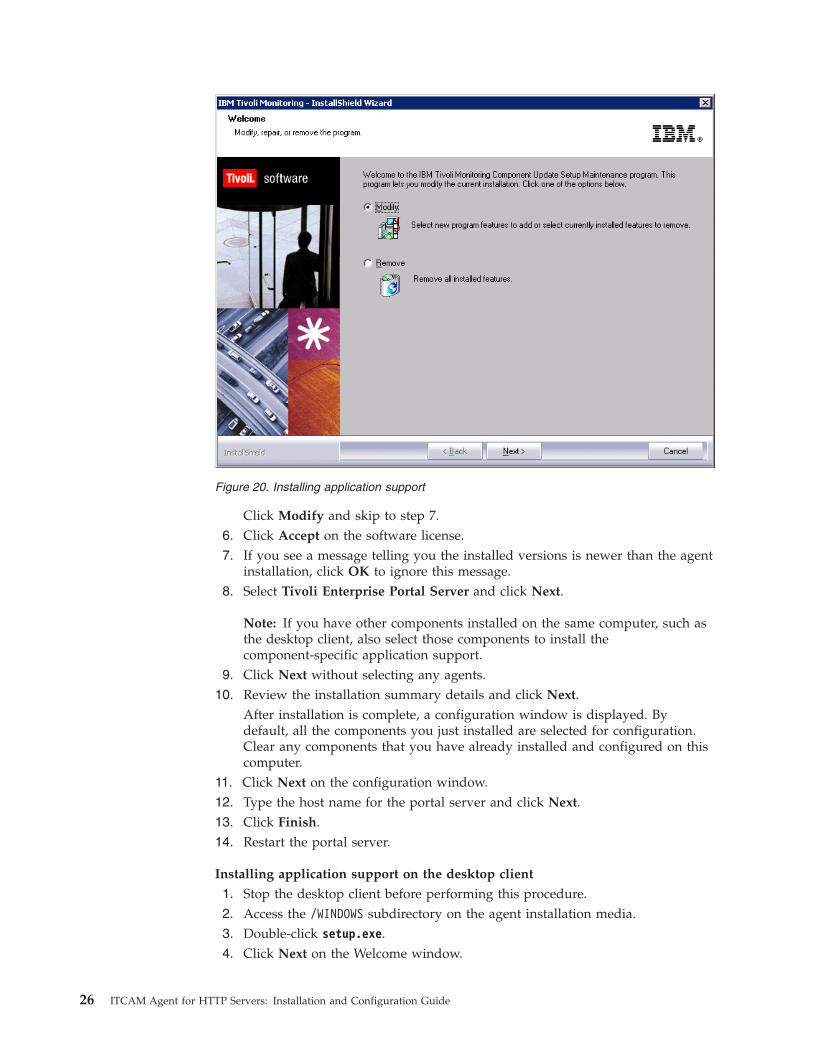
Figure 20. Installing application support
26 ITCAM Agent for HTTP Servers: Installation and Configuration Guide
Note: If you are installing the support separately from the agent itself andyou have already installed an agent on this computer, you see the followingwindow:
Click Modify and skip to step 6.5. Click Accept on the software license.6. If you see a message regarding installed versions being newer than the agent
installation, click OK to ignore this message.7. Select Tivoli Enterprise Portal Desktop Client and click Next.8. Click Next. Do not select any agents.9. Review the installation summary details. Click Next to start the installation.
After installation is complete, a configuration window is displayed. Bydefault, all the components you just installed are selected for configuration.Clear any components that you have already installed and configured on thiscomputer.
10. Click Next on the configuration window.11. Type the host name for the portal server and click Next.12. Click Finish to complete the installation wizard.
Ensure that the Eclipse server has been configuredWhen the installation is complete, you must check the TEP client's Eclipse helpserver to ensure that it has been configured. Start Manage Tivoli EnterpriseMonitoring Services (Start > All Programs > IBM Tivoli Monitoring > ManageTivoli Monitoring Services), and ensure that the Eclipse Help Server entryindicates Yes in the Configured column. If it is not, right-click the entry, and select
Figure 21. Installing application support
Chapter 2. Installing the Tivoli Enterprise Monitoring Agent on Windows 27
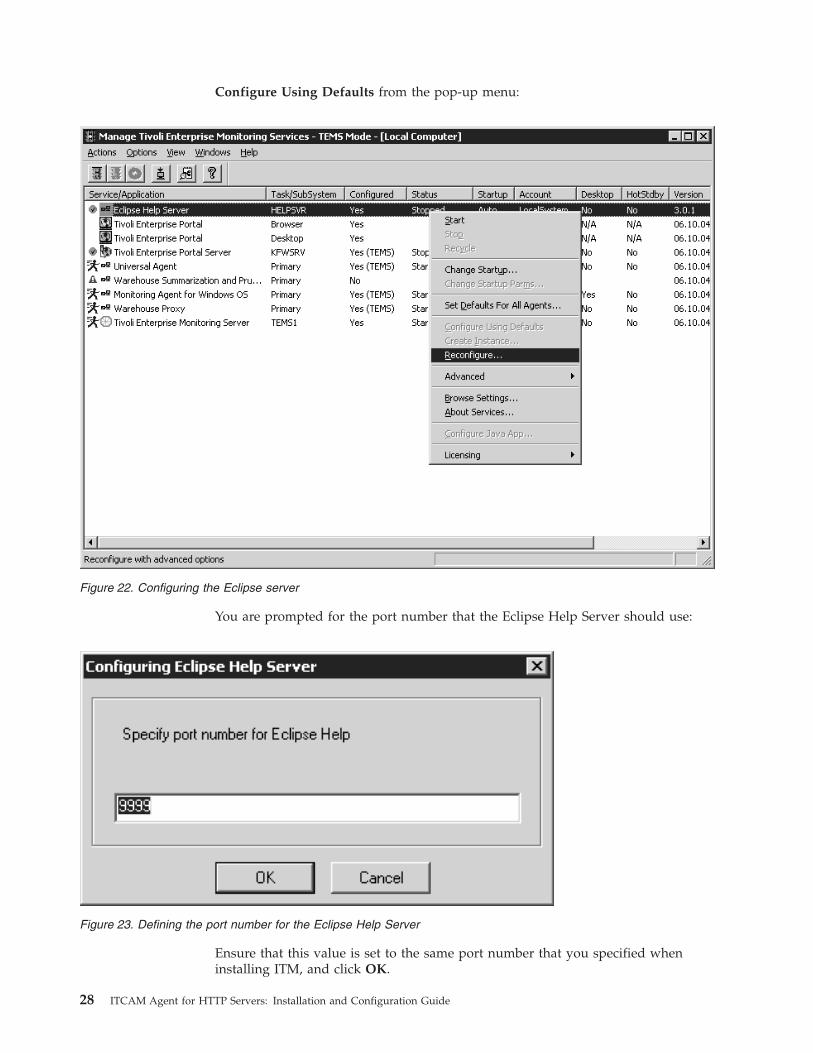
Configure Using Defaults from the pop-up menu:
You are prompted for the port number that the Eclipse Help Server should use:
Ensure that this value is set to the same port number that you specified wheninstalling ITM, and click OK.
Figure 22. Configuring the Eclipse server
Figure 23. Defining the port number for the Eclipse Help Server
28 ITCAM Agent for HTTP Servers: Installation and Configuration Guide
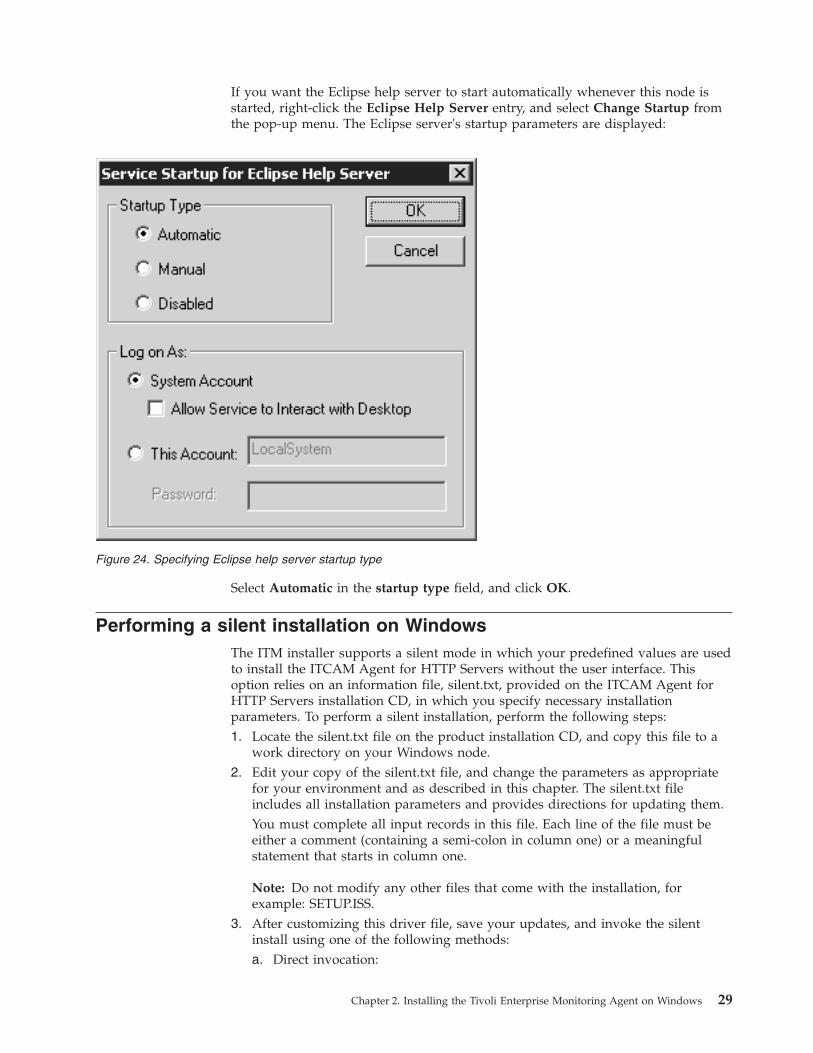
If you want the Eclipse help server to start automatically whenever this node isstarted, right-click the Eclipse Help Server entry, and select Change Startup fromthe pop-up menu. The Eclipse server's startup parameters are displayed:
Select Automatic in the startup type field, and click OK.
Performing a silent installation on WindowsThe ITM installer supports a silent mode in which your predefined values are usedto install the ITCAM Agent for HTTP Servers without the user interface. Thisoption relies on an information file, silent.txt, provided on the ITCAM Agent forHTTP Servers installation CD, in which you specify necessary installationparameters. To perform a silent installation, perform the following steps:1. Locate the silent.txt file on the product installation CD, and copy this file to a
work directory on your Windows node.2. Edit your copy of the silent.txt file, and change the parameters as appropriate
for your environment and as described in this chapter. The silent.txt fileincludes all installation parameters and provides directions for updating them.You must complete all input records in this file. Each line of the file must beeither a comment (containing a semi-colon in column one) or a meaningfulstatement that starts in column one.
Note: Do not modify any other files that come with the installation, forexample: SETUP.ISS.
3. After customizing this driver file, save your updates, and invoke the silentinstall using one of the following methods:a. Direct invocation:
Figure 24. Specifying Eclipse help server startup type
Chapter 2. Installing the Tivoli Enterprise Monitoring Agent on Windows 29
v Open a command prompt, and change to the directory that containsinstallation files setup.exe and setup.ins.
v Invoke setup as follows. Specify the parameters in the order listed.start /wait setup /z"/sfC:\temp\SILENT.TXT" /s /f2"C:\temp\silent_setup.log"
where /z"/sf" specifies the name and location of the installation driverthat you customized for your site (in this example, file SILENT.TXT in theC:\temp directory). This is a required parameter. This file must exist./s specifies that this is a silent install; if you specify this option, nothingis displayed during installation./f2 specifies the name of the InstallShield log file. If you do not specifythis parameter, the Setup.log file is created by default in the samelocation as setup.iss. This log is the InstallShield log but not theinstallation log. The installation log can be found in the installation targetdirectory. The default directory is C:\IBM\Omegamon sub-directory, andif the installation aborts before the installation location has beenidentified, the directory is on the Windows Boot drive root directory. Ineither case, the Setup program must be able to create and write to thisfile.
b. SMS invocation:1) Copy all the installation files to a LAN-based disk that SMS will mount
on the designated servers.2) Replace the original SILENT.TXT file on the LAN disk with your
modified version.3) Edit the PDF file located in the same place as the setup.exe file and
change the Setup invocation as follows:Setup /z"/sfC:\temp\SILENT.TXT" /s /f2"C:\temp\silent_setup.log"
You can find complete information about silent ITM installation in IBM TivoliMonitoring: Installation and Setup Guide.
Uninstalling the Tivoli Enterprise Monitoring Agent on WindowsUse the following procedures to remove a monitoring agent on Windows.1. From the desktop, click Start → Settings → Control Panel (for Windows 2000) or
Start → Control Panel (for Windows 2003).2. Click Add or Remove Programs.3. Select the agent you want to uninstall.4. Click Change/Remove.5. Select Remove and click Next.6. Click OK to confirm the uninstallation.7. Click Finish to complete the uninstallation.
Installing and uninstalling a Language Pack on WindowsA Language Pack enables user interaction with the Agent in a language other thanEnglish. For example, when a Spanish language pack is installed, the TivoliEnterprise Portal workspaces and the internal messages of the Agent are displayedin Spanish.
30 ITCAM Agent for HTTP Servers: Installation and Configuration Guide
To enable full support for a language, you must install the Language Pack on theAgent host and all hosts where the Agent ITM support files are installed (hubTivoli Enterprise Monitoring Servers, all Tivoli Enterprise Portal Servers, and allTivoli Enterprise Portal desktop clients).
If you no longer want to use a language, uninstall the language pack for it.
Before installing or uninstalling a language pack, ensure that:v The Agent and the TEP Support Files are installed.v The Java runtime environment (JRE) is available on every host where you are
planning to install the Language Pack. (The JRE is required by ITM).
Installing a Language Pack on WindowsTo install a Language Pack on Windows you need to use the installer on theLanguage Pack DVD. The procedure is the same on the Agent host, hub TivoliEnterprise Monitoring Server, Tivoli Enterprise Portal Server, and Tivoli EnterprisePortal desktop client.
Perform the following procedure:1. Start lpinstaller.exe from the Language Pack DVD.2. Select the language of the installer and click OK.
Note: In this step, you select the language for the installer user interface, notthe language pack that will be installed.
3. Click Next on the Introduction window.4. Select Add/Update and click Next.5. Select the folder where the National Language Support package (NLSPackage)
files are located. This is the nlspackage folder on the Language Pack DVD.6. Select ITCAM Agent for HTTP Servers.7. Select the languages to install and click Next.
Note: You can hold down the Ctrl key for multiple selections.8. Examine the installation summary page and click Next to begin installation.9. Click Next.
10. Click Finish to exit the installer.11. If you are installing the Language Pack on a Tivoli Enterprise Monitoring
Server, Tivoli Enterprise Portal Server, or Tivoli Enterprise Portal desktopclient, start the Manage Tivoli Monitoring Services utility, and use it torestart the server or client. If the Eclipse Help Server is running, restart it aswell.
Uninstalling a Language Pack on WindowsTo uninstall a Language Pack on Windows you need to use the installer on theLanguage Pack DVD. The procedure is the same on the Agent host, hub TivoliEnterprise Monitoring Server, Tivoli Enterprise Portal Server, and Tivoli EnterprisePortal desktop client.
Perform the following procedure:1. Start lpinstaller.exe from the Language Pack DVD.2. Select the language of the installer and click OK.
Chapter 2. Installing the Tivoli Enterprise Monitoring Agent on Windows 31
Note: In this step, you select the language for the installer user interface, notthe language pack that will be installed.
3. Click Next on the Introduction window.4. Select Remove and click Next.5. Select ITCAM Agent for HTTP Servers.6. Select the languages to uninstall and click Next.
Note: You can hold down the Ctrl key for multiple selections.7. Examine the installation summary page and click Next to begin installation.8. Click Next.9. Click Finish to exit the installer.
10. If you are installing the Language Pack on a Tivoli Enterprise MonitoringServer, Tivoli Enterprise Portal Server, or Tivoli Enterprise Portal desktopclient, start the Manage Tivoli Monitoring Services utility, and use it torestart the server or client. If the Eclipse Help Server is running, restart it aswell.
32 ITCAM Agent for HTTP Servers: Installation and Configuration Guide
Chapter 3. Installing the Tivoli Enterprise Monitoring Agent onUNIX and Linux
This chapter provides installation instructions for installing the ITCAM Agent forHTTP Servers on any UNIX or Linux environment, including:v Linux running on Intelv AIX®
v HP/UXv Solaris
It also includes instructions for installing the language packs for users ofnon-English languages.v “UNIX and Linux requirements”v “Installing the Tivoli Enterprise Monitoring Agent on UNIX and Linux” on page
34v “Configuring the Tivoli Enterprise Monitoring Agent on UNIX and Linux” on
page 37v “Performing a silent installation on UNIX and Linux” on page 46v “Installing application support on Linux and UNIX” on page 47v “Uninstalling the Tivoli Enterprise Monitoring Agent on UNIX and Linux” on
page 51v “Installing a Language Pack on Linux and UNIX systems” on page 51
UNIX and Linux requirementsThe Tivoli Enterprise Monitoring Agent for ITCAM Agent for HTTP Servers canrun with or without root authority on UNIX and Linux platforms. Start the agentwith the same user ID used to start HTTP Servers, because it must be able to stopor start a Web server using the standard scripts.
Note: Certain features of this installation require that you supply a superuserpassword to complete; therefore your installation user ID must have root authority.
Prerequisite APAR for AIX sitesIf your HTTP Servers environment is running under AIX Version 5.3, you mustinstall APAR IY65196 before installing the Agent; see Web pagehttp://www-1.ibm.com/support/docview.wss?uid=isg1IY65196.
Historical data collection in LinuxIf your site uses Linux as its HTTP Servers operating environment, you need tosynchronize historical data collection at the agent with the time zone of the TivoliEnterprise Portal client. To do this, set a time zone variable in the Linux/etc/profile file. For example, to set the Linux time zone to the U.S. Pacific timezone:1. Do one of the following: For Red Hat Linux, set:
ZONE="US/Pacific"export ZONE
For SuSE/Novell Linux, set:
© Copyright IBM Corp. 2007, 2010 33
TIMEZONE="US/Pacific"export TIMEZONE
2. Reboot your Linux server.
Installing the Tivoli Enterprise Monitoring Agent on UNIX and LinuxThis section will guide you through the installation process of ITCAM Agent forHTTP Servers on UNIX and Linux. Follow the proceeding instructions to performthe installation.
Note:
To upgrade from earlier versions of the Agent, run the installer and specify theexisting Agent runtime location. Agent support files for TEP, TEPS and TEMS areupgraded in the same way.
Attention: you must install ITCAM Agent for HTTP Servers version 7.1 beforeinstalling version 7.1.0.2.v “Step 1: Invoke the installer”v “Step 2: Supply the name of the installation directory”v “Step 3: Select installation option”v “Step 4: Accept the product license agreement” on page 35v “Step 5: Provide an encryption key” on page 35v “Step 6: Select and install the product software” on page 36v “Step 7: Configure the Tivoli Enterprise Monitoring Server” on page 36v “Configure and start the Tivoli Enterprise Monitoring Agent using command
line” on page 37
Step 1: Invoke the installerAfter loading the ITCAM Agent for HTTP Servers disk and changing to its rootdirectory, locate the installation script, install.sh, and invoke it:./install.sh
Step 2: Supply the name of the installation directoryThe install script prompts you for the name of the installation directory where theITCAM Agent for HTTP Servers should be installed:Enter the name of the IBM Tivoli Monitoring directory[ default = /opt/IBM/ITM ]:
Specify the absolute or relative directory name, or press Enter to accept the default.
If the directory exists, the installer prompts you:ITM home directory "/opt/IBM/ITM" already exists.OK to use it [ 1-yes, 2-no; "1" is default ]?
If you do want to use this directory, press Enter to accept the default.
Step 3: Select installation optionThe installer next displays background information about installation requirements,searches the CD for the ITM pieces available for installation, and prompts you forinformation about how you want those pieces installed:
34 ITCAM Agent for HTTP Servers: Installation and Configuration Guide
Select one of the following:
1) Install products to the local host.2) Install products to depot for remote deployment (requires TEMS).3) Install TEMS support for remote seeding4) Exit install.
Please enter a valid number:
Enter 1. The installer displays status messages about the installation's progress.
Note: Option 2 applies to remote agent deployment. If you want to add thisagent's installation files to your site's deployment depot, return to install.sh, andinvoke this option.
Step 4: Accept the product license agreementThe installer next displays the product license so you can accept or decline it:Software Licensing AgreementPress Enter to display the license agreement on yourscreen. Please read the agreement carefully beforeinstalling the Program. After reading the agreement, youwill be given the opportunity to accept it or decline it.If you choose to decline the agreement, installation willnot be completed and you will not be able to use theProgram.
International Program License Agreement
Part 1 - General Terms
BY DOWNLOADING, INSTALLING, COPYING, ACCESSING, OR USINGTHE PROGRAM YOU AGREE TO THE TERMS OF THIS AGREEMENT. IFYOU ARE ACCEPTING THESE TERMS ON BEHALF OF ANOTHER PERSONOR A COMPANY OR OTHER LEGAL ENTITY, YOU REPRESENT ANDWARRANT THAT YOU HAVE FULL AUTHORITY TO BIND THAT PERSON,COMPANY, OR LEGAL ENTITY TO THESE TERMS. IF YOU DO NOTAGREE TO THESE TERMS,
- DO NOT DOWNLOAD, INSTALL, COPY, ACCESS, OR USE THEPROGRAM; AND
- PROMPTLY RETURN THE PROGRAM AND PROOF OF ENTITLEMENT TO
Press Enter to continue viewing the license agreement, orenter "1" to accept the agreement, "2" to decline it, "3"to print it, "4" to read non-IBM terms, or "99" to go backto the previous screen.
If you accept the license agreement, enter 1.
Step 5: Provide an encryption keyYou are prompted to provide a 32-character encryption key to secure passwordtransmission and other sensitive data across your ITM environment:Enter a 32-character encryption key, or press Enter to use the default
Default = IBMTivoliMonitoringEncryptionKey....+....1....+....2....+....3..
Supply the 32-character key, or accept the default. The key information isdisplayed:
Chapter 3. Installing the Tivoli Enterprise Monitoring Agent on UNIX and Linux 35
GSkit encryption key has been set.Key File directory: /opt/IBM/ITM/keyfiles
Step 6: Select and install the product softwareThe installer prompts you to specify which products to install from the productCD:Product packages are available for this operating system and componentsupport categories:
1) IBM Tivoli Monitoring components for this operating system2) Tivoli Enterprise Portal Browser Client support3) Tivoli Enterprise Portal Desktop Client support4) Tivoli Enterprise Portal Server support5) Tivoli Enterprise Monitoring Server support6) Other operating systems
Type the number or type "q" to quit selection[ number "1" or "IBM Tivoli Monitoring components for this operating system"is default ]:
Specify the correct selection; to install the Agent, specify 1. Press Enter.
If you have specified 1, the installer displays a list of available components:The following products are available for installation:
1) IBM Tivoli Composite Application Manager Agent for HTTP ServersV07.10.00.022) all of the above
Type the numbers for the products you want to install, type "b" tochange operating system, or type "q" to quit selection.If you enter more than one number, separate the numbers by a comma or a space.
Specify 1 or 2. Press Enter.
The installer displays a list of the components to be installed and prompts you toverify that the list is correct:The following products will be installed:
IBM Tivoli Composite Application Manager Agent for HTTP ServersV07.10.00.02
Are your selections correct [ 1=Yes, 2=No ; default is "1" ] ?
Specify Y. The installer displays several status messages as the product files areinstalled. When that installation completes, you are prompted for whether youwant to install again for a different operating system:Do you want to install additional products or product support packages[ y or n; "n" is default ]?
Enter y or n, as appropriate. The installer completes the installation postprocessing.
Step 7: Configure the Tivoli Enterprise Monitoring ServerThe installer prompts you to add the ITCAM Agent for HTTP Servers's applicationdata to the Tivoli Enterprise Monitoring Server's database.As a reminder, you should install product support on each of yourTEM servers for any agents you have just installed. This is done via the"[ITM home]/bin/itmcmd support" command on your TEM servers.
36 ITCAM Agent for HTTP Servers: Installation and Configuration Guide
Go to “Configuring the Tivoli Enterprise Monitoring Agent on UNIX and Linux” tocomplete the configuration. For information about integrating the agent'sapplication support with the TEMS, see “Installing application support on Linuxand UNIX” on page 47
Configuring the Tivoli Enterprise Monitoring Agent on UNIX and LinuxThis section instructs you how to configure the Agent. On UNIX and Linuxplatforms, the software provides two methods for configuring the Agent.v Command line configurationv GUI configuration
Configure and start the Tivoli Enterprise Monitoring Agentusing command line
Before terminating, the installer prompts you to invoke the itmcmd command withthe config operand to configure this agent:You may now configure any locally installed IBM Tivoli Monitoring productvia the "[ITM home]/bin/itmcmd config" command.
/opt/IBM/ITM is the default installation location. Change to the ITM directory's binsubdirectory, and invoke itmcmd:./itmcmd config -A ht
where ht is the 2-character product code for the ITCAM Agent for HTTP Servers.
Note: For summary information about the invocation sequence for theconfiguration tool, enter the itmcmd command without parameters.
The configuration tool begins collecting configuration information specific to theITCAM Agent for HTTP Servers. See Appendix C, “Configuration parameters forITCAM Agent for HTTP Servers,” on page 59 for details about parameter values.Edit "ITCAM Agent for HTTP Servers " settings? [ 1=Yes, 2=No ](default is: 1):Edit ’Basic’ settings? (default is: Yes):
Press Enter at these prompts.
The configuration utility prompts you to update the Agent basic data-collectionparameters:Monitoring Method [ 1=Fixed Interval, 2=On Demand ] (default is: 1):Fixed Interval between Collections (sec) (default is: 60):On Demand Maximum Sample Age (sec) (default is: 15):Ping the Web Sites [ 1=Disabled, 2=Enabled ] (default is: 1):Maximum Number of Agent’s Log Events (default is: 100):Alternative Node ID for Identifying this Agent (default is: ):
Attention: If you install more than one copy of the Agent on a single host, youmust set the Alternative Node ID parameter to different values for each of thecopies. Otherwise, the multiple copies of the Agent will not work correctly withTivoli Monitoring.
When you have defined the basic Agent parameters, The configuration utilityprompts you to edit Apache aliases.
Attention: For IBM HTTP Server, use Apache configuration.
Chapter 3. Installing the Tivoli Enterprise Monitoring Agent on UNIX and Linux 37
Edit ’Apache Web Server Aliases’ settings? [ 1=Yes, 2=No ] (default is: 1):
Select 1 if you need to monitor Apache or IBM HTTP Servers; otherwise select 2.
If you have selected 1, you are prompted to configure Apache HTTP aliases:No ’Apache Web Server Aliases’ settings available.Edit ’Apache Web Server Aliases’ settings, [1=Add, 2=Edit,3=Del, 4=Next, 5=Exit] (default is: 5): 1
Select 1 to configure a new Apache alias, and enter information for the alias:Alias Name for Apache Web Server (default is: ):Web Server Configuration file path (default is: ):Path to the executable (default is: ):Arguments for the executable (default is: ):Web Site name is created from ServerName [ 1=Disabled, 2=Enabled ]
(default is: 1):Main Apache server is excluded from monitoring [ 1=Disabled, 2=Enabled ]
(default is: 1):
Then, you are prompted to add more aliases (1) or finish adding aliases (5).
Next, you are prompted to configure Sun Web Server aliases:Edit ’Sun Web Server Aliases’ settings? [ 1=Yes, 2=No ](default is: 1):
Select 1 if you need to monitor Sun HTTP Servers; otherwise select 2.
If you have selected 1, you are prompted to configure Sun Web Server aliases:No ’Sun Web Server Aliases’ settings available.Edit ’Sun Web Server Aliases’ settings, [1=Add, 2=Edit,3=Del, 4=Next, 5=Exit] (default is: 5):
Select 1 to configure a new Sun Web Server alias, and enter information for thealias:Alias Name for Sun Web Server (default is: ):Web Server Name (default is: ):Web Server MIB Index (default is: ):
Then, you are prompted to add more aliases (1) or finish adding aliases (5).
In the next step, you are prompted for whether you want to edit the Sun WebServer conf parameters:Edit ’Sun Web Server Conf’ settings? (default is: Yes):
If you press Enter (or reply YES), you are prompted for the Sun Web Server Confparameter values:Server root (default is: C:\\Sun\\WebServer6.1):SNMP host (default is: localhost):SNMP port (default is: 161):SNMP community (default is: public):
The configuration tool next begins to configure the Agent connection to a TEMS.Will this agent connect to a TEMS? [YES or NO] (Default is: YES):
Accept the default (YES). The agent prompts for the location of the TEMS thisagent is to communicate with:TEMS Host Name (Default is: localhost):
38 ITCAM Agent for HTTP Servers: Installation and Configuration Guide
If the TEMS resides on this node, press Enter to accept the default; otherwisesupply the host name.
You are prompted for the network protocol used for your ITM environment:Network Protocol [ip, sna, ip.pipe or ip.spipe] (Default is: ip.pipe):
Specify the primary communications protocol for communication with the TEMSthat will communicate with this agent: IP.UDP, IP.PIPE, IP.SPIPE, or SNA.
You are prompted for your secondary network protocol. You can specify up tothree communication methods; this enables backup communication methods sothat, if protocol 1 fails, protocol 2 is used and then protocol 3.Now choose the next protocol from one of these:
- ip- sna- ip.spipe- 0 for none
Network Protocol 2 (Default is: none):
Next, you are prompted for communication details for the selected protocols. Forexample:IP.PIPE Port Number (Default is: 1918):Enter name of KDC_PARTITION (Default is: null):
details
Finally, you are asked if you need to configure this agent for connection to asecondary (hot standby) TEMS:Configure connection for a secondary TEMS? [YES or NO] (Default is: NO):Enter Optional Primary Network Name or "none" (Default is: none):
Press Enter for both prompts.
After you have completed all questions, the following text is displayed:Agent configuration completed...
Ensure that the Eclipse server has been configuredAfter the installation has completed, you must check the TEP client's Eclipse helpserver to ensure that it has been configured.1. Start Manage Tivoli Enterprise Monitoring Services:
./itmcmd manage
The Manage Tivoli Enterprise Monitoring Services window opens.2. Ensure that the Eclipse Help Server entry indicates Yes in the Configured
column. If it does not, right-click the entry, and select Configure from thepop-up menu.
3. You are prompted for the port number the that Eclipse Help Server should use.Ensure that this value is set to the same port number that you specified wheninstalling ITM, and click OK.
Start the Tivoli Enterprise Monitoring AgentTo start the Agent so it can pass Web Server monitoring data to your site's TEMS,invoke this command on the server:./itmcmd agent start ht
where ht is the 2-character product code for the ITCAM Agent for HTTP Servers.
Chapter 3. Installing the Tivoli Enterprise Monitoring Agent on UNIX and Linux 39
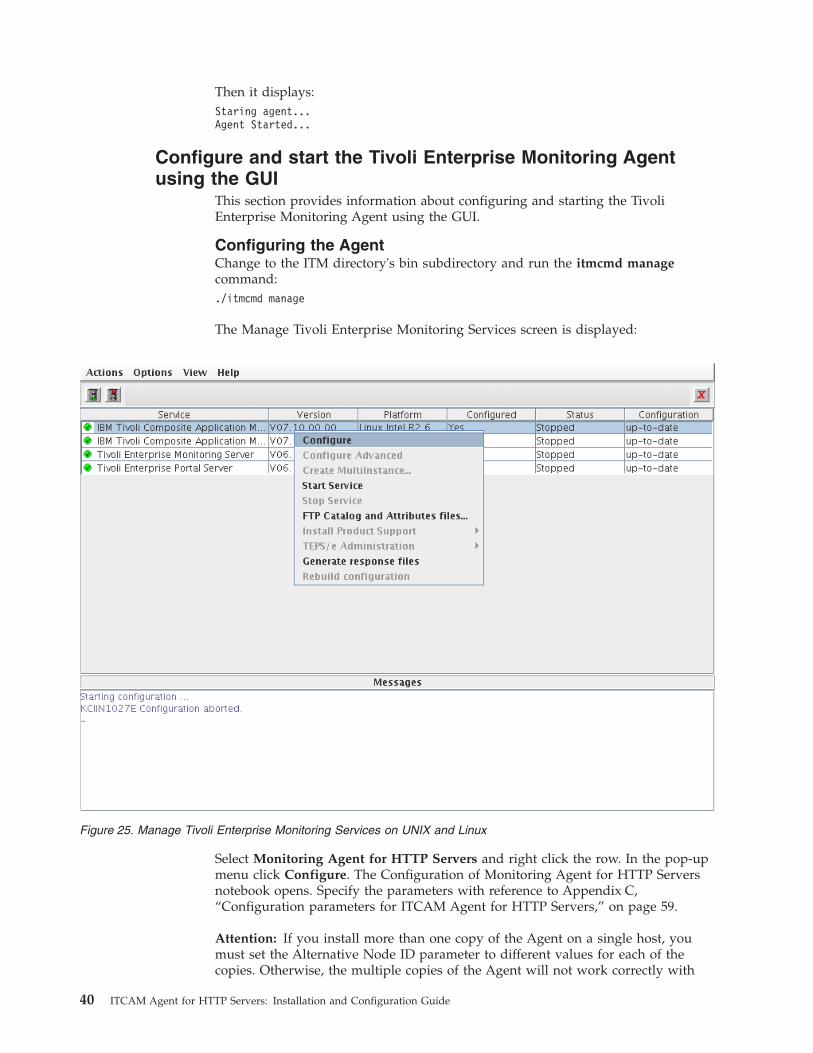
Then it displays:Staring agent...Agent Started...
Configure and start the Tivoli Enterprise Monitoring Agentusing the GUI
This section provides information about configuring and starting the TivoliEnterprise Monitoring Agent using the GUI.
Configuring the AgentChange to the ITM directory's bin subdirectory and run the itmcmd managecommand:./itmcmd manage
The Manage Tivoli Enterprise Monitoring Services screen is displayed:
Select Monitoring Agent for HTTP Servers and right click the row. In the pop-upmenu click Configure. The Configuration of Monitoring Agent for HTTP Serversnotebook opens. Specify the parameters with reference to Appendix C,“Configuration parameters for ITCAM Agent for HTTP Servers,” on page 59.
Attention: If you install more than one copy of the Agent on a single host, youmust set the Alternative Node ID parameter to different values for each of thecopies. Otherwise, the multiple copies of the Agent will not work correctly with
Figure 25. Manage Tivoli Enterprise Monitoring Services on UNIX and Linux
40 ITCAM Agent for HTTP Servers: Installation and Configuration Guide

Tivoli Monitoring.
After you specify the parameters in this page, if you want to specify an alternateApache server that has a name of 32 character or fewer, click the Apache WebServer Aliases tab and click New. Skip this page otherwise.
Figure 26. Configuration of Monitoring Agent for HTTP Servers: Basic tab on UNIX and Linux
Chapter 3. Installing the Tivoli Enterprise Monitoring Agent on UNIX and Linux 41
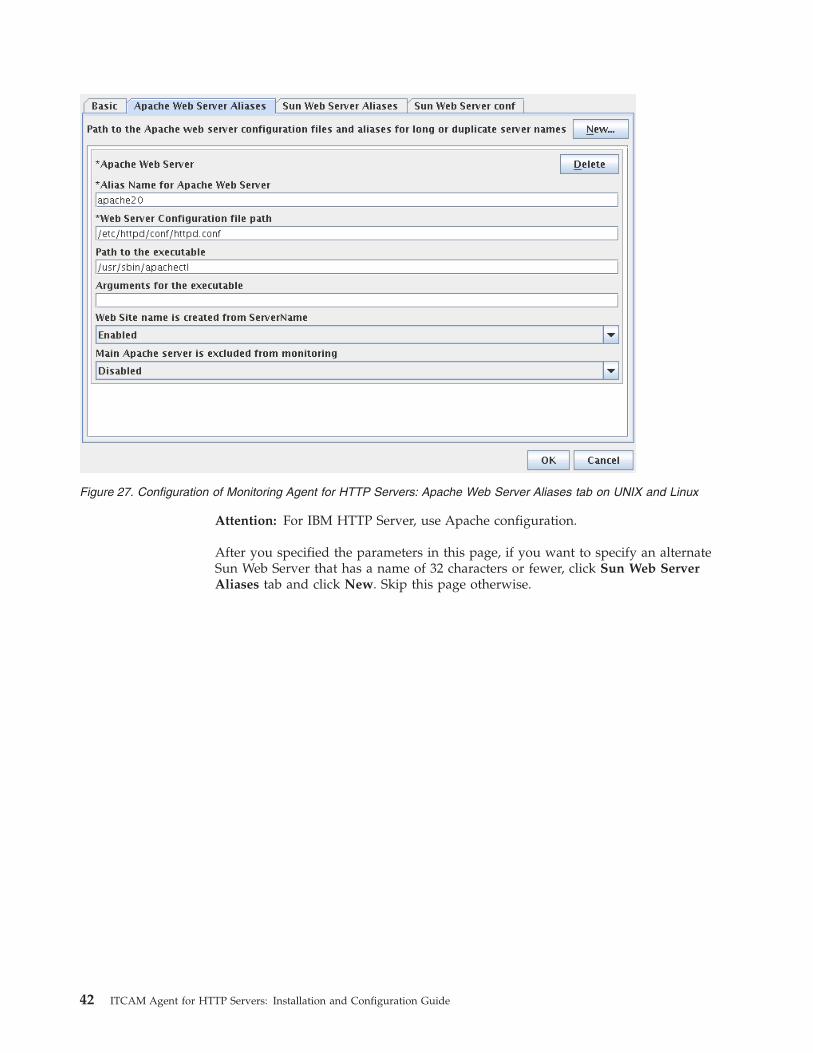
Attention: For IBM HTTP Server, use Apache configuration.
After you specified the parameters in this page, if you want to specify an alternateSun Web Server that has a name of 32 characters or fewer, click Sun Web ServerAliases tab and click New. Skip this page otherwise.
Figure 27. Configuration of Monitoring Agent for HTTP Servers: Apache Web Server Aliases tab on UNIX and Linux
42 ITCAM Agent for HTTP Servers: Installation and Configuration Guide
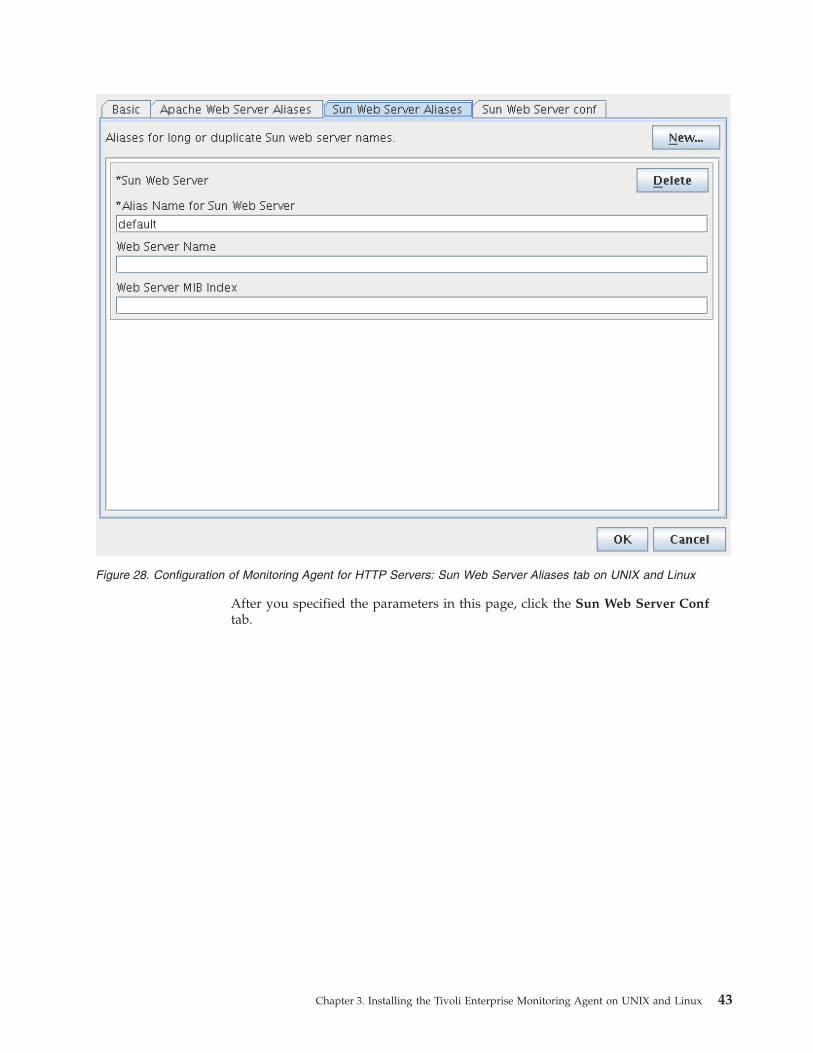
After you specified the parameters in this page, click the Sun Web Server Conftab.
Figure 28. Configuration of Monitoring Agent for HTTP Servers: Sun Web Server Aliases tab on UNIX and Linux
Chapter 3. Installing the Tivoli Enterprise Monitoring Agent on UNIX and Linux 43
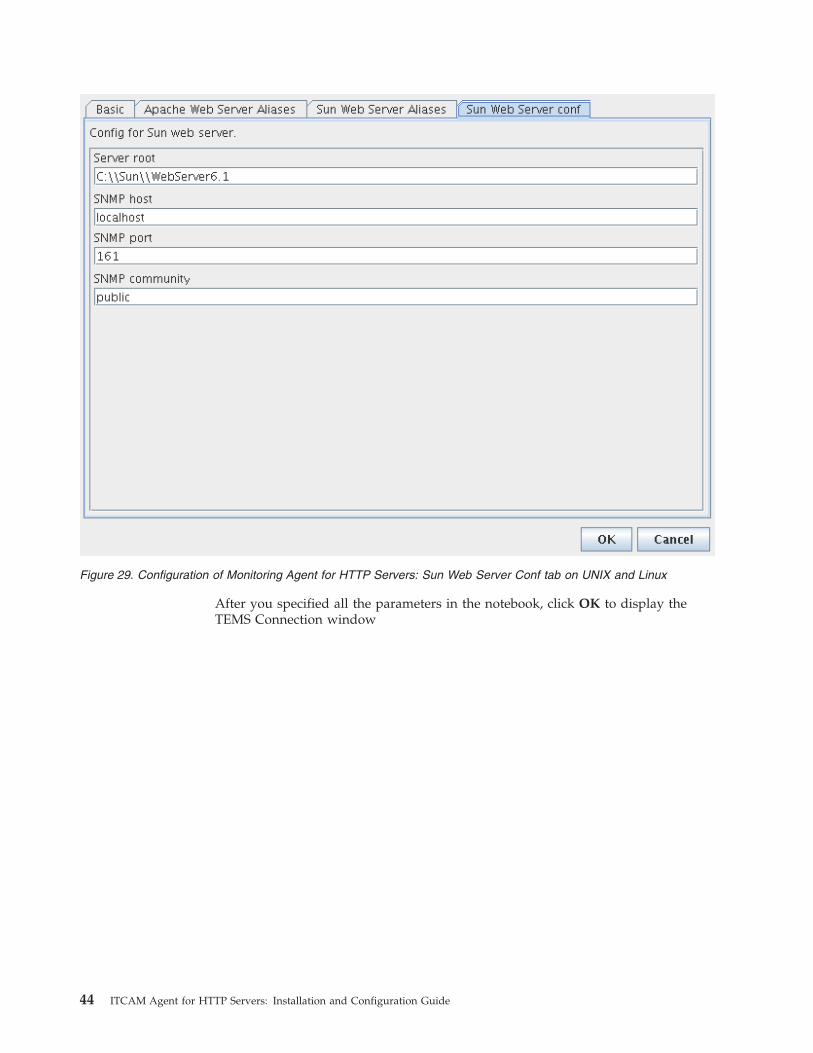
After you specified all the parameters in the notebook, click OK to display theTEMS Connection window
Figure 29. Configuration of Monitoring Agent for HTTP Servers: Sun Web Server Conf tab on UNIX and Linux
44 ITCAM Agent for HTTP Servers: Installation and Configuration Guide
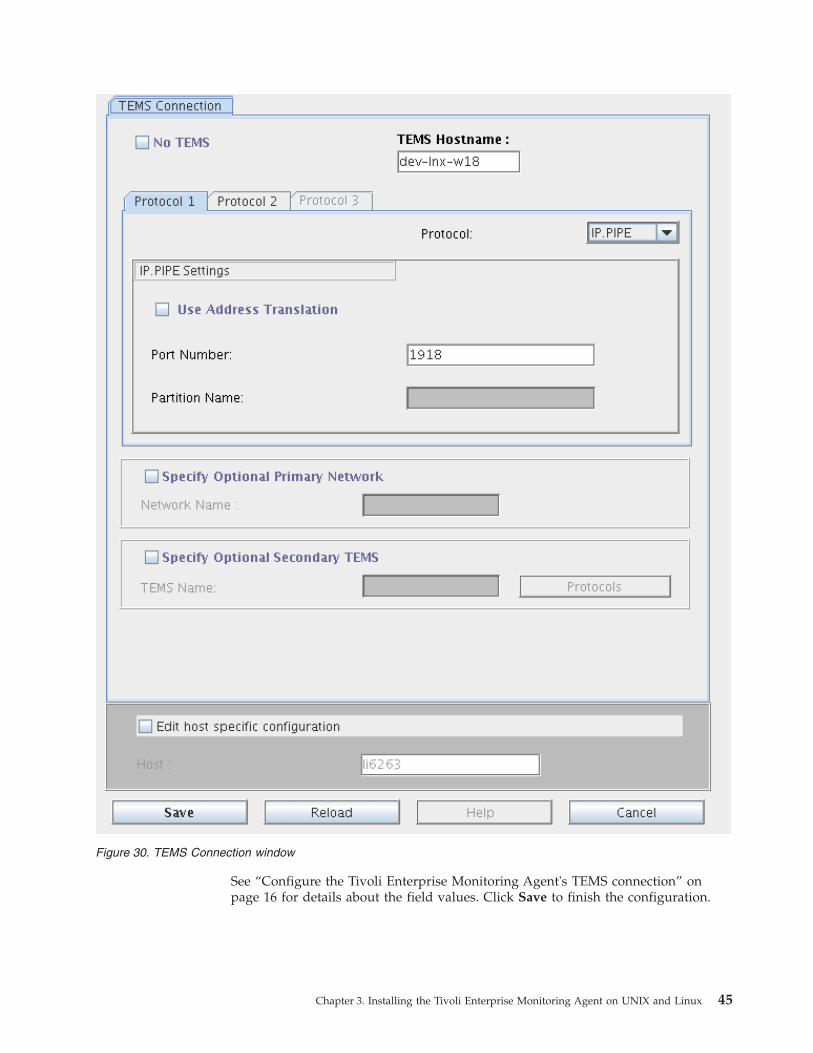
See “Configure the Tivoli Enterprise Monitoring Agent's TEMS connection” onpage 16 for details about the field values. Click Save to finish the configuration.
Figure 30. TEMS Connection window
Chapter 3. Installing the Tivoli Enterprise Monitoring Agent on UNIX and Linux 45
Configuring the Apache Web Server, IBM HTTP server, andSun Java System Web Server
This section introduces the configuration prerequisites for Apache Web Server andSun Java System Web Server on UNIX and Linux.
Configuration steps for Apache Web Server and IBM HTTPServerEach Apache server and IBM HTTP Server monitored needs to be added to theApache Server Aliases page. Specify the full path to the Web Server Configurationfile (for example, /usr/local/apache2/conf/httpd.conf) for the Web ServerConfiguration file path. If the path to the Web Server executable or the path toWeb Server configuration file differs from the default layout, you also need tospecify the Path to the executable field. If the Web Server startup script (forexample, apachectl) takes custom arguments you need to specify them in theArguments for the executable field. For example, when the apachectl script isused to launch multiple server instances with different configuration each, thenyou can type -f /path/to/httpd.conf in the Arguments for the executable field.
Configuration steps for Sun Java System Web ServerPerform the following steps:1. Install the SNMP agent, which is usually provided with the Sun Java System
Web Server.2. Install the Sun Java System Web Server.3. Configure SNMP by performing the following steps:
a. Set up the master agent.b. Configure the Sun Web Server subagent by clicking server > manage >
SNMP Subagent Configuration. Specify the needed information. Select onfor the Enable SNMP Statistics Collection field, then click OK and applychanges. For details, see http://docs.sun.com/source/819-0130/agsnmp.html.
c. Start or restart master agent.d. Start or restart SNMP subagent.e. Start or restart Web Server.f. Start/restart configured servers from Sun Web Server web admin console.
Performing a silent installation on UNIX and LinuxThe ITM installer and configurator support a silent mode in which yourpredefined values are used so that you can avoid using the GUI. On UNIX andLinux, silent installation is, like the standard verbose procedures, a 2-phase processin which you first install the components and then configure them.
Installation relies on an information file, silent_install.txt, supplied on the ITCAMAgent for HTTP Servers installation CD, in which you supply necessaryinstallation parameters. Silent configuration requires a similar file,ht_silent_config.txt. Both these files are automatically updated with the parametersyou supply whenever you install or configure the product.
Before invoking the silent installation or configuration, you must edit these files toensure that their parameter settings contain values that are appropriate for yoursite.
When editing silent_install.txt or ht_silent_config.txt, remember these points:
46 ITCAM Agent for HTTP Servers: Installation and Configuration Guide
v The comments explain the parameters required and valid values. Comment linesbegin with a number sign (#).
v Blank lines are ignored.v Parameter lines take the form PARAMETER=value. Do not insert a space before
the parameter; you can, however, use a space before or after the equal sign (=).v Remember that the product code for the ITCAM Agent for HTTP Servers is ht.v Do not use any of the following characters in any parameter value:
– Dollar sign ($)– Equal sign (=)– Pipe sign (|)
You can find complete information about silent ITM installation in the IBM TivoliMonitoring: Installation and Setup Guide.
Silent installationTo start a silent installation, invoke install.sh:./install.sh -q -h<candlehome> -p <silent_response_file>
The <candlehome> parameter specifies the directory where Agent runtime will beinstalled. The default value is /opt/IBM/ITM.
The <silent_response_file> value identifies the response file that you edited tospecify installation parameters, usually the silent_install.txt file. Specify theabsolute path to this file.
Silent configurationTo start a silent configuration, invoke the itmcmd command with the configoption:./itmcmd config -A -p <response_file> ht
where <response_file> identifies the response file that you edited to specifyconfiguration parameters, usually the ht_silent_config.txt file. Specify the absolutepath to this file.
ht is the product code for the ITCAM Agent for HTTP Servers.
Installing application support on Linux and UNIXThis procedure has three parts:v Installing application support on the Tivoli Enterprise Monitoring Serverv Installing application support on the Tivoli Enterprise Portal serverv Installing application support on the Tivoli Enterprise Portal desktop client
Install application support on the Tivoli Enterprise Monitoring Server.
1. Stop the monitoring server by running the following command:./itmcmd server stop tems_name
2. Run ./install.sh from the installation media3. Press Enter to accept the default directory (/opt/IBM/ITM) or type the full path
to the installation directory you used when the software asks for the IBMTivoli Monitoring home directory.The software displays the following prompt:
Chapter 3. Installing the Tivoli Enterprise Monitoring Agent on UNIX and Linux 47
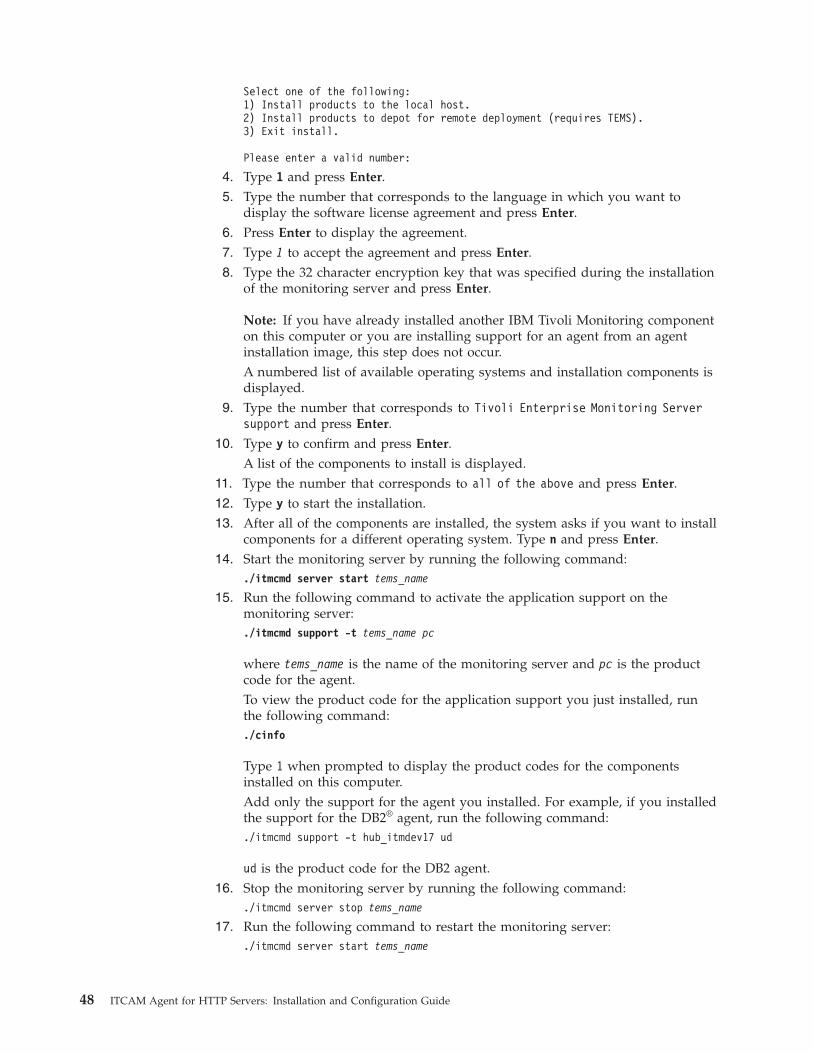
Select one of the following:1) Install products to the local host.2) Install products to depot for remote deployment (requires TEMS).3) Exit install.
Please enter a valid number:
4. Type 1 and press Enter.5. Type the number that corresponds to the language in which you want to
display the software license agreement and press Enter.6. Press Enter to display the agreement.7. Type 1 to accept the agreement and press Enter.8. Type the 32 character encryption key that was specified during the installation
of the monitoring server and press Enter.
Note: If you have already installed another IBM Tivoli Monitoring componenton this computer or you are installing support for an agent from an agentinstallation image, this step does not occur.A numbered list of available operating systems and installation components isdisplayed.
9. Type the number that corresponds to Tivoli Enterprise Monitoring Serversupport and press Enter.
10. Type y to confirm and press Enter.A list of the components to install is displayed.
11. Type the number that corresponds to all of the above and press Enter.12. Type y to start the installation.13. After all of the components are installed, the system asks if you want to install
components for a different operating system. Type n and press Enter.14. Start the monitoring server by running the following command:
./itmcmd server start tems_name
15. Run the following command to activate the application support on themonitoring server:./itmcmd support -t tems_name pc
where tems_name is the name of the monitoring server and pc is the productcode for the agent.To view the product code for the application support you just installed, runthe following command:./cinfo
Type 1 when prompted to display the product codes for the componentsinstalled on this computer.Add only the support for the agent you installed. For example, if you installedthe support for the DB2® agent, run the following command:./itmcmd support -t hub_itmdev17 ud
ud is the product code for the DB2 agent.16. Stop the monitoring server by running the following command:
./itmcmd server stop tems_name
17. Run the following command to restart the monitoring server:./itmcmd server start tems_name
48 ITCAM Agent for HTTP Servers: Installation and Configuration Guide
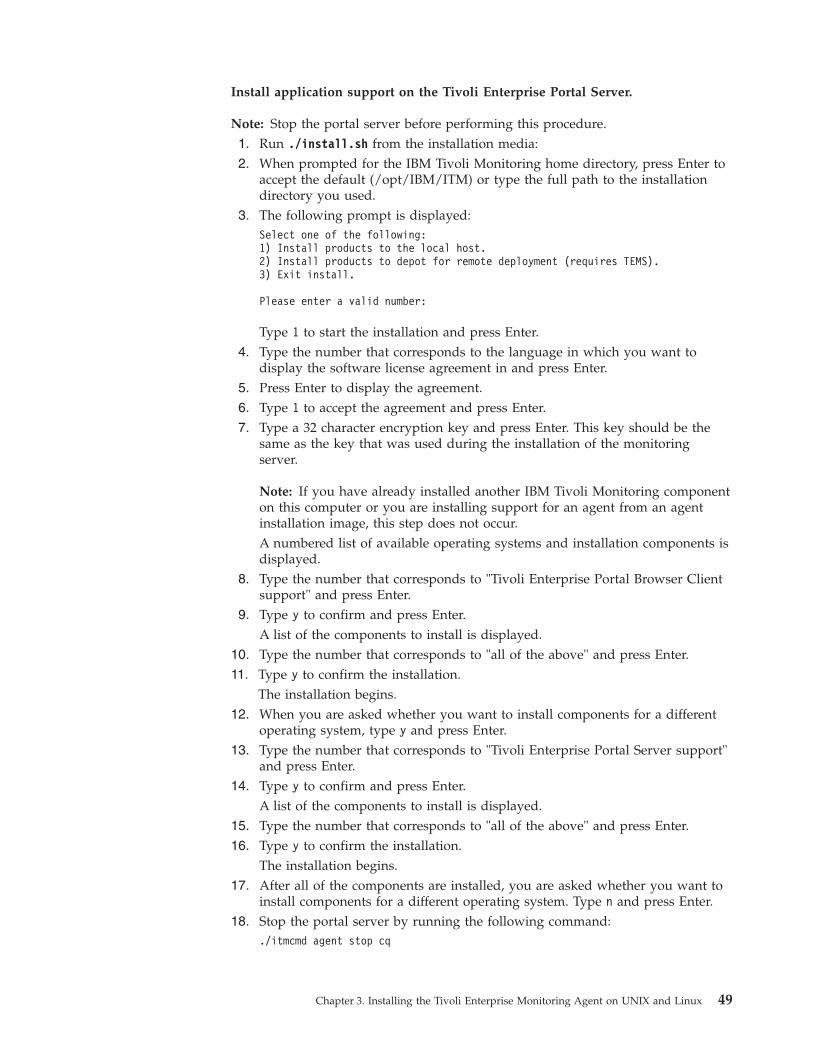
Install application support on the Tivoli Enterprise Portal Server.
Note: Stop the portal server before performing this procedure.1. Run ./install.sh from the installation media:2. When prompted for the IBM Tivoli Monitoring home directory, press Enter to
accept the default (/opt/IBM/ITM) or type the full path to the installationdirectory you used.
3. The following prompt is displayed:Select one of the following:1) Install products to the local host.2) Install products to depot for remote deployment (requires TEMS).3) Exit install.
Please enter a valid number:
Type 1 to start the installation and press Enter.4. Type the number that corresponds to the language in which you want to
display the software license agreement in and press Enter.5. Press Enter to display the agreement.6. Type 1 to accept the agreement and press Enter.7. Type a 32 character encryption key and press Enter. This key should be the
same as the key that was used during the installation of the monitoringserver.
Note: If you have already installed another IBM Tivoli Monitoring componenton this computer or you are installing support for an agent from an agentinstallation image, this step does not occur.A numbered list of available operating systems and installation components isdisplayed.
8. Type the number that corresponds to "Tivoli Enterprise Portal Browser Clientsupport" and press Enter.
9. Type y to confirm and press Enter.A list of the components to install is displayed.
10. Type the number that corresponds to "all of the above" and press Enter.11. Type y to confirm the installation.
The installation begins.12. When you are asked whether you want to install components for a different
operating system, type y and press Enter.13. Type the number that corresponds to "Tivoli Enterprise Portal Server support"
and press Enter.14. Type y to confirm and press Enter.
A list of the components to install is displayed.15. Type the number that corresponds to "all of the above" and press Enter.16. Type y to confirm the installation.
The installation begins.17. After all of the components are installed, you are asked whether you want to
install components for a different operating system. Type n and press Enter.18. Stop the portal server by running the following command:
./itmcmd agent stop cq
Chapter 3. Installing the Tivoli Enterprise Monitoring Agent on UNIX and Linux 49
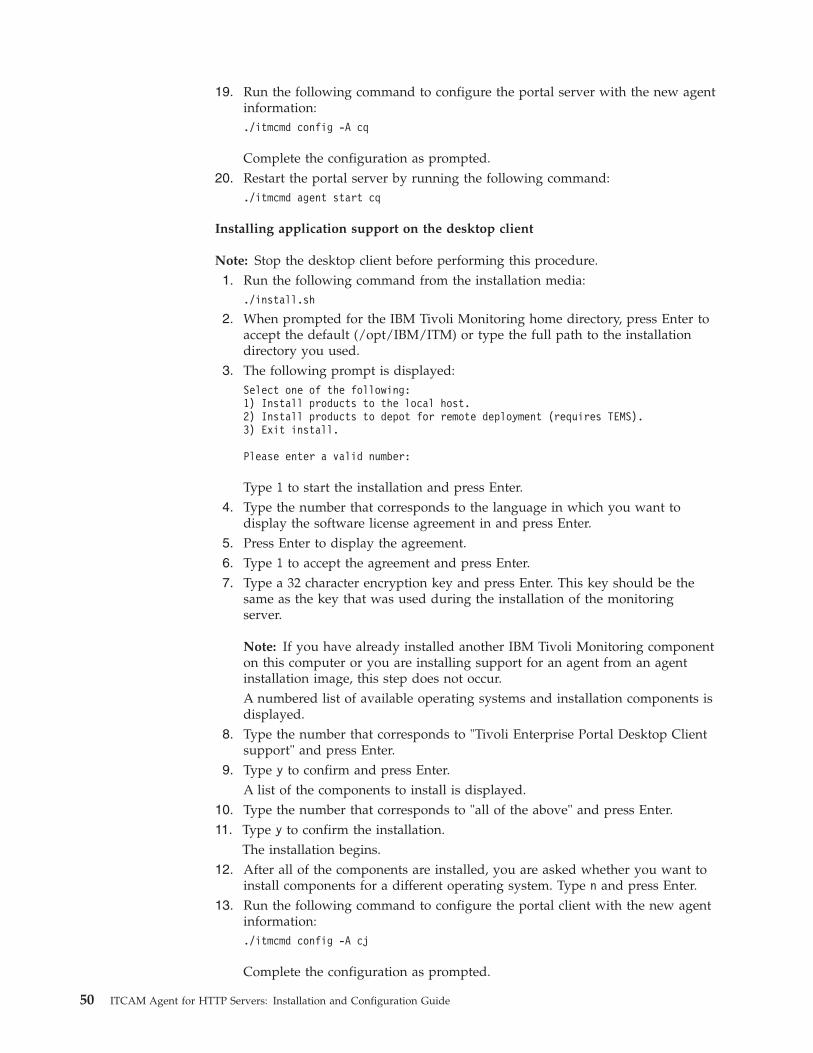
19. Run the following command to configure the portal server with the new agentinformation:./itmcmd config -A cq
Complete the configuration as prompted.20. Restart the portal server by running the following command:
./itmcmd agent start cq
Installing application support on the desktop client
Note: Stop the desktop client before performing this procedure.1. Run the following command from the installation media:
./install.sh
2. When prompted for the IBM Tivoli Monitoring home directory, press Enter toaccept the default (/opt/IBM/ITM) or type the full path to the installationdirectory you used.
3. The following prompt is displayed:Select one of the following:1) Install products to the local host.2) Install products to depot for remote deployment (requires TEMS).3) Exit install.
Please enter a valid number:
Type 1 to start the installation and press Enter.4. Type the number that corresponds to the language in which you want to
display the software license agreement in and press Enter.5. Press Enter to display the agreement.6. Type 1 to accept the agreement and press Enter.7. Type a 32 character encryption key and press Enter. This key should be the
same as the key that was used during the installation of the monitoringserver.
Note: If you have already installed another IBM Tivoli Monitoring componenton this computer or you are installing support for an agent from an agentinstallation image, this step does not occur.A numbered list of available operating systems and installation components isdisplayed.
8. Type the number that corresponds to "Tivoli Enterprise Portal Desktop Clientsupport" and press Enter.
9. Type y to confirm and press Enter.A list of the components to install is displayed.
10. Type the number that corresponds to "all of the above" and press Enter.11. Type y to confirm the installation.
The installation begins.12. After all of the components are installed, you are asked whether you want to
install components for a different operating system. Type n and press Enter.13. Run the following command to configure the portal client with the new agent
information:./itmcmd config -A cj
Complete the configuration as prompted.
50 ITCAM Agent for HTTP Servers: Installation and Configuration Guide
Uninstalling the Tivoli Enterprise Monitoring Agent on UNIX and LinuxUse the following steps to remove an agent on a UNIX or Linux computer.1. From a command prompt, run the following command to change to the
appropriate /bin directory:cd install_dir/bin
where install_dir is the path for the home directory for the agent.2. Run the following command:
./uninstall.sh
A numbered list of product codes, architecture codes, version and releasenumbers, and product titles is displayed for all installed products.
3. Type the number for the monitoring agent. Repeat this step for each additionalinstalled product you want to uninstall.
Installing and uninstalling a Language Pack on Linux and UNIXsystems
A Language Pack enables user interaction with the Agent in a language other thanEnglish. For example, when a Spanish language pack is installed, the TivoliEnterprise Portal workspaces and the internal messages of the Agent are displayedin Spanish.
To enable full support for a language, you must install the Language Pack on theAgent host and all hosts where the Agent ITM support files are installed (hubTivoli Enterprise Monitoring Servers, all Tivoli Enterprise Portal Servers, and allTivoli Enterprise Portal desktop clients).
If you no longer want to use a language, uninstall the language pack for it.
Before installing or uninstalling a language pack, ensure that:v The Agent and the TEP Support Files are installed.v The Java runtime environment (JRE) is available on every host where you are
planning to install the Language Pack. (The JRE is required by ITM).v You know the installation directories (ITM_home) for the Agent and all other
ITM components on which you are planning to install the Agent. The defaultinstallation directory is /opt/IBM/ITM.
Installing a Language Pack on Linux and UNIX systemsTo install a Language Pack on Linux and UNIX systems you need to use theinstaller on the Language Pack DVD. The procedure is the same on the Agent host,hub Tivoli Enterprise Monitoring Server, Tivoli Enterprise Portal Server, and TivoliEnterprise Portal desktop client.
Perform the following procedure:1. Mount the Language Pack DVD. Make sure the full path to the mount
directory does not include spaces.2. Use the following commands to start the installer from the Language Pack
DVD:cd dir_name./lpinstaller.sh -c ITM_home
3. Select the language of the installer and click OK.
Chapter 3. Installing the Tivoli Enterprise Monitoring Agent on UNIX and Linux 51
Note: In this step, you select the language for the installer user interface, notthe language pack that will be installed.
4. Click Next on the Introduction window.5. Select Add/Update and click Next.6. Select the directory where the the National Language Support package
(NLSPackage) files are located. This is the nlspackage directory on theLanguage Pack DVD.
7. Select ITCAM Agent for HTTP Servers.8. Select the languages to install and click Next.
Note: You can hold down the Ctrl key for multiple selections.9. Examine the installation summary page and click Next to begin installation.
10. Click Next.11. Click Finish to exit the installer.12. If you are installing the Language Pack on a Tivoli Enterprise Monitoring
Server, Tivoli Enterprise Portal Server, or Tivoli Enterprise Portal desktopclient, start the Manage Tivoli Monitoring Services utility, and use it torestart the server or client. If the Eclipse Help Server is running, restart it aswell.
Uninstalling a Language Pack on Linux and UNIX systemsTo uninstall a Language Pack on Linux and UNIX systems you need to use theinstaller on the Language Pack DVD. The procedure is the same on the Agent host,hub Tivoli Enterprise Monitoring Server, Tivoli Enterprise Portal Server, and TivoliEnterprise Portal desktop client.
Perform the following procedure:1. Mount the Language Pack DVD. Make sure the full path to the mount
directory does not include spaces.2. Use the following commands to start the installer from the Language Pack
DVD:cd dir_name./lpinstaller.sh -c ITM_home
3. Select the language of the installer and click OK.
Note: In this step, you select the language for the installer user interface, notthe language pack that will be installed.
4. Click Next on the Introduction window.5. Select Remove and click Next.6. Select ITCAM Agent for HTTP Servers.7. Select the languages to uninstall and click Next.
Note: You can hold down the Ctrl key for multiple selections.8. Examine the installation summary page and click Next to begin installation.9. Click Next.
10. Click Finish to exit the installer.11. If you are installing the Language Pack on a Tivoli Enterprise Monitoring
Server, Tivoli Enterprise Portal Server, or Tivoli Enterprise Portal desktop
52 ITCAM Agent for HTTP Servers: Installation and Configuration Guide
client, start the Manage Tivoli Monitoring Services utility, and use it torestart the server or client. If the Eclipse Help Server is running, restart it aswell.
Chapter 3. Installing the Tivoli Enterprise Monitoring Agent on UNIX and Linux 53

54 ITCAM Agent for HTTP Servers: Installation and Configuration Guide
Appendix A. Support information
If you have a problem with your IBM software, you want to resolve it quickly. IBMprovides the following ways for you to obtain the support you need:
OnlineGo to the IBM Software Support site at http://www.ibm.com/software/support/probsub.html and follow the instructions.
IBM Support AssistantThe IBM Support Assistant (ISA) is a free local software serviceabilityworkbench that helps you resolve questions and problems with IBMsoftware products. The ISA provides quick access to support-relatedinformation and serviceability tools for problem determination. To installthe ISA software, go to http://www.ibm.com/software/support/isa.
Troubleshooting GuideFor more information about resolving problems, see the product'sTroubleshooting Guide.
Obtaining fixesA product fix might be available to resolve your problem. To determine what fixesare available for your IBM software product, follow these steps:1. Go to the IBM Software Support Web site at http://www.ibm.com/software/
support.2. Click Downloads in the Software section.3. Under the Updates, drivers, and fixes section, select Fixes, fixpacks and
utilities.4. Navigate to ITCAM for WebSphere or ITCAM for J2EE to obtain a list of
available fixes.
For more information about the types of fixes that are available, see the IBMSoftware Support Handbook at http://www14.software.ibm.com/webapp/set2/sas/f/handbook/home.html.
Receiving support updates
To receive e-mail notifications about software support news and updates, followthese steps:1. Go to the IBM Software Support Web site at http://www.ibm.com/software/
support.2. On the right hand side, click My Notifications.3. If you have already registered for My Notifications, login. If you have not
registered, click register now. Complete the registration form using youre-mail address as your IBM ID. When you have logged in, the Mynotifications for IBM technical support home page is displayed.
4. Select the Subscribe tab.5. Under the Software list, select Tivoli.6. Select Tivoli Composite Application Manager for J2EE and/or Tivoli
Composite Application Manager for WebSphere. Click Continue.
© Copyright IBM Corp. 2007, 2010 55
7. In the Options section, enter a folder name, update notifications will be savedin this folder.
8. In the Notify me by section, choose if you want to me notified of updatesdaily or weekly.
9. In the Notify me by section, choose if you want to receive notifications inplain text or html.
10. In the Document Types section, customize the types of information you wantto be updated on, for example, white papers, drivers etc. Click Submit.
If you experience problems with the My Notifications feature, you can obtain helpin one of the following ways:
OnlineSend an e-mail message to [email protected], describing your problem.
By phoneCall 1-800-IBM-4You (1-800-426-4968).
56 ITCAM Agent for HTTP Servers: Installation and Configuration Guide
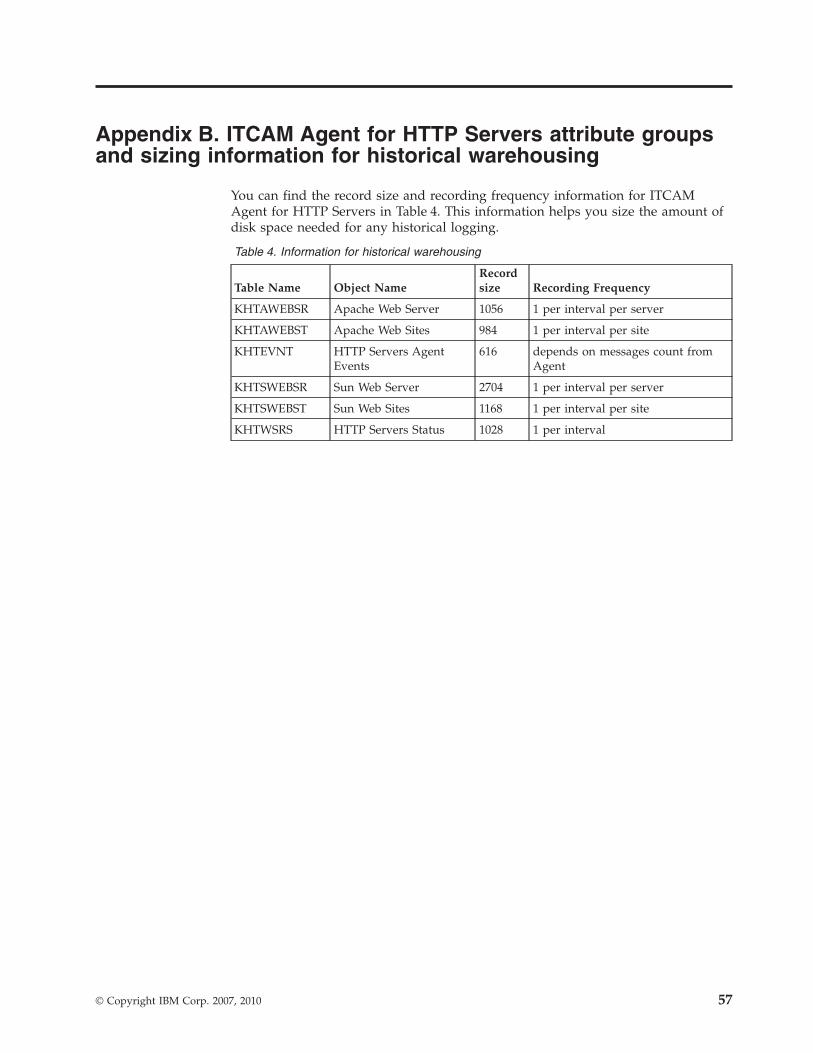
Appendix B. ITCAM Agent for HTTP Servers attribute groupsand sizing information for historical warehousing
You can find the record size and recording frequency information for ITCAMAgent for HTTP Servers in Table 4. This information helps you size the amount ofdisk space needed for any historical logging.
Table 4. Information for historical warehousing
Table Name Object NameRecordsize Recording Frequency
KHTAWEBSR Apache Web Server 1056 1 per interval per server
KHTAWEBST Apache Web Sites 984 1 per interval per site
KHTEVNT HTTP Servers AgentEvents
616 depends on messages count fromAgent
KHTSWEBSR Sun Web Server 2704 1 per interval per server
KHTSWEBST Sun Web Sites 1168 1 per interval per site
KHTWSRS HTTP Servers Status 1028 1 per interval
© Copyright IBM Corp. 2007, 2010 57

58 ITCAM Agent for HTTP Servers: Installation and Configuration Guide
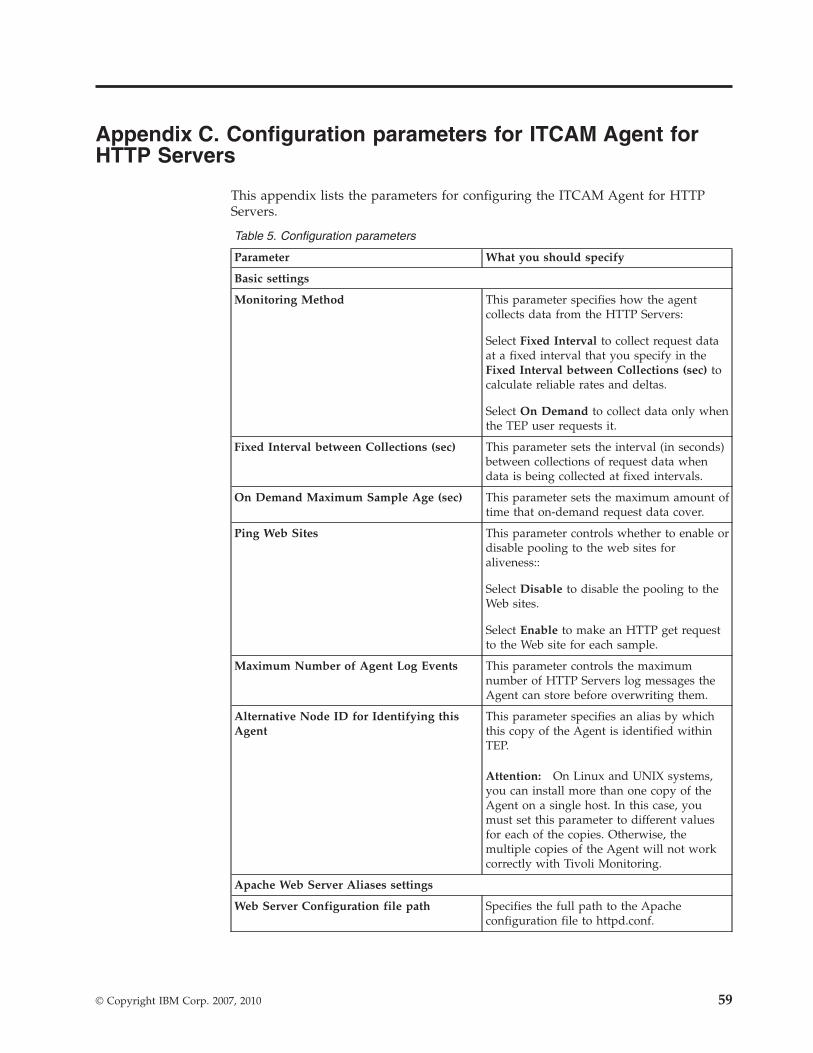
Appendix C. Configuration parameters for ITCAM Agent forHTTP Servers
This appendix lists the parameters for configuring the ITCAM Agent for HTTPServers.
Table 5. Configuration parameters
Parameter What you should specify
Basic settings
Monitoring Method This parameter specifies how the agentcollects data from the HTTP Servers:
Select Fixed Interval to collect request dataat a fixed interval that you specify in theFixed Interval between Collections (sec) tocalculate reliable rates and deltas.
Select On Demand to collect data only whenthe TEP user requests it.
Fixed Interval between Collections (sec) This parameter sets the interval (in seconds)between collections of request data whendata is being collected at fixed intervals.
On Demand Maximum Sample Age (sec) This parameter sets the maximum amount oftime that on-demand request data cover.
Ping Web Sites This parameter controls whether to enable ordisable pooling to the web sites foraliveness::
Select Disable to disable the pooling to theWeb sites.
Select Enable to make an HTTP get requestto the Web site for each sample.
Maximum Number of Agent Log Events This parameter controls the maximumnumber of HTTP Servers log messages theAgent can store before overwriting them.
Alternative Node ID for Identifying thisAgent
This parameter specifies an alias by whichthis copy of the Agent is identified withinTEP.
Attention: On Linux and UNIX systems,you can install more than one copy of theAgent on a single host. In this case, youmust set this parameter to different valuesfor each of the copies. Otherwise, themultiple copies of the Agent will not workcorrectly with Tivoli Monitoring.
Apache Web Server Aliases settings
Web Server Configuration file path Specifies the full path to the Apacheconfiguration file to httpd.conf.
© Copyright IBM Corp. 2007, 2010 59
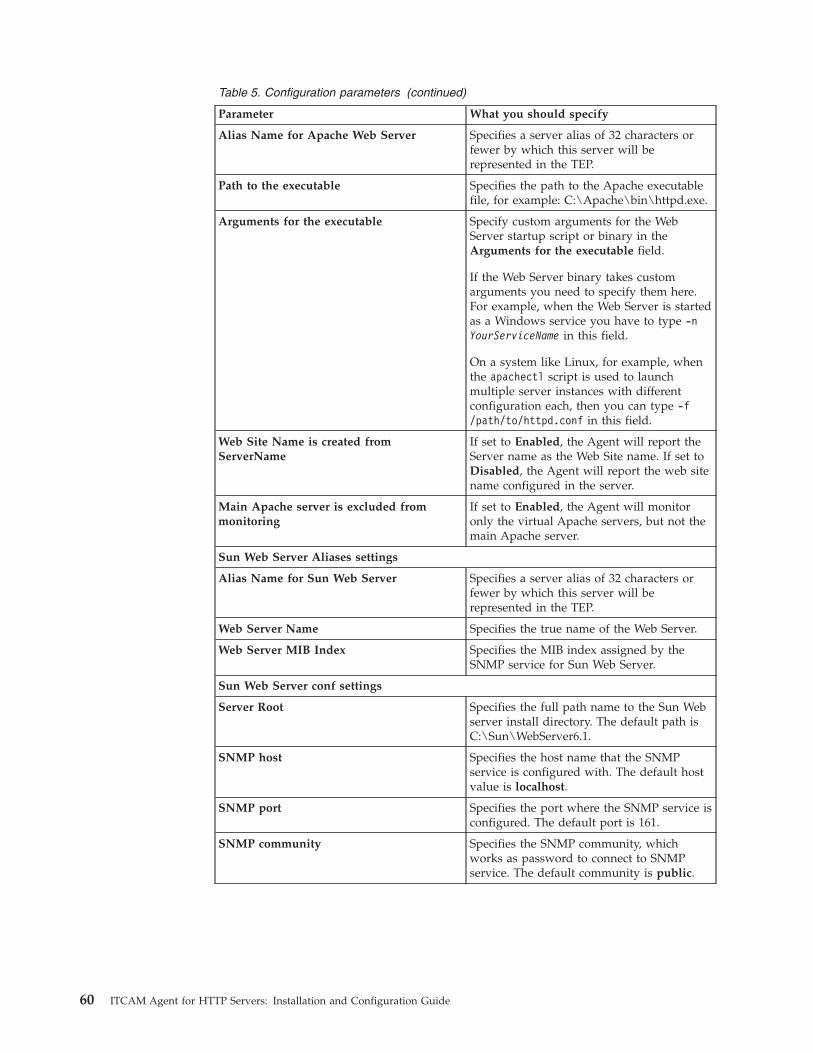
Table 5. Configuration parameters (continued)
Parameter What you should specify
Alias Name for Apache Web Server Specifies a server alias of 32 characters orfewer by which this server will berepresented in the TEP.
Path to the executable Specifies the path to the Apache executablefile, for example: C:\Apache\bin\httpd.exe.
Arguments for the executable Specify custom arguments for the WebServer startup script or binary in theArguments for the executable field.
If the Web Server binary takes customarguments you need to specify them here.For example, when the Web Server is startedas a Windows service you have to type -nYourServiceName in this field.
On a system like Linux, for example, whenthe apachectl script is used to launchmultiple server instances with differentconfiguration each, then you can type -f/path/to/httpd.conf in this field.
Web Site Name is created fromServerName
If set to Enabled, the Agent will report theServer name as the Web Site name. If set toDisabled, the Agent will report the web sitename configured in the server.
Main Apache server is excluded frommonitoring
If set to Enabled, the Agent will monitoronly the virtual Apache servers, but not themain Apache server.
Sun Web Server Aliases settings
Alias Name for Sun Web Server Specifies a server alias of 32 characters orfewer by which this server will berepresented in the TEP.
Web Server Name Specifies the true name of the Web Server.
Web Server MIB Index Specifies the MIB index assigned by theSNMP service for Sun Web Server.
Sun Web Server conf settings
Server Root Specifies the full path name to the Sun Webserver install directory. The default path isC:\Sun\WebServer6.1.
SNMP host Specifies the host name that the SNMPservice is configured with. The default hostvalue is localhost.
SNMP port Specifies the port where the SNMP service isconfigured. The default port is 161.
SNMP community Specifies the SNMP community, whichworks as password to connect to SNMPservice. The default community is public.
60 ITCAM Agent for HTTP Servers: Installation and Configuration Guide
Appendix D. Accessibility
Accessibility features help a user who has a physical disability, such as restrictedmobility or limited vision, to use software products successfully. These are themajor accessibility features you can use with IBM Tivoli Composite ApplicationManager when accessing it via the IBM Personal Communications terminal emulator:v You can operate all features using the keyboard instead of the mouse.v You can read text through interaction with assistive technology.v You can use system settings for font, size, and color for all user interface
controls.v You can magnify what is displayed on your screen.
For more information about viewing PDFs from Adobe, go to the following Website: http://www.adobe.com/enterprise/accessibility/main.html
© Copyright IBM Corp. 2007, 2010 61

62 ITCAM Agent for HTTP Servers: Installation and Configuration Guide
Glossary
Apache HTTP serverAn open-source Web server. IBM offers aWeb server, called the IBM HTTP Server,which is based on Apache.
application serverA program in a distributed network thatprovides the execution environment foran application program.
attributeData associated with a component. Forexample, a Web server component mighthave attributes such as Web server name,WWW server status, node name, originnode, interval time, and so on.
HTTP Hypertext Transfer Protocol. A suite ofprotocols for the Internet that transfer anddisplay hypertext documents.
HTTP requestA transaction initiated by a Web browserand adhering to HTTP. The server usuallyresponds with HTML data, but can sendother kinds of objects as well.
ITM platformThe software architecture and foundationthat support the development andoperations of Tivili Enterprise Portal andits Tivoli Enterprise Management Agents.
J2EE Java 2 Platform, Enterprise Edition. Anenvironment for developing anddeploying multitier enterpriseapplications. J2EE simplifies developmentof enterprise applications by basing themon standard, modular components; itcomprises a set of services, applicationprogramming interfaces (APIs), andprotocols that provide the necessaryfunctions for developing multitiered,Web-based applications.
Java An object-oriented programminglanguage for portable interpretive codethat supports interaction among remote
objects. Java was developed and specifiedby Sun Microsystems, Incorporated.
JSP Java server page. A Web page thatspecifies one or more servlets whoseexecution on the HTTP Servers modifiesthe page's content or appearance before itis presented to the user.
monitor1) A transaction environment formaintaining large quantities of data in aconsistent state and that controls whichusers and clients can access data throughauthorized servers. 2) A programmingprimitive created so that multipleprogram threads can share the sameresource (such as an object). A programcreates a monitor for a given resource byrequesting it from the system; the systemreturns a unique ID for that monitor.After that, any thread needing theresource must use the monitor to lock theresource while the thread is using it. Ifthe monitor is already locked, a threadrequesting the resource is queued by thesystem and then given control when themonitor becomes unlocked. Also called amutex.
monitored applicationAn application that interfaces with aTivoli Privacy Manager monitor to enableaccess to monitored items that flowbetween the application and themonitored system.
node Any managed system, such as a J2EEserver, that Tivoli Enterprise Portal ismonitoring. A node can also be amanaged system of subnodes, all ofwhich are being managed as componentsof the primary node.
requestThe entry point into an application whoseprocessing or response time directlyaffects the response time the end userperceives.
© Copyright IBM Corp. 2007, 2010 63
server In a network, hardware or software thatprovides facilities to clients. Examples ofa server are a file server, a printer server,or a mail server.
sessionA series of requests to a servlet thatoriginate from the same user at the samebrowser. Sessions enable applicationsrunning in a Web container to keep trackof individual users.
URL Universal Resource Locator. The uniqueaddress for a file that is accessible on theInternet. A common way to get to a Website is to enter the URL of its home pagein your Web browser's address line.However, any file within that Web sitecan also be specified as the URL. Such afile might be any Web (HTML) page otherthan the home page, an image file, or aprogram such as a Common GatewayInterface application or Java applet. TheURL contains the name of the protocolused to process the file, a domain namethat identifies the specific computer onthe Internet, and a pathname to the fileon that computer.
virtual serverA server that shares its resources withother servers to support applications.
Web serverA software program that is capable ofservicing Hypertext Transfer Protocol(HTTP) requests.
Web serviceA self-contained, self-describing modularapplication that can be published,discovered, and invoked over a networkusing standard network protocols.Typically, XML is used to tag the data,SOAP is used to transfer the data, WSDLis used for describing the servicesavailable, and UDDI is used for listingwhat services are available.
Web siteA related collection of files available onthe Web that is managed by a singleentity (an organization or an individual)
and contains information in hypertext forits users. A Web site often includeshypertext links to other Web sites.
workspaceA window comprised of one or moreviews. For example, the ASP Overviewworkspace in ITCAM for HTTP Servers.
64 ITCAM Agent for HTTP Servers: Installation and Configuration Guide
Index
Aaccessibility 61AIX
APAR required 33alternative node id, HTTP Servers 59Apache Web Servers workspace 4Apache Web Sites workspace 4
Ccommunications protocols
UNIX 39Windows 17
configuration file, HTTP Servers 59
Ddestination folder
Windows 10destination location
Windows 10disability 61
EEclipse help server
UNIX 39Windows 27
encryption key for your ITMenvironment, defining
UNIX 35Windows 11
executable file, HTTP Servers 60
Ffeatures
Windows 12fixes, obtaining 55
Ggarbage collector, analyzing JVM 5Global Security Kit, installing
UNIX 35
Hhistorical data collection
Linux requirements 33host name, HTTP Servers 60HTTP Servers Agent workspace 4HTTP Servers workspace 4hub TEMS
hot standbyUNIX 39Windows 17
hub TEMS (continued)identifying
UNIX 38
IIBM Support Assistant 55IBM Tivoli Monitoring 1install directory, HTTP Servers 60install.sh, invoking 34installation prerequisites 5ISA 55ITM 1
Llicense agreement, product
UNIX 35Windows 9
log messages, HTTP Servers 59
MManage Tivoli Enterprise Monitoring
Services 2, 23, 39MIB index, HTTP Servers 60Monitoring Agent 2monitoring method, HTTP Servers 59MTMS 2
Pping web sites, HTTP Servers 59port number, HTTP Servers 60program folder
Windows 13
Rremote agent deployment
UNIX 35request data, HTTP Servers 5, 59resource data, HTTP Servers 5
Ssecurity environment, defining
Windows 11server alias, HTTP Servers 60server name, HTTP Servers 60servername workspace 4setup.exe, invoking
Windows 7silent product installation
UNIX 46Windows 29
situationsITCAM Agent for HTTP Servers 3, 4
situations (continued)predefined 3, 4
SNMP community, HTTP Servers 60Software Support 55
receiving weekly updates 55Sun Web Servers workspace 4Sun Web Sites workspace 4support assistant 55
TTake Action commands
ITCAM Agent for HTTP Servers 5predefined 5
TEMS 2TEMS database
adding ITCAM for HTTP Servers dataUNIX 36
TEP 2Tivoli Enterprise Monitoring Agent 2Tivoli Enterprise Monitoring Server 2Tivoli Enterprise Portal 2
benefits 2client 2
browser client 2desktop client 2
server 2Tivoli Monitoring Services 1, 22TMS 1
UUNIX requirements 33
Wworkspaces
Apache Web Servers 4Apache Web Sites 4HTTP Servers 4HTTP Servers Agent 4ITCAM Agent for HTTP Servers 3primary 3secondary 3servername 4Sun Web Servers 4Sun Web Sites 4
© Copyright IBM Corp. 2007, 2010 65

66 ITCAM Agent for HTTP Servers: Installation and Configuration Guide
Trademarks
IBM, the IBM logo, and ibm.com are trademarks or registered trademarks ofInternational Business Machines Corp., registered in many jurisdictions worldwide.Other product and service names might be trademarks of IBM or other companies.A current list of IBM trademarks is available on the Web at “Copyright andtrademark information” at www.ibm.com/legal/copytrade.shtml.
Adobe is either a registered trademark or a trademark of Adobe SystemsIncorporated in the United States, other countries, or both.
Intel is a trademark or registered trademark of Intel Corporation or its subsidiariesin the United States and other countries.
Linux is a registered trademark of Linus Torvalds in the United States, othercountries, or both.
Microsoft and Windows are trademarks of Microsoft Corporation in the UnitedStates, other countries, or both.
UNIX is a registered trademark of The Open Group in the United States and othercountries.
Java and all Java-based trademarks are trademarks or registered trademarksof Oracle and/or its affiliates.
Other company, product, and service names may be trademarks or service marksof others.
© Copyright IBM Corp. 2007, 2010 67

68 ITCAM Agent for HTTP Servers: Installation and Configuration Guide
Notices
This information was developed for products and services offered in the U.S.A.IBM may not offer the products, services, or features discussed in this document inother countries. Consult your local IBM representative for information on theproducts and services currently available in your area. Any reference to an IBMproduct, program, or service is not intended to state or imply that only that IBMproduct, program, or service may be used. Any functionally equivalent product,program, or service that does not infringe any IBM intellectual property right maybe used instead. However, it is the user's responsibility to evaluate and verify theoperation of any non-IBM product, program, or service.
IBM may have patents or pending patent applications covering subject matterdescribed in this document. The furnishing of this document does not give youany license to these patents. You can send license inquiries, in writing, to:
IBM Director of LicensingIBM CorporationNorth Castle DriveArmonk, NY 10504-1785 U.S.A.
For license inquiries regarding double-byte (DBCS) information, contact the IBMIntellectual Property Department in your country or send inquiries, in writing, to:
IBM World Trade Asia CorporationLicensing2-31 Roppongi 3-chome, Minato-kuTokyo 106, Japan
The following paragraph does not apply to the United Kingdom or any othercountry where such provisions are inconsistent with local law:
INTERNATIONAL BUSINESS MACHINES CORPORATION PROVIDES THISPUBLICATION "AS IS" WITHOUT WARRANTY OF ANY KIND, EITHEREXPRESS OR IMPLIED, INCLUDING, BUT NOT LIMITED TO, THE IMPLIEDWARRANTIES OF NON-INFRINGEMENT, MERCHANTABILITY OR FITNESSFOR A PARTICULAR PURPOSE.
Some states do not allow disclaimer of express or implied warranties in certaintransactions, therefore, this statement might not apply to you.
This information could include technical inaccuracies or typographical errors.Changes are periodically made to the information herein; these changes will beincorporated in new editions of the publication. IBM may make improvementsand/or changes in the product(s) and/or the program(s) described in thispublication at any time without notice.
Any references in this information to non-IBM Web sites are provided forconvenience only and do not in any manner serve as an endorsement of those Websites. The materials at those Web sites are not part of the materials for this IBMproduct and use of those Web sites is at your own risk.
© Copyright IBM Corp. 2007, 2010 69
IBM may use or distribute any of the information you supply in any way itbelieves appropriate without incurring any obligation to you.
Licensees of this program who wish to have information about it for the purposeof enabling: (i) the exchange of information between independently createdprograms and other programs (including this one) and (ii) the mutual use of theinformation which has been exchanged, should contact:
IBM Corporation2Z4A/10111400 Burnet RoadAustin, TX 78758 U.S.A.
Such information may be available, subject to appropriate terms and conditions,including in some cases payment of a fee.
The licensed program described in this document and all licensed materialavailable for it are provided by IBM under terms of the IBM Customer Agreement,IBM International Program License Agreement or any equivalent agreementbetween us.
Any performance data contained herein was determined in a controlledenvironment. Therefore, the results obtained in other operating environments mayvary significantly. Some measurements may have been made on development-levelsystems and there is no guarantee that these measurements will be the same ongenerally available systems. Furthermore, some measurement may have beenestimated through extrapolation. Actual results may vary. Users of this documentshould verify the applicable data for their specific environment.
Information concerning non-IBM products was obtained from the suppliers ofthose products, their published announcements or other publicly available sources.IBM has not tested those products and cannot confirm the accuracy ofperformance, compatibility or any other claims related to non-IBM products.Questions on the capabilities of non-IBM products should be addressed to thesuppliers of those products.
All statements regarding IBM's future direction or intent are subject to change orwithdrawal without notice, and represent goals and objectives only.
All IBM prices shown are IBM's suggested retail prices, are current and are subjectto change without notice. Dealer prices may vary.
This information is for planning purposes only. The information herein is subject tochange before the products described become available.
This information contains examples of data and reports used in daily businessoperations. To illustrate them as completely as possible, the examples include thenames of individuals, companies, brands, and products. All of these names arefictitious and any similarity to the names and addresses used by an actual businessenterprise is entirely coincidental.
COPYRIGHT LICENSE:
This information contains sample application programs in source language, whichillustrate programming techniques on various operating platforms. You may copy,modify, and distribute these sample programs in any form without payment to
70 ITCAM Agent for HTTP Servers: Installation and Configuration Guide

IBM, for the purposes of developing, using, marketing or distributing applicationprograms conforming to the application programming interface for the operatingplatform for which the sample programs are written. These examples have notbeen thoroughly tested under all conditions. IBM, therefore, cannot guarantee orimply reliability, serviceability, or function of these programs. You may copy,modify, and distribute these sample programs in any form without payment toIBM for the purposes of developing, using, marketing, or distributing applicationprograms conforming to IBM‘s application programming interfaces.
Each copy or any portion of these sample programs or any derivative work, mustinclude a copyright notice as follows:
© (your company name) (year). Portions of this code are derived from IBM Corp.Sample Programs. © Copyright IBM Corp. _enter the year or years_. All rightsreserved.
If you are viewing this information in softcopy form, the photographs and colorillustrations might not display.
Notices 71

72 ITCAM Agent for HTTP Servers: Installation and Configuration Guide


����
Printed in USA
SC27-2819-00


![Chapter 05 Servlets - WordPress.com · The Hypertext Transfer Protocol (HTTP) [Ref.1] HTTP is the protocol that allows web servers and browsers to exchange data over the web. It is](https://static.documents.pub/doc/80x56/5f0b6bf77e708231d4307033/chapter-05-servlets-the-hypertext-transfer-protocol-http-ref1-http-is-the.jpg)


