Participants who complete the “SCRATCH” program with YPP will: ● Understand the fundamentals of coding
● Understand how to navigate, and operate the scratch program ● Use critical thinking and logic skills developed from coding to solve “real life problems”
PERIMETER AND AREA GAMES/ pythagorean theorem
5m/s versus 7m/s : 5 m/s gets a head start who finishes first (have them act the race out)
TUESDAY 3-6 (Schedule changed) WEDNESDAY/THURSDAY 3-6 INTRO Icebreakers: should happen when we have a more technical workshop in which we need a little assistance in getting the juices flowing. We can have a broken icebreaker where the activity comes before the icebreaker. For days where activities are extremely fun and engaging we won't have icebreakers. Initial pieces of business : Paperwork (consent forms,assent forms etc.) Creating a SCRATCH account and watching Chris Bosh video Log onto Scratch.Mit.Edu and search on the home screen for “Sign Up” Make sure that the username and password are memorable and written down on the instructors google drive. These files will not be shown with anyone.
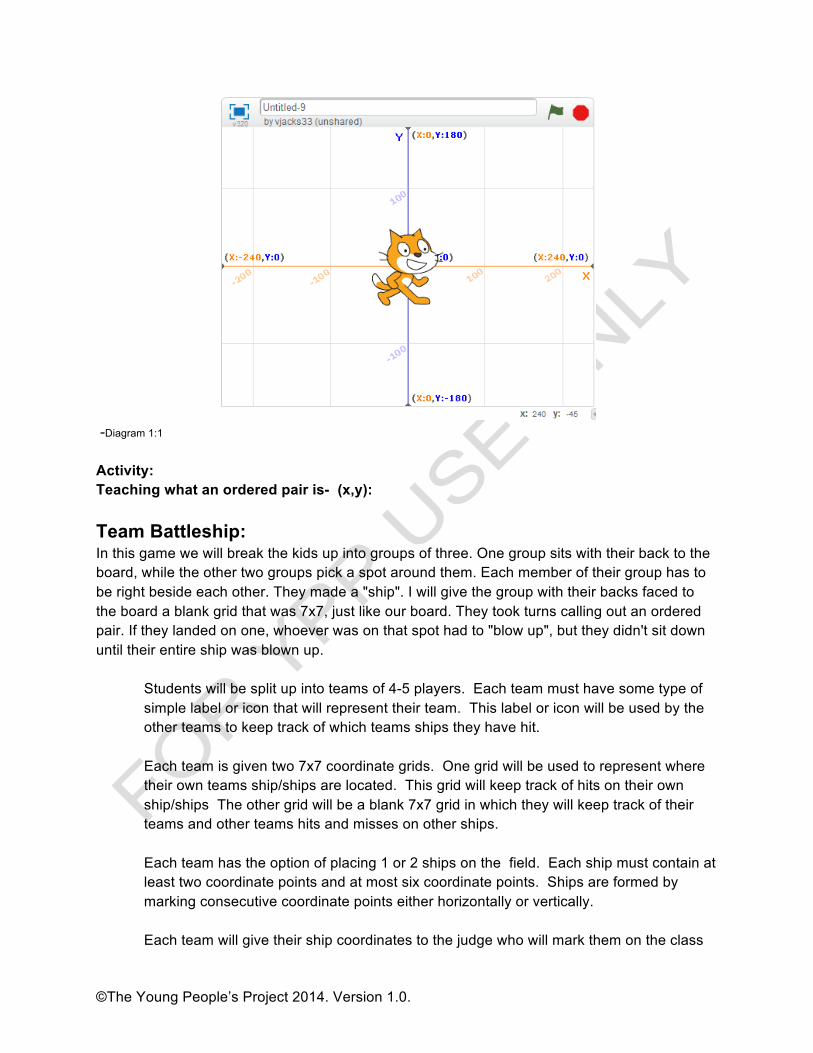
Next we will watch an empowering video with Chris Bosh and Bill Gates http://www.youtube.com/watch?feature=player_embedded&v=nKIu9yen5nc Human Programming- This game based activity can have potentially many variations and ways to be lead. However, the primary goal is to take programming to the human realm and have one person program another human being’s actions. The straightforward approach is to break the participants into small groups and have one person being appointed the “sprite” and the rest the programmers. The facilitators should create a simple goal for the sprite to complete; and the programmers create a set of simple instructions that allow for the the “sprite” to complete the objective clearly. Variations may allow for the sprite to be blindfolded, for the facilitators to be appointed sprites for each group, or whatever else the facilitators feel is needed for the game to be more effective. Human Programming (Activity)- Participants will be placed into teams (depending on the amount of participants we have), they must say specific commands to complete their objective that we have given to them one at a time. They will also be given one of us (MLW) to use as their object (SPRITE) and a blindfold for their sprite. each teammate will have one opportunity to say a command to the sprite, then it will be the next person’s turn. One command equals one action for ex. turn left 90 degrees is a command, turn left is a command but turn left and walk is not a command. Whichever team reaches their goal first is the official human program winner! Goals: Place a blank piece of paper on a stationary CMLWs head in the corner Unit 1: Coordinate Planes Goals: The purpose of this unit is to have the students engage in various activities that will familiarize them with coordinate planes. Coordinate planes are important to the learning of scratch because it is the foundation of every scratch project. The Backdrop: Shown in the diagram below (Diagram 1:1) is a coordinate plane. (Teaching Point): Notoriously known as the white space, the backdrop has a hidden coordinate plane beneath it. The backdrop is like any other Coordinate grid. The grid is represented by the X axis and Y axis. The maximum value on the X axis is 240. The minimum is -240. The maximum value on the Y axis is 180. The minimum is -180. This will help students develop mapping skills and greater abilities in locating objects in space.
-Diagram 1:1 Activity: Teaching what an ordered pair is- (x,y): Team Battleship: In this game we will break the kids up into groups of three. One group sits with their back to the board, while the other two groups pick a spot around them. Each member of their group has to be right beside each other. They made a "ship". I will give the group with their backs faced to the board a blank grid that was 7x7, just like our board. They took turns calling out an ordered pair. If they landed on one, whoever was on that spot had to "blow up", but they didn't sit down until their entire ship was blown up.
Students will be split up into teams of 4-5 players. Each team must have some type of simple label or icon that will represent their team. This label or icon will be used by the other teams to keep track of which teams ships they have hit. Each team is given two 7x7 coordinate grids. One grid will be used to represent where their own teams ship/ships are located. This grid will keep track of hits on their own ship/ships The other grid will be a blank 7x7 grid in which they will keep track of their teams and other teams hits and misses on other ships. Each team has the option of placing 1 or 2 ships on the field. Each ship must contain at least two coordinate points and at most six coordinate points. Ships are formed by marking consecutive coordinate points either horizontally or vertically. Each team will give their ship coordinates to the judge who will mark them on the class
grid. The class grid should not be visible to any of the players. teams take turns calling out coordinate points. each team should designate a spokesperson for the team. the object is to be the last ship on the battlefield by finding and sinking other team’s ships. Your team should keep track of all of the class “hit” and “miss” points on your coordinate grid using different colored markers for hit, miss and sink; and using the teams labels or icons. When another team calls a coordinate point that is part of your team’s ship you must raise your team’s yellow flag. Your ship is sunk when every coordinate point has been hit. When a team calls a coordinate point that sinks your ship you must raise your team’s red flag. Hits are worth 5 points; sinks are worth 10 points. double hits and triple hits- If a team hits two other ships at one time then they will accumulate 10 points (5+5) If a team hits three other ships at one time then they will accumulate 15 points (5+5+5). Likewise with sinks if a team sinks two ships at one time they will accumulate 20 points (10+10) and if the team sinks three ships at once, they will accumulate 30 points(10+10+10) Each team will get a class grid to keep track of the classes hits and misses and each team will also get a Team Grid which will serve as a scorecard. -Hits-yellow -Sinks-red -Misses-blue
Sacrifice: A team may choose to hit their own ship if they believe that another team’s ship is located at that same point, in which case the team would have to raise their yellow flag as they call out their coordinate point to indicate that they are making a sacrifice.
Quad City Twister: (move to beginning?) The facilitators will create a coordinate grid using tape. The X values will range from -5 to 5 and the Y axis will range from -5 to 5 . Each group will have their own coordinate grid to play on and there will be a minimum of 2 groups. Teams must have the same number of players (MLW can join the game to ensure this happens). The facilitator will have a deck of 100 cards, one for each point on the coordinate grid. The first player from each team will play. The facilitator will choose one card, i.e (2,3) and will use the scratch spinner to dictate which hand or foot the first players will place on that coordinate point. Then the second players from each team will play. In this way each team will be doing the same
thing at the same time. Once each player from the team has a hand or foot on a position on the coordinate grid a cycle has been completed. The first team to go through 3 cycles without falling wins ( Cycle: When everyone on your team has a point and body part that is one cycle). Students do not change the position of any body part unless when it’s their turn, the facilitator tells them to move a previously placed body part. If someone on your team falls, then the whole team has to start over. Materials:
● Pre-made notecards ● Scratch Spinner (http://scratch.mit.edu/projects/10698162/#editor) ● Tape ● Sharpie-Marker to mark the coordinate on the tape
(Creating a Coordinate Grid) Part 1: With a piece of printer paper and a few colored pencils, make a coordinate plane. A coordinate plane is a plane where there is an x and y- axis that are defined by vertical (y-axis) and horizontal (x-axis) lines, which are used to help find the location of a point on a line. For these activities we are using the program SCRATCH, which was based on the following intervals: (X axis is -240 to 240) and (Y axis is -180 to 180). We will be using the same intervals for this activity. Instead of incrementing each point by 1, increment each point by 30. When designing the coordinate grid, use two different colors to identify positive from negative values. Materials: · 8 by 11 Printer paper w/ pre-made grid · Color pencils 1. Taking the piece of paper, the coordinate grid should start with the cross-type pattern spanning the entire paper. Incremental points should be drawn as marks down each of the limbs of the coordinate plane. (Suggest to the participants increments of 20, making 9 points down each limb.) Indicate to the students that the colors for negatives and positives should be different. Every incremental
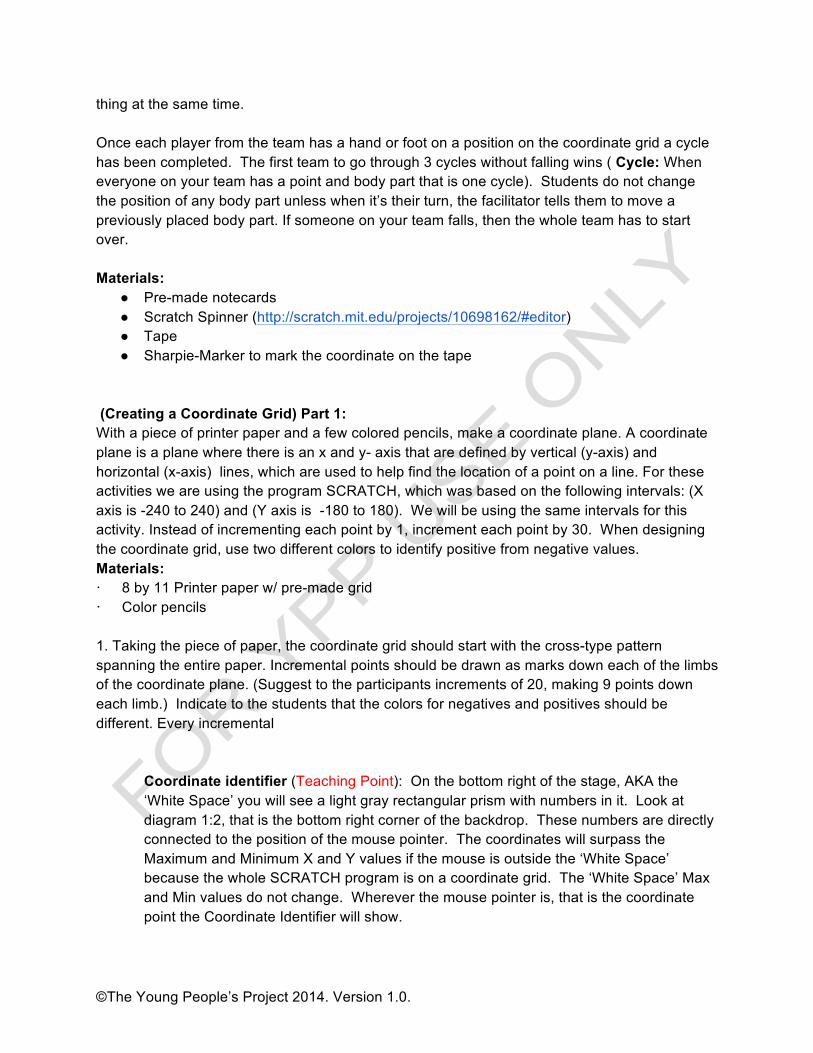
Coordinate identifier (Teaching Point): On the bottom right of the stage, AKA the ‘White Space’ you will see a light gray rectangular prism with numbers in it. Look at diagram 1:2, that is the bottom right corner of the backdrop. These numbers are directly connected to the position of the mouse pointer. The coordinates will surpass the Maximum and Minimum X and Y values if the mouse is outside the ‘White Space’ because the whole SCRATCH program is on a coordinate grid. The ‘White Space’ Max and Min values do not change. Wherever the mouse pointer is, that is the coordinate point the Coordinate Identifier will show.
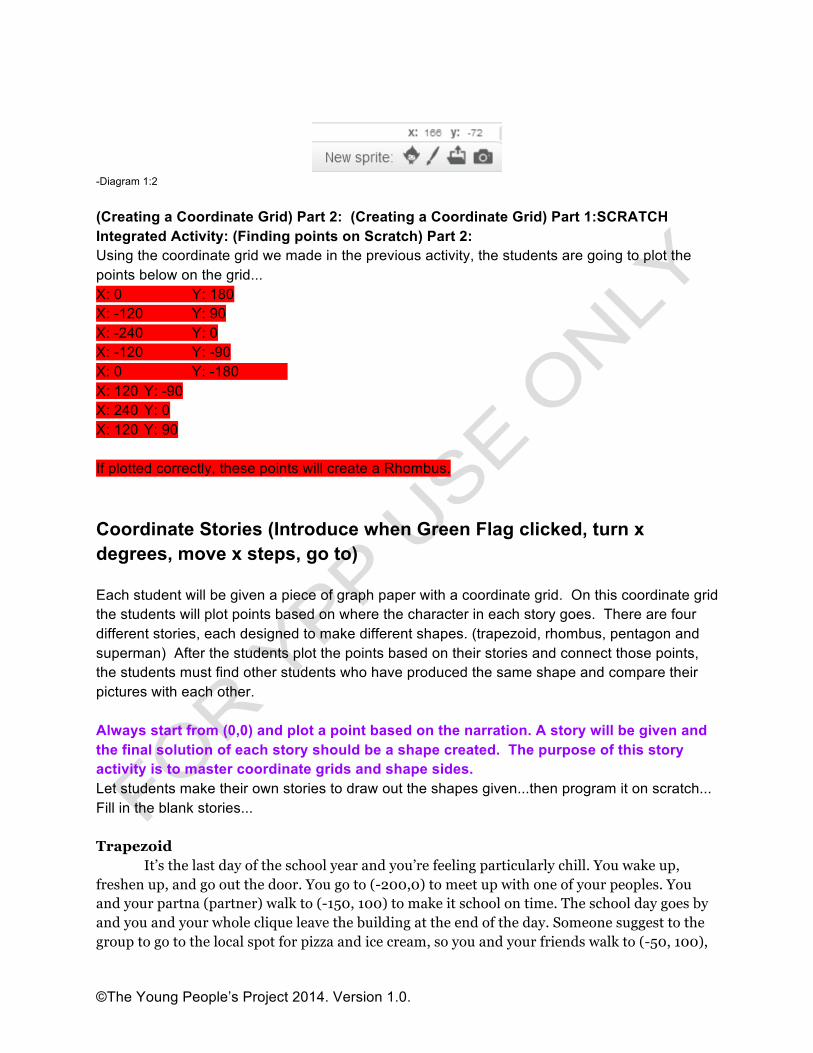
-Diagram 1:2 (Creating a Coordinate Grid) Part 2: (Creating a Coordinate Grid) Part 1:SCRATCH Integrated Activity: (Finding points on Scratch) Part 2: Using the coordinate grid we made in the previous activity, the students are going to plot the points below on the grid... X: 0 Y: 180 X: -120 Y: 90 X: -240 Y: 0 X: -120 Y: -90 X: 0 Y: -180 X: 120 Y: -90 X: 240 Y: 0 X: 120 Y: 90 If plotted correctly, these points will create a Rhombus. Coordinate Stories (Introduce when Green Flag clicked, turn x degrees, move x steps, go to) Each student will be given a piece of graph paper with a coordinate grid. On this coordinate grid the students will plot points based on where the character in each story goes. There are four different stories, each designed to make different shapes. (trapezoid, rhombus, pentagon and superman) After the students plot the points based on their stories and connect those points, the students must find other students who have produced the same shape and compare their pictures with each other. Always start from (0,0) and plot a point based on the narration. A story will be given and the final solution of each story should be a shape created. The purpose of this story activity is to master coordinate grids and shape sides. Let students make their own stories to draw out the shapes given...then program it on scratch... Fill in the blank stories... Trapezoid
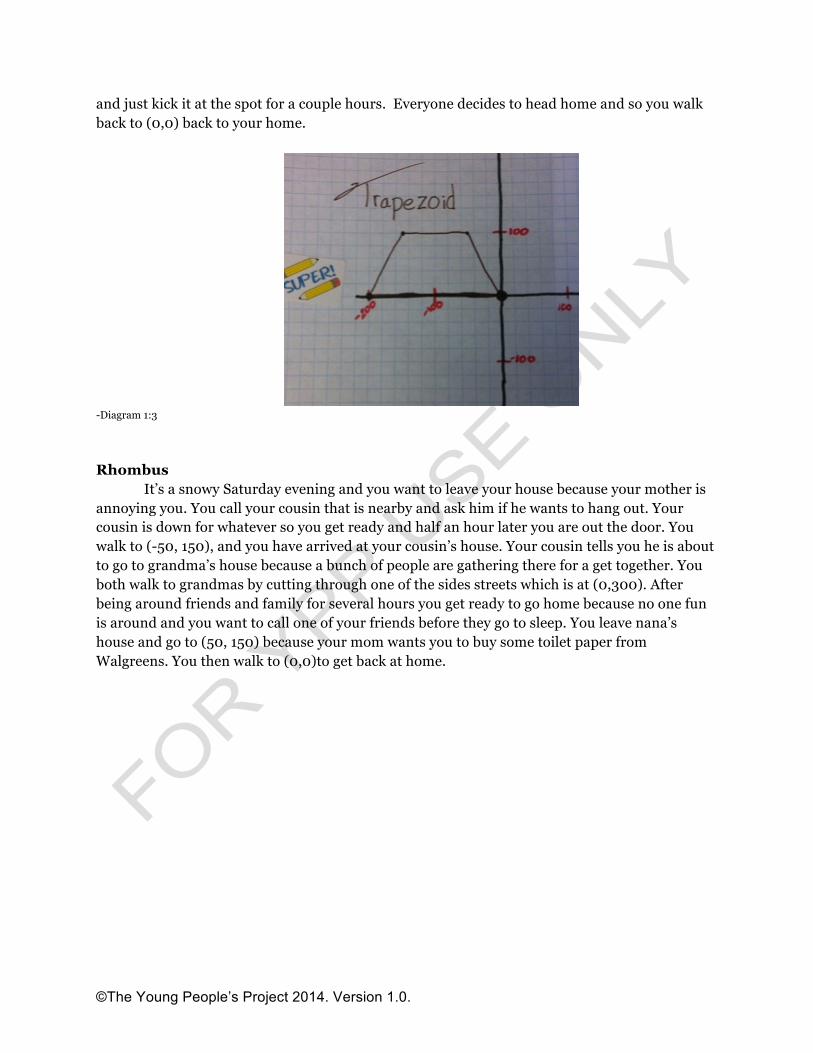
It’s the last day of the school year and you’re feeling particularly chill. You wake up, freshen up, and go out the door. You go to (-200,0) to meet up with one of your peoples. You and your partna (partner) walk to (-150, 100) to make it school on time. The school day goes by and you and your whole clique leave the building at the end of the day. Someone suggest to the group to go to the local spot for pizza and ice cream, so you and your friends walk to (-50, 100),
and just kick it at the spot for a couple hours. Everyone decides to head home and so you walk back to (0,0) back to your home.
-Diagram 1:3
Rhombus
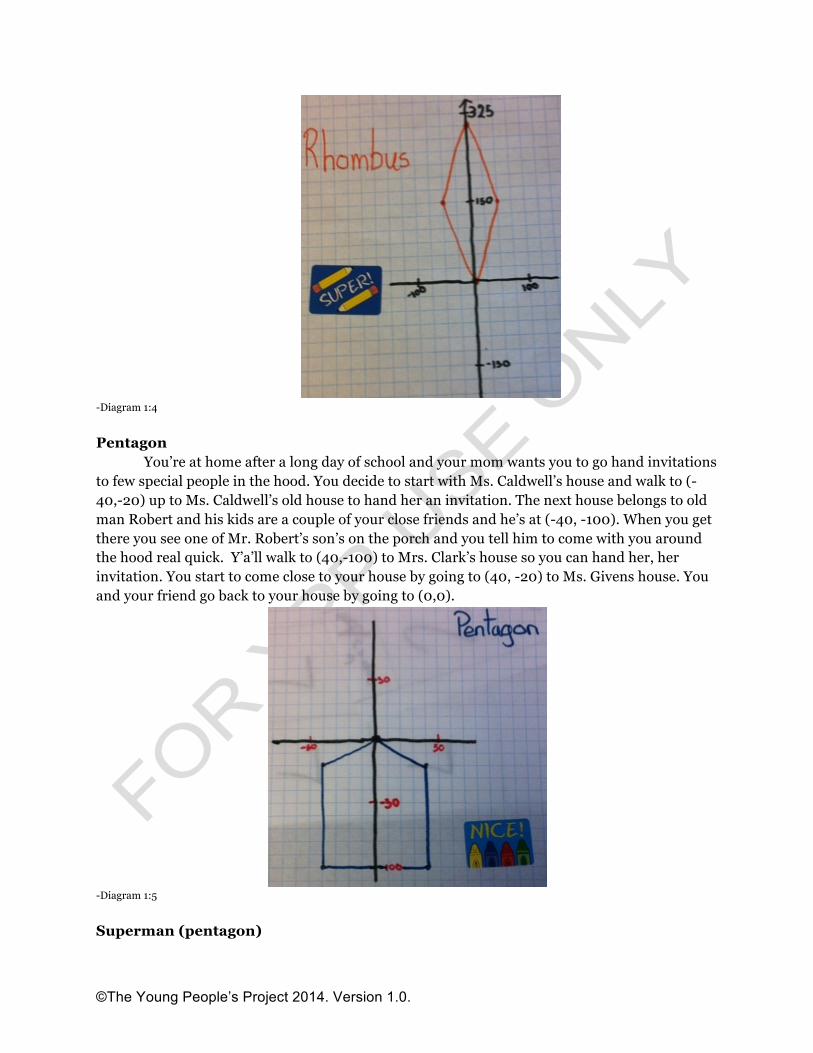
It’s a snowy Saturday evening and you want to leave your house because your mother is annoying you. You call your cousin that is nearby and ask him if he wants to hang out. Your cousin is down for whatever so you get ready and half an hour later you are out the door. You walk to (-50, 150), and you have arrived at your cousin’s house. Your cousin tells you he is about to go to grandma’s house because a bunch of people are gathering there for a get together. You both walk to grandmas by cutting through one of the sides streets which is at (0,300). After being around friends and family for several hours you get ready to go home because no one fun is around and you want to call one of your friends before they go to sleep. You leave nana’s house and go to (50, 150) because your mom wants you to buy some toilet paper from Walgreens. You then walk to (0,0)to get back at home.
-Diagram 1:4 Pentagon You’re at home after a long day of school and your mom wants you to go hand invitations to few special people in the hood. You decide to start with Ms. Caldwell’s house and walk to (-40,-20) up to Ms. Caldwell’s old house to hand her an invitation. The next house belongs to old man Robert and his kids are a couple of your close friends and he’s at (-40, -100). When you get there you see one of Mr. Robert’s son’s on the porch and you tell him to come with you around the hood real quick. Y’a’ll walk to (40,-100) to Mrs. Clark’s house so you can hand her, her invitation. You start to come close to your house by going to (40, -20) to Ms. Givens house. You and your friend go back to your house by going to (0,0).
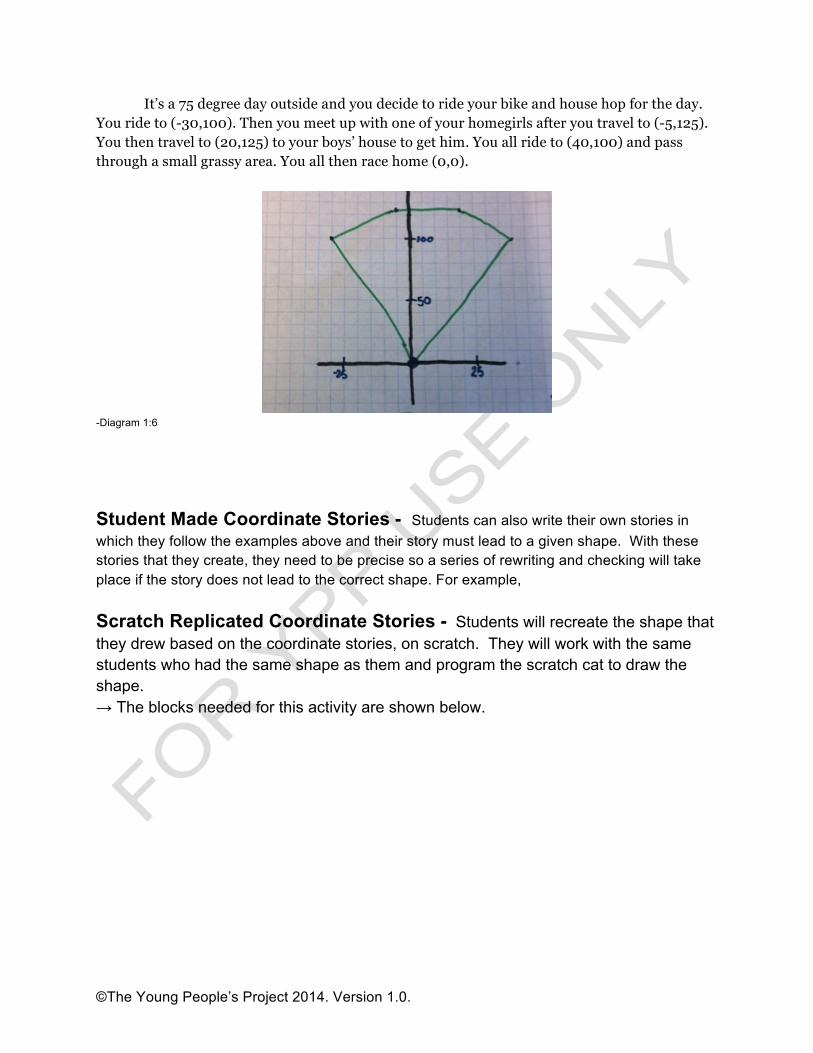
It’s a 75 degree day outside and you decide to ride your bike and house hop for the day. You ride to (-30,100). Then you meet up with one of your homegirls after you travel to (-5,125). You then travel to (20,125) to your boys’ house to get him. You all ride to (40,100) and pass through a small grassy area. You all then race home (0,0).
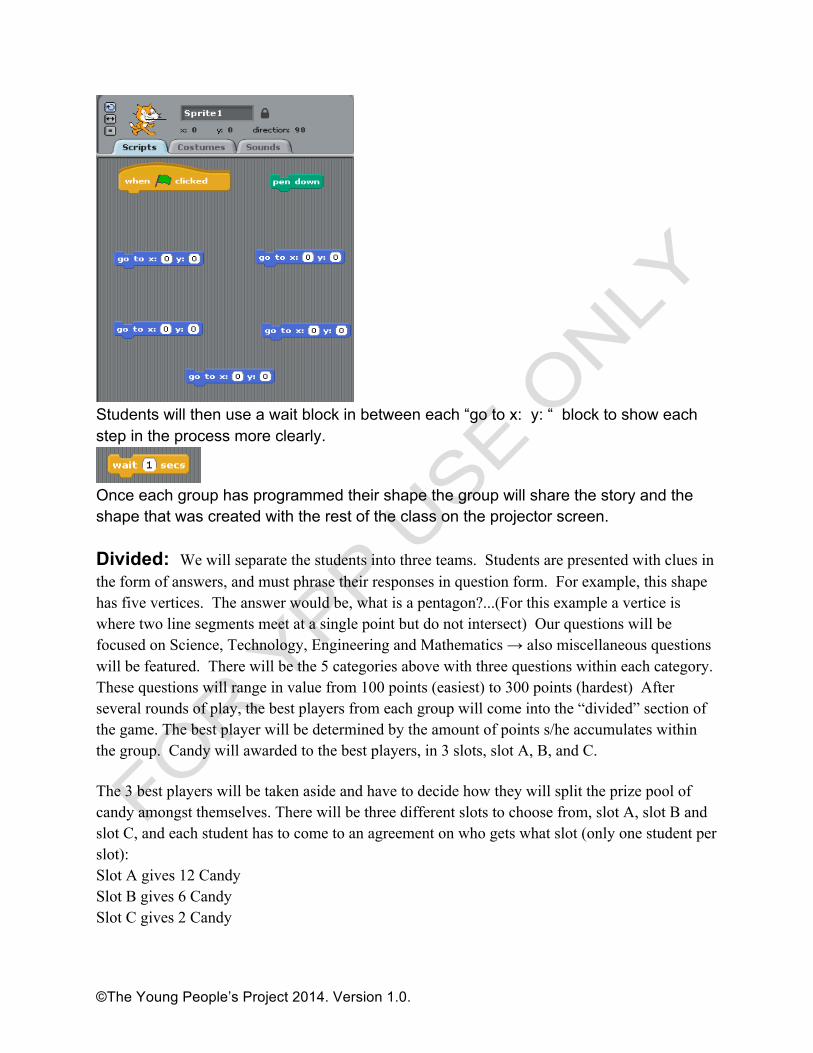
-Diagram 1:6 Student Made Coordinate Stories - Students can also write their own stories in which they follow the examples above and their story must lead to a given shape. With these stories that they create, they need to be precise so a series of rewriting and checking will take place if the story does not lead to the correct shape. For example, Scratch Replicated Coordinate Stories - Students will recreate the shape that they drew based on the coordinate stories, on scratch. They will work with the same students who had the same shape as them and program the scratch cat to draw the shape. → The blocks needed for this activity are shown below.
Students will then use a wait block in between each “go to x: y: “ block to show each step in the process more clearly.
Once each group has programmed their shape the group will share the story and the shape that was created with the rest of the class on the projector screen. Divided: We will separate the students into three teams. Students are presented with clues in the form of answers, and must phrase their responses in question form. For example, this shape has five vertices. The answer would be, what is a pentagon?...(For this example a vertice is where two line segments meet at a single point but do not intersect) Our questions will be focused on Science, Technology, Engineering and Mathematics → also miscellaneous questions will be featured. There will be the 5 categories above with three questions within each category. These questions will range in value from 100 points (easiest) to 300 points (hardest) After several rounds of play, the best players from each group will come into the “divided” section of the game. The best player will be determined by the amount of points s/he accumulates within the group. Candy will awarded to the best players, in 3 slots, slot A, B, and C. The 3 best players will be taken aside and have to decide how they will split the prize pool of candy amongst themselves. There will be three different slots to choose from, slot A, slot B and slot C, and each student has to come to an agreement on who gets what slot (only one student per slot): Slot A gives 12 Candy Slot B gives 6 Candy Slot C gives 2 Candy
Students will have 15 seconds to come to an agreement on who gets slot A, B and C. If the students do not come to an agreement within 15 seconds - such as 2 or more players feel they deserve slot A - then the divided round begins. In the divided round, students have 1 minute to debate and determine how to assign each slot and split the candy. During the divided round, the amount of candy in each slot is reduced according to the rules below.
Rules: Slot A’s candy pool is reduced by 1 every 5 seconds. Slot B’s candy pool is reduced by 1 every 10 seconds. Slot C’s candy pool is reduced by 1 every 30 seconds.
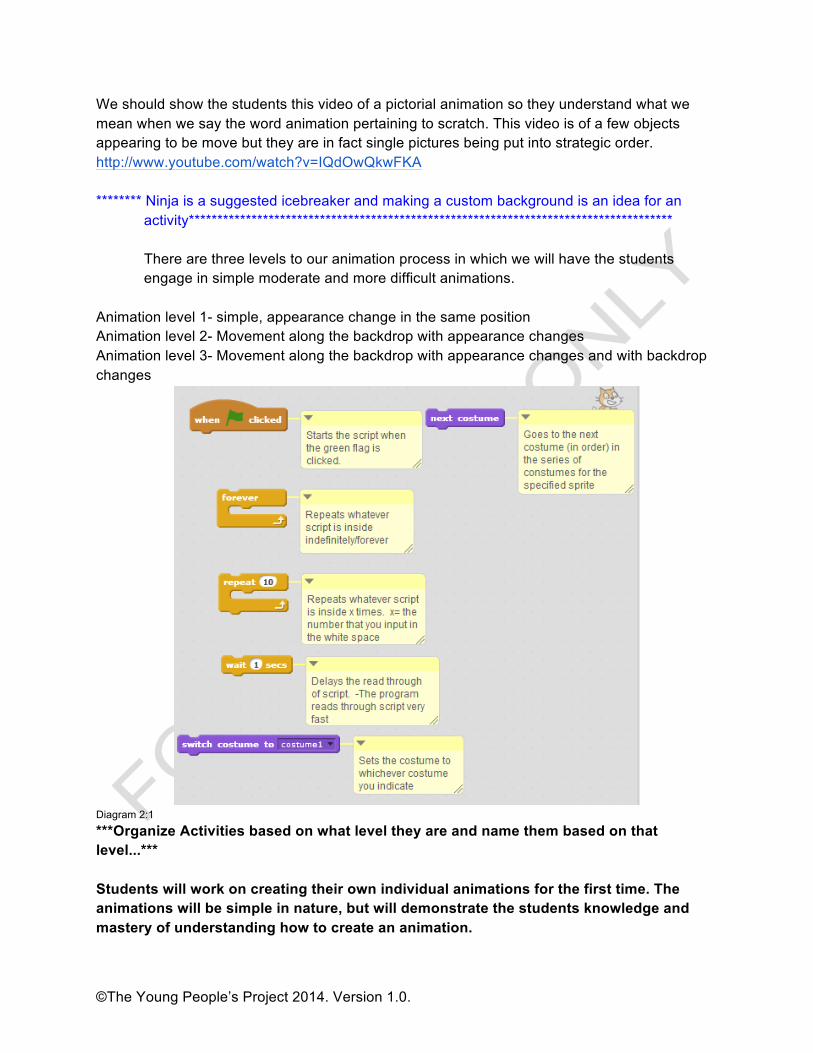
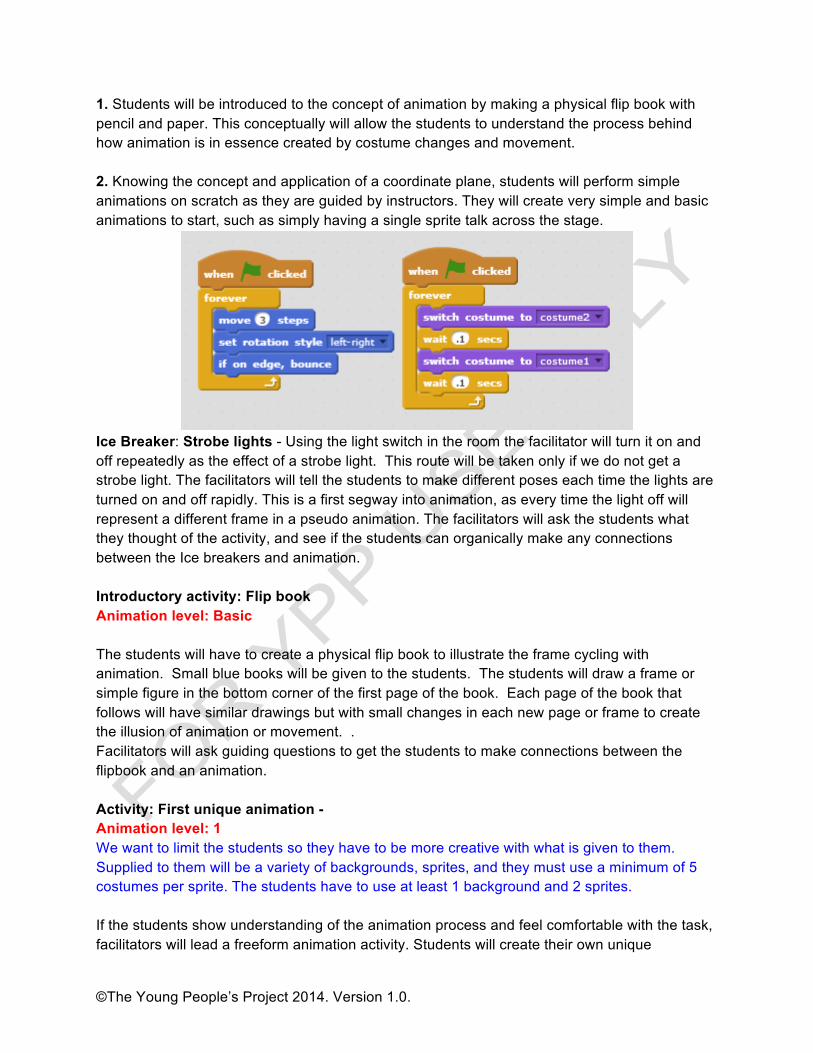
The total countdown time given is 1 minute, if a decision if not reached by 1 minute, the pool is 0 and no candy is awarded to any player. The countdown may be paused at the 30 second mark, and the facilitator should tell the players how much candy is remaining in the pool and suggest that a compromise be reached before no candy remains. The moment the players come to agreement, the pool is awarded according to the current time. Students who are not in the “Divided” round are given a voting slip to vote on the outcome of the divided round. Students will cast their votes before the divided round begins. The voting slip will ask them to predict the following outcomes: 1) Players share candy equally vs. 2) Players do not share candy equally Player X gets slot A Player Y gets slot B Player Z gets slot C 3) No player gets any candy Students who predict the outcome with 100 percent accuracy will earn a piece of candy. Unit 2: Animation (Animated Cartoon)-->Look at definitions Goals: The purpose of this unit is to have the participants express their creativity and get introduced to programming around the blocks below in (diagram 2:1). This unit is based on one of the most simplest forms of programming, animation. Learning how to create the appearance of movement. With animation students will have a sprite or multiple sprites (sprite = any object in scratch) going through costume changes to depict movement and changes in appearance. The students will use loop blocks (ex. forever/repeat) which will trap a repetition of script thus showing continuous movement. They will also use delay or wait blocks(ex. wait x sec) which slows the process down to a speed that is clearly seen because script is read through in a fast pace. This will help students create storyboards and be able to disassemble the bigger picture and gain understanding on how the smaller pieces add up to create the bigger pieces.
We should show the students this video of a pictorial animation so they understand what we mean when we say the word animation pertaining to scratch. This video is of a few objects appearing to be move but they are in fact single pictures being put into strategic order. http://www.youtube.com/watch?v=IQdOwQkwFKA ******** Ninja is a suggested icebreaker and making a custom background is an idea for an
There are three levels to our animation process in which we will have the students engage in simple moderate and more difficult animations.
Animation level 1- simple, appearance change in the same position Animation level 2- Movement along the backdrop with appearance changes Animation level 3- Movement along the backdrop with appearance changes and with backdrop changes
Diagram 2:1 ***Organize Activities based on what level they are and name them based on that level...*** Students will work on creating their own individual animations for the first time. The animations will be simple in nature, but will demonstrate the students knowledge and mastery of understanding how to create an animation.
1. Students will be introduced to the concept of animation by making a physical flip book with pencil and paper. This conceptually will allow the students to understand the process behind how animation is in essence created by costume changes and movement. 2. Knowing the concept and application of a coordinate plane, students will perform simple animations on scratch as they are guided by instructors. They will create very simple and basic animations to start, such as simply having a single sprite talk across the stage.
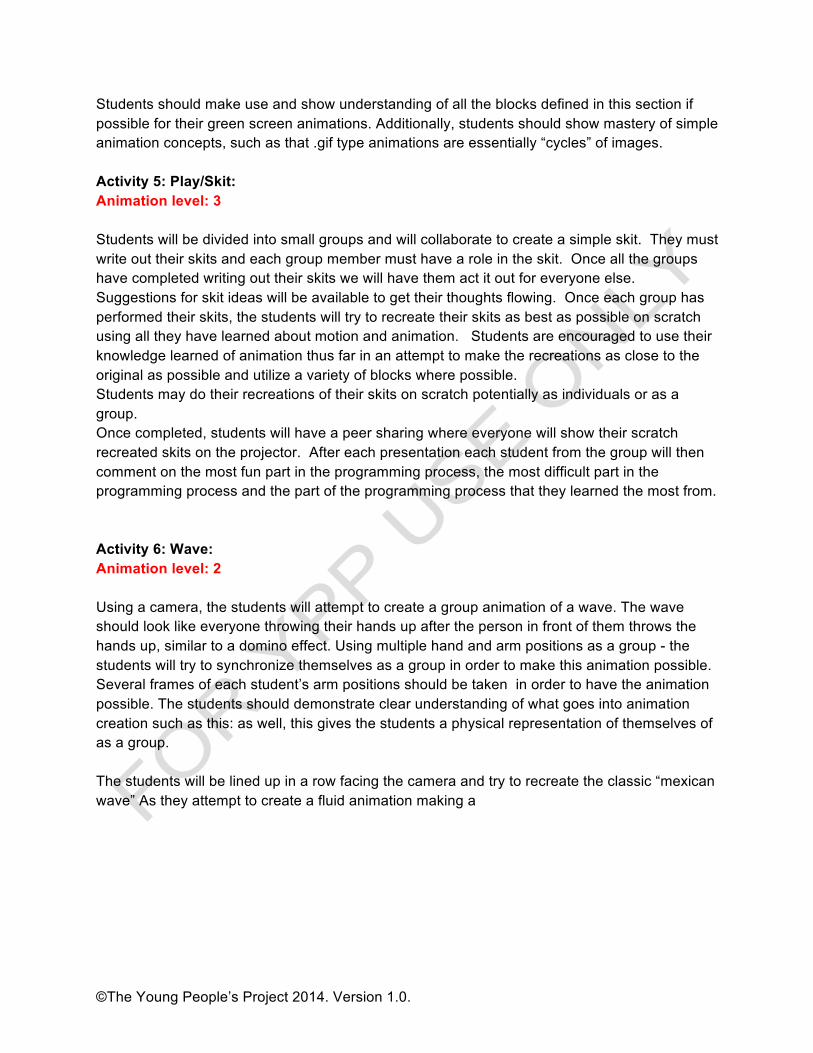
Ice Breaker: Strobe lights - Using the light switch in the room the facilitator will turn it on and off repeatedly as the effect of a strobe light. This route will be taken only if we do not get a strobe light. The facilitators will tell the students to make different poses each time the lights are turned on and off rapidly. This is a first segway into animation, as every time the light off will represent a different frame in a pseudo animation. The facilitators will ask the students what they thought of the activity, and see if the students can organically make any connections between the Ice breakers and animation. Introductory activity: Flip book Animation level: Basic The students will have to create a physical flip book to illustrate the frame cycling with animation. Small blue books will be given to the students. The students will draw a frame or simple figure in the bottom corner of the first page of the book. Each page of the book that follows will have similar drawings but with small changes in each new page or frame to create the illusion of animation or movement. . Facilitators will ask guiding questions to get the students to make connections between the flipbook and an animation. Activity: First unique animation - Animation level: 1 We want to limit the students so they have to be more creative with what is given to them. Supplied to them will be a variety of backgrounds, sprites, and they must use a minimum of 5 costumes per sprite. The students have to use at least 1 background and 2 sprites. If the students show understanding of the animation process and feel comfortable with the task, facilitators will lead a freeform animation activity. Students will create their own unique
animations based off whatever they want to, using whatever sprites and blocks they see fit. Students will present their own animations in a peer sharing to see what each student has come up with after the time allotted to make their animations. During the activity, facilitators are encouraged to have the students to use the coordinate grid to the highest potential during the activity, instead of simply using turn “x”degrees and move “x” units, to go to and glide and to coordinates on the plane. Once again, to show mastery of the coordinate plane concept. Activity 2: Personal .gif - wave: Animation level: 2 Students will create a very basic backdrop based animation, by using the webcam feature to take pictures of themselves waving, using multiple frames, the students will be able to make simple repeatable pseudo-gifs of themselves waving to the camera. Using backdrop changes exclusively. Facilitators will guide the students through using the backdrop changes, peer share optional, however, facilitators must know that the students feel entirely comfortable conceptually before moving to the next step. Activity 3: .gif creation: Animation level: 1 Students will be lead into an activity that now focuses on costume changing as opposed to movement of the coordinate plane. The students will be lead into an activity focusing on making it appear as though their character is performing actions and movement through as many costume changes as possible. Using the appropriate blocks for the animation, as listed above. The students will create this animation, then have a brief pair and share with the rest of the students. Activity 4: Green screen animation: Animation level: 3 Today we will be using a green screen sheet and a camera for animation creation. Every student will take turns taking a series of pictures in front of the green screen serving as different costumes. The students will choose a unique motion they want to play out which will take a series of pictures that are slightly advanced than the previous. For an example, if a student wanted to wave, they would have three costumes. The costumes will be as follows: their elbow at a 90 degree angle, 45 degree angle, and 189 degrees. If you cycle through these three pictures the arm will appear to wave. The goal of the activity is for students to understand the process of how animation is created through pieces and stages using many frames.
Students should make use and show understanding of all the blocks defined in this section if possible for their green screen animations. Additionally, students should show mastery of simple animation concepts, such as that .gif type animations are essentially “cycles” of images. Activity 5: Play/Skit: Animation level: 3 Students will be divided into small groups and will collaborate to create a simple skit. They must write out their skits and each group member must have a role in the skit. Once all the groups have completed writing out their skits we will have them act it out for everyone else. Suggestions for skit ideas will be available to get their thoughts flowing. Once each group has performed their skits, the students will try to recreate their skits as best as possible on scratch using all they have learned about motion and animation. Students are encouraged to use their knowledge learned of animation thus far in an attempt to make the recreations as close to the original as possible and utilize a variety of blocks where possible. Students may do their recreations of their skits on scratch potentially as individuals or as a group. Once completed, students will have a peer sharing where everyone will show their scratch recreated skits on the projector. After each presentation each student from the group will then comment on the most fun part in the programming process, the most difficult part in the programming process and the part of the programming process that they learned the most from. Activity 6: Wave: Animation level: 2 Using a camera, the students will attempt to create a group animation of a wave. The wave should look like everyone throwing their hands up after the person in front of them throws the hands up, similar to a domino effect. Using multiple hand and arm positions as a group - the students will try to synchronize themselves as a group in order to make this animation possible. Several frames of each student’s arm positions should be taken in order to have the animation possible. The students should demonstrate clear understanding of what goes into animation creation such as this: as well, this gives the students a physical representation of themselves of as a group. The students will be lined up in a row facing the camera and try to recreate the classic “mexican wave” As they attempt to create a fluid animation making a
wave one at a time from left to right. Unit 3: Strategy/Logic -- Cliffs S-Unit (possibly spread the unit out for icebreakers?) Goals: The purpose of this unit is to get the students thinking outside of the box. Literally outside of the computer screen which we now call home. Its time to get students out the classroom and learn the true power of their brains!
The activities in this unit are all about strategy, logic and team building. The students will be challenged to think, rethink, and strategically come to conclusions through fun games and activities. This unit will develop the critical thinking skills of the students which will carry them a long way in life. Instead of just jumping the gun the students will be forced to think before they come to conclusions and this skill will teach them how to detect problems then plan to solve
those problems. I bet your Number is 3! Ice breaker Each student will be given a blank piece of paper to “Work out their arithmetic” . After each student has a blank piece of paper they will be given the following commands: 1. Think of a number 2. Double it 3. Add six 4. Divide by 2 5. Subtract that by the original number you started with 6. You should always get 3 (What is the result and point of the activity?) Cross the River: (IceBreaker) The students will be given the URL: http://www.quickflashgames.com/games/animal-river-crossing_v1/ The rules for the game are as follows: : The boat cannot go by itself.. It needs someone to ride it. The cat (<) cannot travel with the dog (what) The mouse cannot travel with the cat The cat and the dog cannot stay by themselves on the land The cat and the mouse cannot stay by themselves on the land Create polygons: (Activity) The goal of this game is to construct as many unique polygons as possible using the materials given. Each student will be given a blank piece of paper and 10 strips of cut paper (skinny cut rectangular pieces). The students will make as many different shapes as they can with the 10 strips of paper. All the strips do not have to be used. Each time the students makes a closed figure/polygon, they will draw the shape out on a separate piece of paper. Some questions we will ask them after the activity are: What shape did you construct has the most amount of sides? Can you make a shape with more sides? How many different shapes did you make? Materials:
● Scrap paper for students to draw shapes ● 200 strips of paper (Hotdog cut)
Preparation: The facilitator has to cut up about 200 strips of paper in the shape of a skinny rectangles Traffic Jam: (Activity) The students will be placed into two teams (EastSide & WestSide). The students will line up with
their team one behind the other facing the other team head on. The first person in the line on one team will be facing head on the first person on the other team with a blank space in between them. Students from each team will have a spot to stand on represented by a blank piece of paper. Students can move forward to the next spot only if there is a blank spot in front of them or if there is a blank spot behind a member of the opposing team who’s in front of them; in that case they may hop over the other teams player. You may not hop over one of your own teammates. Once you have moved forward you cannot move back. The objective is to get every team member on the other side successfully with the same blank spot in the middle now separating the last two players on each team. Each team will pick a leader to strategize the moves. This person can leave their spots to look at the whole playing field but must return when they are going to make their move. The crucial principle to this game is to work cooperatively with the opposing team Materials:
● 20 pieces of blank paper Guess my number: (Activity) Using 10 guesses, strategically guess a particular number between 0 and 100. http://scratch.mit.edu/projects/3226134/ Extra: What’s the best strategy to guess the number in the fewest number of tries? If you start by guessing 50, and continue to guess so that you eliminate half the remaining numbers you can always get the number in less than seven guesses (because 2^7 =128). How many guesses would you need if the number is between 0 and 1000? (Just 10.) What is the relationship between the number of guesses and range of numbers? (log2 range = total number of guesses.) This uses knowledge of exponents and logarithms which the students probably aren’t aware of, but it’s a good way to teach them the basics. Measure it!: (Activity) The students will need roles. There will be 1-2 Project Managers
P.S. All of the roles will be on a notecard given to the students just incase they forget. Project Managers task is to document all the measurements being taken by every Project surveyor. Each checkpoint the Project Manager documents how many steps has been taken by the Surveyor. This position will also give chalk to every checkpoint manager. Project Surveyors task will be to walk heel to toe on the sidewalk all the way around the block.
On each 10th step, the surveyor screams out 10 for the checker. Project Checkers will be making sure that the Surveyor is truthfully taking 10 whole steps straight as possible heel to toe. Checkpoint Managers+ will be marking every 10th step with some chalk given by the project manager. What we will be doing is measuring the schools city block. What we will do this day is measure the surrounding sidewalk of the school by feet. The students will walk heel to toe around the block to get the correct measurements. Materials:
● Clipboard and paper for Project manager ○ Surveyor name: __(insert name)_ || total steps taken: _(Tally marks)_
● Chalk for the Project Checkers Materials:
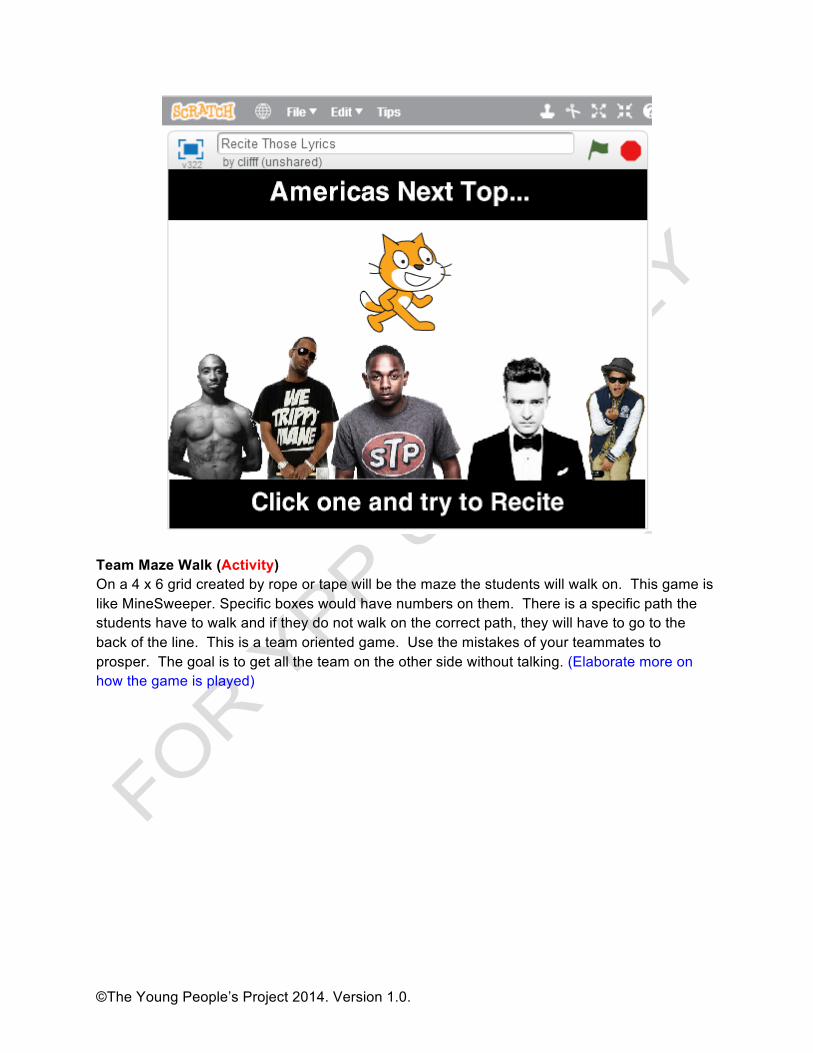
● Blank pieces of paper Compose those lyrics: (Activity)- On a scratch program that was created we will have a listening party. As I play each snippet of a song the students will try to recite the words on paper. Each song is about 15 seconds and I am allowed to replay each snippet 3 times. What we are going to practice is our listening, observation, and memory skills with this activity using tunes we all love! Can we make this more math oriented? Materials:
● Paper and pencils for the students ● Cliffs program
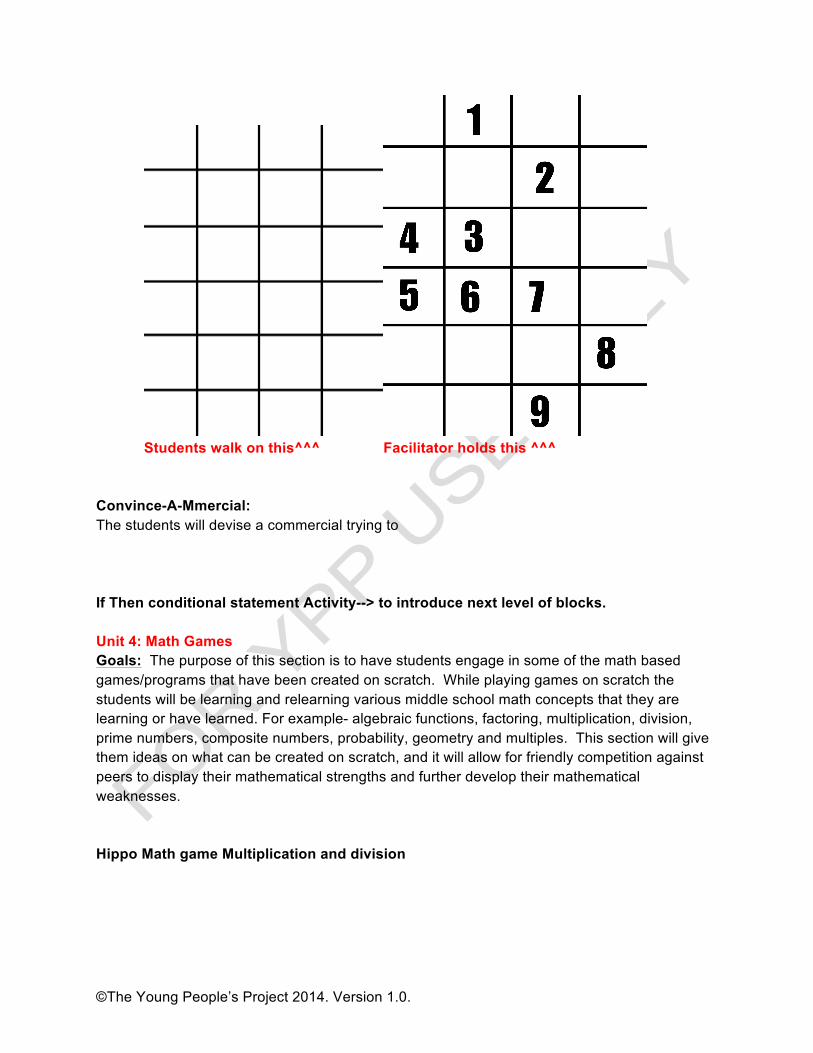
Team Maze Walk (Activity) On a 4 x 6 grid created by rope or tape will be the maze the students will walk on. This game is like MineSweeper. Specific boxes would have numbers on them. There is a specific path the students have to walk and if they do not walk on the correct path, they will have to go to the back of the line. This is a team oriented game. Use the mistakes of your teammates to prosper. The goal is to get all the team on the other side without talking. (Elaborate more on how the game is played)
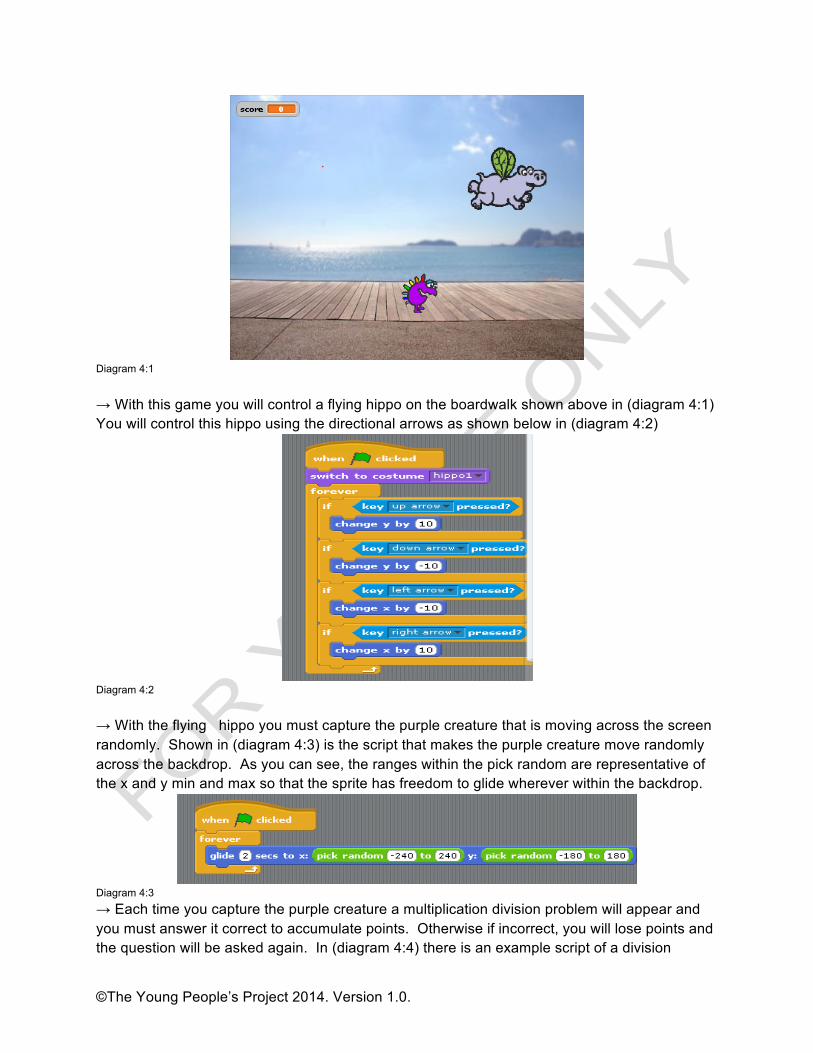
Students walk on this^^^ Facilitator holds this ^^^ Convince-A-Mmercial: The students will devise a commercial trying to If Then conditional statement Activity--> to introduce next level of blocks. Unit 4: Math Games Goals: The purpose of this section is to have students engage in some of the math based games/programs that have been created on scratch. While playing games on scratch the students will be learning and relearning various middle school math concepts that they are learning or have learned. For example- algebraic functions, factoring, multiplication, division, prime numbers, composite numbers, probability, geometry and multiples. This section will give them ideas on what can be created on scratch, and it will allow for friendly competition against peers to display their mathematical strengths and further develop their mathematical weaknesses. Hippo Math game Multiplication and division
Diagram 4:1 → With this game you will control a flying hippo on the boardwalk shown above in (diagram 4:1) You will control this hippo using the directional arrows as shown below in (diagram 4:2)
Diagram 4:2 → With the flying hippo you must capture the purple creature that is moving across the screen randomly. Shown in (diagram 4:3) is the script that makes the purple creature move randomly across the backdrop. As you can see, the ranges within the pick random are representative of the x and y min and max so that the sprite has freedom to glide wherever within the backdrop.
Diagram 4:3 → Each time you capture the purple creature a multiplication division problem will appear and you must answer it correct to accumulate points. Otherwise if incorrect, you will lose points and the question will be asked again. In (diagram 4:4) there is an example script of a division
question 14/7; with this script it shows how the answer either gets registered as correct or incorrect. In (diagram 4:5) the script in action shows the hippo on the boardwalk being asked a question by the purple creature.
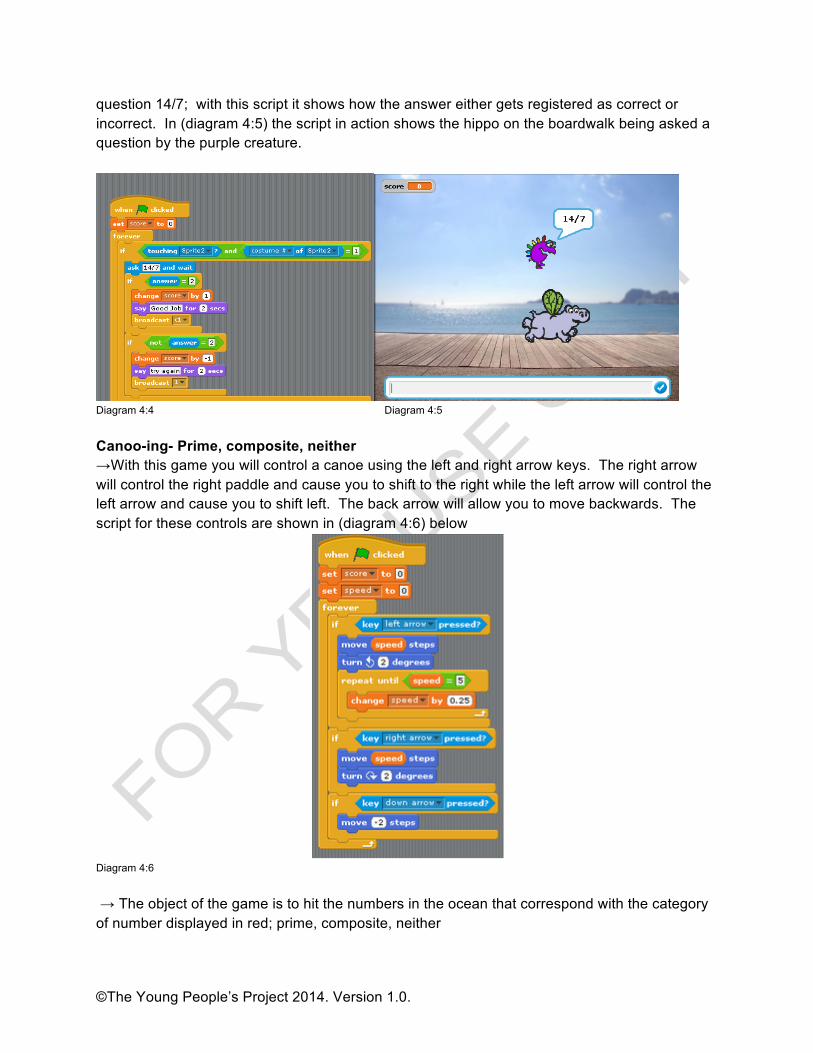
Diagram 4:4 Diagram 4:5 Canoo-ing- Prime, composite, neither →With this game you will control a canoe using the left and right arrow keys. The right arrow will control the right paddle and cause you to shift to the right while the left arrow will control the left arrow and cause you to shift left. The back arrow will allow you to move backwards. The script for these controls are shown in (diagram 4:6) below
Diagram 4:6 → The object of the game is to hit the numbers in the ocean that correspond with the category of number displayed in red; prime, composite, neither
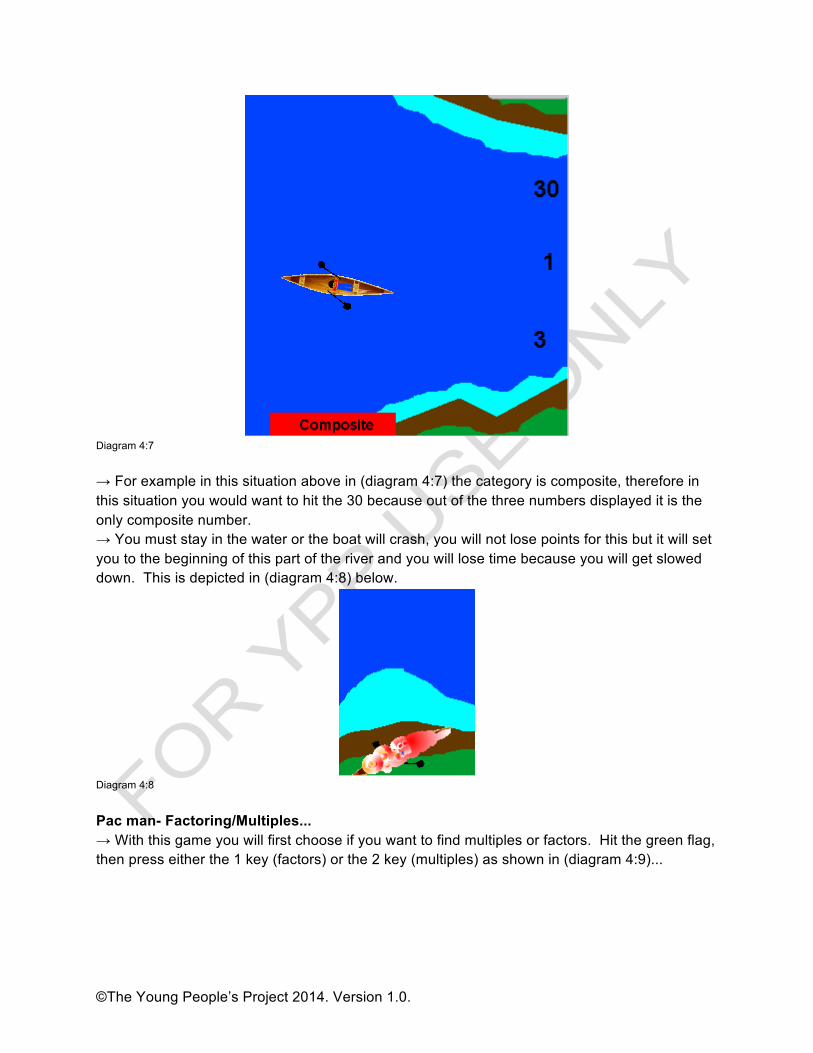
Diagram 4:7 → For example in this situation above in (diagram 4:7) the category is composite, therefore in this situation you would want to hit the 30 because out of the three numbers displayed it is the only composite number. → You must stay in the water or the boat will crash, you will not lose points for this but it will set you to the beginning of this part of the river and you will lose time because you will get slowed down. This is depicted in (diagram 4:8) below.
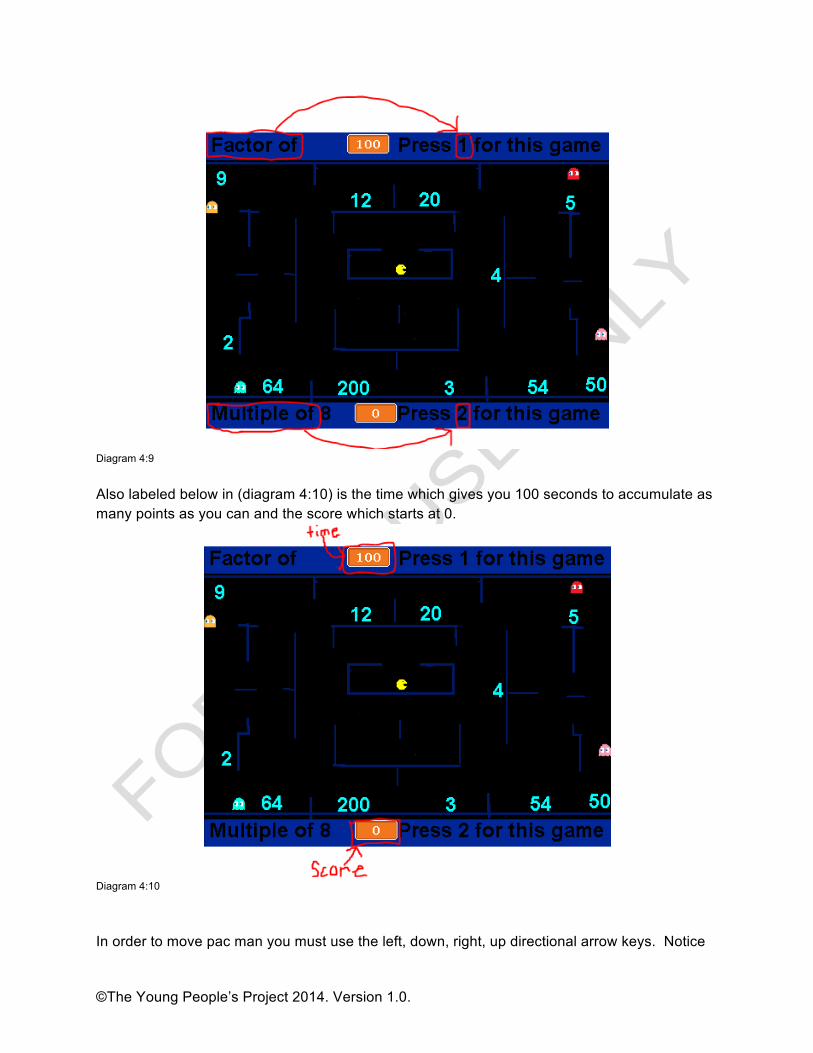
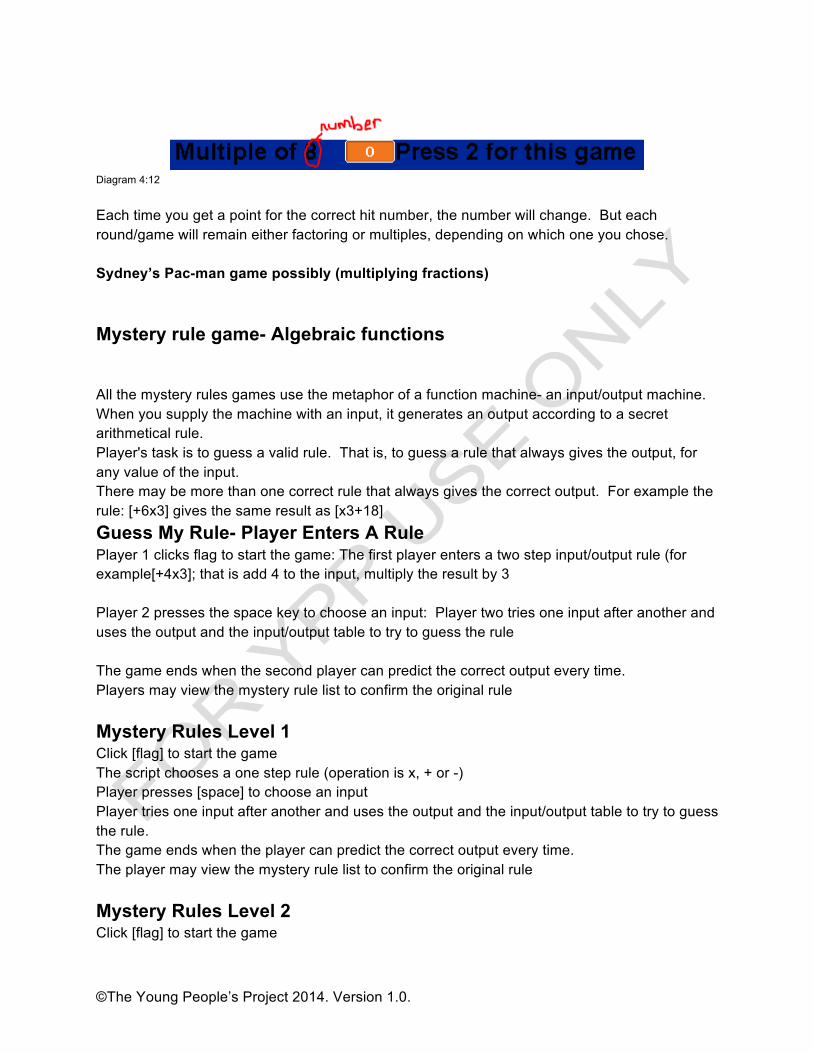
Diagram 4:8 Pac man- Factoring/Multiples... → With this game you will first choose if you want to find multiples or factors. Hit the green flag, then press either the 1 key (factors) or the 2 key (multiples) as shown in (diagram 4:9)...
Diagram 4:9 Also labeled below in (diagram 4:10) is the time which gives you 100 seconds to accumulate as many points as you can and the score which starts at 0.
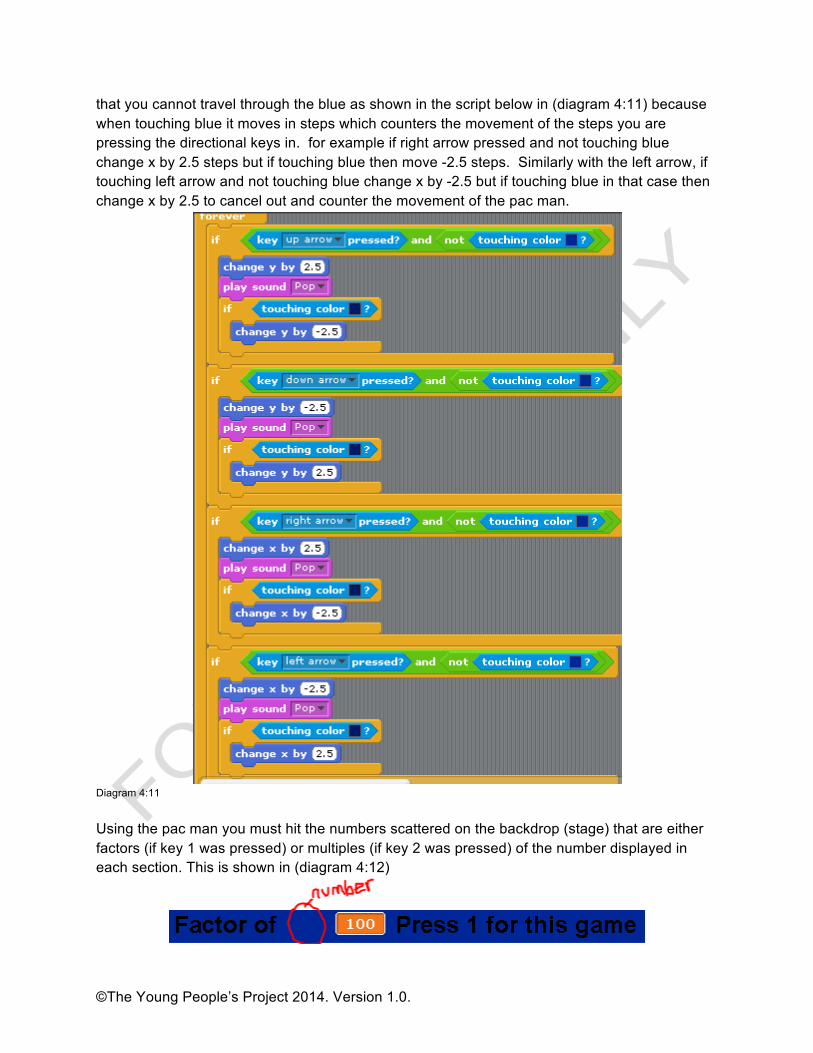
Diagram 4:10 In order to move pac man you must use the left, down, right, up directional arrow keys. Notice
that you cannot travel through the blue as shown in the script below in (diagram 4:11) because when touching blue it moves in steps which counters the movement of the steps you are pressing the directional keys in. for example if right arrow pressed and not touching blue change x by 2.5 steps but if touching blue then move -2.5 steps. Similarly with the left arrow, if touching left arrow and not touching blue change x by -2.5 but if touching blue in that case then change x by 2.5 to cancel out and counter the movement of the pac man.
Diagram 4:11 Using the pac man you must hit the numbers scattered on the backdrop (stage) that are either factors (if key 1 was pressed) or multiples (if key 2 was pressed) of the number displayed in each section. This is shown in (diagram 4:12)
Diagram 4:12 Each time you get a point for the correct hit number, the number will change. But each round/game will remain either factoring or multiples, depending on which one you chose. Sydney’s Pac-man game possibly (multiplying fractions) Mystery rule game- Algebraic functions All the mystery rules games use the metaphor of a function machine- an input/output machine. When you supply the machine with an input, it generates an output according to a secret arithmetical rule. Player's task is to guess a valid rule. That is, to guess a rule that always gives the output, for any value of the input. There may be more than one correct rule that always gives the correct output. For example the rule: [+6x3] gives the same result as [x3+18] Guess My Rule- Player Enters A Rule Player 1 clicks flag to start the game: The first player enters a two step input/output rule (for example[+4x3]; that is add 4 to the input, multiply the result by 3 Player 2 presses the space key to choose an input: Player two tries one input after another and uses the output and the input/output table to try to guess the rule The game ends when the second player can predict the correct output every time. Players may view the mystery rule list to confirm the original rule Mystery Rules Level 1 Click [flag] to start the game The script chooses a one step rule (operation is x, + or -) Player presses [space] to choose an input Player tries one input after another and uses the output and the input/output table to try to guess the rule. The game ends when the player can predict the correct output every time. The player may view the mystery rule list to confirm the original rule Mystery Rules Level 2 Click [flag] to start the game
The script chooses a two step rule (first operation is x, second is + or -) Player presses [space] to choose an input Player tries one input after another and uses the output and the input/output table to try to guess the rule. The game ends when the player can predict the correct output every time. The player may view the mystery rule list to confirm the original rule Mystery Rules Level 3 Click [flag] to start the game The script chooses a two step rule(first operation is x or /, second is + or -) Player presses [space] to choose an input Player tries one input after another and uses the output and the input/output table to try to guess the rule. The game ends when the player can predict the correct output every time. The player may view the mystery rule list to confirm the original rule Mystery Rules Level 4 Click [flag] to start the game The script chooses a two step rule ( first operation is +, -, x or /). If the first input is (+ or -), the second will be (x or /) If the first input is (x or /), the second will be (+ or -) Player presses [space] to choose an input Player tries one input after another and uses the output and the input/output table to try to guess the rule. The game ends when the player can predict the correct output every time. The player may view the mystery rule list to confirm the original rule Polystar game- Geometry In this activity we will explore the behavior of a script, Polystar, to create geometric designs using two variables, distance and angle. Working with Polystar is about creating interesting designs and paying attention to the variables that are used to create them. Think of yourself as a scientist, investigating the behavior of a strange machine. Or as an artist, investigating the potential of a creative medium. Or as a mathematician investigating the relationship between geometric and numerical patterns. Your task is to learn as much as you can about the behavior of the script: to understand the behavior of Polystar so well that you can predict exactly what the result will be for any value of angle and distance variables. You will need to describe the mechanical behavior of the script--- what it makes the sprite do when Polystar --- and the mathematical rules linking Polystar's variables to the resulting designs. It's good to work in groups of 2 or 3 people at a computer. Then collaborate with other groups and compare results. Make sure that each group includes scribe and recorder RECORD ALL RESULTS AND CONJECTURES ON THE POLYSTAR EXPERIMENT RECORD SHEET
Here are some starting points 1. Try Polystar with a variety of angle and distance values. Keep records of the results. What type of designs does it make? Do any of the designs have names that you know? Can you invent names for unfamiliar designs 2. What does the angle variable control? What does the distance variable control? Make a conjecture about this and then invent some experiments to test your conjecture 3. Expand the kinds of values you use for the variables. Large numbers, small numbers, negative numbers, fractions and decimals. Make predictions about what will happen SOME VALUES OF THE VARIABLES WILL CAUSE THE SPRITE TO HIT THE EDGE OF THE SCREEN. WHEN THIS HAPPENS JUST CLEAR THE SCREEN AND START AGAIN 4. Try some of the visual challenges 5. As you work, write down any questions you have about Polystar or conjectures that you make. Devise experiments to try to answer the questions or test the conjectures. 6. As you work, record your data on the back of the Polystar experiment record sheet Conclusions: Can you predict the type of shape and the number of points if you know the values of the angle and distance variables Plinko/Spinner wheel -Probability ******************************************************************************** Unit 5: Little lessons in Programming / Objectives / Experimentation Goals: The purpose of this unit is to allow the students to experiment within scratch and create small programs that we give to them. This section will be essential to the students understanding of scratch programming as they will go in depth and learn about specific blocks that will enable them to create more complex programs than animations. The students will have two parts to this section; The first section they will experiment with the various blocks and not have any specific program to make, rather they will build their mini scripts in scratch and observe what they do. The second section will be more structured in which we will give them mini scratch programs/objectives to complete based on where we feel their levels of understanding are. Experimentation enhances the thought processes and critical thinking of individuals. This unit will be key to the students grasping the literacy abilities needed to create complex programs and understand the math within scratch. Practicing makes perfect-keep practicing... POPCORN PROGRAMMING! 1. Motion a. Make the sprite follow the mouse b. Make the sprite move with the arrow keys
2. Loops and variables a. Make the sprite count to 10 using "say" when flag clicked b. Make sure the count starts over from 1 the next time (initialization) 3. Messages Make sprite A "say" something when you click on sprite B 4. Pen a. Make a sprite draw when the mouse button is down b. Make a sprite that changes the color of the pen when you click on it (incl. messages) c. Make other sprites that change pen color, width, etc. (i.e. make a simple paint project) Popcorn Programming, objective based, giving goals for a team/group and giving them 30 seconds or more for programming, and seeing how many people can get through. Damien objectives 1. Make a sprite that revolves around another sprite whenever the the left or right arrow is clicked 2. Make a program that has bats looking like they are flying away into the moonlight 3. Create a sprite that acts as an eraser 4. Create an animation that looks like apples falling from a tree 5. Planetarium Destruction Level 1: program the cursor to follow the mouse pointer Level 2: Program the planets to change costumes when clicked by the mouse pointer Level 3: Incorporate a score system
Small objectives: 1) Create a background that looks like the Milky Way Galaxy that rotates forever. Rotating slower, make planets revolve around the milky way in the solar dust. 2) Create a sprite that looks like an iPad that has buttons you can press. The buttons do not have to be programmed to do anything. 3) Create a backdrop of a blueprint. Make the blueprint of the room. Include all tables, windows, and doors. It has to look like a real blueprint. Blue format and all! 4) Make a program that displays a cup that cycles through an array of colors. Make a indicator sprite for which color to stop the color of the cup on. When you click the cup the switching of
color should stop. The objective is to match the color you clicked with the color of the sprite indicator. 5) Make a short episode of spongebob. Create a sprite that looks like sandy, mr.krabs, plankton, spongebob, patrick, and gary inside of sandys air bubble home. They should all be having a picnic. Make the characters have conversations about the foods at the picnic. 6) Create a ball that bounces on the walls randomly. Make the program as so it is not predictable. 7) Create a Spanish translator game. Make 10 different sprites all in the form of buttons that say this: áíóé
● Más and Mas-- More and But ● Sí and Si -- Yes and If ● Sólo and Solo -- Only and Alone
Each time you press and hold a button the word will appear and the user will have to match the correct words by placing it on the correct translation. When the button is not held, the blank background shows. Create two separate sprites for each translation to match that look like this:
Each Sprite should have an additional costume which serves as back sided that looks like this-----------------------------------------^^^^^^^^^ ******************************************************************************** Unit 6: Find the bug --- Hriday’s Unit Goals: The purpose of this unit is to test students computational literacies. This unit will have the students engage in reading through script to detect problems and fix problems. These two skills are very important to programming and life. The first step to solving any problem is knowing the problem and it is that which usually takes up the majority of the critical thinking process. The next step is solving the problem which is another important skill for the students to develop and practicing these skills in this unit will further their understanding of the programming they are presented with and the programming they will be doing in the near future. Before we can understand why the whole program works, we must be able to dis ensemble each portion of the script. Problem solving is essential in everyday life because no one can solve problems until they get to the root causes of those problems and having students engage in activities that will develop these skills will get them thinking more critically and analyzing data
more effectively. -Those who can detect a problem and solve it -Those who can detect the a problem but not solve it. -Those who cannot detect the problem but can solve it -Those who can do neither. Activity Ideas: "Find the bug" activity- Somewhat like musical chairs, or indian chief where all students sit together around in a musical formations, where one student starts a beat and another student is the "bug" and tries to interfere with another beat, the students need to find the bug. Human Programming ideas/ Duck Duck Goose Game (Insert other games from other computer) Everyone Create multiple games on scratch and replace some code with some wrong code and have students try to find the wrong code and see that if it fixes will the game work or not. Game Ideas: - Small short games - Games where students can be both hands on and have fun with computer games --- SCRATCH, use paint game and maze game Lectures/Programs Used: - Maze Game - Pacman Game Potential Ideas: 1. Put a debugging script/section in each topic/unit instead of having just 1 individual debugging section. SCRATCH: Reference the debugging article. Game 1: In the following script, why isn’t the cat stopping after 10 steps? A. Forever block
Game 2: In the following script, why is the dog becoming a cat when the green flag is clicked? Game3: In the following script, Cliff wants to raise his hand, but his hand does move up, when he tries to his hand? Game 4: Why Game 5: Understanding the difference between a sprites script and a backdrop's script. The script that you want the sprite to do is written perfectly and should function but the problem is that it is under the backdrop script area. The students must detect this and drag the script into the sprite script area. This is a common problem scratch programmers encounter because they do not always pay close attention to where they are putting script. Many times the backdrop accidentally gets script placed into it when it was assumed that the script was placed in into the sprite. Airplane Battles: Construct the most flyable paper plane with all the materials provided Materials: Paper, Scissors, staples, markers This should be ran as a competition on several different objectives. There will be multiple rounds which allows only one plane per student a round. The first round will be to construct a plane that soares the fastest. The second round will be to construct a plane that soars for the longest time on one throw. The third round will be to construct a plane that flips upward on the initial throw. The fourth round will be to construct a plane that flips downward on the initial throw. The fifth round will be to construct a plane that spins like a spiral on the initial throw. EggDrop Activity: In this activity students must create a strategical design which will help prevent an egg from breaking/crashing when the egg is dropped from various heights. Students can create designs that will help soften the impact of the crash, or ones that are the most aerodynamic, but the main goal is to make sure the egg doesn’t break when it lands on the ground. Some materials that are mostly used are:
● Eggs ● Paper towels ● Plastic straws ● Popsicle sticks ● Tape ● Recycled paper ● Glue
● Plastic bags ● Boxes ● Used material ● Plastic containers ● Cotton Balls ● Manilla Folders ● Etc.... (Use materials that you think that will prevent the egg from crashing)
Students need to create a prototype in which the impact and energy that the egg gains as it is falling/accelerating is all absorbed. Any surface can crack the egg, so it’s smart to use a design where the egg is protected from both the interior and exterior of the design. Another possible design could be to try to slow down the speed of the egg as it is falling, so the impact is limited and can help preserve the egg. Unit 7: Final Game Creation (Overall goal) Goals: The purpose of this unit is to get the students to use everything they have learned and create a final product which displays their new skills on scratch. This unit will include them not only creating a program but also documenting it in their notebooks. Their program must have some math element to it described in detail and they will be assisted by ITEST staff. We will have a list of potential ideas for final projects that students can choose from and they will also be able to choose from their own ideas with approval of ITEST staff. 5 step process → concept of what they want the program to do storyboard/costumes (picture) identify blocks / why put blocks together for the code then they have the game (symbolic representation) Student Talk (Steps 1-3)
1. experience - draw on your life experiences with math/learning/playing games to identify a focus for your project (game/animation) 2. pictures - draw the characters (sprites) and their different appearances (costumes) that will be featured in your project (game/animation) 3. stories - write a story or draw a storyboard for your project (game/animation)
Scratch Talk (Steps 4-5)
4. feature talk: What blocks will be used for your project and why. What does the code
look like for your project 5. symbolic representation - What does your final project look like in action. http://scratch.mit.edu/projects/2352074/
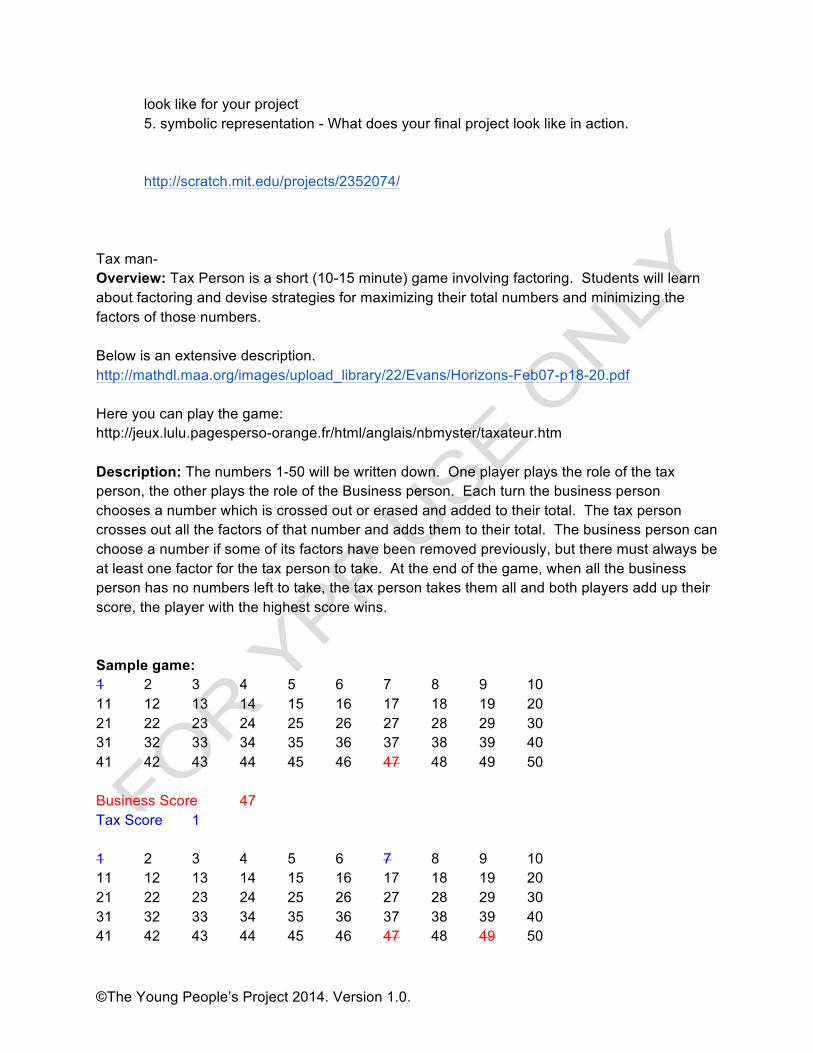
Tax man- Overview: Tax Person is a short (10-15 minute) game involving factoring. Students will learn about factoring and devise strategies for maximizing their total numbers and minimizing the factors of those numbers. Below is an extensive description. http://mathdl.maa.org/images/upload_library/22/Evans/Horizons-Feb07-p18-20.pdf Here you can play the game: http://jeux.lulu.pagesperso-orange.fr/html/anglais/nbmyster/taxateur.htm Description: The numbers 1-50 will be written down. One player plays the role of the tax person, the other plays the role of the Business person. Each turn the business person chooses a number which is crossed out or erased and added to their total. The tax person crosses out all the factors of that number and adds them to their total. The business person can choose a number if some of its factors have been removed previously, but there must always be at least one factor for the tax person to take. At the end of the game, when all the business person has no numbers left to take, the tax person takes them all and both players add up their score, the player with the highest score wins.
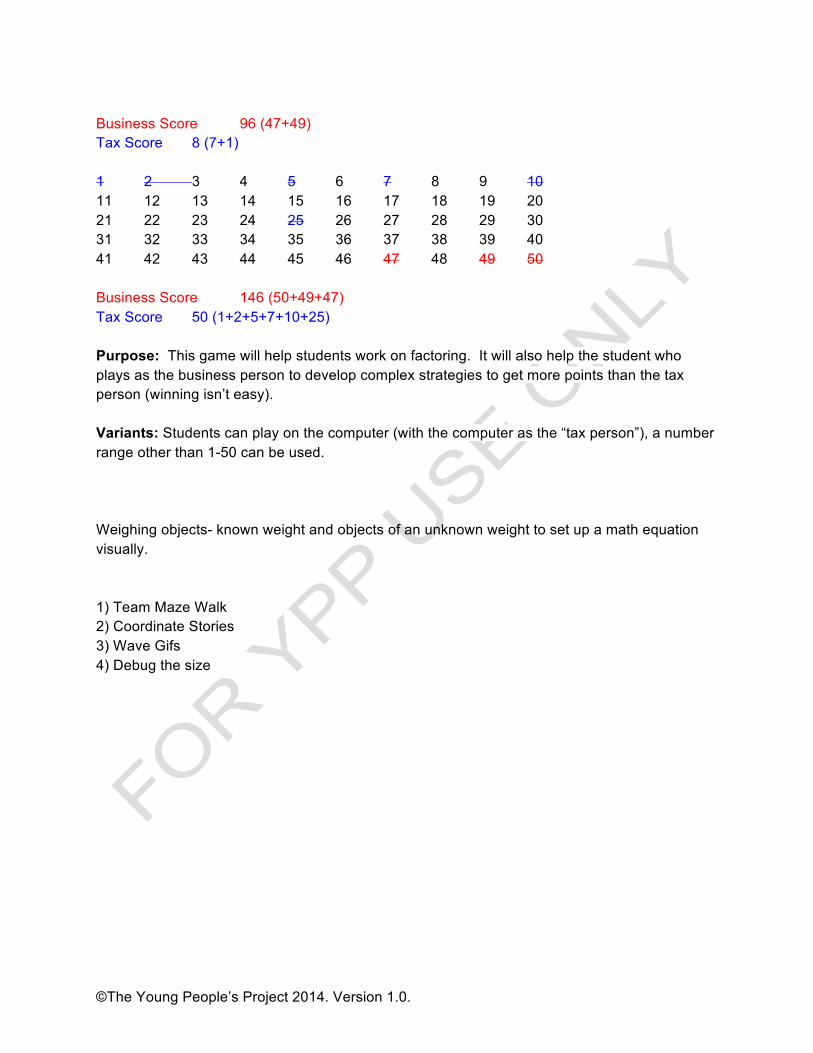
Business Score 96 (47+49) Tax Score 8 (7+1) 1 2 3 4 5 6 7 8 9 10 11 12 13 14 15 16 17 18 19 20 21 22 23 24 25 26 27 28 29 30 31 32 33 34 35 36 37 38 39 40 41 42 43 44 45 46 47 48 49 50 Business Score 146 (50+49+47) Tax Score 50 (1+2+5+7+10+25) Purpose: This game will help students work on factoring. It will also help the student who plays as the business person to develop complex strategies to get more points than the tax person (winning isn’t easy). Variants: Students can play on the computer (with the computer as the “tax person”), a number range other than 1-50 can be used. Weighing objects- known weight and objects of an unknown weight to set up a math equation visually. 1) Team Maze Walk 2) Coordinate Stories 3) Wave Gifs 4) Debug the size