J/80 Owner Guide 1 CopyrightJ/Boats, Inc., 2000 Introduction WELCOME ABOARD and welcome to J/Boats’ family of owners. Your boat is designed and engineered to be the strongest, best performing, easiest-to-use, and most comfortable sailing boat of its type. J/Boats has prepared this guide to familiarize you with rigging, tuning, and operating the J/80. Before we begin please be sure to: COMPLETE THE WARRANTY CARD AND MAIL TO TPI COMPOSITES, INC. This guide is furnished for your benefit, but shall in no way be construed as any sort of warranty or contract, express or implied, creating any obligation on the part of J Boats, Inc., with respect to any fact or facts or any advice or opinions contained herein. The sole and exclusive warranty of the product is the TPI Composites, Inc. Warranty described in the appendix hereto and on the Warranty Card furnished with the yacht. J/BOATS, INC. HEREBY DISCLAIMS ANY AND ALL WARRANTIES, EXPRESS OR IMPLIED, INCLUDING ANY WARRANTY OF FITNESS FOR A PARTICULAR PURPOSE OR ANY IMPLIED WARRANTY OF MERCHANTABILITY.
Transcript
J/80 Owner Guide 1
Copyright J/Boats, Inc., 2000
Introduction
WELCOME ABOARD and welcome to J/Boats’ family of owners. Your boat is designed and engineered to be the strongest, best performing, easiest-to-use, and most comfortable sailing boat of its type.
J/Boats has prepared this guide to familiarize you with rigging, tuning, and operating the J/80. Before we begin please be sure to:
COMPLETE THE WARRANTY CARD AND MAIL TO TPI COMPOSITES, INC.
This guide is furnished for your benefit, but shall in no way be construed as any sort of warranty or contract, express or implied, creating any obligation on the part of J Boats, Inc., with respect to any fact or facts or any advice or opinions contained herein.
The sole and exclusive warranty of the product is the TPI Composites, Inc. Warranty described in the appendix hereto and on the Warranty Card furnished with the yacht.
J/BOATS, INC. HEREBY DISCLAIMS ANY AND ALL WARRANTIES, EXPRESS OR IMPLIED, INCLUDING ANY WARRANTY OF FITNESS FOR A PARTICULAR PURPOSE OR ANY IMPLIED WARRANTY OF MERCHANTABILITY.
J/80 Owner Guide 2
Copyright J/Boats, Inc., 2000
J/80 Fact Sheet
LOA 26.3 100% Sail Area 378LWL 22.0 I 31.50Beam 8.3 J 9.50Draft 4.9 P 30.00Displacement 2,900 E 12.50Engine Obd. J/Sprit 6.25Water N/A Dspl/L 122Keel (lead) 1400.0 SA/Dspl 30Headroom 4'0" One Design PHRF Rating 123Height of Boat Only w/Keel 9' Mast height above water 37'6"
Backstay Control Polyester 6mm 50'Traveler Control Polyester 8mm 19'Sprit Shock Cord Cord 5/16" 10'
Standing RiggingDia. Length Term1 Term2Pin
Headstay w/unit 0 furler -4 Rod 32'9-1/2" Pin to Pin 3/8"Headstay w/unit 00 furler 3/16" Dyform WireUpper backstay 5/32" 28'6-3/4" fork eye 5/16"Lower backstay 1/8" 8'9-3/8" fork trbkl 1/4"Upper shrouds 7/32" 31'5" Gibb T trbkl 3/8"Intermediates 5/32" 22'4" Gibb T trbkl 5/16"Lower shrouds 3/16" 11'8-3/8" Gibb T trbkl 3/8"
J/80 Owner Guide 3
Copyright J/Boats, Inc., 2000
Commissioning Checklist
Pre-Launch
___ Read equipment owner manuals
___ Pre-rig mast and check installation of:
• halyards
• blocks
• electronics
• shrouds
• spreader chafe guards
• lifeline pins
___ Pre-rig boom
___ Bottom painted or touched up
___ De-winterize outboard engine
___ Check battery charge
Loose Gear
___ Fenders and lines
___ Dock lines
___ Winch handles
___ Bilge pump & bucket
___ Mast wedges ready
Step Mast
___ Hoist spar and lower into boat
___ Attach furler to stemhead fitting
___ Attach backstay
___ Attach all shrouds and hand tighten
___ Install wedges and mast boot
Rigging
___ Install boom
___ Rerun halyards in mast
___ Rig reef line
___ Install and connect boom vang
___ Rough tune spar per tuning guide
J/80 Owner Guide 4
Copyright J/Boats, Inc., 2000
Getting Started With Your J/80 Generally, your dealer will help you prepare your boat before launching. They are experts in the field and are capable of completing most commissioning tasks.
Before Proceeding Before you begin to assemble your new boat you should become familiar with the different sail control systems and associated hardware. All running rigging and loose deck hardware items are shipped from the factory in parts boxes complete with part inventory sheets. To help you properly install these items please refer to the rigging and hardware sections and diagrams in this guide.
The Commissioning Checklist: will help you double check that the J/80 is assembled properly and all systems and rigging are functioning properly. If a boatyard other than an authorized J/Boat dealer is performing the work, review this list with them to establish what needs to be done and by whom.
Topsides: wash off all the dirt and grime accumulated from delivery. Use only non-abrasive cleansers on the gelcoat. Then apply a coat of high quality carnauba car or boat wax or use a synthetic poly-based coating. Either finish will prolong the life and sheen of the gelcoat.
Bottom: preparation is critical to long-lasting enjoyment. To ensure a professional finish carefully review the paint manufacturers recommendations for preparing the bottom, and have your dealer to roll it or spray it on. Be sure that there are a minimum of 4 coats of epoxy primer covering the keel and rudder prior to final coating of bottom paint.
Deck Hardware Chainplates: are custom built of polished 304 grade stainless steel. Each pair surrounds the main structural bulkhead and is anchored directly to it with bolts. The backstay chainplate is also 304 grade and through bolts directly to a reinforced area of the transom.
Stemhead Fitting: is a custom polished 304 grade stainless fabrication. It is designed to withstand all headstay loads, and is attached with bolts directly to the stem of the hull.
Toe Rail: is low maintenance white plastic extrusion, which is attached through the Hull/deck joint and between custom stanchion bases where necessary.
Stanchions & Pulpits: are designed for proper offshore safety as well as to facilitate access to the boat. The bow pulpit is properly braced, houses the bow running lights, and with a mid-height bar across the front end, to allow easier handling of the spinnaker. The stern push-pit is arranged with an aft gate, stern running light, and is a convenient place to mount an outboard bracket, etc.. All stanchions are 1” diameter
J/80 Owner Guide 5
Copyright J/Boats, Inc., 2000
tapered stainless steel, which fit into stainless steel bases. The stanchion gates are well supported with an additional bar and socket.
Lifelines: are SS wire and are fastened at either end by stainless forks and turnbuckles. Each lifeline is clearly marked from the factory and is intended to fit a specific portion of the lifeline/stanchion system.
Skylight Ventilation Hatch: is made of extruded anodized aluminum frames and scratch-resistant acrylic covers. This is the “Ocean Hatch” from Lewmar Marine’s Ocean Series hardware line. The hatch is equipped with a ventilation position and 180 degree articulation
DO NOT PERMIT ACETONE OR OTHER HARSH CLEANSERS TO GET ON PORTS OR HATCHES AS THEY MAY DAMAGE THE FINISH & CLARITY OF SOME DECK HARDWARE.
Deckhouse Handrails: are 304 grade stainless and replace the traditional teak to facilitate easy of maintenance and ownership.
Winches: standard winches are Harken 32-2A two speed winches. The location of the winches facilitates sailing with one or two aboard. They are geared to match the load requirements of the specific task.
J/80 Owner Guide 6
Copyright J/Boats, Inc., 2000
J/80 Rigging & Tuning Guide
Tools needed for rigging your J/80:
• Phillips head screwdriver
• Flat head screwdriver
• Adjustable wrench
• Portable Drill
• Needle nose pliers
• Knife/scissors
• Wooden clamp
• WD-40 or Superlube
Mast & Boom Commissioning
Mast: Find two saw-horse supports and cover with padding or carpeting to support the mast. Carefully remove all protective packaging from the new mast and spreaders. The roller furler is shipped pre-assembled from the factory and should be carefully handled while commissioning. Locate and remove the four standard spreaders taped to the mast and put aside in a clean area. Locate all wire rigging and standard halyards (3) from the running rigging box inside the J/80.
Attach each halyard tail to the end of the appropriate messenger lines pre-installed in the mast. The main halyard feeds into the mast crane at the top of the mast, the spinnaker halyard feeds through sheave 18” above the headstay connection, and the jib halyard, just below the headstay connection. Both the main and jib halyard exit the port side of the mast with the jib halyard leading to the double Harken cam cleats and the main halyard leading to the horn cleat. The spinnaker halyard leads to starboard to a large cam cleat on the cabin top.
Be sure when you attach the halyard to the messenger that you tie an appropriate knot or else you risk losing the messenger line into the mast. A good idea is to tape over your knot with rigging or duct tape.
After all the halyards are installed, you can insert the spreader bars into the mast. With the mast on its side, insert a screwdriver through the top spreader hole and arrange the halyards so they are aft of the bar hole. Then, insert the spreader bar from the underside of the mast. Each spreader is marked with its appropriate location in reference to the mast. These are pre-fit at Hall Spars on each mast individually. When installing the spreader over the spreader bar after feeding the bar through the mast, you will notice that the fit is tight. This is done intentionally and under no circumstances should you start to reach for your file or hack-saw. There are two ways to get the spreader on. Hall Spars recommends that a carpenters clamp be used to slightly squeeze the mast itself. This allows you to get the clevis pins with ease. This is how they are pre-fit and drilled at Hall Spars. The riskier way of installing the spreaders is to insert a screw driver into one of the two clevis pin holes and torque the spreader to get the first pin all the way through, the second pin goes easily. (however, we recommend that you use the Hall method ).
J/80 Owner Guide 7
Copyright J/Boats, Inc., 2000
With both sets of spreaders installed, you are ready to install the shrouds. This is very simple. Peel off the black tape from the shroud termination points on both sides of the mast. Beginning with the upper shrouds, remove the rubber plug, insert the “T” fitting on the end of each shroud into the mast termination hole and twist 90 degrees then insert the rubber plug above the fitting. Follow the same procedure for the other five remaining shrouds.
• Install the shrouds into the spreader end slots and slightly tighten the stainless end plate (do not over-tighten these).
• Tape the spreader ends thoroughly with rigging tape and/or rubber boots.
• Attach the backstay and boom topping lift wire to the clevis pin on the masthead crane.
• Install the mast boot around the base of the mast and a Windex at the top of the mast and proceed to the tuning section for post mast-stepping tips and instructions.
Boom: Rigging the boom of a J/80 is a breeze. Just run the reef line through the boom with the pre-fed messenger line and your done. The outhaul is assembled at Hall Spars and is delivered ready to go!
Simply attach the gooseneck to the mast after the mast is stepped and attach the mainsheet block and vang block to the provided stainless bales.
Lifelines/Stanchions: Insert stanchions tubes into the bases and tighten the Phillips head screws. To prevent the screws from vibrating loose during trailering or heavy air sailing, dip the screw ends in silicone or spray them with blue Loctite before tightening. To connect lifelines: attach the fork fitting to the eye on the bow pulpit (with pin inserted outboard to prevent jib from catching on ring ding), then unscrew the stainless loop at the opposite end of the lifeline, and reeve the stud aft through the stanchion tops. Then reattach the stainless loop and secure to the stern pulpit with the rope lanyard provided.
Tiller Extension: The J/80 is provided with a tiller extension. This extension is included in the rigging box with the boat and requires installation by the dealer or owner. Follow the directions included with the extension and locate to suit. We recommend locating this at least 4” behind the forward end of the tiller to ensure space to directly control the tiller with your hand.
Rigging the Bow Sprit: Cut away the tie-straps securing the bowsprit. Run the tail of the pole control line through the inboard hole at the back end of the sprit and tie a stopper knot. Then run the line through the Harken single block on the forepeak bulkhead and reeve aft through the plastic eyes on the overhead to the cleat at the back of the cabin trunk. IMPORTANT: Tie a stopper knot aft of the cleat to prevent the back end of the pole from hitting the main bulkhead when the line is released.
Roller Furler: Your J/80 is equipped with a custom pre-assembled Harken Roller Furler attached to a Navtec rod rigging headstay. The furler unit can wind the jib either
J/80 Owner Guide 8
Copyright J/Boats, Inc., 2000
clockwise or counterclockwise, depending on which side of the jib the UV cover is on. If the UV cover is on the starboard side, the furler line should pull the drum counterclockwise. If UV cover is to port, the drum should wind up clockwise. The furler line leads aft from the furler through a centerline bow eye then aft to port, cleating at the side of the cabin in the cockpit. After attaching the jib head and tack to the furler shackles, be sure to tape the shackles.
Tuning the Rig Your sailmaker will have specific rig tension recommended for different conditions. We'll stick with the basics to obtaining a well-tuned J/80.
Before Stepping the Mast: • Measure the headstay length- this should be approx. 32'10" from pin to pin. Class
rules allow a range. Consult your sailmaker for the recommended length for your sails.
• Add Windex- There is a pre-tapped hole in the mast crane for a Windex base fitting. We suggest setting each Windex tab to 30 degrees off center.
• Tape spreader ends and all exposed pins
• Run a short piece of line between the upper shroud (about 6” above the bottom spreader) and the intermediate shroud. Then tape off. This helps prevent the spinnaker from catching in the triangle formed by the spread, and the two shrouds.
• Add the mast boot
• Set mast step to middle position, then tighten the aft two step bolts.
After Stepping the Mast: • Center the mast: Establish reference points on the toe-rail abeam of the mast, by
measuring aft from the bow equidistant to both rails. Then hoist a metal tape measure up the main halyard. Measure from rail to rail and adjust the upper shrouds until the top of the mast is centered. The lowers and intermediates should be slack.
• Tighten the uppers two turns per side until you reach a shroud tension of approx. 800 lb. as measured by a LOOS gauge. Then hand tighten the lowers so that the mast is straight side to side while sitting up the mast track.
• Once straight, tighten the lowers two turns per side up to 600 lb.
• Finally, hand tighten the intermediates rechecking for straight alignment, and then tighten to 300 lb.
• Tighten the backstay turnbuckles so that with the backstay line released, the backstay bridle rests approximately 12 inches below the intersection with the upper backstay.
• With the rig tightened up the last step is to install the rubber mast wedges. Spray some lube on the wedges for easier fitting. Then tighten the backstay so the mast bends forward at the deck. Insert the small wedge behind the mast. Then release the backstay. Then wrap the longer wedge around the front of the mast and press
J/80 Owner Guide 9
Copyright J/Boats, Inc., 2000
down to fit. If necessary pry down on the sides with a flathead screwdriver, being careful not to scratch the gelcoat mast partners. Next, slide the mast boot down over the wedges and thoroughly tape the area to minimize leakage.
New wire rigging will tend to stretch a little. Be prepared to go through this same tuning procedure after your first day of sailing in a good breeze.
The J/80 comes equipped with Navtec open body turnbuckles. Rather then pinning the turnbuckles to prevent unwinding, simply take a short piece of messenger line and run it through the bodies of the three turnbuckles on each side and tie a square knot. The turnbuckles won't unwind, yet they're easy to get to for future rig adjustments. For the backstay turnbuckles, tie a messenger line through the turnbuckle and around the stern rail.
Sailing Tips Cross-Sheeting the Jib- While most times you will want to trim the jib sheet to the leeward winch, there are times when “cross-sheeting” can be very fast. Cross sheeting means trimming the jib sheet across the cockpit to the windward winch. This is especially helpful in windier, wavy conditions when you want all the weight on the rail AND the ability to constantly adjust the jib sheet. To cross sheet most effectively, you have two options. 1) On the standard J/80, you can install a Wichard folding pad-eye just forward and outboard of the primary winch and then shackle a Harken ratchet block to it. 2) If your boat is equipped with the optional genoa tracks (for PHRF sailing), simply run the jib sheet through a block on the genoa track and sheet across the cockpit.
Spinnaker Handling- The J/80 is equipped with a foredeck hatch which is wonderful for ventilation and spinnaker handling while daysailing, but most J/80 racers deploy the spinnaker out of the main companionway. For this reason, it is very important to tape up anything that can potentially rip the spinnaker. This includes the boomvang/boom intersect, the shroud bases and any visible ring dings or pins. Some sailors have rigging spinnaker bags that clip just inside the companionway opening, to help prevent the spinnaker from grabbing loose gear below.
Hooking up the Spinnaker- Always remember to tape the halyard shackle after attaching. It can otherwise catch on the rigging while being hoisted and potentially open at an inopportune time. When hooking up the spinnaker for the first time, start by hooking up both spinnaker sheets to the clew of the sail. Assuming that you want to set the spinnaker on starboard tack, hook the sheets up to the port side. Then take the tack line from the bowsprit, run it over the dip in the bow rail (to port of the headstay), and aft to the spinnaker tack, making sure the tack line stays on top of the lazy spinnaker sheet. You’ll see the benefit of this later when the spinnaker is flying. With the tack line always rigging on top of the lazy sheet, the spinnaker is automatically rigged for “inside” jibing. This is when the clew of the spinnaker (during a jibe) passes in front of the headstay but aft of the spinnaker luff. An “outside jibe” (when the spinnaker clew goes all the way in front of the spinnaker luff) is only effective in windy (20+ knot) conditions.
J/80 Owner Guide 10
Copyright J/Boats, Inc., 2000
Spare Parts- It’s always prudent to carry spares. The following is a recommended list of items to keep on board:
• Clevis pins for the lifelines, shrouds
• Spare shackles for the roller furler
• Assorted shackles
• Winch grease and pawl kit
• Spare Tiller extension
• Extra spinnaker sheet (this can then be used as a spare for anything)
• One extra jib block assembly
• Small tackle box to keep all the small parts above.
Class Required Equipment- The J/80 class requires certain safety equipment to be carried aboard for class racing. For the most part, these correspond to most boating safety regulations. Because regulations vary from area to area, the owner should check local regs in outfitting their boat.
• One anchor and chain exceeding 6.0kg with 40m of polyamide rode with minimum diameter of 9mm.
• One manual bilge pump
• One compass, applicable charts, and either (a) speed and depth measuring devices or (b) operational GPS.
• Operable navigation lights, a 12 volt battery (8kg min, 25kg max)
• One horseshoe type throwable life ring.
• Marine first aid kit and manual.
• One operational VHF radio.
• One bucket of not less than 9 liter capacity
• Personal flotation vests shall be carried for each crewmember on board.
• Engine: Minimum nominal power of 2 kilowatts (3hp) minimum weight 12.5kg (empty of fuel). When not in use, engine and any removable outboard bracket shall be stowed aft of forward wall of cockpit.
J/80 Owner Guide 11
Copyright J/Boats, Inc., 2000
J/80 Polar Diagram
(Chart data generated using 2000 IMS Velocity Prediction Program )
True WindSpeeds (kts.)
180165
10
16
20
14
12
6
8
Status: One Design ConfigurationBoat: J/80
Boat Speed
4
(kts.) 6
True Wind 8
105
150
135
120
60
30
45
Angle (deg.)True Wind
90
75
J/80 Owner Guide 12
Copyright J/Boats, Inc., 2000
J/80 Construction
The J/80 is built by TPI Composites, Inc. in Warren, Rhode Island. TPI is America's most qualified and advanced builder in fiberglass yacht construction. TPI's extensive staff of craftsmen, engineers, production specialists and quality inspectors ensure that each yacht is carefully built and thoroughly inspected. TPI is further distinguished by the development of the patented "SCRIMP" resin infusion molding technique and industry leading 10 year hull warranty against blistering.
Construction Materials The techniques developed for constructing the J/80 are the most advanced in the marine industry. Patented SCRIMP molding technique insures the best quality laminate for the hull and deck. A recent development with this technology allows the structural floor grid to be infused directly with the hull. This eliminates all secondary bonds with floor stringers to ensure the strongest possible structural pattern. The finely engineered laminate is tailored to suit structural requirements without unnecessary duplication.
TPI utilizes only the highest quality construction materials, which undergo constant testing at their laboratory to ensure they meet stringent construction specifications
Gelcoat: The J/80 moldings use a neo pentyl glycol (NPG) isophthalic gelcoat. NPG ISO gelcoats yield a dense frequently branched molecular network which inhibits migration of water molecules. Because of the structure, these gelcoats offer superior resistance to moisture penetration, blistering, and fading. The product is formulated to "yield" more than other gelcoats and provides more "flexibility" to improve cracking resistance. Testing also indicates that NPG ISO GELCOATS produce the highest gloss and the best color retention under harsh exposure.
Glass Fabrics: Unidirectional, bi-axial, and tri-axial fibers are used throughout the J/80 hull and deck. This offers superior strength and stiffness to conventional cloth and woven roving laminates. These unidirectional fibers are oriented in the laminate structures along lines of stress for optimized hull/deck strength and stiffness.
Resins: Resins are chemically formulated to TPI's exacting specifications to incorporate the best balance of properties based on extensive testing. For the hull, a special vinylester resin is used as a barrier coat behind the gelcoat to prevent moisture penetration. The combination of this vinylester resin with NPG ISO gelcoats and properly specified glass fibers yields the most blister resistant hull in the industry. The J/80 hull has a 10 year owner transferable warranty against blistering.
Hull/Deck Sandwich Construction TPI utilizes Baltek balsa-cored fiberglass construction in the J/80 hull and deck to produce a lighter, stronger and faster yacht. Cored fiberglass is superior to single skin fiberglass construction because, for the same strength, a balsa cored structure can be as much as 60 percent lighter. Of all synthetic foam and natural core material available, end grain balsa is the toughest against fatigue, and rates highest in sheer strength as well as impact and puncture resistance. As repeatedly proven in recent Whitbread Round-the-World races, balsa is
J/80 Owner Guide 13
Copyright J/Boats, Inc., 2000
the only core material that can withstand repetitive pounding in ocean going conditions.
Production Control Great care is taken in producing quality laminated structures. TPI regularly conducts ultrasonic inspections of hulls and decks to measure laminate thickness. Weights and specifications of resins, glass, wood, balsa, are checked on a regular basis prior to being accepted from a vendor for use. Resin burn-off tests are run randomly to check on the ratio of resin to glass.........the only exact method to determine this balance. Barcol hardness testers are used to check the relative cure of both resins and gelcoats. Gelcoat application is carefully controlled and monitored to ensure the proper coating thickness, crucial for blister resistance.
Structure: At the center of the J/80 structural design is the main bulkhead. This anchors the shroud chainplates and attaches directly to the mast bearing beam and keel support grid. The construction of this bulkhead is similar to the hull, except that the bulkhead is solid fiberglass in areas where the chainplates are attached. All structural keel frames are infused simultaneously with the hull. Bulkheads are bonded to the hull using non-woven biaxial glass fabrics and high strength adhesives. This provides a strong bond between the hull, deck, and bulkheads, keeping the yacht "quieter" over time.
ABS Approved TPI Hull/Deck Joint: The extremely strong and watertight hull-to-deck joint is created by chemically bonding the hull/deck flange overlap with 3M 5200 and Plexus adhesive. This yields a bond that is proven superior in strength to a conventional bolted joint with 3M 5200, with less opportunity for leaks, and less weight on deck. Essential hardware elements along the deck edge are bolted through this joint and sealed with Sikaflex bedding compound. Each flange (hull & deck) is supported with extra glass laminates and designed to withstand high local area stresses from stanchions, rails, & blocks.
Keel: The J/80 keel is 1,400 lbs, draws 4.9' feet and is manufactured to designer specified templates and molds. The keel is made of cast lead reinforced with 4% antimony with high-strength stainless bolts cast into the lead. The molded keel stub area of the J/80 hull uses multi-layered fiberglass laminates to withstand the high local loads induced by the keel. Heavy duty fiberglass keel stringers are infused into the stub in the hull molding process. The lead keel is seated in epoxy and thru-bolted to the stub and then spray coated with a minimum of four coats of specially formulated epoxy primer.
Hardware: The J/80 deck is designed to allow simple short-handed operation cockpit. The power ratio, safe working load, and breaking strength of each piece of hardware are carefully reviewed in the design process to ensure efficiency, durability, and light weight. Only the highest quality hardware manufacturers are chosen for each application. The fastenings are specified for longevity and ease of maintenance. All deck hardware is bedded with Sikaflex bedding compound with additional laminate reinforcements incorporated where necessary to ensure reliable fastening.
J/80 Owner Guide 14
Copyright J/Boats, Inc., 2000
Stanchions, chainplates and other above deck stainless fittings are custom made and specified by TPI’s engineers.
Spars and Rigging: J/80 spars and rigging are designed for efficiency and performance by Hall Spars. The standard double spreader aluminum mast and boom are painted off-white. Standing rigging is stainless wire with Navtec turnbuckles. The running rigging package is specified to minimize weight and maintain durability.
J/80 Owner Guide 15
Copyright J/Boats, Inc., 2000
Safety
Lightning Protection The J/80 is completely grounded in accordance with industry practice. The mast, shroud chainplates, stemhead fitting, backstay fitting and pulpits are grounded to the keel. In spite of this grounding, there can be no assurance that personnel or the boat will not suffer injury if the boat is hit by lightning. The following are suggestions only and in no way guarantee safety in the event of a lightning strike.
• If possible, remain inside a closed boat during a lightning storm. Do not contact any metallic objects inside or outside the boat.
• Avoid contact with any items connected to the lightning conductive system (mast, shrouds, etc) and especially in a manner to act as a bridge between them (mast to shroud, etc).
• Avoid swimming during a lightning storm.
• If the boat is mildly struck by lightning, check all compasses and electrical gear to determine that no damage or change in calibration has taken place.
Safety Equipment You can never be prepared enough for emergencies which may arise at sea. Please contact your local U.S. Coast Guard office for up to date USCG safety requirements.
IT IS THE OWNER’S RESPONSIBILITY TO COMPLY WITH ALL FEDERAL AND STATE REGULATIONS WITH RESPECT TO SAFETY EQUIPMENT; OPERATION OF THEIR VESSEL; AND SAFETY OF ALL PASSENGERS
J/80 Owner Guide 16
Copyright J/Boats, Inc., 2000
Maintenance Tips Even though modern construction has helped reduce upkeep, regular attention should be given to the maintenance of your boat. This includes the fiberglass exterior and interior surfaces, and the hardware and rigging..
A well maintained boat will not only bring you years of enjoyment, but most importantly, will bring you greater personal pride and joy.
Fiberglass/Gelcoat Apply a marine wax at least twice annually to preserve the “factory fresh” appearance for many years. Be sure fiberglass surfaces are clean and free of salt before waxing. Abrasive cleansers should never be used for general cleaning as they can severely mar the shiny gelcoat finish. On areas difficult to wax, like nonskid, a coating such as “Armor All” will restore its original luster.
Bottom Paint Keeping your bottom clean is of paramount importance as it not only keeps off bottom growth, but maintains passage-making speed. Even though you may have applied anti-fouling paint, take a swim every two weeks to scrub the bottom with a sponge pad.
Deck Hardware/Running Rigging Wash deck hardware frequently with fresh water to remove accumulated salt and grime. Wash down the jib sheets, spinnaker sheets, and other lines in fresh water. Check for chafe and turn sheets end-for-end once a year to more equally distribute wear.
Check the blocks and also wash them with fresh water. Most ball-bearing blocks need only hot water to cleanse them, then spray with a dry teflon lubricant. On conventional sheave/pin blocks, wash off, disassemble, clean, rub a light waterproof lubricant on the center pin, then reassemble.
Furthermore, check and lubricate the sheaves and blocks on the mast. Also, ensure the turnbuckles are clean and well lubricated. Without proper care they can “freeze up” and not turn.
In general, it is handy to keep a spray can of a light lubricant, such as TRIFLON, in your tool kit for frequent squirts of blocks, shackles, mainsheet travelers, and other moving fittings.
Winches
J/80 Owner Guide 17
Copyright J/Boats, Inc., 2000
Read the manufacturer’s manuals on winch repair and maintenance. Winches are fine pieces of machinery which take little effort to maintain. However, all too frequently, they suffer neglect because no one can see how much they wear down or get dirty.
Clean And Lubricate Them! It takes little time to disassemble and put back together. Note that the gears and bearings are lubricated with special winch grease and pawls. Pawl springs need only a light oil. Keep spare pawls and springs in a kit for replacement.
Deck Hatches Hatches need lubrication of their hinges with a silicone grease once a year. Also check the seals to see they are not unduly cracked, or are losing their ability to seal correctly. To increase traction on the plastic hatch covers, apply a non-skid tape fore and aft.
Cabin Ports The ports are made of acrylic and are highly impact resistant. However, avoid highly abrasive cleansers which can scratch them. Instead, use mild soap and water to clean ports. Avoid chemical solvents, notably acetone, which can “melt” the ports...ie. smear its smooth finish.
Stainless Hardware like stanchions, bow/stern pulpits, chainplates can be treated with Never-dull or other light abrasive cleansers, even toothpaste works well. After applying cleanser, polish to a gleam with a clean cotton rag.
Fiberglass/Gelcoat/Formica Interior gelcoat surfaces should be cleaned periodically with non-abrasive cleansers and smooth areas should be waxed. Formica should be cleaned with non-abrasive cleaners.
Bilges Bilges are painted with airdry gelcoat to prevent water permeation and accumulation of mildew. They should be washed regularly with strong solvents to keep them smelling clean and to prevent the fouling of bilge pumps.
J/80 Owner Guide 18
Copyright J/Boats, Inc., 2000
Annual Maintenance Checklist
Running Rigging ___ Check running rigging lines for wear at splice, turning blocks, etc.
___ Inspect blocks and shackles for wear. Clean and lubricate or replace as necessary.
Mechanical Systems ___ Remove your outboard and store at home
Keel ___ Check keel bolt nuts for tightness*
*Do not arbitrarily tighten bolts unless you’ve experienced a severe grounding. If there is concern for leakage, consult your dealer or professional yard.
J/80 Owner Guide 19
Copyright J/Boats, Inc., 2000
Storage Tips Many of the maintenance problems surrounding boats can be pinpointed during the end-of-season haul-out. This is the time when a careful inspection will reveal the ravages of a long summer. If you live in colder climates, it is also the time to prepare the boat for what might be an even more brutal winter ashore.
First, clean your boat as thoroughly as possible. Get the yard to use a high-powered hose to clean off most of the growth before it dries onto the bottom paint.
Rigging- Sails and lines should be removed at the end of each season, rinsed thoroughly in fresh water and stored in a warm, dry place. This will prolong their useful life as mildew can affect even today’s synthetic materials.
Engine- Check the engine owner’s manual for maintenance guidance during the season and for the specific winterizing tips
Battery- It is preferable to remove the battery and store in a heated area, recharging periodically to maintain full charge status. If you are in warmer climates, it is possible to leave the battery aboard. Simply check it once a month to ensure it remains charged.
Bilges- Pump bilges completely dry and use a strong cleaning solvent to eliminate odors and bacteria.
Electronics- Remove as many as possible to avoid condensation caused by the extreme rise and fall of temperature and humidity that come with winter.
Interior & Ventilation- Clean the cabin thoroughly with a damp rag, for any salt left behind will breed mildew. Any paper items- books, notepads- should be taken off so they don’t mildew and rot. If a winter cover is used, it is good to leave the hatches cracked open to enhance air circulation. This helps prevent mildew. Also, remove boat cushions and store indoors.
Exterior- If storing outdoors, a winter cover is recommended. It can be a simple piece of canvas forming a tent over the entire boat or heat-shrunk plastic. In either case, a tent-like support structure is necessary to prevent pools of water and to assure proper air circulation. Ensure the entire deck is covered to prevent uneven discoloration of the gelcoat.
Cradle- It is critical the boat is adequately supported. The keel must rest solidly on the main beam and the vertical risers merely stabilize the boat. If it appears the boat is supported too much by the vertical risers, correct the problem as it could structurally damage the hull.
Mast Storage- Store masts on well padded supports and do not place any weights on them. Avoid tape on the mast surface as it leaves a difficult to remove residue. Wash all surfaces, sheaves, standing rigging with fresh water. If possible, remove all standing rigging, halyards and mast instruments and store indoors.
J/80 Owner Guide 20
Copyright J/Boats, Inc., 2000
8:1 Boom Vang System *The Hall Quik-Vang is optional on the J/80 and is shipped with all necessary hardware. If you have ordered this option, the description below will not apply to your
• Nicopressed wires, short length attaches to lower padeye on mast, long length to upper padeye using (2) shackles listed below.
• Harken #304 Wire Block, attaches to boom vang bale with twist shackle. (shackle provided with the #304 block should be replaced with twist shackle).
• Harken #053 Little Fiddle Block, “floating” mount on end of long wire. • Harken #060 Little Fiddle w/Hexaratchet and Cam cleat, “floating” mount
on the end of short wire. • (2) Stainless Steel Shackles, to attach wires to mast. • Stainless Steel Twist Shackle, to attach #304 block to J/80 boom bale.
#098 blocks as shown. • Harken #166 Swivel Bullet Block, mounts to
padeye on aft face of cockpit. **Lead Backstay adjuster line as shown
J/80 Owner Guide 23
Copyright J/Boats, Inc., 2000
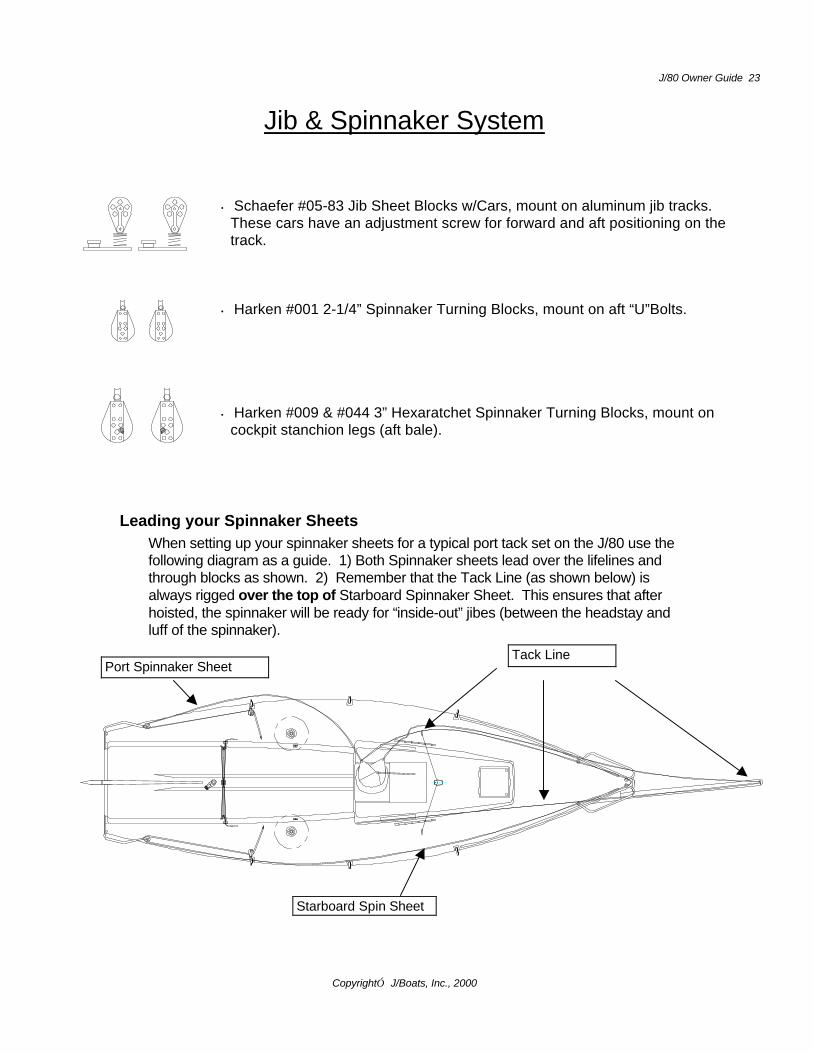
Jib & Spinnaker System
Leading your Spinnaker Sheets When setting up your spinnaker sheets for a typical port tack set on the J/80 use the following diagram as a guide. 1) Both Spinnaker sheets lead over the lifelines and through blocks as shown. 2) Remember that the Tack Line (as shown below) is always rigged over the top of Starboard Spinnaker Sheet. This ensures that after hoisted, the spinnaker will be ready for “inside-out” jibes (between the headstay and luff of the spinnaker).
• Schaefer #05-83 Jib Sheet Blocks w/Cars, mount on aluminum jib tracks. These cars have an adjustment screw for forward and aft positioning on the track.
• Harken #001 2-1/4” Spinnaker Turning Blocks, mount on aft “U”Bolts. • Harken #009 & #044 3” Hexaratchet Spinnaker Turning Blocks, mount on