36
| Date post: | 16-Apr-2017 |
| Category: |
Software |
| Upload: | nayanda-haberty |
| View: | 153 times |
| Download: | 0 times |
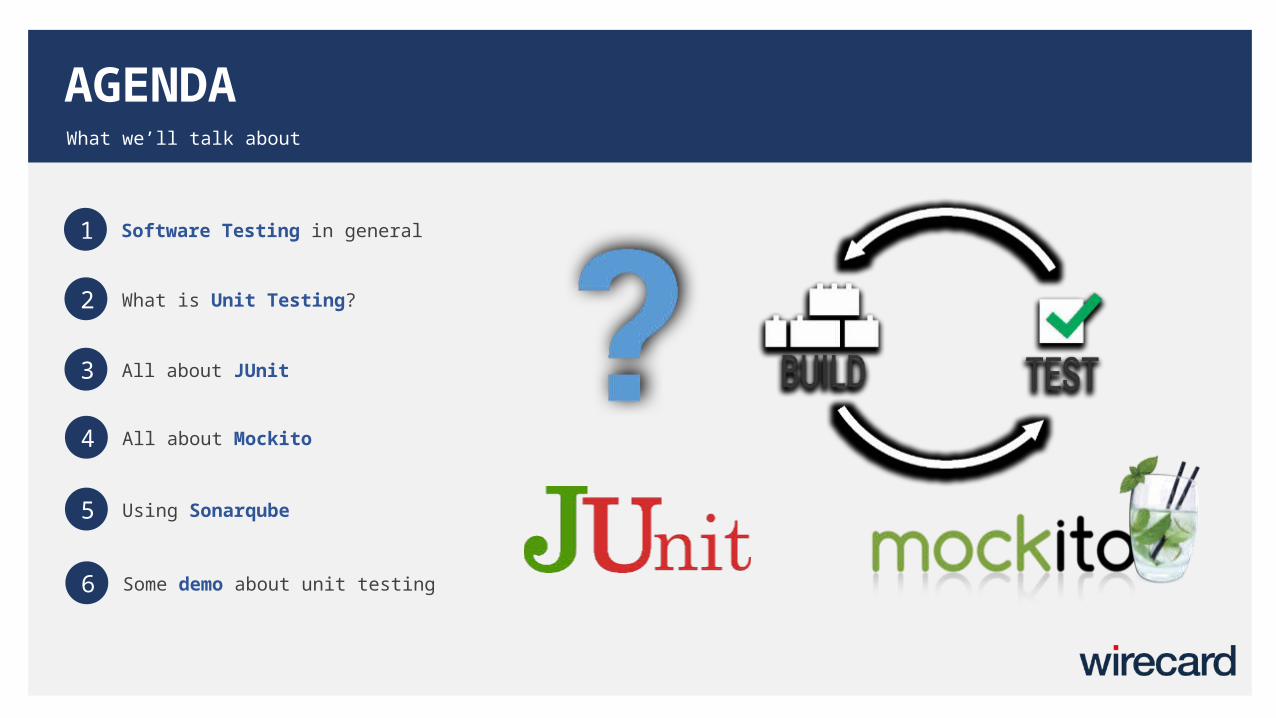
AGENDAWhat we’ll talk about
1 Software Testing in general
2 What is Unit Testing?
3 All about JUnit
4 All about Mockito
5 Using Sonarqube
6 Some demo about unit testing
SOFTWARE TESTING DEFINITION
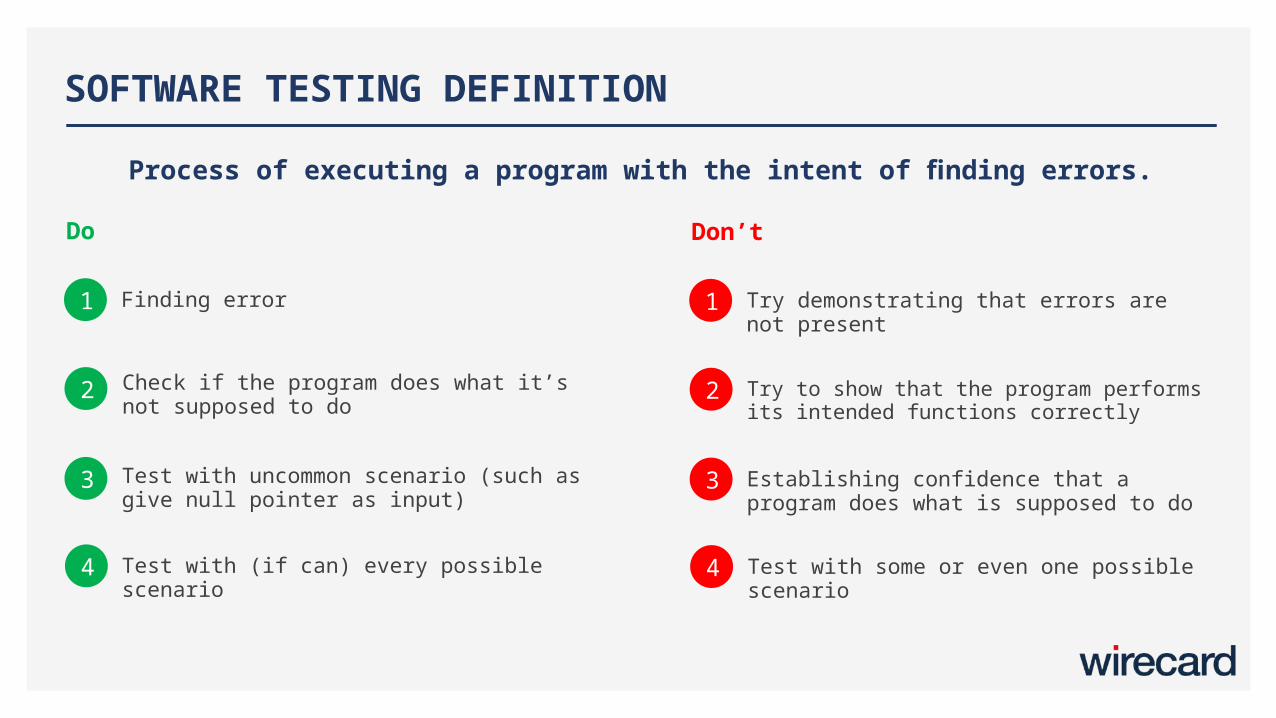
1 Finding error
2
Test with uncommon scenario (such as give null pointer as input)
3
Test with (if can) every possible scenario4
Check if the program does what it’s not supposed to do
Do
1 Try demonstrating that errors are not present
2 Try to show that the program performs its intended functions correctly
3 Establishing confidence that a program does what is supposed to do
4 Test with some or even one possible scenario
Don’t
Process of executing a program with the intent of finding errors.
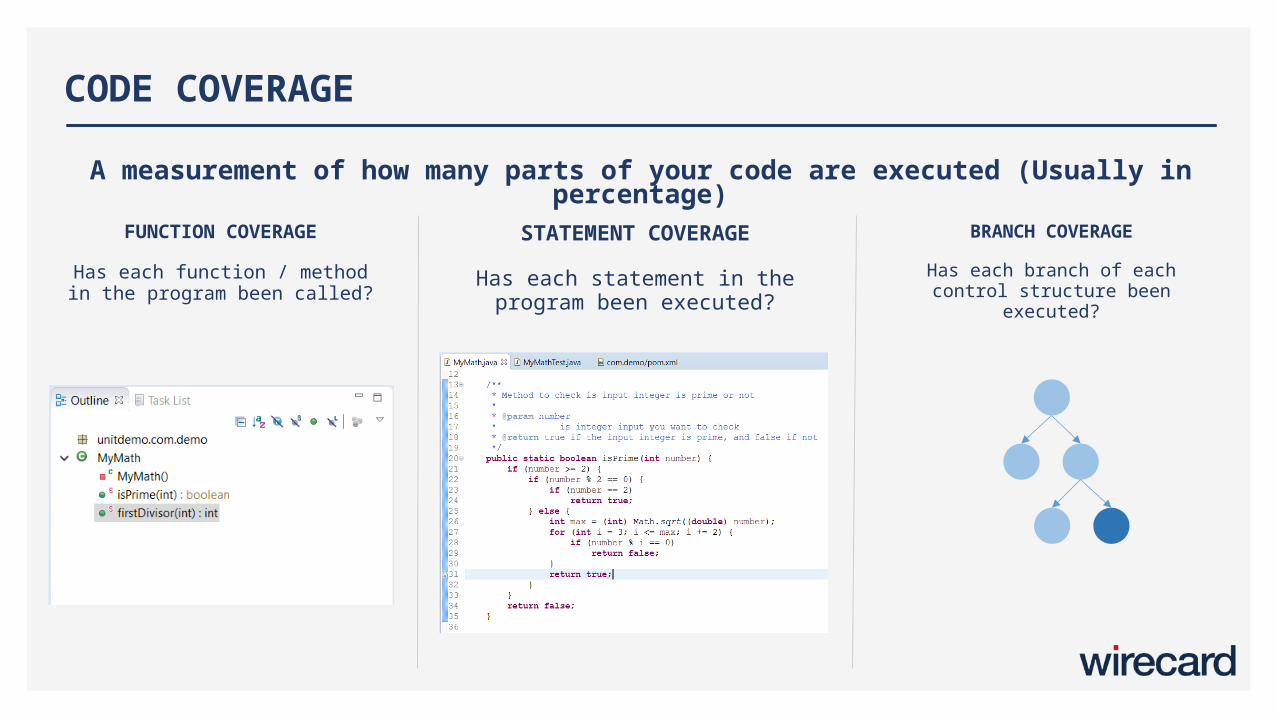
CODE COVERAGE
FUNCTION COVERAGE
Has each function / method in the program been called?
STATEMENT COVERAGE
Has each statement in the program been executed?
BRANCH COVERAGE
Has each branch of each control structure been executed?
A measurement of how many parts of your code are executed (Usually in percentage)
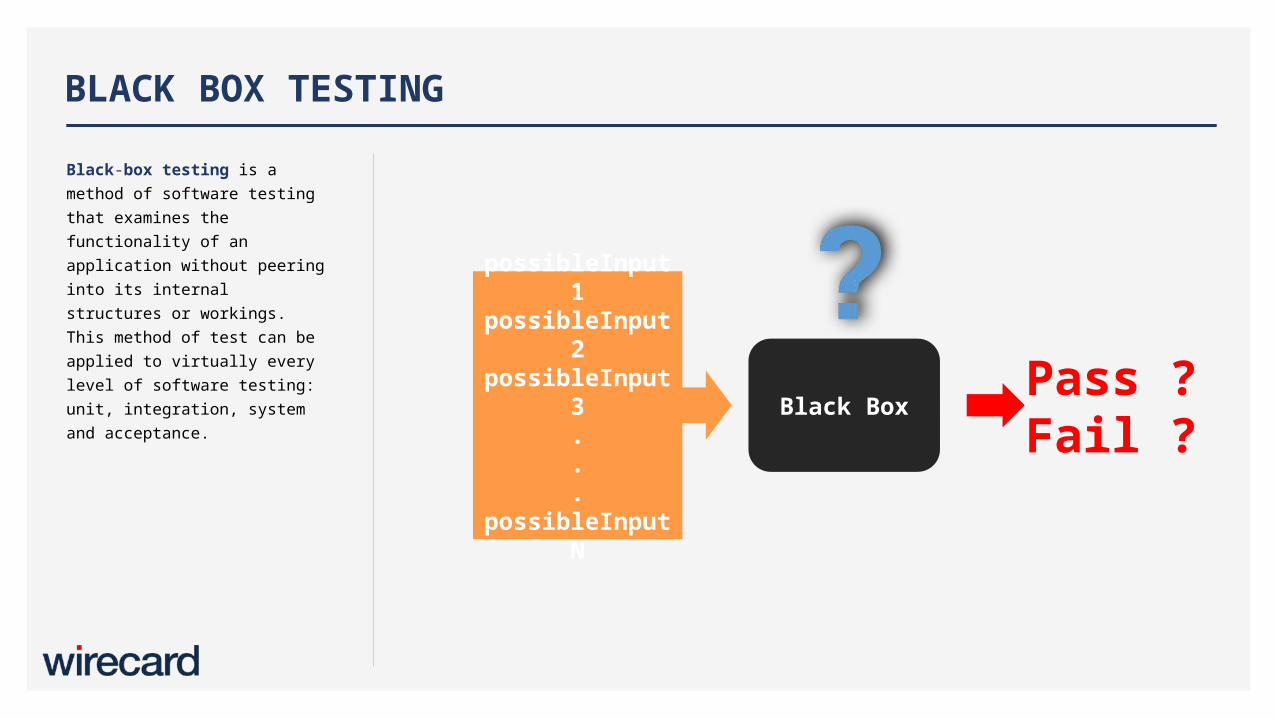
Black-box testing is a method of software testing that examines the functionality of an application without peering into its internal structures or workings. This method of test can be applied to virtually every level of software testing: unit, integration, system and acceptance.
BLACK BOX TESTING
Black Box
possibleInput1
possibleInput2
possibleInput3...
possibleInputN
Pass ?Fail ?
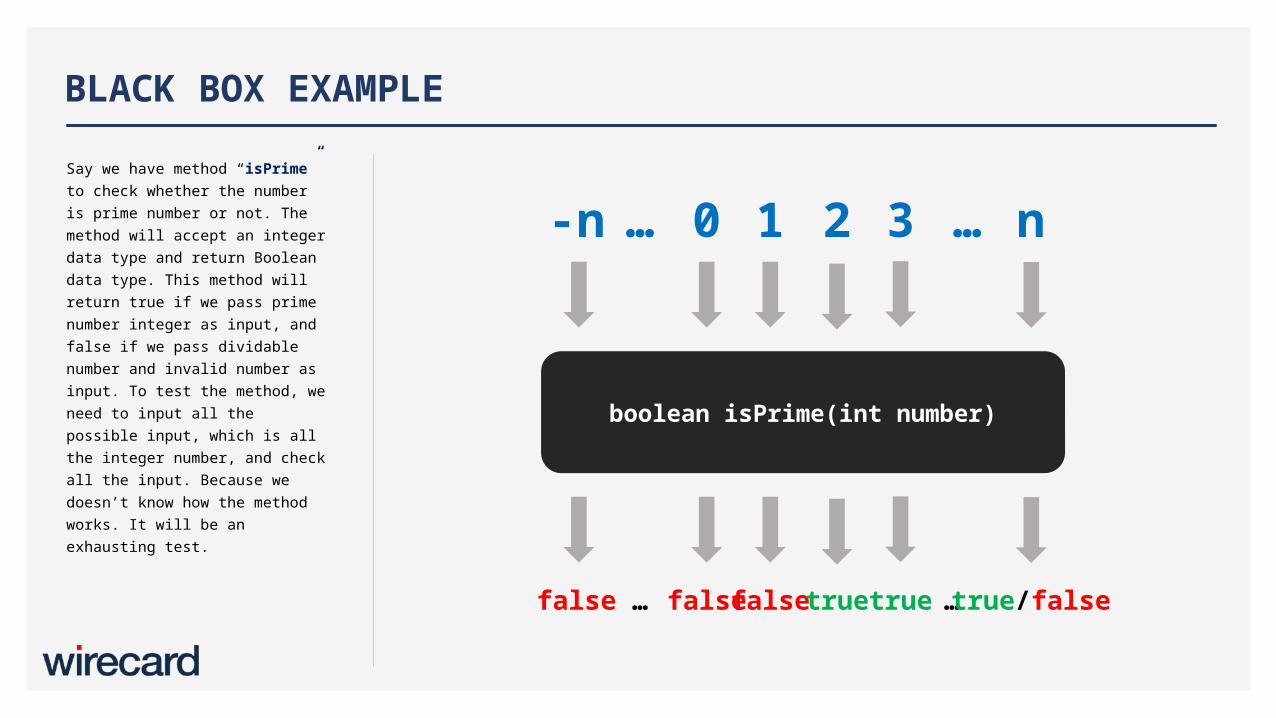
Say we have method “isPrime” to check whether the number is prime number or not. The method will accept an integer data type and return Boolean data type. This method will return true if we pass prime number integer as input, and false if we pass dividable number and invalid number as input. To test the method, we need to input all the possible input, which is all the integer number, and check all the input. Because we doesn’t know how the method works. It will be an exhausting test.
BLACK BOX EXAMPLE
boolean isPrime(int number)
-n … 0 1 2 3 … n
false … falsefalsetruetrue …true/false
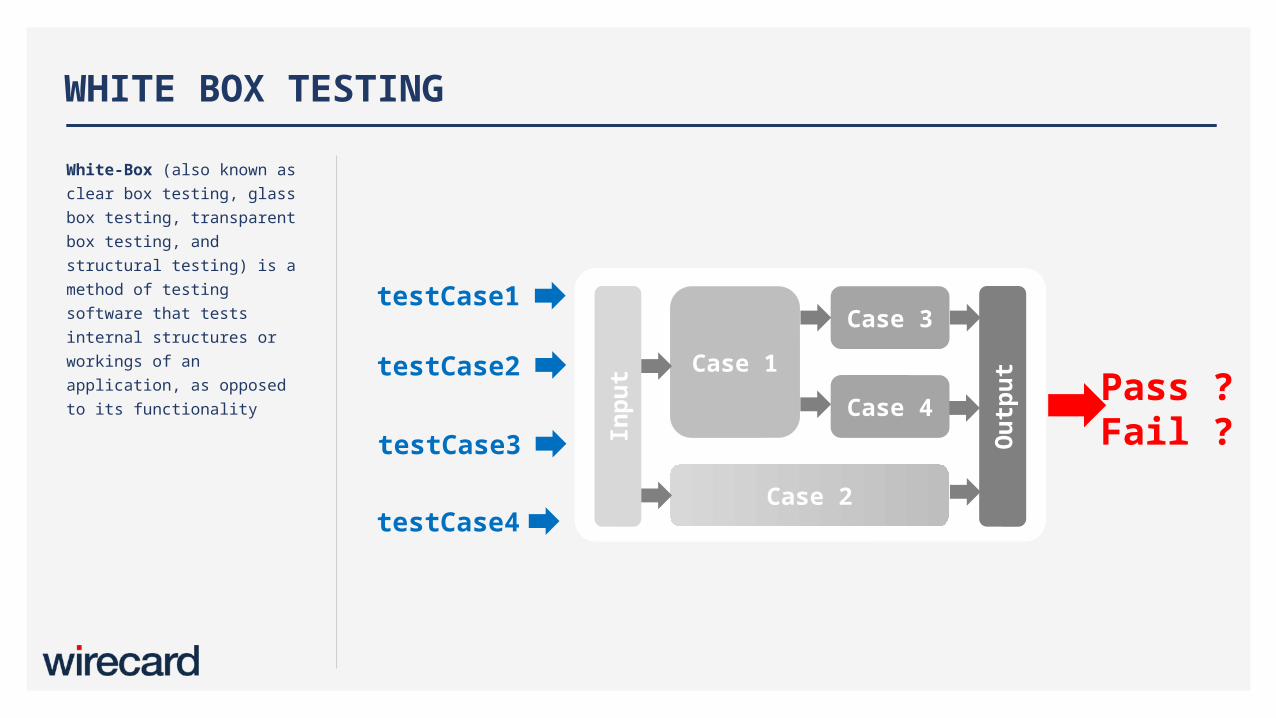
White-Box (also known as clear box testing, glass box testing, transparent box testing, and structural testing) is a method of testing software that tests internal structures or workings of an application, as opposed to its functionality
WHITE BOX TESTING
Pass ?Fail ?
Case 3
Case 4
Case 2
Case 1
Inpu
t
Out
put
testCase1
testCase2
testCase3
testCase4
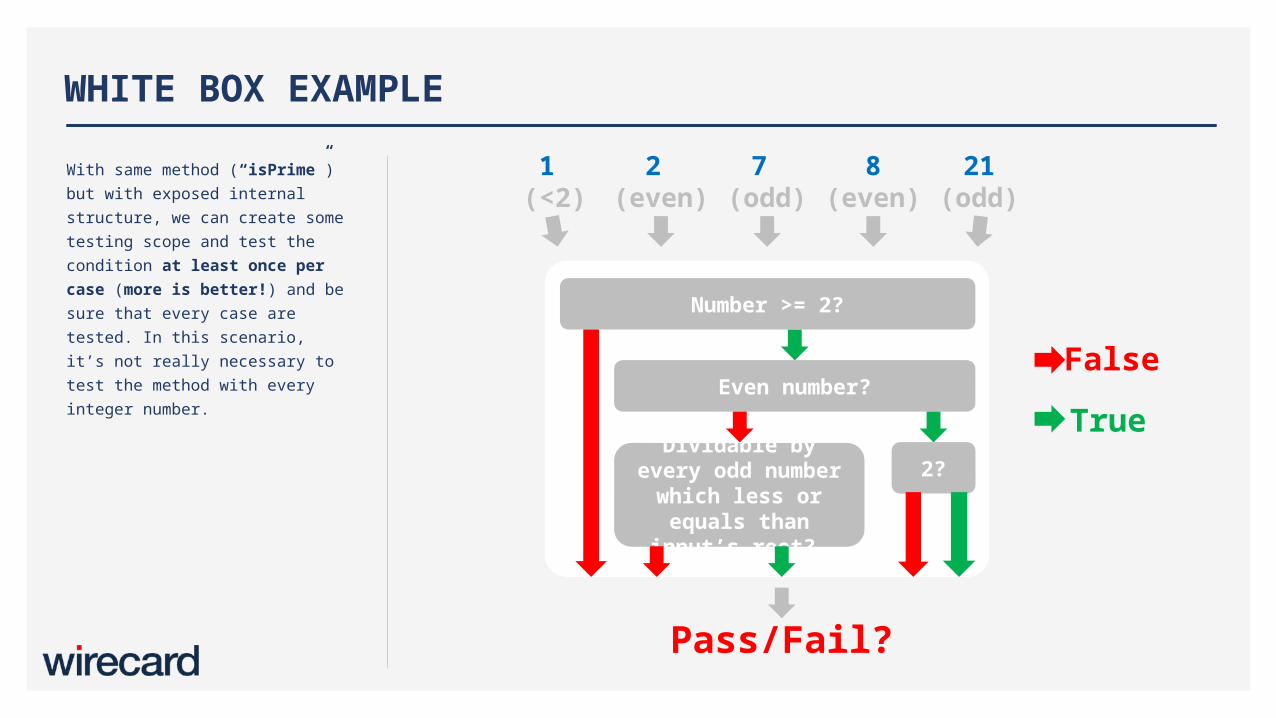
With same method (“isPrime”) but with exposed internal structure, we can create some testing scope and test the condition at least once per case (more is better!) and be sure that every case are tested. In this scenario, it’s not really necessary to test the method with every integer number.
WHITE BOX EXAMPLE
Number >= 2?
Even number?
2?Dividable by
every odd number which less or equals than
input’s root?
Pass/Fail?
1 (<2)
2 (even)
7 (odd)
8(even)
FalseTrue
21(odd)

Unit testing is a software development process in which the smallest testable parts of an application, called units, are individually and independently scrutinized for proper operation. Unit testing is often automated but it can also be done manually.
The goal of unit testing is to isolate each part of the program and show that the individual parts are correct.
WHAT IS UNIT TESTING ?
User Acceptance
TestSystem
Integration Test
Unit TestEx
ecut
ion
Tim
e
Number of Test
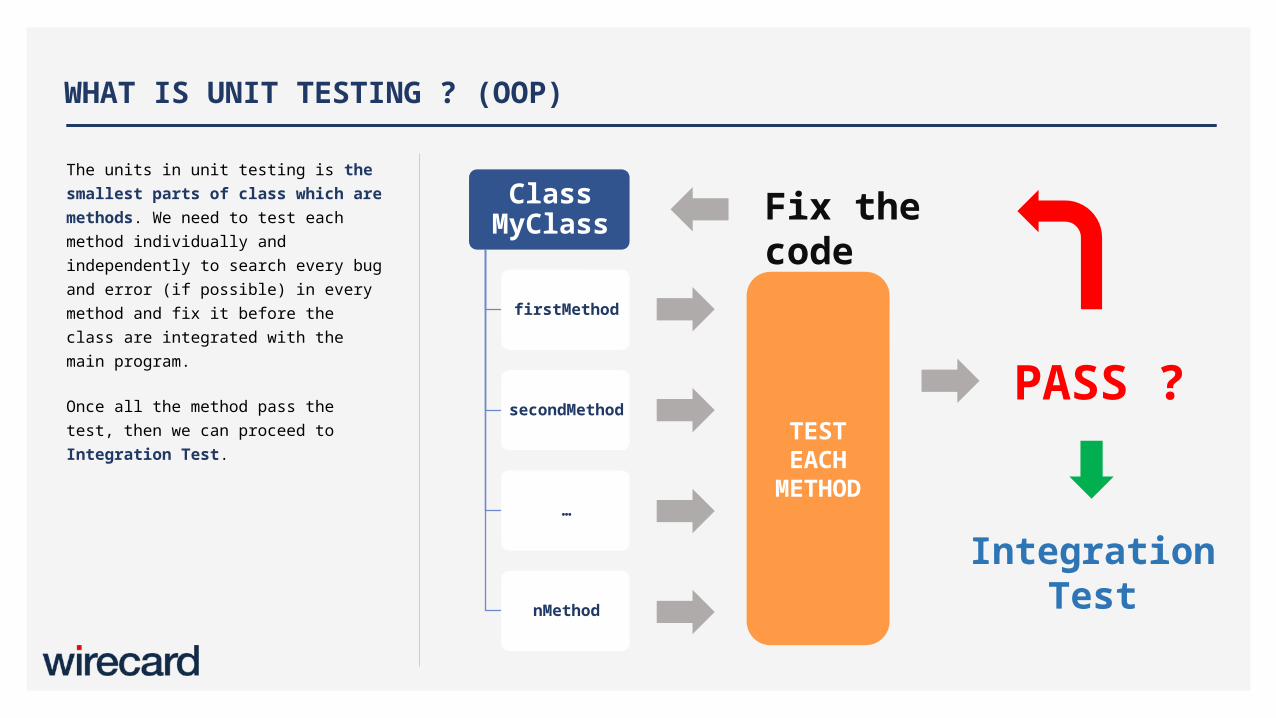
The units in unit testing is the smallest parts of class which are methods. We need to test each method individually and independently to search every bug and error (if possible) in every method and fix it before the class are integrated with the main program.
Once all the method pass the test, then we can proceed to Integration Test.
WHAT IS UNIT TESTING ? (OOP)
Class MyClass
firstMethod
secondMethod
…
nMethod
TEST EACH
METHOD
PASS ?
Fix the code
Integration Test
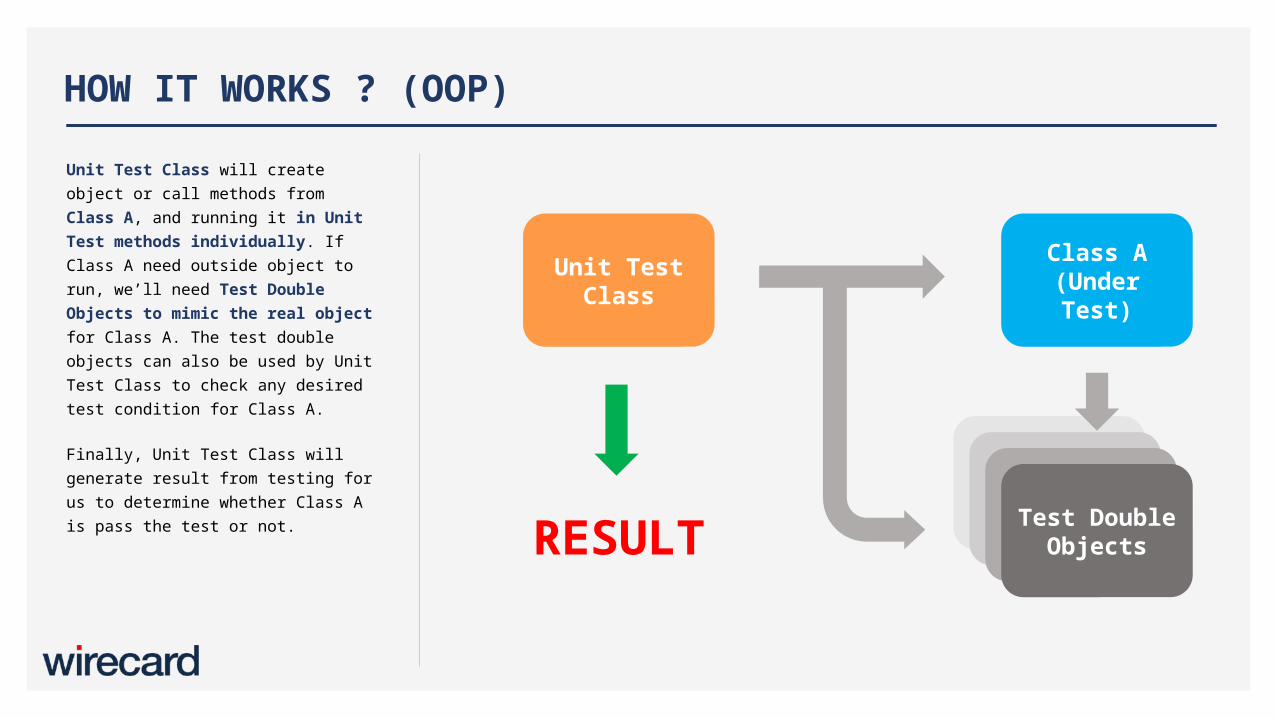
Unit Test Class will create object or call methods from Class A, and running it in Unit Test methods individually. If Class A need outside object to run, we’ll need Test Double Objects to mimic the real object for Class A. The test double objects can also be used by Unit Test Class to check any desired test condition for Class A.
Finally, Unit Test Class will generate result from testing for us to determine whether Class A is pass the test or not.
HOW IT WORKS ? (OOP)
Unit Test Class
Class A (Under Test)
Fake ObjectsFake ObjectsFake ObjectsTest Double ObjectsRESULT
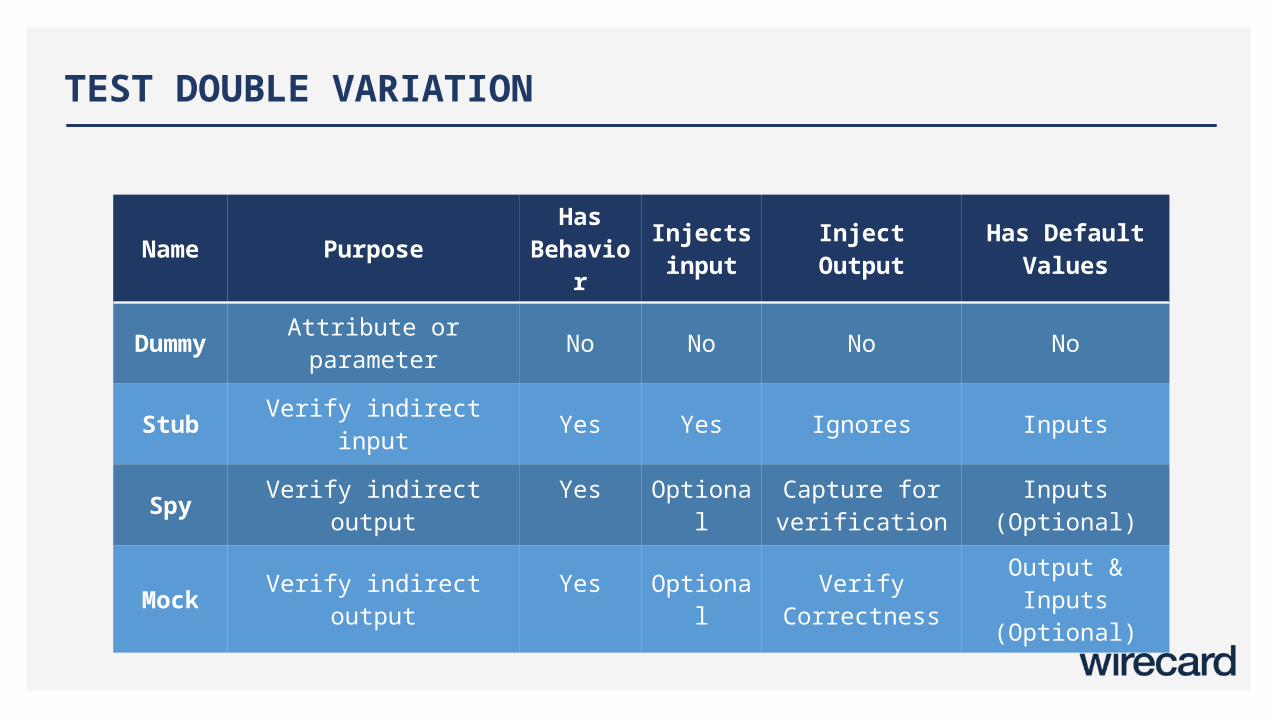
TEST DOUBLE VARIATION
Name PurposeHas
Behavior
Injects input Inject Output Has Default
Values
Dummy Attribute or parameter No No No No
Stub Verify indirect input Yes Yes Ignores Inputs
Spy Verify indirect output Yes Optional
Capture for verification
Inputs (Optional)
Mock Verify indirect output Yes Optional
Verify Correctness
Output & Inputs
(Optional)
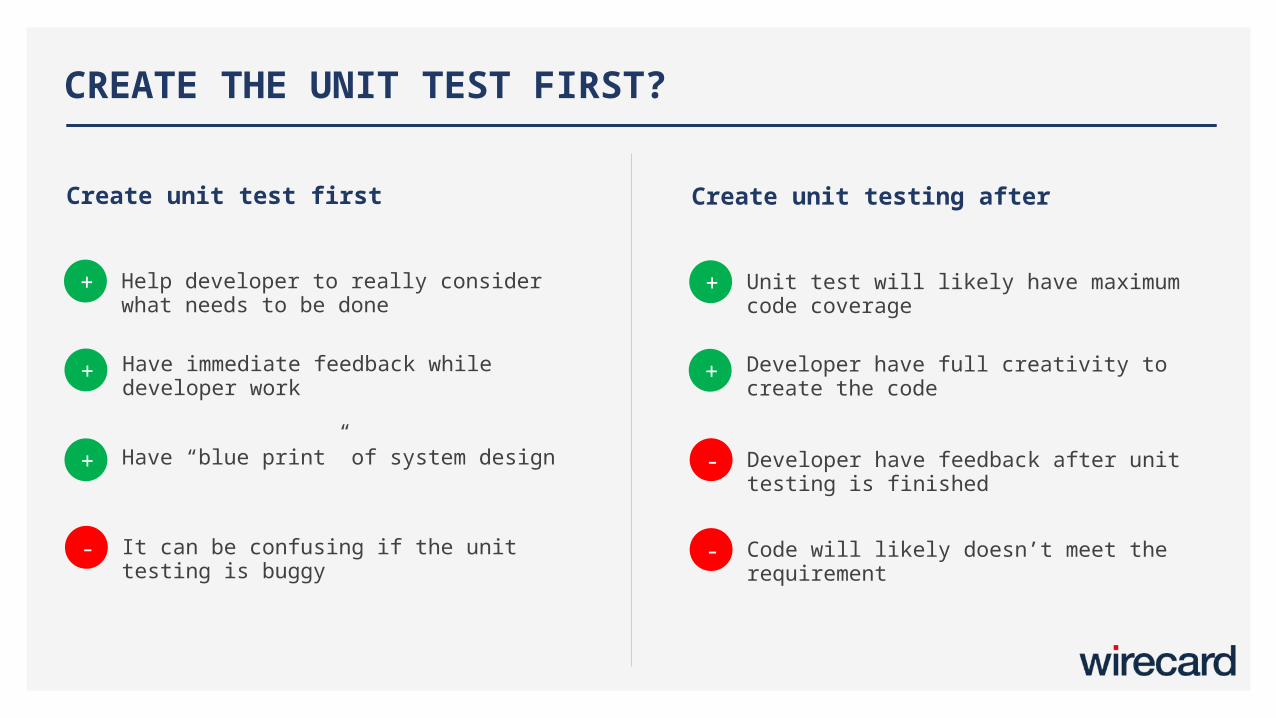
CREATE THE UNIT TEST FIRST?
+ Help developer to really consider what needs to be done
+
Have “blue print” of system design+
It can be confusing if the unit testing is buggy
-
Have immediate feedback while developer work
Create unit test first
+ Unit test will likely have maximum code coverage
- Developer have feedback after unit testing is finished
- Code will likely doesn’t meet the requirement
Create unit testing after
+ Developer have full creativity to create the code

1 Find the problems early
2 Facilitates changes
3 Simplifies Integration
4 Documentation
THE BENEFITS (AND THE CONS) OF UNIT TESTING
The Pros (+)
1 Time consuming
2 Does not show absence of errors
3 Cannot be run in actual deployment environment
4 Test code is likely to be buggy
The Cons (-)
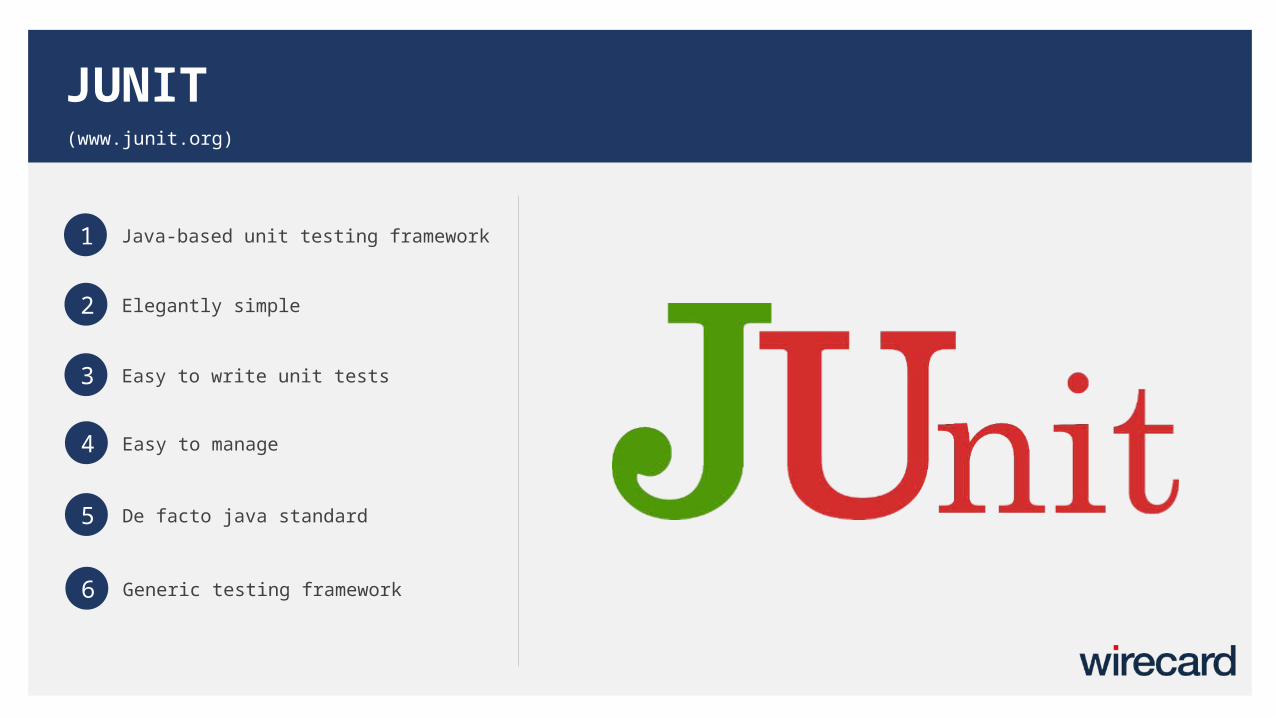
JUNIT(www.junit.org)
1 Java-based unit testing framework
2 Elegantly simple
3 Easy to write unit tests
4 Easy to manage
5 De facto java standard
6 Generic testing framework
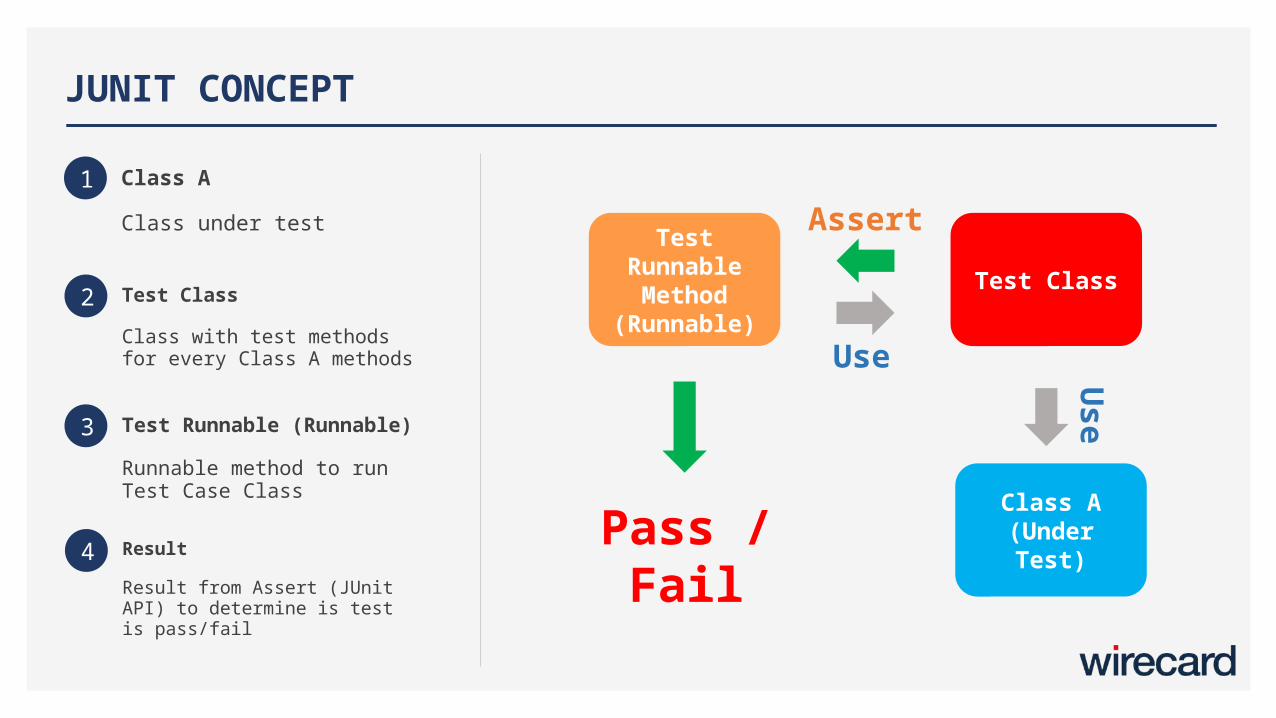
JUNIT CONCEPT
Test Runnable Method
(Runnable)Test Class
Class A (Under Test)
Pass / Fail
Use
Use
Assert1 Class A
Class under test
2 Test Class
Class with test methods for every Class A methods
3 Test Runnable (Runnable)
Runnable method to run Test Case Class
4 Result
Result from Assert (JUnit API) to determine is test is pass/fail
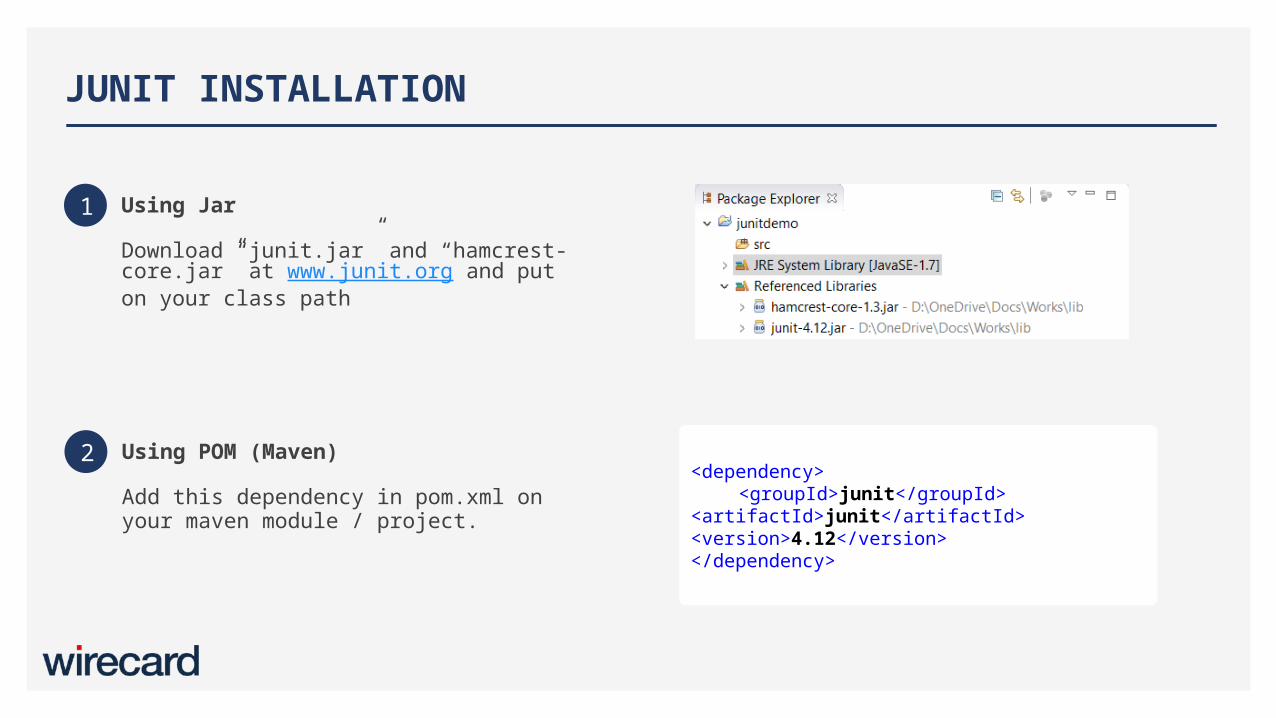
JUNIT INSTALLATION
1 Using Jar
Download “junit.jar” and “hamcrest-core.jar” at www.junit.org and put on your class path
2 Using POM (Maven)
Add this dependency in pom.xml on your maven module / project.
<dependency> <groupId>junit</groupId>
<artifactId>junit</artifactId> <version>4.12</version> </dependency>
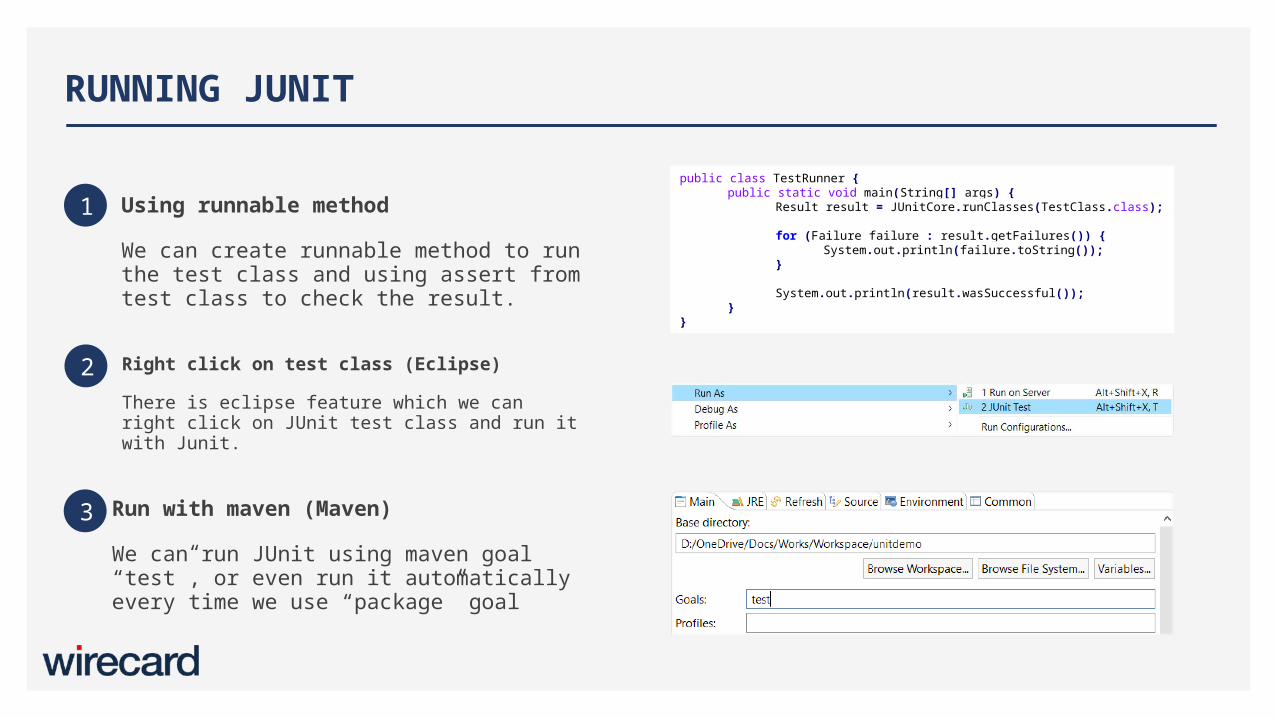
RUNNING JUNIT
1 Using runnable method
We can create runnable method to run the test class and using assert from test class to check the result.
2 Right click on test class (Eclipse)
There is eclipse feature which we can right click on JUnit test class and run it with Junit.
Run with maven (Maven)
We can run JUnit using maven goal “test”, or even run it automatically every time we use “package” goal
3
public class TestRunner {public static void main(String[] args) {
Result result = JUnitCore.runClasses(TestClass.class);
for (Failure failure : result.getFailures()) {
System.out.println(failure.toString());}
System.out.println(result.wasSuccessful());}
}
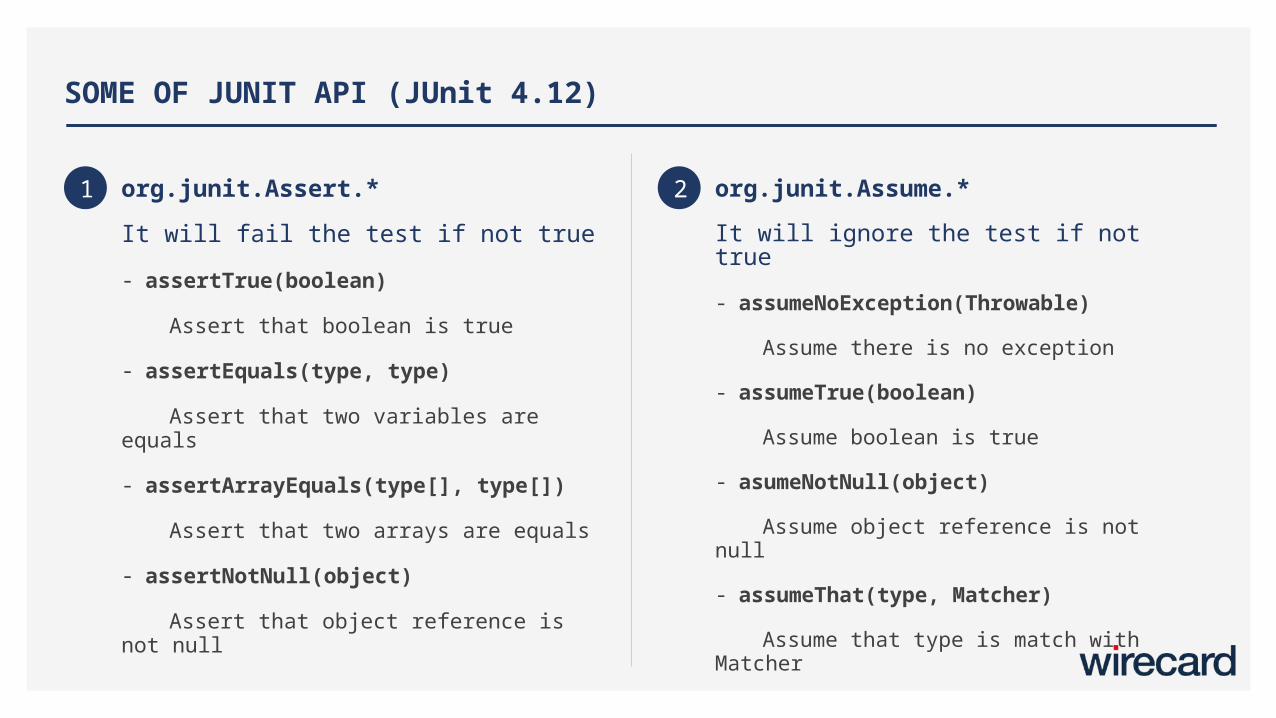
SOME OF JUNIT API (JUnit 4.12)
1 org.junit.Assert.*It will fail the test if not true- assertTrue(boolean)
Assert that boolean is true- assertEquals(type, type)
Assert that two variables are equals- assertArrayEquals(type[], type[])
Assert that two arrays are equals- assertNotNull(object)
Assert that object reference is not null
2 org.junit.Assume.*It will ignore the test if not true- assumeNoException(Throwable)
Assume there is no exception- assumeTrue(boolean)
Assume boolean is true- asumeNotNull(object)
Assume object reference is not null- assumeThat(type, Matcher)
Assume that type is match with Matcher
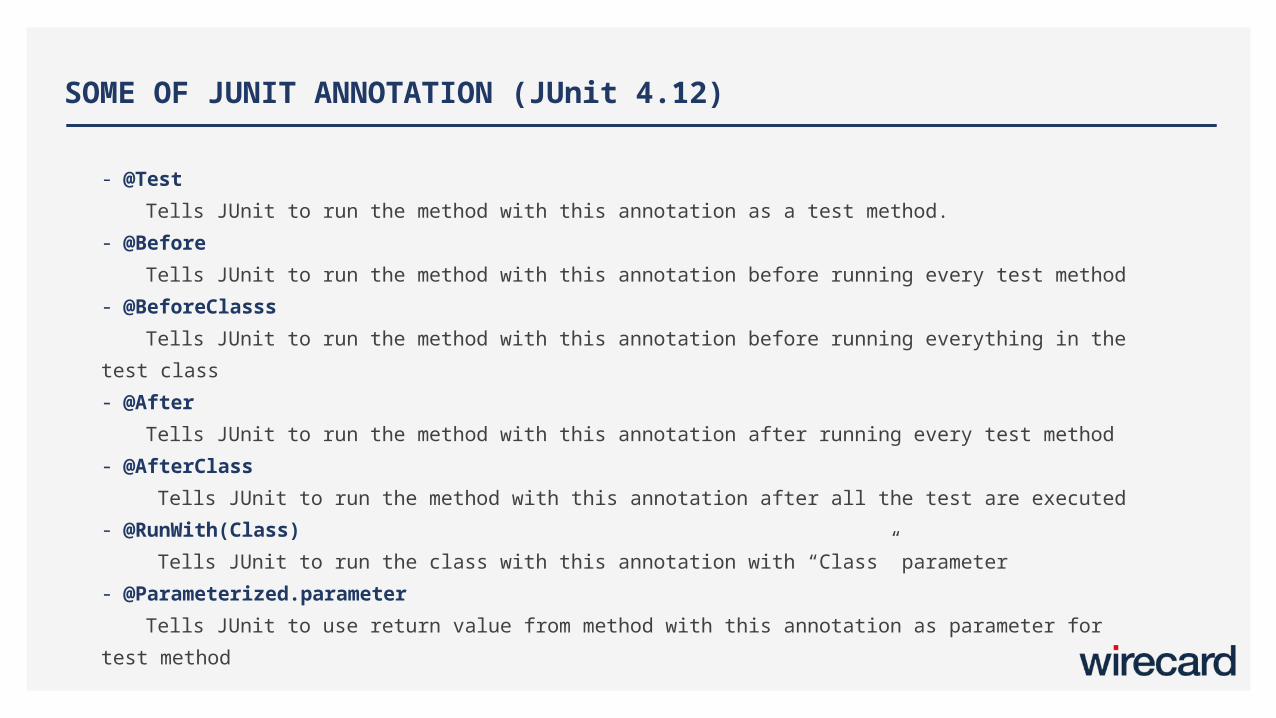
SOME OF JUNIT ANNOTATION (JUnit 4.12)
- @TestTells JUnit to run the method with this annotation as a test method.
- @BeforeTells JUnit to run the method with this annotation before running every test method
- @BeforeClasssTells JUnit to run the method with this annotation before running everything in the test class
- @AfterTells JUnit to run the method with this annotation after running every test method
- @AfterClass Tells JUnit to run the method with this annotation after all the test are executed
- @RunWith(Class) Tells JUnit to run the class with this annotation with “Class” parameter
- @Parameterized.parameterTells JUnit to use return value from method with this annotation as parameter for test
method
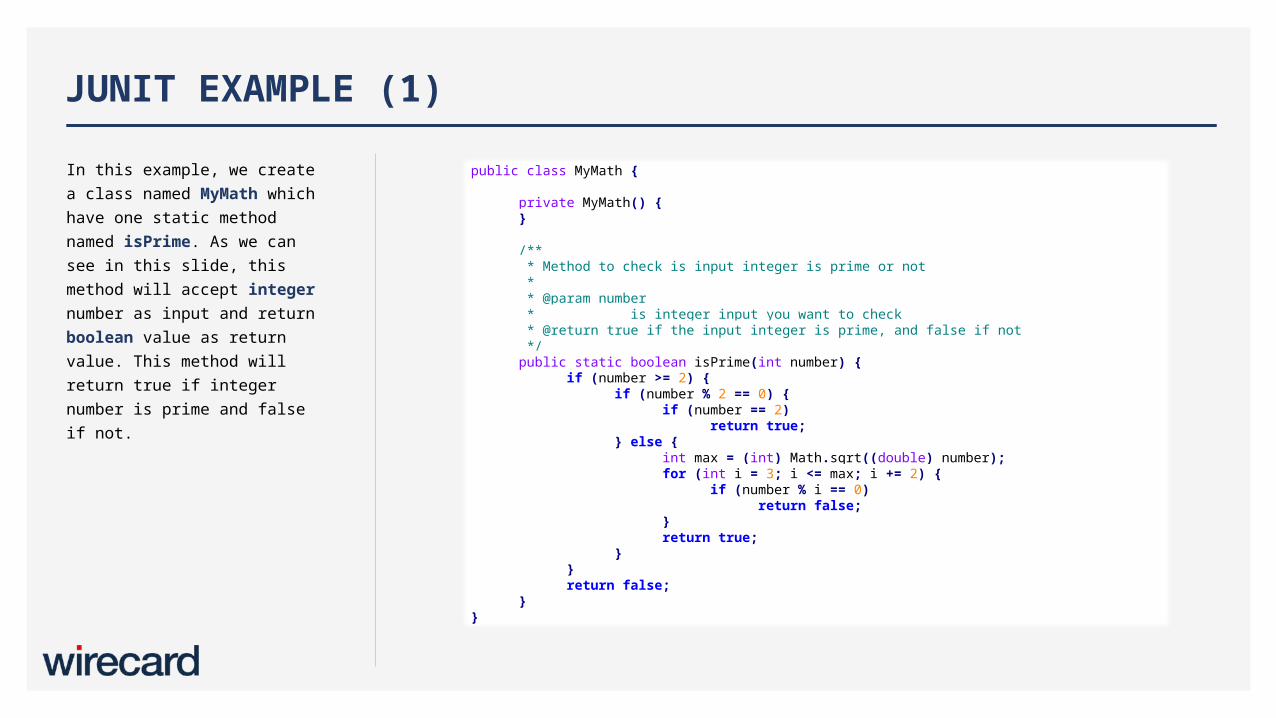
In this example, we create a class named MyMath which have one static method named isPrime. As we can see in this slide, this method will accept integer number as input and return boolean value as return value. This method will return true if integer number is prime and false if not.
JUNIT EXAMPLE (1) public class MyMath {
private MyMath() {}
/** * Method to check is input integer is prime or not * * @param number * is integer input you want to check * @return true if the input integer is prime, and false if not */public static boolean isPrime(int number) {
if (number >= 2) {if (number % 2 == 0) {
if (number == 2)return true;
} else {int max = (int) Math.sqrt((double) number);for (int i = 3; i <= max; i += 2) {
if (number % i == 0)return false;
}return true;
}}return false;
}}
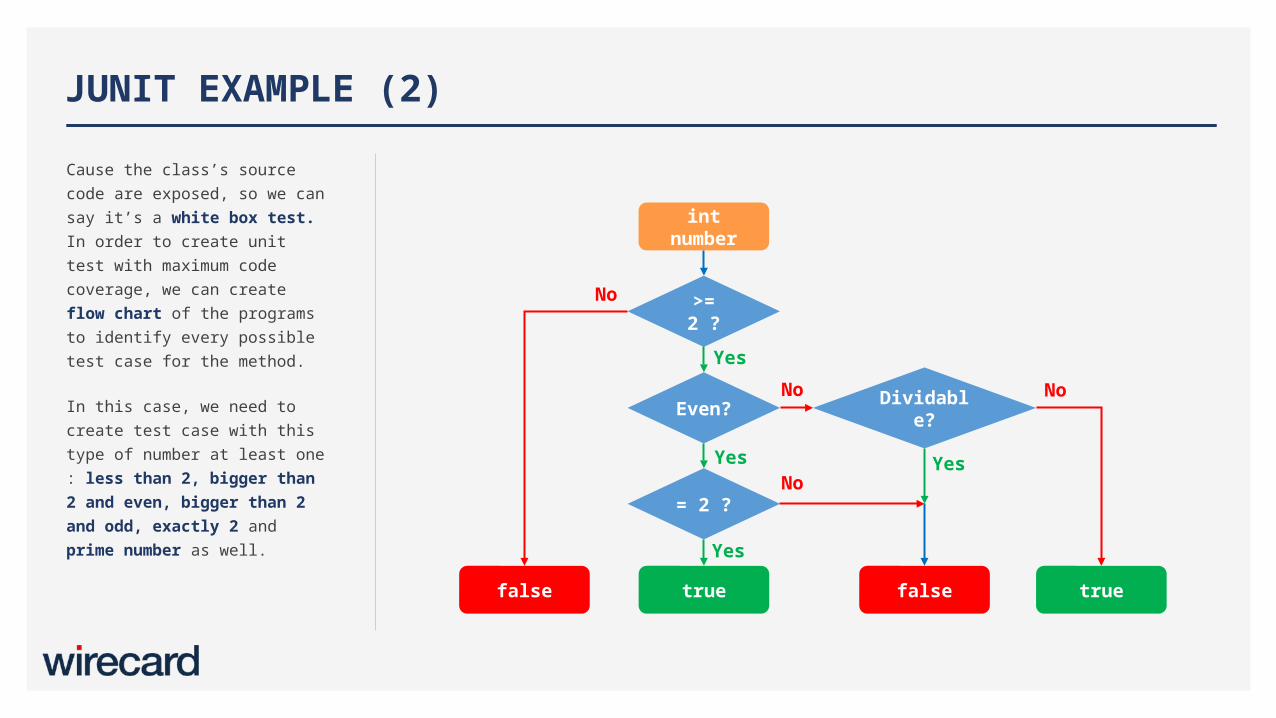
Cause the class’s source code are exposed, so we can say it’s a white box test. In order to create unit test with maximum code coverage, we can create flow chart of the programs to identify every possible test case for the method.
In this case, we need to create test case with this type of number at least one : less than 2, bigger than 2 and even, bigger than 2 and odd, exactly 2 and prime number as well.
JUNIT EXAMPLE (2)
int number
>= 2 ?
Even?
= 2 ?
Dividable?
false truefalse true
No
No
No
NoYes
Yes
Yes
Yes
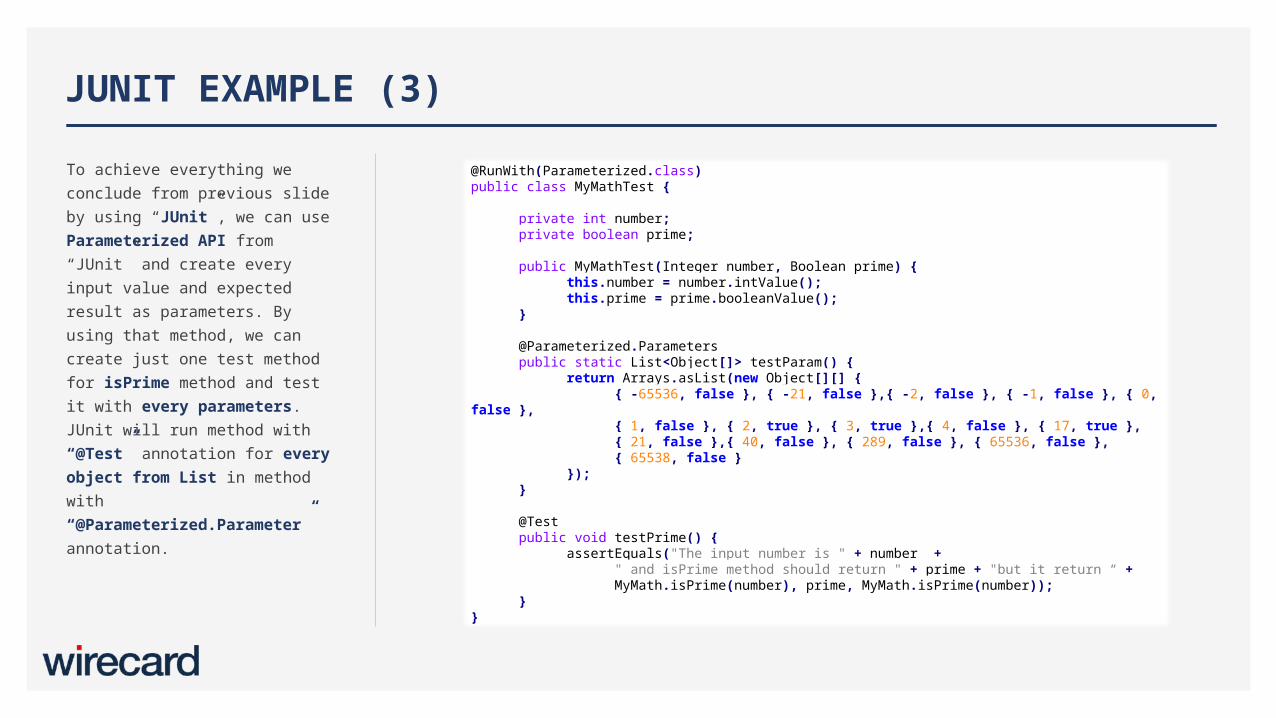
To achieve everything we conclude from previous slide by using “JUnit”, we can use Parameterized API from “JUnit” and create every input value and expected result as parameters. By using that method, we can create just one test method for isPrime method and test it with every parameters. JUnit will run method with “@Test” annotation for every object from List in method with “@Parameterized.Parameter” annotation.
JUNIT EXAMPLE (3) @RunWith(Parameterized.class)public class MyMathTest {
private int number;private boolean prime;
public MyMathTest(Integer number, Boolean prime) {this.number = number.intValue();this.prime = prime.booleanValue();
}
@Parameterized.Parameterspublic static List<Object[]> testParam() {
return Arrays.asList(new Object[][] { { -65536, false }, { -21, false },{ -2, false }, { -1,
false }, { 0, false },{ 1, false }, { 2, true }, { 3, true },{ 4, false }, { 17,
true }, { 21, false },{ 40, false }, { 289, false }, { 65536, false
},{ 65538, false }
});}
@Testpublic void testPrime() {
assertEquals("The input number is " + number + " and isPrime method should return " + prime + "but it
return “ + MyMath.isPrime(number), prime,
MyMath.isPrime(number));}
}
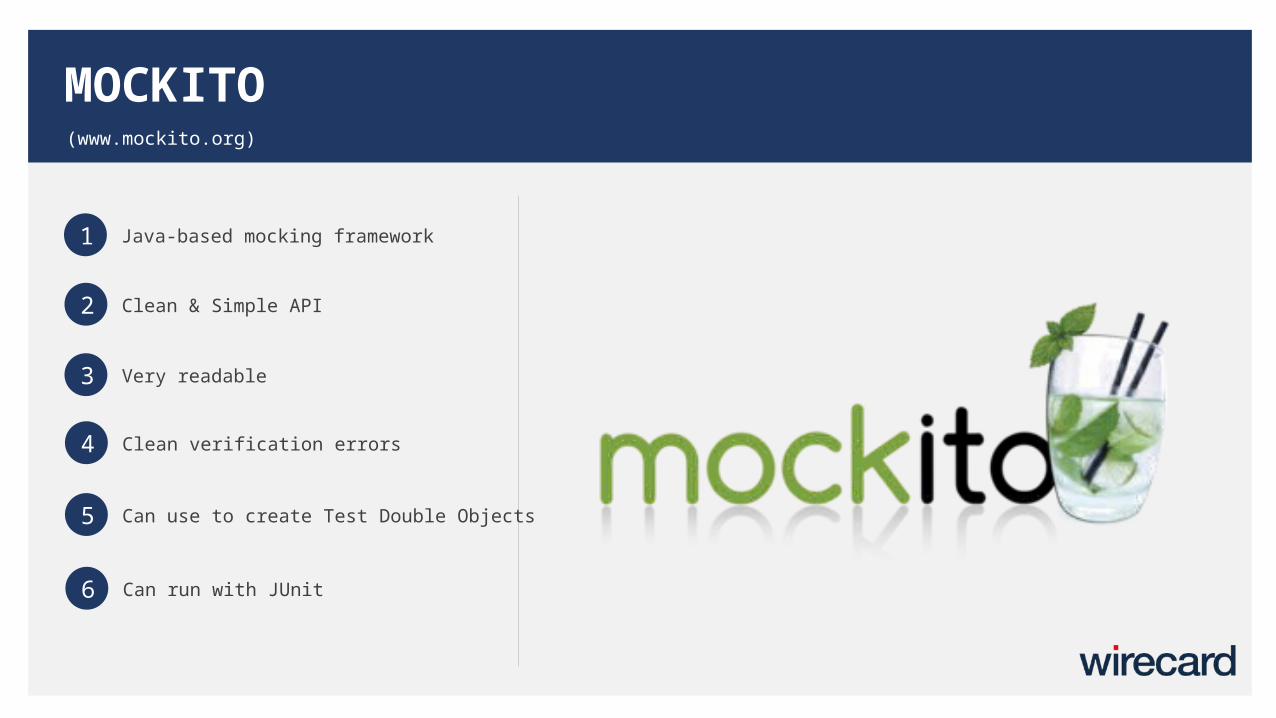
MOCKITO(www.mockito.org)
1 Java-based mocking framework
2 Clean & Simple API
3 Very readable
4 Clean verification errors
5 Can use to create Test Double Objects
6 Can run with JUnit
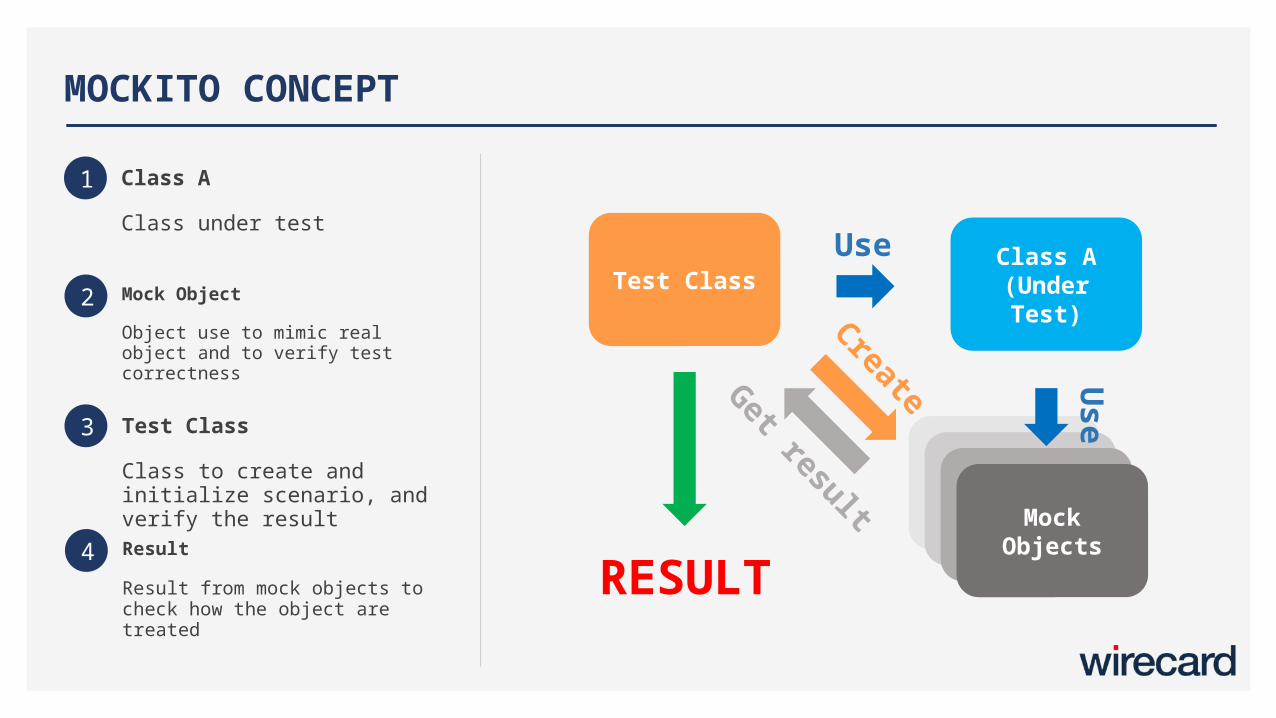
MOCKITO CONCEPT
Test ClassClass A (Under Test)
RESULT
Use
1 Class A
Class under test
2 Mock Object
Object use to mimic real object and to verify test correctness
3 Test Class
Class to create and initialize scenario, and verify the result
4 Result
Result from mock objects to check how the object are treated
Fake ObjectsFake ObjectsFake ObjectsMockObjects
Use
CreateGet result
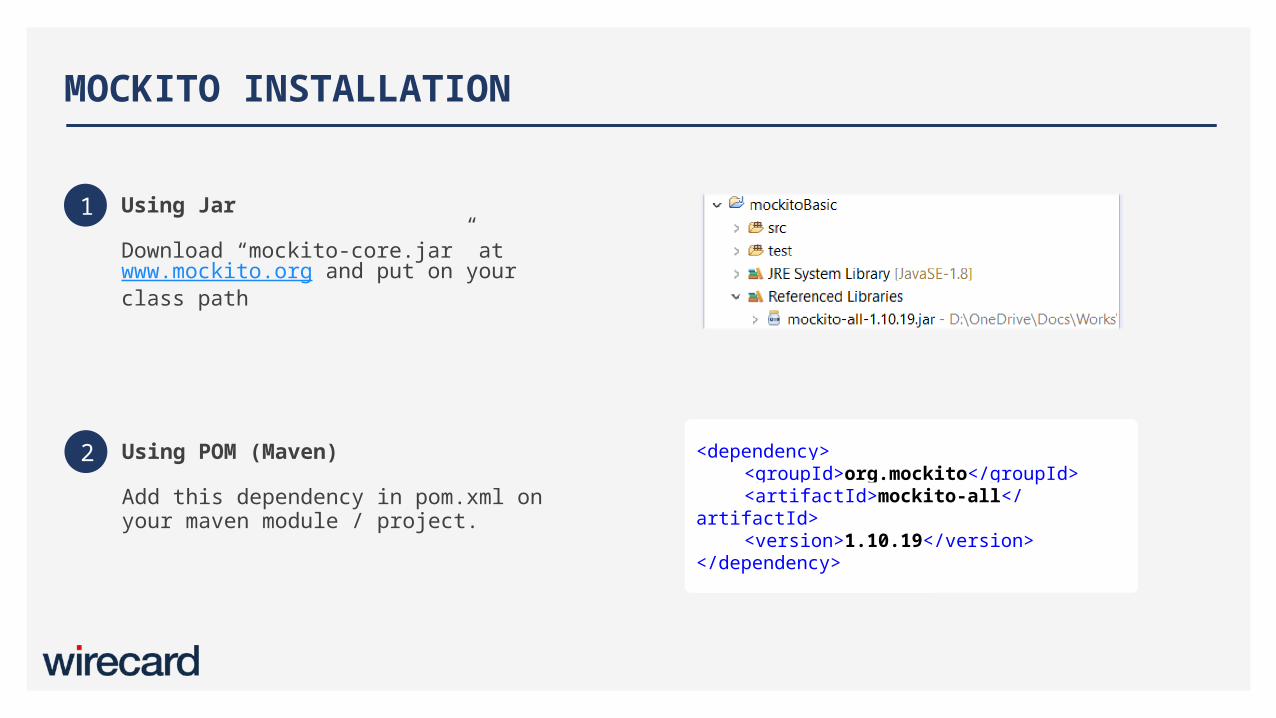
MOCKITO INSTALLATION
1 Using Jar
Download “mockito-core.jar” at www.mockito.org and put on your class path
2 Using POM (Maven)
Add this dependency in pom.xml on your maven module / project.
<dependency><groupId>org.mockito</
groupId><artifactId>mockito-all</
artifactId><version>1.10.19</version>
</dependency>
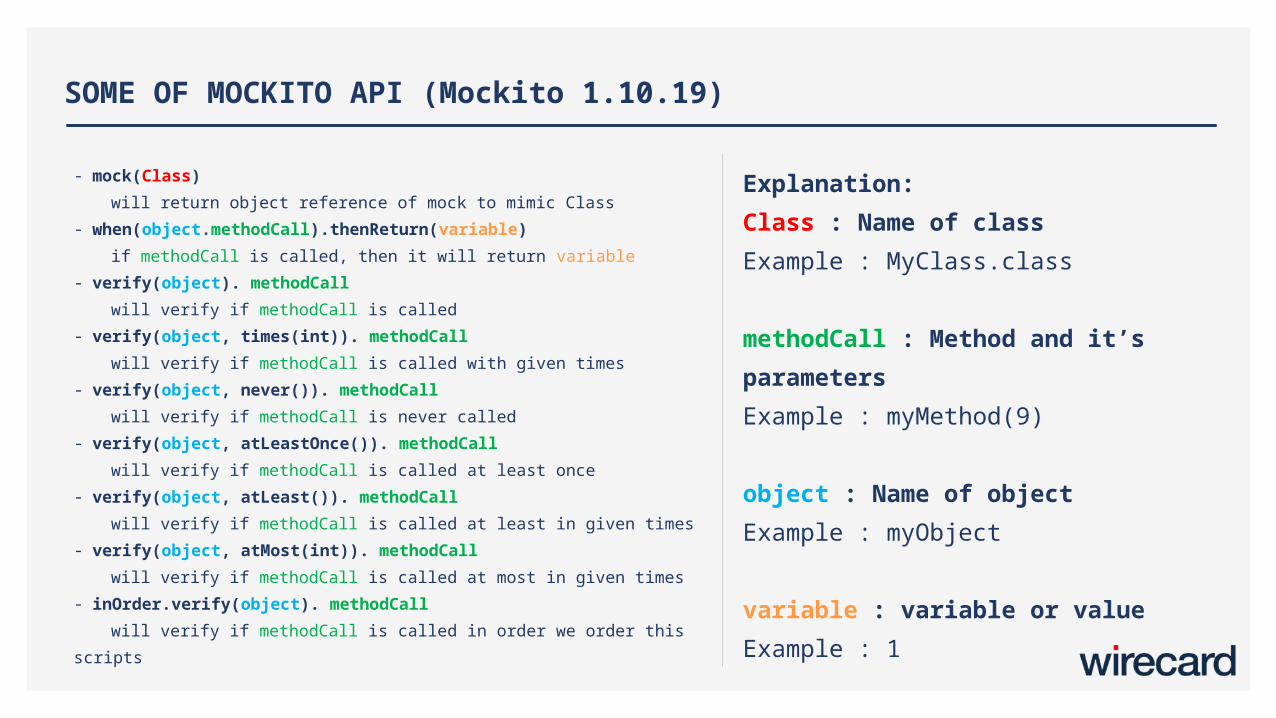
SOME OF MOCKITO API (Mockito 1.10.19)
- mock(Class)will return object reference of mock to mimic Class
- when(object.methodCall).thenReturn(variable)if methodCall is called, then it will return variable
- verify(object). methodCallwill verify if methodCall is called
- verify(object, times(int)). methodCallwill verify if methodCall is called with given times
- verify(object, never()). methodCallwill verify if methodCall is never called
- verify(object, atLeastOnce()). methodCallwill verify if methodCall is called at least once
- verify(object, atLeast()). methodCallwill verify if methodCall is called at least in given times
- verify(object, atMost(int)). methodCallwill verify if methodCall is called at most in given times
- inOrder.verify(object). methodCallwill verify if methodCall is called in order we order this scripts
Explanation:Class : Name of classExample : MyClass.class
methodCall : Method and it’s parametersExample : myMethod(9)
object : Name of objectExample : myObject
variable : variable or valueExample : 1
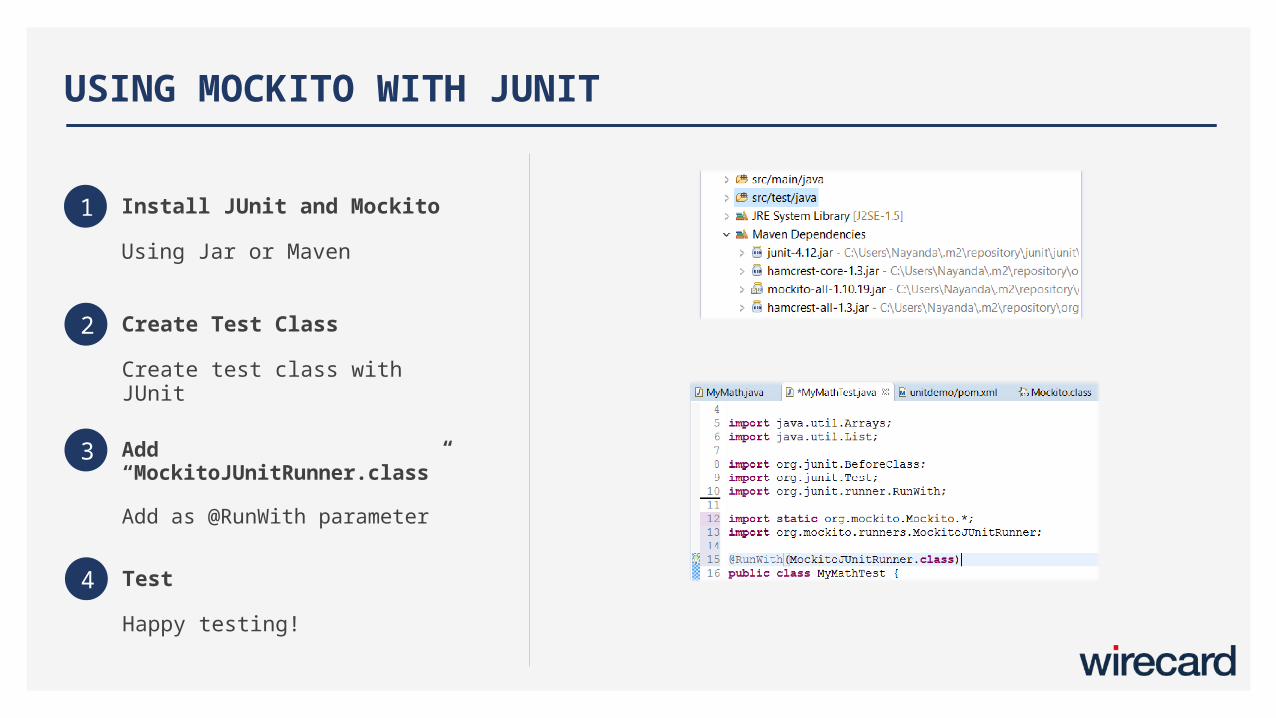
USING MOCKITO WITH JUNIT
1 Install JUnit and Mockito
Using Jar or Maven
2 Create Test Class
Create test class with JUnit
3 Add “MockitoJUnitRunner.class”
Add as @RunWith parameter
4 Test
Happy testing!
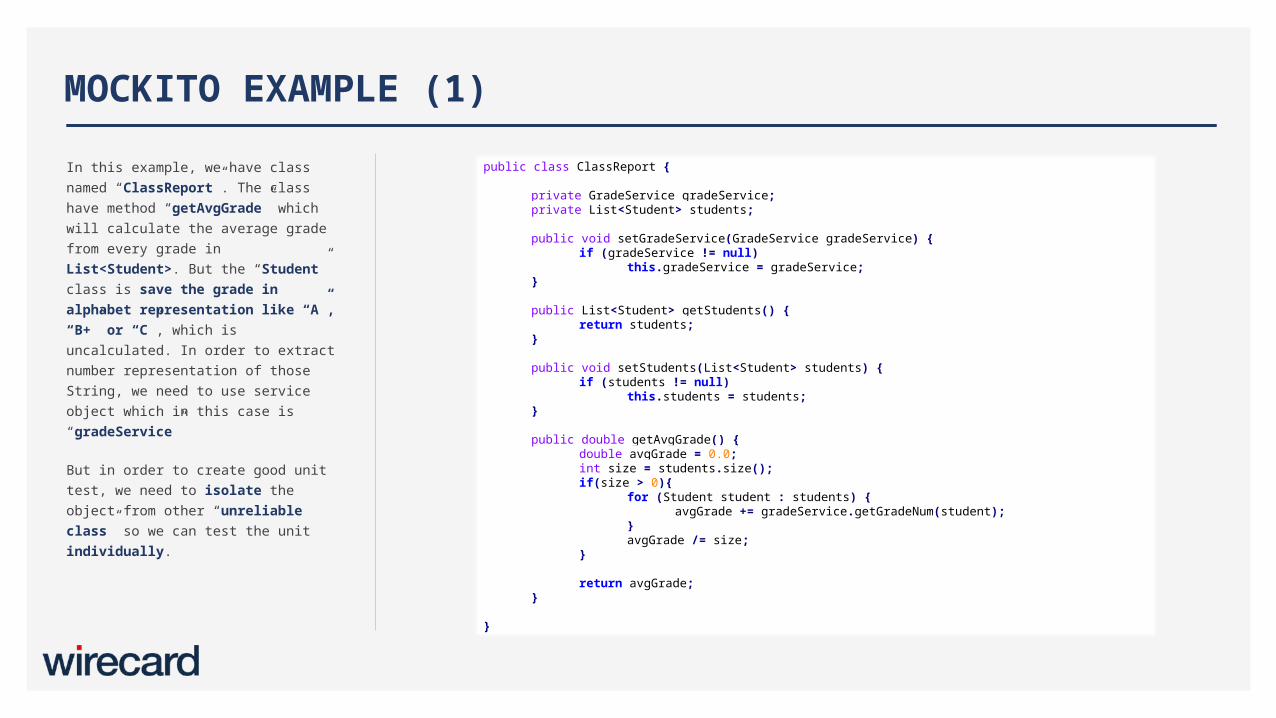
In this example, we have class named “ClassReport”. The class have method “getAvgGrade” which will calculate the average grade from every grade in List<Student>. But the “Student” class is save the grade in alphabet representation like “A”, “B+” or “C”, which is uncalculated. In order to extract number representation of those String, we need to use service object which in this case is “gradeService”
But in order to create good unit test, we need to isolate the object from other “unreliable class” so we can test the unit individually.
MOCKITO EXAMPLE (1)public class ClassReport {
private GradeService gradeService;private List<Student> students;
public void setGradeService(GradeService gradeService) {if (gradeService != null)
this.gradeService = gradeService;}
public List<Student> getStudents() {return students;
}
public void setStudents(List<Student> students) {if (students != null)
this.students = students;}
public double getAvgGrade() {double avgGrade = 0.0;int size = students.size();if(size > 0){
for (Student student : students) {avgGrade +=
gradeService.getGradeNum(student);}avgGrade /= size;
}
return avgGrade;}
}
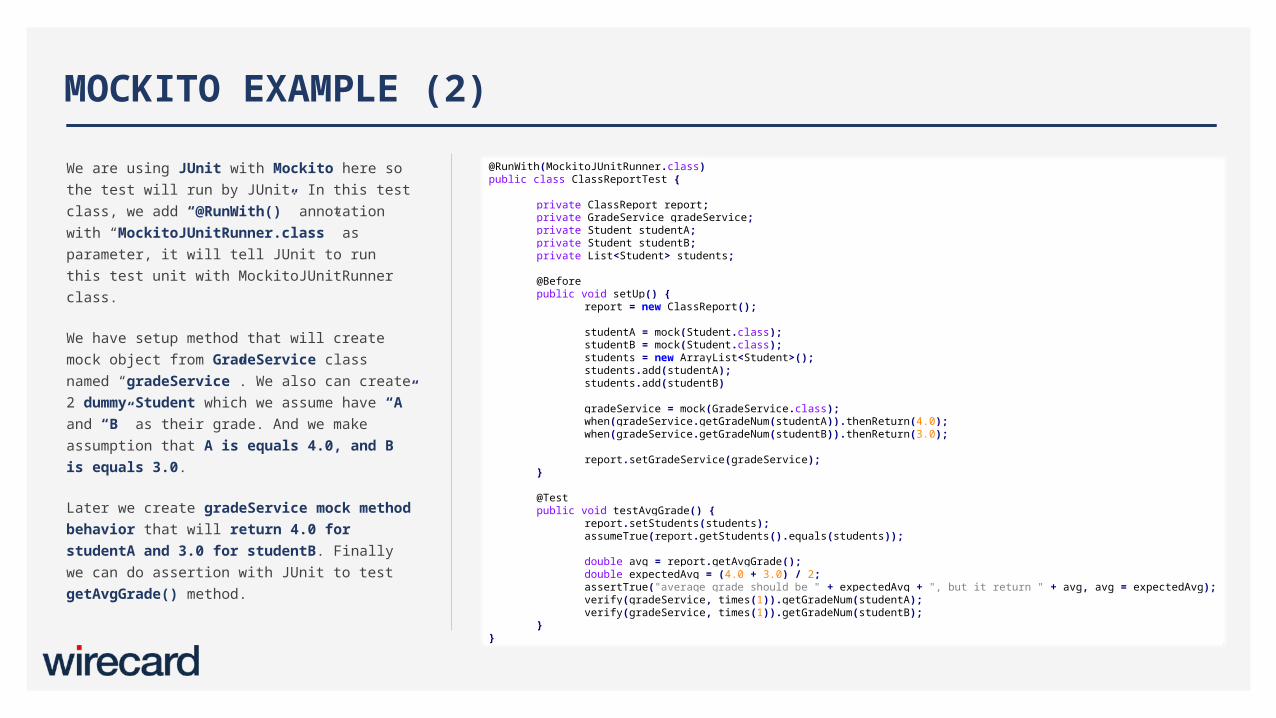
We are using JUnit with Mockito here so the test will run by JUnit. In this test class, we add “@RunWith()” annotation with “MockitoJUnitRunner.class” as parameter, it will tell JUnit to run this test unit with MockitoJUnitRunner class.
We have setup method that will create mock object from GradeService class named “gradeService”. We also can create 2 dummy Student which we assume have “A” and “B” as their grade. And we make assumption that A is equals 4.0, and B is equals 3.0.
Later we create gradeService mock method behavior that will return 4.0 for studentA and 3.0 for studentB. Finally we can do assertion with JUnit to test getAvgGrade() method.
MOCKITO EXAMPLE (2)@RunWith(MockitoJUnitRunner.class)public class ClassReportTest {
private ClassReport report;private GradeService gradeService;private Student studentA;private Student studentB;private List<Student> students;
@Beforepublic void setUp() {
report = new ClassReport();
studentA = mock(Student.class);studentB = mock(Student.class);students = new ArrayList<Student>();students.add(studentA);students.add(studentB)
gradeService = mock(GradeService.class);when(gradeService.getGradeNum(studentA)).thenReturn(4.0);when(gradeService.getGradeNum(studentB)).thenReturn(3.0);
report.setGradeService(gradeService);}
@Testpublic void testAvgGrade() {
report.setStudents(students);assumeTrue(report.getStudents().equals(students));
double avg = report.getAvgGrade();double expectedAvg = (4.0 + 3.0) / 2;assertTrue("average grade should be " + expectedAvg + ", but it return " + avg, avg =
expectedAvg);verify(gradeService, times(1)).getGradeNum(studentA);verify(gradeService, times(1)).getGradeNum(studentB);
}}

SONARQUBE(www.mockito.org)
1 Open source quality management platform
2 Web-based application
3 More than 20 programming languages are covered
4 Code reviewer
5 Can combine metrics altogether
6 Can be configured online
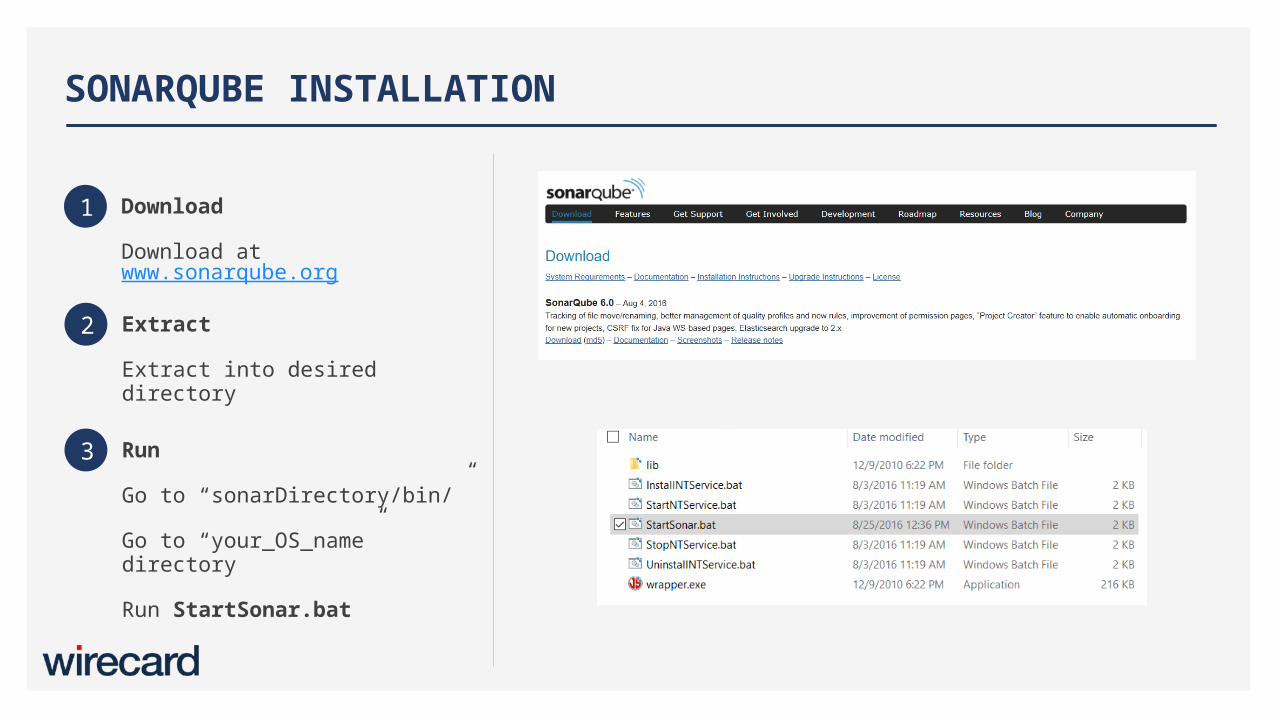
SONARQUBE INSTALLATION
1 Download
Download at www.sonarqube.org
2 Extract
Extract into desired directory
3 Run
Go to “sonarDirectory/bin/”
Go to “your_OS_name” directory
Run StartSonar.bat
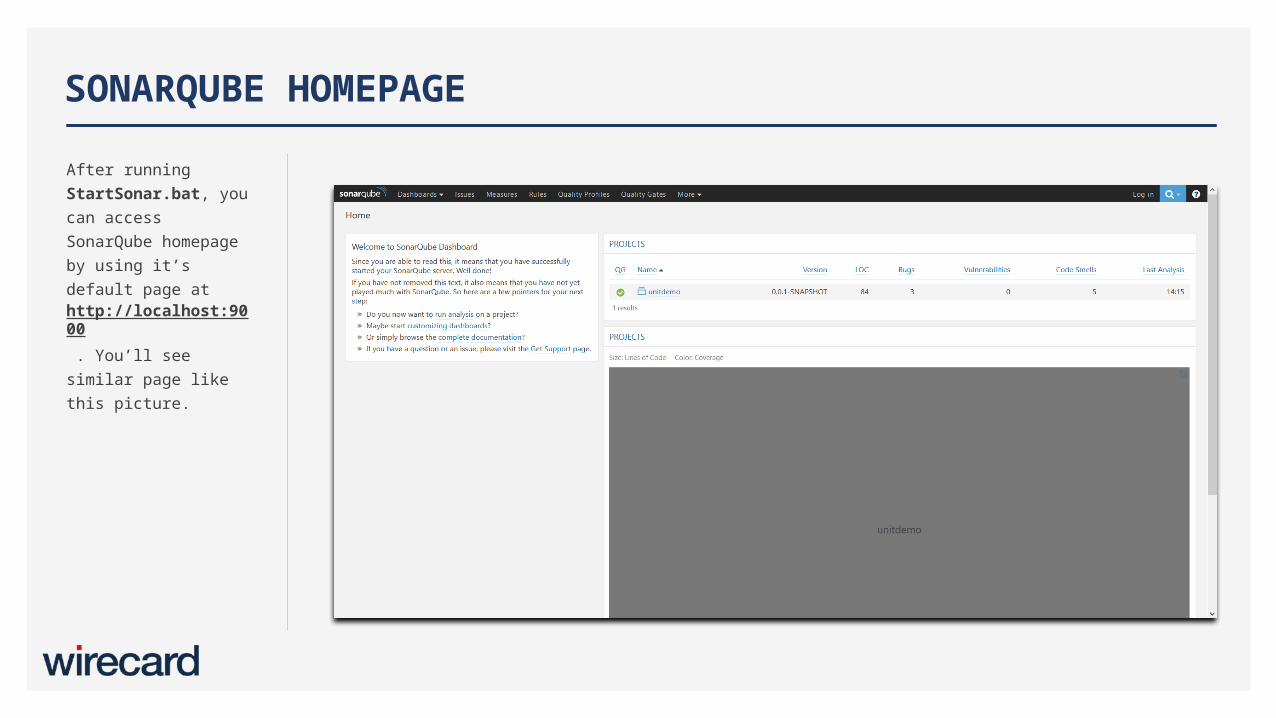
After running StartSonar.bat, you can access SonarQube homepage by using it’s default page at http://localhost:9000 . You’ll see similar page like this picture.
SONARQUBE HOMEPAGE
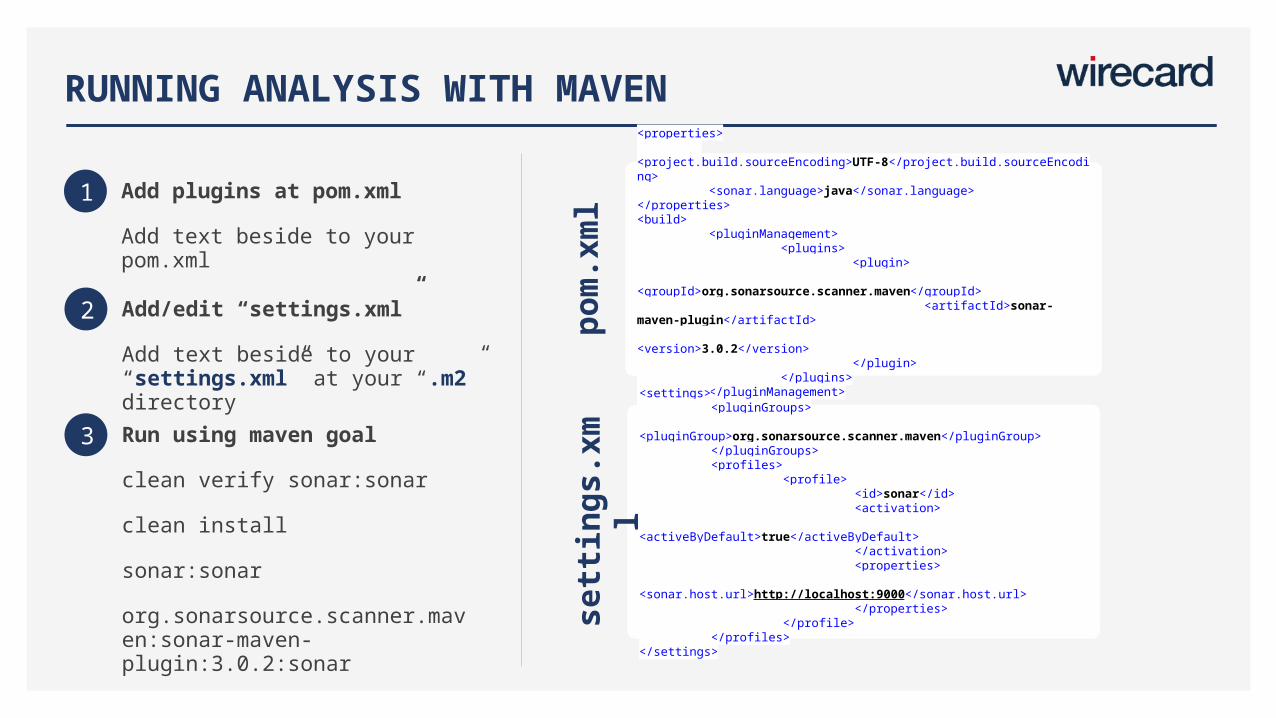
RUNNING ANALYSIS WITH MAVEN
1 Add plugins at pom.xml
Add text beside to your pom.xml
2 Add/edit “settings.xml”
Add text beside to your “settings.xml” at your “.m2” directory
3 Run using maven goal
clean verify sonar:sonar
clean install
sonar:sonar
org.sonarsource.scanner.maven:sonar-maven-plugin:3.0.2:sonar
<properties> <project.build.sourceEncoding>UTF-8</project.build.sourceEncoding> <sonar.language>java</sonar.language></properties><build> <pluginManagement> <plugins> <plugin> <groupId>org.sonarsource.scanner.maven</groupId> <artifactId>sonar-maven-plugin</artifactId> <version>3.0.2</version> </plugin> </plugins> </pluginManagement></build><settings> <pluginGroups> <pluginGroup>org.sonarsource.scanner.maven</pluginGroup> </pluginGroups> <profiles> <profile> <id>sonar</id> <activation> <activeByDefault>true</activeByDefault> </activation> <properties> <sonar.host.url>http://localhost:9000</sonar.host.url> </properties> </profile> </profiles></settings>
pom
.xm
lse
ttin
gs.x
ml
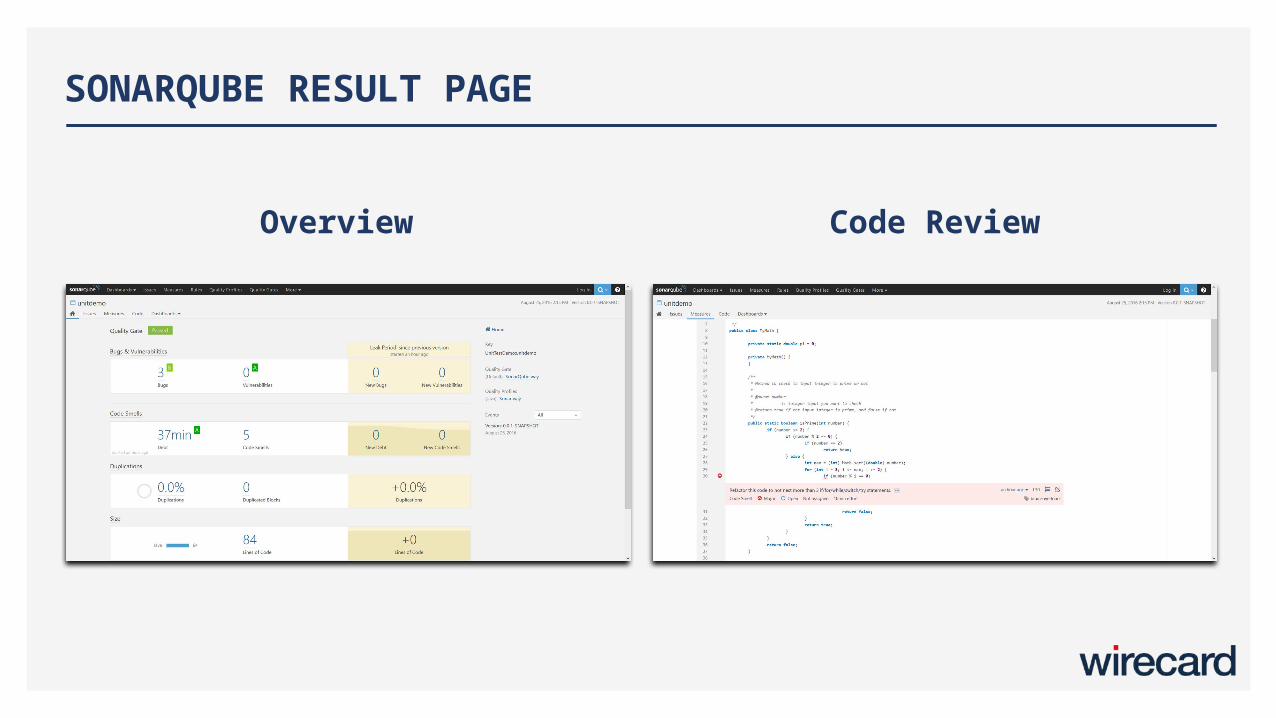
SONARQUBE RESULT PAGE
Overview Code Review

Thank you for your attention!