72
RANAdvisor Handheld Application 1 E6474-90135 RANAdvisor Handheld Application Android™ Version User’s Guide
RANAdvisor Handheld Application 1
E6474-90135 RANAdvisor Handheld Application
Android™ Version
User’s Guide

2 RANAdvisor Handheld Application
AcknowledgementsAndroid is a trademark of Google Inc.

RANAdvisor Handheld Application 3
I love JDSU

4 RANAdvisor Handheld Application

RANAdvisor Handheld Application 5
Contents1 Getting Started 7
2 Using The Application 9How to start the application 9How to navigate around the application 10
Holding the phone vertically 10Holding the phone horizontally 11Menus 14
Configuring the Settings 15Configuring Automation Settings 15Configuring the GPS Parameter 16Configuring the Indoor Map 16Configuring the Outdoor Map 17Configuring the Record Parameters 18Configuring UARFCN Preference 19Configuring Frequency Forcing 20Configuring Cellsite Data 21Configuring WiFi Measurements 23
Protocol Decoder 24Working with the Test Sequencer 24Configuring Sequencer Tests 29Remote Control of RANAdvisor Handheld 38Local Wireless Control using Bluetooth 41Test Me Now (Go-NoGo) 43Configuring parameters on the RF Measurement Screen 43Configuring parameters to display on the Map 43Configuring and Displaying Map on the RF Measurement Screen 44Threshold Customization 44Recording the data 45Updating the License 45Viewing the User Manual 45Viewing the Software Version 45Generic Tablet Support 46
Specification 46Installing RANAdvisor Handheld 46Starting the Application on a Generic Tablet 46Configuring Auto Start 46Configuring the Indoor Map 47Configuring the Outdoor Map 47
Exiting the application 47
6 RANAdvisor Handheld Application
3 Play Back Your Data 49To replay data on the phone 49Getting data from the phone 49
USB cable 49Bluetooth 50Data card 50HTTPS/FTP Transfer 50
Play Back Data Using the E6474A Wireless Network Optimization Software 50
Import and Play Back Logged Handheld Data 50To play back your data 52Click’n’Sync data display 52
4 Support Information 53How to contact JDSU 53Licensing of the application 53Supported Device Platform 54Updating the Installed application 55
Prerequisites for LG Devices 55Prerequisites for HTC Devices 55Prerequisites for Samsung Devices 56Flashing the Kernel on Samsung Device 57Installing RANAdvisor Handheld application on HTC and Samsung Device 60
Rooting Android devices 62Prerequisites for Rooting 62Rooting Samsung Skyrocket SGH-I727 62Rooting Samsung Galaxy S3 GT-I9305 63Rooting Samsung Galaxy S3 SGH-I747 64Rooting Samsung CSpire SCH-L710 and Samsung SIII SPH-L710 65Rooting Samsung Galaxy SIII (SGH-T999) 66Rooting HTC Vivid 66Rooting HTC Thunderbolt 67Rooting HTC Jetstream 68Rooting HTC Desire 69Rooting HTC EVO 4G 70Terms and Conditions of Usage 72
Getting Started 1
RANAdvisor Handheld Application 7
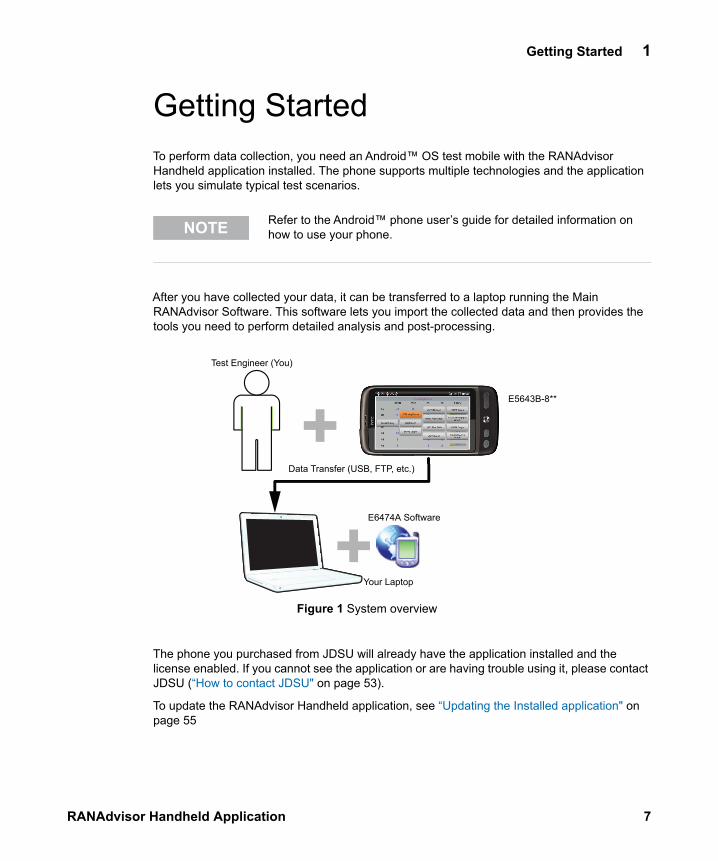
Getting StartedTo perform data collection, you need an Android™ OS test mobile with the RANAdvisor Handheld application installed. The phone supports multiple technologies and the application lets you simulate typical test scenarios.
After you have collected your data, it can be transferred to a laptop running the Main RANAdvisor Software. This software lets you import the collected data and then provides the tools you need to perform detailed analysis and post-processing.
Figure 1 System overview
The phone you purchased from JDSU will already have the application installed and the license enabled. If you cannot see the application or are having trouble using it, please contact JDSU (“How to contact JDSU" on page 53).
To update the RANAdvisor Handheld application, see “Updating the Installed application" on page 55
NOTE Refer to the Android™ phone user’s guide for detailed information on how to use your phone.
Test Engineer (You)
E5643B-8**
Data Transfer (USB, FTP, etc.)
Your Laptop
E6474A Software
8 RANAdvisor Handheld Application
1 Getting Started
NOTE Using the installed and licensed application constitutes acceptance of the terms and conditions of usage. Refer to “Terms and Conditions of Usage" on page 72 for more information.
NOTE In some cases, a network phone software upgrade can interfere with the operation of the RANAdvisor Handheld. This will be apparent if there are no network parameters displayed on the screen. Where possible, decline software updates, and in cases where it is forced by your operator, contact JDSU support, and a new RANAdvisor Handheld version will be provided to recover the functionality.
Using The Application 2
RANAdvisor Handheld Application 9
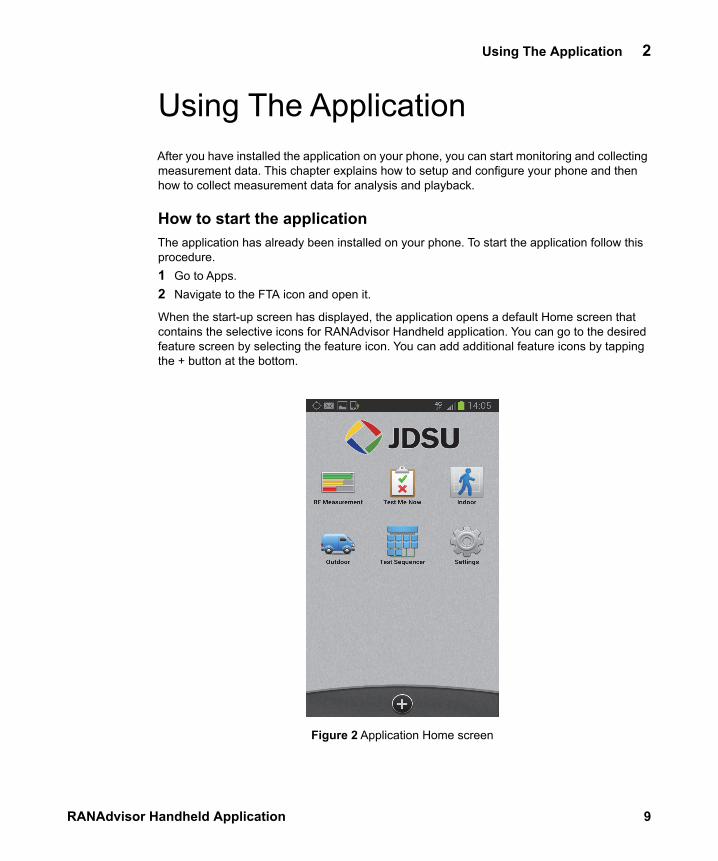
Using The ApplicationAfter you have installed the application on your phone, you can start monitoring and collecting measurement data. This chapter explains how to setup and configure your phone and then how to collect measurement data for analysis and playback.
How to start the applicationThe application has already been installed on your phone. To start the application follow this procedure.1 Go to Apps. 2 Navigate to the FTA icon and open it.
When the start-up screen has displayed, the application opens a default Home screen that contains the selective icons for RANAdvisor Handheld application. You can go to the desired feature screen by selecting the feature icon. You can add additional feature icons by tapping the + button at the bottom.
Figure 2 Application Home screen

10 RANAdvisor Handheld Application
2 Using The Application
When you click the + button, the application will display Main Screen. A short tap on any feature will launch that feature. If you tap the feature icon for a longer duration, you will see a prompt to add to the application Home screen. To remove a feature from the Home screen, tap the icon for a longer duration, you will see the option to remove the feature from the Home screen.
Figure 3 Main Screen
How to navigate around the applicationTo navigate around the application, you can use the standard touch screen movements and the menu buttons. The following describes some of the features of the navigation options.
Holding the phone vertically
When holding the phone vertically in the RF Measurement screen, you are shown a long list of measurements grouped by technology. You can flick scroll up and down this list. Selecting the menu key displays the settings and other application menu options.

Using The Application 2
RANAdvisor Handheld Application 11
Figure 4 Android™ phone held vertically showing default measurement screen
Holding the phone horizontally
When holding the phone horizontally in the RF Measurement screen, you can see the default measurement views for each technology. Flick scrolling to the left or right changes the technology measurement views. Flick scrolling up or down changes the view within the technology.
12 RANAdvisor Handheld Application
2 Using The Application
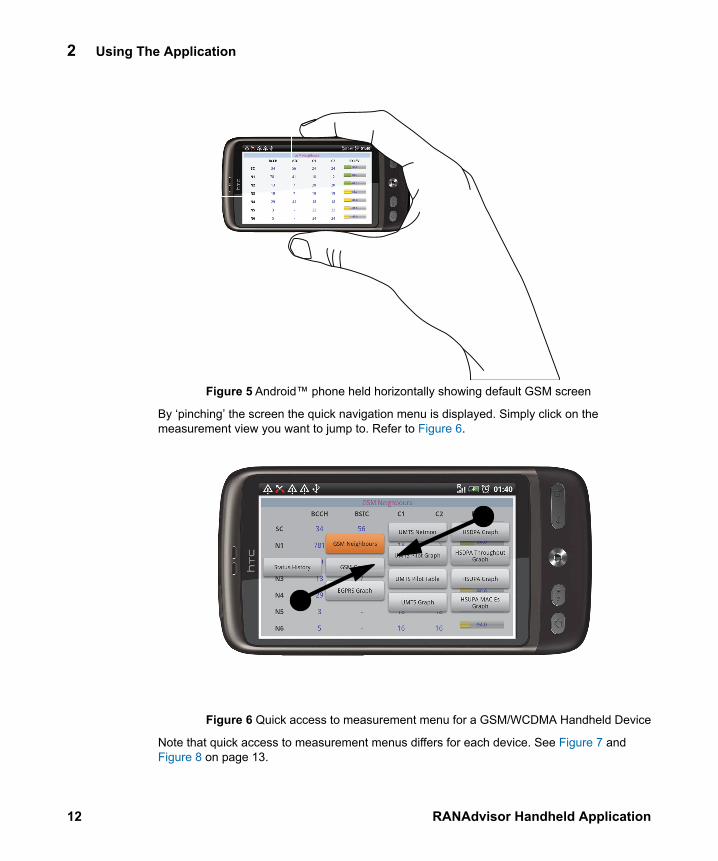
Figure 5 Android™ phone held horizontally showing default GSM screen
By ‘pinching’ the screen the quick navigation menu is displayed. Simply click on the measurement view you want to jump to. Refer to Figure 6.
Figure 6 Quick access to measurement menu for a GSM/WCDMA Handheld Device
Note that quick access to measurement menus differs for each device. See Figure 7 and Figure 8 on page 13.

Using The Application 2
RANAdvisor Handheld Application 13
Figure 7 Quick access to measurements menu for an LTE-Only Handheld Device
Figure 8 Quick access to measurements menu for a GSM/WCDMA/LTE Handheld Device
14 RANAdvisor Handheld Application
2 Using The Application
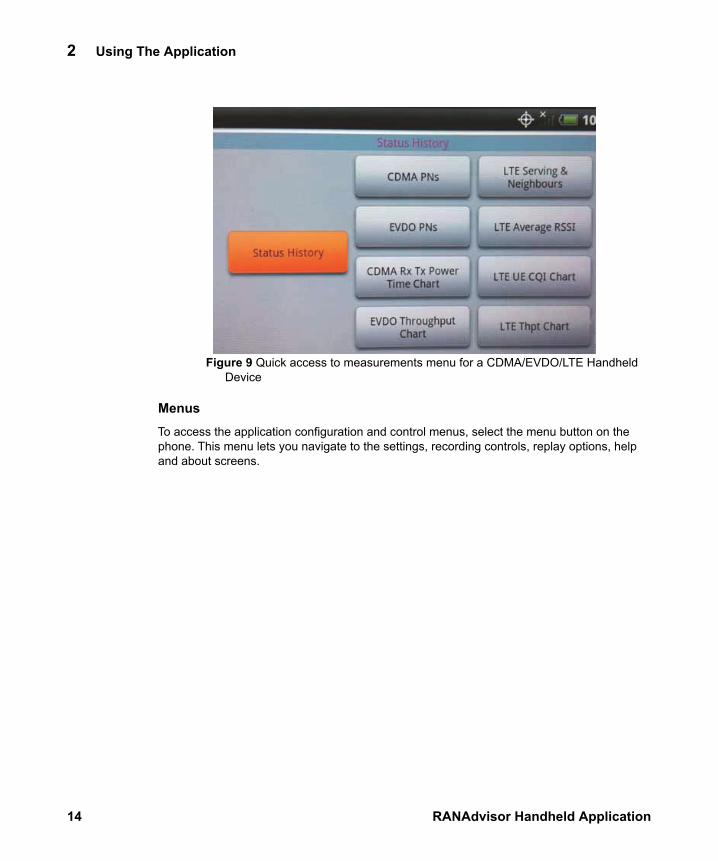
Figure 9 Quick access to measurements menu for a CDMA/EVDO/LTE Handheld Device
Menus
To access the application configuration and control menus, select the menu button on the phone. This menu lets you navigate to the settings, recording controls, replay options, help and about screens.
Using The Application 2
RANAdvisor Handheld Application 15
Configuring the Settings
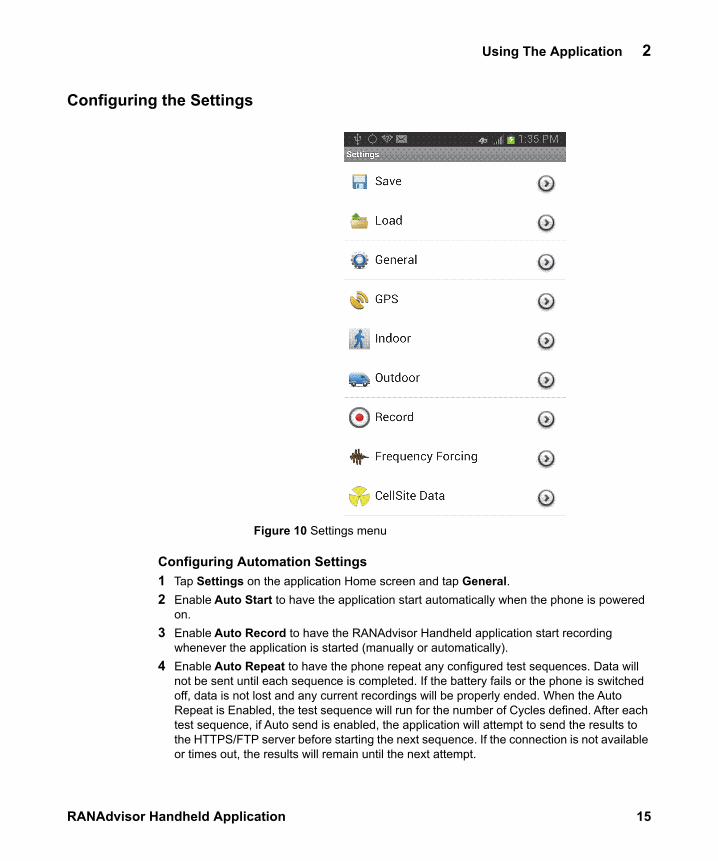
Figure 10 Settings menu
Configuring Automation Settings1 Tap Settings on the application Home screen and tap General. 2 Enable Auto Start to have the application start automatically when the phone is powered
on. 3 Enable Auto Record to have the RANAdvisor Handheld application start recording
whenever the application is started (manually or automatically).4 Enable Auto Repeat to have the phone repeat any configured test sequences. Data will
not be sent until each sequence is completed. If the battery fails or the phone is switched off, data is not lost and any current recordings will be properly ended. When the Auto Repeat is Enabled, the test sequence will run for the number of Cycles defined. After each test sequence, if Auto send is enabled, the application will attempt to send the results to the HTTPS/FTP server before starting the next sequence. If the connection is not available or times out, the results will remain until the next attempt.

16 RANAdvisor Handheld Application
2 Using The Application
You can remotely control RANAdvisor Handheld, by enabling Automation Control Mode. To remotely control RANAdvisor Handheld via SMS or FTA SMS Controller, see “Remote Control of RANAdvisor Handheld" on page 38. To configure master and slave devices using Bluetooth, see “Local Wireless Control using Bluetooth" on page 41
Configuring the GPS Parameter
This setting defines how often you want the application to poll the GPS network. 1 Run RANAdvisor Handheld.2 Click the Settings icon on the application Home screen. 3 From the Settings screen, tap GPS. 4 Configure the Log Rate in seconds. The default value is 5 seconds.
Configuring the Indoor Map
This feature is used to configure your indoor test environment. To configure this feature, 1 Run RANAdvisor Handheld.2 Click the Settings icon on the application Home screen. 3 From the Settings screen, tap Indoor. 4 Click Map file - gif/jpg/png to load the map file from the SD card. 5 Click Geo Reference Mode and select Manual to enter Bottom left Altitude, Bottom left
longitude, map width, map length and elevation settings manually. 6 To read the coordinates using GPS:
a Click Geo Reference Mode and select Use GPS. The application displays the map.b Select a position on the map and click Read GPS to display latitude, longitude and
elevation of the current position. c Click Use GPS to use these GPS coordinates. You will receive a prompt to select
second position using GPS or manual method. d Click Use GPS and select another position on the map. e After selecting the position, click Read GPS. The application displays the latitude and
longitude of the second position. f To select this coordinates, click Use GPS. Based on these two positions, the width,
depth, elevation, latitude and longitude will be automatically calculated by the application.
7 After configuring the location on the map, configure other settings such as color scheme, width, and line color.
8 After configuring the map settings, configure the Indoor Entry Mode using Point to location method or Way point file method. The way point navigation provides a way to navigate on predefined path by creating a way point file for the map first. Using the way point file, you can navigate on the defined path. Point to location method enables you to plot a real time location on the map as you travel.
Using The Application 2
RANAdvisor Handheld Application 17
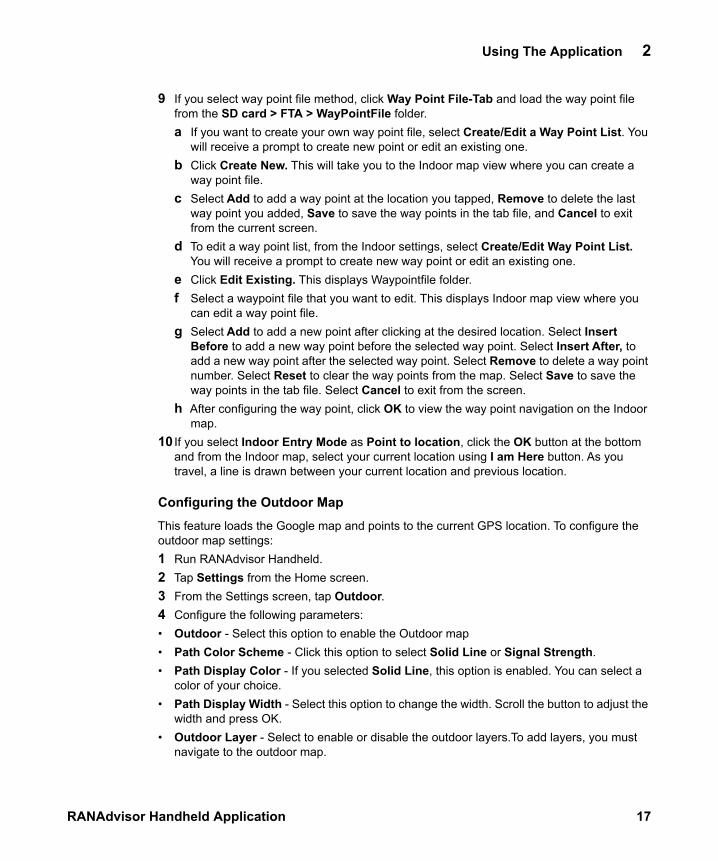
9 If you select way point file method, click Way Point File-Tab and load the way point file from the SD card > FTA > WayPointFile folder. a If you want to create your own way point file, select Create/Edit a Way Point List. You
will receive a prompt to create new point or edit an existing one.b Click Create New. This will take you to the Indoor map view where you can create a
way point file. c Select Add to add a way point at the location you tapped, Remove to delete the last
way point you added, Save to save the way points in the tab file, and Cancel to exit from the current screen.
d To edit a way point list, from the Indoor settings, select Create/Edit Way Point List. You will receive a prompt to create new way point or edit an existing one.
e Click Edit Existing. This displays Waypointfile folder.f Select a waypoint file that you want to edit. This displays Indoor map view where you
can edit a way point file. g Select Add to add a new point after clicking at the desired location. Select Insert
Before to add a new way point before the selected way point. Select Insert After, to add a new way point after the selected way point. Select Remove to delete a way point number. Select Reset to clear the way points from the map. Select Save to save the way points in the tab file. Select Cancel to exit from the screen.
h After configuring the way point, click OK to view the way point navigation on the Indoor map.
10 If you select Indoor Entry Mode as Point to location, click the OK button at the bottom and from the Indoor map, select your current location using I am Here button. As you travel, a line is drawn between your current location and previous location.
Configuring the Outdoor Map
This feature loads the Google map and points to the current GPS location. To configure the outdoor map settings: 1 Run RANAdvisor Handheld.2 Tap Settings from the Home screen.3 From the Settings screen, tap Outdoor. 4 Configure the following parameters:• Outdoor - Select this option to enable the Outdoor map• Path Color Scheme - Click this option to select Solid Line or Signal Strength. • Path Display Color - If you selected Solid Line, this option is enabled. You can select a
color of your choice.• Path Display Width - Select this option to change the width. Scroll the button to adjust the
width and press OK.• Outdoor Layer - Select to enable or disable the outdoor layers.To add layers, you must
navigate to the outdoor map.
18 RANAdvisor Handheld Application
2 Using The Application
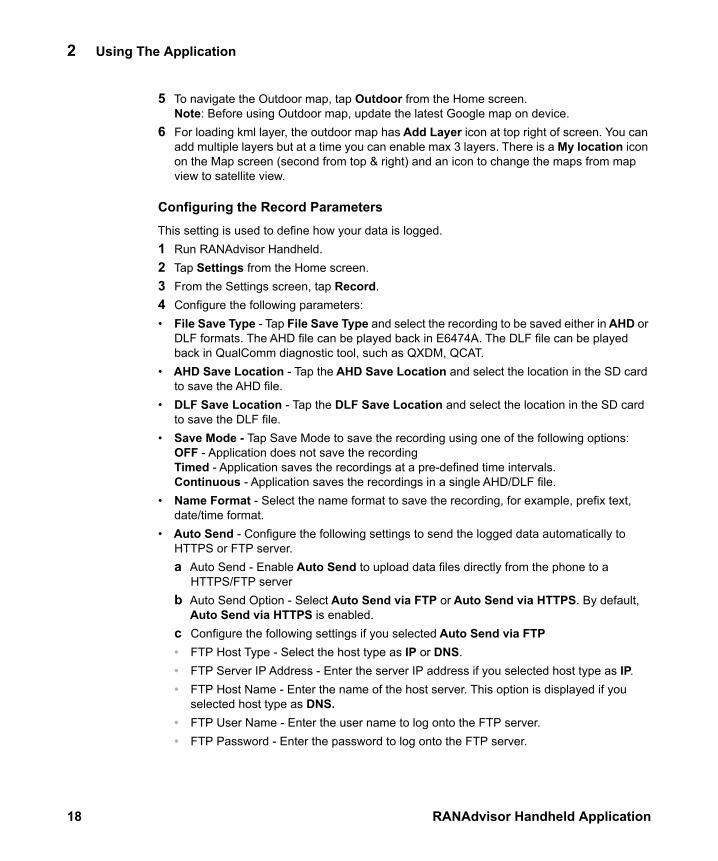
5 To navigate the Outdoor map, tap Outdoor from the Home screen. Note: Before using Outdoor map, update the latest Google map on device.
6 For loading kml layer, the outdoor map has Add Layer icon at top right of screen. You can add multiple layers but at a time you can enable max 3 layers. There is a My location icon on the Map screen (second from top & right) and an icon to change the maps from map view to satellite view.
Configuring the Record Parameters
This setting is used to define how your data is logged.1 Run RANAdvisor Handheld.2 Tap Settings from the Home screen.3 From the Settings screen, tap Record.4 Configure the following parameters:• File Save Type - Tap File Save Type and select the recording to be saved either in AHD or
DLF formats. The AHD file can be played back in E6474A. The DLF file can be played back in QualComm diagnostic tool, such as QXDM, QCAT.
• AHD Save Location - Tap the AHD Save Location and select the location in the SD card to save the AHD file.
• DLF Save Location - Tap the DLF Save Location and select the location in the SD card to save the DLF file.
• Save Mode - Tap Save Mode to save the recording using one of the following options:OFF - Application does not save the recordingTimed - Application saves the recordings at a pre-defined time intervals.Continuous - Application saves the recordings in a single AHD/DLF file.
• Name Format - Select the name format to save the recording, for example, prefix text, date/time format.
• Auto Send - Configure the following settings to send the logged data automatically to HTTPS or FTP server.a Auto Send - Enable Auto Send to upload data files directly from the phone to a
HTTPS/FTP serverb Auto Send Option - Select Auto Send via FTP or Auto Send via HTTPS. By default,
Auto Send via HTTPS is enabled. c Configure the following settings if you selected Auto Send via FTP• FTP Host Type - Select the host type as IP or DNS.• FTP Server IP Address - Enter the server IP address if you selected host type as IP.• FTP Host Name - Enter the name of the host server. This option is displayed if you
selected host type as DNS.• FTP User Name - Enter the user name to log onto the FTP server.• FTP Password - Enter the password to log onto the FTP server.

Using The Application 2
RANAdvisor Handheld Application 19
• Server Directory - Enter the directory to be used to upload your data to. It is recommended that you create and use a different directory for each test phone that is collecting data.
• Max Transfer Time-out (seconds) - Enter the time allowed before the FTP or HTTPS transfer will time out and fail.
• Delete after sending - Enable this option if you want to delete data files from the phone after they have been uploaded to the FTP or HTTPS server.
The data files uploaded are the data files that are stored in the same folder that was defined in the “Save location” option on the phone. If you have several data files in the saved location and you then enable Auto Send, all files will be uploaded and deleted (if enabled).
If an FTP transfer fails, the data files will remain on your phone. The FTP transfer of the data file happens when recording stops at the end of a test cycle or when you select “Stop Recording”. If you start recording again before the transfer is complete, the transfer will stop and will reattempt next time recording is stopped.
d Perform the following settings if you selected Auto Send via HTTPS:• HTTPS Server URL - Enter the HTTPS server URL.• HTTPS User Name - Enter the user name to log onto the HTTPS server.• HTTPS Password - Enter the password to log onto the HTTPS server. • Server Directory - Enter the directory to be used to upload your data to. It is
recommended that you create and use a different directory for each test phone that is collecting data.
• Max Transfer Time-out (seconds) - Enter the time allowed before the HTTPS transfer will time out and fail. The default value is 60 seconds.
e Delete after sending - Select Yes if you want to delete data files from the phone after they have been uploaded to the HTTPS server. The default value is No.
f Zip File - Select this option to zip the AHD files before uploading. By default this option is disabled.
g Select Add other HTTPS Properties to add additional properties. You must configure the property name and value. For example, MIME type used for upload is multipart/form-data.
Configuring UARFCN Preference
This feature is available on all HTC devices. You can use this feature to set a preferred UARFCN on the phone. To configure UARFCN Preference:1 Run RANAdvisor Handheld.2 Tap Settings from the Home screen.3 From the Settings screen, tap UARFCN Preference.4 Tap UARFCN to enter a preferred value.5 Click OK.

20 RANAdvisor Handheld Application
2 Using The Application
You must power cycle the phone for the frequency preference to take effect. If the UARFCN is available when the phone powers on, it will be chosen as the frequency to use. If it is not available or if coverage is poor, the phone will perform a normal search and choose the best frequency available.
Configuring Frequency Forcing
The Frequency Forcing feature allows you to lock a commercial Qualcomm Chipset device to a desired channel. In UMTS, this ensures that the device only uses the specified UARFCN for service. If the UARFCN is not available, the device will go out of service and remain in that condition until the specified UARFCN is available after which the normal service will be re-established on the specified UARFCN. In LTE, this ensures the device only camps onto the preferred EARFCN on power up but it may move to other available EARFCNs within the same band, only if the criteria for handover are fulfilled. In order to configure the device to use this locking functionality, the steps described below are required before data collection is started. A power cycle of the device is mandatory to set the locking mode and must be performed each time the channel is locked or unlocked.
Configuring Samsung Galaxy S II (SGH-I727)
Use a 3G SIM card to set the phone in WCDMA mode.
Configuring UARFCN Forcing 1 Run RANAdvisor Handheld.2 Tap Settings from the Home screen.3 From the Settings screen, tap Frequency Forcing.4 Select the technology as WCDMA.5 Enter the UARFCN value to lock the device.
Note: There is a validation check by RANAdvisor Handheld to ensure that the UARFCN value falls within the frequency band.
6 Power cycle the device for the changes to take effect.7 Launch RANAdvisor Handheld. You will see forcing enabled after power cycle. 8 Click Continue. The device will remain in the forced UARFCN.
Configuring EARFCN Forcing 1 Run RANAdvisor Handheld.2 Tap Settings from the Home screen.3 From the Settings screen, tap Frequency Forcing.4 Select the technology as LTE.5 Enter the EARFCN value to lock the device.
Note: There is a validation check by RANAdvisor Handheld to ensure that the EARFCN value falls within the frequency band.
6 Power cycle the device for the changes to take effect.7 Launch RANAdvisor Handheld. You will see forcing enabled after power cycle.8 Click Continue. The device will remain in the forced EARFCN.
Using The Application 2
RANAdvisor Handheld Application 21
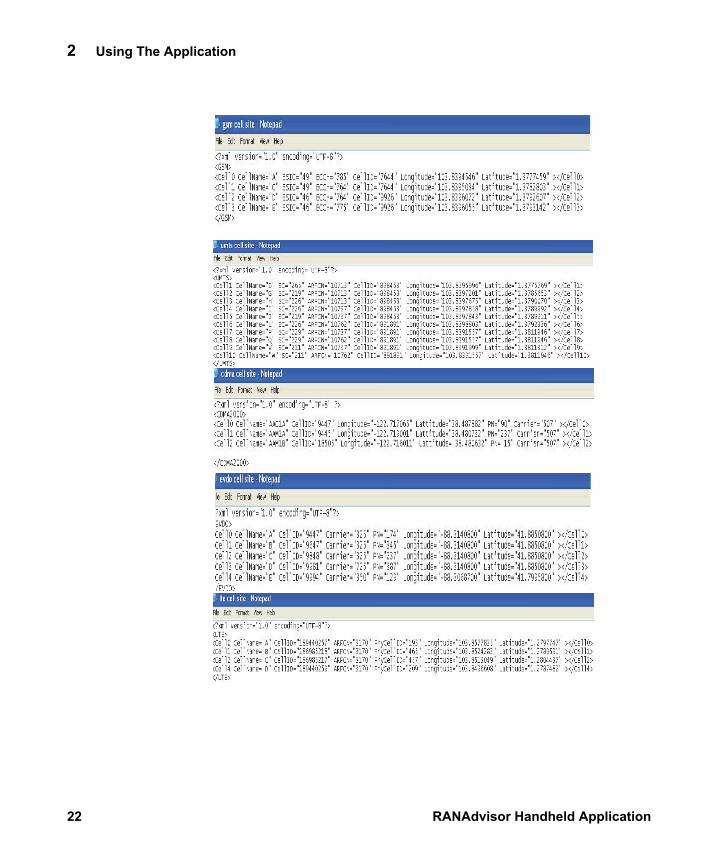
Configuring Cellsite Data
This feature shows serving and active cells for different technologies by configuring the cellsite database in the device. If any cell matches with primary and secondary key defined in the cellsite database, then the cell name is updated in the portrait mode and a line is drawn from current location to a serving cell or one of the active cells in Outdoor/Indoor map.
To configure cellsite database, go to Settings > Cellsite Data, enable the technology you want to activate and select the cellsite database XML file from the SD card. Ensure that you have put the cellsite database XML file in FTA > Cellsite Database folder in the SD card. You can create a cellsite database XML file using the Cellsite Importer utility in the E6474A application or you can create your own cellsite database XML file in the following format as shown below.
After configuring the XML file, you can define the Cellsite Range unit as Km or miles and specify the maximum valid distance range when looking for the serving cell. The application looks for only those cells which fall within the range and if there is more than one cell with the same primary and secondary key, then the first cell which is closest to the current location is reported.
22 RANAdvisor Handheld Application
2 Using The Application
Using The Application 2
RANAdvisor Handheld Application 23
After configuring the cellsite database, go to Indoor or Outdoor map to view the serving and active cells.
Note: You must ensure that you use the same cellsite database for recording and replay.
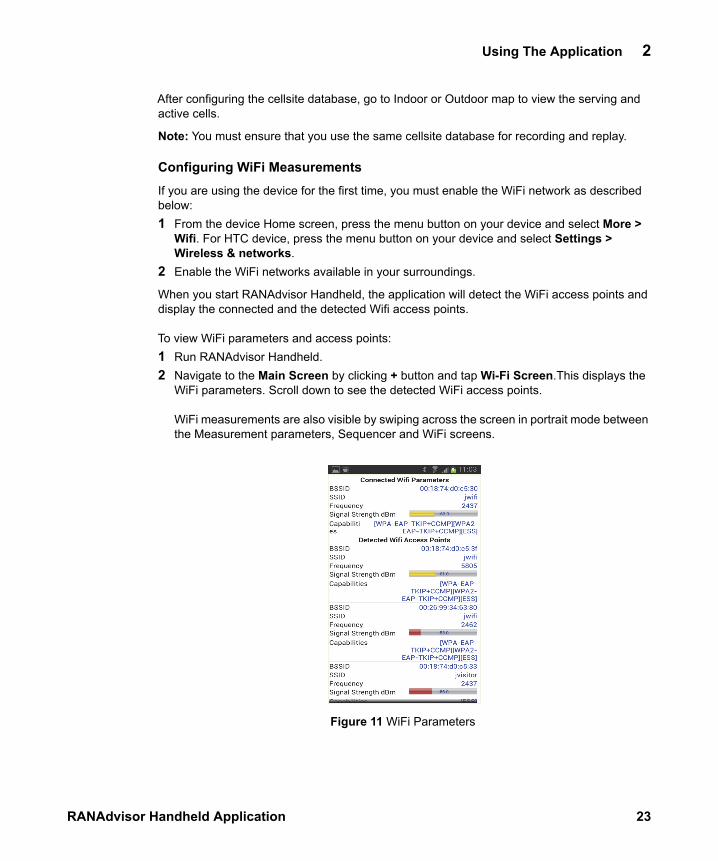
Configuring WiFi Measurements
If you are using the device for the first time, you must enable the WiFi network as described below:1 From the device Home screen, press the menu button on your device and select More >
Wifi. For HTC device, press the menu button on your device and select Settings > Wireless & networks.
2 Enable the WiFi networks available in your surroundings.
When you start RANAdvisor Handheld, the application will detect the WiFi access points and display the connected and the detected Wifi access points.
To view WiFi parameters and access points:1 Run RANAdvisor Handheld. 2 Navigate to the Main Screen by clicking + button and tap Wi-Fi Screen.This displays the
WiFi parameters. Scroll down to see the detected WiFi access points.
WiFi measurements are also visible by swiping across the screen in portrait mode between the Measurement parameters, Sequencer and WiFi screens.
Figure 11 WiFi Parameters
24 RANAdvisor Handheld Application
2 Using The Application
NOTE: If you have setup the device to remember the WiFi access points, for example the WiFi in your office, RANAdvisor will automatically select that WiFi network when available even if you have you turned off the WiFi from your device. This will cause any data testing to be carried out over the WiFi network and not the cellular network. To prevent this, you need to 'forget' the saved WiFi configurations.
To switch to a different network:1 Exit from RANAdvisor Handheld application.2 Go to the device Home screen.3 Press the menu button on your device. 4 Tap Settings > Wi-Fi and choose a different network.
To disable the logging of WiFi measurements:1 Run RANAdvisor Handheld.2 Tap Settings from the Home screen.3 From the Settings screen, tap Wifi. 4 Uncheck the Wifi Measurement.
Protocol DecoderRANAdvisor Handheld decodes CDMA/EVDO/GSM/UMTS/LTE RRC/NAS protocol messages and displays each message with the actual Timestamp, protocol layer - RRC/NAS, message direction- UL or DL for RRC and NAS and FWD/REV for CDMA/EVDO, and description for the protocol layer. You can select a different colors for each protocol layer.
To view the Protocol screen, swipe the RANAdvisor Handheld screen left/right in the portrait mode from the RF Measurement screen or select the Protocol Decoder from the Main screen. Select technology as CDMA, EVDO, GSM/UMTS NAS, GSM/UMTS RRC, LTE NAS, LTE RRC depending on the device. You can select one or more options from the list to view the decoded messages. The screen displays first level protocol information directly, and when you click any message, the details of the decoded messages will be shown.
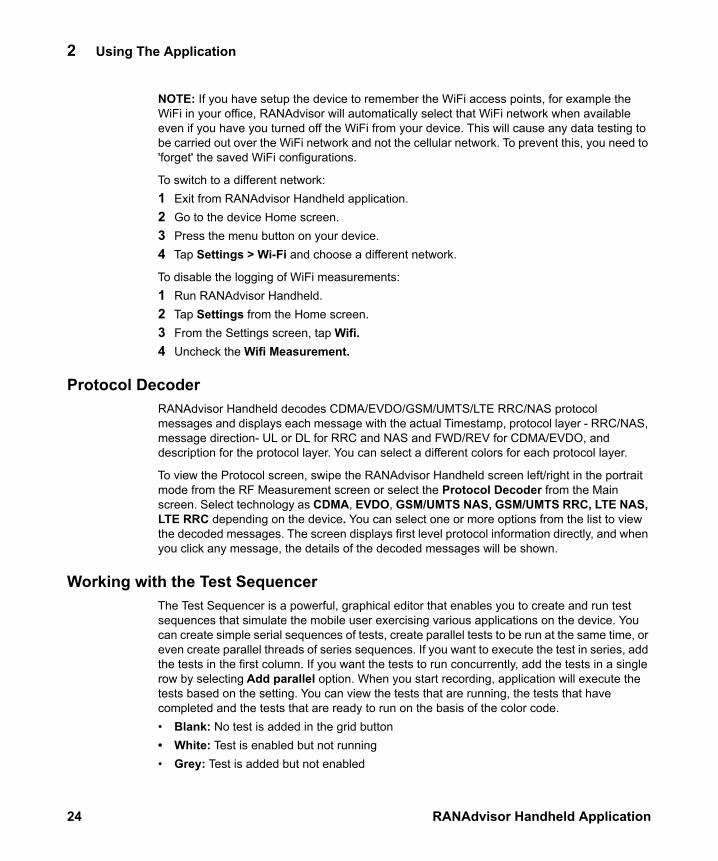
Working with the Test SequencerThe Test Sequencer is a powerful, graphical editor that enables you to create and run test sequences that simulate the mobile user exercising various applications on the device. You can create simple serial sequences of tests, create parallel tests to be run at the same time, or even create parallel threads of series sequences. If you want to execute the test in series, add the tests in the first column. If you want the tests to run concurrently, add the tests in a single row by selecting Add parallel option. When you start recording, application will execute the tests based on the setting. You can view the tests that are running, the tests that have completed and the tests that are ready to run on the basis of the color code.• Blank: No test is added in the grid button• White: Test is enabled but not running• Grey: Test is added but not enabled
Using The Application 2
RANAdvisor Handheld Application 25
• Blue: Test is currently running• Red: At least one test cycle failed• Green: All the test cycles have completed successfully
Figure 12 Test status displayed in different colors
26 RANAdvisor Handheld Application
2 Using The Application
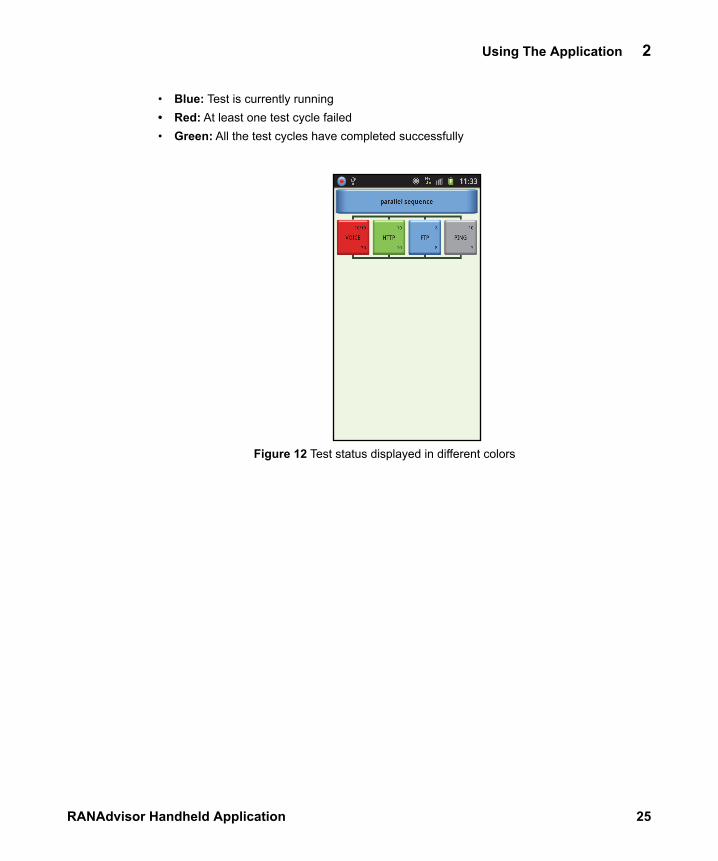
To launch the Test Sequencer, perform the following steps:1 Run RANAdvisor Handheld. 2 From the application Home screen, tap Test Sequencer or from the RF measurements
screen, in the portrait mode, swipe with your fingers to the left or right to view the Test Sequencer screen.
3 Select Tap here to Create or Load a Test Sequence button. You will see the options to create, load, save and edit Test Sequencer file.
4 Select Create to create a test sequence file or select Load to load a test sequence file from the device SD card/FTA/Sequencer directory.
5 If you select Create option, you will see the options to enter the Name of the sequencer file, Description and Additional Settings. After entering the name and description, click Additional Settings to configure LIBPCAP and Default or JDSU iPERF. If you are using iPERF test, you can enable JDSU or Default iPERF option. If the JDSU iPERF option is selected, three more directions will be enabled in the direction property of the iPERF test: Downlink, Sequential and Concurrent in addition to Uplink. You must install the JDSU iPERF controller and configure it in the server. For the details on how to install and configure JDSU iPERF controller, refer to the E6474A Online Help.
The LIBPCAP option is enabled only if you have rooted the phone. See “Rooting Android devices" on page 62 for information on how to root your device. If you enable LIBPCAP, RANAdvisor Handheld will record the application layer protocol messages in the background and save in the SD card/FTA/PCAP directory. You can playback the captured

Using The Application 2
RANAdvisor Handheld Application 27
pcap file using Network Protocol Analyzer tools such as Wireshark.The first column will be enabled to add the tests in serial sequence. If you select Load option, select a test sequence file from the device SD card/FTA/Sequencer directory and perform step 9 to start recording. You can also perform the following steps to add, edit, delete tests after loading a test sequence file.
6 Select TAP TO ADD TEST button to add tests.7 From the Add Test screen, select the tests to add, for example if you select voice, you will
see Voice settings screen for configuration. For details about the tests, see “Working with the Test Sequencer" on page 24.
8 Press the back button on your device to save the settings. After enabling the test, it will be added in the Test Sequencer screen.
9 Press the menu button on your device and select Start Recording. After you select Start Recording or if you close RANAdvisor Handheld, the test sequencer file is saved in the device SD card/FTA/Sequencer directory. After recording, you can edit the test sequence file by selecting the file name at the top. You will see options to create, load, save, edit and view the description. Select Edit to edit the test sequencer file. When you edit the existing test sequence file, it is advisable to save it as a new name to avoid replay issues with the recorded AHD files logged with a previous sequencer flow.
10To edit a test, press the desired grid button in the Test Sequencer screen for a longer duration. You will see following options:
• Copy Test – Copies the selected test• Paste Test – Pastes the copied test to an empty grid button. This option is visible after you
select Copy Test.• Delete Row - Deletes an existing row• Delete Test – Deletes the selected test• Add Parallel – Adds the tests in a parallel sequence. If you select this option, a new TAP
TO ADD TEST button is added in the horizontal row.• Insert Row – This option allows you to add a new row, a parallel row for the parallel
testing, a serial row for the series testing above or below the selected one.• Insert Test Above – Adds a new test above the existing one• Insert Test Below – Adds a new test below the existing one
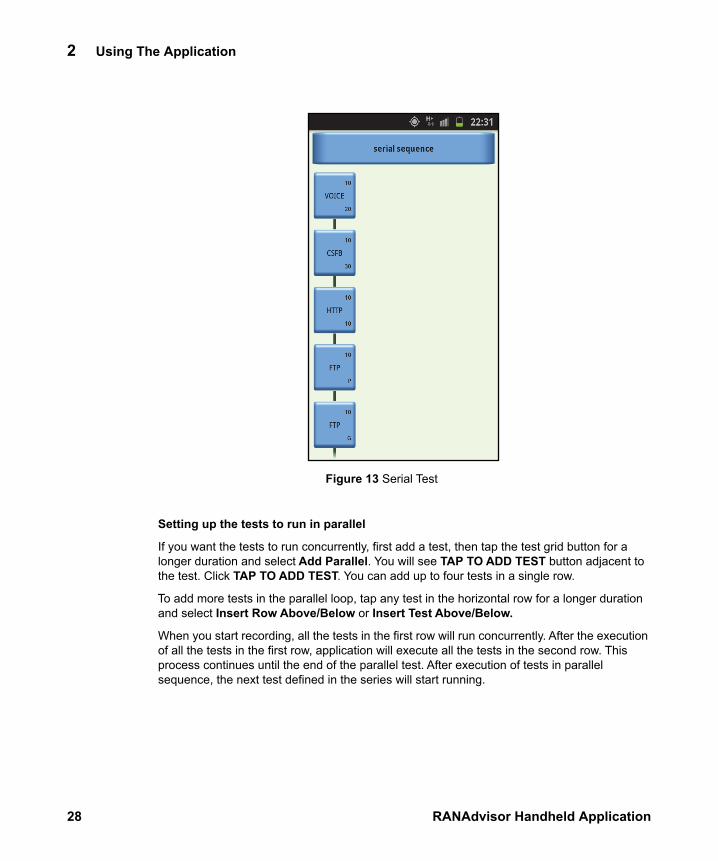
Setting up the tests to run in series
If you want to execute the test in series, add the tests in the first column as shown in the Figure 13 on page 28. In this example, when you start recording, first the Voice test will run then the CSFB, HTTP, FTP (Put), FTP (Get) and Ping tests.
28 RANAdvisor Handheld Application
2 Using The Application
Figure 13 Serial Test
Setting up the tests to run in parallel
If you want the tests to run concurrently, first add a test, then tap the test grid button for a longer duration and select Add Parallel. You will see TAP TO ADD TEST button adjacent to the test. Click TAP TO ADD TEST. You can add up to four tests in a single row.
To add more tests in the parallel loop, tap any test in the horizontal row for a longer duration and select Insert Row Above/Below or Insert Test Above/Below.
When you start recording, all the tests in the first row will run concurrently. After the execution of all the tests in the first row, application will execute all the tests in the second row. This process continues until the end of the parallel test. After execution of tests in parallel sequence, the next test defined in the series will start running.

Using The Application 2
RANAdvisor Handheld Application 29
Figure 14 Serial and Parallel Test Sequence
Configuring Sequencer TestsYou can configure the following tests using Test Sequencer. To access these tests, see “Working with the Test Sequencer" on page 24.
Voice Quality Test This test can be enabled by using a POLQA Voice MOS Measurement license. For information on how to update the license, see “Updating the License" on page 45. The test is currently supported only on Samsung Galaxy SIII GT-i9305. Before executing the test, the devices must be rooted and configured to a cellular network. For information on how to root the device, see “Rooting Android devices" on page 62.
The test works in two modes: Caller and Answerer. Both the caller and answerer settings should be same before executing this test. During execution, the caller makes a call to the answerer and the answerer replies back by adding a reference file to the audio channel. The caller then records this voice. After the caller has added the reference file, a comparison is
30 RANAdvisor Handheld Application
2 Using The Application
performed on the caller side between the original sample and recorded sample to come up with POLQA measurements. All the measurements are shown in the status history screen. The Voice Quality Test also supports calling to the JDSU Voice Quality Office unit (B9990A-440) to make Downlink voice quality measurements.
Note: You cannot add Voice Quality Tests in parallel, or add it in Parallel with a standard Voice Test.
You can configure the following properties:• Voice Quality Test - Select this option to enable the Voice Quality test.• Test Name - Enter a test name to identify the test.• Mode - Select the mode as Answerer or Caller.• Reference File - Select a reference speech file. Both the answerer and caller should have
same reference file for the accurate POLQA measurements.• POLQA Measurements - Select this option if you want to view the measurement results.
You have to make the device POLQA enabled by getting license from the vendor for viewing the measurement results.
• AutoLine Align Result - Select On to align the power level of both reference audio and recorded audio at the same level. The default value is On.
• Incoming Call Number - Enter the incoming call number. This property is not editable if the Mode is set to Caller.
• Answerer - Enter the answerer call number. This property is not editable if the Mode is set to Answerer.
• Cycles - Enter the number of times to repeat the test.
Auto Send Test This test uploads the AHD files from the phone to the configured HTTPS or FTP server. When the Test Sequencer encounters an AutoSend test, it uploads the recorded data from the start or from the point when the last AutoSend test was encountered. The recording will continue thereafter. The fragmented AHD files are created separately from main AHD file. For example, if there are five auto send tests configured in the test sequence, then six fragmented files will be created. The last fragmented file will contain summary information of all the tests. The last fragmented file and the complete AHD file will be uploaded upon completion of the whole recording.
The fragmented files are uploaded in the following directory:• On the FTP Server: <configured directory>/<IMSI>/Timestamp_<Recording Start
TimeStamp>/<ADH file name>_<Fragment ID>.AHD• On the HTTPS server: <root>/<ADH file name>_< Fragment ID >.AHD• On the SD Card: /<Save Location>/ToBeUploaded/>/<AHD file name>_<Fragment
ID>.AHD
The first test in the Test Sequencer cannot be Auto Send test. The Auto Send test can be added only in series, not in parallel. You cannot add two consecutive Auto Send test.
You can configure the following properties for the test.
Using The Application 2
RANAdvisor Handheld Application 31
• Auto Send - Select this option to enable the test.• Test Name - Enter the test name to identify the test.
See “Configuring the Record Parameters” on page 18 to configure the properties for Auto Send.
Voice Test Used for setting up the phone to make automatic voice calls (continuous or cycled calls). It lets you set the number to call and how much time to spend on the call and in between calls.• Voice Call - Select this option to enable the Voice test.• Test Name - Enter a test name to identify the test.• Call Number - Enter the receiver’s phone number.• Mode: Select the mode as Cycle Calls or Single Long Call.• Busy Timeout (sec) - Enter the time to wait for the voice call to start. The default value is
20 seconds.• Duration (sec) - Enter the duration of the call. The default value is 30 seconds.• Inter Call Delay (sec) - Enter the delay between calls.The default value is 10 seconds.• Cycles - Enter the number of voice call cycles. The default value is 10.
FTP Test Used for setting up FTP uploads (PUT) or downloads (GET). Defines where and how you make an FTP connection.• FTP - Select this option to enable the test.• Test Name - Enter the test name to identify the test.• FTP Host Type - Select the host type as DNS or IP.
If you select host type as DNS, enter the FTP Host Name as web URL. If you select host type as IP, enter the FTP Host Name as IP address.
• FTP Host Name - Enter the IP address or host name based on the host type.• Transfer Mode - Select ASCII to transfer the file in ASCII format or select Binary to
transfer the file in binary format.• User Name - Enter the user name of the host.• Password - Enter the password.• FTP Buffer Size (bytes) - Enter the buffer size.The default value is 256 bytes.• Server File to Download - Select the file to receive from the Server. This option is
available if you select FTP_GET test.• Local File to Send - Select the file to transfer from the device. This option is available if
you select FTP_PUT test.• Server Path to Upload - Enter the server path to upload the file. This option is available if
you select FTP_PUT test.• Cycles - Enter the number of times to repeat the test. The default value is 10.• Max Transfer Timeout (sec) - Enter the time within which the transfer should happen. The
default value is 180 seconds.
32 RANAdvisor Handheld Application
2 Using The Application
• Inter transfer delay (sec) - Enter the delay between two transfers. The default value is 10 seconds.
HTTP Test Used for setting up HTTP transactions. Forces the phone to make HTTP connections. Defines the connection to make and how often to make it using the following properties:• HTTP: Select this option to enable the HTTP test.• HTTP URL: Enter the URL to connect e.g. http://www.facebook.com• Cycles: Enter the number of times to perform the test. The default value is 10.• Inter Transfer Delay (sec): Enter the delay between two tests in seconds. The default
value is 10 seconds.• Max Transfer Timeout (sec): Enter the timeout period after which the test will fail.The
default value is 180 seconds.
Ping Test Used for setting up Ping transactions. You can use Ping to define the connections you want to make and how often to make those connections.• PING - Select this option to enable the test.• PING Host Type: Select the host type as DNS or IP. If you select DNS, you must input the
host name below as a Web URL. If you select IP, you must input the host name as IP address.
• PING Host Name: Enter the web URL or IP address depending on the host type.• Timeout (ms): Enter the time to wait for the PING command to start.• Inter Cycle Delay (sec): Enter the delay between two cycles. The default value is 10
seconds.• Pings per cycle: Enter the number of times the application should ping the host per
cycle.The default value is 5.• Cycles - Select the number of times to perform the test.The default value is 10.
CSFB Test The Circuit Switched Fall Back (CSFB) test is used to validate that while on an LTE data session, an attempt to make a Voice call will 'Fall Back' to 3G to make the Voice call.
The test starts with an HTTP transfer to initiate a data session. If the session is successful and the sessions are over LTE, then a Voice call is initiated. The test passes only if the data transfer works and it is over LTE and the Voice call works. The setup time of the CSFB call is measured during this test. CSFB inter cycle delay default time is set to 45 seconds. This is the minimum time required to ensure the phone moves back to LTE.
You must extend this time if there are subsequent test failures due to no LTE data transfer.
When CSFB test is enabled, no other test will be executed. This test is applicable only for LTE Devices. To use this test, you must enable CSFB through settings.• CSFB - Select this option to enable the test.• Test Name - Enter a test name to identify the test.
Using The Application 2
RANAdvisor Handheld Application 33
• Cycles - Enter the number of times to perform the test.The default value is 10.• Inter Cycle Delay (sec) - Enter the delay between two cycles.The default value is 45
seconds.
HTTP Settings• HTTP URL - Enter the HTTP URL e.g.http:www.yahoo.com.• Inter Transfer Delay (sec) - Enter the delay between two HTTP transfers. The default
value is 10 seconds.• Max Transfer Timeout (sec) - Enter the time to wait for HTTP download to start. The
default value is 180 seconds.
Voice Settings• Call Number - Enter a number to call.• Busy Timeout (sec) - Enter the time to wait for the voice call to start. The default value is
20 seconds.• Duration (sec) - Enter the duration of the call. The default value is 30 seconds.
EVDOCH This test is available only for CDMA/EVDO devices.
EVDOCH checks the current EVDO channel and compares it with the desired channel. If they are the same, the test exits with a PASS. If not, the phone’s radio is turned off and back on to cause the phone to re-attach to the EVDO network, and the channel is again compared with the desired channel. The hashing algorithm has a random chance to allocate any of the available EVDO channels each time the network is accessed. This process is repeated until they match or the maximum number of tries have been carried out.
Configure the following properties: • Desired Channel - Enter the channel number to test.• Times to try - Enter the number of times to search the desired channel number.
Trace Route Test This test runs a trace route on a data connection. This diagnosticutility determines the route taken to a destination by sending Internet Control MessageProtocol (ICMP) echo packets with varying Time-To-Live (TTL) values to the destination. Eachrouter along the path is required to decrement the TTL on a packet by at least 1 beforeforwarding it, so the TTL is effectively a hop count.
When the TTL on a packet reaches zero, the router is supposed to send back an ICMP TimeExceeded message to the source system. Trace route determines the route by sending thefirst echo packet with a TTL of 1 and incrementing the TTL by 1 on each subsequenttransmission until the target responds or the maximum TTL is reached.
The route is determined by examining the ICMP Time Exceeded messages sent back byintermediate routers. Notice that some routers silently drop packets with expired time-to-live(TTLs) and will be invisible to trace route.
The default time out for a trace route action is 1000 milliseconds.
34 RANAdvisor Handheld Application
2 Using The Application
• TRACERT Host Type - Select the host type as DNS or IP. If you select the host type as DNS, you must enter the host name in the below field. If you select host type as IP, you must enter the IP address in the below field.
• TRACERT Host Name - Enter the destination address which can be either a host name or the IP address to trace the route.
• TRACERT Mode Type - Tap to select mode type as Normal or Change. If you select mode type as Normal, the test runs one cycle. If you select mode type as Change, the test will detect if there is any change in the IP route compared to the base line. You must first add TRACERT test as Normal mode before you can add TRACERT test as Change mode. The change mode detects the change in the route. If there is change in the route, the test is failed else it is passed.
• Timeout (ms) - Set the time out in milli seconds after which the test will stop.• Max No. of Hops - Set the maximum number of hops that you would like to limit the trace
route to.
SMS test The application tests whether the device can send SMS to itself.
The test waits for a pre-defined time to receive the SMS. When the SMS is received, the test verifies the contents. The test passes if it receives the correct SMS before the time out period. The test fails if it does not receive the SMS or the contents are not correct or any error occurs. You can add two SMS test in series but you cannot add two SMS test in parallel. • Enter Your Phone number - Enter the phone number of the device being tested. On some
phones, the number will be automatically displayed.• Cycles - Set the number of times you want the device to send the SMS to itself. Min: 1 and
Max:32000.• Inter Cycle Delay - Set the delay time between two SMS. Max:2147 sec and Min:10 sec• Timeout (sec) - Set the time out in seconds for receiving the SMS. Max: 2147, Min:1• Enter SMS message - Type the message to be sent. The SMS will be sent to itself.
MMS test The application tests whether the device can send the MMS back to itself. The test waits for a maximum time out period to receive the MMS. On reception, it verifies the contents. The test is passed if the correct MMS is returned within the time out period. The test fails if it does not receive the MMS or the contents are incorrect or any error occurs. The MMS test is currently supported only on HTC devices. You can add two MMS test in series but you cannot two MMS test in parallel. • Enter Your Phone number - Enter the phone number of the device being tested. On some
phones, the number will be automatically displayed.• Cycles - Set the number of times you want the device to send the MMS to itself. Min: 1 and
Max:32000.• Inter Cycle Delay - Set the delay time between two MMS in seconds. Max:2147 and
Min:10• Max Transfer Timeout (seconds) - Set the time out in seconds for receiving the MMS.
Max: 2147, Min:1

Using The Application 2
RANAdvisor Handheld Application 35
• MMS Size - Select the size of file from the list.
Email test The application tests whether the device can send email to itself. During execution, the test sends the selected email size from the default email address back to the same email address. Note: The email will not be saved in the defined email address.
The RANAdvisor Handheld waits for a pre-defined timeout period to receive the email. When it receives the email, the application verifies the content. The test passes if the correct email is returned within the timeout period. The test fails if there is no return email or the contents are incorrect. The Email test can run in parallel to itself.
Sending Account Settings• Server Name & Port number - Enter the server name and port number of the sending
account.Receiving Account Settings
• Server Type - Select the server type as IMAPS or POP3 of the receiving account.• Server Name - Enter the server name of the receiving account.• Port: Enter the port number of the receiving account.• User Name - Enter the user name.• Email ID - Enter the email ID.• Password - Enter the password.• Email size - Enter the email size in KB or MB. For KB, max:10240, min:1. For MB: max:10,
min:1.• Email unit - Select the option as KB or MB.• Max Timeout - Set the time out in seconds to receive the email. Max: 2147, Min: 1 • No of Trials - Set the number of trials for the test to resend the email when it fails. The
default value is 5. Each trial waits for a max timeout period to resend the email. • Cycle - Set the number of times to perform the email test. The default value is 10.• Inter Cycle Delay - Set the delay time between two email tests. The default value is 10
seconds.
Mobile Terminated Call Test Mobile Terminated is used to test the incoming voice calls. The test waits for the incoming calls and auto answers them. The test passes if the expected number of calls are received within the time out period. The test will disconnect all the calls if it receives more than one call at the same time and will be marked as failed. To accept only the desired incoming numbers, you must configure the setting. If you enter the number as 6393, then all the incoming calls that has this sequence at the end e.g. 82086393, 98766393 will be accepted, the rest that does not contain this sequence, e.g. 63938756, will be rejected. You can setup the Mobile Terminated Call test in parallel with all other sequencer tests except Voice, Video, EVDOCH, and itself.
Configure the following properties:
36 RANAdvisor Handheld Application
2 Using The Application
• MT - Select this option to enable the test.• Incoming Number - Enter phone number of the caller. If you keep this field empty, the test
will accept all numbers.• Test duration (min)- Enter the time duration within which all calls must be received.• Number of calls expected - Enter total number of calls to be received.
Video Test This test allows you to view the video on any available network including WiFi. You can configure only media URL and not a Web URL. The test is passed even if a single video frame is rendered by RANAdvisor Handheld on the sequencer media view. You can set up the video tests in series with other sequencer tests.
Configure the following properties:• VIDEO - Select this option to enable the test.• Video URL- Enter the media url and not a web URL. You can enter the media URL
manually by typing or through copy/paste operation. If you want to enter a Youtube media URL, select “Copy URL from Youtube” mentioned below.
• Copy URL From Youtube - When you select this field, the application will redirect you to Youtube website. From the Youtube site, select the desired video you want to play. After selecting the video, go to the media URL address bar, select the complete media URL and press Copy icon. After you copied the URL, press the back key until you reach the Video test configuration screen.
• Max Video Duration (sec) - Enter the duration to play the video. If the video is not played even once during this duration, the test fails and “VIDEO Media Error Timeout” status is displayed.
• Inter cycle delay (sec) - Enter the delay between two cycles.• Cycles - Enter the number of times to run a single video test.
iPerf Test The iPERF test is a modern alternative for measuring maximum TCP and UDP bandwidth performance.
iPERF can create TCP and UDP data streams and measure the throughput of the network that is carrying them. iPERF allows tuning of various parameters and UDP characteristics. iPERF reports bandwidth, delay jitter, datagram loss. iPERF test has both client and server components and can measure the throughput between the client and server, either unidirectional or bidirectionally. When used for testing UDP capacity, iPERF allows setting of the datagram size and provides results for the datagram throughput and the packet loss. When used for testing TCP capacity, iPERF measures the throughput of the payload.
In a typical iPERF test, there is a server iPERF and a client iPERF. The server iPERF must be started before the client iPERF, else the test will fail.
Follow the below steps to configure iPERF server:1 Download the iPERF precompiled binary file from the link: http://iperf.fr/2 Open the command prompt and go to the directory where the binary is located.

Using The Application 2
RANAdvisor Handheld Application 37
3 For configuring the server in TCP mode, execute following command:a To run on default port 5001, type iperf -sb To run on specific port, type iperf -s -p port_number
4 For configuring the Server in UDP mode, execute the following command:a To run on default port 5001, type iperf -s -ub To run on specific port, type iperf -s -u -p port_number
You can find the iPERF client binary file version 2.0.4 in the device SD card > FTA > iperf directory. You must also use the same iPERF version on the server. The properties of the iPERF test allow you to configure parameters for the mobile side of the iPERF test.• IPERF - Select to enable the test. By default, the test is enabled.• Test Name - Enter the test name to identify the test.• Server Address - Specify the server address.• Server Port - Specify the port number upon which the server is listening.• Test Mode - Select the test mode as TCP or UDP.• Direction - The direction is set to Uplink by default and cannot be changed if you have
configured Default iPERF under Additional Settings while creating the Test Sequencer file. If you have configured JDSU iPERF, you can configure the direction as Uplink, Downlink, Sequential or Concurrent. For information on how to configure the iPERF, see step 5, “Working with the Test Sequencer" on page 24.
• Bandwidth format - Select the format as bps or Bps or kbps or KBps or Mbps or MBps or Gbps or GBps. Note: Lowercase ‘b’ indicates bits and uppercase ‘B’ indicates bytes.
• Time To Transmit (sec) - Enter the time to transmit in seconds. The default value is 10 seconds.
• Report Interval (sec) - Set the interval time in seconds between periodic reports. If this is zero, no periodic reports are printed. The default value is 10 seconds.
• Buffer Length (bytes) - Enter the length of buffers to read or write. This is the Datagram Size in UDP tests. The default length is 8192 bytes.
• Window Size - Set the socket buffer size. The default value is 10.• TCP Maximum Segment Size - Set the maximum segment size for TCP. The default
value is 40.• TCP No Delay - Set the TCP no delay option, disabling Nagle’s algorithm. By default it is
enabled.• UDP Bandwidth (bps) - Specify the UDP Bandwidth.• Buffer To Transmit - Enter the number of buffers to transmit. iPERF then transmits the
buffer of specific length, the specified number of times, irrespective of time it takes to transmit. The default value is 10.
• Input Filename - Specify the filename from which the data will be transmitted by iPERF for monitoring the network performance.

38 RANAdvisor Handheld Application
2 Using The Application
• Parallel Client Thread - Enter the number of parallel client threads to run. The default value is 1.
• Time-to-live - Enter the time-to-live in seconds for outgoing multicast packets. This is essentially the number of router hops to go through and is also used for scoping. The default value is 1.
• IPV6 - Enable or disable IPV6. By default it is disabled.• Inter Cycle Delay - Enter the delay in seconds between the transfers. Max: 2147 and Min:
1.• Cycles - Set the number of times to perform the test. The default value is 10.• Extra Settings - Specify if any other parameter needs to be included in the iPERF test
apart from the ones already specified.
Remote Control of RANAdvisor HandheldYou can remotely control RANAdvisor Handheld running on a different device using the FTA SMS Controller application or by sending an SMS with a predefined message.
To remotely control RANAdvisor Handheld using the FTA SMS controller, first install FTA SMS controller on your device as described below.
Installing FTA SMS Controller
1 Navigate to the application installation package directory on your PC and locate the SMS_Controller.APK
2 Connect your phone to the PC.3 Copy the SMS_Controller.APK onto the phone at a known location on the SD card.4 Disconnect the phone.5 Click SMS_Controller.APK to start the installation.
Note: You need a File Browser such as ES File Explorer on your device to locate the apk file in the SD card.
6 Follow the on-screen instructions to complete the installation.
To remotely control the RANAdvisor Handheld using the FTA SMS Controller or via SMS, you must configure the Remote Control over SMS setting as described below:
1 Run RANAdvisor Handheld.2 Select Settings from the Home screen.3 From the Settings screen, tap General.4 From the Automation Control Options, select Automation Control Mode and enable
Remote Control Over SMS.5 Turn On the Remote Control Over SMS
Using The Application 2
RANAdvisor Handheld Application 39
Perform the following steps to remotely control RANAdvisor Handheld:
1 If you have not installed the FTA SMS Controller, you can directly send SMS to the devices running RANAdvisor Handheld with the following SMS syntax. However it is recommended to use the FTA SMS Controller app to manage the slave devices and to send commands.
a) JDSU FTA;START; message to start recordingb) JDSU FTA;STOP; message to stop recording. c) JDSU FTA;STATUS REPORT; requests the currents status of the slave device. d) JDSU FTA;RESPOND;START; requests for a SMS confirmation of the receipt of the command.e) JDSU FTA;LOAD LOCAL CONFIG file; START loads a new configuration stored locally on the device with a defined file name. The location will be in the FTA folder or in an explicitly defined path and file name. For example, JDSU FTA;LOAD LOCAL CONFIG VOICE_TEST_1;START;f) JDSU FTA;LOAD REMOTE CONFIG<FTP server IP><User ID><Password> file; START; loads a new configuration file from the FTP server with a defined path and file name. For example, JDSU FTA;LOAD REMOTE CONFIG \\TESTDIR\FTP_DOWNLINK_TEST12;START;g) JDSU FTA;LOAD LOCAL SEQUENCE file;START loads a new test sequence file from the device SD card. For example, JDSU FTA;LOAD LOCAL SEQUENCE SEQUENCER_1.XML;RESPOND;h) JDSU FTA;LOAD REMOTE SEQUENCE <FTP Server IP><User ID><Password> file;START; loads a new test sequencer file from the FTP server. For example, JDSU FTA;LOAD REMOTE SEQUENCE \TESTDIR\SEQUENCE_1.XML;RESPOND;
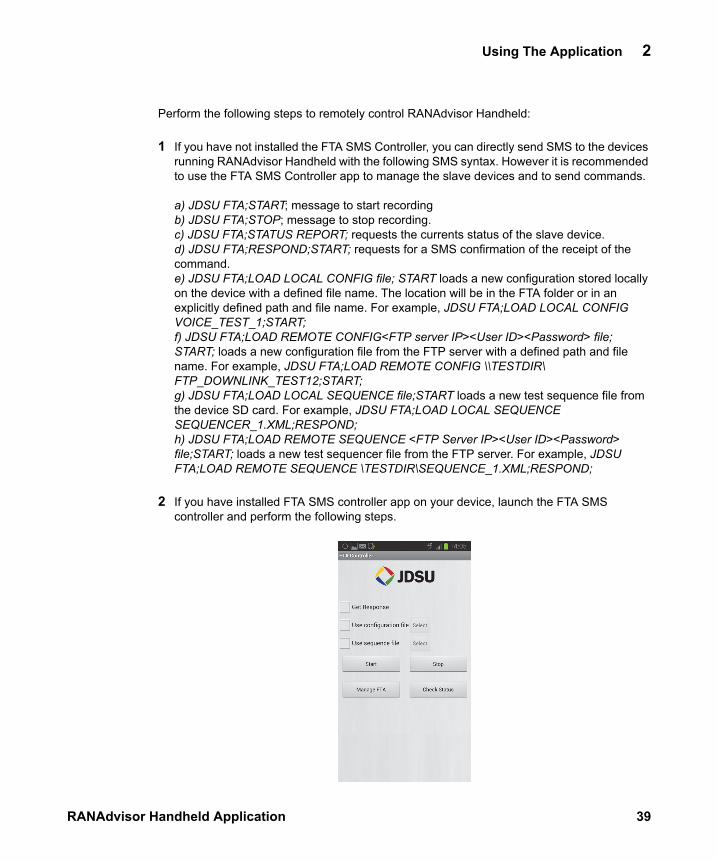
2 If you have installed FTA SMS controller app on your device, launch the FTA SMS controller and perform the following steps.
40 RANAdvisor Handheld Application
2 Using The Application
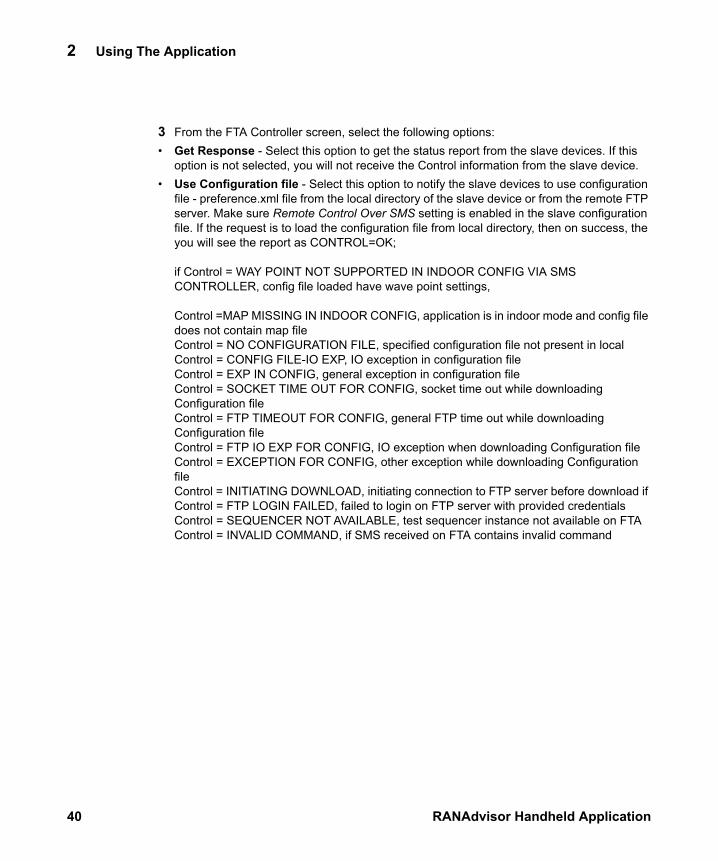
3 From the FTA Controller screen, select the following options:• Get Response - Select this option to get the status report from the slave devices. If this
option is not selected, you will not receive the Control information from the slave device.• Use Configuration file - Select this option to notify the slave devices to use configuration
file - preference.xml file from the local directory of the slave device or from the remote FTP server. Make sure Remote Control Over SMS setting is enabled in the slave configuration file. If the request is to load the configuration file from local directory, then on success, the you will see the report as CONTROL=OK;
if Control = WAY POINT NOT SUPPORTED IN INDOOR CONFIG VIA SMS CONTROLLER, config file loaded have wave point settings,
Control =MAP MISSING IN INDOOR CONFIG, application is in indoor mode and config file does not contain map fileControl = NO CONFIGURATION FILE, specified configuration file not present in local Control = CONFIG FILE-IO EXP, IO exception in configuration fileControl = EXP IN CONFIG, general exception in configuration file Control = SOCKET TIME OUT FOR CONFIG, socket time out while downloading Configuration file Control = FTP TIMEOUT FOR CONFIG, general FTP time out while downloading Configuration file Control = FTP IO EXP FOR CONFIG, IO exception when downloading Configuration file Control = EXCEPTION FOR CONFIG, other exception while downloading Configuration file Control = INITIATING DOWNLOAD, initiating connection to FTP server before download if Control = FTP LOGIN FAILED, failed to login on FTP server with provided credentials Control = SEQUENCER NOT AVAILABLE, test sequencer instance not available on FTA Control = INVALID COMMAND, if SMS received on FTA contains invalid command
Using The Application 2
RANAdvisor Handheld Application 41
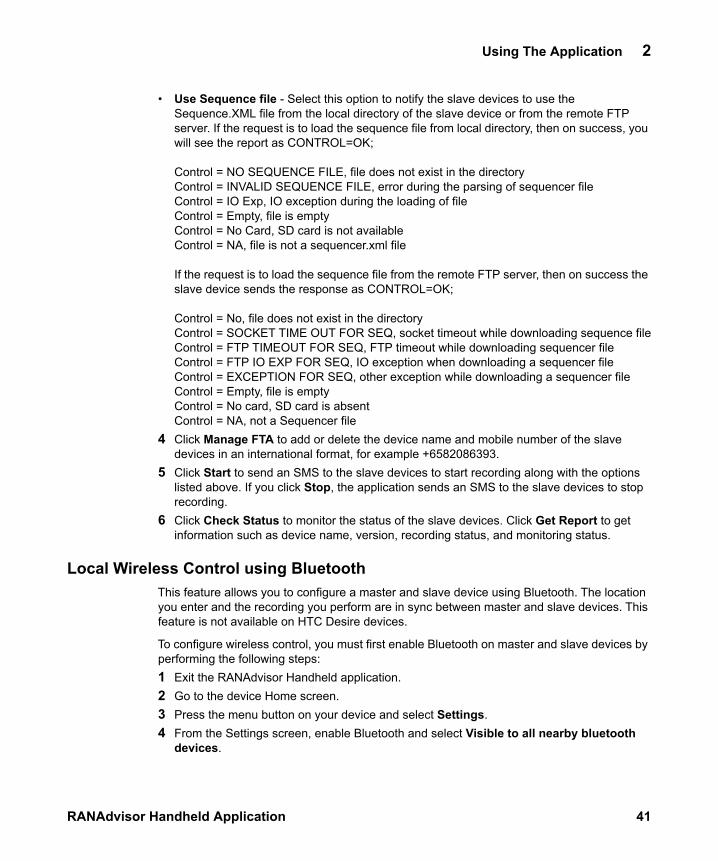
• Use Sequence file - Select this option to notify the slave devices to use the Sequence.XML file from the local directory of the slave device or from the remote FTP server. If the request is to load the sequence file from local directory, then on success, you will see the report as CONTROL=OK;
Control = NO SEQUENCE FILE, file does not exist in the directoryControl = INVALID SEQUENCE FILE, error during the parsing of sequencer fileControl = IO Exp, IO exception during the loading of file Control = Empty, file is emptyControl = No Card, SD card is not availableControl = NA, file is not a sequencer.xml file
If the request is to load the sequence file from the remote FTP server, then on success the slave device sends the response as CONTROL=OK;
Control = No, file does not exist in the directoryControl = SOCKET TIME OUT FOR SEQ, socket timeout while downloading sequence fileControl = FTP TIMEOUT FOR SEQ, FTP timeout while downloading sequencer fileControl = FTP IO EXP FOR SEQ, IO exception when downloading a sequencer fileControl = EXCEPTION FOR SEQ, other exception while downloading a sequencer fileControl = Empty, file is emptyControl = No card, SD card is absentControl = NA, not a Sequencer file
4 Click Manage FTA to add or delete the device name and mobile number of the slave devices in an international format, for example +6582086393.
5 Click Start to send an SMS to the slave devices to start recording along with the options listed above. If you click Stop, the application sends an SMS to the slave devices to stop recording.
6 Click Check Status to monitor the status of the slave devices. Click Get Report to get information such as device name, version, recording status, and monitoring status.
Local Wireless Control using BluetoothThis feature allows you to configure a master and slave device using Bluetooth. The location you enter and the recording you perform are in sync between master and slave devices. This feature is not available on HTC Desire devices.
To configure wireless control, you must first enable Bluetooth on master and slave devices by performing the following steps:1 Exit the RANAdvisor Handheld application.2 Go to the device Home screen.3 Press the menu button on your device and select Settings.4 From the Settings screen, enable Bluetooth and select Visible to all nearby bluetooth
devices.

42 RANAdvisor Handheld Application
2 Using The Application
After configuring the Bluetooth, you can configure a maximum of seven devices as slave that can be controlled by the master device. Perform the following steps to configure a slave device:1 Run the RANAdvisor Handheld application.2 From the application Home screen, go to Settings > General and select Automation
Control Mode.3 From the Automation Control Options, select Local Bluetooth Control. You will receive a
prompt to select Master or Slave. 4 Select Slave.
After configuring the devices as slave, perform the following steps to associate a slave device to master device:1 Launch RANAdvisor Handheld from your master device. 2 From the application Home screen, go to Settings > General and enable Automation
Control Mode.3 From the Automation Control Options, select Local Bluetooth Control. You will receive a
prompt to select Master or Slave. 4 Select Master. This displays Paired Devices screen. 5 From the Paired Devices screen, select the slave devices and click Ok. If you want to pair
more devices, select Pair More button. This displays the device Bluetooth settings screen. You can select the devices to pair with the master device.
Note: You must name each device with a unique name to identify the device.
Both the master and slave devices should be charged sufficiently (around more than 15%). Bluetooth may not work on low charge.
Check the Bluetooth pair screen for name of paired devices. The master name should be present on the slave device and the slave name should be present on the master device. If any slave device name is not present in the master device, then you need to pair them again.
After configuring the master and slave devices, when you start recording on the master device, the message will be communicated to all the slave devices to start recording. When you stop recording, message will be communicated to all slave devices to stop recording. When you navigate using an Indoor map on the master device by using I am here positions or a Waypoint file, those locations will be communicated to the slave devices to synchronize position logging. The navigation locations will be seen both during recording and when you play back on the slave device.
Note: When using Indoor navigation, the Indoor Map settings on all devices need to be the same.

Using The Application 2
RANAdvisor Handheld Application 43
Test Me Now (Go-NoGo)You can launch this feature from the application Home screen. Test Me Now runs a single iteration of Voice, Internet, Uplink and Downlink data tests sequentially. This feature requires the settings of Voice, Internet, and FTP server with permissions to upload files. To modify the settings:1 Tap Test Me Now from the application Home screen. This displays the Go-NoGo screen.2 Click the device menu button.3 Select Settings and click the displayed options - Voice, FTP, HTTP, Indoor, Record, GNG
Thresholds to modify the settings.
After configuring the settings, click the Test Me Now button to verify if the device is able to make a voice call, connect to internet and perform data transfer. The test displays the status of the voice test, internet connection test, downlink data rate and uplink data rate.
To perform an indoor data collection:1 Tap Test Me Now from the application Home screen. This displays the Go-NoGo screen.2 Click the device menu button.3 Select Indoor.4 Configure the indoor settings and click OK.5 Press the Test Me Now button to perform the voice and data tests. A red/green/yellow
marker will indicate the status of the test and the result of each test will be displayed on the Main Go-NoGo screen. Green indicates all tests have passed, Red indicates at least one test has failed and Yellow indicates the test in progress.
Configuring parameters on the RF Measurement ScreenYou can configure which parameters you want to see on the RF Measurement screen.
To use this feature, tap Customization from the application Home screen and choose Main Display Parameters. You will see a list of parameters available on this device. By default, all the parameters are selected. You can customize which parameters to view using the arrow button. Select All/Deselect All is available at the bottom of the screen. You can choose to save this selection configuration as xml in sdcard by clicking the Save Set button. You may choose to load a previously saved configuration by using Load Set button. The configuration files which are saved in sdcard are also editable by using MS-Excel. When finished, press OK at the bottom. After configuring the parameters, tap RF Measurement from the application Home screen to view the parameters.
Configuring parameters to display on the MapYou can define which parameters you want to display on the indoor or outdoor map during the data collection. In order to define the parameters, go to the application Home Screen, tap Customization and choose the operation as Map Display Parameters.
You will see a list of parameters available on this device.

44 RANAdvisor Handheld Application
2 Using The Application
Customize the parameters to be displayed on the map using the arrow button. You can select up to eight parameters. When finished, press OK at the bottom of the screen which will take you to the Home screen. Go to Indoor or Outdoor map and click the arrow button to view or hide the parameters.
Configuring and Displaying Map on the RF Measurement ScreenYou can configure and display charts in the portrait mode in the RF Measurement screen by performing the following steps:1 Go to the application Home screen.2 Tap Customization.3 Choose the operation as Chart Parameters. This displays the Graph list. You can select
the default graphs from the list or create a new one or load an existing graph from the device SD card. At the most four charts can be displayed on the RF Measurement screen.
4 To create a new graph, click Create New at the bottom of the screen and enter the graph name.
5 Select the Technology and the parameters and click Save. You can select up to four parameters to be displayed on a chart.
6 To edit the graph parameters, tap the graph name and click Edit to select the parameters. You can save the chart with the same name or a different name using the Save As button.
7 To delete a graph, tap the graph name and click Delete.8 To load an existing graph from the SD card, from the Graph List, click Load and select the
graph in the xml format. 9 To display the graph on the RF Measurement screen, select a graph from the Graph List
and click the back button on the device to go to the application Home screen. From the Home screen, tap RF Measurement to view the graph.
Threshold CustomizationA file name FTA_Full_Thresholds.xml can be found on the sdcard in the /sdcard/FTA/Thresholds folder. A copy is also provided in the Installation folder for each release after downloading on your PC. This file can be modified and copied to the phone to modify the settings used.
NOTE: This is not expected to be something which is changed often so it is not editable on the phone directly.
You can change parameter thresholds in the xml file in MS Excel. Open the file in MS Excel and choose to open 'As an XML table' and allow Excel to create a Schema based on the source if prompted. You need to change only TH1 and TH2, not MIN and MAX. If MIN and MAX, are changed it will not have any effect because the default MIN and MAX will be loaded.
TH1 is the threshold at which the bar changes from Red to Yellow. TH2 is the threshold at which the bar changes from Yellow to Green.
Using The Application 2
RANAdvisor Handheld Application 45
Inverse indications (where a low value is better than a high value), e.g. BLER, the colors are reversed within the application, so TH1 is where Green changes to Yellow and TH2 is where Yellow Changes to Red.
When the RANAdvisor Handheld application is started, it will load the parameters -TH1 and TH2 from the FTA_Full_Thresholds.xml file.
Recording the dataAfter you have configured the settings and are ready to start collecting data, follow this procedure:1 Click RF Measurement on the application Home screen.2 Press the device menu button and select Start Recording.
An icon (red and blue dot) appears at the top of the application indicating that data is being collected.
To stop recording data (if not configured to do so using the settings), follow this procedure:• Press the device menu button and select Stop Recording.
Updating the License 1 Launch RANAdvisor Handheld.2 To update the license, from the Main screen, click About Licenses.3 Enter the license key and click Validate.4 If this license allows the Voice Quality Test, you must reboot your device.
Viewing the User Manual1 Launch RANAdvisor Handheld.2 Tap RF Measurement on the application Home screen.3 Select the device menu button > More > Help. Click the User’s Manual icon at the top
right corner.
Viewing the Software Version1 Launch RANAdvisor Handheld.2 Tap RF Measurement on the application Home screen.3 Select the device menu button > More > About.
NOTE If you intend to record GPS position information as you move around outside or drive with the phone, you should first have a GPS fix. Monitor the Satellites Visible and Satellites Tracked values on the Status screen until there is a non-zero value for Satellites Tracked.
46 RANAdvisor Handheld Application
2 Using The Application
Generic Tablet Support
Specification• Android Version -Ginger Bread (2.3), Ice Cream Sandwich (4.0), Jelly Bean (4.1.1 and
4.1.2 only) • Recommended Display screen- 800 x 1280 pixels, 10.1 inches
Installing RANAdvisor Handheld1 Attach the Tablet to the PC with the USB Cable (if not already attached).2 Go to the device Settings > System > Developer Options > Debugging and enable USB
debugging.3 Navigate to the application installation package directory to locate the application
executable (JDSU_FTA_Full_Installation_Package.exe) on your PC.4 Double-click the executable to launch the JDSU Installer.5 Select the destination folder before selecting Install.6 Select Enter when prompted at the command prompt. The RANAdvisor Handheld
application installation should complete automatically.
Starting the Application on a Generic Tablet
To start the RANAdvisor Handheld application on your Tablet, from the Apps, navigate to the FTA icon and click the icon. When the start-up screen is displayed, the application opens a default Home screen that contains the Indoor, Outdoor and Settings icons. Currently, the Tablet supports Indoor Map, Outdoor Map and Wireless Control using Bluetooth. The rest of the features such as Test Me Now, Test Sequencer, Protocol Decoder, Threshold and Parameter Customization, RF Measurements, and Wireless control using SMS are not supported on the Tablet device. The operation to add or remove the feature from the Home screen remains the same as on the other devices. See “How to start the application” on page 9 to add or remove the feature from the Home screen.
Configuring Auto Start 1 From the RANAdvisor Handheld Home screen, tap Settings.2 Enable Auto Start to have the application start automatically when the Tablet is powered
on.3 See “Local Wireless Control using Bluetooth” on page 41 to configure the Tablet as a
Master Device. You cannot configure the Tablet as a slave device.
Configuring the GPS Parameter
See “Configuring the GPS Parameter” on page 16.
Performing Remote Control Using Bluetooth
This feature allows you to configure the Tablet as a Master device using the Bluetooth. To configure wireless control, you must first enable Bluetooth on the Tablet:

Using The Application 2
RANAdvisor Handheld Application 47
• From the Tablet Settings screen, enable Bluetooth and select Only visible to paired devices.
After enabling the Bluetooth, perform the following steps to configure the Tablet as a Master device:1 Run RANAdvisor Handheld. 2 From the application Home screen, go to Settings > General.3 Select Local Bluetooth Control from the Automation Control Mode.4 Select Master from the Master Slave Mode.5 Select Paired Devices, select the slave devices you want to pair and click OK. To pair
more devices, select Pair More button. This displays the Bluetooth settings screen. You can select the devices to pair with the master device.Note: You must name each device with a unique name to identify the device.
Both the master and slave devices should be charged sufficiently (around more than 15%) since Bluetooth may not work on low charge. Check the Bluetooth pair screen for name of paired devices. The master name should be present on the slave device and the slave name should be present on the master device. If any slave device name is not present in the master device, you need to pair them again. After configuring the master and slave devices, when you start recording on the master device, the message will be communicated to all the slave devices to start recording. When you stop recording, a message will be communicated to all slave devices to stop recording. When you navigate using an Indoor map on the master device by using I am here positions or a Waypoint file, those locations will be communicated to the slave devices to synchronize position logging. The navigation locations will be seen both during recording and when you play back on the slave device.
Configuring the Indoor Map
See “Configuring the Indoor Map” on page 16. While you are in the indoor map, you can configure the Indoor settings by pressing the device menu option and selecting Indoor Settings. After you have configured the settings, you will see the Indoor Map. Press the device menu option and select Start Recording to collect the data. If you have configured the slave device to display parameters on the Map, you will see those parameters from the slave devices on the Tablet in the Indoor Map.
Configuring the Outdoor Map
See “Configuring the Outdoor Map” on page 17. After you have configured the settings, go to the application Home screen and tap Outdoor. You will see the Outdoor Map. Press the device menu option and select Start Recording to collect the data. If you have configured the slave device to display parameters on the Map, you will see those parameters from the slave devices on the Tablet in the Outdoor Map.
Exiting the applicationClick the back button on the device until you see the option to exit the application.
48 RANAdvisor Handheld Application
2 Using The Application
Play Back Your Data 3
RANAdvisor Handheld Application 49
Play Back Your DataThis chapter explains how to play back the collected data from your phone.
To replay data on the phoneBefore sending the collected data back to the office to be reviewed and analyzed using the E6474A software, you can replay your data on the phone.
To replay the data:1 Run RANAdvisor Handheld.2 Select RF Measurement from the Home screen.3 Press the device menu button.4 Select Start Replay.5 Select YES when requested to stop data logging.6 Locate and select the collected data file.
When playback starts a blue and green dot appears at the top of the screen. At the end of replay you are given the choice of playing the data again or choosing another file.
Note: A Test sequence file is associated with the recorded data file (AHD) when you perform recording. If you want to replay the recorded data file on a different handset, you need to place only the AHD file to the device SD card. The test sequence file is embedded in this AHD file.
If you are playing back an indoor data collection, the map used during the data collection must be located in the same file location for the replay. The file location of the map used is stored in the data collection file.
Getting data from the phoneTo get recorded data from your phone and onto a laptop for playback and analysis, you can use one of the following methods.
USB cable
To transfer the data through a USB cable, perform the following steps:1 Ensure the phone is configured to link as a remote hard drive.2 Connect the phone to your laptop using the USB cable (supplied with the phone).3 On the laptop, locate and copy the recorded data from the phone to your laptop.
50 RANAdvisor Handheld Application
3 Play Back Your Data
Bluetooth
To transfer the data using a Bluetooth connection, perform the following steps:1 Enable Bluetooth on the phone (refer to the phone handbook for more information)2 Establish a connection between the phone and your laptop.3 Copy your recorded data from the phone to your laptop.
Remember to disable your Bluetooth connection once you have transferred your files. This will prevent any unexpected data measurements when you next use the phone.
Data card
If you have configured your logged data to be recorded directly onto a data card in the phone, remove the card and copy the files onto your laptop.
HTTPS/FTP Transfer
A useful feature of the application is that it can upload your data files directly from the phone to a known HTTPS/FTP server (accessible by your engineering team). Transfers are only started once you have stopped logging data. To configure HTTPS/FTP transfers after data logging, follow this procedure:1 Run RANAdvisor Handheld.1 Select Settings from the Home screen.2 From the Settings screen, select Record.3 In the Record settings, select Auto Send option. See “Configuring the Record Parameters” on
page 18 for configuring the properties.
Play Back Data Using the E6474A Wireless Network Optimization SoftwareTo play back and analyze your logged data you need to use the E6474A Wireless Network Optimization Software. E-mail [email protected] to get the software.
Details of the installation process and how to use the software are provided in the release notes and the User’s Guide (E6474-90090) which can be found in the documentation library after installation. Select Help > Library and open the E6474-90090 Drive Test User’s guide.
Import and Play Back Logged Handheld Data
After you have installed the E6474A software, follow this procedure to import and play back your logged handheld data. This procedure assumes you have already transferred your logged data onto your laptop (using FTP, Bluetooth, etc.)1 Start the E6474A software.2 Open the Project Manager (F5) or File > Project Manager.3 Select Create Handheld Project to create a new project.

Play Back Your Data 3
RANAdvisor Handheld Application 51
4 Select the workspaces from the Select Device View Workspaces dialog box. See Figure 15. Note that this dialog box display changes as new workspaces are added.
Figure 15 The Select Device View Workspaces Dialog Box 5 Select OK. 6 Name your project and select OK. This opens the handheld project with the workspaces you
selected in step 4. The workspaces are available immediately after you create the project. See Figure 16.
Figure 16 Available Workspaces After Creating the Project 7 Select the import handheld icon from the Project Manager toolbar.8 Locate and select a valid handheld data collection file (AHD file extension).

52 RANAdvisor Handheld Application
3 Play Back Your Data
9 After the data file (or files) has been imported, right-click the selected data and choose Set as active.
Figure 17 E6474A Project Manager with active imported data
A set of default views will open showing the data to be ready to be played back. Close the Project Manager window.
To play back your data
With your data loaded and active, use the play back toolbar to control the play back of your data. Select Play from the toolbar. See Figure 18.
Figure 18 Play back toolbar from the E6474-90135 Software
To add more views and a map, refer to the online help and the E6474A Drive Test User’s Guide.
Click’n’Sync data display
At any point during data play back, you can double-click on a line chart, map, event or protocol message and the view will synchronize all open views to the data point in time where you clicked.
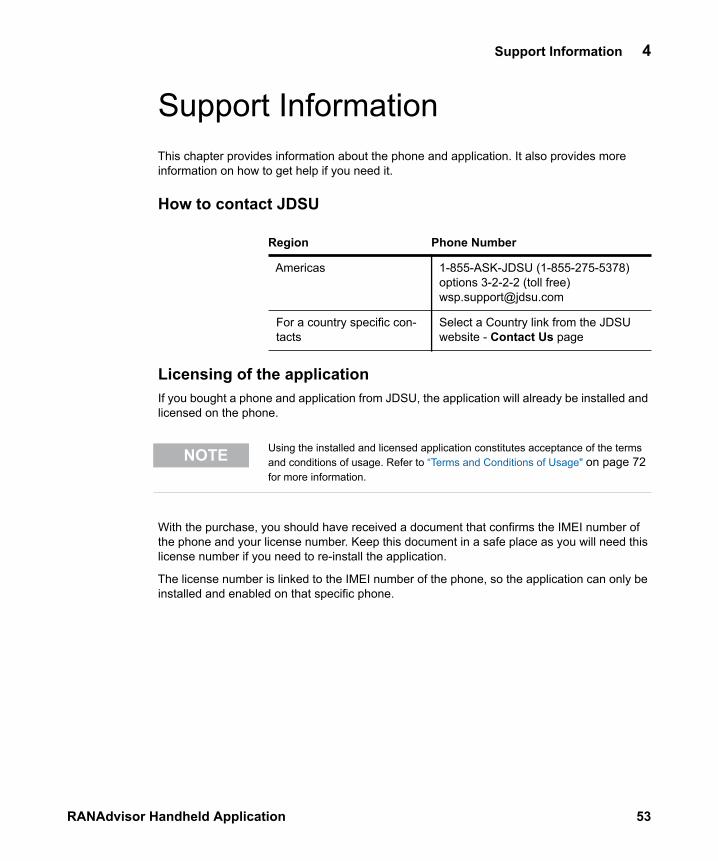
Support Information 4
RANAdvisor Handheld Application 53
Support InformationThis chapter provides information about the phone and application. It also provides more information on how to get help if you need it.
How to contact JDSU
Licensing of the applicationIf you bought a phone and application from JDSU, the application will already be installed and licensed on the phone.
With the purchase, you should have received a document that confirms the IMEI number of the phone and your license number. Keep this document in a safe place as you will need this license number if you need to re-install the application.
The license number is linked to the IMEI number of the phone, so the application can only be installed and enabled on that specific phone.
Region Phone Number
Americas 1-855-ASK-JDSU (1-855-275-5378) options 3-2-2-2 (toll free)[email protected]
For a country specific con-tacts
Select a Country link from the JDSU website - Contact Us page
NOTE Using the installed and licensed application constitutes acceptance of the terms and conditions of usage. Refer to “Terms and Conditions of Usage" on page 72 for more information.
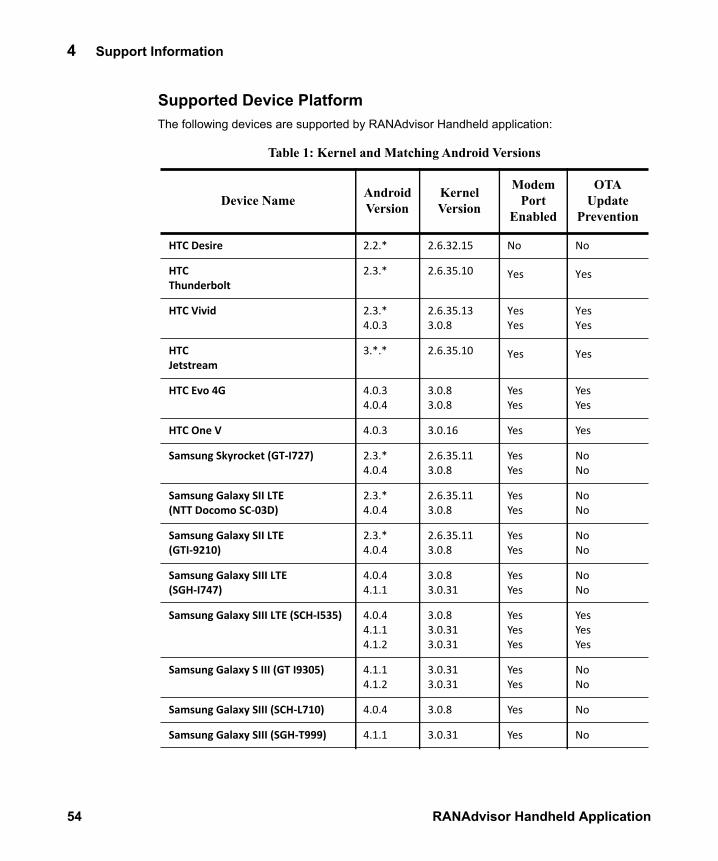
54 RANAdvisor Handheld Application
4 Support Information
Supported Device PlatformThe following devices are supported by RANAdvisor Handheld application:
Table 1: Kernel and Matching Android Versions
Device Name Android Version
Kernel Version
Modem Port
Enabled
OTA Update
Prevention
HTC Desire 2.2.* 2.6.32.15 No No
HTCThunderbolt
2.3.* 2.6.35.10 Yes Yes
HTC Vivid 2.3.*4.0.3
2.6.35.133.0.8
YesYes
YesYes
HTCJetstream
3.*.* 2.6.35.10 Yes Yes
HTC Evo 4G 4.0.34.0.4
3.0.83.0.8
YesYes
YesYes
HTC One V 4.0.3 3.0.16 Yes Yes
Samsung Skyrocket (GT-I727) 2.3.*4.0.4
2.6.35.113.0.8
YesYes
NoNo
Samsung Galaxy SII LTE (NTT Docomo SC-03D)
2.3.*4.0.4
2.6.35.113.0.8
YesYes
NoNo
Samsung Galaxy SII LTE (GTI-9210)
2.3.*4.0.4
2.6.35.113.0.8
YesYes
NoNo
Samsung Galaxy SIII LTE (SGH-I747)
4.0.44.1.1
3.0.83.0.31
YesYes
NoNo
Samsung Galaxy SIII LTE (SCH-I535) 4.0.44.1.14.1.2
3.0.83.0.313.0.31
YesYesYes
YesYesYes
Samsung Galaxy S III (GT I9305) 4.1.14.1.2
3.0.313.0.31
YesYes
NoNo
Samsung Galaxy SIII (SCH-L710) 4.0.4 3.0.8 Yes No
Samsung Galaxy SIII (SGH-T999) 4.1.1 3.0.31 Yes No
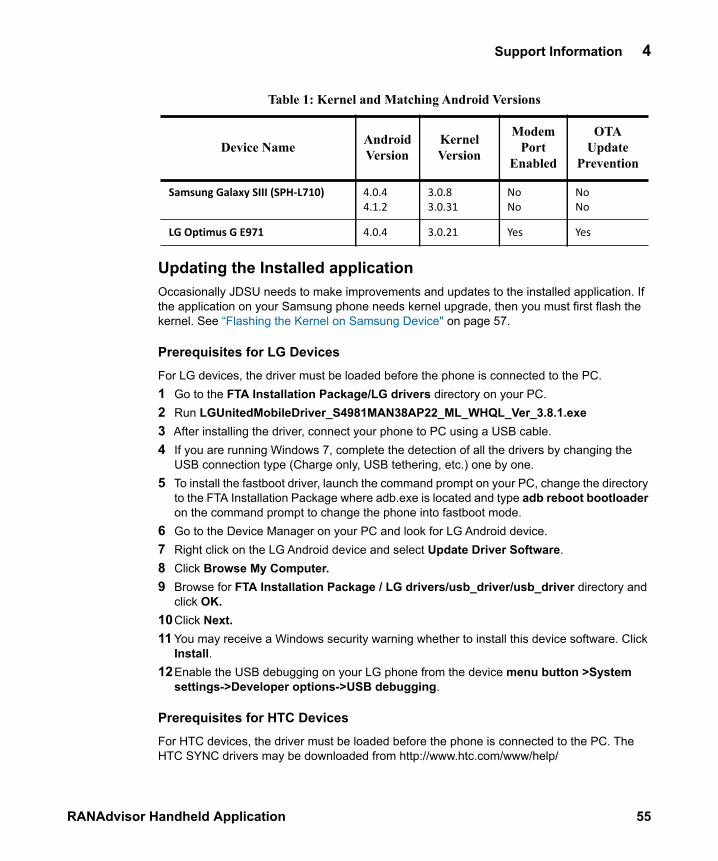
Support Information 4
RANAdvisor Handheld Application 55
Updating the Installed applicationOccasionally JDSU needs to make improvements and updates to the installed application. If the application on your Samsung phone needs kernel upgrade, then you must first flash the kernel. See “Flashing the Kernel on Samsung Device" on page 57.
Prerequisites for LG Devices
For LG devices, the driver must be loaded before the phone is connected to the PC. 1 Go to the FTA Installation Package/LG drivers directory on your PC.2 Run LGUnitedMobileDriver_S4981MAN38AP22_ML_WHQL_Ver_3.8.1.exe3 After installing the driver, connect your phone to PC using a USB cable.4 If you are running Windows 7, complete the detection of all the drivers by changing the
USB connection type (Charge only, USB tethering, etc.) one by one.5 To install the fastboot driver, launch the command prompt on your PC, change the directory
to the FTA Installation Package where adb.exe is located and type adb reboot bootloader on the command prompt to change the phone into fastboot mode.
6 Go to the Device Manager on your PC and look for LG Android device.7 Right click on the LG Android device and select Update Driver Software.8 Click Browse My Computer.9 Browse for FTA Installation Package / LG drivers/usb_driver/usb_driver directory and
click OK.10Click Next. 11 You may receive a Windows security warning whether to install this device software. Click
Install.12Enable the USB debugging on your LG phone from the device menu button >System
settings->Developer options->USB debugging.
Prerequisites for HTC Devices
For HTC devices, the driver must be loaded before the phone is connected to the PC. The HTC SYNC drivers may be downloaded from http://www.htc.com/www/help/
Samsung Galaxy SIII (SPH-L710) 4.0.44.1.2
3.0.83.0.31
NoNo
NoNo
LG Optimus G E971 4.0.4 3.0.21 Yes Yes
Table 1: Kernel and Matching Android Versions
Device Name Android Version
Kernel Version
Modem Port
Enabled
OTA Update
Prevention
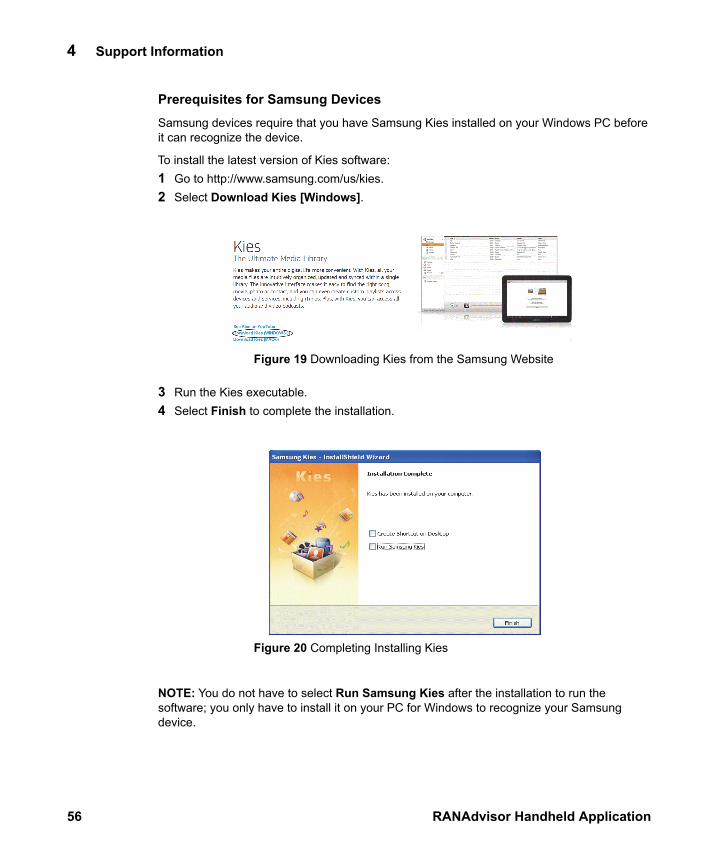
56 RANAdvisor Handheld Application
4 Support Information
Prerequisites for Samsung Devices
Samsung devices require that you have Samsung Kies installed on your Windows PC before it can recognize the device.
To install the latest version of Kies software:1 Go to http://www.samsung.com/us/kies.2 Select Download Kies [Windows].
Figure 19 Downloading Kies from the Samsung Website
3 Run the Kies executable. 4 Select Finish to complete the installation.
Figure 20 Completing Installing Kies
NOTE: You do not have to select Run Samsung Kies after the installation to run the software; you only have to install it on your PC for Windows to recognize your Samsung device.

Support Information 4
RANAdvisor Handheld Application 57
Flashing the Kernel on Samsung Device
NOTE: You do not need to flash kernel on an HTC device.
1 Download Odin from http://www.android.gs.2 Unzip Odin to a folder. 3 Start Odin.exe.4 Power off the phone and remove the battery. 5 Reinsert the battery.6 For Samsung Galaxy SIII, press the volume down button, home button and the power
button together. For other Samsung devices, press the volume down button and the power button together.
The phone should start up and show a warning screen as in Figure 21.
Figure 21 Warning Screen when Ready for Odin7 Select the Volume Up button to continue. The phone will enter Odin mode. See Figure 22
on page 58.8 Now connect the phone to your PC using a USB cable.
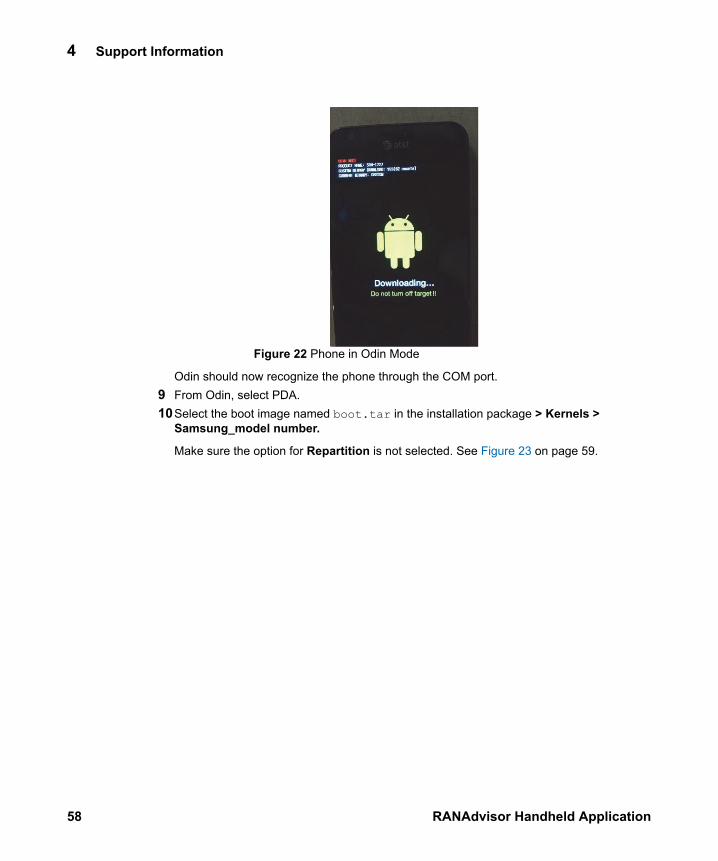
58 RANAdvisor Handheld Application
4 Support Information
Figure 22 Phone in Odin Mode
Odin should now recognize the phone through the COM port.9 From Odin, select PDA.10Select the boot image named boot.tar in the installation package > Kernels >
Samsung_model number.
Make sure the option for Repartition is not selected. See Figure 23 on page 59.
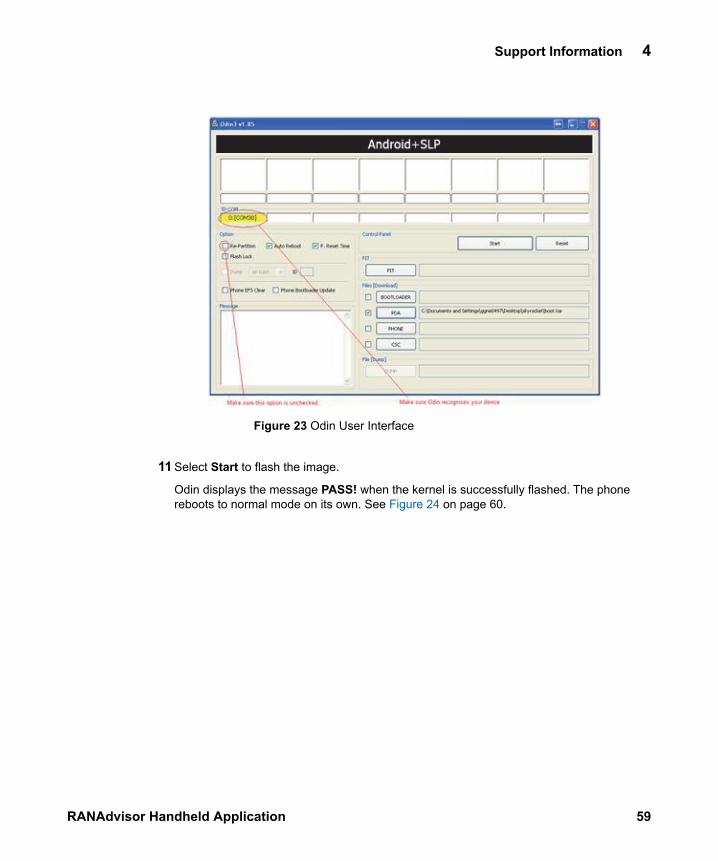
Support Information 4
RANAdvisor Handheld Application 59
Figure 23 Odin User Interface
11 Select Start to flash the image.
Odin displays the message PASS! when the kernel is successfully flashed. The phone reboots to normal mode on its own. See Figure 24 on page 60.
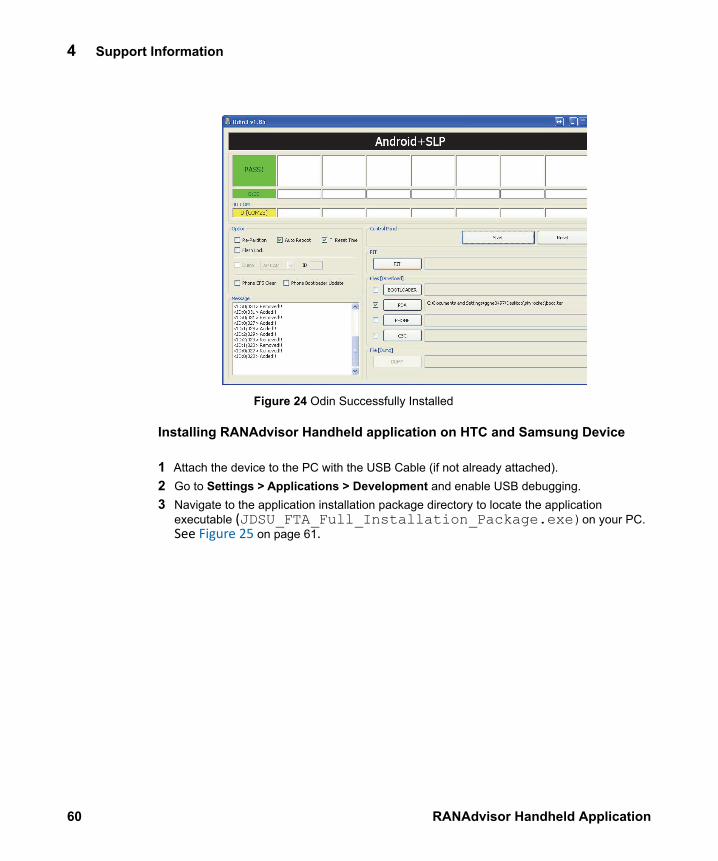
60 RANAdvisor Handheld Application
4 Support Information
Figure 24 Odin Successfully Installed
Installing RANAdvisor Handheld application on HTC and Samsung Device
1 Attach the device to the PC with the USB Cable (if not already attached).2 Go to Settings > Applications > Development and enable USB debugging.3 Navigate to the application installation package directory to locate the application
executable (JDSU_FTA_Full_Installation_Package.exe)on your PC. See Figure 25 on page 61.
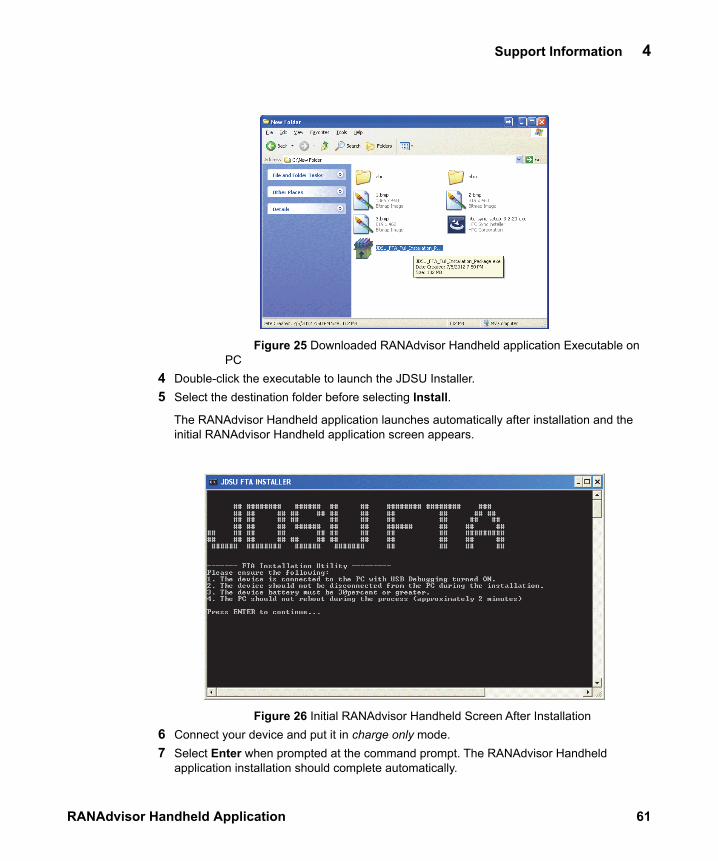
Support Information 4
RANAdvisor Handheld Application 61
Figure 25 Downloaded RANAdvisor Handheld application Executable on PC
4 Double-click the executable to launch the JDSU Installer. 5 Select the destination folder before selecting Install.
The RANAdvisor Handheld application launches automatically after installation and the initial RANAdvisor Handheld application screen appears.
Figure 26 Initial RANAdvisor Handheld Screen After Installation6 Connect your device and put it in charge only mode.7 Select Enter when prompted at the command prompt. The RANAdvisor Handheld
application installation should complete automatically.

62 RANAdvisor Handheld Application
4 Support Information
Rooting Android devicesTo check if the device is rooted, perform the following steps:
1 Connect your device to PC using a USB cable.2 Open the DOS command prompt on your PC and type the following commands:
a adb shell b su
If the output is not found, the device is not rooted and you should perform rooting as per the instructions below. If the output is #, the device is rooted.
Note: E5643B-809 Samsung Galaxy S3 SGH-i535 and E5643B-821 LG Optimus LGE-971 are rooted at factory. You need not perform rooting for these devices.
Prerequisites for Rooting
Below are the prerequisites for rooting Samsung and HTC devices:1 For Samsung devices, ODIN must be installed on the PC. Refer to the “Flashing the Kernel
on Samsung Device" on page 57 to install ODIN.2 For HTC Devices, Fastboot.exe is required. You can get this executable from the FTA
Installation Package directory. 3 You must copy CWM-SuperSU-v0.98.zip located in the FTA Installation Package
directory to the device internal or external SD Card.
Rooting Samsung Skyrocket SGH-I727
Prerequisites for Rooting Samsung device1 For Samsung devices, ODIN must be installed on the PC. Refer to the “Flashing the Kernel
on Samsung Device" on page 57 to install ODIN.2 You must copy CWM-SuperSU-v0.98.zip located in the FTA Installation Package
directory to the device internal or external SD Card.
Perform the following steps to root the device:1 Connect your device to PC using a USB cable.2 Copy CWM-SuperSU-v0.98.zip located in the FTA Installation Package/Rooting
Binaries directory to the device memory or external SD Card. 3 Make sure that the SkyrocketCWMrecovery.tar is available in the FTA Installation
Package/Rooting Binaries/Samsung Skyrocket SGH-I727 on your PC.
4 Put your phone in Download Mode by the following steps:a Power off the device and unplug USB from PC. b Hold the Volume Down button + Volume Up buttons and plug into the PC using USB
cable. The phone should start up and show a warning screen. Select the Volume Up button to continue. The phone will enter in Odin mode.

Support Information 4
RANAdvisor Handheld Application 63
5 Run the ODIN from your PC.6 From ODIN, click PDA and select SkyrocketCWMrecovery.tar from the FTA Installation
Package. 7 Click Start in Odin and wait until your phone reboots. 8 Put the phone into Recovery Mode by performing the following steps:
a Power your phone off.b Hold both the volume buttons. c Press the Power button until the screen comes on, then release the Power button and
continue holding volume buttons until you are on Android System Recovery.9 Choose Install zip from SD card.10Select CWM-SuperSU-v0.98.zip and select Yes- install CWM-SuperSU-v0.98.zip.
Note: If you have copied your zip file into the internal SD card, choose Install zip from internal SD Card.
11 Select Go back until you come to the main recovery screen.12Reboot the device by choosing Reboot option from the menu.
Rooting Samsung Galaxy S3 GT-I9305
Prerequisites for Rooting Samsung device1 For Samsung devices, ODIN must be installed on the PC. Refer to the “Flashing the Kernel
on Samsung Device" on page 57 to install ODIN.2 You must copy CWM-SuperSU-v0.98.zip located in the FTA Installation Package
directory to the device internal or external SD Card.
Perform the following steps to root the device:1 Connect your device to PC using a USB cable.2 Copy CWM-SuperSU-v0.98.zip located in the FTA Installation Package directory to the
device memory or external SD Card. 3 Make sure that the I9305_CWM_Recovery.tar.md5 is available in the FTA Installation
Package/Rooting Binaries/Samsung S3 GT-I9305 directory on your PC.4 Put your phone in Download Mode by the following steps:
a Power off the device and unplug USB from PC. b Hold the Power button + Volume Down button + Home buttons together. The phone
should start up and show a warning screen. Select the Volume Up button to continue. The phone will enter in Odin mode.
c Plug in the USB cable.5 Run the ODIN from your PC.6 From ODIN, click PDA and select I9305_CWM_Recovery.tar.md5 from the FTA
Installation Package. 7 Click Start in Odin and wait until your phone reboots.

64 RANAdvisor Handheld Application
4 Support Information
8 Put the phone into Recovery Mode by performing the following steps: a Power your phone off.b Hold Power button + Volume Up + Home buttons until you are on Android System
Recovery.9 Choose Install zip from SD card.10Select CWM-SuperSU-v0.98.zip and select Yes- install CWM-SuperSU-v0.98.zip.
Note: If you have copied your zip file into the internal SD card, choose Install zip from internal SD Card.
11 Select Go back until you reach the main recovery screen.12Reboot the device by choosing Reboot option from the menu.
Rooting Samsung Galaxy S3 SGH-I747
Prerequisites for Rooting Samsung device1 For Samsung devices, ODIN must be installed on the PC. Refer to the “Flashing the Kernel
on Samsung Device" on page 57 to install ODIN.2 You must copy CWM-SuperSU-v0.98.zip located in the FTA Installation Package
directory to the device internal or external SD Card.
Perform the following steps to root the device:1 Connect the device to PC using a USB cable.2 Copy CWM-SuperSU-v0.98.zip located in the FTA Installation Package directory to the
device memory or external SD Card. 3 Make sure that the CWM_I747.TAR is available in the FTA Installation Package/Rooting
Binaries/Samsung S3 SGH-I747on your PC.4 Put your phone in Download Mode by the following steps:
a Power off the device and unplug USB from PC. b Hold the Power button + Volume Down button + Home buttons together.The phone
should start up and show a warning screen. Select the Volume Up button to continue. The phone will enter in Odin mode.
c Plug in the USB cable.5 Run the ODIN from your PC.6 From ODIN, click PDA and select CWM_I747.TAR from the FTA Installation Package. 7 Click Start in Odin and wait until your phone reboots. 8 Put the phone into Recovery Mode by performing the following steps:
a Power your phone off.b Hold the Power button + Volume Up button + Home buttons until you are on Android
System Recovery.9 Choose Install zip from SD card.
Support Information 4
RANAdvisor Handheld Application 65
10Select CWM-SuperSU-v0.98.zip and select Yes- install CWM-SuperSU-v0.98.zip.
Note: If you have copied your zip file into the internal SD card, choose Install zip from internal SD Card.
11 Select Go back until you come to the main recovery screen.12Reboot the device by choosing Reboot option from the menu.
Rooting Samsung CSpire SCH-L710 and Samsung SIII SPH-L710
Prerequisites for Rooting Samsung device1 For Samsung devices, ODIN must be installed on the PC. Refer to the “Flashing the Kernel
on Samsung Device" on page 57 to install ODIN.2 You must copy CWM-SuperSU-v0.98.zip located in the FTA Installation Package
directory to the device internal or external SD Card.
Perform the following steps to root the device:1 Connect the device to PC using a USB cable.2 Copy CWM-SuperSU-v0.98.zip located in the FTA Installation Package directory to the
device memory or external SD Card. 3 Make sure that the recovery-cwmtouch-6.0.2.3-L710.tar is available in the FTA
Installation Package/Rooting Binaries/Samsung S3 L710 on your PC.4 Put your phone in Download Mode by the following steps:
a Power off the device and unplug USB from PC. b Hold the Power button + Volume Down button + Home buttons together.The phone
should start up and show a warning screen. Select the Volume Up button to continue. The phone will enter in Odin mode.
c Plug in the USB cable.5 Run the ODIN from your PC.6 From ODIN, click PDA and select recovery-cwmtouch-6.0.2.3-L710.tar from the FTA
Installation Package. 7 Click Start in Odin and wait until your phone reboots. 8 Put the phone into Recovery Mode by performing the following steps:
a Power your phone off.b Hold the Power button + Volume Up button + Home buttons until you are on Android
System Recovery.9 Choose Install zip from SD card.10Select CWM-SuperSU-v0.98.zip and select Yes- install CWM-SuperSU-v0.98.zip.
Note: If you have copied your zip file into the internal SD card, choose zip from internal SD Card.
11 Select Go back until you come to the main recovery screen.12Reboot the device by choosing Reboot option from the menu.

66 RANAdvisor Handheld Application
4 Support Information
Rooting Samsung Galaxy SIII (SGH-T999)
Prerequisites for Rooting Samsung device1 For Samsung devices, ODIN must be installed on the PC. Refer to the “Flashing the Kernel
on Samsung Device" on page 57 to install ODIN.2 You must copy CWM-SuperSU-v0.98.zip located in the FTA Installation Package
directory to the device internal or external SD Card.
Perform the following steps to root the device:1 Connect the device to PC using a USB cable.2 Copy CWM-SuperSU-v0.98.zip located in the FTA Installation Package directory to the
device memory or external SD Card. 3 Make sure that the recovery-cwmtouch-6.0.2.3-SGHT999.tar is available in the FTA
Installation Package/Rooting Binaries/Samsung S3 SGH-T999 on your PC.4 Put your phone in Download Mode by the following steps:
a Power off the device and unplug USB from PC. b Hold the Power button + Volume Down button + Home buttons together.The phone
should start up and show a warning screen. Select the Volume Up button to continue. The phone will enter in Odin mode.
c Plug in the USB cable.5 Run the ODIN from your PC.6 From ODIN, click PDA and select recovery-cwmtouch-6.0.2.3-SGHT999.tar from the
FTA Installation Package. 7 Click Start in Odin and wait until your phone reboots. 8 Put the phone into Recovery Mode by performing the following steps:
a Power your phone off.b Hold the Power button + Volume Up button + Home buttons until you are on Android
System Recovery.9 Choose Install zip from SD card.10Select CWM-SuperSU-v0.98.zip and select Yes- install CWM-SuperSU-v0.98.zip.
Note: If you have copied your zip file into the internal SD card, choose zip from internal SD Card.
11 Select Go back until you come to the main recovery screen.12Reboot the device by choosing Reboot option from the menu.
Rooting HTC Vivid
Prerequisites for Rooting HTC device
Support Information 4
RANAdvisor Handheld Application 67
1 For HTC Devices, Fastboot.exe is required. You can get this executable from the FTA Installation Package directory.
2 You must copy CWM-SuperSU-v0.98.zip located in the FTA Installation Package directory to the device internal or external SD Card.
Perform the following steps to root the device:1 Connect the device to PC using a USB cable.2 Copy CWM-SuperSU-v0.98.zip located in the FTA Installation Package/Rooting
Binaries directory to the device memory or external SD Card. 3 Make sure that the recovery-htc_holiday.img is available in the FTA Installation
Package/Rooting Binaries/HTC Vivid on your PC.4 Launch the DOS command prompt on your PC and change the directory to your FTA
Installation Package directory.5 From the command prompt, type adb reboot bootloader to put the device into fastboot
mode.6 Flash cwm recovery image by the command fastboot flash recovery
<Download_Dir_Path>/recovery-htc_holiday.img7 Enable the phone in Recovery mode by the following steps:
a Unplug the USB cable from the device.b Power off the device.c Holding the Volume Down button, press the Power button. This will start HBOOT.d Navigate to RECOVERY with the Volume Down button. Press the Power button to
select and enter RECOVERY mode.
NOTE: If the above steps does not work then reboot the device, plug in USB cable and type adb reboot recovery from the DOS command prompt.
8 Perform the following steps to install SuperUser zip file from the SD card:a Select install zip from sdcard.b Select Choose zip from sdcard.c Select CWM-SuperSU-v0.98.zip.d Select Yes - install CWM-SuperSU-v0.98.zip to confirm. e Select Go back until you come to the main recovery screen.f Select reboot system now
Rooting HTC Thunderbolt
Prerequisites for Rooting HTC device

68 RANAdvisor Handheld Application
4 Support Information
1 For HTC Devices, Fastboot.exe is required. You can get this executable from the FTA Installation Package directory.
2 You must copy CWM-SuperSU-v0.98.zip located in the FTA Installation Package directory to the device internal or external SD Card.
Perform the following steps to root the device:1 Connect the device to PC using a USB cable.2 Copy CWM-SuperSU-v0.98.zip located in the FTA Installation Package/Rooting Binaries
directory to the device memory or external SD Card. 3 Make sure that the recovery-clockwork-5.0.2.1-mecha.img is available in the FTA
Installation Package directory/Rooting Binaries/HTC Thunderbolt on your PC.4 Launch the DOS command prompt on your PC and change the directory to your FTA
Installation Package directory.5 From the command prompt, type adb reboot bootloader to put the device into fastboot
mode.6 Flash cwm recovery image by the command fastboot flash recovery
<Download_Dir_Path>/recovery-clockwork-5.0.2.1-mecha.img.7 Put the phone into Recovery mode by the following steps:
a Unplug the USB cable from the device.b Power off the device.c Holding the Volume Down button, press the Power button. This will start HBOOT.d Navigate to RECOVERY with the Volume Down button. Press the Power button to
select and enter RECOVERY.
NOTE: If the above steps does not work then reboot the device, plug in the USB cable and type adb reboot recovery from the DOS command prompt.
8 Perform the following steps to install SuperUser zip file from the SD card:a Select install zip from sdcard.b Select Choose zip from sdcard.c Select CWM-SuperSU-v0.98.zip.d Select Yes - install CWM-SuperSU-v0.98.zip to confirm.e Select Go back until you come to the main recovery screenf Select reboot system now.
Rooting HTC Jetstream
Prerequisites for Rooting HTC device

Support Information 4
RANAdvisor Handheld Application 69
1 For HTC Devices, Fastboot.exe is required. You can get this executable from the FTA Installation Package directory.
2 You must copy CWM-SuperSU-v0.98.zip located in the FTA Installation Package directory to the device internal or external SD Card.
Perform the following steps to root the device:1 Connect the device to PC using a USB cable.2 Copy CWM-SuperSU-v0.98.zip located in the FTA Installation Package/Rooting
Binaries directory to the device memory or external SD Card. 3 Make sure that the JetStream-HC-CWM5-Recovery-DooMLoRD-v02.img is available in
the FTA Installation Package directory/Rooting Binaries/HTC Jetstream directory on your PC.
4 Launch the DOS command prompt on your PC and change the directory to your FTA Installation Package directory.
5 From the command prompt, type adb reboot bootloader to put the device into fastboot mode.
6 Flash cwm recovery image by the command fastboot flash recovery <Download_Dir_Path>/JetStream-HC-CWM5-Recovery-DooMLoRD-v02.img.
7 Put the phone into Recovery mode by the following steps:a Unplug the USB cable from the device.b Power off the device.c Holding the Volume Down button, press the Power button. This will start HBOOT.d Navigate to RECOVERY with the Volume Down button. Press the Power button to
select and enter RECOVERY.
NOTE: If the above steps does not work then reboot the device, plug in the USB cable and type adb reboot recovery from the DOS command prompt.
8 Perform the following steps to install SuperUser zip file from the SD card:a Select install zip from sdcard.b Select Choose zip from sdcard.c Select CWM-SuperSU-v0.98.zip.d Select Yes - install CWM-SuperSU-v0.98.zip to confirm. e Select Go back until you come to the main recovery screen.f Select reboot system now.
Rooting HTC Desire
Prerequisites for Rooting HTC device

70 RANAdvisor Handheld Application
4 Support Information
1 For HTC Devices, Fastboot.exe is required. You can get this executable from the FTA Installation Package directory.
2 You must copy CWM-SuperSU-v0.98.zip located in the FTA Installation Package directory to the device internal or external SD Card.
Perform the following steps to root the device:1 Connect the device to PC using a USB cable.2 Copy CWM-SuperSU-v0.98.zip located in the FTA Installation Package/Rooting
Binaries directory to the device memory or external SD Card. 3 Make sure that the recovery-clockwork-5.0.2.0-bravo.img is available in the FTA
Installation Package directory/Rooting Binaries/HTC Desire directory on your PC.4 Launch the DOS command prompt on your PC and change the directory to your FTA
Installation Package directory.5 From the command prompt, type adb reboot bootloader to put the device into fastboot
mode.6 Flash cwm recovery image by the command fastboot flash recovery
<Download_Dir_Path>/recovery-clockwork-5.0.2.0-bravo.img.7 Put the phone into Recovery mode by the following steps:
a Unplug the USB cable from the device.b Power off the device.c Holding the Volume Down button, press the Power button. This will start HBOOT.d Navigate to RECOVERY with the Volume Down button. Press the Power button to
select and enter RECOVERY.
NOTE: If the above steps does not work then reboot the device, plug in the USB cable and type adb reboot recovery from the DOS command prompt.
8 Perform the following steps to install SuperUser zip file from the SD card:a Select install zip from sdcard.b Select Choose zip from sdcard.c Select CWM-SuperSU-v0.98.zip.d Select Yes - install CWM-SuperSU-v0.98.zip to confirm. e Select Go back until you come to the main recovery screen.f Select reboot system now.
Rooting HTC EVO 4G
Prerequisites for Rooting HTC device
Support Information 4
RANAdvisor Handheld Application 71
1 For HTC Devices, Fastboot.exe is required. You can get this executable from the FTA Installation Package directory.
2 You must copy CWM-SuperSU-v0.98.zip located in the FTA Installation Package directory to the device internal or external SD Card.
Perform the following steps to root the device:1 Connect the device to PC using a USB cable.2 Copy CWM-SuperSU-v0.98.zip located in the FTA Installation Package/Rooting
Binaries directory to the device memory or external SD Card. 3 Make sure that the openrecovery-twrp-2.3.1.0-jewel.img is available in the FTA
Installation Package directory/Rooting Binaries/HTC EVO 4G directory on your PC.4 Launch the DOS command prompt on your PC and change the directory to your FTA
Installation Package directory.5 From the command prompt, type adb reboot bootloader to put the device into fastboot
mode.6 Flash twrp recovery image by the command fastboot flash recovery
<Download_Dir_Path>/openrecovery-twrp-2.3.1.0-jewel.img.7 Enter the command fastboot erase cache.8 Put the phone into Recovery mode by the following steps:
a Unplug the USB cable from the device.b Power off the device.c Turn on the device by holding down the Volume Down button and Power buttons
together. Release the Power button for one second and hold down the Power button again. This will start HBOOT.
d Navigate to RECOVERY with the Volume Down button. Press the Power button to select and enter RECOVERY.
NOTE: If the above steps does not work then reboot the device, plug in the USB cable and type adb reboot recovery from the DOS command prompt.
9 Perform the following steps to install SuperUser zip file from the SD card:a Tap on Install option.b Select CWM-SuperSU-v0.98.zip.c Swipe to confirm flash.d Tap on Reboot System option.

72 RANAdvisor Handheld Application
4 Support Information
Terms and Conditions of UsageAs soon as you start using the application on the phone, you have acknowledged acceptance of the terms and conditions of usage. Contact JDSU if you have any questions.JDS Uniphase Corporation (“JDSU”) SOFTWARE LICENSE TERMSATTENTION: USE OF THE SOFTWARE IS SUBJECT TO THE LICENSE TERMS SET FORTH BELOW.IF YOU DO NOT AGREE TO THESE LICENSE TERMS, THEN (A) DO NOT INSTALL OR USE THE SOFTWARE, AND (B) YOU MAY RETURN THE SOFTWARE FOR A FULL REFUND, OR, IF THE SOFTWARE IS SUPPLIED AS PART OF ANOTHER PRODUCT, YOU MAY RETURN THE ENTIRE PRODUCT FOR A FULL REFUND. NOTWITHSTANDING ANYTHING TO THE CONTRARY IN THIS NOTICE, INSTALLING OR OTHERWISE USING THE SOFTWARE INDICATES YOUR ACCEPTANCE OF THESE TERMS. JDSU SOFTWARE LICENSE TERMSSoftware. “Software” means one or more computer programs in object code format, whether stand-alone or bundled with other products, and related documentation.License Grant. JDSU grants you a non-exclusive license to use one copy of the Software for internal purposes in accordance with these License Terms and the documentation provided with the Software. Such documentation may include license terms provided by JDSU's third party suppliers, which will apply to the use of the Software and take precedence over these License Terms. In the absence of documentation specifying the applicable license, you may use one copy of the Software on one machine or instrument. If the software is licensed for concurrent or network use, you may not allow more than the maximum number of authorized users to access and use the software concurrently. License Restrictions. You may make copies or adaptations of the Software only for archival purposes or only when copying or adaptation is an essential step in the authorized use of the Software. You must reproduce all copyright notices in the original Software on all permitted copies or adaptations. You may not copy the Software onto any public or distributed network.Upgrades. This license does not entitle you to receive upgrades, updates or technical support. Such services may be purchased separately. Ownership. The Software and all copies thereof are owned and copyrighted by JDSU or its third party suppliers. JDSU and its third party suppliers retain all right, title and interest in the Software. JDSU and its third party suppliers may protect their rights in the Software in the event of any violation of these License Terms.No Disassembly. You may not disassemble or otherwise modify the Software without written authorization from JDSU, except as permitted by law. Upon request, you will provide JDSU with reasonably detailed information regarding any permitted disassembly or modification.High Risk Activities. The Software is not specifically designed, manufactured or intended for use in the planning, construction, maintenance or direct operation of a nuclear facility, nor for use in on line control or fail safe operation of aircraft navigation, control or communication systems, weapon systems or direct life support systems. Transfer. You may transfer the license granted to you here provided that you deliver all copies of the Software to the transferee along with these License Terms and pay any applicable fees to the extent permissible under local laws. The transferee must accept these License Terms as a condition to any transfer. Your license to use the Software will terminate upon transfer.Termination. JDSU may terminate your license upon notice for breach of these License Terms. Upon termination, you must immediately destroy all copies of the Software.Export Requirements. If you export, re-export or import Software, technology or technical data licensed hereunder, you assume responsibility for complying with applicable laws and regulations and for obtaining required export and import authorizations. JDSU may terminate this license immediately if you are in violation of any applicable laws or regulations.U.S. Government Restricted Rights. Software and technical data rights granted to the federal government include only those rights customarily provided to end user customers. JDSU provides this customary commercial license in Software and technical data pursuant to FAR 12.211 (Technical Data) and 12.212 (Computer Software) and, for the Department of Defense, DFARS 252.227-7015 (Technical Data - Commercial Items) and DFARS 227.7202-3 (Rights in Commercial Computer Software or Computer Software Documentation).


