Join mesh APs to Catalyst 9800 Wireless LAN Controller Contents Introduction Prerequisites Requirements Components Used Configure Case study 1: Bridge Mode Network Diagram Configurations Verify Troubleshoot Case study 2 : Flex + Bridge Configure Verify Troubleshoot Introduction This document provides a basic configuration example on how to join a mesh Access Point (AP) to the Catalyst 9800 Wireless LAN Controller (WLC) This example uses lightweight access point (1572AP and 1542) which can either be configured as a Root AP (RAP) or Mesh AP (MAP) to join to Catalyst 9800 WLC. Procedure will be identical for 1542 or 1562 access points. The RAP is connected to theCatalyst 9800 WLC through a Cisco Catalyst switch. Prerequisites Requirements Cisco recommends that you have knowledge of these topics: Catalyst Wireless 9800 configuration model ● Basic knowledge of the configuration of LAPs ● Basic knowledge of Control And Provisioning of Wireless Access Points (CAPWAP) ● Knowledge of the configuration of an external DHCP server ● Basic configuration knowledge of Cisco switches ● Components Used
Transcript
Join mesh APs to Catalyst 9800 Wireless LANController Contents
IntroductionPrerequisitesRequirementsComponents UsedConfigureCase study 1: Bridge ModeNetwork DiagramConfigurationsVerifyTroubleshootCase study 2 : Flex + BridgeConfigureVerifyTroubleshoot
Introduction
This document provides a basic configuration example on how to join a mesh Access Point (AP) tothe Catalyst 9800 Wireless LAN Controller (WLC)
This example uses lightweight access point (1572AP and 1542) which can either be configured asa Root AP (RAP) or Mesh AP (MAP) to join to Catalyst 9800 WLC. Procedure will be identical for1542 or 1562 access points. The RAP is connected to theCatalyst 9800 WLC through a CiscoCatalyst switch.
Prerequisites
Requirements
Cisco recommends that you have knowledge of these topics:
Catalyst Wireless 9800 configuration model●
Basic knowledge of the configuration of LAPs ●
Basic knowledge of Control And Provisioning of Wireless Access Points (CAPWAP)●
Knowledge of the configuration of an external DHCP server●
Basic configuration knowledge of Cisco switches●
Components Used
The information in this document is based on these software and hardware versions:
C9800-CL v16.12.1●
Cisco Layer 2 Switch●
Cisco Aironet 1572 Series Lightweight Outdoor Access Points for the Bridge section●
Cisco Aironet 1542 for the Flex+Bridge section●
The information in this document was created from the devices in a specific lab environment. All ofthe devices used in this document started with a cleared (default) configuration. If your network islive, make sure that you understand the potential impact of any command.
Configure
Case study 1: Bridge Mode
Network Diagram
Configurations
A mesh AP needs to be authenticated for it to join the 9800 controller. This case study considersthat you will join the AP in local mode first to the WLC and then convert it to Bridge (a.k.a) meshmode.
If you want to avoid assigning AP join profiles, you can also follow this example but configure thedefault aaa authorization credential-download method so that any mesh AP is allowed to join thecontroller
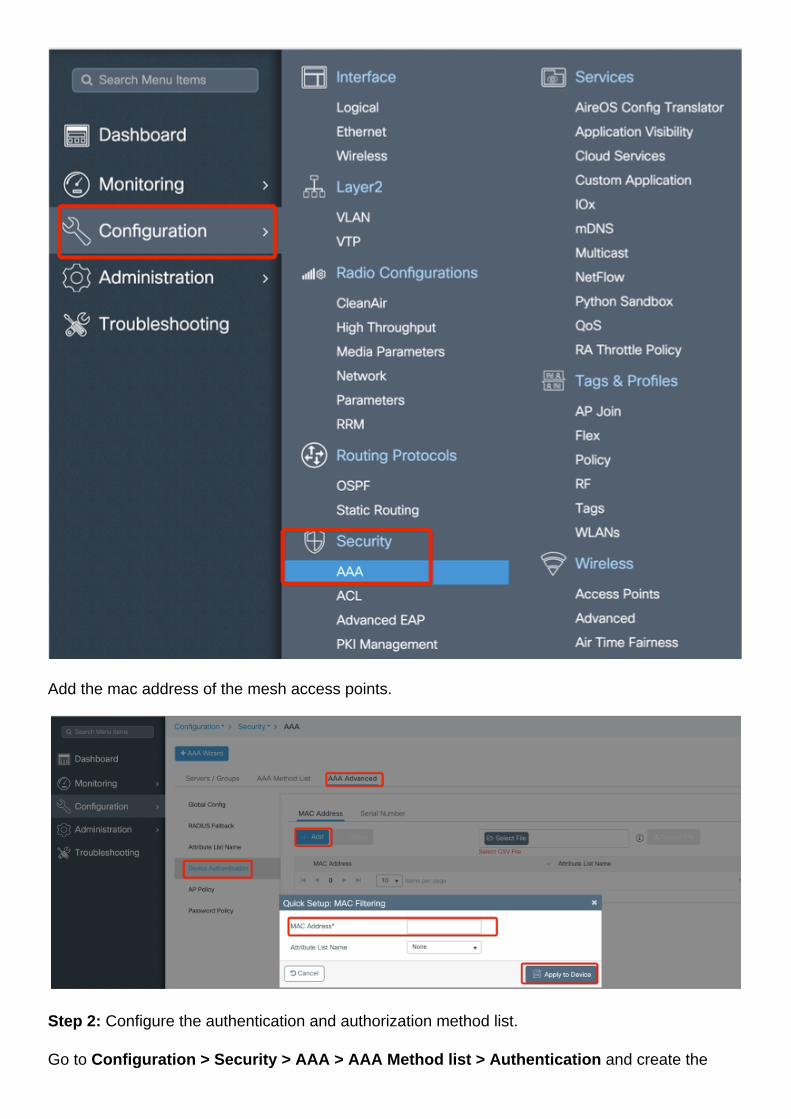
Step1: Configure RAP/MAP mac addresses under Device Authentication.
Go to Configuration > AAA > AAA Advanced > Device Authentication as below
Add the mac address of the mesh access points.
Step 2: Configure the authentication and authorization method list.
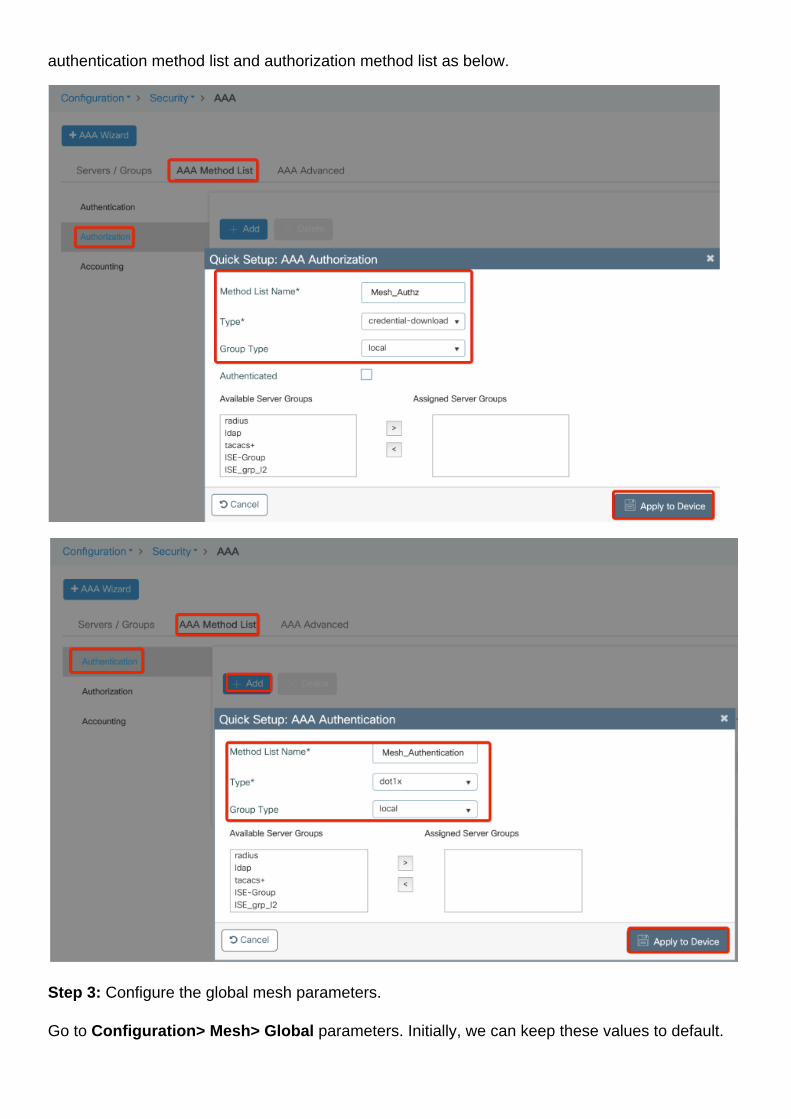
Go to Configuration > Security > AAA > AAA Method list > Authentication and create the
authentication method list and authorization method list as below.
Step 3: Configure the global mesh parameters.
Go to Configuration> Mesh> Global parameters. Initially, we can keep these values to default.
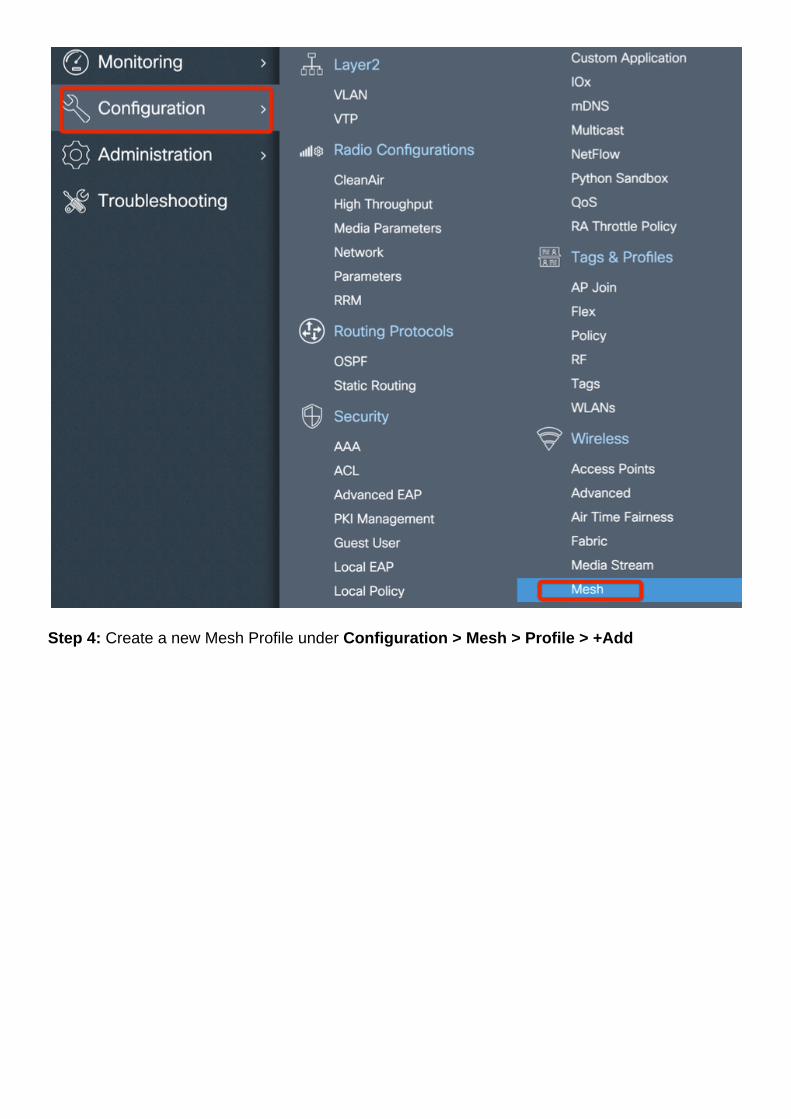
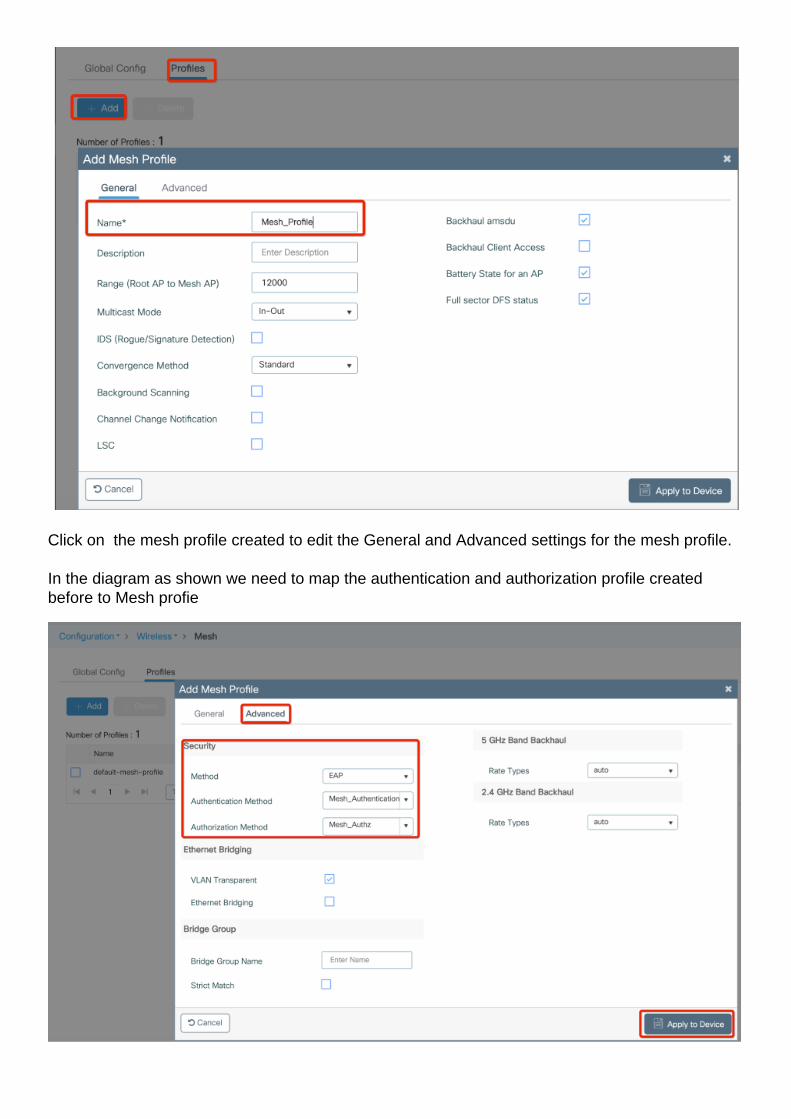
Step 4: Create a new Mesh Profile under Configuration > Mesh > Profile > +Add
Click on the mesh profile created to edit the General and Advanced settings for the mesh profile.
In the diagram as shown we need to map the authentication and authorization profile createdbefore to Mesh profie
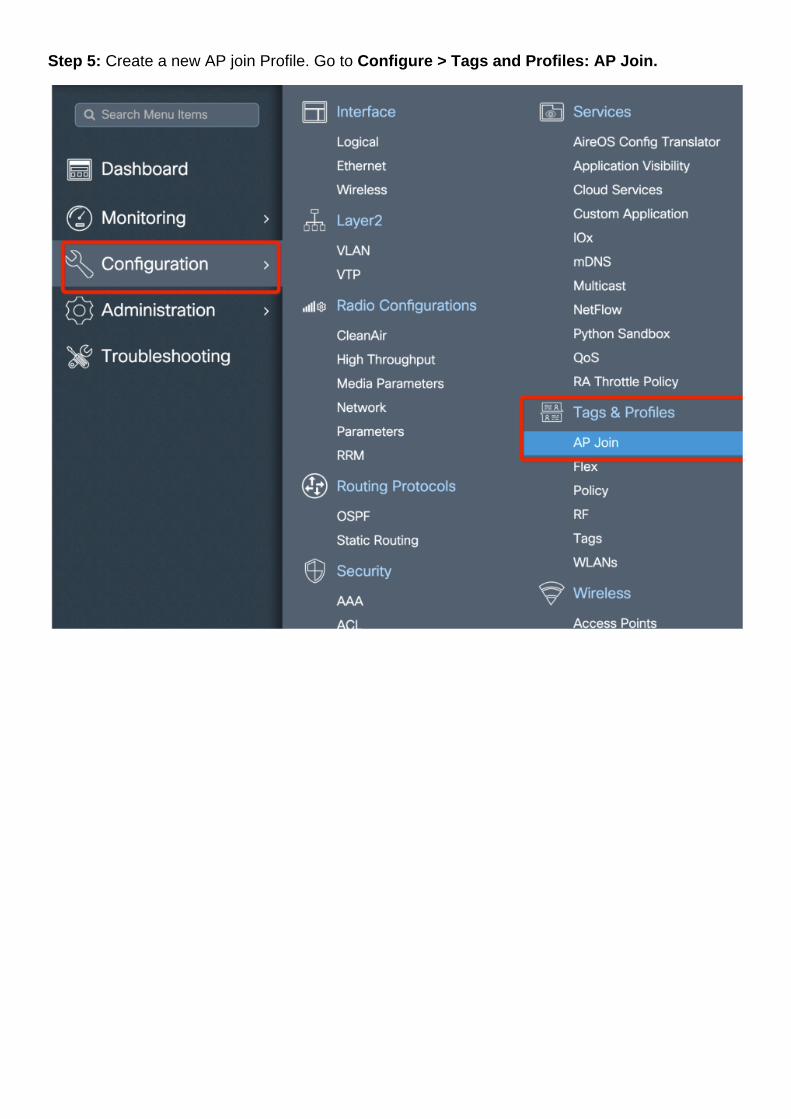
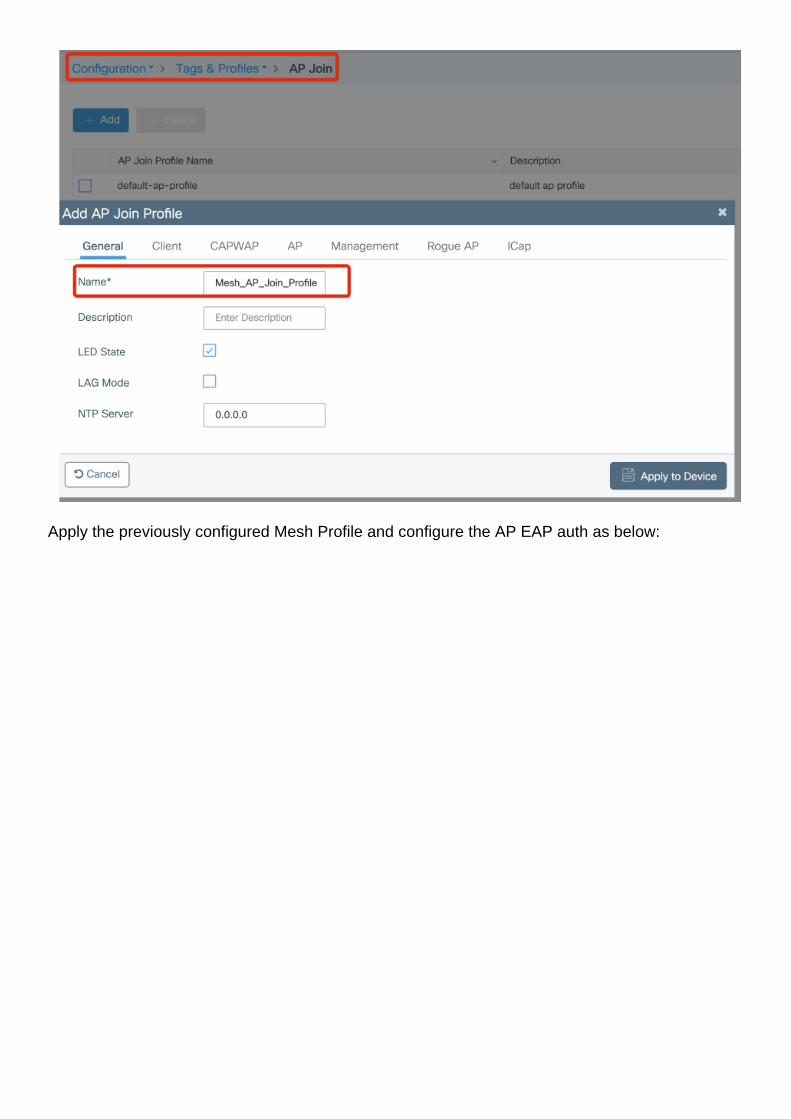
Step 5: Create a new AP join Profile. Go to Configure > Tags and Profiles: AP Join.
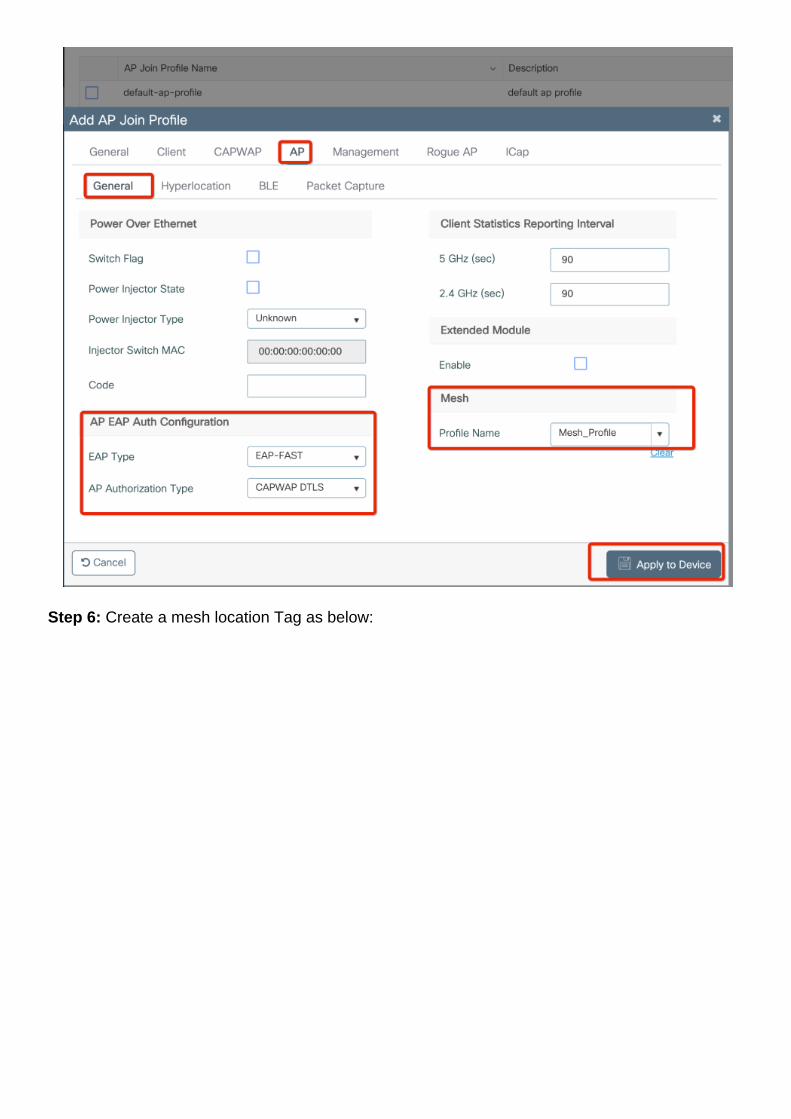
Apply the previously configured Mesh Profile and configure the AP EAP auth as below:
Step 6: Create a mesh location Tag as below:
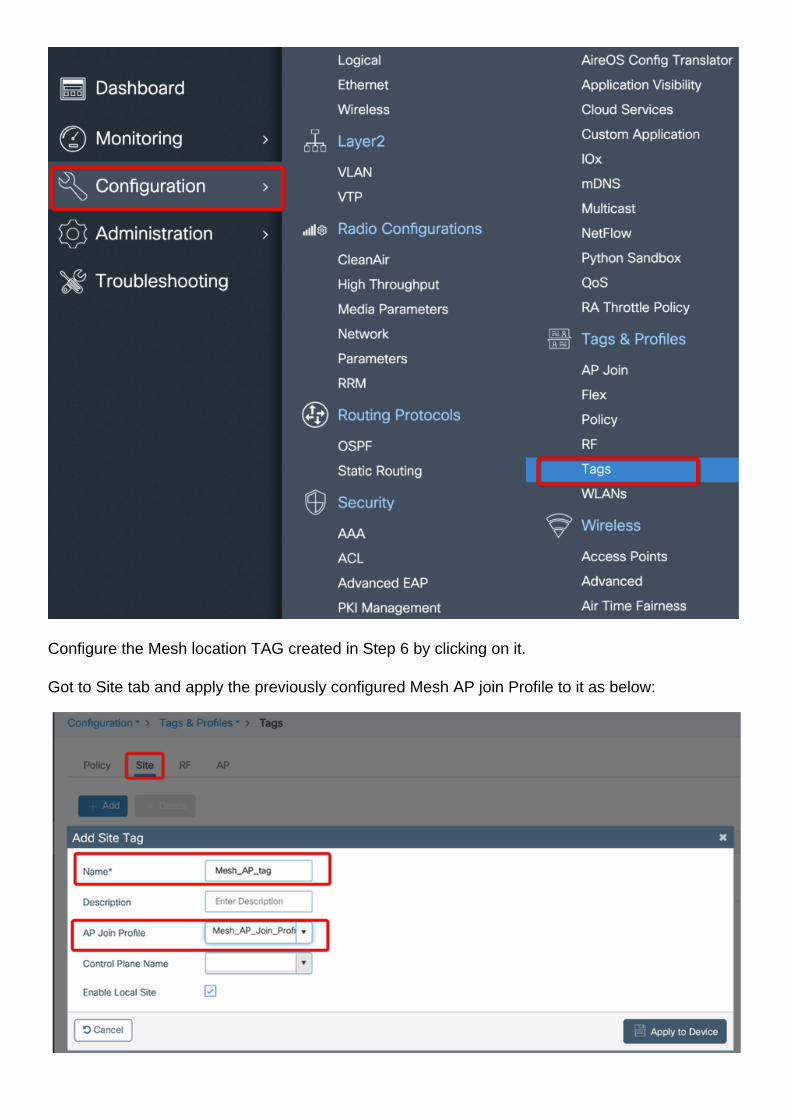
Configure the Mesh location TAG created in Step 6 by clicking on it.
Got to Site tab and apply the previously configured Mesh AP join Profile to it as below:
Step 7. Convert the AP to Bridge mode.
via CLI you can this commad on the AP :
capwap ap mode bridge
The AP should reboot and join back as Bridge mode.
Step 8. You can now define the role of the AP : either root AP or mesh AP. The root AP is the onewith a wired connection to the WLC while the mesh AP will join the WLC via its radio which will tryto connect to a root AP. A mesh AP can join the WLC via its wired interface once it has failed tofind a root AP via its radio, for provisioning purposes.
Verify
aaa new-model
aaa local authentication default authorization default
!
!
aaa authentication dot1x default local
aaa authentication dot1x Mesh_Authentication local
aaa authorization network default local
aaa authorization credential-download default local
aaa authorization credential-download Mesh_Authz local
username 111122223333 mac
wireless profile mesh Mesh_Profile
method authentication Mesh_Authentication
method authorization Mesh_Authz
wireless profile mesh default-mesh-profile
description "default mesh profile"
wireless tag site Mesh_AP_Tag
ap-profile Mesh_AP_Join_Profile
ap profile Mesh_AP_Join_Profile
hyperlocation ble-beacon 0
hyperlocation ble-beacon 1
hyperlocation ble-beacon 2
hyperlocation ble-beacon 3
hyperlocation ble-beacon 4
mesh-profile Mesh_Profile
Troubleshoot
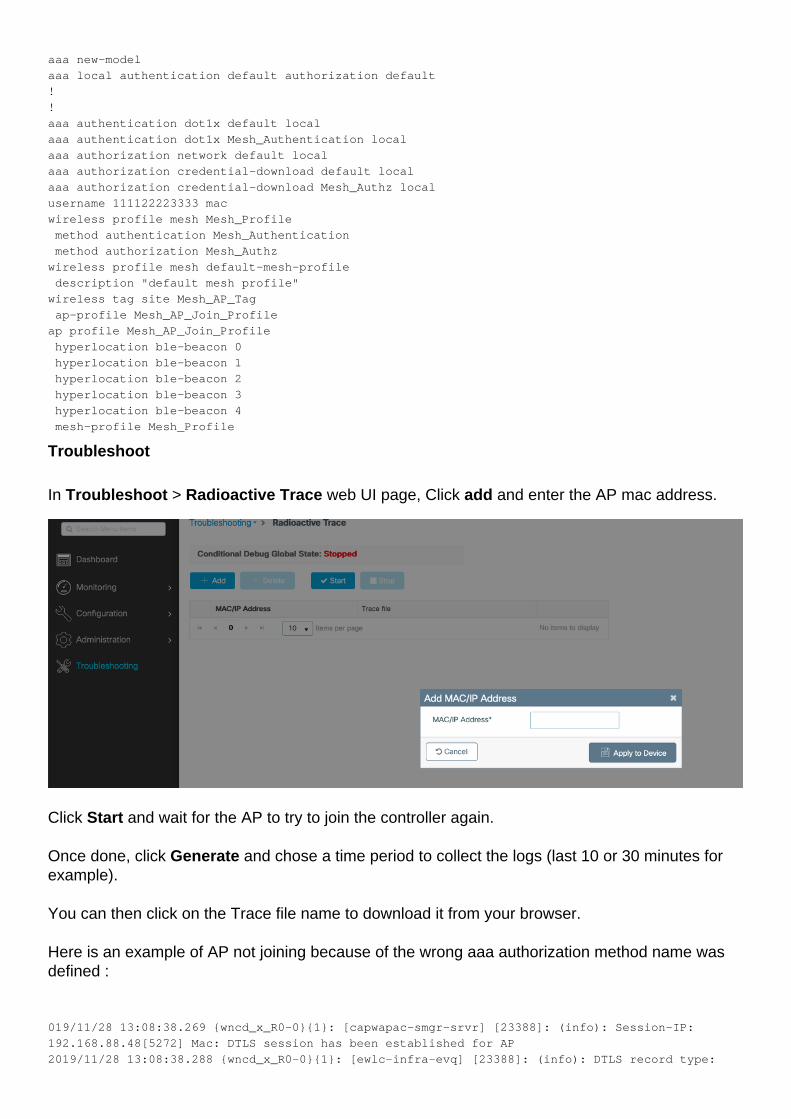
In Troubleshoot > Radioactive Trace web UI page, Click add and enter the AP mac address.
Click Start and wait for the AP to try to join the controller again.
Once done, click Generate and chose a time period to collect the logs (last 10 or 30 minutes forexample).
You can then click on the Trace file name to download it from your browser.
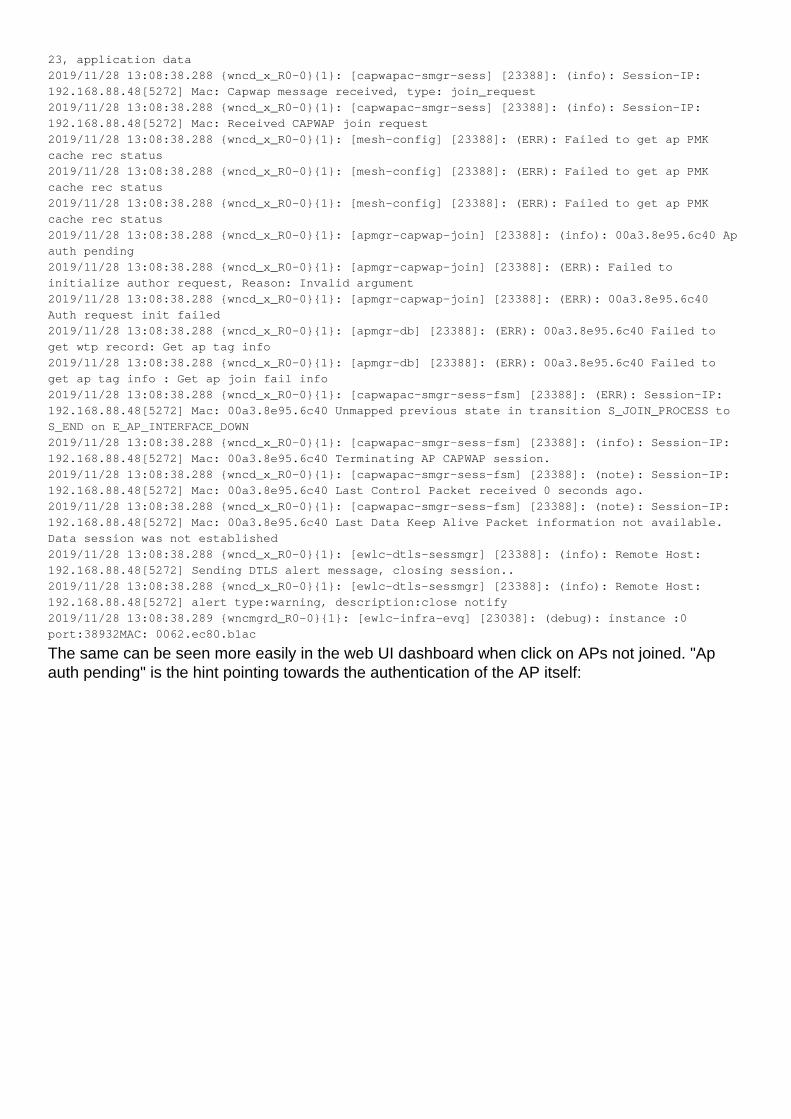
Here is an example of AP not joining because of the wrong aaa authorization method name wasdefined :
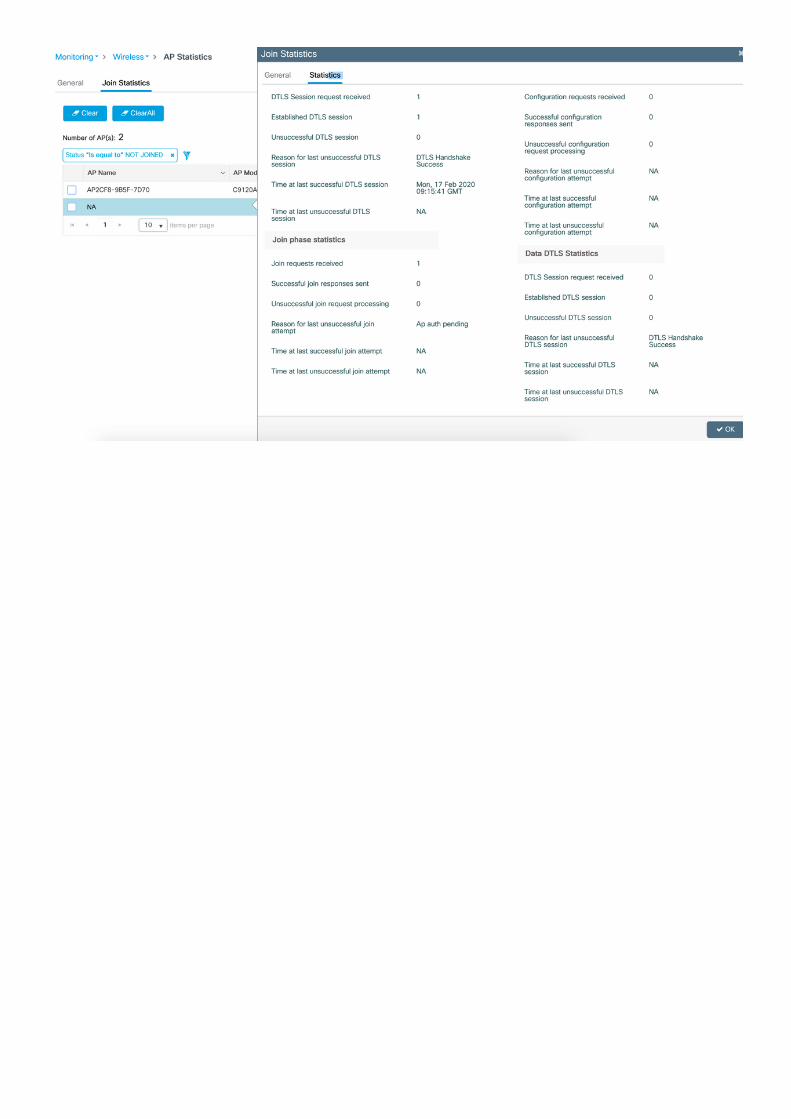
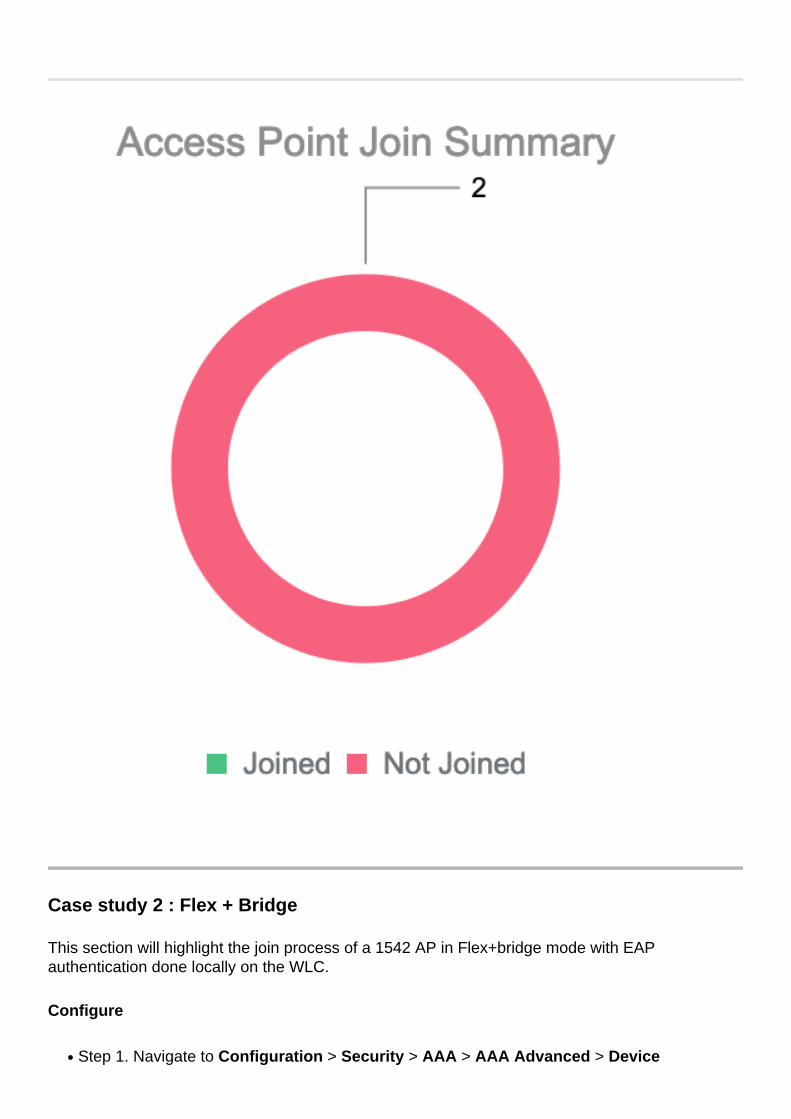
The same can be seen more easily in the web UI dashboard when click on APs not joined. "Apauth pending" is the hint pointing towards the authentication of the AP itself:
Case study 2 : Flex + Bridge
This section will highlight the join process of a 1542 AP in Flex+bridge mode with EAPauthentication done locally on the WLC.
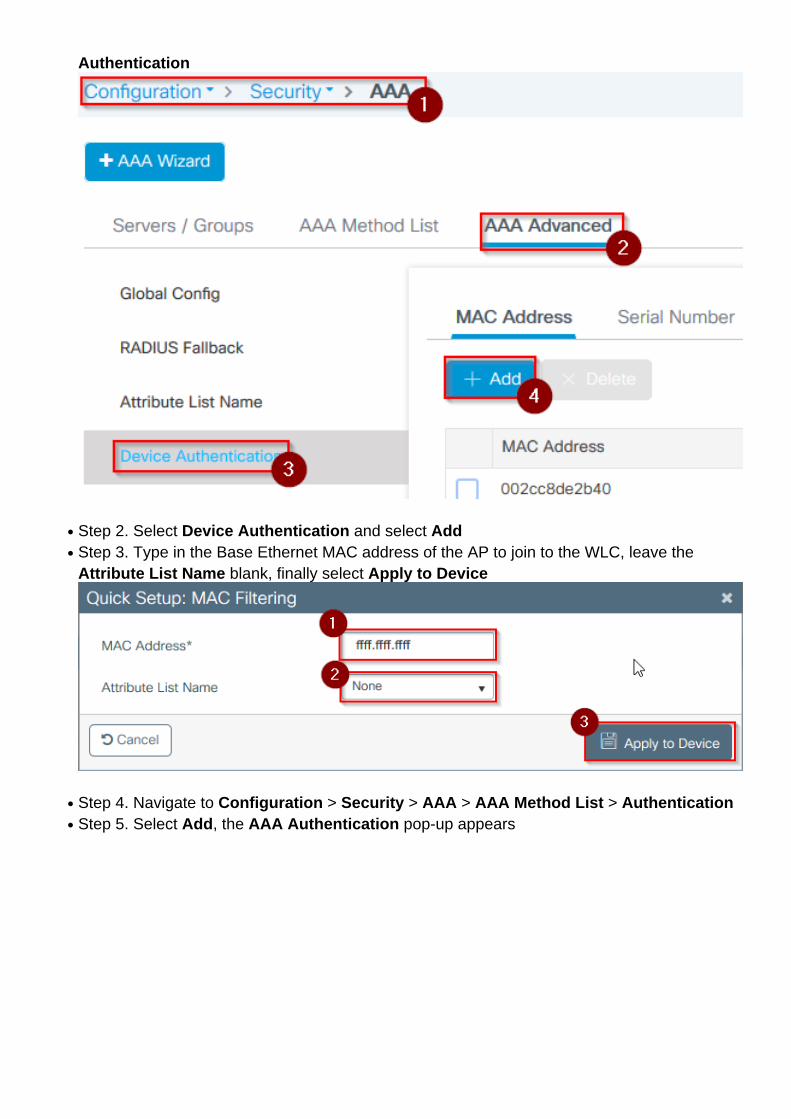
Step 2. Select Device Authentication and select Add●
Step 3. Type in the Base Ethernet MAC address of the AP to join to the WLC, leave theAttribute List Name blank, finally select Apply to Device
●
Step 4. Navigate to Configuration > Security > AAA > AAA Method List > Authentication●
Step 5. Select Add, the AAA Authentication pop-up appears●
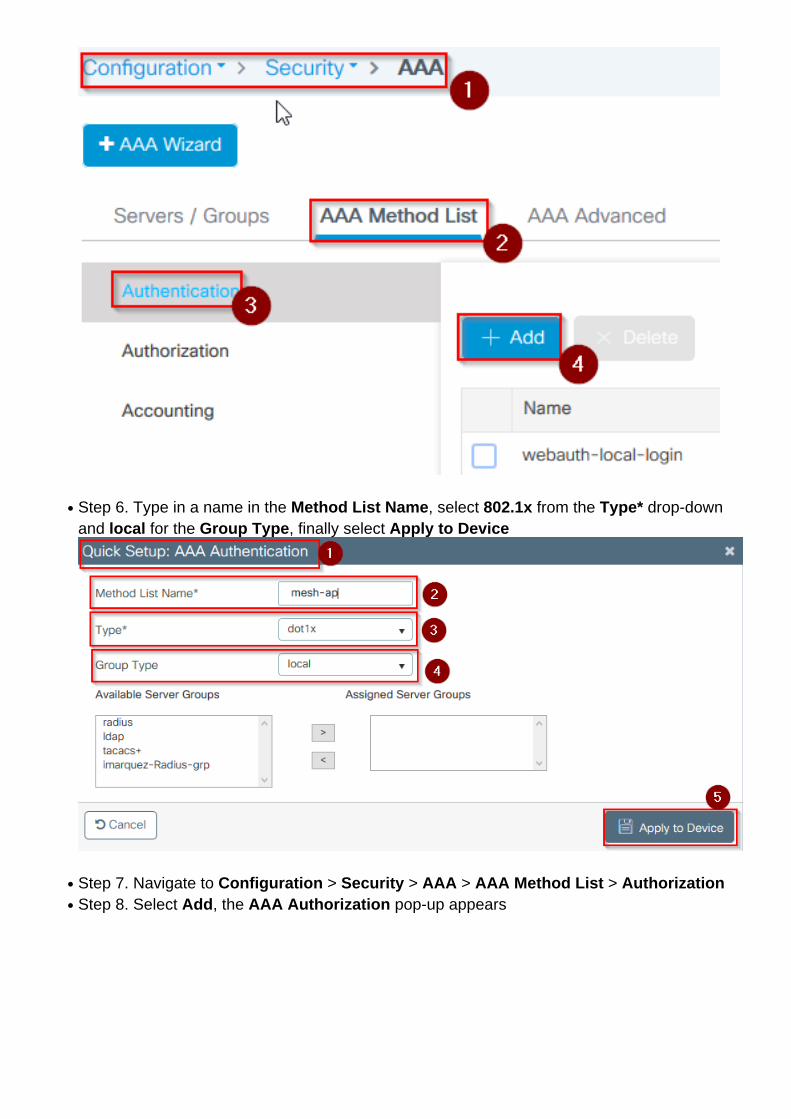
Step 6. Type in a name in the Method List Name, select 802.1x from the Type* drop-downand local for the Group Type, finally select Apply to Device
●
Step 7. Navigate to Configuration > Security > AAA > AAA Method List > Authorization●
Step 8. Select Add, the AAA Authorization pop-up appears●
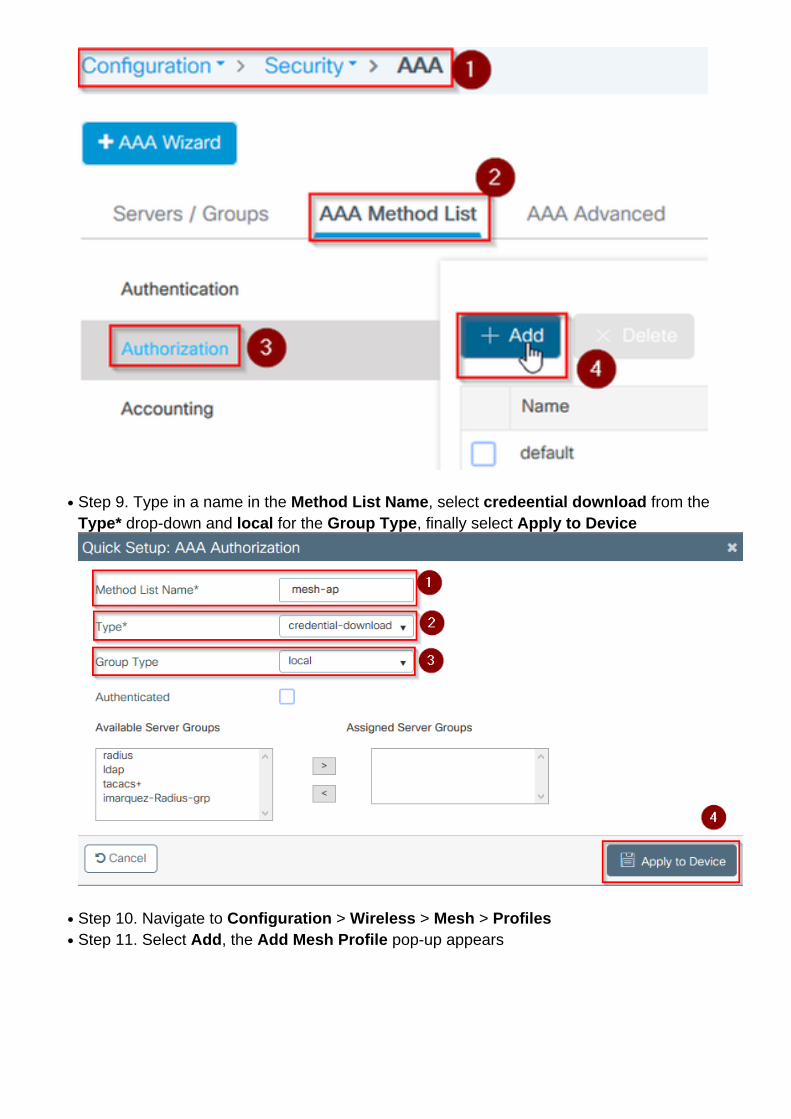
Step 9. Type in a name in the Method List Name, select credeential download from theType* drop-down and local for the Group Type, finally select Apply to Device
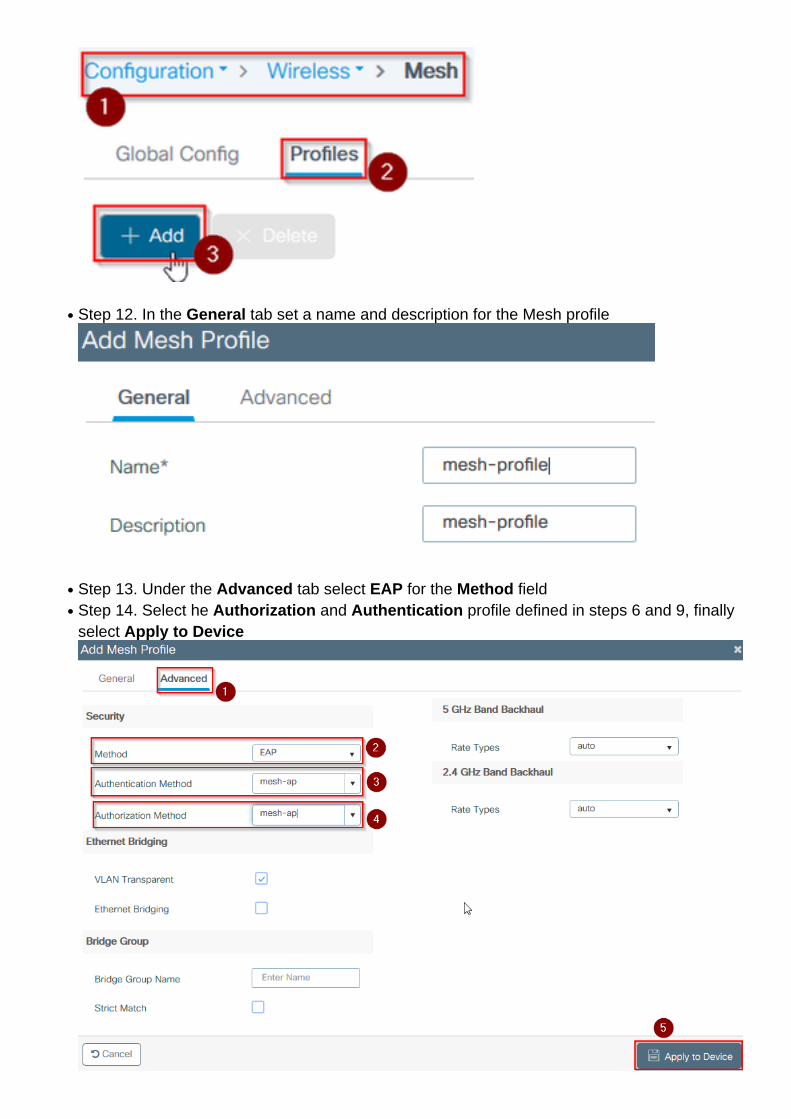
Step 11. Select Add, the Add Mesh Profile pop-up appears●
Step 12. In the General tab set a name and description for the Mesh profile●
Step 13. Under the Advanced tab select EAP for the Method field●
Step 14. Select he Authorization and Authentication profile defined in steps 6 and 9, finallyselect Apply to Device
●
Step 15. Navigate to Configuration > Tag & Profiles > AP Join > Profile●
Step 16. Select Add, the AP Join Profile pop-up appears, set a name and description for theAP Join profile
●
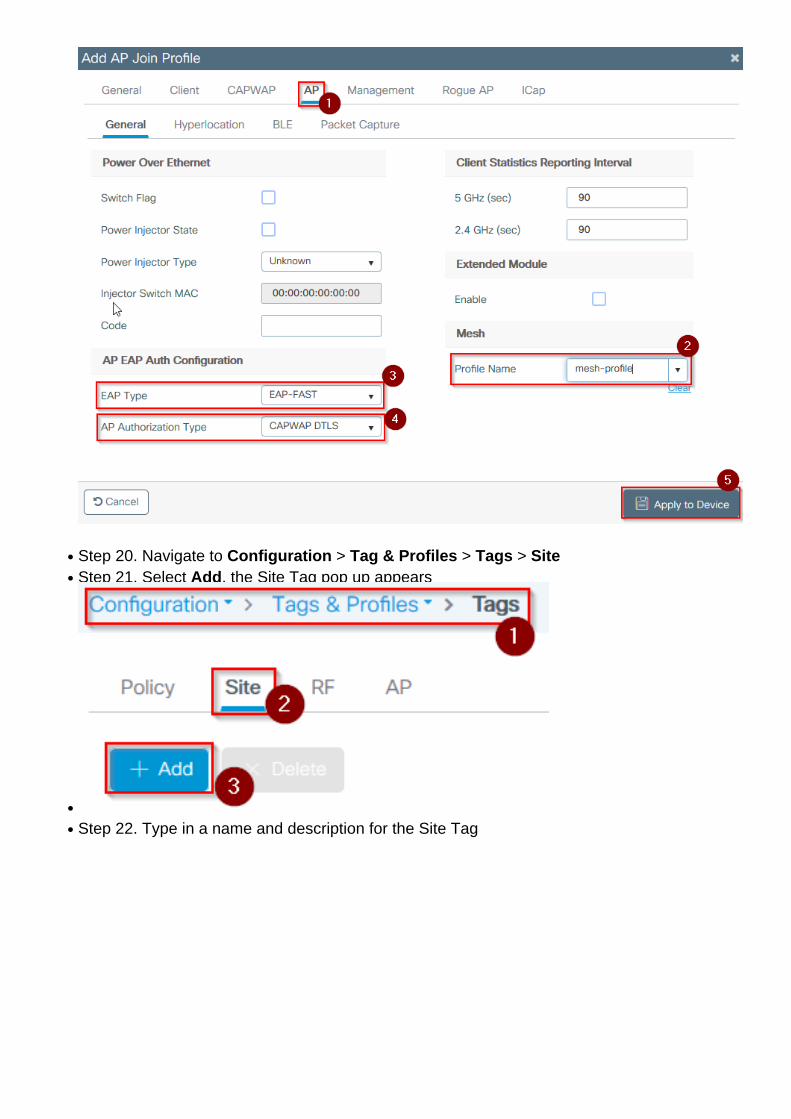
Step 17. Navigate to the AP tab and select the Mesh Profile created in step 12 from theMesh Profile Name dropdown
●
Step 18. Ensure EAP-FAST and CAPWAP DTLS are set for the EAP Type and APAuthorization Type fields respectively
●
Steo 19. Select Apply to Device●
Step 20. Navigate to Configuration > Tag & Profiles > Tags > Site●
Step 21. Select Add, the Site Tag pop up appears●
●
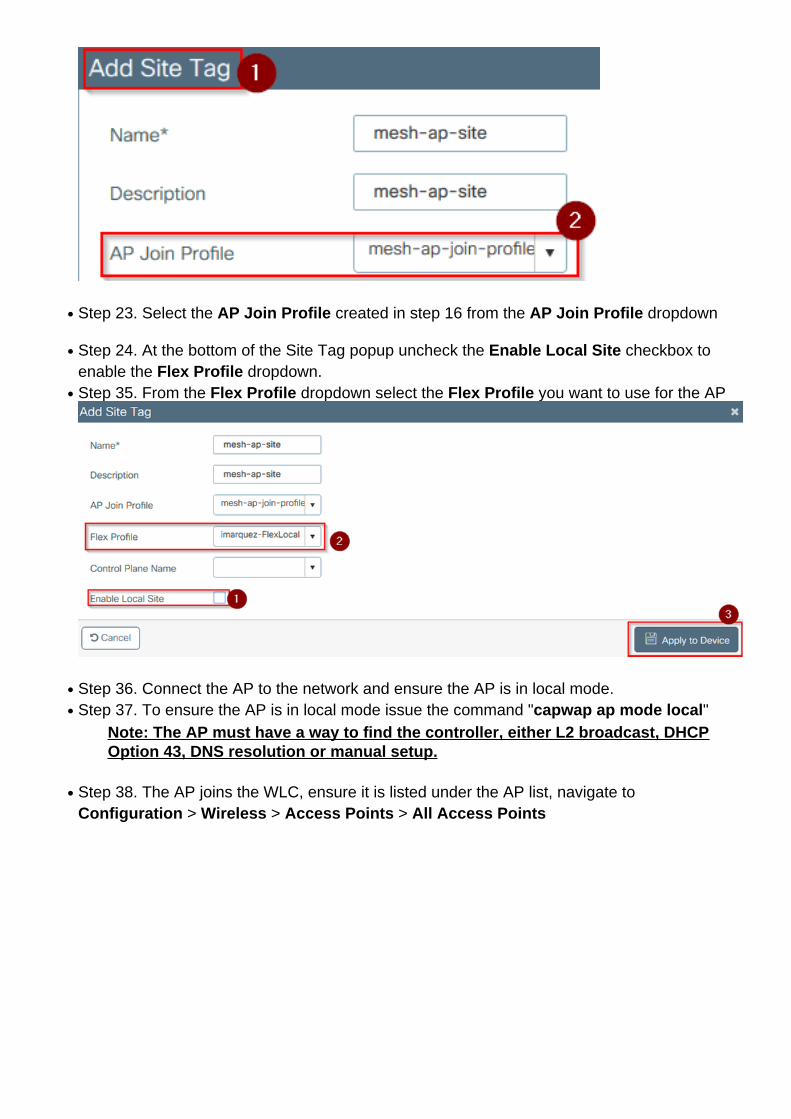
Step 22. Type in a name and description for the Site Tag●
Step 23. Select the AP Join Profile created in step 16 from the AP Join Profile dropdown●
Step 24. At the bottom of the Site Tag popup uncheck the Enable Local Site checkbox toenable the Flex Profile dropdown.
●
Step 35. From the Flex Profile dropdown select the Flex Profile you want to use for the AP●
Step 36. Connect the AP to the network and ensure the AP is in local mode.●
Step 37. To ensure the AP is in local mode issue the command "capwap ap mode local"●
Note: The AP must have a way to find the controller, either L2 broadcast, DHCPOption 43, DNS resolution or manual setup.
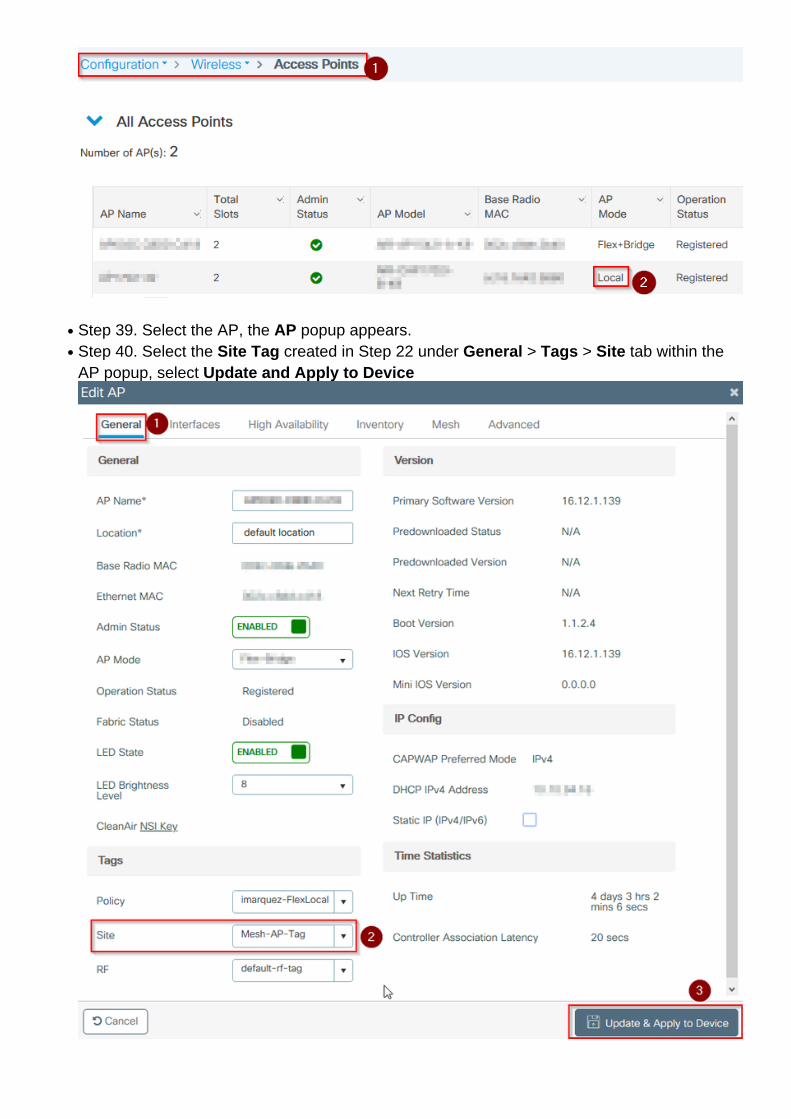
Step 38. The AP joins the WLC, ensure it is listed under the AP list, navigate toConfiguration > Wireless > Access Points > All Access Points
●
Step 39. Select the AP, the AP popup appears.●
Step 40. Select the Site Tag created in Step 22 under General > Tags > Site tab within theAP popup, select Update and Apply to Device
●
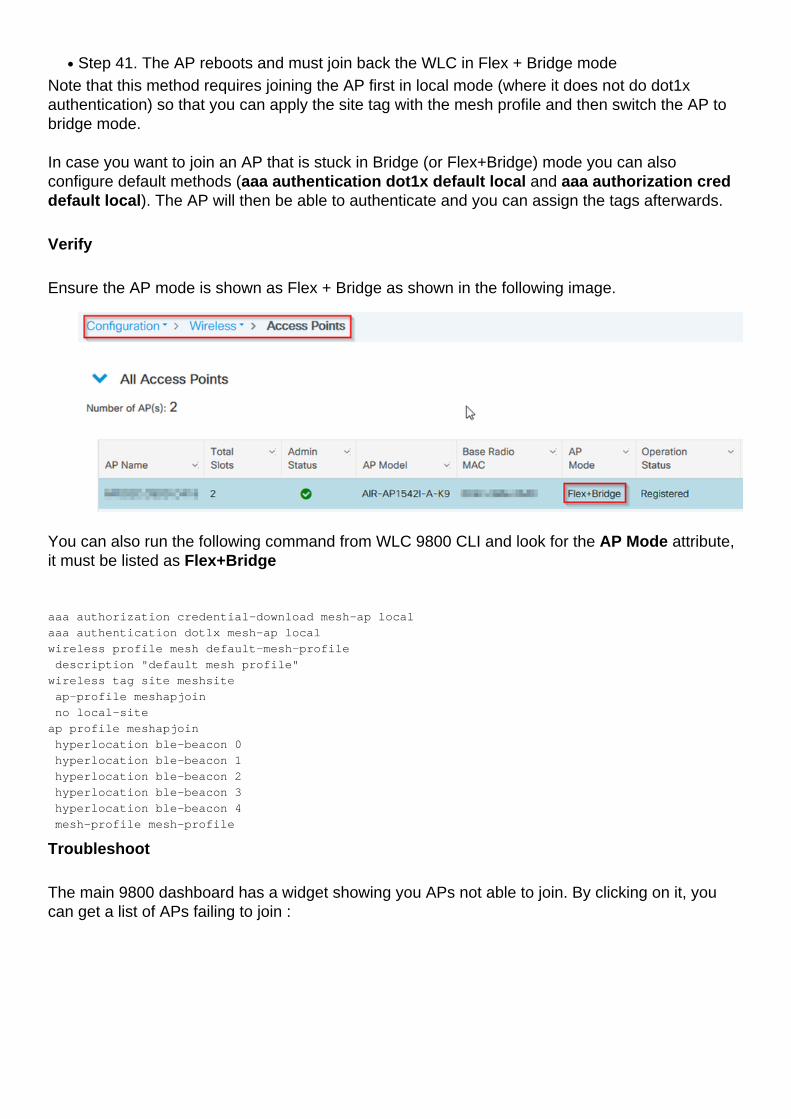
Step 41. The AP reboots and must join back the WLC in Flex + Bridge mode●
Note that this method requires joining the AP first in local mode (where it does not do dot1xauthentication) so that you can apply the site tag with the mesh profile and then switch the AP tobridge mode.
In case you want to join an AP that is stuck in Bridge (or Flex+Bridge) mode you can alsoconfigure default methods (aaa authentication dot1x default local and aaa authorization creddefault local). The AP will then be able to authenticate and you can assign the tags afterwards.
Verify
Ensure the AP mode is shown as Flex + Bridge as shown in the following image.
You can also run the following command from WLC 9800 CLI and look for the AP Mode attribute,it must be listed as Flex+Bridge
aaa authorization credential-download mesh-ap local
aaa authentication dot1x mesh-ap local
wireless profile mesh default-mesh-profile
description "default mesh profile"
wireless tag site meshsite
ap-profile meshapjoin
no local-site
ap profile meshapjoin
hyperlocation ble-beacon 0
hyperlocation ble-beacon 1
hyperlocation ble-beacon 2
hyperlocation ble-beacon 3
hyperlocation ble-beacon 4
mesh-profile mesh-profile
Troubleshoot
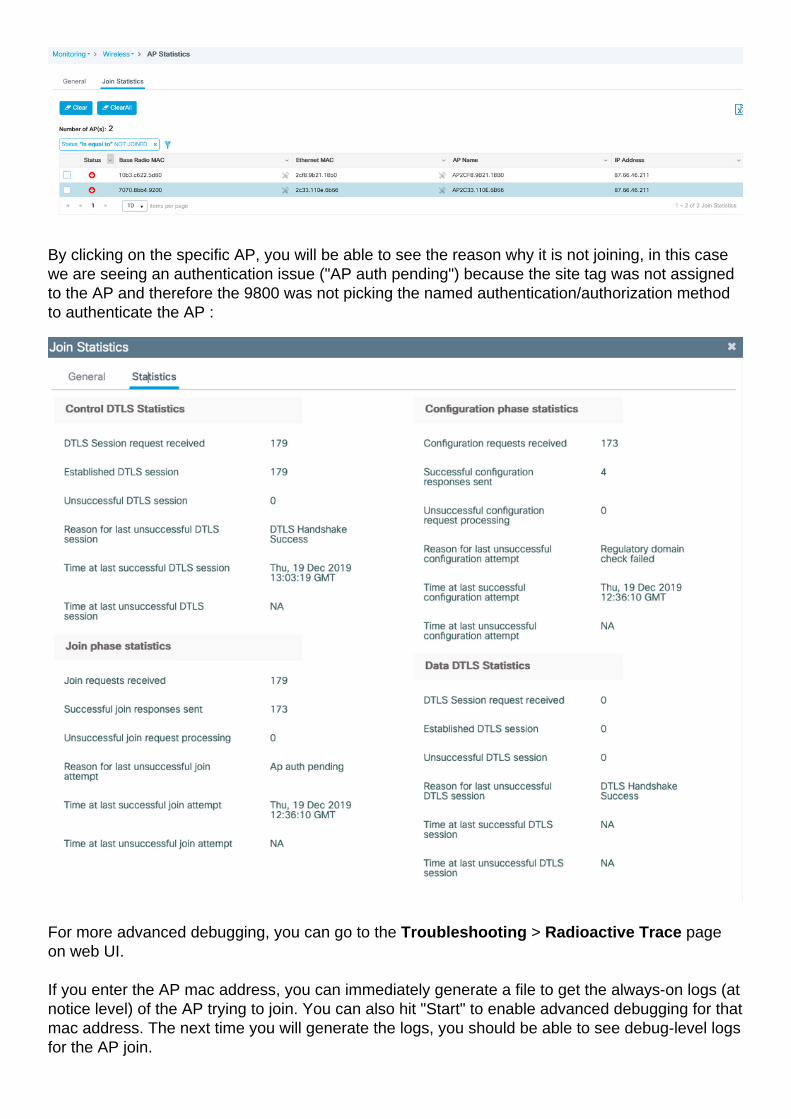
The main 9800 dashboard has a widget showing you APs not able to join. By clicking on it, youcan get a list of APs failing to join :
By clicking on the specific AP, you will be able to see the reason why it is not joining, in this casewe are seeing an authentication issue ("AP auth pending") because the site tag was not assignedto the AP and therefore the 9800 was not picking the named authentication/authorization methodto authenticate the AP :
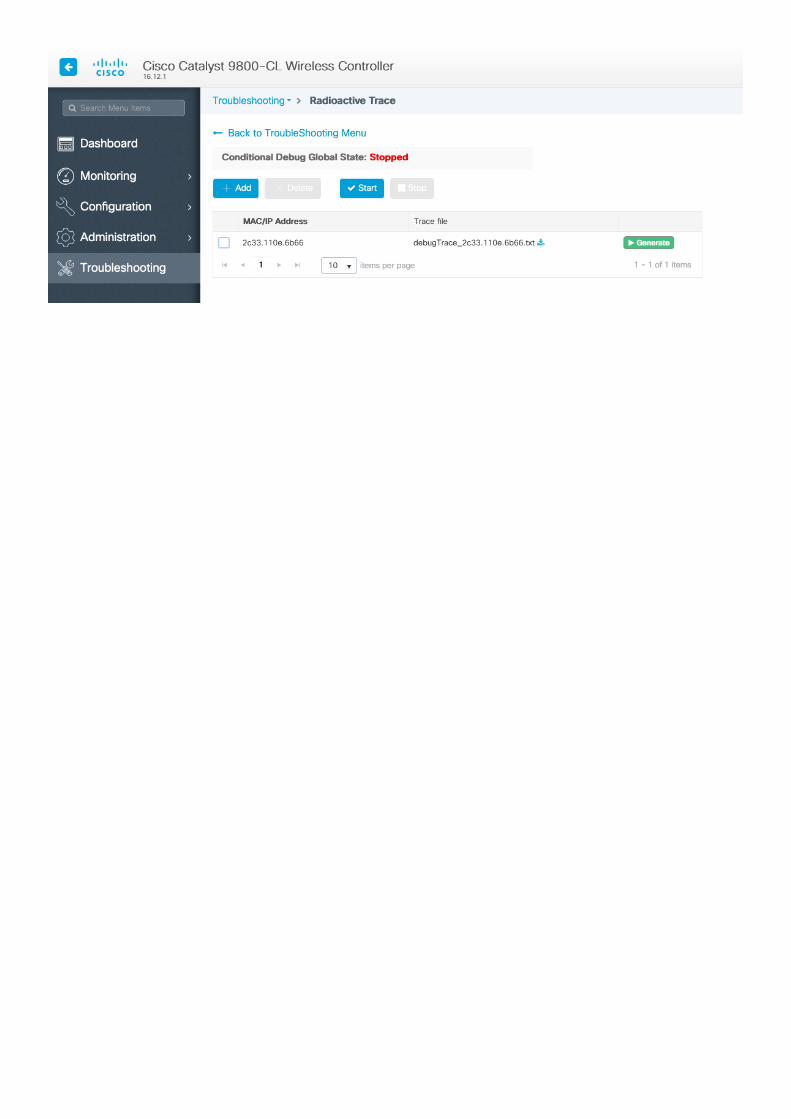
For more advanced debugging, you can go to the Troubleshooting > Radioactive Trace pageon web UI.
If you enter the AP mac address, you can immediately generate a file to get the always-on logs (atnotice level) of the AP trying to join. You can also hit "Start" to enable advanced debugging for thatmac address. The next time you will generate the logs, you should be able to see debug-level logsfor the AP join.