12
Jugular/Subclavian Vein Approach Instructions for Use ®

Jugular/Subclavian Vein ApproachInstructions for Use
®


1
Instructions for Use For use in the Vena CavaCaution: Federal (U.S.A.) law restricts this device to sale by or on the order of a physician.A. General InformationThe EclipsE® Filter is a venous interruption device designed to prevent pulmonary embolism. The unique design and material of the EclipsE® Filter provide filtering efficiency and allow percutaneous placement through an angiographic introducer with minimum entry site difficulties. The placement procedure is quick and simple to perform. The EclipsE® Filter is an electropolished version of the G2® X Filter. This product is not manufactured with latex.The EclipsE® Filter is intended to be used in the inferior vena cava (IVC) with a diameter less than or equal to 28 mm.The jugular/subclavian system allows for placement of the EclipsE® Filter via a jugular or subclavian vein approach. The jugular/subclavian system consists of a dilator and introducer set and a delivery device. The dilator accepts a 0.038" guidewire and allows for an 800 psi maximum pressure contrast power injection. The 10 French I.D. introducer sheath contains a radiopaque tip and hemostasis valve with a side port. The delivery device fits within the introducer sheath and consists of a side port for saline infusion and a delivery mechanism to deploy the EclipsE® Filter. The delivery device contains a spline cap that mechanically separates the filter anchors from one another in a unique pattern to prevent leg entanglement. The EclipsE® Filter is preloaded within the delivery device. Once the introducer sheath is within position, the delivery device is advanced through the introducer sheath until the introducer and delivery hubs snap together. The safety clip is then removed. The introducer hub is pulled back over the pusher wire handle to unsheath and release the EclipsE® Filter allowing it to recover to its predetermined shape. The EclipsE® Filter is designed to act as a permanent filter. When clinically indicated, the EclipsE® Filter may be percutaneously removed after implantation according to the instructions provided under the Optional Removal Procedure. The EclipsE® Filter's anchors allow the filter to remain rigid and resist migration, but elastically deform when the filter is percutaneously removed (reference Optional Procedure for Filter Removal for specific removal instructions).MRI Safety:The EclipsE® Filter was determined to be MR-conditional based on testing that was conducted on the G2® X Filter. The EclipsE® Filter is an electropolished version of the G2® X Filter.The G2® X Filter was determined to be MR-conditional according to the terminology specified in the American Society for Testing and Materials (ASTM) International, Designation: F2503-05. Standard Practice for Marking Medical Devices and Other Items for Safety in the Magnetic Resonance Environment. ASTM International, 100 Barr Harbor Drive, PO Box C700, West Conshohocken, Pennsylvania, 2005.Non-clinical testing demonstrated that the G2® X Filter is MR Conditional. A patient with this implant can be scanned safely immediately after placement under the following conditions: -Static magnetic field of 3-Tesla or less-Spatial gradient magnetic field of 720-Gauss/cm or less-Maximum MR system reported whole-body-averaged specific absorption rate (SAR) of 3-W/kg for 15 minutes of scanning.
In non-clinical testing, the G2® X Filter produced a temperature rise of 0.8°C at a maximum MR system-reported whole body averaged specific absorption rate (SAR) of 3-W/kg for 15-minutes of MR scanning in a 3-Tesla MR system using a transmit/receive body coil (Excite, Software G3.0-052B, General Electric Healthcare, Milwaukee, WI). MR image quality may be compromised if the area of interest is in the exact same area or relatively close to the position of the G2® X Filter. Therefore, optimization of MR imaging parameters to compensate for the presence of this implant may be necessary.B. Device DescriptionThe EclipsE® Filter System - Jugular/Subclavian consists of the filter and delivery system. The EclipsE® Filter can be delivered via the femoral and jugular/subclavian approaches. A separate delivery system is available for each approach. The EclipsE® Filter consists of twelve shape-memory nitinol wires emanating from a central nitinol sleeve with a retrieval hook at the apex of the filter. These twelve wires form two levels of filtration of emboli: the legs provide the lower level of filtration and the arms provide the upper level of filtration. The EclipsE® Filter System - Jugular/Subclavian is illustrated in Figure 1. The Delivery System consists of a 10 French I.D. introducer sheath and dilator, the EclipsE® Filter, and a delivery device. The EclipsE® Filter is packaged pre-loaded within the delivery device.
Figure 1: EclipsE® Filter System - Jugular/Subclavian
IMPORTANT: Read instructions carefully before using the EclipsE® FilterC. Indications for UseThe EclipsE® Filter - Jugular/Subclavian is indicated for use in the prevention of recurrent
pulmonary embolism via permanent placement in the vena cava in the following situations:• Pulmonarythromboembolismwhenanticoagulantsarecontraindicated.• Failureofanticoagulanttherapyforthromboembolicdisease.• Emergencytreatmentfollowingmassivepulmonaryembolismwhereanticipatedbenefitsof
conventional therapy are reduced.• Chronic,recurrentpulmonaryembolismwhereanticoagulant therapy has failed or is
contraindicated.• EclipsE® Filter may be removed according to the instructions supplied under Section
labeled: Optional Procedure for Filter Removal.D. Contraindications for Use
CAUTION: If the IVC diameter exceeds 28 mm, the filter must not be inserted into the IVC.
The EclipsE® Filter should not be implanted in:• Pregnantpatientswhenfluoroscopymayendangerthefetus.Risksandbenefitsshouldbe
assessed carefully.
ENGLISH

2
• PatientswithanIVCdiameterlargerthan28mm.• Patientswithriskofsepticembolism.
E. WarningsEclipsE® Filter Implantation1. The EclipsE® Filter is pre-loaded and is intended for single use only. Do not deploy
the filter prior to proper positioning in the IVC, as the EclipsE® Filter cannot be safely reloaded.
2. This device has been designed for single use only. Reusing this medical device bears the risk of cross-patient contamination as medical devices – particularly those with long and small lumina, joints, and/or crevices between components – are difficult or impossible to clean once body fluids or tissues with potential pyrogenic or microbial contamination have had contact with the medical device for an indeterminable period of time. The residue of biological material can promote the contamination of the device with pyrogens or microorganisms which may lead to infectious complications.
3. Do not resterilize. After resterilization, the sterility of the product is not guaranteed because of an indeterminable degree of potential pyrogenic or microbial contamination which may lead to infectious complications. Cleaning, reprocessing and/or resterilization of the present medical device increases the probability that the device will malfunction due to potential adverse effects on components that are influenced by thermal and/or mechanical changes.
4. Do not deploy the filter unless IVC has been properly measured. (Refer to Precaution # 7).
5. If large thrombus is present at the initial delivery site, do not attempt to deliver the filter. Migration of the clot and/or filter may occur. Select an alternate site to deliver the filter. A small thrombus could be bypassed by the guidewire and introducer sheath.
6. Never re-deploy a removed filter.7. Never advance the guidewire or introducer sheath/dilator or deploy the filter without
fluoroscopic guidance.8. Filter fractures are a known complication of vena cava filters. There have been
some reports of serious pulmonary and cardiac complications with vena cava filters requiring the retrieval of the fragment utilizing endovascular and/or surgical techniques.
9. Movement, migration or tilt of the filter are known complications of vena cava filters. Migration of filters to the heart or lungs has been reported. There have also been reports of caudal migration of the filter. Migration may be caused by placement in IVCs with diameters exceeding the appropriate labeled dimensions specified in this IFU. Migration may also be caused by improper deployment, deployment into clots and/or dislodgement due to large clot burdens.
10. Never use the jugular or subclavian delivery system for femoral approach, as this will result in improper EclipsE® Filter orientation within the IVC.
11. When injecting contrast medium through the dilator, do not exceed the maximum pressure rating of 800 psi.
12. Persons with allergic reactions to nickel may suffer an allergic response to this implant.
13. After use, the EclipsE® Filter and accessories may be a potential biohazard. Handle and dispose of in accordance with accepted medical practice and applicable local, state and federal laws and regulations.
Reference Potential Complications section for further information regarding other known filter complications.EclipsE® Filter Removal1. Do not attempt to remove the EclipsE® Filter if significant amounts of thrombus are
trapped within the filter or if the retrieval hook is embedded within the vena cava wall.
NOTE: It is possible that complications such as those described in the "Warnings," "Precautions," or "Potential Complications" sections of this Instructions for Use may affect the recoverability of the device and result in the clinician's decision to have the device remain permanently implanted.
2. Never re-deploy a removed filter.3. Remove the EclipsE® Filter using an intravascular snare or the REcovERy conE®
Removal System only. Refer to the Optional Procedure for Filter Removal section for details.
F. PrecautionsEclipsE® Filter Implantation1. This product is intended for use by physicians trained and experienced in diagnostic and
interventional techniques.2. The safety and effectiveness of this device has not been established for pregnancy, nor in
suprarenal position.13. The safety and effectiveness of this device has not been established for morbidly obese
patients. Open abdominal procedures such as bariatric surgery may affect the integrity and stability of the filter.
4. Anatomical variances may complicate filter insertion and deployment. Careful attention to these Instructions for Use can shorten insertion time and reduce the likelihood of difficulties.
5. Procedures or activities that lead to changes in intra-abdominal pressure could affect the integrity or stability of the filter.
6. Position the retrieval hook 1 cm below the lowest renal vein. Venacavography must always be performed to confirm proper implant site. Radiographs without contrast, which do not clearly show the wall of the IVC, may be misleading.
7. When measuring caval dimensions, consider an angiographic catheter or Intravascular Ultrasound (IVUS) if there is any question about caval morphology.
8. If misplacement, sub-optimal placement, or tilting of the filter occurs, consider immediate removal. Do not attempt to reposition the filter. Retrieve the EclipsE® Filter using an intravascular snare or a REcovERy conE® Removal System only. Refer to the Optional Procedure for Filter Removal section for details.
9. Spinal deformations: It is important to exercise care when contemplating implantation in patients with significant kyphoscoliotic spinal deformations because the IVC may follow the general course of such anatomic deformations. This may make percutaneous removal of the filter more difficult.
10. In patients with continued risk of chronic, recurrent pulmonary embolism, patients should be returned to anti-thrombotic therapy as soon as it is deemed safe.
11. If resistance is encountered during the insertion procedure, withdraw the guidewire and check vein patency fluoroscopically with a small injection of contrast medium. If a large thrombus is present, remove the venipuncture needle and use the vein on the opposite side. A small thrombus may be bypassed by the guidewire and introducer.
12. Ensure that the introducer and the delivery device hubs are snapped together and that the system has been positioned for optimal placement, before deploying the EclipsE® Filter.
13. Do not remove the safety clip until the introducer and the delivery device hubs are snapped together.
14. Do not deliver the filter by pushing on the handle, rather retract the introducer hub to properly deploy the EclipsE® Filter.
15. It is very important to maintain introducer patency with a saline flush to prevent occlusion of the introducer, which may interfere with delivery device advancement.
16. Aspirating the introducer sheath while leaving the guidewire in place may lead to the introduction of air into the system.
EclipsE® Filter Removal1. Anatomical variances may complicate the removal procedure. Careful attention to these
Instructions for Use can shorten insertion time and reduce the likelihood of difficulties.2. Spinal deformations: It is important to exercise care when contemplating removing the
EclipsE® Filter with the REcovERy conE® Removal System in patients with significant kyphoscoliotic spinal deformations because the IVC may follow the general course of such anatomic deformations. This may require advanced interventional techniques to remove the filter.
3. When using the REcovERy conE® Removal System, the cone must be fully retracted into the Y-adapter before connecting the system to the introducer catheter to ensure that the cone can be properly delivered through the catheter.

3
NOTE: Standards and guidelines developed by the Society of Interventional Radiologists recommend that patients with filters (either permanent or retrievable) be tracked andreceive "routine follow-up" subsequent to the placement of the device.See Reporting Standards for Inferior Vena Caval Filter Placement and Patient Follow-up:Supplement for Temporary and Retrievable/Optional Filters. Millward, S., et al.: J. VascInterv Radiol 2005; 16:441-443; Recommended Reporting Standards for Vena Cava FilterPlacement and Patient Follow-up. The Participants in the Vena Caval Filter ConsensusConference: J Vasc Inter Radiol 2003; 14:S427-S432; Guidelines for the Use of Retrievableand Convertible Vena Cava Filters: Report from the Society of Interventional RadiologyMultidisciplinary Consensus Conference. Kaufman, J., et al.: J Vasc Interv Radiol 2006;17:449-459.G. Potential ComplicationsProcedures requiring percutaneous interventional techniques should not be attempted by physicians unfamiliar with the possible complications. Complications may occur at any time during or after the procedure.Possible complications include, but are not limited to, the following:• Movement,migrationortiltofthefilterareknowncomplicationsofvenacavafilters.
Migration of filters to the heart or lungs has been reported. There have also been reports of caudal migration of the filter. Migration may be caused by placement in IVCs with diameters
exceeding the appropriate labeled dimensions specified in this IFU. Migration may also be caused by improper deployment, deployment into clots and/or dislodgement due to large clot burdens.
• Filterfracturesareaknowncomplicationofvenacavafilters. There have been some reports of serious pulmonary and cardiac complications with vena cava filters requiring the retrieval of the fragment utilizing endovascular and/or surgical techniques.
• Detachmentofcomponents• PerforationorotheracuteorchronicdamageoftheIVCwall.• Acuteorrecurrentpulmonaryembolism.Thishasbeenreporteddespitefilterusage.It
is not known if thrombi passed through the filter, or originated from superior or collateral vessels.
• Deepveinthrombosis• Cavalthrombosis/occlusion.• Extravasationofcontrastmaterialattimeofvenacavogram.• Airembolism• Hematomaornerveinjuryatthepuncturesiteorsubsequentretrievalsite.• Hemorrhage• Restrictionofbloodflow.• Occlusionofsmallvessels.• Distalembolization.• Infection.• Intimaltear.• Stenosisatimplantsite.• Failureoffilterexpansion/incompleteexpansion• Insertionsitethrombosis• Filtermalposition• Vesselinjury• Arteriovenousfistula• Backorabdominalpain• FilterTilt• Hemothorax• Organinjury• Phlegmasiaceruleadolens• Pneumothorax• Postphlebiticsyndrome• Stroke• Thrombophlebitis• VenousUlceration• BloodLoss• Guidewireentrapment• Pain
All of the above complications may be associated with serious adverse events such as medical intervention and/or death. There have been reports of complications including death, associated with the use of vena cava filters in morbidly obese patients. The risk/benefit ratio of any of these complications should be weighed against the inherent risk/benefit ratio for a patient who is at risk of pulmonary embolism without intervention.H. Equipment Required• OneEclipsE® Filter Jugular/Subclavian System that contains:
-One 55 cm, 10 French I.D. introducer and dilator set -One delivery device with pre-loaded EclipsE® Filter
• 0.038"3mmJ-tippedGuidewire,110cmlongorlonger• 18Gentryneedle• Saline• Contrastmedium• Sterileextensiontubeforsalinedriporsyringeforsalineinfusion• Allbasicmaterialsforvenipuncture:scalpel,#11blade,localanesthesia,drapes,etc.
I. Directions for Use1. Select a suitable jugular or subclavian venous access route, on either the right or left side,
depending upon the patient’s size/anatomy, operator’s preference, or location of venous thrombosis.
2. Prep, drape, and anesthetize the skin puncture site in standard fashion. 3. Select and open the carton and outer pouch. Open the introducer sheath and dilator inner
pouch.4. Nicktheskinwitha#11bladeandperformvenipuncturewithan18Gentryneedle.5. Insert a J-tipped guidewire and gently advance it into the inferior vena cava.
PRECAUTION: If resistance is encountered during the insertion procedure, withdraw the guidewire and check vein patency fluoroscopically with a small injection of contrast medium. If a large thrombus is present, remove the venipuncture needle and try the vein on the opposite side. A small thrombus may be bypassed by the guidewire and introducer.
6. Remove the 18G entry needle over the J-tipped guidewire. Obtain the dilator and the introducer sheath from the package. Flush the dilator and the introducer with saline. Insert the dilator through the introducer sheath ensuring that the hubs snap together. Advance the 10 French introducer sheath together with its tapered dilator over the guidewire and into the inferior vena cava.
NOTE: A 0.038" guidewire is used to guide the dilator/introducer assembly beyond the implant site to ensure proper advancement.
PRECAUTION: It is very important to maintain introducer patency with a saline flush to prevent occlusion of the introducer, which may interfere with delivery device advancement.
7. Remove the guidewire and perform a standard inferior venacavogram in both the AP and lateralview,(typically30mLofcontrastmediumat15mL/s)throughthedilator.Checkforcaval thrombi, position of renal veins, and congenital anomalies. Select the optimum level for filter placement and measure the IVC diameter, correcting for magnification (typically 20 percent).
4
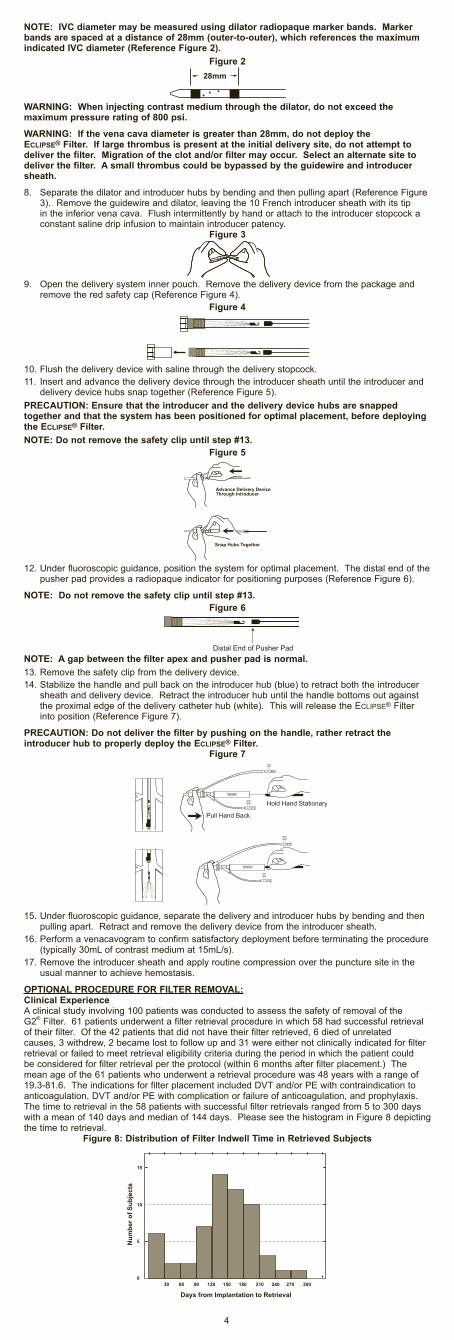
NOTE: IVC diameter may be measured using dilator radiopaque marker bands. Marker bands are spaced at a distance of 28mm (outer-to-outer), which references the maximum indicated IVC diameter (Reference Figure 2).
Figure 2
WARNING: When injecting contrast medium through the dilator, do not exceed the maximum pressure rating of 800 psi.
WARNING: If the vena cava diameter is greater than 28mm, do not deploy the EclipsE® Filter. If large thrombus is present at the initial delivery site, do not attempt to deliver the filter. Migration of the clot and/or filter may occur. Select an alternate site to deliver the filter. A small thrombus could be bypassed by the guidewire and introducer sheath.
8. Separate the dilator and introducer hubs by bending and then pulling apart (Reference Figure 3). Remove the guidewire and dilator, leaving the 10 French introducer sheath with its tip in the inferior vena cava. Flush intermittently by hand or attach to the introducer stopcock a constant saline drip infusion to maintain introducer patency.
Figure 3
9. Open the delivery system inner pouch. Remove the delivery device from the package and remove the red safety cap (Reference Figure 4).
Figure 4
10. Flush the delivery device with saline through the delivery stopcock. 11. Insert and advance the delivery device through the introducer sheath until the introducer and
delivery device hubs snap together (Reference Figure 5).PRECAUTION: Ensure that the introducer and the delivery device hubs are snapped together and that the system has been positioned for optimal placement, before deploying the EclipsE® Filter. NOTE: Do not remove the safety clip until step #13.
Figure 5
12. Under fluoroscopic guidance, position the system for optimal placement. The distal end of the pusher pad provides a radiopaque indicator for positioning purposes (Reference Figure 6).
NOTE: Do not remove the safety clip until step #13.Figure 6
NOTE: A gap between the filter apex and pusher pad is normal.13. Remove the safety clip from the delivery device.14. Stabilize the handle and pull back on the introducer hub (blue) to retract both the introducer
sheath and delivery device. Retract the introducer hub until the handle bottoms out against the proximal edge of the delivery catheter hub (white). This will release the EclipsE® Filter into position (Reference Figure 7).
PRECAUTION: Do not deliver the filter by pushing on the handle, rather retract the introducer hub to properly deploy the EclipsE® Filter.
Figure 7
15. Under fluoroscopic guidance, separate the delivery and introducer hubs by bending and then pulling apart. Retract and remove the delivery device from the introducer sheath.
16. Perform a venacavogram to confirm satisfactory deployment before terminating the procedure (typically30mLofcontrastmediumat15mL/s).
17. Remove the introducer sheath and apply routine compression over the puncture site in the usual manner to achieve hemostasis.
OPTIONAL PROCEDURE FOR FILTER REMOVAL:Clinical ExperienceA clinical study involving 100 patients was conducted to assess the safety of removal of the G2® Filter. 61 patients underwent a filter retrieval procedure in which 58 had successful retrieval of their filter. Of the 42 patients that did not have their filter retrieved, 6 died of unrelated causes, 3 withdrew, 2 became lost to follow up and 31 were either not clinically indicated for filter retrieval or failed to meet retrieval eligibility criteria during the period in which the patient could be considered for filter retrieval per the protocol (within 6 months after filter placement.) The mean age of the 61 patients who underwent a retrieval procedure was 48 years with a range of 19.3-81.6. The indications for filter placement included DVT and/or PE with contraindication to anticoagulation, DVT and/or PE with complication or failure of anticoagulation, and prophylaxis. The time to retrieval in the 58 patients with successful filter retrievals ranged from 5 to 300 days with a mean of 140 days and median of 144 days. Please see the histogram in Figure 8 depicting the time to retrieval.
Figure 8: Distribution of Filter Indwell Time in Retrieved Subjects

5
Of the 61 attempted filter retrievals, 3 technical failures for retrieval resulted from inability to engage the filter apex with the REcovERy conE® Removal System due to filter tilt leading to embedding of the filter apex into the vena caval wall. One of the 58 successful filter retrievals involved a filter that was retrieved in spite of tilt and associated embedding of filter apex into caval wall. There was one symptomatic complication in the study. A patient reported low back pain after a successful filter placement. On pre-retrieval imaging, two (2) of the filter arms were found to be penetrating the caval wall. The filter was successfully retrieved and the pain resolved.Asymptomatic complications included caudal migration (n=10), fracture (n=1), PE (n=2), filter tilt (n=15), penetration (n=17), caval occlusion (n=1), non-occlusive caval thrombosis (n=1), and caval stenosis at implant site post successful retrieval (n=1).Removal of EclipsE® Filter Using an Intravascular SnareEquipment Required• Oneintravascularsnareofuser’schoice• One80-cmintroducersheath,7FIDorgreater,tobeusedasretrievalsheath• 0.035"3mmJ-tippedGuidewire,110cmlongorlonger• 18gaugeentryneedle• Saline• Contrastmedium• Sterileextensiontubeforsalinedriporsyringeforsalineinfusion• Allbasicmaterialsforvenipuncture:scalpel,#11blade,localanesthesia,drapes,etc.Procedural Instructions1. Select a suitable jugular venous access route on either the right or left side depending upon
the patient’s size or anatomy, operator’s preference, or location of venous thrombosis.2. Remove the retrieval sheath from its packaging using sterile technique.3. Prior to use, flush the retrieval sheath with heparinized saline or suitable isotonic solution.4. Prepare all other procedure components according to the manufacturers’ Instructions for Use.5. Use appropriate technique to determine that the filter, the jugular retrieval route, and distal
IVC are free of thrombus.6. Select the appropriate loop diameter size of the intravascular snare.7. Assemble the intravascular snare according to the Instructions for Use provided by its
manufacturer.8. Insert the guidewire of choice into the retrieval sheath using the guidewire tip-straightener.
Gently advance the guidewire into the IVC under fluoroscopic guidance such that it is caudal to the filter.
9. Introduce and advance the tip of the retrieval sheath such that the tip of the sheath is approximately 3cm cephalad to the filter retrieval hook.
10. Remove the guidewire.11. Insert and advance the intravascular snare assembly through the sheath until it protrudes out
of the sheath such that the marker band of the snare catheter is cephalad to the filter retrieval hook.
12. The retrieval of the EclipsE® Filter using an intravascular snare is illustrated Figure 9 A-E.Figure 9 A-E: Retrieval of EclipsE® Filter using an Intravascular Snare, Illustrated
Figure 9 A: Slowly advance the loop forward over the filter apex.Figure 9 B: Reduce the loop diameter by advancing the snare catheter while simultaneously pulling the snare backwards until the loop engages the filter retrieval hook.NOTE: Under fluoroscopic guidance, ensure that the loop of the snare has properly engaged the retrieval hook and that the retrieval hook, retrieval catheter and snare are aligned. Be careful to snare the apex of the retrieval hook; not the side. The marker band of the snare catheter must be cephalad to the retrieval hook.NOTE: Always maintain tension on the snare to prevent disengagement of the snare loop from the filter retrieval hook.Figure 9 C: Advance the sheath in the caudal direction until it aligns with the distal tip of the snare catheter. Figure 9 D: While keeping tension of the snare, hold the retrieval sheath stationary and withdraw the filter into the retrieval sheath by retracting the intravascular snare.Figure 9 E: Continue retracting the snare until the filter is completely collapsed inside the sheath. Once the filter is fully collapsed inside the sheath, retract the complete system as a unit out through the sheath.
WARNING: Do not attempt to remove the EclipsE® Filter if significant amounts of thrombus are trapped within the filter or if the retrieval hook is embedded within the vena caval wall.
WARNING: Remove the EclipsE® Filter using an intravascular snare or the REcovERy conE® Removal System only.
13. Examine the filter to assure that the complete filter has been removed.Follow-up Venacavogram14. A follow-up venacavogram may be performed prior to withdrawing the introducer catheter
(typically30mLofcontrastmediumat15mL/s).15. Remove the introducer catheter and apply routine compression over the puncture site in the
usual way to achieve hemostasis.
Removal of EclipsE® Filter Using the REcovERy conE® Removal SystemEquipment RequiredThe following equipment is required for use:• OneREcovERy conE® Removal System that contains:
–One 75 cm, 10 French I.D. introducer catheter and dilator set –One Y-adapter with REcovERy conE® Removal System and pusher delivery system
• 0.035"3mmJ-tippedGuidewire,110cmlongorlonger• 18gaugeentryneedle• 12Frenchdilator• Saline• Contrastmedium• Sterileextensiontubeforsalinedriporsyringeforsalineinfusion• Allbasicmaterialsforvenipuncture:scalpel,#11blade,localanesthesia,drapes,etc.
If the physician chooses to use the REcovERy conE® Removal System to remove the EclipsE® Filter, it is available from C. R. Bard, Inc.
Procedural InstructionsInsertion of the Introducer Catheter1. Select a suitable jugular venous access route on either the right or left side depending upon
the patient’s size or anatomy, operator’s preference, or location of venous thrombosis.2. Prep, drape and anesthetize the skin puncture site in standard fashion.3. Select and open the REcovERy conE® Removal System package. Open Kit A Introducer
Catheter package.4. Nicktheskinwitha#11bladeandperformvenipuncturewithan18-gaugeentryneedle.5. Insert the guidewire and gently advance it to the location of the EclipsE® Filter for removal. 6. Remove the venipuncture needle over the guidewire. 7. Pre-dilate the accessed vessel with a 12 French dilator.8. Advance the 10 French introducer catheter together with its tapered dilator over the guidewire
and into the vein, such that the tip of the sheath is approximately 3cm cephalad to the filter retrieval hook.

6
NOTE: The introducer catheter has a radiopaque marker at the distal end of the catheter sheath to assist in visualization.
9. Remove the guidewire and dilator, leaving the introducer catheter with its tip in the appropriate location. Flush intermittently by hand or attach to the catheter a constant saline drip infusion to maintain introducer catheter patency.
10.Performastandardinferiorvenacavogram(typically30mLofcontrastmediumat15mL/s).Check for thrombus within the filter. If there is significant thrombus within the filter, do not remove the EclipsE® Filter.
REcovERy conE® Removal System Insertion and Delivery11. Remove the REcovERy conE® Removal System and pusher system from Kit B.12. Flush the central lumen of the cone catheter and wet the cone with saline—preferably
heparinized saline.13.LoosentheTouhy-BorstandslowlywithdrawtheconeintotheY-adaptertocollapsethecone
and flush with saline.
PRECAUTION: The cone must be fully retracted into the Y-adapter before connecting the system to the introducer catheter to ensure that the cone can be properly delivered through the catheter.
14. Attach the male end of the Y-adapter with the collapsed cone directly to the introducer catheter. The introducer catheter and the retrieval cone system should be held in a straight line to minimize friction.
15. Advance the cone by moving the pusher shaft forward through the introducer catheter, advancing the cone with each forward motion of the pusher shaft.
16. Continue forward movement of the pusher shaft until the cone advances to the radiopaque marker on the distal end of the introducer catheter. Unsheath to open the cone by stabilizing the pusher shaft and retracting the introducer catheter.
17. The retrieval of the EclipsE® Filter using a REcovERy conE® Removal System is illustrated in Figure 10 A-E:
Figure 10 A-E: Retrieval of EclipsE® Filter using REcovERy conE® Removal System, Illustrated
Figure 10 A: After the cone has been opened superior to the filter, carefully advance the cone over the retrieval hook by holding the introducer catheter stationary and advancing the pusher shaft. It is recommended to obtain an anterior-oblique fluoroscopic image to confirm that the cone is over the retrieval hook.Figure 10 B: Close the cone over the retrieval hook by advancing the introducer catheter over the cone while holding the pusher shaft stationary.Figure 10 C: Continue advancing the introducer catheter over the cone until the cone is within the introducer catheter.Figure 10 D: With the cone collapsed over the filter, remove the filter by stabilizing the introducer catheter and retracting the pusher shaft in one, smooth, continuous motion.Figure 10 E: The filter has been retracted into the catheter.WARNING: Do not attempt to remove the EclipsE® Filter if significant amounts of thrombus are trapped within the filter or if the retrieval hook is embedded within the vena cava wall.WARNING: Remove the EclipsE® Filter using an intravascular snare or the REcovERy conE® Removal System only.NOTE: It is recommended to fluoroscopically obtain image(s) of the filter in AP and lateral views during the retrieval procedure.NOTE: If difficulty is encountered while attempting to engage the retrieval hook and/or multiple passes are required, consider using an intravascular snare as an alternate retrieval method.18. Examine the filter to assure that the complete filter has been removed.Follow-up Venacavogram19. A follow-up venacavogram may be performed prior to withdrawing the introducer catheter
(typically30mLofcontrastmediumat15mL/s).20. Remove the introducer catheter and apply routine compression over the puncture site in the
usual way to achieve hemostasis.Guidewire - Assisted TechniqueDue to anatomical variances with respect to the position of the EclipsE® Filter, guidewire-assisted techniques may be used.Use of a GuidewireIf it is difficult to align the cone with the EclipsE® retrieval hook, a guidewire could be used to facilitate advancement of cone over the retrieval hook.Withdraw the introducer catheter and cone shaft away from the retrieval hook. Insert a 0.035" 260cm guidewire through the central lumen (a stiff guidewire with J or angled tip is recommended). Advance the guidewire through the cone and through the filter near the retrieval hook.After it has been confirmed that the guidewire is in contact with or in close proximity to the retrieval hook, advance the cone over the guidewire to the retrieval hook.Advance the introducer catheter to slightly collapse the cone over the retrieval hook. Withdraw the guidewire into the pusher shaft. Continue removing the filter as described in step 17.J. How SuppliedEach EclipsE® Filter is supplied preloaded in a delivery device. Each EclipsE® Filter is sterile and nonpyrogenic unless the package is damaged or opened, and is ready for single use only. If the filter is inadvertently discharged, do not attempt to re-sterilize or reload it.WARNING: After use, the EclipsE® Filter and accessories may be a potential biohazard. Handle and dispose of in accordance with accepted medical practice and applicable local, state and federal laws and regulations.The EclipsE® Filter should be stored in a cool (room temperature), dark, dry place.K. WarrantyBard Peripheral Vascular warrants to the first purchaser of this product that this product will be free from defects in materials and workmanship for a period of one year from the date of first purchase and liability under this limited product warranty will be limited to repair or replacement of the defective product, in Bard Peripheral Vascular’s sole discretion or refunding your net price paid. Wear and tear from normal use or defects resulting from misuse of this product are not covered by this limited warranty.TO THE EXTENT ALLOWABLE BY APPLICABLE LAW, THIS LIMITED PRODUCT WARRANTY IS IN LIEU OF ALL OTHER WARRANTIES, WHETHER EXPRESS OR IMPLIED, INCLUDING, BUT NOT LIMITED TO, ANY IMPLIED WARRANTY OF MERCHANTABILITY OR FITNESS FOR A PARTICULAR PURPOSE. IN NO EVENT WILL BARD PERIPHERAL VASCULAR BE LIABLE TO YOU FOR ANY INDIRECT, INCIDENTAL OR CONSEQUENTIAL DAMAGES RESULTING FROM YOUR HANDLING OR USE OF THIS PRODUCT.Some states/countries do not allow an exclusion of implied warranties, incidental or consequential damages. You may be entitled to additional remedies under the laws of your state/country.An issue or revision date and a revision number for these instructions are included for the user's information on the last page of this booklet. In the event 36 months have elapsed between this date and product use, the user should contact Bard Peripheral Vascular to see if additional product information is available.For additional vena cava filter clinical information please refer to the following societal guidelines:• "Practice Guideline for the Performance of Percutaneous Inferior Vena Cava Filter
Placement for the Prevention of Pulmonary Embolism" [ACR Practice Guideline 2007; 38:673-684]

• "American College of Chest Physicians: Opinions regarding the diagnosis and management of venous thromboembolic disease. ACCP Consensus Committee on Pulmonary Embolism. American College of Chest Physicians" [ Chest 1998 Feb; 113(2): 499-504]
• "Practice Management Guidelines for the Prevention of Venous Thromboembolism in Trauma Patients: The EAST Practice Management Guidelines Work Group" [J Trauma 2002; 53:142-614]
• "Quality Improvement Guidelines for Percutaneous Inferior Vena Cava Filter Placement for the Prevention of Pulmonary Embolism" [JVIR 2003; 14:S271-S275]
References:1. Quality Improvement Guidelines for Percutaneous Permanent Inferior Vena Cava Filter
Placement for the Prevention of Pulmonary Embolism. Grassi, Swan, Cardella, et al.: J Vasc Interv Radiol 2003; 14:S271-S275.
2. Initial Experience in Humans with a New Retrievable Inferior Vena Cava Filter. Asch, M.: Radiology 2002, 225(3), 835-844.
3. RetrievabilityoftheRecoveryVenaCavaFilterAfterDwellTimesLongerthan180Days.Binkert, C., et al.: J Vasc Interv Radiol 2006, 17(2), 299-302.
4. Experience with the Recovery Filter as a Retrievable Inferior Vena Cava Filter. Grande, J., et al.: J Vasc Interv Radiol 2005, 16(9), 1189-1193.
5. Difficult Retrieval of a Recovery IVC Filter. Hagspiel, K., et al.: J Vasc Interv Radiol 2004, 15(6), 645-647.
6. Removal of Vena Cava Filter at 224 Days. Lipman,J.:SouthernMedicalJournal2005,98(5),556-558.
7. Retrieval of the Bard Recovery Filter from a Superior Vena Cava. Rajan, D., et al.: J Vasc Interv Radiol 2004, 15(10), 1169-1171.
8. Retrievable Inferior Vena Cava Filters: Initial Clinical Results. Rosenthal, D., et al.: Annals of Vascular Surgery 2006, 20(1), 157-165.


Eclipse® Vena Cava Filter
Eclipse® Filter Jugular/Subclavian Delivery Device
Eclipse® Filter Introducer Sheath With Dilator
Jugular/Subclavian
Contents:(1) Eclipse® FilterJugular/Subclavian Delivery Device (1) 10 Fr. Introducer Sheath 55cm Long With Dilator
Contents:(1) 10 Fr. Introducer Sheath 55cm Long With Dilator
Contents:(1) Eclipse® Filter Jugular/Subclavian Delivery Device
Use By
Lot Number
Catalogue Number
Attention, See Instructions For Use
Sterilized Using Ethylene Oxide
Non-Pyrogenic
Keep Dry
Keep Away From Sunlight
Single Use
Do Not Resterilize
Do Not Use If Package Is Damaged
MR Conditional
Recommended Guidewire
Manufacturer
Does Not Contain Latex
Bard, Eclipse, G2 and Recovery Cone are trademarks and/or registered trademarks of C. R. Bard, Inc. or an affiliate.
Variously protected by one or more of the following U.S. Patent numbers: 6,007,558 6,258,026 and 6,156,055. Other U.S. and Foreign Patents Pending.Copyright © 2013 C. R. Bard, Inc. All Rights Reserved. Printed In U.S.A.
INTINT
KIT
INTDD

PK5100700 Rev. 2 02/13
Bard Peripheral Vascular, Inc.1625 West 3rd StreetTempe, AZ 85281USA
TEL: 1-480-894-9515 1-800-321-4254
FAX: 1-480-966-7062 1-800-440-5376 www.bardpv.com
Manufacturer:


