25
PONY CLUB ASSOCIATION OF WESTERN AUSTRALIA INC. JUMPING EQUITATION MANUAL APRIL 2012 ADAPTED FROM THE PCAQ JUMPING EQUITATION RULES AND MANUAL 2012

PONY CLUB ASSOCIATION OF WESTERN AUSTRALIA INC.
JUMPING EQUITATION MANUAL
APRIL 2012
ADAPTED FROM THE PCAQ JUMPING EQUITATION RULES AND MANUAL 2012
PCAWA Jumping Equitation Manual 2012 2
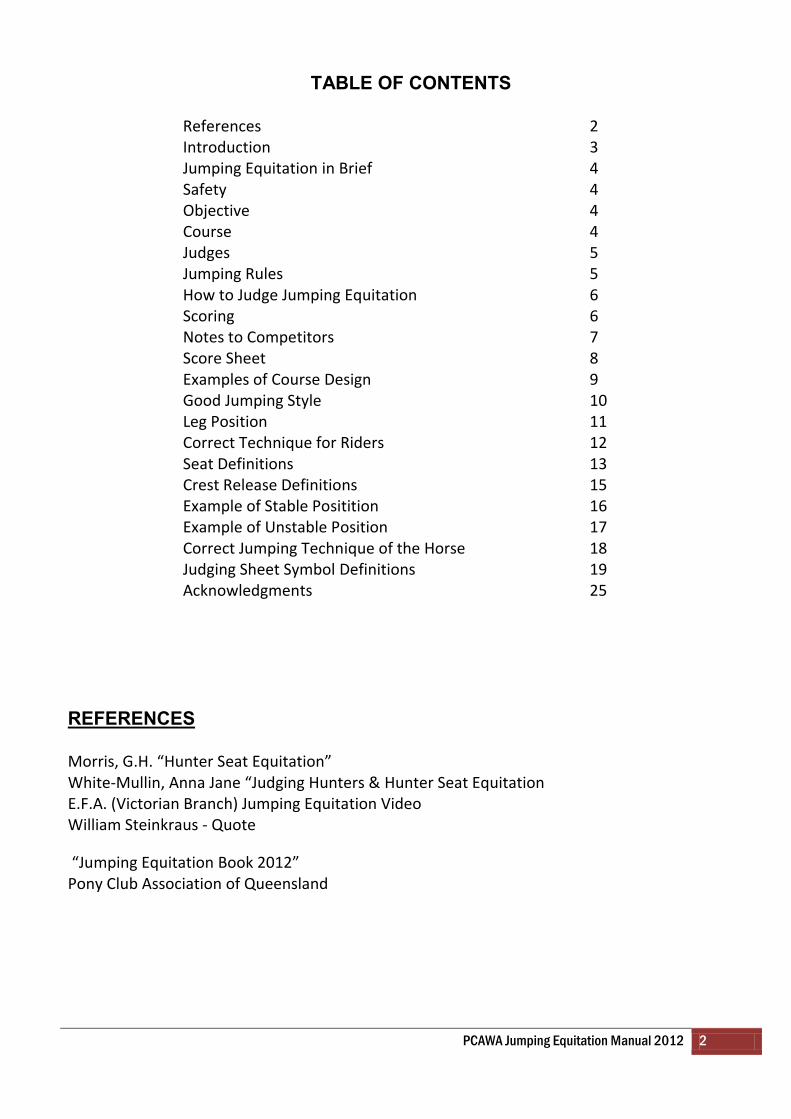
TABLE OF CONTENTS
References 2 Introduction 3 Jumping Equitation in Brief 4 Safety 4 Objective 4 Course 4 Judges 5 Jumping Rules 5 How to Judge Jumping Equitation 6 Scoring 6 Notes to Competitors 7 Score Sheet 8 Examples of Course Design 9 Good Jumping Style 10 Leg Position 11 Correct Technique for Riders 12 Seat Definitions 13 Crest Release Definitions 15 Example of Stable Positition 16 Example of Unstable Position 17 Correct Jumping Technique of the Horse 18 Judging Sheet Symbol Definitions 19 Acknowledgments 25
REFERENCES
Morris, G.H. “Hunter Seat Equitation” White-Mullin, Anna Jane “Judging Hunters & Hunter Seat Equitation E.F.A. (Victorian Branch) Jumping Equitation Video William Steinkraus - Quote
“Jumping Equitation Book 2012” Pony Club Association of Queensland
PCAWA Jumping Equitation Manual 2012 3
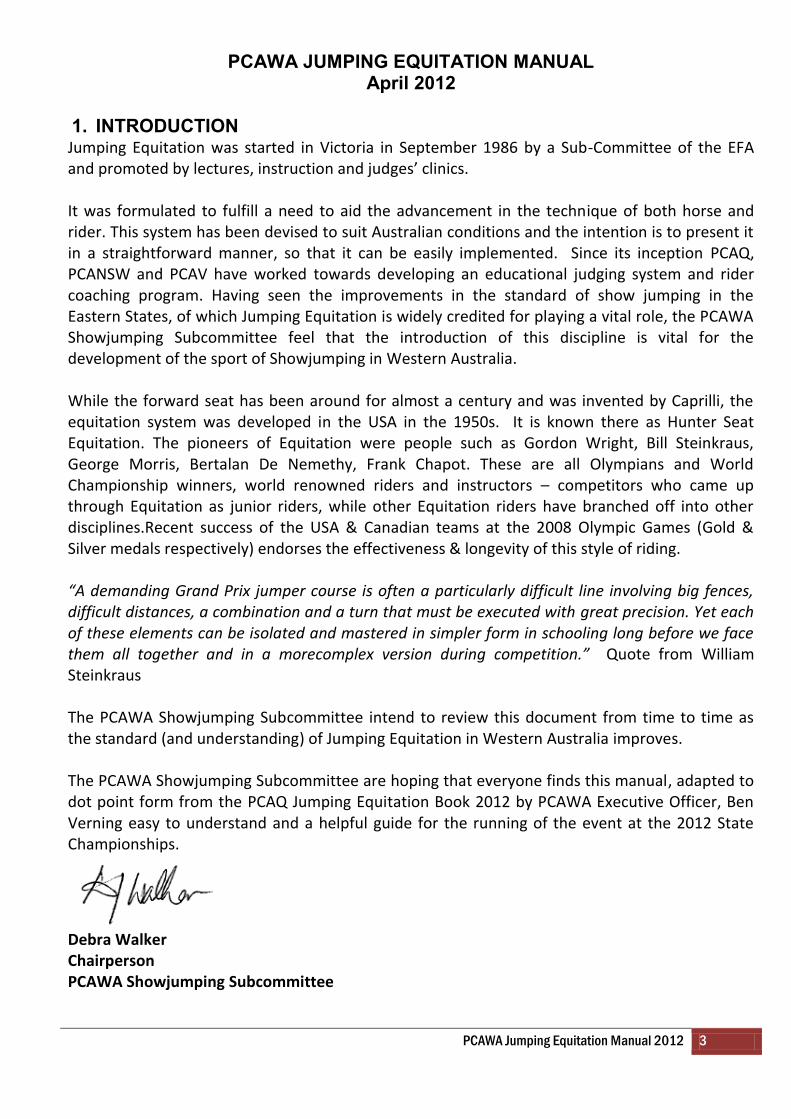
PCAWA JUMPING EQUITATION MANUAL
April 2012 1. INTRODUCTION
Jumping Equitation was started in Victoria in September 1986 by a Sub-Committee of the EFA and promoted by lectures, instruction and judges’ clinics. It was formulated to fulfill a need to aid the advancement in the technique of both horse and rider. This system has been devised to suit Australian conditions and the intention is to present it in a straightforward manner, so that it can be easily implemented. Since its inception PCAQ, PCANSW and PCAV have worked towards developing an educational judging system and rider coaching program. Having seen the improvements in the standard of show jumping in the Eastern States, of which Jumping Equitation is widely credited for playing a vital role, the PCAWA Showjumping Subcommittee feel that the introduction of this discipline is vital for the development of the sport of Showjumping in Western Australia. While the forward seat has been around for almost a century and was invented by Caprilli, the equitation system was developed in the USA in the 1950s. It is known there as Hunter Seat Equitation. The pioneers of Equitation were people such as Gordon Wright, Bill Steinkraus, George Morris, Bertalan De Nemethy, Frank Chapot. These are all Olympians and World Championship winners, world renowned riders and instructors – competitors who came up through Equitation as junior riders, while other Equitation riders have branched off into other disciplines.Recent success of the USA & Canadian teams at the 2008 Olympic Games (Gold & Silver medals respectively) endorses the effectiveness & longevity of this style of riding. “A demanding Grand Prix jumper course is often a particularly difficult line involving big fences, difficult distances, a combination and a turn that must be executed with great precision. Yet each of these elements can be isolated and mastered in simpler form in schooling long before we face them all together and in a morecomplex version during competition.” Quote from William Steinkraus The PCAWA Showjumping Subcommittee intend to review this document from time to time as the standard (and understanding) of Jumping Equitation in Western Australia improves. The PCAWA Showjumping Subcommittee are hoping that everyone finds this manual, adapted to dot point form from the PCAQ Jumping Equitation Book 2012 by PCAWA Executive Officer, Ben Verning easy to understand and a helpful guide for the running of the event at the 2012 State Championships.
Debra Walker Chairperson PCAWA Showjumping Subcommittee

PCAWA Jumping Equitation Manual 2012 4
2. JUMPING EQUITATION IN BRIEF Equitation is simply a system of correct riding. It is a system which caters for all riders
regardless of natural ability.
It is not something new, but emphasis is placed on co-ordinating and training both horse and rider in the safest most effective manner.
Natural talent is not enough to become a complete rider, trainer or teacher. As many of us with less talent know, it is impossible to become proficient in this sport without disciplined guidance and hard work.
A quote from George Morris “first become a good rider before you become a good rider over jumps”
This system enables everyone to become stylish and effective riders, which in turn, produces good trainers, teachers and judges.
3. SAFETY Safety MUST come first when teaching any riding discipline.
Proper riding apparel must be worn with particular attention being paid to the correct approved skull cap and boots.
Safety is not just about having the correct equipment, however, because important as they are, a helmet and boots will not prevent a broken arm or leg if one should suffer a fall.
The rider MUST also learn safety through the correct techniques of position.
4. OBJECTIVES To improve the technique of both horse and rider in showjumping.
To promote quality showjumping.
To encourage novice horses and riders in the jumping field.
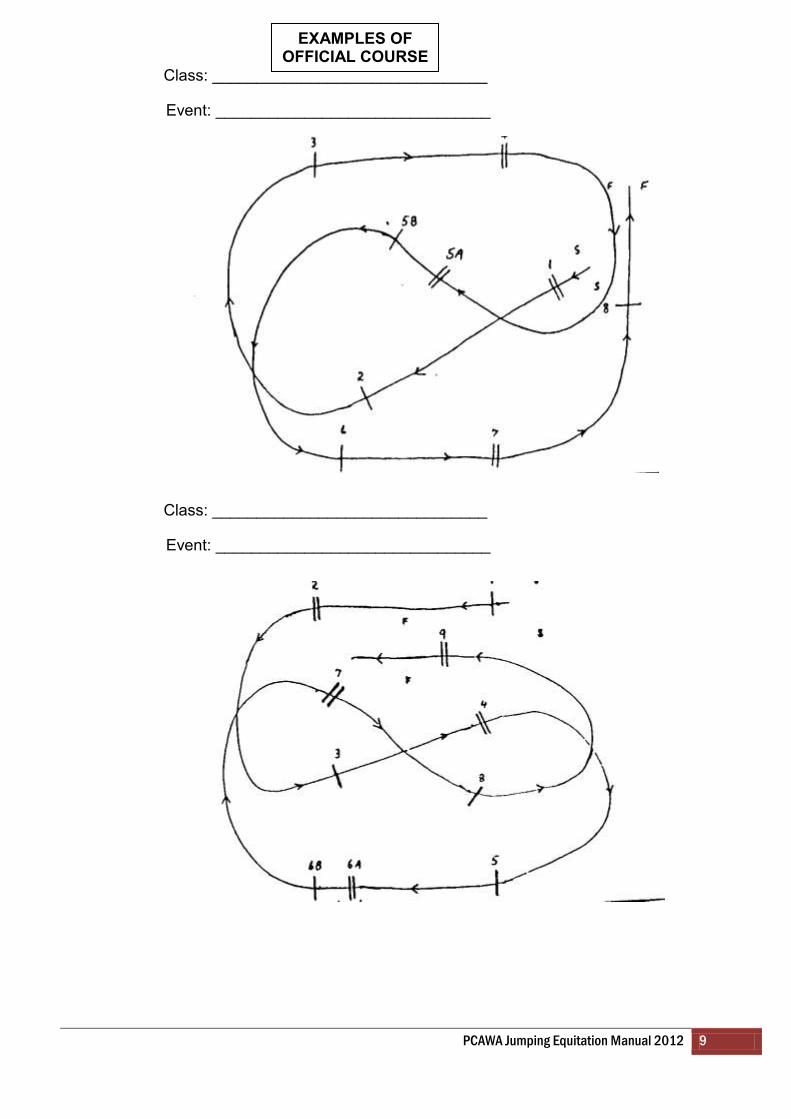
5. COURSE A flowing course without difficult turns, appropriate to the group.
A series of related strides both on straight and broken lines.
A suggested maximum of 8-10 fences set on true distances for all competitions.
It is suggested that a 2 non-jumping stride combination be used for non-championship competitions and lower heights; and a 1 non-jumping stride combination for Championships and higher heights.
6. JUDGES Judges must present themselves suitably attired.
Judges should be accredited or probationary. Probationary Judges should always judge with a fully accredited Judge.
The Judges are not to be situated within hearing distance of each other, but situated within the arena, and located well clear of distractions.
The position of the Judge must not be altered once the competition has commenced. The Judge must be positioned to see all obstacles and corners and must decide where to judge from e.g. a judge’s stand, back of a Ute, etc. It is preferable to be side on to the combination.
Judges should not be approached by competitors or spectators.
PCAWA Jumping Equitation Manual 2012 5
One Judge is appointed chief, takes the salute, and is in control of the bell and time keeper.
Judging of rider commences on entry to the arena and ceases the moment the horse and rider leave the arena. Jumping penalties will be noted where they occur after the rider crosses the Start line and before crossing the Finish line, and deducted from the final score.
Time for the course is calculated at 350mpm. Under 13’s are permitted to ride at 300 metres per minute at the Judge’s/ Course Builder’s discretion.
Judges are responsible for ensuring that the course is suitable and safe for competition prior to the competitors walking the course. This includes checking that the combination and distances are correct and the track is flowing.
Judges must use correct terminology at all times. Be clear and concise
When instructing the penciller, first name fence, then problem if applicable.
If it is an obvious problem that will occur throughout the round, e.g. stirrups too long use the recurring problem symbol
It is imperative that the Judge/Penciller/Scorer does not alter any of the scores given once the round has been marked and the sheet given to the scorer for totaling. Any alterations during the judging should be initialed by the Judge.
The Scorer should be instructed to total all sheets and place them in order as the event progresses to facilitate an efficient presentation upon completion of the class.
7. JUMPING RULES All Jumping Equitation competitions must be conducted in accordance with the Rules and
Regulations of the Pony Club Australia Showjumping Rules.
A map of the course is to be displayed prior to the riders walking the course. Only Team Managers or appointees are permitted to walk the course with the competitors at Championships.
Jumping penalties will be noted where they occur and deducted from the final score.
Time for the course is calculated at 350 metres per minute; (under 13 years calculated at 300mpm) but no time penalties are incurred up to the TIME LIMIT, which is twice the time allowed. Exceeding the Time Limit incurs elimination.
Saddlery as per PCAWA Gear Checking rules.
Only whole marks are awarded.
In the case of marked lameness, the Chief Judge informs the rider that he/she is eliminated. There is no appeal against this decision.
Riders are required to have their mounts under sufficient control throughout the round. The Judge may eliminate riders whose mounts are not under sufficient control.
The Judge scores on various aspects of the performance of the horse and rider (see score sheet and Definitions of Incorrect Techniques).
8. HOW TO JUDGE JUMPING EQUITATION
First the Judge uses a set of symbols to define major faults at and between each jump while the rider is on course. The Judge scores on various aspects of the performance of horse and rider by giving each category in the Collective Marks a score out of 10.The symbols provide an explanation of the faults of the horse and rider and give rise to the mark awarded for each of the aspects of the round.
PCAWA Jumping Equitation Manual 2012 6
Jumping penalties will be noted where they occur and deducted from the final score.
Scores given by the Judge have the same meaning as the Dressage scale of marks. The scale of marks is as follows:
10 Excellent 5 Sufficient
9 Very Good 4 Insufficient
8 Fairly Good 3 Fairly Bad
7 Good 2 Bad
6 Satisfactory 1 Very Bad
“Incorrect technique” definitions outline the major faults to be judged.
It is not necessary to record a problem for every fence, but it is important to record the major problems throughout the round. If it is an obvious problem that will occur throughout the round, e.g. stirrups too long, use the recurring problem symbol
Marking the relevant technique problem provides an explanation of the score given at the end of the round. If a judge gives a 4 (insufficient) or below in a category in the collective marks, symbols on the score sheet should reflect why these scores were given.
Rider only salutes at commencement of the round to the Chief Judge.
The position of the Judge must not be altered once the competition has commenced. The Judge must be positioned to see all obstacles and corners and must decide where to judge from e.g. a judge’s stand, back of a Ute, etc. It is preferable to be side on to the combination.
No part marks are awarded.
In the case of equality, start with the rider’s leg position, then eye contact, etc. until a rider with a higher mark is found, then this rider is awarded the higher place.
In the case of marked lameness, the Chief Judge informs the rider that he/she is eliminated. There is no appeal against this decision.
Riders are required to have their mounts under sufficient control throughout the round. The Judge may eliminate riders whose mounts are not under sufficient control.
9. SCORING
The Judge uses a set of symbols to define major faults as they occur around the course and then scores on various aspects of the performance of a horse and rider by giving each category in the collective marks a score out of 10.
Jumping faults will be noted in the Obstacles boxes at top of page and the total deducted from the collective marks at bottom of page. Check boxes for jumping faults.
Skills Task/s, if included in the round, will be given a score out of 10 and added to the collective marks to give final score for the round. If a movement is not executed then the mark is 0.
“Incorrect Technique Definitions” outline the major faults to be judged and the symbols on the score sheet reflect these faults.
Marking the relevant technique problem provides an explanation of the score given at the end of the round.

PCAWA Jumping Equitation Manual 2012 7
In the event of equality of points, start with ‘leg position’, then ‘eye contact’, etc. until the rider with the higher mark is found, then this rider is awarded the higher place. Where there are two judges it is the average for each of these marks.
To aid in the calculation of the scores on each sheet, a third person is required to add marks and put sheets in order while the event is in progress to facilitate efficiency, or sheets are collected at the end of round and scores calculated away from the ring. Whatever method is used, the calculations should be checked.
Age Champion/Teams: Points are awarded 10 points to 1 point descending to 10th place for each round.
TEAM CHAMPIONSHIPS If two or more teams tie for the Team Champion, the actual marks for the riders in the team will be averaged and the team with the highest average score will be the Champion. If still equal, the team with the highest average mark for ‘leg position’, then ‘eye contact’, etc. until a result has been achieved. 13. NOTE TO COMPETITORS
Gear and Dress Clean, neat and appropriate tack in accordance with PCAWA rules.
Presentation Horse and ponies must be plaited.
Walk Walk the course after checking Course Plan. Any skill task/s will be stated there.
Enter In working trot or canter in 2-point or crotch 3-point. You are judged from the time of entry until the time of exit from the arena.
Proceed To the judge. Salute only the Chief Judge at commencement of round. No salute is required at the end of the round.
Prepare With 2-point or crotch 3-point canter circle and await the bell.
Maintain Adequate control over your mount throughout the round.
Finish With circle at the end a smooth downward transition and then walk out of the arena.
Judging Sheet Collect judging sheet after completion of the class. SCORE SHEET:
PCAWA will be utilizing the PCAQ Jumping Equitation Score sheet for the 2012 PCAWA State Championships. Please note that at the 2012 State Championships competitors will also be awarded a Presentation Mark prior to entering the arena. The Presentation Judge will inspect the Teams immediately before they enter the arena so please ensure that you amend your warm up time accordingly. Any team that keeps the Presentation Judge waiting will be eliminated from the Jumping Equitation Element of the Competition.
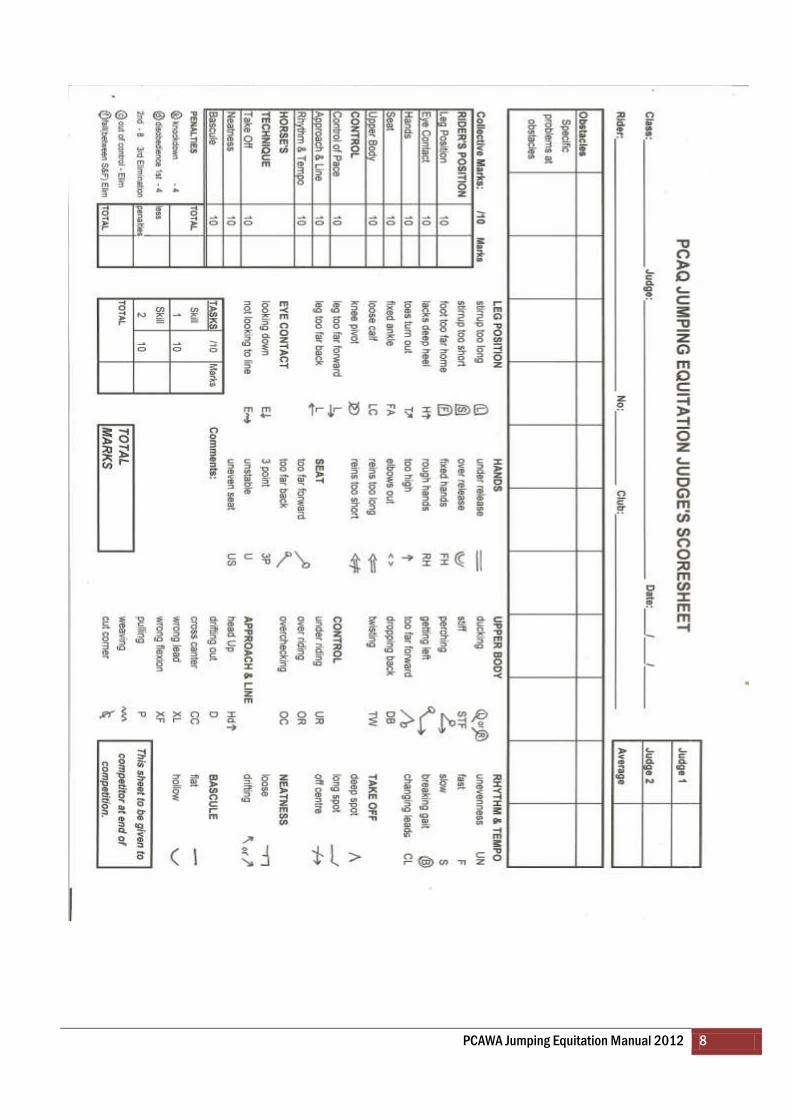
PCAWA Jumping Equitation Manual 2012 8
PCAWA Jumping Equitation Manual 2012 9
Class: _______________________________
Event: _______________________________
Class: _______________________________
Event: _______________________________
EXAMPLES OF OFFICIAL COURSE
PLANS
PCAWA Jumping Equitation Manual 2012 10
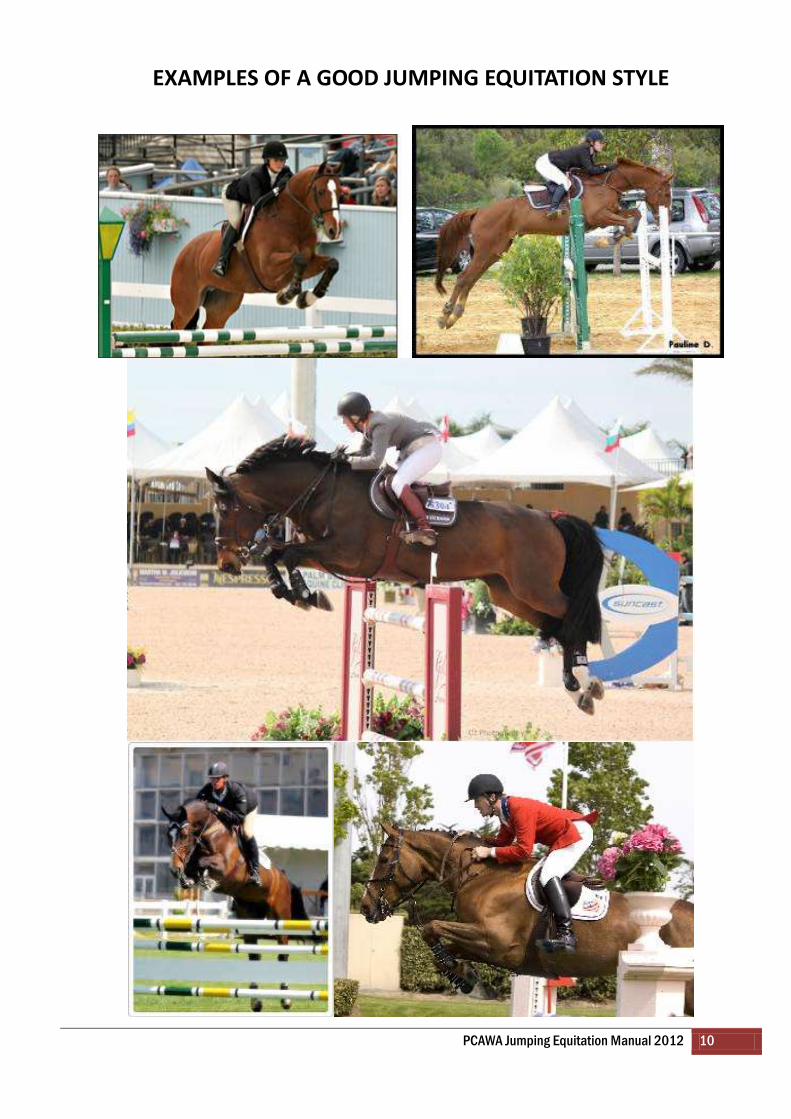
EXAMPLES OF A GOOD JUMPING EQUITATION STYLE
PCAWA Jumping Equitation Manual 2012 11
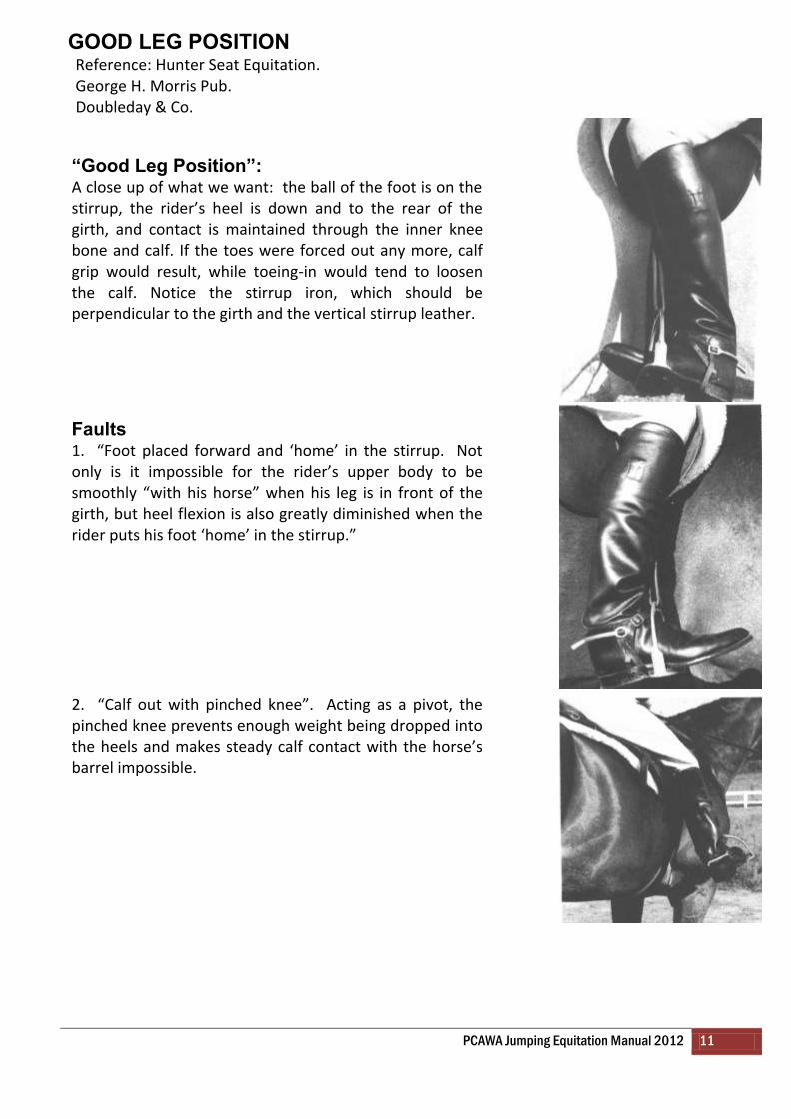
GOOD LEG POSITION
Reference: Hunter Seat Equitation. George H. Morris Pub. Doubleday & Co.
“Good Leg Position”: A close up of what we want: the ball of the foot is on the stirrup, the rider’s heel is down and to the rear of the girth, and contact is maintained through the inner knee bone and calf. If the toes were forced out any more, calf grip would result, while toeing-in would tend to loosen the calf. Notice the stirrup iron, which should be perpendicular to the girth and the vertical stirrup leather.
Faults 1. “Foot placed forward and ‘home’ in the stirrup. Not only is it impossible for the rider’s upper body to be smoothly “with his horse” when his leg is in front of the girth, but heel flexion is also greatly diminished when the rider puts his foot ‘home’ in the stirrup.”
2. “Calf out with pinched knee”. Acting as a pivot, the pinched knee prevents enough weight being dropped into the heels and makes steady calf contact with the horse’s barrel impossible.
PCAWA Jumping Equitation Manual 2012 12
14. CORRECT TECHNIQUE OF RIDERS Basic position is divided into four principle parts:
The leg from the knee down which is your “Security”
The thigh and seat
The “Upper Body”
Arms and hands RIDER’S POSITION
Secure lower leg
Eyes looking to line
Head up
Straight line from elbow to bit maintained
2-point seat or crotch 3-point seat
Flat back
Heels down
Hip and heel in balance
Upper body approximately 20 degrees forward
Supple hip, knee and ankle allowing horse to open and close rider’s angle.
Leg Position The leg position as defined below does not alter in flat work or jumping work, in slow work or in fast work. In fact, the only time this position alters is when it is being used behind the girth for lateral work and control of the quarters. Your leg aid therefore is not a constant movement but
rather an altering of degrees of pressure.
Legs
Stirrup leather hangs parallel to the girth
The ball of the foot is positioned on the stirrup bar
The heel is down and in just behind the girth
The toe is at a natural angle (ideally 15 degrees) to establish contact with the calf behind the inner knee bone.
The leg is held just behind the back edge of the girth
Thighs lie flat against the saddle not being held any more tightly than the knee or calf. Contact should be evenly distributed between the calf, inner knee bone and the thigh.
The ankle must be flexible.
Eyes The eyes may be dropped only when checking diagonals or leads, but it is preferable to know these by feel. The eyes are vital for directional control. The rider’s head should be up and eyes looking to line, his vision parallel to the ground

PCAWA Jumping Equitation Manual 2012 13
Seat Definitions Our seat is divided into two groups: 2-point and 3-point. 3-point is then divided into three positions: crotch 3-point, seat bone 3-point and buttock 3 point. For the purposes of Equitation we are mainly concerned with the appropriate use of crotch point and 2-point to match the horse’s centre of gravity. A rider may alternate between 2-point, crotch 3-point and 3 point where necessary
2-point Seat Position
In the 2-point seat the two main points of contact are the rider’s two legs with the weight well in the heels, the seat bones are a little out of the saddle but the seat MUST be positioned over the centre of the saddle at all times. The 2-point seat is directly related to the rider’s upper body angle and an independent balanced seat cannot be achieved unless the rider’s upper body angle is forward, with the shoulder no further forward than the knee. The 2-point seat should be used on straight lines and shallow curves as the horse should be properly educated to be responsive to light leg aids. Correct use: if the horse is travelling in a controlled, smooth and balanced fashion. Incorrect use: if you cannot maintain your horse travelling smoothly and in a balance with the 2-
point, you should sink into 3-point.
Crotch 3 Point Seat Position
PCAWA Jumping Equitation Manual 2012 14
The crotch 3-point seat is similar in appearance to the 2-point position, but the rider sinks his crotch into the saddle for the third point of contact. The upper body angle remains in the forward position, but may come back a shade. Crotch 3-point is used on turns to adjust the horse’s pace in a smooth manner. Correct use: when 2 point does not maintain control, smoothness and balance Incorrect use: where it would have been sufficient to use more discrete aids in 2-point to maintain balance and smoothness.
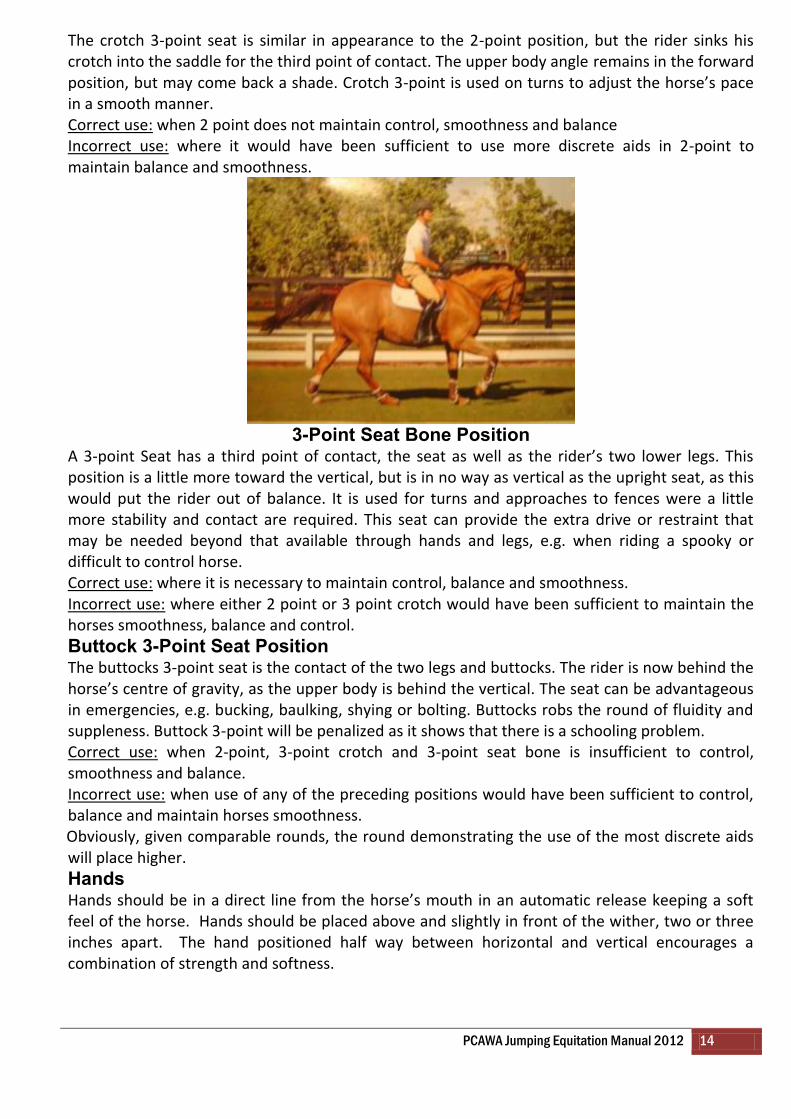
3-Point Seat Bone Position
A 3-point Seat has a third point of contact, the seat as well as the rider’s two lower legs. This position is a little more toward the vertical, but is in no way as vertical as the upright seat, as this would put the rider out of balance. It is used for turns and approaches to fences were a little more stability and contact are required. This seat can provide the extra drive or restraint that may be needed beyond that available through hands and legs, e.g. when riding a spooky or difficult to control horse. Correct use: where it is necessary to maintain control, balance and smoothness. Incorrect use: where either 2 point or 3 point crotch would have been sufficient to maintain the horses smoothness, balance and control.
Buttock 3-Point Seat Position The buttocks 3-point seat is the contact of the two legs and buttocks. The rider is now behind the horse’s centre of gravity, as the upper body is behind the vertical. The seat can be advantageous in emergencies, e.g. bucking, baulking, shying or bolting. Buttocks robs the round of fluidity and suppleness. Buttock 3-point will be penalized as it shows that there is a schooling problem. Correct use: when 2-point, 3-point crotch and 3-point seat bone is insufficient to control, smoothness and balance. Incorrect use: when use of any of the preceding positions would have been sufficient to control, balance and maintain horses smoothness.
Obviously, given comparable rounds, the round demonstrating the use of the most discrete aids will place higher.
Hands Hands should be in a direct line from the horse’s mouth in an automatic release keeping a soft feel of the horse. Hands should be placed above and slightly in front of the wither, two or three inches apart. The hand positioned half way between horizontal and vertical encourages a combination of strength and softness.

PCAWA Jumping Equitation Manual 2012 15
Releases There are several choices determined by the level of skill of the rider and level of education of the horse: a. Long crest release with mane – the elbow angles opens until the hands reach approximately one-half of the way up the crest. The aim of this release is to stabilise the rider’s upper body, prevent abuse of the horse’s mouth and to develop the horse’s correct jumping technique. Used in training and for beginner riders. b. Long crest release – reaches the same place but without mane, with hands either on top or on either side of the crest. This release is used when extra support is no longer needed. c. Short crest release – the elbow angle opens a little with the hands moving 5cm to 7 cm up the crest enough to allow the horse to use its head and neck. d. Automatic release – hands follow a direct line towards the horse’s mouth maintaining a steady contact with the bit and independent of the crest and neck.
Long Crest Release Automatic Release Short Crest Release
Upper Body The upper body is held approximately 20 degrees in front of the vertical. The upper body is held with the shoulder no further forward than the knee. The rider’s angle is closed by the horse as he jumps. The back is flat, the shoulders square and the head held up. The upper body must be held over the leg. The hip should not be either in front or behind the lower leg. If it is, balance is not achieved and the rider cannot be in motion with the horse.
Conclusion The perfect Equitation round should be one of rhythm, fluency and precision. If these components of the ‘invisible ride’ are not achieved then look for what is causing the jarring note. It is the Instructor’s job to then prescribe exercises to cure faults either in the horse or rider.

PCAWA Jumping Equitation Manual 2012 16

PCAWA Jumping Equitation Manual 2012 17
PCAWA Jumping Equitation Manual 2012 18
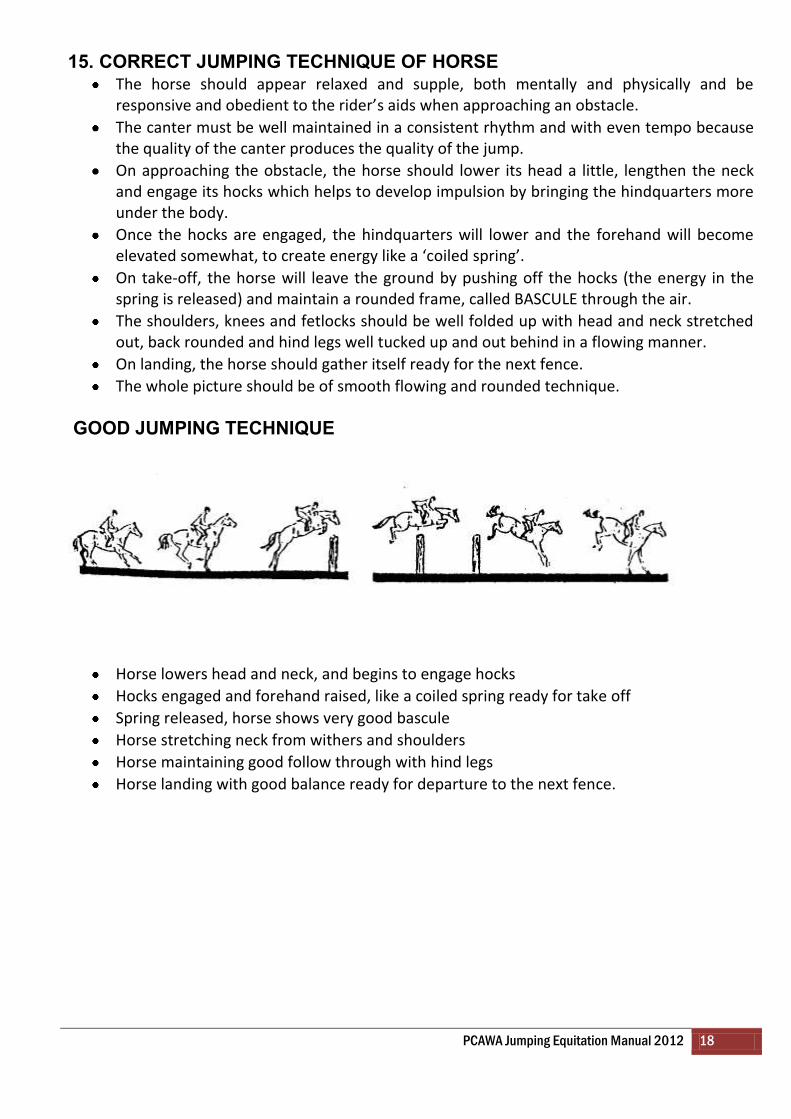
15. CORRECT JUMPING TECHNIQUE OF HORSE
The horse should appear relaxed and supple, both mentally and physically and be responsive and obedient to the rider’s aids when approaching an obstacle.
The canter must be well maintained in a consistent rhythm and with even tempo because the quality of the canter produces the quality of the jump.
On approaching the obstacle, the horse should lower its head a little, lengthen the neck and engage its hocks which helps to develop impulsion by bringing the hindquarters more under the body.
Once the hocks are engaged, the hindquarters will lower and the forehand will become elevated somewhat, to create energy like a ‘coiled spring’.
On take-off, the horse will leave the ground by pushing off the hocks (the energy in the spring is released) and maintain a rounded frame, called BASCULE through the air.
The shoulders, knees and fetlocks should be well folded up with head and neck stretched out, back rounded and hind legs well tucked up and out behind in a flowing manner.
On landing, the horse should gather itself ready for the next fence.
The whole picture should be of smooth flowing and rounded technique.
GOOD JUMPING TECHNIQUE
Horse lowers head and neck, and begins to engage hocks
Hocks engaged and forehand raised, like a coiled spring ready for take off
Spring released, horse shows very good bascule
Horse stretching neck from withers and shoulders
Horse maintaining good follow through with hind legs
Horse landing with good balance ready for departure to the next fence.

PCAWA Jumping Equitation Manual 2012 19
PCAWA Jumping Equitation Manual 2012 20
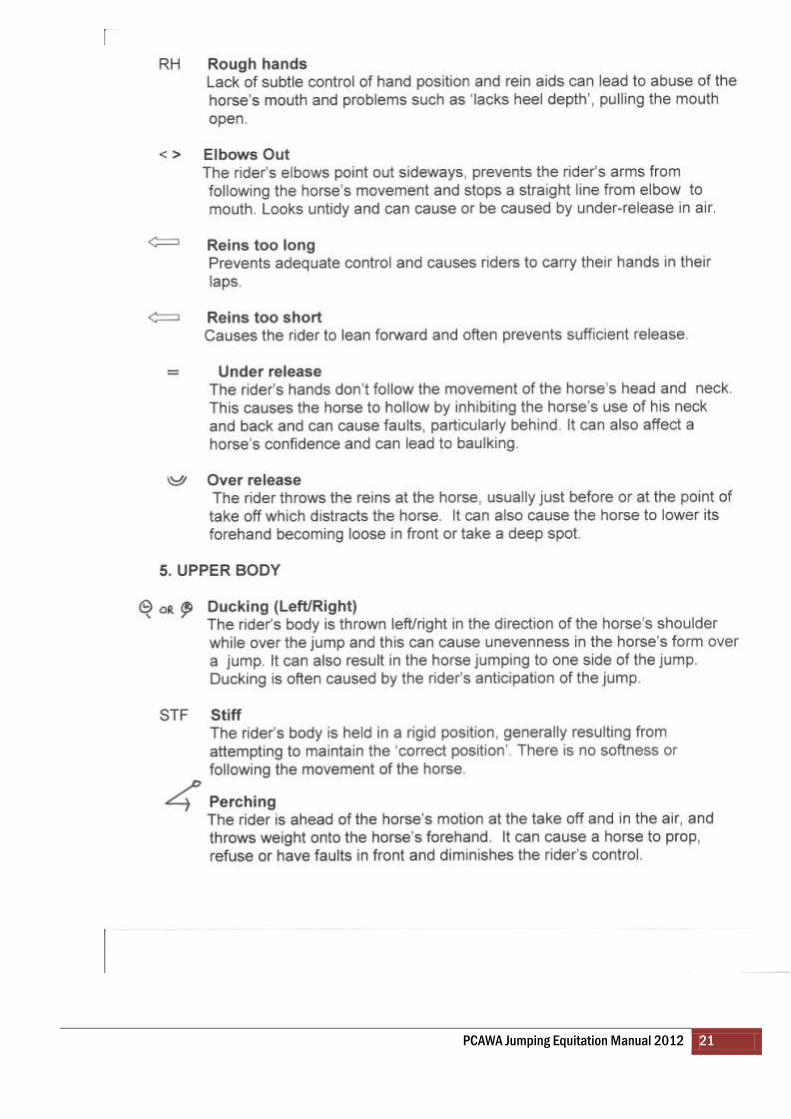
PCAWA Jumping Equitation Manual 2012 21
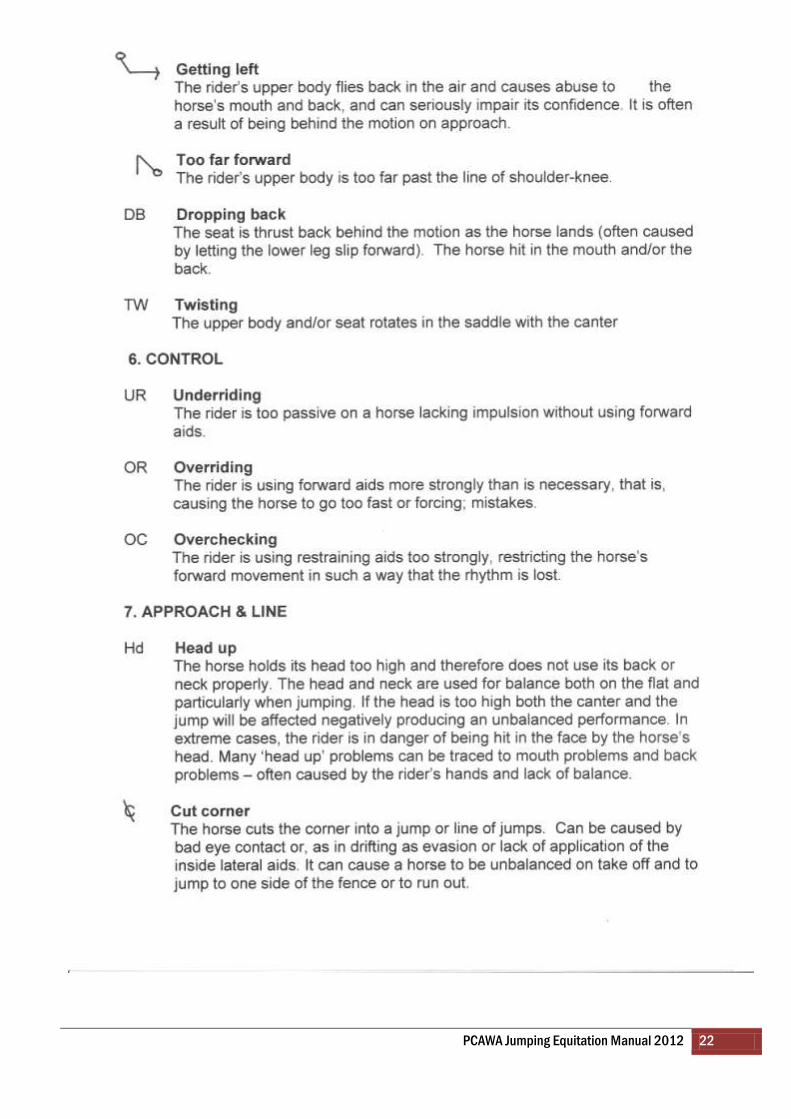
PCAWA Jumping Equitation Manual 2012 22
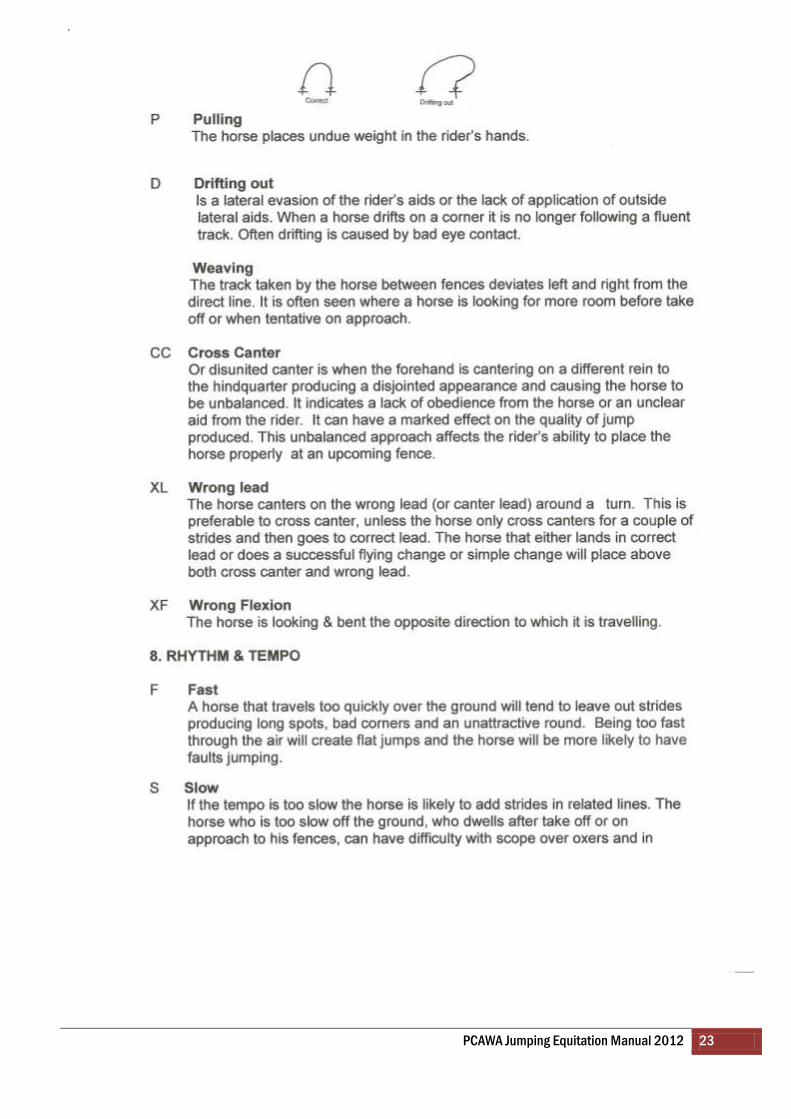
PCAWA Jumping Equitation Manual 2012 23

PCAWA Jumping Equitation Manual 2012 24
PCAWA Jumping Equitation Manual 2012 25
The PCAWA Showjumping Subcommittee hopes that you have found this Manual helpful in preparing for the 2012 State Championships. For more information on the discipline of Jumping Equitation you may like to attend a Jumping Equitation Seminar to be held at the State Equestrian Centre on Friday 25th May commencing at 7pm. This seminar will be conducted by Pony Club Association of Queensland State Chief Steward and Judge for Showjumping and Jumping Equitation, Mrs Lyn Coombe. Good luck at the Championships and we hope to see as many of you there as possible.


