HOUR 1 Jumping in with Both Feet: A Visual Basic 2008 Programming Tour What You’ll Learn in This Hour: . Building a simple (yet functional) Visual Basic application . Letting a user browse a hard drive . Displaying a picture from a file on disk . Getting familiar with some programming lingo . Learning about the Visual Studio 2008 IDE Learning a new programming language can be intimidating. If you’ve never programmed before, the act of typing seemingly cryptic text to produce sleek and powerful applications probably seems like a black art, and you might wonder how you’ll ever learn everything you need to know. The answer, of course, is one step at a time. I believe the first step to mastering a programming language is building confidence. Programming is part art and part science. Although it might seem like magic, it’s more akin to illusion. After you know how things work, a lot of the mysticism goes away, and you are free to focus on the mechanics necessary to produce the desired result. Producing large, commercial solutions is accomplished by way of a series of small steps. After you’ve finished this hour, you’ll have a feel for the overall development process and will have taken the first step toward becoming an accomplished programmer. In fact, you will build on the examples in this hour in subsequent chapters. By the time you complete this book, you will have built a robust application, complete with resizable screens, an intuitive interface including menus and toolbars, and robust code with professional error handling. But I’m getting ahead of myself.
Transcript
HOUR 1
Jumping in with Both Feet:A Visual Basic 2008Programming Tour
What You’ll Learn in This Hour:. Building a simple (yet functional) Visual Basic application. Letting a user browse a hard drive. Displaying a picture from a file on disk. Getting familiar with some programming lingo. Learning about the Visual Studio 2008 IDE
Learning a new programming language can be intimidating. If you’ve never programmed
before, the act of typing seemingly cryptic text to produce sleek and powerful applications
probably seems like a black art, and you might wonder how you’ll ever learn everything
you need to know. The answer, of course, is one step at a time. I believe the first step to
mastering a programming language is building confidence. Programming is part art and
part science. Although it might seem like magic, it’s more akin to illusion. After you know
how things work, a lot of the mysticism goes away, and you are free to focus on the
mechanics necessary to produce the desired result.
Producing large, commercial solutions is accomplished by way of a series of small steps.
After you’ve finished this hour, you’ll have a feel for the overall development process and
will have taken the first step toward becoming an accomplished programmer. In fact, you
will build on the examples in this hour in subsequent chapters. By the time you complete
this book, you will have built a robust application, complete with resizable screens, an
intuitive interface including menus and toolbars, and robust code with professional error
handling. But I’m getting ahead of myself.
8 HOUR 1: Jumping in with Both Feet: A Visual Basic 2008 Programming Tour
In this hour, you’ll complete a quick tour of Visual Basic that takes you step by step
through creating a complete, albeit small, Visual Basic program. Most introductory
programming books start by having the reader create a simple Hello World pro-
gram. I’ve yet to see a Hello World program that’s the least bit helpful. (They usu-
ally do nothing more than print hello world to the screen—what fun!) So, instead,
you’ll create a Picture Viewer application that lets you view Windows bitmaps and
icons on your computer. You’ll learn how to let a user browse for a file and how to
display a selected picture file on the screen. The techniques you learn in this chapter
will come in handy in many real-world applications that you’ll create, but the goal
of this chapter is for you to realize just how much fun it is to program using Visual
Basic 2008.
Starting Visual Basic 2008Before you begin creating programs in Visual Basic 2008, you should be familiar
with the following terms:
. Distributable component: The final, compiled version of a project. Compo-
nents can be distributed to other people and other computers, and they don’t
require the Visual Basic 2008 development environment (the tools you use to
create a .NET program) to run (although they do require the .NET runtime,
which I’ll discuss in Hour 23, “Deploying Applications”). Distributable compo-
nents are often called programs. In Hour 23, you’ll learn how to distribute the
Picture Viewer program that you’re about to build to other computers.
. Project: A collection of files that can be compiled to create a distributable
component (program). There are many types of projects, and complex appli-
cations might consist of multiple projects, such as Windows application proj-
ects, and support dynamic link library (DLL) projects.
. Solution: A collection of projects and files that make up an application or
component.
In the past, Visual Basic was an autonomous language. This has changed. Now,Visual Basic is part of a larger entity known as the .NET Framework. The .NETFramework encompasses all the .NET technology, including Visual Studio .NET (thesuite of development tools) and the common language runtime (CLR), which is theset of files that make up the core of all .NET applications. You’ll learn about theseitems in more detail as you progress through this book. For now, realize thatVisual Basic is one of many languages that exist within the Visual Studio family.Many other languages, such as C#, are also .NET languages, make use of theCLR, and are developed within Visual Studio.
By theWay
Creating a New Project 9
Visual Studio 2008 is a complete development environment, and it’s called the IDE
(short for integrated development environment). The IDE is the design framework
in which you build applications; every tool you’ll need to create your Visual Basic
projects is accessed from within the Visual Basic IDE. Again, Visual Studio 2008 sup-
ports development using many different languages, Visual Basic being the most
popular. The environment itself is not Visual Basic, but the language you’ll be using
within Visual Studio 2008 is Visual Basic. To work with Visual Basic projects, you
first start the Visual Studio 2008 IDE.
Start Visual Studio 2008 now by choosing Microsoft Visual Basic 2008 Express
Edition from the Start/Programs menu. If you are running the full retail version of
Visual Studio, your shortcut may have a different name. In this case, locate the
shortcut on the Start menu and click it once to start the Visual Studio 2008 IDE.
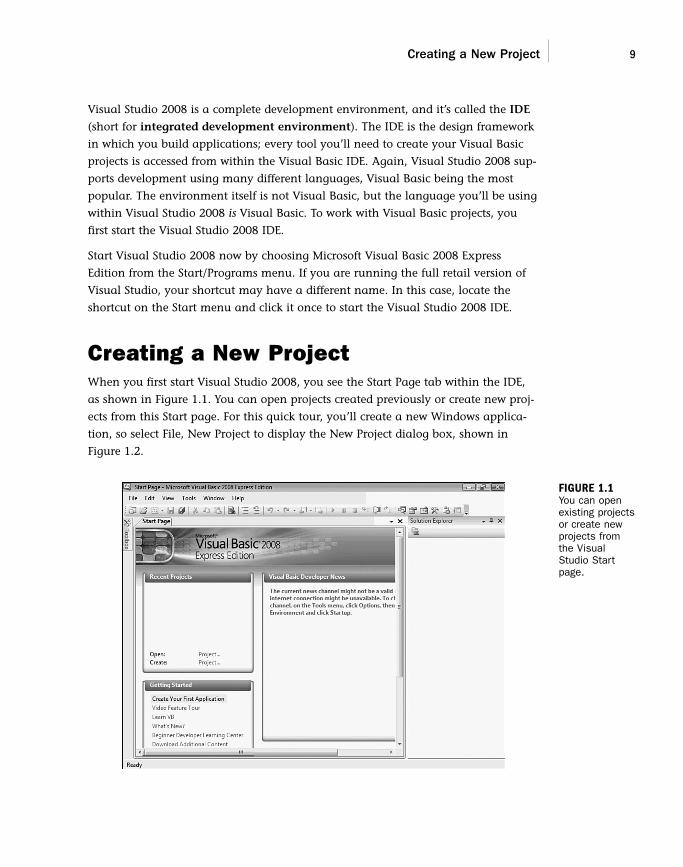
Creating a New ProjectWhen you first start Visual Studio 2008, you see the Start Page tab within the IDE,
as shown in Figure 1.1. You can open projects created previously or create new proj-
ects from this Start page. For this quick tour, you’ll create a new Windows applica-
tion, so select File, New Project to display the New Project dialog box, shown in
Figure 1.2.
FIGURE 1.1You can openexisting projectsor create newprojects fromthe VisualStudio Startpage.
10 HOUR 1: Jumping in with Both Feet: A Visual Basic 2008 Programming Tour
If your Start page doesn’t look like the one shown in Figure 1.1, chances are thatyou’ve changed the default settings. In Hour 2, “Navigating Visual Basic 2008,” I’llshow you how to change them back.
By theWay
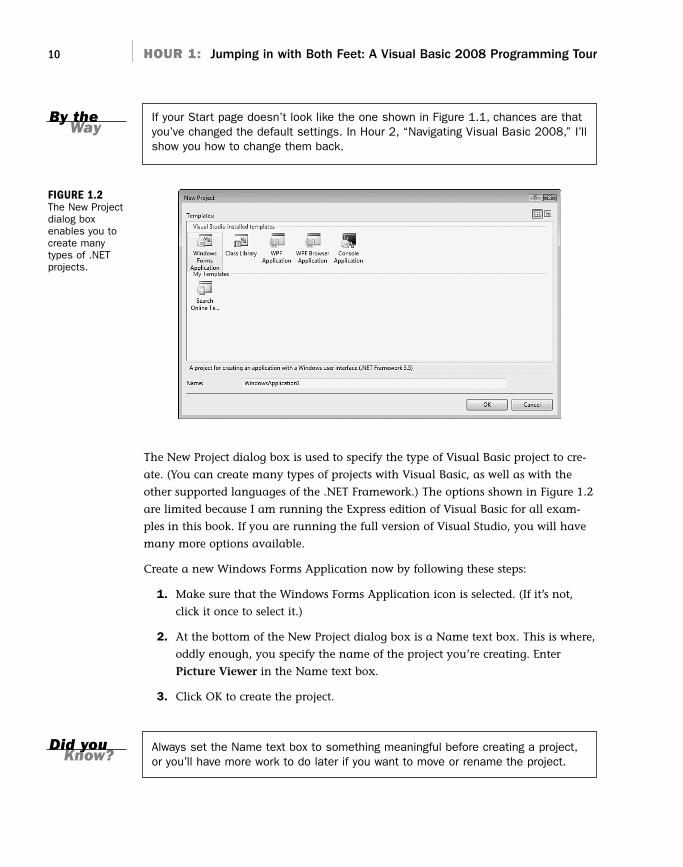
FIGURE 1.2The New Projectdialog boxenables you tocreate manytypes of .NETprojects.
The New Project dialog box is used to specify the type of Visual Basic project to cre-
ate. (You can create many types of projects with Visual Basic, as well as with the
other supported languages of the .NET Framework.) The options shown in Figure 1.2
are limited because I am running the Express edition of Visual Basic for all exam-
ples in this book. If you are running the full version of Visual Studio, you will have
many more options available.
Create a new Windows Forms Application now by following these steps:
1. Make sure that the Windows Forms Application icon is selected. (If it’s not,
click it once to select it.)
2. At the bottom of the New Project dialog box is a Name text box. This is where,
oddly enough, you specify the name of the project you’re creating. Enter
Picture Viewer in the Name text box.
3. Click OK to create the project.
Always set the Name text box to something meaningful before creating a project,or you’ll have more work to do later if you want to move or rename the project.
Did youKnow?
Creating a New Project 11
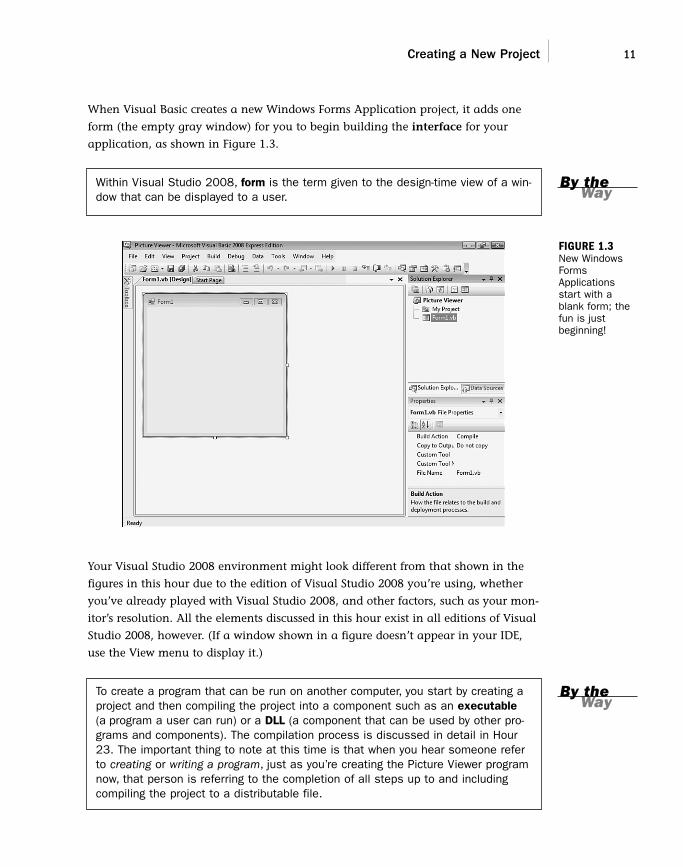
When Visual Basic creates a new Windows Forms Application project, it adds one
form (the empty gray window) for you to begin building the interface for your
application, as shown in Figure 1.3.
Within Visual Studio 2008, form is the term given to the design-time view of a win-dow that can be displayed to a user.
By theWay
FIGURE 1.3New WindowsFormsApplicationsstart with ablank form; thefun is justbeginning!
Your Visual Studio 2008 environment might look different from that shown in the
figures in this hour due to the edition of Visual Studio 2008 you’re using, whether
you’ve already played with Visual Studio 2008, and other factors, such as your mon-
itor’s resolution. All the elements discussed in this hour exist in all editions of Visual
Studio 2008, however. (If a window shown in a figure doesn’t appear in your IDE,
use the View menu to display it.)
To create a program that can be run on another computer, you start by creating aproject and then compiling the project into a component such as an executable(a program a user can run) or a DLL (a component that can be used by other pro-grams and components). The compilation process is discussed in detail in Hour23. The important thing to note at this time is that when you hear someone referto creating or writing a program, just as you’re creating the Picture Viewer programnow, that person is referring to the completion of all steps up to and includingcompiling the project to a distributable file.
By theWay
12 HOUR 1: Jumping in with Both Feet: A Visual Basic 2008 Programming Tour
Understanding the Visual Studio 2008EnvironmentThe first time you run Visual Studio 2008, you’ll notice that the IDE contains a num-
ber of windows, such as the Properties window on the right, which is used to view
and set properties of objects. In addition to these windows, the IDE contains a num-
ber of tabs, such as the vertical Toolbox tab on the left edge of the IDE (refer to
Figure 1.3). Try this now: Click the Toolbox tab to display the Toolbox window (click-
ing a tab displays an associated window). You can hover the mouse over a tab for a
few seconds to display the window as well. To hide the window, simply move the
mouse off the window (if you hovered over the tab to display it) or click another
window. To close the window, click the Close (X) button in the window’s title bar.
If you opened the toolbox by clicking its tab rather than hovering over the tab, thetoolbox will not automatically close. Instead, it will stay open until you clickanother window.
You can adjust the size and position of any of these windows, and you can even
hide and show them as needed. You’ll learn how to customize your design environ-
ment in Hour 2.
Unless specifically instructed to do so, don’t double-click anything in the VisualStudio 2008 design environment. Double-clicking most objects produces anentirely different result than single-clicking does. If you mistakenly double-click anobject on a form (discussed shortly), a code window appears. At the top of thecode window is a set of tabs: one for the form design and one for the code. Clickthe tab for the form design to hide the code window, and return to the form.
The Properties window on the right side of the design environment is perhaps the
most important window in the IDE, and it’s the one you’ll use most often. If your
computer display resolution is set to 800×600, you can probably see only a few prop-
erties at this time. This makes it difficult to view and set properties as you create
projects. All the screen shots in this book were captured at 800×600 due to size con-
straints, but you should run at a higher resolution if you can. I highly recommend
that you develop applications with Visual Basic at a screen resolution of 1024×768
or higher to have plenty of work space. To change your display settings, right-click
the desktop and select Personalize. Keep in mind, however, that end users might be
running at a lower resolution than you are using for development.
By theWay
WatchOut!
Changing the Characteristics of Objects 13
Changing the Characteristics of ObjectsAlmost everything you work with in Visual Basic is an object. Forms, for instance,
are objects, as are all the items you can put on a form to build an interface, such as
list boxes and buttons. There are many types of objects, and objects are classified by
type. For example, a form is a Form object, whereas items you can place on a form
are called Control objects, or controls. (Hour 3, “Understanding Objects and
Collections,” discusses objects in detail.) Some objects don’t have a physical appear-
ance but exist only in code. You’ll learn about these kinds of objects in later hours.
You’ll find that I often mention material coming up in future chapters. In the pub-lishing field, we call these forward references. For some reason, these tend tounnerve some people. I do this only so that you realize you don’t have to fullygrasp a subject when it’s first presented; the material will be covered in moredetail later. I try to keep forward references to a minimum, but unfortunately,teaching programming is not a perfectly linear process. There will be times I’llhave to touch on a subject that I feel you’re not ready to dive into fully yet. Whenthis happens, I give you a forward reference to let you know that the subject willbe covered in greater detail later.
Every object has a distinct set of attributes known as properties (regardless of
whether the object has a physical appearance). Properties define the characteristics
of an object. Even you have certain properties, such as your height and hair color.
Visual Basic objects have properties as well, such as Height and BackColor. When
you create a new object, the first thing you need to do is set its properties so that the
object appears and behaves the way you want it to. To display an object’s properties,
click the object in its designer (the main work area in the IDE).
Click anywhere in the default form now, and check to see that its properties are dis-
played in the Properties window. You’ll know because the drop-down list box at the
top of the Properties window will contain the form’s name: Form1
System.Windows.Forms.Form. Form1 is the name of the object, and
System.Windows.Forms.Form is the type of object.
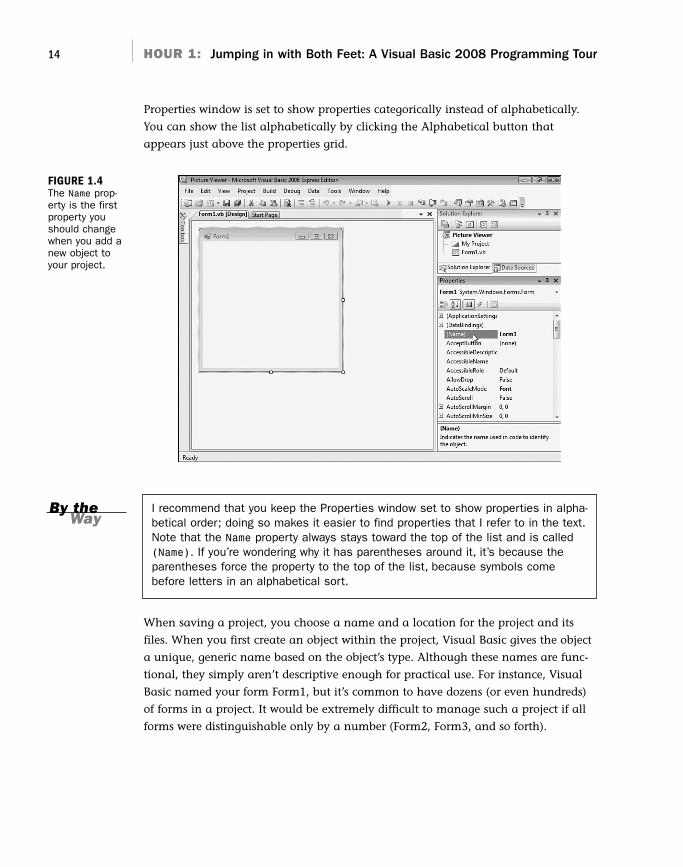
Naming ObjectsThe property you should always set first when creating any new object is the Name
property. Press F4 to display the Properties window (if it’s not already visible), and
scroll toward the top of the properties list until you see the (Name) property, as
shown in Figure 1.4. If the Name property isn’t one of the first properties listed, the
WatchOut!
14 HOUR 1: Jumping in with Both Feet: A Visual Basic 2008 Programming Tour
Properties window is set to show properties categorically instead of alphabetically.
You can show the list alphabetically by clicking the Alphabetical button that
appears just above the properties grid.
FIGURE 1.4The Name prop-erty is the firstproperty youshould changewhen you add anew object toyour project.
I recommend that you keep the Properties window set to show properties in alpha-betical order; doing so makes it easier to find properties that I refer to in the text.Note that the Name property always stays toward the top of the list and is called(Name). If you’re wondering why it has parentheses around it, it’s because theparentheses force the property to the top of the list, because symbols comebefore letters in an alphabetical sort.
When saving a project, you choose a name and a location for the project and its
files. When you first create an object within the project, Visual Basic gives the object
a unique, generic name based on the object’s type. Although these names are func-
tional, they simply aren’t descriptive enough for practical use. For instance, Visual
Basic named your form Form1, but it’s common to have dozens (or even hundreds)
of forms in a project. It would be extremely difficult to manage such a project if all
forms were distinguishable only by a number (Form2, Form3, and so forth).
By theWay
Changing the Characteristics of Objects 15
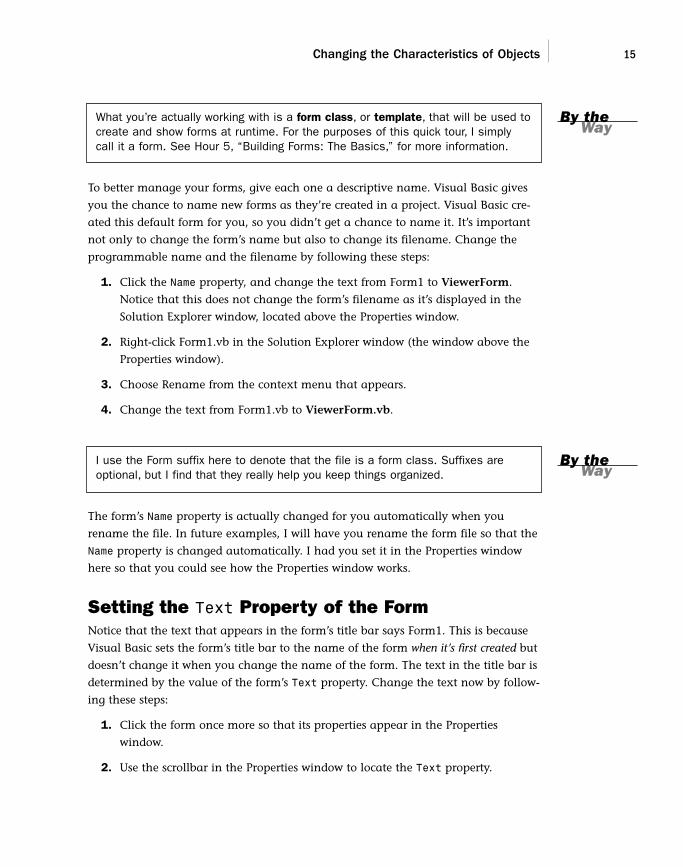
What you’re actually working with is a form class, or template, that will be used tocreate and show forms at runtime. For the purposes of this quick tour, I simplycall it a form. See Hour 5, “Building Forms: The Basics,” for more information.
To better manage your forms, give each one a descriptive name. Visual Basic gives
you the chance to name new forms as they’re created in a project. Visual Basic cre-
ated this default form for you, so you didn’t get a chance to name it. It’s important
not only to change the form’s name but also to change its filename. Change the
programmable name and the filename by following these steps:
1. Click the Name property, and change the text from Form1 to ViewerForm.
Notice that this does not change the form’s filename as it’s displayed in the
Solution Explorer window, located above the Properties window.
2. Right-click Form1.vb in the Solution Explorer window (the window above the
Properties window).
3. Choose Rename from the context menu that appears.
4. Change the text from Form1.vb to ViewerForm.vb.
I use the Form suffix here to denote that the file is a form class. Suffixes areoptional, but I find that they really help you keep things organized.
The form’s Name property is actually changed for you automatically when you
rename the file. In future examples, I will have you rename the form file so that the
Name property is changed automatically. I had you set it in the Properties window
here so that you could see how the Properties window works.
Setting the Text Property of the FormNotice that the text that appears in the form’s title bar says Form1. This is because
Visual Basic sets the form’s title bar to the name of the form when it’s first created but
doesn’t change it when you change the name of the form. The text in the title bar is
determined by the value of the form’s Text property. Change the text now by follow-
ing these steps:
1. Click the form once more so that its properties appear in the Properties
window.
2. Use the scrollbar in the Properties window to locate the Text property.
By theWay
By theWay
16 HOUR 1: Jumping in with Both Feet: A Visual Basic 2008 Programming Tour
3. Change the text to Picture Viewer. Press the Enter key or click a different
property. You’ll see the text in the title bar of the form change.
Saving a ProjectThe changes you’ve made so far exist only in memory. If you were to turn off your
computer at this time, you would lose all your work up to this point. Get into the
habit of frequently saving your work, which commits your changes to disk.
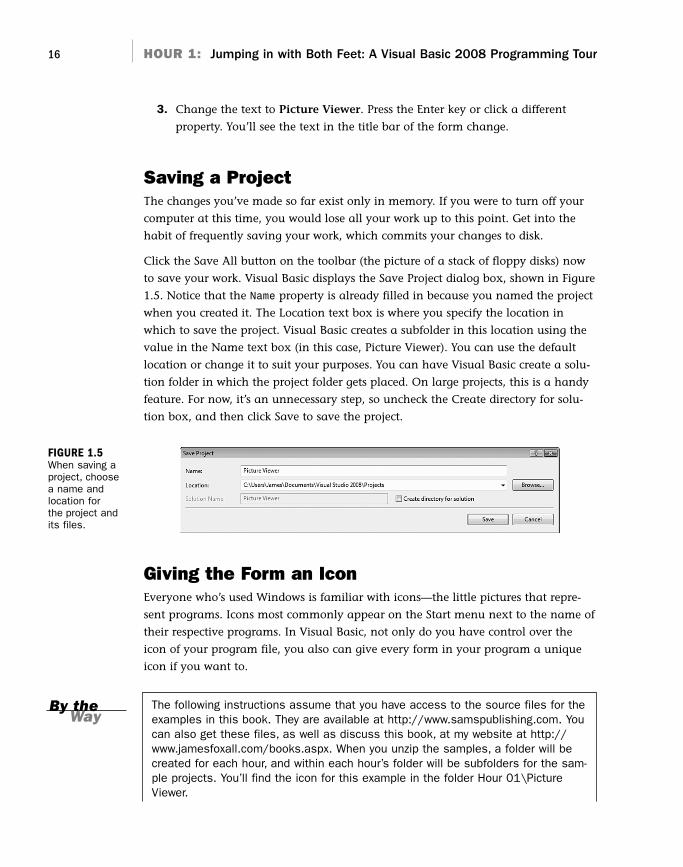
Click the Save All button on the toolbar (the picture of a stack of floppy disks) now
to save your work. Visual Basic displays the Save Project dialog box, shown in Figure
1.5. Notice that the Name property is already filled in because you named the project
when you created it. The Location text box is where you specify the location in
which to save the project. Visual Basic creates a subfolder in this location using the
value in the Name text box (in this case, Picture Viewer). You can use the default
location or change it to suit your purposes. You can have Visual Basic create a solu-
tion folder in which the project folder gets placed. On large projects, this is a handy
feature. For now, it’s an unnecessary step, so uncheck the Create directory for solu-
tion box, and then click Save to save the project.
Giving the Form an IconEveryone who’s used Windows is familiar with icons—the little pictures that repre-
sent programs. Icons most commonly appear on the Start menu next to the name of
their respective programs. In Visual Basic, not only do you have control over the
icon of your program file, you also can give every form in your program a unique
icon if you want to.
The following instructions assume that you have access to the source files for theexamples in this book. They are available at http://www.samspublishing.com. Youcan also get these files, as well as discuss this book, at my website at http://www.jamesfoxall.com/books.aspx. When you unzip the samples, a folder will becreated for each hour, and within each hour’s folder will be subfolders for the sam-ple projects. You’ll find the icon for this example in the folder Hour 01\PictureViewer.
You don’t have to use the icon I’ve provided for this example; you can use anyicon. If you don’t have an icon available (or you want to be a rebel), you can skipthis section without affecting the outcome of the example.
To give the form an icon, follow these steps:
1. In the Properties window, click the Icon property to select it.
2. When you click the Icon property, a small button with three dots appears to
the right of the property. Click this button.
3. Use the Open dialog box that appears to locate the Picture Viewer.ico file or
another icon file of your choice. When you’ve found the icon, double-click it,
or click it once to select it and then choose Open.
After you’ve selected the icon, it appears in the Icon property along with the word
“Icon.” A small version of the icon appears in the upper-left corner of the form as
well. Whenever this form is minimized, this is the icon displayed on the Windows
taskbar.
This doesn’t change the icon for the project as a whole. In Hour 23, you’ll learnhow to assign an icon to your distributable file.
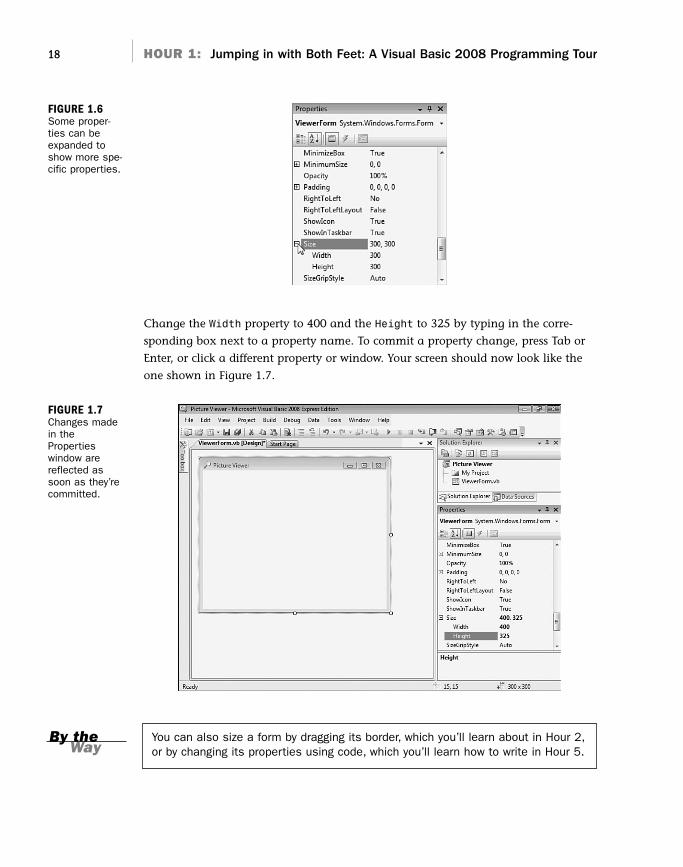
Changing the Size of the FormNext, you’ll change the form’s Width and Height properties. The Width and Height
values are shown collectively under the Size property; Width appears to the left of
the comma, and Height to the right. You can change the Width or Height property
by changing the corresponding number in the Size property. Both values are repre-
sented in pixels. (That is, a form that has a Size property of 200,350 is 200 pixels
wide and 350 pixels tall.) To display and adjust the Width and Height properties
separately, click the small plus sign (+) next to the Size property (see Figure 1.6).
(After you click it, it changes to a minus sign (–).)
A pixel is a unit of measurement for computer displays; it’s the smallest visible“dot” on the screen. The resolution of a display is always given in pixels, such as800×600 or 1024×768. When you increase or decrease a property by one pixel,you’re making the smallest possible visible change to the property.
By theWay
By theWay
18 HOUR 1: Jumping in with Both Feet: A Visual Basic 2008 Programming Tour
Change the Width property to 400 and the Height to 325 by typing in the corre-
sponding box next to a property name. To commit a property change, press Tab or
Enter, or click a different property or window. Your screen should now look like the
one shown in Figure 1.7.
FIGURE 1.6Some proper-ties can beexpanded toshow more spe-cific properties.
FIGURE 1.7Changes madein thePropertieswindow arereflected assoon as they’recommitted.
You can also size a form by dragging its border, which you’ll learn about in Hour 2,or by changing its properties using code, which you’ll learn how to write in Hour 5.
By theWay
Adding Controls to a Form 19
Save the project now by choosing File, Save All from the menu or by clicking the
Save All button on the toolbar—it has a picture of stacked floppy disks.
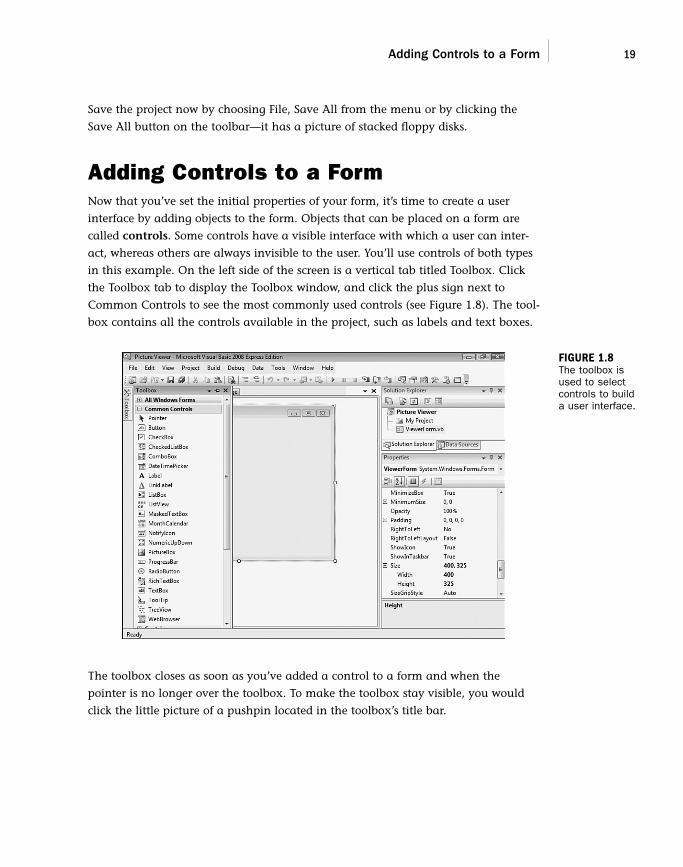
Adding Controls to a FormNow that you’ve set the initial properties of your form, it’s time to create a user
interface by adding objects to the form. Objects that can be placed on a form are
called controls. Some controls have a visible interface with which a user can inter-
act, whereas others are always invisible to the user. You’ll use controls of both types
in this example. On the left side of the screen is a vertical tab titled Toolbox. Click
the Toolbox tab to display the Toolbox window, and click the plus sign next to
Common Controls to see the most commonly used controls (see Figure 1.8). The tool-
box contains all the controls available in the project, such as labels and text boxes.
FIGURE 1.8The toolbox isused to selectcontrols to builda user interface.
The toolbox closes as soon as you’ve added a control to a form and when the
pointer is no longer over the toolbox. To make the toolbox stay visible, you would
click the little picture of a pushpin located in the toolbox’s title bar.
20 HOUR 1: Jumping in with Both Feet: A Visual Basic 2008 Programming Tour
I don’t want you to add them yet, but your Picture Viewer interface will consist of
the following controls:
. Two Button controls: The standard buttons that you’re used to clicking in
pretty much every Windows program you’ve ever run
. A PictureBox control: A control used to display images to a user
. An OpenFileDialog control: A hidden control that exposes the Windows
Open File dialog box functionality
Designing an InterfaceIt’s generally best to design a form’s user interface and then add the code behind the
interface to make the form functional. You’ll build your interface in the following
sections.
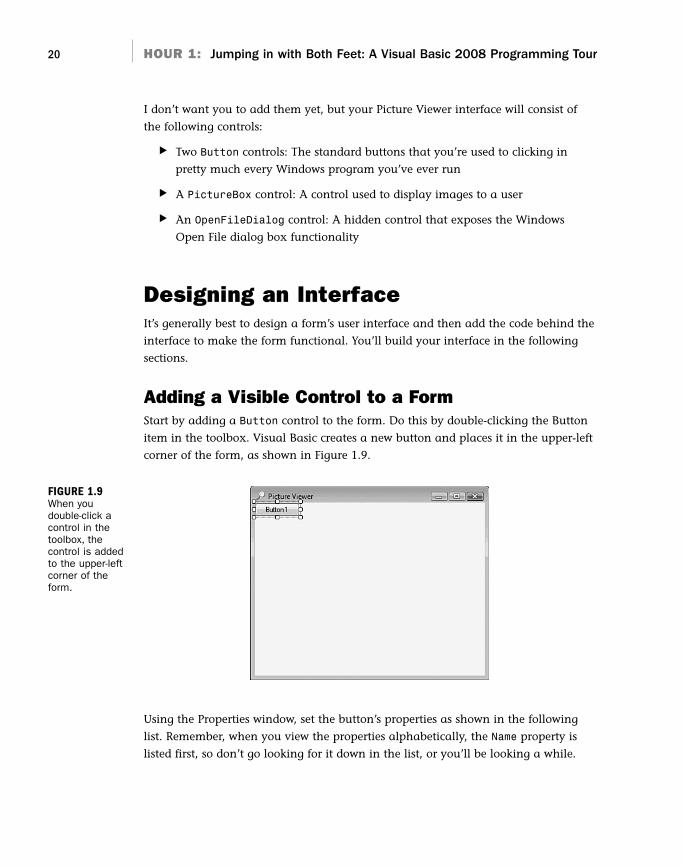
Adding a Visible Control to a FormStart by adding a Button control to the form. Do this by double-clicking the Button
item in the toolbox. Visual Basic creates a new button and places it in the upper-left
corner of the form, as shown in Figure 1.9.
FIGURE 1.9When youdouble-click acontrol in thetoolbox, thecontrol is addedto the upper-leftcorner of theform.
Using the Properties window, set the button’s properties as shown in the following
list. Remember, when you view the properties alphabetically, the Name property is
listed first, so don’t go looking for it down in the list, or you’ll be looking a while.
Designing an Interface 21
Property Value
Name btnSelectPicture
Location 295,10 (295 is the x coordinate; 10 is the y coordinate.)
Size 85,23
Text Select Picture
Now you’ll create a button that the user can click to close the Picture Viewer pro-
gram. Although you could add another new button to the form by double-clicking
the Button control on the toolbox again, this time you’ll add a button to the form
by creating a copy of the button you’ve already defined. This allows you to easily
create a button that maintains the size and other style attributes of the original but-
ton when the copy was made.
To do this, right-click the Select Picture button, and choose Copy from its context
menu. Next, right-click anywhere on the form, and choose Paste from the form’s
shortcut menu. (You can also use the keyboard shortcuts Ctrl+C to copy and Ctrl+V
to paste.) The new button appears centered on the form, and it’s selected by default.
Notice that it retains almost all the properties of the original button, but the name
has been reset. Change the properties of the new button as follows:
Property Value
Name btnQuit
Location 295,40
Text Quit
The last visible control you need to add to the form is a PictureBox control. A
PictureBox has many capabilities, but its primary purpose is to show pictures,
which is precisely what you’ll use it for in this example. Add a new PictureBox con-
trol to the form by double-clicking the PictureBox item in the toolbox, and set its
properties as follows:
Property Value
Name picShowPicture
BorderStyle FixedSingle
Location 8,8
Size 282,275
22 HOUR 1: Jumping in with Both Feet: A Visual Basic 2008 Programming Tour
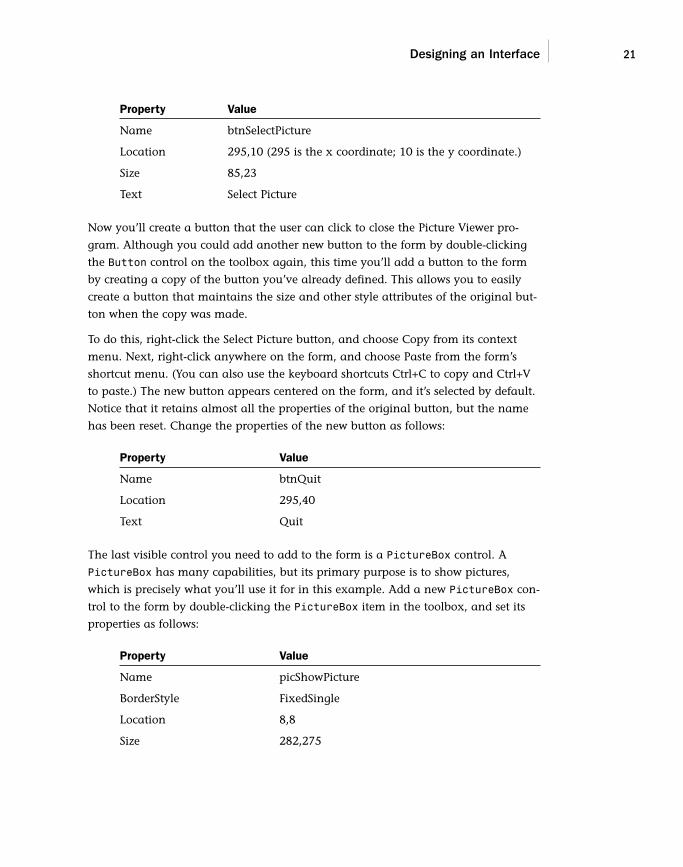
After you’ve made these property changes, your form will look like the one shown in
Figure 1.10. Click the Save All button on the toolbar to save your work.
FIGURE 1.10An application’sinterfacedoesn’t haveto be complexto be useful.
Adding an Invisible Control to a FormAll the controls you’ve used so far sit on a form and have a physical appearance
when a user runs the application. Not all controls have a physical appearance,
however. Such controls, called nonvisual controls (or invisible-at-runtime
controls), aren’t designed for direct user interactivity. Instead, they’re designed to
give you, the programmer, functionality beyond the standard features of Visual
Basic.
To enable users to select a picture to display, you need to give them the ability to
locate a file on their hard drives. You might have noticed that whenever you choose
to open a file from within any Windows application, the dialog box displayed is
almost always the same. It doesn’t make sense to force every developer to write the
code necessary to perform standard file operations, so Microsoft has exposed the
functionality via a control that you can use in your projects. This control is called
OpenFileDialog, and it will save you dozens of hours that would otherwise be nec-
essary to duplicate this common functionality.
Other controls in addition to the OpenFileDialog control give you file functional-ity. For example, the SaveFileDialog control provides features for allowing theuser to specify a filename and path for saving a file.
Display the toolbox and scroll down using the down arrow in the lower part of the
toolbox until you can see the OpenFileDialog control (it’s in the Dialogs category),
By theWay
Designing an Interface 23
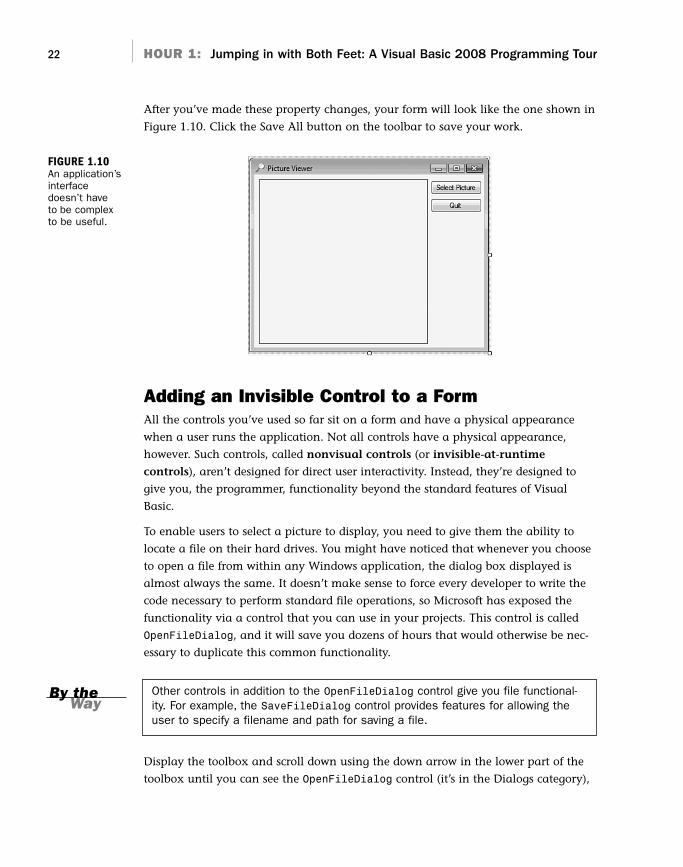
and then double-click it to add it to your form. Note that the control isn’t placed on
the form; rather, it appears in a special area below the form (see Figure 1.11). This
happens because the OpenFileDialog control has no form interface to display to
the user. It does have an interface (a dialog box) that you can display as necessary,
but it has nothing to display directly on a form.
FIGURE 1.11Controls thathave no inter-face appearbelow the formdesigner.
Select the OpenFileDialog control, and change its properties as follows:
Property Value
Name ofdSelectPicture
Filename <make empty>
Filter Windows Bitmaps|*.BMP|JPEG Files|*.JPG
Title Select Picture
Don’t actually enter the text <make empty> for the filename; I really mean deletethe default value and make this property value empty.
The Filter property is used to limit the types of files that will be displayed in the
Open File dialog box. The format for a filter is description|filter. The text that
WatchOut!
24 HOUR 1: Jumping in with Both Feet: A Visual Basic 2008 Programming Tour
appears before the first pipe symbol is the descriptive text of the file type, whereas
the text after the pipe symbol is the pattern to use to filter files. You can specify
more than one filter type by separating each description|filter value with another
pipe symbol. Text entered into the Title property appears in the title bar of the
Open File dialog box.
The graphical interface for your Picture Viewer program is now finished. If you
pinned the toolbox open, click the pushpin in the title bar of the toolbox now to
close it.
Writing the Code Behind an InterfaceYou have to write code for the program to be capable of performing tasks and
responding to user interaction. Visual Basic is an event-driven language, which
means that code is executed in response to events. These events might come from
users, such as a user clicking a button and triggering its Click event, or from
Windows itself (see Hour 4, “Understanding Events,” for a complete explanation of
events). Currently, your application looks nice, but it won’t do a darn thing. Users
can click the Select Picture button until they can file for disability with carpel tunnel
syndrome, but nothing will happen, because you haven’t told the program what to
do when the user clicks the button. You can see this for yourself now by pressing F5
to run the project. Feel free to click the buttons, but they don’t do anything. When
you’re finished, close the window you created to return to Design mode.
You’ll write code to accomplish two tasks. First, you’ll write code that lets users
browse their hard drives to locate and select a picture file and then display it in the
picture box (this sounds a lot harder than it is). Second, you’ll add code to the Quit
button that shuts down the program when the user clicks the button.
Letting a User Browse for a FileThe first bit of code you’ll write enables users to browse their hard drives, select a
picture file, and then see the selected picture in the PictureBox control. This code
executes when the user clicks the Select Picture button; therefore, it’s added to the
Click event of that button.
When you double-click a control on a form in Design view, the default event for that
control is displayed in a code window. The default event for a Button control is its
Click event, which makes sense, because clicking is the most common action a user
performs with a button. Double-click the Select Picture button now to access its
Click event in the code window (see Figure 1.12).
Writing the Code Behind an Interface 25
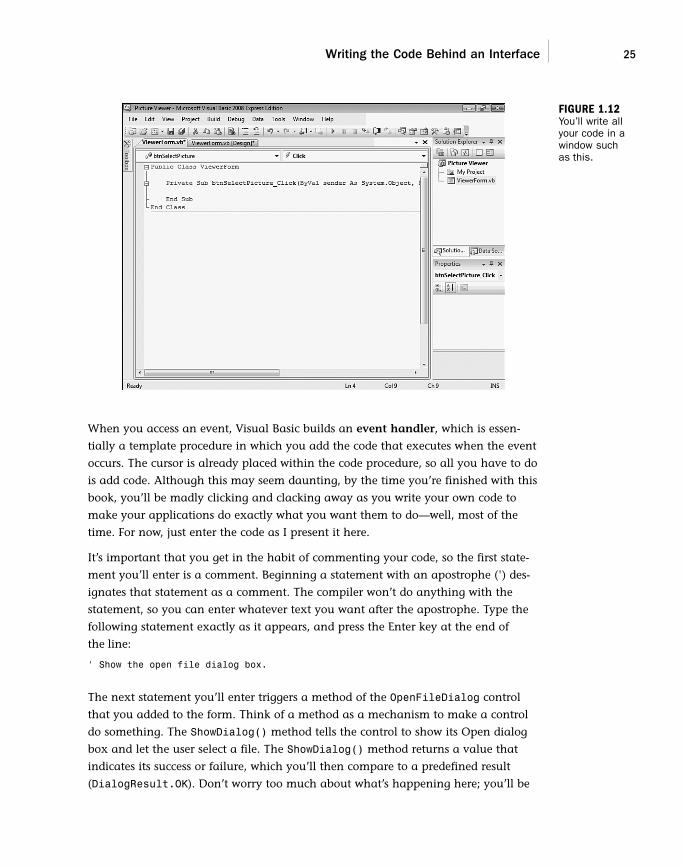
FIGURE 1.12You’ll write allyour code in awindow suchas this.
When you access an event, Visual Basic builds an event handler, which is essen-
tially a template procedure in which you add the code that executes when the event
occurs. The cursor is already placed within the code procedure, so all you have to do
is add code. Although this may seem daunting, by the time you’re finished with this
book, you’ll be madly clicking and clacking away as you write your own code to
make your applications do exactly what you want them to do—well, most of the
time. For now, just enter the code as I present it here.
It’s important that you get in the habit of commenting your code, so the first state-
ment you’ll enter is a comment. Beginning a statement with an apostrophe (') des-
ignates that statement as a comment. The compiler won’t do anything with the
statement, so you can enter whatever text you want after the apostrophe. Type the
following statement exactly as it appears, and press the Enter key at the end of
the line:
‘ Show the open file dialog box.
The next statement you’ll enter triggers a method of the OpenFileDialog control
that you added to the form. Think of a method as a mechanism to make a control
do something. The ShowDialog() method tells the control to show its Open dialog
box and let the user select a file. The ShowDialog() method returns a value that
indicates its success or failure, which you’ll then compare to a predefined result
(DialogResult.OK). Don’t worry too much about what’s happening here; you’ll be
26 HOUR 1: Jumping in with Both Feet: A Visual Basic 2008 Programming Tour
learning the details of all this in later hours. The sole purpose of this hour is to get
your feet wet. In a nutshell, the ShowDialog() method is invoked to let a user
browse for a file. If the user selects a file, more code is executed. Of course, there’s a
lot more to using the OpenFileDialog control than I present in this basic example,
but this simple statement gets the job done. Enter the following statement and press
Enter to commit the code (don’t worry about capitalization; Visual Basic will fix the
case for you!):
If ofdSelectpicture.ShowDialog = DialogResult.OK Then
After you insert the statement that begins with If and press Enter, Visual Basicautomatically creates the End If statement for you. If you type in End If, you’llwind up with two End If statements, and your code won’t run. If this happens,delete one of the statements. Hour 13, “Making Decisions in Visual Basic Code,”has all the details on the If statement.
It’s time for another comment. The cursor is currently between the statement that
starts with If and the End If statement. Leave the cursor there and type the follow-
ing statement, remembering to press Enter at the end of the line:
‘ Load the picture into the picture box.
Don’t worry about indenting the code by pressing the Tab key or using spaces.Visual Basic automatically indents code for you.
This next statement, which appears within the If construct (between the If and
End If statements), is the line of code that actually displays the picture in the
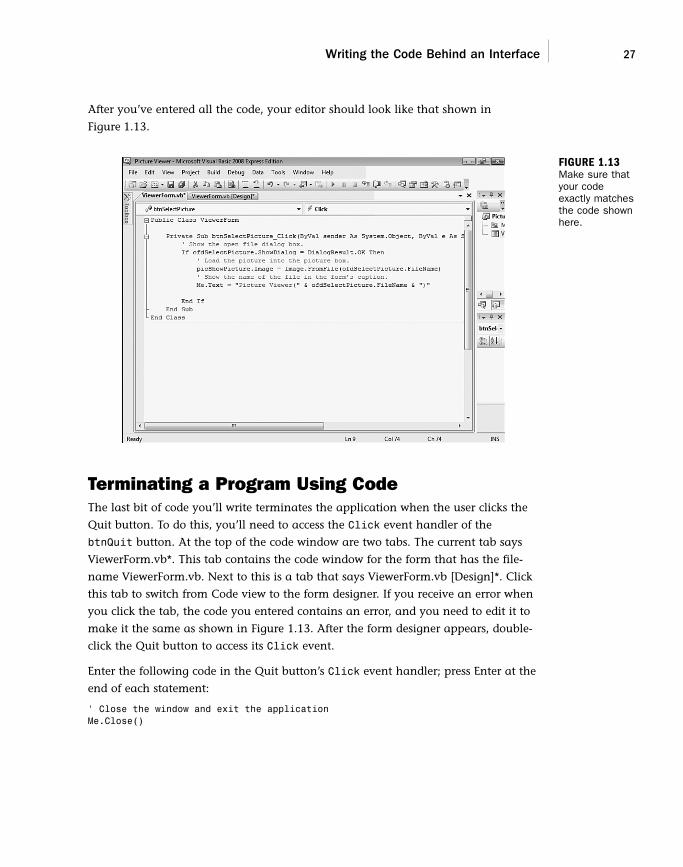
Terminating a Program Using CodeThe last bit of code you’ll write terminates the application when the user clicks the
Quit button. To do this, you’ll need to access the Click event handler of the
btnQuit button. At the top of the code window are two tabs. The current tab says
ViewerForm.vb*. This tab contains the code window for the form that has the file-
name ViewerForm.vb. Next to this is a tab that says ViewerForm.vb [Design]*. Click
this tab to switch from Code view to the form designer. If you receive an error when
you click the tab, the code you entered contains an error, and you need to edit it to
make it the same as shown in Figure 1.13. After the form designer appears, double-
click the Quit button to access its Click event.
Enter the following code in the Quit button’s Click event handler; press Enter at the
end of each statement:
‘ Close the window and exit the applicationMe.Close()
28 HOUR 1: Jumping in with Both Feet: A Visual Basic 2008 Programming Tour
The Me.Close() statement closes the current form. When the last loaded form ina program is closed, the application shuts itself down—completely. As you buildmore robust applications, you’ll probably want to execute all kinds of cleanup rou-tines before terminating an application, but for this example, closing the form isall you need to do.
Running a ProjectYour application is now complete. Click the Save All button on the toolbar (the stack
of floppy disks), and then run your program by pressing F5. You can also run the
program by clicking the button on the toolbar that looks like a right-facing triangle
and resembles the Play button on a DVD player. (This button is called Start, and it
can also be found on the Debug menu.) Learning the keyboard shortcuts will make
your development process move along faster, so I recommend that you use them
whenever possible.
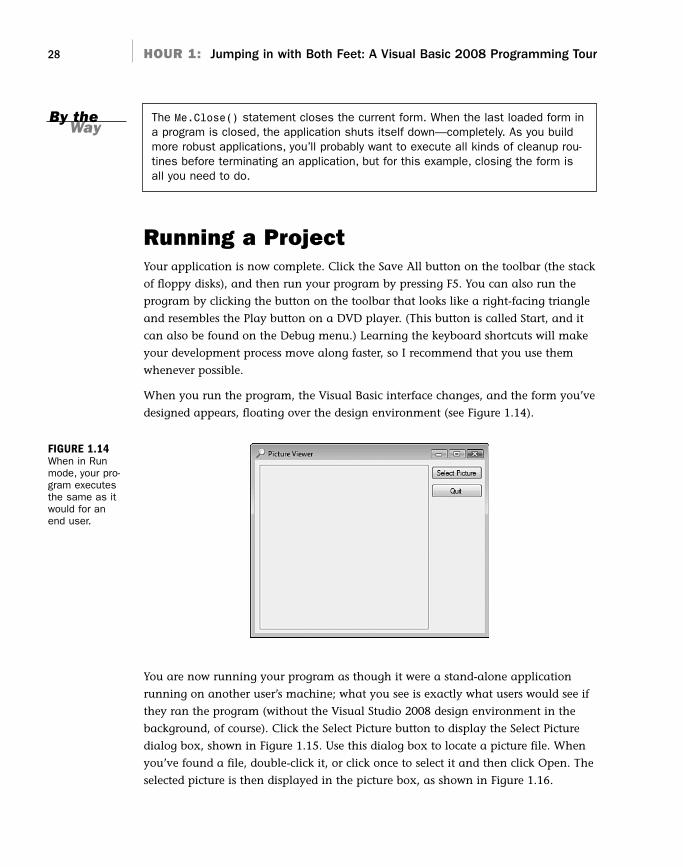
When you run the program, the Visual Basic interface changes, and the form you’ve
designed appears, floating over the design environment (see Figure 1.14).
By theWay
FIGURE 1.14When in Runmode, your pro-gram executesthe same as itwould for anend user.
You are now running your program as though it were a stand-alone application
running on another user’s machine; what you see is exactly what users would see if
they ran the program (without the Visual Studio 2008 design environment in the
background, of course). Click the Select Picture button to display the Select Picture
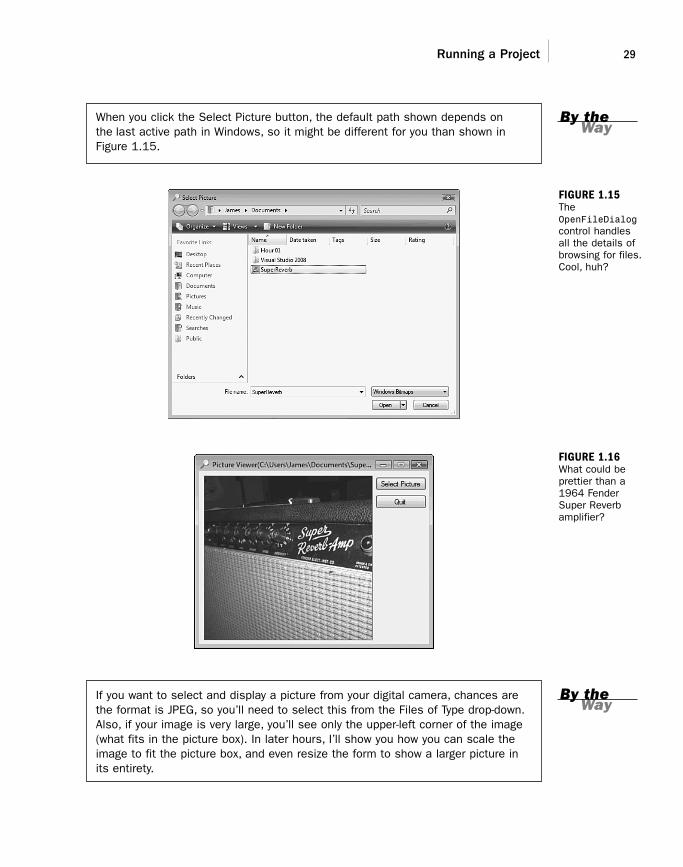
dialog box, shown in Figure 1.15. Use this dialog box to locate a picture file. When
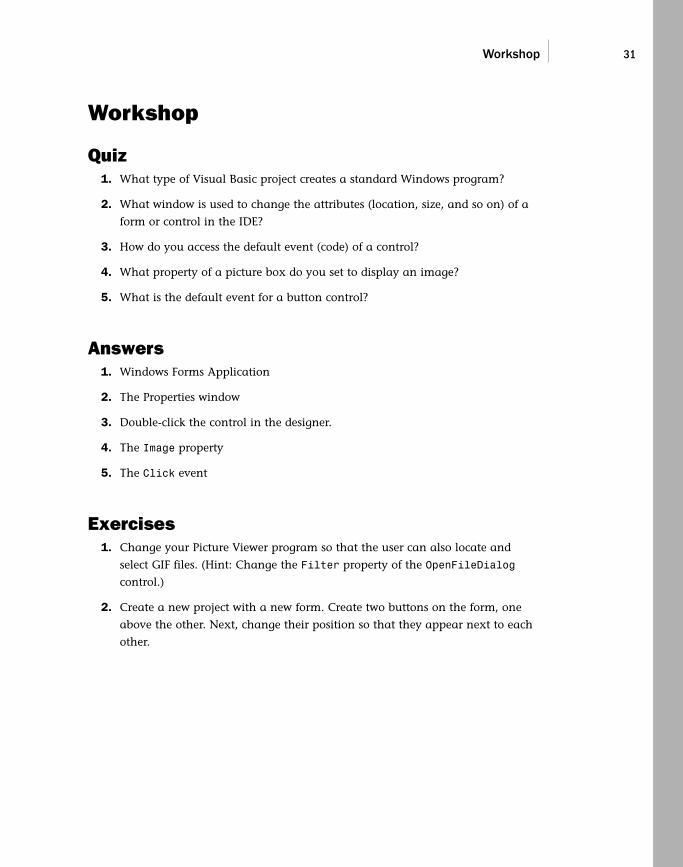
you’ve found a file, double-click it, or click once to select it and then click Open. The
selected picture is then displayed in the picture box, as shown in Figure 1.16.
If you want to select and display a picture from your digital camera, chances arethe format is JPEG, so you’ll need to select this from the Files of Type drop-down.Also, if your image is very large, you’ll see only the upper-left corner of the image(what fits in the picture box). In later hours, I’ll show you how you can scale theimage to fit the picture box, and even resize the form to show a larger picture inits entirety.
Running a Project 29
When you click the Select Picture button, the default path shown depends onthe last active path in Windows, so it might be different for you than shown inFigure 1.15.
By theWay
FIGURE 1.15TheOpenFileDialogcontrol handlesall the details ofbrowsing for files.Cool, huh?
FIGURE 1.16What could beprettier than a1964 FenderSuper Reverbamplifier?
By theWay
30 HOUR 1: Jumping in with Both Feet: A Visual Basic 2008 Programming Tour
SummaryWhen you’re finished playing with the program, click the Quit button to return to
Design view.
That’s it! You’ve just created a bona fide Visual Basic program. You’ve used the tool-
box to build an interface with which users can interact with your program, and
you’ve written code in strategic event handlers to empower your program to do
things. These are the basics of application development in Visual Basic. Even the
most complicated programs are built using this fundamental approach; you build
the interface and add code to make the application do things. Of course, writing
code to do things exactly the way you want things done is where the process can get
complicated, but you’re on your way.
If you take a close look at the organization of the hours in this book, you’ll see that
I start out by teaching you the Visual Basic (Visual Studio .NET) environment. I then
move on to building an interface, and later I teach you about writing code. This
organization is deliberate. You might be eager to jump in and start writing serious
code, but writing code is only part of the equation—don’t forget the word Visual in
Visual Basic. As you progress through the hours, you’ll build a solid foundation of
development skills.
Soon, you’ll pay no attention to the man behind the curtain—you’ll be that man (or
woman)!
Q&AQ. Can I show bitmaps of file types other than BMP and JPG?
A. Yes. PictureBox supports the display of images with the extensions BMP, JPG,
ICO, EMF, WMF, and GIF. PictureBox can even save images to a file using
any of the supported file types.
Q. Is it possible to show pictures in other controls?
A. PictureBox is the control to use when you are just displaying images.
However, many other controls allow you to display pictures as part of the con-
trol. For instance, you can display an image on a button control by setting the
button’s Image property to a valid picture.
Workshop 31
Workshop
Quiz1. What type of Visual Basic project creates a standard Windows program?
2. What window is used to change the attributes (location, size, and so on) of a
form or control in the IDE?
3. How do you access the default event (code) of a control?
4. What property of a picture box do you set to display an image?
5. What is the default event for a button control?
Answers1. Windows Forms Application
2. The Properties window
3. Double-click the control in the designer.
4. The Image property
5. The Click event
Exercises1. Change your Picture Viewer program so that the user can also locate and
select GIF files. (Hint: Change the Filter property of the OpenFileDialog
control.)
2. Create a new project with a new form. Create two buttons on the form, one
above the other. Next, change their position so that they appear next to each