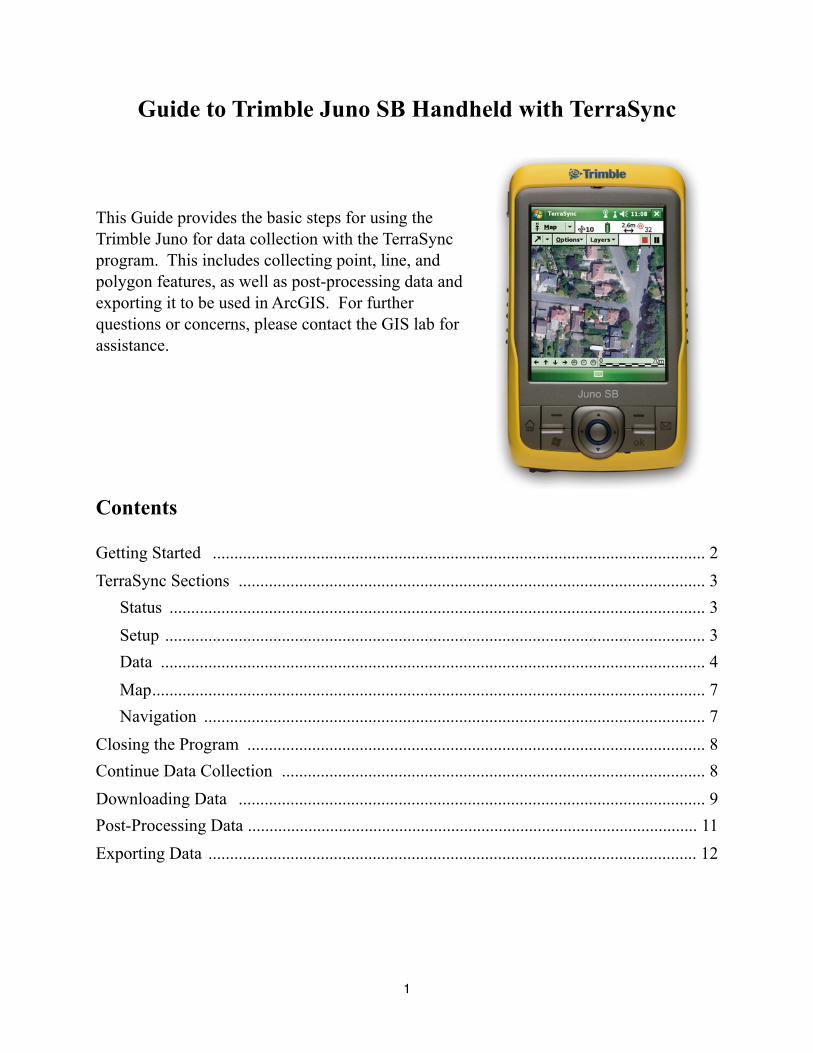
Guide to Trimble Juno SB Handheld with TerraSync This Guide provides the basic steps for using the Trimble Juno for data collection with the TerraSync program. This includes collecting point, line, and polygon features, as well as post-processing data and exporting it to be used in ArcGIS. For further questions or concerns, please contact the GIS lab for assistance. Contents Getting Started .................................................................................................................. 2 TerraSync Sections ............................................................................................................ 3 Status ............................................................................................................................ 3 Setup ............................................................................................................................. 3 Data .............................................................................................................................. 4 Map................................................................................................................................ 7 Navigation .................................................................................................................... 7 Closing the Program .......................................................................................................... 8 Continue Data Collection .................................................................................................. 8 Downloading Data ............................................................................................................ 9 Post-Processing Data ........................................................................................................ 11 Exporting Data ................................................................................................................. 12 1
Transcript
Guide to Trimble Juno SB Handheld with TerraSync
This Guide provides the basic steps for using the Trimble Juno for data collection with the TerraSync program. This includes collecting point, line, and polygon features, as well as post-processing data and exporting it to be used in ArcGIS. For further questions or concerns, please contact the GIS lab for assistance.
Contents
Getting Started .................................................................................................................. 2TerraSync Sections ............................................................................................................ 3 Status ............................................................................................................................ 3 Setup ............................................................................................................................. 3 Data .............................................................................................................................. 4 Map ................................................................................................................................ 7 Navigation .................................................................................................................... 7Closing the Program .......................................................................................................... 8Continue Data Collection .................................................................................................. 8Downloading Data ............................................................................................................ 9Post-Processing Data ........................................................................................................ 11Exporting Data ................................................................................................................. 12
1
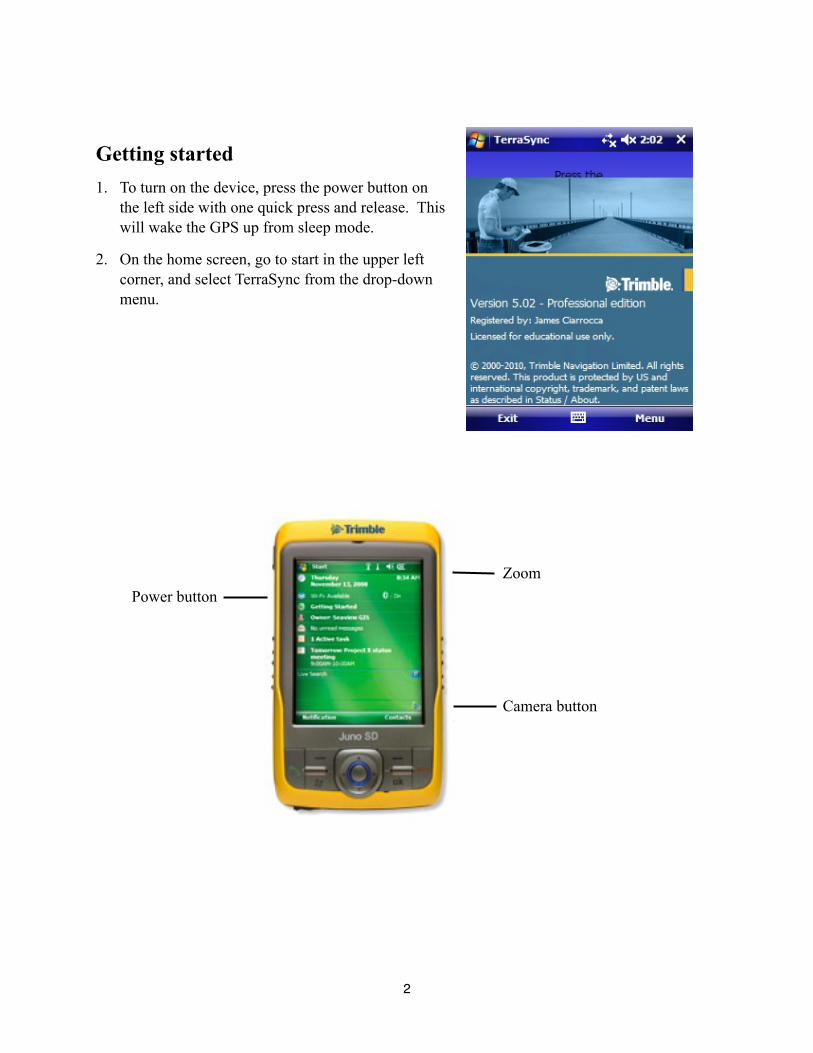
Getting started1. To turn on the device, press the power button on
the left side with one quick press and release. This will wake the GPS up from sleep mode.
2. On the home screen, go to start in the upper left corner, and select TerraSync from the drop-down menu.
2
Power button
Camera button
Zoom
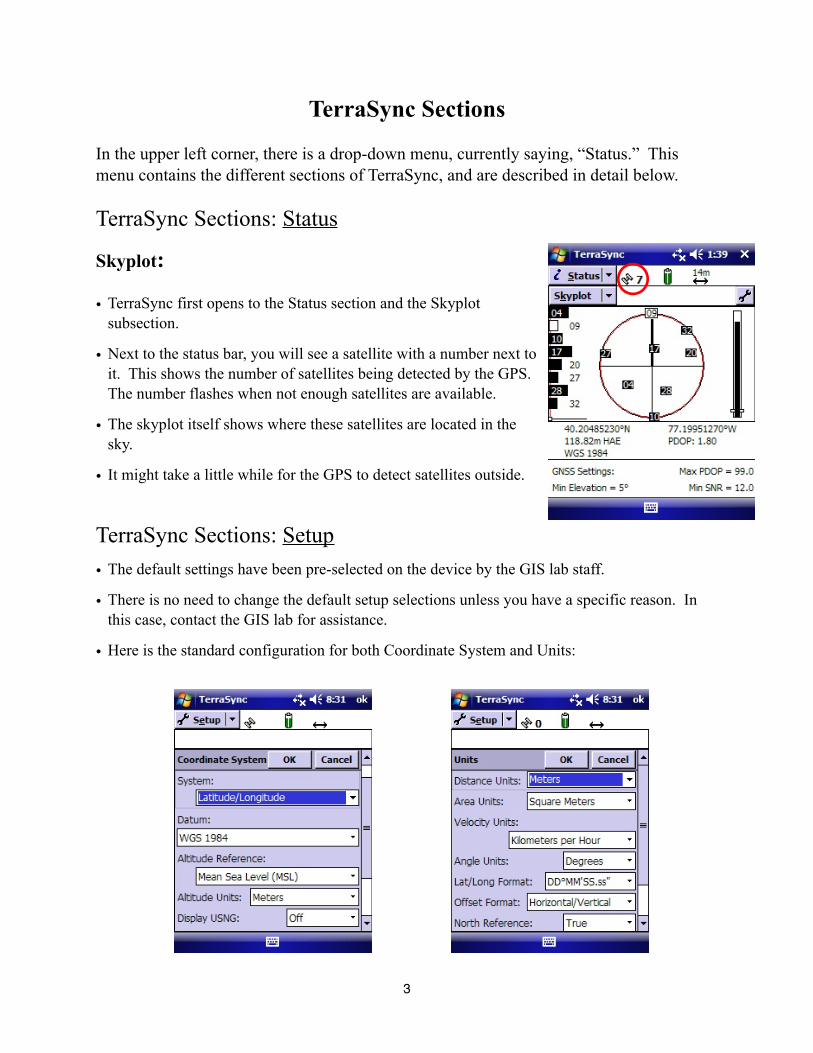
TerraSync Sections
In the upper left corner, there is a drop-down menu, currently saying, “Status.” This menu contains the different sections of TerraSync, and are described in detail below.
TerraSync Sections: Status
Skyplot:
• TerraSync first opens to the Status section and the Skyplot subsection.
• Next to the status bar, you will see a satellite with a number next to it. This shows the number of satellites being detected by the GPS. The number flashes when not enough satellites are available.
• The skyplot itself shows where these satellites are located in the sky.
• It might take a little while for the GPS to detect satellites outside.
TerraSync Sections: Setup• The default settings have been pre-selected on the device by the GIS lab staff.
• There is no need to change the default setup selections unless you have a specific reason. In this case, contact the GIS lab for assistance.
• Here is the standard configuration for both Coordinate System and Units:
3
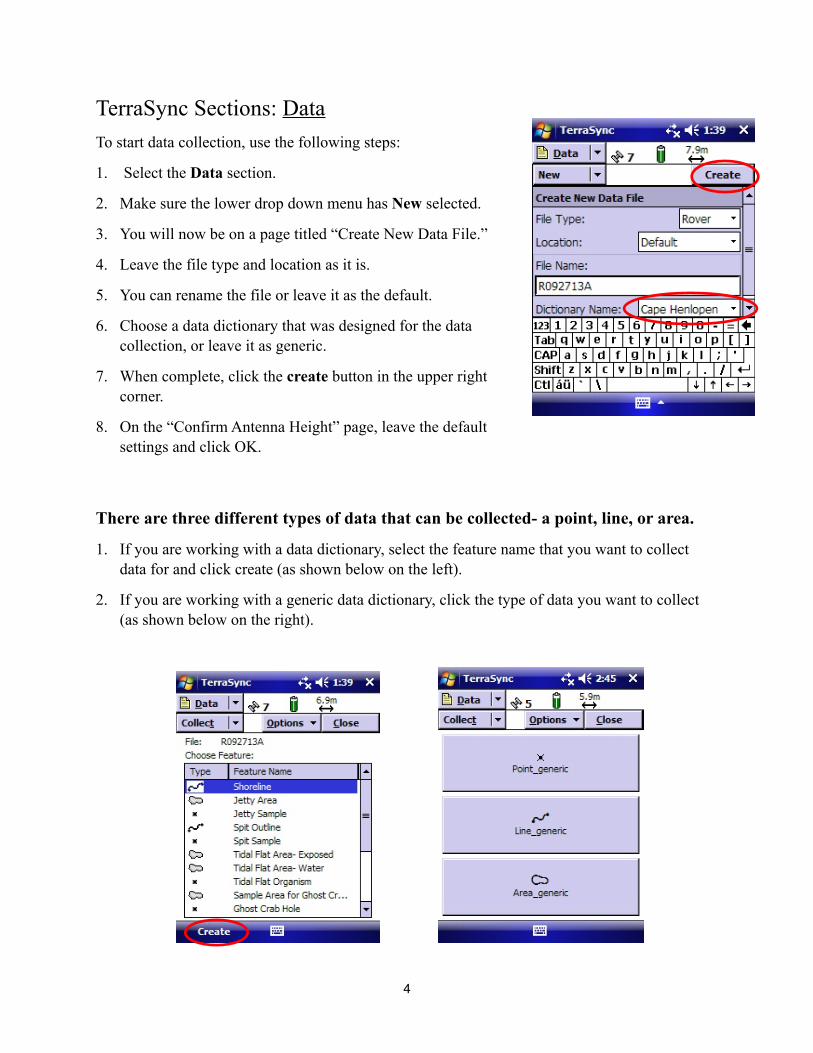
TerraSync Sections: DataTo start data collection, use the following steps:
1. Select the Data section.
2. Make sure the lower drop down menu has New selected.
3. You will now be on a page titled “Create New Data File.”
4. Leave the file type and location as it is.
5. You can rename the file or leave it as the default.
6. Choose a data dictionary that was designed for the data collection, or leave it as generic.
7. When complete, click the create button in the upper right corner.
8. On the “Confirm Antenna Height” page, leave the default settings and click OK.
There are three different types of data that can be collected- a point, line, or area.
1. If you are working with a data dictionary, select the feature name that you want to collect data for and click create (as shown below on the left).
2. If you are working with a generic data dictionary, click the type of data you want to collect (as shown below on the right).
4
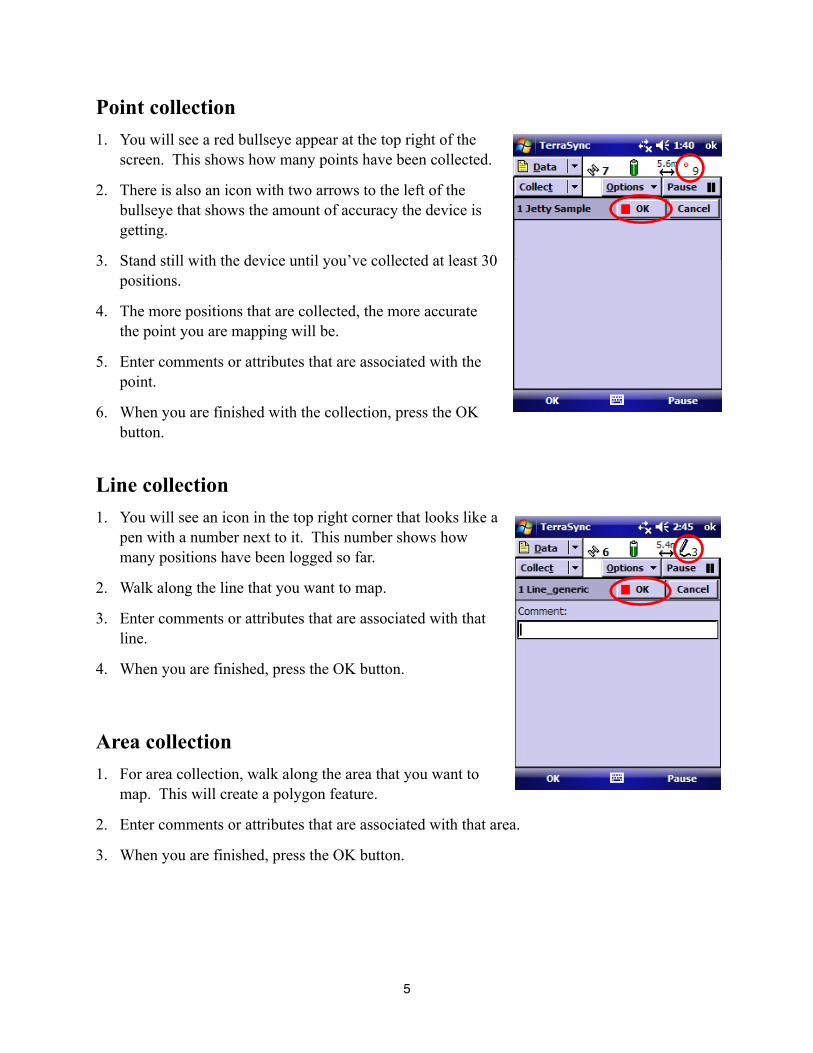
Point collection1. You will see a red bullseye appear at the top right of the
screen. This shows how many points have been collected.
2. There is also an icon with two arrows to the left of the bullseye that shows the amount of accuracy the device is getting.
3. Stand still with the device until you’ve collected at least 30 positions.
4. The more positions that are collected, the more accurate the point you are mapping will be.
5. Enter comments or attributes that are associated with the point.
6. When you are finished with the collection, press the OK button.
Line collection1. You will see an icon in the top right corner that looks like a
pen with a number next to it. This number shows how many positions have been logged so far.
2. Walk along the line that you want to map.
3. Enter comments or attributes that are associated with that line.
4. When you are finished, press the OK button.
Area collection1. For area collection, walk along the area that you want to
map. This will create a polygon feature.
2. Enter comments or attributes that are associated with that area.
3. When you are finished, press the OK button.
5
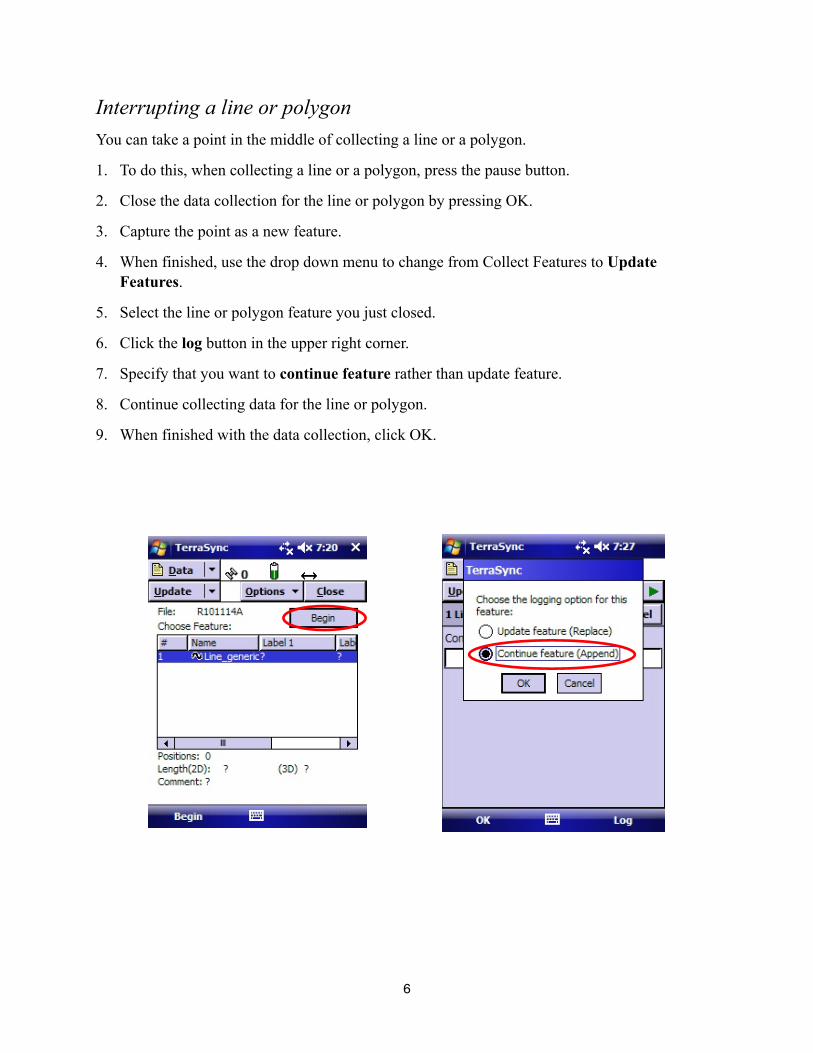
Interrupting a line or polygonYou can take a point in the middle of collecting a line or a polygon.
1. To do this, when collecting a line or a polygon, press the pause button.
2. Close the data collection for the line or polygon by pressing OK.
3. Capture the point as a new feature.
4. When finished, use the drop down menu to change from Collect Features to Update Features.
5. Select the line or polygon feature you just closed.
6. Click the log button in the upper right corner.
7. Specify that you want to continue feature rather than update feature.
8. Continue collecting data for the line or polygon.
9. When finished with the data collection, click OK.
6
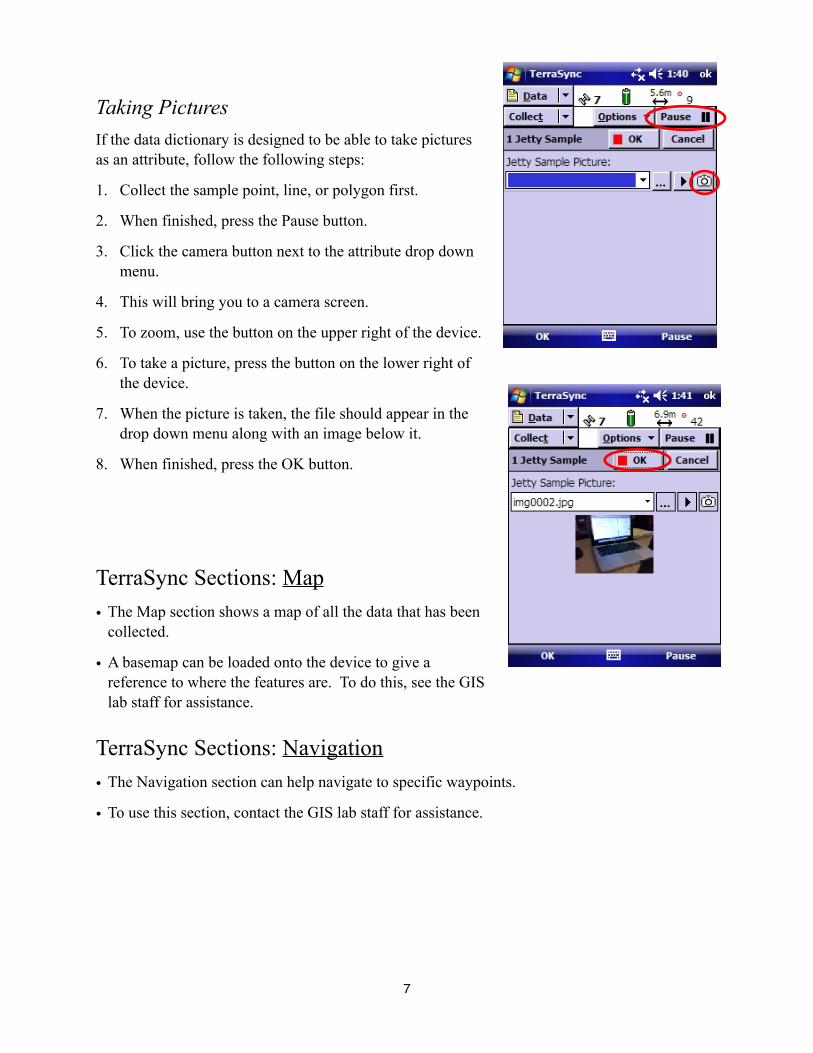
Taking PicturesIf the data dictionary is designed to be able to take pictures as an attribute, follow the following steps:
1. Collect the sample point, line, or polygon first.
2. When finished, press the Pause button.
3. Click the camera button next to the attribute drop down menu.
4. This will bring you to a camera screen.
5. To zoom, use the button on the upper right of the device.
6. To take a picture, press the button on the lower right of the device.
7. When the picture is taken, the file should appear in the drop down menu along with an image below it.
8. When finished, press the OK button.
TerraSync Sections: Map• The Map section shows a map of all the data that has been
collected.
• A basemap can be loaded onto the device to give a reference to where the features are. To do this, see the GIS lab staff for assistance.
TerraSync Sections: Navigation• The Navigation section can help navigate to specific waypoints.
• To use this section, contact the GIS lab staff for assistance.
7
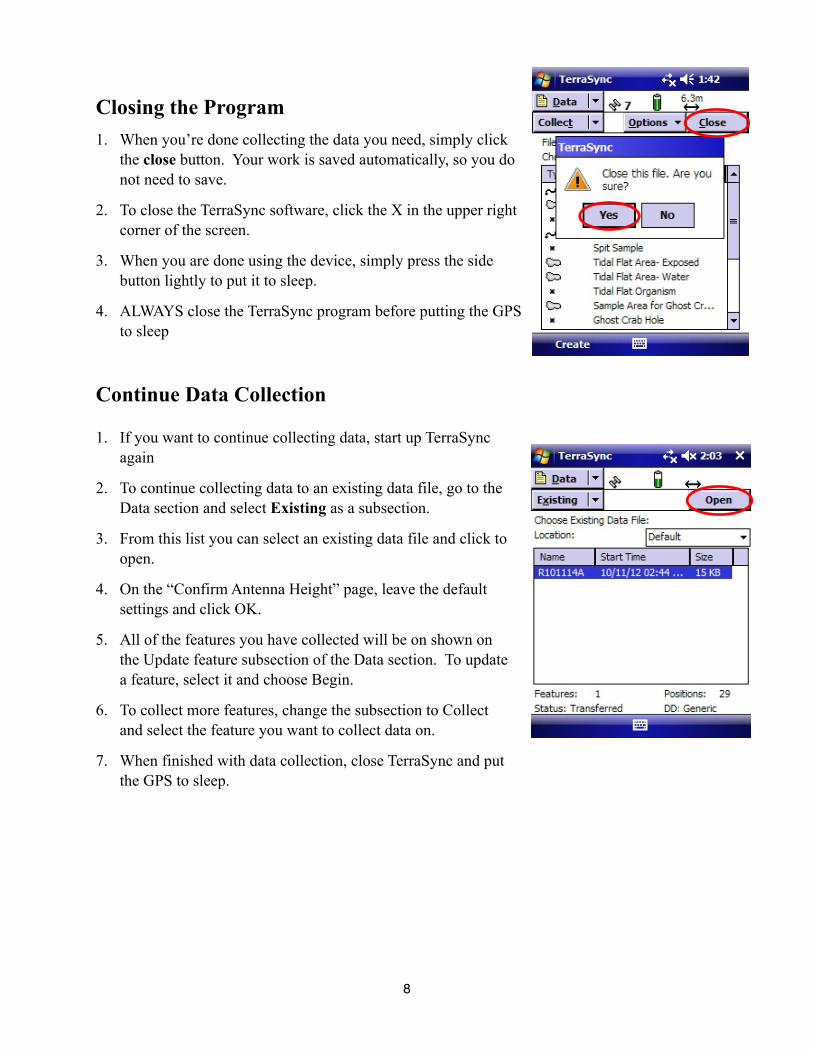
Closing the Program1. When you’re done collecting the data you need, simply click
the close button. Your work is saved automatically, so you do not need to save.
2. To close the TerraSync software, click the X in the upper right corner of the screen.
3. When you are done using the device, simply press the side button lightly to put it to sleep.
4. ALWAYS close the TerraSync program before putting the GPS to sleep
Continue Data Collection
1. If you want to continue collecting data, start up TerraSync again
2. To continue collecting data to an existing data file, go to the Data section and select Existing as a subsection.
3. From this list you can select an existing data file and click to open.
4. On the “Confirm Antenna Height” page, leave the default settings and click OK.
5. All of the features you have collected will be on shown on the Update feature subsection of the Data section. To update a feature, select it and choose Begin.
6. To collect more features, change the subsection to Collect and select the feature you want to collect data on.
7. When finished with data collection, close TerraSync and put the GPS to sleep.
8
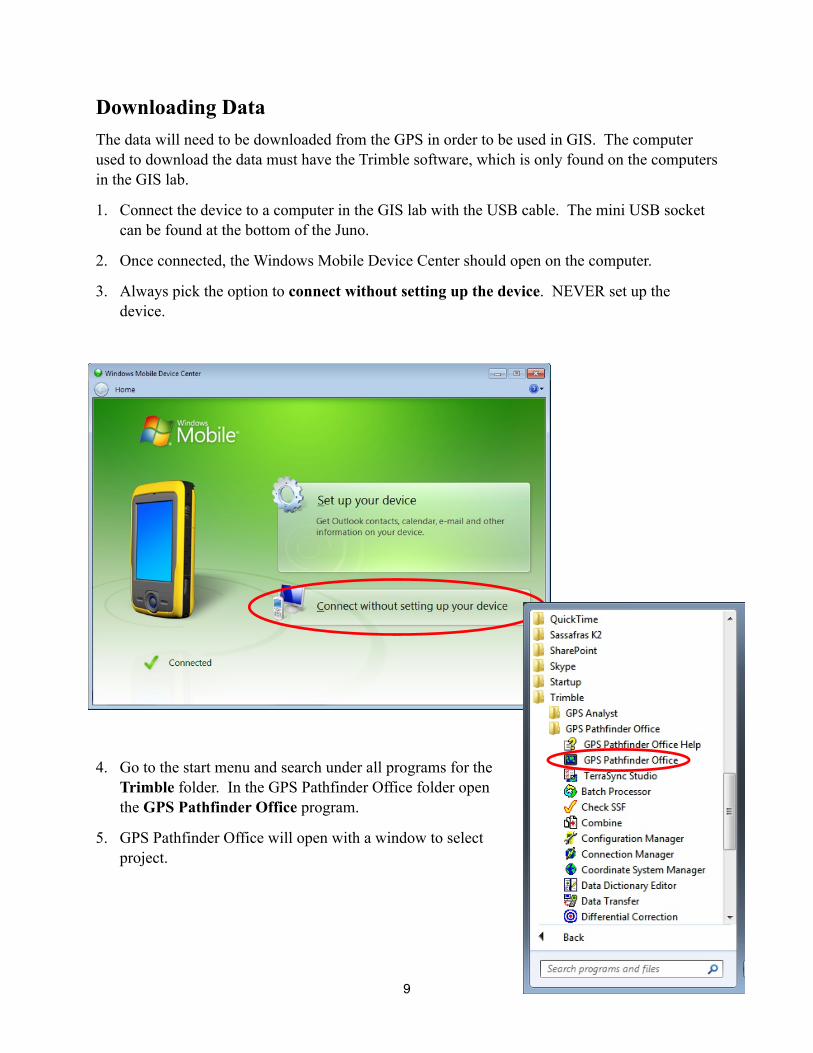
Downloading DataThe data will need to be downloaded from the GPS in order to be used in GIS. The computer used to download the data must have the Trimble software, which is only found on the computers in the GIS lab.
1. Connect the device to a computer in the GIS lab with the USB cable. The mini USB socket can be found at the bottom of the Juno.
2. Once connected, the Windows Mobile Device Center should open on the computer.
3. Always pick the option to connect without setting up the device. NEVER set up the device.
4. Go to the start menu and search under all programs for the Trimble folder. In the GPS Pathfinder Office folder open the GPS Pathfinder Office program.
5. GPS Pathfinder Office will open with a window to select project.
9
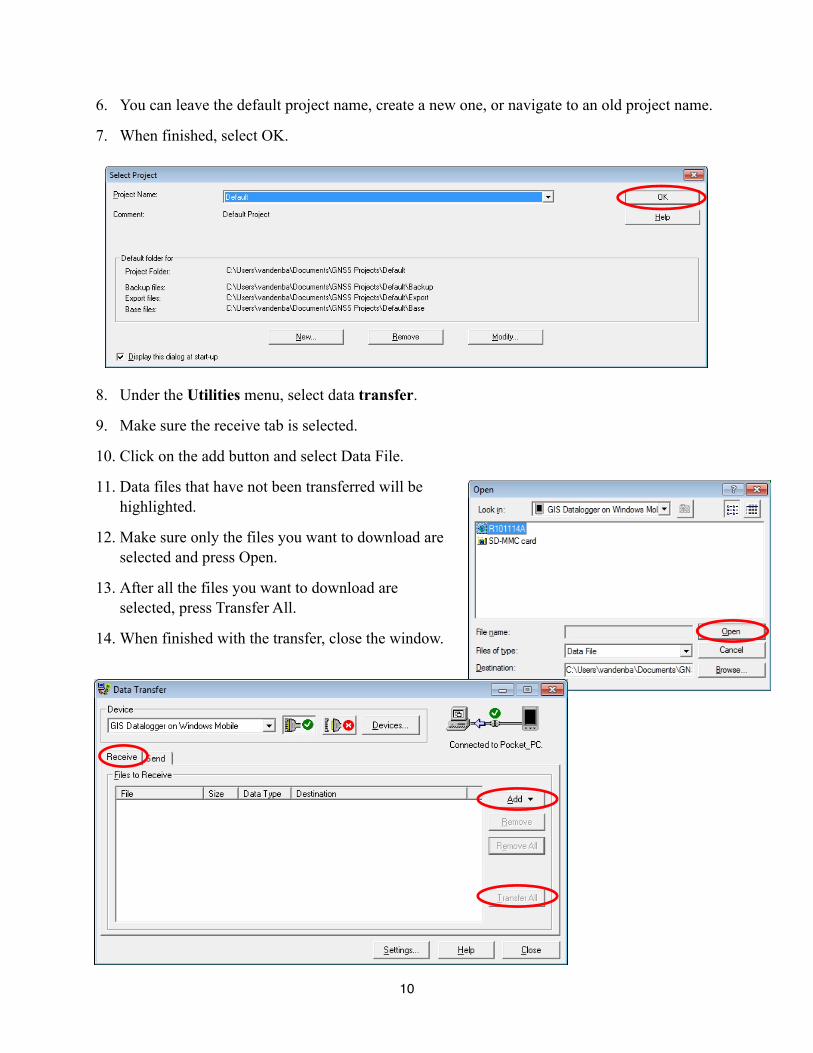
6. You can leave the default project name, create a new one, or navigate to an old project name.
7. When finished, select OK.
8. Under the Utilities menu, select data transfer.
9. Make sure the receive tab is selected.
10. Click on the add button and select Data File.
11. Data files that have not been transferred will be highlighted.
12. Make sure only the files you want to download are selected and press Open.
13. After all the files you want to download are selected, press Transfer All.
14. When finished with the transfer, close the window.
10
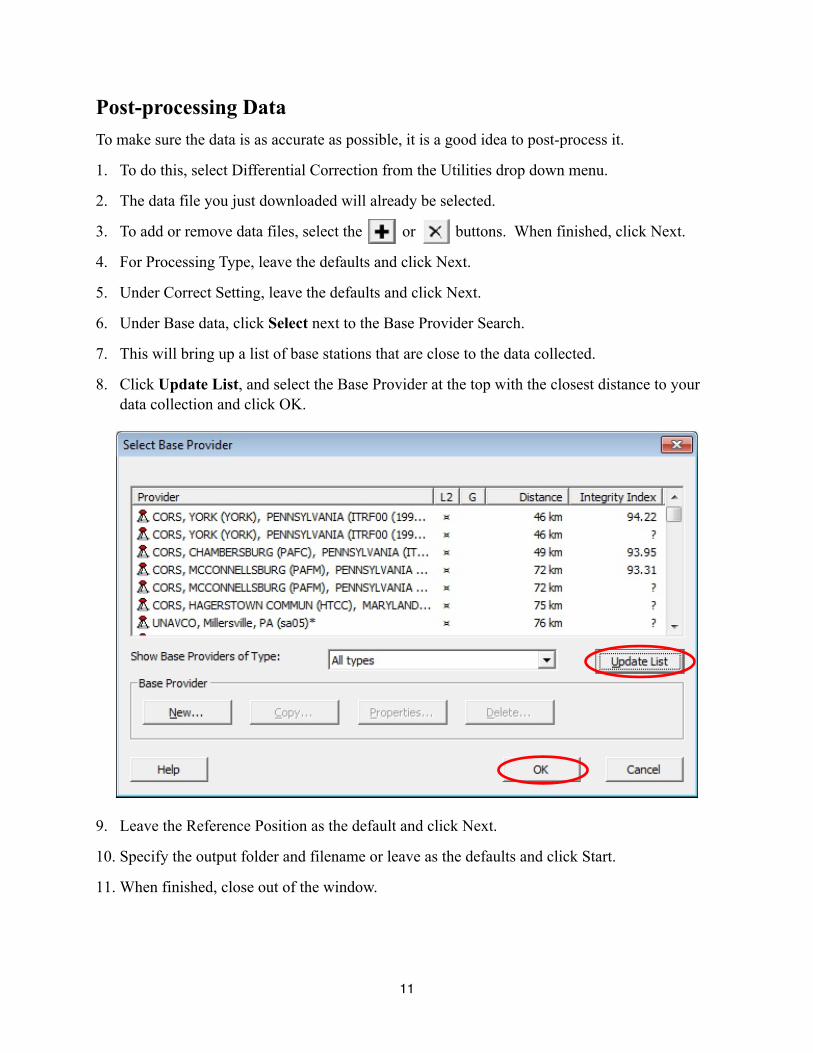
Post-processing DataTo make sure the data is as accurate as possible, it is a good idea to post-process it.
1. To do this, select Differential Correction from the Utilities drop down menu.
2. The data file you just downloaded will already be selected.
3. To add or remove data files, select the or buttons. When finished, click Next.
4. For Processing Type, leave the defaults and click Next.
5. Under Correct Setting, leave the defaults and click Next.
6. Under Base data, click Select next to the Base Provider Search.
7. This will bring up a list of base stations that are close to the data collected.
8. Click Update List, and select the Base Provider at the top with the closest distance to your data collection and click OK.
9. Leave the Reference Position as the default and click Next.
10. Specify the output folder and filename or leave as the defaults and click Start.
11. When finished, close out of the window.
11
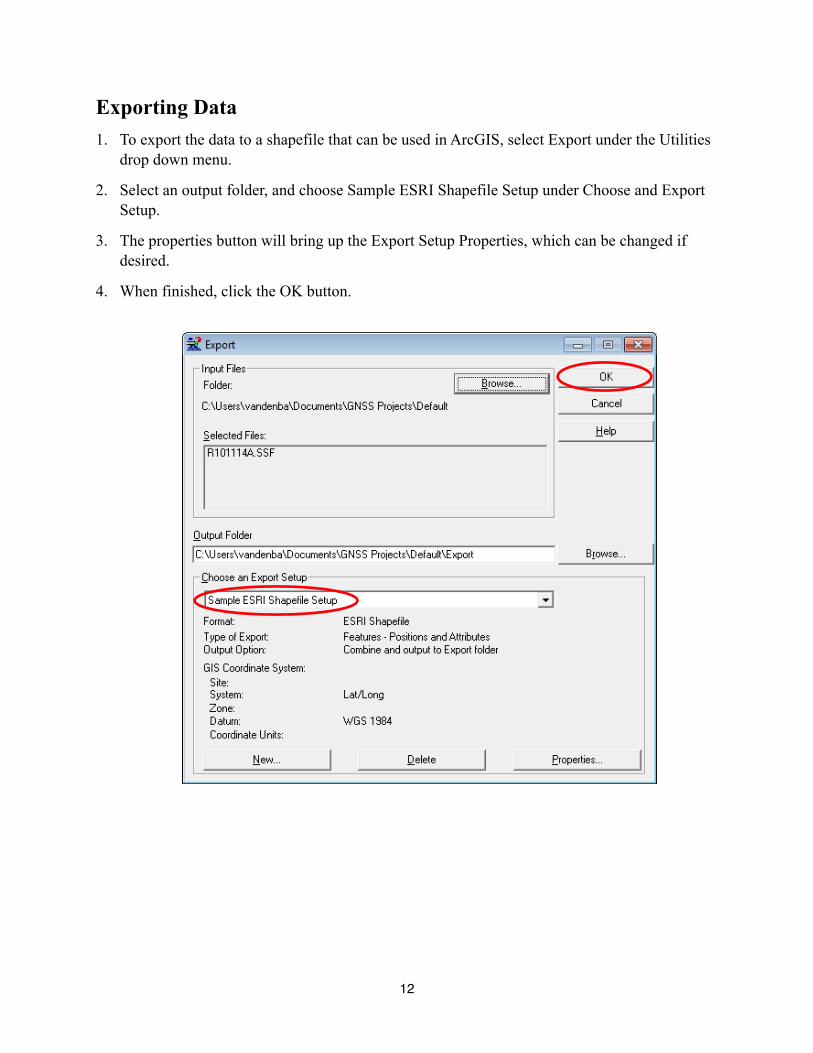
Exporting Data1. To export the data to a shapefile that can be used in ArcGIS, select Export under the Utilities
drop down menu.
2. Select an output folder, and choose Sample ESRI Shapefile Setup under Choose and Export Setup.
3. The properties button will bring up the Export Setup Properties, which can be changed if desired.