95
JUNOS as a second language Radostina Gercheva, JNCIP-ENT Smartcom Bulgaria AD Mircho Mirchev, JNCIP-SP/SEC/ENT Smartcom Bulgaria AD

JUNOS as a second language
Radostina Gercheva, JNCIP-ENT Smartcom Bulgaria AD
Mircho Mirchev, JNCIP-SP/SEC/ENT Smartcom Bulgaria AD

QUIZ at 20:15
1st Award – TP-Link Wireless N Nano router
(TL-WR802N)
2nd Award – Lenovo Mobile Power (MP506)
3rd Award – AData 32GB USB Flash drive
Questions - at 20:15

Demo LAB
use an SSH client:
Sofia-FW1: 193.178.153.165
Varna-FW1: 193.178.153.166
user: junos
pass: Barzikt
(case-sensitive)
Note: some stanzas are protected;
Please, do NOT change them
Try also:
https://193.178.153.165
https://193.178.153.166
Wi-Fi: SSID: MTF3201
Pass: mtf_3201

JUNIPER NETWORKS
A brief history of
Timeline
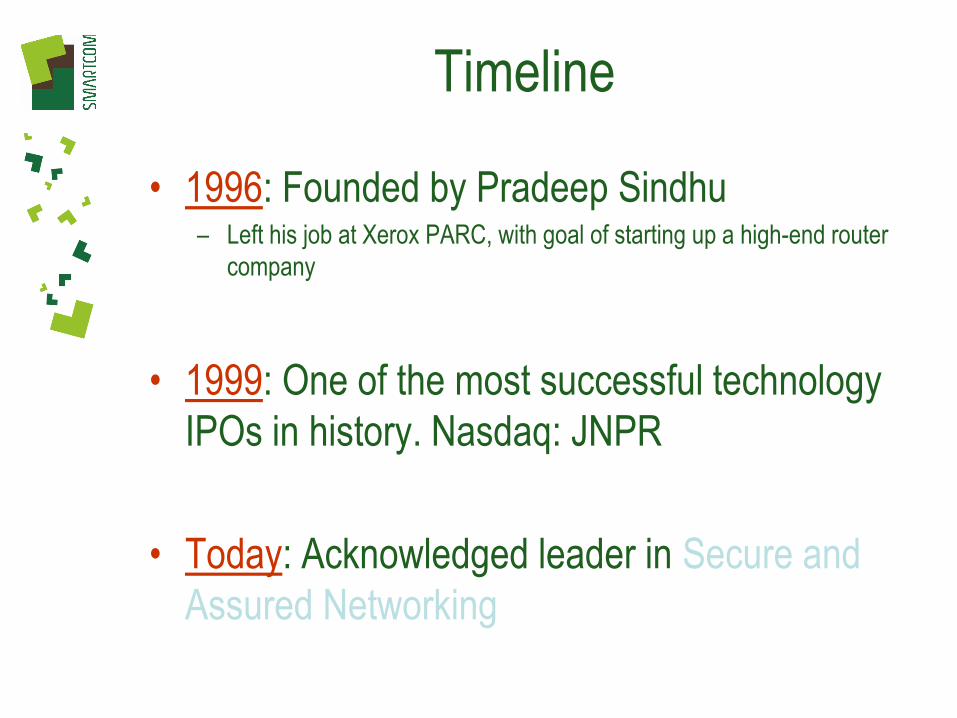
• 1996: Founded by Pradeep Sindhu – Left his job at Xerox PARC, with goal of starting up a high-end router
company
• 1999: One of the most successful technology
IPOs in history. Nasdaq: JNPR
• Today: Acknowledged leader in Secure and
Assured Networking

History of innovation - Juniper
• 1998: First separation of control plane & data plane
• 1998: First implementation of IPv4, v6, MPLS in silicon
• 1998: First 2.4Gbps forwarding engine
• 2000: First wire-rate 10Gbps forwarding engine
• 2002: First implementation of integrated services
• 2003: First scalable cell-switched fabric
• 2004: First multi-chassis router
• 2005: First line-rate 40Gbps forwarding engine
• 2007: First Ethernet router
• 2007: First > 160G Firewall
• 1998-2006: Record quadrupling of capacity every 2 years
• 2009: Next generation edge silicon: NISP
• 2010: First 100GE
78 own microchip developments
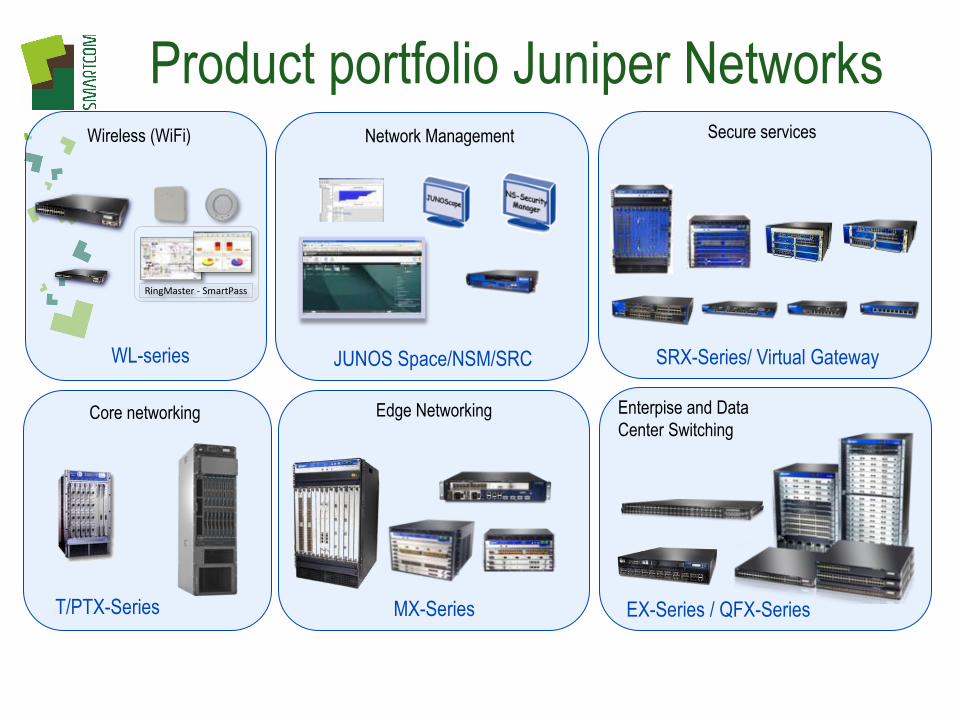
Product portfolio Juniper Networks
MX-Series
Network Management
T/PTX-Series
Core networking Enterpise and Data
Center Switching
Secure services
EX-Series / QFX-Series
SRX-Series/ Virtual Gateway JUNOS Space/NSM/SRC
Edge Networking
WL-series
Wireless (WiFi)
RingMaster - SmartPass

Modular Juniper System Architecture A Fundamentally Different Approach
Copyright © 2004 Juniper Networks, Inc. Proprietary and Confidential www.juniper.net
Hardware Architecture
+
• Guaranteed resources per function • Clean separation of functions
Control Engine
Forwarding Engine
Services Engine
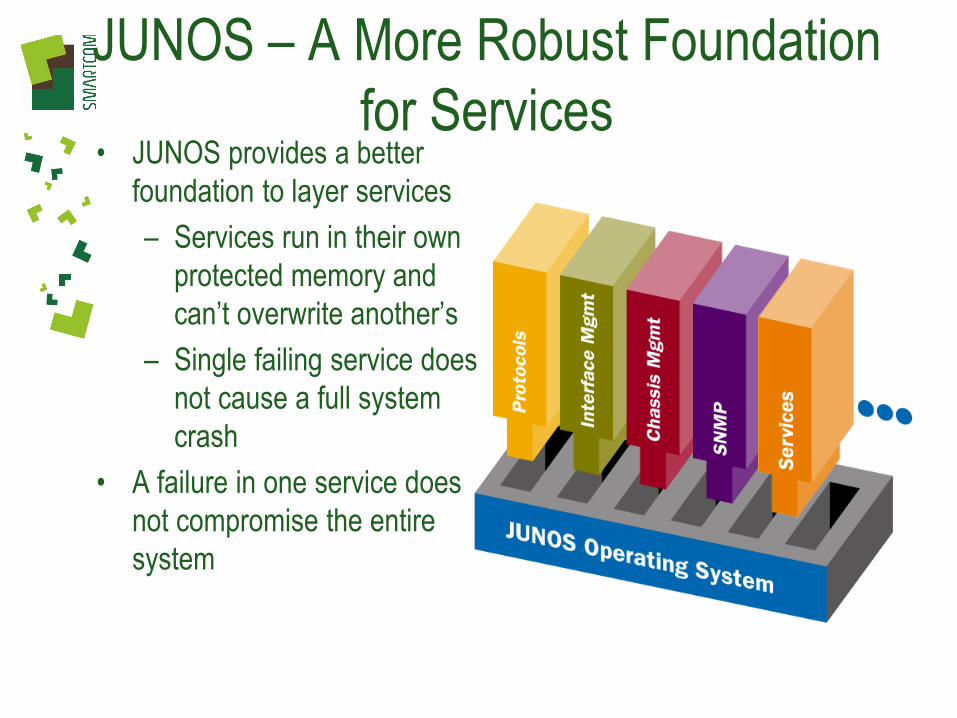
JUNOS – A More Robust Foundation
for Services • JUNOS provides a better
foundation to layer services
– Services run in their own
protected memory and
can’t overwrite another’s
– Single failing service does
not cause a full system
crash
• A failure in one service does
not compromise the entire
system

Predictable Performance Advanced QOS Mechanisms to Control Traffic
Predictable performance, even under load
Comprehensive QOS functions to classify, prioritize and schedule traffic
Activate real-time performance monitoring and usage tracking without degradation
% o
f Lin
e R
ate
Complexity of Packet Processing
Addition of new service
features
Juniper
Traditional Router
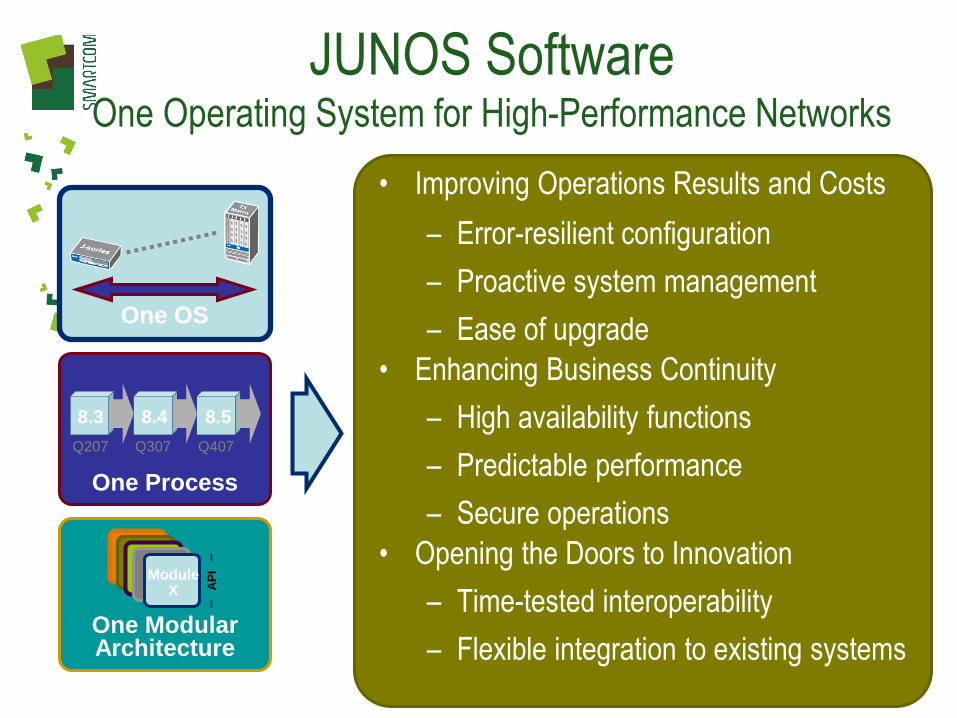
• Improving Operations Results and Costs
– Error-resilient configuration
– Proactive system management
– Ease of upgrade
• Enhancing Business Continuity
– High availability functions
– Predictable performance
– Secure operations
• Opening the Doors to Innovation
– Time-tested interoperability
– Flexible integration to existing systems
JUNOS Software One Operating System for High-Performance Networks
One Process
Q207
8.3 8.4
Q307
8.5
Q407
One OS
One Modular Architecture
AP
I
Module X
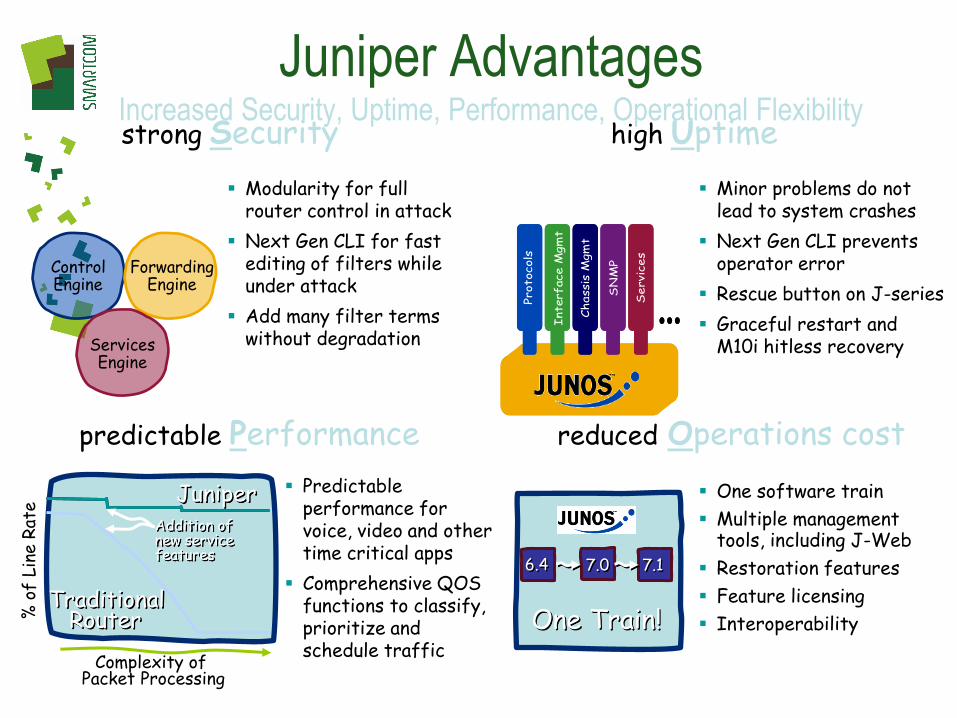
Juniper Advantages Increased Security, Uptime, Performance, Operational Flexibility
Protocols
Interface M
gm
t
Chassis
Mgm
t
SN
MP
Servic
es
strong Security
high Uptime
Modularity for full router control in attack
Next Gen CLI for fast editing of filters while under attack
Add many filter terms without degradation
Minor problems do not lead to system crashes
Next Gen CLI prevents operator error
Rescue button on J-series
Graceful restart and M10i hitless recovery
ControlEngine
ForwardingEngine
ServicesEngine
predictable Performance reduced Operations cost
Predictable performance for voice, video and other time critical apps
Comprehensive QOS functions to classify, prioritize and schedule traffic
One software train
Multiple management tools, including J-Web
Restoration features
Feature licensing
Interoperability
One Train!
6.4 7.0 7.1
% o
f Li
ne R
ate
Complexity of Packet Processing
Addition of new service features
Juniper
Traditional Router

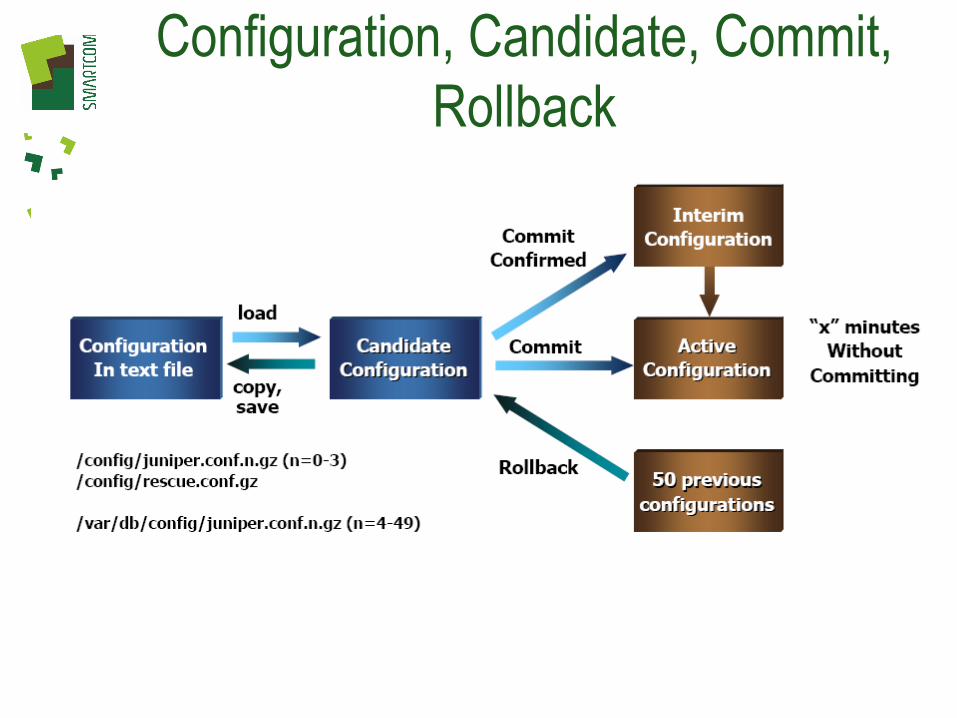
High Uptime - Next Gen CLI Protect Network from Configuration Errors
• Commit check of candidate config verifies entire config
• Commit confirm automates rollback if problems occur
• Rollback to 50 previous configs
• Rescue button linked to a golden config in J-series
• Configuration compare between any two configs
Config compare with J-Web
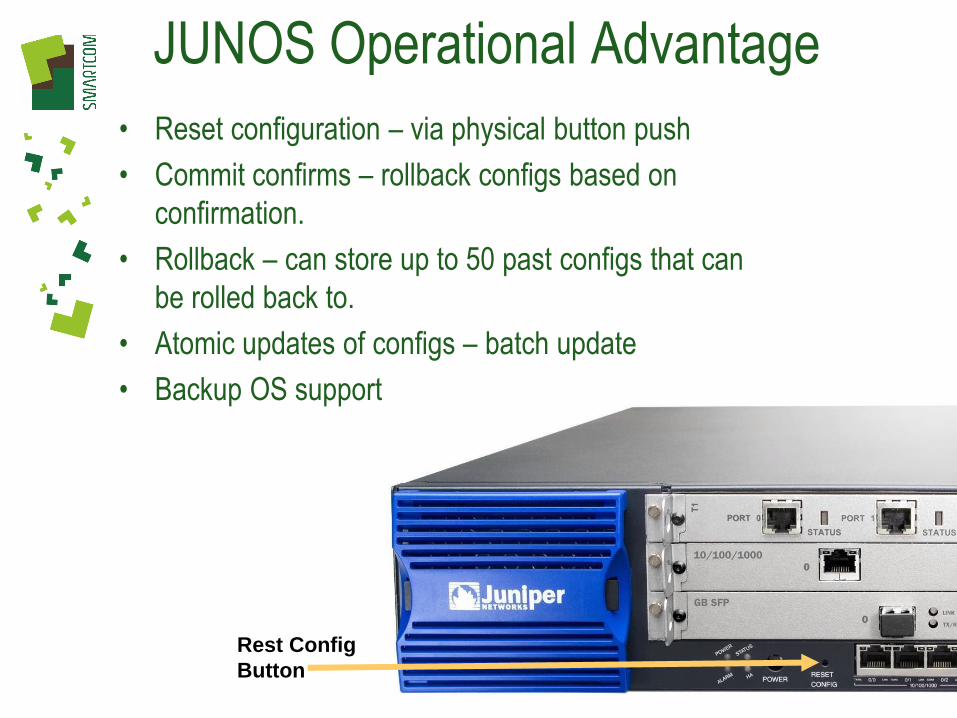
JUNOS Operational Advantage
• Reset configuration – via physical button push
• Commit confirms – rollback configs based on
confirmation.
• Rollback – can store up to 50 past configs that can
be rolled back to.
• Atomic updates of configs – batch update
• Backup OS support
Rest Config
Button

Control Plane Versus Data Plane
• Control Plane:
– Implemented on the Routing Engine
– JUNOS software kernel, daemons, chassis management, user interface, routing protocols, system monitoring, clustering control
• Data Plane:
– Implemented on the DPCs, MPCs, IOCs and SPCs
– Forwarding packets, session setup and maintenance, load-balancing, security policy, screen options, IDP, VPN

Login
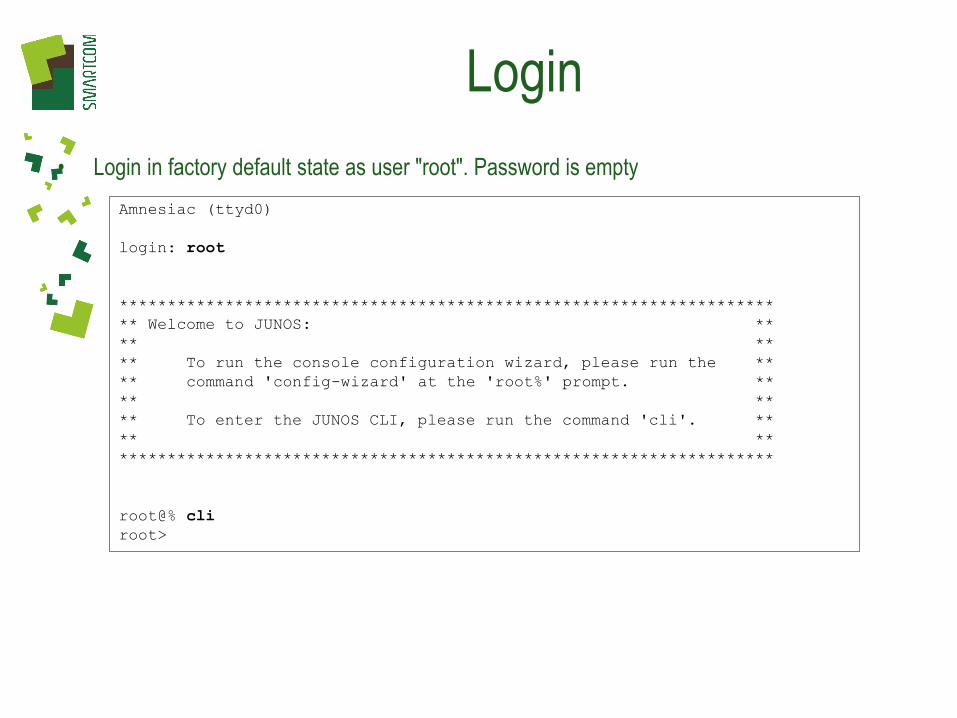
Login
• Login in factory default state as user "root". Password is empty
Amnesiac (ttyd0)
login: root
********************************************************************
** Welcome to JUNOS: **
** **
** To run the console configuration wizard, please run the **
** command 'config-wizard' at the 'root%' prompt. **
** **
** To enter the JUNOS CLI, please run the command 'cli'. **
** **
********************************************************************
root@% cli
root>
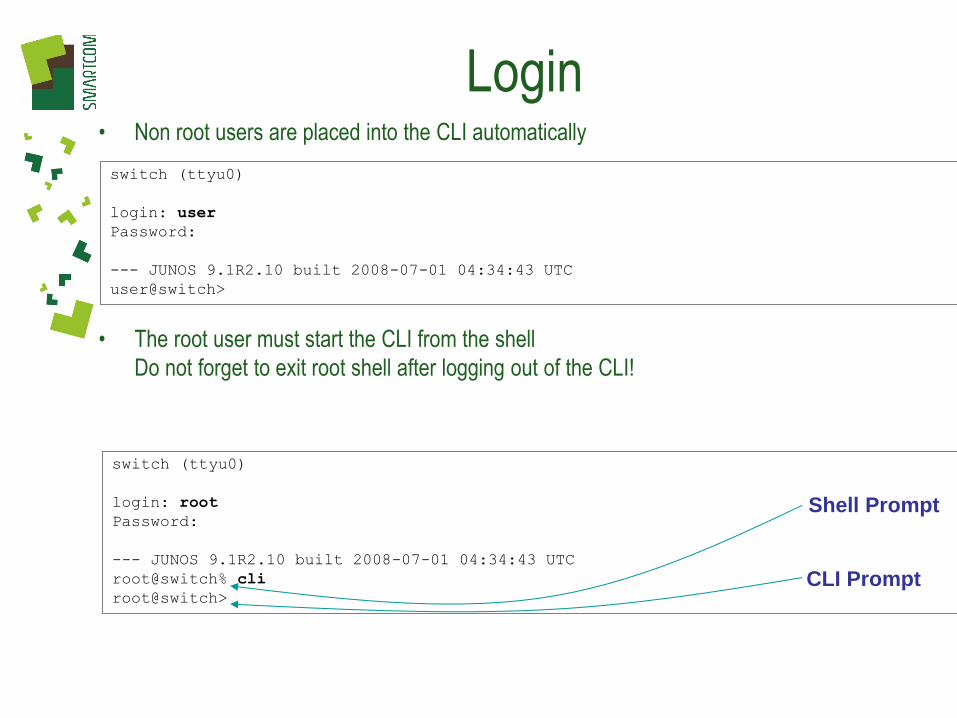
Login • Non root users are placed into the CLI automatically
• The root user must start the CLI from the shell
Do not forget to exit root shell after logging out of the CLI!
Shell Prompt
CLI Prompt
switch (ttyu0)
login: user
Password:
--- JUNOS 9.1R2.10 built 2008-07-01 04:34:43 UTC
user@switch>
switch (ttyu0)
login: root
Password:
--- JUNOS 9.1R2.10 built 2008-07-01 04:34:43 UTC
root@switch% cli
root@switch>

CLI Basics
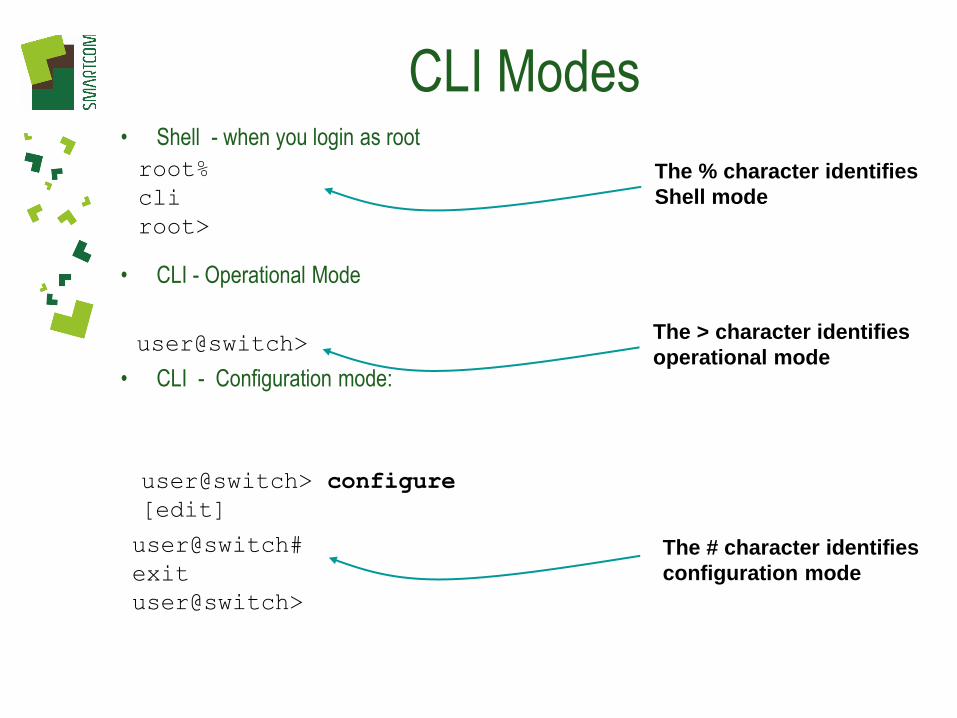
CLI Modes • Shell - when you login as root
• CLI - Operational Mode
• CLI - Configuration mode:
user@switch> The > character identifies
operational mode
user@switch#
exit
user@switch>
user@switch> configure
[edit]
The # character identifies
configuration mode
root%
cli
root>
The % character identifies
Shell mode

CLI Hierarchy
• Execute commands (mainly) from the default CLI level (user@switch>)
– Can execute from configuration mode with the run command
– Hierarchy of commands
– Example: show spanning-tree interface
Less Specific
More Specific bridge mstp statistics
configuration
configure help monitor etc.
interface
dot1x
clear set show
spanning-tree version etc.

• EMACS-style editing sequences are supported
• A VT100 terminal type also supports the Arrow keys
user@switch> show interfaces
• Ctrl+b user@switch> show interfaces
• Ctrl+a user@switch> show interfaces
• Ctrl+f user@switch> show interfaces
• Ctrl+e user@switch> show interfaces
CLI Editing
Cursor Position
Keyboard
Sequence

Command and Variable
Completion • Spacebar completes a command user@host> sh<space>ow i<space>
'i' is ambiguous.
Possible completions:
igmp Show Internet Group Management Protocol...
ike Show Internet Key Exchange information
interfaces Show interface information
ipsec Show IP Security information
isis Show Intermediate System-to-Intermediate...
user@host> show i
• Use the Tab key to complete an assigned variable [edit policy-options]
user@host# show policy-statement t<tab>his-is-my-policy
then accept;
[edit policy-options]
user@host# Use Tab to complete
assigned variables
Enter a space to
complete a command
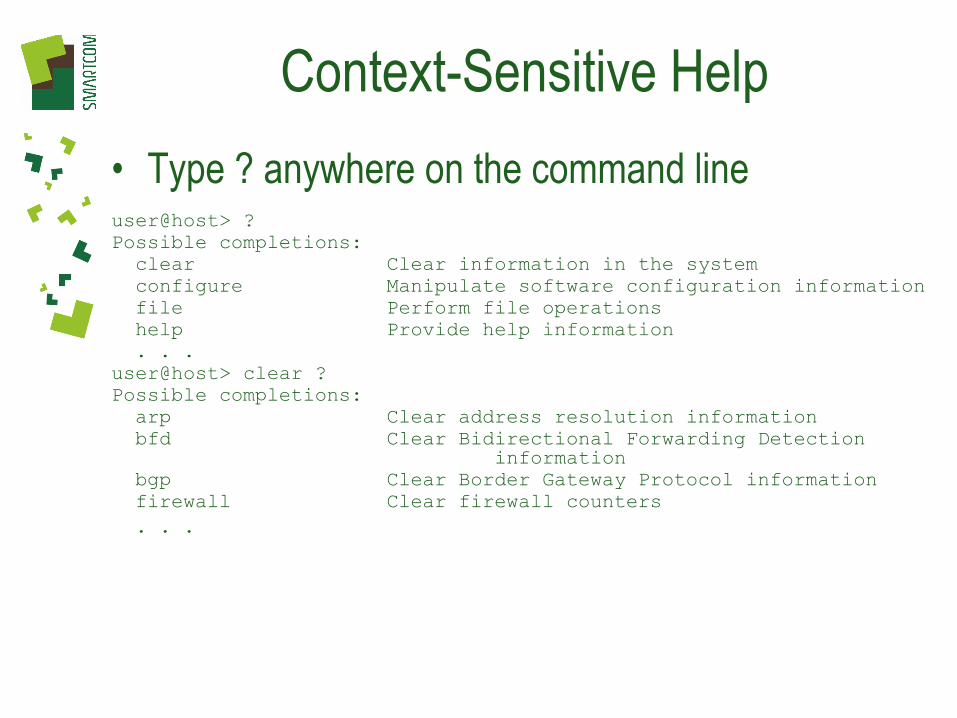
• Type ? anywhere on the command line
user@host> ?
Possible completions:
clear Clear information in the system
configure Manipulate software configuration information
file Perform file operations
help Provide help information
. . .
user@host> clear ?
Possible completions:
arp Clear address resolution information
bfd Clear Bidirectional Forwarding Detection information
bgp Clear Border Gateway Protocol information
firewall Clear firewall counters
. . .
Context-Sensitive Help
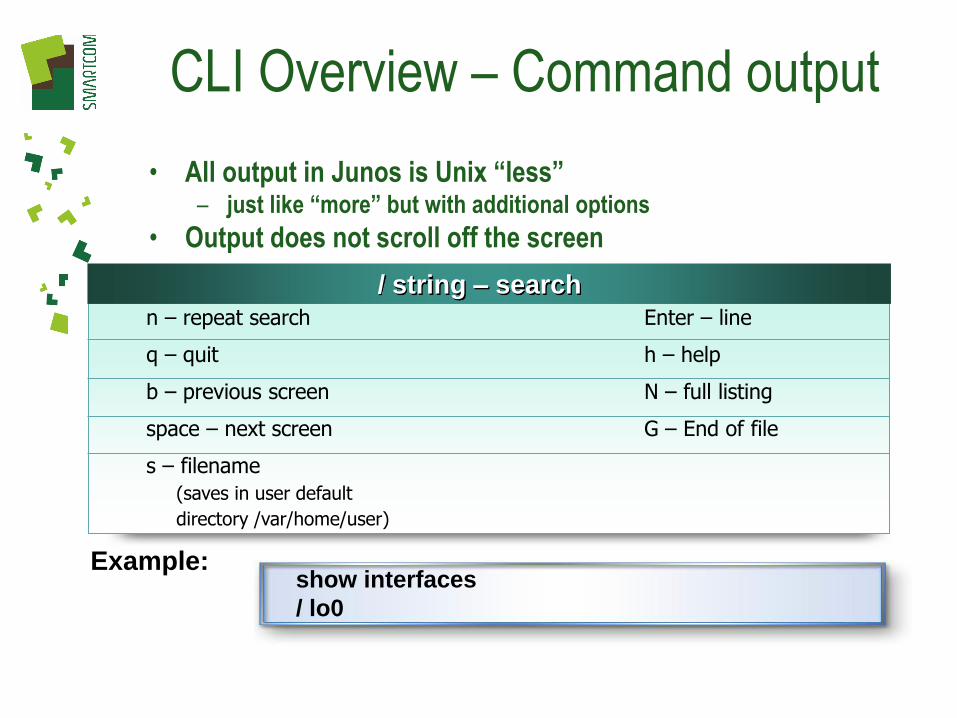
CLI Overview – Command output
• All output in Junos is Unix “less” – just like “more” but with additional options
• Output does not scroll off the screen
/ string – search
n – repeat search
q – quit
b – previous screen
space – next screen
s – filename
(saves in user default
directory /var/home/user)
Enter – line
h – help
N – full listing
G – End of file
show interfaces
/ lo0
Example:
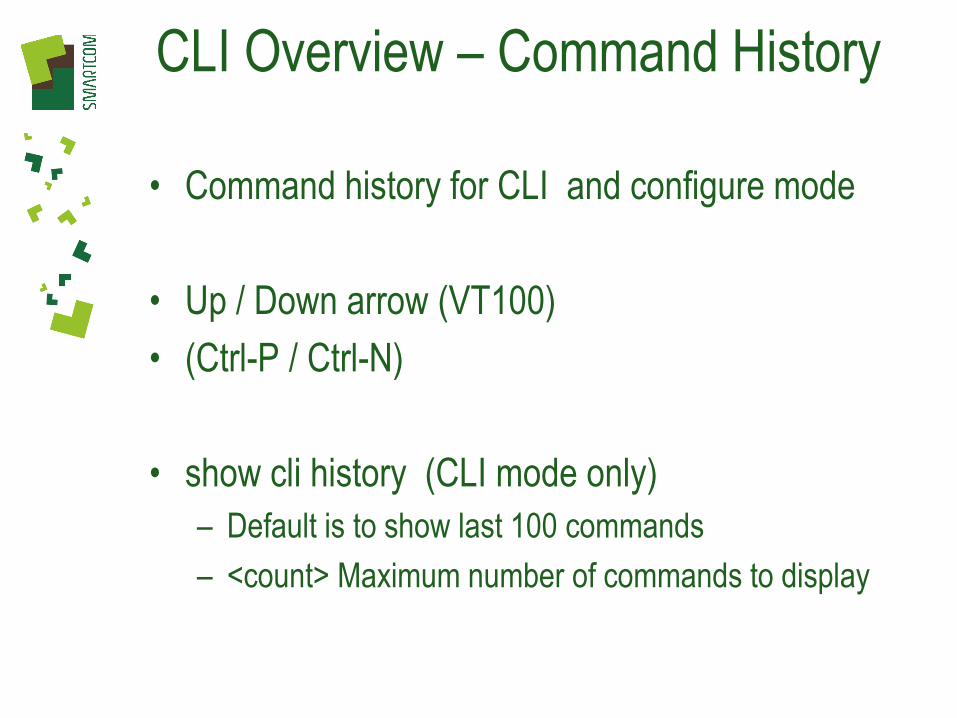
CLI Overview – Command History
• Command history for CLI and configure mode
• Up / Down arrow (VT100)
• (Ctrl-P / Ctrl-N)
• show cli history (CLI mode only)
– Default is to show last 100 commands
– <count> Maximum number of commands to display

Show current Configuration
root@J6350> show config | display set
set version 9.3R2.8
set system host-name J6350
set system root-authentication encrypted-password "$1$QOLKoFKc$D/rIuLTkLP1BX9/GjQ.yN."
set system name-server 172.30.80.65
set system login user lab uid 2000
set system login user lab class super-user
........
• JUNOS Style
IOS Style
root@J6350> show config
## Last commit: 2009-03-18 10:27:20 UTC by lab
version 9.3R2.8;
system {
host-name Demo-081-111-J6350;
root-authentication {
encrypted-password "$1$QOLKoFKc$D/rIuLTkLP1BX9/GjQ.yN."; ## SECRET-DATA
}
name-server {
172.30.80.65;
}
login {
user lab {
uid 2000;
class super-user;
........
Configuration, Candidate, Commit,
Rollback
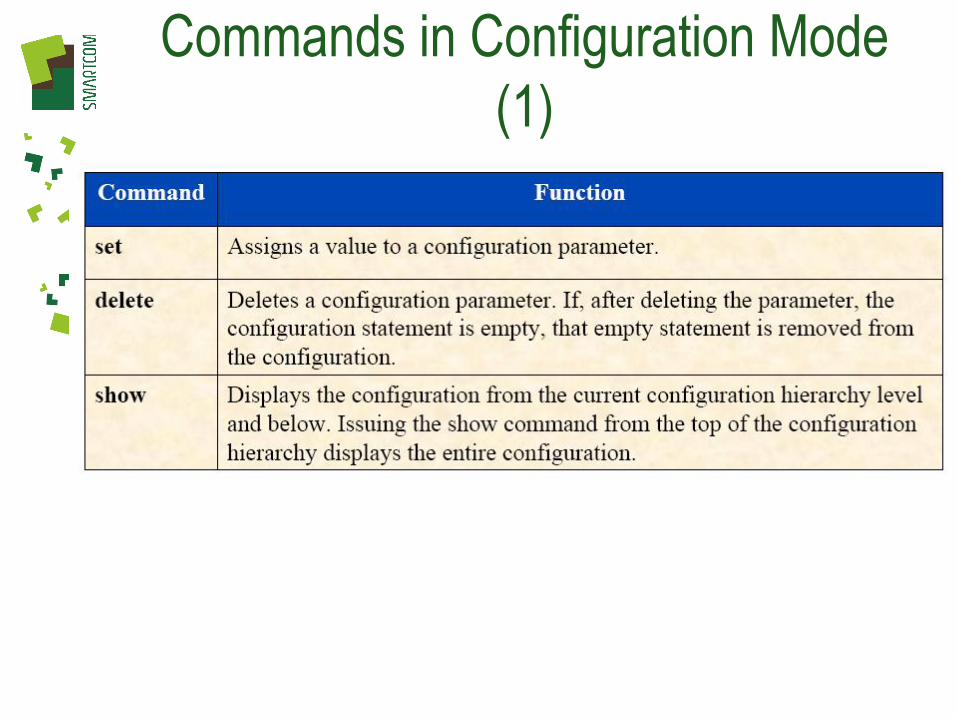
Commands in Configuration Mode
(1)
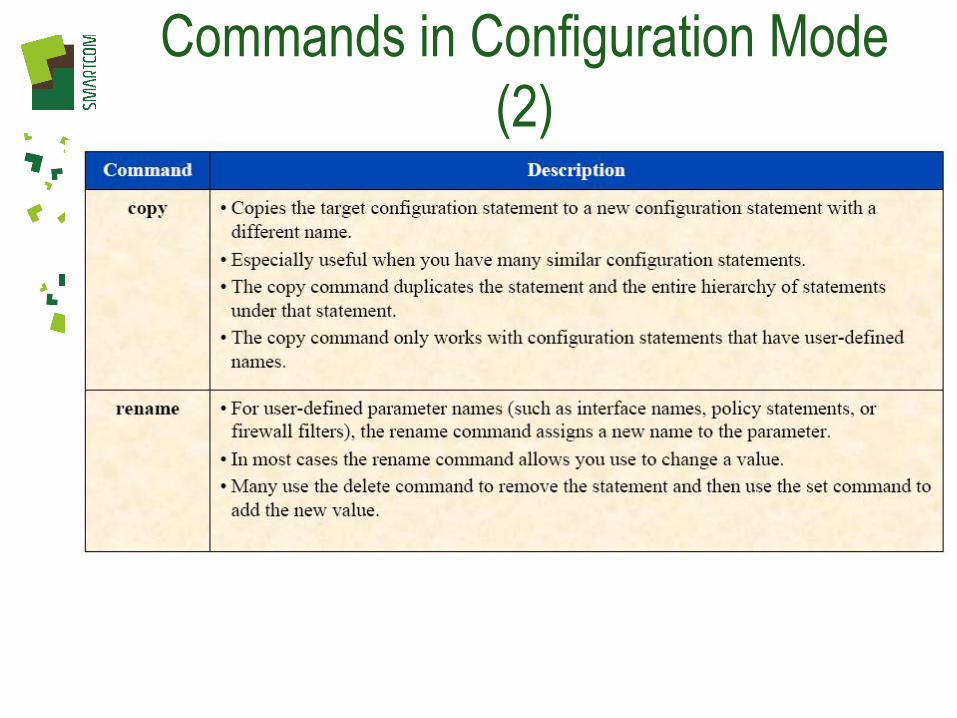
Commands in Configuration Mode
(2)

Copy/Paste Configurations
• To paste and override the whole configuration
• To paste and add pieces of configuration
• To paste configuration written with "set" commands
SRX# load merge terminal <relative>
[Type ^D at a new line to end input]
system {
........
SRX# load replace terminal
[Type ^D at a new line to end input]
system {
........
SRX# load set terminal <relative>
[Type ^D at a new line to end input]
set system ….

Control and Forwarding Plane of a
JUNOS Router

Interfaces

Interface Numbering • Interfaces Names and Numbers
• Wildcards - Many commands accept wildcards in
ifnames
Interface name = <Interface Type>-<Slot>/<Module>/<Port>.<logical number>
All numbers start from 0
Example :
ge-0/1/2.3 - Gigabit Interface (Slot 0, Module 1, Port 2, Logical unit 3)
fe-0/1/2.3 - Fast Ethernet Interface
st0.0 - First Secure Tunnel Interface (VPN Tunnel)
lo0 - First loopback interface
For a list of Interface Types see
http://www.juniper.net/techpubs/software/JUNOS/JUNOS96/swconfig-network-
interfaces/frameset.html
show interfaces ge-0/0/*

Switching
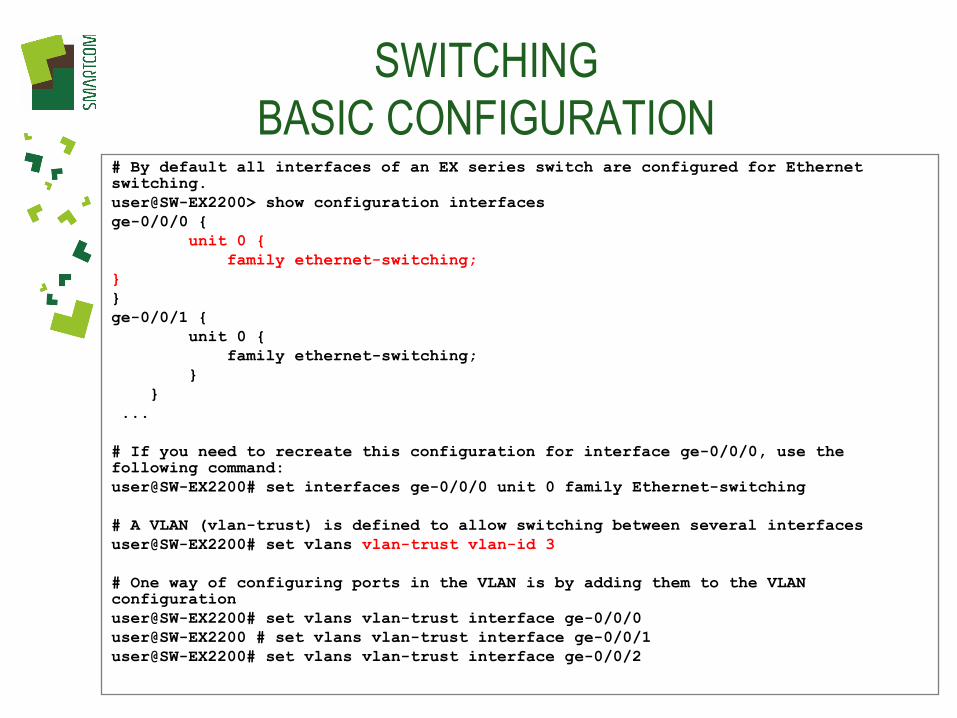
SWITCHING
BASIC CONFIGURATION # By default all interfaces of an EX series switch are configured for Ethernet switching.
user@SW-EX2200> show configuration interfaces
ge-0/0/0 {
unit 0 {
family ethernet-switching;
}
}
ge-0/0/1 {
unit 0 {
family ethernet-switching;
}
}
...
# If you need to recreate this configuration for interface ge-0/0/0, use the following command:
user@SW-EX2200# set interfaces ge-0/0/0 unit 0 family Ethernet-switching
# A VLAN (vlan-trust) is defined to allow switching between several interfaces
user@SW-EX2200# set vlans vlan-trust vlan-id 3
# One way of configuring ports in the VLAN is by adding them to the VLAN configuration
user@SW-EX2200# set vlans vlan-trust interface ge-0/0/0
user@SW-EX2200 # set vlans vlan-trust interface ge-0/0/1
user@SW-EX2200# set vlans vlan-trust interface ge-0/0/2

SWITCHING BASIC CONFIGURATION
(cont.) # You can also add allowed VLAN’s to the interface (using names and/or VLAN
ID’s):
user@SW-EX2200> show configuration interfaces
...
ge-0/0/2 {
unit 0 {
family ethernet-switching {
port-mode trunk;
vlan {
members [ vlan-trust vlan-untrust vlan-23 112 96 ];
}
}
}
}
...
# By default all switching interfaces are in access mode (untagged)!
# If you need IP routing for this VLAN, you need to add L3 interface:
user@SW-EX2200# set vlans vlan-trust l3-interface vlan.3
user@SW-EX2200# set interfaces vlan unit 3 family inet address 10.0.0.1/8
SWITCHING
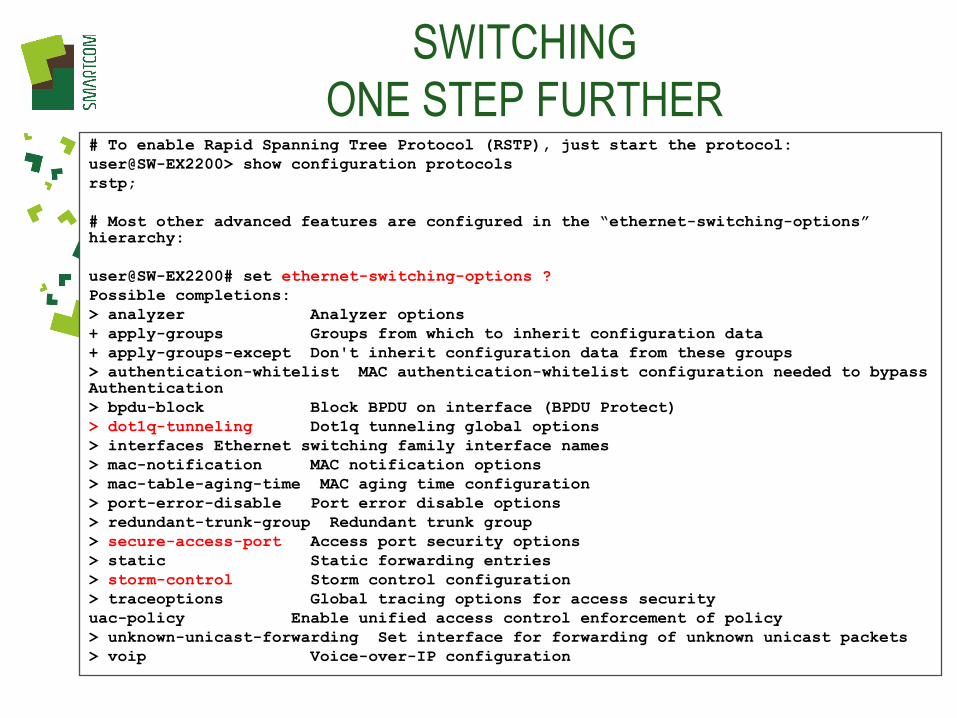
ONE STEP FURTHER # To enable Rapid Spanning Tree Protocol (RSTP), just start the protocol:
user@SW-EX2200> show configuration protocols
rstp;
# Most other advanced features are configured in the “ethernet-switching-options” hierarchy:
user@SW-EX2200# set ethernet-switching-options ?
Possible completions:
> analyzer Analyzer options
+ apply-groups Groups from which to inherit configuration data
+ apply-groups-except Don't inherit configuration data from these groups
> authentication-whitelist MAC authentication-whitelist configuration needed to bypass Authentication
> bpdu-block Block BPDU on interface (BPDU Protect)
> dot1q-tunneling Dot1q tunneling global options
> interfaces Ethernet switching family interface names
> mac-notification MAC notification options
> mac-table-aging-time MAC aging time configuration
> port-error-disable Port error disable options
> redundant-trunk-group Redundant trunk group
> secure-access-port Access port security options
> static Static forwarding entries
> storm-control Storm control configuration
> traceoptions Global tracing options for access security
uac-policy Enable unified access control enforcement of policy
> unknown-unicast-forwarding Set interface for forwarding of unknown unicast packets
> voip Voice-over-IP configuration
SWITCHING
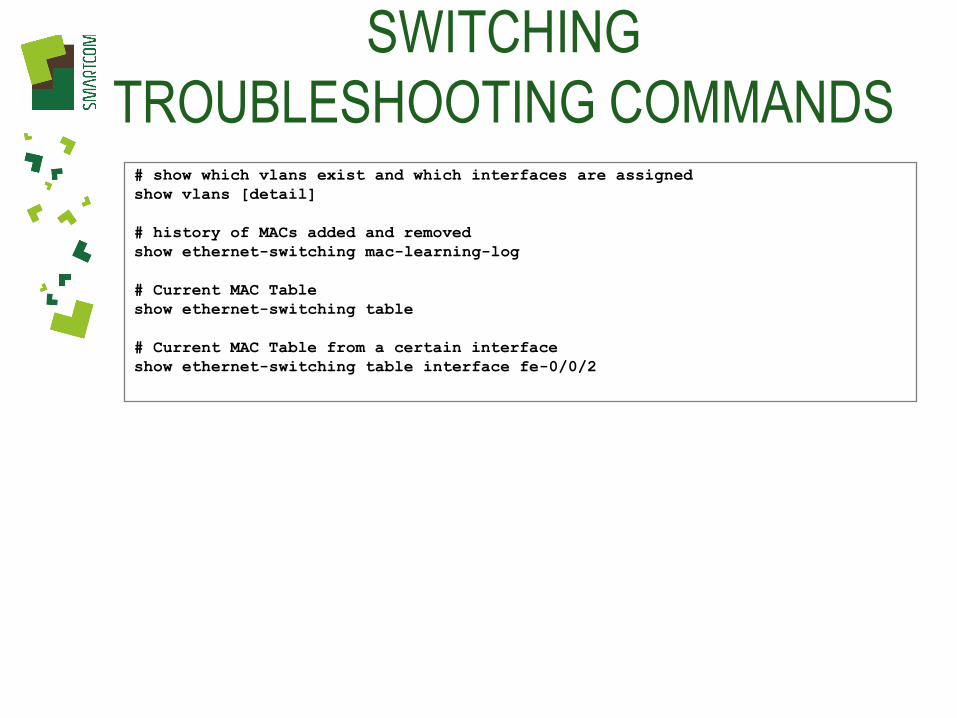
TROUBLESHOOTING COMMANDS # show which vlans exist and which interfaces are assigned
show vlans [detail]
# history of MACs added and removed
show ethernet-switching mac-learning-log
# Current MAC Table
show ethernet-switching table
# Current MAC Table from a certain interface
show ethernet-switching table interface fe-0/0/2

Routing

Static Routes Configuration # Host Route
set routing-options static route 10.2.2.1/32 next-hop 10.1.1.254
# Network Route
set routing-options static route 10.2.2.0/24 next-hop 10.1.1.254
# Default Route
set routing-options static route 0.0.0.0/0 next-hop 10.1.1.254
# Route to an Interface
# Useful for Point-to-Point Interfaces like pppoe, vpn-tunnel, gre-tunnel
set routing-options static route 0.0.0.0/0 next-hop pp0.0
set routing-options static route 10.1.1.0/24 next-hop st0.0
# Route to another Virtual Router
set routing-options static route 10.0.0.100/32 next-table Logging.inet.0
# Example for a the Definition of the VR with name Logging referenced above
set routing-instances Logging instance-type virtual-router
set routing-instances Logging interface ge-0/0/7.0
# A network route to discard any traffic that did not hit a more specific route
# Black hole Routes could sometimes save performance for policy lookups or
# avoid rerouting in case of interfaces failures (example: VPN is down)
set routing-options static route 0.0.0.0/0 discard

Static Routes
ROUTE FAILOVER WITH IP-
MONITORING (SRX only) # Since 11.4 all Branch SRX support IP-Monitoring and automatic route failover
# Check out KB22052 for configuration details of an dual ISP connection with RPM for
# IP-Monitoring and Filter based Forwarding for load distribution
set services ip-monitoring policy Server-Tracking match rpm-probe Probe-Server
set services ip-monitoring policy Server-Tracking then preferred-route routing-
instances FBF-1 route 0.0.0.0/0 next-hop 2.2.2.2 ------> Installs route in the First
Routing Instance
set services ip-monitoring policy Server-Tracking1 match rpm-probe Probe-Server1
set services ip-monitoring policy Server-Tracking1 then preferred-route routing-
instances FBF-2 route 0.0.0.0/0 next-hop 1.1.1.1 ------> Installs route in Second
Routing Instance

Static Routes
MONITORING # display Routing table
root@J2300> show route
inet.0: 4 destinations, 4 routes (4 active, 0 holddown, 0 hidden)
+ = Active Route, - = Last Active, * = Both
0.0.0.0/0 *[Static/5] 01:13:15
> to 172.16.42.1 via fe-0/0/0.0
10.2.2.0/24 *[Static/5] 00:00:05
> to 172.16.42.1 via fe-0/0/0.0
172.16.42.0/24 *[Direct/0] 01:13:15
> via fe-0/0/0.0
172.16.42.230/32 *[Local/0] 01:21:12
Local via fe-0/0/0.0
224.0.0.9/32 *[RIP/100] 01:21:37, metric 1
MultiRecv
# route lookup for a certain destination
root@J2300> show route 20.0.0.1
# routing table overview
root@J2300> show route summary
# Forwarding table (includes all active routes, visible for the data-plane)
root@J2300> show route forwarding-table
OSPF
CONFIGURATION
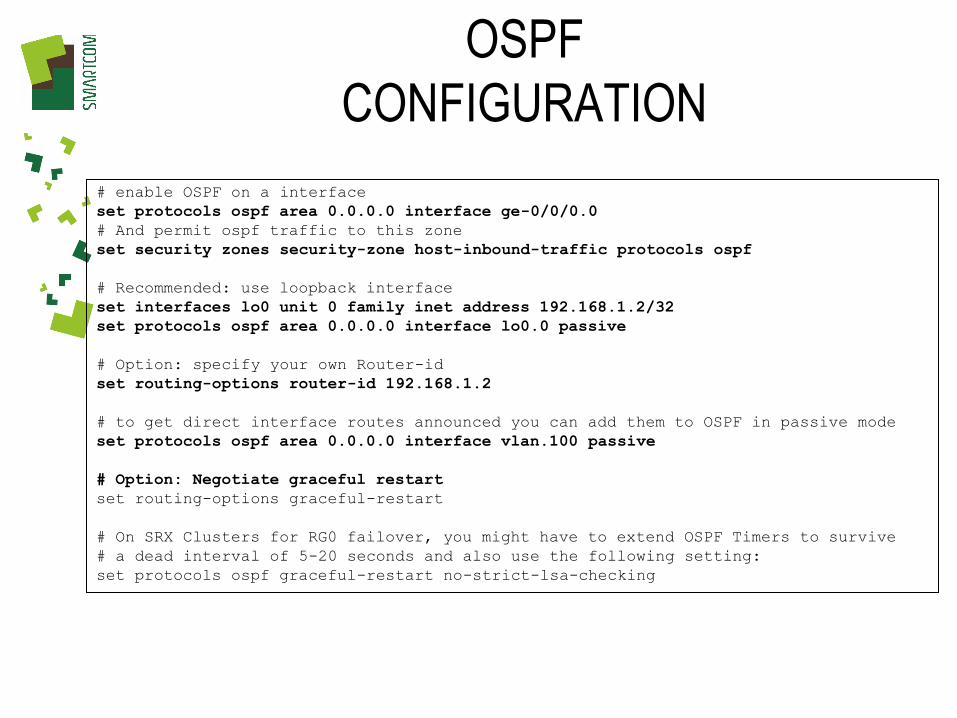
# enable OSPF on a interface
set protocols ospf area 0.0.0.0 interface ge-0/0/0.0
# And permit ospf traffic to this zone
set security zones security-zone host-inbound-traffic protocols ospf
# Recommended: use loopback interface
set interfaces lo0 unit 0 family inet address 192.168.1.2/32
set protocols ospf area 0.0.0.0 interface lo0.0 passive
# Option: specify your own Router-id
set routing-options router-id 192.168.1.2
# to get direct interface routes announced you can add them to OSPF in passive mode
set protocols ospf area 0.0.0.0 interface vlan.100 passive
# Option: Negotiate graceful restart
set routing-options graceful-restart
# On SRX Clusters for RG0 failover, you might have to extend OSPF Timers to survive
# a dead interval of 5-20 seconds and also use the following setting:
set protocols ospf graceful-restart no-strict-lsa-checking

RIP
CONFIGURATION # RIP requires a group, all interface are attached to this group
set protocols rip group RIP ge-0/0/0.0
set protocols rip group RIP ge-0/0/1.0
# And permit rip traffic to the zones of these interfaces
set security zones security-zone TRUST host-inbound-traffic protocols rip
# You can add IPSEC Tunnel-Interfaces with relaxed RIP-Update-Timers
# You can even work with Tunnel-Interfaces with Next-Hop-Tunnel-Binding (NHTB)
set protocols rip group RIP neighbour st0.0 interface-type p2mp
set protocols rip group RIP neighbour st0.0 dynamic-peers
set interface st0 unit 0 multipoint
# Option: Negotiate graceful restart
set routing-options graceful-restart
# Import Routes to the RIP group via policy-options filter
set policy-options policy-statement FILTER term a from route-filter 1.2.3.0/24 exact
set policy-options policy-statement FILTER term a then accept
set policy-options policy-statement FILTER term drop then reject
set protocols rip group RIP export FILTER

OSPF
MONITORING
# See Neighbors and State
root> show ospf neighbour
Address Interface State ID Pri Dead
10.222.2.2 ge-0/0/11.0 Full 192.168.36.1 128 36
# Link State Database
root> show ospf database

OSPF IMPORT/EXPORT Filter
(Policy-OPTIONS)
# OSPF default is to import everything (into RT) and export routes only from interfaces
# that are (active) members of the same OSPF area
# For export of all other routes or to filter inbound routes you need Routing Policy
# Filters
# Example Filter to export all local static and all direct routes
set policy-options policy-statement ALL-LOCAL
set term 1 from protocol direct
set term 1 then accept
set term 2 from protocol static
set term 2 then accept
top
set protocols ospf export ALL-LOCAL
# Example Filter to export only a certain route (which must exist on the routing table) set policy-options policy-statement JUST-ONE
set term 1 from route-filter 172.10.0.0/16 exact
set term 1 then metric 10 accept
top
set protocols ospf export JUST-ONE

# Example Configuration With Two AS
# Permit BGP traffic on the zone or interface(s) where you reach your peer(s)
set security zones security-zone trust host-inbound-traffic protocols bgp
# Recommended: use loopback interface
set interfaces lo0 unit 0 family inet address 1.1.1.2/32
# Specify your own AS and your Router-ID
set routing-options autonomous-system 1234
set router-id 1.1.1.2
# Specify Peer(s)
set protocols bgp group UPSTREAM set local-address 1.1.1.2
set peer-as 64005
set local-as 64006
set neighbor 1.1.1.1 export BGP-EXPORT-POLICY
top
# A Policy how to export the routes
set policy-options policy-statement BGP-EXPORT-POLICY from protocol direct
set policy-options policy-statement BGP-EXPORT-POLICY then accept
# Option: Set static routes that do not redistribute
set routing-options static route 1.1.2.0/24 no-readvertise
# Option: Specify how to aggregate routes
set routing-options aggregate 1.1.1.1/20 [policy ... ]
BGP
CONFIGURATION
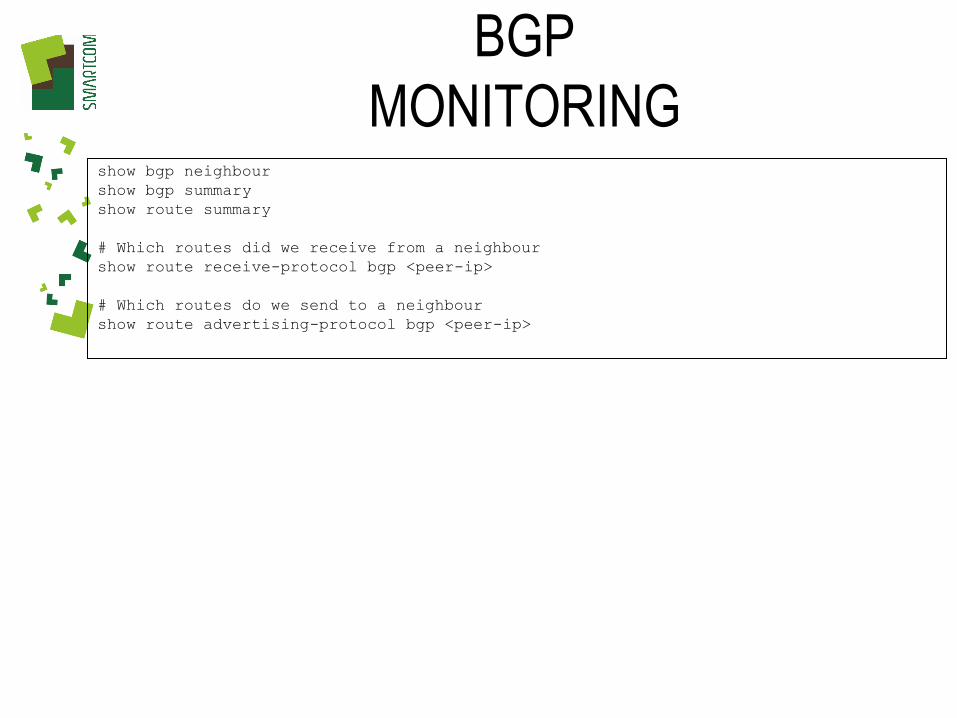
BGP
MONITORING show bgp neighbour
show bgp summary
show route summary
# Which routes did we receive from a neighbour
show route receive-protocol bgp <peer-ip>
# Which routes do we send to a neighbour
show route advertising-protocol bgp <peer-ip>
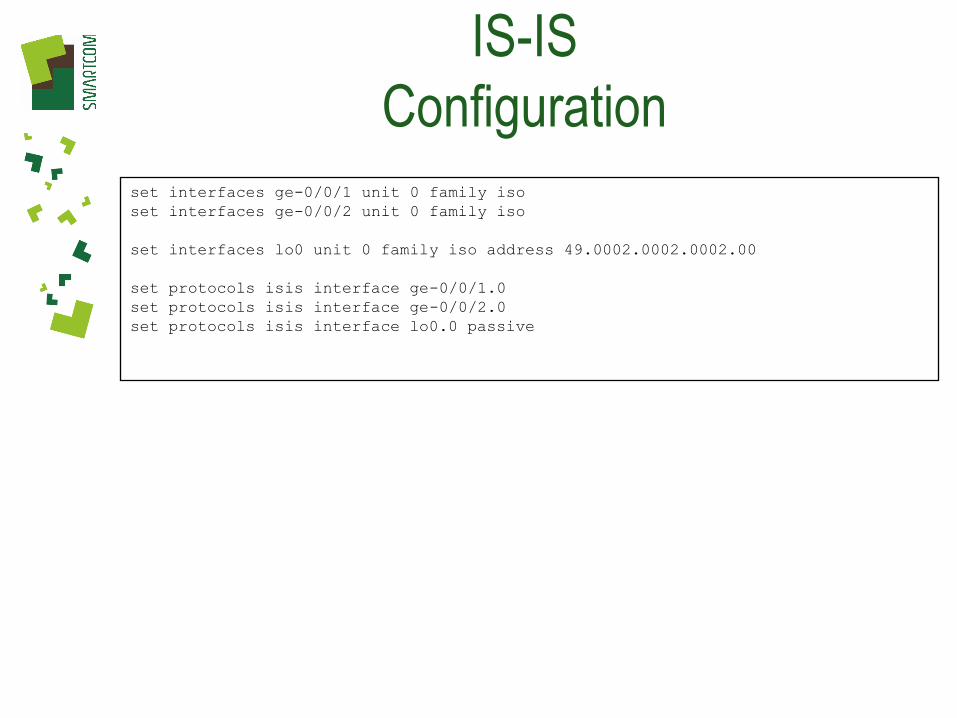
IS-IS
Configuration
set interfaces ge-0/0/1 unit 0 family iso
set interfaces ge-0/0/2 unit 0 family iso
set interfaces lo0 unit 0 family iso address 49.0002.0002.0002.00
set protocols isis interface ge-0/0/1.0
set protocols isis interface ge-0/0/2.0
set protocols isis interface lo0.0 passive

TUNNEL INTERFACES

Tunnel Interfaces :
GRE - Generic ROUTING
ENCAPSULATION # Typical Use cases for GRE Tunnels are
# - OSPF over GRE with non-Juniper Routers
# - Multicast over GRE with non-Juniper Routers
set interfaces gr-0/0/0 unit 0 tunnel source 10.0.0.1
set interfaces gr-0/0/0 unit 0 tunnel destination 10.0.0.2
set interfaces gr-0/0/0 unit 0 family inet address 10.1.0.1/3
set protocols ospf area 0.0.0.0 interface gr-0/0/0.0
set security zones security-zone vpn host-inbound-traffic protocols ospf
set security zones security-zone vpn interfaces gr-0/0/0.0
# MTU Adjustments might be necessary because GRE Default MTU is ~ 9000
# When Fragementation happens in a GRE Tunnel there are two options for reassembly
# a) use IDP Inspection on the traffic leaving the tunnel
# b) since JUNOS 11.2 you can apply the following command
"set security flow force-ip-reassembly
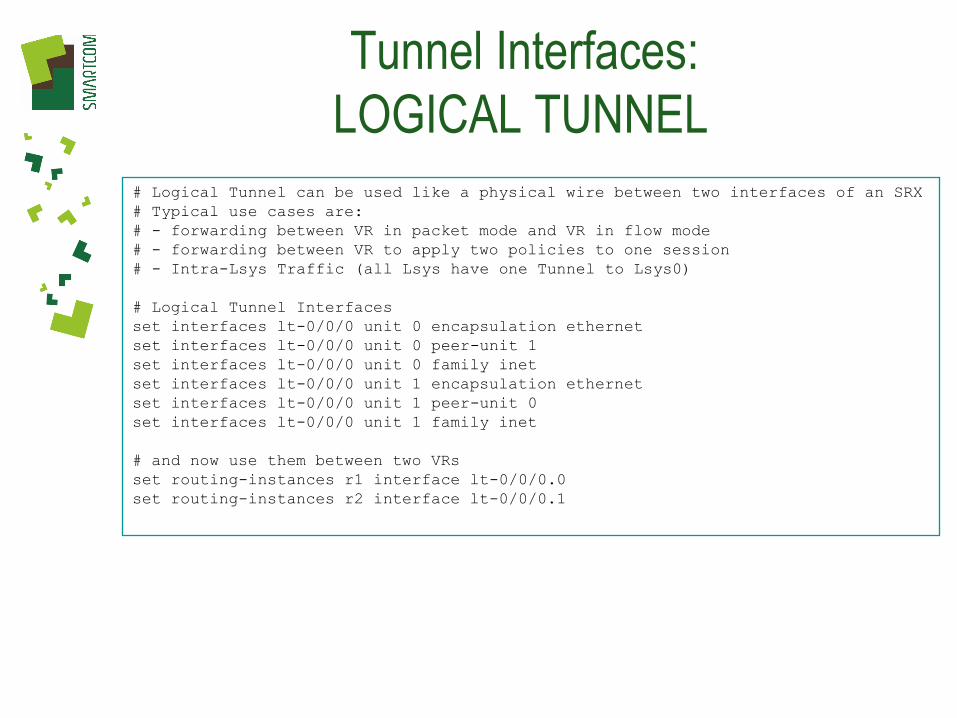
Tunnel Interfaces:
LOGICAL TUNNEL
# Logical Tunnel can be used like a physical wire between two interfaces of an SRX
# Typical use cases are:
# - forwarding between VR in packet mode and VR in flow mode
# - forwarding between VR to apply two policies to one session
# - Intra-Lsys Traffic (all Lsys have one Tunnel to Lsys0)
# Logical Tunnel Interfaces
set interfaces lt-0/0/0 unit 0 encapsulation ethernet
set interfaces lt-0/0/0 unit 0 peer-unit 1
set interfaces lt-0/0/0 unit 0 family inet
set interfaces lt-0/0/0 unit 1 encapsulation ethernet
set interfaces lt-0/0/0 unit 1 peer-unit 0
set interfaces lt-0/0/0 unit 1 family inet
# and now use them between two VRs
set routing-instances r1 interface lt-0/0/0.0
set routing-instances r2 interface lt-0/0/0.1
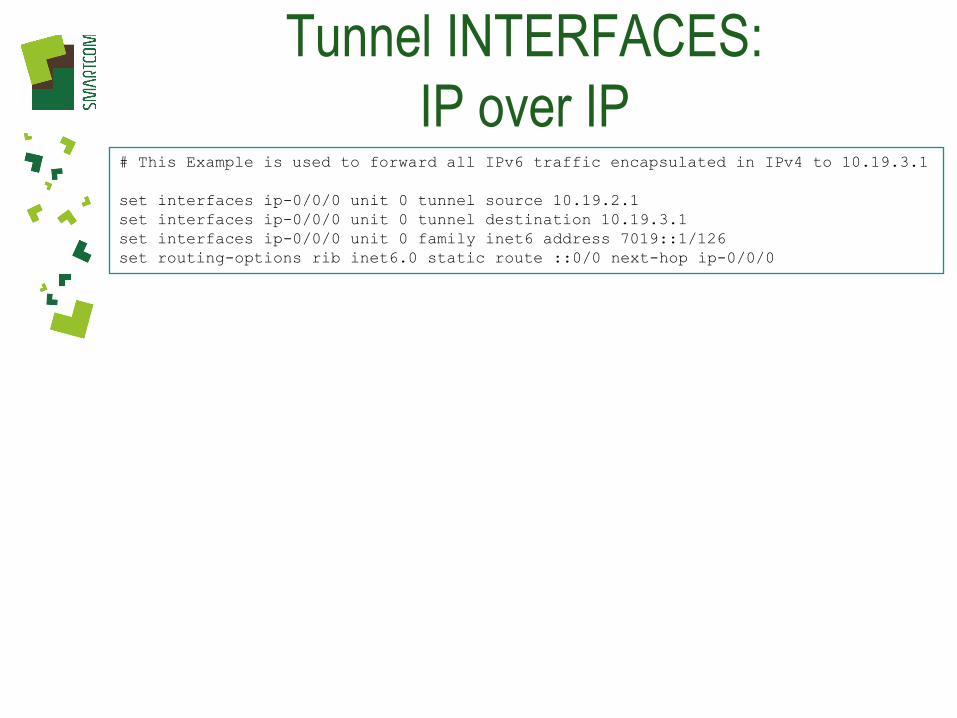
Tunnel INTERFACES:
IP over IP # This Example is used to forward all IPv6 traffic encapsulated in IPv4 to 10.19.3.1
set interfaces ip-0/0/0 unit 0 tunnel source 10.19.2.1
set interfaces ip-0/0/0 unit 0 tunnel destination 10.19.3.1
set interfaces ip-0/0/0 unit 0 family inet6 address 7019::1/126
set routing-options rib inet6.0 static route ::0/0 next-hop ip-0/0/0

MULTICAST
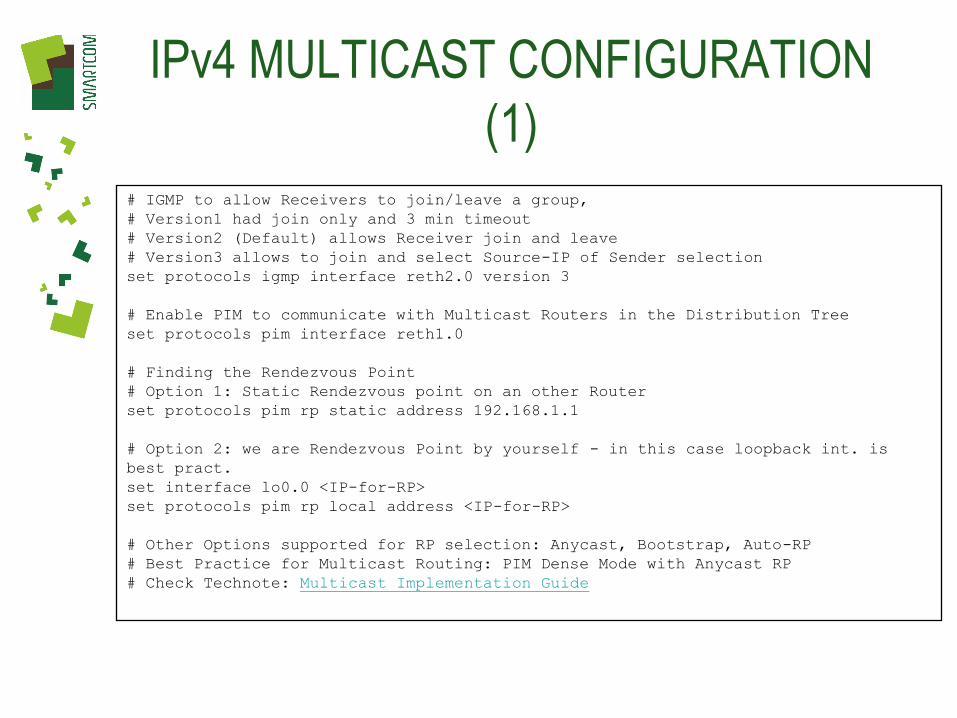
IPv4 MULTICAST CONFIGURATION
(1)
# IGMP to allow Receivers to join/leave a group,
# Version1 had join only and 3 min timeout
# Version2 (Default) allows Receiver join and leave
# Version3 allows to join and select Source-IP of Sender selection
set protocols igmp interface reth2.0 version 3
# Enable PIM to communicate with Multicast Routers in the Distribution Tree
set protocols pim interface reth1.0
# Finding the Rendezvous Point
# Option 1: Static Rendezvous point on an other Router
set protocols pim rp static address 192.168.1.1
# Option 2: we are Rendezvous Point by yourself - in this case loopback int. is
best pract.
set interface lo0.0 <IP-for-RP>
set protocols pim rp local address <IP-for-RP>
# Other Options supported for RP selection: Anycast, Bootstrap, Auto-RP
# Best Practice for Multicast Routing: PIM Dense Mode with Anycast RP
# Check Technote: Multicast Implementation Guide
IPv4 MULTICAST CONFIGURATION
(2)
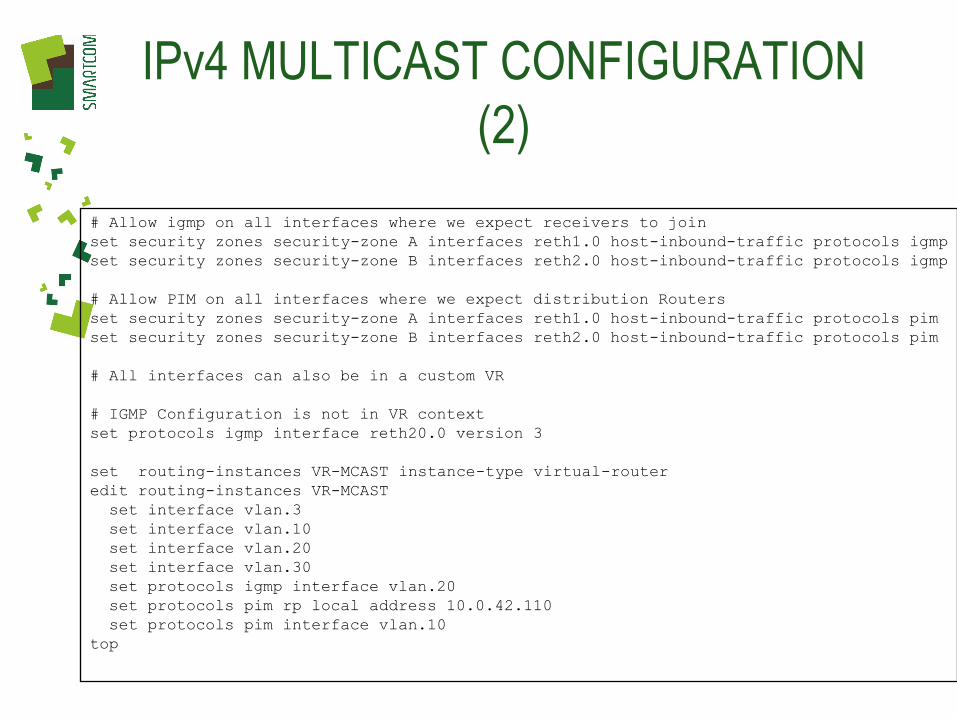
# Allow igmp on all interfaces where we expect receivers to join
set security zones security-zone A interfaces reth1.0 host-inbound-traffic protocols igmp
set security zones security-zone B interfaces reth2.0 host-inbound-traffic protocols igmp
# Allow PIM on all interfaces where we expect distribution Routers
set security zones security-zone A interfaces reth1.0 host-inbound-traffic protocols pim
set security zones security-zone B interfaces reth2.0 host-inbound-traffic protocols pim
# All interfaces can also be in a custom VR
# IGMP Configuration is not in VR context
set protocols igmp interface reth20.0 version 3
set routing-instances VR-MCAST instance-type virtual-router
edit routing-instances VR-MCAST
set interface vlan.3
set interface vlan.10
set interface vlan.20
set interface vlan.30
set protocols igmp interface vlan.20
set protocols pim rp local address 10.0.42.110
set protocols pim interface vlan.10
top
IPv4 MULTICAST
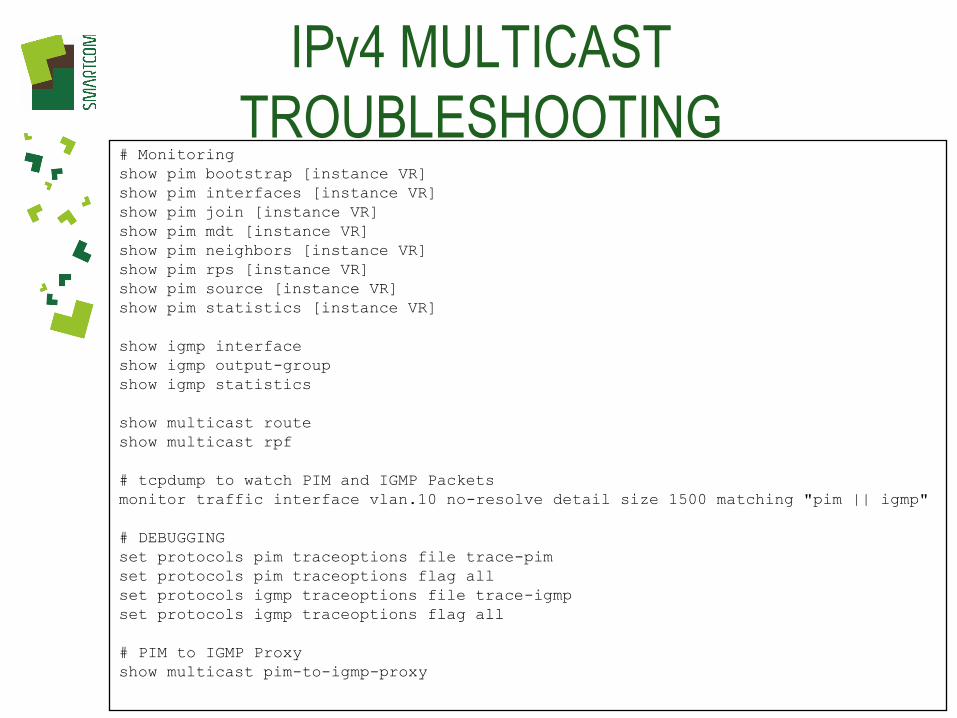
TROUBLESHOOTING # Monitoring
show pim bootstrap [instance VR]
show pim interfaces [instance VR]
show pim join [instance VR]
show pim mdt [instance VR]
show pim neighbors [instance VR]
show pim rps [instance VR]
show pim source [instance VR]
show pim statistics [instance VR]
show igmp interface
show igmp output-group
show igmp statistics
show multicast route
show multicast rpf
# tcpdump to watch PIM and IGMP Packets
monitor traffic interface vlan.10 no-resolve detail size 1500 matching "pim || igmp"
# DEBUGGING
set protocols pim traceoptions file trace-pim
set protocols pim traceoptions flag all
set protocols igmp traceoptions file trace-igmp
set protocols igmp traceoptions flag all
# PIM to IGMP Proxy
show multicast pim-to-igmp-proxy

IPv4 MULTICAST FURTHER
INFORMATION # Best Practice for Multicast Routing: PIM Dense Mode with Anycast RP
# Check Technote: Multicast Implementation Guide
# IGMP-Proxy is not available, but pim-to-igmp-proxy is available
set pim-to-igmp-proxy upstream-interface ge-0/1/0.1
# Important Hint for Multicast on SRX-Cluster:
# Disable IGMP-Snooping on the surrounding switches to avoid outages after failover
# Multicast Configuration Overview and Examples
http://www.juniper.net/techpubs/en_US/junos12.1/information-products/pathway-
pages/config-guide-multicast/config-guide-multicast.html#configuration
# Dense Mode and Debugging Example
http://kb.juniper.net/InfoCenter/index?page=content&id=KB24781
# Multicast Implementation Guide (EX and MX)
http://kb.juniper.net/library/CUSTOMERSERVICE/technotes/8010062-001-EN.pdf

IPv6
IPV6
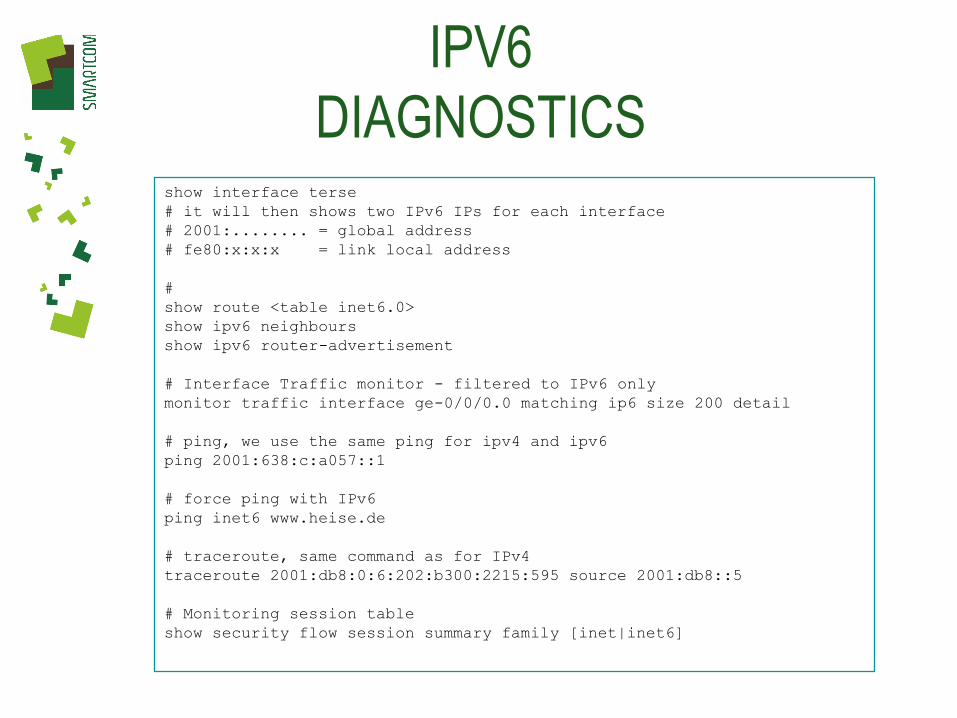
DIAGNOSTICS show interface terse
# it will then shows two IPv6 IPs for each interface
# 2001:........ = global address
# fe80:x:x:x = link local address
#
show route <table inet6.0>
show ipv6 neighbours
show ipv6 router-advertisement
# Interface Traffic monitor - filtered to IPv6 only
monitor traffic interface ge-0/0/0.0 matching ip6 size 200 detail
# ping, we use the same ping for ipv4 and ipv6
ping 2001:638:c:a057::1
# force ping with IPv6
ping inet6 www.heise.de
# traceroute, same command as for IPv4
traceroute 2001:db8:0:6:202:b300:2215:595 source 2001:db8::5
# Monitoring session table
show security flow session summary family [inet|inet6]

IPV6
DYNAMIC ROUTING WITH RIPNG # Enable RIP Listener on the following interfaces
edit protocols ripng
edit group NEIGHBORS
set neighbour ge-0/0/0.0
set neighbour ge-0/0/1.0
set neighbour fe-0/0/2.0
set neighbour fe-0/0/3.0
top
# If you want to export routes you need a route filter
edit policy-options policy-statement RIPNG-EXPORT
set term RIPNG from protocol ripng
set term RIPNG then accept
set term DIRECT from protocol direct
set term DIRECT from route-filter 2001:DB8::/32 orlonger
set term DIRECT then accept
top
# The Route Filter must be applied to the RIPNG Group
set protocols ripng group NEIGHBORS export RIPNG-EXPORT
# Monitoring
show route receive-protocol ripng
show route advertising-protocol ripng
show route protocol ripng

IPV6
DYNAMIC ROUTING WITH OSPFv3 # Introduction of a loopback Interface is best practice when using Routing protocols
set interface lo0 unit 0 family inet address 10.0.0.210/32
# Specifying the router-id (as IPv4) is also recommended
set routing-options router-id 10.0.0.210
# Enable OSPF Listener on the following interfaces
edit protocols ospf3
set area 0 interface lo0.0 passive
set area 0 interface ge-0/0/0.0
set area 0 interface ge-0/0/1.0
set area 0 interface fe-0/0/2.0
set area 0 interface fe-0/0/3.0
top
# Monitoring Commands
show ospf3 neighbour
show ospf3 overview
show ospf3 route
show ospf3 statistics

IPV6
IMPROVED SECURITY
# Off-link malicious IPv6 nodes may spoof Neighbor Discovery messages to poison
# the routers ND cache. To mitigate, use
set protocols neighbor-discovery onlink-subnet-only
# reload after commit is suggested to clear out any bogus neighbor entries in the cache

LINK AGGREGATION
AND LACP

LINK AGGREGATION on A SINGLE
UNIT
Configuration Example for a Aggregate Ethernet Interface
# Set number of Aggregated Interfaces on this device/chassis
set chassis aggregated-devices ethernet device-count <number>
# Configure AE interfaces (ae0,ae1….) # On High-End SRX AE can be members of family inet
# On Branch SRX AE can be members of family inet and family ethernet-switching
set interfaces <aex> unit 0 family inet address <ip address>
# Associate physical ethernet interfaces to the AE
set interfaces <interface-name> gigether-options 802.3ad <aex>
# Minimum number of Links required for this aggregate to be UP
set interfaces <aex> aggregated-ether-options minimum-links <n>
# LACP configuration (today only supported on Branch SRX)
set interfaces <aex> aggregated-ether-options lacp passive

LINK AGGREGATION ON A
CHASSIS CLUSTER
Configuration Example for a Redundant Ethernet Interface # On High End SRX LAG support starts with 10.1r2, LACP starts with 10.2r3
# On some Branch SRX LAG support starts with 10.3r2, LACP also starts with 10.3r2
# Documentation: "Chassis Cluster Redundant Ethernet Interface Link Aggregation Groups"
set interfaces ge-1/0/1 gigether-options redundant-parent reth1
set interfaces ge-1/0/2 gigether-options redundant-parent reth1
set interfaces ge-1/0/3 gigether-options redundant-parent reth1
set interfaces ge-12/0/1 gigether-options redundant-parent reth1
set interfaces ge-12/0/2 gigether-options redundant-parent reth1
set interfaces ge-12/0/3 gigether-options redundant-parent reth1
set interfaces reth1 redundant-ether-options minimum-links 3
# From the Network Point of view, these are two independent Aggregate Interfaces. # Only the interfaces on the active node are used for transmission
# Further LACP Configuration can be added to the reth Interface now
set interfaces reth1 redundant-ether-options lacp periodic fast
set interfaces reth1 redundant-ether-options lacp passive
set interfaces reth1 redundant-ether-options lacp active

Scripting and Automation

Automation with JUNOS scripts • Commit Scripts
– Enable automated compliance checks & configuration changes • e.g.. Reject guest VLAN tag configuration on access switch trunk ports – restrict guest access to a floor
– Macros allow operators to simplify complex configurations and self-heal errors • e.g. Apply pre-defined Data+VoIP port template on any switch port that gets a description matching a
particular string “data-phone”
• Operations Scripts – Allows custom output for diagnosis and event management
• e.g.. Combine 2 different show commands to get a custom output for better analysis
• Event Policies & Scripts – Automated pre-defined responses to events creating self-monitoring networks
• e.g.. When a switch’s trunk port goes up & down, run “show interfaces” and “show alarms” CLI, parse data,
save it to a file and send this to a server
How TO INTEGRATE SCRIPTS ?
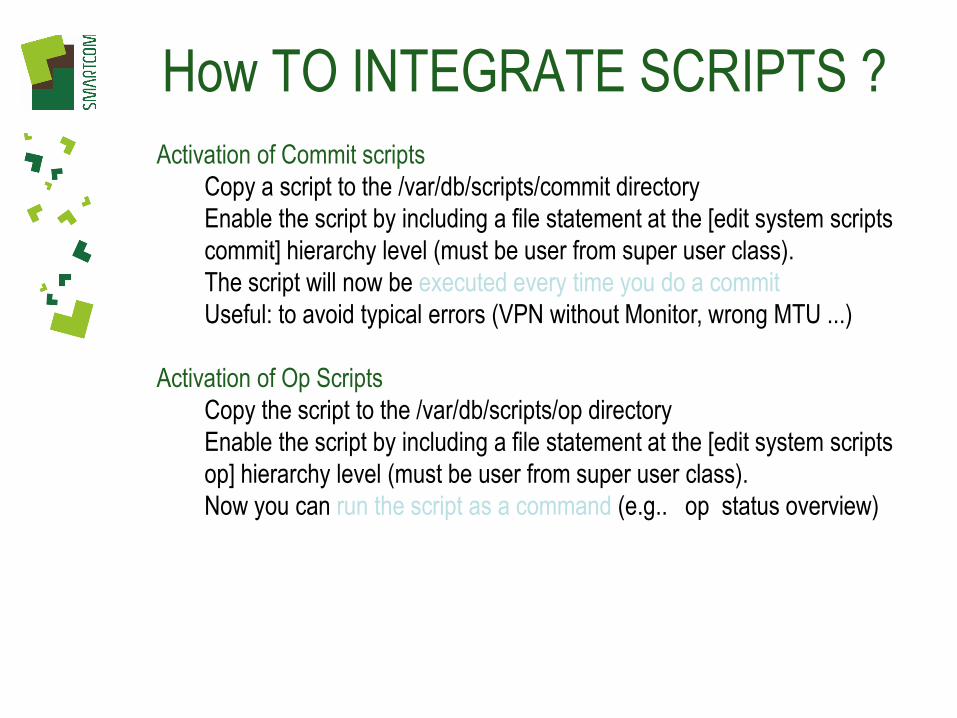
Activation of Commit scripts
Copy a script to the /var/db/scripts/commit directory
Enable the script by including a file statement at the [edit system scripts
commit] hierarchy level (must be user from super user class).
The script will now be executed every time you do a commit
Useful: to avoid typical errors (VPN without Monitor, wrong MTU ...)
Activation of Op Scripts
Copy the script to the /var/db/scripts/op directory
Enable the script by including a file statement at the [edit system scripts
op] hierarchy level (must be user from super user class).
Now you can run the script as a command (e.g.. op status overview)

Useful LINKS FOR AUTOMATION
Useful How-to Information is available from this Scripting Guide
http://www.juniper.net/solutions/literature/white_papers/200252.
Script Library from Juniper
http://JUNOS.juniper.net/scripts/
Script Library on Google
http://code.google.com/p/junoscriptorium/

SCRIPT LIBRARY https://www.juniper.net/us/en/community/junos/script-automation/library/

Nice Features you will like .....

Help is available from the CLI,
EVEN without Internet
Help available from the CLI [ topic reference apropos ]
# Full description of certain configuration hierarchies
root> help reference security address-book
address-book
Syntax
address-book {
address address-name (ip-prefix | dns-name dns-address-name);
address-set address-set-name {
address address-name;
}
}
....
# Commands which include the word xyz
root> help apropos proxy-arp
...
# Help on certain topics
root> help topic snmp agent
...

We have FTP/SCP Servers on
board # Start the FTP Server
set system services ftp
# Enable inbound ftp on the desired zone and/or interface
set security zones security-zone trust interfaces ge-0/0/0.0 host-inbound-traffic system-services ftp
And Connect with your favourite FTP Client

Useful Extensions for
Configuration Versioning Configuration Comments
Personal Configuration Files
Load/Save Configuration Files via FTP/HTTP
# Add comment to a configuration
commit comment "Let us try this"
# List comments added during commit
show system commit
show | compare rollback ?
# load via ftp or http
load merge ftp://user:password@host/filename
load merge http://user:password@host/filename
# save via ftp or scp
show configuration | save ftp://user:password@host/filename.
show configuration | save user@host:filename.
# This will save/load configuration files in the home directory of the user
save mytestconfig.txt
load replace mytestconfig.txt

Configuration Rollback
Automatic rollback if not confirmed within 5 minutes
Rollback Versions , by Default you have 5 (on SRX) to 50 (on EX)
The "Rescue" Configuration
# Automatic rollback if not confirmed within 5 minutes
commit confirmed 5
# Commit at desired time
commit at hh:mm:ss
# on SRX Clusters Rollback is only available if you entered "configure exclusive"
# Create a rescue configuration
request system configuration rescue save
# Manual rollback to rescue
rollback rescue
commit
# On J-Series press reset button for more than 5 and less than 15 Seconds
# to automatically load and commit the rescue configuration
rollback ?
show config | compare rollback <number>
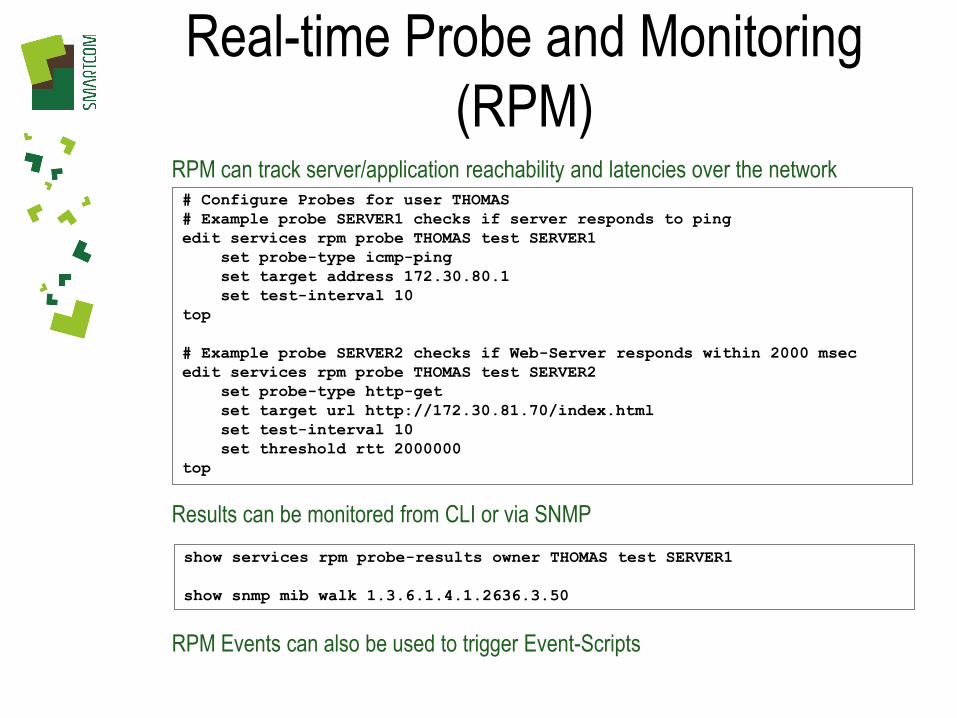
Real-time Probe and Monitoring
(RPM) RPM can track server/application reachability and latencies over the network
Results can be monitored from CLI or via SNMP
RPM Events can also be used to trigger Event-Scripts
# Configure Probes for user THOMAS
# Example probe SERVER1 checks if server responds to ping
edit services rpm probe THOMAS test SERVER1
set probe-type icmp-ping
set target address 172.30.80.1
set test-interval 10
top
# Example probe SERVER2 checks if Web-Server responds within 2000 msec
edit services rpm probe THOMAS test SERVER2
set probe-type http-get
set target url http://172.30.81.70/index.html
set test-interval 10
set threshold rtt 2000000
top
show services rpm probe-results owner THOMAS test SERVER1
show snmp mib walk 1.3.6.1.4.1.2636.3.50
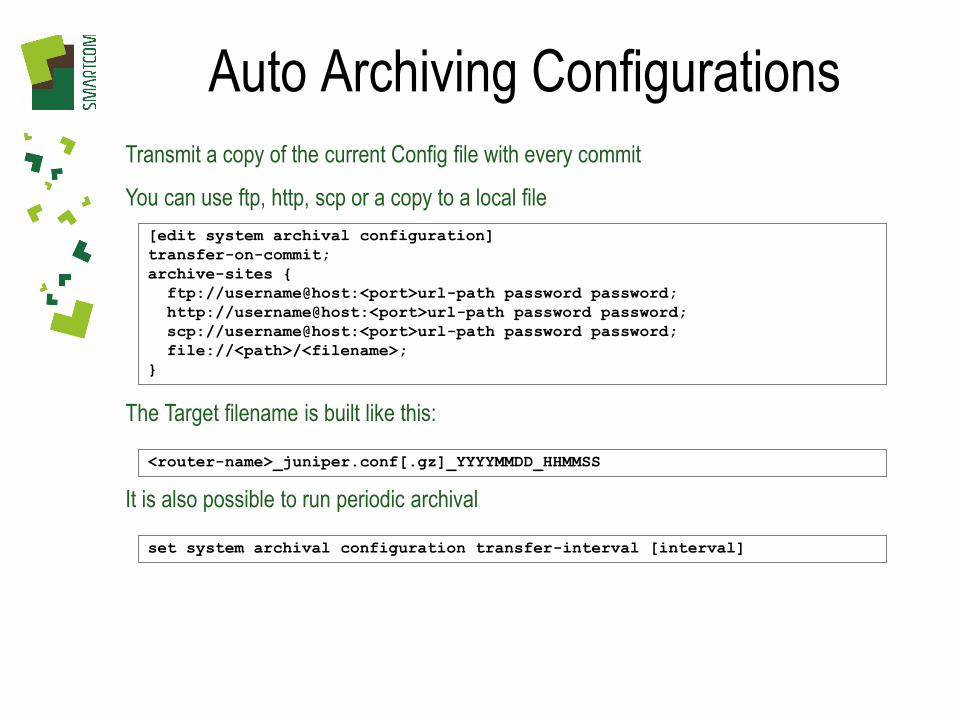
Auto Archiving Configurations
Transmit a copy of the current Config file with every commit
You can use ftp, http, scp or a copy to a local file
The Target filename is built like this:
It is also possible to run periodic archival
[edit system archival configuration]
transfer-on-commit;
archive-sites {
ftp://username@host:<port>url-path password password;
http://username@host:<port>url-path password password;
scp://username@host:<port>url-path password password;
file://<path>/<filename>;
}
<router-name>_juniper.conf[.gz]_YYYYMMDD_HHMMSS
set system archival configuration transfer-interval [interval]

More useful stuff ..... DNS lookup and reverse lookup
Network Clients available on the CLI (route lookup starts in inet.0)
Some clients can be used to pipe command output
CLI Shortcuts
telnet, ssh , ftp, scp, ping, traceroute, mtrace
monitor traffic interface count 100 | ftp://172.16.1.1/capture.txt
lab@SRX3600> show host 193.99.144.85
85.144.99.193.in-addr.arpa domain name pointer www.heise.de.
lab@SRX3600> show host www.heise.de
www.heise.de has address 193.99.144.85
• CTRL-A takes you to the beginning of the command line
• CTRL-E takes you to the end of the command line
• CTRL-W deletes backwards to the previous space
• CTRL-U deletes the entire command line
• CTRL-L redraws the command line (in case it has been interrupted by
messages, etc.)
• CTRL-R starts CLI history search, start typing and matching results will
be displayed and can be executed by simply pressing ENTER
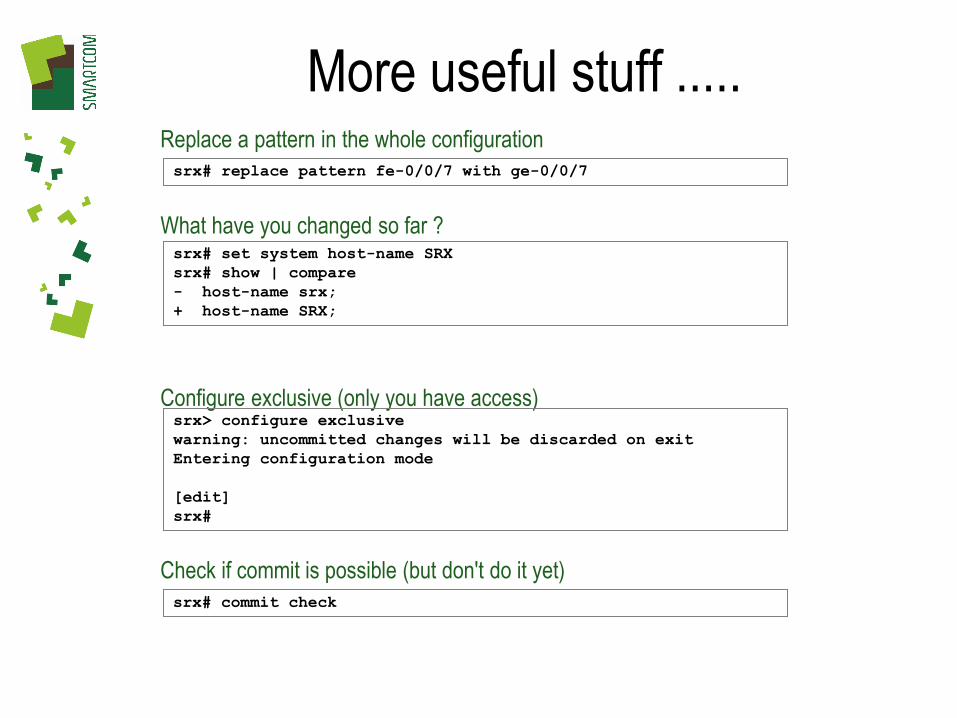
More useful stuff ..... Replace a pattern in the whole configuration
What have you changed so far ?
Configure exclusive (only you have access)
Check if commit is possible (but don't do it yet)
srx# replace pattern fe-0/0/7 with ge-0/0/7
srx# set system host-name SRX
srx# show | compare
- host-name srx;
+ host-name SRX;
srx> configure exclusive
warning: uncommitted changes will be discarded on exit
Entering configuration mode
[edit]
srx#
srx# commit check

And more ...... Add comments anywhere in the configuration
Temporary deactivate sections of the configuration
Generate your own Events (good to combine with Event-Scripts)
srx# annotate security policies from-zone trust to-zone trust "this is an annotation"
srx# show security policies
/* this is an annotation */
from-zone trust to-zone trust {
inactive: policy 1 {
.....
# To remove the command redo the command with an empty string annotate .... ""
# deactivate whatever you want, but still keep it in the configuration
deactivate protocols ospf
set event-options generate-event backup-config-event time-of-day 23:30:00

And more ..... apply-groups to
Copy a file from one cluster member to the other
Show Configuration with Details
Login Messages
set groups sonet interfaces <so-*> sonet-options rfc-2615
set apply-groups sonet
file copy /var/tmp/test node1:/var/tmp/sampled.test
# Use this command to get explanations and range information for each parameter
show configuration | display detail
# To make a message appear before login
set system login message “ Welcome \n to \n JUNOS Training\n “
# To make a message appear after successful authentication
set system login announcement “Maintenance scheduled 11PM to 2AM tonight”
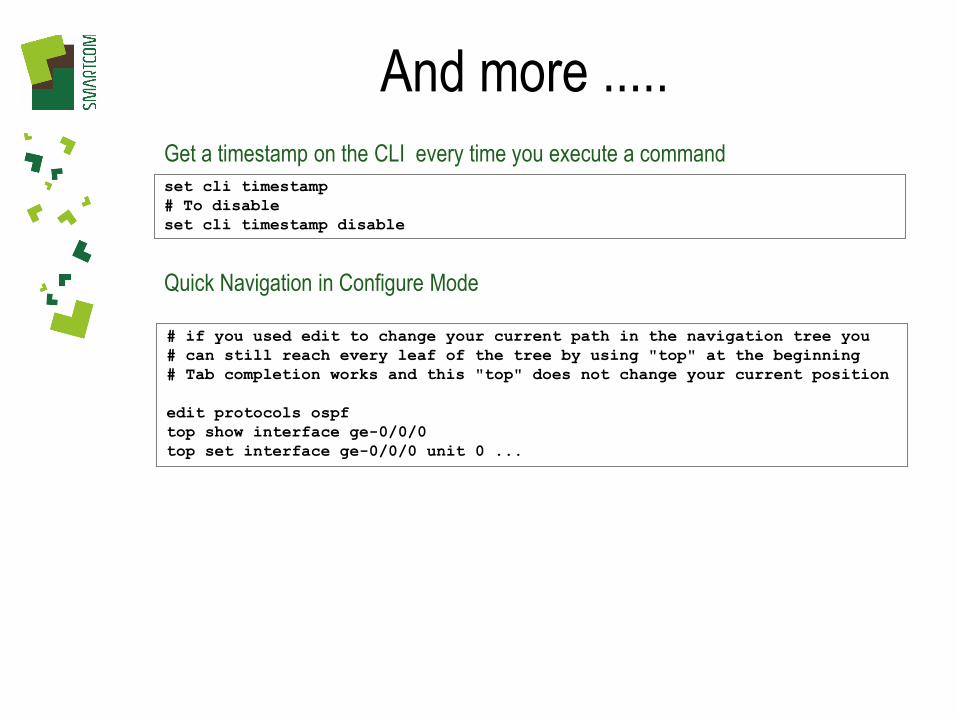
And more .....
Get a timestamp on the CLI every time you execute a command
Quick Navigation in Configure Mode
set cli timestamp
# To disable
set cli timestamp disable
# if you used edit to change your current path in the navigation tree you
# can still reach every leaf of the tree by using "top" at the beginning
# Tab completion works and this "top" does not change your current position
edit protocols ospf
top show interface ge-0/0/0
top set interface ge-0/0/0 unit 0 ...

Further Useful Information

Documentation and additional
Sources • Software Documentation for SRX and J-Series
http://www.juniper.net/techpubs/software/JUNOS/
• Hardware Documentation for SRX und J-Series http://www.juniper.net/techpubs/hardware/srx-series.html
http://www.juniper.net/techpubs/software/jseries/
• The JUNOS Page http://JUNOS.juniper.net/
• JTAC Knowledgebase http://kb.juniper.net/
SRX Channel: http://kb.juniper.net/index?page=content&cat=SRX_SERIES&channel=KB
• User Forums http://forums.juniper.net/jnet/
http://www.juniperforum.com/
• Books http://www.juniper.net/us/en/training/jnbooks/
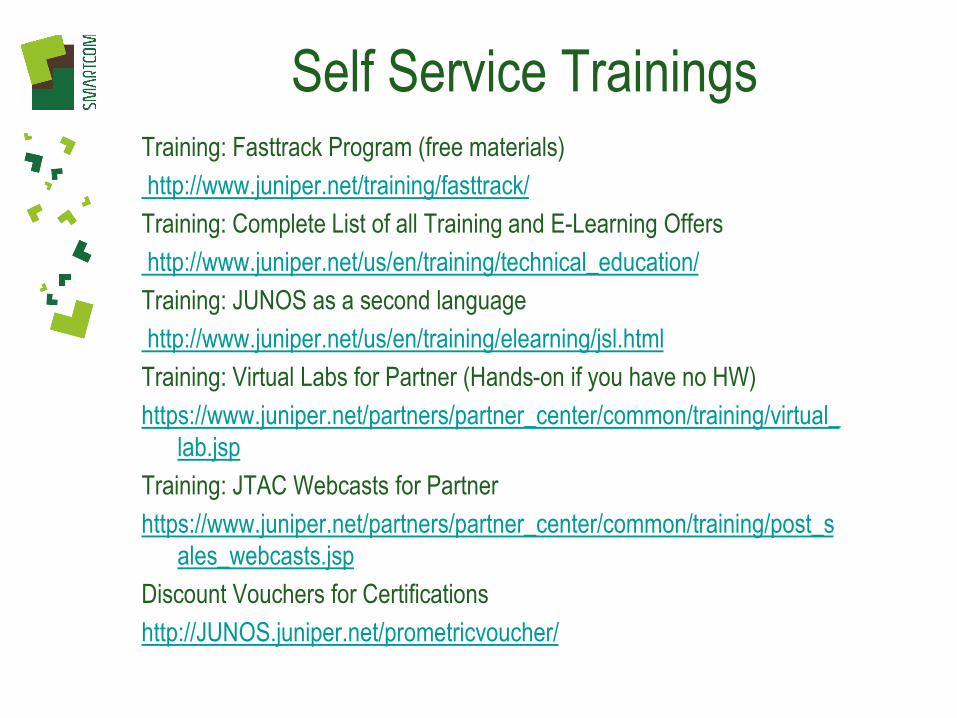
Self Service Trainings Training: Fasttrack Program (free materials)
http://www.juniper.net/training/fasttrack/
Training: Complete List of all Training and E-Learning Offers
http://www.juniper.net/us/en/training/technical_education/
Training: JUNOS as a second language
http://www.juniper.net/us/en/training/elearning/jsl.html
Training: Virtual Labs for Partner (Hands-on if you have no HW)
https://www.juniper.net/partners/partner_center/common/training/virtual_
lab.jsp
Training: JTAC Webcasts for Partner
https://www.juniper.net/partners/partner_center/common/training/post_s
ales_webcasts.jsp
Discount Vouchers for Certifications
http://JUNOS.juniper.net/prometricvoucher/

VPN Configuration Generator • Generator for VPN Configurations (route and policy
based) https://www.juniper.net/customers/support/configtools/vpnconfig.html
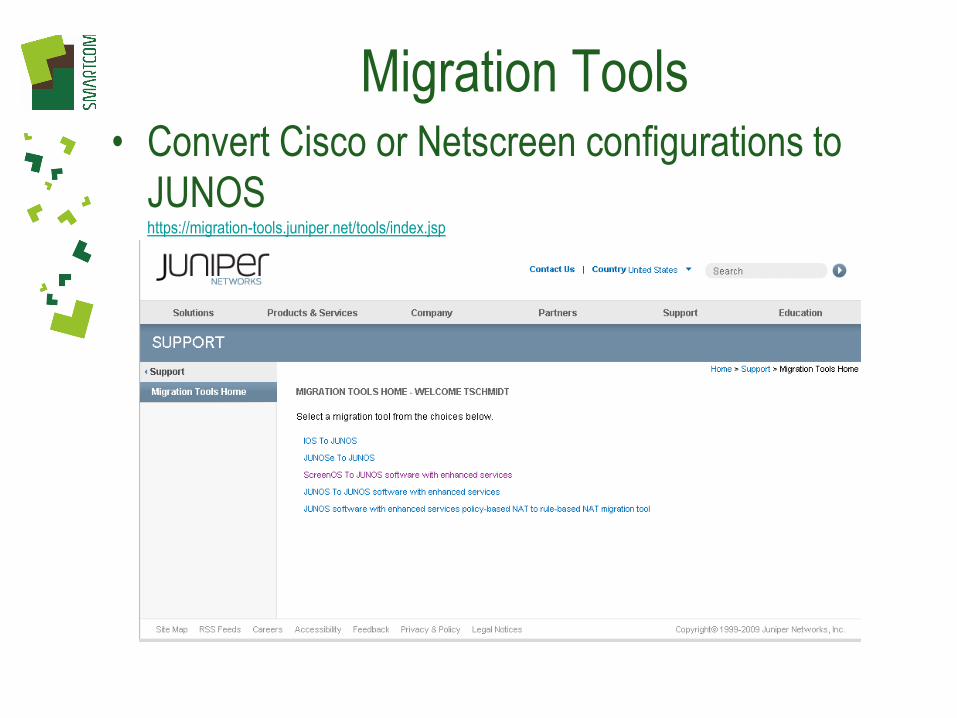
Migration Tools • Convert Cisco or Netscreen configurations to
JUNOS https://migration-tools.juniper.net/tools/index.jsp

Additional Useful Information Sources Day One Booklets
http://www.juniper.net/us/en/community/junos/training-certification/day-one/
Feature Explorer and Content Explorer
http://pathfinder.juniper.net/feature-explorer/
http://www.juniper.net/techpubs/content-applications/content-explorer/
Feature Support Reference Guide
https://www.juniper.net/techpubs/en_US/junos12.1/information-products/pathway-pages/security/feature-support-
reference.html?chap-feature-support-tables.html
SRX Knowledgebase (Jump Station)
http://kb.juniper.net/KB15694
SRX Knowledgebase (Here a list of the latest SRX articles)
http://kb.juniper.net/index?page=content&cat=SRX_SERIES&channel=KB
SRX Application Notes
http://www.juniper.net/us/en/products-services/security/srx-series/#literature
JUNOS Network Configuration Examples
http://www.juniper.net/techpubs/en_US/junos/information-products/pathway-pages/nce/index.html
Juniper Forum
• Configuration Library http://forums.juniper.net/t5/Configuration-Library/bd-p/ConfigLib
• DayOne Tips http://forums.juniper.net/t5/Day-One-Tips-Contest/bd-p/DayOneContest

QUIZ

Question 1 – 3rd award
• Which operational command you will execute
to quickly verify the status of all interfaces on
a Junos device?
A. show interfaces terse
B. show interfaces ip brief
C. show interfaces
D. show configuration interfaces
E. show interfaces extensive

Question 2 – 2nd award
• Which statement is true about route preference?
A. A lower preference is better than a higher
preference.
B. A higher preference is better than a lower
preference.
C. It must be assigned manually for each protocol.
D. It is the same as a route metric.
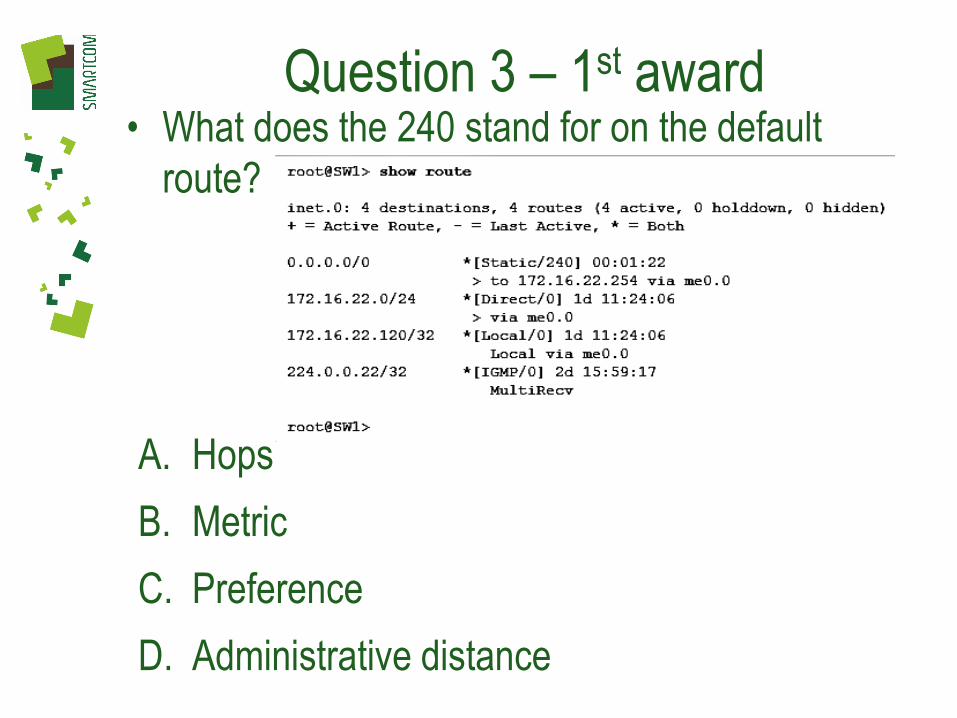
Question 3 – 1st award • What does the 240 stand for on the default
route?
A. Hops
B. Metric
C. Preference
D. Administrative distance
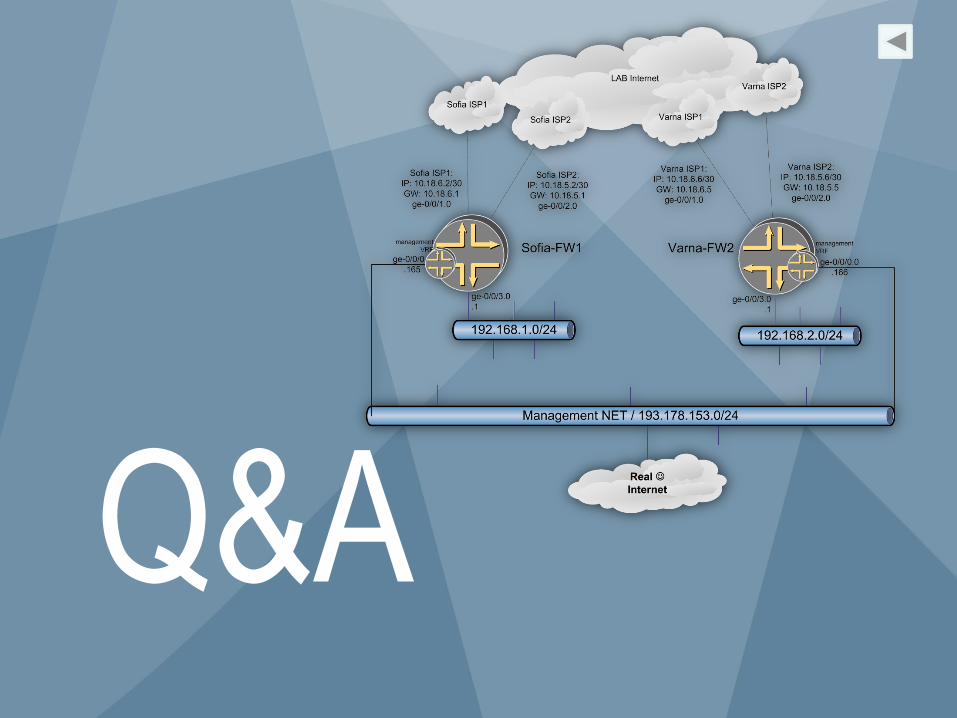
Q&A


