22
KARAOKE – SYSTEM AST Mini Owner’s manual

KARAOKE – SYSTEM AST Mini Owner’s manual

Karaoke System AST Mini. Owner’s manual
2
Table of contents 1. Precautionary measures ................................................................................................................................................ 4
1.1. During installation ................................................................................................................................................... 41.2. During exploitation .................................................................................................................................................. 41.3. During prophylaxis and cleaning ............................................................................................................................. 5
2. Getting to know the device ............................................................................................................................................ 62.1. Functional capabilities ............................................................................................................................................. 62.2. Package content ....................................................................................................................................................... 62.3. Front panel ............................................................................................................................................................... 62.4. Rear panel ................................................................................................................................................................ 72.5. Remote control panel ............................................................................................................................................... 8
3. Initialising and connection ............................................................................................................................................ 93.1. Connection to home theatre ..................................................................................................................................... 93.2. Connection of background video external source .................................................................................................... 93.3. Installation of electronic certificate ....................................................................................................................... 10
4. Functional capabilities ................................................................................................................................................. 114.1. «Karaoke» function ................................................................................................................................................ 11
4.1.1. Playback of songs ........................................................................................................................................... 114.1.2. Songs reservation ........................................................................................................................................... 11
Song reservation .................................................................................................................................................. 11Songs playback from the list of reserved songs ................................................................................................... 11Cancellation of reservation «on-the-fly» ............................................................................................................ 11Review and editing of the list of reserved songs ................................................................................................. 12
4.1.3. Songs search ................................................................................................................................................... 12Beginning of search ............................................................................................................................................. 12Search results ...................................................................................................................................................... 12Work with search results ..................................................................................................................................... 12
4.1.4. Additional capabilities ................................................................................................................................... 12Recording of song execution ............................................................................................................................... 12Switching of source of background video ............................................................................................................ 12Selection of playback mode ................................................................................................................................. 12New songs ............................................................................................................................................................ 13My songs .............................................................................................................................................................. 13Playback of tracks from USB drive ..................................................................................................................... 13Favorites .............................................................................................................................................................. 13TOP 100 .............................................................................................................................................................. 14Applause .............................................................................................................................................................. 14
4.2. Function «Media player» ....................................................................................................................................... 154.2.1. Playback of video tracks (tab «Video») ......................................................................................................... 154.2.2. Playback of audio tracks (tab «Music») ......................................................................................................... 154.2.3. Viewing images (tab «Slideshow») ............................................................................................................... 15
4.3. Function «Setup» ................................................................................................................................................... 164.3.1. Main setup menu ............................................................................................................................................ 16
User ..................................................................................................................................................................... 16Administrator ....................................................................................................................................................... 16Service ................................................................................................................................................................. 16Information .......................................................................................................................................................... 16Additional updates ............................................................................................................................................... 16
4.3.2. Menu option «User» ....................................................................................................................................... 17Karaoke ............................................................................................................................................................... 17Background video ................................................................................................................................................ 17Background audio ............................................................................................................................................... 17Settings by default ............................................................................................................................................... 18
4.3.3. Menu option «Administrator» ........................................................................................................................ 18General Settings .................................................................................................................................................. 18Microphonic processing ...................................................................................................................................... 18MIDI .................................................................................................................................................................... 18Video .................................................................................................................................................................... 18Network / Local area network (LAN) .................................................................................................................. 19Network / Wireless network (Wi-Fi) .................................................................................................................... 19Security ................................................................................................................................................................ 19
Karaoke System AST Mini. Owner’s manual
3
Settings by default ............................................................................................................................................... 195. AST Manager, the program to control the device using tablet PC or smart phone .............................................. 206. Installation of updates (firmware) ............................................................................................................................. 217. Troubleshooting ........................................................................................................................................................... 22

Karaoke System AST Mini. Owner’s manual
4
1. Precautionary measures
1.1. During installation
• For connection of AST Mini to electricity mains use only input power with the voltage 220 V and alternative current frequency 50 Hz.
• Install AST Mini at sufficient distance from walls and other objects. Special attention to be in respect of distance between the device and wall which must be not less than 10 centimetres. Breach of this rule may cause overheating of the device and possible flaming.
• Do not install AST Mini in places with strong vibration, on surfaces with incline, on unsteady, high surfaces, in dusty and/or insufficiently ventilated places.
• Do not install AST Mini in places with high humidity, do not put on AST Mini vases, glasses and other objects with liquids.
• Do not install AST Mini close to electric heaters, radiators and other sources of heat, in places with strong and/or frequent changes of temperature, in places with intensive solar heating. It may cause device overhearing and its breakage.
• During connection of AST Mini to external equipment carefully read manual for its use. Before connection turn off AST Mini and disconnect power cord from electric circuit.
• During transfer of AST Mini from outside to warm room at cold season in order to prevent appearance of condensate, it is necessary to leave the device at room temperature for 1 – 2 hours and only after that you may connect the device to electric circuit.
• Do not connect power cord to electric circuit before completion of final installation of AST Mini. • Do not connect AST Mini to one power board simultaneously with other devices consuming big power.
Check that the total consuming power of connected to power board devices do not exceed 2000W. • Do not put power cord close to electric heaters and other sources of heat. Do not put on power cord any
heavy objects. It may cause damage to power cord and injury by electric current.
1.2. During exploitation
• Avoid penetration of water and other liquids to surface and inside AST Mini. Do not put objects with liquids on device surface.
• Do not put in AST Mini foreign objects and do not leave them on device surface. • Do not touch device and power cord by moist hands. Do not touch power cord during thunderstorm. • Do not deform, twist and heat power cord. In case of damage to power cord replace it immediately. • During disconnection of power cord from от electric circuit do not pull power cord, hold the plug. • Do not cover ventilating holes and louvers on top and on each side of AST Mini housing. Do not exploit
device in poor ventilated places. • Do not put on AST Mini heavy objects, do not step on and do not hang up the device. • During movement of AST Mini to another place disconnect from the device connected units, disconnect
power cord from electric circuit. Do not carry the device to another place with foreign objects on it. • If you do not use AST Mini during long time disconnect power cord from electric circuit. • In case of fall the device or damage to device housing switch off AST Mini, disconnect connected units,
disconnect power cord from electric circuit. • Do not push buttons hard. • In case of strange sound or smell of smoke immediately disconnect power cord from electric circuit, using
thick gloves or dry cloth. • Do not dismantle and do not repair device independently. Repair to be arranged in authorised maintenance
shop.
Karaoke System AST Mini. Owner’s manual
5
1.3. During prophylaxis and cleaning
• Before cleaning of AST Mini turn off power, disconnect power cord from electric circuit. • Use for cleaning of the AST Mini surfaces only special detergents for electronics. Do not use organic
compounds (gasoline, turpentine, etc.). • It is recommended not less than once a year to make prophylaxis of the device in authorised maintenance
shop.

Karaoke System AST Mini. Owner’s manual
6
2. Getting to know the device
2.1. Functional capabilities
The device AST Mini is designed for: • playback of karaoke sound tracks and audio files. Supported audio formats: MP3, WAV, MIDI; • video playback in format HD-Ready (720p), MPEG2, MPEG4, h.264, AVC, DivX, xvid.
2.2. Package content
Supply package of AST Mini is as follows: • device AST Mini; • remote control panel; • batteries for remote control panel (type АА, 2 pieces); • songs list sorted out by name (title) of singer; • USB storage with electronic certificate and this manual; • composite audio/video cable, 3 m; • HDMI cable, 1,8 m; • power cord 220 V; • unit package (box, seal, plastic case).
2.3. Front panel
Lay out of control elements and sight control on front panel of the device AST Mini:
Figure 1
1. Button for turning on/off the device. 2. Information display of the device. 3. USB port.

Karaoke System AST Mini. Owner’s manual
7
2.4. Rear panel
Lay out of ports on rear panel of the device AST Mini:
Figure 2
1. Port for connection to local area network. 2. HDMI port. 3. USB port. 4. Port for connection of external video source. 5. Port for connection of acoustic system. 6. RS-232 port. 7. Level control devices for microphone ports. 8. Port for connection of power cord. 9. Component video out. 10. Composite video output. 11. Port for connection of microphones.
Karaoke System AST Mini. Owner’s manual
8
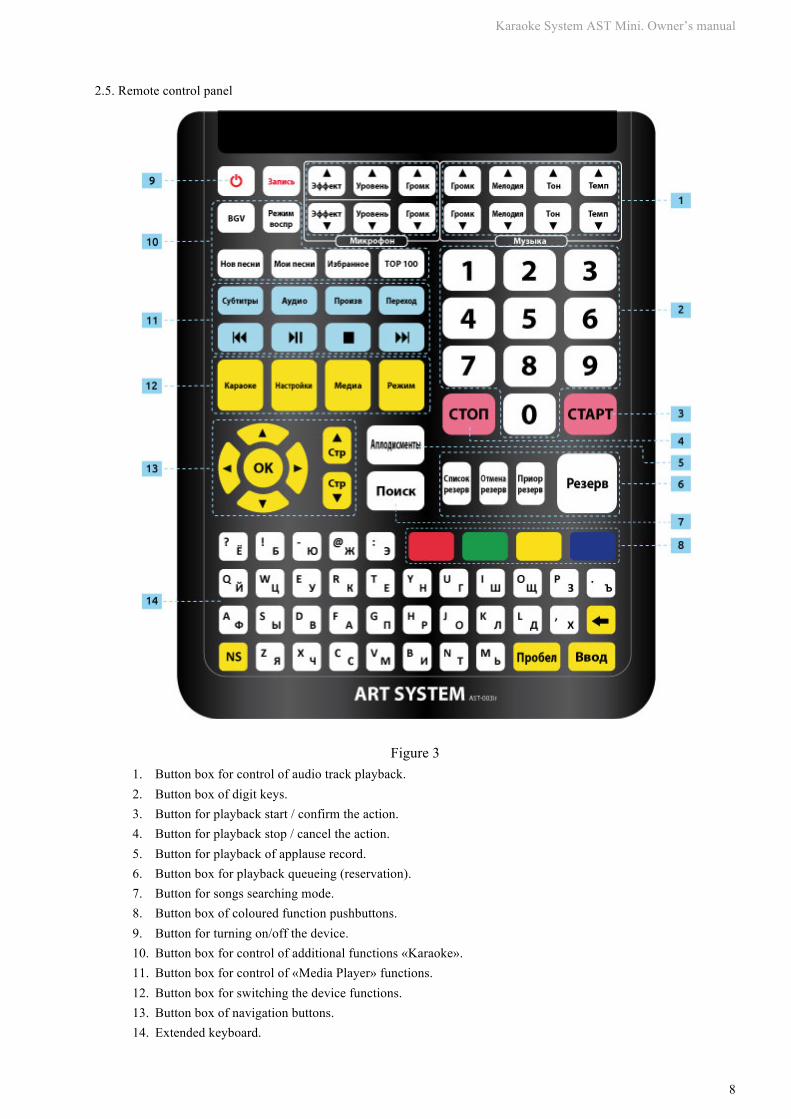
2.5. Remote control panel
Figure 3 1. Button box for control of audio track playback. 2. Button box of digit keys. 3. Button for playback start / confirm the action. 4. Button for playback stop / cancel the action. 5. Button for playback of applause record. 6. Button box for playback queueing (reservation). 7. Button for songs searching mode. 8. Button box of coloured function pushbuttons. 9. Button for turning on/off the device. 10. Button box for control of additional functions «Karaoke». 11. Button box for control of «Media Player» functions. 12. Button box for switching the device functions. 13. Button box of navigation buttons. 14. Extended keyboard.

Karaoke System AST Mini. Owner’s manual
9
3. Initialising and connection
• Before connection of AST Mini with other devices make sure that power of the device and pluggable equipment switched off.
• Do not cover ventilating holes of AST Mini and pluggable equipment for natural air circulation. • Before connection of AST Mini with other devices read carefully manuals for pluggable equipment. • During connection of audio and video cables make sure that shape, size and colour of plug correspond to
shape, size and colour of connector.
3.1. Connection to home theatre
Approximate scheme of AST Mini connection to home theatre system.
Figure 4
3.2. Connection of background video external source
External source of background video (DVD player, satellite TV receiver) to be connected through composite input VIDEO IN (BGV) ([5] on Figure 2). Supported devices are with video formats PAL or NTSC.

Karaoke System AST Mini. Owner’s manual
10
3.3. Installation of electronic certificate
Installation of certificate to be done after connection of peripheral equipment (display or TV set) to AST Mini. For installation of certificate the following actions to be done: 1. Turn on the device, wait for its download finish, insert included in delivery USB drive with the certificate to
USB port on the front panel of device. 2. On display (TV set) screen connected to the device will appear information message with offer to install the
new certificate. For installation press green button «Yes», to cancel installation press red button «No» (button box of coloured function pushbuttons [8] on Figure 3).
3. Certificate updating procedure will take a few seconds. Upon completion of updating procedure in the upper right corner for a few seconds will appear the message «Certificate installed».
4. Remove USB drive from USB port. The device is ready to work. Installation will not start in case that certificate with the same or later creation time than on USB drive is already
installed in the device.
Karaoke System AST Mini. Owner’s manual
11
4. Functional capabilities
4.1. «Karaoke» function
Just after switching-on and during periods of time between songs playback the device is in standby mode. In standby mode AST Mini produces background video to the screen of connected display or TV set and background audio track to connected to the device acoustic system in case that in the device set up switched on playback of background video (per default switched on) and audio. In case that playback of background video is switched off to the screen of display transfers «black screen».
In order to enter karaoke function press button «Karaoke» on remote control (button box [12] on Figure 3).
4.1.1. Playback of songs
In standby mode enter song number using button box of digit keys on remote control (button box [2] on Figure 3). Entered number displays in upper left corner of connected to the device display or TV set and also on data display of the device ([5] on Figure 1). On completing of entering on display screen will be short summary of information about the song with entered number including track name and singer and also parameters of track sound: type, melody, tone, tempo, availability of backing vocal. At this moment possible to make correction to some parameters of track sound: volume level of melody (only for MIDI format), tone and tempo playback change using special buttons on remote control (button box [1] on Figure 3). Changing of these parameters is also possible «on-the-fly» during track playback. To put song to the list of chosen songs press «blue» button on remote control (button box of coloured function pushbuttons [8] on Figure 3).
In case of entering number of nonexistent song will appear information message «TRACK NOT EXISTS». To start song playback press button «START» on remote control ([3] on Figure 3). Press this button during song
playback to pause playback («pause») and second pressure will resume playback («pause removal»). Press of this button in standby will start repeated playback of the last played song.
During song playback on information display of the device ([5] on Figure 1) displays countdown of the total time of song’s playback.
To cancel song playback press button «STOP» on remote control ([4] on Figure 4). Press of this button during song playback will stop playback.
4.1.2. Songs reservation
Reservation (postponed playback) is necessary for alternate songs playback. For songs reservation and control the list of reserved songs is designed button box [6] on remote control (Figure 3).
Song reservation In standby mode enter song number using in the same way as during usual playback. After completion of
entering number during displaying of referral information it is possible to change parameters of track sound (for more details, see para. 4.1.1). Changing parameters will take effect during playback of reserved song. Press button «Reserve» on remote control. It is also possible to put track to waiting list for playback using button «RESERVE» on the front panel of the device. To put song involuntarily to the beginning of reserve list («at the head of the queue») press button «Priority reserve» on remote control. After entering song to reserve in the upper right corner of display will appear lettering «Reserve» with songs numbers lead in reserve list and total quantity of reserved songs.
Songs playback from the list of reserved songs To start songs playback from waiting list press button «START» on remote control ([3] on Figure 3). After the
end of playback of current song automatically starts playback of song located first in the list. To cancel automatic playback use the function «Settings» (for more details, see para. 4.3).
Cancellation of reservation «on-the-fly» Enter song number the same as during usual playback. After the end of entering number press button «Reserve
cancellation» on remote control (button box [6] on Figure 3). In case that one song with the same number reserved a

Karaoke System AST Mini. Owner’s manual
12
few times will be cancelled playback of the first song in reserve list. To cancel later reservations use the reserve list (see below).
Review and editing of the list of reserved songs Open reserve list using button «Reserve list» on remote control (button box [6] on Figure 3). For navigation
between list lines use arrows on remote control (button box [13] on Figure 3). In order to make actions with the active line (highlights by colour) use coloured functional buttons on remote control (button box [8] on Figure 3). Actions corresponding to pressing each functional buttons are shown in prompt situated in the bottom of reserve list.
In review/editing mode of reserve list it is possible to change parameters of tracks playback (for more details, see para. 4.1.1).
In order to exit the mode of reserve list review press button «STOP» on remote control ([4] on Figure 3).
4.1.3. Songs search
Beginning of search For song search press button «Search» on remote control ([7] on Figure 3) or start to enter search text using
extended keyboard on remote control ([14] on Figure 3). Entered text will appear in search box situated in the upper part of display. Using button box of coloured function pushbuttons on remote control (button box of coloured function pushbuttons [8] on Figure 3) set area of search (in name, text of song, etc.), input language, choose desired track format and song genre. Search results will appear automatically after entering the third symbol.
Search results Search results display in the form of list with the following positions: song name, name/title of singer, song
number, track format. Maximum number of lines in the list – 1000. If the list with search results contains maximum number of lines and necessary song is not in the list try to specify search parameters. For example, limit area of search, enter more precise text line for search, etc. If no one song is found according to these parameters during the search the list will be empty.
Work with search results For navigation between lines of the list with search results use arrows on remote control (button box [13] on
Figure 3). Song in active line (highlights by colour) may be put in reserve list, it is possible to immediate start song playback, to change parameters of track playback (for more details, see para. 4.1.1). Changes count towards during immediate song playback or during playback of track from reserve list in case that song is in reserve.
In order to exit search mode press button «STOP» on remote control ([4] on Figure 3).
4.1.4. Additional capabilities
Recording of song execution AST Mini may record and playback recordings of song execution. The device memory keeps up to 50 last
recordings of song execution, more old recordings delete automatically. Recording of song execution saves in case that the following two conditions will be executed: 1. soundtrack to be played until the end and 2. sound of the voice to be transmitted to the microphone input. To see the list of presented recordings, playback, copying of recordings to external storage, switching on or off the function of recording of song execution press the button «Record» on remote control (Figure. 3). For navigation in the list of recordings use buttons with arrows (button box [13] on Figure. 3). To perform the actions related to recordings of song execution use the button box of function pushbuttons (button box of coloured function pushbuttons [8] on Figure. 3).
Switching of source of background video If external source of background video connected to AST Mini (for more details, see para. 3.2) it is possible
using button «BGV» on remote control (button box [10] on Figure 3) to switch between external sources and record of background video on hard disk of the device.
Selection of playback mode
Karaoke System AST Mini. Owner’s manual
13
AST Mini may automatically play all songs recorded on hard disk of the device. Apart from normal playback mode (for more details, see para. 4.1.1) there are two modes of automatic playback: serial mode and random playback. Selection of the necessary playback mode to be done by serial push of button «Playback mode» on remote control (button box [10] on Figure 3). Current mode displays in information message in upper right corner of display. In serial mode and random playback information message displays constantly, in normal mode this message will disappear after a few time.
To start playback in selected automatic playback press button «START» on remote control ([3] on Figure 3), to stop playback press button «STOP» on remote control ([4] on Figure 3).
New songs During exploitation repertoire may be widen using downloading and installation of updates. In order to see songs
lists containing in update press button «New songs» (button box [10] on Figure 3) on remote control. Information about work with lists and possible actions see in para. 4.1.3, section «Work with search results». For navigation between updates use buttons «<» (left) and «>» (right) (button box [13] on Figure 3).
My songs In this model of karaoke system it is possible to add to repertoire up to one hundred tracks not included in the
main songs catalogue. To see the list of earlier downloaded tracks press button «My songs» (button box [9] on Figure 3) on remote control.
For navigation between lines of the list use arrows on remote control (button box [12] on Figure 3). With the song in active line (highlights by colour) it is possible to make the following actions:
• to start playback (button «START»); • to put in reserve list (buttons «Reserve» or «Priority reserve»); • to enter or edit song name and name (title) of singer (yellow button in button box of coloured function
pushbuttons [7] on Figure 3); • to delete song from the system (red button in button box of coloured function pushbuttons [7] on Figure
3). To download new track make the following actions:
1. Record track and (in case of using CD+G format) supporting image file to root directory of USB drive. 2. Connect USB drive to USB port on the front panel of karaoke system. 3. Press button «USB drive» (blue button in button box of coloured function pushbuttons [7] on Figure 3). 4. Locate cursor on the name of necessary file, press button «Add to my songs» (green button in button
box of coloured function pushbuttons [7] on Figure 3). Will start copying of the necessary files. 5. Wait for the end of copying procedure. For backspacing to the list «My songs» press button «Return to
my songs» (blue button in button box of coloured function pushbuttons [7] on Figure 3). To every downloaded track automatically assigns a number within the limits from 11000 to 11099. This number
afterwards may be used to start track playback (for more details, see para. 4.1.1).
Playback of tracks from USB drive In case that on the connected to USB port of karaoke system USB drive available files with supported format of
musical tracks, then each of these tracks will receive internal number within the limits from 11500 to 11599. This number may be used to start track playback (for more details, see para. 4.1.1) for as long as USB drive will be disconnected from USB port of the system.
To see the list of tracks available for playback and also definition of current number of one or another track press button «My songs» (button box [9] on Figure 3) and after that button «USB drive» (blue button in button box of coloured function pushbuttons [7] on Figure 3).
Favorites
Karaoke System AST Mini. Owner’s manual
14
To display the list of favourites (songs) press button «Favourites» on remote control (button box [10] on Figure 3). Information about work with lists and possible actions see in para. 4.1.3, section «Work with search results».
TOP 100 Pressing on button «TOP 100» on remote control (button box [10] on Figure 3) will display on display screen list
of the most frequently playing songs by the device. The most frequently playing songs are situated at the top of list.
Applause During pressing the button «Applause» on remote control ([5] on Figure 3) AST Mini will play recording of the
sound of applause. Sound of applause do not interrupt song playback, it plays simultaneously with track playback (overlap). Applause also may be started in standby mode. The next pressings during applause record playback ignore.

Karaoke System AST Mini. Owner’s manual
15
4.2. Function «Media player»
Function «Media player» allows to playback video tracks, audio tracks and to view image files in «slideshow» mode from external USB drive connected to USB port of the device. To switch to «Media player» mode press button «Media» on remote control (button box [12] on Figure 3).
For navigation between tabs «Video», «Music» and «Slideshow» use navigating buttons on remote control (button box [13] on Figure 3).
4.2.1. Playback of video tracks (tab «Video»)
Supported formats of video files: AVI, MKV, MP4. Insert USB drive to USB port of the device ([6] on Figure 1). For navigation between file catalogs and files,
presented on USB drive use navigating buttons on remote control (button box [13] on Figure 3). Choose video file to see and press button «OK» to start playback.
Playback control to be done by navigating buttons on remote control (button box [13] on remote control). Buttons with arrows right/left «rewind» video to 30 seconds forward and backward correspondingly. Buttons with arrows up/down «rewind» video approximately to 2% of the total length of film. Button «OK» turns on pause and resumes playback.
4.2.2. Playback of audio tracks (tab «Music»)
Supported formats of audio files: MP3, WAV. Insert USB drive to USB port of the device ([6] on Figure 1). For navigation between file catalogs and files
presented on USB drive use navigating buttons on remote control (button box [13] on Figure 3). Choose audio file to listen and press button «OK» to start playback. Playback of the next audio file in current file catalog on USB drive starts automatically.
Playback control to be done by navigating buttons on remote control (button box [13] on remote control). Buttons with arrows right/left «rewind» audio track to 30 seconds forward and backward correspondingly. Buttons with arrows up/down «rewind» audio track approximately to 2% of its total length. Button «OK» turns on pause and resumes playback.
Playback control to be done by navigating buttons on remote control (button box [11] on remote control). Buttons >>| and |<< start playback of the next or previous audio track correspondingly.
4.2.3. Viewing images (tab «Slideshow»)
Supported formats of image files: JPG. Insert USB drive to USB port of the device ([6] on Figure 1). For navigation between file catalogs and files
presented on USB drive use navigating buttons on remote control (button box [12] on Figure 3). Choose image to view and press button «ОК» to start slideshow. Images automatically change every 15 seconds.
Playback control to be done by navigating buttons on remote control (button box [11] on remote control). Buttons >>| and |<< start playback of the next or previous image correspondingly. Button >|| suspends («pause») or resumes automatic image changing.

Karaoke System AST Mini. Owner’s manual
16
4.3. Function «Setup»
To enter setup menu press button «Setup» on remote control (button box [12] on Figure 3). All actions in «Setup» mode to be done with remote control (Figure 3). For navigation between setup menu
options use buttons with arrows (button box [13] on Figure 3). To enter the necessary setup menu option use button «OK» (button box [13] on Figure 3) or «START» ([3] on Figure 3), to go to previous menu option use button «STOP» ([4] on Figure 3).
For navigation between setup menu options use buttons with arrows up/down, for changing settings use buttons with arrows right/left (button box [13] on Figure 3). If necessary, use extended keyboard (button box [14] on Figure 3) or buttons with figures (button box [2] on Figure 3).
4.3.1. Main setup menu
User In this menu section presented global configuration influenced over the work of karaoke system in «Karaoke»
mode.
Administrator There are extended setup options of the device in this menu section. This menu section is protected by password.
To enter the section type the password «1234». Password request will be one time after every restart of karaoke system.
Service This menu section designed only for employees of specialised maintenance shops.
Information Summary information about karaoke system’s main data. Serial number. Serial number of the device. Also available on rear panel of AST Mini (Figure 2). Date of sale / Warranty. Date of sale and warranty period AST Mini . Firmware version. Current number of firmware version installed to AST Mini . Network. Assigned to AST Mini IP address in local area network (by default 192.168.1.101), connection method
(wired or wireless), MAC address of net adapter. Played songs. Statistical information about quantity of songs played by the device. The last certified month. Month and year of the last certified repertoire update. May mismatch with month and
year of the last installed to the device repertoire update. For more details about installation of electronic certificate see para. 3.3.
Date of the last update. Month and year of the last installed to the device repertoire update. May mismatch with month and year of the last installed to the device repertoire update.
Additional updates Displaying of additional updates list using national languages installed to karaoke system.

Karaoke System AST Mini. Owner’s manual
17
4.3.2. Menu option «User»
Karaoke Countdown. Switching on/off the countdown. Countdown warns about beginning of painting over text among
other after long solo. Theme. Selection of karaoke system user interface colour scheme and painting over song’s text. Reservation playout delay. Selection of pause duration before start of playback the next song from list of
reserved songs. For more details about reservation, see para. 4.1.2. Quantity of song lines on the screen. Adjustment of quantity of simultaneously displayed on the screen lines of
playing song. Four lines take more space on the screen, but simplify vision of text. Lines adjustment. Selection of version of song text lines adjustment in horizontal direction. Text adjustment. Selection of version of song text lines adjustment in vertical direction. Text platter. Selection of translucent song text platter intensity. The more saturated (dark) platter, the better text
readability. At the same time dark platter overrides background video. Extended information. Switching on/off detailed information about song in standby mode, before its playback. Scoring. Switching on/off scoring function for alloting the mark for song execution.
Background video In this menu section it is possible to see the list of downloaded to hard drive video files for background video
playback, activate or switch off necessary video file, to download new video files to hard drive of the device (up to 10 video files).
Downloading of video files to be done as follows: 1. Download to USB drive one or a few video files in formats AVI, MKV or MPEG. 2. Insert USB drive to USB port ([6] on Figure 1 or [4] on Figure 2). 3. Locate cursor on one of free cells in the list of video files. If cursor locates on occupied cell video file
presented on hard drive of the device will be replaced by the new one. 4. Press yellow button «Add/change» (button box of coloured function pushbuttons [8] on Figure 3). Will
display dialog box «Add file» with the list of connected to the device USB drives. 5. Locate cursor on line with name of necessary USB drive and press «OK» (button box [13] on Figure 3) for
displaying of the list of files available for copying. 6. Locate cursor on line with file for copying and confirm option by pressing yellow button «Add file» (button
box of coloured function pushbuttons [8] on Figure 3). Will start copying of video file to hard drive of the device.
IMPORTANT: do not disconnect USB drive from USB port before the end of copying process.
On completion of copying the name of downloaded video file will appear in the list of downloaded to hard drive
of the device video files. In order to delete unnecessary video file set cursor on line with this file and press red button «Delete», then
confirm deleting by pressing on green button «Yes». Press red button «NO» for rejection of deleting (button box of coloured function pushbuttons [8] on Figure 3).
For activation or stop of playback of background video file set cursor on line with the necessary video file and press button «OK» (button box [13] on Figure 3).
Background audio In this menu section it is possible to see the list of downloaded to hard drive catalogs with MP3 files, which may
be played as background audio, activate or switch off necessary file catalog, to download new audio files to hard drive of the device or to delete unnecessary files.
Background audio. Switching on/off playback of background audio in pauses between songs playback.
Karaoke System AST Mini. Owner’s manual
18
Volume of background audio. Control of playback volume of background audio relatively to general volume, set in karaoke system, in percents.
Downloading of catalogs with audio files to be done as follows: 1. Make on empty USB drive new folder, write to it audio files in MP3 format. 2. Insert USB drive to USB port ([6] on Figure 1 or [4] on Figure 2). 3. Locate cursor on one of free cells in the list of catalogs. If cursor locates on occupied cell presented on hard
drive of the device catalog will be replaced by the new one. 4. Press yellow button «Add/change» (button box of coloured function pushbuttons [8] on Figure 3). Will
display dialog box «Add file» with the list of connected to the device USB drives. 5. Locate cursor on line with name of necessary USB drive and press «OK» (button box [13] on Figure 3) for
displaying of the list of folders available for copying. 6. Locate cursor on line with folder for copying and confirm option by pressing yellow button «Add file»
(button box of coloured function pushbuttons [8] on Figure 3). Will start copying of audio files to hard drive of the device.
IMPORTANT: do not disconnect USB drive from USB port before the end of copying process.
On completion of copying the name of downloaded folder with audio files will appear in the list of downloaded
to hard drive of the device folders. In order to delete unnecessary catalog with audio files set cursor on line with the name of this catalog and press
red button «Delete», then confirm deleting by pressing on green button «Yes». Press red button «NO» for rejection of deleting (button box of coloured function pushbuttons [8] on Figure 3).
Settings by default This menu section is designed to reset main parameters of user-definable AST Mini settings to recommended by
manufacturer settings (delivery settings). Reset of settings does not affect changes done in the menu option «Administrator».
4.3.3. Menu option «Administrator»
To enter this menu option type the password «1234». Password request will be one time after every restart of karaoke system.
General Settings Language. Selection of the language of interface and karaoke system messages. Songs counter. Control of songs counter dwell from the beginning of track playback.
Microphonic processing Limiter. Limits maximum volume level of signal received from microphone port of the device. Limitation is
designed for overload protection of acoustic equipment. Frequency HF/MF/LF/LF2. Selection of central frequency from HF (100 Hz – 10000 Hz) / MF (80 Hz – 4100
Hz) / LF (80 Hz – 1700 Hz) / LF2 (40 Hz – 350 Hz) frequency range for adjustment. Level HF/MF/LF/LF2. Volume of amplification/signal depression in the selected frequency range
HF/MF/LF/LF2.
MIDI Melody. Control of playback volume of prompt melody accompanied the track. Reverberation mode. Selection of simulation algorithm of acoustic model of room. Reverberation level. Tuning of effect intensity.
Video HDMI/Component mode. Selection of mode of operation of component and HDMI outputs of karaoke system.

Karaoke System AST Mini. Owner’s manual
19
Composite video output(s) mode. Information about the format of video signal at the composite video output of the device. Depends on the selected mode of operation of component and HDMI outputs.
A/V delay. Setting of video signal delay time relatively to audio, in milliseconds. Designed for compensation of uninterruptible post processing of signals in some models of TV and home theatre receivers.
Network / Local area network (LAN) Method of getting an IP address. Selection of network settings determination method for connection of AST
Mini to local area network. For automatic determination of connection parameters to local area network use value «Assigning». For independent setting of parameters values use the «Static» method of IP address receiving.
IP address. Setting of IP address of built-in network adapter of AST Mini. Net mask. Setting of net mask. Gateway. Setting of IP address of gateway by default. Initial DNS. Setting of IP address of initial DNS server. Secondary DNS. Setting of IP address of secondary DNS server.
Network / Wireless network (Wi-Fi) Connection using wireless network is impossible if AST Mini is already connected to local area network by the
cable. Status. Displays the current status of connection to wireless network. Available networks. The list of available for connection wireless networks. In order to connect to wireless
network locate cursor using arrows on the line with necessary network and press button «OK» (button box [13] on Figure 3).
Security Password for switching on. Field for entering password, requesting during start of AST Mini. Password to be
composed only with figures and may contains from 1 to 10 symbol. To protect settings by password. Activation or switching off password request during start of AST Mini. Password for settings. Field for password requesting during entering settings mode. Password to be composed
only with figures and may contains from 1 to 10 symbol. To protect settings by password. Activation or switching off password request during entering settings mode.
Settings by default This menu section is designed to reset main parameters of administrative AST Mini settings to recommended by
manufacturer settings (delivery settings). Reset of settings does not affect changes done in the menu option «User».

Karaoke System AST Mini. Owner’s manual
20
5. AST Manager, the program to control the device using tablet PC or smart phone
By means of the special program «AST Manager» it is possible to control the device AST Mini using tablet PC or smart phone. The program gives the full control interface substituting screen of connected to the device TV set.
References for downloading and installation of «AST Manager» available on the web site of the company Art System (http://www.art-system.ru) in the section «Service and support / Software».

Karaoke System AST Mini. Owner’s manual
21
6. Installation of updates (firmware)
It is recommended to regularly check availability of the new versions of software (firmware) updates for the device and to renew these updates timely.
For independent updating of firmware make the following actions: 1. Download file with the last firmware update in Personal Area (http://www.astupdate.com/), section
«Software and documentation». 2. Save the file with update on empty USB drive. 3. Turn on the device, wait for its loading, insert USB drive with update to USB port on the front panel of the
device. 4. On display (TV set) screen connected to the device will appear information message with request to renew
software. For continuation press green button «Yes», for rejection of installation press red button «NO» (button box of coloured function pushbuttons [8] on Figure 3).
5. Updating process takes a few minutes. On completion of the procedure the device will automatically reload, whereupon it is ready to work.
IMPORTANT: do not disconnect USB drive from USB port before the end of copying process.
6. Disconnect USB drive from USB port. In case that later version of software (firmware), than presented on USB drive, is already installed to the device,
update will not start.

Karaoke System AST Mini. Owner’s manual
22
7. Troubleshooting
In case of the device faultiness before applying to specialised maintenance shop it is recommended to learn the information presented in below table. The stated actions will help to determine possible cause of faultiness and to avoid it in future.
Check and in case of necessity install the latest version of software (firmware) to the device.
Indications of faultiness Method of elimination
The device not turns on. Check connection of the power cord to grid socket, availability of voltage in mains supply.
No picture, corrupt picture. Make sure that display or TV set properly connected to the device. Check regularity of height-to-width aspect ratio on TV set screen.
No sound, corrupt sound. Check regularity of connection of the device to loudspeaker system.
Remote control does not work. Check maintenance batteries polarity in remote control (+ and -). It may be that charge in batteries finished, replace batteries to new ones. Direct remote control towards to remote control signal receiver. Make sure that work with remote control is on the distance no more than 7 m from the device. Remove all unnecessary objects between remote control and remote control signal receiver.
The device does not react to pushing buttons on the front panel and also on remote control.
Reload the device. For that turn off device power (press and keep pushing for a few seconds turn on button) and again turn on not earlier then after 10 seconds after turning off. Device work may be interrupted due to static electricity, near lightning or other external factors.
Symbols on TV set screen do not display or display partly.
Make sure that regularity of screen type is according to owner’s manual of TV set.
The device does not load. Turn off device power and after10 seconds turn on again. It may be formation of condensate inside the device due to temperature difference. In that case dry up the device during 1-2 hours at room temperature.
Song’s number entered correctly, but track does not playback.
Make sure that downloaded update with the song with entered number.
Track playbacks, but playback only the first 1.5 minutes.
Update with this track is not certified. Download and install the renewed certificate.
On the screen constantly displays message «Error 101»
Immediately contact specialised maintenance shop.


