160
Kaspersky Security Center 10.0 APPLICATION VERSION: 10.0 Administrators' Guide

Kaspersky Security Center 10.0
A P P L I C A T I O N V E R S I O N : 1 0 . 0
AD Administrators' Guide

2
Dear User!
Thank you for choosing our product. We hope that this document will help you in your work and will provide answers regarding this software product.
Attention! This document is the property of Kaspersky Lab ZAO: All rights to this document are protected by the copyright laws of the Russian Federation and by international treaties. Illegal reproduction and distribution of this document or parts hereof result in civil, administrative or criminal liability by applicable law.
Reproduction or distribution of any materials in any format, including translations, is allowed only with the written permission of Kaspersky Lab.
This document, and graphic images related to it, may only be used for informational, non-commercial, and personal purposes.
Kaspersky Lab reserves the right to amend this document without additional notification. You can find the latest version of this document at the Kaspersky Lab website, at http://www.kaspersky.com/docs.
Kaspersky Lab shall not be liable for the content, quality, relevance, or accuracy of any materials used in this document for which the rights are held by third parties, or for any potential or actual losses associated with the use of these materials.
Document revision date: 30.10.2012
© 2012 Kaspersky Lab ZAO. All Rights Reserved.
http://www.kaspersky.com http://support.kaspersky.com

3
CONTENT
ABOUT THIS GUIDE ..................................................................................................................................................... 9
In this document ....................................................................................................................................................... 9
Document conventions ........................................................................................................................................... 11
SOURCES OF INFORMATION ABOUT THE APPLICATION ..................................................................................... 13
Information sources for further research ................................................................................................................. 13
Discussing Kaspersky Lab applications in the forum .............................................................................................. 14
Contacting the Technical Writing and Localization Department by email ............................................................... 14
KASPERSKY SECURITY CENTER ............................................................................................................................. 15
What's new ............................................................................................................................................................. 15
Distribution package ............................................................................................................................................... 16
Hardware and software requirements ..................................................................................................................... 17
APPLICATION INTERFACE ........................................................................................................................................ 20
Main application window ......................................................................................................................................... 20
Console tree ........................................................................................................................................................... 22
Workspace .............................................................................................................................................................. 25
Set of management blocks................................................................................................................................ 27
List of management objects .............................................................................................................................. 27
Set of information blocks ................................................................................................................................... 29
Data filtering block .................................................................................................................................................. 30
Context menu ......................................................................................................................................................... 33
Configuring the interface......................................................................................................................................... 34
APPLICATION LICENSING ......................................................................................................................................... 36
About the End User License Agreement ................................................................................................................ 36
About the license .................................................................................................................................................... 36
About the activation code ....................................................................................................................................... 37
About the key file .................................................................................................................................................... 37
About the volunteering of information ..................................................................................................................... 38
QUICK START WIZARD .............................................................................................................................................. 38
BASIC CONCEPTS ..................................................................................................................................................... 40
Administration Server ............................................................................................................................................. 40
Administration Server hierarchy .............................................................................................................................. 41
Virtual Administration Server .................................................................................................................................. 41
Mobile devices server ............................................................................................................................................. 42
Network Agent. Administration group ..................................................................................................................... 42
Administrator's workstation ..................................................................................................................................... 43
Application management plug-in ............................................................................................................................ 44
Policies, application settings and tasks .................................................................................................................. 44
How local application settings relate to policies ...................................................................................................... 45
MANAGING ADMINISTRATION SERVERS ................................................................................................................ 47
Connecting to an Administration Server and switching between Administration Servers ....................................... 47
Access rights to Administration Server and its objects ........................................................................................... 48
Conditions of connection to an Administration Server via the Internet .................................................................... 49
Secure connection to Administration Server ........................................................................................................... 50
A D M I N I S T R A T O R ' S G U I D E
4
Administration Server certificate ....................................................................................................................... 50
Administration Server authentication during client computer connection .......................................................... 50
Administration Server authentication during Administration Console connection ............................................. 51
Disconnecting from an Administration Server ......................................................................................................... 51
Adding an Administration Server to the console tree .............................................................................................. 51
Removing an Administration Server from the console tree ..................................................................................... 51
Changing an Administration Server service account. The klsrvswch utility............................................................. 52
Viewing and modifying the settings of an Administration Server ............................................................................ 52
Adjusting the general settings of an Administration Server ............................................................................... 53
Configuring event processing settings .............................................................................................................. 53
Control of virus outbreaks ................................................................................................................................. 53
Limiting traffic .................................................................................................................................................... 54
Configuring cooperation with Cisco Network Admission Control (NAC) ............................................................ 54
Interaction between Administration Server and KSN Proxy service .................................................................. 54
Working with internal users ............................................................................................................................... 54
MANAGING ADMINISTRATION GROUPS .................................................................................................................. 56
Creating administration groups ............................................................................................................................... 56
Moving administration groups ................................................................................................................................. 57
Deleting administration groups ............................................................................................................................... 58
Automatic creation of a structure of administration groups ..................................................................................... 58
Automatic installation of applications to computers in an administration group ...................................................... 60
MANAGING APPLICATIONS REMOTELY .................................................................................................................. 61
Managing policies ................................................................................................................................................... 61
Creating policies ............................................................................................................................................... 62
Displaying inherited policy in a subgroup .......................................................................................................... 62
Activating a policy ............................................................................................................................................. 63
Activating a policy automatically at the Virus outbreak event ............................................................................ 63
Applying a roaming policy ................................................................................................................................. 63
Deleting a policy ................................................................................................................................................ 63
Copying a policy ................................................................................................................................................ 64
Exporting a policy .............................................................................................................................................. 64
Importing a policy .............................................................................................................................................. 64
Converting policies ............................................................................................................................................ 65
Managing tasks ...................................................................................................................................................... 65
Creating a group task ........................................................................................................................................ 66
Creating an Administration Server task ............................................................................................................. 66
Creating a task for specific computers .............................................................................................................. 67
Creating a local task ......................................................................................................................................... 68
Displaying an inherited group task in the workspace of a nested group ........................................................... 68
Starting client computers automatically before launching a task ....................................................................... 68
Turning off the computer after a task is complete ............................................................................................. 69
Limiting task run time ........................................................................................................................................ 69
Exporting a task ................................................................................................................................................ 69
Importing a task ................................................................................................................................................ 70
Converting tasks ............................................................................................................................................... 70
Starting and stopping a task manually .............................................................................................................. 70
Pausing and resuming a task manually ............................................................................................................ 71
Monitoring task execution ................................................................................................................................. 71

C O N T E N T
5
Viewing task run results stored on Administration Server ................................................................................. 71
Configuring filtering of information about task run results ................................................................................. 71
Viewing and changing local application settings ..................................................................................................... 72
MANAGING CLIENT COMPUTERS ............................................................................................................................ 73
Connecting client computers to Administration Server ........................................................................................... 73
Connecting a client computer to Administration Server manually. Utility tool klmover ............................................ 74
Checking the connection between a client computer and Administration Server.................................................... 75
Automatic check of connection between a client computer and Administration Server ..................................... 75
Manual check of connection between a client computer and Administration Server. The klnagchk utility ........ 75
Identifying client computers on Administration Server ............................................................................................ 76
Adding computers to an administration group ........................................................................................................ 76
Changing Administration Server for client computers ............................................................................................. 77
Remote turning on, turning off and restarting client computers .............................................................................. 78
Sending a message to the users of client computers ............................................................................................. 78
Remote diagnostics of client computers. Utility for remote diagnostics of Kaspersky Security Center ................... 79
Connecting the remote diagnostics utility to a client computer.......................................................................... 79
Enabling and disabling tracing, downloading the trace file ................................................................................ 81
Downloading applications' settings ................................................................................................................... 82
Downloading event logs .................................................................................................................................... 82
Starting diagnostics and downloading its results ............................................................................................... 82
Starting, stopping and restarting applications ................................................................................................... 83
WORKING WITH REPORTS, STATISTICS, AND NOTIFICATIONS........................................................................... 84
Managing reports .................................................................................................................................................... 84
Creating a report template ................................................................................................................................ 84
Creating and viewing a report ........................................................................................................................... 85
Saving a report .................................................................................................................................................. 85
Creating a report delivery task .......................................................................................................................... 85
Working with the statistical information ................................................................................................................... 86
Configuring notification settings .............................................................................................................................. 86
Event selections ..................................................................................................................................................... 87
Viewing an event selection................................................................................................................................ 87
Customizing an event selection ........................................................................................................................ 88
Creating an event selection............................................................................................................................... 88
Exporting event selection to text file .................................................................................................................. 88
Deleting events from selection .......................................................................................................................... 89
Computer selections ............................................................................................................................................... 89
Viewing computer selection .............................................................................................................................. 89
Configuring a computer selection ...................................................................................................................... 90
Creating a computer selection .......................................................................................................................... 90
Exporting settings of a computer selection to file .............................................................................................. 90
Create a computer selection by using imported settings ................................................................................... 91
Removing computers from administration groups in a selection ....................................................................... 91
UNASSIGNED COMPUTERS ...................................................................................................................................... 92
Network discovery .................................................................................................................................................. 92
Viewing and modifying the settings for Windows network polling ..................................................................... 93
Viewing and modifying Active Directory group properties ................................................................................. 93
Viewing and modifying the settings for IP subnet polling .................................................................................. 94
Working with Windows domains. Viewing and changing the domain settings ........................................................ 94
A D M I N I S T R A T O R ' S G U I D E
6
Working with IP subnets ......................................................................................................................................... 94
Creating an IP subnet ....................................................................................................................................... 95
Viewing and changing the IP subnet settings.................................................................................................... 95
Working with the Active Directory groups. Viewing and modifying group settings .................................................. 95
Creating rules for moving computers to administration groups automatically ......................................................... 95
MANAGING APPLICATIONS ON CLIENT COMPUTERS ........................................................................................... 97
Groups of applications ............................................................................................................................................ 97
Creating application categories ......................................................................................................................... 98
Configuring applications launch management on client computers .................................................................. 99
Viewing the applications registry ..................................................................................................................... 100
Creating groups of licensed applications ........................................................................................................ 100
Managing keys for groups of licensed applications ......................................................................................... 100
Viewing information about executable files ..................................................................................................... 101
Application vulnerabilities ..................................................................................................................................... 102
Viewing information about vulnerabilities in applications ................................................................................ 102
Searching for vulnerabilities in applications .................................................................................................... 103
Fixing vulnerabilities in applications ................................................................................................................ 103
Software updates .................................................................................................................................................. 103
Viewing information about available updates .................................................................................................. 104
Synchronizing updates from Windows Update with Administration Server ..................................................... 104
Installing updates to client computers ............................................................................................................. 105
Configuring application updates in a Network Agent policy ............................................................................ 106
REMOTE INSTALLATION OF OPERATING SYSTEMS AND APPLICATIONS ........................................................ 107
Creating images of operating systems ................................................................................................................. 108
Adding drivers for Windows Preinstallation Environment (WinPE) ....................................................................... 109
Adding drivers to an installation package with an operating system image .......................................................... 109
Configuring sysprep.exe ....................................................................................................................................... 110
Deploying operating systems on new networked computers ................................................................................ 110
Deploying operating systems on client computers ................................................................................................ 111
Creating installation packages of applications ...................................................................................................... 111
Installing applications to client computers............................................................................................................. 112
MANAGING MOBILE DEVICES ................................................................................................................................ 113
Managing Exchange ActiveSync mobile devices .................................................................................................. 113
Viewing information about Exchange ActiveSync mobile devices................................................................... 114
Editing a management profile for Exchange ActiveSync devices .................................................................... 114
Installing certificates to Exchange ActiveSync mobile devices........................................................................ 114
Managing iOS MDM mobile devices ..................................................................................................................... 115
Configuring connection of mobile devices to an iOS MDM mobile devices server .......................................... 116
Managing an iOS MDM mobile device using context menu commands ......................................................... 117
Editing configuration profiles ........................................................................................................................... 118
Adding a managed application to an iOS MDM mobile devices server ........................................................... 118
Installing a managed application to an iOS MDM mobile device ..................................................................... 119
Configuring the roaming on an iOS MDM mobile device ................................................................................ 119
ENCRYPTION AND DATA PROTECTION ................................................................................................................ 120
Viewing the list of encrypted devices .................................................................................................................... 120
Viewing the list of encryption events ..................................................................................................................... 121
Exporting the list of encryption events to a text file ............................................................................................... 122

C O N T E N T
7
Creating and viewing encryption reports .............................................................................................................. 122
MANAGING DEVICES ACCESS TO AN ORGANIZATION'S NETWORK (NETWORK ACCESS CONTROL, NAC) 124
Switching to the NAC settings in the Network Agent properties ........................................................................... 125
Selecting an operation mode for the NAC agent .................................................................................................. 125
Creating network elements ................................................................................................................................... 126
Creating network access restriction rules ............................................................................................................. 127
Creating a white list .............................................................................................................................................. 127
Creating a list of allowed network addresses ........................................................................................................ 128
Creating accounts to use on the authorization portal ............................................................................................ 128
Configuring the authorization page interface ........................................................................................................ 128
Configuring NAC in a Network Agent policy ......................................................................................................... 129
INVENTORY OF EQUIPMENT DETECTED ON THE NETWORK ............................................................................ 130
Adding information about new devices ................................................................................................................. 130
Configuring criteria used to define enterprise devices .......................................................................................... 131
UPDATING DATABASES AND SOFTWARE MODULES .......................................................................................... 132
Creating the task of downloading updates to the repository ................................................................................. 132
Configuring the task of downloading updates to the repository ............................................................................ 133
Verifying downloaded updates .............................................................................................................................. 133
Configuring test policies and auxiliary tasks ......................................................................................................... 134
Viewing downloaded updates ............................................................................................................................... 135
Automatic distribution of updates .......................................................................................................................... 135
Distributing updates to client computers automatically ................................................................................... 136
Distributing updates to slave Administration Servers automatically ................................................................ 136
Installing program modules for Servers and Network Agents automatically ................................................... 137
Creating and configuring the list of Update Agents ......................................................................................... 138
Downloading updates by Update Agents ........................................................................................................ 138
WORKING WITH APPLICATION KEYS .................................................................................................................... 140
Viewing information about keys in use ................................................................................................................. 140
Adding a key to the Administration Server repository ........................................................................................... 140
Distributing a key to client computers ................................................................................................................... 141
Automatic distribution of a key .............................................................................................................................. 141
Creating and viewing a report on the use of keys ................................................................................................. 142
DATA REPOSITORIES .............................................................................................................................................. 143
Exporting a list of repository objects to a text file .................................................................................................. 143
Installation packages ............................................................................................................................................ 143
Quarantine and Backup ........................................................................................................................................ 144
Enabling remote management for files in the repositories .............................................................................. 144
Viewing properties of a file placed in repository .............................................................................................. 145
Removing files from repositories ..................................................................................................................... 145
Restoring files from repositories ...................................................................................................................... 145
Saving a file from repositories to disk ............................................................................................................. 146
Scanning files in Quarantine ........................................................................................................................... 146
Unprocessed files ................................................................................................................................................. 146
Postponed file disinfection .............................................................................................................................. 146
Saving an unprocessed file to disk .................................................................................................................. 147
Deleting files from the Unprocessed files folder .............................................................................................. 147

A D M I N I S T R A T O R ' S G U I D E
8
CONTACTING TECHNICAL SUPPORT .................................................................................................................... 148
How to obtain technical support ............................................................................................................................ 148
Technical support by phone .................................................................................................................................. 148
Obtaining technical support via My Kaspersky Account ....................................................................................... 148
APPLICATIONS ......................................................................................................................................................... 150
GLOSSARY ............................................................................................................................................................... 151
KASPERSKY LAB ZAO ............................................................................................................................................. 155
INFORMATION ABOUT THIRD-PARTY CODE ........................................................................................................ 156
TRADEMARK NOTICES ............................................................................................................................................ 157
INDEX ........................................................................................................................................................................ 158
9
ABOUT THIS GUIDE
This document is the Administrator's Guide for Kaspersky Security Center 10.0 (hereafter referred to as Kaspersky Security Center).
This Guide is intended for technical specialists tasked with installing and administering Kaspersky Security Center and supporting companies that use Kaspersky Security Center.
This Guide is intended to do the following:
Help configure and use Kaspersky Security Center.
Provide a readily searchable source of information for questions related to operation of Kaspersky Security Center.
Describe additional sources of information about the application and ways of receiving technical support.
IN THIS SECTION
In this document ................................................................................................................................................................ 9
Document conventions .................................................................................................................................................... 11
IN THIS DOCUMENT
Kaspersky Security Center Administrator's Guide contains an introduction, sections that describe the application interface, settings, and maintenance, sections that describe how to perform daily tasks, and a glossary.
Sources of information about the application (see page 13)
This section describes sources of information about the application and lists websites that you can use to discuss the application's operation.
Kaspersky Security Center (see page 15)
The section contains information on the purpose of Kaspersky Security Center, and its main features and components.
Application interface (see page 20)
This section describes the main features of the Kaspersky Security Center interface.
Application licensing (see page 36)
This section provides information about general terms related to the application activation. Read this section to learn more about the purpose of the License Agreement, license types, ways of activating the application, and license renewal.
Quick Start Wizard (see page 38)
This section provides information about the functionality of the Kaspersky Security Center Quick Start Wizard.
A D M I N I S T R A T O R ' S G U I D E
10
Basic concepts (see page 40)
This section explains basic concepts related to Kaspersky Security Center in detail.
Managing Administration Servers (see page 47)
This section provides information about how to handle Administration Servers and how to configure them.
Managing administration groups (see page 56)
This section provides information about how to handle administration groups.
Managing applications remotely (see page 61)
This section provides information about how to perform remote management of Kaspersky Lab applications installed on client computers, using policies, tasks, and local settings of applications.
Managing client computers (see page 73)
This section provides information about how to handle client computers.
Working with reports, statistics, and notifications (see page 84)
This section provides information about how to handle reports, statistics, and selections of events and client computers in Kaspersky Security Center, as well as how to configure Administration Server notifications.
Unassigned computers (see page 92)
This section provides information about how to manage computers on an enterprise network if they are not included in an administration group.
Applications and vulnerabilities (see page 97)
This section describes how to handle application and vulnerabilities that Kaspersky Security Center detects on client computers.
Updating databases and software modules (see page 132)
This section describes how to download and distribute updates of databases and software modules using Kaspersky Security Center.
Working with application keys (see page 140)
This section describes the features of Kaspersky Security Center related to handling keys of managed Kaspersky Lab applications.
Data repositories (see page 143)
This section provides information about data stored on the Administration Server and used for tracking the condition of client computers and servicing them.
Contacting the Technical Support Service (see page 148)
This section provides information about how to obtain technical support and what conditions should be met to receive help from the Technical Support Service.
A B O U T T H I S G U I D E
11
Glossary
This section lists terms used in the guide.
Kaspersky Lab ZAO (see page 155)
This section provides information about Kaspersky Lab ZAO.
Information about third-party code (see page 156)
This section provides information about third-party code used in Kaspersky Security Center.
Trademark notices
This section contains registered trademark notices.
Index
Using this section, you can easily find the required data in the document.
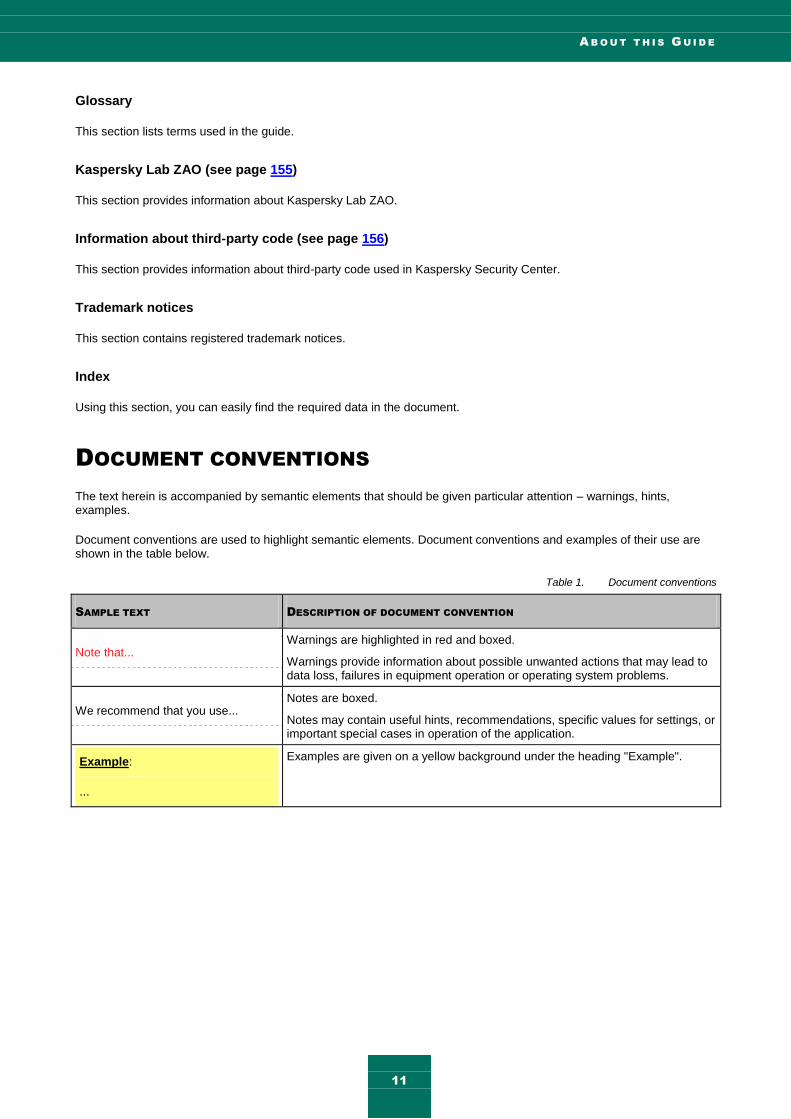
DOCUMENT CONVENTIONS
The text herein is accompanied by semantic elements that should be given particular attention – warnings, hints, examples.
Document conventions are used to highlight semantic elements. Document conventions and examples of their use are shown in the table below.
Table 1. Document conventions
SAMPLE TEXT DESCRIPTION OF DOCUMENT CONVENTION
Note that... Warnings are highlighted in red and boxed.
Warnings provide information about possible unwanted actions that may lead to data loss, failures in equipment operation or operating system problems.
We recommend that you use... Notes are boxed.
Notes may contain useful hints, recommendations, specific values for settings, or important special cases in operation of the application.
Example:
...
Examples are given on a yellow background under the heading "Example".

A D M I N I S T R A T O R ' S G U I D E
12
SAMPLE TEXT DESCRIPTION OF DOCUMENT CONVENTION
Update means...
The Databases are out of date event
occurs.
The following semantic elements are italicized in the text:
New terms
Names of application statuses and events.
Press ENTER.
Press ALT+F4.
Names of keyboard keys appear in bold and are capitalized.
Names of keys that are connected by a + (plus) sign indicate the use of a key combination. Those keys must be pressed simultaneously.
Click the Enable button. Names of application interface elements, such as entry fields, menu items, and buttons, are set off in bold.
To configure a task schedule: Introductory phrases of instructions are italicized and are accompanied by the arrow sign.
Enter help in the command line
The following message then appears:
Specify the date in dd:mm:yy
format.
The following types of text content are set off with a special font:
Text in the command line
Text of messages that the application displays on screen
Data that the user must enter.
<User name> Variables are enclosed in angle brackets. Instead of a variable, the corresponding value should be inserted, with angle brackets omitted.
13
SOURCES OF INFORMATION ABOUT THE
APPLICATION
This section describes sources of information about the application and lists websites that you can use to discuss the application's operation.
You can select the most suitable information source, depending on the issue's level of importance and urgency.
IN THIS SECTION
Information sources for further research ......................................................................................................................... 13
Discussing Kaspersky Lab applications in the forum ...................................................................................................... 14
Contacting the Technical Writing and Localization Department by email ........................................................................ 14
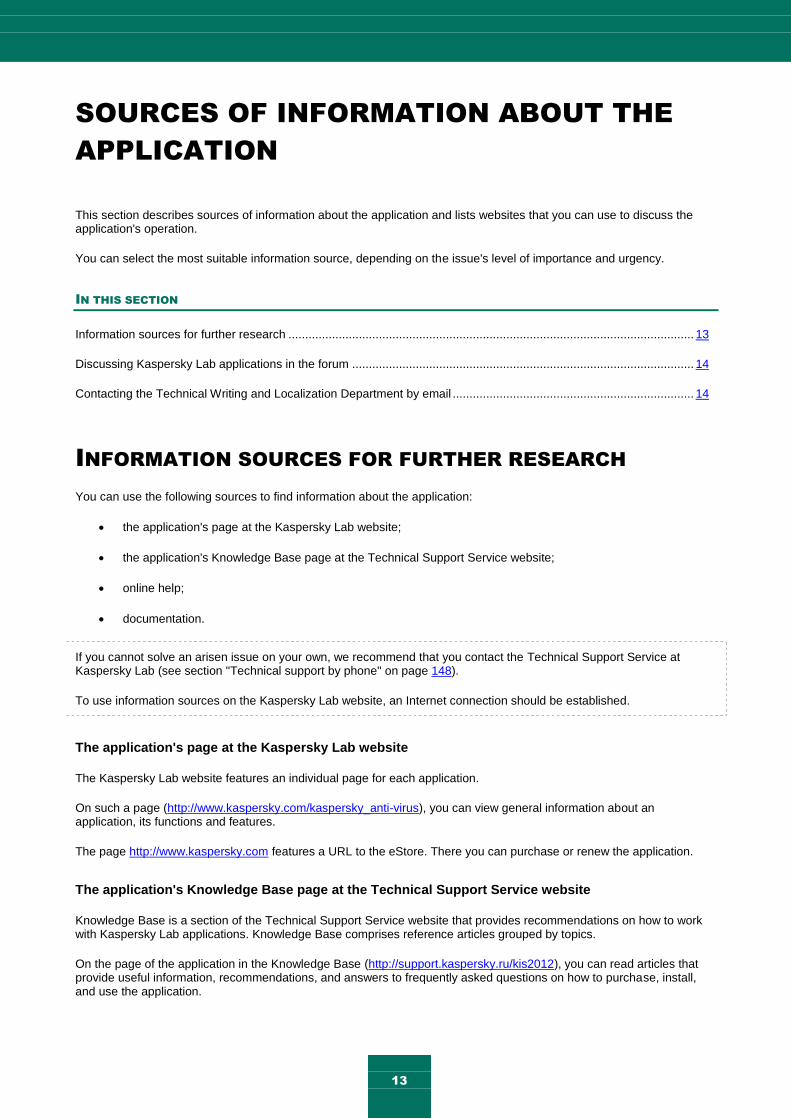
INFORMATION SOURCES FOR FURTHER RESEARCH
You can use the following sources to find information about the application:
the application's page at the Kaspersky Lab website;
the application's Knowledge Base page at the Technical Support Service website;
online help;
documentation.
If you cannot solve an arisen issue on your own, we recommend that you contact the Technical Support Service at Kaspersky Lab (see section "Technical support by phone" on page 148).
To use information sources on the Kaspersky Lab website, an Internet connection should be established.
The application's page at the Kaspersky Lab website
The Kaspersky Lab website features an individual page for each application.
On such a page (http://www.kaspersky.com/kaspersky_anti-virus), you can view general information about an application, its functions and features.
The page http://www.kaspersky.com features a URL to the eStore. There you can purchase or renew the application.
The application's Knowledge Base page at the Technical Support Service website
Knowledge Base is a section of the Technical Support Service website that provides recommendations on how to work with Kaspersky Lab applications. Knowledge Base comprises reference articles grouped by topics.
On the page of the application in the Knowledge Base (http://support.kaspersky.ru/kis2012), you can read articles that provide useful information, recommendations, and answers to frequently asked questions on how to purchase, install, and use the application.

A D M I N I S T R A T O R ' S G U I D E
14
Articles may provide answers to questions that are out of scope of Kaspersky Security Center, being related to other Kaspersky Lab applications. They also may contain news from the Technical Support Service.
Online help
The online help of the application comprises help files.
The context help provides information about each window of the application, listing and describing the corresponding settings and a list of tasks.
The full help provides detailed information about how to manage the персонального компьютера's protection using the application.
Documentation
The application delivery set includes documents that will help you install and activate the application on computers in a local area network, configure application settings, and learn the basic principles of using the application.
DISCUSSING KASPERSKY LAB APPLICATIONS IN THE
FORUM
If your question does not require an immediate answer, you can discuss it with the Kaspersky Lab experts and other users in our forum (http://forum.kaspersky.com).
In this forum you can view existing topics, leave your comments, create new topics.
CONTACTING THE TECHNICAL WRITING AND
LOCALIZATION DEPARTMENT BY EMAIL
If you have any questions about the documentation, please contact our Technical Documentation Development Group. For example, if you would like to leave feedback.

15
KASPERSKY SECURITY CENTER
The section contains information on the purpose of Kaspersky Security Center, and its main features and components.
The application Kaspersky Security Center is designed for centralized management of basic tasks of enterprise network administration and maintenance. The application provides the administrator access to detailed information about the organization's network security level, and allows configuring all the components of the protection system built using Kaspersky Lab applications.
The Kaspersky Security Center application is aimed at corporate network administrators and employees responsible for anti-virus protection in organizations.
The SPE version of the application is designed for SaaS providers (hereinafter referred to as service providers).
Using Kaspersky Security Center you can:
Create virtual Administration Servers to ensure the anti-virus protection of remote offices or networks of client organizations.
The client organization is an organization, whose anti-virus protection is ensured by service provider.
Create a hierarchy of administration groups to ensure anti-virus protection. which allow similar types of computers to be managed as a single unit.
Remotely install and uninstall Kaspersky Lab applications.
Centrally administer all installed Kaspersky Lab applications across the network, from a single computer.
Centrally receive and distribute, on client computers, database updates and updates to application modules of Kaspersky Lab applications.
Receive notifications about critical events in the operation of Kaspersky Lab applications.
Receive statistics and reports about the operation of Kaspersky Lab applications.
Manage keys for installed Kaspersky Lab applications.
Centrally manage files put in Quarantine or Backup by anti-virus applications, and objects for which disinfection has been postponed.
Centrally manage any third-party applications installed on the client computers.
IN THIS SECTION
What's new ...................................................................................................................................................................... 15
Distribution package ........................................................................................................................................................ 16
Hardware and software requirements ............................................................................................................................. 17
WHAT'S NEW
Changes made to Kaspersky Security Center 10.0 as compared with Kaspersky Security Center 9.0:
The option of creating virtual Administration Servers has been implemented.

A D M I N I S T R A T O R ' S G U I D E
16
The KSN Proxy functionality has been added, ensuring interaction between KSN and client computers.
Kaspersky Security Center Web-Console has been added.
The applications control functionality has been added.
The functionality of centralized collection of information about the condition of software on managed computers has been added.
The functionality of centralized applications registry has been expanded.
The functionality of controlling vulnerabilities in applications on managed computers has been added.
Support of Windows Failover® Clustering has been added for the Administration Server.
The functionality of updating the description of incompatible applications when creating installation packages for anti-virus applications has been added.
The option of receiving notifications on new versions of corporate applications from Kaspersky Lab and the option of retrieving new versions within the Administration Server update task have been added.
The set of reports and information panels has been expanded.
The mechanism of automatic assignment of update agents has been implemented.
The option of network polling and remote installation of applications using Network Agent has been added.
The user interface of the Administration Console has been reworked.
The option of using connection gateway has been added.
A dedicated installer for the Administration Console has been added.
A mode of full-text information search via the Administration Console has been implemented.
The function of identifying virtual machines has been implemented: now you can perform the search and set rules for moving computers according to the settings of a virtual machine.
Support of dynamic mode for Virtual Desktop Infrastructure (VDI) has been implemented.
The connections manager component has been added. It allows you to set time intervals of data transfer from Network Agent to the Administration Server.
The option of managing interactions with Microsoft® NAP in the policy of Network Agent has been added.
The option of creating Kaspersky Security Center accounts that are not Windows user accounts, has been added.
The option of excluding selected administration groups from the scope of a task has been added.
A dedicated installer has been developed for the installation of Kaspersky Security Center System Health Validator: its distribution package has been excluded from the application.
DISTRIBUTION PACKAGE
You can purchase the application at Kaspersky Lab's online stores (for example, http://www.kaspersky.com, section eStore) or from partner companies.
If you purchase Kaspersky Security Center at an online store, you copy the application from the store's website. Information required for the application activation, will be sent to you by email on payment.
K A S P E R S K Y S E C U R I T Y C E N T E R
17
For more details on ways of purchasing and the distribution kit, contact the Sales Department.
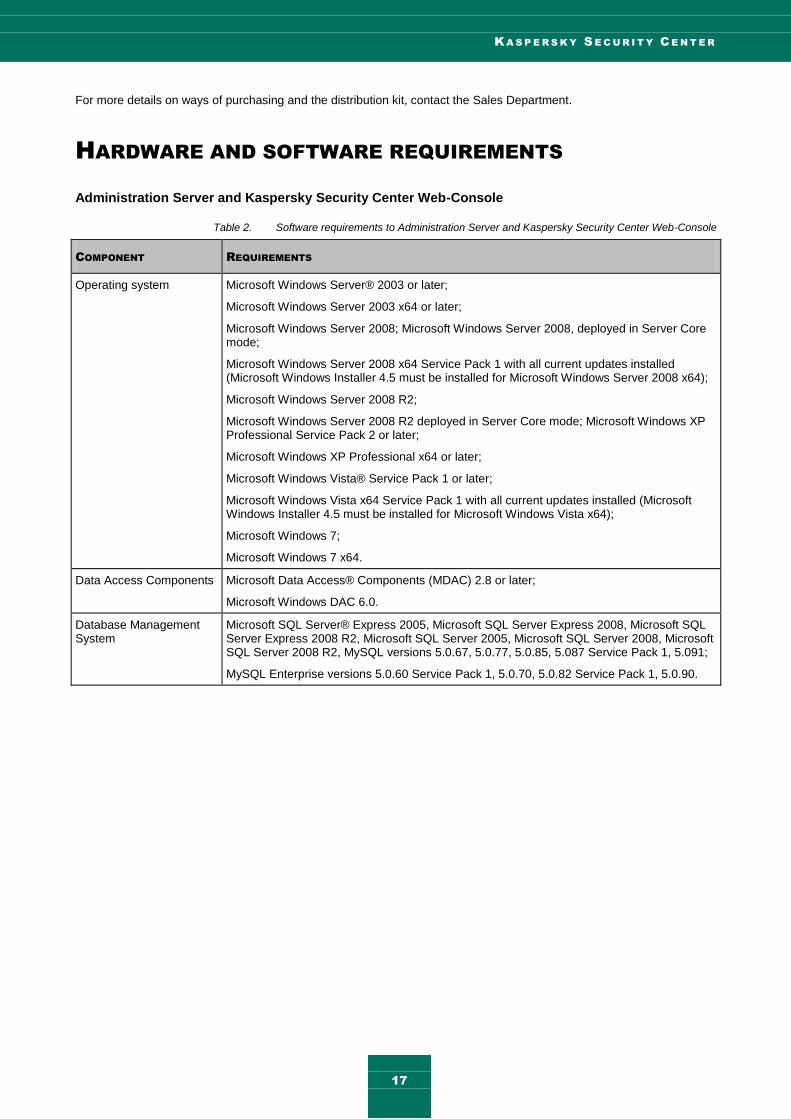
HARDWARE AND SOFTWARE REQUIREMENTS
Administration Server and Kaspersky Security Center Web-Console
Table 2. Software requirements to Administration Server and Kaspersky Security Center Web-Console
COMPONENT REQUIREMENTS
Operating system Microsoft Windows Server® 2003 or later;
Microsoft Windows Server 2003 x64 or later;
Microsoft Windows Server 2008; Microsoft Windows Server 2008, deployed in Server Core mode;
Microsoft Windows Server 2008 x64 Service Pack 1 with all current updates installed (Microsoft Windows Installer 4.5 must be installed for Microsoft Windows Server 2008 x64);
Microsoft Windows Server 2008 R2;
Microsoft Windows Server 2008 R2 deployed in Server Core mode; Microsoft Windows XP Professional Service Pack 2 or later;
Microsoft Windows XP Professional x64 or later;
Microsoft Windows Vista® Service Pack 1 or later;
Microsoft Windows Vista x64 Service Pack 1 with all current updates installed (Microsoft Windows Installer 4.5 must be installed for Microsoft Windows Vista x64);
Microsoft Windows 7;
Microsoft Windows 7 x64.
Data Access Components Microsoft Data Access® Components (MDAC) 2.8 or later;
Microsoft Windows DAC 6.0.
Database Management System
Microsoft SQL Server® Express 2005, Microsoft SQL Server Express 2008, Microsoft SQL Server Express 2008 R2, Microsoft SQL Server 2005, Microsoft SQL Server 2008, Microsoft SQL Server 2008 R2, MySQL versions 5.0.67, 5.0.77, 5.0.85, 5.087 Service Pack 1, 5.091;
MySQL Enterprise versions 5.0.60 Service Pack 1, 5.0.70, 5.0.82 Service Pack 1, 5.0.90.
A D M I N I S T R A T O R ' S G U I D E
18
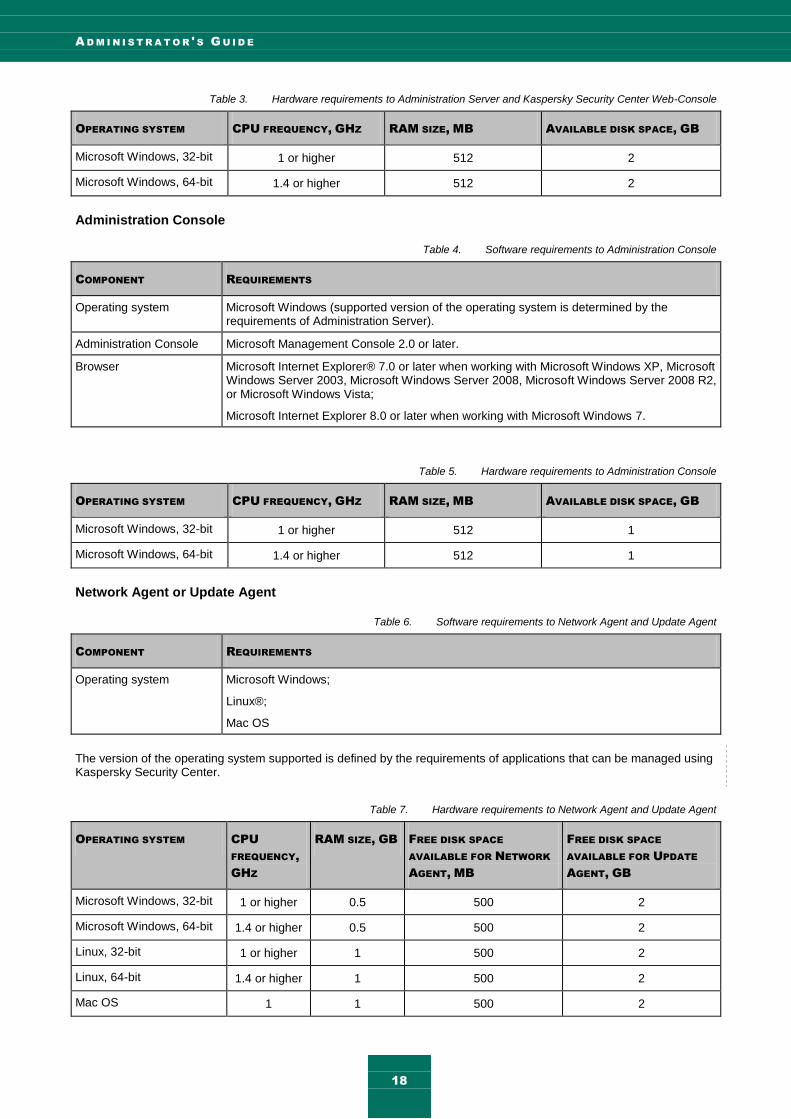
Table 3. Hardware requirements to Administration Server and Kaspersky Security Center Web-Console
OPERATING SYSTEM CPU FREQUENCY, GHZ RAM SIZE, MB AVAILABLE DISK SPACE, GB
Microsoft Windows, 32-bit 1 or higher 512 2
Microsoft Windows, 64-bit 1.4 or higher 512 2
Administration Console
Table 4. Software requirements to Administration Console
COMPONENT REQUIREMENTS
Operating system Microsoft Windows (supported version of the operating system is determined by the requirements of Administration Server).
Administration Console Microsoft Management Console 2.0 or later.
Browser Microsoft Internet Explorer® 7.0 or later when working with Microsoft Windows XP, Microsoft Windows Server 2003, Microsoft Windows Server 2008, Microsoft Windows Server 2008 R2, or Microsoft Windows Vista;
Microsoft Internet Explorer 8.0 or later when working with Microsoft Windows 7.
Table 5. Hardware requirements to Administration Console
OPERATING SYSTEM CPU FREQUENCY, GHZ RAM SIZE, MB AVAILABLE DISK SPACE, GB
Microsoft Windows, 32-bit 1 or higher 512 1
Microsoft Windows, 64-bit 1.4 or higher 512 1
Network Agent or Update Agent
Table 6. Software requirements to Network Agent and Update Agent
COMPONENT REQUIREMENTS
Operating system Microsoft Windows;
Linux®;
Mac OS
The version of the operating system supported is defined by the requirements of applications that can be managed using Kaspersky Security Center.
Table 7. Hardware requirements to Network Agent and Update Agent
OPERATING SYSTEM CPU
FREQUENCY,
GHZ
RAM SIZE, GB FREE DISK SPACE
AVAILABLE FOR NETWORK
AGENT, MB
FREE DISK SPACE
AVAILABLE FOR UPDATE
AGENT, GB
Microsoft Windows, 32-bit 1 or higher 0.5 500 2
Microsoft Windows, 64-bit 1.4 or higher 0.5 500 2
Linux, 32-bit 1 or higher 1 500 2
Linux, 64-bit 1.4 or higher 1 500 2
Mac OS 1 1 500 2

K A S P E R S K Y S E C U R I T Y C E N T E R
19

20
APPLICATION INTERFACE
This section describes the main features of the Kaspersky Security Center interface.
Viewing, creation, modification and configuration of administration groups and centralized management of Kaspersky Lab applications installed on client computers are performed from the administrator's workstation. The management interface is provided by the Administration Console component. It is a specialized stand-alone snap-in that is integrated with Microsoft Management Console (MMC); so the Kaspersky Security Center interface is standard for MMC.
Administration Console allows remote connection to Administration Server over the Internet.
For local work with client computers, the application supports remote connection to a computer through Administration Console by using the standard Microsoft Windows Remote Desktop Connection application.
To use this functionality, you must allow remote connection to the desktop on the client computer.
IN THIS SECTION
Main application window ................................................................................................................................................. 20
Console tree .................................................................................................................................................................... 22
Workspace ...................................................................................................................................................................... 25
Data filtering block ........................................................................................................................................................... 30
Context menu .................................................................................................................................................................. 33
Configuring the interface ................................................................................................................................................. 34
MAIN APPLICATION WINDOW
The main application window (see figure below) comprises a menu, a toolbar, an overview panel, and a workspace.
The menu bar allows you to use the windows and provides access to the Help system. The Action submenu duplicates
the context menu commands for the console tree object.
The overview panel displays the namespace of Kaspersky Security Center as a console tree (on page 22).
The set of toolbar buttons provides direct access to some of the menu items. The set of buttons on the toolbar may change depending on the current node or folder selected in the console tree.

A P P L I C A T I O N I N T E R F A C E
21
The appearance of the workspace of the main application window depends on which node (folder) of the console tree it is associated with, and what functions it performs.
Figure 1. Kaspersky Security Center main application window

A D M I N I S T R A T O R ' S G U I D E
22
CONSOLE TREE
The console tree (see figure below) is designed to display the hierarchy of Administration Servers in the corporate network, the structure of their administration groups, and other objects of the application, such as the Repositories or Reports and notifications folders. The namespace of Kaspersky Security Center can contain several nodes including
the names of servers corresponding to the installed Administration Servers included in the hierarchy.
Figure 2. Console tree
The Administration Server – <Computer name> node is a container that shows the structural organization of the

A P P L I C A T I O N I N T E R F A C E
23
selected Administration Server. The Administration Server – <Computer name> container includes the following
folders:
Managed computers
User accounts
Reports and notifications.
Administration Server tasks.
Tasks for specific computers
Applications and vulnerabilities.
Remote install
Mobile devices
Encryption and data protection
Unassigned computers
Repositories
The Managed computers folder is intended for storage, display, configuration and modification of the structure of
administration groups, group policies and group tasks.
The User accounts folder contains information about user accounts on the network.
The Reports and notifications folder contains a set of templates for the generation of reports about the status of the anti-virus protection on client computers in administration groups. The Reports and notifications folder contains the
following subfolders:
Computer selections. Intended for searching client computers by specified criteria.
Events. Contains selections of events that present information about application events and the results of tasks
run.
The Administration Server tasks folder contains a set of tasks defined for Administration Server.
The Tasks for specific computers folder contains tasks defined for sets of computers in administration groups or in the Unassigned computers folder. Such tasks are convenient for small groups of client computers that cannot be combined
into a separate administration group.
The Applications and vulnerabilities folder is intended for managing applications installed on computers on the
network. It contains the following subfolders:
Application categories. Intended for handling user categories of applications.
Applications registry. Contains the list of applications installed on client computers on which Network Agent is
installed.
Executable files. Contains the list of executable files stored on client computers on which Network Agent is
installed.
Application vulnerabilities. Contains the list of vulnerabilities in the applications on client computers on which
Network Agent is installed.
Software updates. Contains list of updates downloaded by the Administration Server, which can be distributed
to client computers.

A D M I N I S T R A T O R ' S G U I D E
24
The Remote installation folder is intended for managing remote installation of operating systems and applications. It
comprises the following subfolders:
Deploying computer images. Intended for deploying images of operating systems on client computers.
Installation packages. Contains a list of installation packages that can be used for remote installation of
applications on client computers.
The Mobile devices folder is designed to manage Exchange ActiveSync and iOS MDM mobile devices.
The Encryption and data protection folder is intended for managing the process of user data encryption on drives and
removable media.
The Unassigned computers folder displays the network where the Administration Server is installed. Information about
the structure of the network and computers on this network is received by the Administration Server through regular polling of the Windows network, IP subnets, and Active Directory® within the corporate computer network. Polling results are displayed in the information areas of the corresponding subfolders: Domains, IP subnets, and Active Directory.
The Repositories folder is intended for operations with objects used to monitor the status of client computers and
perform their maintenance. It includes the following folders:
Updates. Contains a list of updates received by Administration Server that can be distributed to client
computers.
Hardware. Contains a list of hardware connected to the organization's network.
Keys. Contains a list of keys on client computers.
Quarantine. Contains a list of objects moved to Quarantine by anti-virus software on client computers.
Backup. Contains the list of backup copies of objects in storage.
Unprocessed files. Contains a list of files assigned for later scanning by anti-virus applications.

A P P L I C A T I O N I N T E R F A C E
25
WORKSPACE
Workspace is an area of the main application window of Kaspersky Security Center located on the right from the console
tree (see figure below). It contains descriptions of console tree objects and their respective functions. The content of the workspace corresponds to the object selected from the console tree.
Figure 3. Workspace
The appearance of the workspace for various console tree objects depends on the type of data displayed. Three appearances of the workspace exist:
set of management boxes;
list of management objects;
set of information panes.

A D M I N I S T R A T O R ' S G U I D E
26
If the console tree does not display some of the items within an object of the console tree, the workspace is divided into tabs. Each tab corresponds to an item of the console tree (see figure below).
Figure 4. Workspace divided into tabs
IN THIS SECTION
Set of management blocks .............................................................................................................................................. 27
List of management objects ............................................................................................................................................ 27
Set of information blocks ................................................................................................................................................. 29

A P P L I C A T I O N I N T E R F A C E
27
SET OF MANAGEMENT BLOCKS
In the workspace represented as a set of management blocks, management tasks are divided into blocks. Each management block contains a set of links each of which corresponds to a management task (see figure below).
Figure 5. Workspace represented as a set of management blocks
LIST OF MANAGEMENT OBJECTS
Workspace represented as a list of management objects comprises four areas (see the figure below).
Block of objects list management.
List of objects.
Block of selected object (optional).

A D M I N I S T R A T O R ' S G U I D E
28
Block of data filtering (optional).
Figure 6. Information area represented by a list of management objects
The block of objects list management contains the header of the list and a set of links each of which corresponds to a list management task.
The list of objects is displayed in a table view. The set of table columns can be changed using a context menu.
The block of selected object contains detailed information about an object and a set of links intended for running main tasks of object management.
The block of data filtering allows you to create samples of objects from the list (see section "Data filtering block" on page 30).

A P P L I C A T I O N I N T E R F A C E
29
SET OF INFORMATION BLOCKS
Information-type data are shown in the workspace as information panes without controls (see figure below).
Figure 7. Workspace represented as a set of information panes
A D M I N I S T R A T O R ' S G U I D E
30
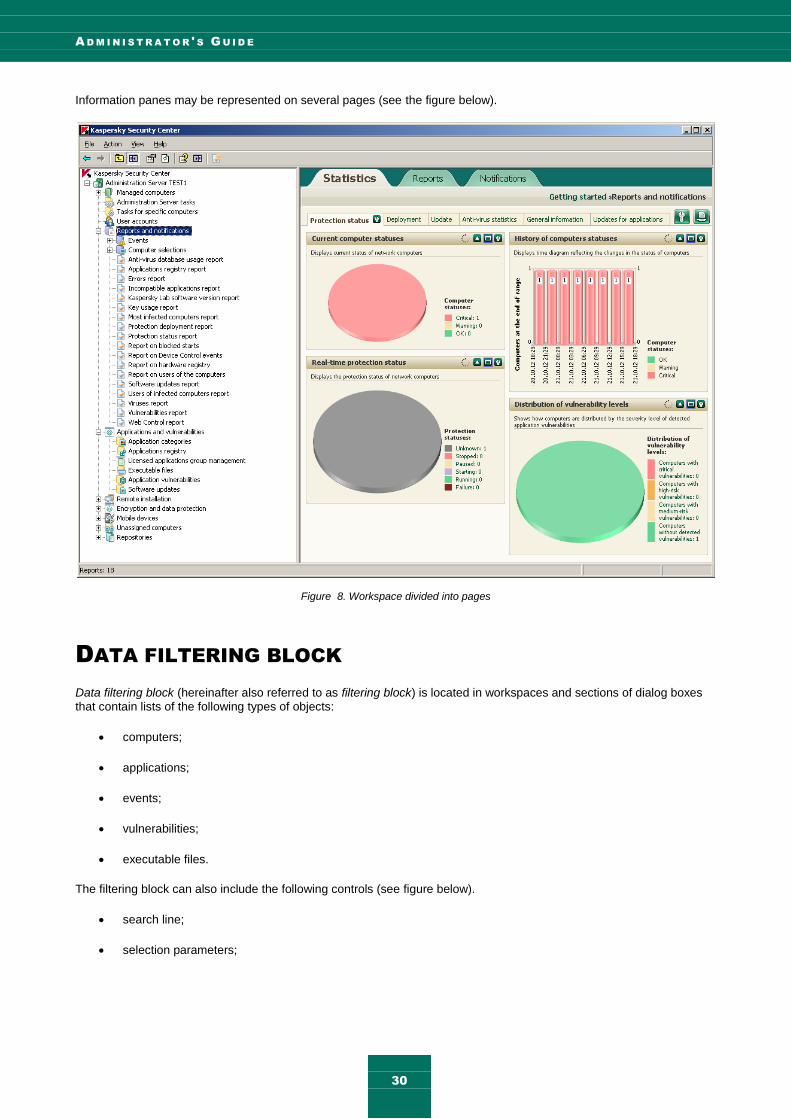
Information panes may be represented on several pages (see the figure below).
Figure 8. Workspace divided into pages
DATA FILTERING BLOCK
Data filtering block (hereinafter also referred to as filtering block) is located in workspaces and sections of dialog boxes that contain lists of the following types of objects:
computers;
applications;
events;
vulnerabilities;
executable files.
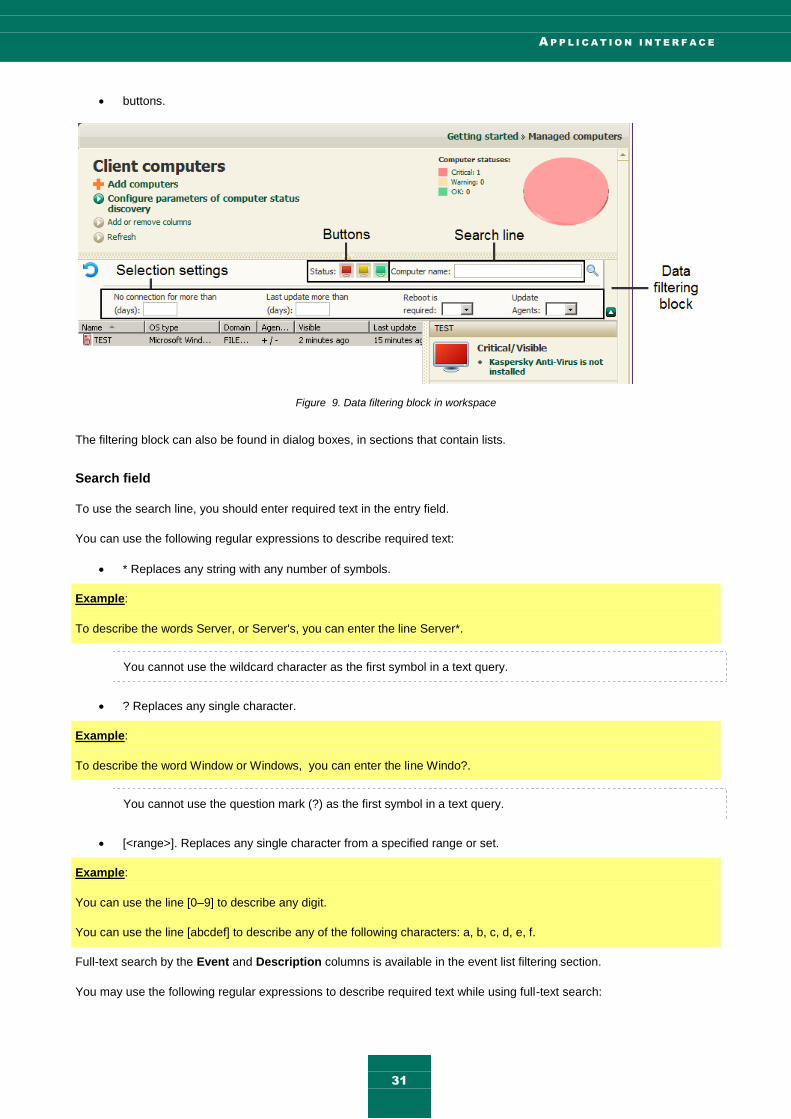
The filtering block can also include the following controls (see figure below).
search line;
selection parameters;
A P P L I C A T I O N I N T E R F A C E
31
buttons.
Figure 9. Data filtering block in workspace
The filtering block can also be found in dialog boxes, in sections that contain lists.
Search field
To use the search line, you should enter required text in the entry field.
You can use the following regular expressions to describe required text:
* Replaces any string with any number of symbols.
Example:
To describe the words Server, or Server's, you can enter the line Server*.
You cannot use the wildcard character as the first symbol in a text query.
? Replaces any single character.
Example:
To describe the word Window or Windows, you can enter the line Windo?.
You cannot use the question mark (?) as the first symbol in a text query.
[<range>]. Replaces any single character from a specified range or set.
Example:
You can use the line [0–9] to describe any digit.
You can use the line [abcdef] to describe any of the following characters: a, b, c, d, e, f.
Full-text search by the Event and Description columns is available in the event list filtering section.
You may use the following regular expressions to describe required text while using full-text search:

A D M I N I S T R A T O R ' S G U I D E
32
Space. You will see all computers whose descriptions contain any of the listed words.
Example:
To find a phrase that contains Slave or Virtual words, you can include Slave Virtual line in your query.
+. When plus precedes a word, all search results will contain this word.
Example:
To find a phrase that contains both Slave and Virtual, enter the +Slave+Virtual query.
-. When minus precedes a word, all search results will not contain this word.
Example:
To find a phrase that contains Slave and does not contain Virtual, enter the +Slave-Virtual query.
"<some text>". Text enclosed in quotation marks should be present in the text.
Example:
To find a phrase that contains Slave Server word combination, you can enter "Slave Server" in the query.
Selection parameters
To use the selection settings, you should specify a value using one of the following methods:
Enter a value manually
Select a value from the dropdown list
Select (or clear) a check box.
Buttons
Buttons of the filtering block are shaped as multicolored icons on a darker background.
When you click a button, its background brightens. When you then double-click the button, its background brightens.
The following filtering rules apply:
A list item with the specified value of an attribute is considered selected if the icon with the specified value of the attribute is placed on the darker background in the filtering block.
Example:
– The selection will include the computers with the Critical status.
– The selection will include the computers with the Warning status.
– The selection will include the computers with the OK status.
A list item with the specified value of an attribute is considered not selected if the icon with the specified value of the attribute is placed on the lighter background in the filtering block.
Example:
– The selection will not include computers with the Critical status.
A P P L I C A T I O N I N T E R F A C E
33
– The selection will not include computers with the Warning status.
– The selection will not include computers with the OK status.
The selection includes all list items if the icons of all values of the attribute are placed on the lighter background
(such as ) or on the darker background (such as ).
The values of attributes depend on the statuses of computers (or network devices) and the severity levels of events. A list of statuses of computers, network devices and severity levels of events (and corresponding icons, as well) is shown in the appendix.
Working with the filtering block
When working with the filtering block, you can create data selections and disable the filtering, as well as enable the expanded format of the block including additional filtering settings:
Creating a selection:
When using the buttons of the filtering block, the list selection is created automatically by clicking a button.
When using line parameters and selection parameters, you should click the button in the top right corner of the filtering block to create a selection.
When using the buttons together with line parameters or selection parameters, you should click the button in the top right corner of the filtering block to create a selection.
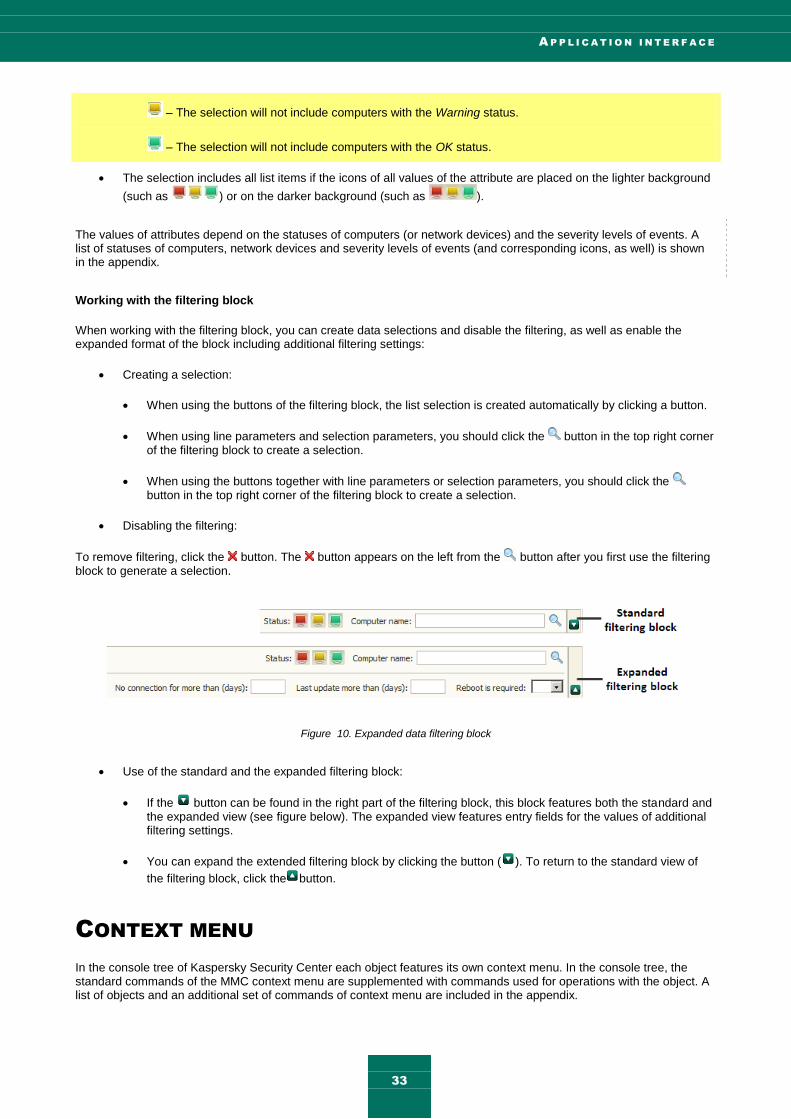
Disabling the filtering:
To remove filtering, click the button. The button appears on the left from the button after you first use the filtering block to generate a selection.
Figure 10. Expanded data filtering block
Use of the standard and the expanded filtering block:
If the button can be found in the right part of the filtering block, this block features both the standard and the expanded view (see figure below). The expanded view features entry fields for the values of additional filtering settings.
You can expand the extended filtering block by clicking the button ( ). To return to the standard view of
the filtering block, click the button.
CONTEXT MENU
In the console tree of Kaspersky Security Center each object features its own context menu. In the console tree, the standard commands of the MMC context menu are supplemented with commands used for operations with the object. A list of objects and an additional set of commands of context menu are included in the appendix.
A D M I N I S T R A T O R ' S G U I D E
34
In the workspace each item of an object selected in the tree also features a context menu containing the commands used to handle the item. Basic types of items and corresponding additional sets of commands are included in the appendix.
CONFIGURING THE INTERFACE
Kaspersky Security Center allows configuring the Administration Console interface.
To change the specified interface settings:
1. In the console tree, click the Administration Server node.
2. In the View menu, select Configuring interface.
3. In the Configuring interface window that opens (see the figure below), configure how interface elements
should be displayed by using the following check boxes:
Display computer images deployment
If the check box is selected, in the Remote installation folder the Deploying computer images subfolder is displayed; also, the feature of operating system deployment becomes available on client computers.
This check box is cleared by default.
Display data encryption and protection
If the check box is selected, the Encryption and data protection folder is displayed in the console; also, the data encryption feature becomes available on networked devices.
This check box is cleared by default.
Display management components
If this check box is selected, the properties window of the policy of Kaspersky Endpoint Security 10 for Windows displays the Workstation control section, and the application and device control functionality becomes available.
This check box is cleared by default.
Display mobile devices management
If the check box is selected, the Mobile devices folder is displayed in the console; also, the feature of management of mobile devices via Administration Server becomes available.
This check box is cleared by default.
Display slave Administration Servers
If this check box is selected, the Administration Console tree will display the nodes of slave and virtual Administration Servers included in the administration groups. The functionality connected with slave and virtual Administration Servers – for example, the creation of tasks for remote installation of applications on slave Administration Servers – is available.
By default, this check box is cleared.
Display security settings sections
If this check box is selected, the Security section is displayed in the properties of Administration Server, administration groups and other objects. This check box allows you to give custom permissions for working with objects to users and groups of users.
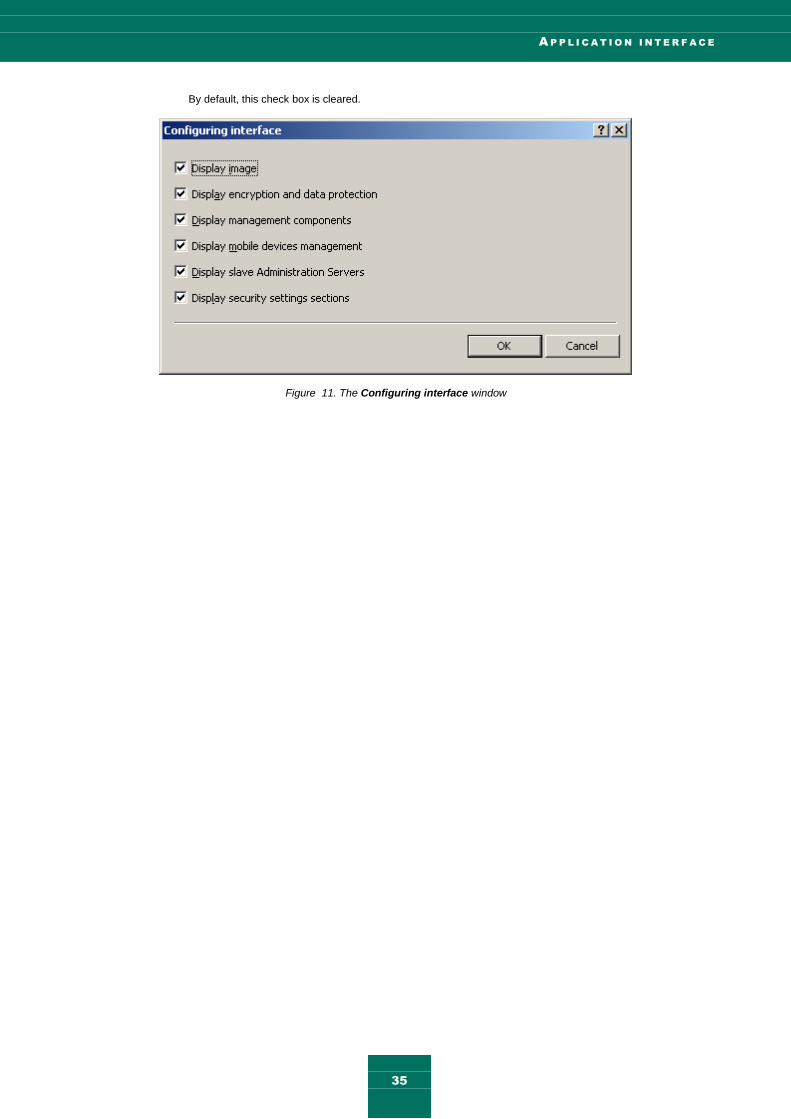
A P P L I C A T I O N I N T E R F A C E
35
By default, this check box is cleared.
Figure 11. The Configuring interface window

36
APPLICATION LICENSING
This section provides information about general terms related to the application activation. Read this section to learn more about the purpose of the License Agreement, license types, ways of activating the application, and license renewal.
IN THIS SECTION
About the End User License Agreement ......................................................................................................................... 36
About the license ............................................................................................................................................................. 36
About the activation code ................................................................................................................................................ 37
About the key file ............................................................................................................................................................. 37
About the volunteering of information .............................................................................................................................. 38
ABOUT THE END USER LICENSE AGREEMENT
The End User License Agreement is a binding agreement between you and Kaspersky Lab ZAO, stipulating the terms on which you may use the application.
Read through the terms of the License Agreement carefully before you start using the application.
It is deemed that you accept the terms of the License Agreement by confirming that you agree with the License Agreement when installing the application. If you do not accept the terms of the License Agreement, you must abort the application installation or renounce the use of the application.
ABOUT THE LICENSE
A license is a time-limited right to use the application, granted under the End User License Agreement. The license is
linked to a unique code for the activation of your copy of Kaspersky Security Center.
A current license entitles you to the following kinds of services:
The right to use the application on one or several devices.
The number of devices on which you may use the application is specified in the End User License Agreement.
Assistance from Kaspersky Lab Technical Support.
Other services available from Kaspersky Lab or its partners during the term of the license.
The scope of services and application usage term depend on the type of license under which the application is activated.
The following license types are provided:
Trial – a free license intended for trying out the application.
Trial license usually has a short term. As soon as the trial license expires, all Kaspersky Security Center features are disabled. To continue using the application, you need to acquire a commercial license.

A P P L I C A T I O N L I C E N S I N G
37
Commercial – a paid license offered upon purchase of the application.
When the commercial license expires, the application continues running though with a limited functionality (for example, updating and using Kaspersky Security Network are not available). You still can benefit all of the application components and perform scans for viruses and other malware, but using only the databases that had been installed last before the license expired. To continue using Kaspersky Security Center in fully functional mode, you must renew your commercial license.
We recommend renewing the license before its expiration to ensure maximum protection of your computer against all security threats.
ABOUT THE ACTIVATION CODE
Activation code is a code that you receive on acquiring the commercial license for Kaspersky Security Center. This code is required for activation of the application.
The activation code is a unique sequence of twenty digits and Latin letters in the format xxxxx-xxxxx-xxxxx-xxxxx.
Depending on how you purchased the application, you can obtain the activation code in one of the following ways:
If you have purchased the boxed version of Kaspersky Security Center, the activation code is specified in the documentation or on the box containing the setup CD.
If you have purchased Kaspersky Security Center at an online store, the activation code is sent to the email address that you have specified when ordering the product.
The license term countdown starts from the date when you activate the application. If you have acquired a license intended for the use of Kaspersky Security Center on several devices, the term of the license starts counting down from the moment you have first applied the activation code.
If you have lost or accidentally deleted your activation code after the application activation, contact the Technical Support Service at Kaspersky Lab to recover the code.
ABOUT THE KEY FILE
Key file is a file named as ххххххх.key. The application downloads a key file from the activation server using the
activation code. You may use the application only when you have a key file.
If the key file is accidentally deleted, you can restore it in one of the following ways:
Send a request to Technical Support Service (see section "Contacting Technical Support" on page 148).
Receive a key file on the website using the activation code.
The key file contains the following information:
Key – unique sequence of alphanumeric characters. The key is intended, for example, to obtain technical support from Kaspersky Lab.
Limit on number of computers – the maximum number of computers on which the application can be activated with the given key file.
Key file creation date – the date of key file creation on the activation server.
License validity period – the term of the application use provided by the License Agreement and counted down starting from the day of the first activation of the application using the given key file. For example, it may be 1 year.

A D M I N I S T R A T O R ' S G U I D E
38
The license expires no later than does the key file that was used to activate the application under this license.
Key file validity period – a time period that begins at the moment of key file creation. Key file validity period may equal up to several years. You can activate the application with a key file only before the corresponding validity period expires.
A key file validity period is automatically considered to be expired as soon as the license activated with this key file expires.
ABOUT THE VOLUNTEERING OF INFORMATION
In order to increase the level of real-time protection, accepting the terms of the License Agreement means that you agree to send information about checksums of processed objects (MD5), information required to determine the reputation of URLs, and statistical data for anti-spam protection, in automatic mode. This information does not contain any personal data or other private information. Kaspersky Lab protects any information received in this way as prescribed by the law. Visit the website http://support.kaspersky.com for more details.
QUICK START WIZARD
This section provides information about the functionality of the Kaspersky Security Center Quick Start Wizard.
The Kaspersky Security Center application allows adjusting a minimum collection of settings necessary to build a centralized management system for anti-virus protection. This configuration is performed by using the Quick Start Wizard. While the Quick Start Wizard is running, the following changes are made to the application:
The Wizard adds keys that can be automatically deployed to computers within administration groups.
Configures interaction with Kaspersky Security Network (KSN). KSN allows obtaining information about applications installed on managed computers if that information can be found in reputation databases of Kaspersky Lab. If you allowed the use of KSN, the wizard starts the KSN Proxy service that ensures connection between KSN and client computers.
It generates settings for notification delivery by email informing of events logged in the operation of Administration Server and managed applications (to ensure a successful notification, Messenger service should keep running on Administration Server and all of the recipient computers).
Then the Wizard adjusts the update settings and vulnerability fixing settings of applications installed on client computers.
Protection policies for workstations and servers are created on the top level of hierarchy of managed computers; virus scan tasks, update tasks, and backup tasks are also created.
The Quick Start Wizard creates protection policies only for applications for which the Managed computers
folder does not contain any. The Quick Start Wizard does not create tasks if ones with the same names have already been created for the top level in the hierarchy of managed computers.
An offer to run the Quick Start Wizard is displayed after Administration Server installation, at the first connection to it. You can also start the Quick Start Wizard manually using the context menu of the Administration Server <Computer name> node.

Q U I C K S T A R T W I Z A R D
39
SEE ALSO:
Interaction between Administration Server and KSN Proxy service ................................................................................ 54
40
BASIC CONCEPTS
This section explains basic concepts related to Kaspersky Security Center in detail.
IN THIS SECTION
Administration Server ...................................................................................................................................................... 40
Administration Server hierarchy ...................................................................................................................................... 41
Virtual Administration Server ........................................................................................................................................... 41
Mobile devices server...................................................................................................................................................... 42
Network Agent. Administration group .............................................................................................................................. 42
Administrator's workstation ............................................................................................................................................. 43
Application management plug-in ..................................................................................................................................... 44
Policies, application settings and tasks ........................................................................................................................... 44
How local application settings relate to policies .............................................................................................................. 45
ADMINISTRATION SERVER
Kaspersky Security Center components allow remotely managing Kaspersky Lab applications installed on client computers.
Computers with the Administration Server component installed will be referred to as Administration Servers (hereinafter also referred to as Servers).
Administration Server is installed on a computer as a service with the following set of attributes:
With the name "Kaspersky Security Center Administration Server"
Using automatic startup when the operating system starts.
with the Local System account or the user account selected during the installation of the Administration Server.
The Administration Server performs the following functions:
Storage of the administration groups structure
storage of information about the configuration of client computers;
Organization of storages for application distribution packages
Remote installation of applications to client devices and removal of applications
updating of application databases and software modules of Kaspersky Lab applications;
Management of policies and tasks on client computers
Storage of information about events that have occurred on client devices

B A S I C C O N C E P T S
41
generation of reports on the operation of Kaspersky Lab applications;
Distribution of keys to client devices, and storage of information about keys
sending notifications of the progress of tasks (for example, of viruses detected on a client computer).
ADMINISTRATION SERVER HIERARCHY
Administration Servers can be arranged in a master/slave hierarchy. Each Administration Server can have several slave Administration Servers (referred to as slave Servers) on different nesting levels of the hierarchy. The nesting level for slave Servers is unrestricted. The administration groups of the master Administration Server will then include the client computers of all slave Administration Servers. Thus, isolated and independent sections of computer networks can be controlled by different Administration Servers which are in turn managed by the master Server.
Virtual Administration Servers (see section "Virtual Administration Server" on page 41) are a particular case of slave Administration Servers.
The hierarchy of Administration Servers can be used to do the following:
Decrease the load on Administration Server (compared to a single installed Administration Server in an entire network).
Decrease intranet traffic and simplify work with remote offices. It is unnecessary to establish connections between the master Server and all networked computers, which may be located, for example, in other regions. It is sufficient to install a slave Administration Server in each network node , distribute computers among administration groups of slave Servers , and establish connections between the slave Servers and the master Server over fast communication channels.
Distribute responsibilities among the anti-virus security administrators. All capabilities for centralized management and monitoring of anti-virus security status in the corporate networks remain available.
Using Kaspersky Security Center by service providers. A service provider needs to install Kaspersky Security Center and Kaspersky Security Center Web-Console only. To manage more client computers of several organizations, a service provider can add virtual Administration Servers to an Administration Server hierarchy.
Each computer included in the hierarchy of administration groups can be connected to one Administration Server only. You should control the status of connection of computers to Administration Servers. Use the features for computer search in administration groups of different Servers based on network attributes.
VIRTUAL ADMINISTRATION SERVER
Virtual Administration Server (hereinafter also referred to as virtual Server) is a component of Kaspersky Security Center designed for managing a client organization's network.
Virtual Administration Server is a particular case of a slave Administration Server and has the following restrictions as compared with physical Administration Server:
Virtual Administration Server can be created only on master Administration Server.
Virtual Administration Server uses the master Administration Server database. Thus, the following tasks are not supported on virtual Server: backup copying, restoration, updates verification and updates downloading. These tasks exist only on master Administration Server.
Virtual Server does not support creation of slave Administration Servers (including virtual Servers).
Besides, virtual Administration Server has the following restrictions:
In the virtual Administration Server properties window the number of sections is limited.

A D M I N I S T R A T O R ' S G U I D E
42
To carry out remote installation of Kaspersky Lab applications on client computers managed by the virtual Administration Server, you should make sure that the Network Agent is installed on one of the client computers in order to ensure communication with the virtual Administration Server. At the first connection to the virtual Administration Server, that computer is automatically appointed Update Agent, thus functioning as a gateway for connection between the client computers and the virtual Administration Server.
A virtual Server can only poll the network using Update Agents.
To restart a malfunctioning virtual Server, Kaspersky Security Center restarts the master Administration Server and all virtual Servers.
The administrator of a virtual Server has all privileges on this particular virtual Server.
MOBILE DEVICES SERVER
A mobile devices server is a component of Kaspersky Security Center that provides access to mobile devices and allows managing them through Administration Console. The mobile devices server collects information about mobile devices and stores their profiles.
There are two types of mobile devices servers:
Mobile devices server supporting Exchange ActiveSync. Installed to a client computer where a Microsoft Exchange server has been installed, allowing retrieving data from the Microsoft Exchange server and passing them to Administration Server. This mobile devices server is used for management of mobile devices that support Exchange ActiveSync protocol.
iOS MDM mobile devices server. This mobile devices server is used for management of mobile devices that support Apple Push Notifications (APNs) service.
Mobile devices servers of Kaspersky Security Center allow managing the following objects:
An individual mobile device
Several mobile devices
Several mobile devices connected to a cluster of servers, simultaneously. After connecting to a cluster of servers, the mobile devices server installed on this cluster is displayed in Administration Console as a single server.
NETWORK AGENT. ADMINISTRATION GROUP
Interaction between the Administration Server and client computers is performed by a component of the Kaspersky Security Center application named Network Agent. Network Agent should be installed on all client computers on which
Kaspersky Security Center is used to manage Kaspersky Lab applications.
Network Agent performs the following functions:
delivery of information about the current status of applications;
sending and reception of management commands;
synchronization of configuration data;
sending information about events that have occurred on client computers, to the Server;
ensuring Update Agent operation.

B A S I C C O N C E P T S
43
Network Agent is installed on a computer as a service with the following set of attributes:
With the name "Kaspersky Security Center Network Agent"
Using automatic startup type when the operating system starts
Using the Local system account.
Network Agent is installed on the computer together with a plug-in for work with Cisco® NAC. This plug-in is used if the computer has Cisco Trust Agent installed. The settings of joint operation with Cisco NAC are specified in the properties window of the Administration Server.
When integrated with Cisco NAC, Administration Server acts as a standard Posture Validation Server (PVS) policy server, which an administrator may use to either allow or block access by a computer to the network, depending on the anti-virus protection status.
A computer, server, or workstation on which Network Agent and managed Kaspersky Lab applications are installed will be referred to as the Administration Server client (also, client computer or just computer).
The set of computers in a corporate network can be subdivided into groups arranged in a certain hierarchical structure. Such groups are called administration groups. The hierarchy of administration groups is displayed in the console tree, in
the Administration Server node.
An administration group (hereinafter also referred to as group) is a set of client computers united according to a criterion, aiming at managing computers within the group as a single unit. All client computers within a group are configured to.
use common application settings (defined in group policies);
use a common mode of applications' operation due to the creation of group tasks with a specified collection of settings. For example, creating and installing a common installation package, updating the application databases and modules, scanning the computer on demand, and ensuring the real-time protection.
A client computer can only be included in a single administration group.
You can create hierarchies for Servers and groups with any degree of nesting. A single hierarchy level can include slave and virtual Administration Servers, groups and client computers.
ADMINISTRATOR'S WORKSTATION
Computers on which the Administration Console component is installed are referred to as administrator's workstations.
Administrators can use those computers for centralized remote management of Kaspersky Lab applications installed on client computers.
After Administration Console is installed on a computer, its icon appears in the Start Applications Kaspersky Security Center menu and can be used to start the console.
There are no restrictions on the number of administrator's workstations. From any of the administrator's workstation you can manage administration groups of several Administration Servers on the network at once. You can connect an administrator's workstation to an Administration Server (either physical, or virtual one) of any level of hierarchy.
You can include an administrator's workstation in an administration group as a client computer.
Within the administration groups of any Administration Server, the same computer can function as an Administration Server client, an Administration Server, or an administrator's workstation.

A D M I N I S T R A T O R ' S G U I D E
44
APPLICATION MANAGEMENT PLUG-IN
Management of Kaspersky Lab applications via the Administration Console is performed using a special component named management plug-in. It is included in all Kaspersky Lab applications that can be managed by using Kaspersky Security Center.
The management plug-in is installed on an administrator's workstation. Using the management plug-in, you can perform the following actions in the Administration Console:
creating and editing the application policies and settings, as well as the settings of the application tasks;
obtaining information about application tasks, events occurring in its operation, as well as application operation statistics received from client computers.
POLICIES, APPLICATION SETTINGS AND TASKS
A named action performed by a Kaspersky Lab application is called a task. Tasks are organized by types according to functions.
Each task is associated with a set of settings used during performance of the task. The set of application settings common to all types of its tasks constitutes the application settings. Application settings specific for each task type constitute the corresponding task settings.
A detailed description of task types for each Kaspersky Lab application can be found in the respective application guides.
Application settings defined for an individual client computer through the local interface or remotely through Administration Console are referred to as local application settings.
The applications installed on client computers are configured centrally through definition of policies.
Policy is a collection of application settings defined for an administration group. The policy does not define all the application settings.
Several policies with different values can be defined for a single application. However, there can be only one active policy for an application at a time.
The program can run in different ways for different groups of settings. Each group can have its own policy for an application.
The application settings are defined by the policy settings and the task settings.
Nested groups and slave Administration Servers inherit the tasks from groups belonging to higher hierarchy levels. A task defined for a group is performed not only on client computers included in that group but also on client computers included in its child groups and belonging to slave Servers on all lower hierarchy levels.
Each setting represented in a policy has a "lock" attribute: . The "lock" shows whether the setting is allowed for modification in the policies of lower hierarchy levels (for nested groups and slave Administration Servers), in task settings and local application settings. If the lock is applied to a setting in a policy, its value cannot be redefined (see section "How local application settings relate to policies" on page 45).
If you clear the Inherit settings from parent policy check box in the Inheritance of settings section of the General
section in the properties window of an inherited policy, the "lock" is lifted for that policy.
There is the capability to activate a disabled policy on a certain event. This means that you can, for example, enforce stricter anti-virus protection settings during virus outbreaks.
You can also create a policy for mobile users.
Tasks for objects managed by a single Administration Server are created and configured in a centralized manner. The

B A S I C C O N C E P T S
45
following types of tasks can be defined:
Group task is a task that defines settings for an application installed on computers within an administration group.
Local task is a task for an individual computer.
Task for selection of computers is a task for an arbitrary set of computers included or not included in administration groups.
Administration Server task is a task defined directly for an Administration Server.
A group task can be defined for a group even if a corresponding Kaspersky Lab application is installed only on certain client computers of that group. In that case, the group task will only be performed on computers where the application is installed.
Tasks created for a client computer locally are only performed for this computer. When synchronizing a client computer with the Administration Server, local tasks are added to the list of tasks created for that client computer.
Because application settings are defined by policy, task settings can redefine those settings that are not locked in the policy. Task settings also can redefine those settings that can be configured only for a specific instance of a task. For example, the drive name and masks of files to be scanned are such settings for the drive scan task.
A task can be launched automatically (according to schedule) or manually. Task results are saved locally and on the Administration Server. The administrator can receive notifications about one or another task that has been performed and can view detailed reports.
Information about policies, application settings, and settings of task for specific computers, and information about group tasks is saved on Administration Server and distributed to client computers during synchronization. At that, the Administration Server stores information about local changes allowed by the policy and performed on client computers. Additionally, the list of applications running on the client computer, their status, and the existing tasks are updated.
HOW LOCAL APPLICATION SETTINGS RELATE TO POLICIES
You can use policies to set identical values of the application settings for all computers in the group.
Values of settings specified by a policy can be redefined for individual computers in a group by using local application settings. You can only set the values of settings that the policy allows to be modified, that is, "unlocked" settings.
The value of a setting that the application uses on a client computer (see figure below) is defined by the "lock" position for that setting in the policy:
If the setting modification is "locked", the same value defined in the policy is used on all client computers.

A D M I N I S T R A T O R ' S G U I D E
46
If the setting modification is "unlocked", the application uses the local value on each client computer instead of the value specified in the policy. The parameter value can then be changed in the local application settings.
Figure 12. Policy and local application settings
In this way, when the task is run on a client computer, the application uses settings defined in two different ways:
by task settings and local application settings if the setting is not locked against change;
by group policy if the setting is locked against change.
Local application settings are changed after the policy is first applied in accordance with the policy settings.

47
MANAGING ADMINISTRATION SERVERS
This section provides information about how to handle Administration Servers and how to configure them.
IN THIS SECTION
Connecting to an Administration Server and switching between Administration Servers ................................................ 47
Access rights to Administration Server and its objects .................................................................................................... 48
Conditions of connection to an Administration Server via the Internet ............................................................................ 49
Secure connection to Administration Server ................................................................................................................... 50
Disconnecting from an Administration Server ................................................................................................................. 51
Adding an Administration Server to the console tree ...................................................................................................... 51
Removing an Administration Server from the console tree ............................................................................................. 51
Changing an Administration Server service account. The klsrvswch utility ..................................................................... 52
Viewing and modifying the settings of an Administration Server ..................................................................................... 52
CONNECTING TO AN ADMINISTRATION SERVER AND
SWITCHING BETWEEN ADMINISTRATION SERVERS
After Kaspersky Security Center is launched, it makes an attempt to connect to an Administration Server. If several Administration Servers are available on the network, the application requests the one that was connected to during the previous session of Kaspersky Security Center.
If the application is launched for the first time after it is installed, it makes an attempt to connect to the Administration Server specified during the installation of Kaspersky Security Center.
After connection with an Administration Server is established, the folders tree of that Server is displayed in the console tree.
If several Administration Servers have been added to the console tree, you can switch between them.
To switch to another Administration Server:
1. In the console tree select the node with the name of the required Administration Server.
2. From the context menu of the node select Connect to Administration Server.
3. In the Connection settings window that opens, in the Server address field specify the name of the
Administration Server to which you want to connect. You can specify an IP address or the name of a computer on a Windows network as the name of the Administration Server. Clicking the Advanced button in the bottom
part of the window allows you to configure connection to the Administration Server (see figure below).
To connect to the Administration Server via a port that differs from the default one, a value in <Administration Server name>:<Port> format should be entered in the Server address field.

A D M I N I S T R A T O R ' S G U I D E
48
Users without rights of administrator or operator of Kaspersky Security Center will be denied access to the Administration Server.
Figure 13. Connecting to the Administration Server
4. Click the OK button to complete the switching between Servers.
After the Administration Server is connected, the folders tree of the corresponding node in the console tree is updated.
ACCESS RIGHTS TO ADMINISTRATION SERVER AND ITS
OBJECTS
During Kaspersky Security Center installation the KLAdmins and KLOperators groups are created automatically. These
groups are granted the rights to connect to the Administration Server and to work with its objects.
Depending on what account is used for installation of Kaspersky Security Center, the KLAdmins and KLOperators
groups are created as follows:
If the application is installed under a user account included in a domain, the groups are created in the domain that includes the Administration Server, and on the Administration Server itself.
If the application is installed under a system account, the groups are created on the Administration Server only.

M A N A G I N G A D M I N I S T R A T I O N S E R V E R S
49
You can view KLAdmins and KLOperators groups and modify the access privileges of the users that belong to the KLAdmins and KLOperators groups by using the standard administrative tools of the operating system.
The KLAdmins group is granted all access rights, and the KLOperators group is granted only Read and Execution rights. The rights granted to the KLAdmins group are locked.
Users that belong to the KLAdmins group are called Kaspersky Security Center administrators; users from the KLOperators group are called Kaspersky Security Center operators.
In addition to users included in the KLAdmins group, the rights of Kaspersky Security Center administrator are provided
to the local administrators of computers on which the Administration Server is installed.
You can exclude local administrators from the list of users that have Kaspersky Security Center administrator rights.
All operations started by the administrators of Kaspersky Security Center will be performed using the rights of the Administration Server account.
For each Administration Server from the network an individual KLAdmins group can be created; it will have the
necessary rights to work with that Administration Server only.
If computers belonging to the same domain are included in administration groups of different Administration Servers, the domain administrator is the Kaspersky Security Center administrator for all the groups. The KLAdmins group is the
same for those administration groups; it is created during installation of the first Administration Server. All operations initiated by Kaspersky Security Center administrator are performed using the account rights of the Administration Server for which these operations have been started.
After the application is installed, an administrator of Kaspersky Security Center can:
modify rights granted to the KLOperators groups;
grant rights to access the functionality of Kaspersky Security Center to other user groups and individual users registered on the administrator's workstation;
assign access rights in each administration group.
The Kaspersky Security Center administrator can assign access rights to each administration group or to other objects of Administration Server in the Security section in the properties window of the selected object.
You can track user activity by using the records of events in the Administration Server operation. These event records are displayed in the console tree in the Events folder, the Audit events subfolder. These events have the severity level Info; and event types begin with Audit.
CONDITIONS OF CONNECTION TO AN ADMINISTRATION
SERVER VIA THE INTERNET
If an Administration Server is remote, being located out of a corporate network, client computers connect to it via the Internet. To connect client computers to the Administration Server via the Internet, the following conditions should be met:
A remote Administration Server should have an internal IP address, while the incoming ports 13000 and 14000 should remain open.
Network Agent should be first installed on client computers.
When installing Network Agent on client computers, you should specify the external IP address of the remote Administration Server. If an installation package is used for installation, the external IP address should be specified manually in the properties of the installation package in the Settings section.

A D M I N I S T R A T O R ' S G U I D E
50
To manage applications and tasks of a client computer using a remote Administration Server, you should select the Do not disconnect from the Administration Server check box in the properties window of that computer in the General section. After the check box is selected, wait until the Server is synchronized with the remote
client computer. The number of client computers maintaining a continuous connection with an Administration Server cannot exceed 100.
To increase the performance of tasks generated by a remote Administration Server, you can open the port 15000 on a client computer. In this case, to run a task, the Administration Server sends a special packet to Network Agent via the port 15000 without waiting until the synchronization with the client computer completes.
SECURE CONNECTION TO ADMINISTRATION SERVER
Data exchange between client computers and Administration Server, as well as Administration Console connection to Administration Server, can be performed using the Secure Socket Layer (SSL) protocol. The SSL protocol can identify the interacting parties, encrypt the data that is transferred, and protect it against modification during transfer. SSL protocol is based on authenticating the interacting parties and data encryption using public keys.
IN THIS SECTION
Administration Server certificate ...................................................................................................................................... 50
Administration Server authentication during client computer connection ........................................................................ 50
Administration Server authentication during Administration Console connection ............................................................ 51
ADMINISTRATION SERVER CERTIFICATE
Administration Server authentication during connection by Administration Console and data exchange with client computers is based on the Administration Server certificate. The certificate is also used for authentication when a connection between master and slave Administration Servers is established.
The Administration Server certificate is created automatically during the installation of the Administration Server component and is stored in the ALLUSERSPROFILE%\Application Data\KasperskyLab\adminkit\1093\cert folder.
The Administration Server certificate is created only once – during Administration Server installation. If the Administration Server certificate is lost, to get it back you should reinstall the Administration Server component and restore data.
ADMINISTRATION SERVER AUTHENTICATION DURING CLIENT
COMPUTER CONNECTION
At the first connection of a client computer to Administration Server, Network Agent on the client computer downloads the Administration Server certificate copy and stores it locally.
If you install Network Agent to a client computer locally, you can select the Administration Server certificate manually.
The downloaded copy of the certificate is used to verify Administration Server rights and permissions during subsequent connections.
During future sessions, Network Agent requests the Administration Server certificate at each connection of the client computer to Administration Server and compares it with the local copy. If the copies do not match, the client computer is not allowed access to Administration Server.
M A N A G I N G A D M I N I S T R A T I O N S E R V E R S
51
ADMINISTRATION SERVER AUTHENTICATION DURING
ADMINISTRATION CONSOLE CONNECTION
At the first connection to Administration Server, Administration Console requests the Administration Server certificate and saves it locally on the administrator's workstation. After that, each time when Administration Console tries to connect to this Administration Server, the Administration Server is identified based on the certificate copy.
If the Administration Server certificate does not match the copy stored on the administrator's workstation, the Administration Console offers to confirm connection to the Administration Server with the specified name and download a new certificate. After the connection is established, Administration Console saves a copy of the new Administration Server certificate, which will be used to identify the Administration Server in the future.
DISCONNECTING FROM AN ADMINISTRATION SERVER
To disconnect from an Administration Server:
1. In the console tree select the node corresponding to the Administration Server that should be disconnected.
2. From the context menu of the node select Disconnect from Administration Server.
ADDING AN ADMINISTRATION SERVER TO THE CONSOLE
TREE
To add an Administration Server to the console tree:
1. In the main window of Kaspersky Security Center select the Kaspersky Security Center node from the console
tree.
2. From the context menu of the node select New Administration Server.
After it's done, a node named Administration Server - <Computer name> (Not connected) will be created in the
console tree from which you will be able to connect to any of the Administration Servers on the network.
REMOVING AN ADMINISTRATION SERVER FROM THE
CONSOLE TREE
To remove an Administration Server from the console tree:
1. In the console tree select the node corresponding to the Administration Server that you want to remove.
2. From the context menu of the node select Remove.

A D M I N I S T R A T O R ' S G U I D E
52
CHANGING AN ADMINISTRATION SERVER SERVICE
ACCOUNT. THE KLSRVSWCH UTILITY
If you need to change the Administration Server service account set when installing Kaspersky Security Center, you can use a utility named klsrvswch and designed for changing the Administration Server account.
When installing Kaspersky Security Center, the utility is automatically copied in the application installation folder.
Number of launches of the utility is virtually unlimited.
To change an Administration Server service account:
1. Launch the klsrvswch utility from the installation folder of Kaspersky Security Center.
This action also launches the wizard for modification of Administration Server service account. Follow the Wizard's instructions.
2. In the Administration Server service account window select any of the two options for setting an account:
Local System Account. The Administration Server service will start under the Local System Account and
using its credentials.
Correct operation of Kaspersky Security Center requires that the account used to start the Administration Server service had the rights of administrator of the resource where the Administration Server database is hosted.
User account. The Administration Server service is started under the account of a user within the domain.
In this case the Administration Server is to initiate all operations by using the rights of that account.
To select the user whose account will be used to start the Administration Server service:
1. Click the Find now button and select a user in the Select: User window that opens.
Close the Select: User window and click Next.
2. In the Account password window set a password for the selected user account, if necessary.
After the wizard completes its operations, the Administration Server account is changed.
When using an SQL server in a mode that presupposes authenticating user accounts with Microsoft Windows tools, access to the database should be granted. The user account should be assigned the status of owner of Kaspersky Anti-Virus database. The dbo scheme is used by default.
VIEWING AND MODIFYING THE SETTINGS OF AN
ADMINISTRATION SERVER
You can adjust the settings of an Administration Server in the properties window of this Server.
To open the Properties: Administration Server window,
select Properties from the context menu of the Administration Server node in the console tree.

M A N A G I N G A D M I N I S T R A T I O N S E R V E R S
53
IN THIS SECTION
Adjusting the general settings of an Administration Server ............................................................................................. 53
Configuring event processing settings............................................................................................................................. 53
Control of virus outbreaks ............................................................................................................................................... 53
Limiting traffic .................................................................................................................................................................. 54
Configuring cooperation with Cisco Network Admission Control (NAC) .......................................................................... 54
Interaction between Administration Server and KSN Proxy service ................................................................................ 54
Working with internal users ............................................................................................................................................. 54
ADJUSTING THE GENERAL SETTINGS OF AN ADMINISTRATION
SERVER
You can adjust the general settings of an Administration Server in the General, Settings, and Security sections of the
Properties window of the Administration Server.
Whether the Security section is shown or hidden is determined by the user interface settings. To make this section
displayed, go to the View Configuring interface and in the Configuring interface window that opens select the Display security settings sections check box.
CONFIGURING EVENT PROCESSING SETTINGS
You can view lists of events that occur in the application's operation, and configure the processing of events in the Events section of the Administration Server properties window.
Each event has a characteristic that reflects its importance level. Events of the same type may have different importance levels depending on the conditions in which the event occurred.
CONTROL OF VIRUS OUTBREAKS
Kaspersky Security Center allows you to quickly respond to threats of virus outbreaks. Assessment of a virus outbreak threat is performed by controlling virus activity on client computers.
You can use the Virus outbreak section of the properties window of the Administration Server in order to configure
assessment rules for virus outbreak threats and actions to take in case of an outbreak.
The order of actions performed when notifying of the Virus outbreak event can be set in the Events section of the
Administration Server properties window (see section "Configuring event processing settings" on page 53), in the properties window of the Virus outbreak event.
The Virus outbreak event is created when the Infected objects detected events are detected in the operation of anti-virus software. Thus, information about the Infected objects detected events should be saved on the Administration
Server in order to recognize a virus outbreak.
Settings for saving information about the Infected objects detected event are specified in policies of anti-virus
applications.
A D M I N I S T R A T O R ' S G U I D E
54
When counting the Infected objects detected events, only information from the client computers of the master
Administration Server is to be taken into account. The information from slave Administration Servers is not taken into account. For each slave Server the Virus outbreak event settings are adjusted individually.
LIMITING TRAFFIC
To reduce traffic volumes within a network, the application provides the option to limit the speed of data transfer to an Administration Server from specified IP ranges and IP subnets.
You can create and configure traffic limiting rules in the Traffic section of the Administration Server properties window.
CONFIGURING COOPERATION WITH CISCO NETWORK ADMISSION
CONTROL (NAC)
You can set correspondence between conditions of anti-virus protection of client computers and security statuses of Cisco Network Admission Control (NAC).
To set such correspondence, you should create conditions under which a client computer is assigned certain security statuses of Cisco Network Admission Control (NAC): Healthy, Checkup, Quarantine or Infected.
You can configure correspondence between statuses of Cisco NAC and conditions of anti-virus protection of client computers in the Cisco NAC section of the Administration Server properties window.
The Cisco NAC section is displayed in the Administration Server properties window if the Kaspersky Lab Cisco NAC Posture Validation Server component has been installed along with the Administration Server when installing the application (for details, see the Kaspersky Security Center Implementation Guide). Otherwise, the Cisco NAC section is
not displayed in the Administration Server properties window.
INTERACTION BETWEEN ADMINISTRATION SERVER AND KSN
PROXY SERVICE
KSN Proxy is a service that ensures interaction between the infrastructure of Kaspersky Security Network and client computers managed by an Administration Server.
The use of KSN Proxy provides you with the following options:
Client computers can send requests to KSN and transfer information to KSN even if they do not have direct access to the Internet.
KSN Proxy caches processed data, thus reducing the workload on the outbound channel and the time period spent for waiting for information requested by a client computer.
You can configure KSN Proxy in the KSN Proxy server section of the properties window of the Administration Server.
WORKING WITH INTERNAL USERS
The accounts of internal users are used to work with virtual Administration Servers. Under the account of an internal user, the administrator of a virtual Administration Server can start Kaspersky Security Center Web-Console to check the anti-virus security status of a network. Kaspersky Security Center grants the rights of real users to internal users of the application.
Accounts of internal users are created and used only within Kaspersky Security Center. No data on internal users is transferred to the operating system. Kaspersky Security Center authenticates internal users.

M A N A G I N G A D M I N I S T R A T I O N S E R V E R S
55
You can configure the settings of accounts of internal users in the Internal users section of the Administration Server
properties window.
The Internal users section is only displayed in the Administration Server properties window if the Administration Server
is virtual or contains virtual Administration Servers.

56
MANAGING ADMINISTRATION GROUPS
This section provides information about how to handle administration groups.
You can take the following actions on administration groups:
add any number of nested groups of any level of hierarchy to administration groups;
add client computers to administration groups;
change the hierarchy of administration groups by moving individual client computers and whole groups to other groups;
remove nested groups and client computers from administration groups;
add slave and virtual Administration Servers to administration groups;
move client computers from the administration groups of an Administration Server to those of another Server;
define which Kaspersky Lab applications will be automatically installed on client computers included in a group.
IN THIS SECTION
Creating administration groups ....................................................................................................................................... 56
Moving administration groups ......................................................................................................................................... 57
Deleting administration groups ........................................................................................................................................ 58
Automatic creation of a structure of administration groups.............................................................................................. 58
Automatic installation of applications to computers in an administration group ............................................................... 60
CREATING ADMINISTRATION GROUPS
The hierarchy of administration groups is created in the main application window of Kaspersky Security Center, in the Managed computers folder. Administration groups are displayed as folders in the console tree (see figure below).
Immediately after the installation of Kaspersky Security Center, the Managed computers folder only contains the Administration Servers folder, which is empty.
The user interface settings determine whether the Administration Servers folder appears in the console tree. To make
this section displayed, go to the View Configuring interface and in the Configuring interface window that opens select the Display slave Administration Servers check box.
When creating the hierarchy of administration groups, you can add client computers and nested groups to the Managed computers folder. You can add slave Administration Servers to the Administration Servers folder.

M A N A G I N G A D M I N I S T R A T I O N G R O U P S
57
Identically to the Managed computers group, each created group initially contains the Administration Servers folder
only, which is empty, intended to handle slave Administration Servers of this group. Information about policies, tasks of this group, and computers included is displayed on the corresponding tabs in the workspace of this group.
Figure 14. Viewing administration groups hierarchy
To create an administration group:
1. In the console tree, open the Managed computers folder.
2. If you want to create a subgroup in an existing administration group, in the Managed computers folder select a
nested folder corresponding to the group, which should comprise the new administration group.
If you create a new top-level administration group, you can skip this step.
3. Start the administration group creation process in one of the following ways:
Using the Create Group command from the context menu
By clicking the Create a subgroup link located in the workspace of the main application window, on the Groups tab.
4. In the Group name window that opens, enter a name for the group and click the OK button.
As a result, a new administration group folder with the specified name appears in the console tree.
MOVING ADMINISTRATION GROUPS
You can move nested administration groups within the groups hierarchy.
An administration group is moved together with all child groups, slave Administration Servers, client computers, group policies, and tasks. The system will apply to the group all the settings that correspond to its new position in the hierarchy of administration groups.
The name of the group should be unique within one level of the hierarchy. If a group with the same name already exists in the folder into which you move the administration group, you should change the name of the latter. If you have not changed the name of the group being moved, an index in (<serial number>) format is automatically added to its name when it is moved, for example: (1), (2).

A D M I N I S T R A T O R ' S G U I D E
58
You cannot rename the Managed computers folder because it is a built-in element of Administration Console.
To move a group to another folder of the console tree:
1. Select a group to move from the console tree.
2. Do one of the following:
Move the group using the context menu:
1. Select Cut from the context menu of the group;
2. Select Paste from the context menu of the administration group to which you need to move the
selected group.
Move the group using the main application menu:
a. Select Action Cut from the main menu;
b. Select the administration group to which you need to move the selected group, from the console tree.
c. Select Action Paste from the main menu.
Move the group to another one in the console tree using the mouse.
DELETING ADMINISTRATION GROUPS
You can delete an administration group if it contains no slave Administration Servers, nested groups, or client computers, and if no group tasks or policies have been created for it.
Before deleting an administration group, you should delete all slave Administration Servers, nested groups, and client computers from that group.
To delete a group:
1. Select an administration group in the console tree.
2. Perform one of the following actions:
Select Delete from the context menu of the group
Select Action Delete from the main application menu.
Press the DEL key.
AUTOMATIC CREATION OF A STRUCTURE OF
ADMINISTRATION GROUPS
Kaspersky Security Center allows you to create a structure of administration groups using the New Administration Group Structure Wizard.
The Wizard creates a structure of administration groups based on the following data:
structures of Windows domains and workgroups
structures of Active Directory groups;
M A N A G I N G A D M I N I S T R A T I O N G R O U P S
59
contents of a text file created by the administrator manually.
When generating the text file, the following requirements should be met:
The name of each new group must begin with a new line; and the delimiter must begin with a line break. Blank lines are ignored.
Example:
Office 1
Office 2
Office 3
Three groups of the first hierarchy level will be created in the target group.
The name of the nested group must be entered with a slash mark (/).
Example:
Office 1/Division 1/Department 1/Group 1
Four subgroups nested into each other will be created in the target group.
To create several nested groups of the same hierarchy level, you must specify the "full path to the group".
Example:
Office 1/Division 1/Department 1
Office 1/Division 2/Department 1
Office 1/Division 3/Department 1
Office 1/Division 4/Department 1
One group of the first hierarchy level Office 1 will be created in the destination group; this group will include four nested groups of the same hierarchy level: "Division 1", "Division 2", "Division 3", and "Division 4". Each of these groups will include the "Department 1" group.
If you use a Wizard to create the administration groups structure, the network integrity is preserved: new groups do not replace the existing ones. A client computer cannot be included in an administration group again, because it is removed from the Unassigned computers group after the client computer is moved to the administration group.
If, when creating a structure of administration groups, a client computer has not been included in the Unassigned computers group by any reason (it has been shut down or lost the network connection), it will not be automatically
moved to the administration group. You can add client computers to administration groups manually after the Wizard finishes its operation.
To launch the automatic creation of a structure of administration groups:
1. Select the Managed computers folder in the console tree.
2. From the context menu of the Managed computers folder select All tasks Create groups structure.
As a result, the New Administration Group Structure Wizard launches. Follow the Wizard's instructions.
A D M I N I S T R A T O R ' S G U I D E
60
AUTOMATIC INSTALLATION OF APPLICATIONS TO
COMPUTERS IN AN ADMINISTRATION GROUP
You can specify which installation packages should be used for automatic remote installation of Kaspersky Lab applications to client computers that have recently been added to a group.
To configure automatic installation of applications on new computers as they are added to an administration group:
1. In the console tree, select the required administration group.
2. Open the properties window of this administration group.
3. In the Automatic installation section, select the installation packages to be installed on new computers by selecting the check boxes for the installation packages of the required applications. Click OK.
Group tasks will be created that will run on the client computers immediately after they are added to the administration group.
If some installation packages of one application were selected for automatic installation, the installation task will be created for the most recent application version only.

61
MANAGING APPLICATIONS REMOTELY
This section provides information about how to perform remote management of Kaspersky Lab applications installed on client computers, using policies, tasks, and local settings of applications.
IN THIS SECTION
Managing policies ........................................................................................................................................................... 61
Managing tasks ............................................................................................................................................................... 65
Viewing and changing local application settings ............................................................................................................. 72
MANAGING POLICIES
The applications installed on client computers are configured centrally through definition of policies.
Policies created for applications in an administration group are displayed in the workspace, on the Policies tab. Before
the name of each policy an icon with its status is displayed.
After a policy is deleted or revoked, the application continues working with the settings specified in the policy. Those settings can be subsequently modified manually.
A policy applies as follows: if a client computer is running resident tasks (real-time protection tasks), they keep running with the new values of the settings. Any periodic tasks (on-demand scan, update of application databases) started keep running with the values unchanged. Next time they are run with the new values of the settings.
If Administration Servers are structured hierarchically, slave Administration Servers receive policies from the master Administration Server and distribute them to client computers. When inheritance is enabled, policy settings can be modified on the master Administration Server. After that, any changes made to the policy settings are propagated to inherited policies on slave Administration Servers.
If the connection is terminated between the master and slave Administration Servers, the policy on the slave Server continues, using the applied settings. Policy settings modified on the master Administration Server are distributed to a slave Administration Server after the connection is re-established.
If inheritance is disabled, policy settings can be modified on a slave Administration Server independently from the master Administration Server.
If connection between Administration Server and a client computer is interrupted, the client computer starts running under the policy for mobile users (if it is defined), or the policy keeps running under the applied settings until the connection is re-established.
The results of policy distribution to the slave Administration Server are displayed in the policy properties window of the console on the master Administration Server.
Results of propagation of policies to client computers are displayed in the policy properties window of Administration Server to which they are connected.
A D M I N I S T R A T O R ' S G U I D E
62
IN THIS SECTION
Creating policies .............................................................................................................................................................. 62
Displaying inherited policy in a subgroup ........................................................................................................................ 62
Activating a policy ........................................................................................................................................................... 63
Activating a policy automatically at the Virus outbreak event .......................................................................................... 63
Applying a roaming policy ............................................................................................................................................... 63
Deleting a policy .............................................................................................................................................................. 63
Copying a policy .............................................................................................................................................................. 64
Exporting a policy ............................................................................................................................................................ 64
Importing a policy ............................................................................................................................................................ 64
Converting policies .......................................................................................................................................................... 65
CREATING POLICIES
To create a policy for administration group:
1. In the console tree, select an administration group for which you want to create a policy.
2. In the workspace for the group, select the Policies tab and click the Create a policy link to run the New Policy
Wizard.
This starts the New Policy Wizard. Follow the Wizard's instructions.
You can create several policies for one application from the group, but only one policy can be active at a time. When you create new active policy, the previous active policy becomes inactive.
When creating a policy, you can specify a minimum set of parameters required for the application to function properly. All other values are set to the default values applied during the local installation of the application. You can change the policy after it is created.
Settings of Kaspersky Lab applications changed after policies are applied are described in details in their respective Guides.
After the policy is created, settings prohibited to modify (marked with the "lock" ) take effect on client computers regardless of what settings had been specified for the application earlier.
DISPLAYING INHERITED POLICY IN A SUBGROUP
To enable the display of inherited policies for a nested administration group:
1. In the console tree select the administration group for which inherited policies should be displayed.
2. In the workspace for the selected group select the Policies tab.
3. From the context menu of the list of policies select View Inherited Policies.

M A N A G I N G A P P L I C A T I O N S R E M O T E L Y
63
As a result, inherited policies are displayed on the list of policies with the icon (light-colored icon). When the settings inheritance mode is enabled, inherited policies are only available for modification in the group in which they have been created. Modification of those inherited policies is not available in the group, which inherits them.
ACTIVATING A POLICY
To make a policy active for the selected group:
1. In the workspace of the group, on the Policies tab select the policy that you need to make active.
2. To activate the policy, perform one of the following actions:
From the context menu of the policy select Active policy.
In the policy properties window open the General section and select Active policy from the Policy status
settings group.
As a result, the policy becomes active for the selected administration group.
When a policy is applied to a large number of clients, both the load on the Administration Server and the network traffic increase significantly for a period of time.
ACTIVATING A POLICY AUTOMATICALLY AT THE VIRUS OUTBREAK
EVENT
To make a policy perform the automatic activation at the Virus outbreak event:
1. In the Administration Server properties window open the Virus outbreak section.
2. Open the Policy activation window by clicking the Configure policies to activate on "Virus outbreak" event
link and add the policy to the selected list of policies activated upon detection of a virus outbreak.
If a policy has been activated on the Virus outbreak event, the manual mode is the only way that you can use to return to the previous policy.
APPLYING A ROAMING POLICY
A roaming policy takes effect on a computer in case it is disconnected from the enterprise network.
To apply the selected roaming policy,
in the properties window of the policy open the General section and select Roaming policy from the Policy status
settings group.
As a result, the policy activates on the computers in case they are disconnected from the organization's network.
DELETING A POLICY
To delete a policy:
1. In the workspace of a group, on the Policies tab select the policy that you need to delete.
2. Delete the policy using one of the following methods:

A D M I N I S T R A T O R ' S G U I D E
64
By selecting Delete from the context menu of the policy.
By clicking the Delete policy link located in the workspace, in the section intended for handling the
selected policy.
COPYING A POLICY
To copy a policy:
1. In the workspace of the required group, on the Policies tab select a policy.
2. From the context menu of the policy select Copy.
3. In the console tree, select a group to which you want to add the policy.
You can add a policy to the group, from which it was copied.
4. From the context menu of the list of policies for the selected group, on the Policies tab select Paste.
As a result, the policy will be copied with all its settings and applied to the computers within the group into which it was copied. If you paste the policy to the same group from which it has been copied, the (<sequence number>) index is automatically added to the name of the policy: for example, (1), (2).
An active policy becomes inactive while it is copied. If necessary, you can make it active.
EXPORTING A POLICY
To export a policy:
1. Export a policy in one of the following ways:
By selecting All tasks Export from the context menu of the policy.
By clicking the Export policy to file link located in the workspace, in the section intended for handling the
selected policy.
2. In the Save as window that opens, specify the name of the policy file and the path to save it. Click the Save
button.
IMPORTING A POLICY
To import a policy:
1. In the workspace of the required group, on the Policies tab select one of the following methods of importing
policies:
By selecting All tasks Import from the context menu of the list of policies.
Click the Import policy from file link in the management block for policy list.
2. In the window that opens, specify the path to the file from which you want to import a policy. Click the Open
button.
The policy is then displayed in the list of policies.

M A N A G I N G A P P L I C A T I O N S R E M O T E L Y
65
If a policy with the name coinciding with that of the imported policy is already included on the list of policies, the name of the imported policy will be expanded with the with a suffix (<next number>), for example: (1), (2).
CONVERTING POLICIES
Kaspersky Security Center can convert policies from earlier versions of Kaspersky Lab applications into those from up-to-date versions of the same applications.
Conversion is available for policies of the following applications:
Kaspersky Anti-Virus 6.0 for Windows Workstations MP4
Kaspersky Endpoint Security 8 for Windows;
Kaspersky Endpoint Security 10 for Windows.
To convert policies:
1. From the console tree select Administration Server for which you want to convert policies.
2. From the context menu of Administration Server select All tasks Policies and tasks conversion wizard.
This will start the Policies and Tasks Conversion Wizard. Follow the wizard's instructions.
After the wizard finishes its operation, new policies are created, which use the settings of policies from earlier versions of Kaspersky Lab applications.
MANAGING TASKS
Using Kaspersky Security Center you can manage applications installed on client computers through the creation and running of tasks. Tasks are required for installing, launching and stopping applications, scanning files, updating databases and software modules, and taking other actions on applications.
Tasks are subdivided into the following types:
Group tasks. Tasks that are performed on the client computers of the selected administration group.
Administration Server tasks. Tasks that are performed on the Administration Server.
Tasks for specific computers. Tasks that are performed on selected computers, regardless of whether they are included in any administration groups.
Local tasks. Tasks that are performed on an individual client computer.
An application task can only be created if the management plug-in for that application is installed on the administrator's workstation.
For each application you can create any number of group tasks, tasks for specific computers, or local tasks.
Exchange of information about tasks between an application installed on a client computer and the Kaspersky Security Center database is carried out in the moment Network Agent is connected to Administration Server.
You can make changes to the settings of tasks, view their progress, copy, export, import, and delete them.
A D M I N I S T R A T O R ' S G U I D E
66
Tasks are launched on a client only if the application for which the task was created is running. When the application is not running, all running tasks are canceled.
Results of tasks run are saved in the events log of Microsoft Windows and Kaspersky Security Center – as in centralized mode on Administration Server, so in local mode on each client computer.
IN THIS SECTION
Creating a group task ...................................................................................................................................................... 66
Creating an Administration Server task ........................................................................................................................... 66
Creating a task for specific computers ............................................................................................................................ 67
Creating a local task ........................................................................................................................................................ 68
Displaying an inherited group task in the workspace of a nested group .......................................................................... 68
Starting client computers automatically before launching a task ..................................................................................... 68
Turning off the computer after a task is complete ........................................................................................................... 69
Limiting task run time ...................................................................................................................................................... 69
Exporting a task .............................................................................................................................................................. 69
Importing a task ............................................................................................................................................................... 70
Converting tasks ............................................................................................................................................................. 70
Starting and stopping a task manually ............................................................................................................................ 70
Pausing and resuming a task manually ........................................................................................................................... 71
Monitoring task execution................................................................................................................................................ 71
Viewing task run results stored on Administration Server ............................................................................................... 71
Configuring filtering of information about task run results................................................................................................ 71
CREATING A GROUP TASK
To create a group task:
1. In the workspace of the group for which you need to create a task, select the Tasks tab.
2. Run the task creation process by clicking the Create a task link.
This starts the New Task Wizard. Follow the Wizard's instructions.
CREATING AN ADMINISTRATION SERVER TASK
The Administration Server performs the following tasks:
Automatic distribution of reports

M A N A G I N G A P P L I C A T I O N S R E M O T E L Y
67
Downloading of updates to the repository
Backup of Administration Server data
Windows Update synchronization
Creation of an installation package based on the OS image of a reference computer.
On a virtual Administration Server, only the automatic report delivery task and the installation package creation task from reference computer OS image are available. The repository of the virtual Administration Server displays updates downloaded to the master Administration Server. Backup of virtual Server's data is performed along with backup of master Administration Server's data.
To create an Administration Server task:
1. In the console tree, select the Administration Server tasks folder.
2. Start creating the task in one of the following ways:
In the console tree, in the Administration Server tasks folder context menu, select New Task.
Click the Create a task link in the workspace.
This starts the New Task Wizard. Follow the wizard's instructions.
The Download updates to the repository, Windows Update synchronization, and Back up Administration Server data tasks can be created only once. If the Download updates to the repository, Back up Administration Server data, and Windows Update synchronization tasks have been already created for Administration Server, they will not
be displayed in the task type selection window of the New Task Wizard.
CREATING A TASK FOR SPECIFIC COMPUTERS
In Kaspersky Security Center you can create tasks for specific computers. Computers joined in a set can be included in various administration groups or be out of any administration groups. Kaspersky Security Center can perform the following main tasks:
install application remotely (for more information, see Kaspersky Security Center Implementation Guide).
Send message for user (see section "Sending a message to the users of client computers" on page 78).
Change Administration Server (see section "Changing Administration Server for client computers" on page 77).
Manage client computer (see section "Remote turning on, turning off and restarting client computers" on page 78).
Verify updates (see section "Verifying downloaded updates" on page 133).
deploy installation package (for more information, see Kaspersky Security Center Implementation Guide).
install application remotely on the slave Administration Servers (for more information, see Kaspersky Security Center Implementation Guide).
uninstall application remotely (for more information, see Kaspersky Security Center Implementation Guide).
To create a task for specific computers:
1. In the console tree, select the Tasks for specific computers folder.
A D M I N I S T R A T O R ' S G U I D E
68
2. Start creating the task in one of the following ways:
From the context menu of the console tree folder named Tasks for specific computers select New Task.
Click the Create a task link in the workspace.
This starts the New Task Wizard. Follow the Wizard's instructions.
CREATING A LOCAL TASK
To create a local task for client computer:
1. Select the Computers tab in the workspace of the group that includes the client computer.
2. From the list of computers on the Computers tab select the computer for which a local task should be created.
3. Start creating the task for the selected computer in one of the following ways:
By clicking the Create a task link in the workspace of the computer.
From the computer properties window in the following way:
a. From the computer context menu, select Properties.
b. In the computer properties window that opens, select the Tasks section and click Add.
This starts the New Task Wizard. Follow the Wizard's instructions.
Detailed instructions on how to create and configure local tasks are provided in the Guides for the respective Kaspersky Lab applications.
DISPLAYING AN INHERITED GROUP TASK IN THE WORKSPACE OF A
NESTED GROUP
To enable the display of inherited tasks of a nested group in the workspace:
1. Select the Tasks tab in the workspace of a nested group.
2. Select View Inherited tasks from the context menu of the list of tasks.
As a result, inherited tasks are displayed in the list of tasks with the icon. If the settings inheritance mode is enabled, inherited tasks can only be edited in the group in which they have been created. Inherited tasks cannot be edited in the group that inherits the tasks.
STARTING CLIENT COMPUTERS AUTOMATICALLY BEFORE
LAUNCHING A TASK
Kaspersky Security Center allows you to adjust the settings of a task so that the operating system starts loading on client computers, which are turned off, before the task is launched.
To configure the automatic startup of client computers before launching a task:
1. In the task properties window, select the Schedule section.
M A N A G I N G A P P L I C A T I O N S R E M O T E L Y
69
2. Open the window intended for configuration of actions on client computers, by clicking the Advanced link.
3. In the Advanced window that opens, select the Activate computer before the task is started by the Wake On LAN function (min) check box and specify the time interval in minutes.
As a result, the operating system will start loading on client computers, which are turned off, the specified time interval before the task is launched.
Automatic loading of the operating system is only available on computers that support the Wake On Lan feature.
TURNING OFF THE COMPUTER AFTER A TASK IS COMPLETE
Kaspersky Security Center allows you to adjust the settings of a task so that the client computers, to which it is applied, turn off automatically after it is complete.
To turn off the client computers after the task is complete:
1. In the task properties window, select the Schedule section.
2. Open the window intended for configuration of actions on client computers, by clicking the Advanced link.
3. In the Advanced window that opens, select the Turn off computer after task is complete check box.
LIMITING TASK RUN TIME
To limit the time of task run on client computers:
1. In the task properties window, select the Schedule section.
2. Open the window intended for configuration of actions on client computers, by clicking the Advanced link.
3. In the Advanced window that opens, select the Stop if the task is taking longer than (min) check box and
specify the time interval in minutes.
As a result, if the task is not yet complete when the specified time interval expires, Kaspersky Security Center stops the task run automatically.
EXPORTING A TASK
You can export group tasks and tasks for specific computers into a file. Administration Server tasks and local tasks are not available for export.
To export a task:
1. Export the task using one of the following methods:
By selecting All tasks Export from the context menu of the task.
By clicking the Export task to file link located in the workspace, in the section intended for handling the
selected policy.
2. In the Save as window that opens, specify the name of the file and the path to save it. Click the Save button.
The rights of local users are not exported.
A D M I N I S T R A T O R ' S G U I D E
70
IMPORTING A TASK
You can import group tasks and tasks for specific computers. Administration Server tasks and local tasks are not available for import.
To import a task:
1. Select the task list to which the task should be imported:
If you want to import the task to the list of group tasks, in the workspace of the required group select the Tasks tab.
If you want to import a task into the list of tasks for specific computers, select the Tasks for specific computers folder from the console tree.
2. Select one of the following options to import the task:
In the context menu of the task list, select All Tasks Import.
Click the Import task from file link in the task list management block.
3. In the window that opens, specify the path to the file from which you want to import task. Click the Open button.
The task is then displayed in the task list.
If a task with the same name as that of the imported task is already included in the selected list, an index in (<serial number>) format will be added to the name of the imported one, for example: (1), (2).
CONVERTING TASKS
You can use Kaspersky Security Center to convert tasks from earlier versions of Kaspersky Lab applications into those from up-to-date versions of the applications.
Conversion is available for tasks of the following applications:
Kaspersky Anti-Virus 6.0 for Windows Workstations MP4
Kaspersky Endpoint Security 8 for Windows;
Kaspersky Endpoint Security 10 for Windows.
To convert tasks:
1. In the console tree, select an Administration Server for which you want to convert tasks.
2. From the context menu of Administration Server select All tasks Policies and tasks conversion wizard.
This will start the Policies and Tasks Conversion Wizard. Follow the wizard's instructions.
After the wizard completes its operation, new tasks are created, which use the settings of tasks from earlier versions of the applications.
STARTING AND STOPPING A TASK MANUALLY
To start or stop a task manually:
1. In the list of tasks, select a task.

M A N A G I N G A P P L I C A T I O N S R E M O T E L Y
71
2. Start or stop the task in one of the following ways:
Click Start or Stop in the workspace of the selected tasks.
In the context menu of the task, select Start or Stop.
In the task properties window, in the General section, click Start or Stop.
PAUSING AND RESUMING A TASK MANUALLY
To pause or resume a running task:
1. In the list of tasks, select a task.
2. Pause or resume the task using one of the following methods:
In the context menu of the task, select Pause or Resume.
In task properties window, select the General section and click Pause or Resume.
MONITORING TASK EXECUTION
To monitor task execution,
select the task properties window, the General section.
In the middle part of the General section, the current task status is displayed.
VIEWING TASK RUN RESULTS STORED ON ADMINISTRATION SERVER
Kaspersky Security Center allows you to view run results for group tasks, tasks for specific computers, and Administration Server tasks. No run results can be viewed for local tasks.
To view task results,
in the task properties window, select the General section and click the Results link to open the Task results
window.
CONFIGURING FILTERING OF INFORMATION ABOUT TASK RUN
RESULTS
Kaspersky Security Center allows you to filter information about run results for group tasks, tasks for specific computers, and Administration Server tasks. No filtering is available for local tasks.
To configure filtering of information about task run results:
1. In the task properties window, select the General section and click the Results link to open the Task results
window.
The table in the upper part of the window contains all client computers for which the task is assigned.
The table in the lower part of the window displays the results of the task performed on the selected client computer.
2. In the Task results window in the required table, select the Filter context menu item.

A D M I N I S T R A T O R ' S G U I D E
72
3. In the Set filter window that opens, configure the filter in the Events, Computers and Time sections. Click OK.
As a result, the Task results window displays information that meets the settings specified in the filter.
VIEWING AND CHANGING LOCAL APPLICATION SETTINGS
The Kaspersky Security Center administration system allows remote management of local application settings on remote computers through Administration Console.
Local application settings are the settings of an application that are specific for a client computer. You can use Kaspersky
Security Center to specify local application settings on client computers included in administration groups.
Detailed descriptions of settings of Kaspersky Lab applications are provided in respective Guides.
To view or change application's local settings:
1. In the workspace of the group to which the required client computer belongs to, select the Computers tab.
2. In the client computer properties window, in the Applications section, select the required application.
3. Open the application properties window by double-clicking the application name or by clicking the Properties
button.
As a result, the local settings window of the selected application opens so that you can view and edit those settings.
You can change the values of the settings that have not been prohibited for modification by a group policy (i.e., those not marked with the "lock" in a policy).
73
MANAGING CLIENT COMPUTERS
This section provides information about how to handle client computers.
IN THIS SECTION
Connecting client computers to Administration Server .................................................................................................... 73
Connecting a client computer to Administration Server manually. Utility tool klmover .................................................... 74
Checking the connection between a client computer and Administration Server ............................................................ 75
Identifying client computers on Administration Server ..................................................................................................... 76
Adding computers to an administration group ................................................................................................................. 76
Changing Administration Server for client computers ..................................................................................................... 77
Remote turning on, turning off and restarting client computers ....................................................................................... 78
Sending a message to the users of client computers ...................................................................................................... 78
Remote diagnostics of client computers. Utility for remote diagnostics of Kaspersky Security Center ............................ 79
CONNECTING CLIENT COMPUTERS TO ADMINISTRATION
SERVER
The connection of the client computer to the Administration Server is established through Network Agent installed on client computer.
When a client computer connects to Administration Server, the following operations are performed:
Automatic data synchronization:
synchronization of applications installed on the client computer;
synchronization of the policies, application settings, tasks, and task settings.
Retrieval of up-to-date information about the condition of applications, execution of tasks and applications' operation statistics by the Server.
Delivery of the event information to Administration Server for processing.
Automatic data synchronization is performed regularly in accordance with the Network Agent settings (for example, every 15 minutes). You can specify the connection interval manually.
Information about an event is delivered to Administration Server as soon as it occurs.
Kaspersky Security Center allows you to configure connection between a client computer and Administration Server so that the connection remains active after all operations are completed. Uninterrupted connection is necessary in cases when real-time control of application status is required and Administration Server is unable to establish a connection to the client for some reason (connection is protected by a firewall, opening of ports on the client computer is not allowed, the client IP address is unknown, and so on). You can establish a continuous connection between a client computer and Administration Server in the General section of the client computer properties window.
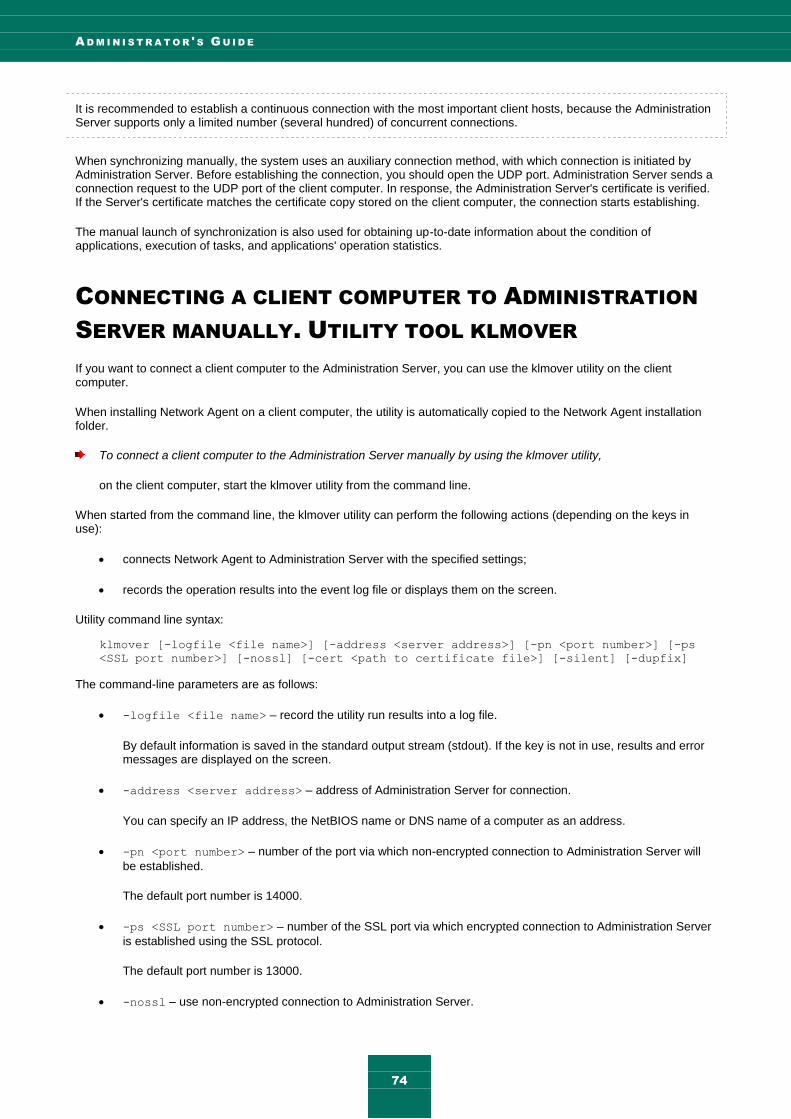
A D M I N I S T R A T O R ' S G U I D E
74
It is recommended to establish a continuous connection with the most important client hosts, because the Administration Server supports only a limited number (several hundred) of concurrent connections.
When synchronizing manually, the system uses an auxiliary connection method, with which connection is initiated by Administration Server. Before establishing the connection, you should open the UDP port. Administration Server sends a connection request to the UDP port of the client computer. In response, the Administration Server's certificate is verified. If the Server's certificate matches the certificate copy stored on the client computer, the connection starts establishing.
The manual launch of synchronization is also used for obtaining up-to-date information about the condition of applications, execution of tasks, and applications' operation statistics.
CONNECTING A CLIENT COMPUTER TO ADMINISTRATION
SERVER MANUALLY. UTILITY TOOL KLMOVER
If you want to connect a client computer to the Administration Server, you can use the klmover utility on the client computer.
When installing Network Agent on a client computer, the utility is automatically copied to the Network Agent installation folder.
To connect a client computer to the Administration Server manually by using the klmover utility,
on the client computer, start the klmover utility from the command line.
When started from the command line, the klmover utility can perform the following actions (depending on the keys in use):
connects Network Agent to Administration Server with the specified settings;
records the operation results into the event log file or displays them on the screen.
Utility command line syntax:
klmover [-logfile <file name>] [-address <server address>] [-pn <port number>] [-ps
<SSL port number>] [-nossl] [-cert <path to certificate file>] [-silent] [-dupfix]
The command-line parameters are as follows:
-logfile <file name> – record the utility run results into a log file.
By default information is saved in the standard output stream (stdout). If the key is not in use, results and error messages are displayed on the screen.
-address <server address> – address of Administration Server for connection.
You can specify an IP address, the NetBIOS name or DNS name of a computer as an address.
-pn <port number> – number of the port via which non-encrypted connection to Administration Server will
be established.
The default port number is 14000.
-ps <SSL port number> – number of the SSL port via which encrypted connection to Administration Server
is established using the SSL protocol.
The default port number is 13000.
-nossl – use non-encrypted connection to Administration Server.

M A N A G I N G C L I E N T C O M P U T E R S
75
If the key is not in use, Network Agent is connected to Administration Server over the encrypted SSL protocol.
-cert <path to certificate file> – use the specified certificate file for authentication of access to
Administration Server.
If the key is not in use, Network Agent receives a certificate at the first connection to Administration Server.
-silent – run the utility in silent mode.
Using the key may be useful if, for example, the utility is started from the login script at the user's registration.
-dupfix – the key is used if Network Agent has been installed using a method that differs from the usual one
(with the distribution package) – for example, by recovering it from an ISO disk image.
CHECKING THE CONNECTION BETWEEN A CLIENT
COMPUTER AND ADMINISTRATION SERVER
Kaspersky Security Center allows you to check connections between a computer and Administration Server automatically or manually.
Automatic check of connection is performed on Administration Server. Manual check of connection is performed on the client computer.
IN THIS SECTION
Automatic check of connection between a client computer and Administration Server ................................................... 75
Manual check of connection between a client computer and Administration Server. The klnagchk utility ....................... 75
AUTOMATIC CHECK OF CONNECTION BETWEEN A CLIENT COMPUTER
AND ADMINISTRATION SERVER
To start an automatic check of connection between a client computer and Administration Server:
1. In the console tree select the administration group that includes the client computer.
2. In the workspace of the administration group, on the Computers tab select the client computer.
3. Select Check connection from the context menu of the client computer.
As a result, a window opens that provides information about the computer's accessibility.
MANUAL CHECK OF CONNECTION BETWEEN A CLIENT COMPUTER
AND ADMINISTRATION SERVER. THE KLNAGCHK UTILITY
You can check connection and obtain detailed information about the settings of connection between a client computer and Administration Server using the klnagchk utility.
When installing Network Agent on a client computer, the klnagchk utility is automatically copied to the Network Agent installation folder.
When started from the command line, the klnagchk utility can perform the following actions (depending on the keys in
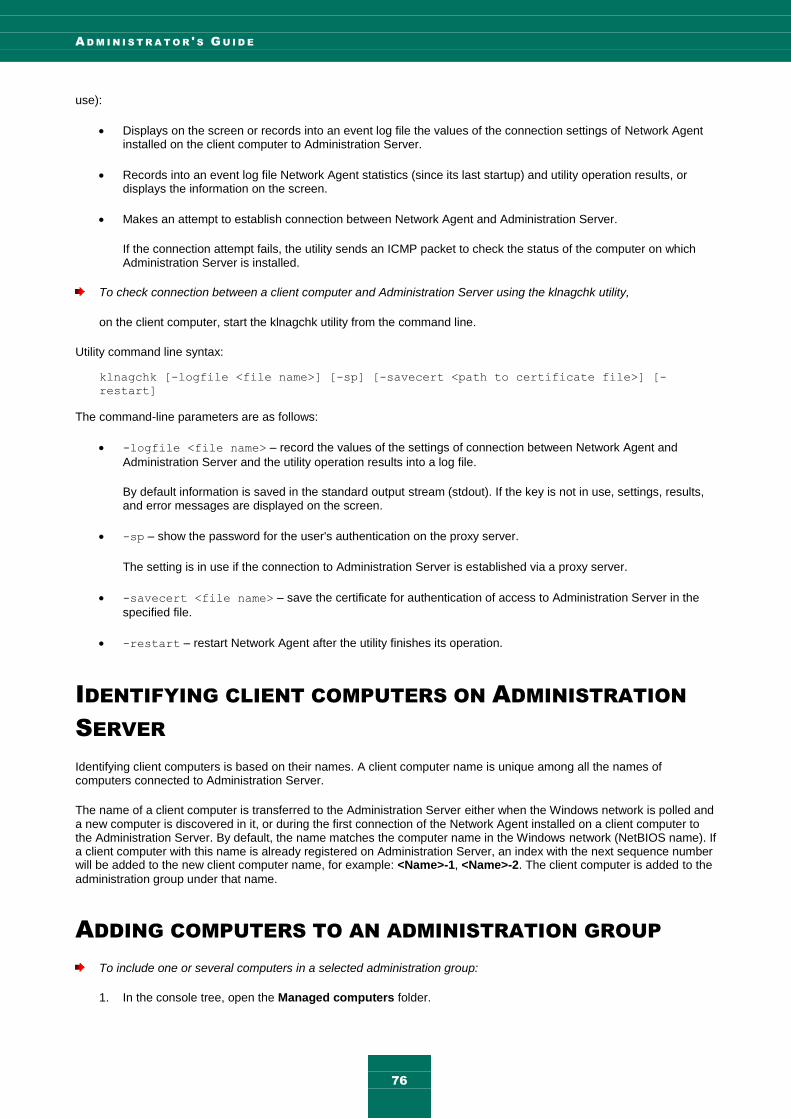
A D M I N I S T R A T O R ' S G U I D E
76
use):
Displays on the screen or records into an event log file the values of the connection settings of Network Agent installed on the client computer to Administration Server.
Records into an event log file Network Agent statistics (since its last startup) and utility operation results, or displays the information on the screen.
Makes an attempt to establish connection between Network Agent and Administration Server.
If the connection attempt fails, the utility sends an ICMP packet to check the status of the computer on which Administration Server is installed.
To check connection between a client computer and Administration Server using the klnagchk utility,
on the client computer, start the klnagchk utility from the command line.
Utility command line syntax:
klnagchk [-logfile <file name>] [-sp] [-savecert <path to certificate file>] [-
restart]
The command-line parameters are as follows:
-logfile <file name> – record the values of the settings of connection between Network Agent and
Administration Server and the utility operation results into a log file.
By default information is saved in the standard output stream (stdout). If the key is not in use, settings, results, and error messages are displayed on the screen.
-sp – show the password for the user's authentication on the proxy server.
The setting is in use if the connection to Administration Server is established via a proxy server.
-savecert <file name> – save the certificate for authentication of access to Administration Server in the
specified file.
-restart – restart Network Agent after the utility finishes its operation.
IDENTIFYING CLIENT COMPUTERS ON ADMINISTRATION
SERVER
Identifying client computers is based on their names. A client computer name is unique among all the names of computers connected to Administration Server.
The name of a client computer is transferred to the Administration Server either when the Windows network is polled and a new computer is discovered in it, or during the first connection of the Network Agent installed on a client computer to the Administration Server. By default, the name matches the computer name in the Windows network (NetBIOS name). If a client computer with this name is already registered on Administration Server, an index with the next sequence number will be added to the new client computer name, for example: <Name>-1, <Name>-2. The client computer is added to the
administration group under that name.
ADDING COMPUTERS TO AN ADMINISTRATION GROUP
To include one or several computers in a selected administration group:
1. In the console tree, open the Managed computers folder.

M A N A G I N G C L I E N T C O M P U T E R S
77
2. In the Managed computers folder select the nested folder that corresponds to the group, which should include
the client computers.
If you want to include the client computers in the Managed computers group, you can skip this step.
3. In the workspace of the selected administration group, on the Computers tab run the process of including the
client computers in the group using one of the following methods:
Add the computers to the group by clicking the Add computers link in the section intended for managing
the list of computers.
By selecting New Computer from the context menu of the list of computers.
This will start the Add client computers wizard. Following its instructions, select a method of adding the client computers to the group and create a list of computers to include in the group.
If you create the list of computers manually, you can use an IP address (or an IP range), a NetBIOS name, or a DNS name as the address of a computer. You can add to the list manually only computers for which information has already been added to the Administration Server database when connecting the computer, or after a network poll.
To import a list of computers from a file, specify a .txt file with a list of addresses of computers to be added. Each address must be specified in a separate line.
After the wizard finishes its operation, the selected client computers are included in the administration group and displayed in the list of computers under names generated by Administration Server.
You can add a client computer to the selected administration group by dragging it from the Unassigned computers
folder to the administration group folder.
CHANGING ADMINISTRATION SERVER FOR CLIENT
COMPUTERS
You can change Administration Server that manages client computers with another one using the Change Administration Server task.
To change Administration Server that manages client computers with another one:
1. Connect to the Administration Server which manages the client computers.
2. Create the Administration Server change task using one of the following methods:
If you need to change Administration Server for computers included in the selected administration group, create a group task (see section "Creating a group task" on page 66).
If you need to change Administration Server for computers included in different administration groups or in none of the existing groups, create a task for specific computers (see section "Creating a task for specific computers" on page 67).
This starts the New Task Wizard. Follow the Wizard's instructions. In the Task type window of the New Task Wizard select the Kaspersky Security Center node, open the Advanced folder, and select the Change Administration Server task.
3. Run the created task.
After the task is complete, the client computers for which it had been created go under the management of Administration Server specified in the task settings.

A D M I N I S T R A T O R ' S G U I D E
78
If Administration Server supports the data encryption and protection functionality, the process of creation of the Change Administration Server task is accompanied with a warning informing you that, if any encrypted data are stored on the
computers, the users will only be provided access to those they had already handled earlier, after the computers have gone under the management of a new server. In other cases no access to encrypted data will be provided. For detailed descriptions of the scenarios in which no access will be provided to encrypted data, refer to the Administrator's Guide of Kaspersky Endpoint Security 10 for Windows.
REMOTE TURNING ON, TURNING OFF AND RESTARTING
CLIENT COMPUTERS
Kaspersky Security Center allows you to manage client computers remotely: turn on, turn off, and restart them.
To manage client computers remotely:
1. Connect to the Administration Server which manages the client computers.
2. Create the management task for a client computer using one of the following methods:
If you need to turn on, turn off or restart computers included in the selected administration group, create a group task (see section "Creating a group task" on page 66).
If you need to turn on, turn off or restart computers included in various administration groups or belonging to none of them, create a task for specific computers (see section "Creating a task for specific computers" on page 67).
This starts the New Task Wizard. Follow the Wizard's instructions. In the Task type window of the New Task Wizard select the Kaspersky Security Center node, open the Advanced folder, and select the Manage client computer task.
3. Run the created task.
After the task is complete, the selected command (turn on, turn off, or restart) will be executed on the selected client computers.
SENDING A MESSAGE TO THE USERS OF CLIENT
COMPUTERS
To send a message to the users of client computers:
1. Connect to the Administration Server which manages the client computers.
2. Create a message sending task for client computer users in one of the following ways:
If you want to send message to the users of client computers that belong to the selected administration group, create a task for the selected group (see section "Creating a group task" on page 66).
If you want to send message to the users of client computers that belong to different administration groups or do not belong to administration groups at all, create a task for specific computers (see section "Creating a task for specific computers" on page 67).
This starts the New Task Wizard. Follow the Wizard's instructions. In the Task type window, select the Kaspersky Security Center node, open the Advanced folder and select the Send message to the user task.
3. Run the created task.

M A N A G I N G C L I E N T C O M P U T E R S
79
After the task completes, the created message will be sent to the users of selected client computers.
REMOTE DIAGNOSTICS OF CLIENT COMPUTERS. UTILITY
FOR REMOTE DIAGNOSTICS OF KASPERSKY SECURITY
CENTER
The utility for remote diagnostics of Kaspersky Security Center (hereinafter referred to as the remote diagnostics utility) is designed for remote performing of the following operations on client computers:
enabling and disabling tracing, changing the tracing level, downloading the trace file;
downloading applications' settings;
downloading event logs;
starting the diagnostics and downloading diagnostics results;
starting and stopping applications.
The remote diagnostics utility is installed on the computer automatically together with the Administration Console.
IN THIS SECTION
Connecting the remote diagnostics utility to a client computer ........................................................................................ 79
Enabling and disabling tracing, downloading the trace file .............................................................................................. 81
Downloading applications' settings .................................................................................................................................. 82
Downloading event logs .................................................................................................................................................. 82
Starting diagnostics and downloading its results ............................................................................................................. 82
Starting, stopping and restarting applications.................................................................................................................. 83
CONNECTING THE REMOTE DIAGNOSTICS UTILITY TO A CLIENT
COMPUTER
To connect the remote diagnostics utility to a client computer:
1. Select any administration group from the console tree.
2. In the workspace, on the Computers tab, in the context menu of any client computer select Custom tools Remote diagnostics.
As a result, the main window of the remote diagnostics utility opens.
3. In the first field of the main window of the remote diagnostics utility specify the tools that you intend to use to connect to the client computer:
Access using Microsoft Windows network.
Access using Administration Server.

A D M I N I S T R A T O R ' S G U I D E
80
4. If you have selected Access using Microsoft Windows network in the first field of the main utility window,
perform the following actions:
In the Computer field specify the computer that should be connected to.
You can use an IP address, NetBIOS or DNS name as the computer address.
The default value is the address of the computer from the context menu of which the utility has been run.
Specify an account to connect to the computer:
Connect as current user (selected by default). Connecting under the current user account.
Use provided user name and password to connect. Connecting under a provided user account. Specify the User name and the Password of the required account.
Connection to a client computer is only possible under the account of the local administrator of the client computer.
5. If you have selected Access using Administration Server in the first field of the main utility window, perform
the following actions:
In the Administration Server field specify the address of Administration Server from which you intend to
connect to the client computer.
You can use an IP address, NetBIOS or DNS name as the server address.
The default value is the address of Server from which the utility has been run.
If required, select the Use SSL, Compress traffic, and Computer belongs to slave Administration Server check boxes.
If the Computer belongs to slave Administration Server box is checked, you can fill in the Slave Server
field with the name of the slave Administration Server, which manages the client computer. To do this, click the Browse button.
6. To connect to the client computer, click the Enter button.
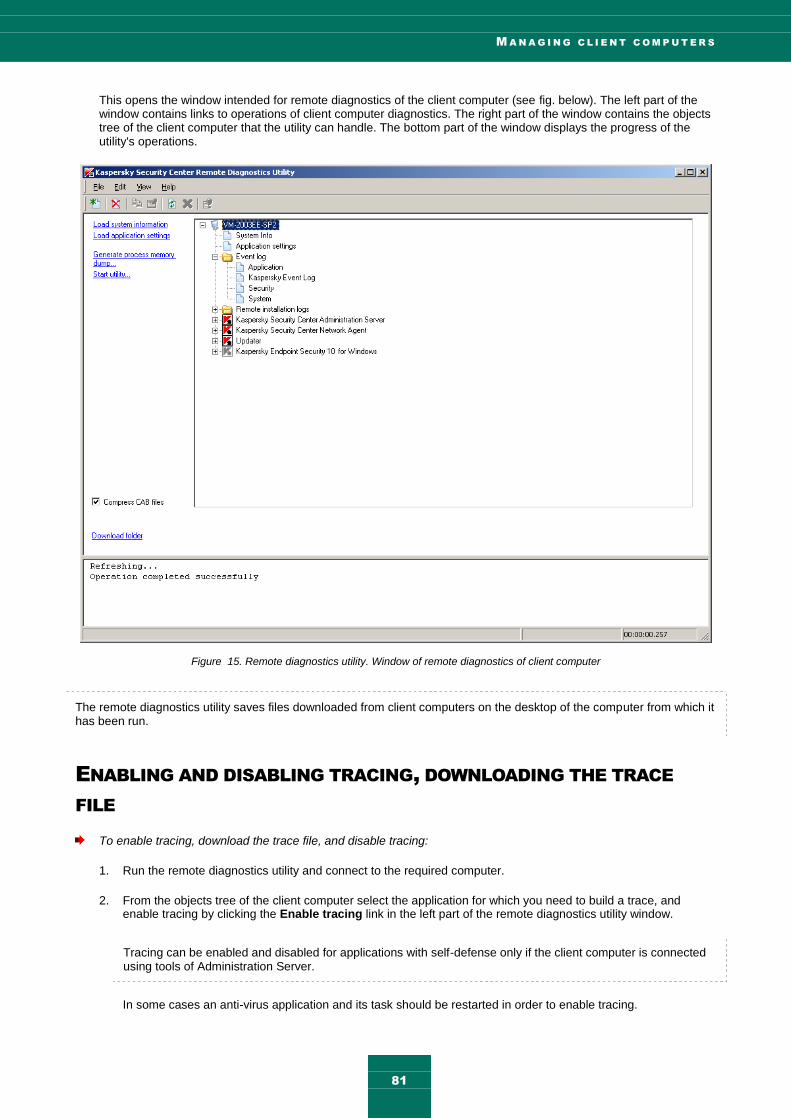
M A N A G I N G C L I E N T C O M P U T E R S
81
This opens the window intended for remote diagnostics of the client computer (see fig. below). The left part of the window contains links to operations of client computer diagnostics. The right part of the window contains the objects tree of the client computer that the utility can handle. The bottom part of the window displays the progress of the utility's operations.
Figure 15. Remote diagnostics utility. Window of remote diagnostics of client computer
The remote diagnostics utility saves files downloaded from client computers on the desktop of the computer from which it has been run.
ENABLING AND DISABLING TRACING, DOWNLOADING THE TRACE
FILE
To enable tracing, download the trace file, and disable tracing:
1. Run the remote diagnostics utility and connect to the required computer.
2. From the objects tree of the client computer select the application for which you need to build a trace, and enable tracing by clicking the Enable tracing link in the left part of the remote diagnostics utility window.
Tracing can be enabled and disabled for applications with self-defense only if the client computer is connected using tools of Administration Server.
In some cases an anti-virus application and its task should be restarted in order to enable tracing.

A D M I N I S T R A T O R ' S G U I D E
82
3. In the node of the application for which tracing is enabled, in the Trace files folder select the required file and download it by clicking the Download file link. For large-sized files only the most recent trace parts can be
downloaded.
You can delete the highlighted trace file. The file can be deleted after tracing is disabled.
4. Disable tracing for the selected application by clicking the Disable tracing link.
DOWNLOADING APPLICATIONS' SETTINGS
To download applications' settings:
1. Run the remote diagnostics utility and connect to the required computer.
2. From the objects tree of the remote diagnostics window select the top node with the name of the computer and select the required action in the left part of the window:
Load system information.
Load application settings.
Generate process memory dump.
In the window that opens after you click this link, specify the executable file of the selected application for which you need to generate a memory dump file.
Start utility.
In the window that opens after you click this link, specify the executable file of the selected utility and its startup settings.
As a result, the selected utility is downloaded and run on the client computer.
DOWNLOADING EVENT LOGS
To download an event log:
1. Run the remote diagnostics utility and connect to the required computer.
2. In the Event log folder of the computer objects tree select the required log and download it by clicking the Download event log Kaspersky Event Log link in the left part of the remote diagnostics utility window.
STARTING DIAGNOSTICS AND DOWNLOADING ITS RESULTS
To start diagnostics for an application and download its results:
1. Run the remote diagnostics utility and connect to the required computer.
2. From the objects tree of the client computer select the required application and start diagnostics by clicking the Run diagnostics link.
As a result, a diagnostics report appears in the node of the selected application in the objects tree.
3. Select the newly generated diagnostics report in the objects tree and download it by clicking the Download file link.

M A N A G I N G C L I E N T C O M P U T E R S
83
STARTING, STOPPING AND RESTARTING APPLICATIONS
You can only start, stop, and restart applications if you have connected the client computer using Administration Server tools.
To start, stop, or restart an application:
1. Run the remote diagnostics utility and connect to the required client computer.
2. From the objects tree of the client computer select the required application and select an action in the left part of the window:
Stop application.
Restart application.
Start application.
Depending on the action that you have selected, the application will be started, stopped, or restarted.
84
WORKING WITH REPORTS, STATISTICS,
AND NOTIFICATIONS
This section provides information about how to handle reports, statistics, and selections of events and client computers in Kaspersky Security Center, as well as how to configure Administration Server notifications.
IN THIS SECTION
Managing reports ............................................................................................................................................................ 84
Working with the statistical information ........................................................................................................................... 86
Configuring notification settings ...................................................................................................................................... 86
Event selections .............................................................................................................................................................. 87
Computer selections ....................................................................................................................................................... 89
MANAGING REPORTS
Reports in Kaspersky Security Center contain information about the condition of the protection system. Reports are generated based on information stored on Administration Server. You can create reports for the following types of objects:
For a selection of client computers
For computers of a specific administration group
For a set of client computers from different administration groups
For all the computers on the network (available for the deployment report)
The application includes a set of standard report templates; it also supports creation of user-defined report templates. Reports are displayed in the main application window, in the Reports and notifications folder of the console tree.
IN THIS SECTION
Creating a report template ............................................................................................................................................... 84
Creating and viewing a report ......................................................................................................................................... 85
Saving a report ................................................................................................................................................................ 85
Creating a report delivery task ........................................................................................................................................ 85
CREATING A REPORT TEMPLATE
To create a report template,
select the Reports and notifications folder from the console tree and perform one of the following actions:

W O R K I N G W I T H R E P O R T S , S T A T I S T I C S , A N D N O T I F I C A T I O N S
85
Select New Report Template from the context menu of the Reports and notifications folder.
In the workspace of the Reports and notifications folder, on the Reports tab run the report template creation process by clicking the Create a report template link.
As a result, the New Report Template Wizard starts. Follow the Wizard's instructions.
After the Wizard finishes its operation, the newly created report template is added to the Reports and notifications
folder of the console tree. You can use this template for generating and viewing reports.
CREATING AND VIEWING A REPORT
To create and view a report:
1. In the console tree open the Reports and notifications folder in which report templates are listed.
2. Select the required report template from the console tree or from the workspace on the Reports tab.
As a result, the workspace will display a report created on the selected template.
The report displays the following data:
report name and type, its brief description and reporting period, as well as information about which group of computers the report has been generated for;
graphic diagram reflecting the most crucial data from the report;
summary table of data reflecting calculated values from the report;
table of detailed data from the report.
SAVING A REPORT
To save a created report:
1. In the console tree open the Reports and notifications folder in which report templates are listed.
2. Select the required report template from the console tree or from the workspace on the Reports tab.
3. From the context menu of the selected report template select Save.
The Report Saving Wizard starts. Follow the Wizard's instructions.
After the Wizard finishes its operation, the folder opens into which you have saved the report file.
CREATING A REPORT DELIVERY TASK
Delivery of reports in Kaspersky Security Center is carried out using the report delivery task. You can deliver reports by email or save them in a dedicated folder, for example, in a shared folder on Administration Server or a local computer.
To create a delivery task for a report:
1. In the console tree open the Reports and notifications folder in which report templates are listed.
2. Select the required report template from the console tree or from the workspace on the Reports tab.
3. In the report template's context menu, select the Send Reports item.
A D M I N I S T R A T O R ' S G U I D E
86
This will start the Report Delivery Task Creation Wizard. Follow the Wizard's instructions.
To create a task of sending several reports:
1. In the console tree, select the Administration Server tasks folder.
2. Start creating the task in one of the following ways:
in the console tree, from the Administration Server tasks folder's context menu select New Task.
click the Create a task link in the workspace.
As a result, the Administration Server Task Creation Wizard starts. Follow the Wizard's instructions. In the Task type wizard window select Deliver reports.
The created report delivery task is displayed in the console tree, in the Administration Server tasks folder.
The report delivery task is created automatically if email settings have been specified during the Kaspersky Security Center installation.
WORKING WITH THE STATISTICAL INFORMATION
Statistical information about the anti-virus protection system is displayed in the workspace of the Reports and notifications folder on the Statistics tab. The Statistics tab contains several pages, each one of them consists of
informational panes that display statistical information. The statistical information is displayed as a table or chart (pie or bar). The data in the information panes are updated while the application is running, reflecting the current condition of the anti-virus protection system.
You can change the number and structure of pages on the Statistics tab, the number of information panes on each
page, and the data display mode in information panes.
The following buttons are intended to edit the display settings and print settings for statistics:
– located in the top right corner of the Statistics tab. Configure the structure of the Statistics tab: add,
remove statistics pages, change their positions.
– located on the right from the page name. Configure the statistics page.
– located on the right from the information pane name. Configure the information pane.
– located on the right from the information pane name. Minimize the information pane.
– located on the right from the information pane name. Maximize the information pane.
– located in the top right corner of the Statistics tab. Print the current statistics page.
CONFIGURING NOTIFICATION SETTINGS
Kaspersky Security Center allows you to configure notification of the administrator of events occurring on client devices, as well as to select a notification method:
email;
SMS;

W O R K I N G W I T H R E P O R T S , S T A T I S T I C S , A N D N O T I F I C A T I O N S
87
executable file to run.
To configure notification of events occurring on client devices:
1. Open the properties window of the Reports and notifications folder in one of the following ways:
Select Properties from the context menu of the Reports and notifications folder of the console tree.
In the workspace of the Reports and notifications folder, on the Notifications tab open the window by clicking the Modify notification delivery settings link.
2. In the Notifications section of the properties window of the Reports and notifications folder configure
notification of events.
As a result, the re-adjusted notification settings are applied to all events occurring on client devices.
You can configure the notification of an event in the properties window of that event. You can obtain quick access to the settings of events by clicking the Configure Kaspersky Endpoint Security events and Modify Administration Server event settings links.
SEE ALSO:
Configuring event processing settings............................................................................................................................. 53
EVENT SELECTIONS
Information on the events in Kaspersky Security Center operation is saved both in the Microsoft Windows system log and in the Kaspersky Security Center event log. You can view information from the event log of Kaspersky Security Center in the Reports and notifications folder of the console tree, in the Events subfolder.
The information in the Events folder is represented in selections. Each selection includes events that meet specified
conditions. After application installation, the folder contains some standard selections. You can create additional event selections or export event information to file.
IN THIS SECTION
Viewing an event selection .............................................................................................................................................. 87
Customizing an event selection ....................................................................................................................................... 88
Creating an event selection ............................................................................................................................................. 88
Exporting event selection to text file ................................................................................................................................ 88
Deleting events from selection ........................................................................................................................................ 89
VIEWING AN EVENT SELECTION
To view the event selection:
1. In the console tree, expand the Reports and notifications folder, and locate Events.
2. Open the event selection in one of the following ways:
Expand the Events folder and select the folder that contains the required event selection.

A D M I N I S T R A T O R ' S G U I D E
88
In the workspace of the Events folder click the link that corresponds to the required event selection.
As a result, the workspace will display a list of events, stored on the Administration Server, of the selected type.
You can sort the information in the events list, either in ascending or descending order in any column.
CUSTOMIZING AN EVENT SELECTION
To customize an event selection:
1. In the console tree, expand the Reports and notifications folder, and locate Events.
2. Open the required event selection in the Events folder.
3. Open the event selection properties in one of the following ways:
In the context menu of the event selection, select Properties.
Click the Selection properties in the event selection management block.
In the event selection properties window that opens you can configure the event selection.
CREATING AN EVENT SELECTION
To create an event selection:
1. In the Reports and notifications folder of the console tree select the Events subfolder.
2. Start creating the event selection in one of the following ways:
From the context menu of the folder, select New Selection.
Click the Create a selection link in the workspace of the Events folder.
3. In the New event selection window that opens, enter the name of the new selection and click OK.
As a result, a new folder with the name you entered will appear in the console tree in the Events folder.
By default, a created event selection contains all events stored on the Administration Server. To make a selection display only the events you are particularly interested in, you should customize the selection.
EXPORTING EVENT SELECTION TO TEXT FILE
To export an event selection to text file:
1. In the console tree, expand the Reports and notifications folder, and locate Events.
2. Open the required computer selection in the Events folder.
3. Start the event export in one of the following ways:
From the context menu of the selection, select All Tasks Export.
Click the Export events to file link in the event selection management block.
This starts the Events Export Wizard. Follow the wizard's instructions.

W O R K I N G W I T H R E P O R T S , S T A T I S T I C S , A N D N O T I F I C A T I O N S
89
DELETING EVENTS FROM SELECTION
To delete events:
1. In the console tree, expand the Reports and notifications folder, and locate Events.
2. Open the required computer selection in the Events folder.
3. Select the events that you want to delete by using a mouse, the Shift or Ctrl key.
4. Delete the selected events by one of the following ways:
In the context menu of any of the selected events, select Delete.
If you select the Clear all item from the context menu, all displayed events will be removed from the
selection, regardless of your selection of events for selection.
Click the Delete event link if one event is selected, or Delete events link if several events are selected in
the working block for these events.
As a result, the selected events will be deleted from the Events folder.
COMPUTER SELECTIONS
Information about the statuses of client computers is available in the Reports and notifications folder of the console tree, in the Computer selections subfolder.
In the Computer selections folder the data is represented as a set of selections, each of which displays information
about computers matching the specified conditions. After application installation, the folder contains some standard selections. You can create additional computer selections, export selection settings to file or create selections with settings imported from another file.
IN THIS SECTION
Viewing computer selection ............................................................................................................................................. 89
Configuring a computer selection .................................................................................................................................... 90
Creating a computer selection ......................................................................................................................................... 90
Exporting settings of a computer selection to file ............................................................................................................ 90
Create a computer selection by using imported settings ................................................................................................. 91
Removing computers from administration groups in a selection ..................................................................................... 91
VIEWING COMPUTER SELECTION
To view a computer selection:
1. In the Reports and notifications folder of the console tree select the Computer selections subfolder.
2. Open the computer selection in one of the following ways:
Open the Computer selections folder and select the folder that contains the required computer selection.

A D M I N I S T R A T O R ' S G U I D E
90
In the Computer selections folder workspace, by using the link that corresponds to the required computer
selection.
The workspace will display the list of computers that correspond to the selection filter.
You can sort the information in the computers list, either in ascending or descending order in any column.
CONFIGURING A COMPUTER SELECTION
To customize a computer selection:
1. In the Reports and notifications folder of the console tree select the Computer selections subfolder.
2. Open the required computer selection in the Computer selection folder.
3. Open the computer selection properties in one of the following ways:
In the context menu of the computer selection, select Properties.
Click the Selection properties in the computer selection management block.
In the computer selection properties window that opens you can configure the computer selection.
CREATING A COMPUTER SELECTION
To create a computer selection:
1. In the Reports and notifications folder of the console tree select the Computer selections subfolder.
2. Start creating the computer selection in one of the following ways:
From the context menu of the folder, select New Selection.
Click the Create a selection link in the workspace of the Computer selections folder.
3. In the New computer selection window that opens, enter the name of the new selection and click the OK
button.
As a result, a new folder with the name you entered will appear in the console tree in the Computer selections
folder.
By default, the new computer selection contains all computers included in the administration groups of the Server on which the selection has been created. To make a selection display only the computers you are particularly interested in, you should customize the selection.
EXPORTING SETTINGS OF A COMPUTER SELECTION TO FILE
To export the settings of a computer selection to text file:
1. In the Reports and notifications folder of the console tree select the Computer selections subfolder.
2. Open the required computer selection in the Computer selection folder.
3. From the context menu of the computer selection, select All Tasks Export settings.
4. In the Save as window that opens, specify a name for the selection settings export file, select a folder to save it to, and click the Save button.

W O R K I N G W I T H R E P O R T S , S T A T I S T I C S , A N D N O T I F I C A T I O N S
91
The settings of the computer selection will be saved to the specified file.
CREATE A COMPUTER SELECTION BY USING IMPORTED SETTINGS
To create a computer selection by using imported settings:
1. In the Reports and notifications folder of the console tree select the Computer selections subfolder.
2. Create a computer selection by using the settings imported from file in one of the following ways:
From the context menu of the folder, select All Tasks Import.
By clicking the Import selection from file link in the folder management block.
3. In the window that opens, specify the path to the file from which you want to import the selection settings. Click the Open button.
As a result, in the Computer selections folder a New selection is created. Its settings are imported from the file
that you specified.
If a selection named New selection already exists in the Computer selections folder, an index in (<serial number>) format is added to the name of the selection being created, for example: (1), (2).
REMOVING COMPUTERS FROM ADMINISTRATION GROUPS IN A
SELECTION
When working with computer selections, you can remove computers from administration groups, without switching to the administration groups in which these computers are located.
To remove computers from administration groups:
1. In the Reports and notifications folder of the console tree select the Computer selections subfolder.
2. Open the required computer selection in the Computer selection folder.
3. Select the computers that you want to remove by using the Shift or Ctrl keys.
4. Remove the selected computers from groups in one of the following ways:
In the context menu of any of the selected computers, select Delete.
By clicking the Remove from group link in the workspace of the selected computers.
As a result, selected computers will be removed from the corresponding administration groups.
92
UNASSIGNED COMPUTERS
This section provides information about how to manage computers on an enterprise network if they are not included in an administration group.
Information about computers within a corporate network that are not included in administration groups can be found in the Unassigned computers folder. The Unassigned computers folder contains three subfolders: Domains, IP subnets, and Active Directory.
The Unassigned computers folder of the virtual Administration Server does not contain the IP subnets folder. Client computers found while polling IP subnets on the virtual Administration Server are displayed in the Domains folder.
The Domains folder contains the hierarchy of subfolders that show the structure of domains and workgroups in the Windows network of the organization that were not included in the administration groups. Each subfolder of the Domains
folder at the lowest level contains a list of computers of the domain or of the workgroup. If you add a computer to an administration group, the information on it is deleted from the Domains folder. If you remove a computer from the administration group, the information on it is displayed in the Domains folder, in the domain subfolder or in the
workgroup of this computer.
The Active Directory folder displays computers reflecting the Active Directory groups structure.
The IP subnets folder displays computers reflecting the structure of IP subnetworks created within the corporate network. You can change the IP subnets folder structure by creating and modifying the settings of existing IP subnets.
IN THIS SECTION
Network discovery ........................................................................................................................................................... 92
Working with Windows domains. Viewing and changing the domain settings ................................................................. 94
Working with IP subnets .................................................................................................................................................. 94
Working with the Active Directory groups. Viewing and modifying group settings ........................................................... 95
Creating rules for moving computers to administration groups automatically .................................................................. 95
NETWORK DISCOVERY
Information about the structure of the network and computers on this network is received by the Administration Server through regular polling of the Windows network, IP subnets, and Active Directory within the corporate computer network. The content of the Unassigned computers folder will be updated based on the results of this polling.
The Administration Server can use the following types of network scanning:
Windows network polling. You can run either a quick or a full scan of the Windows network. During quick
polling, only information on hosts in the list of NetBIOS names of all network domains and workgroups is collected. During the full scan the following information is requested from each computer: operating system, IP address, DNS name, NetBIOS name.
IP subnets polling. The Administration Server will poll the specified IP subnets by using ICMP packets, and
collect a complete set of data on hosts within the IP subnets.
Active Directory groups polling. The information on the Active Directory unit structure and DNS names of the
computers from the Active Directory is recorded into the Administration Server database.

U N A S S I G N E D C O M P U T E R S
93
Kaspersky Security Center uses the collected information and the data on corporate network structure to update the contents of the Unassigned computers and Managed computers folders. If the computers in the corporate network
are configured to be moved to administration groups automatically, the discovered computers are included in the administration groups.
IN THIS SECTION
Viewing and modifying the settings for Windows network polling .................................................................................... 93
Viewing and modifying Active Directory group properties ............................................................................................... 93
Viewing and modifying the settings for IP subnet polling................................................................................................. 94
VIEWING AND MODIFYING THE SETTINGS FOR WINDOWS NETWORK
POLLING
To modify the settings for the Windows network polling:
1. In the console tree, select the Unassigned computers folder, the Domains subfolder.
2. Open the Properties: Domains window in one of the following ways:
From the context menu of the folder, select Properties.
By clicking the Edit polling settings link in the folder management block.
This will open the Properties: Domains window in which you can change the settings of Windows network polling.
You can also change the settings of Windows network polling in the workspace of the Unassigned computers folder by using the Edit polling settings link in the Windows network polling settings section.
On the virtual Administration Server you can view and edit the polling settings of the Windows network in the properties window of the update agent, in the Network discovery section.
VIEWING AND MODIFYING ACTIVE DIRECTORY GROUP PROPERTIES
To modify the settings for polling Active Directory groups:
1. In the console tree, select the Unassigned computers folder, the Active Directory subfolder.
2. Open the Properties: Active Directory window in one of the following ways:
From the context menu of the folder, select Properties.
By clicking the Edit polling settings link in the folder management block.
This will open the Properties: Active Directory window in which you can change the settings of Active Directory
polling.
You can also change the settings of the Active Directory groups polling in the workspace of the Unassigned computers folder by using the Edit polling settings link in the Active Directory groups polling block.
On the virtual Administration Server you can view and edit the settings of polling Active Directory groups in the properties window of the update agent, in the Network discovery section.
A D M I N I S T R A T O R ' S G U I D E
94
VIEWING AND MODIFYING THE SETTINGS FOR IP SUBNET POLLING
To modify the settings for IP subnets polling:
1. In the console tree, select the Unassigned computers folder, the IP subnets subfolder.
2. Open the Properties: IP subnets window in one of the following ways:
From the context menu of the folder, select Properties.
By clicking the Edit polling settings link in the folder management block.
This will open the Properties: IP subnets window in which you can change the settings of IP subnets polling.
You can also change the settings of IP subnets polling in the workspace of the Unassigned computers folder by using the Edit polling settings link in the IP subnets polling block.
On the virtual Administration Server you can view and edit the settings of polling IP subnets in the properties window of the update agent, in the Network discovery section. Client computers found during the polling of IP subnets are displayed in the Domains folder of the virtual Administration Server.
WORKING WITH WINDOWS DOMAINS. VIEWING AND
CHANGING THE DOMAIN SETTINGS
To modify the domain settings:
1. In the console tree, select the Unassigned computers folder, the Domains subfolder.
2. Select a domain and open its properties window in one of the following ways:
From the context menu of the domain, select Properties.
By clicking the Show group properties link.
This will open the Properties: <Domain name> properties window in which you can configure the properties of the
selected domain.
WORKING WITH IP SUBNETS
You can customize existing IP subnets and create the new ones.
IN THIS SECTION
Creating an IP subnet ..................................................................................................................................................... 95
Viewing and changing the IP subnet settings .................................................................................................................. 95

U N A S S I G N E D C O M P U T E R S
95
CREATING AN IP SUBNET
To create an IP subnet:
1. In the console tree, select the Unassigned computers folder, the IP subnets subfolder.
2. From the context menu of the folder, select New IP subnet.
3. In the New IP subnet window that opens customize the new IP subnet.
As a result, new IP subnet appears in the IP subnets folder.
VIEWING AND CHANGING THE IP SUBNET SETTINGS
To modify the IP subnet settings:
1. In the console tree, select the Unassigned computers folder, the IP subnets subfolder.
2. Select an IP subnet and open its properties window in one of the following ways:
From the context menu of the IP subnet, select Properties.
By clicking the Show group properties link.
This will open the Properties: <IP subnet name> properties window in which you can configure the properties of
the selected IP subnet.
WORKING WITH THE ACTIVE DIRECTORY GROUPS.
VIEWING AND MODIFYING GROUP SETTINGS
To modify the settings for the Active Director group:
1. In the console tree, select the Unassigned computers folder, the Active Directory subfolder.
2. Select an Active Directory group and open its properties window in one of the following ways:
From the context menu of the group, select Properties.
By clicking the Show group properties link.
This will open the Properties: <Active Directory group name> window in which you can customize the selected Active Directory group.
CREATING RULES FOR MOVING COMPUTERS TO
ADMINISTRATION GROUPS AUTOMATICALLY
You can configure the computers to be moved automatically to administration groups after they are found.
To configure rules for moving computers to administration groups automatically,
open the properties window of the Unassigned computers folder in one of the following ways:
From the context menu of the folder, select Properties.

A D M I N I S T R A T O R ' S G U I D E
96
Click the Configure rules of computer allocation to administration groups link in the workspace of this
folder.
This will open the Properties: Unassigned computers window. Configure the rules to move computers to administration groups automatically in the Computer relocation section.

97
MANAGING APPLICATIONS ON CLIENT
COMPUTERS
Kaspersky Security Center allows managing applications developed by Kaspersky Lab and other vendors, and installed on client computers.
The administrator can do the following:
Create categories of applications based on specified criteria
Manage categories of applications using specially created rules
Manage launches of applications on client computers
Perform inventory and maintain a registry of software installed on client computers
Fix vulnerabilities in software installed on client computers
Install Windows Updates and other vendors' updates to client computers
Track the use of license keys for groups of applications.
IN THIS SECTION
Groups of applications..................................................................................................................................................... 97
Application vulnerabilities .............................................................................................................................................. 102
Software updates .......................................................................................................................................................... 103
GROUPS OF APPLICATIONS
This section describes how to handle groups of applications installed on client computers.
Creating application categories
Kaspersky Security Center allows creating categories of applications installed on client computers.
You can create categories of applications using the following methods:
The administrator specifies a folder in which executable files have been included in the selected category.
The administrator sets criteria that should be used to include applications in the selected category.
When the category of applications is created, the administrator can set rules for that category. Rules define the behavior of applications included in the specified category. For example, you can block or allow launching applications included in the category.
Managing launch of applications on client computers
Kaspersky Security Center allows managing launch of applications on client computers in "Everything which is not allowed is forbidden" mode (for details refer to the Administrator's Guide for Kaspersky Endpoint Security 10 for

A D M I N I S T R A T O R ' S G U I D E
98
Windows). While in "Everything which is not allowed is forbidden" mode, on selected client computers you can only launch applications included in the specified categories.
Inventory of software installed on client computers
Kaspersky Security Center allows performing inventory of software on client computers. Network Agent collects information about all of the applications installed on client computers. Information collected during inventory is displayed in the workspace of the Applications registry folder. The administrator can view detailed information about any
application, including its version and manufacturer.
Managing groups of licensed applications
Kaspersky Security Center allows creating groups of licensed applications. A group of licensed applications includes applications that meet criteria set by the administrator. The administrator can specify the following criteria for groups of licensed applications:
Application name
Application version
Manufacturer
Application tag.
Applications that meet one or several criteria are automatically included in a group. To create a group of licensed applications, you should set at least one criterion of including applications in such group.
Each group of lisensed applications has its own key. The key of a group of licensed applications defines the maximum allowed number of installations for applications included in this group. If the number of installations has exceeded the limit set by the key, an information event is logged on Administration Server. The administrator can specify an expiration date for the key. When this date arrives, an information event is logged on Administration Server.
Viewing information about executable files
Kaspersky Security Center collects all information about executable files that have been run on client computers since the operating system had been installed to them. Collected information about executable files is displayed in the main application window, in the workspace of the Executable files folder.
IN THIS SECTION
Creating application categories ....................................................................................................................................... 98
Configuring applications launch management on client computers ................................................................................. 99
Viewing the applications registry ................................................................................................................................... 100
Creating groups of licensed applications ....................................................................................................................... 100
Managing keys for groups of licensed applications ....................................................................................................... 100
Viewing information about executable files ................................................................................................................... 101
CREATING APPLICATION CATEGORIES
To create an application category:
1. in the Applications and vulnerabilities folder of the console tree select the Application categories subfolder.

M A N A G I N G A P P L I C A T I O N S O N C L I E N T C O M P U T E R S
99
2. Click the Create a category link to run the Create User Category Wizard.
3. In the Wizard window select a user category type:
Category with content added manually. In this case, you will be able to manually set criteria used to
include applications in the category being created.
Category with content added automatically. In this case, you will be able to specify a folder from which
applications will be automatically added to the category being created.
Category with executable files. In this case
4. Follow the Wizard's instructions.
When the Wizard is finished, a user category of applications is created. You can view created categories in the Application categories folder.
CONFIGURING APPLICATIONS LAUNCH MANAGEMENT ON CLIENT
COMPUTERS
To configure the applications launch management on client computers:
1. In the Applications and vulnerabilities folder of the console tree select the Application categories subfolder.
2. In the workspace of the Application categories folder create a category of applications (see section "Creating
application categories" on page 98) that you want to manage while they are being launched.
3. In the Managed computers folder, on the Policies tab click the Create Kaspersky Endpoint Security policy
link to run the New Policy Wizard for Kaspersky Endpoint Security and follow the Wizard's instructions.
If such a policy already exists, you can skip this step. You can configure the applications launch management in a specified category through the settings of the policy. The newly created policy is displayed in the Managed computers folder, on the Policies tab.
4. Select Properties from the context menu of the policy for Kaspersky Endpoint Security.
The properties window of the Kaspersky Endpoint Security policy opens.
5. In the properties window of the Kaspersky Endpoint Security policy, in the Application Startup Control section click the Add button.
The Application Startup Control window opens.
6. In the Application Startup Control rule window, in the Category drop-down list select a category of
applications that the launch rule will cover. Configure the launch rule for the selected category of applications.
For more details on applications launch management rules refer to the Administrator's Guide for Kaspersky Endpoint Security Data Protection Suite.
7. Click OK.
Launch of applications included in the specified category will be performed on client computers according to the rule that you have created. The created rule is displayed in the properties window of the Kaspersky Endpoint Security policy, in the Application Startup Control section.
A D M I N I S T R A T O R ' S G U I D E
100
VIEWING THE APPLICATIONS REGISTRY
To view the registry of applications installed on client computers,
in the Applications and vulnerabilities folder of the console tree select the Applications registry subfolder.
The workspace of the Applications registry folder displays a list of applications that have been detected by
Network Agent installed on the client computers.
Gathering of information about installed applications is only available under Microsoft Windows.
To view the properties of a selected application,
select Properties from the context menu of the application.
A window opens, displaying general information about the application and information about the executable files of the application, as well as a list of computers on which the application has been installed.
To view applications that meet specified criteria, you can use the filtering fields in the workspace of the Applications registry folder.
Information about the applications installed on client computers connected to slave and virtual Administration Servers is also collected and stored in the applications registry of the master Administration Server. Use an applications registry report to view this information, by enabling collection of data from slave and virtual Administration Servers.
To include information from slave Administration Servers in the report:
1. In the Reports and notifications folder select Kaspersky Lab software version report.
2. Select Properties from the context menu of the report.
The Properties: Kaspersky Lab software version report window opens.
3. In the Administration Servers hierarchy section select the Include data from slave and virtual Administration Servers check box.
CREATING GROUPS OF LICENSED APPLICATIONS
To create a group of licensed applications:
1. In the Applications and vulnerabilities folder of the console tree select the Licensed applications group management subfolder.
2. Click the Add a group of licensed applications link to run the Licensed Application Group Addition Wizard.
3. Follow the Wizard's instructions.
After the Wizard completes its operation, a group of licensed applications is created and displayed in the Licensed applications group management folder.
MANAGING KEYS FOR GROUPS OF LICENSED APPLICATIONS
To create a key for a group of licensed applications:
1. In the Applications and vulnerabilities folder of the console tree select the Licensed applications group management subfolder.
M A N A G I N G A P P L I C A T I O N S O N C L I E N T C O M P U T E R S
101
2. In the workspace of the Licensed applications group management folder click the Manage keys of licensed applications link to open the Managing keys of licensed applications window.
3. In the Managing keys of licensed applications window click the Add button.
The Key window opens.
4. In the Key window specify the settings of the key and restrictions that the key imposes on the group of licensed
applications.
Name. The name of the key.
Comment. Notes on the selected key.
Restriction. The number of client computers to which the application using this key can be installed.
Expiration date. The expiration date of the key.
Created keys are displayed in the Managing keys of licensed applications window.
To apply a key to a group of licensed applications:
1. In the Applications and vulnerabilities folder of the console tree select the Licensed applications group management subfolder.
2. In the Licensed applications group management folder select a group of licensed applications to which you
want to apply a key.
3. Select Properties from the context menu of the group of licensed applications.
The properties window of the group of licensed applications opens.
4. In the properties window of the group of licensed applications, in the Keys section select Control violation of current licensing restrictions.
5. Click the Add button.
The Select a key window opens.
6. In the Selecting a key window select a key that you want to apply to a group of licensed applications.
7. Click OK.
Restrictions imposed on a group of licensed applications and specified in the key will also cover the selected group of licensed applications.
VIEWING INFORMATION ABOUT EXECUTABLE FILES
To view a list of all executable files detected on client computers,
in the Applications and vulnerabilities folder of the console tree select the Executable files subfolder.
The workspace of the Executable files folder displays a list of executable files that have been run on client
computers since the operating system had been installed, or have been detected while running the inventory task of Kaspersky Endpoint Security 10 for Windows.
To view data on executable files that meet specified criteria, you can use filtering.
To view the properties of an executable file,
select Properties from the context menu of the file.
A D M I N I S T R A T O R ' S G U I D E
102
A window opens that contains information about the executable file, along with a list of client computers on which the executable file has been detected.
APPLICATION VULNERABILITIES
Kaspersky Security Center allows detecting and fixing vulnerabilities in applications installed on client computers.
Search of vulnerabilities is performed using the Find vulnerabilities and application updates task. Network Agent
collects information about all applications installed on client computers and, if any vulnerabilities are detected, sends that information to Administration Server.
After completing the task, you can view a report on vulnerabilities in applications, as well as information about each of the vulnerabilities detected and the update that should be installed to fix that vulnerability.
You can fix vulnerabilities detected in applications using a group task named Installing application updates and fixing vulnerabilities.
Gathering of information about vulnerabilities in applications is only available under Microsoft Windows.
IN THIS SECTION
Viewing information about vulnerabilities in applications ............................................................................................... 102
Searching for vulnerabilities in applications ................................................................................................................... 103
Fixing vulnerabilities in applications .............................................................................................................................. 103
VIEWING INFORMATION ABOUT VULNERABILITIES IN APPLICATIONS
To view a list of vulnerabilities detected on client computers,
in the Applications and vulnerabilities folder of the console tree select the Application vulnerabilities subfolder.
The workspace of the folder displays a list of vulnerabilities in applications detected on client computers by Network Agent installed on them.
To obtain information about a selected vulnerability,
select Properties from the context menu of the vulnerability.
The properties window of the vulnerability opens, displaying the following information:
Application in which the vulnerability has been detected
List of computers on which the vulnerability has been detected
Information on whether the vulnerability has been fixed.
To view the report on all detected vulnerabilities,
click the View report on application vulnerabilities link in the Application vulnerabilities folder.
A report on vulnerabilities in applications installed on client computers will be generated. You can view the report in the Reports and notifications folder.
M A N A G I N G A P P L I C A T I O N S O N C L I E N T C O M P U T E R S
103
Gathering of information about vulnerabilities in applications is only available under Microsoft Windows.
SEARCHING FOR VULNERABILITIES IN APPLICATIONS
If you have configured the application through the Quick Start Wizard, the vulnerability scan task is created automatically. You can view the task in the Managed computers folder, on the Tasks tab.
To create a task for vulnerability scan in applications installed on client computers:
1. In the Applications and vulnerabilities folder of the console tree select the Application vulnerabilities
subfolder.
2. Click the Configure vulnerability scan link in the workspace to run the Vulnerabilities and Required Updates
Search Task Creation Wizard.
The Task Creation Wizard window opens.
3. Follow the Wizard's instructions.
After the Wizard completes its operation, the Find vulnerabilities and application updates task is created and displayed on the list of tasks in the Managed computers folder on the Tasks tab.
FIXING VULNERABILITIES IN APPLICATIONS
If you have selected Find and install application updates in the Update management settings window of the Quick Start Wizard, the Install application updates and fix vulnerabilities task is created automatically. The task is displayed in the Managed computers folder on the Tasks tab.
To create the vulnerabilities fix task using available updates for applications:
1. In the console tree select the Managed computers folder on the Tasks tab.
2. Click the Create a task link to run the New Task Wizard.
3. In the Select task type window of the Wizard specify the Installing application updates and fixing vulnerabilities task type.
4. Follow the Wizard's instructions.
After the Wizard completes its operation, the Install application updates and fix vulnerabilities task is created and displayed in the Managed computers folder on the Tasks tab.
SOFTWARE UPDATES
Kaspersky Security Center allows managing updates of software installed on client computers, and fixing vulnerabilities in Microsoft applications and other vendors' products through installation of required updates.
Kaspersky Security Center searches for updates through the update search task and downloads them to the updates storage. After completing the search of updates, the application provides the administrator with information about available updates and vulnerabilities in applications that can be fixed using those updates.
Information about available updates for Microsoft Windows is provided by Windows Update service. Administration Server can be used as Windows Update server (WSUS). To use Administration Server as Windows Update server, you should configure synchronization of updates with Windows Update. After you have configured data synchronization with Windows Update, Administration Server provides updates to Windows Update services on client computers in centralized mode and with the set frequency.
A D M I N I S T R A T O R ' S G U I D E
104
You can also manage software updates through a Network Agent policy. To do this, you should create a Network Agent policy and configure software updating in the corresponding windows of the New Policy Wizard.
The administrator can view a list of available updates in the Software updates subfolder comprised in the Applications and vulnerabilities folder. This folder contains a list of updates for Microsoft applications and other vendors' products
retrieved by Administration Server that can be distributed to client computers. After viewing information about available updates, the administrator can install them to client computers.
Before installing the updates to all of the client computers, you can perform a test installation to make sure installed updates will cause no failures to the operation of applications on the client computers.
IN THIS SECTION
Viewing information about available updates ................................................................................................................ 104
Synchronizing updates from Windows Update with Administration Server ................................................................... 104
Installing updates to client computers ........................................................................................................................... 105
Configuring application updates in a Network Agent policy ........................................................................................... 106
VIEWING INFORMATION ABOUT AVAILABLE UPDATES
To view a list of available updates for applications installed on client computers,
in the Applications and vulnerabilities folder of the console tree select the Software updates subfolder.
In the workspace of the folder you can view a list of available updates for applications installed on client computers.
To view the properties of an update,
in the workspace of the Software updates folder select Properties from the context menu of the update.
The following information is available for viewing in the properties window of the update:
List of client computers for which the update is intended (target computers)
Vulnerabilities in applications that the update should fix.
SYNCHRONIZING UPDATES FROM WINDOWS UPDATE WITH
ADMINISTRATION SERVER
If you have selected Use Administration Server as WSUS server in the Update management settings window of the
Quick Start Wizard, the Windows Update synchronization task is created automatically. You can run the task in the Administration Server tasks folder.
To create a task for synchronizing Windows Updates with Administration Server:
1. in the Applications and vulnerabilities folder of the console tree select the Software updates subfolder.
2. Click the Configure Windows Update synchronization link to run the Windows Update Center Data Retrieval
Task Creation Wizard.
3. Follow the Wizard's instructions.
The Wizard creates the Windows Update synchronization task displayed in the Administration Server tasks
folder.

M A N A G I N G A P P L I C A T I O N S O N C L I E N T C O M P U T E R S
105
You can also create the Windows Update synchronization task in the Administration Server tasks folder by clicking the Create a task link.
INSTALLING UPDATES TO CLIENT COMPUTERS
If you have selected Find and install application updates in the Update management settings window of the Quick Start Wizard, the Install application updates and fix vulnerabilities task is created automatically. You can run or stop the task in the Managed computers folder on the Tasks tab.
If you have selected Search for critical updates in the Quick Start Wizard, you can install software updates to client computers through the Install application updates and fix vulnerabilities task.
To create an update installation task:
1. in the Applications and vulnerabilities folder of the console tree select the Software updates subfolder.
2. In the Software updates folder open the context menu of an update and select Install update New task, or click the Install update (create task) link in the section intended for handling selected updates.
This opens the Updates Installation and Vulnerabilities Fix Task Creation Wizard.
3. Follow the Wizard's instructions.
After the Wizard completes its operation, the Install application updates and fix vulnerabilities task is created and displayed in the Managed computers folder on the Tasks tab.
In the settings of the updates installation task you can configure a test installation of updates.
To configure a test installation of updates:
1. In the console tree select the Installing application updates and fixing vulnerabilities task in the Managed computers folder, on the Tasks tab.
2. Select Properties from the context menu of the task.
The properties window of the Install application updates and fix vulnerabilities task opens.
3. In the properties window of the task, in the Test installation section select one of the available options for test
installation:
Do not scan. Select this option if you do not want to perform a test installation of updates.
Perform scan on selected computers. Select this option if you want to test updates installation on selected computers. Click the Add button and select computers on which you want to perform a test
installation of updates.
Perform scan on computers in the specified group. Select this option if you want to test updates installation on a group of computers. In the Specify test group field specify a group of computers on which
you want to perform a test installation.
Perform scan on the specified percentage of computers. Select this option if you want to test updates installation on some portion of target computers. In the Percentage of test computers from all target computers field specify the percentage of computers on which you want to perform a test installation of
updates.
4. Upon selecting any of the options but the first one, in the Time to take the decision if the installation is to be continued field specify the number of hours that should elapse from the test installation of updates until the
start of installation of the updates to all the target computers.

A D M I N I S T R A T O R ' S G U I D E
106
CONFIGURING APPLICATION UPDATES IN A NETWORK AGENT
POLICY
To configure Windows Updates on client computers in a Network Agent policy:
1. In the Managed computers folder, on the Policies tab click the Create a policy link to run the New Policy
Wizard.
2. In the Select an application for which you want to create a group policy window of the Wizard specify Kaspersky Security Center Network Agent as the application.
3. In the Software updates and vulnerabilities window of the Wizard select the Use Administration Server as WSUS server check box if you want to use Administration Server as the update server.
In this case, updates will be downloaded to Administration Server and installed to client computers through Network Agent. If the check box is cleared, Administration Server will not be used for downloading and installing Windows updates.
4. In the Software updates and vulnerabilities window of the Wizard, in the Windows Update search mode
section select one of the following options:
Online. Administration Server with support from Network Agent initiates a request from Windows Update
on a client computer to an update source: Windows Update Servers, or WSUS. After that, Network Agent passes information received from Windows Update to Administration Server.
Offline. When in offline mode, Network Agent periodically passes Administration Server information from
Windows Update about updates retrieved at the last synchronization of Windows Update with the update source. If no synchronization of Windows Update with an update source is performed, information about updates on Administration Server becomes out-of-date.
Disabled. Administration Server collects no information about updates.
The newly created policy is displayed in the Managed computers folder, on the Policies tab.
If a Network Agent policy has already been created, perform the following actions:
1. In the Managed computers folder, on the Policies tab select a Network Agent policy.
2. In the context menu of the policy, select Properties. Open the properties window of the Network Agent policy.
3. In the properties window of the Network Agent policy configure Windows Update in the Software updates and vulnerabilities section.
107
REMOTE INSTALLATION OF OPERATING
SYSTEMS AND APPLICATIONS
Kaspersky Security Center allows creating images of operating systems and deploy them on client computers over the network, as well as performing remote installation of applications by Kaspersky Lab and other vendors.
Capturing images of operating systems
Kaspersky Security Center can capture images of operating systems from target computers and transfer those images to Administration Server. Such images of operating systems are stored on Administration Server in a dedicated folder. Making and creating an image of an operating system is performed through an installation package creation (see section "Creating installation packages of applications" on page 111) task.
To create images of operating systems, Windows Automated Installation Kit (WAIK) tool package should be installed on Administration Server.
The functionality of operating system image capturing has the following features:
An operating system image cannot be captured on a computer on which Administration Server is installed.
While capturing an operating system image, a utility named sysprep resets the settings of the reference computer. If you need to restore the settings of the reference computer, you should select the Save computer backup copy check box in the Operating System Image Creation Wizard.
The image capturing process provides for a restart of the reference computer.
Deploying images of operating systems on new computers
The administrator can use images to deploy on new networked computers on which no operating system has been installed yet. A technology named Preboot eXecution Environment (PXE) is used in this case. The administrator selects a networked computer that will be used as the PXE server. This computer should meet the following requirements:
Network Agent should be installed on the computer.
No DHCP server should be active on the computer, since a PXE server uses the same ports as a DHCP server.
The network segment comprising the computer should not contain any other PXE servers.
The following conditions should be met to deploy an operating system: a network card should be mounted on the computer, the computer should be connected to the network, the Network boot option should be selected in BIOS when booting the computer.
Deployment of an operating system is performed as follows:
1. The PXE server establishes a connection with a new client computer while it boots up.
2. The client computer becomes included in Windows Preinstallation Environment (WinPE).
Adding the client computer to WinPE environment may require configuration of the set of drivers for WinPE.
3. The client computer is registered on Administration Server.
4. The administrator assigns the client computer an installation package with an operating system image.

A D M I N I S T R A T O R ' S G U I D E
108
The administrator can add required drivers to the installation package with the operating system image and specify a configuration file with the operating system settings (answer file) that should apply during installation.
5. The operating system is deployed on the client computer.
The administrator can manually specify the MAC addresses of client computers that have not yet connected, and assign them the installation package with the operating system image. When the selected client computers connect to the PXE server, the operating system is automatically installed to those computers.
Deploying images of operating systems on computers where another operating system has already been installed
Deployment of images of operating systems on client computers where another operating system has already been installed is performed through the remote installation task for specific computers.
Installing applications by Kaspersky Lab and other vendors
The administrator can create installation packages of any applications, including those specified by the user, and install the applications to client computers through the remote installation task.
IN THIS SECTION
Creating images of operating systems .......................................................................................................................... 108
Adding drivers for Windows Preinstallation Environment (WinPE) ................................................................................ 109
Adding drivers to an installation package with an operating system image ................................................................... 109
Configuring sysprep.exe................................................................................................................................................ 110
Deploying operating systems on new networked computers......................................................................................... 110
Deploying operating systems on client computers ........................................................................................................ 111
Creating installation packages of applications............................................................................................................... 111
Installing applications to client computers ..................................................................................................................... 112
CREATING IMAGES OF OPERATING SYSTEMS
Images of operating systems are created through the reference computer operating system image making task.
To create the reference computer operating system image making task:
1. In the Remote installation folder of the console tree select the Installation packages subfolder.
2. Click the Create installation package link to run the New Package Wizard.
3. In the Select installation package type window of the Wizard click the Create installation package based on OS image of reference computer button.
4. Follow the Wizard's instructions.
The Wizard's activities create an Administration Server task named Copy the OS image from the computer. You can view the task in the Administration Server tasks folder.

R E M O T E I N S T A L L A T I O N O F O P E R A T I N G S Y S T E M S A N D A P P L I C A T I O N S
109
When the Copy the OS image from the computer task is completed, an installation package is created that you can
use to deploy the operating system on client computers through a PXE server or the remote installation task. You can view the installation package in the Installation packages folder.
ADDING DRIVERS FOR WINDOWS PREINSTALLATION
ENVIRONMENT (WINPE)
To add drivers for WinPE:
1. In the Remote installation folder of the console tree select the Deploying computer images subfolder.
2. In the workspace of the Deploying computer images folder, click the Configure driver set for Windows Preinstallation Environment (WinPE) link to open the Windows Preinstallation Environment drivers
window.
3. In the Windows Preinstallation Environment drivers window click the Add button.
The Adding driver window opens.
4. In the Add driver window specify the name of a driver and the path to the driver installation package. You can specify the path to an installation package by clicking the Browse button in the Add driver window.
5. Click OK.
6. The driver will be added to the Administration Server repository. When added to the repository, the driver is displayed in the Selecting driver window.
7. Click OK in the Select driver window.
The driver will be added to Windows Preinstallation Environment (WinPE).
ADDING DRIVERS TO AN INSTALLATION PACKAGE WITH
AN OPERATING SYSTEM IMAGE
To add drivers to an installation package with an operating system image:
1. In the Remote installation folder of the console tree select the Installation packages subfolder.
2. From the context menu of an installation package with an operating system image select Properties.
The installation package properties window opens.
3. In the installation package properties window select the Additional drivers section.
4. Click the Add button in the Additional drivers section.
5. The Select driver window opens.
6. In the Select driver window select drivers that you want to add to the installation package with the operating
system image.
You can add new drivers to the Administration Server repository by clicking the Add button in the Select driver
window.
7. Click OK.
A D M I N I S T R A T O R ' S G U I D E
110
Added drivers are displayed in the Additional drivers section of the properties window of the installation package
with the operating system image.
CONFIGURING SYSPREP.EXE
To configure sysprep.exe:
1. In the Remote installation folder of the console tree select the Installation packages subfolder.
2. From the context menu of an installation package with an operating system image select Properties.
The installation package properties window opens.
3. In the installation package properties window select the sysprep.exe settings section.
4. In the sysprep.exe settings section adjust the following settings:
Use default configuration file. Select this option to use the answer file generated by default when
capturing the operating system image.
Specify configuration file. Select this option to use a custom answer file.
5. To apply the changes made, click the Apply button.
DEPLOYING OPERATING SYSTEMS ON NEW NETWORKED
COMPUTERS
To deploy an operating system on new computers that have not yet had any operating system installed:
1. In the Remote installation folder of the console tree select the Deploying computer images subfolder.
2. Click the Manage the list of PXE servers in the network link in the Deploying computer images folder to open the Properties: Deploying computer images window on the PXE servers section.
3. Click the Add button in the PXE servers section, and in the PXE servers window that opens, select a computer
that will be used as PXE server.
The added computer will be displayed in the PXE servers section.
4. In the PXE servers section select a PXE server and click the Properties button.
5. In the properties window of the selected PXE server, on the PXE server connection settings tab configure
connection between Administration Server and the PXE server.
6. Boot the client computer on which you want to deploy the operating system.
7. In the BIOS of the client computer select the Network boot installation option.
The client computer connects to the PXE server and is then displayed in the workspace of the Deploying computer images folder.
8. In the Actions section click the Assign installation package link to select an installation package that will be
used for installing the operating system to the selected computer.
After you have added a computer and assigned an installation package to it, the operating system deployment starts automatically on this computer.

R E M O T E I N S T A L L A T I O N O F O P E R A T I N G S Y S T E M S A N D A P P L I C A T I O N S
111
9. To cancel the deployment of an operating system on a client computer, click the Cancel OS image installation link in the Actions section.
To add computers by MAC address,
click the Add MAC address of target computer link in the Deploying computer images folder to open the New target computer window, and specify the MAC address of a computer that you want to add.
click the Import MAC addresses of target computers from file link in the Deploying computer images
folder to select a file containing a list of MAC addresses of all computers on which you want to deploy an operating system.
DEPLOYING OPERATING SYSTEMS ON CLIENT COMPUTERS
To deploy an operating system on client computers with another operating system installed:
1. In the Remote installation folder of the console tree click the Start Remote Installation Wizard link to run the
Remote Installation Wizard.
2. In the Select installation package window of the Wizard specify an installation packages with an operating
system image.
3. Follow the Wizard's instructions.
The Wizard's activities create a remote installation task intended for installation of the operating system to the client computers. You can start or stop the task in the Tasks for specific computers folder.
CREATING INSTALLATION PACKAGES OF APPLICATIONS
To create an installation package of an application:
1. In the Remote installation folder of the console tree select the Installation packages subfolder.
2. Click the Create installation package link to run the New Package Wizard.
3. In the Select installation package type window of the Wizard click one of the following buttons:
Create Kaspersky Lab's installation package. Select this option if you want to create an installation
package for a Kaspersky Lab application.
Create installation package for specified executable file. Select this option if you want to create an
installation package for an application requested by the user.
Create installation package based on OS image of reference computer. Select this option if you want
to create an installation package with an image of the operating system of a reference computer.
The Wizard's activities create an Administration Server task named Copy the OS image from the computer. When this task is completed, an installation package is created that you can use to deploy the
operating system image through a PXE server or the remote installation task.
4. Follow the Wizard's instructions.
The Wizard's activities create an installation package that you can use to install the application to client computers. You can view the installation package in the Installation packages folder.
For detailed information on installation packages, see Kaspersky Security Center Implementation Guide.

A D M I N I S T R A T O R ' S G U I D E
112
INSTALLING APPLICATIONS TO CLIENT COMPUTERS
To install an application to client computers:
1. In the Remote installation folder of the console tree click the Start Remote Installation Wizard link to run the
Remote Installation Wizard.
2. In the Select installation package window of the Wizard specify the installation package of an application that
you want to install.
3. Follow the Wizard's instructions.
The Wizard's activities create a remote installation task to install the application to client computers. You can start or stop the task in the Tasks for specific computers folder.

113
MANAGING MOBILE DEVICES
This section describes how to manage mobile devices connected to Administration Server. For details on how to connect mobile devices refer to the Deployment Guide of Kaspersky Security Center.
IN THIS SECTION
Managing Exchange ActiveSync mobile devices .......................................................................................................... 113
Managing iOS MDM mobile devices ............................................................................................................................. 115
MANAGING EXCHANGE ACTIVESYNC MOBILE DEVICES
You can manage connected Exchange ActiveSync mobile devices in the properties window of the Exchange ActiveSync mobile devices server displayed in the Mobile devices servers subfolder of the Mobile devices folder of the console
tree.
The administrator can take the following actions on Exchange ActiveSync mobile devices:
Create management profiles of Exchange ActiveSync mobile devices and add them to the users' mailboxes.
Management profile of Exchange ActiveSync mobile devices is an ActiveSync policy used on a Microsoft
Exchange server for managing Exchange ActiveSync mobile devices. You can assign the "default profile" attribute to a management profile of Exchange ActiveSync mobile devices. Such profile is automatically assigned to new mailboxes and mailboxes with deleted profiles. The default profile cannot be deleted. To delete the current default profile, you should assign the "default profile" attribute to a different profile.
A mailbox can be managed by one management profile only.
Adjust the following settings of a mobile device:
Mail synchronization
Use of applications
User password
Data encryption
Connection of removable media.
Depending on the type of the operating system under which a connected Exchange ActiveSync mobile device is running, the collection of settings may vary for this device.
Install certificates to the Exchange ActiveSync mobile device.
For information about how to connect Exchange ActiveSync mobile devices to Exchange ActiveSync mobile devices server, refer to the Kaspersky Security Center Implementation Guide.

A D M I N I S T R A T O R ' S G U I D E
114
VIEWING INFORMATION ABOUT EXCHANGE ACTIVESYNC MOBILE
DEVICES
To view information about an Exchange ActiveSync mobile device:
1. In the Mobile devices folder of the console tree select the Exchange ActiveSync mobile devices subfolder.
The workspace of the folder displays the mobile devices connected to Exchange ActiveSync mobile devices server.
2. From the context menu of the mobile device select Properties.
The properties window of the mobile device opens.
The General section in the properties window of the mobile device displays information about the connected
Exchange ActiveSync mobile device.
EDITING A MANAGEMENT PROFILE FOR EXCHANGE ACTIVESYNC
DEVICES
To edit a management profile for Exchange ActiveSync mobile devices:
1. In the console tree, in the Mobile devices folder select the Mobile devices servers subfolder.
2. In the workspace of the Mobile devices servers folder select an Exchange ActiveSync mobile devices server.
3. Select Properties. from the context menu of the Mobile devices server.
The Properties of mobile devices server window opens.
4. In the Properties of mobile devices server window select the Mail boxes section.
5. Select a mailbox and click the Change profiles button.
The Settings profiles window opens.
6. In the Settings profiles window select a profile and click the Properties button.
The profile properties window opens.
7. Edit the profile in the profile properties window.
8. Click OK, to save the changes.
All changes made to the profile settings will be saved.
INSTALLING CERTIFICATES TO EXCHANGE ACTIVESYNC MOBILE
DEVICES
To install a certificate to an Exchange ActiveSync mobile device:
1. In the console tree select the User accounts folder.
2. In the workspace of the User accounts folder select the account of the user whom you want to install a
certificate to the mobile device.

M A N A G I N G M O B I L E D E V I C E S
115
3. In the Actions block of settings click the Install certificate to user's mobile devices link to open the Assigning certificate window.
4. In the Certificate assignment window, in the Certificate type group of settings select a certificate type. The
following certificate types are available:
General certificate. Select this option to send the user a general certificate of Kaspersky Security Center.
The general certificate is used for verifying Administration Server by the client.
Mail certificate. Select this option to send the user a mail certificate. The mail certificate is used for
connecting the mail client to the server and downloading messages.
VPN certificate. Select this option to send the user a VPN certificate. A VPN certificate allows establishing
a VPN connection to an organization's network.
5. Select the Specify your own certificate check box if you want to use your own certificate. If this check box is selected, clicking the Select button allows you specifying the confidential part and the public part of the
certificate.
6. In the User authentication group of settings select a user authentication method. Authentication is required to
confirm the user's identity when obtaining the certificate.
Domain authentication. If you select this option, the user specifies the user name and password to access
the domain.
One-off password. If you select this option, the user enters a one-off password. This method applies if the
device user is not within the domain.
7. In the User notification method block of settings adjust the following settings:
By SMS. Select the check box to send the user an SMS notification stating that a certificate has been installed on the device. In the SMS text field enter a message for the user or use the default one. From the dropdown list next to the SMS text entry field select One-off password and specify user password to
obtain access to the certificate.
Email. Select the check box to send the user an email notification stating that a certificate has been
installed to the device.
In the Subject field enter the message subject.
In the Notification message field enter a message for the user. If you want the user to confirm his or her identity using the password, from the dropdown list next to the Notification message field select One-off password and enter the user password to obtain access to the certificate.
8. Click the OK button.
The certificate will be installed to the user's mobile device.
MANAGING IOS MDM MOBILE DEVICES
You can manage connected iOS MDM mobile devices through Administration Console in the Mobile devices folder
using the following methods:
Via the context menu of the mobile device in the iOS MDM mobile devices folder
In the properties window of the iOS MDM mobile devices server, in the Mobile devices servers folder.
The administrator can take the following actions on iOS MDM mobile devices:
Add and edit configuration profiles for iOS MDM devices. A configuration profile contains the settings and restrictions for the mobile device.

A D M I N I S T R A T O R ' S G U I D E
116
Installation of configuration profiles to iOS MDM mobile devices is described in the Kaspersky Security Center Implementation Guide.
Install provisioning profiles to an iOS MDM mobile device. Provisioning profile is a profile that is used for managing applications distributed in ways other than via App Store. A provisioning profile contains information about the license; it is linked to a specific application.
Installation of provisioning profiles to iOS MDM mobile devices is described in the Kaspersky Security Center Implementation Guide.
Install applications to an iOS MDM mobile device via App Store or using manifest files (.plist). Manifest file
contains a description of an application for an iOS MDM mobile device and a link to download that application. Before installing an application to an iOS MDM mobile device, you should add the application to the iOS MDM mobile devices server (see section "Adding a managed application to an iOS MDM mobile devices server" on page 118).
Block an iOS MDM mobile device.
Reset the password of an iOS MDM mobile device.
Remove all data from an iOS MDM mobile device.
A PUSH notification is sent to all connected iOS MDM mobile devices each 24 hours. If a device has not responded for 30 days, this device is automatically marked as inactive; it will not be connected to Administration Server anymore since, until the administrator lifts the Inactive mark in the context menu of the iOS MDM device.
For information about how to install iOS MDM mobile devices server refer to the Kaspersky Security Center Implementation Guide.
CONFIGURING CONNECTION OF MOBILE DEVICES TO AN IOS MDM
MOBILE DEVICES SERVER
To configure connection of iOS MDM mobile devices to an iOS MDM mobile devices server:
1. In the console tree, in the Mobile devices folder select the Mobile devices servers subfolder.
2. In the Mobile devices servers folder select an iOS MDM mobile devices server.
3. Select Properties from the context menu of the iOS MDM Mobile devices server.
The properties window of the iOS MDM mobile devices server opens.
4. In the properties window of the iOS MDM Mobile devices server select the Certificates section.
5. In the Settings section select the Updating frequency for information about devices check box and specify
refreshing frequency for information about iOS MDM mobile devices (in hours). The default value is 24 hours.
6. In the Connection ports block of settings adjust the following settings:
Network Agent connection port. In this field specify a port for connection of the iOS MDM service to
Network Agent. The default port number is 9799.
Local port to connect to iOS MDM service. In this field specify a local port for connection of Network
Agent to the iOS MDM service. The default port number is 9899.
External port to connect to iOS MDM service. In this field specify an external port for connection of
mobile devices to the iOS MDM service. The default port number is 443.
M A N A G I N G M O B I L E D E V I C E S
117
7. Click OK.
MANAGING AN IOS MDM MOBILE DEVICE USING CONTEXT MENU
COMMANDS
To manage an iOS MDM mobile device using context menu commands:
1. In the Mobile devices folder of the console tree select the iOS MDM mobile devices subfolder.
2. In the workspace of the iOS MDM mobile devices folder select an iOS MDM mobile device.
3. From the context menu of the device select a command for the iOS MDM mobile device, or use the corresponding link in the Actions menu.
The following commands are available:
Block device. Performs a forced activation of Lock Screen on an iOS MDM mobile device.
Reset device password. Resets the password on an iOS MDM mobile device.
Clear device. Removes all data from an iOS MDM mobile device. The device settings are then rolled back
to the default values.
Install profile to device. Installs a configuration profile to an iOS MDM mobile device.
Remove profile from device. Removes the selected configuration profile from an iOS MDM mobile device.
Install provisioning profile to device. Installs a provisioning profile to an iOS MDM mobile device.
Remove provisioning profile from device. Removes a provisioning profile from an iOS MDM mobile
device.
Install application to device. Installs an application to an iOS MDM mobile device.
Enter application redemption code. Activates the entered redemption code if it is required to proceed
with the installation of an application to an iOS MDM device.
Remove application from device. Removes from an iOS MDM device an application managed through an
MDM profile.
Set roaming settings for device. Allows configuring the voice roaming and data roaming for an iOS MDM
device. These settings can be modified by the iOS MDM mobile device user.
Remove command from queue. Removes a command from the command queue for the selected iOS
MDM mobile device.
Mark device as inactive. Selects the Inactive check box in the database for an iOS MDM device, after
which all attempts of connecting the device to Administration Server are declined.
Remove "Inactive" mark from device. Clears the Inactive check box in the database for an iOS MDM
device, after which the device can connect to an iOS MDM mobile devices server again.
Delete. Deletes the record of an iOS MDM mobile device from the database, after which all attempts of
connecting the device to an iOS MDM mobile devices server are declined.
The selected command is then added to the command queue of the iOS MDM mobile device.

A D M I N I S T R A T O R ' S G U I D E
118
EDITING CONFIGURATION PROFILES
To edit a configuration profile:
1. In the console tree, in the Mobile devices folder select the Mobile devices servers subfolder.
2. In the Mobile devices servers folder select an iOS MDM mobile devices server.
3. Select Properties from the context menu of the iOS MDM Mobile devices server.
The properties window of the iOS MDM mobile devices server opens.
4. In the properties window of the iOS MDM mobile devices server select the Profiles section.
5. Click the Edit button in the Profiles section.
An application named iPhone Configuration Utility then starts. If the application has not been installed, you should install it to the computer where Administration Console is installed.
6. Edit the configuration profile in iPhone Configuration Utility.
ADDING A MANAGED APPLICATION TO AN IOS MDM MOBILE
DEVICES SERVER
To add a managed application to an iOS MDM mobile devices server:
1. In the console tree, in the Mobile devices folder select the Mobile devices servers subfolder.
2. In the Mobile devices servers folder select an iOS MDM mobile devices server.
3. Select Properties from the context menu of the iOS MDM Mobile devices server.
The properties window of the iOS MDM mobile devices server opens.
4. In the properties window of the iOS MDM mobile devices server select the Managed applications section.
5. Click the Add button in the Managed applications section.
The Add application window opens.
6. In the Add application window, in the Application name field specify the name of the application to be added.
7. In the Apple ID or link to application field specify the Apple ID of the application to be added, or specify a link
that can be used to download the application.
8. Select the Remove application when removing profile check box if you want the application to be removed
after you remove the MDM profile from the IOS MDM mobile device.
9. Select the Block creation of backup copies of application data check box if you want to prohibit backup of
the application data using iTunes tools.
10. Click OK.
The added application is displayed in the Managed applications section of the properties window of the iOS MDМ
mobile devices server.
M A N A G I N G M O B I L E D E V I C E S
119
INSTALLING A MANAGED APPLICATION TO AN IOS MDM MOBILE
DEVICE
To install a managed application to an iOS MDM mobile device:
1. In the Mobile devices folder of the console tree select the iOS MDM mobile devices subfolder.
2. In the workspace of the iOS MDM mobile devices folder select an iOS MDM mobile device.
3. From the context menu of the mobile device select the Install application to device command, or use the corresponding option from the Action menu.
The Select application window opens.
4. In the Select application window select an application that you want to install.
You can install applications to an iOS MDM mobile device only if they have been added to the iOS MDM mobile devices server (see section "Adding a managed application to an iOS MDM mobile devices server" on page 118).
The application installation command will be added to the command queue of the iOS MDM mobile device. If you want to remove the command from the command queue, select Remove command from queue from the context
menu of the iOS MDM mobile device.
CONFIGURING THE ROAMING ON AN IOS MDM MOBILE DEVICE
To adjust the roaming settings on an iOS MDM mobile device:
1. In the Mobile devices folder of the console tree select the iOS MDM mobile devices subfolder.
2. In the workspace of the iOS MDM mobile devices folder select an iOS MDM mobile device.
3. From the context menu of the iOS MDM mobile device select the Edit roaming settings for this device
command.
The Roaming settings window opens.
4. In the Roaming settings window adjust the following settings:
Enable voice roaming. Select the check box to enable the voice roaming on the iOS MDM mobile device.
If the voice roaming is enabled, the user of the iOS MDM mobile device can make and answer calls while in roaming.
Enable data roaming. Select the check box to enable the data roaming on the mobile device. If the data
roaming is enabled, the user of the iOS MDM mobil;e device can surf the Internet while in roaming.
5. Click OK.
120
ENCRYPTION AND DATA PROTECTION
Data encryption reduces the risk of unintended data leakage in case a laptop, a removable medium, or a hard drive is stolen or lost, or when accessing data of unauthorized users and applications.
The encryption functionality has been implemented in Kaspersky Endpoint Security 10 for Windows. Kaspersky Endpoint Security 10 for Windows allows encrypting files stored on local drives of the computer and removable media, as well as removable media and hard drives entirely.
Encryption rules are configured using Kaspersky Security Center, through policies. Encryption and decryption according to specified rules are performed upon applying a policy.
Availability of the encryption functionality is defined by the user interface settings (see section "Configuring the interface" on page 34).
The administrator can do the following:
Configure and perform encryption and decryption of files stored on local drives of the computer
Configure and perform encryption of files stored on removable media
Create rules of applications' access to encrypted files
Create and pass to the user a key file of access to encrypted files if the file encryption functionality has been limited on the user's computer
Configure and perform encryption of hard drives
Manage users' access to encrypted hard drives and removable media (manage Authentication Agent accounts, create and pass to the users blocks of response to the request for recovery of the account name and password, and keys of access to encrypted devices)
View encryption statuses and file encryption reports.
These operations are performed using dedicated tools provided by Kaspersky Endpoint Security 10 for Windows. For detailed instructions on how to perform operations and the description of the encryption functionality features refer to the Administrator's Guide of Kaspersky Endpoint Security 10 for Windows.
IN THIS SECTION
Viewing the list of encrypted devices ............................................................................................................................ 120
Viewing the list of encryption events ............................................................................................................................. 121
Exporting the list of encryption events to a text file ....................................................................................................... 122
Creating and viewing encryption reports ....................................................................................................................... 122
VIEWING THE LIST OF ENCRYPTED DEVICES
To view the list of devices storing encrypted information:
1. Select the Encryption and data protection folder in the console tree of Administration Server.
E N C R Y P T I O N A N D D A T A P R O T E C T I O N
121
2. Open the list of encrypted devices using one of the following methods:
By clicking the Go to list of encrypted devices link in the Manage encrypted devices section.
In the console tree select the Encrypted devices folder.
As a result, the workspace displays information about devices on the network storing encrypted files, and about devices encrypted at the drive level. After the information on a device is decrypted, the device is automatically removed from the list.
You can sort the information in the list of devices either in ascending or descending order in any column.
The user interface settings (see section "Configuring the interface" on page 34) determine whether the Encryption and data protection folder appears in the console tree.
VIEWING THE LIST OF ENCRYPTION EVENTS
When running data encryption and decryption tasks on client computers, Kaspersky Endpoint Security 10 for Windows sends to Kaspersky Security Center information about events of the following types:
Cannot encrypt / decrypt a file, or create an encrypted archive due to a lack of free disk space
Cannot encrypt / decrypt a file, or create an encrypted archive due to license issues
Cannot encrypt / decrypt a file, or create an encrypted archive due to missing access rights
The application has been prohibited to access an encrypted file
Unknown errors.
To view a list of events that have occurred when encrypting data on client computers:
1. Select the Encryption and data protection folder in the console tree of Administration Server.
2. Go to the list of events occurring during encryption, using one of the following methods:
By clicking the Go to error list link in the Data encryption error control section.
In the console tree select the Encryption events folder.
As a result, the workspace displays information about problems that have occurred during data encryption on client computers.
You can take the following actions on the list of encryption events:
Sort data records in ascending or descending order in any of the columns
Perform quick search for records (by text match with a substring in any of the list fields)
Export the list of events to a text file.
The user interface settings (see section "Configuring the interface" on page 34) determine whether the Encryption and data protection folder appears in the console tree.

A D M I N I S T R A T O R ' S G U I D E
122
EXPORTING THE LIST OF ENCRYPTION EVENTS TO A TEXT
FILE
To export the list of encryption events to a text file:
1. Create a list of encryption events (see section "Viewing the list of encryption events" on page 121).
2. From the context menu of the events list select Export list.
The Export list window opens.
3. In the Export list window specify the name of the text file with the events list, select a folder to save it, and click the Save button.
The list of encryption events will be saved to the file that you have specified.
CREATING AND VIEWING ENCRYPTION REPORTS
The administrator can generate the following reports:
Report on devices encryption containing information about the devices encryption status for all groups of computers
Report on rights of access to encrypted devices containing information about the status of the accounts of users who have been granted access to encrypted devices
Report on encryption errors containing information about errors that have occurred when running data encryption and decryption tasks on client computers.
To view the report on devices encryption:
1. In the console tree select the Encryption and data protection folder.
2. Do one of the following:
Click the View devices encryption report link to run the New Report Template Wizard.
Select the Encrypted devices subfolder, then click the View devices encryption report link to run the
New Report Template Wizard.
3. Follow the instructions of the New Report Template Wizard.
In the Reports and notifications folder of the console tree a new report appears. The report generation
process starts. The report is displayed in the console workspace.
To view the report on rights of access to encrypted files:
1. In the console tree select the Encryption and data protection folder.
2. Do one of the following:
Click the View report on rights of access to encrypted devices link in the Manage encrypted devices
section to run the New Report Template Wizard.
Select the Encrypted devices subfolder, then click the View report on rights of access to encrypted devices link to run the New Report Template Wizard.
3. Follow the instructions of the New Report Template Wizard.

E N C R Y P T I O N A N D D A T A P R O T E C T I O N
123
In the Reports and notifications folder of the console tree a new report appears. The report generation
process starts. The report is displayed in the console workspace.
To view the report on encryption errors:
1. In the console tree select the Encryption and data protection folder.
2. Do one of the following:
Click the View report on encryption errors link in the Data encryption error control section to run the
New Report Template Wizard.
Select the Encryption events subfolder, then click the View report on encryption errors link to run the
New Report Template Wizard.
3. Follow the instructions of the New Report Template Wizard.
In the Reports and notifications folder of the console tree a new report appears. The report generation
process starts. The report is displayed in the console workspace.
124
MANAGING DEVICES ACCESS TO AN
ORGANIZATION'S NETWORK (NETWORK
ACCESS CONTROL, NAC)
Kaspersky Security Center allows controlling access of devices to an organization's network using access restriction rules and a white list of devices. NAC agents are used to manage access of devices to an organization's network. An NAC agent is installed to client computers together with Network Agent.
Two NAC agents are used in each of the broadcast segments of a network: main and redundant. The main NAC agent is available for regular use of network access policies. When the computer hosting the main NAC agent is shut down, the redundant NAC agent takes its functions, which ensures a continuous operation of NAC on the organization's network. Roles of NAC agents can be deployed and distributed either manually or automatically.
Before creating network access restriction rules for devices and a white list of devices, the administrator should create network elements. Network element is a group of devices created on the basis of criteria defined by the administrator.
The administrator can specify the following criteria for adding devices to a network element:
network attributes (IP address, MAC address)
device manufacturer
device's membership in a domain
device protection status
presence of non-installed critical application updates and security updates on the device.
When a network element is created, the administrator can create access restriction rules for it or add it to a white list.
The administrator can create the following network access restriction rules:
A rule that blocks network access for all devices included in the network element.
A rule that redirects to the authorization portal any request of network access generated by any device included in the network element. Authorization portal is a web service that provides network access to guest devices. The administrator creates accounts and assigns them to the users of guest devices.
A rule that allows devices included in the network element to access the specified network addresses only.
The administrator can select a network element and add it to the white list. Devices included in the white list are provided full access to the organization's network.
M A N A G I N G D E V I C E S A C C E S S T O A N O R G A N I Z A T I O N ' S N E T W O R K ( N E T W O R K A C C E S S
C O N T R O L , NA C )
125
IN THIS SECTION
Switching to the NAC settings in the Network Agent properties .................................................................................... 125
Selecting an operation mode for the NAC agent ........................................................................................................... 125
Creating network elements ............................................................................................................................................ 126
Creating network access restriction rules ...................................................................................................................... 127
Creating a white list ....................................................................................................................................................... 127
Creating a list of allowed network addresses ................................................................................................................ 128
Creating accounts to use on the authorization portal .................................................................................................... 128
Configuring the authorization page interface ................................................................................................................. 128
Configuring NAC in a Network Agent policy .................................................................................................................. 129
SWITCHING TO THE NAC SETTINGS IN THE NETWORK
AGENT PROPERTIES
To switch to the NAC settings in the properties of Network Agent:
1. In the console tree select the Managed computers folder.
2. In the Managed computers folder on the Computers tab select a client computer where Network Agent is
installed.
3. In the context menu of the client computer, select Properties.
A client computer properties window opens.
4. In the client computer properties window, select the Applications section.
5. In the Applications section select Network Agent and click the Properties button.
The Settings of Network Agent of Kaspersky Security Center window opens.
6. In the Settings of Network Agent of Kaspersky Security Center window select the Managing network access (NAC) section and adjust the NAC settings.
SELECTING AN OPERATION MODE FOR THE NAC AGENT
To select an operation mode for the NAC agent:
1. In the Settings of Kaspersky Security Center Network Agent (see section "Switching to the NAC settings in the Network Agent properties" on page 125) window select the Managing network access (NAC) section.
2. In the Settings subsection, in the NAC agent operation mode block of settings select an operation mode for
the NAC agent:
Disabled. Select this option to disable the NAC agent.
A D M I N I S T R A T O R ' S G U I D E
126
Main. Select this option to use the NAC agent as the main one. The main NAC agent is responsible for
continuous use of access restriction rules in the network segment.
Standby. Select this option to use the NAC agent as the standby one. If the main NAC agent is inactive,
the standby one enables.
3. In the NAC operation mode block of settings select an operation mode for NAC:
Disabled. Select this option if you do not want to apply the access restriction rules in the network segment
in which the NAC agent operates.
Standard. Select this option if you want the created access restriction rules to take effect immediately in
the network segment in which the NAC agent operates.
Emulation. Select this option if you want the created access restriction rules apply in test mode. In this
case, the rules do not apply, but rule applying events are logged.
CREATING NETWORK ELEMENTS
To create a network element:
1. In the Settings of Kaspersky Security Center Network Agent (see section "Switching to the NAC settings in the Network Agent properties" on page 125) window, in the Managing network access (NAC) section select the Network elements subsection.
2. From the Add dropdown list select the type of devices that you want to add to the network element (for
example, computers).
The Creating network element window opens.
3. In the Creating network element window enter a name for the network element that you are creating.
From the Add dropdown list select criteria, which should define whether a network device will be included in the
network element that you are creating:
By network attributes. If you select this option, you can add a computer or computers to the network
element by IP address, MAC address, IP range, or subnet mask.
By manufacturer. If you select this option, you can add computers to the network element by
manufacturer.
By domain membership. If you select this option, you can add computers to the network element on the
basis of their membership in a domain. Domain membership can be used as a criterion that allows accessing the organization's network.
By computer status. If you select this option, you can specify a computer protection status: for example,
"Critical". You can create rules restricting network access for computers with such status.
By software. If you select this option, you can add computers to the network element by operating system
type, firewall status, and availability of updates.
The added criteria are displayed in the Criteria field so that a network object should meet them.
4. Click OK.
The created network elements are displayed in the properties window of the Kaspersky Security Center Network Agent policy, in the Network elements subsection.

M A N A G I N G D E V I C E S A C C E S S T O A N O R G A N I Z A T I O N ' S N E T W O R K ( N E T W O R K A C C E S S
C O N T R O L , NA C )
127
CREATING NETWORK ACCESS RESTRICTION RULES
To create a network access restriction rule:
1. In the Settings of Kaspersky Security Center Network Agent (see section "Switching to the NAC settings in the Network Agent properties" on page 125) window, in the Managing network access (NAC) section select the Access rules subsection.
2. In the Access rules section select the Access restrictions subsection and click the Add button.
The Properties of access restriction rule window opens.
3. In the Properties of access restriction rule window enter a name for the rule that you are creating.
4. In the Properties of access restriction rule window click the Add button to select a network element to which
the rule will apply. You can add several network elements to the same rule.
The Adding network elements window opens.
5. In the Adding network elements window select a network element and click the OK button.
The selected network element is displayed in the Properties of access restriction rule window.
6. In the Properties of access restriction rule window, in the Restrict network access block of settings select
one of the following options:
Block network access. If you select this option, all devices in the network element are prohibited to
access the network.
Redirect to authorization portal. If you select this option, requests from devices in the network element
will be redirected to the authorization server.
Allow access to specified addresses only. If you select this option, in the Available addresses field
specify addresses that are accessible for devices included in the network element.
7. Click OK.
The created rule is displayed in the Access restrictions subsection.
CREATING A WHITE LIST
To create a white list of IP devices:
1. In the Settings of Kaspersky Security Center Network Agent (see section "Switching to the NAC settings in the Network Agent properties" on page 125) window, in the Managing network access (NAC) section select the Access rules subsection.
2. In the Access rules section select the White list subsection and click the Add button.
The Adding network elements window opens.
3. In the Adding network elements window select the network element that you want to add to the white list.
4. Click OK.
Network elements added to the white list are displayed in the White List subsection. Devices added to the white list
are granted full access to the organization's network.
A D M I N I S T R A T O R ' S G U I D E
128
CREATING A LIST OF ALLOWED NETWORK ADDRESSES
To create a list of allowed network addresses:
1. In the Settings of Kaspersky Security Center Network Agent (see section "Switching to the NAC settings in the Network Agent properties" on page 125) window, in the Managing network access (NAC) section select the Network services addresses subsection.
2. In the Network services addresses section, from the drop-down list on the right from the Add button select a
network address type:
Allowed network addresses. Select this option to add allowed addresses for guest devices.
The Allowed network addresses window opens in which you can add the addresses of network services
by IP address, MAC address, IP range, and subnet mask.
Authorization portal. Select this option to add the address of the authorization portal to which requests
from guest devices will be redirected.
The Authorization portal window opens where you can specify the address of the server to which
requests from network devices will be redirected.
The added network addresses are displayed in the Network services addresses section.
CREATING ACCOUNTS TO USE ON THE AUTHORIZATION
PORTAL
To create an account for further use on the authorization portal:
1. In the Settings of Kaspersky Security Center Network Agent (see section "Switching to the NAC settings in the Network Agent properties" on page 125) window, in the Managing network access (NAC) section select the Authorization page subsection.
2. In the Authorization page section select the Accounts subsection.
3. Click the Add button in the Accounts section.
The Account addition window opens.
4. In the Account addition window adjust the account settings.
5. If you want to block network access for this account, select the Block account check box.
6. Click OK.
Created accounts are displayed in the Accounts subsection comprised in the Authorization page section.
CONFIGURING THE AUTHORIZATION PAGE INTERFACE
To configure the interface of the authorization page:
1. In the Settings of Kaspersky Security Center Network Agent (see section "Switching to the NAC settings in the Network Agent properties" on page 125) window, in the Managing network access (NAC) section select the Authorization page subsection.
2. In the Authorization page section select the Interface subsection.
M A N A G I N G D E V I C E S A C C E S S T O A N O R G A N I Z A T I O N ' S N E T W O R K ( N E T W O R K A C C E S S
C O N T R O L , NA C )
129
3. In the Logo block of settings select a logo to use on the authorization page:
By default. Select this option if you want to use Kaspersky Lab logo on the authorization page.
Custom. Select this option if you want to use a custom logo. Click the Select button if you want to specify
the path to a logo file. The new logo should have the same settings as the default one.
4. In the Authorization page block of settings select the authorization page to which network access requests will
be redirected.
By default. Select this option if you want to use the default page on the authorization portal. To edit the default page, click the Save as file button and save the authorization page to a file for further editing.
Custom. Select this option if you want to use an edited version of the Kaspersky Lab page or your own version. Click the Select button and specify the path to an authorization page file.
5. Click OK.
CONFIGURING NAC IN A NETWORK AGENT POLICY
To configure NAC in a Network Agent policy:
1. In the Managed computers folder of the console tree go to the Policies tab.
2. Start configuring NAC using one of the following methods:
Click the Change policy settings link in the Actions menu to open the properties window of Kaspersky Security Center Network Agent, and select the Managing network access (NAC) section.
Use links in the Managing network access (NAC) group of settings in the Actions menu.

130
INVENTORY OF EQUIPMENT DETECTED ON
THE NETWORK
Kaspersky Security Center collects information about the equipment detected during the network poll. Inventory covers all equipment connected to the organization's network. Information about the equipment is updated after each new network poll. The list of detected equipment may contain the following types of devices:
Computers
Mobile devices
Network devices
Virtual devices
OEM components
Computer peripherals
Connected devices
VoIP phones
Network storages
Equipment detected during a network poll is displayed in the Repositories subfolder of the Hardware folder of the
console tree.
The administrator can add new devices to the equipment list manually or edit information about equipment that already exists on the network. In the properties of a device you can view and edit detailed information about that device.
The administrator can assign the "Enterprise equipment" attribute to detected devices. This attribute can be assigned manually in the properties of a device, or the administrator can specify criteria for the attribute to be assigned automatically. In this case, the "Enterprise equipment" attribute is assigned by device type. You can allow or prohibit network connection of equipment by the "Enterprise equipment" attribute.
Kaspersky Security Center allows writing off equipment. To do this, select the Device written off check box in the
properties of a device. Such device is not displayed on the equipment list.
IN THIS SECTION
Adding information about new devices .......................................................................................................................... 130
Configuring criteria used to define enterprise devices ................................................................................................... 131
ADDING INFORMATION ABOUT NEW DEVICES
To add information about new devices on the network:
1. In the Repositories folder of the console tree select the Hardware subfolder.
2. In the workspace of the Hardware folder click the Add device link to open the New device window.
The New device window opens.

I N V E N T O R Y O F E Q U I P M E N T D E T E C T E D O N T H E N E T W O R K
131
3. In the New device window, in the Type drop-down list select a device type that you want to add.
4. Click OK.
The device properties window opens on the General section.
5. In the General section fill in the entry fields with data on the device. The General section lists the following
settings:
Enterprise device. Select the check box if you want to assign the "Enterprise" attribute to the device. Using this attribute, you can search for devices in the Hardware folder.
Device written off. Select the check box if you do not want the device to be displayed on the list of devices in the Hardware folder.
6. Click Apply.
The new device will be displayed in the workspace of the Hardware folder.
CONFIGURING CRITERIA USED TO DEFINE ENTERPRISE
DEVICES
To configure criteria of detection for enterprise devices:
1. In the Repositories folder of the console tree select the Hardware subfolder.
2. In the workspace of the Hardware folder click the Configure criteria for enterprise devices link to open the
hardware properties window.
3. In the hardware properties window, in the Enterprise devices section select a mode of assigning the
"Enterprise" attribute to the device:
Set the "Enterprise" attribute manually. The "Enterprise equipment" attribute is assigned to the device manually in the device properties window, in the General section.
Set the "Enterprise" attribute automatically. In the By device type block of settings specify device types
to which the application will automatically assign the "Enterprise" attribute.
4. Click Apply.

132
UPDATING DATABASES AND SOFTWARE
MODULES
This section describes how to download and distribute updates of databases and software modules using Kaspersky Security Center.
To maintain reliable anti-virus protection, you should timely update databases and Kaspersky Lab application modules, managed through Kaspersky Security Center.
To update databases and Kaspersky Lab application modules that are managed through Kaspersky Security Center, the Download updates to the repository task of the Administration Server is used. As a result, the databases and
application modules are downloaded from the update source.
The Download updates to the repository task is not available on virtual Administration Servers. The repository of the
virtual Administration Server displays updates downloaded to the master Administration Server.
You can configure the updates the be verified for performance and errors before they are distributed to client computers.
IN THIS SECTION
Creating the task of downloading updates to the repository .......................................................................................... 132
Configuring the task of downloading updates to the repository ..................................................................................... 133
Verifying downloaded updates ...................................................................................................................................... 133
Configuring test policies and auxiliary tasks .................................................................................................................. 134
Viewing downloaded updates ........................................................................................................................................ 135
Automatic distribution of updates .................................................................................................................................. 135
CREATING THE TASK OF DOWNLOADING UPDATES TO THE
REPOSITORY
The Download updates to the repository task is created automatically by Kaspersky Security Center Quick Start Wizard. You can create only one task for downloading updates to the repository. Thai is why you can create a task for downloading updates to the repository only if such task was removed from the Administration Server tasks list.
To create a task for downloading updates to the repository:
1. In the console tree, select the Administration Server tasks folder.
2. Start creating the task in one of the following ways:
In the console tree, in the Administration Server tasks folder context menu, select New Task.
Click the Create a task link in the workspace.
This starts the New Task Wizard. Follow the Wizard's instructions. In the Task type wizard window, select Download updates to the repository.

U P D A T I N G D A T A B A S E S A N D S O F T W A R E M O D U L E S
133
After the Wizard completes, the Download updates to the repository task will be created in the list of Administration
Server tasks.
When an Administration Server performs the Download updates to repository task, updates to databases and software
modules of applications are downloaded from the updates source and stored in the shared folder.
Updates are distributed to client computers and slave Administration Servers from the shared folder.
The following resources can be used as a source of updates for the Administration Server:
Kaspersky Lab update servers – Kaspersky Lab's servers to which the updated anti-virus database and the application modules are uploaded.
Master Administration Server – Shared folder located on the master Administration Server.
FTP / HTTP server, or a network updates folder – an FTP server, an HTTP server, a local or a network folder added by the user and containing the latest updates. When selecting a local folder, you should specify a folder on a computer with Administration Server installed.
To update Administration Server from an FTP / HTTP server or a network folder, you should copy to those resources the correct structure of folders with updates, identical to that created when using Kaspersky Lab update servers.
Source selection depends on task settings. By default, updates are downloaded from Kaspersky Lab's update servers.
CONFIGURING THE TASK OF DOWNLOADING UPDATES TO
THE REPOSITORY
To configure the task for downloading updates to the repository:
1. In the workspace of Administration Server tasks folder, select the Download updates to the repository task
in the task list.
2. Open the task properties window in one of the following ways:
From the context menu of the task, select Properties.
By clicking the Change task settings link in the workspace of the selected task.
This will open the Download updates to the repository task properties window. In this window you can configure
how the updates are downloaded to the Administration Server repository.
VERIFYING DOWNLOADED UPDATES
To make Kaspersky Security Center verify downloaded updates before distributing them to client computers:
1. In the workspace of Administration Server tasks folder, select the Download updates to the repository task
in the task list.
2. Open the task properties window in one of the following ways:
From the context menu of the task, select Properties.
By clicking the Change task settings link in the workspace of the selected task.

A D M I N I S T R A T O R ' S G U I D E
134
3. In the task properties window that opens, in the Updates verification section, select the Verify updates before distributing check box and select the updates verification task in one of the following ways:
Click Select to choose an existing updates verification task.
Click the Create button to create an update verification task.
This starts the Update Verification Task Wizard. Follow the Wizard's instructions.
You can create an updates verification task for a selected administration group or a set of computers. Computers on which the updates verification task is running, are called test computers.
It is recommended to use computers with most reliable protection and most popular application configuration in the network. This approach increases the quality of scans, and minimizes the risk of false positives and the probability of virus detection during scans. If viruses are detected on the test computers, the update verification task is considered unsuccessful.
4. Click OK to close the properties window of the downloading updates to the repository task.
As a result, the updates verification task is performed with the task of downloading updates to the repository. The Administration Server will download updates from the source, save them in temporary storage, and run the update verification task. If the task completes successfully, the updates will be copied from the temporary storage to the Administration Server shared folder (<Kaspersky Security Center installation folder>\Share\Updates) and distributed to all client computers for which the Administration Server is the source of updates.
If the results of the update verification task show that updates located in the temporary storage are incorrect or if the update verification task completes with an error, such updates will not be copied to the shared folder, and the Administration Server will keep the previous set of updates. The tasks that have the When new updates are downloaded to the repository schedule type are not started then, either. These operations will be performed at the
next start of the Administration Server update download task if scanning of the new updates completes successfully.
A set of updates is considered to be incorrect if one of the following conditions is met on at least one test computer:
update task error has occurred;
status of real-time protection of an anti-virus application has changed after applying updates;
infected object was found during a scan task;
functional error of a Kaspersky Lab application has occurred.
If none of the listed conditions is true for any test computer, the set of updates is considered to be correct and the update verification task completes successfully.
CONFIGURING TEST POLICIES AND AUXILIARY TASKS
When creating an update verification task, the Administration Server generates test policies, auxiliary group update tasks and on-demand scan tasks.
Auxiliary group update and on-demand scan tasks take some time. These tasks are performed when the updates verification task is executed. The updates verification task is performed when updates are downloaded to the repository. The duration of Download updates to the repository task includes auxiliary group update and on-demand scan tasks.
You can change the settings of text policies and auxiliary tasks.
To change settings of a text policy or an auxiliary task:
1. In the console tree, select a group for which the updates verification task is created.
U P D A T I N G D A T A B A S E S A N D S O F T W A R E M O D U L E S
135
2. In the group workspace, select one of the following tabs:
Policies, if you want to edit the test policy settings
Tasks, if you want to change auxiliary task settings.
3. In the tab workspace select a policy or a task, whose settings you want to change.
4. Open the policy (task) properties window in one of the following ways:
From the context menu of the policy (task), select Properties.
By clicking the Change policy settings (Change task settings) link in the workspace of the selected
policy (task).
To verify updates correctly, the following restrictions should be imposed on the modification of test policies and auxiliary tasks:
In the auxiliary task settings:
Save all tasks with the Critical event and Error severity levels on Administration Server. Using the events
of these types, the Administration Server analyzes the operation of applications.
Use Administration Server as the source of updates.
Specify task schedule type: Manually.
In the settings of test policies:
Disable the iChecker, iSwift, and iStream scanning acceleration technologies.
Select action to perform on infected objects: Do not prompt / Skip / Write information to report.
In the settings of test policies and auxiliary tasks:
If a computer restart is required after the installation of updates to software modules, it must be performed immediately. If the computer is not restarted, it is impossible to test this type of updates. For some applications installation of updates that require a restart may be prohibited or configured to prompt the user for confirmation first. These restrictions should be disabled in the settings of test policies and auxiliary tasks.
VIEWING DOWNLOADED UPDATES
To view the list of downloaded updates,
in the console tree, select the Repositories folder, the Updates subfolder.
The workspace of the Updates folder shows the list of updates that are saved on the Administration Server.
AUTOMATIC DISTRIBUTION OF UPDATES
Kaspersky Security Center allows you to automatically distribute and install updates on client computers and slave Administration Servers.

A D M I N I S T R A T O R ' S G U I D E
136
IN THIS SECTION
Distributing updates to client computers automatically .................................................................................................. 136
Distributing updates to slave Administration Servers automatically .............................................................................. 136
Installing program modules for Servers and Network Agents automatically .................................................................. 137
Creating and configuring the list of Update Agents ....................................................................................................... 138
Downloading updates by Update Agents ...................................................................................................................... 138
DISTRIBUTING UPDATES TO CLIENT COMPUTERS AUTOMATICALLY
To distribute the updates of the selected application to client computers immediately after the updates are downloaded to the Administration Server repository:
1. Connect to the Administration Server which manages the client computers.
2. Create an update deployment task for the selected client computers in one of the following ways:
If you want to distribute updates to the client computers that belong to the selected administration group, create a task for the selected group (see section "Creating a group task" on page 66).
If you want to distribute updates to the client computers that belong to different administration groups or do not belong to administration groups at all, create a task for specific computers (see section "Creating a task for specific computers" on page 67).
This starts the New Task Wizard. Follow its instructions and perform the following actions:
a. In the Task type wizard window, in the node of the required application select the updates deployment
task.
The name of the updates deployment task displayed in the Task type window depends on the
application for which you create this task. For detailed information about names of update tasks for the selected Kaspersky Lab application, see the corresponding Guides.
b. In the Schedule wizard window, in the Scheduled start field, select When new updates are downloaded to the repository.
As a result, the created update distribution task will start for selected computers each time the updates are downloaded to the Administration Server repository.
If an updates distribution task for the required application is created for selected computers, to automatically distribute updates to client computers in the task properties window in the Schedule section, select the When new updates are downloaded to the repository option, in the Scheduled start field.
DISTRIBUTING UPDATES TO SLAVE ADMINISTRATION SERVERS
AUTOMATICALLY
To distribute the updates of the selected application to slave Administration Servers immediately after the updates are downloaded to the Administration Server repository:
1. In the console tree, in the master Administration Server node, select the Administration Server tasks folder.

U P D A T I N G D A T A B A S E S A N D S O F T W A R E M O D U L E S
137
2. In the task list in the workspace, select the task of downloading updates to the Administration Server repository.
3. Open the Settings section of the selected task in one of the following ways:
From the context menu of the task, select Properties.
By clicking the Edit settings link in the workspace of the selected task.
4. In the Settings section of the task properties window, select the Other settings subsection, click the Configure link. This opens the Other settings window.
5. In the Other settings window that opens, select the Force update of slave Servers check box.
In the settings of the task of downloading updates by the Administration Server, on the Settings tab of the task properties window, select the Force update of slave Servers check box.
As a result, after the master Administration Server retrieves updates, the updates download tasks automatically start on slave Administration Servers regardless of their schedule.
INSTALLING PROGRAM MODULES FOR SERVERS AND NETWORK
AGENTS AUTOMATICALLY
To install the updates for Administration Server and Network Agent modules automatically after they are uploaded to the Administration Server repository:
1. In the console tree, in the master Administration Server node, select the Administration Server tasks folder.
2. In the task list in the workspace, select the task of downloading updates to the Administration Server repository.
3. Open the Settings section of the selected task in one of the following ways:
From the context menu of the task, select Properties.
By clicking the Edit settings link in the workspace of the selected task.
4. In the Settings section of the task properties window, select the Other settings subsection, click the Configure link. This opens the Other settings window.
5. In the Other settings window that opens, select the following check boxes:
Update Administration Server modules.
If this check box is selected, updates of Administration Server modules will be installed immediately after completion of the update download task by the Administration Server.
If this check box is cleared, you will only be able to install the updates manually.
This check box is selected by default.
Update Network Agent modules.
If this check box is selected, the updates of Network Agent modules will be installed after completion of the update download task by the Administration Server, provided that the updates of Network Agent modules are already retrieved.
If this check box is cleared, you will only be able to install the updates manually.
This check box is selected by default.
As a result, after master Administration Server retrieves updates, all selected program modules are installed automatically.
A D M I N I S T R A T O R ' S G U I D E
138
CREATING AND CONFIGURING THE LIST OF UPDATE AGENTS
To create a list of Update Agents and configure them for distribution of updates to client computers within an administration group:
1. In the console tree, open the Managed computers folder.
2. In the Managed computers folder select an administration group for which you want to create a list of Update
Agents.
If you want to create a list of Update Agents for the Managed computers group, you can skip this step.
3. Open the group properties window in one of the following ways:
From the context menu of the group, select Properties.
By clicking the Configure Update Agents for group link.
4. In the group properties window, in the Update Agents section, create a list of computers that will act as Update Agents in the administration groups, by using the Add and Remove buttons.
5. For each Update Agent in the list, you can click Properties to open the properties window and customize its
settings.
DOWNLOADING UPDATES BY UPDATE AGENTS
Kaspersky Security Center allows to distribute updates to client computers included in the administration groups not only through the Administration Server, but also through the Update Agents of these groups.
To configure the retrieval of updates for a group through Update Agents:
1. In the console tree, open the Managed computers folder.
2. In the Managed computers folder select the required group.
If you have already selected the Managed computers group, you can skip this step.
3. Open the group properties window in one of the following ways:
From the context menu of the group, select Properties.
By clicking the Configure Update Agents for group link.
4. In the Update Agents section, in the group properties window, select a computer that will act as Update Agent
for client computers included in the group.
5. Click the Properties button to open the properties of this Update Agent and select the Updates source section.
6. Select the Use update download task check box. and select the update download task in one of the following
ways:
Click Select to choose an existing updates download task.
Click the New task button to create the updates download task for the Update Agent.
The task of updates download by Update Agent is a Network Agent task, the task type is Download updates to the repository. The task for downloading updates by Network Agent is a local task. You should create it for
each computer that acts as Update Agent separately.

U P D A T I N G D A T A B A S E S A N D S O F T W A R E M O D U L E S
139
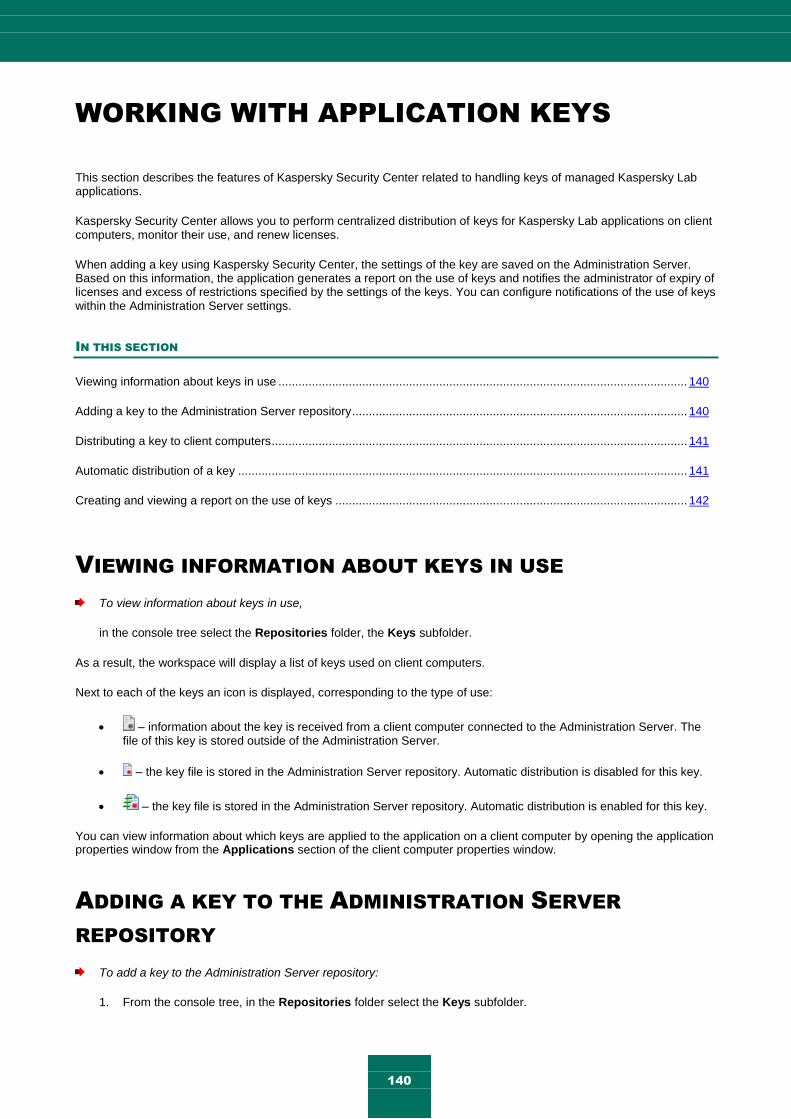
140
WORKING WITH APPLICATION KEYS
This section describes the features of Kaspersky Security Center related to handling keys of managed Kaspersky Lab applications.
Kaspersky Security Center allows you to perform centralized distribution of keys for Kaspersky Lab applications on client computers, monitor their use, and renew licenses.
When adding a key using Kaspersky Security Center, the settings of the key are saved on the Administration Server. Based on this information, the application generates a report on the use of keys and notifies the administrator of expiry of licenses and excess of restrictions specified by the settings of the keys. You can configure notifications of the use of keys within the Administration Server settings.
IN THIS SECTION
Viewing information about keys in use .......................................................................................................................... 140
Adding a key to the Administration Server repository .................................................................................................... 140
Distributing a key to client computers ............................................................................................................................ 141
Automatic distribution of a key ...................................................................................................................................... 141
Creating and viewing a report on the use of keys ......................................................................................................... 142
VIEWING INFORMATION ABOUT KEYS IN USE
To view information about keys in use,
in the console tree select the Repositories folder, the Keys subfolder.
As a result, the workspace will display a list of keys used on client computers.
Next to each of the keys an icon is displayed, corresponding to the type of use:
– information about the key is received from a client computer connected to the Administration Server. The file of this key is stored outside of the Administration Server.
– the key file is stored in the Administration Server repository. Automatic distribution is disabled for this key.
– the key file is stored in the Administration Server repository. Automatic distribution is enabled for this key.
You can view information about which keys are applied to the application on a client computer by opening the application properties window from the Applications section of the client computer properties window.
ADDING A KEY TO THE ADMINISTRATION SERVER
REPOSITORY
To add a key to the Administration Server repository:
1. From the console tree, in the Repositories folder select the Keys subfolder.

W O R K I N G W I T H A P P L I C A T I O N K E Y S
141
2. Start the key adding task using one of the following methods:
from the context menu of the list of keys select Add Key;
by clicking the Add key link in the workspace of the list of keys.
This will start the Add Key Wizard. Follow the Wizard's instructions.
DISTRIBUTING A KEY TO CLIENT COMPUTERS
Kaspersky Security Center allows distributing the key to client computers using the key distribution task.
To distribute a key to client computers:
1. From the console tree, in the Repositories folder select the Keys subfolder.
2. Run the key distribution task using one of the following methods:
from the context menu of the list of keys select Deploy a key;
click the Deploy key to managed computers link in the workspace of the list of keys.
This starts the Key Distribution Task Creation Wizard. Follow the Wizard's instructions.
Tasks created using the Key Distribution Task Creation Wizard are tasks for specific computers stored in the Tasks for specific computers folder of the console tree.
You can also create a group or local key distribution task using the Task Creation Wizard for an administration group and for a client computer.
AUTOMATIC DISTRIBUTION OF A KEY
Kaspersky Security Center allows automatic distribution of keys to client computers if they are located in the keys repository on the Administration Server.
To distribute a key to client computers automatically:
1. In the console tree, in the Repositories folder select the Keys subfolder.
2. Select the key that you want to distribute.
3. Open the properties window of the selected key using one of the following methods:
from the context menu of the key select Properties;
click the Show key properties window link in the workspace of the selected key.
4. In the key properties window that opens, select the Automatically deployed key check box. Close the key
properties window.
As a result, the key will be automatically distributed to client computers on which the application has been installed without an active key.
Key distribution is performed by means of the Network Agent. No additional key distribution tasks are created for the application. The key is added as an active one.
When distributing a key, the license limit specified in its settings is also taken into account. If the limit is reached, the key will not be deployed to any client computer.

A D M I N I S T R A T O R ' S G U I D E
142
CREATING AND VIEWING A REPORT ON THE USE OF KEYS
To create a report on the use of keys on client computers,
in the console tree, in the Reports and notifications folder select the report template named Report on the use of keys, or create a new report template of the same type.
As a result, the workspace of the report on the use of keys displays information about active and additional keys used on the client computers. The report also contains information about computers on which the keys are used, and about restrictions specified in the settings of the keys.
143
DATA REPOSITORIES
This section provides information about data stored on the Administration Server and used for tracking the condition of client computers and servicing them.
The data used to track the status of client computers are displayed in the Repositories folder of the console tree.
The Repositories folder contains the following objects:
the updates downloaded by the Administration Server that are distributed to client computers (see section "Viewing downloaded updates" on page 135);
a list of equipment detected on the network;
keys that were found on client computers (see section "Working with application keys" on page 140);
files quarantined on client computers by anti-virus applications;
files placed into repositories on client computers;
files assigned for scanning later by anti-virus applications.
IN THIS SECTION
Exporting a list of repository objects to a text file .......................................................................................................... 143
Installation packages ..................................................................................................................................................... 143
Quarantine and Backup................................................................................................................................................. 144
Unprocessed files .......................................................................................................................................................... 146
EXPORTING A LIST OF REPOSITORY OBJECTS TO A TEXT
FILE
You can export the list of objects from the repository to a text file.
To export the list of objects from the repository to a text file:
1. In the console tree, select the Repositories folder, the necessary subfolder.
2. In the repository subfolder, select Export list.
This will open the Export list window, in which you can specify the name of text file and path to the folder where
it was placed.
INSTALLATION PACKAGES
Kaspersky Security Center moves to data storages installation packages of applications by Kaspersky Lab and third-party vendors.
A D M I N I S T R A T O R ' S G U I D E
144
An installation package is a set of files required to install an application. An installation package contains the setup settings and initial configuration of the application being installed.
If you want to install an application to a client computer, you should create an installation package (see section "Creating installation packages of applications" on page 111) for it or use an existing one. The list of available installation packages is stored in the Remote installation folder of the console tree, in the Installation packages subfolder.
For detailed information on installation packages, see Kaspersky Security Center Implementation Guide.
QUARANTINE AND BACKUP
The Kaspersky Lab anti-virus applications installed on client computers can quarantine objects or place them to backup during computer scan.
Quarantine is a special area storing files probably infected with viruses and files that cannot be disinfected at the time
when they are detected.
Backup storage is designed for storing backup copies of files that have been deleted or modified during the disinfection process.
Kaspersky Security Center creates a list of files placed into Quarantine or Backup by Kaspersky Lab application on client computers. The Network Agents on client computers transfer information about the files in Quarantine and Backup to the Administration Server. You can use Administration Console to view the properties of files in repositories on client computers, run anti-virus scanning of those repositories, and delete the stored files.
Operations with Quarantine and Backup are supported for versions 6.0 or later of Kaspersky Anti-Virus for Windows Workstations and Kaspersky Anti-Virus for Windows Servers, as well as for Kaspersky Endpoint Security 10 for Windows.
Kaspersky Security Center does not copy files from repositories to Administration Server. All files are stored in the repositories on client computers. You can restore files only on a computer where an anti-virus application that placed the file into the repository is installed.
IN THIS SECTION
Enabling remote management for files in the repositories............................................................................................. 144
Viewing properties of a file placed in repository ............................................................................................................ 145
Removing files from repositories ................................................................................................................................... 145
Restoring files from repositories .................................................................................................................................... 145
Saving a file from repositories to disk ............................................................................................................................ 146
Scanning files in Quarantine ......................................................................................................................................... 146
ENABLING REMOTE MANAGEMENT FOR FILES IN THE REPOSITORIES
By default, you cannot manage files placed in the repositories on client computers.
To enable remote management for files in the repositories on client computers:
1. In the console tree, select an administration group, for which you want to enable remote management for files in the repository.
2. In the group workspace, open the Policies tab.

D A T A R E P O S I T O R I E S
145
3. On the Policies tab select the policy of an anti-virus application that places files to the repositories on client
computers.
4. In the policy settings window in the Inform Administration Server group of settings, select the check boxes
corresponding to the repositories for which you want to enable the remote management.
The location of Inform Administration Server settings group in the policy properties window and the names of
check boxes depend on selected anti-virus application.
VIEWING PROPERTIES OF A FILE PLACED IN REPOSITORY
To view properties of a file in Quarantine or Backup:
1. In the console tree, select the Repositories folder, the Quarantine or Backup subfolder.
2. In the workspace of the Quarantine (Backup) folder, select a file whose properties you want to view.
3. Open the file properties window in one of the following ways:
From the context menu of the file, select Properties.
Click the Show object properties link in the workspace of the selected file.
REMOVING FILES FROM REPOSITORIES
To delete a file from Quarantine or Backup:
1. In the console tree, select the Repositories folder, the Quarantine or Backup subfolder.
2. In the workspace of the Quarantine (Backup) folder select the files that you want to delete by using the Shift and Ctrl keys.
3. Delete the files in one of the following ways:
From the context menu of the files select Remove.
Click the Delete objects (Delete object if you want to delete one file) in the workspace of the selected
files.
As a result, the anti-virus applications that placed files to repositories on client computers, will delete files from these repositories.
RESTORING FILES FROM REPOSITORIES
To restore a file from Quarantine or Backup:
1. In the console tree, select the Repositories folder, the Quarantine or Backup subfolder.
2. In the workspace of the Quarantine (Backup) folder select the files that you want to restore by using the Shift and Ctrl keys.
3. Start files restoration in one of the following ways:
From the context menu of the files, select Restore.
By clicking the Restore link in the workspace of the selected files.

A D M I N I S T R A T O R ' S G U I D E
146
As a result, the anti-virus applications that placed files to repositories on client computers, will restore files to their initial folders.
SAVING A FILE FROM REPOSITORIES TO DISK
Kaspersky Security Center allows you to save to disk the copies of files that were placed by an anti-virus application in Quarantine or Backup on client computer. The files are copied to the computer on which Kaspersky Security Center is installed, to the specified folder.
To save a copy of file from Quarantine or Backup to hard drive:
1. In the console tree, select the Repositories folder, the Quarantine or Backup subfolder.
2. In the workspace of the Quarantine (Backup) folder, select a file that you want to copy to the hard drive.
3. Start copying the files in one of the following ways:
In the context menu of the file, select the Save to Disk item.
Click the Save to Disk link in the workspace of the selected file.
As a result, the anti-virus application that placed the file in Quarantine on client computer will save a copy of file to hard drive.
SCANNING FILES IN QUARANTINE
To scan quarantined files:
1. In the console tree, select the Repositories folder, the Quarantine subfolder.
2. In the workspace of the Quarantine folder select the files that you want to scan by using the Shift and Ctrl
keys.
3. Start the file scanning process in one of the following ways:
Select Save to Disk from the context menu of the file.
By clicking the Scan link in the workspace of the selected files.
As a result, the application runs the on-demand scan task for anti-virus applications that have placed files to Quarantine on computers where the selected files are stored.
UNPROCESSED FILES
The information about unprocessed files found on client computers is stored in the Repositories folder, the Unprocessed files subfolder.
Postponed processing and disinfection by an anti-virus application are performed upon request or after a specified event. You can configure the postponed processing.
POSTPONED FILE DISINFECTION
To start postponed file disinfection:
1. In the console tree, select the Repositories folder, the Unprocessed files subfolder.

D A T A R E P O S I T O R I E S
147
2. In the workspace of the Unprocessed files folder, select a file that you want to disinfect.
3. Start disinfecting the file in one of the following ways:
From the context menu of the file, select Disinfect.
By clicking the Disinfect link in the workspace of the selected file.
The attempt to disinfect this file is then performed.
If a file has been disinfected, the anti-virus application installed on client computer restores it to its initial location. The record about the file is removed from list in the Unprocessed files folder. If file disinfection is not possible, anti-virus
application installed on client computer removes the file from the computer. The record about the file is removed from list in the Unprocessed files folder.
SAVING AN UNPROCESSED FILE TO DISK
Kaspersky Security Center allows to save to disk the copies of unprocessed files found on client computers. The files are copied to the computer on which Kaspersky Security Center is installed, to the specified folder.
To save a copy of an unprocessed file to disk:
1. In the console tree, select the Repositories folder, the Unprocessed files subfolder.
2. In the workspace of the Unprocessed files folder, select files that you want to copy on the hard drive.
3. Start copying the files in one of the following ways:
In the context menu of the file, select the Save to Disk item.
Click the Save to Disk link in the workspace of the selected file.
As a result, an anti-virus application installed on client computer on which an unprocessed file has been found, will save a file copy to the specified folder.
DELETING FILES FROM THE UNPROCESSED FILES FOLDER
To delete a file from the Unprocessed files folder:
1. In the console tree, select the Repositories folder, the Unprocessed files subfolder.
2. In the workspace of the Unprocessed files folder select the files that you want to delete by using the Shift and Ctrl keys.
3. Delete the files in one of the following ways:
From the context menu of the files select Remove.
Click the Delete objects (Delete object if you want to delete one file) in the workspace of the selected
files.
As a result, the anti-virus applications that placed files to repositories on client computers, will delete files from these repositories. The records about files are removed from list in the Unprocessed files folder.

148
CONTACTING TECHNICAL SUPPORT
This section provides information about how to obtain technical support and what conditions should be met to receive help from the Technical Support Service.
IN THIS SECTION
How to obtain technical support .................................................................................................................................... 148
Technical support by phone .......................................................................................................................................... 148
Obtaining technical support via My Kaspersky Account ................................................................................................ 148
HOW TO OBTAIN TECHNICAL SUPPORT
If you do not find a solution to your problem in the application documentation or in one of the sources of information about the application (on page 13), we recommend that you contact Kaspersky Lab's Technical Support Service. Technical Support specialists will answer your questions about installing and using the application.
Before contacting Technical Support, please read the support rules (http://support.kaspersky.com/support/rules).
You can contact Technical Support in one of the following ways:
By telephone. This method allows you to consult with specialists from our Russian-language or international Technical Support.
By sending a query from your Kaspersky Account on the Technical Support Service website. This method allows you to contact Technical Support specialists through a request form.
Technical support is only available to users who purchased the commercial license. No technical support is provided to users of trial versions.
TECHNICAL SUPPORT BY PHONE
If an urgent issue arises, you can call specialists from Russian-speaking or international Technical Support (http://support.kaspersky.com/support/international) by phone.
Before contacting Technical Support, please read the support rules (http://support.kaspersky.com/support/details). This will allow our specialists to help you more quickly.
OBTAINING TECHNICAL SUPPORT VIA MY KASPERSKY
ACCOUNT
My Kaspersky Account is your personal area (https://my.kaspersky.com) on the Technical Support Service website.
To obtain access to My Kaspersky Account, you should go through the registration procedure on the registration page (https://my.kaspersky.com/registration). Enter your email address and a password to log in to My Kaspersky Account.
C O N T A C T I N G T E C H N I C A L S U P P O R T
149
In My Kaspersky Account, you can perform the following actions:
Contact Technical Support and the Virus Lab.
Contact Technical Support without using email.
Track the status of your requests in real time.
View a detailed history of your Technical Support requests.
Receive a copy of the key file if it is lost or deleted.
Technical Support by email
You can send an online request to Technical Support in English, Russian, German, French, or Spanish.
In the fields of the online request form, specify the following data:
Request type
Application name and version number
Request description
Customer ID and password
email address.
A specialist from the Technical Support Service sends an answer to your question to your My Kaspersky Account and to the email address that you have specified in your online request.
Online request to the Virus Lab
Some requests must be sent to the Virus Lab instead of Technical Support.
You can send requests of the following types to the Virus Lab:
Unknown malicious program – you suspect that a file contains a virus but Kaspersky Security Center has not identified it as infected.
Virus Lab specialists analyze malicious code that is sent. If they detect a previously unknown virus, they add a corresponding description to the database, which becomes available when updating anti-virus applications.
False alarm – Kaspersky Security Center classifies the file as a virus, yet you are sure that the file is not a virus.
Request for description of malicious program – you want to receive the description of a virus detected by
Kaspersky Security Center, using the name of the virus.
You can also send requests to the Virus Lab from the page with the request form (http://support.kaspersky.com/virlab/helpdesk.html) without being registered in My Kaspersky Account. On this page, you do not have to specify the application activation code.

150
APPLICATIONS
This section provides information that complements the document text.

151
GLOSSARY
A
A C T I V E K E Y
Key that is used at the moment to work with the application.
A D D I T I O N A L K E Y
Key that verifies the use of the application but is not used at the moment.
A D M I N I S T R A T I O N CO N S O L E
A Kaspersky Security Center component that provides a user interface for the administrative services of Administration Server and Network Agent.
A D M I N I S T R A T I O N G R O U P
A set of computers that share common functions and a set of Kaspersky Lab applications that is installed on them. Computers are grouped so that they can be managed conveniently as a single unit. A group may include other groups. It is possible to create group policies and group tasks for each installed application in the group.
A D M I N I S T R A T I O N S E R V E R C L I E N T (CL I E N T C O M P U T E R )
A computer, server, or workstation on which Network Agent and managed Kaspersky Lab applications are running.
A U T H E N T I C A T I O N AG E N T
An interface that allows passing the authentication procedure to obtain access to encrypted hard drives and to boot the operating system after encryption of the system hard drive.
A V A I L A B L E U P D A T E
A package of updates for the modules of a Kaspersky Lab application including a set of urgent patches released during a certain time interval, and modifications to the application architecture.
C
C O N F I G U R A T I O N P R O F I L E
Policy that contains a collection of settings and restrictions for an iOS MDM mobile device.
D
D A T A B A S E S
Databases that contain descriptions of computer security threats that are known to Kaspersky Lab by the moment of release of the databases. Records that are contained in databases allow detecting malicious code in scanned objects. The databases are created by Kaspersky Lab specialists and updated hourly.
E
E X C H A N G E AC T I V ESY N C M O B I L E D E V I C E
Mobile device connected to Administration Server over Exchange ActiveSync protocol.
G
G R O U P O F L I S E N S E D A P P L I C A T I O N S
A group of applications created on the basis of criteria set by the administrator (for example, by vendor), for which statistics of installations to client computers are maintained.
A D M I N I S T R A T O R ' S G U I D E
152
G R O U P T A S K
A task defined for an administration group and performed on all client computers within this group.
I
I N S T A L L A T I O N P A C K A G E
A set of files created for remote installation of a Kaspersky Lab application by using the Kaspersky Security Center remote administration system. An installation package is created based on special files with the .kpd and .kud extensions that are included in the application distribution package; it contains a set of settings required for application setup and its configuration for normal functioning immediately after installation. Parameter values correspond to application defaults.
I N T E R N A L U S E R S
The accounts of internal users are used to work with virtual Administration Servers. Under the account of an internal user, the administrator of a virtual Administration Server can start Kaspersky Security Center Web-Console to check the anti-virus security status of a network. Kaspersky Security Center grants the rights of real users to internal users of the application.
Accounts of internal users are created and used only within Kaspersky Security Center. No data on internal users is transferred to the operating system. Kaspersky Security Center authenticates internal users.
I OS MDM M O B I L E D E V I C E
Mobile device on iOS platform managed by an iOS MDM mobile devices server (see section "iOS MDM mobile devices server" on page 152).
I OS MDM M O B I L E D E V I C E S S E R V E R
A component of Kaspersky Security Center installed to a client computer and allowing connection of iOS mobile devices to Administration Server and management of iOS mobile devices through Apple Push Notifications (APNs) service.
I OS MDM P R O F I L E
Collection of settings for connection of iOS mobile devices to Administration Server. The user installs an iOS MDM profile to a mobile device, after which this mobile device connects to Administration Server.
K
K A S P E R S K Y S E C U R I T Y C E N T E R A D M I N I S T R A T O R
The person managing the application operations through the Kaspersky Security Center system of remote centralized administration.
K A S P E R S K Y S E C U R I T Y NE T W O R K (KSN)
An infrastructure of online services that provides access to the online Knowledge Base of Kaspersky Lab which contains information about the reputation of files, web resources, and software. Using data from the Kaspersky Security Network ensures a faster response time for Kaspersky Lab applications when encountering new types of threats, improves performance of some protection components, and reduces the risk of false positives.
L
L O C A L T A S K
A task defined and running on a single client computer.
M
M O B I L E D E V I C E S S E R V E R
A component of Kaspersky Security Center that provides access to mobile devices and allows managing them through Administration Console.

G L O S S A R Y
153
M O B I L E D E V I C E S S E R V E R S U P P O R T I N G EX C H A N G E A C T I V E SY N C
A component of Kaspersky Security Center that is installed to a client computer, allowing connection of Exchange ActiveSync mobile devices to Administration Server.
N
N E T W O R K AG E N T
Network Agent is a component of Kaspersky Security Center that coordinates interaction between Administration Server and Kaspersky Lab applications installed on a specific network node (a workstation or a server). This component is a common one for all of the company’s products for Windows. Separate versions of Network Agent exist for Kaspersky Lab products developed for Novell®, Unix® and Mac.
P
P R O F I L E
A collection of settings of Exchange ActiveSync mobile devices that define their behavior when connected to a MS Exchange server.
P R O V I S I O N I N G P R O F I L E
Collection of settings for applications’ operation on iOS mobile devices. A provisioning profile contains information about the license; it is linked to a specific application.
R
R E S T O R A T I O N
Relocation of the original object from Quarantine or Backup to its original folder where the object had been stored before it was quarantined, disinfected or deleted, or to a user-defined folder.
R E S T O R A T I O N O F AD M I N I S T R A T I O N S E R V E R D A T A
Restoration of Administration Server data from the information saved in Backup by using the backup utility. The utility can restore:
Information database of the Administration Sever (policies, tasks, application settings, events saved on the Administration Server)
Configuration information about the structure of administration groups and client computers
Repository of the installation files for remote installation of applications (content of the folders: Packages, Uninstall Updates)
Administration Server certificate
T
T A S K
Functions performed by a Kaspersky Lab application are implemented as tasks, for example: Real-time protection of files, Full computer scan and Database update.
T A S K F O R S P E C I F I C C O M P U T E R S
A task assigned for a set of client computers from arbitrary administration groups and performed on those hosts.
U
U P D A T E AG E N T
Computer acting as an intermediate source for distribution of updates and installation packages in an administration group.

A D M I N I S T R A T O R ' S G U I D E
154
V
V I R T U A L AD M I N I S T R A T I O N S E R V E R
(also referred to as virtual Server) A component of Kaspersky Security Center aimed at managing anti-virus protection of client organization's network.
Virtual Administration Server is a particular case of a slave Administration Server and has the following restrictions as compared with physical Administration Server:
Virtual Administration Server can be created only on master Administration Server.
Virtual Administration Server uses the master Administration Server database. Thus, the following tasks are not supported on virtual Server: backup copying, restoration, updates verification and updates downloading. These tasks exist only on master Administration Server.
Virtual Server does not support creation of slave Administration Servers (including virtual Servers).
V I R U S O U T B R E A K
A series of deliberate attempts to infect a computer with a virus.
V U L N E R A B I L I T Y
A flaw of an operating system or program that may be used by malware developers for penetrating into the system or program and violating its integrity. A large number of vulnerabilities in a system makes its functioning unreliable, because viruses having penetrated into the system may cause operation failures in the system itself and in applications installed.
W
W I N D O W S S E R V E R UP D A T E S E R V I C E S (WSUS)
An application used for distribution of updates for Microsoft applications on users' computers in an organization's network.

155
KASPERSKY LAB ZAO
Kaspersky Lab software is internationally renowned for its protection against viruses, malware, spam, network and hacker attacks, and other threats.
In 2008, Kaspersky Lab was rated among the world’s top four leading vendors of information security software solutions for end users (IDC Worldwide Endpoint Security Revenue by Vendor). Kaspersky Lab is the preferred developer of computer protection systems among home users in Russia, according to the COMCON survey "TGI-Russia 2009".
Kaspersky Lab was founded in Russia in 1997. Today, it is an international group of companies headquartered in Moscow with five regional divisions that manage the company's activity in Russia, Western and Eastern Europe, the Middle East, Africa, North and South America, Japan, China, and other countries in the Asia-Pacific region. The company employs more than 2000 qualified specialists.
Products. Kaspersky Lab’s products provide protection for all systems—from home computers to large corporate
networks.
The personal product range includes anti-virus applications for desktop, laptop, and pocket computers, and for smartphones and other mobile devices.
Kaspersky Lab delivers applications and services to protect workstations, file and web servers, mail gateways, and firewalls. Used in conjunction with Kaspersky Lab’s centralized management system, these solutions ensure effective automated protection for companies and organizations against computer threats. Kaspersky Lab's products are certified by the major test laboratories, are compatible with the software of many suppliers of computer applications, and are optimized to run on many hardware platforms.
Kaspersky Lab’s virus analysts work around the clock. Every day they uncover hundreds of new computer threats, create tools to detect and disinfect them, and include them in the databases used by Kaspersky Lab applications. Kaspersky Lab's Anti-Virus database is updated hourly; and the Anti-Spam database every five minutes.
Technologies. Many technologies that are now part and parcel of modern anti-virus tools were originally developed by
Kaspersky Lab. It is no coincidence that many other developers use the Kaspersky Anti-Virus kernel in their products, including: SafeNet (USA), Alt-N Technologies (USA), Blue Coat Systems (USA), Check Point Software Technologies (Israel), Clearswift (UK), CommuniGate Systems (USA), Critical Path (Ireland), D-Link (Taiwan), M86 Security (USA), GFI (Malta), IBM (USA), Juniper Networks (USA), LANDesk (USA), Microsoft (USA), NETASQ (France), NETGEAR (USA), Parallels (Russia), SonicWALL (USA), WatchGuard Technologies (USA), ZyXEL Communications (Taiwan). Many of the company’s innovative technologies are patented.
Achievements. Over the years, Kaspersky Lab has won hundreds of awards for its services in combating computer
threats. For example, in 2010 Kaspersky Anti-Virus received several top Advanced+ awards in a test administered by AV-Comparatives, a respected Austrian anti-virus laboratory. But Kaspersky Lab's main achievement is the loyalty of its users worldwide. The company’s products and technologies protect more than 300 million users, and its corporate clients number more than 200,000.
Kaspersky Lab official site: http://www.kaspersky.com
Virus Encyclopedia: http://www.securelist.com/
Anti-Virus Lab: [email protected] (only for sending probably infected files in archive format)
http://support.kaspersky.com/virlab/helpdesk.html
(for queries addressed to virus analysts)
Kaspersky Lab web forum: http://forum.kaspersky.com

156
INFORMATION ABOUT THIRD-PARTY CODE
Information about third-party code is contained in a file named legal_notices.txt and stored in the application installation folder.

157
TRADEMARK NOTICES
Registered trademarks and service marks are the property of their respective owners.
Cisco is a registered trademark or trademark of Cisco Systems, Inc. and/or its affiliates in the United States and certain other countries.
Active Directory, Data Access, Internet Explorer, Microsoft, SQL Server, Windows, Windows Server and Windows Vista are registered trademarks of Microsoft Corporation in the United States and other countries.
Linux is the registered trademark of Linus Torvalds in the U.S. and other countries.
Mac and Mac OS are registered trademarks of Apple Inc.
Novell is a registered trademark of Novell, Inc in the United States and other countries.
UNIX is a registered trademark in the United States and in other countries, used under license from X/Open Company Limited.

158
INDEX
A
Activation code ............................................................................................................................................................. 37
Adding Administration Server ............................................................................................................................................. 51 Client computer ...................................................................................................................................................... 76
Administration groups........................................................................................................................................... 40, 151
Administration Server ................................................................................................................................................... 40
Administration server certificate ................................................................................................................................... 50
Application activation activation code ........................................................................................................................................................ 37
APPLICATION MANAGEMENT ................................................................................................................................... 61
C
Cisco Network Admission Control ................................................................................................................................ 54
Client computers .......................................................................................................................................................... 42 connecting to the Server ......................................................................................................................................... 74 message to the user ............................................................................................................................................... 78
Configuration profile ................................................................................................................................................... 118
Console tree ................................................................................................................................................................. 22
Context menu ............................................................................................................................................................... 33
D
Deleting policy ...................................................................................................................................................................... 63
E
ENCRYPTION ............................................................................................................................................................ 120
Events queries configuring .............................................................................................................................................................. 88 creating ................................................................................................................................................................... 88 viewing the log ........................................................................................................................................................ 87
Exchange ActiveSync mobile device .......................................................................................................................... 113
Exporting policies.................................................................................................................................................................... 64 tasks ....................................................................................................................................................................... 69
G
Group of licensed applications ................................................................................................................................... 100
Group tasks filter ......................................................................................................................................................................... 71 inheritance .............................................................................................................................................................. 68
Groups structure.................................................................................................................................................................. 58
I
Image ......................................................................................................................................................................... 108
Importing policies.................................................................................................................................................................... 64 tasks ....................................................................................................................................................................... 70
Installation package ................................................................................................................................................... 152
iOS MDM mobile devices server ................................................................................................................................ 116
I N D E X
159
IP range changing ........................................................................................................................................................... 94, 95 creating ................................................................................................................................................................... 95
K
KASPERSKY LAB ...................................................................................................................................................... 155
KASPERSKY LAB ZAO ............................................................................................................................................. 155
Key ............................................................................................................................................................................... 37 deployment ........................................................................................................................................................... 141 installation ............................................................................................................................................................. 140 report .................................................................................................................................................................... 142
KEY ............................................................................................................................................................................ 140
Key file ......................................................................................................................................................................... 37
L
License activation code ........................................................................................................................................................ 37 End User License Agreement ................................................................................................................................. 36
License agreement ....................................................................................................................................................... 36
M
Management policies.................................................................................................................................................................... 61
MANAGEMENT INITIAL CONFIGURATION .................................................................................................................................... 38 KEYS .................................................................................................................................................................... 140
Managing client computer ....................................................................................................................................................... 78
Mobile devices server supporting Exchange ActiveSync ................................................................................... 113, 114
Mobile users switching conditions
iOS MDM mobile device.................................................................................................................................. 115
N
Network scan ............................................................................................................................................................... 92
Notifications .................................................................................................................................................................. 86
P
Policies ......................................................................................................................................................................... 44 activation ................................................................................................................................................................ 63 copying ................................................................................................................................................................... 64 deleting ................................................................................................................................................................... 63 exporting ................................................................................................................................................................. 64 importing ................................................................................................................................................................. 64
Policies and tasks conversion wizard ..................................................................................................................... 65, 70
Policy creating ................................................................................................................................................................... 62
Polling Active Directory group ............................................................................................................................................ 93 Windows network ................................................................................................................................................... 93
R
Removing Administration Server ............................................................................................................................................. 51
Report template creating ................................................................................................................................................................... 84
Reports creation ................................................................................................................................................................... 85

A D M I N I S T R A T O R ' S G U I D E
160
delivery ................................................................................................................................................................... 85 keys ...................................................................................................................................................................... 142 view ........................................................................................................................................................................ 85
Repositories application registry ................................................................................................................................................ 100
REPOSITORIES KEYS .................................................................................................................................................................... 140
Roaming ..................................................................................................................................................................... 119
S
Scan IP ranges ................................................................................................................................................................ 94
Statistics ....................................................................................................................................................................... 86
Storages installation packages ............................................................................................................................................ 143
T
Task key adding ............................................................................................................................................................ 140
Tasks............................................................................................................................................................................ 44 Administration Server change task ......................................................................................................................... 77 delivery of reports ................................................................................................................................................... 85 execution ................................................................................................................................................................ 71 exporting ................................................................................................................................................................. 69 group tasks ..................................................................................................................................................... 66, 152 importing ................................................................................................................................................................. 70 local ........................................................................................................................................................................ 68 managing the client computers ............................................................................................................................... 78 viewing results ........................................................................................................................................................ 71
Traffic limit .................................................................................................................................................................... 54
U
Update Agents ................................................................................................................................................... 138, 153
Updates distribution ............................................................................................................................................ 135, 136, 138 download .............................................................................................................................................................. 132 testing ................................................................................................................................................................... 133 viewing.................................................................................................................................................................. 135
Updating the application ............................................................................................................................................. 103
V
Virtual Administration Server ........................................................................................................................................ 41
Vulnerability ................................................................................................................................................................ 102


![Sharp 14b Sc,20b Sc,14d Sc [ET]](https://static.documents.pub/doc/80x56/545e287eaf795937758b46c4/sharp-14b-sc20b-sc14d-sc-et.jpg)


