Department of Human Services Med-QUEST Division Kauhale On-Line Eligibility Assistance (KOLEA) Project MyBenefits.Hawaii.Gov Online User Guide Submitted: Version 2.1 Submitted Date: October 19, 2015 kpmg.com
Submitted: Version 2.1 Submitted Date: October 19, 2015
kpmg.com
i KOLEA FFM Integration Portal User Guide
Revision History
Version Date Description of Updates Author
1.0 12/23/2014 Final Document Release 2 Matthew Grifone
2.0 09/30/2015 First Draft – FFM Module 1 Michael Senior
2.1 10/19/2015 QA Review Nicole Chiominto
ii KOLEA FFM Integration Portal User Guide
Table of Contents
1. Introduction 1
1.1 Document Overview 1
2. Application Pre-Assessment 2
3. Application 5
3.1 User Registration 5
3.2 Apply 8
3.3 Save and Exit 28
4. Account Management 30
4.1 My Applications 30
4.2 My Eligibility 31
4.3 My Verifications 32
4.4 My Documents 34
4.4.1 Notices 34
4.4.2 Upload Verification Document 36
4.4.3 Upload Form 41
4.5 Change of Circumstance 44
4.5.1 Predefined Change of Circumstance 44
4.5.2 Other Change of Circumstance 47
4.6 Paperless Preference 48
4.7 Appeals 50
5. Contact Us 52
1 KOLEA FFM Integration Portal User Guide
1. Introduction
1.1 Document Overview This document is intended to provide an overview of the Portal for Individuals and Families (the “Portal”). The Portal is divided into three main sections which are outlined below:
The Application Pre-Assessment section details the Screening tool, which allows you to enter data anonymously to see if you are likely to qualify for assistance including Advance Premium Tax Credits or Medicaid.
The Application section describes the process for creating a user account, and starting, saving and submitting an application. It includes a walkthrough of the application entry process for a family of three.
The Account Management section includes walkthroughs of all functionality available to applicants with an existing user account, including viewing application and eligibility information, verification items, uploaded documents, reporting change of circumstance, and appeals.
For any questions or concerns, refer to the Contact Us section.
2 KOLEA FFM Integration Portal User Guide
2. Application Pre-Assessment 1. By answering a few questions in the Application Pre-Assessment, you can determine
if you are eligible to receive assistance to help pay for health coverage. This feature is anonymous and neither a user account or application is required. No information input into the Application Pre-Assessment is used for determination, as all eligibility determinations require the submittal of an application. The following section provides an example of the Application Pre-Assessment feature. Click on the Pre-Assessment button under Am I Eligible?
3 KOLEA FFM Integration Portal User Guide
2. Click on Next to continue.
3. Answer all questions and click Next to continue.
4 KOLEA FFM Integration Portal User Guide
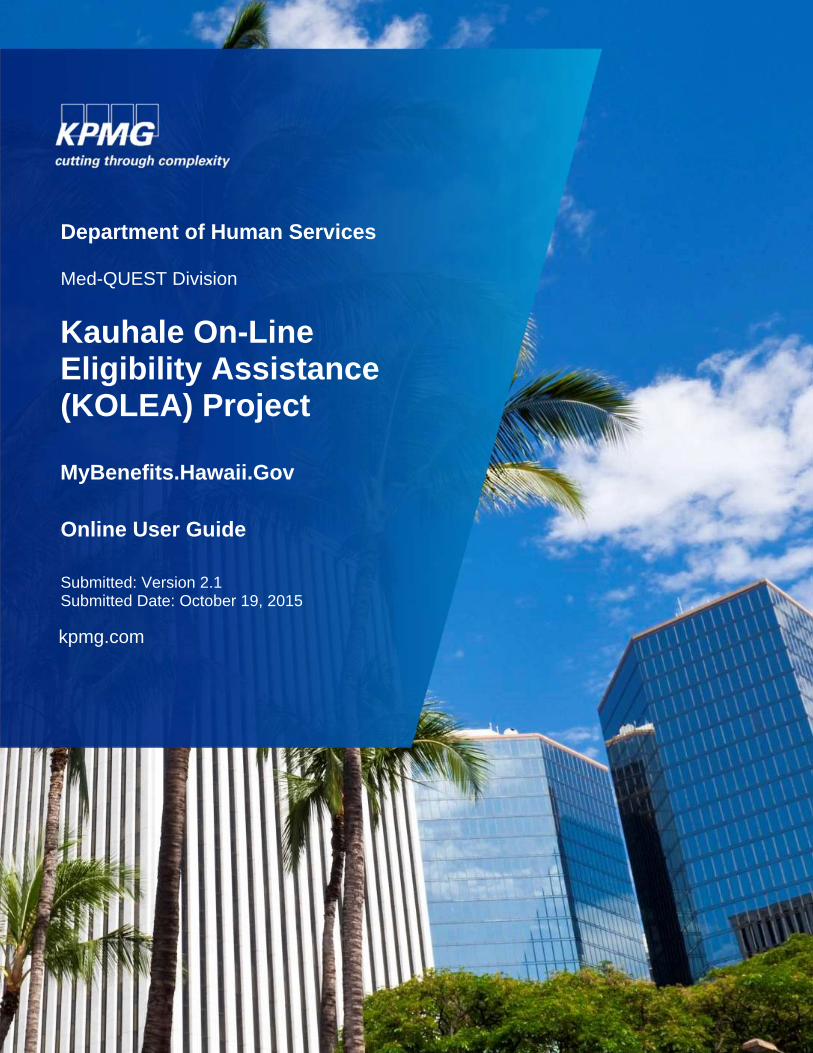
4. The Portal will conduct a pre-assessment for eligibility for assistance. If you want to re-do the pre-assessment, click the Back button. If you want to file an application click the Close button and click Apply Now. If you want to purchase health insurance without assistance click on the hyperlink under Don’t Need Assistance.
5 KOLEA FFM Integration Portal User Guide
3. Application This process describes the process to create, save and submit an application.
Note: If you do not have an email address and want to apply for assistance, you can choose to submit a paper application. Paper applications can be picked up at any Department of Human Services office. Once filled out, applications can be faxed or dropped off at any DHS office.
3.1 User Registration A User Account is required in order to create an application. This process describes the steps to create a new account within the online system.
1. Navigate to the homepage and select Apply Now.
6 KOLEA FFM Integration Portal User Guide
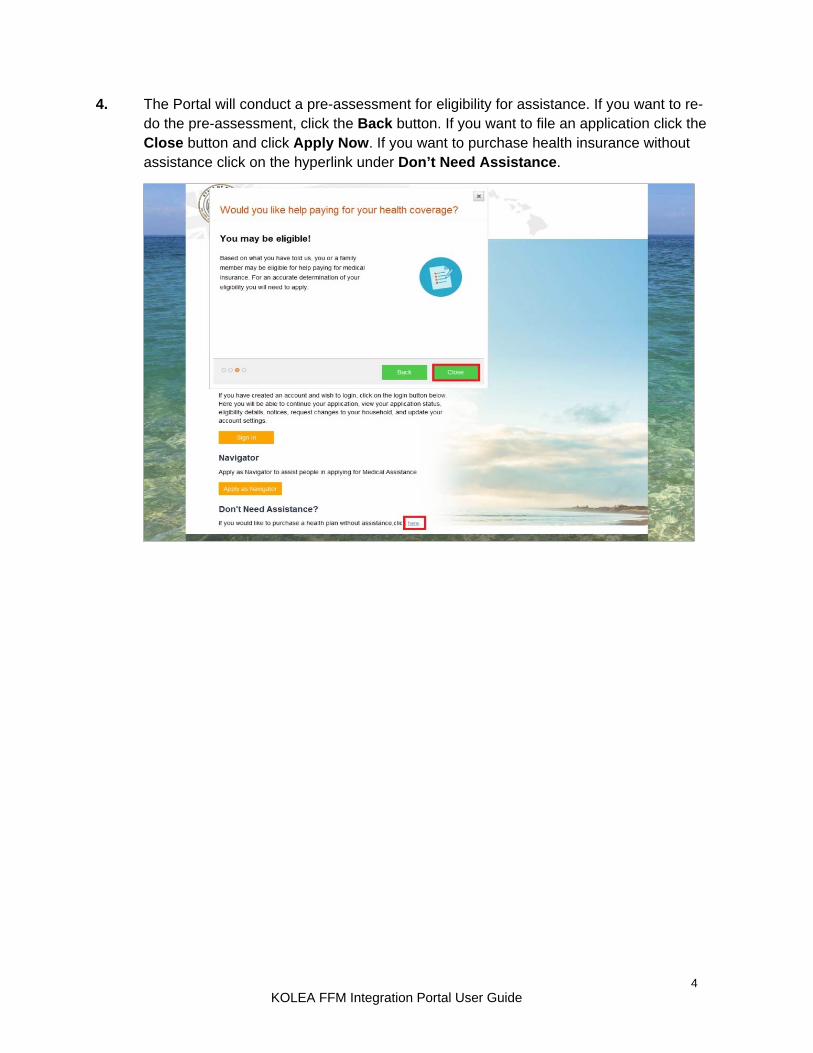
2. Select Create a New Account.
3. Select Individual in User Type and complete the required information indicated with an asterick (*). Click the Register button.
7 KOLEA FFM Integration Portal User Guide
4. An account has now been created. Select Login Now to create an application.
8 KOLEA FFM Integration Portal User Guide
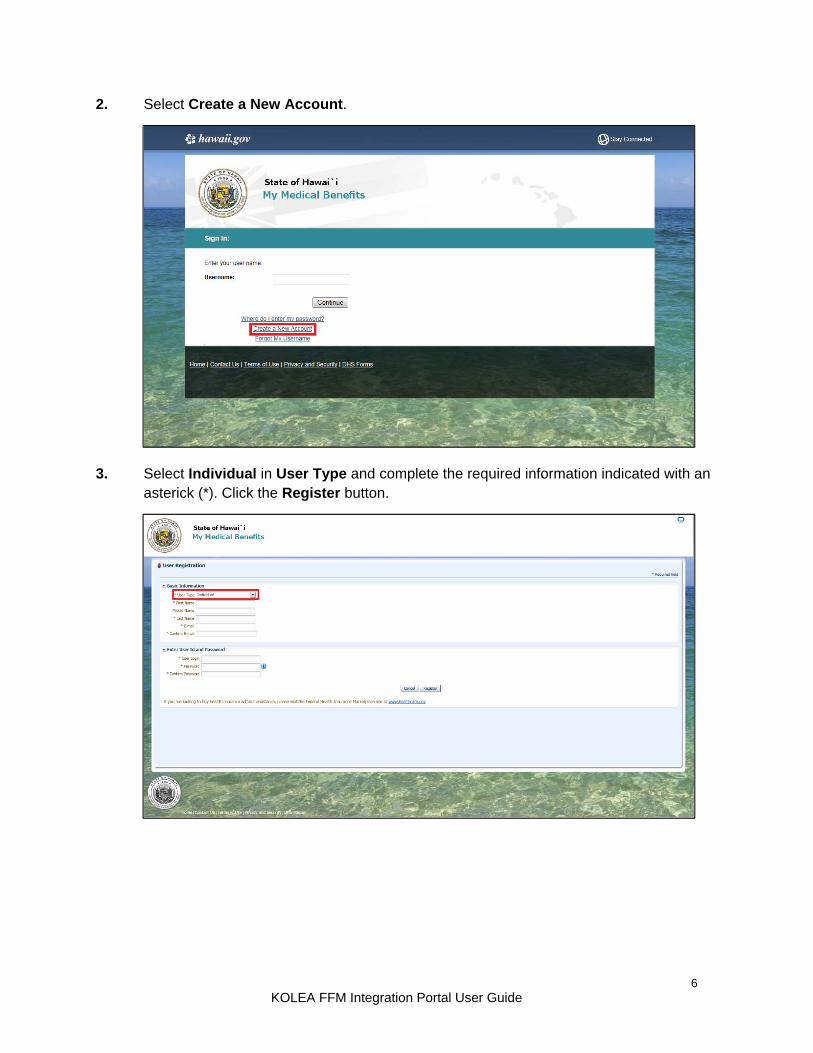
3.2 Apply 1. Enter the username and password created in User Registration.
9 KOLEA FFM Integration Portal User Guide
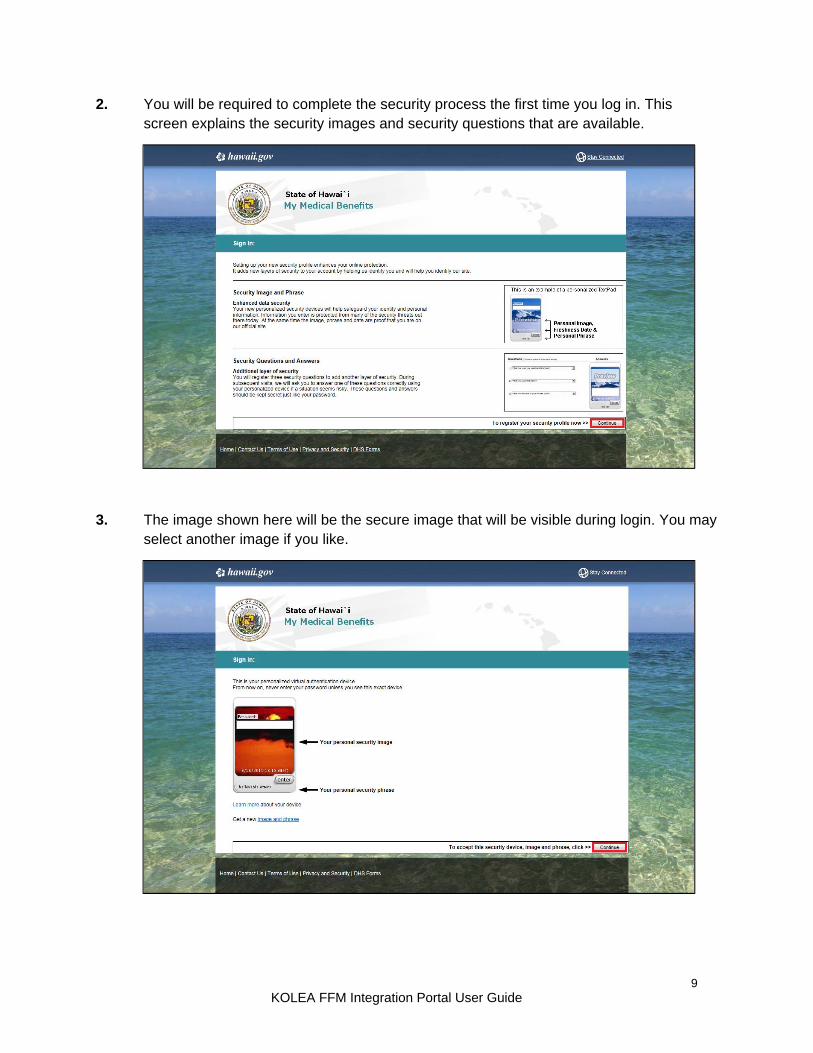
2. You will be required to complete the security process the first time you log in. This screen explains the security images and security questions that are available.
3. The image shown here will be the secure image that will be visible during login. You may select another image if you like.
10 KOLEA FFM Integration Portal User Guide
4. You will be asked to pick and answer three security questions for future security use. Please remember the answers to these questions. If you forget your password you will be asked to answer one of these questions in order to reset your password.
5. The Portal uses a federal service to validate your identity. Answer the questions in the required fields.
11 KOLEA FFM Integration Portal User Guide
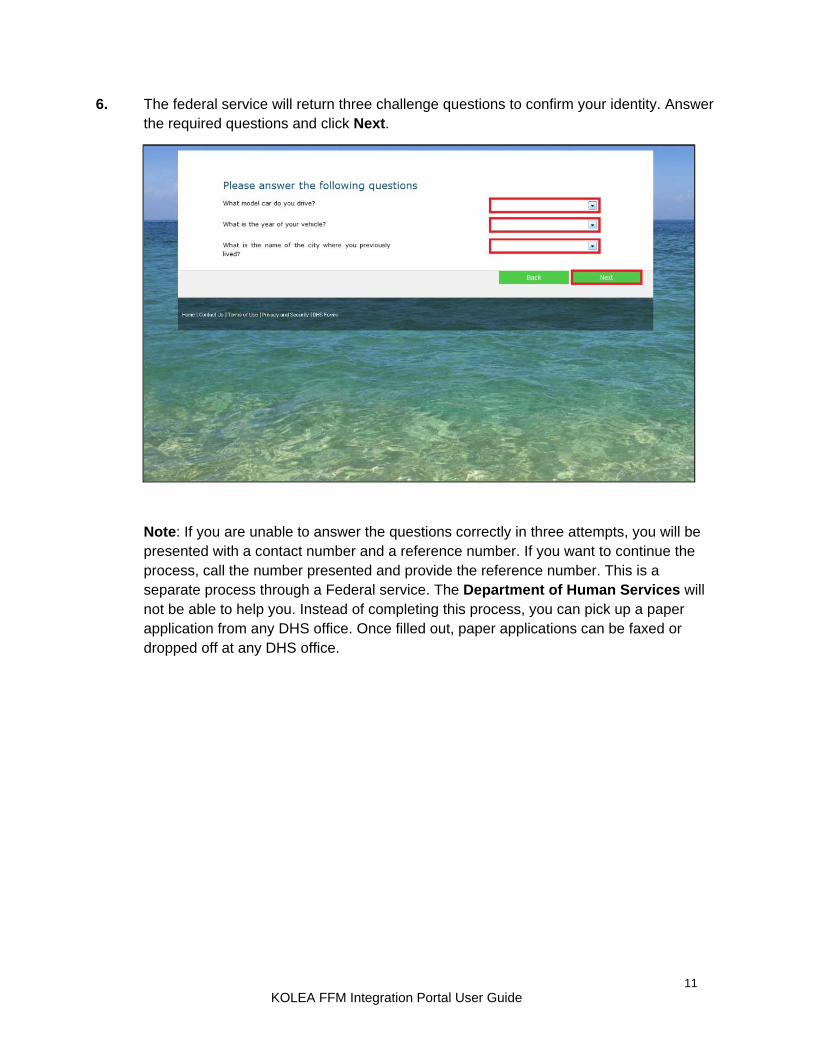
6. The federal service will return three challenge questions to confirm your identity. Answer the required questions and click Next.
Note: If you are unable to answer the questions correctly in three attempts, you will be presented with a contact number and a reference number. If you want to continue the process, call the number presented and provide the reference number. This is a separate process through a Federal service. The Department of Human Services will not be able to help you. Instead of completing this process, you can pick up a paper application from any DHS office. Once filled out, paper applications can be faxed or dropped off at any DHS office.
12 KOLEA FFM Integration Portal User Guide
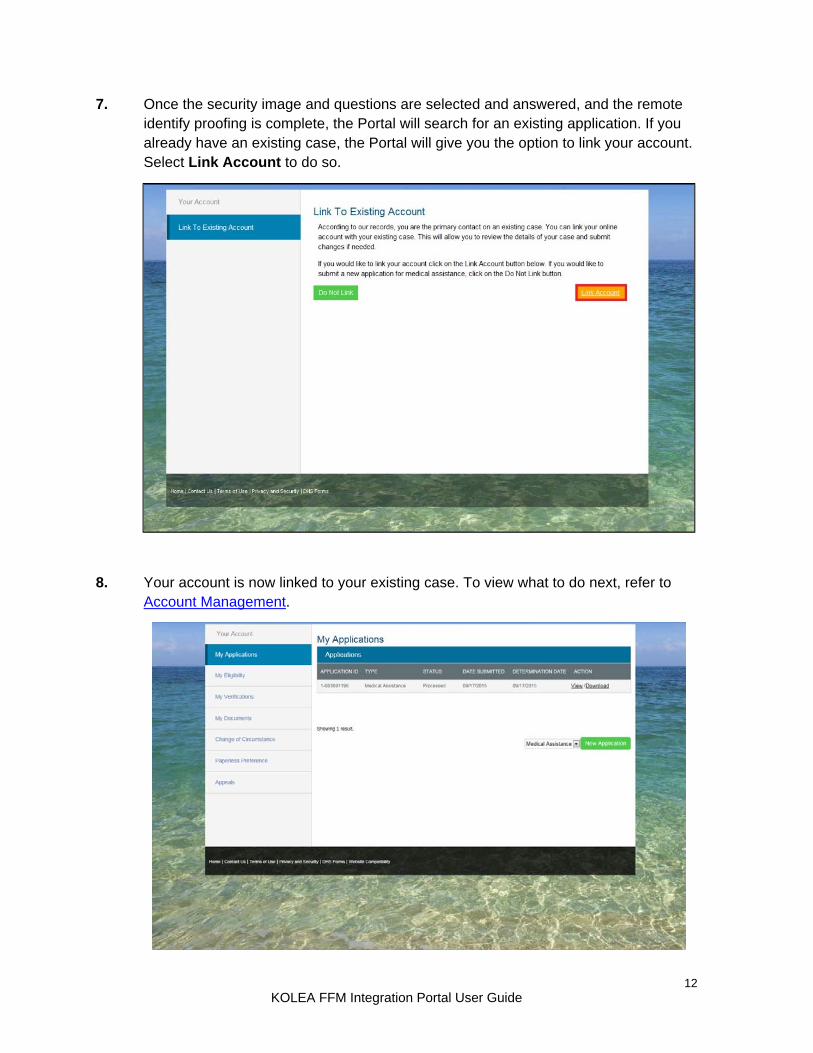
7. Once the security image and questions are selected and answered, and the remote identify proofing is complete, the Portal will search for an existing application. If you already have an existing case, the Portal will give you the option to link your account. Select Link Account to do so.
8. Your account is now linked to your existing case. To view what to do next, refer to Account Management.
13 KOLEA FFM Integration Portal User Guide
9. If you choose not to link your account or do not have an existing account, navigate to the My Applications tab and click New Application.
14 KOLEA FFM Integration Portal User Guide
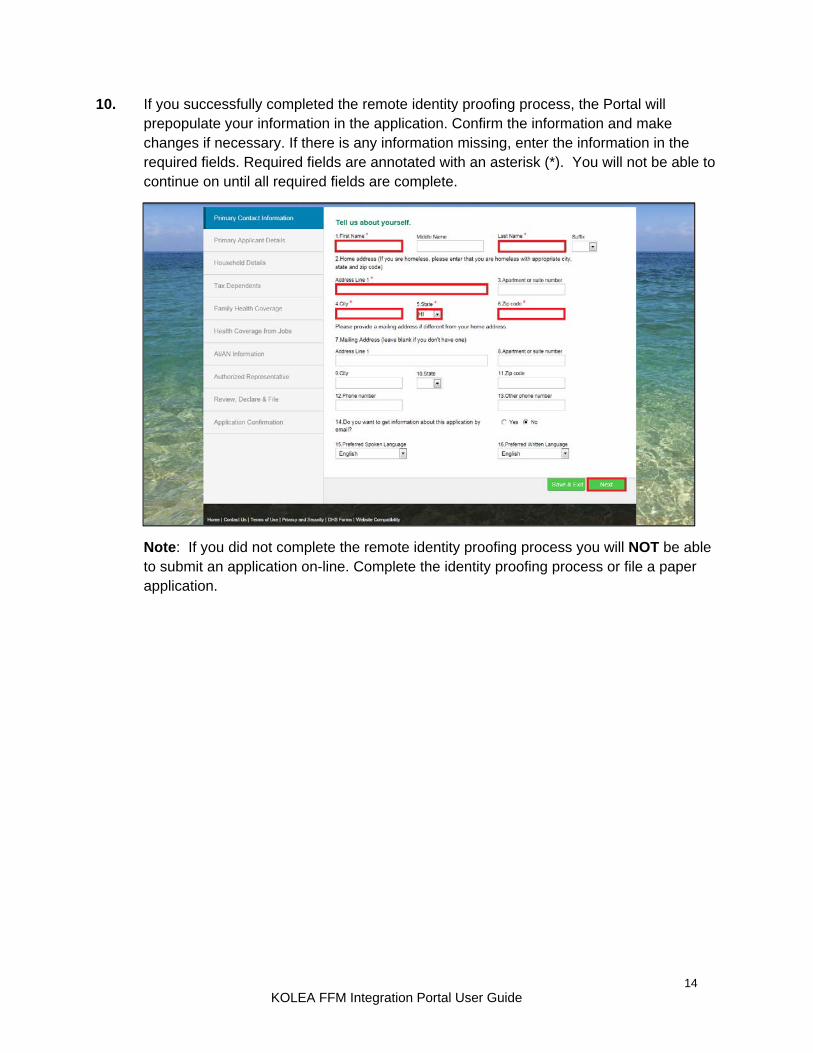
10. If you successfully completed the remote identity proofing process, the Portal will prepopulate your information in the application. Confirm the information and make changes if necessary. If there is any information missing, enter the information in the required fields. Required fields are annotated with an asterisk (*). You will not be able to continue on until all required fields are complete.
Note: If you did not complete the remote identity proofing process you will NOT be able to submit an application on-line. Complete the identity proofing process or file a paper application.
15 KOLEA FFM Integration Portal User Guide
11. The Portal matches the address with the U.S. Postal Service and returns a standardized address. You have the option of picking either the provided address or the standardized address. Confirm the correct address and click Next.
16 KOLEA FFM Integration Portal User Guide
12. Enter the required information in the fields for the Primary Applicant Details. This is the person who will receive all eligibility notices.
17 KOLEA FFM Integration Portal User Guide
13. If you have more people in your household, use the Add Person button in the Household Details section.
18 KOLEA FFM Integration Portal User Guide
14. Once all household members have been entered, the Household Details page will provide the option to edit or remove a member. To edit a member, click the blue button. To remove a member, click the red button. To add a member, click the Add Person button. The Primary Applicant is editable, but not removable.
19 KOLEA FFM Integration Portal User Guide
15. The next screen prompts you to validate the relationships previously built in the Household Details section. Validate the relationships and click Next. If the relationships are incorrect, use the check boxes provided to correct the relationships.
20 KOLEA FFM Integration Portal User Guide
16. If a household member has existing health coverage, select Yes and enter the required information. If no one in the household has existing health coverage, select No and click Next.
21 KOLEA FFM Integration Portal User Guide
17. If a household member has health coverage from an employer, select Yes and enter the required information. If that person has health coverage from another employer, click the Add Employer button. You will then select which household member is the employee receiving health insurance. If no one in the household has health insurance from an employer, select No and click Next.
22 KOLEA FFM Integration Portal User Guide
18. If a household member is American Indian or Alaskan Native, select Yes and complete the required fields. If no one in the household is American Indian or Alaskan Native, select No and click Next.
23 KOLEA FFM Integration Portal User Guide
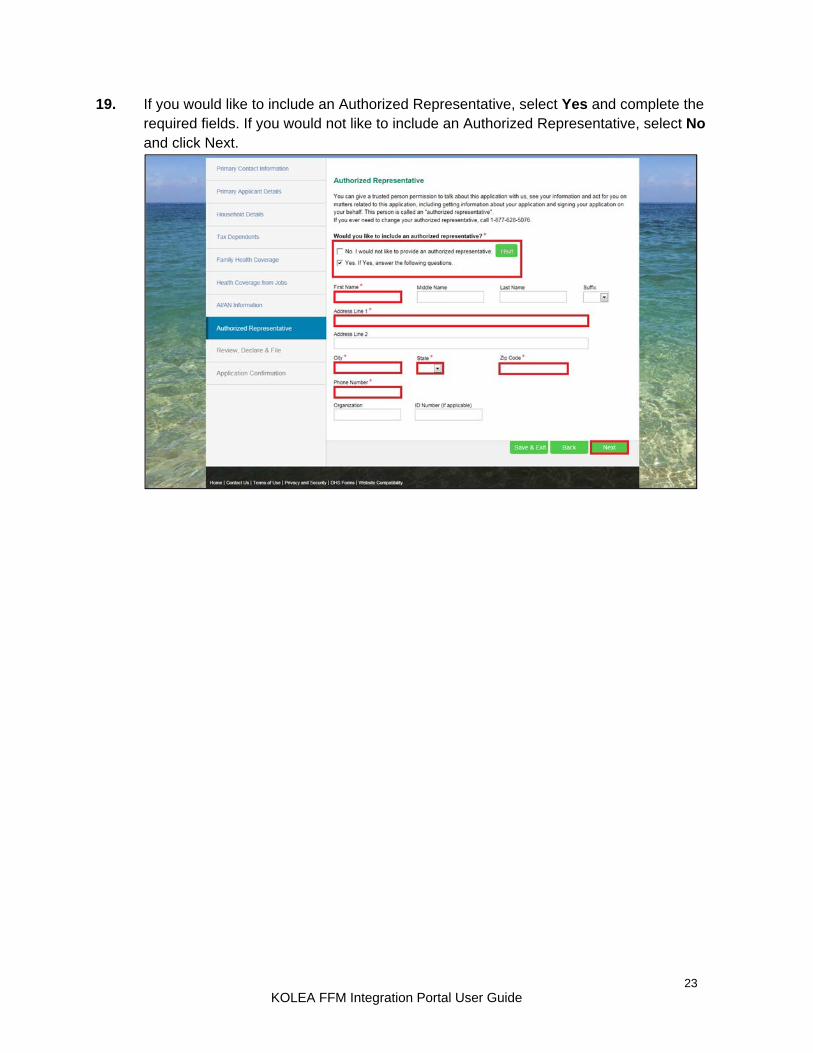
19. If you would like to include an Authorized Representative, select Yes and complete the required fields. If you would not like to include an Authorized Representative, select No and click Next.
24 KOLEA FFM Integration Portal User Guide
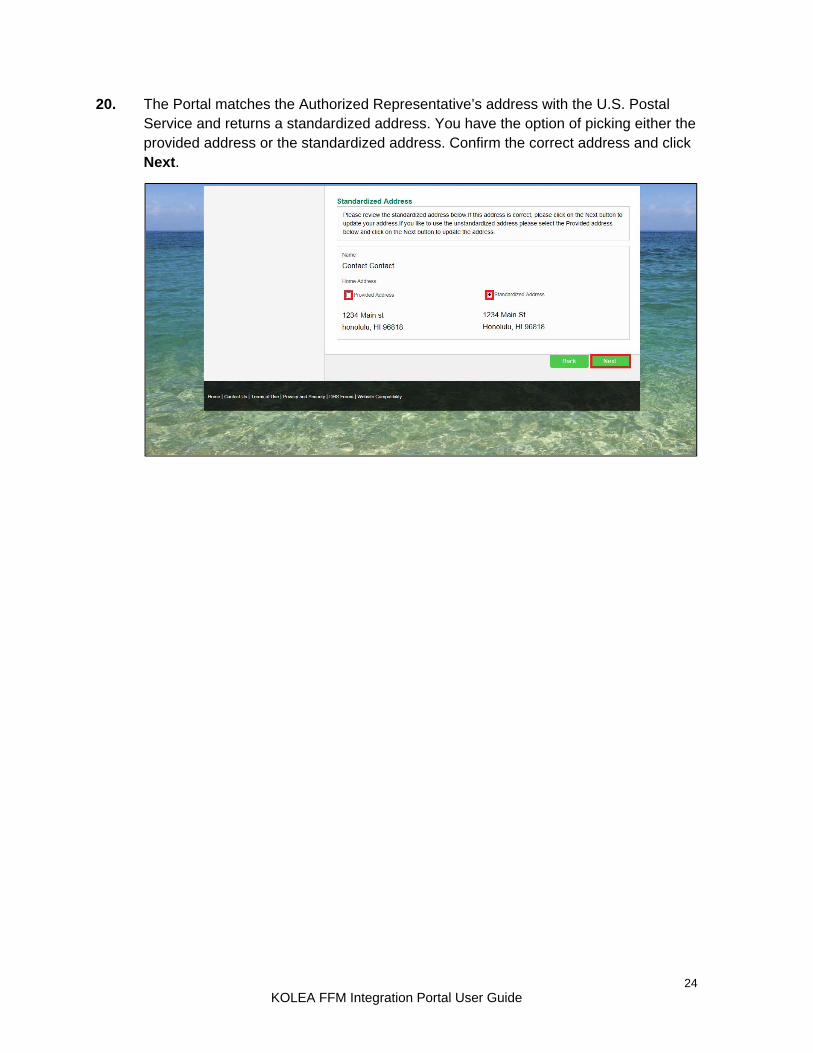
20. The Portal matches the Authorized Representative’s address with the U.S. Postal Service and returns a standardized address. You have the option of picking either the provided address or the standardized address. Confirm the correct address and click Next.
25 KOLEA FFM Integration Portal User Guide
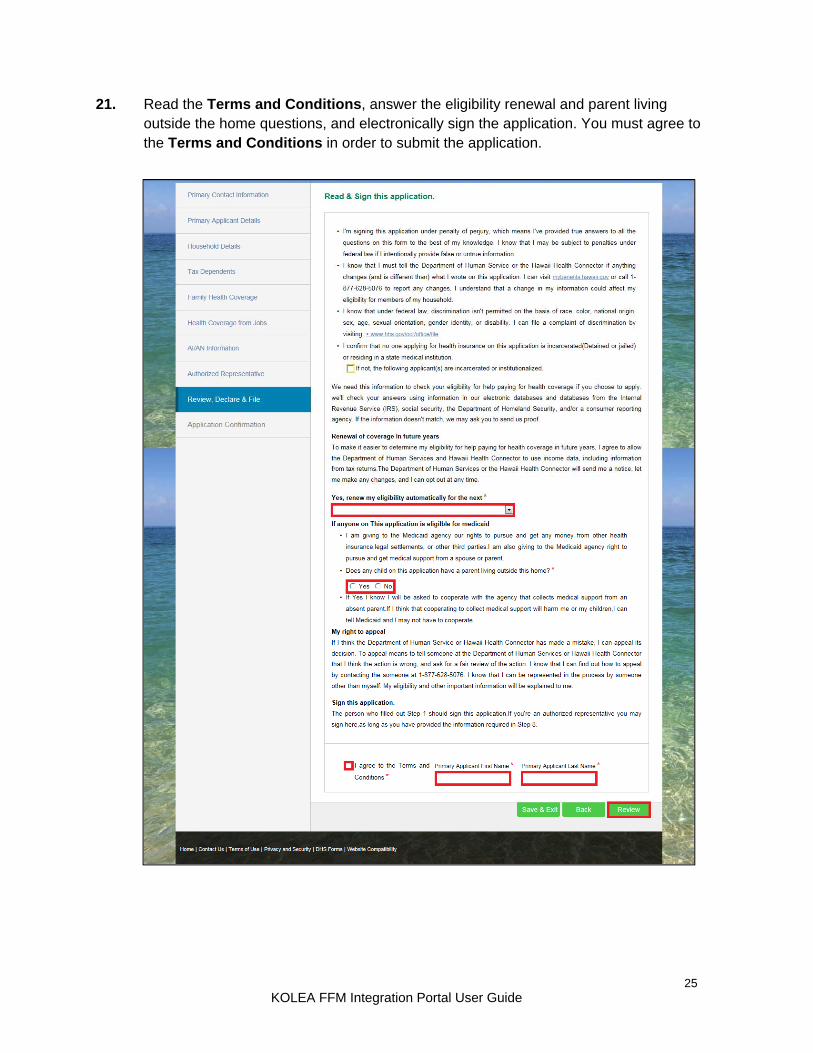
21. Read the Terms and Conditions, answer the eligibility renewal and parent living outside the home questions, and electronically sign the application. You must agree to the Terms and Conditions in order to submit the application.
26 KOLEA FFM Integration Portal User Guide
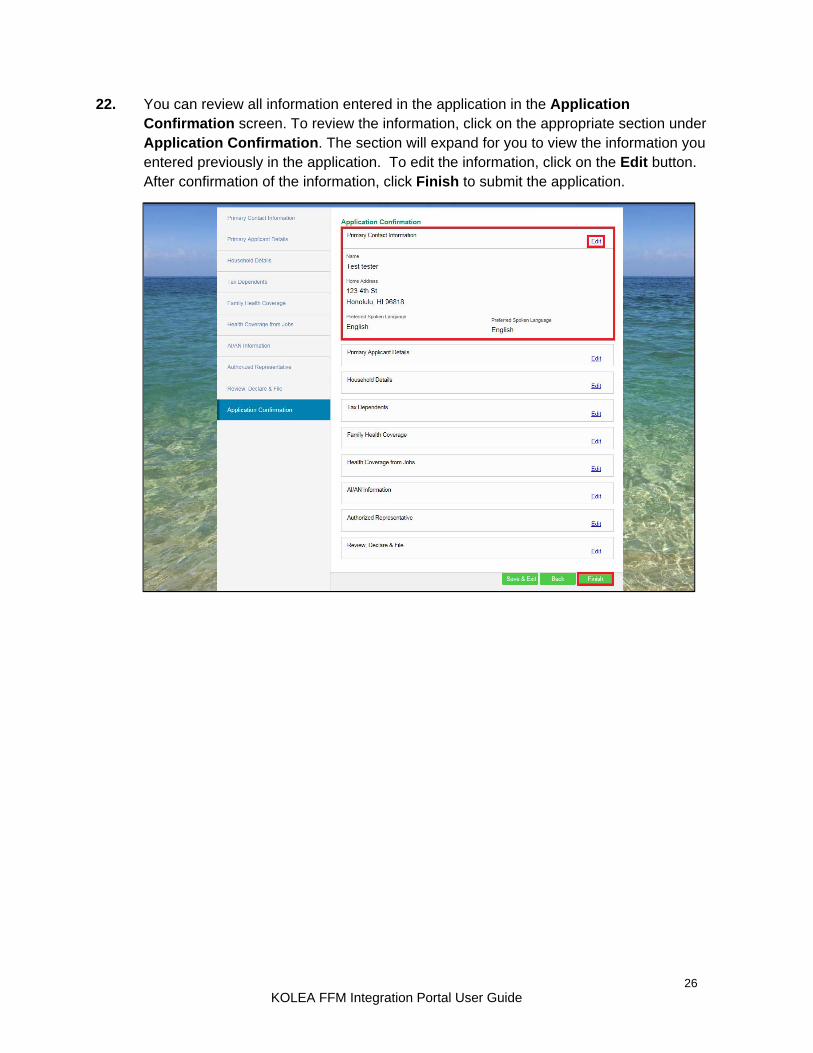
22. You can review all information entered in the application in the Application Confirmation screen. To review the information, click on the appropriate section under Application Confirmation. The section will expand for you to view the information you entered previously in the application. To edit the information, click on the Edit button. After confirmation of the information, click Finish to submit the application.
27 KOLEA FFM Integration Portal User Guide
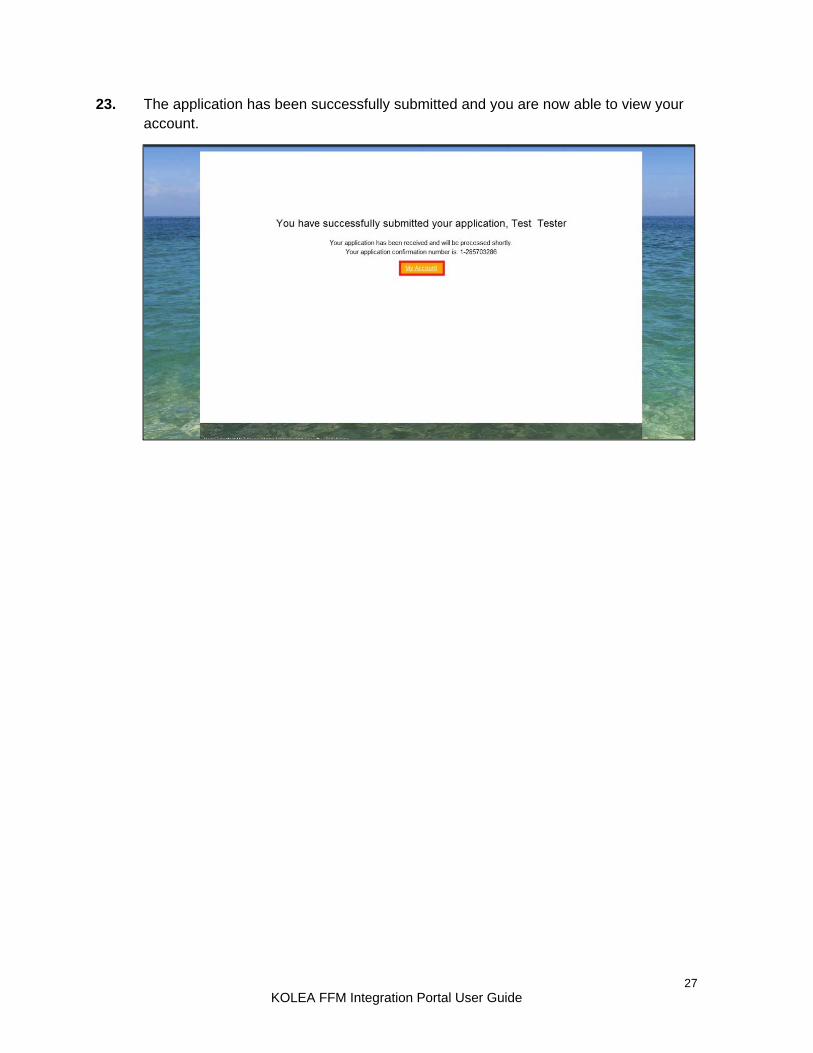
23. The application has been successfully submitted and you are now able to view your account.
28 KOLEA FFM Integration Portal User Guide
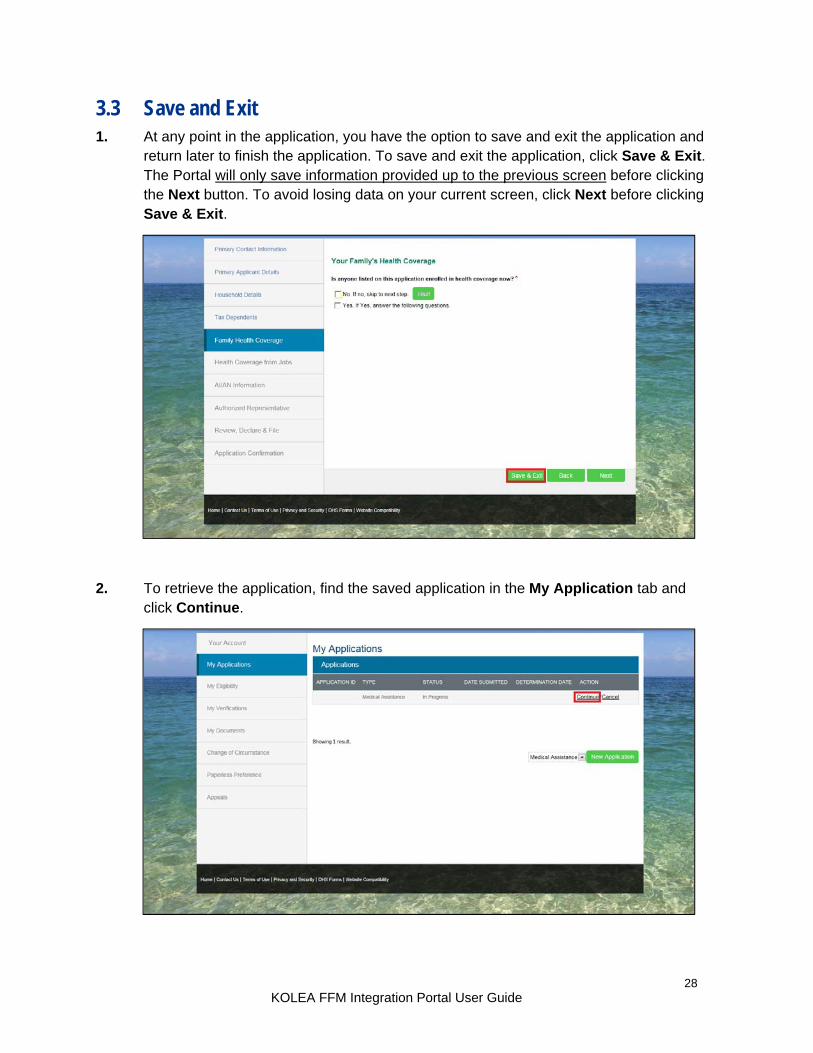
3.3 Save and Exit 1. At any point in the application, you have the option to save and exit the application and
return later to finish the application. To save and exit the application, click Save & Exit. The Portal will only save information provided up to the previous screen before clicking the Next button. To avoid losing data on your current screen, click Next before clicking Save & Exit.
2. To retrieve the application, find the saved application in the My Application tab and click Continue.
29 KOLEA FFM Integration Portal User Guide
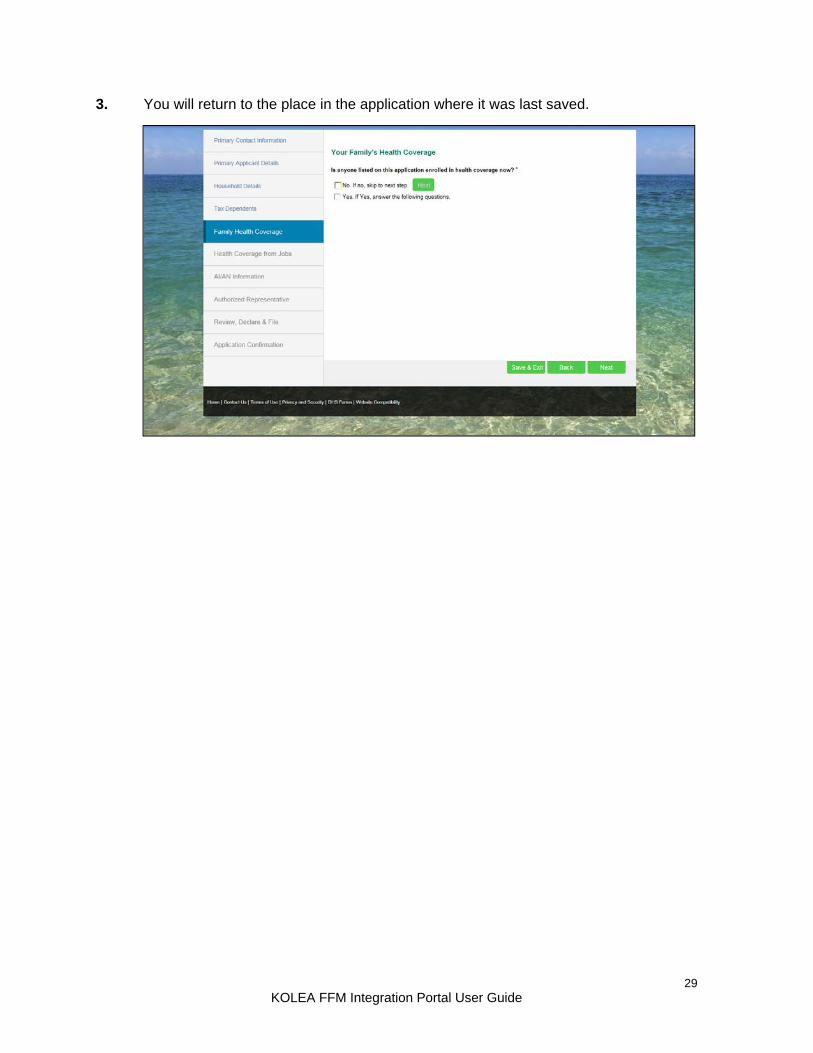
3. You will return to the place in the application where it was last saved.
30 KOLEA FFM Integration Portal User Guide
4. Account Management You are able to manage your account using the following tabs:
My Applications
My Eligibility
My Verifications
My Documents
Change of Circumstance
Paperless Preference
Appeals
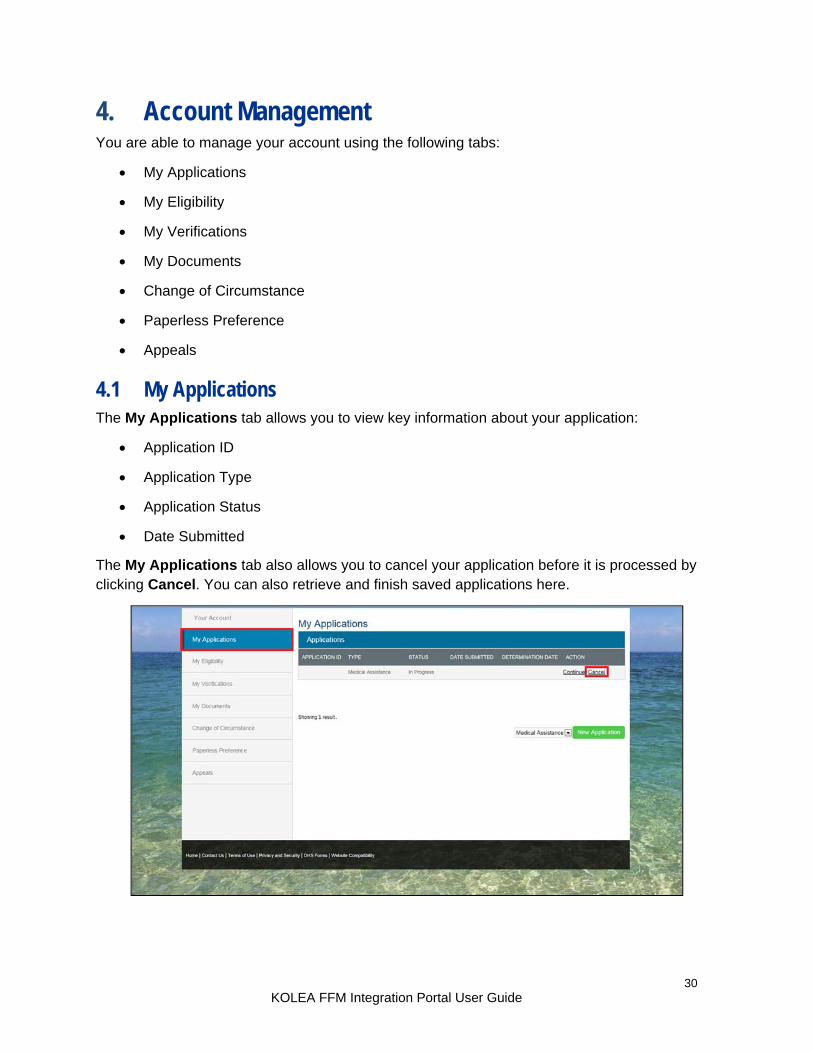
4.1 My Applications The My Applications tab allows you to view key information about your application:
Application ID
Application Type
Application Status
Date Submitted
The My Applications tab also allows you to cancel your application before it is processed by clicking Cancel. You can also retrieve and finish saved applications here.
31 KOLEA FFM Integration Portal User Guide
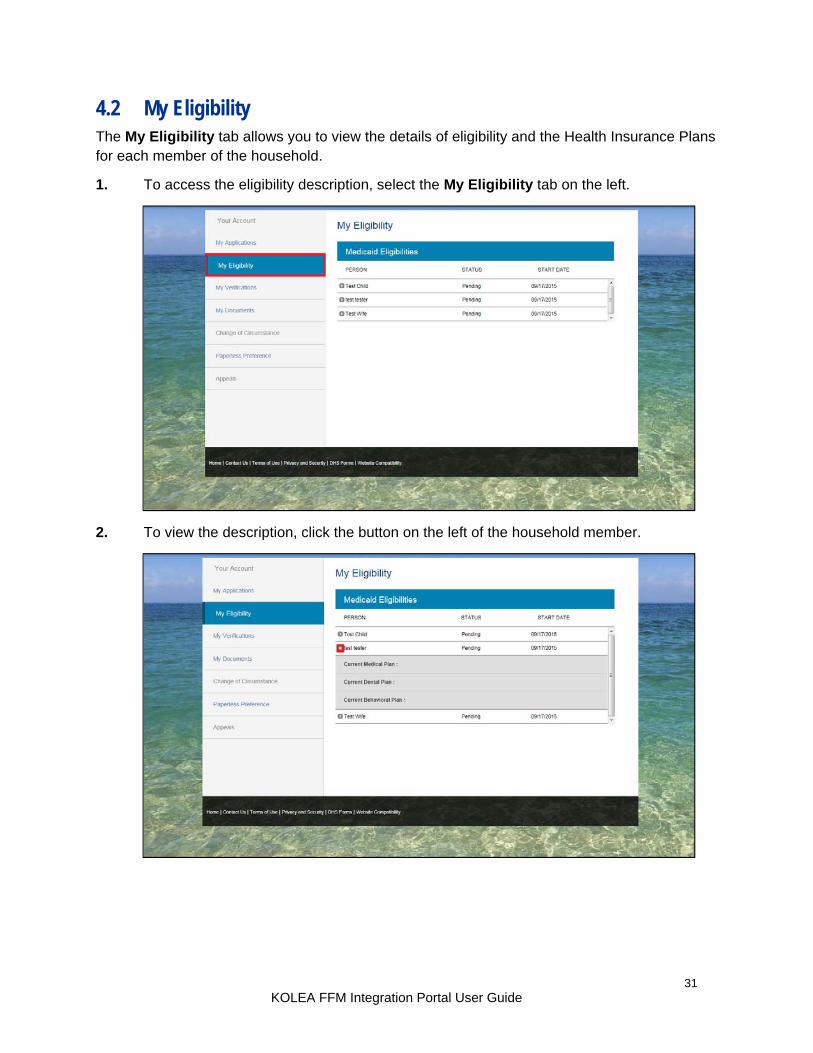
4.2 My Eligibility The My Eligibility tab allows you to view the details of eligibility and the Health Insurance Plans for each member of the household.
1. To access the eligibility description, select the My Eligibility tab on the left.
2. To view the description, click the button on the left of the household member.
32 KOLEA FFM Integration Portal User Guide
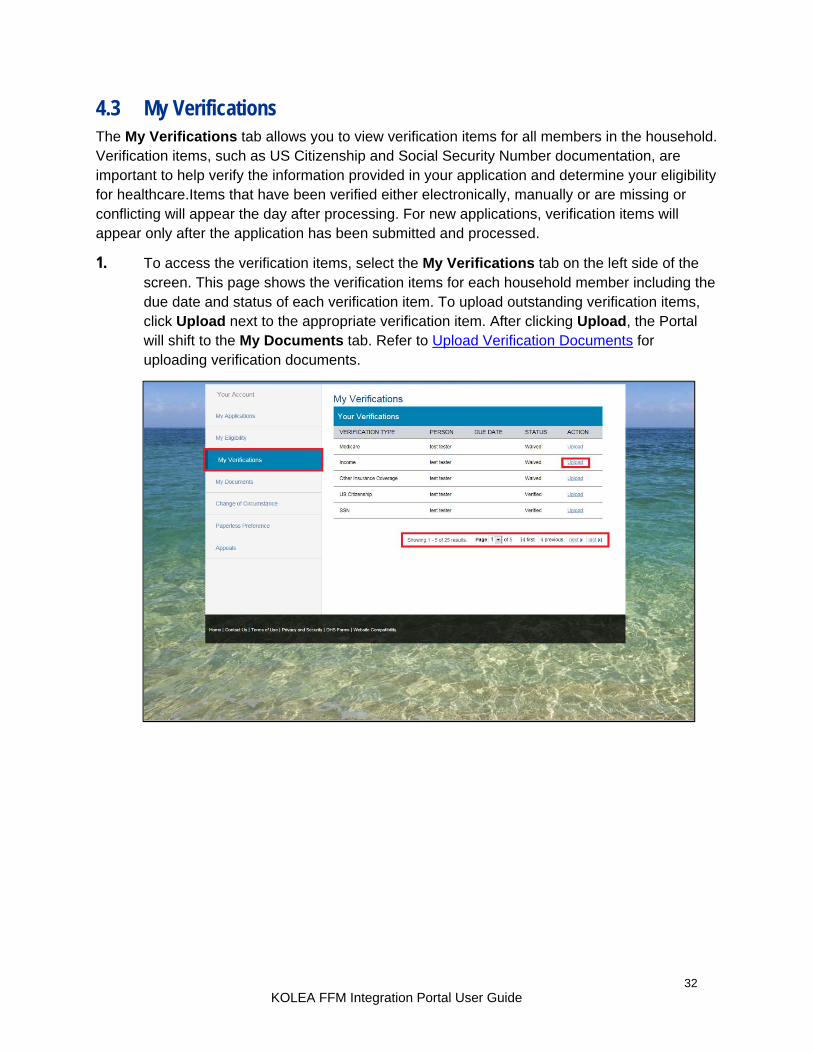
4.3 My Verifications The My Verifications tab allows you to view verification items for all members in the household. Verification items, such as US Citizenship and Social Security Number documentation, are important to help verify the information provided in your application and determine your eligibility for healthcare.Items that have been verified either electronically, manually or are missing or conflicting will appear the day after processing. For new applications, verification items will appear only after the application has been submitted and processed.
1. To access the verification items, select the My Verifications tab on the left side of the screen. This page shows the verification items for each household member including the due date and status of each verification item. To upload outstanding verification items, click Upload next to the appropriate verification item. After clicking Upload, the Portal will shift to the My Documents tab. Refer to Upload Verification Documents for uploading verification documents.
33 KOLEA FFM Integration Portal User Guide
2. You may view uploaded verification items in the My Documents tab. To view the uploaded documents, select Other Documents in the dropdown. You are able to see the documents that have been uploaded, but are not able to open the document.
34 KOLEA FFM Integration Portal User Guide
4.4 My Documents The My Documents tab allows you to view notices and upload documents such as verification items and forms. This process describes the steps for viewing notices and uploading forms and verification documents.
Note: Verification items are documents that help verify the information provided in your application. Forms are documents supplied by the Department of Human Services for you to provide additional information or make additional requests and applications.
4.4.1 Notices
Notices are sent to communicate eligibility related information to you once you apply for healthcare. Notices are created for purposes that include requests for additional information, communication of eligibility, and other informational purposes. Examples include the N01 – Request for Additional Information notice, which asks you to provide additional information to support your application, and the N03 – Eligibility Determination notice, which informs you of your healthcare eligibility.
1. You are able to view notices in the My Documents tab. To view a notice, click on the My Documents tab on the left side of the screen. Select Notices as the document type in the dropdown. To open the notice, select View next the appropriate notice.
35 KOLEA FFM Integration Portal User Guide
2. From here, you can view the notice and have the option to save or print the document.
36 KOLEA FFM Integration Portal User Guide
4.4.2 Upload Verification Document
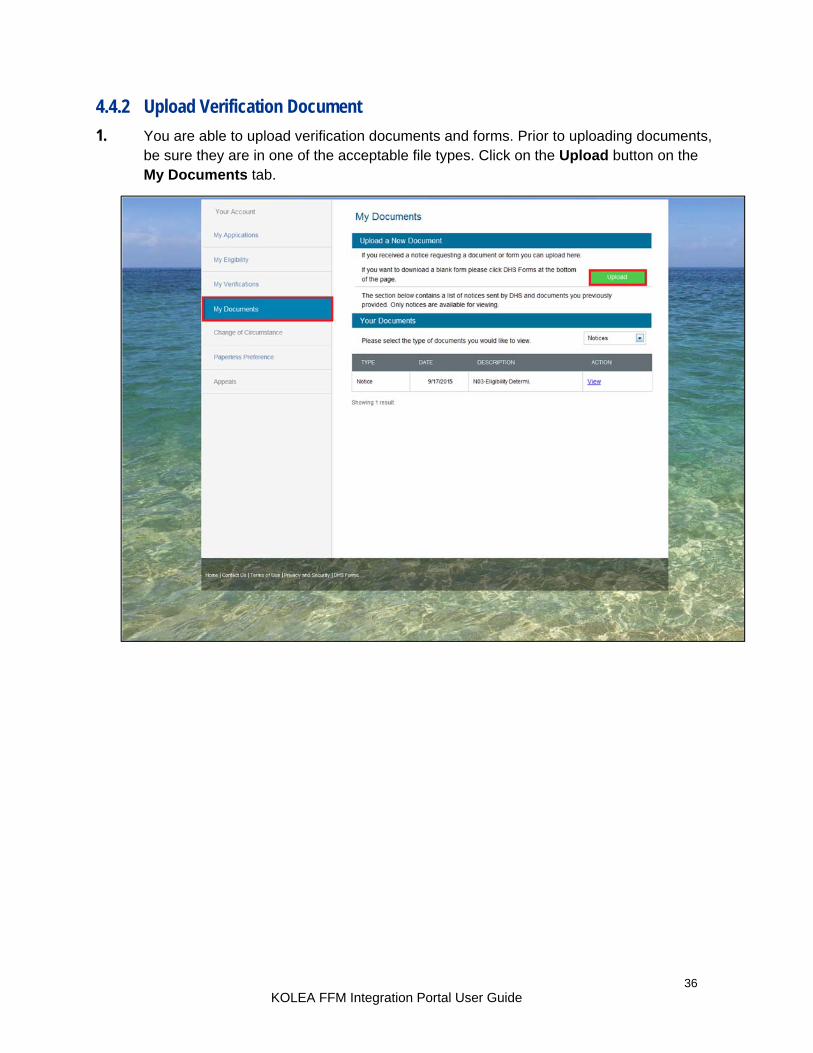
1. You are able to upload verification documents and forms. Prior to uploading documents, be sure they are in one of the acceptable file types. Click on the Upload button on the My Documents tab.
37 KOLEA FFM Integration Portal User Guide
2. Select the appropriate file type. Select the type of verification document that will be uploaded. Select the household member that the verification document applies. If the document applies to more than one household member, select Yes and specify the additional information.
Note: Valid file types for documents include .tiff, .tif, .jpeg, .jpg & .pdf.
38 KOLEA FFM Integration Portal User Guide
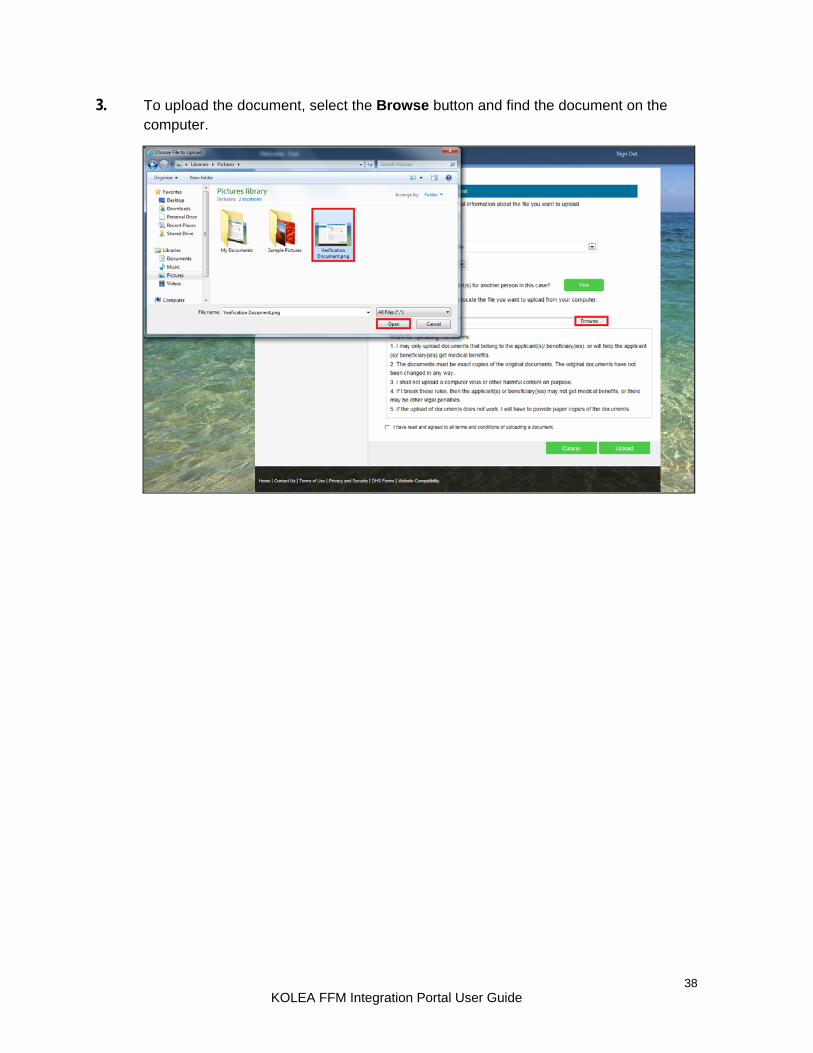
3. To upload the document, select the Browse button and find the document on the computer.
39 KOLEA FFM Integration Portal User Guide
4. To complete the upload, read the Rules for Uploading Documents, click the confirmation of terms and conditions, and click Upload. If you make a mistake and want to re-do or cancel the upload, click the Cancel button.
40 KOLEA FFM Integration Portal User Guide
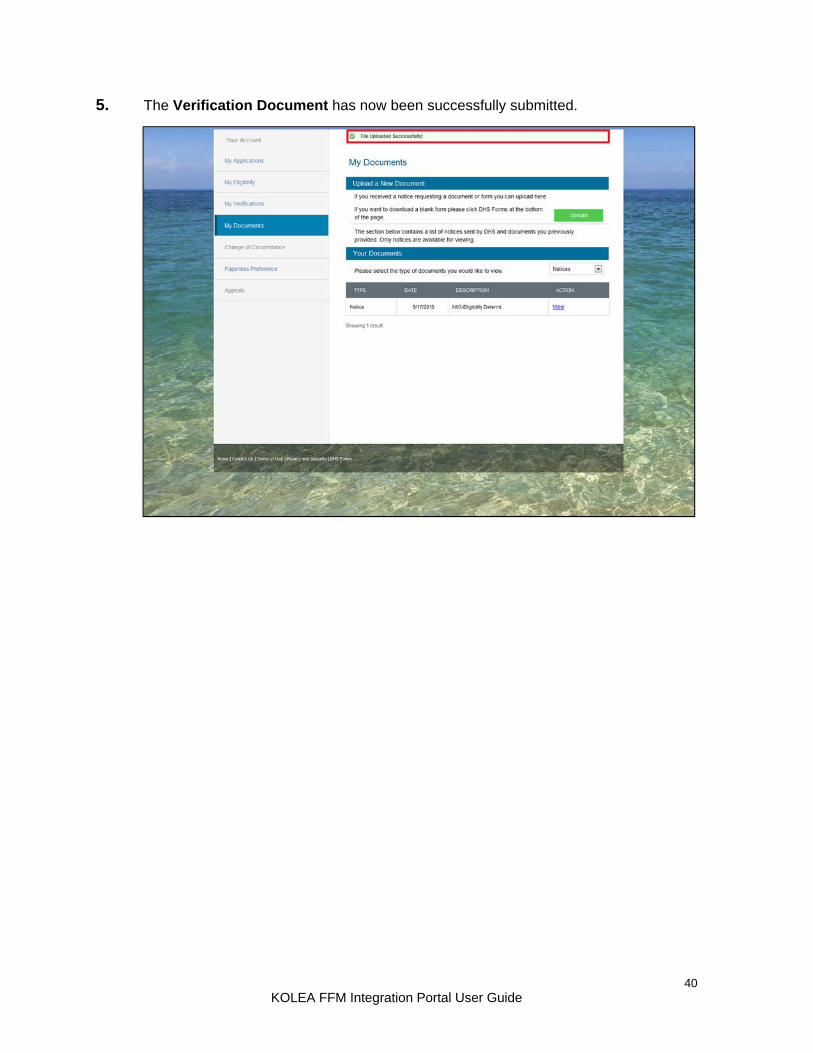
5. The Verification Document has now been successfully submitted.
41 KOLEA FFM Integration Portal User Guide
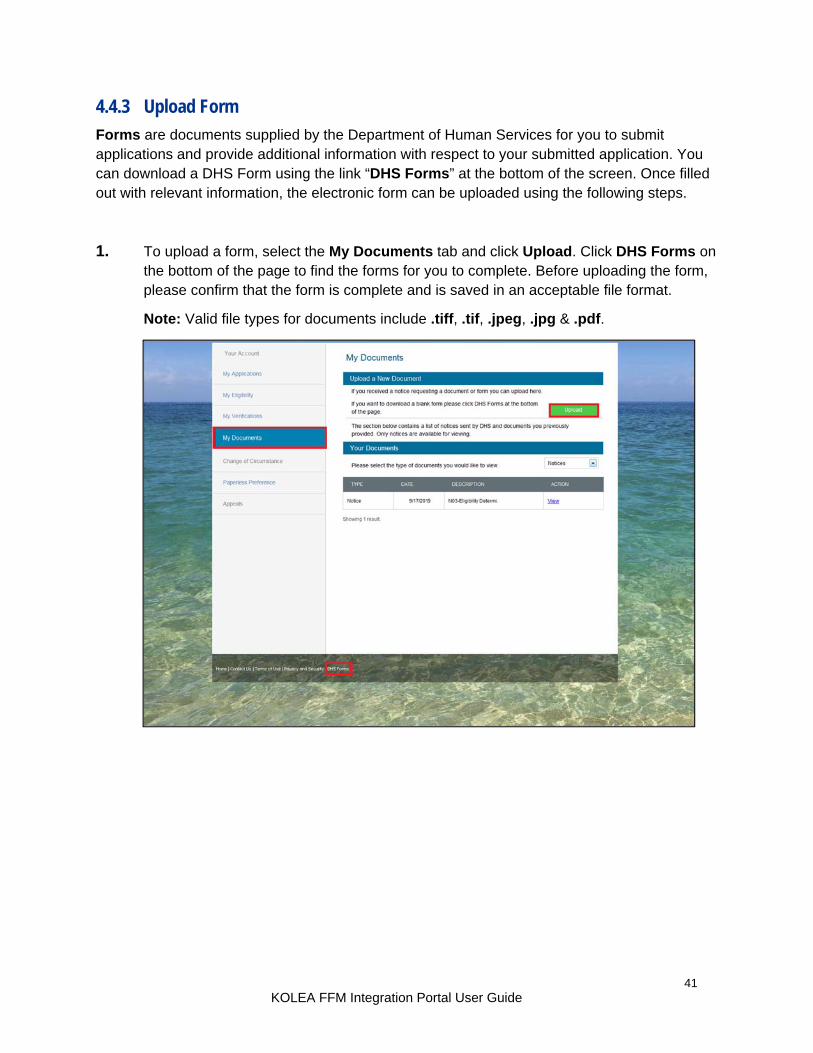
4.4.3 Upload Form
Forms are documents supplied by the Department of Human Services for you to submit applications and provide additional information with respect to your submitted application. You can download a DHS Form using the link “DHS Forms” at the bottom of the screen. Once filled out with relevant information, the electronic form can be uploaded using the following steps.
1. To upload a form, select the My Documents tab and click Upload. Click DHS Forms on the bottom of the page to find the forms for you to complete. Before uploading the form, please confirm that the form is complete and is saved in an acceptable file format.
Note: Valid file types for documents include .tiff, .tif, .jpeg, .jpg & .pdf.
42 KOLEA FFM Integration Portal User Guide
2. Select the document type in the dropdown, then select the type of document to be uploaded.
3. Follow the steps in Upload Verification Document to complete the upload.
43 KOLEA FFM Integration Portal User Guide
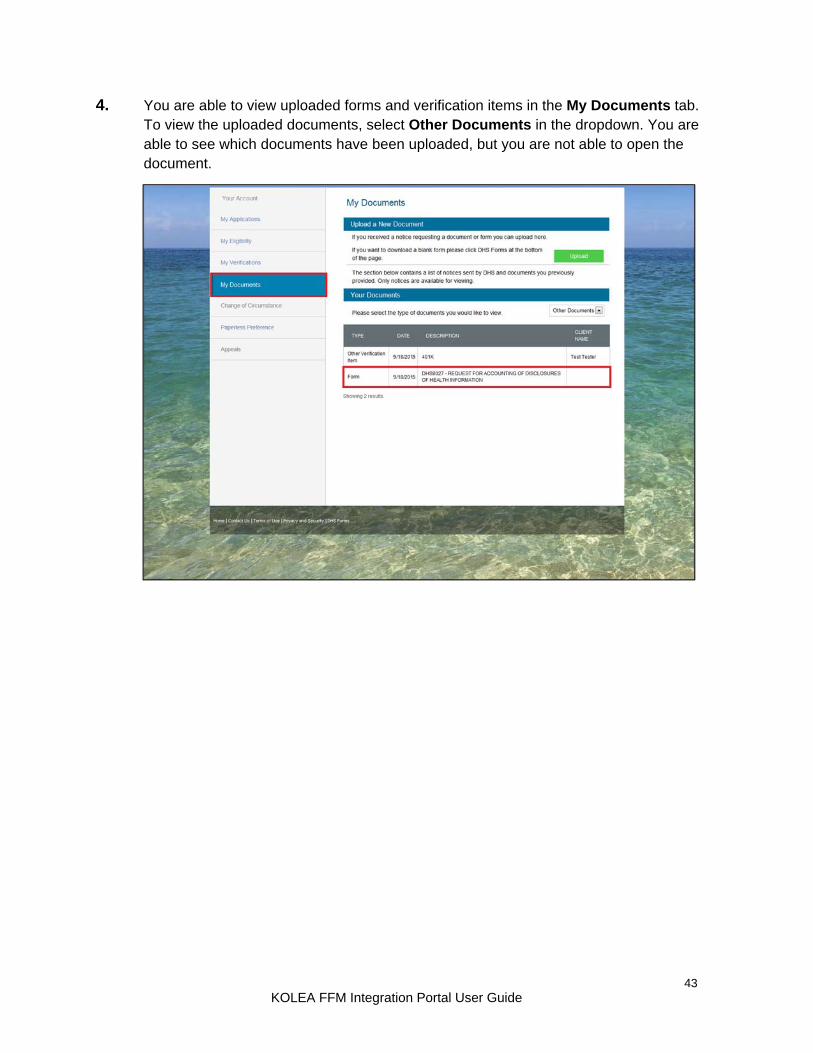
4. You are able to view uploaded forms and verification items in the My Documents tab. To view the uploaded documents, select Other Documents in the dropdown. You are able to see which documents have been uploaded, but you are not able to open the document.
44 KOLEA FFM Integration Portal User Guide
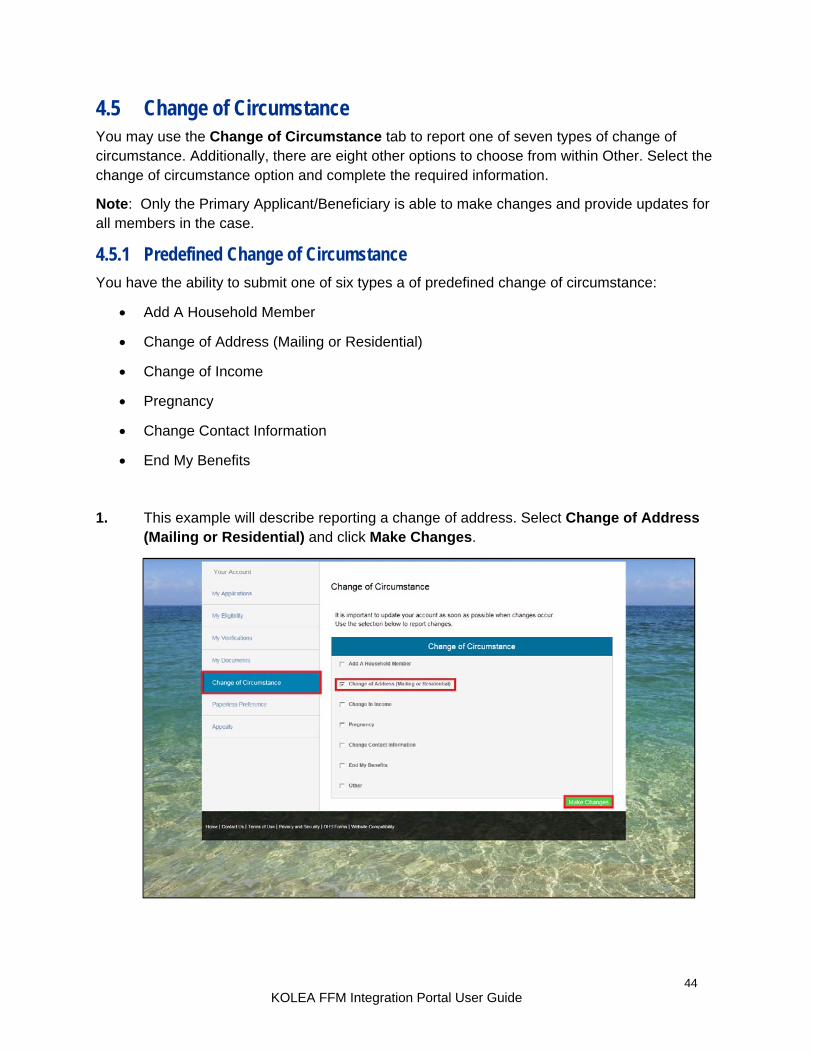
4.5 Change of Circumstance You may use the Change of Circumstance tab to report one of seven types of change of circumstance. Additionally, there are eight other options to choose from within Other. Select the change of circumstance option and complete the required information.
Note: Only the Primary Applicant/Beneficiary is able to make changes and provide updates for all members in the case.
4.5.1 Predefined Change of Circumstance
You have the ability to submit one of six types a of predefined change of circumstance:
Add A Household Member Change of Address (Mailing or Residential) Change of Income Pregnancy Change Contact Information End My Benefits
1. This example will describe reporting a change of address. Select Change of Address (Mailing or Residential) and click Make Changes.
45 KOLEA FFM Integration Portal User Guide
2. Select the appropriate Household Member for the change of circumstance and click Edit.
3. Enter the necessary information and click Next.
46 KOLEA FFM Integration Portal User Guide
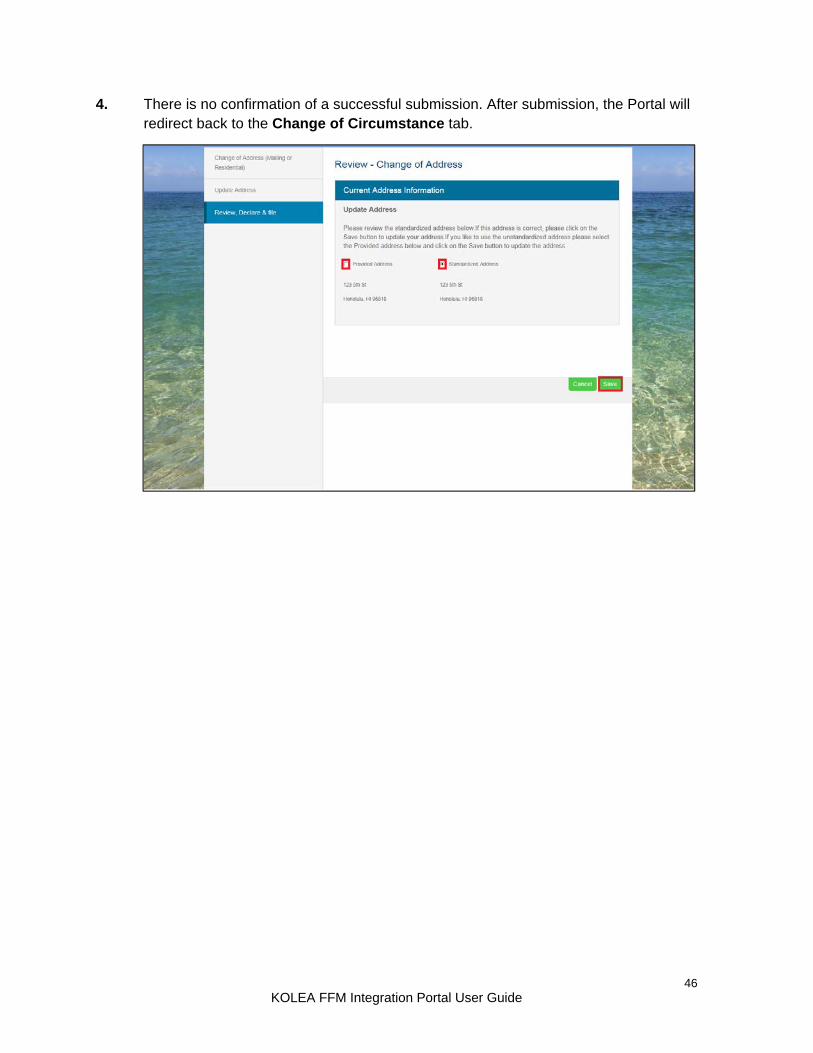
4. There is no confirmation of a successful submission. After submission, the Portal will redirect back to the Change of Circumstance tab.
47 KOLEA FFM Integration Portal User Guide
4.5.2 Other Change of Circumstance
You have the option to submit a change of circumstance that is not included in the predefined list. The Other options include reporting:
Absent Parent
Authorized Rep
Death
Disability
Expenses
Incarceration
Remove a Household Member
Other
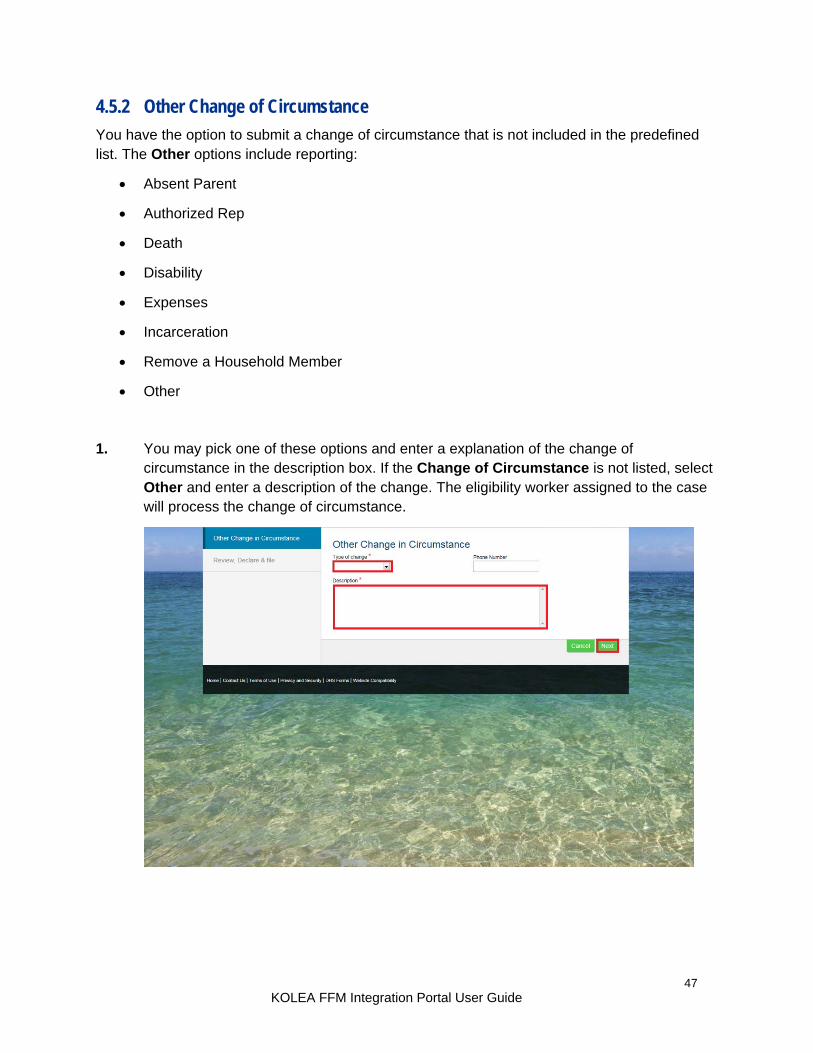
1. You may pick one of these options and enter a explanation of the change of circumstance in the description box. If the Change of Circumstance is not listed, select Other and enter a description of the change. The eligibility worker assigned to the case will process the change of circumstance.
48 KOLEA FFM Integration Portal User Guide
4.6 Paperless Preference You have the option to enroll your account in a Paperless Preference. By choosing this option, you will receive your documents and certain notices electronically, and you will no longer receive paper documents in the mail. Select the Paperless Preference option and follow the available links.
1. To change your enrollment preference or update your email address, click the here link.
49 KOLEA FFM Integration Portal User Guide
2. Select Yes and fill out the required fields. Click Submit.
3. View the confirmation and click My Applications to return to view your applications.
50 KOLEA FFM Integration Portal User Guide
4.7 Appeals You may use the Appeals tab to request an appeal if you think an eligibility determination has been applied incorrectly.
1. To request an appeal, click on the Appeals tab on the left side of the screen.
2. Enter your contact information and a description of why you think your appeal should be accepted.
51 KOLEA FFM Integration Portal User Guide
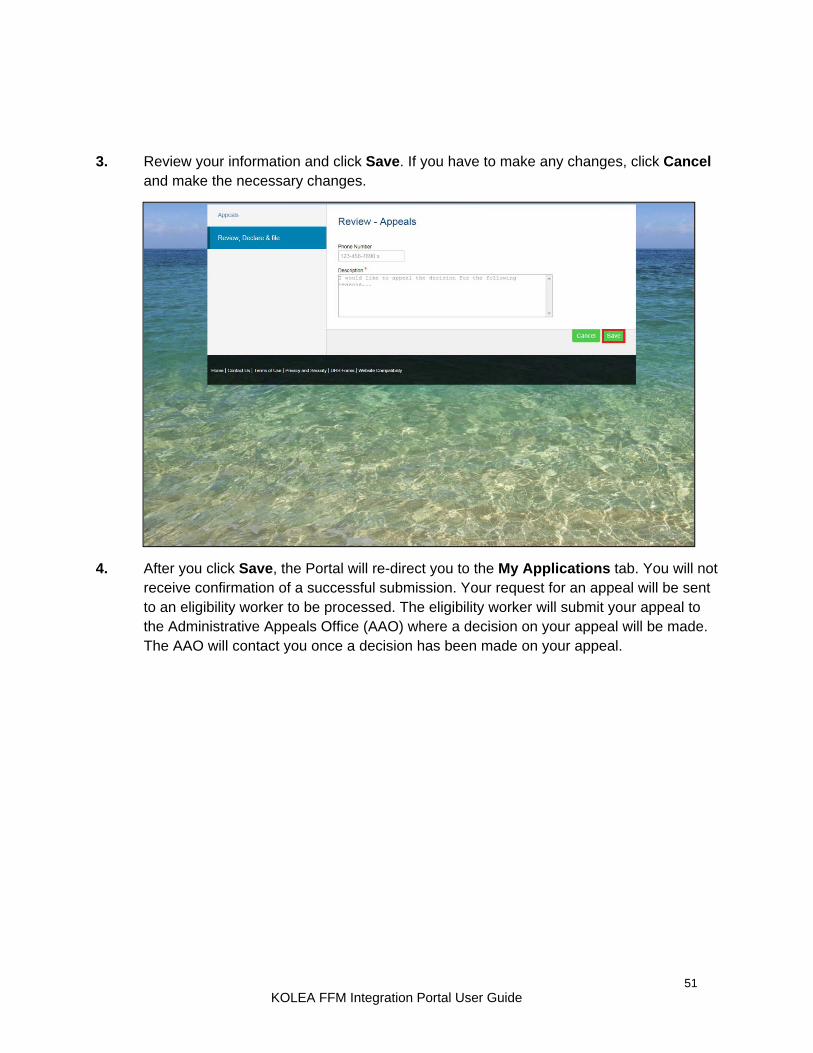
3. Review your information and click Save. If you have to make any changes, click Cancel and make the necessary changes.
4. After you click Save, the Portal will re-direct you to the My Applications tab. You will not receive confirmation of a successful submission. Your request for an appeal will be sent to an eligibility worker to be processed. The eligibility worker will submit your appeal to the Administrative Appeals Office (AAO) where a decision on your appeal will be made. The AAO will contact you once a decision has been made on your appeal.
52 KOLEA FFM Integration Portal User Guide
5. Contact Us 1. To contact us with questions about your eligibility, click on the Contact Us hyperlink at
the bottom of the page. You can find the address and phone number for the office in your area here. You can submit paper applications at these locations.


![LONGHORN PRICELIST - mainstream.co.ke · Pepea Na Kipepeo Utamu Kolea Series Usena Series ... [Kimeidhinishwa] Pamela M Ngugi 165.00 9966 36 222 3 Mgeni [Kimeidhinishwa] Prof Kitula](https://static.documents.pub/doc/80x56/5ae092887f8b9ad66b8e5472/longhorn-pricelist-na-kipepeo-utamu-kolea-series-usena-series-kimeidhinishwa.jpg)


