32
Keenan & Associates – Client Use Only 1 claimsonline Training Guide – September 2008 V1 TRAINING GUIDE

Keenan & Associates – Client Use Only 1 claimsonline Training Guide – September 2008 V1
TRAINING GUIDE

Keenan & Associates – Client Use Only 2 claimsonline Training Guide – September 2008 V1
claimsonline System Requirements:
Internet Explorer 5.0 or above
• You can download the latest version of Internet Explorer for free at www.microsoft.com.
Display Settings
• For proper viewing of forms and tables we recommend display settings of 800 x 600 or greater.
To Print/View Forms
• You can download the latest version of Adobe Acrobat Reader for free at www.adobe.com.
Helpful Hints
• Do not use all capital letters • When exiting the site, please click on "Logout" in the upper left corner • Enter Social Security numbers and phone numbers with no punctuation • Enter all required time fields in 24 hour clock time format
• Do not use commas when entering monetary fields
• Leave fields blank if you are not sure what to enter – i.e. - do not use “Unknown” or “Unk.”

Keenan & Associates – Client Use Only 3 claimsonline Training Guide – September 2008 V1
Logging into claimsonline:
Step 1:
To access claimsonline, go to the Keenan & Associates website at www.keenan.com. Choose/click on “Client Login”.
Step 2: From the Online Applications menu, choose/click on the “Ultra ClaimsOnline” selection.

Keenan & Associates – Client Use Only 4 claimsonline Training Guide – September 2008 V1
Step 3: In order to access the system, choose/click on “Login” or “simply login” link.
claimsonline Home Screen

Keenan & Associates – Client Use Only 5 claimsonline Training Guide – September 2008 V1
Modifying Your Password
Step 1: In order to modify your password, choose/click on your User ID name in the right hand corner.
Step 2: Enter your new password information and click on “Save”. Please note that your e-mail address is your sign-on ID. If you need to make changes to this information, please contact the WC Service Desk.

Keenan & Associates – Client Use Only 6 claimsonline Training Guide – September 2008 V1
Reporting a Claim An important new feature/enhancement introduced in July 2008 is the ability to save your data entry on a 5020 form before the form is completed or transmitted to Keenan. If you are interrupted during the completion of the form or require additional information/time to complete it, you can now save your data and return to the form at a later time. Please note that saving your completed 5020 form is not the final step in the claims reporting process. You must choose the “Notify Keenan of Claim” option in order to transmit the claim data to Keenan.
Step 1: Choose/click on “>> Report a Claim”

Keenan & Associates – Client Use Only 7 claimsonline Training Guide – September 2008 V1
Step 2: Enter “Date of Injury” – be sure to enter the date in the format indicated (mm/dd/yy) then click on “Continue”.
Step 3: You have the option to choose from your existing employee data table or add the employee’s information in the system for the new claim. Once you have entered an employee’s information in the data table it will remain in the system for future reference/use.

Keenan & Associates – Client Use Only 8 claimsonline Training Guide – September 2008 V1
Step 4: Add the employee information in the system for automatic population into the 5020 Form. When you have completed the form, be sure to click on “Save”.
Be sure to enter data in the correct format as shown in the examples (in red) associated with Social Security, Birth Date, Hire Date, and Gross Salary.
If you choose an existing employee from the database, please be sure to check that the employee’s data is current when you are entering information on the 5020 Form. You can do this by clicking on the “Edit” option under the Employee section of the 5020 Form.

Keenan & Associates – Client Use Only 9 claimsonline Training Guide – September 2008 V1
Step 4 (continued) Once you click on “Edit”, you will be taken to the Employee’s information record for review and modification as needed. Once your have confirmed that the data is accurate, click on “Save”.
Step 5: Once the employee has been chosen or the employee data has been entered and saved, you will be ready to complete the 5020 Form. When data has been entered, click on “Save” to create your 5020 Form record.
Note: Saving the 5020 Form creates a Report ID #, but does not automatically report the data to Keenan & Associates. Be sure to enter data in the correct format as shown in the examples at the top of the 5020 Form (date fields and time fields).

Keenan & Associates – Client Use Only 10 claimsonline Training Guide – September 2008 V1
Step 5 (continued)
Please note that while completing the 5020 Form, you are able to “Edit/Add” the Physician and Hospital information at the time of entry. See page 27 for additional information on these sections.

Keenan & Associates – Client Use Only 11 claimsonline Training Guide – September 2008 V1
Step 6: The Confidential Claim Comment section can be used to communicate confidential claim information for the claims examiner that will not be a part of the 5020 Form. This information must be entered prior to notifying Keenan of the claim. This is a one time feed to Keenan, and any additional comments entered after the initial notification will not be transmitted to Keenan. Add information under this section by clicking on “Add Confidential Claim Comment”. Click “Save” to complete your entry. Please note that documentation can not be deleted or modified once the information has been saved to the Report ID record.
Keenan & Associates – Client Use Only 12 claimsonline Training Guide – September 2008 V1
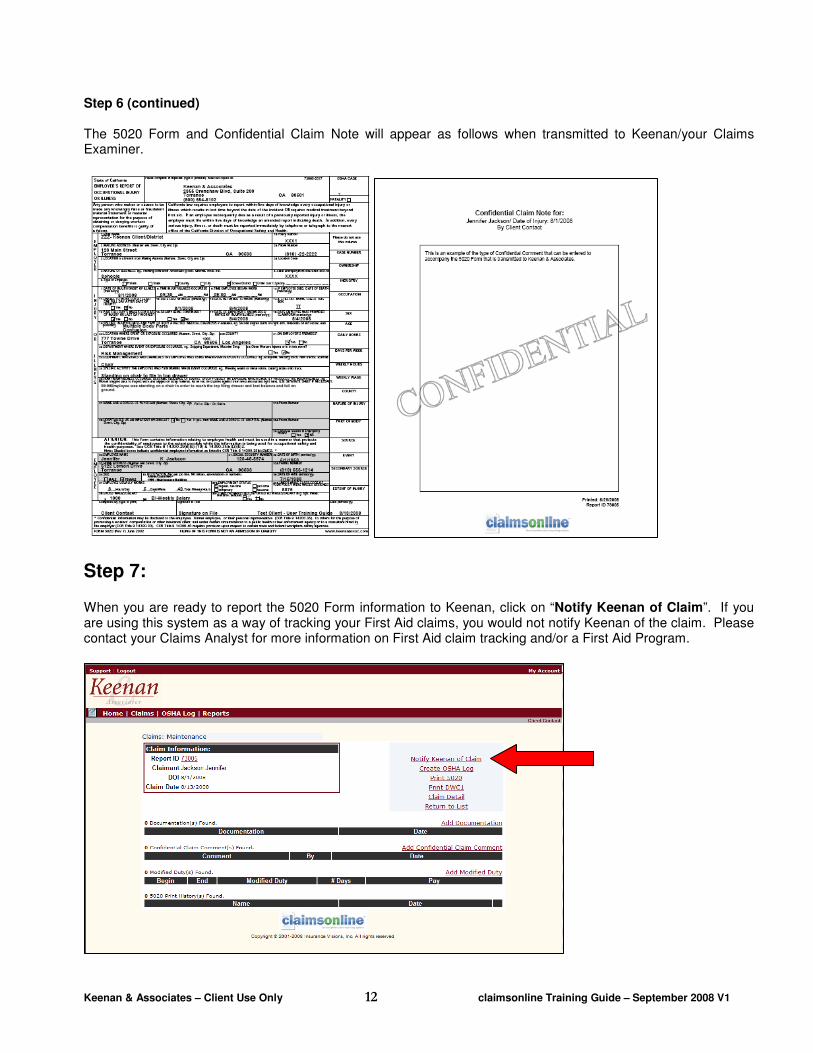
Step 6 (continued) The 5020 Form and Confidential Claim Note will appear as follows when transmitted to Keenan/your Claims Examiner.
Step 7: When you are ready to report the 5020 Form information to Keenan, click on “Notify Keenan of Claim”. If you are using this system as a way of tracking your First Aid claims, you would not notify Keenan of the claim. Please contact your Claims Analyst for more information on First Aid claim tracking and/or a First Aid Program.

Keenan & Associates – Client Use Only 13 claimsonline Training Guide – September 2008 V1
Step 7 (continued) Be sure to click on “Yes” to confirm your notification to Keenan.
If you have not completed a required field or data has been incorrectly entered, you will be notified of this prior to the data being transmitted to Keenan. You must complete/correct all fields before the claim can be transmitted.

Keenan & Associates – Client Use Only 14 claimsonline Training Guide – September 2008 V1
Step 7 (continued) To return to the 5020 Form to complete/correct the required data noted in the error box, click on the “Report ID” link. Once the data has been entered/corrected, “Save” the form and click on “Notify Keenan of Claim” to complete the reporting process.
When you have notified Keenan of the claim, a date and time will appear below the Report ID # for your reference. In addition, the “Notify Keenan of Claim” option will no longer be available.

Keenan & Associates – Client Use Only 15 claimsonline Training Guide – September 2008 V1
OSHA Log This is a feature that can be used to assist with the tracking of OSHA recordable claims. Please note that this information is not reviewed by, transmitted to, or maintained by Keenan. For information on OSHA Logs, recordable claims vs. reportable claims, or OSHA posting/reporting requirements, please contact your Claims Analyst.
Step 1: Before using the OSHA Log feature, be sure to have your OSHA Assignment Codes set-up under My Account. Go to “My Account” and then click on “OSHA Assignment Codes”.

Keenan & Associates – Client Use Only 16 claimsonline Training Guide – September 2008 V1
Step 2: To edit an existing OSHA Assignment Code, click on the Code Number or Description, edit the existing information, and then click “Save”. To add an OSHA Assignment Code, click on “Add OSHA Assignment Code”, enter the code information/description, and then click on “Save”. To return to the “My Account” main screen, click on “My Account”.
Step 3: To create an OSHA Log record for a reported claim, go to the Claims screen and choose the Report ID number in question. When the claim Report ID information is on the screen, click on “Create OSHA Log”.

Keenan & Associates – Client Use Only 17 claimsonline Training Guide – September 2008 V1
Step 3 (continued)

Keenan & Associates – Client Use Only 18 claimsonline Training Guide – September 2008 V1
Step 4: Select the appropriate OSHA Assignment Code from the drop down menu and click on “Continue”. You will then be taken to the claim maintenance screen to review/edit your OSHA Log entry.

Keenan & Associates – Client Use Only 19 claimsonline Training Guide – September 2008 V1
Step 5: To review/edit your OSHA Log entry, click on the OSHA Case Number. Review/edit your OSHA Log entry as needed. Be sure to click on “Save” when you have completed your OSHA Log entry. Please note that you can delete an OSHA Log entry from the system; however the log number issued to the deleted entry will not be reassigned/reused during the calendar year. When needed, there is a Privacy Case option that may used to mark a specific OSHA Log entry as private.

Keenan & Associates – Client Use Only 20 claimsonline Training Guide – September 2008 V1
Additional Benefits and Features
Documentation Section – This section can be used to enter claim information and notes as applicable
during the lifetime of the claim. This section is not viewed by, reported to, or maintained by Keenan. Add information under this section by clicking on “Add Documentation”. Click “Save” to complete your entry. Please note that documentation can not be deleted or modified once the information has been saved to the Report ID record.

Keenan & Associates – Client Use Only 21 claimsonline Training Guide – September 2008 V1
Modified Duty – This section can be used to track Modified Duty information during the lifetime of the
claim. This section is not viewed by, reported to, or maintained by Keenan. Add information under this section by clicking on “Add Modified Duty”. Click “Save” to complete your entry. Data entered in this Section does not affect the OSHA information entered for a reportable claim.
Printing the 5020 Form You have the ability to print the 5020 Form by selecting “Print 5020” from the claims maintenance screen.

Keenan & Associates – Client Use Only 22 claimsonline Training Guide – September 2008 V1
Printing a DWC-1 Form You have the ability to print out a DWC-1/Claim Form. The law requires the DWC-1/Claim Form be provided within one working day of receiving notice or knowledge of an injury when the injury results in lost time beyond the employee’s work shift or medical treatment beyond First Aid. For additional information regarding these timeframes, please contact your Claims Analyst.

Keenan & Associates – Client Use Only 23 claimsonline Training Guide – September 2008 V1
Printing an OSHA Log You have the ability to print an OSHA Log by clicking on the OSHA Log selection at the top of the claims maintenance screen.
Select the appropriate year then click on “Print OSHA Log”.

Keenan & Associates – Client Use Only 24 claimsonline Training Guide – September 2008 V1
Printing an OSHA Log (continued) You can print the OSHA Log by a specific Assignment Code or choose all Codes then click on “Print OSHA Log”. Follow the screen instructions for printing, and then click on “Return” to return to the previous page or “Home” to return to the main menu.

Keenan & Associates – Client Use Only 25 claimsonline Training Guide – September 2008 V1
What’s Under “My Account”
My Account Main Screen

Keenan & Associates – Client Use Only 26 claimsonline Training Guide – September 2008 V1
The My Account section of the system allows you to view Data Tables for your account. Several of the tables are edited and maintained by the Client and others are populated at the time of account set-up by Keenan. A review of these Data Tables is as follows:
Employees - To view the employees you have on file in the database, click on “Employees”.
To review/edit an existing employee’s information, click on the employee’s last name, make the appropriate changes as needed, and then click “Save”. To add an employee, click on “Add Employee”, entered the employee’s information in the appropriate fields and click on “Save”. To search for a specific employee in the database, click on the “Search” link, then enter the employee’s last name or employee number, and click on “Search” to see your results. To return to the My Account main screen, click on “My Account”.

Keenan & Associates – Client Use Only 27 claimsonline Training Guide – September 2008 V1
Departments - To view the Departments you have on file in the database, click on “Departments”. Please
note that this Data Table is populated at the time of account set-up. If you want to change or add to the existing information, please contact your Claims Analyst for assistance. To return to the My Account main screen, click on “My Account”.
Keenan & Associates – Client Use Only 28 claimsonline Training Guide – September 2008 V1
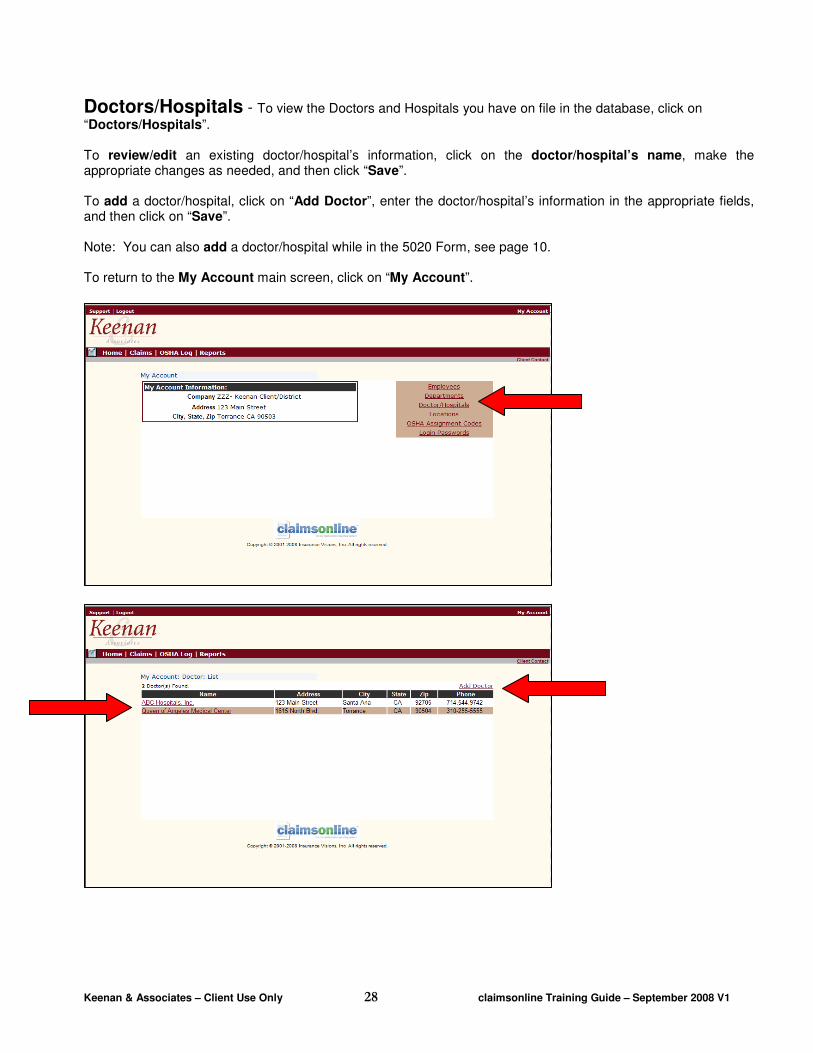
Doctors/Hospitals - To view the Doctors and Hospitals you have on file in the database, click on
“Doctors/Hospitals”. To review/edit an existing doctor/hospital’s information, click on the doctor/hospital’s name, make the appropriate changes as needed, and then click “Save”. To add a doctor/hospital, click on “Add Doctor”, enter the doctor/hospital’s information in the appropriate fields, and then click on “Save”. Note: You can also add a doctor/hospital while in the 5020 Form, see page 10. To return to the My Account main screen, click on “My Account”.

Keenan & Associates – Client Use Only 29 claimsonline Training Guide – September 2008 V1
Locations - To view the Locations you have on file in the database, click on “Locations”. Please note that
this Data Table is populated at the time of account set-up. If you want to change or add to the existing information, please contact your Claims Analyst for assistance. To return to the My Account main screen, click on “My Account”.
Keenan & Associates – Client Use Only 30 claimsonline Training Guide – September 2008 V1
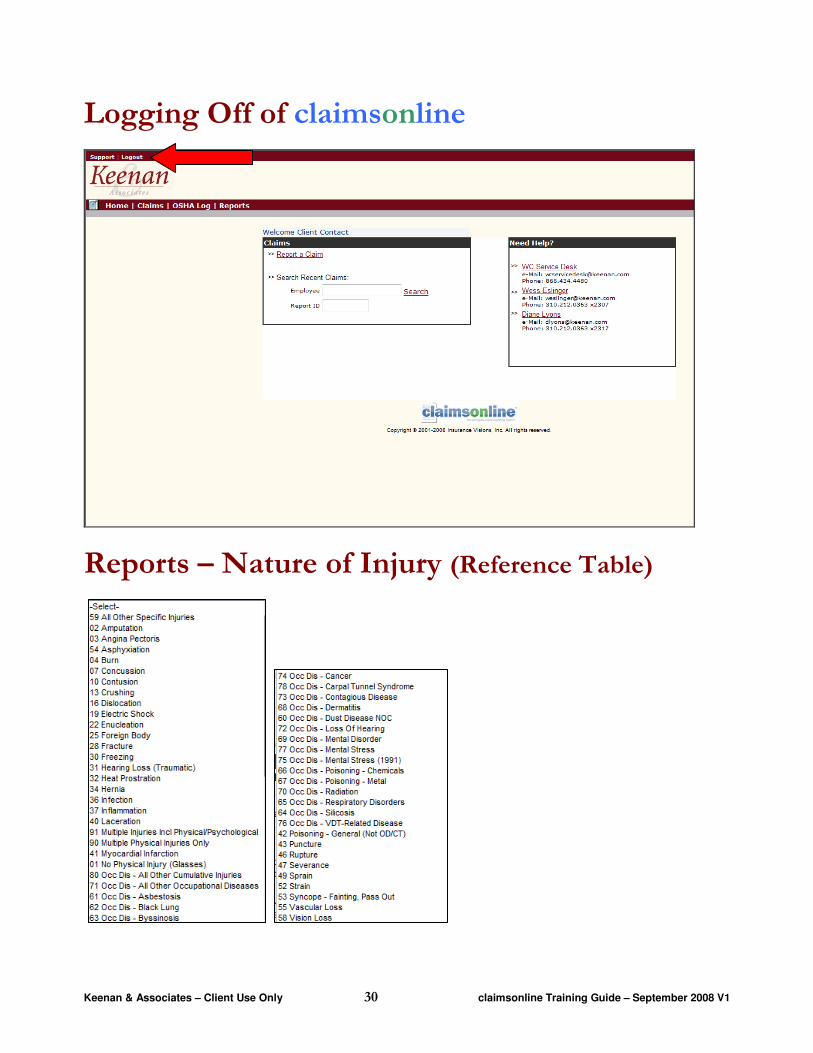
Logging Off of claimsonline
Reports – Nature of Injury (Reference Table)

Keenan & Associates – Client Use Only 31 claimsonline Training Guide – September 2008 V1
Reports – Part of Body (Reference Table)
Reports – Cause of Loss (Reference Table)

Keenan & Associates – Client Use Only 32 claimsonline Training Guide – September 2008 V1
24 Hour Clock (Reference Table)
When Technical Assistance is Required:
Please contact your Claims Analyst for additional information or system training.


