Keg King Kegerator Instruction Manual SAFETY FIRST CO2 gas can be dangerous. Make sure to always use CO2 in a well‐ventilated place. Never exceed 40psi on your keg system. Flush out chemicals from your beer line completely before tapping keg. Always thoroughly check for gas leaks once you have set up your system. WARNING IF FRIDGE HAS JUST BEEN MOVED DO NOT TURN ON UNLESS THE FRIDGE HAS BEEN STANDING UPRIGHT FOR 24hrs. FAILURE TO DO SO WILL VOID WARRANTY. STAND FRIDGE IN THE UPRIGHT POSITION FOR 24HRS BEFORE PLUGGING INTO MAINS POWER SOCKET
Transcript
Keg King
Kegerator Instruction Manual
SAFETY FIRST
CO2 gas can be dangerous. Make sure to always use CO2 in a well‐ventilated place.
Never exceed 40psi on your keg system.
Flush out chemicals from your beer line completely before tapping keg.
Always thoroughly check for gas leaks once you have set up your system.
WARNING
IF FRIDGE HAS JUST BEEN MOVED DO NOT TURN ON UNLESS THE FRIDGE HAS
BEEN STANDING UPRIGHT FOR 24hrs. FAILURE TO DO SO WILL VOID WARRANTY.
STAND FRIDGE IN THE UPRIGHT POSITION FOR 24HRS BEFORE PLUGGING INTO
MAINS POWER SOCKET
Watch our helpful instructional YouTube Videos Video instructions now available. The Keg King YouTube Channel is at:
https://www.youtube.com/KegKingBeer
Please visit our Keg King YouTube Channel. It is essential that you watch at all these three videos before setting
up this kegerator:
Video Title URL Link
Keg Master Series 4 Kegerator Setup https://www.youtube.com/watch?v=cuhiYEmZRmo
Keg King Premium Carbon Dioxide MKII Regulator ‐ How to set up
https://www.youtube.com/watch?v=ZD8ItqJi6Ts
Keg Couplers for 50L Kegs https://www.youtube.com/watch?v=ZBzpWZNr4Rg
If there is any part of these videos above that you do not understand or you cannot access please call or email
Keg King or a Keg King Distributor for more assistance.
Kegerators can be used for different keg types and it’s important that you understand what types of kegs are
available and the types of fittings that are required for each type. You will need to customize your kegerator
to suit the kegs that you want to dispense. The keg types can be split up into two main categories:
1. Commercial Kegs (look similar to the one below). These kegs are usually used by commercial breweries
and in Australia are mainly sold as 50L kegs. The commercial kegs use several different coupler types as
shown below. The most common are the A‐type and D‐type couplings. 90% of all 50L commercial kegs
in Australia will use one of these two couplings. The next most common coupling is the S‐type which is
often used for imported beers from Europe or Asia. The device to connect your beer and gas line to the
coupling on the keg is called a “Keg Coupler”. Make sure to know what type of keg coupler you need
before purchasing the equipment so you can easily be supplied with the correct one.
2. Home Brewing Kegs. (look similar to the ones below). These kegs are
usually used by home brewers or very small
microbreweries. The sizes are usually 19L or 9.5L.
These kegs have 2 separate posts on them where
you attach the beer and gas lines to. The posts
are slightly different in shape as described below:
1. Pin lock – shown at the top right.
2. Ball lock – Shown at the bottom right.
The pin lock kegs use a “Pin Lock Disconnect”
shown in the top right (red colour). The ball lock
kegs use “Ball Lock Disconnects” as shown in the bottom right
in grey and black. Most customers prefer the ball lock posts because there is a larger availability of
spare parts and accessories for these posts.
1. Commercial Kegs As described above there are 3 main commercial keg coupler types that you are likely to encounter in Australia. These are “D‐type”, “S‐type” and “A‐type”. Different brands of beer use different keg coupler types as you can see below. Most of these kegs are 50Litres in size however smaller commercial kegs of 25L or 30L do also exist.
A‐type Keg
A‐type Keg Coupling This keg coupling is also known as a “German Slider”. This type of keg is used by Toohey, Coopers, West End, Little Creatures, XXXX and any beer made by Lion Nathan. To use this keg coupler, just slide the coupling over the top of the keg and engage the handle on the keg coupler. This is the most common keg coupler type in Australia and approximately 45% of kegs in Australia would use this coupling type.
D‐type Keg
D‐type Keg Coupling This keg coupler is also known as an American Sankey. This keg coupler is used for beers such as VB, Carlton Draught, and any beers made by Carlton United Breweries. About 40% of kegs in Australia would use this coupling type. To use the coupler just push the coupler against the top of the keg, twist clockwise firmly then depress the handle to tap the keg.
S‐type Keg
S‐type Keg Coupling
This keg coupler is often confused with the D‐type keg coupling. It looks very similar however the “well” in the middle of the coupling is slightly deeper. These kegs are used by Asian, American and other imported beers such as Asahi and Heineken. To use the coupler just push the coupler against the top of the keg, twist clockwise firmly then depress the handle to tap the keg. About 10% of kegs in Australia use this type of coupling.
Setting up Commercial Keg Couplers The gas enters the side of the coupler at about a 45 degree angle and the beer exits the keg coupler out
the top of the keg coupler. For that reason you will need to connect your gas line from your CO2 regulator to the side of the keg coupler and the beer line from your tap to the top of the keg coupler. Inside the keg coupler there may be two “one‐way valve”. The one on the left is the one way gas valve and the one on the right is the one way beer valve. On a kegerator system
these valves are not strictly necessary and you do not know how to use them it is best to just take them out of the coupler. The keg coupler should include a hex nut, barbtail and rubber washer (as shown to the right). Always ensure that the rubber washer is between the barbital and the keg coupler body.
2. Home Brewing Kegs Almost all home brewers use the smaller 9litre – 25litre kegs. There are two main systems that are used by home brewers. These are called “ball lock” and “pin lock” as explained below.
Ball Lock Posts (on the keg)
Ball Lock Disconnects These types of kegs were originally used by Pepsi for syrup. About 85% of home brewers use this type of keg because they are easy to use, have a high availability of spare parts and they are inexpensive. The 2 posts on the kegs look very similar but are not compatible. As you can see on the photo to the left the gas post is slightly different shape to the liquid post. The gas post has a small ground notch (see arrow) which signifies the post is a gas post. Similarly the ball lock disconnects are also different from each other. The grey should only be used for gas and the black should only be used for beer.
Pin Lock Posts (on the keg)
Pin Lock Disconnects These types of kegs were originally used by Coca Cola and about 10% of home brewers use these kegs.
Using Stepless Clamps
The stainless stepless clamps that come included with the kegerator are the best clamp to
use on the beer line. The stepless clamps grasp the beer line in a perfect circle meaning to
do not pinch the line like worm style clamps. The stepless clamps come in different size so
it is important you have the correct style of clamp for the beer line and barb fitting that you
are using. The clamps are a single use items.
To use the clamps the best tool for the job is clamp tool (shown below in photo to left). These tools can be
purchase separately (Part number 6530). If you do not have one of these tools the wire cutters (shown below
to the right) will do an adequate job.
As shown below. All that is required is a quick single clamp with the tool and the job is done.
Setting up the Plumbing on your Kegerator
Installation Diagram for Home Brewing Kegs (Ball Lock & Pin Lock) Installation Diagram for Commercial Kegs (usually 50L)
Balancing your Keg System with CO2
Balancing your keg system is vital for optimum draft beer performance and is especially important
when using CO2 to dispense the beer. To balance your keg system correctly we must first understand:
1. Carbonation Level
2. Keg Storage Temperature
Carbonation Level
Different beers are carbonated at different levels. The carbonation is measured in “volumes of
carbonation”. Most draft beers have a carbonation level of about 2.6‐2.8 volumes of carbonation. (see
table 1.1).
Keg Storage Temperature
Keg Storage temperature is best measured using a thermometer. Put a full glass of water in the fridge
with the keg for 2hrs with a thermometer in the glass. Take a reading with the thermometer. This will
give a true reflection of the keg storage temperature. In order to pour without excessive head keg
storage temperature of most beers should be between 00C up to 2.50C. Some very lightly carbonated
beers such as English Ales can be dispensed as high as 80C.
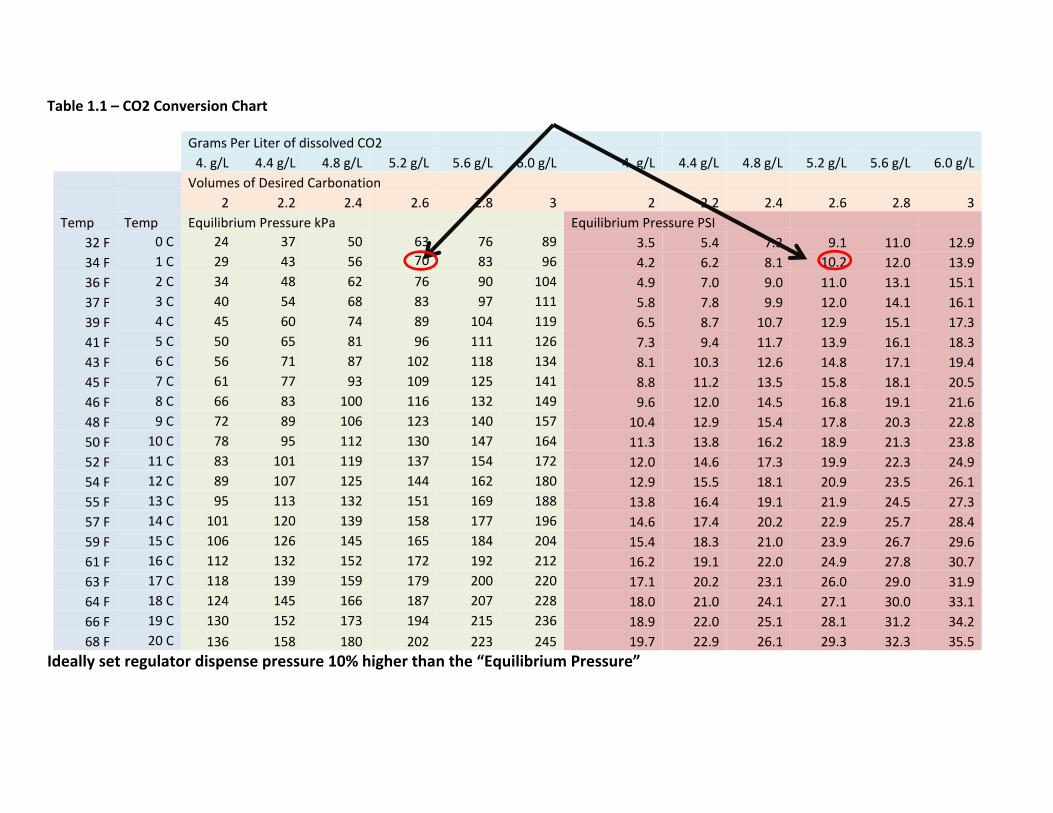
Once you know what carbonation level is (if you do not know assume 2.6 volumes of carbonation) and
your keg storage temperature use the table below to work out the correct dispense pressure. For
example, if your keg storage temperature is 1C and the carbonation level is 2.6 volumes then the
equilibrium pressure is 70kPa (10.2PSI). The dispense pressure should be 10% above the equilibrium
pressure. So you should set your regulator dispense pressure at 77kPa (11.2PSI).
Setting you dispense pressure below the equilibrium pressure will cause the beer to go flat over time.
Setting the dispense pressure above the equilibrium pressure will cause the beer to absorb more
carbonation over time.
NOTE: Many people make the mistake of using the keg dispense pressure to increase or decrease the
flow speed of the beer out of the tap. THIS IS INCORRECT. When using CO2 to dispense, the dispense
pressure must be set according to the table below. The method to adjust the speed of flow is to adjust
the beer line length and diameter.
Beer line diameter and length adjustment
The beer line on a kegerator is not just a hose to get beer from the keg to tap. It also performs the
important function of applying “flow resistance”. With too little flow resistance the beer will come out
of the tap too fast. With too much flow resistance the beer will come out of the tap too slow. Small
internal diameter (ID) beer line with apply more flow resistance and longer beer line will also apply
more flow resistance. Most domestic systems work well with the following line length/diameter:
4mm ID Beer Line: 1.5‐2 Meters
5mm ID Beer Line: 3‐4 Meters
6mm ID Beer Line: 7‐8 Meters
Small ID beer line is often the best choice for kegerators as it means the customer can use a shorter
beer line which makes less mess inside the fridge. It also minimizes the amount of beer sitting in the
beer lines.
Using 4mm ID beer line you will have 12.5ml per meter in the beer line and a total of approx 22.5ml.
Using 5mm ID beer line you will have 20ml per meter in the beer line and a total of approx 70ml.
Using 6mm ID beer line you will have 28ml per meter in the beer line and a total of approx. 210ml.
For the above reasons 4mm ID beer line is often the best choice however the small ID makes it difficult
for some customers to fit the ID over the barb fittings on the keg coupler or ball lock disconnects. The
Kegerators comes standard with the 5mm ID beer line as a compromise between the two options.
If using 4mm ID the user may need to stretch the beer line open slightly so it can fit onto the barbs of
some of the fittings. The perfect tool for this job is a set of needle nose pliers. Heat the beer line in
some boiling hot water for 30 seconds to soften then push onto the needle nose pliers to stretch the
internal diameter open. Open the handles on the pliers to further stretch the beer line open.