35


Kentucky Erosion Prevention and Sediment Control Field Guide
Funding for this project was provided in part by a grant from the U.S. Environmental Protection Agency (USEPA) through the Kentucky Division of Water (KDOW), Nonpoint Source Section
and the Kentucky Division of Conservation (KDOC) to Tetra Tech, as authorized by the Clean Water Act Amendments of
1987, Section 319(h) Nonpoint Source Implementation Grant # C9994861-01. Mention of trade names or commercial products, if any, does not constitute endorsement. This
document was printed on recycled paper.
Technical Review Committee
Bruce Scott, KY Division of Water
Tom Gabbard, KY Division of Water
Joe Ferguson, KY Division of Water
Jennifer Thompson, KY Division of Conservation
Carolyn Hestand, KY Division of Conservation
David Waldner, KY Transportation Cabinet
Stephen Bowling, KY Transportation Cabinet
Ray Werkmeister, KY Transportation Center
Kurt Mason, USDA NRCS
Charles Farmer, USDA NRCS
Mary Kathryn Dickerson, Boone, Kenton, Campbell Cons. Dist.
David Uckotter, Lexington-Fayette Urban Co. Govt.
Randy Stambaugh, Metropolitan Sewer District
John Lyons, NKY Sanitation District # 1
James Kipp, KY Water Resources Research Institute
Lindell Ormsbee, Tracy Farmer Center for the Environment
Laura Wagers, KY Association of Counties
Henry Duncan, UK Cooperative Extension Service
Richard Warner, UK Cooperative Extension Service
Judy Petersen, KY Waterways Alliance
Russ Barnett, KY Institute for Sustainable Development
Michael Berthurem, KY League of Cities
Juva Sizemore Barber, Home Builders Association of Kentucky
Richard Walker, Tetra Tech
John Kosco, Tetra Tech
William Marshall, Tetra Tech
Barry Tonning, Tetra Tech
This document has been approved by the Kentucky Transportation Cabinet, and reflects Best Management Practices for erosion and
sediment control for highway construction projects.

This Field Guide will take you through the erosion and sediment control process. The guide starts out with sections on pre-project planning and operational activities. The rest of the guide discusses erosion prevention and sediment control by starting at the top of the hill, above the project site, and proceeding down the slope through the bare soil area, ditches and channels, traps and basins, and on down to the waterways below. The drawing below summarizes this approach.
Preserve existing vegetation
Divert upland runoff around exposed soil
Seed/mulch/cover bare soil immediately
Use sediment barriers to trap soil in runoff
Protect slopes and channels from gullying
Install sediment traps and settling basins
Preserve vegetation near all waterways
Why do we need to control erosion and sediment losses from construction sites?Sediment washing into streams is one of the biggest water quality problems in Kentucky. Sediment muddies up the water, kills or weakens fish and other organisms, and ruins wildlife habitat. It is not difficult to reduce erosion and prevent sediment from leaving construction sites. Follow the basic approach shown above. Sites with steep slopes near waterways need more controls than flat sites farther away.
Observe basic principles such as: 1) Preserve existing vegetation as much as possible; 2) Mulch or seed bare soil immediately for the best and cheapest erosion protection; 3) Use silt fences, brush barriers, or other approaches to pond and filter sediment from runoff; 4) Install silt check dams made of rock, brush, or other products to prevent ditch erosion and remove sediment; 5) Protect inlets and outlets; and 6) Settle out soil particles in sediment traps and basins.
Clean runoff starts with you.

Table of Contents
1. Pre-Construction Planning . . . . . . . . . . . . . . . . . . . . . . . . . . . 1
Assess soils and slopes Identify streams and drainage control points Preserve existing vegetation Design projects to fit the lay of the land Minimize impervious surfaces Promote infiltration in project design Develop an erosion and sediment control plan
2. Overview of Construction Phase Operations . . . . . . . . . . . . 6
Phase work to minimize exposed soil Construction entrances and dust control Dewatering operations and discharges Inspection and maintenance of E&S controls
3. Diverting Upland Runoff Around Exposed Soils . . . . . . . . 11
Diversion berms Diversion channels Vegetated buffers
4. Protecting Soils With Seed, Mulch, or Other Products . . 15
Soil cover requirements Seed types and application Sod application Mulch types and application Erosion control blankets Turf reinforcement mats
5. Using Silt Fence and Other Sediment Barriers. . . . . . . . . 28
Sediment filter placement Silt fence installation Other sediment filters Maintenance of sediment filters
6. Protecting Slopes to Prevent Gullies. . . . . . . . . . . . . . . . . 37
Assessing slopes and soils Slope protection basics Chemical soil stabilizers
7. Protecting Culvert and Ditch Inlets and Outlets . . . . . . . . 44
Culvert and storm drain ponding methods Inlet protection devices Outlet protection methods

8. Stabilizing Drainage Ditches . . . . . . . . . . . . . . . . . . . . . . . 52
Drainage ditch slopes and soils Erosion control blanket and turf mat linings Silt check dams of rock, brush, or other products Lining steep channels
9. Installing Sediment Traps and Basins . . . . . . . . . . . . . . . 57
Locations for traps and basins Sediment traps Sediment basins Sizing considerations Inspection and maintenance
10. Protecting Stream Channels, Wetlands, and Lakes . . . 62
Setback requirements Vegetated buffers Stream bank stabilization Stream crossings
11. Maintaining & Closing Out Your Construction Project . 66
Inspecting storm water flow structures Managing trash, materials, and supplies Vegetated cover considerations for close-out Removing temporary sediment controls Final site stabilization
12. Regulatory Information . . . . . . . . . . . . . . . . . . . . . . . . . . 69
Storm water permits Erosion protection and sediment control plans Utility construction regulations Transportation project regulations Section 404 permits for wetlands and streams
Appendices
Appendix A: KPDES Permit Requirements Appendix B: Local ESC Plan Requirements Appendix C: Section 404 Permits for Work in Waterways Appendix D: 401 Water Quality Certification Appendix E: Floodplain Construction Permits Appendix F: Additional Details for KYTC Projects Appendix G: Erosion/Sediment Control Checklist Appendix H: Kentucky Site Inspection Report

Factors influencing erosion. Heavy rainfall, steep slopes, removal of most existing vegetation, and erodible soils result in higher soil losses from erosion.
Lower rainfall amounts, flatter slopes, preserving existing vegetation, and less erodible soils result in lower soil losses from erosion.
What contributes to erosion?

What contributes to erosion?
• Removing vegetation
• Removing topsoil and organic matter
• Reshaping the lay of the land
• Exposing subsoil to precipitation
• Failure to cover bare soil areas
• Allowing gullies to form and grow larger
• Removing vegetation along stream banks
What other factors affect erosion?
Rainfall frequency and intensity
Slope (steep = more; flat = less)
Soil structure and type of soil (silty = more erosion)
Vegetation (more vegetation = less erosion)
Erosion and sediment controls for muddy runoff:
• Soak it in—maximize seeding and mulching
• Sift it out—use silt fences or other filters
• Slow it down—don’t let gullies form
• Spread it around—break up concentrated flows
• Settle it out—use sediment traps and basins

Types of erosion. Raindrop erosion (top) breaks down soil structure. Slope runoff creates sheet erosion, which can lead to the formation of small rill channels and larger gullies (below). Erosion of unprotected stream banks can be caused by removing vegetation and higher flows caused by runoff from pavement, sidewalks, and roofs in newly developed areas.
Types of Erosion

Pre-Construction Planning
Planning your construction project can help you avoid costly mistakes in controlling erosion and sediment loss to nearby waterways. Follow the steps below before you begin clearing, grading, and exca-vation work. If your project is one acre or larger, you will need a storm water permit from the Kentucky Division of Water (502-564-3410, or see http://www.water.ky.gov/permitting/wastewaterpermitting/KPDES/storm/).
Assess soils and slopes on the construction siteIf your construction site has highly erodible soils
and steep slopes, you will need maximum erosion and sediment control protection. See the table below.
Need for erosion and sediment controls for various slope and soil conditions
Soil Type
Slope Angle Silty Clays Sandy
Very Steep (2:1 or more)
Very high High High
Steep (2:1–4:1) Very High High Moderate
Moderate (5:1–10:1) High Moderate Moderate
Slight (10:1–20:1) Moderate Moderate Lower
Identify nearby streams and drainage control points
Walk over the site and find where ditches or other concentrated flows leave the site. These are the final sediment control points. Sediment traps or basins should be installed just above these control points. Your site may drain to an underground storm sewer system. In this case, the storm drain inlets that drain runoff from your site are the control points and must be protected (see Section 7). These are also the com-pliance points for any permits issued for the site. Low spots—where rain water ponds—are good places for sediment traps (see Section 9).
SECTION
1

2 Pre-Construction Planning
Install clean water diversions, sediment traps/basins, grassed ditches, silt check dams, and sedi-ment barriers such as silt fences before clearing and excavation work begins!
Preserve existing vegetation wherever possibleOnly dig or grade where necessary. Existing trees,
bushes, and grass help keep erosion to a minimum. Protect large trees by marking off a no-dig root protec-tion zone that is twice as large as the outer perimeter of the branches. Plan your project to limit the amount of bare soil area exposed to the weather, and limit the amount of exposure time. Do not clear vegetation or excavate areas near streams, rivers, lakes, or wet-lands without getting the required state and federal permits!
Design projects to fit the lay of the landMinimize clearing and grading to preserve mature
vegetation and save money. Identify natural land-scape features you want to keep, like large trees, wildflower areas, grasslands, streams, and wetlands. Plan ways to fit your project around these features, so they remain in place after construction is completed. Be sure to mark off these areas with colored ribbon or stakes and warn equipment operators of their loca-tion!
Minimize impervious surfacesKeep the amount of roof area, parking lots, drive-
ways, and roads to a minimum. Design these hard surfaces so that rain water they collect is directed onto landscaped or yard areas, not into ditches or streams. For example, design roads slightly higher than adjacent lawn areas, and use rain infiltration ditches (swales) rather than curbs along roadways. Porous pavement can also help soak up runoff.
Promote infiltration in project designMoving storm water runoff from hard surfaces to
landscaped or yard areas helps runoff soak into the soil. This promotes groundwater recharge, filters sedi-ment and other pollutants from runoff, and helps to prevent flooding.

Pre-Construction Planning 3
Develop an erosion and sediment control planDevelop a written site plan for your project that
shows the drainage patterns and slopes, areas of disturbance (cuts/fills, grading), location of erosion and sediment controls, location of surface waters and wetlands, and the location of storm water drain-age control points. Your site plan must be updated as conditions change at the site. If your construction site is one acre or more, erosion protection and sediment control plans must be on file to assure compliance with storm water regulations (see Appendix A). Plans related to state road projects must be filed with the Transportation Cabinet; some counties also require that plans be filed with local agencies (see Section 12 and Appendices).
Design specifications for erosion and sediment controls (i.e., “Best Management Practices” or BMPs) are available from the Kentucky Division of Water, Di-vision of Conservation, the Louisville-Jefferson County Metropolitan Sewer District, and the Lexington-Fayette Urban County Government.
The cheapest erosion and sediment controls are the most effective. For example, limiting the amount of bare soil by phasing your project and preserving existing vegetation are less expensive and work better than installing large storm water control basins or ponds.

4 Pre-Construction Planning
Limiting the amount of bare soil exposed to the weather by working in phases reduces erosion and sediment control expenses.
Preserving existing vegetation at the site makes the final development more attractive and saves money by reducing clearing, excavation, and erosion control expenses.
Erosion and sediment controls are required for all construction sites one acre or larger under new federal, state, and local regulations. Storm water pollution preven-tion plans (also called Best Management Practice Plans) must be written up before the project begins. Permit coverage is also required before clearing, grading, or other cut/fill activities start.

Providing primary and secondary containment for fuel and other haz-ardous materials at the work site helps prevent problems. Controlling non-storm water runoff, trash and other wastes, and post-construction runoff are also required under the new storm water permit program.
Storm water pollution prevention (BMP) plans and KPDES permit coverage are required for all construction sites one acre or larger under 2003 regulations. Plans must be kept on site and available for inspection.
Pre-Construction Planning 5

Construction Phase Operations
Divide your construction site into natural drainage areas, so you can deal with each one individually. You will be controlling erosion on bare soil areas by apply-ing seed, mulch, or sediment filters, and minimizing the time bare soil is exposed to the weather. Control points for sediment in runoff will be at the curb inlets or in the ditches, channels, or sediment traps/basins installed where concentrated flow leaves the site.
Install clean water diversions, sediment traps/basins and stabilize drainage channels with grass, liners, and silt check dams before excavation, fill, or grading work begins (see Sections 8 and 9). Install silt fences and other sediment barriers downhill from bare soil areas before clearing or excavation work begins (see Section 5).
Phase your construction work to minimize ex-posed soil areas
Excavate or place fill material at the site in stages, to avoid exposing large areas of bare soil to the elements. Establish final grade quickly, then seed, mulch, or cover bare soil. Require utilities and sub-
SECTION
6
Identify drainage areas and drainage ditches and channels. Install diversions, grassed channels, sediment traps/basins, downslope sedi-ment barriers, and rock construction entrance before beginning work.

contractors to grade their work sites and seed, mulch, or cover excavated areas promptly. You should require subcontractors to sign a form assuring compliance with your erosion and sediment control plan if their work is covered under your permit.
If work will proceed over several weeks or months, apply temporary seeding or mulch until final grade work is completed. New regulations require seeding or mulching all bare soil areas that are not being worked after 21 consecutive days.
Excavation and grading work should be done dur-ing dry weather if possible. Prepare for rainy weather forecasts by making sure sediment controls are in place and that mulch or grass is on bare areas that are at final grade.
Install construction entrances and control dustMud tracked onto paved roads is the number one
complaint from citizens regarding construction site operations. Use #2 (4- to 8-inch) rock—not 57s or 410 “traffic bound”—for entrance/exit pads leading to paved roads. Pads should be 20 feet wide, 50 feet long, and 6" thick. Install filter fabric under the rock to keep it from sinking into the soil below. Rake rock
Construction Phase Operations 7
Construction entrance detail. Entrance/exit pad must keep mud from tracking onto paved roads.

with a grubbing attachment or add new rock if the pad fills with sediment.
Control dust during hot, dry weather by seeding or mulching bare areas promptly, wetting haul roads as needed, or applying approved chemical soil binders.
Dewatering operations and dischargesMuddy water pumped from collection basins or
other areas must not be pumped into storm sew-ers, streams, lakes, or wetlands unless sediment is removed prior to discharge. Discharges to streams, lakes, or wetlands, or storm sewers must be covered by a KPDES permit issued by the Division of Water.
Use sock filters or sediment filter bags on dis-charge pipes, discharge muddy water into silt fence enclosures installed in vegetated areas away from waterways, or discharge muddy water into a de-silting basin. Remove accumulated sediment after water has dispersed and stabilize or seed the discharge area. Dispose of sediment in areas where it won’t wash into waterways, then grade the area and seed.
8 Construction Phase Operations
Pump muddy water from dewatering operations away from waterways into a silt fence enclosure or use a bag filter or other device to remove sediment. Allow discharge to soak into the ground if possible. Do not pump discharger from dewatering operations into curb inlets, storm sewers, creeks, lakes, or rivers without a KPDES permit from the Divi-sion of Water.

Inspection and maintenance of erosion and sediment controls
For sites one acre or larger, new state and federal regulations require that you inspect and repair/replace silt fences, vegetated buffers, berms, silt check dams, channels, and other erosion and sedi-ment controls every 7 days and after each rainfall of 0.5 inch or more (0.1 inch for KYTC projects). Re-move accumulated sediment from behind silt fences before it reaches 1⁄2 the silt fence height. Remove sediment from pipe or curb inlet ponding dams or filters as it accumulates. Clean mud off paved roads immediately. Your inspection reports must be in writ-ing, and kept on file at the site.
Silt check dams in ditches and sediment traps/basins also require periodic sediment removal. Re-move sediment from traps and basins before they are halfway full. Dispose of removed sediment in areas where it will not wash into waterways. Seed or mulch bare soil areas as soon as possible.
Keep written records of these inspections, includ-ing dates, observations and corrective actions taken, with your erosion and sediment control plan and Storm Water Pollution Prevention Plan, or BMP Plan. See Section 5 for information on installing and maintaining overland sheet flow sediment filters. See Sections 7, 8, and 9 for information on handling concentrated flows in ditches, channels, and other areas.
Rock pad was installed properly with right sized rock, but lack of filter fabric underliner is causing rock to spread and sink into the soil. Note tracking of mud onto paved road. Mud tracked on roadways violates BMP standards, and is a potential legal liability.
Construction Phase Operations 9

Poor construction entrance. Rock pad is poorly constructed; rock is too small. Use filter fabric under rock and larger sized rock, such as #2. No mud should be tracked onto paved roads open for traffic.
10 Construction Phase Operations
Rock sizing, placement, and pad sizing are good, but sediment from unprotected slopes and ditches is washing onto paved highway. Seri-ous liability issue.
Rock sizing and placement look OK for a residential site, and very little mud appears on the pavement. The pad is a little thin, however, and it looks like some drivers are not using it—note track marks near curb. Entire area needs seed and mulch.

Diverting Upland Runoff Around Exposed Soils
Keep clean upland runoff from flowing through your construction site, or route it through stable ditches so it won’t get muddy. Below are some simple approaches for dealing with uphill sources of runoff.
Diversion bermsA diversion berm is a long, mounded “collar” of
compacted soil located uphill from the excavated area. The berm is designed to intercept overland runoff and direct it around the construction site. This prevents “clean” water from becoming muddied with soil from the construction site. Berms can be temporary or per-manent landscape features of the site.
Berms should be located so that storm water flow-ing along their uphill face follows a gently sloping path (i.e., less than 5 percent channel slope). Turf rein-forcement mats, erosion control blankets, or rock pro-tection might be needed for berms that channel water at a slope of 5 percent or more (see Section 4). Berm side slopes should be 2:1 or flatter, 10 to 14 inches high, and seeded immediately after construction.
11
SECTION
Berms and ditches diverting clean upland runoff around construction sites reduce erosion and sedimentation problems. Seed berms and ditches after construction.

Extend the downhill end of the berm so it directs overland flow to areas of thick vegetation or flat sur-faces to promote dispersal and infiltration. Seed and mulch berms after construction to minimize erosion.
Diversion ditchesDiversion ditches are similar to berms—they are
designed to intercept and divert upland runoff around bare soil areas. Ditches are cut above cleared or fill areas and designed with a gentle slope to carry water away from work areas. Ditches should be 8 to 12 inches deep and seeded. Side slopes should be 2:1 or flatter.
Stabilized, lined ditches can also be used to move upland water through your site without getting muddy. Construct and line “pass-through” ditches before general clearing or grading work begins.
Ditches should discharge to areas with thick vegetation or flat surfaces to promote dispersal and infiltration. Gullies must be repaired as soon as they appear. Ditches with slopes less than 5 percent may be heavily seeded, mulched, and maintained without additional protection if stabilized quickly after con-struction. Ditches with slopes of 5 percent or more need erosion control blankets, turf mats, or rock liner protection.
12 Diverting Upland Runoff
Diversion ditches should be lined with grass at a minimum, and blan-kets if slopes exceed 10:1 (10%) (see Section 8).

Vegetated buffersGrass, shrubs, trees, and other vegetation located
above or below excavated areas should be preserved if possible. Vegetation above construction sites prevents high volume sheet runoff flows from moving across cut or fill areas. Vegetation below the construc-tion site helps filter and trap sediment before it can move into ditches, channels, and streams. All vegetat-ed areas help to promote infiltration of storm water, which is a key objective in preventing erosion and controlling sediment movement off the construction site. Vegetated buffers along channels, streams, and other waterways must not be cleared unless proper permit coverage is provided by KDOW.
Diverting Upland Runoff 13
Vegetated buffers above or below your work site are always a plus. They trap sediment before it can wash into waterways, and prevent bank erosion.
Vegetated waterways help move upland water through or past your site while keeping it clear of mud. Do not disturb existing vegetation along banks, and leave a buffer of tall grass and shrubs between stream bank trees and disturbed areas.

14 Diverting Upland Runoff
Well built vegetated berm diverting runoff from wooded stream. Diversion berms and ditches should be seeded after construction. Use blankets if slopes are steep.
Good construction, seeding, and stabilization of diversion berm. Note that diversion ditch is lined with grass on flatter part of slope, and with rock on steeper part.
Good installation of rock-lined berm to divert rain runoff around residential construction site on steep slope near a river. Diversion ditches can be lined with grass if chan-nel slopes are 20:1 or less, and with blankets or turf mats if they are steeper.

Protecting Soils With Seed, Mulch, or Other Products
Seeding or covering bare soil with mulch, blan-kets, mats, or other products as soon as possible is the cheapest and best way to prevent erosion. Grass seeding alone can reduce erosion by more than 90 percent. Sod, mulch, blankets, and other products can further increase protection (see tables below).
Soil cover requirementsBare soil in excavated or fill areas must be seeded,
mulched, or covered immediately after final grading work is completed. Stockpile topsoil and spread over site prior to seeding. Bare soil areas must be seeded, mulched, or covered after 14 days when temporary or final grade is established if no work is planned in that area during the following 7 days (i.e., 21 consecu-tive days). This requirement can be extended if snow or freezing conditions prevent site work. Seed or cover soil stockpiles if they will not be used for more than 21 consecutive days.
Soil cover vs. erosion reduction
Soil covering Erosion reduction
Mulch (hay or straw) 1⁄2 ton per acre 1 ton per acre 2 tons per acre
75 percent87 percent98 percent
Grass (seed or sod) 40 percent cover 60 percent cover 90 percent cover
90 percent96 percent99 percent
Bushes and shrubs 25 percent cover 75 percent cover
60 percent72 percent
Trees 25 percent cover 75 percent cover
58 percent64 percent
Erosion control blankets 95–99 percent
SECTION
15

Seed types and applicationPrepare bare soil for planting by disking across
slopes, scarifying, or tilling if soil has been sealed or crusted over by rain. Seedbed must be dry with loose soil to a depth of 3 to 6 inches.
For slopes steeper than 4:1, walk bulldozer or other tracked vehicle up and down slopes before seeding to create tread-track depressions for catching and holding seed. Mulch slopes after seeding if pos-sible. Cover seed with erosion control blankets or turf mats if slopes are 2:1 or greater.
Fertilize poor soils with 400–800 pounds per acre of 10-10-10 fertilizer. Apply lime at 1 to 2 tons per acre if needed. Disk or harrow fertilizer and lime 2 to 4 inches into soil. Follow the contour (level path) with tractors and other equipment on all slopes if possible.
Check seed bag tags to make sure correct seed is used. Mix seed thoroughly prior to loading seeders. Use the following tables to calculate seed application rates, mixture portions, and soil pH requirements, or use seed mixes approved for your site. Apply seed by hand, seeder, drill, or hydroseed. Drilled seed should be 1⁄2 inch deep. Mulch right away if possible.
Apply more seed to channels, ditches, lawn, and landscaped areas. Apply less seed to areas that are flat or that will not be mowed very often. Water seeded areas during dry conditions to ensure seed germination and early growth. Re-seed areas that do not show growth within 14 days after rain or watering.
Kentucky Transportation Cabinet seed mixes
Mixture Type Percentage Seed Type
Mixture No. I 75% Kentucky 31 Tall Fescue
10% Red Top
5% White Dutch Clover
10% Ryegrass (perennial)
Mixture No. III 30% Kentucky 31 Tall Fescue
15% Red Top
15% Partridge Pea
20% Sericea Lespedeza
10% Sweet Clover – Yellow
10% Ryegrass
16 Protecting Soils with Seed, Mulch or Other Products

Protecting Soils with Seed, Mulch or Other Products 17
Protect bare areas during the cold season by sow-ing winter rye, winter wheat, or mulching. Sow perma-nent seed when weather permits.
Do not mow newly seeded bluegrass or red fescue until it is at least 4 inches high. Crownvetch should never be mowed. KY 31 tall fescue can be mowed for appearance or only occasionally, according to site conditions and the owner’s preferences.
Seed mixes for wildflower and native plant plots are also available. They are more expensive, but are very hardy, require little mowing or watering, and add beauty to landscaped and other areas. Most mixes require mowing only once per year, to control tree and brush growth.
Excellent soil preparation prior to seeding. Seeded development sites erode less, are cleaner, and are easier to market than muddy sites.
Erosion and sediment loss is virtually eliminated on seeded areas (left side). Rills and small gullies form quickly on unseeded slopes (right).

18 Protecting Soils with Seed, Mulch or Other Products
Oth
er
sugg
est
ed
se
ed
ing
rate
s, s
oil
co
nd
itio
ns,
an
d o
the
r in
form
ati
on
fo
r va
rio
us
spe
cie
s a
nd
se
ed
mix
ture
s
Se
ed
sp
eci
es
& m
ixtu
res
Se
ed
ing
rate
/acr
eP
er
100
0 s
q. f
t.S
oil
pH
Oth
er
info
rma
tio
n
See
d an
d se
ed m
ixtu
res
for
rela
tivel
y fla
t or
slig
htly
slo
ping
are
as
Pe
renn
ial r
yegr
ass
+
tall
fesc
ue
Tall
fesc
ue
+ la
dino
or
whi
te c
love
r
25
to 3
5 lb
s.1
5 to
30
lbs.
40
to 5
0 lb
s.1
to 2
lbs.
1 lb
.1
lb.
11⁄2
lb.
2 o
z.
5.6
to 7
.0
5.5
to 7
.5
Appl
y lim
e at
2 to
ns p
er a
cre
if so
il pH
is b
elow
5
.5; u
se 4
00
-80
0 lb
. fer
tiliz
er (1
0-1
0-1
0) o
n po
or
soils
. Use
wild
flow
er o
r “n
o m
ow”
mix
es to
sav
e on
mow
ing
and
wat
erin
g co
sts.
Ste
ep s
lope
s, b
anks
, cut
s, a
nd o
ther
low
mai
nten
ance
are
as (n
ot m
owed
)
S
moo
th b
rom
egra
ss
+ re
d cl
over
Ta
ll fe
scue
+
whi
te o
r la
dino
clo
ver
O
rcha
rdgr
ass
+
red
clov
er
+ la
dino
clo
ver
C
row
nvet
ch
+ ta
ll fe
scue
25
to 3
5 lb
s.10
to 2
0 lb
s.4
0 to
50
lbs.
1 to
2 lb
s.2
0 to
30
lbs.
10 to
20
lbs.
1 to
2 lb
s.10
to 1
2 lb
s.2
0 to
30
lbs.
1 lb
.1⁄2
lb.
1 lb
.2
oz.
1 lb
.1⁄2
lb.
2 o
z.1⁄4
lb.
1 lb
.
5.5
to 7
.5
5.5
to 7
.5
5.6
to 7
.0
5.6
to 7
.0
Trac
k st
eep
slop
es w
ith d
ozer
up
and
dow
n hi
ll be
fore
see
ding
. Mul
ch s
lope
s af
ter
seed
ing
with
2
to 3
tons
of s
traw
or
6 to
ns o
f woo
d ch
ips
per
acre
. Use
tack
ifier
on
mul
ch, d
isk
it in
, or
punc
h in
with
she
ep-fo
ot ro
ller.
Dis
k or
she
ep-fo
ot o
n th
e co
ntou
r (a
cros
s sl
ope,
on
the
leve
l). F
or e
xtre
mel
y st
eep
slop
es, u
se e
rosi
on c
ontr
ol b
lank
ets
afte
r se
edin
g. U
se 2
4”
spac
ing
for
blan
ket s
tapl
es.

Protecting Soils with Seed, Mulch or Other Products 19
Law
ns a
nd o
ther
hig
h tr
affic
or
high
mai
nten
ance
are
as (m
owed
)
B
lueg
rass
Pe
renn
ial r
yegr
ass
(tur
f)
+ b
lueg
rass
Ta
ll fe
scue
(tur
f typ
e)
+ b
lueg
rass
105
to 1
40
lbs.
45
to 6
0 lb
s.7
0 to
90
lbs.
13
0 to
17
0 lb
s.2
0 to
30
lbs.
3 lb
.2
lb.
21⁄2
lb.
4 lb
.1
lb.
5.5
to 7
.05
.6 to
7.0
5.6
to 7
.5
Use
wild
flow
er m
ixes
to s
ave
on m
owin
g an
d w
ater
ing
cost
s. D
o no
t est
ablis
h gr
asse
d la
wns
nea
r st
ream
s or
wet
land
s –
leav
e a
15
- to
30
-foot
buf
fer
of n
atur
al v
eget
atio
n.
Ditc
hes
and
othe
r ar
eas
of c
once
ntra
ted
wat
er fl
ows
Pe
renn
ial r
yegr
ass
+
whi
te o
r la
dino
clo
ver
K
entu
cky
blue
gras
s
+ s
moo
th b
rom
egra
ss
+ s
witc
hgra
ss
+ ti
mot
hy
+ p
eren
nial
rye
gras
s
+ w
hite
or
ladi
no c
love
r
Tall
fesc
ue
+ la
dino
or
whi
te c
love
r
Tall
fesc
ue
+ p
eren
nial
rye
gras
s
+ K
entu
cky
blue
gras
s
100
to 1
50
lbs.
1 to
2 lb
s.2
0 lb
s.10
lbs.
3 lb
s.4
lbs.
10 lb
s.1
to 2
lbs.
100
to 1
50
lbs.
1 to
2 lb
s.10
0 to
15
0 lb
s.1
5 to
20
lbs.
15
to 2
0 lb
s.
3 lb
.2
oz.
1⁄2 lb
.1⁄4
lb.
2 o
z.1⁄4
lb.
1⁄4 lb
.2
oz.
3 lb
.2
oz.
3 lb
.1⁄2
lb.
1⁄2 lb
.
5.6
to 7
.0
5.5
to 7
.5
5.5
to 7
.5
5.5
to 7
.5
See
d di
tche
s an
d ch
anne
ls th
ickl
y. D
o no
t use
fe
rtili
zer
near
ditc
h or
cha
nnel
bot
tom
. Use
ero
sion
co
ntro
l bla
nket
s or
turf
rein
forc
emen
t mat
s w
hen
chan
nel b
otto
m s
lope
s ex
ceed
3 p
erce
nt.
Silt
che
ck d
ams
are
need
ed w
hen
chan
nel
slop
es e
xcee
d 5
per
cent
or
whe
n ch
anne
ls b
egin
do
wnc
uttin
g (g
ully
ing)
on
the
bott
om. D
o no
t use
silt
fe
ncin
g or
hay
bal
es a
s si
lt ch
eck
dam
s in
cha
nnel
s w
ith s
lope
s gr
eate
r th
an 3
per
cent
; use
rock
, bru
sh,
or c
omm
erci
al s
ilt d
ikes
inst
ead.
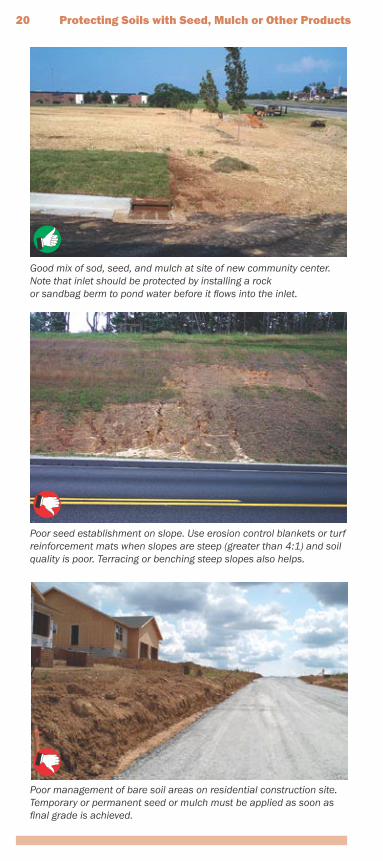
Poor management of bare soil areas on residential construction site. Temporary or permanent seed or mulch must be applied as soon as final grade is achieved.
Good mix of sod, seed, and mulch at site of new community center. Note that inlet should be protected by installing a rockor sandbag berm to pond water before it flows into the inlet.
Poor seed establishment on slope. Use erosion control blankets or turf reinforcement mats when slopes are steep (greater than 4:1) and soil quality is poor. Terracing or benching steep slopes also helps.
20 Protecting Soils with Seed, Mulch or Other Products

Protecting Soils with Seed, Mulch or Other Products 21
Sod applicationSod reduces the potential for erosion to near zero.
To install, bring soil to final grade and clear of trash, wood, rock, and other debris. Apply topsoil, fertilizer, and lime if needed (approx. 1000 lbs. 10-10-10 fertil-izer per acre; 1 to 2 tons of lime per acre).
Use sod within 36 hours of cutting. Lay sod in straight lines. Butt joints tightly, but do not overlap joints or stretch sod. Stagger joints in adjacent rows in a brickwork type pattern. Use torn or uneven pieces on the end of the row. Notch into existing grass.
Anchor sod with pins or stakes if placed on slopes greater than 3:1. Roll or tamp sod after installation and water immediately. Soak to a depth of 4 to 6 inches. Replace sod that grows poorly. Do not cut or lay sod in extremely wet or cold weather. Do not mow regularly until sod is well established.
Mulch types and applicationMulch by itself or applied over seed provides excel-
lent erosion protection (see table). To apply, bring site to final grade and clear rocks, wood, trash, and other debris. Apply seed first. Straw or hay should be hand scattered or blown at a rate of 11⁄2 to 21⁄2 tons per acre (see table). Wood chips, bark, and sawdust should be applied at 5 to 8 tons per acre. Emulsified asphalt or other tackifier should be used on slopes greater than 3:1. In general, apply mulch so that at least 80 to 90 percent of the ground is covered.
Sod provides immediate protection around storm drain inlets, on slopes, and other areas.

Mu
lch
pro
du
ctA
pp
lica
tio
n r
ate
Be
ne
fits
Lim
ita
tio
ns
Str
aw o
r ha
y1
1⁄2 to
21⁄2
ton
spe
r ac
reR
eadi
ly a
vaila
ble
and
inex
pens
ive;
ver
y ef
fect
ive
in c
ontr
ollin
g er
osio
n; c
an b
e ap
plie
d on
larg
e si
tes
via
blow
er
May
car
ry u
nwan
ted
seed
s; m
ay n
eed
tack
ifier
or
anch
orin
g, e
spec
ially
on
stee
p sl
opes
; crim
p m
ulch
in
with
doz
er o
r st
raig
ht-s
et d
isk
harr
ow to
pre
vent
blo
w-o
ff
Woo
d ch
ips,
bar
k,
saw
dust
5 to
8 to
nspe
r ac
reVe
ry lo
w c
ost i
n so
me
loca
tions
; can
use
chi
ps
prod
uced
from
rem
oved
veg
etat
ion;
chi
ps
effe
ctiv
e on
slo
pes
up to
35
per
cent
Hig
h ni
trog
en d
eman
d w
hen
deco
mpo
sing
; may
floa
t aw
ay o
r bl
ow a
way
dur
ing
rain
sto
rms
Roc
k2
00
to 5
00
tons
or
mor
e pe
r ac
reM
ay b
e in
expe
nsiv
e an
d re
adily
ava
ilabl
e in
so
me
loca
litie
s; m
ay b
e su
itabl
e fo
r sm
alle
r si
tes
Inhi
bits
pla
nt g
row
th; a
dds
no n
utrie
nts
to th
e so
il;
can
be c
ostly
to a
pply
on
slop
es a
nd la
rge
site
s; a
dds
“har
dene
d” lo
ok to
slo
pes
Hyd
raul
ic
mul
ches
and
soi
l bi
nder
s
11⁄2
to
2 to
nspe
r ac
reEa
sily
and
rap
idly
app
lied
with
spr
ayer
eq
uipm
ent;
can
incl
ude
seed
, fer
tiliz
er, a
nd
soil
bind
ers;
man
y ne
w p
rodu
cts
avai
labl
e
May
be
too
expe
nsiv
e fo
r sm
all o
r ve
ry re
mot
e si
tes;
m
ust d
ry fo
r at
leas
t 24
hou
rs b
efor
e ra
infa
ll. S
ee
Appe
ndix
F fo
r K
YTC
app
licat
ion
limita
tions
.
Com
post
2 to
3 to
nspe
r ac
reAd
ds n
utrie
nts
to th
e so
il; re
adily
ava
ilabl
e an
d in
expe
nsiv
e in
som
e lo
catio
nsLi
mite
d er
osio
n co
ntro
l eff
ectiv
enes
s; n
ot s
uita
ble
for
stee
p sl
opes
; may
be
expe
nsiv
e in
som
e ar
eas
22 Protecting Soils with Seed, Mulch or Other Products

Protecting Soils with Seed, Mulch or Other Products 23
Installing sod immediately after grading work is complete can reduce erosion and sediment loss to near zero.
Excellent application of hand-scattered straw mulch in new residential subdivision. Work sites must be seeded and mulched as soon as final grade is established. Crimp mulch into soil with dozer tracking or disk harrows set straight to prevent straw from blowing.
Very good treatment of roadside areas with blown straw after seeding. In areas near lakes, streams, and rivers, straw in roadway must be cleaned up after application.

Good slope protection with permanent rock cover. This slope could have been protected with erosion control blankets or mats and seeded for a “softer” look.
Excellent soil coverage at stream bank stabilization project using hand scattered straw, jute matting, and erosion blanket.
Erosion control blanketsErosion control blankets are used to protect steep
slopes (up to 3:1; check product information sheets), drainage ditches with less than 20:1 slopes, and other areas where erosion potential is high. Most are designed to provide temporary stabilization until veg-etation is established. Blankets degrade within 6 to 24 months, depending on their makeup. They usually consist of a layer of straw, coconut fiber, wood fiber, or jute sandwiched between layers of plastic or fiber mesh.
For short slopes (8 feet or less) above channels, install blankets across the slope (horizontal). Install up and down the hill (vertical) for long slopes.
24 Protecting Soils with Seed, Mulch or Other Products

Protecting Soils with Seed, Mulch or Other Products 25
Site conditions Blanket installation notes
Ditches and channels (from high flow line to ditch bottom—see Section 8)
• Grade, disk, and prepare seedbed.• Seed, lime, and fertilize the area first• Install horizontally (across slope).• Start at ditch bottom. • Staple down blanket center line first.• Staple & bury top in 8" deep trench. • Top staples should be 12" apart. • Uphill layers overlap bottom layers. • Side overlap should be 6"–8".• Side & middle staples = 24" apart. • Staple below the flow level every 12".• Staple thru both blankets at overlaps.
Long slopes, including areas above ditch flow levels
• Grade, disk, and prepare seedbed.• Seed, lime, and fertilize first.• Install vertically (up & down hill).• Unroll from top of hill if possible.• Staple down center line of blanket first.• Staple & bury top in 8" deep trench.• Top staples should be 12" apart.• Side & middle staples = 24" apart.• Uphill layers overlap downhill layers.• Overlaps should be 6"–8".• Staple thru both blankets at overlap.
Walk blankets down to ensure good contact with the soil. Use plenty of staples to keep blankets flat. Overlap blankets at 6 to 8 inches on sides, tops, and bottoms. Do not stretch blankets, and do not exceed manufacturer’s directions on maximum slope angle for the product.
Install blankets and mats vertically on long slopes. Unroll from top of hill, staple as you unroll it. Do not stretch blankets.

Turf reinforcement matsTurf reinforcement mats are similar to erosion
control blankets, but are thicker and sturdier because they have more layers and sturdier fill material. Mats provide greater protection than blankets because of their heavier construction, and last longer in the field.
Mats are used for steep slopes (3:1 or steeper) and ditches or channels with 15:1 to 10:1 slopes. Mats are installed just like blankets (see previous table). Additional staking or stapling is needed for ap-plications in channels that carry flowing water, and on steep slopes.
Other engineered products are available that are similar to blankets and mats. For example, bonded fi-ber matrices and other hydraulically applied products contain a mix of soil binders, mulch fibers, and even seed and fertilizer that can provide a stable crust that cements soil particles and prevents erosion. Apply seed prior to hydraulic mats or mulches, if seed is not included in the mix. Consult the manufacturer’s installation instructions for product applicability and installation instructions.
Erosion control blankets are thinner and usually degrade quicker than turf reinforcement mats. Check manufacturer’s product information for degradation rate (life span), slope limitations, and installation. Remember to apply seed, fertilizer, and lime before covering with blankets or mats!
26 Protecting Soils with Seed, Mulch or Other Products

Protecting Soils with Seed, Mulch or Other Products 27
Good application of erosion control blanket to stabilize shoulder and protect storm drain, but too few staples used along the top edge. Trench in top edge of blanket on steep slopes.
Very good installation of erosion control blanket in seeded ditch below well-mulched slope on highway project.
Blankets installed along stream banks or other short slopes can be laid horizontally. Install blankets vertically on longer slopes. Ensure 6 inch minimum overlap.
Excellent slope and bank protection for stream stabili-zation project. Note that stream bottom is not lined, to preserve rock and gravel habitat.


