46
KRC-PS959R KRC-859R KRC-859C KRC-859W KRC-759R © B64-1159-00 (EW) CASSETTE RECEIVER INSTRUCTION MANUAL
KRC-PS959RKRC-859RKRC-859CKRC-859WKRC-759R
© B64-1159-00 (EW)
CASSETTE RECEIVER
INSTRUCTION MANUAL
Contents
— 2 —
En
glish Befor use
Safety precautions .......................................................................................3Buttons and Display
Basic operations...........................................................................................5Tuner features..............................................................................................5RDS features................................................................................................6Cassette player features ..............................................................................6Disc control features....................................................................................7Other features..............................................................................................7Steering remote control ...............................................................................8Remote control ............................................................................................8
Basic operations Stealth Retraction Mechanism.....................................................................8Switching Modes .........................................................................................9Volume.........................................................................................................9Attenuator ....................................................................................................9Loudness ...................................................................................................10Menu System ............................................................................................10
Tuner features K2I (Kenwood Intelligent Twin IF) ..............................................................12Selecting Tuning Mode ..............................................................................12Tuning ........................................................................................................12Local Seek Function...................................................................................12Monaural Reception...................................................................................13Switching Display for Tuner(non-RDS station) ...........................................13Station Preset Memory..............................................................................13Auto Memory Entry ...................................................................................14Direct Access Tuning .................................................................................14Preset station seek with Programme service name .................................15
RDS features RDS (Radio Data System) ..........................................................................15EON (Enhanced Other Network)................................................................15Alarm..........................................................................................................15AF (Alternative Frequency) Function..........................................................16Restricting RDS Region (Region Restrict Function) ...................................16Traffic Information Function.......................................................................16Auto TP Seek Function ..............................................................................17Presetting Volume for Traffic Information/News .......................................17News Bulletin Function with PTY News Timeout Setting .........................18Programme Type (PTY) Function ...............................................................18
Cassette player features Playing Cassette Tapes..............................................................................20Fast Forwarding and Rewinding Cassette Tapes.......................................20Using Dolby B/C NR (Noise Reduction) .....................................................20Switching Tape Types................................................................................20Blank Skip Function....................................................................................20Tuner Call Function ....................................................................................21
Tape Advance Function..............................................................................21Music Repeat Function ..............................................................................21Switching Display for Tape ........................................................................21
Disc control features Playing Disc mode .....................................................................................22Fast Forwarding and Reversing Disc Play..................................................22Track Search ..............................................................................................22Disc Search ................................................................................................23Track / Disc Repeat Function .....................................................................23Track Scan Function...................................................................................23Disc Scan Function ....................................................................................24Random Play Function ...............................................................................24Magazine Random Play Function...............................................................24Switching Display for Discs .......................................................................25Text Scroll ..................................................................................................25Presetting Disc Names ..............................................................................26Direct Track Search....................................................................................27Direct Disc Search .....................................................................................27Disc Name Preset Play (DNPP)..................................................................28
Other features Audio Control Setting.................................................................................29Table of Audio Control Setting ...................................................................29Switching preout........................................................................................30TEL Mute Function ....................................................................................30Navigation Mute Function..........................................................................30Touch sensor tone .....................................................................................30Automatic Dimmer Function......................................................................31Selectable Illumination ...............................................................................31Contrast Adjustment..................................................................................31Switching Spectrum Analyzer Display .......................................................32Switching Graphic Display .........................................................................32Switching Clock display .............................................................................32Adjusting Time ...........................................................................................33Code Security Function..............................................................................34
Basic operations of steering remote control ........................35Basic operations of remote control ...........................................36Installation
Accessories................................................................................................37Installation Procedure ................................................................................38Connecting Cables to Terminals ................................................................39Installtion....................................................................................................40Removing the Unit .....................................................................................41Attaching Steering Remote Control ...........................................................42
Troubleshooting guide ......................................................................43Specifications ........................................................................................46
— 3 —
To prevent injury and/or fire, take thefollowing precautions:
• Insert the unit all the way until it is fullylocked in place. Otherwise it may fly out ofplace during collisions and other jolts.
• When extending the ignition, battery orground cables, make sure to use automotive-grade cables or other cables with an area of0.75mm2 (AWG18) or more to prevent cabledeterioration and damage to the cablecoating.
• To prevent short circuits, never put or leaveany metallic objects (e.g., coins or metaltools) inside the unit.
• If the unit starts to emit smoke or strangesmells, turn off the power immediately andconsult your Kenwood dealer.
• Make sure not to get your fingers caughtbetween the faceplate and the unit.
• Be careful not to drop the unit or subject it tostrong shock.The unit may break or crack because itcontains glass parts.
• Do not touch the liquid crystal fluid if the LCDis damaged or broken due to shock. Theliquid crystal fluid may be dangerous to yourhealth or even fatal.If the liquid crystal fluid from the LCDcontacts your body or clothing, wash it offwith soap immediately.
2WARNINGTo prevent damage to the machine,take the following precautions:
• Make sure to ground the unit to a negative12V DC power supply.
• Do not open the top or bottom covers of theunit.
• Do not install the unit in a spot exposed todirect sunlight or excessive heat or humidity.Also avoid places with too much dust or thepossibility of water splashing.
• Do not subject the faceplate to excessiveshock, as it is a piece of precision equipment.
• When replacing a fuse, only use a new onewith the prescribed rating. Using a fuse withthe wrong rating may cause your unit tomalfunction.
• To prevent short circuits when replacing afuse, first disconnect the wiring harness.
• Do not place any object between thefaceplate and the unit.
• During installation, do not use any screwsexcept for the ones provided. The use ofimproper screws might result in damage tothe main unit.
2CAUTION IMPORTANT INFORMATION
You cannot connect the unit directly to thefollowing CD automatic changers. For userswho want to use older changers with theunit, follow the directions below according tothe type of changer you own:
• KDC-C200 / KDC-C300 / KDC-C400Use the extension cable and the control boxattached to the CD changer, and the optionalCA-DS100 converter cable.
• KDC-C301 / KDC-C600 / KDC-C800 / KDC-C601 /KDC-C401Use the extension cable attached to the CDchanger, and the optional CA-DS100converter cable.
• KDC-C100 / KDC-C302 / C205 / C705 /non-Kenwood CD changersCannot be used with this model.
You can damage both your unit andthe CD changer if you connect themincorrectly.
2CAUTION
Safety precautions
— 4 —
En
glish
• If you experience problems duringinstallation, consult your Kenwood dealer.
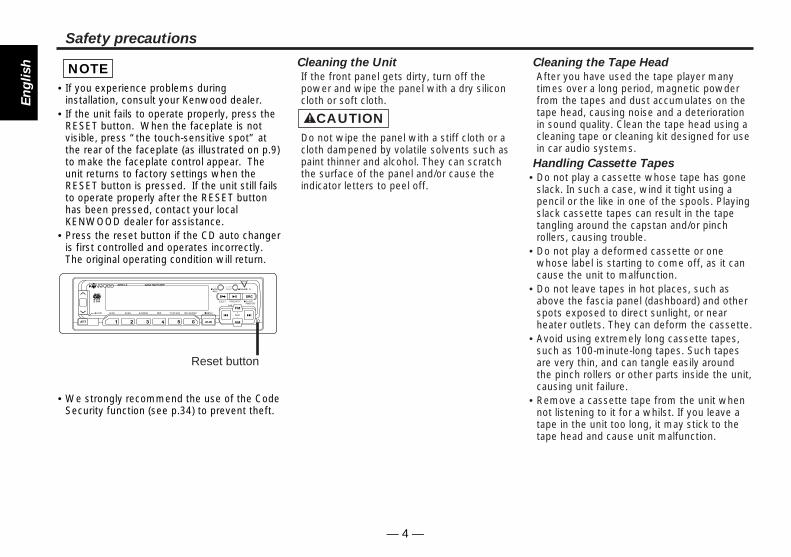
• If the unit fails to operate properly, press theRESET button. When the faceplate is notvisible, press “the touch-sensitive spot” atthe rear of the faceplate (as illustrated on p.9)to make the faceplate control appear. Theunit returns to factory settings when theRESET button is pressed. If the unit still failsto operate properly after the RESET buttonhas been pressed, contact your localKENWOOD dealer for assistance.
• Press the reset button if the CD auto changeris first controlled and operates incorrectly.The original operating condition will return.
• We strongly recommend the use of the CodeSecurity function (see p.34) to prevent theft.
NOTE
AUD
DISC
DAB
B NR SCAN B.S/RDM REP T.C/D.SCN MTL/M.RDM MENULOUD
40W 4xTI DISP/
TEXTVOL NAME. SADJ
EJECT PROG/PTY CLOSEPWR OFF
TUNER
Reset button
Cleaning the Unit
If the front panel gets dirty, turn off thepower and wipe the panel with a dry siliconcloth or soft cloth.
Do not wipe the panel with a stiff cloth or acloth dampened by volatile solvents such aspaint thinner and alcohol. They can scratchthe surface of the panel and/or cause theindicator letters to peel off.
2CAUTION
Safety precautions
Cleaning the Tape Head
After you have used the tape player manytimes over a long period, magnetic powderfrom the tapes and dust accumulates on thetape head, causing noise and a deteriorationin sound quality. Clean the tape head using acleaning tape or cleaning kit designed for usein car audio systems.
Handling Cassette Tapes
• Do not play a cassette whose tape has goneslack. In such a case, wind it tight using apencil or the like in one of the spools. Playingslack cassette tapes can result in the tapetangling around the capstan and/or pinchrollers, causing trouble.
• Do not play a deformed cassette or onewhose label is starting to come off, as it cancause the unit to malfunction.
• Do not leave tapes in hot places, such asabove the fascia panel (dashboard) and otherspots exposed to direct sunlight, or nearheater outlets. They can deform the cassette.
• Avoid using extremely long cassette tapes,such as 100-minute-long tapes. Such tapesare very thin, and can tangle easily aroundthe pinch rollers or other parts inside the unit,causing unit failure.
• Remove a cassette tape from the unit whennot listening to it for a whilst. If you leave atape in the unit too long, it may stick to thetape head and cause unit malfunction.

— 5 —
Buttons and Display
DISC
DAB
B NR SCAN B.S/RDM REP T.C/D.SCN MTL/M.RDM MENULOUD
40W 4xTI DISP/
TEXTVOL NAME. SADJ
EJECT PROG/PTY CLOSEPWR OFF
TUNER
MENU
SRC
ATT/LOUD
ud FM
¢
4
AM
AUD
DISC
DAB
B NR SCAN B.S/RDM REP T.C/D.SCN MTL/M.RDM MENULOUD
40W 4xTI DISP/
TEXTVOL NAME. SADJ
EJECT PROG/PTY CLOSEPWR OFF
TUNER
MENU
SRC
#1~6
FM
¢
4
AM
DISP
AUD
Basic operations Tuner features
for KRC-859R/C/W, 759R
FM1 92.1
5ch 92.1FM1-
VOLUME 10
LUME 10 VO
AUTO indicatorFrequency
ATT indicator
LOUD indicator
Band display
AUTO indicator
ST indicator
for KRC-859R/C/W, 759R
for KRC-PS959R
ATT indicator
LOUD indicator
for KRC-PS959R
FrequencyBand displayPreset station number
ST indicator
Preset station number
Mode displaySpectrum analyzer display

DISC
DAB
B NR SCAN B.S/RDM REP T.C/D.SCN MTL/M.RDM MENULOUD
40W 4xTI DISP/
TEXTVOL NAME. SADJ
EJECT PROG/PTY CLOSEPWR OFF
TUNER
MENU
FM
¢
4
AM
DISPTI/VOL ADJ
38/PTY
#1~6
AUD AUD
DISC
DAB
B NR SCAN B.S/RDM REP T.C/D.SCN MTL/M.RDM MENULOUD
40W 4xTI DISP/
TEXTVOL NAME. SADJ
EJECT PROG/PTY CLOSEPWR OFF
TUNER
NR
SRC
B.S FM¢ 4 AM
DISP38/PROG/EJECT
MTLT.C
REP
RDS features Cassette player features
En
glish
Buttons and Display
— 6 —
TAPE-B (((((
E-B 1 TAP
FM3 KENWOOD
6ch KENWOODFM3-
for KRC-859R/C/W, 759R
for KRC-PS959R
for KRC-859R/C/W, 759R
for KRC-PS959R
TI indicator
Band display
™ indicatorTP indicator
TA indicator
TI indicator
Band display
™ indicatorTP indicator TA indicator
¢ indicator
Number of tracks to be skipped
B NR indicatorMTL indicator
Tape side
¢ indicator
Number of tracks to be skipped
B/C NR indicatorMTL indicator
Tape side
REG indicator
NEWS indicator
REG indicatorNEWS indicator
Tape running display
Character display Mode display
Tape running display

— 7 —
DISC
NF
DAB
B C NR SCAN B.S/RDM REP T.C/D.SCN MTL/M.RDM MENUCLK/ANALOUD
40W 4xTI DISP/
TEXTVOL NAME. SADJ
EJECT PROG/PTY CLOSEPWR OFF
TUNER
CLK/ANA AUD/MENU AM/NF
FM4 DISP SRC
#1~4 ¢
AUD
Other features
DISC
DAB
B NR SCAN B.S/RDM REP T.C/D.SCN MTL/M.RDM MENULOUD
40W 4xTI DISP/
TEXTVOL NAME. SADJ
EJECT PROG/PTY CLOSEPWR OFF
TUNER
MENU
SRC
RDM FM/DISC+
4
AM/DISC–
DISP/NAME.S 38
M.RDMD.SCN
REPSCAN¢
AUD
Disc control features
FM1 1235
92.1FM1 12:35
for KRC-859R/C/W, 759R
for KRC-PS959R
Clock display
Clock display / Spectrum analyzer display
£ indicator
£ indicator
CH T-08 235
T-08 : 2:35D06
for KRC-859R/C/W, 759R
for KRC-PS959R
Disc numberTrack number
Track time/Direct inputted track number/Direct inputted disc number
Track time/Direct inputted track number/Direct inputted disc number
Disc number
Track numberMode display
Mode display
TEXT indicator
TEXT indicator
Graphic display
AUDIO CONTROL indicator

CD
VOL.TUNETRACK
REMOTE CONTROL UNIT
DISCREW FF
#0~9A~Z
TUNE +¢
TRACK +
TUNE –4
TRACK –
AMREW
DISC –
FMFF
DISC +
TUNER
TAPE
DIRECTOK
CD¥MD CH
DNPP
u
d
PROG38
1 2 3
4 5 6
7 8 9
0
DEF
MNOJKLGHI
WXYTUVPRS
QZ
ABC
TUNER
TAPE
CD·MDCH
AM–
FM+ PROG
– +
DIRECTOK
DNPP
Remote control
Steering remote control
VOLUME
SRC
AM/DISC–
FM/DISC+
4
¢
ATT
DWN
UP
5
∞
AM/DISC –
FM/DISC +
SRC
d
u
ATT
¢
4
Optional
En
glish
— 8 —
Buttons and Display Basic operations (See page 5)
Stealth Retraction MechanismYou can help prevent theft of the unit by reversing thefaceplate so that the control panel cannot be seen, hiding theunit, and shutting off the audio.
Power ON/OFF:When you turn your vehicle’s ignition on, the unit’s power willalso turn on, with the faceplate reversing to show the controlpanel.When you turn your vehicle’s ignition off, the faceplate willreverse to hide the control panel, and the unit’s power will turnoff.
• When the moving faceplate is hit by an object, it will stop andreturn to its original state. Remove the object and repeat theaction.
• The status of the Code Security Function (P.34) is displayedwhenever the power is switched on."CODE ON" (Code Security has been registered)"CODE OFF" (Code Security has not been registered)
Using the Unit in Vehicles with Covered Consoles• Make sure the console is uncovered whilst the faceplate is
reversed. • Do not exert any excess force on the movable parts of the unit,
including the faceplate, as it can cause failure in the unit’smechanism.
Hiding the unit with the ignition turned on (forced closing):Hold down the SRC button for one second or more. The faceplate will reverse, hiding the unit. The unit will turnoff.
• When the closing faceplate is hit by an object, the unit will turnoff without the faceplate closing all the way. Remove the objectand press the SRC button to turn the unit back on, then turn itoff again to make it close properly.
• Whilst the control panel is moving, pressing the buttons will nothave any effect. Do not try to press the buttons on the controlpanel as the faceplate is moving, as excessive force maydamage the unit.
NOTE
2CAUTION
NOTE
Optional for the KRC-759R

— 9 —
• During the forced closing of the unit (i.e., having the unit leftclosed whilst ignition is turned on), the faceplate will not openno matter how often the ignition is turned on or off, unless “thetouch-sensitive spot” at the rear of the faceplate is pressed inorder to open it. You can prevent tampering of the unit whenletting someone else drive your car by keeping it closed thisway.
To cancel the stealth retraction mechanism’s forced closing ofunit and open control panel:
Press “the touch-sensitive spot” at the rear of the faceplate.(as illustrated)
Touch-sensitive spotThe invisible switch is hiding behind the touch-sensitive spot.Press the hollow spot (invisible switch) to open.
NOTE
Touch-sensitive spot
Switching ModesSwitching Modes:
Each time you press the SRC button, the mode switches asfollows:
Tuner mode
Tape mode
Disc control mode
• The mode switches to the next mode from any mode whichcannot be used.
• The disc control mode will differ depending on the unit that isconnected.
NOTE
VolumeIncreasing Volume:
Press the u button to turn up the volume.Decreasing Volume:
Press the d button to turn down the volume.
AttenuatorThis function allows you to turn down the volume quickly.
Turning Attenuator On/Off:Press the ATT button to switch the attenuator on and off.When the attenuator is on, the ATT indicator blinks.When the attenuator is off, the volume returns to the originallevel.
Turning down the volume all the way turns off the attenuatorfunction.
NOTE

— 10 —
En
glish
Basic operations (See page 5)
LoudnessThis function amplifies low and high tones when the volumeis turned down.The LOUD indicator lights up, when the loudness function ison.
Turning Loudness On/Off:Hold down the LOUD button for one second or more to switchthe loudness on and off.
Ending the menu modePress the MENU button.
• Make sure to end the menu mode when finished.If you fail to end the menu mode, several functions may notoperate properly, including the Traffic Information function, theNews Bulletin function with PTY news timeout setting, and theAlarm function.
• The News function turns on when the setting is made for thenews interruption interval. The "##MIN" display indicates thesetting selected for the news interruption timeout interval.
• The "##" display indicates the setting value.
NOTE
4
Menu SystemTo accommodate a greater number of functions, a menusystem has been employed for making settings. Press theMENU button to enter the menu mode and then display thefunction to make the setting. Details on each setting areexplained separately in the corresponding function page.
Hold down the MENU button for one second or more."MENU" is displayed when the menu mode is entered.
The function that you can adjust is indicated with the currentsettings displayed.
Selecting function to setPress the ¢ button to search through the functions until yousee the one you want to adjust in the display.Press the 4 button to search through the functionsbackward.Example: If you want to switch the tuning mode from AUTO1
to manual, first search through the functions untilyou see "AUTO 1" in the display.
Changing setting for currently displayed functionPress either the AM or FM button.The setting will change for each function.Example: The tuning mode will switch from AUTO 1 to AUTO
2. Pressing the button again switches the setting tomanual, and "MANUAL" is displayed.
3
2
1
AUTO 1
AUTO 2 MANUAL
MENU AUTO 1
for KRC-PS959R for KRC-859R/C/W,759R

— 11 —
↓CLOCK ON ↔ CLOCK OFF
↑↓CLOCK ADJST (Time Adjustment mode entered)
↑↓SYNC ON ↔ SYNC OFF
↑↓SECURITY
↑↓COLOR GREEN ↔ COLOR AMBER
↑↓CONTRAST ##
↑↓GRAPHIC ON ↔ GRAPHIC OFF
↑↓BEEP ON ↔ BEEP OFF
↑↓SWPRE FRONT ↔ SWPRE N-FAD
↑↓NEWS OFF ↔ NEWS ##MIN
↑↓LOCAL.S OFF ↔ LOCAL.S ON
↑↓AUTO1 → AUTO2 → MANUAL
↑↓AUTO-MEMORY (start)
↑↓AF ON ↔ AF OFF
↑↓REG ON ↔ REG OFF
↑↓ATPS ON ↔ ATPS OFF
↑↓MONO OFF ↔ MONO ON
↑↓SCROLL MANU ↔ SCROLL AUTO
↑
FunctionVarieties of settings for
each function (display)
Switching Clock Display
Time Adjustment (Manual)
Automatic Time Adjustment
Security mode
Selectable Illumination
Contrast Adjustment
Switching Graphic Display
Touch Sensor Tone
Switching Preout
News Bulletin Function
Local seek
Selecting Tuning Mode
Auto Memory Entry
AF Function
Region Restrict Function
Auto TP Seek
Monaural Reception
Text Scroll
KRC-PS959R Only
<In Tuner mode>
<In Tuner mode>
<In Tuner mode>
<In Disc changer mode>
<In FM reception of Tuner mode>
<Except in AM band>
<Except in AM band>
<Except in AM band>
KRC-859R/C/W,759R Only
KRC-PS959R,859R/C/W Only
<When Automatic Time Adjustment is off>

— 12 —
En
glish
Tuner features (See page 5)
Selecting Tuning ModeYou can choose from three tuning modes: auto seek, presetstation seek, and manual. The “AUTO1” indicator lights upwhen auto seek tuning is selected, and the “AUTO2” indicatorlights when preset station seek tuning is selected.
Hold down the MENU button for one second or more."MENU" is displayed and the menu mode is turned on.
Press the ¢ button repeatedly until the tuning functionappears in the display.Press the 4 button to search in the other direction.The tuning method is displayed as ”AUTO 1“, ”AUTO 2“, or”MANUAL“ referring respectively to auto seek tuning, presetstation seek tuning, and manual tuning.
Switching settingsPress either the AM button or FM button to switch the tuningmode.The display and setting will change.
Press the MENU button to end the menu mode.4
3
2
1
Tuning
Press the SRC button repeatedly until the tuner mode isobtained. "TUNER" is displayed only when the tuner mode isselected.
Press either the FM or AM button to select the band.Each time you press the FM button, the band switchesbetween the FM1, FM2 and FM3.Press the AM button to select the MW and LW bands.
• Auto Seek TuningPress the ¢ button to seek increasing frequencies.Press the 4 button to seek decreasing frequencies.
3
2
1
With the local seek function turned on, auto seek tuning skipsstations with relatively poor reception.
Turning Local Seek Function On/Off:
Hold down the MENU button for one second or more."MENU" is displayed and the menu mode is turned on.
Press the ¢ button repeatedly until the local seek functionappears in the display.Press the 4 button to search in the other direction.The function setting is indicated by "LOCAL.S ON" or "LOCAL.SOFF" in the display, indicating that the local seek function is onor off, respectively.
Switching settingsPress either the AM button or FM button.The display and setting will change.
Press the MENU button to end the menu mode.4
3
2
1
Local Seek Function
K2I (Kenwood Intelligent Twin IF)When the frequency of another station is too close to that ofthe station currently being listened to, interfering with properreception, this function automatically narrows the range ofreceived frequencies to prevent such interference.
• Preset station seek tuningPress the ¢ button to move to the next preset station (i.e.,the one with the next highest number), and the 4 button tomove to the last preset station (i.e., the one with the nextlowest number).
If the frequencies stored at the preset numbers receivestations which were not originally memorized when travelinglong distances, the preset number is not displayed. In suchcases, pressing the 4/¢ button to use preset stationseek will receive channel 1.
• Manual TuningPress the ¢ button to increase the frequency by one step.Press the 4 button to decrease the frequency by one step.
The ST indicator lights up when stereo broadcasts are beingreceived.
NOTE
NOTE
— 13 —
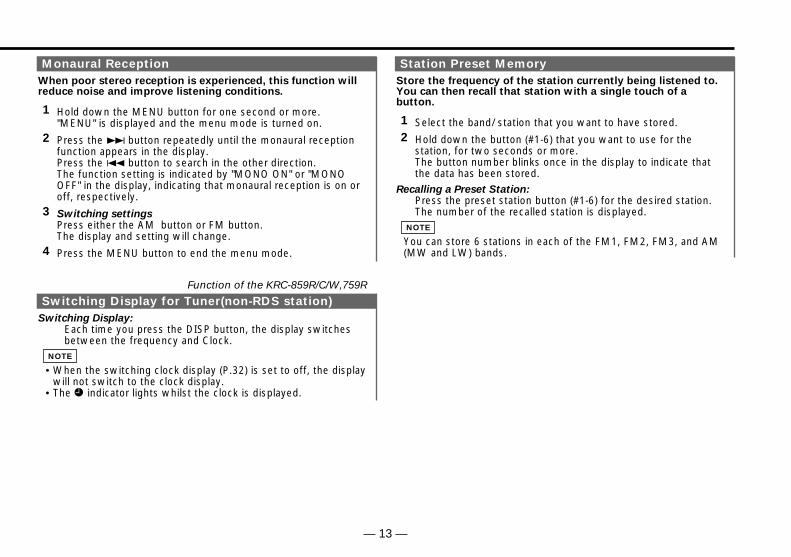
When poor stereo reception is experienced, this function willreduce noise and improve listening conditions.
Hold down the MENU button for one second or more."MENU" is displayed and the menu mode is turned on.
Press the ¢ button repeatedly until the monaural receptionfunction appears in the display.Press the 4 button to search in the other direction.The function setting is indicated by "MONO ON" or "MONOOFF" in the display, indicating that monaural reception is on oroff, respectively.
Switching settingsPress either the AM button or FM button.The display and setting will change.
Press the MENU button to end the menu mode.4
3
2
1
Monaural Reception
Switching Display for Tuner(non-RDS station)Switching Display:
Each time you press the DISP button, the display switchesbetween the frequency and Clock.
• When the switching clock display (P.32) is set to off, the displaywill not switch to the clock display.
• The £ indicator lights whilst the clock is displayed.
NOTE
Function of the KRC-859R/C/W,759R
Station Preset MemoryStore the frequency of the station currently being listened to.You can then recall that station with a single touch of abutton.
Select the band/ station that you want to have stored.
Hold down the button (#1-6) that you want to use for thestation, for two seconds or more.The button number blinks once in the display to indicate thatthe data has been stored.
Recalling a Preset Station:Press the preset station button (#1-6) for the desired station.The number of the recalled station is displayed.
You can store 6 stations in each of the FM1, FM2, FM3, and AM(MW and LW) bands.
NOTE
2
1

— 14 —
En
glish
Tuner features (See page 5)
Auto Memory EntryYou can automatically store all the receivable frequencies inthe band currently being listened to, and then recall them withthe touch of a button later. This function is especially usefulwhen you are travelling and do not know what stations areavailable. Up to 6 frequencies can be stored this way.
Select the band for auto memory entry.
Hold down the MENU button for one second or more."MENU" is displayed and the menu mode is turned on.
Press the ¢ button repeatedly until "AUTO-MEMORY"appears in the display.Press the 4 button to search in the other direction.
Hold down either the AM button or FM button for two secondsor more to start auto memory function.The numbers of the preset station buttons showed in order.When all the stations in a certain band are stored in the presetmemory, the auto memory entry stops. The tuner then playsthe last station received.
Recalling a Preset Station:Press the preset station button (#1-6) for the desired station.The number of the recalled station is displayed.
• When the AF function is turned on whilst auto memory entrytakes place, only RDS stations (i.e., stations with RDScapability) are stored. RDS stations that have been preset forFM1 cannot also be preset in FM2 or FM3.
• When the local seek function is turned whilst auto memoryentry takes place, stations with poor reception are not stored.
• When the Traffic Information function is on , only the localtraffic information station frequency will be stored.
Cancelling Auto Memory Entry During Its Operation:Press the MENU button whilst auto memory entry is takingplace to stop the process.
NOTE
4
3
2
1
Direct Access TuningWhen you already know the frequency of the station that youwant to listen to, you can enter it directly for quick access.
Select the band by pressing the FM or AM button.
Press the DIRECT button.The frequency part of the display blinks for 10 seconds.If you make no input in the 10-second period, direct accesstuning is automatically cancelled.
Enter the frequency of the desired station whilst the display isblinking.If you want to listen to an FM station at 92.1 MHz, forexample, press 0, 9, 2, and 1.If you want to listen to an AM station at 810 kHz, for example,press 0, 8, 1, and 0.
• When a frequency which cannot be received is input, thisfrequency is not verified and operation returns to the originalfrequency input mode.
• FM frequencies can only be input in 0.1 MHz steps, and not in0.01 steps.
Cancelling Direct Access Tuning:Press the DIRECT button again.
NOTE
3
2
1
Function of Remote control with number/letter entry buttons (See page 8)
— 15 —
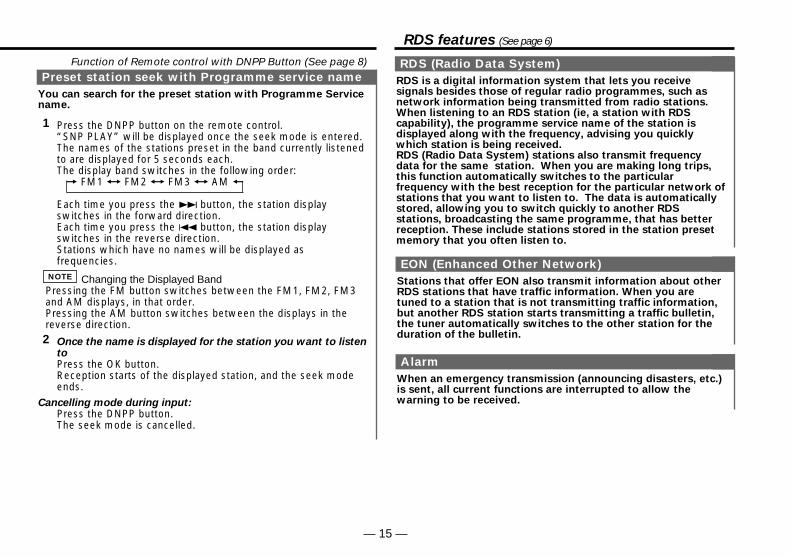
Preset station seek with Programme service name You can search for the preset station with Programme Servicename.
Press the DNPP button on the remote control.“SNP PLAY” will be displayed once the seek mode is entered.The names of the stations preset in the band currently listenedto are displayed for 5 seconds each.The display band switches in the following order:= FM1 Ô FM2 Ô FM3 Ô AM +
Each time you press the ¢ button, the station displayswitches in the forward direction.Each time you press the 4 button, the station displayswitches in the reverse direction.Stations which have no names will be displayed asfrequencies.
Changing the Displayed BandPressing the FM button switches between the FM1, FM2, FM3and AM displays, in that order.Pressing the AM button switches between the displays in thereverse direction.
Once the name is displayed for the station you want to listentoPress the OK button.Reception starts of the displayed station, and the seek modeends.
Cancelling mode during input:Press the DNPP button.The seek mode is cancelled.
2
NOTE
1
Function of Remote control with DNPP Button (See page 8) RDS (Radio Data System)RDS is a digital information system that lets you receivesignals besides those of regular radio programmes, such asnetwork information being transmitted from radio stations.When listening to an RDS station (ie, a station with RDScapability), the programme service name of the station isdisplayed along with the frequency, advising you quicklywhich station is being received.RDS (Radio Data System) stations also transmit frequencydata for the same station. When you are making long trips,this function automatically switches to the particularfrequency with the best reception for the particular network ofstations that you want to listen to. The data is automaticallystored, allowing you to switch quickly to another RDSstations, broadcasting the same programme, that has betterreception. These include stations stored in the station presetmemory that you often listen to.
EON (Enhanced Other Network)Stations that offer EON also transmit information about otherRDS stations that have traffic information. When you aretuned to a station that is not transmitting traffic information,but another RDS station starts transmitting a traffic bulletin,the tuner automatically switches to the other station for theduration of the bulletin.
AlarmWhen an emergency transmission (announcing disasters, etc.)is sent, all current functions are interrupted to allow thewarning to be received.
RDS features (See page 6)

— 16 —
En
glish
RDS features (See page 6)
AF (Alternative Frequency) FunctionWhen poor reception is experienced, automatically switch toanother frequency broadcasting the same programme in thesame RDS network with better reception.The ™indicator lights up when the AF function is turnedon.
Turning AF Function On/Off:
Hold down the MENU button for one second or more."MENU" is displayed and the menu mode is turned on.
Press the ¢ button repeatedly until the AF function appearsin the display.Press the 4 button to search in the other direction.The function setting is indicated by "AF ON" or "AF OFF" in thedisplay, indicating that the AF function is on or off,respectively.
Switching settingsPress either the AM button or FM button.The display and setting will change.
Press the MENU button to end the menu mode.Displaying Frequencies:
• When the Switching Clock Display functions is OFF, and forKRC-PS959R:Press the DISP button.
• When the Switching Clock Display function is ON:Hold down the DISP button for one second or more.
The frequency for the RDS station will be displayed for fiveseconds instead of the station name.
When no other stations with stronger reception are available forthe same programme in the RDS network, you may hear theincoming broadcast in bits and snatches. Turn off the AF functionin such a case.
NOTE
4
3
2
1
Restricting RDS Region (Region Restrict Function)You can choose whether or not to restrict the RDS channels,received with the AF function for a particular network, to aspecific region. When the Region Restrict Function is on, theregion is restricted and the REG indicator is turned on.
Turning Region Restrict Function On/Off:
Hold down the MENU button for one second or more."MENU" is displayed and the menu mode is turned on.
Press the ¢ button repeatedly until the Region restrictfunction appears in the display.Press the 4 button to search in the other direction.The function setting is indicated by "REG ON" or "REG OFF" inthe display, indicating that the function is on or off,respectively.
Switching settingsPress either the AM button or FM button.The display and setting will change.
Press the MENU button to end the menu mode.
Sometimes stations in the same network broadcast differentprogrammes or use different programme service names.
NOTE
4
3
2
1
Traffic Information FunctionYou can listen to traffic information. If you are listening totapes or discs, they will continue playing until a traffic bulletinis broadcast.
Turning TI function On/Off:Press the TI button to turn the function on and off.When the function is on, the TI indicator is turned on.When a traffic information station is being received, the TPindicator will turn on. When none is being received, the TIindicator will blink on and off.When a traffic bulletin begins to be broadcast, the TA indicatorwill turn on, and reception will begin at the preset volume.If you are listening to a tape or disc when a traffic bulletinbegins, they will automatically be turned off. When the

— 17 —
bulletin ends or poor reception is experienced, the tape or discwill begin playing again.
Pressing the TI button whilst in the MW/LW band automaticallyswitches reception to the FM band. However, the MW/LW bandis not returned to when the TI button is pressed again.
Switching to a Different Traffic Information Station:Use the 4 / ¢ buttons to make an auto seek of the TIstations in a certain band.
• When you are listening to a tape or disc, you cannot change toanother TI station.
• When the auto TP seek function is turned on and receptionstarts to weaken, the tuner automatically seeks stations withbetter reception.
• If you are tuned to a station that is not a traffic informationstation itself but which provides EON services, you can stillhave traffic information received.
• Holding the TI button down for one second or more when the TIfunction is on in the disc control mode results in a change tothe frequency display of the traffic information station for fiveseconds.
NOTE
NOTE
Auto TP Seek FunctionWhen the TI function is on and poor reception conditions areexperienced when listening to a traffic information station,another traffic information station with better reception willbe searched for automatically. This function is on, when unitis first powered on.
Turning Auto TP Seek Function On/Off:
Hold down the MENU button for one second or more."MENU" is displayed and the menu mode is turned on.
Press the ¢ button repeatedly until the Auto TP Seekfunction appears in the display.Press the 4 button to search in the other direction.The function setting is indicated by "ATPS ON" or "ATPS OFF"in the display, indicating that the function is on or off,
2
1
respectively.
Switching settingsPress either the AM button or FM button.The display and setting will change.If the traffic information station you are tuned to experiencespoor reception, this function automatically seeks another TPstation.
Press the MENU button to end the menu mode.4
3
Presetting Volume for Traffic Information/NewsPreset the volume level to be used for traffic information andnews broadcasts.
Tune into the station for which you want to set the volume.
Adjust the volume to the desired level.
Hold down the VOL ADJ button for two seconds or more.The volume level blinks once in the display to indicate that thedata has been stored. Future traffic information/news broadcasts are heard at thepreset level.
• The volume cannot be lowered by this function during tunerreception. The volume is only set when it is louder than thelistening volume of the tuner.
• You can arrange only to listen to traffic information or newsbulletins with at preset volume with the volume set atminimum.
NOTE
3
2
1

News Bulletin Function with PTY News Timeout Setting
You can arrange to have news bulletins interrupt your currentlistening source, including other radio stations. When theNews Bulletin function is on, the PTY News Timeout settingallows you to set the interval during which further newsinterruption cannot take place. You can adjust the PTY newsinterruption period from 10 to 90 minutes for each journey.
Turning News Bulletin Function On/Off:
Hold down the MENU button for one second or more."MENU" is displayed and the menu mode is turned on.
Press the ¢ button repeatedly until the News Bulletinfunction appears in the display.Press the 4 button to search in the other direction.The function setting is indicated by "NEWS ##MIN" or "NEWSOFF" in the display, indicating that the function is on or off,respectively.
Depending on the interval chosen, the "##MIN" in the display willchange when the function is turned on.
Changing the Function SettingPress either the FM or AM button.Each time you press the FM or AM button until the desiredsetting is displayed.Press the FM button to increase the interval, and the AMbutton to decrease it.
OFF ↔ 00MIN ↔ 10MIN ↔ 20MIN ↔ 30MIN ↔ 40MIN ↔ 50MIN↔ 60MIN ↔ 70MIN ↔ 80MIN ↔ 90MIN (MIN= minutes)
When you select the news interruption timeout interval, theNews function turns on and the NEWS indicator lights up.When a news bulletin is received, the NEWS indicator will blinkand reception will begin at the preset volume.
If you choose the "20MIN" setting, further news bulletins will notbe received for 20 minutes once the first news bulletin isreceived. Setting the interval at the "00MIN" factory defaultindicates no News Timeout will be made, meaning that additional
NOTE
3
NOTE
2
1
news bulletins will continue to be searched for.
Press the MENU button to end the menu mode.
• This function is only available if the desired station sends PTY-code for news bulletin or belongs to EON-Network sendingPTY-code for news bulletin.
• If you turn on the news bulletin function in the MW/LW band,the band is switched automatically to the FM band. However, the MW/LW band is not returned to when you turnoff the function.
NOTE
4
— 18 —
En
glish
RDS features (See page 6)
Programme Type (PTY) FunctionConduct auto seek tuning only on those stations with selectedkinds of programmes.
Press either the 38(PTY) button."PTY" is displayed and the Programme Type Selection (PTY)Mode entered.If you make no key input in 30 seconds, the mode willautomatically turn off.
You cannot use this function whilst the traffic informationfunction is turned on.
Changing the Display Language to French or GermanIn the PTY mode, hold down the 38(PTY) button for one secondor more to display the name of the language currently used.If you want to change the language, press the preset button forthe desired language and then the 38(PTY) button.English is #1, French is #2, and German is #3.
Select the type of programme to be received• Press either the FM or AM buttons repeatedly to select the
type of programme you want to listen to. The selection includes:
Speech ↔ 1.News ↔ 2.Current Affairs ↔ 3.Information ↔4.Sport ↔ 5.Education ↔ 6.Drama ↔ 7.Culture ↔8.Science ↔ 9.Varied ↔ 10.Pop Music ↔ 11.Rock Music ↔12.M,O,R Music ↔ 13.Light Classical ↔ 14.SeriousClassical ↔ 15.Other Music ↔ 16.Weather ↔ 17.Finance
2
NOTE
NOTE
1

— 19 —
↔ 18.Children's programmes ↔ 19.Social Affairs ↔20.Religion ↔ 21.Phone ↔ 22.Travel ↔ 23.Leisure ↔24.Jazz Music ↔ 25.Country Music ↔ 26.National Music ↔27.Oldies Music ↔ 28.Folk Music ↔ 29.Documentary ↔Music ↔ Speech ↔(Speech.....1~9,16~23, 29, Music.....10~15, 24~28)
• You can select the type of programme directly by pressing apreset button. The buttons are factory-set to the followingtype of programmes:
1. Music 2. Speech 3. News4. Other Music 5. Serious Classical 6. Varied
Changing the Preset Button Settings for Programme TypeAfter selecting the type of programme to be stored in a certainpreset button, hold down that button for two seconds or more.The previously stored data for that button are erased and thenew programme type is stored.
Seeking the selected programme type Press the 4 or ¢ button to make a seek of frequencieswith your selected type of programme.The display blinks and the seek starts.If your selected type of programme is found, the name of thestation is displayed and the station is tuned into."PTY" blinks in the display for about 30 seconds.If you make no key input in 30 seconds, the PTY selectionmode will turn off automatically.
If no programme can be found, "NO PTY" is displayed.If you want to select another type of programme, repeat steps 2and 3 above.
Switching to Other Stations with the Same Type of Programme:When "PTY" is blinking in the display, perform auto seektuning.The tuner scans for another station with the same type ofprogramme.
Cancelling Programme Type Function During Its Operation:Press the 38(PTY) button.
NOTE
3
NOTE
News NEWS1AFFAIRS2 Current Affairs
KRC-859R/C/W,759RProgrammetype number
KRC-PS959R
Programme Type Display
Information INFO3SPORT4 Sport
Education EDUCATE5DRAMA6 Drama
Cultures CULTURE7SCIENCE8 Science
Varied Speech VARIED9POP M10 Pop Music
Rock Music ROCK M11M.O.R. M12 M.o.R Music
Light Classics M LIGHT M13CLASSICS14 Serious Classics
Other Music OTHER M15WEATHER16 Weather& Metr
Finance FINANCE17CHILDREN18 Children's Progs
Social Affairs SOCIAL A19RELIGION20 Religion
Phone In PHONE IN21TRAVEL22 Travel & Touring
Leisure & Hobby LEISURE23JAZZ24 Jazz Music
Country Music COUNTRY25NATION M26 National Music
Oldies Music OLDIES27FOLK M28 Folk Music
Documentary DOCUMENT29MUSIC– All Music
All Speech SPEECH–

— 20 —
En
glish
Cassette player features (See page 6)
Playing Cassette TapesLoading and Playing Cassettes:
Press the ¡(EJECT) button to slide open the faceplate,showing the cassette (insertion) slot. Holding the cassette withthe tape exposed to the right, insert it in the slot. The faceplatewill show the control panel, and the tape will start playing.The ¢ indicator lights up when a cassette has been loaded.
Playing Cassettes Already Loaded:Press the SRC button repeatedly until the tape mode isobtained. "TAPE" is displayed when the tape mode has beenselected.The tape will start playing.
Listening to the other side:Press the PROG button.Tape play switches to the other side.
Eject:Press the ¡(EJECT) button to stop tape play. The faceplatewill slide to eject the tape.Press the ¡(EJECT) button to show the control panel.
• The sound will be temporarily muted whilst the faceplate ismoving.
• The only buttons that will work during the eject state are the¡(EJECT), SRC, TI and ATT buttons, as well as the volumecontrol button.
• Remove a cassette from the unit when not listening to it for awhilst. If you leave it in the unit too long, the tape may stick tothe tape head and cause the unit to malfunction.
NOTE
Fast Forwarding and Rewinding Cassette TapesFast Forwarding Tapes:
Press the FM button.Rewinding Tapes:
Press the AM button.Cancelling:
Press the PROG button.Normal tape play returns.
Using Dolby B/C NR (Noise Reduction)Listen to tapes recorded using the Dolby B or C NR system.
Turning Dolby NR On/Off:Press the NR button repeatedly to switch the Dolby NRselection as follows.
Dolby B NR ON
Dolby C NR ON (KRC-PS959R Only)
OFF
The Dolby B NR indicator lights up when Dolby B NR is turnedon, and the Dolby C NR indicator when Dolby C NR is turnedon.
Dolby noise reduction manufactured under license from DolbyLaboratories Licensing Corporation. ”DOLBY” and the double-D symbol are trademarks of DolbyLaboratories Licensing Corporation.
Switching Tape TypesSelect type of tape being played.
Switching Tape Types:Press the MTL button to switch the MTL indicator on and offand to select the tape type.Turn the MTL indicator off for normal tape (Type I) playback.Turn the MTL indicator on for the following tape types:
CrO2 (Type II) FeCr (Type III) Metal (Type IV)Selecting the wrong tape type may cause sound quality tosuffer.
Blank Skip FunctionAutomatically fast forwards to the beginning of the next trackwhen long blank spaces (10 seconds or more) are detected,continuing tape playback. This function is on, when unit isfirst powered on.
— 21 —
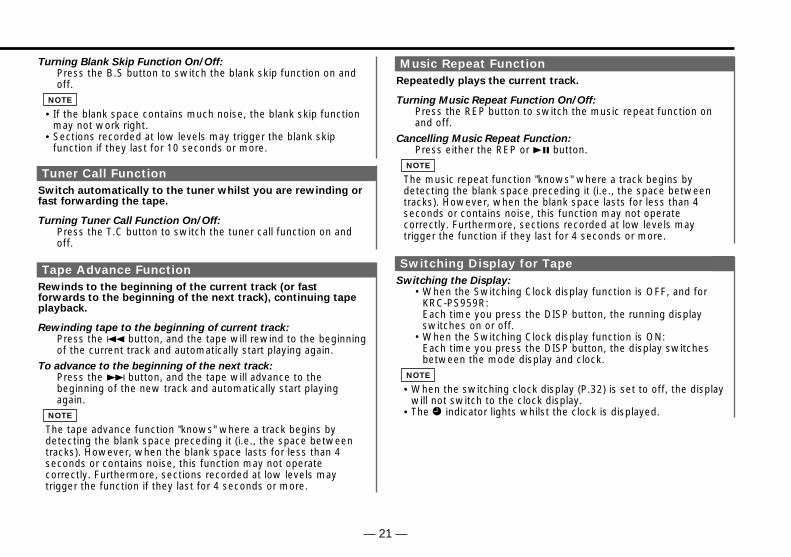
Turning Blank Skip Function On/Off:Press the B.S button to switch the blank skip function on andoff.
• If the blank space contains much noise, the blank skip functionmay not work right.
• Sections recorded at low levels may trigger the blank skipfunction if they last for 10 seconds or more.
NOTE
Tuner Call FunctionSwitch automatically to the tuner whilst you are rewinding orfast forwarding the tape.
Turning Tuner Call Function On/Off:Press the T.C button to switch the tuner call function on andoff.
Tape Advance FunctionRewinds to the beginning of the current track (or fastforwards to the beginning of the next track), continuing tapeplayback.
Rewinding tape to the beginning of current track:Press the 4 button, and the tape will rewind to the beginningof the current track and automatically start playing again.
To advance to the beginning of the next track:Press the ¢ button, and the tape will advance to thebeginning of the new track and automatically start playingagain.
The tape advance function "knows" where a track begins bydetecting the blank space preceding it (i.e., the space betweentracks). However, when the blank space lasts for less than 4seconds or contains noise, this function may not operatecorrectly. Furthermore, sections recorded at low levels maytrigger the function if they last for 4 seconds or more.
NOTE
Music Repeat FunctionRepeatedly plays the current track.
Turning Music Repeat Function On/Off:Press the REP button to switch the music repeat function onand off.
Cancelling Music Repeat Function:Press either the REP or 38 button.
The music repeat function "knows" where a track begins bydetecting the blank space preceding it (i.e., the space betweentracks). However, when the blank space lasts for less than 4seconds or contains noise, this function may not operatecorrectly. Furthermore, sections recorded at low levels maytrigger the function if they last for 4 seconds or more.
NOTE
Switching Display for TapeSwitching the Display:
• When the Switching Clock display function is OFF, and forKRC-PS959R:Each time you press the DISP button, the running displayswitches on or off.
• When the Switching Clock display function is ON:Each time you press the DISP button, the display switchesbetween the mode display and clock.
• When the switching clock display (P.32) is set to off, the displaywill not switch to the clock display.
• The £ indicator lights whilst the clock is displayed.
NOTE

— 22 —
En
glish
Disc control features (See page 7)
Fast Forwarding and Reversing Disc PlayFast Forwarding Disc Play:
Hold down on the ¢ button.Release your finger to play the disc at that point.
Reversing Disc Play:Hold down on the 4 button.Release your finger to play the disc at the point.
You cannot use reverse play between tracks depending on themodel being connected. Instead, the reverse play function iscancelled when it reaches the beginning of a track, at which pointnormal play automatically resumes.
NOTE
Track SearchSearch forwards or backwards through the tracks on the discuntil you reach the one that you want to listen to.
Making a Reverse Track Search:Press the 4 button to display the desired track number.Press once to search back to the beginning of the currenttrack, twice to search back to the beginning of the previoustrack, and so forth.Play starts at the beginning of the displayed track number.
(for disc changers)Pressing the 4 button whilst listening to track 1 only searchesback to the beginning of that track. The reverse search is not"recycled" to the last track on the disc.
NOTE
Playing Disc modeThis funciton permits the connection of optional players andthe playing of discs.
Playing Discs:Press the SRC button repeatedly to select the disc controlmode.The disc will start playing.
The disc control mode will differ, depending on the unit that isconnected.Mode Display Examples• "DISC"...when a disc changer is connected• "DISC-1", "DISC-2"...when two disc changers are connected
NOTE
When a unit equipped with an O-N switch is to be connected,please also see the instruction manual of this unit.Set the O-N switch to "N". "N"-operation will be set.
When a unit that is not equipped with an O-N switch, or thechanger switching unit "KCA-S200" is connected, "O"-operation will be set.
"N"-operation:• The disc title and track title of the CD text can be displayed.• The disc name will be displayed when the name has been
registered to any connected unit with the Presetting DiscNames function, or when the playing unit contains a disc towhich the disc title has been recorded.
"O"-operation:• CD text cannot be displayed.• Regardless of the control unit, the characters that can be
registered with the Presetting Disc Names function are "A~Z0~9 /, +, –, ∗ , =, <, >, [ , ]".
• The disc name will be displayed when the name has beenregistered to the playing unit with the Presetting Disc Namesfunction.
The CD text, Presetting Disc Names, and Disc Name Preset Playfunctions may not be operational depending on the unit.
NOTE
Pausing and Restarting Disc Play:Press the 38 button to make the disc pause.Press the same button again to start play again.
• When one disc has finished playing its last track, the next discin the changer starts playing. When the last disc in the changerhas finished, the player returns to the first disc and startsplaying it.
• Disc #10 is displayed as "0". (KRC-859R/C/W,759R only)
NOTE

— 23 —
Disc SearchSearch forwards or backwards through the discs in a discchanger until you reach the one that you want to listen to.
Making a Reverse Disc Search:Press the DISC– button to display the desired disc number.Each time the button is pressed, the displayed disc numberdecreases by one.Play starts at the beginning of the displayed disc.
Making a Forward Disc Search:Press the DISC+ button to display the desired disc number.Each time the button is pressed, the displayed disc numberincreases by one.Play starts at the beginning of the displayed disc.
"LOAD" is displayed when discs are being exchanged on the discchanger.
NOTE
Repeat playing the current track or disc.
Turning Repeat Play Function On/Off:Press the REP button to switch the repeat play function on andoff as follows :
Track Repeat ON
Disc Repeat ON (Function of disc changers)
Track/Disc Repeat OFF
The track number blinks in the display when the track repeatfunction is on.The disc number blinks in the display when the disc repeatfunction is on.
The repeat play function is cancelled when you stop playing thedisc.
NOTE
Track / Disc Repeat Function
Function of disc changers
Making a Forward Track Search:Press the ¢ button to display the desired track number.Press once to fast forward to the next track, twice to fastforward to the track after that, and so forth.Play starts at the beginning of the displayed track number.
(for disc changers)You cannot make a forward track search when listening to thelast track on a disc.
NOTE
Track Scan FunctionSuccessively play the beginning of each track on a disc untilyou find the track that you want to listen to.
Turning Track Scan Function On/Off:Press the SCAN button to switch the track scan function onand off.The first 10 seconds of each track are played, and the tracksare played in order.The track number currently being heard blinks in the display.
Stopping to Listen to the Track Being Scanned:Press the 38 or SCAN button again to stop the scan and keepon listening to a track normally.
• The track scan function is cancelled when you stop playing adisc.
• The track scan function only scans each track on a disc once.
NOTE

— 24 —
En
glish
Disc control features (See page 7)
Disc Scan FunctionSuccessively play the beginning of each disc on a changeruntil you find the one that you want to listen to.
Turning Disc Scan Function On/Off:Press the D.SCN button to switch the disc scan function onand off.The first 10 seconds of each disc are played, in the order inwhich they are loaded on the changer.The disc number currently being heard blinks in the display.
Stopping to Listen to the Disc Being Scanned:Press the 38 or D.SCN button again to stop the scan and keepon listening to the disc normally.
• The disc scan function is cancelled when you stop playing adisc.
• The disc scan function only scans each disc on the changeronce.
• "LOAD" is displayed when discs are being exchanged on thedisc changer.
NOTE
Random Play FunctionPlay all the tracks on the current disc in random order.
Press the RDM button to switch the random play function onand off.The display of the track number changes continuously as thenext track is being selected.When the track has been selected, play starts.The selected track number blinks in the display as it is beingplayed.
When all the tracks on a certain disc have been played using therandom play function, the next disc on the changer starts playing(with the random play function still turned on).
To change the track being heard, press the ¢ button.Another track is selected and played.
2
NOTE
1
Magazine Random Play FunctionPlay the tracks on all the discs in the disc changer in randomorder.
Press the M.RDM button to switch the magazine random playfunction on and off.The display of the disc and track numbers change continuouslyas the next track is being selected.When the disc/track has been selected, play starts.The selected disc/track number blinks in the display as it isbeing played.
This function is not available with the following models:KDC-C200/C300/C400/C301/C401
To change the track being heard, press the ¢ button.Another disc/track is selected and played.
• The magazine random play function is cancelled when you stopplaying a disc.
• The time needed for random selection depends on the numberof discs loaded in the disc magazine.
NOTE
2
NOTE
1
Function of disc changers
Function of disc changers
The random play function is cancelled when you stop playing adisc.
NOTE

— 25 —
Switching Display for DiscsSwitch the display that appears whilst discs are playing.
Switching Display for Discs:Each time you press the DISP button, the display during discplay switches as follows.
Track time
Disc name
Disc title (Units featuring CD text/MD only)
Track title (Units featuring CD text/MD only)
Clock (KRC-859R/C/W, 759R only)
• You can give names to discs through the presetting disc namefunction (see p. 26). Note that depending on the unit, displaymay not be possible.
• If you try to display the name of a disc that does not have one,"NO NAME" is displayed instead.
• The clock is displayed only when the Switching Clock displayfunction (P.32) is on.
• When there is an attempt to display the title of a disc for whichthe disc title/track title has not been recorded, "NO TEXT" isdisplayed for CD and "NO NAME" is displayed for MD.
• Depending on the type of characters of the CD Text, somecharacters may not be displayable.
NOTE
Text ScrollThis function permits the text to be scrolled and the entiretext to be displayed. Switching between manual scrolling andautomatic scrolling is permitted. The factory default is manualscrolling.
To scroll manually:
Press the DISP button to display the disc title or the track title.1
Holding down the DISP button for one second or more resultsin one scrolling display of the titles.
Manual/Automatic scroll switching:
Hold down the MENU button for one second or more."MENU" is displayed and the menu mode is turned on.
Press the ¢ button repeatedly to switch the function to beset to the text scroll function.Pressing the 4 button results in the functions beingswitched in the reverse order.The text scroll function is displayed with "SCROLL MANU" or"SCROLL AUTO"."SCROLL MANU" (Manual scrolling)"SCROLL AUTO" (Automatic scrolling)
Switching settingsPress either the AM button or FM button.The display and setting will change.
Press the MENU button to end the menu mode.To scroll automatically:
Press the DISP button to display the disc title or the track title.The titles will be displayed in one scrolling display.
When the disc or track to be played changes, the title isdisplayed in one scrolling display.
Holding down the DISP button for one second or more resultsin one scrolling display of the titles.
Only units with a CD text feature permit title display.NOTE
2
NOTE
1
4
3
2
1
2

— 26 —
En
glish
Disc control features (See page 7)
Presetting Disc NamesStore the names of discs to be displayed when played.
Play the disc whose name you want to preset.
• This function is not available for disc changers that do notfeature the Disc Name Preset function.
• This procedure is not to be used to store the disc and tracktitles for MDs that you record.
Press the NAME.S button for at least two seconds."NAME SET" is displayed and the disc name preset mode isentered.The cursor blinks in the position where character input can bemade.
Press either the 4 or ¢ button to move the cursor to thedesired position.The 4 button moves the cursor to the left, and the ¢button to the right.You can also move the cursor left or right by pressing theTRACK+ or TRACK– buttons, respectively, on the remotecontrol.
Each time the 38 button is pressed, the characters to beentered change as listed below.Press the DISC+ or DISC– button to display the desiredcharacter. Characters that can be displayed are as follows.
Alphabet (upper case): A ~ Z
Alphabet (lower case): a ~ z (KRC-PS959R Only)
Numerals and symbols: 1~9 0 @ ” ‘ ` % & ∗ + - = , . / \ < > [ ]
Special characters: á à é è í ì ó ò ú ù Ñ Ç ® ß ‹ fl â ä ê ëî ï ô ö û ü ñ ç © Æ › fi
(KRC-PS959R Only)
The operation and characters that can be entered may changeNOTE
4
3
2
NOTE
1
as listed below, depending on the unit that is connected.A press of the 38 button exits the disc name preset mode.Operations can be followed again from Step 2 at a time suchas this, and the characters to be input are selected using theprocedure described below.Press the DISC+ or DISC– button to display the desiredcharacter. Besides the alphabet (capital letters only) andnumbers, you can choose the following characters: /, +, –, ∗ ,=, <, >, [ and ].
Direct Alphabet InputIf the disc changers that were manufactured and sold after 1997are connected, you can directly input letters using thenumber/letter entry buttons on the remote control.Example: Use the following table to enter the name "DANCE".
Continue steps 3 and 4 until all the characters are chosen forthe name.
Press either the NAME.S button on the main unit or the OKbutton on the remote.The disc name is stored and the disc name preset mode iscanceled.If you make no entry in a 10-second period, the name will bestored with the characters input so far.
• The number of characters and discs whose names can bestored will differ depending on the disc changer that isconnected. Please see your disc changer manual for details.
• Discs are identified by their total length and number of tracks. Ifanother disc happens to have the same specifications as onethat you have already stored a name for, the name will bedisplayed for it, too.
• If you want to change the name of a disc, repeat steps 1 and 2
NOTE
6
5
NOTE
#3 1“D”1“A” #2
#6“N” 2#2 3“C”#3“E” 2
Button to press # Times pressedCharacter

to display the name, and then repeat steps 3 and 4 to input thechanges.
• Pressing the reset button does not erase the disc names storedin a disc changer.
— 27 —
Direct Track SearchUsing the remote control, make direct input of the tracknumber that you want to listen to.
Using the numeric buttons on the remote control, enter thenumber of the track that you want to listen to.The selected track number blinks in the display for 10 seconds.If you make no further input in the 10-second period, thenumber entry mode will automatically be cancelled.
Press either the TRACK+ or TRACK– button whilst the tracknumber is blinking.The track specified in step 1 starts playing.
Cancelling Direct Track Search During Its Operation:Press the 38 button.
You cannot use the direct track search function whilst doing trackor disc scans or using random or magazine-random play.
NOTE
2
1
Function of Remote control with number/letter entry buttons (See page 8)
Direct Disc SearchUsing the remote control, make direct input of the discnumber that you want to listen to.
Using the numeric buttons on the remote control, enter thenumber of the disc that you want to listen to.The selected disc number blinks in the display for 10 seconds.If you make no further input in the 10-second period, thenumber entry mode will automatically be cancelled.
• Input "0" to select disc #10.• If you enter more than two numbers all at once, a search will be
made only of the last number entered.
Press either the DISC+ or DISC– button whilst the numberinputted is blinking.The disc specified in step 1 starts playing.
Cancelling Direct Disc Search During Its Operation:Press the 38 button.
2
NOTE
1
Function of disc changers with remote control havingnumber/letter entry buttons (See page 8)

— 28 —
En
glish
Disc control features (See page 7)
Disc Name Preset Play (DNPP)If you have preset the name of a disc that you want to listento in the disc changer, you can look for it by name and startplaying it.
Press the DNPP button on the remote control."DNP PLAY" will appear in the display, and the disc namepreset play mode is entered.The preset names/disc titles of the disc in the disc changer towhich you are currently listening are successively displayed forfive seconds each. In any of the units that are connected, discs that have not beendisc name preset will display "NO NAME".
• This function can only be used in disc changers that weremanufactured or sold as of 1997. Also note that some unitscannot provide a display unless the disc name preset has beenmade by the unit that is playing.
• Discs in the disc changer that have never been played beforewill appear as "NO ACCESS" when the disc names aredisplayed. When you cannot identify a disc because of the "NOACCESS" display after inserting a disc magazine, try playing itusing the disc scan or a similar function to display the discname. Also note that "NO DISC" will be displayed when a dischas not been loaded.
Rapid display (forward / reverse):Press the DISC+ or DISC– button.Pressing the DISC+ button will rapidly display the presetnames/disc titles in order.Pressing the DISC– button will rapidly display the presetnames/disc titles in reverse order.
When the name appears for the disc you want to playPress the OK button.The disc whose name is displayed will be recalled, and the discname preset play (DNPP) mode will end.
To cancel DNPP mode:Press the DNPP button.The disc name preset play (DNPP) mode will be cancelled.
2
NOTE
1
Function of Remote control with DNPP button (See page 8)

— 29 —
Other features (See page 7)
Audio Control SettingAdjust various parameters of sound quality.
Press the AUD button to enter the control mode.
Press either the FM or AM button.Each time the button is pressed, the adjustment mode willchange as follows: Pressing the FM button advances the display, and pressing theAM button reverses it.
Bass High-pass filter (rear)
Treble High-pass filter (front)
Balance N-F Level (only when being switched)
Fader
Source tone memoryEach source (tape, FM, AM, and disc changer) has its ownmemory in which to store the bass and treble tone settings.The settings made for a particular source are then recalledautomatically whenever you use that source (e.g., FM mode usesthe tone settings made for FM, AM for AM, etc.).
Press the 4/¢ button.Look at the table to adjust the mode being displayed.
Press the AUD button to end the control mode.
Setting the high-pass filterYou can separately set the high-pass filter for front and rearoutput, including preouts. The high-pass filter works exceptduring non- fading preout when switching to non-fading.The factory default settings for front output and rear output are"through".
NOTE
4
3
NOTE
2
1
Table of Audio Control Setting
Bass(“BAS”)
Treble(“TRE”)
Balance(“BAL”)
Fader(“FAD”)
Non-FadingPreout Level
(“NF”)
Bass decreased.
Treble decreased.
Left channelemphasized.
Rear channelincreased.
The front and rearsound is emphasized.
Bass increased.
Treble increased.
Front channelincreased.
The non-fading sound isemphasized.
Right channelemphasized.
Adjustmentmode
(Display) 4 button ¢ button
Operation of Audio control button
High-passfilter for front
output(“HPF F”)
You can select the frequency to be cut, asfollows:
THROU (through) ↔ 40Hz ↔ 60Hz ↔ 80Hz ↔100Hz ↔ 120Hz ↔ 150Hz ↔ 180Hz ↔ 220Hz
High-passfilter for rear
output(“HPF R”)
You can select the frequency to be cut, asfollows:
THROU (through) ↔ 40Hz ↔ 60Hz ↔ 80Hz ↔100Hz ↔ 120Hz ↔ 150Hz ↔ 180Hz ↔ 220Hz
KRC-PS959R,859R/C/W only
(KRC-PS959R,859R/C/W only)
(KRC-PS959R,859R/C/W only)

— 30 —
En
glish
Other features (See page 7)
Switching preoutSwitch the preout between the front and non-fading. Whenyou switch to non-fading, you can adjust the volumeseparately. The factory defalt is front preout.
Switching the preout:
Hold down the MENU button for one second or more."MENU" is displayed and the menu mode is turned on.
Press the ¢ button repeatedly until the Switching preoutfunction appears in the displays.Press the 4 button to search in the other direction.The function setting is indicated by "SWPRE FRONT" or"SWPRE N-FAD" in the display, indicating that the currentpreout is front or non-fading, respectively."SWPRE FRONT" (Front preout)"SWPRE N-FAD" (Non-fading preout)
Switching settingsPress either the AM button or FM button.The display and setting will change.
Press the MENU button to end the menu mode.
You cannot use the high-pass filter with non-fading preout.Turning non-fading output On/Off :
Hold down the NF button for one second or more to set thefunction ON or OFF."NF ON" is displayed when the non-fading output is set ON.
NOTE
4
3
2
1
Function of the KRC-PS959R,859R/C/W TEL Mute FunctionShut down the audio system temporarily whenever anincoming call is received.
The function will not work if a cable is not connected to the carphone.
When the telephone rings:When a call is received, "CALL" is displayed and all the unitfunctions are temporarily interrupted.
Restoring Original Unit Source During Phone Call:Press the SRC button."CALL" disappears from the display, and the volume of theoriginal source is restored gradually.
Turning TEL Mute Function Off After Phone Call:Hang the phone up."CALL" disappears from the display.The original source (i.e., the one used before the phone call) isreturned to automatically, and the volume restored gradually.
NOTE
Navigation Mute FunctionWhen the KENWOOD Navigation System is connected, aninterruption of the audio guide results in the temporarylowering of the audio level.
The Navigation mute function cannot be used unless a TEL mutecable is connected to the KENWOOD Navigation System.
NOTE
Touch sensor toneThis function produces a beep sound that accompanies buttonoperation. It can be switched on or off.
Turning the Beep On/Off:
Hold down the MENU button for one second or more."MENU" is displayed and the menu mode is turned on.
1

— 31 —
Selectable IlluminationYou can switch the colour of the button illumination betweengreen and amber.
Hold down the MENU button for one second or more."MENU" is displayed and the menu mode is turned on.
Press the ¢ button repeatedly until the SelectableIllumination function appears in the display.Press the 4 button to search in the other direction.The function setting is indicated by "COLOR GREEN" or"COLOR AMBER" in the display, indicating that the currentcolour is green or amber, respectively.
Switching settingsPress either the AM button or FM button.The display and setting will change.
Press the MENU button to end the menu mode.4
3
2
1
Automatic Dimmer FunctionThe display dims when the car's lights are turned on.
The dimmer function is not available for units if the dimmer cableis not connected.
NOTE
Contrast AdjustmentThis adjustment permits easy viewing of the display.
To adjust the contrast:
Hold down the MENU button for one second or more."MENU" is displayed and the menu mode is turned on.
Press the ¢ button repeatedly until the Contrast Adjustmentfunction appears in the display.Press the 4 button to search in the other direction.The function setting is indicated by "CONTRAST ##" in thedisplay, indicating that the Contrast Adjustment mode is on.
Switching settingsPress either the AM button or FM button.Press the FM button to change the setting values higher, andpress the AM button to change them lower. Settings may bemade from 0 to 10.
Press the MENU button to end the menu mode.
The "##" display in the contrast adjustment mode will differdepending on the setting. The initial setting value is "5".
NOTE
4
3
2
1
Function of the KRC-PS959RPress the ¢ button repeatedly until the Touch sensor tonefunction appears in the display.Press the 4 button to search in the other direction.The function setting is indicated by "BEEP ON" or "BEEP OFF"in the display, indicating that the current beep setting is on oroff, respectively.
Switching settingsPress either the AM button or FM button.The display and setting will change.
Press the MENU button to end the menu mode.
The beep sound is not output from the preout jacks.NOTE
4
3
2

— 32 —
En
glish
Other features (See page 7)
Switching Clock display
Function of the KRC-PS959R
Switching Spectrum Analyzer DisplayThis function permits switching of the spectrum analyzerdisplay.
Switching the Spectrum Analyzer Display:Each time you press the CLK/ANA button, the display switchesas follows:
Spectrum analyzer
Mode display (icon)
Character
Clock
• When the switching clock display (P.32) is set to off, the displaywill not switch to the clock display.
• The £ indicator lights whilst the clock is displayed.
NOTE
Switching Graphic DisplayThis function permits the graphic display to be switched toone that is linked with the volume level value or to displayvarious modes. The initial setting is ON (displaying variousmodes).
Turning the Graphic Display On/Off:
Hold down the MENU button for one second or more."MENU" is displayed and the menu mode is turned on.
Press the ¢ button repeatedly until the Switching GraphicDisplay function appears on the display.Press the 4 button to search in the other direction.The function setting is indicated on the display by "GRAPHICON" or "GRAPHIC OFF", indicating that the Graphic Display ison or off, respectively.
2
1
Function of the KRC-859R/C/W, 759R
“GRAPHIC ON” (Displays various modes)“GRAPHIC OFF”(Display linked to the volume level value)
Switching settingsPress either the AM button or FM button.The display and setting will change.
Press the MENU button to end the menu mode.
When making audio adjustments, even when this function is on,the display will be linked to the audio adjustment value, not thedisplay of the various modes.
NOTE
4
3
This function permits switching the clock display on/off whenswitching the display during each of the modes.
Turning the Clock Display On/Off:
Hold down the MENU button for one second or more."MENU" is displayed and the menu mode is turned on.
Press the ¢ button repeatedly until the Switching ClockDisplay function appears in the display.Press the 4 button to search in the other direction.The function setting is indicated by "CLOCK ON" or "CLOCKOFF" in the display, indicating that the Clock Display function ison or off, respectively.
Switching settingsPress either the AM button or FM button .The display and setting will change.
Press the MENU button to end the menu mode.4
3
2
1
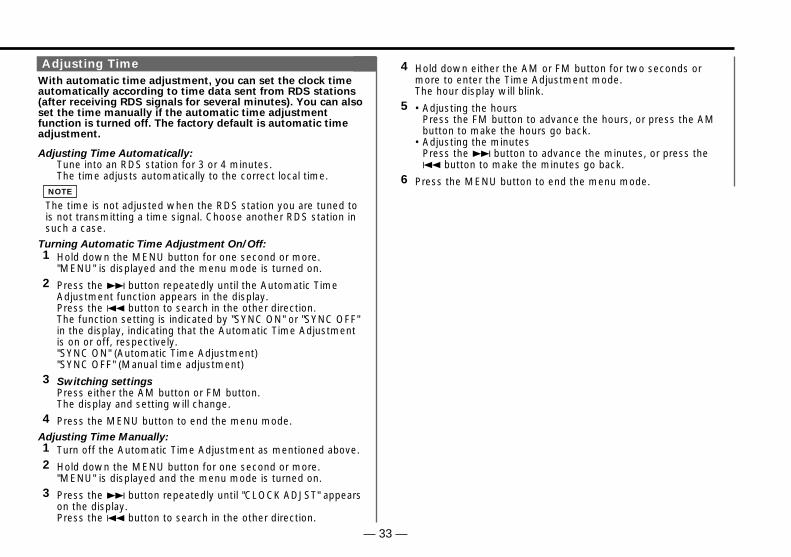
— 33 —
Adjusting TimeWith automatic time adjustment, you can set the clock timeautomatically according to time data sent from RDS stations(after receiving RDS signals for several minutes). You can alsoset the time manually if the automatic time adjustmentfunction is turned off. The factory default is automatic timeadjustment.
Adjusting Time Automatically:Tune into an RDS station for 3 or 4 minutes.The time adjusts automatically to the correct local time.
The time is not adjusted when the RDS station you are tuned tois not transmitting a time signal. Choose another RDS station insuch a case.
Turning Automatic Time Adjustment On/Off:
Hold down the MENU button for one second or more."MENU" is displayed and the menu mode is turned on.
Press the ¢ button repeatedly until the Automatic TimeAdjustment function appears in the display.Press the 4 button to search in the other direction.The function setting is indicated by "SYNC ON" or "SYNC OFF"in the display, indicating that the Automatic Time Adjustmentis on or off, respectively. "SYNC ON" (Automatic Time Adjustment)"SYNC OFF" (Manual time adjustment)
Switching settingsPress either the AM button or FM button.The display and setting will change.
Press the MENU button to end the menu mode.Adjusting Time Manually:
Turn off the Automatic Time Adjustment as mentioned above.
Hold down the MENU button for one second or more."MENU" is displayed and the menu mode is turned on.
Press the ¢ button repeatedly until "CLOCK ADJST" appearson the display.Press the 4 button to search in the other direction.
3
2
1
4
3
2
1
NOTE
Hold down either the AM or FM button for two seconds ormore to enter the Time Adjustment mode.The hour display will blink.
• Adjusting the hoursPress the FM button to advance the hours, or press the AMbutton to make the hours go back.
• Adjusting the minutesPress the ¢ button to advance the minutes, or press the4 button to make the minutes go back.
Press the MENU button to end the menu mode.6
5
4

— 34 —
En
glish
Other features (See page 7)
Code Security FunctionAfter a security code has been registered, power cannot berestored if the battery is disconnected from the unit unless thecode is first input.
All the steps in this procedure (1 through 7) must be completedbefore the code security function can be turned on. However,once the procedure is finished, it need not be repeated. Once the code security function has been activated, "SECURITY"disappears from the MENU system. Note that it will no longer bepossible to cancel this function afterwards.
Hold down the MENU button for one second or more."MENU" is displayed and the menu mode is turned on.
Press the ¢ button repeatedly until the “SECURITY” appearsin the display.Press the 4 button to search in the other direction.
Hold down either the AM or FM button for two seconds ormore."ENTER" will appear in the display for one second, indicatingthe code setting mode has been entered. When "CODE"appears in the display, you can start inputting the code.
Press the preset button and enter your security code.Use the security code shown on your Car Audio Passport.Example: Enter "3510" as your code, pressing the buttons asfollows:
Hold down the DISP button for three seconds or more. The security code will be set."RE-ENTER" will appear in the display for one second, asking
5
4
3
2
1
NOTE
Step Button to press# Timespressed
Display
1 #1 4 “3”
3
6 “5”#22
#3 “1”2
4 #4 1 “0”
you to enter the code once again for confirmation. When"CODE" appears in the display, you can start inputting thecode.
Press the Preset button and input the security code again.
Hold down the DISP button again for three seconds or more."APPROVED" will appear in the display, with the code securityfunction turning on. From this point on, if the unit isdisconnected from the battery, the security code must beentered the first time that the unit's power is turned on."ENTER" and "CODE" will appear in the display, asking you toinput the code.
If you input an incorrect security code, the display ask you oncemore to input the correct one. Follow the procedure in step 6above.
If you press the RESET button or remove the battery: The first time you turn the unit on again, "CODE" will appear inthe display, asking you to input the security code.Repeat steps 6 and 7 above, and input the security code.You can start operating the unit again when "APPROVED"appears in the display.
If you enter the wrong code, "WAITING" is displayed and youcannot make further input of the code for a fixed interval (seetable below), which grows longer each time you enter the wrongcode. When "CODE" is displayed, you can make input again.
The number of wrong inputs is displayed.
NOTE
NOTE
7
6
Number of wronginputs
Interval until next inputis allowed
1 -2 5 minutes3 1 hour4 24 hours

— 35 —
Basic operations of steering remote control (See page 8)Optional for KRC-759R
To prevent accidents, do not attempt to use the steering remotecontrol whilst turning the steering wheel.
Replacing the Lithium Battery:Use one lithium battery (CR2025).Insert the battery with the + and –poles aligned properly, following theillustration.
Store unused lithium batteries out of the reach of children. Contacta doctor immediately if the battery is accidentally swallowed.
2WARNING
2WARNING
All Modes• SRC button
Each time you press the SRC button, the mode switches asfollows:
Tuner mode
Tape mode
Disc control mode
• The mode switches to the next mode from any mode whichcannot be used.
• The disc control mode will differ depending on the unit that isconnected.
• VOLUME buttonsPress the 5 button to turn the volume up.Press the ∞ button to turn the volume down.
• ATT buttonTurns down the volume quickly. To return the volume to itsoriginal level, press the button again. Turning down the volumeall the way also cancels attenuation.
NOTE
Tuner Mode• TUNE buttons
Press the 4 button to make decreasing seeks (using thepreset tuning mode).Press the ¢ button to make increasing seeks (using the presettuning mode).
• FM buttonSelects and switches between the FM1, FM2 and FM3 bands.
• AM buttonSelects the MW and LW bands.
Tape Mode• 4/¢ buttons
Press the 4 button once for each track (including the currenttrack) you want to skip backwards.Press the ¢ button once for each track you want to skipforwards.
• AM/DISC– / FM/DISC+ buttonsPress the AM/DISC– button to rewind the tape.Press the FM/DISC+ button to fast forward the tape.
Disc control Mode• DISC buttons (for disc changers)
Press the AM/DISC– button to search through the discsbackwards.Press the FM/DISC+ button to search through the discsforwards.
• TRACK buttonsPress the 4 button to search through the tracks backwards.Press the ¢ button to search through the tracks forwards.

— 36 —
En
glish
Basic operations of remote control (See page 8)Optional
Tape Mode• T.ADV buttons
Press the 4 button to start play again at the beginning of thecurrent track.Press the ¢ button to start play at the beginning of the nexttrack.
• REW buttonRewinds the tape.
• FF buttonFast forwards the tape.
Do not set the remote control on hot places such as above thefascia panel (dashboard).
Replacing the Lithium Battery:Use one lithium battery (CR2025).Remove the case following the instructions as illustrated.
Insert the battery with the + and – poles aligned properly,following the illustration inside the case.
Store unused lithium batteries out of the reach of children. Contacta doctor immediately if the battery is accidentally swallowed.
A portion of the operations may not be possible, depending on theunit that is connected.
NOTE
2WARNING
2CAUTION
2
1
To open
① Keep on slide
➁ Pull out.
All Modes• VOL. buttons
Keep on pressing the u button to turn the volume up.keep on pressing the d button to turn the volume down.
• TUNER buttonSelects the tuner mode.
• TAPE buttonSelects the tape mode.
• CD•MD CH buttonSelects the disc control mode.
The disc control mode will differ depending on the unit that isconnected.
NOTE
Tuner Mode• Number/ letter entry buttons
Press buttons #1-6 to recall preset stations.During direct access tuning, use these buttons to input thefrequency of the station.
• TUNE buttonsPress the 4 button to make decreasing seeks (using thepreset tuning mode).Press the ¢ button to make increasing seeks (using the presettuning mode).
• AM/FM buttonPress the AM button to select the MW and LW bands.Press the FM button to select and switch between FM1, FM2,and FM3 bands.
• DIRECT/OK buttonSelects the direct access tuning mode, used to inputfrequencies directly. Press this button again to cancel the modewhilst it is operating.During Station name preset play mode, selects station.
• DNPP buttonEnters and cancels the Station Name Preset Play mode.

— 37 —
Disc Control Mode• Number/ letter entry buttons
Used to specify the track (disc) number used in direct track(disc) searches.Used to enter letters during disc name preset.
• TRACK buttonsPress the TRACK– button to search through the tracksbackwards.Press the TRACK+ button to search through the tracksforwards.Used to move the cursor whilst entering disc name.
• DISC buttonsPress the DISC– button to search through the discs backwards.Press the DISC+ button to search through the discs forwards.Selects numbers and symbols whilst entering disc name.
• 38 buttonWhen a disc is playing, this button pauses the play.Press the same button again to start play again.Selects the type of characters at the time of entering the discname.
• OK buttonDuring disc name input, stores the already input data in memoryand ends the input mode.Selects disc during the disc name preset play mode.
• DNPP buttonEnters and cancels the Disc Name Preset Play mode.
• PROG buttonPlays the reverse side of the tape. When pressed during fastforwards and rewinds, this button stops the tape and startsplaying it.
The use of any accessories except for those provided might resultin damage to the unit. Make sure only to use the accessoriesshipped with the unit, as shown above.
2CAUTION
Accessories
.........11
.........22
.........13
.........14
.........15
External view
......... Number of items
.........16
.........17
.........18
.........19
External view
......... Number of items
6~9...KRC-PS959R,859R/C/Wonly
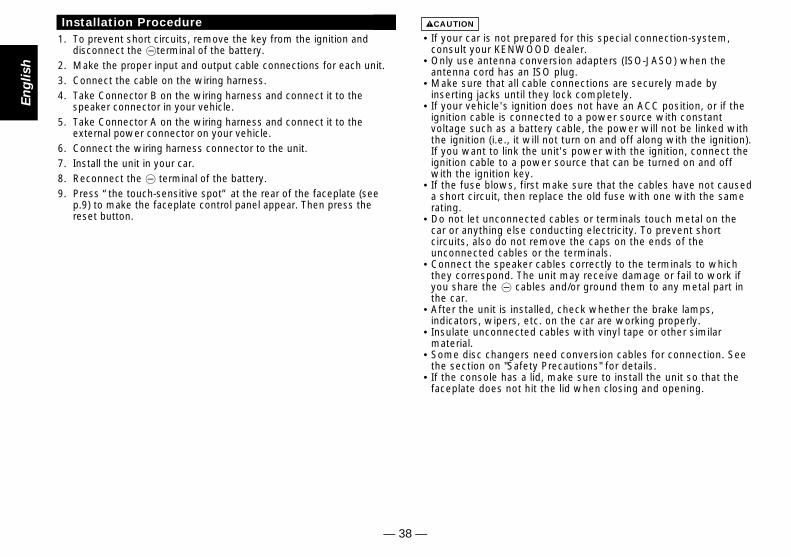
— 38 —
En
glish
Installation Procedure1. To prevent short circuits, remove the key from the ignition and
disconnect the - terminal of the battery.2. Make the proper input and output cable connections for each unit.3. Connect the cable on the wiring harness.4. Take Connector B on the wiring harness and connect it to the
speaker connector in your vehicle.5. Take Connector A on the wiring harness and connect it to the
external power connector on your vehicle.6. Connect the wiring harness connector to the unit.7. Install the unit in your car.8. Reconnect the - terminal of the battery.9. Press “the touch-sensitive spot” at the rear of the faceplate (see
p.9) to make the faceplate control panel appear. Then press thereset button.
• If your car is not prepared for this special connection-system,consult your KENWOOD dealer.
• Only use antenna conversion adapters (ISO-JASO) when theantenna cord has an ISO plug.
• Make sure that all cable connections are securely made byinserting jacks until they lock completely.
• If your vehicle's ignition does not have an ACC position, or if theignition cable is connected to a power source with constantvoltage such as a battery cable, the power will not be linked withthe ignition (i.e., it will not turn on and off along with the ignition).If you want to link the unit's power with the ignition, connect theignition cable to a power source that can be turned on and offwith the ignition key.
• If the fuse blows, first make sure that the cables have not causeda short circuit, then replace the old fuse with one with the samerating.
• Do not let unconnected cables or terminals touch metal on thecar or anything else conducting electricity. To prevent shortcircuits, also do not remove the caps on the ends of theunconnected cables or the terminals.
• Connect the speaker cables correctly to the terminals to whichthey correspond. The unit may receive damage or fail to work ifyou share the - cables and/or ground them to any metal part inthe car.
• After the unit is installed, check whether the brake lamps,indicators, wipers, etc. on the car are working properly.
• Insulate unconnected cables with vinyl tape or other similarmaterial.
• Some disc changers need conversion cables for connection. Seethe section on "Safety Precautions" for details.
• If the console has a lid, make sure to install the unit so that thefaceplate does not hit the lid when closing and opening.
2CAUTION
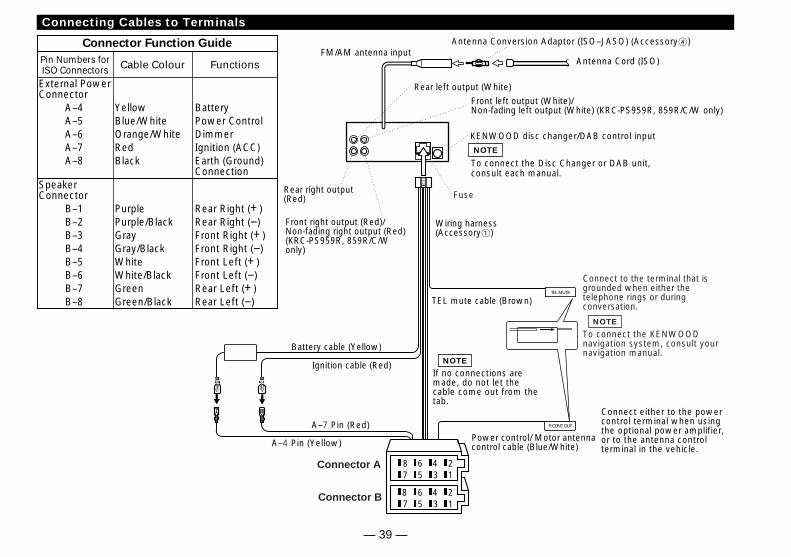
— 39 —
Connecting Cables to Terminals
TEL MUTE
P.CONT.OUT
12
34
56
78
12
34
56
78
Front left output (White)/Non-fading left output (White) (KRC-PS959R, 859R/C/W only)
Front right output (Red)/Non-fading right output (Red)(KRC-PS959R, 859R/C/Wonly)
Rear right output(Red)
Rear left output (White)
Connector Function Guide
Pin Numbers forISO Connectors Cable Colour Functions
External PowerConnector
A–4A–5A–6A–7A–8
SpeakerConnector
B–1B–2B–3B–4B–5B–6B–7B–8
YellowBlue/WhiteOrange/WhiteRedBlack
PurplePurple/BlackGrayGray/BlackWhiteWhite/BlackGreenGreen/Black
BatteryPower ControlDimmerIgnition (ACC)Earth (Ground) Connection
Rear Right (+)Rear Right (–)Front Right (+)Front Right (–)Front Left (+)Front Left (–)Rear Left (+)Rear Left (–)
KENWOOD disc changer/DAB control input
Battery cable (Yellow)
Ignition cable (Red)
FM/AM antenna inputAntenna Cord (ISO)
Antenna Conversion Adaptor (ISO–JASO) (Accessory4)
To connect the Disc Changer or DAB unit,consult each manual.
NOTE
Wiring harness(Accessory1)
If no connections aremade, do not let thecable come out from thetab.
NOTE
TEL mute cable (Brown)
Power control/ Motor antennacontrol cable (Blue/White)
Connect either to the powercontrol terminal when usingthe optional power amplifier,or to the antenna controlterminal in the vehicle.
A–7 Pin (Red)
A–4 Pin (Yellow)
Connector A
Connector B
Fuse
Connect to the terminal that isgrounded when either thetelephone rings or duringconversation.
To connect the KENWOODnavigation system, consult yournavigation manual.
NOTE

— 40 —
En
glish
Make sure that the unit is installed securely in place. If the unit isunstable, it may malfunction (eg, the sound may skip).
NOTE
Bend the tabs of themounting sleeve witha screwdriver orsimilar utensil andattach it in place.Metal mounting
strap (commerciallyavailable)
Self-tappingscrew (commerciallyavailable)
Firewall or metal support
Accessory3
Installation
Installtion
To attach this unit, fit it into the mounting sleeve by pressing the fourcorners of the hard rubber frame.Do not apply strong pressure to other sections than the corners;otherwise troubles such as the impossibility of opening or closing thepanel may result.
2CAUTION
Connecting Cables to Terminals
Connecting the ISO Connector (see p.39)The pin arrangement for the ISO connectors depends on the typeof vehicle you drive. Make sure to make the proper connections toprevent damage to the unit.The default connection for the wiring harness is described in 1below. If the ISO connector pins are set as described in 2 or 3,make the connection as illustrated.
2WARNING
Unit VehicleIgnition cable (Red)
Battery cable (Yellow)
A–7 Pin (Red)
A–4 Pin (Yellow)
Unit VehicleIgnition cable (Red)
Battery cable (Yellow)
A–7 Pin (Red)
A–4 Pin (Yellow)
Unit VehicleIgnition cable (Red)
Battery cable (Yellow) A–4 Pin (Yellow)
1 (Default setting) The A-7 pin (red) of the vehicle's ISOconnector is linked with the ignition, and the A-4 pin (yellow) isconnected to the constant power supply.
2 The A-7 pin (red) of the vehicle's ISO connector is connected tothe constant power supply, and the A-4 pin (yellow) is linked tothe ignition.
3 The A-7 pin (red) of the vehicle's ISO connector is notconnected to anything, while the A-4 pin (yellow) is connectedto the constant power supply (or both the A-7 (red) and A-4(yellow) pins are connected to the constant power supply).
Connect to a power source that can beturned on and off with the ignition key.

— 41 —
Removing the hard rubber frame
Engage the catches on the removal tool2 and remove the twolocks on the lower level, leaving the removal tool5 inserted onthe upper level. Use the removal tool facing the side covered with theprotective sheet to the faceplate.Lower the frame and pull it forward as shown in the figure.
2
You will feel (not hear) a click when the tabs lock securely.NOTE
Insert the removal tool5 deeply with the cut placed to theright to remove the upper locks at an angle as shown below.
1
Removing the Unit
Lock
Accessory5Removal tool
Catch
LockAccessory2Removal tool
Cut
Removing the Unit
Accessory3
Push downward on the left-hand tool and the upwardon the right-hand tool, asshown, and pull the unittoward you until it ishalfway out. The unit maydrop if you pull it outcompletely.
4
Pull the unit all the way outwith your hands, beingcareful not to drop it.
5
Be careful to avoid injury from the catch pins on the removal tool.2CAUTION
Refer to the section “Removing the hard rubber frame” andthen remove the hard rubber frame.
Remove the hex head machine screw with washer (M4×8) onthe back panel.
Insert the two removal tools at an angle and push them deeplyinto the slots on each side, as shown.
3
2
1
Accessory2Removal tool

— 42 —
En
glish
Attaching Steering Remote Control (Optional forthe KRC-759R)
Attach the operation section and the light emitting section of theSteering Remote Control as shown above.Be sure to attach them to positions that can ensure properoperation.
• Clean dirt and oil from the positions where the Steering RemoteControl sections are to be attached.
• If the attached position is cold, warm it before attaching.• The position should be selected so that the product does not
come in the way of steering operation.• Do not attach anything on the surface of a steering wheel
incorporating an air bag.
2CAUTION
Mounting Example

— 43 —
What might appear to be a malfunction in your unit may just be the result of slight misoperation or miswiring. Beforecalling service, first check the following table for possible problems.
SOLUTIONPOSSIBLE CAUSEPROBLEM
The tape head is dirty. Clean the tape head, referring to the section on "Cleaningthe tape head" (see page 4).
No sound can be heard, or thevolume is low.
The fader and/or balance settings are set all the way toone side.
Reset the fader and/or balance settings.
The input/output cables or wiring harness are connectedincorrectly.
Reconnect the input/output cables and/or the wiring harnesscorrectly. See the section on "Connecting Cables toTerminals".
The cassette tape is bad. Try playing another cassette tape. If no problem isexperienced, the first tape was bad.
Nothing happens when thebuttons are pressed.
The computer chip in the unit is not functioning normally. Press the reset button on the unit (see page 4).
The sound quality is poor ordistorted.
The speakers are not wired correctly. Reconnect the speaker cables so that each output terminalis connected to a different speaker.
A speaker cable may be pinched by a screw in the car. Check the speaker wiring.
The antenna control cable is not connected. Connect the cable correctly, referring to the section on"Connecting Cables to Terminals".
Radio reception is poor. The car antenna is not extended. Pull out the antenna all the way.
The power does not turn on. The fuse has blown. After checking for short circuits in the cables, replace thefuse with one having the same rating.
The Attenuator function is turned on. Turn off the Attenuator function.
Troubleshooting Guide
No ACC position on vehicle ignition. Connect the same cable to the ignition as the battery cable.
The tape does not go in. /No sound can be heard eventhough the tape display ismade.
The car ignition was turned off during tape eject; or thetape was pulled out during loading, switching the mode totape mode even though no tape is in.
Press the Eject button.

— 44 —
En
glish
SOLUTIONPOSSIBLE CAUSEPROBLEM
The memory is erased whenthe ignition is turned off.
The battery cable has not been connected to the properterminal.
Connect the cable correctly, referring to the section on"Connecting Cables to Terminals".
The TEL mute function doesnot work.
The TEL mute cable is not connected properly. Connect the cable correctly, referring to the section on"Connecting Cables to Terminals".
The TEL mute function turns oneven though the TEL mutecable is not connected.
The TEL mute cable is touching a metal part of the car. Pull the TEL mute cable away from the metal part of the car.
The faceplate does not open orclose.
The ambient temperature is too low. Warm up your car.
Troubleshooting Guide
The ignition and battery cable are incorrectly connected. Connect the cable correctly, referring to the section on"Connecting Cables to Terminals".
Disc control mode
SOLUTIONPOSSIBLE CAUSEPROBLEM
The computer chip in the unit is not functioning normally. Press the reset button on the unit (see page 4).
The disc control mode cannotbe selected.
No cable has been connected to the disc changer inputterminal on the unit.
Connect the cable to the disc changer input terminal on theunit.
The specified disc does notplay, but another one playsinstead.
The specified CD is very dirty. Clean the CD.
The CD is upside-down. Load the CD with the labelled side up.
The disc is loaded in a different slot from that specified. Eject the disc magazine and check the number for thespecified disc.
The disc is severely scratched. Try another disc instead.
The sound skips. Something is touching the disc changer. Remove whatever is touching it.
The CD is scratched or dirty. If skipping happens at the same place when the car isstopped, something is wrong with the CD. Clean the CD.
The display shows that thechanger is being played, but nosound can be heard.
The specified track does notplay.
Random play or magazine random play has been selected. Turn off the random play or magazine random play function.

— 45 —
The following messages are displayed when certain problems are occurring in your system. Take the recommendedactions.
Nothing has been recorded on the MD.The next MD is automatically played back]
BLANK
No disc magazine has been loaded in the changer. The disc magazine is not completely loaded.Load the disc magazine properly.
No CD in the unit.Insert the CD.]
]EJECT
No tracks are recorded on the MD, although it has a title.The next MD is automatically played back.]
NO TRACK
Something is wrong with the disc magazine. Or the unit is malfunctioning for some reason.Check the disc magazine. And then press the reset button on the unit. If the "E- 99" code does not disappear, consult yournearest service centre.
]E-99
The protective circuit in the unit activates when the temperature inside the automatic disc changer exceeds 60°C (140°F), stoppingall operation.
Cool down the unit by opening the windows or turning on the air conditioner. As the temperature falls below 60°C (140°F), thedisc starts playing again.
]
HOLD
Troubleshooting Guide
No disc has been loaded in the disc magazine.Load a disc into the disc magazine.
The CD is very dirty. The CD is upside-down. The CD is scratched a lot.Clean the CD and load it correctly.]
]E-04
No disc has been loaded in the disc magazine.Load a disc into the disc magazine.]
NO DISC
If this indicator continues blinking, it is possible that the tape has become jammed or tangled.Contact the Kenwood dealer if the tape cassette cannot be ejected.]
¢
The unit is malfunctioning for some reason.Press the reset button on the unit. If the "E- 77" code does not disappear, consult your nearest service centre.]
E-77
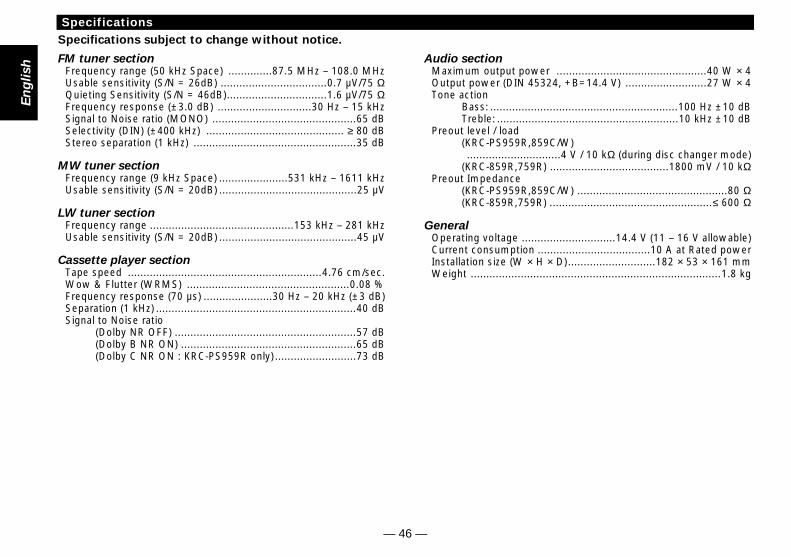
— 46 —
En
glish
Specifications
FM tuner sectionFrequency range (50 kHz Space) ..............87.5 MHz – 108.0 MHzUsable sensitivity (S/N = 26dB) ..................................0.7 µV/75 ΩQuieting Sensitivity (S/N = 46dB)................................1.6 µV/75 ΩFrequency response (±3.0 dB) ..............................30 Hz – 15 kHzSignal to Noise ratio (MONO) ..............................................65 dBSelectivity (DIN) (±400 kHz) ............................................ ≥ 80 dB Stereo separation (1 kHz) ....................................................35 dB
MW tuner sectionFrequency range (9 kHz Space) ......................531 kHz – 1611 kHzUsable sensitivity (S/N = 20dB) ............................................25 µV
LW tuner sectionFrequency range ..............................................153 kHz – 281 kHzUsable sensitivity (S/N = 20dB) ............................................45 µV
Cassette player sectionTape speed ..............................................................4.76 cm/sec.Wow & Flutter (WRMS) ....................................................0.08 %Frequency response (70 µs) ......................30 Hz – 20 kHz (±3 dB)Separation (1 kHz) ................................................................40 dBSignal to Noise ratio
(Dolby NR OFF) ..........................................................57 dB(Dolby B NR ON) ........................................................65 dB(Dolby C NR ON : KRC-PS959R only) ..........................73 dB
Audio sectionMaximum output power ................................................40 W × 4Output power (DIN 45324, +B=14.4 V) ..........................27 W × 4Tone action
Bass: ............................................................100 Hz ±10 dBTreble: ..........................................................10 kHz ±10 dB
Preout level / load(KRC-PS959R,859C/W)..............................4 V / 10 kΩ (during disc changer mode)
(KRC-859R,759R) ......................................1800 mV / 10 kΩPreout Impedance
(KRC-PS959R,859C/W) ................................................80 Ω(KRC-859R,759R) ....................................................≤ 600 Ω
GeneralOperating voltage ..............................14.4 V (11 – 16 V allowable)Current consumption ....................................10 A at Rated powerInstallation size (W × H × D)............................182 × 53 × 161 mmWeight ................................................................................1.8 kg
Specifications subject to change without notice.


