228 9 KEYING Lesson overview In this lesson, you’ll learn how to do the following: • Create a garbage mask. • Use the Color Difference Key effect to key an image. • Check an image’s alpha channel for errors in a key. • Choke a matte to refine a key. • Use the Spill Suppressor effect to remove unwanted light spill. • Key out a background using the Keylight effect. • Adjust the contrast of an image using the Levels effect. • Prepare a project for mobile devices using Adobe Device Central. In this lesson, you will create an introductory menu for a fictional sports network, called Mobile Sports Network, which provides sports scores and stats on mobile phones. You’ll work with live-action footage of an actor captured on a greenscreen stage. You will learn how to use keying effects to remove the green background and clean up the edge of the key to remove any lingering green spill. en, you’ll add titles to the intro. Because some customers will receive the information on phones and oth- ers on other mobile devices and personal computers, the company wants to ensure the video looks good on both low-resolution and high-resolution screens. You’ll use Adobe Device Central to ensure the project works well on a variety of mobile devices. is lesson will take approximately an hour to complete.
Transcript
228
9 kEyinG
lesson overviewIn this lesson, you’ll learn how to do the following:
• Create a garbage mask.
• Use the Color Difference Key effect to key an image.
• Check an image’s alpha channel for errors in a key.
• Choke a matte to refine a key.
• Use the Spill Suppressor effect to remove unwanted light spill.
• Key out a background using the Keylight effect.
• Adjust the contrast of an image using the Levels effect.
• Prepare a project for mobile devices using Adobe Device Central.
In this lesson, you will create an introductory menu for a fictional sports network, called Mobile Sports Network, which provides sports scores and stats on mobile phones. You’ll work with live-action footage of an actor captured on a greenscreen stage. You will learn how to use keying effects to remove the green background and clean up the edge of the key to remove any lingering green spill. Then, you’ll add titles to the intro.Because some customers will receive the information on phones and oth-ers on other mobile devices and personal computers, the company wants to ensure the video looks good on both low-resolution and high-resolution screens. You’ll use Adobe Device Central to ensure the project works well on a variety of mobile devices. This lesson will take approximately an hour to complete.
229
The word keying might conjure up images of a weather person on the evening news, or a shooting technique used in major motion pictures. With Adobe After Eff ects, even the simplest, least-expensive project can benefi t from this technique.
230 lesson 9 keying
About keyingKeying is defining transparency by a particular color value (with a color key or chroma key) or brightness value (with a luminance key) in an image. When you key out a value, all pixels that have similar colors or luminance values become transparent.
Keying makes it easy to replace a background of a consistent color or brightness with another image, which is especially useful when working with objects that are too complex to mask easily. The technique of keying out a background of a consis-tent color is often called bluescreening or greenscreening, although you do not have to use blue or green; you can use any solid color for a background.
Difference keying defines transparency with respect to a particular baseline back-ground image. Instead of keying out a single-color screen, you can key out an arbitrary background.
Why might you use keying? There are a variety of reasons, including the following:
• A stunt may be too dangerous for an actor to perform on location.
• The location may be too hazardous for cast and crew.
• In the case of science-fiction movies, the location may not exist at all.
• You are working with a limited budget and cannot shoot any other way.
The best way to ensure a good key is to know what format works best. While uncompressed footage will always provide the highest quality, MiniDV and the newer HDV formats are popular. In this lesson, you’ll use HDV footage, which uses the same compression scheme as MiniDV. Any compression can create artifacts, such as blocky regions or aliasing along the curves and diagonals of your subject. The greater the digital compression, the harder it is to pull a clean key. After Effects can help you solve these and other keying problems.
Getting startedBefore you begin, preview the movie you’re creating.
1 Make sure the following files are in the AECS4_CIB/Lessons/Lesson09 folder on your hard disk, or copy them from the Adobe After Effects CS4 Classroom in a Book DVD now.
• In the Assets folder: MobileSportsIntro.mov, mobilesportsbackground.mov
• In the Sample_Movie folder: Lesson09.mov
2 Open and play the Lesson09.mov sample movie to see what you will create. When you are done, quit QuickTime Player. You may delete this sample movie from your hard disk if you have limited storage space.
E Tip: You will have greater success when pulling a key in an HDV or MiniDV format if your backdrop is green instead of blue. Luminance information, which makes up 60% of the video signal, is encoded into the green channel. The green channel is also the least compressed of the RGB color channels. Blue, on the other hand, tends to be the noisiest channel.
Adobe After effects cs4 clAssroom in A book 231
Creating compositions in Device CentralScreen dimensions, video frame rates, and color gamuts vary greatly from one mobile device to another. Adobe Device Central contains device profiles that pro-vide information about these characteristics. Using this information, you can create movies that play correctly and look as you intend on the mobile devices you choose. You create your compositions in Device Central—a Device Master composition, and a composition for each of the mobile devices you select. You design, animate, and prepare your movie in the Device Master composition, and then use the device-specific compositions for previews and to render and export for final output.
Because you’re preparing this project for mobile devices as well as high-resolution devices, you’ll begin by creating the compositions in Device Central, which is installed when you install After Effects.
1 Start Adobe Device Central CS4.
2 In the Welcome window, click After Effects File under the Create New Mobile heading. This creates a new composition in Device Central. No specific devices are targeted yet.
Available mobile devices are listed in the Online Library panel, but only Flash Lite is in the Local Library. In this lesson, you’ll use the Nokia 3120 and Sony Ericsson K630i phones, as well as Flash Lite 2.1. You’ll need to add the phones to your local library first.
3 In the Online Library panel, click the triangle next to the Nokia group to see its contents.
4 Expand the Nokia group, and then double-click Nokia 3120 to add it to your local library. Then, collapse the Nokia group.
Note: If the Welcome window doesn’t appear, choose File > New Document In > After Effects to create the new composition.
232 lesson 9 keying
5 Expand the Sony Ericsson group, and then double-click K630i. Collapse the Sony Ericsson group.
6 In the Local Library panel, expand each group to display the devices you want to target.
7 Press Ctrl (Windows) or Command (Mac OS) as you select the three devices (Flash Lite 2.1 16k 320 x 480, Nokia 3120, and Sony Ericsson K630i) in the Local Library panel.
The devices are added to the New Composition panel.
8 Select Create Master Composition at the top of the New Composition panel. This option creates a composition that contains the selected devices as well as a Master Devices composition.
9 Click Create. After Effects CS4 opens.
10 Click Close to close the Welcome window in After Effects.
Adobe After effects cs4 clAssroom in A book 233
The Project panel contains two folders: Device Central Comps and Solids.
11 Double-click the Device Central Comps folder to see its contents. It contains a Device Master composition, a composition for each of the devices you selected, a Preview composition, and a Guide Comps folder. Collapse the Device Central Comps folder, and click an empty area of the Project panel to deselect all items.
12 Choose File > Save As.
13 In the Save As dialog box, navigate to the AECS4_CIB/Lessons/Lesson09/Finished_Project folder, and name the project Lesson09_Finished.aep.
importing the footageYou need to import two footage items for this lesson.
1 Choose File > Import > File. 2 Navigate to the AECS4_CIB/Lessons/Lesson09/Assets folder. Ctrl-click
(Windows) or Command-click (Mac OS) to select the MobileSportsIntro.mov and mobilesportsbackground.mov files, and then click Open. The footage items appear in the Project panel. You will organize them before getting underway.
3 Choose File > New > New Folder to create a new folder in the Project panel, or click the Create A New Folder button ( ) at the bottom of the panel.
4 Type mov_files to name the folder, press Enter or Return to accept the name, and then drag the two footage items into the mov_files folder.
5 Expand the folder so that you can see the items inside.
234 lesson 9 keying
Creating a composition for keyingDevice Central created several compositions for you, but it can be difficult to see keying errors or subtle changes using compositions created by Device Central, which are at a lower resolution. Because you will also be preparing this project for viewing on larger screens, you’ll create a separate composition for keying.
1 Choose Composition > New Composition.
2 In the Composition Settings dialog box, type Color Difference Key in the Composition Name box.
3 Make sure the Preset pop-up menu is set to NTSC DV. This automatically sets the width, height, pixel aspect ratio, and frame rate for the composition.
4 In the Duration field, type 1023 to specify 10 seconds and 23 frames, which matches the length of the MobileSportsIntro.mov footage item, and then click OK.
After Effects opens the new composition in the Timeline and Composition panels.
Adobe After effects cs4 clAssroom in A book 235
Changing the background colorThe default background in After Effects is black, which makes it hard to see holes or other errors when pulling a key. So you’ll start by changing the background to something other than black or white. In this lesson, you will use orange.
1 Choose Composition > Background Color.
2 Click the color swatch and select a bright orange hue, such as RGB 255, 175, 0. Then click OK to close the Color Picker, and OK again to close the Background Color dialog box.
Adding the foreground subjectYou’re ready to add the subject to the composition.
1 Press the Home key to make sure the current-time indicator is at the beginning of the time ruler.
2 Drag the MobileSportsIntro.mov item from the Project panel to the Timeline panel. The MobileSportsIntro.mov image appears in the foreground of the Composition panel.
This is a simple greenscreen shot. If you manually preview the shot by dragging the current-time indicator, you’ll notice that the shot is too big for the composition. The project was shot on an HDV camera and captured at a resolution of 1440 x 1080. You’ll need to resize the clip to use it in a standard definition (SD) project.
E Tip: Instead of changing the background color, you can also click the Toggle Transparency Grid button ( ) at the bottom of the Composition panel. This displays a checkerboard background that reveals transparency, which is another good way to spot errors in a key.
236 lesson 9 keying
3 Select the MobileSportsIntro.mov item in the Timeline panel, and press S to display its Scale property.
4 Change the Scale amount to 45%.
5 Move the current-time indicator to 4:00.
The actor has overshot her mark slightly and needs to be re-centered in the frame.
6 Select the MobileSportsIntro.mov item again, and press P to display its Position property.
7 Change the position to 417, 240 to shift the layer slightly to the right.
The clip is still too wide for the composition, but it will work because it lets you reposition the actor. You may notice in the movie that not everything is out of the frame, as a small portion of a light reflector remains.
Using garbage masksThis greenscreen shot is typical of a lower-budget production. Though the screen is evenly lit, the cloth is wrinkled, which could cause some problems when you pull the key.
When After Effects pulls a key, it looks at the entire frame. The larger the area that must be analyzed and the larger the variation in color, the greater the risk that you won’t be able to remove all of the background color. You can reduce this risk and remove unwanted distractions by using a garbage mask.
Note: You can also reposition an item using the proportional grid. Click the Choose Grid And Guide Options button, and choose Proportional Grid to display it in the Composition panel.
Adobe After effects cs4 clAssroom in A book 237
As the name implies, a garbage mask (or matte) is used to mask out the bad, or unnecessary, parts of an image. When you create a garbage mask for a layer, it’s a good idea to keep it fairly loose. If the foreground subject is moving, you need to leave enough room in the garbage mask to accommodate the motion. If you make it too tight, your subject may move outside the mask. Remember, a garbage mask is used to help solve problems, not create new ones.
There is no limit to the number of garbage masks you can have in a composition. In fact, on some complex shots it is not uncommon to have multiple garbage masks isolate limbs, faces, hair, or different subjects in the scene.
Creating a garbage maskYou’ll create a garbage mask to limit the area you need to key.
1 Move the current-time indicator to 2:00 in the Timeline panel. This is the point at which the actor has stepped fully into the frame, and it’s where she moves furthest to the left.
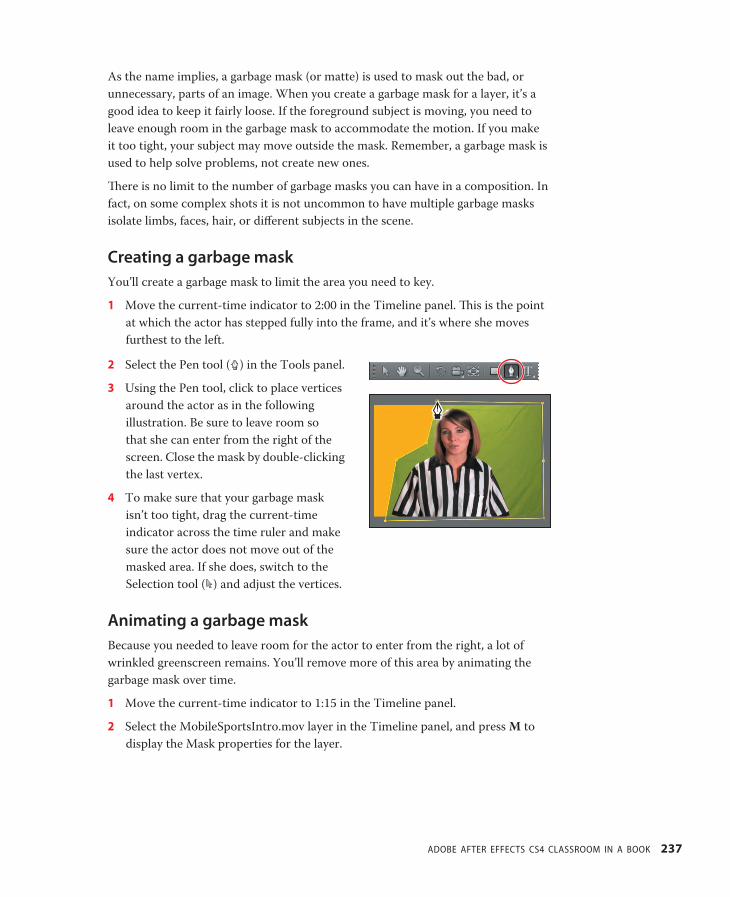
2 Select the Pen tool ( ) in the Tools panel.
3 Using the Pen tool, click to place vertices around the actor as in the following illustration. Be sure to leave room so that she can enter from the right of the screen. Close the mask by double-clicking the last vertex.
4 To make sure that your garbage mask isn’t too tight, drag the current-time indicator across the time ruler and make sure the actor does not move out of the masked area. If she does, switch to the Selection tool ( ) and adjust the vertices.
Animating a garbage maskBecause you needed to leave room for the actor to enter from the right, a lot of wrinkled greenscreen remains. You’ll remove more of this area by animating the garbage mask over time.
1 Move the current-time indicator to 1:15 in the Timeline panel.
2 Select the MobileSportsIntro.mov layer in the Timeline panel, and press M to display the Mask properties for the layer.
238 lesson 9 keying
3 Click the stopwatch icon ( ) next to the Mask Path property to set an initial keyframe for the mask.
4 Move the current-time indicator to 2:00.
5 Select the Selection tool ( ).
6 Click outside the mask, and then adjust the vertices on the right side of the screen, reducing the amount of greenscreen visible. You can add points using the Pen tool for more flexibility.
7 Manually preview the clip to ensure the actor doesn’t move outside of the masked area. If she does, make adjustments to the vertices again.
8 Press M to hide the Mask property.
9 Choose File > Save to save your work so far.
Adobe After effects cs4 clAssroom in A book 239
Applying the Color Difference key effectThere are many keying effects in After Effects. The Color Difference Key effect creates transparency from opposite starting points by dividing an image into two mattes, Matte Partial A and Matte Partial B. Matte Partial B bases the transparency on the specified key color, and Matte Partial A bases transparency on areas of the image that do not contain a second, different color. By combining the two mattes into a third matte, called the alpha matte, the Color Difference Key creates well-defined transparency values.
Confused yet? Many people who come across the Color Difference Key stop right there and run away in terror. But you don’t need to fear the Color Difference Key.
1 Select the MobileSportsIntro.mov layer in the Timeline panel, and choose Effect > Keying > Color Difference Key.
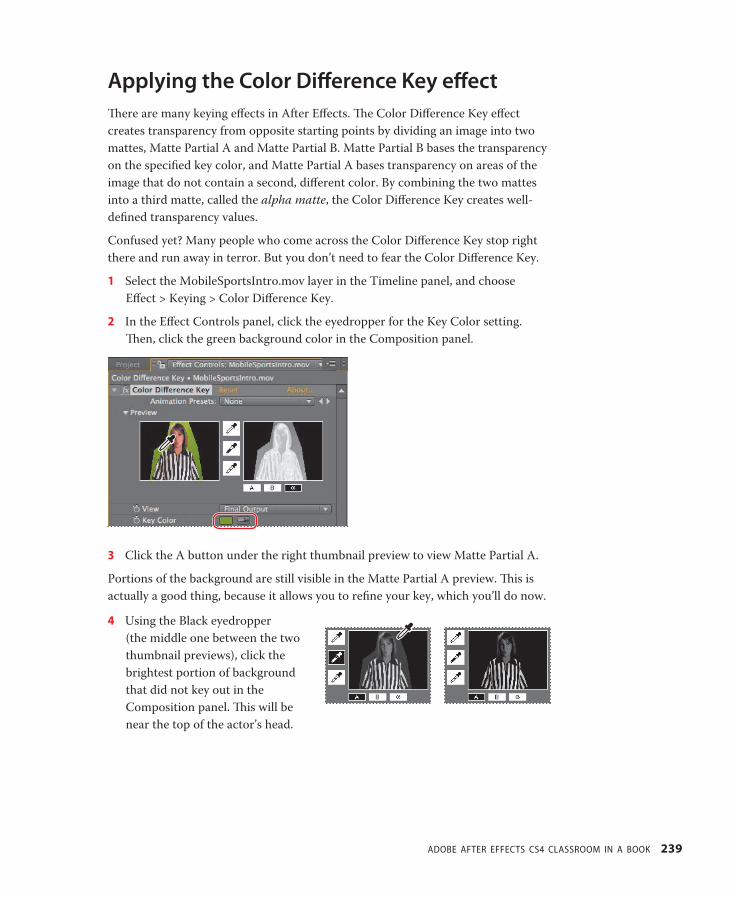
2 In the Effect Controls panel, click the eyedropper for the Key Color setting. Then, click the green background color in the Composition panel.
3 Click the A button under the right thumbnail preview to view Matte Partial A.
Portions of the background are still visible in the Matte Partial A preview. This is actually a good thing, because it allows you to refine your key, which you’ll do now.
4 Using the Black eyedropper (the middle one between the two thumbnail previews), click the brightest portion of background that did not key out in the Composition panel. This will be near the top of the actor’s head.
240 lesson 9 keying
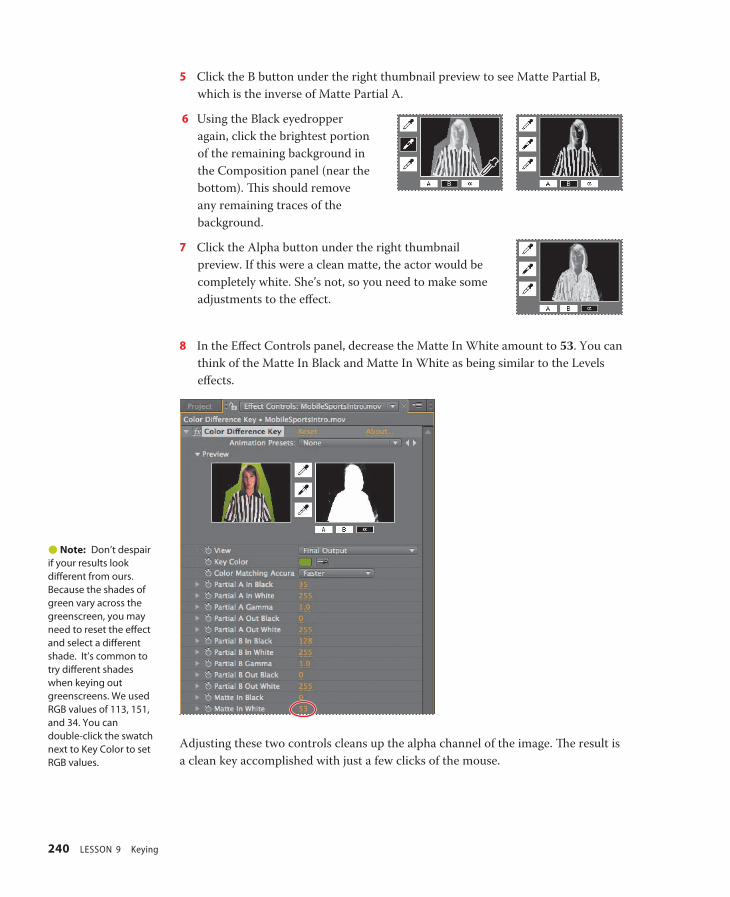
5 Click the B button under the right thumbnail preview to see Matte Partial B, which is the inverse of Matte Partial A.
6 Using the Black eyedropper again, click the brightest portion of the remaining background in the Composition panel (near the bottom). This should remove any remaining traces of the background.
7 Click the Alpha button under the right thumbnail preview. If this were a clean matte, the actor would be completely white. She’s not, so you need to make some adjustments to the effect.
8 In the Effect Controls panel, decrease the Matte In White amount to 53. You can think of the Matte In Black and Matte In White as being similar to the Levels effects.
Adjusting these two controls cleans up the alpha channel of the image. The result is a clean key accomplished with just a few clicks of the mouse.
Note: Don’t despair if your results look different from ours. Because the shades of green vary across the greenscreen, you may need to reset the effect and select a different shade. It’s common to try different shades when keying out greenscreens. We used RGB values of 113, 151, and 34. You can double-click the swatch next to Key Color to set RGB values.
Adobe After effects cs4 clAssroom in A book 241
Checking the alpha channel for errorsThe orange (or transparent) background of the composition makes it easy to see any lingering bits of the greenscreen, but it may still be difficult to see any holes that may have been created with the actor. To double-check your key, switch to the alpha-channel view to see the resulting matte.
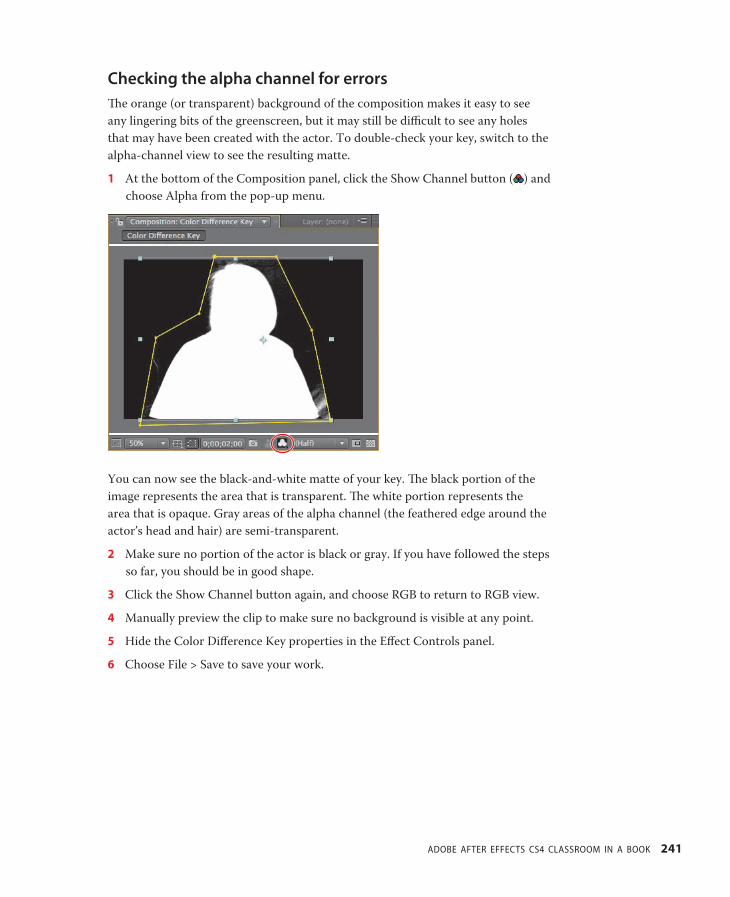
1 At the bottom of the Composition panel, click the Show Channel button ( ) and choose Alpha from the pop-up menu.
You can now see the black-and-white matte of your key. The black portion of the image represents the area that is transparent. The white portion represents the area that is opaque. Gray areas of the alpha channel (the feathered edge around the actor’s head and hair) are semi-transparent.
2 Make sure no portion of the actor is black or gray. If you have followed the steps so far, you should be in good shape.
3 Click the Show Channel button again, and choose RGB to return to RGB view.
4 Manually preview the clip to make sure no background is visible at any point.
5 Hide the Color Difference Key properties in the Effect Controls panel.
6 Choose File > Save to save your work.
242 lesson 9 keying
Choking the matteBecause the Color Difference Key removes color only from the clip, the edge of the actor still has an unwanted fringe. To refine the edge of your matte, you need to choke, or tighten, it.
Additionally, just before the actor walks on, a small area of greenscreen may appear. The garbage mask takes care of this problem area once the actor is in position, but choking the matte will remove it at the beginning of the clip, as well.
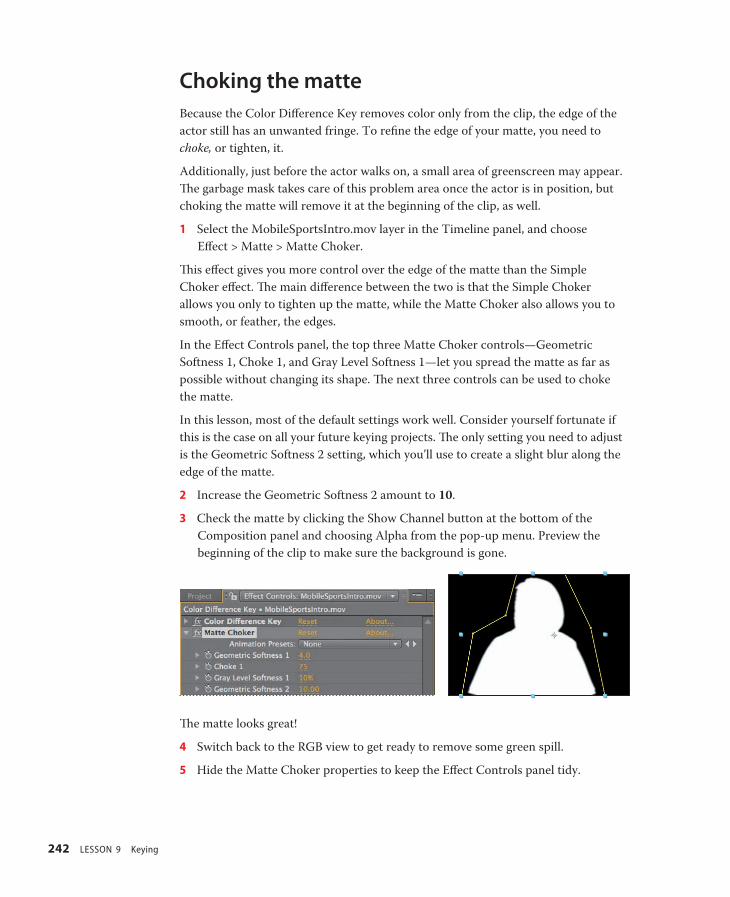
1 Select the MobileSportsIntro.mov layer in the Timeline panel, and choose Effect > Matte > Matte Choker.
This effect gives you more control over the edge of the matte than the Simple Choker effect. The main difference between the two is that the Simple Choker allows you only to tighten up the matte, while the Matte Choker also allows you to smooth, or feather, the edges.
In the Effect Controls panel, the top three Matte Choker controls—Geometric Softness 1, Choke 1, and Gray Level Softness 1—let you spread the matte as far as possible without changing its shape. The next three controls can be used to choke the matte.
In this lesson, most of the default settings work well. Consider yourself fortunate if this is the case on all your future keying projects. The only setting you need to adjust is the Geometric Softness 2 setting, which you’ll use to create a slight blur along the edge of the matte.
2 Increase the Geometric Softness 2 amount to 10.
3 Check the matte by clicking the Show Channel button at the bottom of the Composition panel and choosing Alpha from the pop-up menu. Preview the beginning of the clip to make sure the background is gone.
The matte looks great!
4 Switch back to the RGB view to get ready to remove some green spill.
5 Hide the Matte Choker properties to keep the Effect Controls panel tidy.
Adobe After effects cs4 clAssroom in A book 243
Removing spillIf you look closely at the actor’s hair, you will see green highlights. This is the result of green light bouncing off the background and onto the subject. You can remove this and any unwanted green fringes around the actor with the Spill Suppressor effect. Typically, the Spill Suppressor is used to remove key color spills from the edges of a matte. It is essentially a simple desaturation filter.
It’s easier to select the spill color if you temporarily turn off the Color Difference Key effect.
1 Select the MobileSportsIntro.mov layer in the Timeline panel and choose Effect > Keying > Spill Suppressor.
2 At the top of the Effect Controls panel, click the effect icon ( ) next to the Color Difference Key effect to turn it off.
3 In the Spill Suppressor area at the bottom of the Effect Controls panel, select the Color To Suppress eyedropper and click a green region near the actor’s hair. It’s easiest to select at the top of the screen.)
4 Turn the Color Difference Key effect back on. The subject is now keyed out and the unwanted green in and around her hair is gone.
5 Hide the Spill Suppressor properties.
6 Choose File > Save.
244 lesson 9 keying
key out a background with the keylight effectThere are many ways to pull a key in After Effects. In addition to using the Color Difference keyer, another good alternative is to use the Keylight effect. Keylight is a plug-in effect, licensed from The Foundry, that comes with After Effects CS4 Professional. It is a powerful keyer with numerous controls, and it is also one of the few effects that can pull a clean key in just one click.
If you’d like to try the Keylight effect, start this lesson over and complete the following exercise instead of the “Applying the Color Difference Key effect,” “Choking the matte,” and “Removing spill” exercises.
1 With the MobileSportsIntro.mov layer selected in the Timeline panel, choose Effect > Keying> Keylight (1.2).
As with the Color Difference Key, the first step is to select the key color.
2 In the Effect Controls panel, select the Screen Colour eyedropper.
3 In the Composition panel, click a green area of the background near the actor’s shoulder.
The results are instantaneous, and for many keying projects, one click will produce the desired result. Still, you need to check for possible errors or holes. The effect’s View pop-up menu will help you find and correct errors.
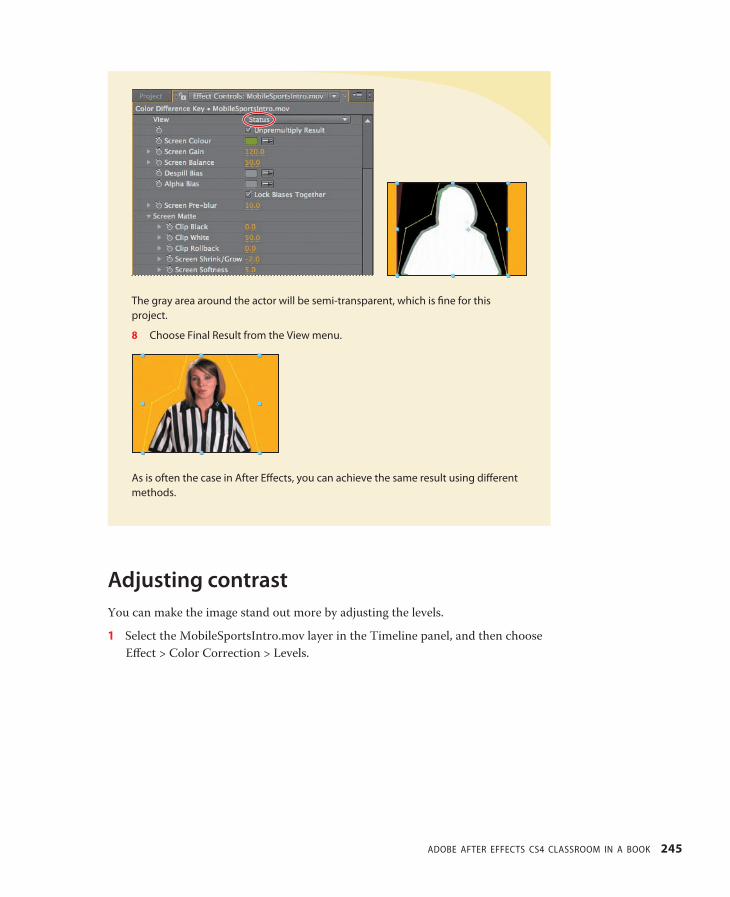
4 In the Effect Controls panel, choose Status from the View pop-up menu.
This shows an exaggerated view of the matte that is generated by the key color selection. Opaque areas appear white, transparent regions appear black, and semi-transparent pixels are gray. You can see that large areas of the image are not keyed correctly.
5 In the Effect Controls panel, increase the Screen Gain amount to 120. Most of the background is knocked out.
6 Increase the Screen Pre-Blur to 10 so that the background appears to wrap around the actor.
7 Expand the Screen Matte property. Decrease the Clip White value to 50, and change the Screen Shrink/Grow value to -2 to contract the matte. Then, increase the Screen Softness to 5.
Adobe After effects cs4 clAssroom in A book 245
The gray area around the actor will be semi-transparent, which is fine for this project.
8 Choose Final Result from the View menu.
As is often the case in After Effects, you can achieve the same result using different methods.
Adjusting contrastYou can make the image stand out more by adjusting the levels.
1 Select the MobileSportsIntro.mov layer in the Timeline panel, and then choose Effect > Color Correction > Levels.
246 lesson 9 keying
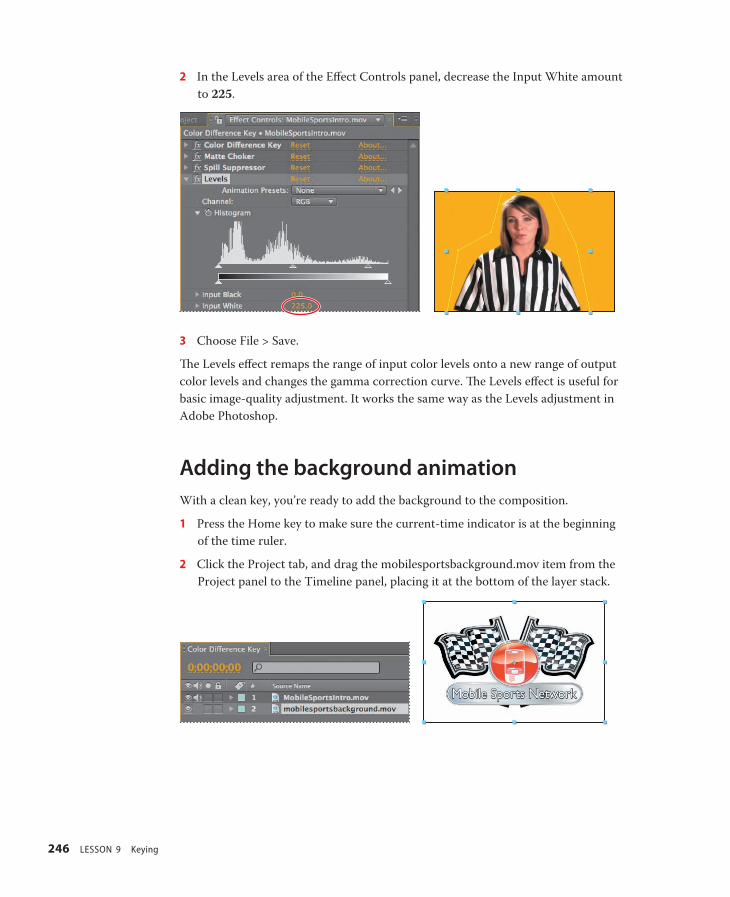
2 In the Levels area of the Effect Controls panel, decrease the Input White amount to 225.
3 Choose File > Save.
The Levels effect remaps the range of input color levels onto a new range of output color levels and changes the gamma correction curve. The Levels effect is useful for basic image-quality adjustment. It works the same way as the Levels adjustment in Adobe Photoshop.
Adding the background animationWith a clean key, you’re ready to add the background to the composition.
1 Press the Home key to make sure the current-time indicator is at the beginning of the time ruler.
2 Click the Project tab, and drag the mobilesportsbackground.mov item from the Project panel to the Timeline panel, placing it at the bottom of the layer stack.
Adobe After effects cs4 clAssroom in A book 247
3 Watch a RAM preview of the composition.
If you have a sharp eye, you may still notice a few aliasing artifacts here and there around the actor. Remember, you are working with footage that originated in HDV format, which is compressed and susceptible to some errors. Also, keep in mind that the computer monitor has a better resolution than a television set. To accurately judge the results of your key, you need to connect your system to a video monitor and view the results there. You’ll preview how the keying appears on mobile devices soon.
4 When you are done watching the RAM preview, press the spacebar to stop playback.
5 Choose File > Save to save your work.
Adding textNow, you’ll add a text layer and create the menu items that appear in the intro.
1 Move the current-time indicator to 5:15. This is the point where the actor tells the viewer to press 1 to select “basketball.”
2 Select the Horizontal Type tool ( ) in the Tools panel. After Effects opens the Character and Paragraph panels.
The company logo, which appears at the beginning of the animated background, uses Gill Sans font, and the company would like you to use that for the menu, if pos-sible. Because this intro will be viewed on the small screens of mobile devices, you’ll make the text large and bold.
248 lesson 9 keying
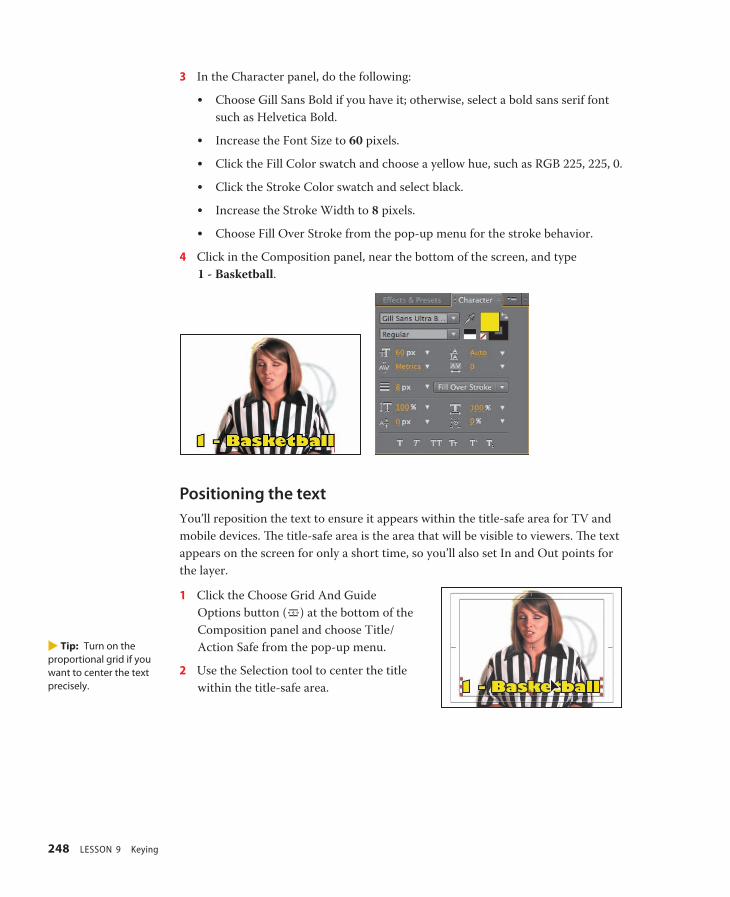
3 In the Character panel, do the following:
• Choose Gill Sans Bold if you have it; otherwise, select a bold sans serif font such as Helvetica Bold.
• Increase the Font Size to 60 pixels.
• Click the Fill Color swatch and choose a yellow hue, such as RGB 225, 225, 0.
• Click the Stroke Color swatch and select black.
• Increase the Stroke Width to 8 pixels.
• Choose Fill Over Stroke from the pop-up menu for the stroke behavior.
4 Click in the Composition panel, near the bottom of the screen, and type 1 - Basketball.
Positioning the textYou’ll reposition the text to ensure it appears within the title-safe area for TV and mobile devices. The title-safe area is the area that will be visible to viewers. The text appears on the screen for only a short time, so you’ll also set In and Out points for the layer.
1 Click the Choose Grid And Guide Options button ( ) at the bottom of the Composition panel and choose Title/Action Safe from the pop-up menu.
2 Use the Selection tool to center the title within the title-safe area.
E Tip: Turn on the proportional grid if you want to center the text precisely.
Adobe After effects cs4 clAssroom in A book 249
3 With the current-time indicator at 5:15, press the [ key to move the layer’s In point to the current time.
4 Go to 7:00, and press Alt+] (Windows) or Option+] (Mac OS) to trim the layer’s Out point to the current time.
Adding a drop shadowThe text looks pretty good, but you can make it even better by adding a drop shadow.
1 With the 1 - Basketball text layer selected in the Timeline panel, choose Layer > Layer Styles > Drop Shadow.
2 In the Timeline panel, double-click the Drop Shadow layer style to see its properties.
3 Reduce the Distance (the distance of the shadow from the text) to 0.0, increase the Spread to 25%, and increase the Size to 25.
Now, the text stands out against the background, making it easier to read on small screens.
4 Hide the Layer Styles properties.
5 Choose File > Save to save your work.
Animating textNext, you’ll add a transition to fade the text out.
1 Select the 1 - Basketball text layer, and then move the current-time indicator to 6:20.
2 In the Effects & Presets panel, navigate to Animation Presets > Text > Animate Out.
250 lesson 9 keying
3 Double-click the Fade Out Slow preset to apply it to the current layer. It starts at the current time.
Expand the Text properties for the 1 - Basketball layer to see the preset, which is listed as Animator 1. Its ending keyframe is far beyond the layer’s Out point. You’ll fix that, and in the process, make the slow effect a fast fade-out.
4 With the 1 - Basketball layer selected in the Timeline panel, press the U key to reveal all of the keyframes for the selected layer.
5 Drag the ending keyframe for the Offset property to the Out point for the layer (7:00).
6 Manually preview the text animation.
Duplicating the textYou’ve created the first menu item. You could create each of the three remaining menu items the same way, but it’s easier to duplicate the layer and its properties.
1 Select the 1 - Basketball layer in the Timeline panel, and press Ctrl+D (Windows) or Command+D (Mac OS) to duplicate the layer.
A new layer, named 1 - Basketball 2, appears in the Timeline panel.
2 Move the current-time indicator to 8:09, which is where the second menu item should end on the screen.
3 Press the ] key to move the Out point of the layer to the current time.
4 Move to 7:00 in the time ruler, and press Alt+[ (Windows) or Option+[ (Mac OS) to trim the In point of the layer to the current time.
5 Double-click the new layer (1 - Basketball 2). The text is selected and After Effects switches to the Horizontal Type tool.
6 Type 2 - Soccer.
7 Use the Selection tool to center the text in the title-safe area. Press the Shift key as you move the text to keep it from shifting vertically.
Adobe After effects cs4 clAssroom in A book 251
8 Select the 2 - Soccer layer in the Timeline panel, and press Ctrl+D (Windows) or Command+D (Mac OS) to duplicate the layer.
9 Move the current-time indicator to 9:11, where the third menu item should end on the screen, and press ] to move the Out point to the current time.
10 Move to 8:09, and press Alt+[ (Windows) or Option+[ (Mac OS) to trim the In point to the current time.
11 Double-click the duplicate layer (2 - Soccer 2), and type 3 - Golf. Use the Selection tool to center the text in the title-safe area as you hold down the Shift key.
12 Repeat steps 8–11 to duplicate the 3 - Golf layer, set the Out point of the duplicated layer to the end of the time ruler and the In point to 9:11, and replace the text with 4 - Tennis. Center the text in the title-safe area.
13 Click in an empty area of the Timeline panel to deselect all the layers.
All the text is in place!
14 Choose File > Save to save your work.
Preparing the composition for mobile devicesThe main work of the composition is done. You’re ready to move it into the compo-sitions you created using Device Central.
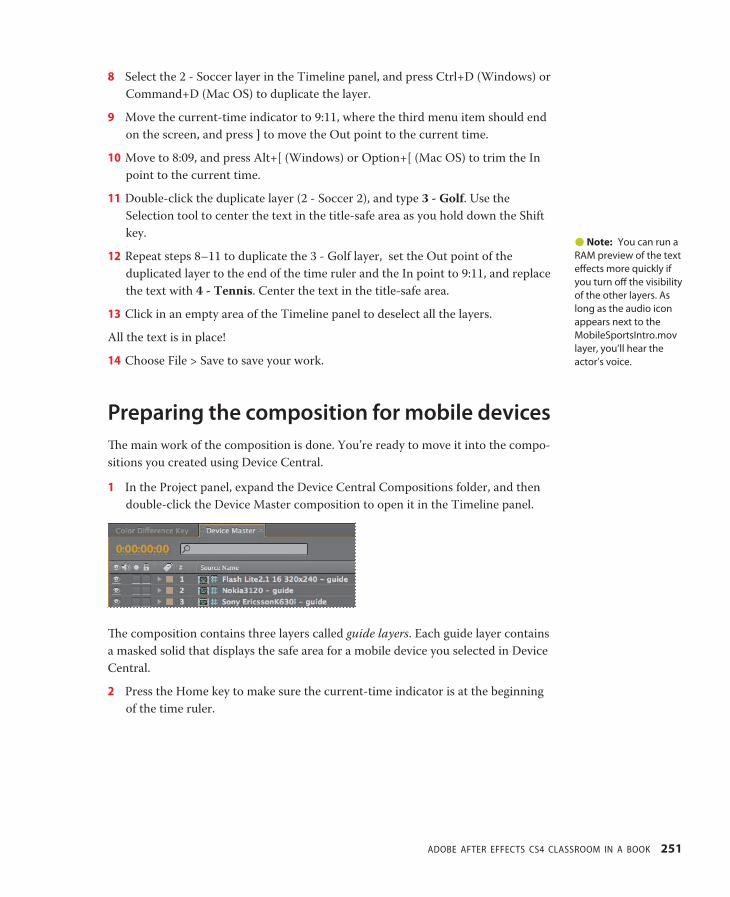
1 In the Project panel, expand the Device Central Compositions folder, and then double-click the Device Master composition to open it in the Timeline panel.
The composition contains three layers called guide layers. Each guide layer contains a masked solid that displays the safe area for a mobile device you selected in Device Central.
2 Press the Home key to make sure the current-time indicator is at the beginning of the time ruler.
Note: You can run a RAM preview of the text effects more quickly if you turn off the visibility of the other layers. As long as the audio icon appears next to the MobileSportsIntro.mov layer, you’ll hear the actor’s voice.
252 lesson 9 keying
3 In the Project panel, drag the Color Difference Key composition to the Timeline panel. Place it at the bottom of the layer stack.
The Color Difference Key composition is too large for any of the selected devices. Most mobile devices have a frame size of 320 x 240 pixels. The Color Difference Key composition has a frame size of 720 x 480 pixels. You’ll need to resize it.
4 With the Color Difference Key layer selected, press S to display its Scale property.
5 Change the Scale amount to 50%. Now the layer fits nicely inside all the guide areas.
There’s one more change to make. Device Central used the default length of 10 sec-onds for its compositions, but the Color Difference Key composition is 10 seconds and 23 frames. You’ll change the settings for the device compositions.
6 Select the Device Master composition in the Project panel, and then choose Composition > Composition Settings.
Adobe After effects cs4 clAssroom in A book 253
7 Change the Duration to 10:12, and then click OK.
The Device Central compositions have a frame rate of 15 frames per second, half the frame rate of the Color Difference Key composition. Therefore, instead of 23 additional frames, you need only 12.
8 Change the Duration for each of the other compositions in the Device Central Comps folder in the Project panel. (There are four more compositions in that folder: Flash Lite 2.1 16 320 x 240, Nokia 3120, Preview, and Sony Ericsson K630i.)
9 Double-click the Preview composition in the Project panel to open it. The Preview composition shows you how your final composition will look on each of the devices. If you identify any problems with positioning, or if it is difficult to read the text on any of the devices, open the composition for that device and make the necessary adjustments.
10 Choose File > Save to save your work.
Congratulations. You’ve not only completed a difficult keying project, but you devel-oped it for both mobile devices and larger screens. If you want to render and export these compositions, see Lesson 14, “Rendering and Outputting,” for instructions.
254 lesson 9 keying
Review Questions1 Review uses Number List
Review questions1 What is keying and when do you use it?
2 What is the purpose of using a garbage mask?
3 How can you check for errors in a color key?
4 What is spill and how can you fix it in After Effects?
5 How can you use Device Central to prepare compositions in After Effects?
Review answers1 Keying is defining transparency by a particular color value (with a color key or chroma
key) or brightness value (with a luminance key) in an image. When you key out a value, all pixels that have similar colors or luminance values become transparent. Keying makes it easy to replace a background of a consistent color or brightness with another image, which is especially useful when working with objects that are too complex to mask easily.
2 A garbage mask is used to remove unwanted portions of the image. This limits the region After Effects must search when keying, thus speeding up the keying calculations and increasing the chances for a cleaner key.
3 Use the alpha channel to check for errors in a color key. Make sure the background is a contrasting color, or toggle on the transparency grid, and then click the Show Channel button at the bottom of the Composition panel and choose Alpha. This displays a black-and-white matte. The black portion represents the area that is transparent; the white portion represents the area that is opaque; gray areas are semi-transparent.
4 Light spill occurs when light illuminating the background reflects onto the subject and colors the shadows and highlights. You can remove spill using the Spill Suppressor effect. Select the keyed layer and choose Effect > Keying > Spill Suppressor.
5 Use Device Central to create compositions with the appropriate settings for multiple mobile devices, and to preview the compositions on those devices.