16
Design, plan, budget, build your dream kitchen

KITCHEN DESIGN GUIDE
Design, plan, budget, build your dream kitchen

Table of Contents
This planning guide gives you the tools you need to make your new kitchen or kitchen remodel a success.
The worksheets will help you assess what you’ve got, determine what you need and want, and then help you to
make it all happen.
Design Project: Inspiration 3 Wish List 4 Creating your Space 5
Plan The Lay of the Land 6-7 Design Styles 8-11
Budget 12
Build 13
Ironhaus Custom Product Guide 14-16
2

Project: Inspiration
Before you tear down the walls and rip out the cupboards, take stock of what you’ve got. You wouldn’t be remodeling if you didn’t have a list of all the things you don’t like about your space. Making a formal assessment of your kitchen is
a good excercise that will give you a clear idea of what you want and what you need.
Start by listing what you like you about your current kitchen (even if it’s as simple as the finish of the hardware on your cabinets, or the great light you get from the win-dows). Determine the style you want to see in your new kitchen. Get out your Pinter-est pages and your Houzz Ideabooks. Let yourself dream big.
What I love about my current kitchen:
What I most want to change about it:
My dream kitchen:
I want to create a feeling of:
I want to use these colors:
I identify most with this style (s):
Design
3

DesignWish List
Decide how you want your new kitchen to look, how you’ll use it, who will use it, and the activities other than cooking you’ll do in your new space.
My new kitchen will open to up to other spaces:
I need/want how many workstations:
Number and age of household members:
Number of household cooks:
I entertain how often:
I plan on hosting small events how often:
I plan on hosting large events how often:
I identify most with this style (s):
BUDGETI plan to hire a contractor:
I plan to hire a designer/architect:
I plan to do all the work myself:
I plan to do some of the work myself, including:
Financing (% of each):Cash/Savings:
4

DesignCreating your Space
Now that you have an idea of what you have, need, want, and a budget to work with, it’s time to look at how you plan to use your new kitchen space.
Check all that apply
KITCHEN ACTIVITIESCooking:Light Cooking Large Family Style Cooking and Meal PrepGourmet CookingBakingEntertaining
Dining:Informal Formal
Other:Office workstationMedia spaceCraft spaceHomework spaceIn-kitchen laundryGrowing plants/herbs
STORAGE NEEDSFood and Bev (list):
Dry goods (list):
Cooking items (herbs, spices, oils):
Other:
Dishes/Serving Ware:Everyday diinerwareLinensFlatwareSpecial occasionServing pieces
Paper/Plastic/Other Goods:Food storage containersPaper goodsPet foodCleaning supplies
Storage SolutionsSeperate room for pantryDoor-mount racks for pantry itemsDedicate racks for pots and pansSeperate unit for Dishes/Serving Seperate until for display items (collections, etc.)
5

PlanThe Lay of the Land
This is a worksheet to help you create the layout for your new kitchen space.
Layout Existing NewRoom sizeNorth wallEast wallSouth wallWest wallSquare feetCeiling height
Cabinets by style:
______ Modern
______Industrial
______Traditional
______Rustic
______Eclectic
______Other
Surfaces Backsplash CountertopCeramic tileConcreteLaminateIronStainless SteelStoneWoodOther
Flooring
______Bamboo______Carpet______Tile______Concrete______Cork______Laminate______Wood______Stone______Other
Sink:
______Acrylic______Cast iron______Composite______Enameled Steel______Solid-Surface______Stainless Steel______Stone
6
Flooring
______Bamboo______Carpet______Tile______Concrete______Cork______Laminate______Wood______Stone______Other
Sink:
______Acrylic______Cast iron______Composite______Enameled Steel______Solid-Surface______Stainless Steel______Stone
Plan
Ventilation
______Island Hood
______Chimney Hood
______Microwave-Hood Combination
______Downdraft
Lighting (check all that apply)
______ Chandelier
______Pendant
______Recessed
______Task
______Accent
Major Appliances
______Conventional Oven
______Convection Oven
______Microwave
______Steam Oven
______Freestanding Range
______Slide-in Range
______Warming Drawer
______Refrigerator
______Freezer
______Wine Cooler
______Dishwasher
______Washer/Dryer
Notes:
Checklist, cont.
7

PlanDesign Styles
Taking the time to plan the layout
of your new kitch-en will help to ensure you get the kitchen you want and will enjoy for your years to come. You want a kitch-en that speaks to your style, fits your needs and space limitations, works for all the members of your household, and fits your cooking and entertaining needs. Following are typical kitchen layouts. GALLEY STYLE
The galley kitchen is a classic. Though best suited for small spaces as it max-imizes space and function, it is this very aspect that makes it an appeal-ing choice for any size space.
A single wall galley kitchen (pictured above) creates an open space with plenty of room to entertain. Or, a tra-ditional two-wall galley kitchen (left) takes advantage of the limited space with white cabinetry, and windows that let in the light.
8
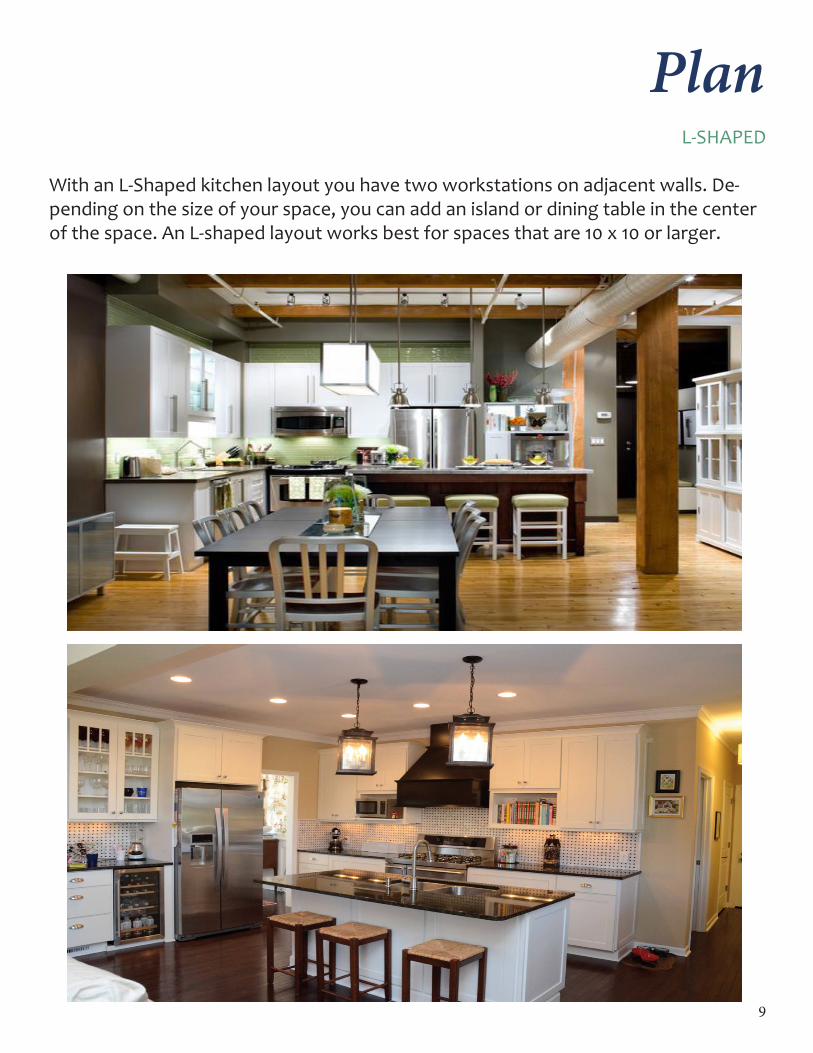
PlanL-SHAPED
With an L-Shaped kitchen layout you have two workstations on adjacent walls. De-pending on the size of your space, you can add an island or dining table in the center of the space. An L-shaped layout works best for spaces that are 10 x 10 or larger.
9

PlanDesign Styles, cont. U-SHAPED
With one worksta-tion on each of it’s three walls, the U-Shaped kitchen style is the most efficient of designs. To make the most of this space, the base of the U should be at least 8 ft. long to allow for more than one cook to be work-ing in the kitchen at the same time. Add-ing an island allows you to move the cooking station, or add an addional sink.
10

PlanMULTIPLE WORK ZONE
If you have the space and the budget a multiple work zone kitchen is the utlimate de-sign offering various work and prep stations, the option of adding in a butler’s pantry for extra storage, or to hide prep or staging areas if you entertain frequently.
11
BudgetHow to Set and Stick to a Budget
Admittedly, determining your budget and then sticking to it is not as much fun as choosing design styles, or shopping for new applianc-
es, but doing this critical step will make the process easier, and will help you to focus on what you can accomplish, which will result in you getting more bang for your buck.
Start the budgeting process by determining why you’re remodeling. Are you wanting to add value to your home to make it more attractive to poten-tial buyers? Are you creating a dream kitchen that will make your home more liveable for the years to come? How you answer these questions will help you to focus on how much money to spend and where to spend it.
To determine your budget make a list of your debts and figure out your monthly gross income. This will give you the maximum montly payment you should spend on your kitchen. Experts recommend that you add a 10% cushion into your budget to allow for those inevitable surprises that almost always hap-pen with every project, no matter how well planned or executed.
Here are some tips to help you save money and keep to your budget:
1. Make a Plan and Stick to It. You’ve given yourself X amount for a backsplash, but then find a unique tile you just can’t live without but that blows your budget. Before you start shopping what are things you want to spend a little extra on? What are those custom items that you just can’t live without? For other items find simi-lar but less expensive options.
2. Hire a Pro. It may cost you more upfront to hire a professional architect, build-er or designer but it will save you money in the long run. A professional with experi-ence in remodeling or building kitchens can help you avoid costly mistakes. You can also negotiate upfront for work you’re willing and able to do on your own.
3. Check References. If you are hiring a professional check their referenc-es. Look for professionals who keep to deadlines, communicate with their clients, are good about follow-up and following through with all aspects of the job. Don’t be afraid to ask the tough questions before you hire a professional. This is your home and your money and you deserve to get the best work.
4. Make a Timeline. Timing is everything. Items like countertops, custom range hoods, lighting, flooring, and all other custom products take time to manufac-ture. So, make sure you’ve figured this into your timeline.
12

BuildLet the Games Begin
Any remodeling project comes with it’s share of inconveniences. A kitchen remodel is especially disruptive as the kitchen is the one space in our homes that is difficult to live without. Of course you generally don’t realize just how
true this is until you’re four weeks into takeout, and washing dishes in the bathtub. But there are some things you can do to make the process a little easier. We’ve got six sure fire tips to keep you sane.
1. Stay Focused on the Big Picture. You’ve taken the time to prepare. You’ve hired professionals you trust. Still you worry and why shouldn’t you? This is a big project. Trust in your planning and keep an eye to the finished space.
2. Be Clear about Expectations. Before the work begins, sit down with your professional to discuss how the job will proceed. You are are the manager of this team so be speficic with your professional.
3. Timeline and Progress. Sit down with your professional before you sign a contract to discuss and develop a reasonable timeline for the project. And then once the work begins refer to the timeline on a weekly basis with your professional. This will help you see where you are, and if there are any potential problems.
4. Safety. Exposed wiring, rough edges, power tools on the job site are safety risks to you and the members of your household. Make sure those items are properly stored when the job is done for the day. And, be respectful of your professionals. Stay out their way, and keep other household members from interfering with the work.
5. Temporary Kitchen. Eating take out for eight weeks while your kitchen is out of use may sound like a fine idea at the beginning of the project but loses its appeal quickly. Set up a designated place in your home, or outdoors if the weather permits to serve as a prep, cooking, and cleaning area. This might be the perfect opportunity to rediscover your love of outdoor living.
6. Final Walk Through. Before you sign your name to the final payment, do a thorough walk-through with your professional. Make a list of things that need to be com-pleted or fixed, and get an agreement as to when these items will be addressed. At that time, you can make your final payment.
13

Ironhaus Product GuideReimagine Custom
You have a lot of choices when it comes to finding the right products for your new kitchen. If you’re looking for that one-of-a-kind statement piece that is both aesthetic and practical, Ironhaus is your custom ironwork studio. Whether you’re looking for a fireplace and fireplace doors for your French
Colonial kitchen, an iron range hood or wrought iron lighting, our product guide is the source for all your custom needs. Don’t see exactly what you want? Give us a call, we work directly with our customers to help bring their visions to reality.
Fire
plac
es Our modern, linear frame
strikes the right note of modern warmth. Placed at any height in the wall to create a stunning focal point, and separate work areas from entertaining areas.
Old world charm abounds in this rustic kitchen with a fireplace that provides a warm ambiance, and divides the kitchen from the formal dining area.
The Essential Kitchen Collection
14

Range Hoods that capture your imagination and will make you want to spend all your time in the kitchen.
You choose the style that most inspires you. We work directly with you to determine size, color, finish, and other options. You tell us what you want and we design and build to your needs and specifications. We ship to you on-time with everything you need to make instal-lation a snap. 4-6 weeks is our standard and to date we have a 99.9% on time-delivery rate.
Create Your Own
All our range hoods come standard with Vent-A-Hood® blower systems to give you the quietest vent-ing system on the market.
15
A Winning Duo

Wrought Iron Lightingthat illuminates and inspires
Breaking the RulesThere’s a well known principle in the design and build industry called the Cost/Quality/Time Rule that states with any project, you can have two of those things. You can spend less and get it quick, but the quality will suffer. Or, you can have quality, but it will cost you both time and money. We’ve effectively shat-tered that rule. Using the old-world techniques of metalwork and applying innovative engineering and state-of-the-art manufacruting processes, we give our clients thoughtful design, unparalleled craftsmanship, easy installation and seamless integration of our prod-ucts with other products and your space.
See our full product collection for hearth and home at www.ironhaus.com. Ready to order? Call Cliff Eggleston @ 866-880-0900. Or, drop him an email at [email protected]. 16
Don’t forget to accessorize with wrought iron pieces. Wrought iron corbels paired with reclaimed wood make for a trending shelving solution with staying power.


![PowerPoint Presentation€¦ · Services Lobby CASTLETREE HOMES BEAUTIFUL HOMES BY DESIGN . Bedroom 2 En-suit ST. Skylounge L] Cloaks En-suite Ent Hall Utili Bedroom 1 Pantry Kitchen](https://static.documents.pub/doc/80x56/604a4a080d305968bd1f1471/powerpoint-presentation-services-lobby-castletree-homes-beautiful-homes-by-design.jpg)


