25
Kivy Designer Documentation Release 0.9 Kivy October 02, 2016

Kivy Designer DocumentationRelease 0.9
Kivy
October 02, 2016

Contents
1 Installation 31.1 Prerequisites . . . . . . . . . . . . . . . . . . . . . . . . . . . . . . . . . . . . . . . . . . . . . . . 31.2 Installation . . . . . . . . . . . . . . . . . . . . . . . . . . . . . . . . . . . . . . . . . . . . . . . . 3
2 Quick-start 52.1 How it works . . . . . . . . . . . . . . . . . . . . . . . . . . . . . . . . . . . . . . . . . . . . . . . 52.2 Kivy Designer Interface . . . . . . . . . . . . . . . . . . . . . . . . . . . . . . . . . . . . . . . . . 62.3 UI Creator . . . . . . . . . . . . . . . . . . . . . . . . . . . . . . . . . . . . . . . . . . . . . . . . 72.4 Building . . . . . . . . . . . . . . . . . . . . . . . . . . . . . . . . . . . . . . . . . . . . . . . . . 82.5 Modules . . . . . . . . . . . . . . . . . . . . . . . . . . . . . . . . . . . . . . . . . . . . . . . . . 10
3 Buildozer Spec Editor 133.1 Settings . . . . . . . . . . . . . . . . . . . . . . . . . . . . . . . . . . . . . . . . . . . . . . . . . . 133.2 Creating a new Buildozer Project . . . . . . . . . . . . . . . . . . . . . . . . . . . . . . . . . . . . 133.3 Editing . . . . . . . . . . . . . . . . . . . . . . . . . . . . . . . . . . . . . . . . . . . . . . . . . . 14
4 Kivy Designer’s Tools 154.1 Create setup.py . . . . . . . . . . . . . . . . . . . . . . . . . . . . . . . . . . . . . . . . . . . . . . 154.2 Check PEP8 . . . . . . . . . . . . . . . . . . . . . . . . . . . . . . . . . . . . . . . . . . . . . . . 164.3 Export .PNG . . . . . . . . . . . . . . . . . . . . . . . . . . . . . . . . . . . . . . . . . . . . . . . 164.4 Git . . . . . . . . . . . . . . . . . . . . . . . . . . . . . . . . . . . . . . . . . . . . . . . . . . . . 164.5 Bug Reporter . . . . . . . . . . . . . . . . . . . . . . . . . . . . . . . . . . . . . . . . . . . . . . . 17
5 Contribute 195.1 About . . . . . . . . . . . . . . . . . . . . . . . . . . . . . . . . . . . . . . . . . . . . . . . . . . . 195.2 Contributing . . . . . . . . . . . . . . . . . . . . . . . . . . . . . . . . . . . . . . . . . . . . . . . 19
6 Indices and tables 21
i

ii

Kivy Designer Documentation, Release 0.9
Kivy Designer is Kivy’s tool for designing Graphical User Interfaces (GUIs) from Kivy Widgets. You can composeand customize widgets, and test them. It is completely written in Python using Kivy. Kivy Designer is integrated withBuildozer and Hanga, so you can easily develop and publish your applications to Desktop and Mobile devices.
Contents 1

Kivy Designer Documentation, Release 0.9
2 Contents

CHAPTER 1
Installation
1.1 Prerequisites
• Kivy 1.9+
• The following Python modules (available via pip):
– watchdog
– Pygments
– docutils
– jedi
– gitpython
– six
– kivy-garden
• The FileBrowser widget from the Kivy Garden
1.2 Installation
Download the Kivy Designer’s source code:
git clone http://github.com/kivy/kivy-designer/
or, download it manually from https://github.com/kivy/kivy-designer/archive/master.zip and extract to kivy-designer
Open the downloaded folder and install the required prerequisites:
cd kivy-designerpip install -Ur requirements.txt
To install the FileBrowser, enter a console (on windows use kivy.bat in the kivy folder):
garden install filebrowser
With the prerequisites installed, you can use the designer:
python -m designer
On OS X you might need to use kivy command instead of Python if you are using our portable package.
3

Kivy Designer Documentation, Release 0.9
4 Chapter 1. Installation
CHAPTER 2
Quick-start
Let’s know more about Kivy Designer!
2.1 How it works
Kivy Designer organizes some open source tools to help you to create Kivy UI easily, develop your applications andtarget multiple platforms.
2.1.1 Creating a new project
To create a new project, you can use:
• In Start Page, there is a New Project button.
• In the menu File -> New Project
This is the New Project wizard:
5

Kivy Designer Documentation, Release 0.9
Where you can select an initial template for your project.
After creating it, you’ll see the UI Creator. You can start editing the app UI, or edit the main.py.
2.2 Kivy Designer Interface
This is a list and overview of some Kivy Designer’s components
After opening a project, you will see following:
1. Project Tree on the left side, shows files and folders inside the project’s directory.
2. Toolbox contains widgets which could be drag-drop to the required positions.
3. UI Creator is place where you will be designing your project.
4. Widget Tree shows the Widget hierarchy of the project.
5. Property Viewer shows properties, their values and allows changing the values.
6. Events shows the available events and their event handler. You can change/set an event handler and addan event.
7. KV Lang Area shows what your kv file would be consisting.
8. Kivy Console is a console just like xterm, GNOME Terminal. You can enter commands and execute them.
9. Python Shell is an interactive Python Shell.
10. Error Console shows errors which may occur in the user code, while opening a project or creating customwidget.
6 Chapter 2. Quick-start

Kivy Designer Documentation, Release 0.9
11. Playground Settings you can change the playground screen size, orientation and zoom to help the UIdevelopment
12. Status Bar The status bar helps you displaying the selected widget hierarchy and messages.
2.3 UI Creator
You’ll probably spend a big part of your time designing the app interface; so the UI creator is the right place for you :)
When designing the UI, you can get Widget from Widget Tree or you insert the KV Lang code in KV Lang Area
If you want to change the size or orientaiton of the emulated interface, you can set it on Playground Settings
2.3. UI Creator 7

Kivy Designer Documentation, Release 0.9
2.4 Building
To build, and run your project, you’ll need to configure the Kivy Designer Builder. The Builder will help you to targetyour application to the desired platforms. You can access Builder settings at Run -> Edit Profiles...
2.4.1 Builders
You can use the following tools to build your project:
• Desktop - This is the default Python interpreter available in your system. (Desktop only)
• Buildozer - Use Buildozer to target mobile devices. (Android and iOS)
• Hanga - Use Hanga to target mobile devices. (Android)
2.4.2 Build Profiles
You can select and configure your Builder using Build Profiles.
8 Chapter 2. Quick-start

Kivy Designer Documentation, Release 0.9
Kivy Designer already provides 3 defaults profiles:
• Desktop
• Android - Buildozer
• iOS - Buildozer
You can edit/delete these profiles and create new ones. To use a profile, click in the button Use this profile orselect the profile from the menu Run -> Select Profile
2.4.3 Editing a profile
Before edit a build profile, it’s a good idea to know what you are editing :) Take a look on what each field represents
• Name - Name of the profile. This name will be visible in the profiles list.
• Builder - Select which Builder do you want to use.
• Target - Select the target platform. IMPORTANT: Just make sure that the selected Builder supports the desiredplatform.
• Mode - Used by Buildozer and Hanga only. This sets the build mode, Debug or Release.
• Install On Device - If you are targeting a mobile device, this tool allows you to auto install the application everybuild.
• Debug - If activated and targeting Android, will show the logcat output on Kivy Console.
• Verbose - If activated, will run your Builder on verbose mode.
2.4. Building 9

Kivy Designer Documentation, Release 0.9
2.4.4 Run
The Run menu provides you some options. Take a look in the table bellow to see how it works with each Builder
Desktop Buildozer HangaRun Run main.py with Python
interpreterBuild, install and run on target device Not yet
implementedStop Stop the Python interpreter Nothing Not yet
implementedClean Removes all .pyc and
__pycache__Clean the Buildozer build Not yet
implementedBuild Generate .pyc Build the project. If Install On Device is set,
install it on device.Not yetimplemented
Re-build
Run Clean and theBuild
Run Clean and the Build Not yetimplemented
2.5 Modules
While developing your application, Kivy provides some extra modules to help you.
Kivy Designer has an interface to some of these modules .
To use Kivy Modules you must target Desktop, select the desired module at Run -> Run with module....
2.5.1 Screen Emulation
It’s really important to see your application running in different screen sizes, dimensions and orientations.
Kivy Designer provides a simple interface to the Screen Module.
This module provides some settings. You can change the Device, Orientation and Scale. And the just pressRun to run your application with Screen Module.
2.5.2 Touchring
The Touchring Module shows rings around every touch on the surface / screen.
You can use this module to check that you don’t have any calibration issues with touches.
2.5.3 Monitor
The Monitor Module is a toolbar that shows the activity of your current application.
2.5.4 Inspector
Note: This module is highly experimental, use it with care.
The Inspector Module is a tool for finding a widget in the widget tree by clicking or tapping on it.
After running your app, you can access the Inspector with:
10 Chapter 2. Quick-start

Kivy Designer Documentation, Release 0.9
• “Ctrl + e”: activate / deactivate the inspector view
• “Escape”: cancel widget lookup first, then hide the inspector view
Available inspector interactions:
• tap once on a widget to select it without leaving inspect mode
• double tap on a widget to select and leave inspect mode (then you can manipulate the widget again)
Warning: Some properties can be edited live. However, due to the delayed usage of some properties, it mightcrash if you don’t handle all the cases.
2.5.5 Web Debugger
The Web Debugger Module starts a webserver and run in the background. You can see how your application evolvesduring runtime, examine the internal cache etc.
To access the debugger, Kivy Designer will open http://localhost:5000/
2.5. Modules 11

Kivy Designer Documentation, Release 0.9
12 Chapter 2. Quick-start

CHAPTER 3
Buildozer Spec Editor
Kivy Designer provides a GUI editor to Buildozer Spec files.
3.1 Settings
You can edit Buildozer Settings at File -> Settings -> Buildozer. You may see the following keys:
• Buildozer Path - indicates the path of Buildozer executable. Kivy Designer finds it automatically if it’s on thesystem path.
3.2 Creating a new Buildozer Project
If you want to make your project compatible with Buildozer, creates a new specification file on Tools ->Buildozer init This command will create a basic buildozer.spec file on the root folder of your project.
13

Kivy Designer Documentation, Release 0.9
3.3 Editing
To open Buildozer Spec editor, just click on the buildozer.spec file in the Project Tree.
3.3.1 GUI
You will see the Editor with the project’s settings.
You can edit the specifications using the GUI editor. You can find some shortcuts to usual settings.
You’ll see the default values for Android Permissions, Garden requirements and Python module dependencies; andyou’ll be able to add your own value if necessary.
3.3.2 Raw Editor
If you prefer, you can edit the spec in text mode. Just open the buildozer.spec tab in the Editor and you’ll see a textinput to edit it.
3.3.3 Save your new specification
If you are using the GUI, it’ll auto save your spec. If using the raw editor, you need to press Apply modifications tosave it; or Cancel modifications to restore the last saved .spec
14 Chapter 3. Buildozer Spec Editor

CHAPTER 4
Kivy Designer’s Tools
This section explain how to use Kivy Designer’s tools. Each tool tries to simplify a process of the development.
4.1 Create setup.py
This is a helper to auto create a setup.py file in the root of the project.
You can access it in the menu Tools -> Create setup.py
15

Kivy Designer Documentation, Release 0.9
4.2 Check PEP8
This tool will check the PEP8 of the current project. It’s run on Kivy Console, so you need to check the Kivy Consoleto see the PEP8 checker status.
4.3 Export .PNG
This is a helper to create a .png image from the Kivy Designer’s Playground. While developing an application, if youwant to save your current design in a image, use Tools -> Export .PNG
If there is a selected widget on Playground, this widget will be exported. If there is no selected widget, the RootWidgetwill be exported.
The .png will be saved in the root folder of the project, and the file name will be displayed on the Status Bar.
4.4 Git
Kivy Designer provides some Git shortcuts to help you with your project versioning. You can get Git tools on Tools-> Git
If the project is not a git repo, you will see the Init button. Otherwise, you’ll have the following tools available.
4.4.1 Commit
Commit the current repository.
4.4.2 Add
Opens a list with untracked files. You can select the desired files to add to the Git repo.
4.4.3 Branches
Opens a list with repo branches. You can select any branch to do a checkout. Or you can type a custom name andselect it to create a new branch and do checkout to it.
4.4.4 Diff
Shows the project’s modification on a Code Input
4.4.5 Pull/Push
To work with remote repositories, you’ll need to generate and configure a SSH key. Read more about it here.
If you have a SSH key working, you can pull and push data from remote repositories. These buttons will display a listof available remotes. Select a remote to pull or push data.
Note: If you are using Windows, you may see a CMD window asking for SSH password before remote actions.
16 Chapter 4. Kivy Designer’s Tools
Kivy Designer Documentation, Release 0.9
4.5 Bug Reporter
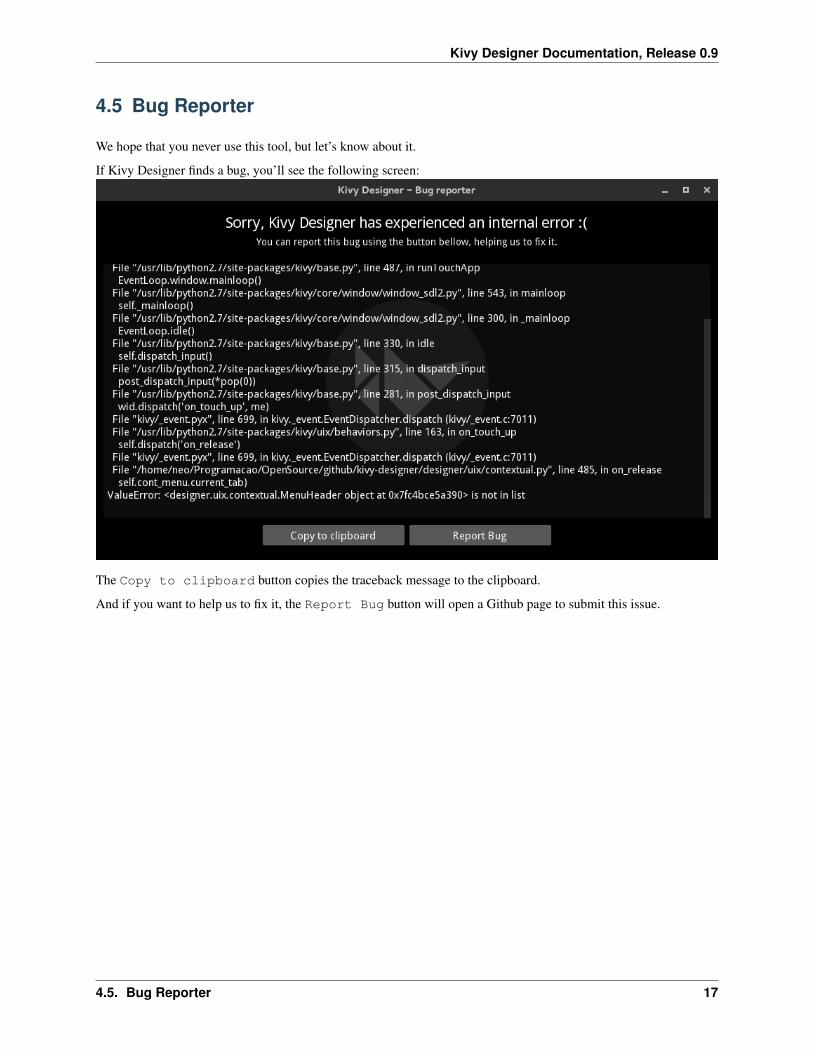
We hope that you never use this tool, but let’s know about it.
If Kivy Designer finds a bug, you’ll see the following screen:
The Copy to clipboard button copies the traceback message to the clipboard.
And if you want to help us to fix it, the Report Bug button will open a Github page to submit this issue.
4.5. Bug Reporter 17

Kivy Designer Documentation, Release 0.9
18 Chapter 4. Kivy Designer’s Tools

CHAPTER 5
Contribute
5.1 About
Kivy Designer is an IDE under development, and we hope to provide with it an easy-to-use multiplatform Pythondevelopment workspace. So, we just need your help to keep it growing :)
• Have you found a bug?
• Is there something missing on Kivy Designer?
• Should it be different?
• Do you have an idea??
– PS: We love ideas. Share it with us :)
• Any kind of contribution are always welcome :)
If you can help us with something listed above, or anything else, reach us on IRC or create a new issue.
5.2 Contributing
We love pull requests and discussing novel ideas. Check out our contribution guide and feel free to improve KivyDesigner.
The following mailing list and IRC channel are used exclusively for discussions about developing the Kivy frameworkand its sister projects:
• Dev Group : https://groups.google.com/group/kivy-dev
• Email : [email protected]
IRC channel:
• Server : irc.freenode.net
• Port : 6667, 6697 (SSL only)
• Channel : #kivy-dev
Read this doc about Kivy Contributing. http://kivy.org/docs/contribute.html
19

Kivy Designer Documentation, Release 0.9
20 Chapter 5. Contribute

CHAPTER 6
Indices and tables
• genindex
• modindex
• search
21


