1
www.Daystarweb.com
Tech Support Contact Info:
[email protected]
Phone: 623.907.0081
Fax: 623.907.0088
841 South 71st Avenue
Phoenix, AZ 85043
Instruction Sheet: P21359
2014 Daystar Products International
Inc.
Revision: 1
Revision Date: 04/22/14
Revised by: PH
KJ71048BK
Side Hood Vents
2007 - 2015 Jeep Wrangler JK
2
Introduction
is your number one source for Made In
The USA quality, vehicle accessories.
Now backed with our exclusive Go Everywhere © Life-
time Limited Warranty (see terms at Daystarweb.com).
To assure your safety and proper installation of this
product, take a moment to read all instructions and Prod-
uct Safety Information before trying to install your Day-
star® product. We are here to help if you have remaining
technical questions after reading these instructions. Con-
tact us toll free at 800-595-7659.
Product Safety Information
Throughout these instructions important safety information is generally pre-
ceded by one of three signal words indicating the relative risk of injury. The
signal words mean:
! WARNING A hazardous situation which, if not avoided, could result in
death or serious injury. You can be Killed or Seriously Hurt if you don’t fol-
low instructions.
! CAUTION A hazardous situation which, if not avoided, could result in
minor or moderate injury. You can be moderately HURT and also may suffer
property damage if you don’t follow instructions.
NOTICE Careful attention is required to this instruction or operation but
does generally not relate to personal injury. Damage to your product or other
property may result if you don’t follow instructions.
!WARNING
Familiarize yourself with all vehicle manufactures’ and Daystar
warnings, instructions and limited warranties before driving your
modified suspension vehicle. Also be aware many states / coun-
tries have laws governing on-road vehicle heights and modifica-
tions. You are responsible for assuring the safety and legality of
your vehicle. A summary of current state vehicle laws is available
at www.sema.org.
3
Tools Needed
Quantity Description
1 1/4” Drive
1 10mm Socket
1 Center Punch
1 Drill
1 1/16” Drill Bit
1 1/4” Drill Bit
1 Scissors
1 Marker or Paint Pen
1 Painters Tape
1 1-1/4” Hole Saw
1 3mm Allen Key
1 Fur Tree Removal Tool
1 Sheet Metal Nibbler or similar tool
1 Razor or Exacto knife
1 Angle Grinder
Bill of Materials
Quantity Part Number Description
14 S21366 M4-0.7 Socket Head Bolt
14 S21367 M4 Flat Washer
1 M56134-BK Left Side Vent
1 M56135-BK Right Side Vent
1 M21342-BK Left Vent Ring
1 M21343-BK Right Vent Ring
1 P21360 Template
1 P21365 242 Blue Loctite
4
Installation Instructions
!Warning: Always work with appropriate personal safety
gear including safety glasses, gloves and hearing protection if
using air powered tools.
Begin by inspecting the components & hardware for dam-
age. Then compare components & hardware to the bill of materi-
als for completeness. If anything is missing/damaged, do not pro-
ceed with the installation. Please, call Daystar Products (800-595-
7659) and we will send you the missing of damaged components
free of charge.
1. Raise hood and remove the hood insulation blanket.
Tools: Fur Tree Removal Tool
2. Remove Footman loop. Figure: 1
Tools: 1/4” Drive & 9mm Socket
3. Remove Windshield Bumpers. Figure: 2
Note: 2007-2010 pull right out, 2011 & UP require depressing
two tabs located on the bottom side of the hood.
4. Lay the Template on a flat surface and cut out the Footman
loop holes and the Windshield Bumper holes. Figure: 3 & 4
5. Place Template onto the hood.
Figure: 2 Figure: 1
5
6. Using two 1/2” bolts and two 1/4” bolts locate the template
using the footman loop holes (1/4”) and the windshield bump-
er holes (1/2”). Figure: 5 & 6
Figure: 3
Figure: 4
Figure: 5
Figure: 6
6
7. Now that the template is placed on the hood. Measure from the from
the front crease of the hood to the template border , on both sides of the
hood, to ensure the template is square. This measurement should be
9.75” +/- 1/16”. The goal is to make sure the measurement is identical on
the left and right sides. Figure: 7
Figure: 7
8. Now that the template is located tape the top edge, so that it will not
move.
9. Place the painters tape under the areas that area to be drilled and cut
out. This step will help protect the paint during the installation proce-
dure. Figure: 8
Figure: 8
7
10. Lay the template out and tape it down to the hood. Make sure that the
template is laying as flat as possible without any wrinkles.
11. Lay a blanket over the engine to protect the engine bay from metal shav-
ings and chips. Figure: 9
Figure: 9
12. Lower the hood
13. Center punch all of the holes to be drilled. Preform the following steps
on both the left and right side of the template. Figure: 10
Figure: 10
14. Use the 1/16” drill bit to create a pilot hole for all of the center
punched holes. Figure: 11
Tools: Drill & 1/16” drill bit.
Note: Be sure to support the hood from underneath, so the hoods
sheet metal does not deform.
8
16. Cut out the center of the vent template. Figure: 12
Tools: Exacto knife or Razor knife.
Figure: 11
Figure: 12
17. Trace the shape of the side hood vent hole that will be cut into the hood.
Figure: 13
Tools: Marker or Paint pen.
9
Figure: 13
18. Open up the three (3) holes located in the interior of the vent. Use the 1-
1/4” hole saw for this operation. Figure: 14
Tools: Drill & 1-1/4” Hole saw.
19. Open up the seven (7) mounting holes on the outer perimeter to 1/4”.
Figure: 15
Tools: Drill & 1/4” Drill Bit
Figure: 14
Figure: 15
10
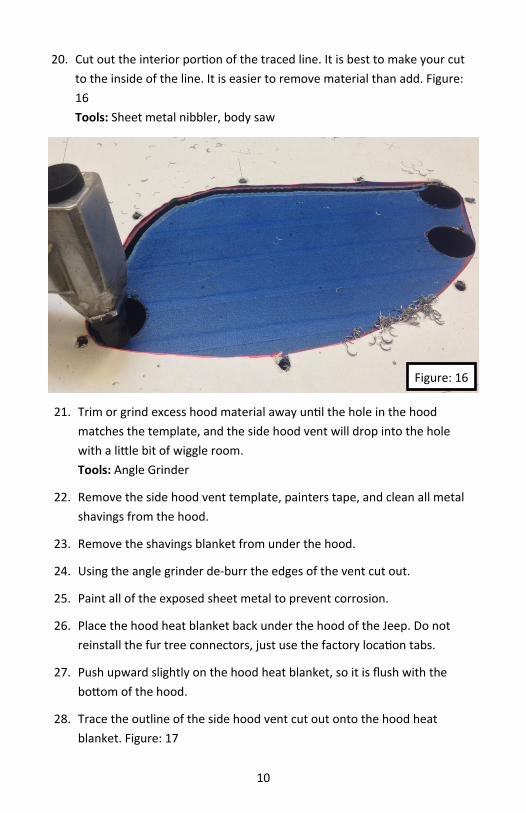
20. Cut out the interior portion of the traced line. It is best to make your cut
to the inside of the line. It is easier to remove material than add. Figure:
16
Tools: Sheet metal nibbler, body saw
Figure: 16
21. Trim or grind excess hood material away until the hole in the hood
matches the template, and the side hood vent will drop into the hole
with a little bit of wiggle room.
Tools: Angle Grinder
22. Remove the side hood vent template, painters tape, and clean all metal
shavings from the hood.
23. Remove the shavings blanket from under the hood.
24. Using the angle grinder de-burr the edges of the vent cut out.
25. Paint all of the exposed sheet metal to prevent corrosion.
26. Place the hood heat blanket back under the hood of the Jeep. Do not
reinstall the fur tree connectors, just use the factory location tabs.
27. Push upward slightly on the hood heat blanket, so it is flush with the
bottom of the hood.
28. Trace the outline of the side hood vent cut out onto the hood heat
blanket. Figure: 17
11
Figure: 17
29. Remove the hood heat blanket and place on a hard level surface.
30. Using the vent rings, line up the ring with the outline traced onto the
hood heat blanket in step 28. Figure: 18
Figure: 18
31. Trace the outer edge of the hood vent ring.
32. Measure in 1/2” from the outer line that was traced on to the hood heat
blanket. Figure: 18
12
Figure: 18
33. Using the marks, placed 1/2” inside the outer line, cut out the center por-
tion of the heat blanket. Figure: 19
Figure: 19
34. Make sure the cut out in the heat hood blanket is large enough for the
vent ring to fit with a little wiggle room. Figure: 20
13
35. Reinstall the windshield
hood bumpers into the
hood.
36. Reinstall the footman loop
into the hood.
37. Reinstall hood heat blanket.
38. Put the passenger side hood
vent (56135) into place.
39. Collect seven (7) of the flat
washers and 4mm bolts.
40. Place a drop of blue 242
Loctite on each bolt.
41. Put the passenger side vent
ring (M21343) into position.
42. Install all seven (7) of the
4mm bolts with washers.
Until, all are installed leave
them loose to allow for ad-
justment.
Figure: 20
14
Daystar® Lifetime GoEverywhere Limited Warranty
Your Daystar® Comfort Ride or Budget Boost leveling kit is covered by the
following Go Everywhere Lifetime Limited Warranty provided exclusively
by Daystar Products International, Inc., 841 South 71st Ave., Phoenix, AZ
85043 (“Daystar”).
43. Tighten up the seven (7) bolt. They just need to be snug, once you see
the polyurethane ring start to compress, the bolts are tight enough.
44. Install the Driver’s side vent along with the vent ring, following the same
procedure.
45. Congratulations you are finished. Now step back and enjoy your work.
15
What is Covered? Real Life Use, Off Road & On: Subject to the terms,
exclusions and limitations herein, Daystar® warrants to the initial retail pur-
chaser that your Comfort Ride™ or Budget Boost™ leveling kit shall be free
of defects in material and workmanship for so long as it is properly installed on
a single vehicle owned by the initial retail Daystar® purchaser.
What is Not Covered? Your Vehicle & Parts Not Daystar’s GoEvery-
where:
Your Daystar Limited Warranty does not cover: (a.) damage to your vehicle,
vehicle systems (ex. electronic stability control) other products, components or
property not manufactured by Daystar to our exclusive GoEverywhere stand-
ards, (b.) customer choice of vehicle configuration/tire and wheel combina-
tions contrary to Daystar® recommendations, warnings or applicable laws,
(C.) Acts of God, weather, corrosion, accidents, theft, vandalism, negligent
misuse or intentional damage, other exclusions under your OEM Limited War-
ranty.
Remedy Limited to Repair/Replacement. Get back on your favorite trail
fast. The exclusive remedy provided hereunder shall, upon Daystar’s inspec-
tion and option, be either repair or replacement of the Comfort Ride™ or
Budget Boost™ leveling kit or parts covered under this Limited Warranty.
Call us and we will get you back wheelin’ (623/907-0081). All labor, removal,
shipping and installation costs are customer’s responsibility.
Other Exclusions –Limitation of Damages - Your Rights Under State Law.
Stuff Lawyers Say.
At Daystar® we aren’t big fans of lawyers, even ours. Still, he says our Lim-
ited Warranty has to include this stuff. In consideration of the purchase price
paid, neither Daystar® nor any independent Daystar® distributor or repair per-
son are responsible for any time loss, loss of vehicle use, rental costs, transpor-
tation, labor or for any incidental, consequential, punitive or other damages
you may have or incur in connection with any part or product purchased. No
Daystar® employee or independent distributor is authorized to make any state-
ment or representation altering the terms of Daystar’s GoEverywhere Lifetime
Limited Warranty. Your exclusive remedy hereunder for covered parts is
repair/replacement as described above. This Limited Warranty gives you
specific rights. You may also have other rights that vary from state to state. For
example, some states do not allow limitations of how long an implied warranty
lasts and/or do not allow the exclusion or limitation of incidental or consequen-
tial damages, so the limitations and exclusions herein may not apply to you.
All other warranties are hereby disclaimed, except to the extent prohibited by
applicable law in which case any implied warranty of merchantability, fitness
for a particular purpose or other implied warranty are limited to a period of
four (4) years from date of initial retail purchase. Daystar® reserves the rights
to: (a.) require invoice or other proof of purchase; (b.) make future revisions to
these products and Limited Warranty without prior notice or obligation to
upgrade your Daystar® product.
16
Established in 1977
Like Us Share Us Watch Us Follow Us