KML 2 SHP Manual 1. Download and unzip file named “AS14988.zip”; 2. Copy file named “kml2shpv2_2.avx” to ArcView 3.x extensions folder, normally C:\ESRI\AV_GIS30\ARCVIEW\EXT32; 3. Open a new ArcView 3.x project (or any existing *.apr ArcView 3.x project); 4. Open Extensions window by clicking menu FILE -> EXTENSIONS… 5. Load extension named “KML to SHAPEFILE converter” by checking right-hand box as shown below:
Transcript
KML 2 SHP Manual
1. Download and unzip file named “AS14988.zip”;
2. Copy file named “kml2shpv2_2.avx” to ArcView 3.x extensions
folder, normally C:\ESRI\AV_GIS30\ARCVIEW\EXT32;
3. Open a new ArcView 3.x project (or any existing *.apr ArcView 3.x
project);
4. Open Extensions window by clicking menu FILE ->
EXTENSIONS…
5. Load extension named “KML to SHAPEFILE converter” by
checking right-hand box as shown below:
6. Open a view DOC GUI (e.g.: View1);
7. Note that a new button was added to button bar, with a “K” icon;
8. Click this button to open a new window named “Choose KML file to
convert to Shape File”
9. Note that folder C:\ is ordered in a peculiar way, normally showing
the contents of folder C:\ESRI\…
New button with a “K” icon
10. To reorder the contents of folder C:\, YOU MUST DOUBLE-CLICK
on the folder C:\ icon, as shown below:
Double-click here
11. After double-clicking over the folder C:\ icon, folders will be reordered, as shown in this window:
12. Roll down the folder list until you find the folder where your KML file is: (You are encouraged to create a folder under C:\ to keep your KML files, like C:\KML Files)
13. Now double-click over the folder C:\KML Files to open this folder: Double-click here
14. When you double-click over C:\ KML Files, you will get this, supposing
that you created a KML file on Google Earth, named “cam5.kml”:
15. Then, select the file named “cam5.kml” and press OK
16. Now you are asked to give a name to the shapefile that will result from
the KML file conversion (or you can accept the proposed name):
17. When you click OK, the KML file will be converted to a 3D shapefile,
named “3D_shp12.shp” (or any other name you have chosen), and, next,
you will be asked if you want to open this shapefile on the current View of
the ArcView 3.x project:
18. Next again, the extension asks the user for a shapefile conversion from
3D to 2D – the reason for this will be explained on the last page of this
manual.
19. If you press YES, a conversion from a 3D Shapefile to a 2D Shapefile will take place, and steps 16. and 17. will be repeated, but now for the 2D Shapefile.
20. Please note that a new View, named “Geographic coordinate View”, was created automatically, to store the converted KML files, which are shapefiles in the WGS84 Geographic Coordinate System – Latitude/Longitude, Decimal Degrees.
Please remember: on ArcView 3.x, do not open, on the same View, shapefiles in Lat/Long coordinates (decimal degrees), along with projected ones (X/Y, meters, feet, etc).
And now a word about saving KML files:
Consider the following sketch made over Google Earth, which represents the various parts of a marble factory, including the buildings (represented by polygons), the fence around the plant (represented by a polyline) and the water outtake for the firemen in case of hazardous fire (represented by points), and note that this sketch is arranged as follows:
• Plant1 (comprising the overall sketch) – mixed feature
• Water1 (the first water source for fire fighting) – point feature • Water2 (the second water source for fire fighting) – point feature • Fences (around the plant) – polyline feature • Build1 (main building) – polygon feature • Build2 (offices) – polygon feature • Store1 (raw materials store) – polygon feature • Store2 (also raw materials store) – polygon feature • Workers (workers facilities – kitchen, resting, WC’s, etc) – polygon
feature
If you save “Plant1.kml” you will obtain a mixed-feature KML file, containing, in the same KML file, the 3 types of features: points, polylines (or lines) and polygons, altogether. This ArcView extension cannot manage such a multi-feature KML file.
To avoid this, you must save each feature-type KML file at a time, and will obtain the following 8 KML files:
Of course that this is for explanation purposes, and you could have
arranged the KML files another way, creating a sub-folder for each
feature type, like this:
• Plant1 • WaterPoints (containing both feature points)
• Water1
• Water2
• Buildings (containing all polygon features on the same folder)
• Build1
• Build2 • Store1 • Store2 • Workers
• Fences (containing the only existing polyline feature)
This Google Earth sketch looks like next picture, and, in this case, you only need to convert 3 KML files (instead of 8 KML files as above)1:
• Waterpoints.kml which you may convert to Waterpoints.shp
• Fences.kml which you may convert to Fences.shp
• Buildings.kml which you may convert to Buildings.shp
1 To save any folder or sub-folder on Google Earth, simply select that folder and right-click the mouse, choosing Save As...
On the ArcView 3.x this will look like:
And the corresponding Attribute Tables are as follows:
If you take a closer look to these attribute tables (see next picture), you will find that the name you have entered on the “Google Earth – New” window, now appears on the column “Name” of the attribute tables, as shown:
Converting 3D shapefiles to 2D ones:
For some reason, not clearly explained at online ArcView 3.x HELP, the 3D converted files, which are three-dimensional shapefiles (i.e., they are of the type PointZ, PolylineZ and PolygonZ), as you can see on the Shape column of the above Attribute tables, are not editable.
To make these shapefiles editable, in ArcView 3.x environment, you need to convert them to 2D shapefiles.
From version 2.0 on, this extension asks the user if she/he would like to perform a 3D to 2D conversion, and if the user clicks YES, such a conversion will be performed. For point shapefiles (and only for point feature shapefiles), a new field will be added to the attribute table, to store the Z information registered on the KML file.
Transforming from WGS84 Datum to a local Datum:
As stated by Google Earth, the only geographic coordinate system used is based on DATUM WGS84.
Of course that shapefiles converted from KML files, using this extension, are on Geographic Coordinate System WGS84, with longitudes and latitudes in Decimal Degrees, no matter they are 3D or 2D.
If you need to project the converted KML file to a Projected Coordinate System not based on the WGS84 DATUM, you need to do, first of all, a DATUM transformation (also called a “DATUM shift”), from the WGS84 DATUM to your local DATUM coordinate system.
For this DATUM transformation, which is the critical step in coordinate system’s conversion, the user may use this extension’s own Datum transformation tool, based on an earlier extension by Ianko Tchoukanski, still available on ArcScripts ESRI site.
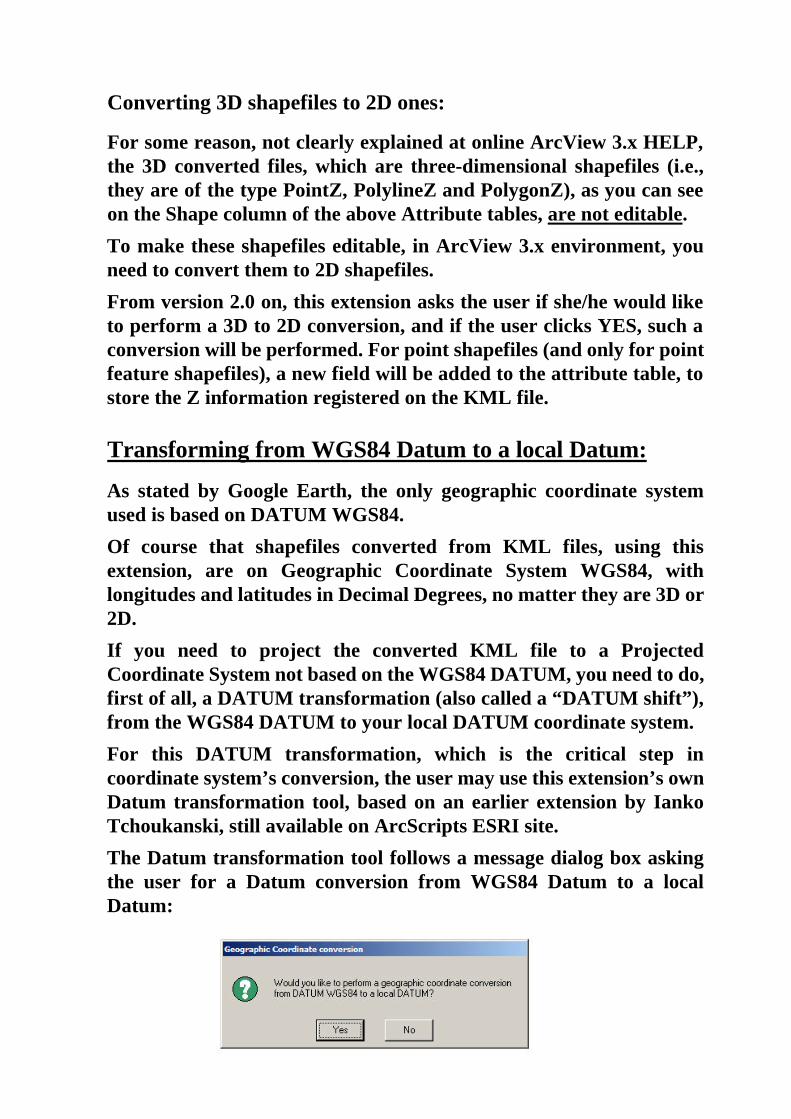
The Datum transformation tool follows a message dialog box asking the user for a Datum conversion from WGS84 Datum to a local Datum:
If the user clicks YES, a new dialog box is launched:
On the left side the user can find a list of Geographic Coordinate Transformations. Each record is a combination of a Datum name and its transformation variant, according the EPSG Geodetic Parameter Data Set, Version 6.18, released 12/Nov/2008 2 :
European Datum 1950 (1)
This list box shows only those DATUM/Transformation variants that have an area of use compatible with the active theme geographic extension, according the Are of Use form of the EPSG dataset. On the right side you get the Area of Use for the selected Datum Name/Transformation variant combination, and the Ellipsoid name used in conjunction with the selected Datum; on the lower side you get the transformation parameters for the selected transformation variant, in meters. All codes are according to EPSG. Let’s remind that this extension only use the Geocentric Translations transformation method, and the formula used to achieve this transformation is Standard Molodensky.
2 Download the EPSG Geodetic Parameter Data Set at: http://www.epsg.org/Geodetic.html
Datum name Transformation variant
Tip: to select a Datum name, just click any name on the list, and then key in the first letter of the datum name you are looking for.
REMEMBER: this tool transforms only in one direction – from WGS84 Datum to a local Datum 3. Let us remind again that KML files are always in WGS84 Datum, geographic coordinates (Latitude/Longitude, degrees). When the user clicks OK, a new dialog box appears:
On the dialog box title you can see that the tool is transforming a shapefile named “2d_shp22.shp” from WGS84 Datum to European Datum (1) local Datum (using transformation variant number 1), and is proposing, for the new transformed shapefile, the name “2d_shp22_trf.shp”. It will be very useful to use this dialog box to make a small change in the transformed shapefile: in place of “_trf” you can write “_Eur_Dt_1” and therefore always remember the Datum of the new shapefile (2d_shp22_Eur_Dt_1.shp). The “Log” dialog box
Note that between the “OK” and the “Exit” buttons there is a “Log” button, which opens the following dialog box:
3 For bi-direction transformations download extension “datum_transform_v10.avx” at: http://arcscripts.esri.com/details.asp?dbid=15967; if you need to unproject a projected theme, download Projector_EPSG extension at: http://arcscripts.esri.com/details.asp?dbid=16218
This dialog box contains all the information for the selected Datum/Transformation variant combination, and the Copy & Close button allow you to copy this information to the clipboard, so that it can be pasted onto any text processor (Notepad, Wordpad, WORD, etc.).
From Version 2.1 on, the extension writes a projection file for the 3D and 2D shapefiles directly converted from KML files, of the type [name of shapefile].prj with the following parameters4:
This projection file will permit the new 8.x/9.x ESRI family georeference a converted shapefile easier.
4 For now, the projection file is only for the WGS84 shapefiles; maybe, at a later time, the extension will be able to write the projections files for the transformed shapes, also.
Projecting a geographic coordinate FTheme:
From version 2.3 on, this extension is able to perform a Map Projection for a geographic coordinate shapefile.
Clicking “Yes” on this message box, the following window will show up:
Now the user may select the most appropriate5 Coordinate Reference System for the map projection; in this example there is only one choice, but on other cases there may be several different map projections for the same geographic coordinate shapefile.
Note that, in some cases, there are no available Map Projections for a specific Datum AND a specific location; if this happens, try to use another destination Datum for the Datum transformation.
Clicking OK on the above window, will start the projection of the transformed geographic shapefile, attaching the suffix “_prj” to the geographic shapefile name, as in the following example:


![RBS 6201 V2 Installation Instructions [11!05!10]](https://static.documents.pub/doc/80x56/55401a5d550346e26f8b4a1d/rbs-6201-v2-installation-instructions-110510.jpg)


