CHAPTER Send documentation comments to [email protected]7-1 Cisco Network Building Mediator User Guide OL-21272-04 7 KNX Deployment This chapter provides an outline of the KNX topology, describes how to configure the KNX protocol on the Mediator, and includes useful troubleshooting tips and information for resolving issues that are encountered when configuring the KNX protocol on the Mediator. It includes the following sections: • Overview, page 7-1 • Topology, page 7-1 • Configuring the KNX Protocol, page 7-3 • Troubleshooting the KNX Configuration, page 7-11 Overview KNX is a decentralized, distributed network protocol that is used to manage building controls, such as HVAC and lighting systems. The KNX protocol describes the means by which the devices can share information with each other by defining the communication mechanisms, standardized data types, and functional block objects. KNX networks support two different configuration models—S-Mode (system) and E-Mode (easy). S-Mode is the primary mode. It describes the centralized free binding mode of operation that is provided by the PC-based tool ETS. E-mode relies on a structured binding principle, through simple manipulations, without the need for a PC-based tool. An E-Mode-based configuration is typically used for simple products (such as a light switch and actuator) that are tightly coupled, and are typically targeted towards home usage. For more information on KNX, refer to the KNX documentation. Topology Figure 7-1 outlines the KNX architecture.
Transcript
Send documenta t i on comments to cbsbu -doc feedback@c i sco . com
OL-21272-04
C H A P T E R 7
KNX Deployment
This chapter provides an outline of the KNX topology, describes how to configure the KNX protocol on the Mediator, and includes useful troubleshooting tips and information for resolving issues that are encountered when configuring the KNX protocol on the Mediator. It includes the following sections:
• Overview, page 7-1
• Topology, page 7-1
• Configuring the KNX Protocol, page 7-3
• Troubleshooting the KNX Configuration, page 7-11
OverviewKNX is a decentralized, distributed network protocol that is used to manage building controls, such as HVAC and lighting systems. The KNX protocol describes the means by which the devices can share information with each other by defining the communication mechanisms, standardized data types, and functional block objects.
KNX networks support two different configuration models—S-Mode (system) and E-Mode (easy). S-Mode is the primary mode. It describes the centralized free binding mode of operation that is provided by the PC-based tool ETS. E-mode relies on a structured binding principle, through simple manipulations, without the need for a PC-based tool. An E-Mode-based configuration is typically used for simple products (such as a light switch and actuator) that are tightly coupled, and are typically targeted towards home usage.
For more information on KNX, refer to the KNX documentation.
TopologyFigure 7-1 outlines the KNX architecture.
7-1Cisco Network Building Mediator User Guide
Send documenta t i on comments to cbsbu -doc feedback@c i sco . com
Chapter 7 KNX Deployment Topology
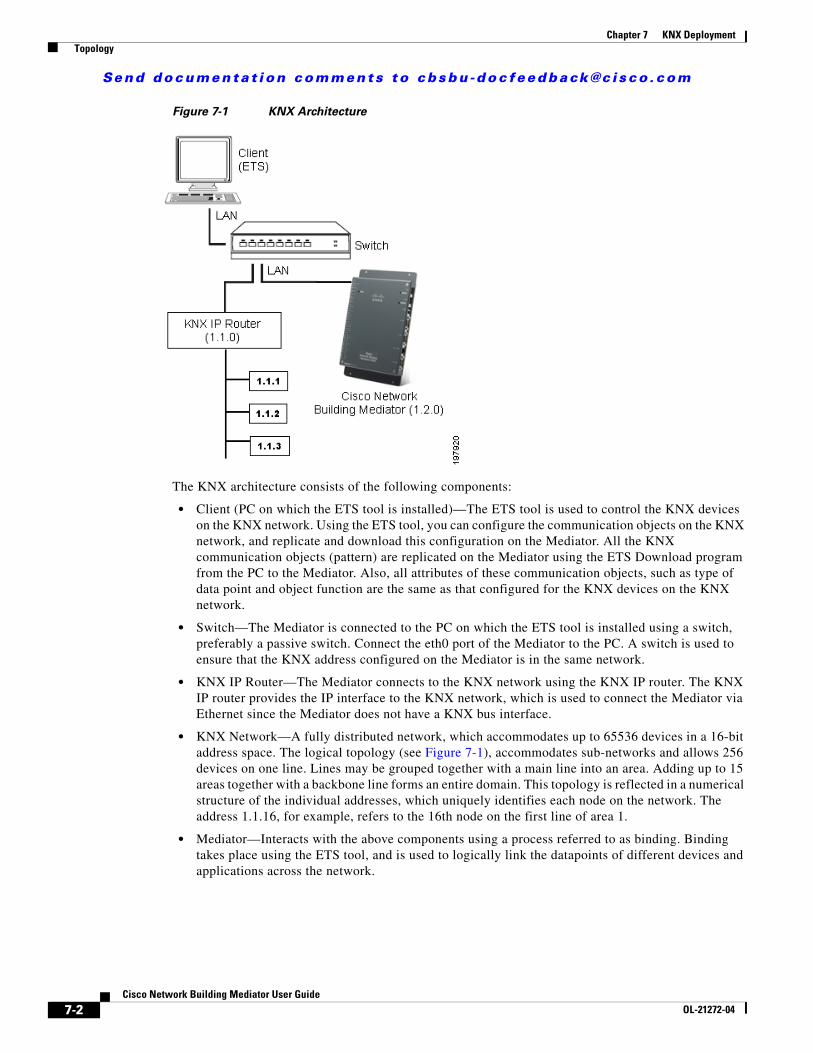
Figure 7-1 KNX Architecture
The KNX architecture consists of the following components:
• Client (PC on which the ETS tool is installed)—The ETS tool is used to control the KNX devices on the KNX network. Using the ETS tool, you can configure the communication objects on the KNX network, and replicate and download this configuration on the Mediator. All the KNX communication objects (pattern) are replicated on the Mediator using the ETS Download program from the PC to the Mediator. Also, all attributes of these communication objects, such as type of data point and object function are the same as that configured for the KNX devices on the KNX network.
• Switch—The Mediator is connected to the PC on which the ETS tool is installed using a switch, preferably a passive switch. Connect the eth0 port of the Mediator to the PC. A switch is used to ensure that the KNX address configured on the Mediator is in the same network.
• KNX IP Router—The Mediator connects to the KNX network using the KNX IP router. The KNX IP router provides the IP interface to the KNX network, which is used to connect the Mediator via Ethernet since the Mediator does not have a KNX bus interface.
• KNX Network—A fully distributed network, which accommodates up to 65536 devices in a 16-bit address space. The logical topology (see Figure 7-1), accommodates sub-networks and allows 256 devices on one line. Lines may be grouped together with a main line into an area. Adding up to 15 areas together with a backbone line forms an entire domain. This topology is reflected in a numerical structure of the individual addresses, which uniquely identifies each node on the network. The address 1.1.16, for example, refers to the 16th node on the first line of area 1.
• Mediator—Interacts with the above components using a process referred to as binding. Binding takes place using the ETS tool, and is used to logically link the datapoints of different devices and applications across the network.
7-2Cisco Network Building Mediator User Guide
OL-21272-04
Send documenta t i on comments to cbsbu -doc feedback@c i sco . com
Chapter 7 KNX Deployment Configuring the KNX Protocol
The Mediator provides access to and visualizes the KNX network using configTOOL. The configTOOL creates a node tree to replicate the KNX communication objects that are present on the KNX network. This is done before downloading the KNX communication object database from ETS to the Mediator. The ETS Download program provides the real KNX communication object database to the Mediator on which the KNX stack is running.
Configuring the KNX ProtocolThis section describes how to configure the KNX protocol on the Mediator and includes the following topics:
• Prerequisites, page 7-3
• Configuring KNX, page 7-3
• Managing KNX Communication Objects, page 7-4
• Configuring the Mediator from the ETS Tool, page 7-5
PrerequisitesThe prerequisites for the KNX protocol configuration are as follows:
• When the Mediator is connected to the PC on which the ETS tool is installed using a switch, connect the eth0 port of the Mediator to the PC.
• When the Mediator is directly connected to the PC on which the ETS tool is installed (without using a switch), connect the eth1 port of the Mediator to the PC.
• Configure the same set of communication objects (using the ETS tool) for the Mediator as that configured for all other KNX devices on the KNX network. For example, Communication Object 1 in ETS for a given KNX device should be mapped to Communication Object 1 in ETS for the Mediator. All attributes of this communication object, such as type of data point and object function should be the same as that configured for the KNX devices in the KNX network.
Configuring KNXTo configure the KNX protocol on the Mediator, perform the following steps:
Step 1 Start Mediator configTOOL and connect to the Mediator.
Step 2 Open an existing Mediator configuration file or create a new configuration file. The Mediator configTOOL window appears.
Step 3 In the node tree pane, expand the node tree, then choose services > network. Right-click the network node, and choose Add from the drop-down list.
The Available Devices dialog box appears listing the protocols supported by the Mediator.
Step 4 In the Available Devices dialog box, choose KNX Protocol (KnxProtocol) from the list, and then click OK.
A new child node, KnxProtocol_1, appears under the network node in the node tree pane.
Step 5 In the node tree pane, right-click the KnxProtocol_1 node, and choose Add from the drop-down list to add a device.
7-3Cisco Network Building Mediator User Guide
OL-21272-04
Send documenta t i on comments to cbsbu -doc feedback@c i sco . com
Chapter 7 KNX Deployment Configuring the KNX Protocol
The Available Devices dialog box appears.
Step 6 In the Available Devices dialog box, choose KNX Device (KnxDevice), and then click OK.
A new child node, KnxDevice, appears under the KnxProtocol_1 node in the node tree pane.
You are permitted to add only one device under a KNX protocol node. If you try to add another device, an exception error is displayed.
Step 7 On the KnxDevice tab, choose the interface from the interface drop-down list. You can select eth0 for Ethernet-0 or eth1 for the Ethernet-1 configuration.
Step 8 Select the Programming Mode Enable check box only if you want to put the Mediator in programming (self-learning) mode, so that you can change the KNX physical address of the Mediator as described in Configuring the KNX Physical Address of the Mediator, page 7-5.
Step 9 In the node tree pane, right-click the KnxDevice node, and choose Add from the drop-down list to add a communication object.
The Available Devices dialog box appears.
Step 10 In the Available Devices dialog box, choose KNX Communication Object (KnxComObj), and then click OK.
A new child node, KnxComObj_1, appears under the KnxDevice node in the node tree pane.
Step 11 On the KnxComObj_1 tab, enter the communication object number and the communication object value.
Note When configuring the KNX communication objects, enter the communication object value as 0.
You can add up to 254 KNX communication objects under each device. To add the communication objects, you must be aware of the object number and it should be available in the KNX network.
Step 12 Save the configuration.
Managing KNX Communication ObjectsYou can view and override the values specified for the communication objects that are configured under each device.
To view and override KNX communication object values, perform the following steps:
Step 1 Launch an Internet browser (for example, Internet Explorer) and browse to the Mediator web client homepage. To do so, enter the IP address of the Mediator in the Address bar of the browser and log in when prompted.
The Mediator web client homepage appears in the Internet browser window.
The Mediator web client Node page displays the configured KNX communication objects and their corresponding values.
7-4Cisco Network Building Mediator User Guide
OL-21272-04
Send documenta t i on comments to cbsbu -doc feedback@c i sco . com
Chapter 7 KNX Deployment Configuring the KNX Protocol
For example, if Communication Object 1 corresponds to a light switch, a value of 0 indicates that the switch is currently Off, and a value of 1 indicates it is On. While for a dimmer switch, a percentage value indicates its brightness.
Note The Mediator web client node browser displays a percentage as an analog value. For example, 40% is displayed as 40.
Step 4 To override the value specified for a given communication object, click the Value link against it.
The Mediator web client Node page displays the value for the given communication object in an editable text box.
Step 5 In the Action text box, enter the desired value. In the case of a communication point, such as a dimmer switch, enter an analog value.
For example, to specify the value as 40%, enter 40 in the Action text box.
Step 6 Click Override to save your setting.
Configuring the Mediator from the ETS ToolThis section describes how to configure the Mediator from the ETS tool and includes the following topics:
• Configuring the KNX Physical Address of the Mediator, page 7-5
• Downloading KNX Communication Objects, page 7-7
Note Ensure that you have installed the ETS tool and imported the .vd3 file using the File > Import option in the ETS tool. You need to import a .vd3 file or a higher file type for ETS 3 and higher versions.
Configuring the KNX Physical Address of the Mediator
By default, the Mediator has a physical address of 15.15.255 based on the KNX standard. You can change the physical address of the Mediator if you want to.
To configure the KNX physical address of the Mediator from the ETS tool, perform the following steps:
Step 1 Connect the eth0 port of the Mediator to the switch. The PC on which the ETS tool is installed and the KNX IP router are also connected to the same switch. (See Figure 7-1.)
Step 2 Configure the KNX protocol on the Mediator as described in Configuring KNX, page 7-3, and verify that the Programming Mode Enable check box in the KnxDevice window is selected. See Step 8 in Configuring KNX, page 7-3.
Step 3 Save the configuration.
Step 4 Open the ETS tool.
Step 5 In the Topology window, double-click the Mediator whose physical address you want to change. The Properties dialog box appears. (See Figure 7-2.)
7-5Cisco Network Building Mediator User Guide
OL-21272-04
Send documenta t i on comments to cbsbu -doc feedback@c i sco . com
Chapter 7 KNX Deployment Configuring the KNX Protocol
Figure 7-2 Properties Dialog Box
Step 6 In the Phys. Address text box, enter the new physical address of the Mediator.
Step 7 To save your changes and close the dialog box, click Close.
Step 8 In the Topology window, right-click the Mediator selected in Step 5, and choose Download as shown in Figure 7-3.
Figure 7-3 Download Option
The Download dialog box appears. (See Figure 7-4.)
7-6Cisco Network Building Mediator User Guide
OL-21272-04
Send documenta t i on comments to cbsbu -doc feedback@c i sco . com
Chapter 7 KNX Deployment Configuring the KNX Protocol
Figure 7-4 Download Dialog Box
Step 9 From the list, choose the Mediator, and click Program Individual Address. The Download (Addr) dialog box appears displaying the progress of the operation. (See Figure 7-5.)
Figure 7-5 Download (Addr) Dialog Box
On completion of the operation, the physical address of the Mediator is changed.
Note After changing the physical address of the Mediator, ensure that you unselect the Programming Mode Enable check box (described in Step 8 of Configuring KNX, page 7-3), and save the configuration.
Step 10 Continue with Downloading KNX Communication Objects, page 7-7.
Downloading KNX Communication Objects
To download KNX communication objects from the ETS tool, perform the following steps:
Step 1 Connect the eth0 port of the Mediator to the switch. The PC on which the ETS tool is installed and the KNX IP router are also connected to the same switch. (See Figure 7-1.)
Step 2 Configure the KNX protocol on the Mediator as described in Configuring KNX, page 7-3, and verify that the KNX stack is ready.
7-7Cisco Network Building Mediator User Guide
OL-21272-04
Send documenta t i on comments to cbsbu -doc feedback@c i sco . com
Chapter 7 KNX Deployment Configuring the KNX Protocol
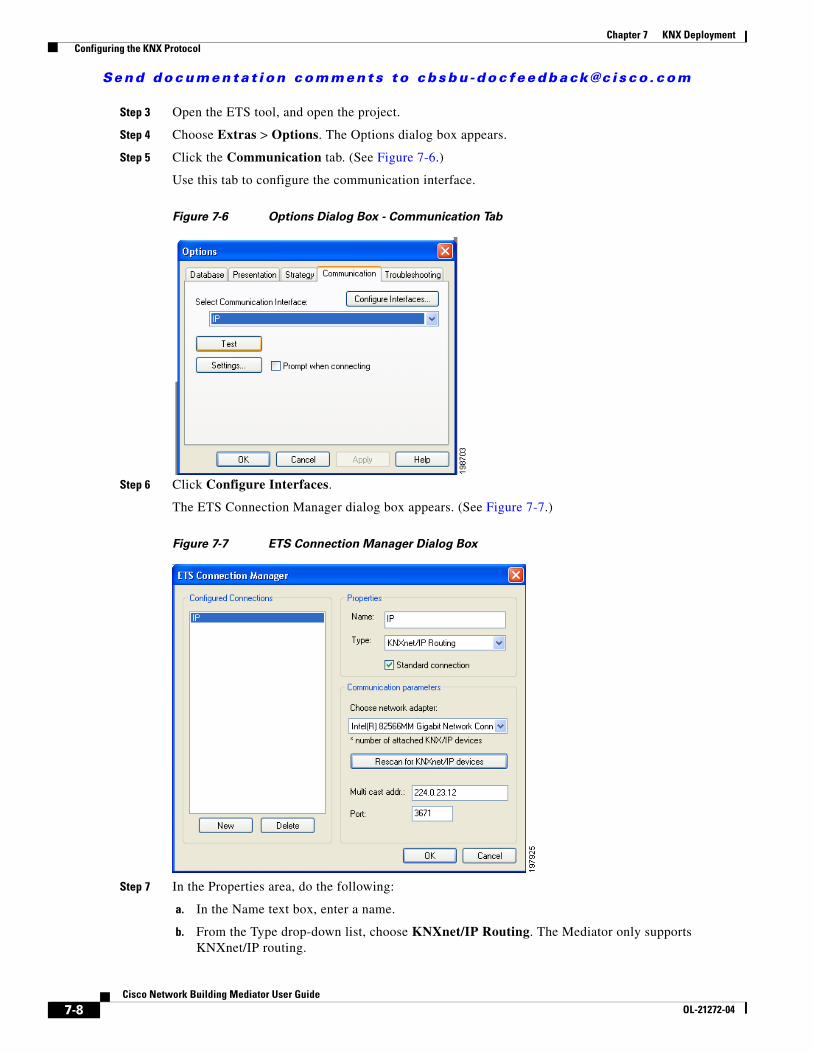
Step 5 Click the Communication tab. (See Figure 7-6.)
Use this tab to configure the communication interface.
Figure 7-6 Options Dialog Box - Communication Tab
Step 6 Click Configure Interfaces.
The ETS Connection Manager dialog box appears. (See Figure 7-7.)
Figure 7-7 ETS Connection Manager Dialog Box
Step 7 In the Properties area, do the following:
a. In the Name text box, enter a name.
b. From the Type drop-down list, choose KNXnet/IP Routing. The Mediator only supports KNXnet/IP routing.
7-8Cisco Network Building Mediator User Guide
OL-21272-04
Send documenta t i on comments to cbsbu -doc feedback@c i sco . com
Chapter 7 KNX Deployment Configuring the KNX Protocol
c. Select the Standard connection check box. This check box is selected by default.
Step 8 In the Communication parameters area, do the following:
a. From the Choose network adapter drop-down list, choose the adapter to which the eth1 port is connected.
b. Retain the default values specified in the Multi cast addr and Port text boxes.
Step 9 Click OK. The Options dialog box appears. (See Figure 7-6.)
Step 10 From the Select Communication Interface drop-down list, choose an interface.
For example, choose IP as shown in Figure 7-6.
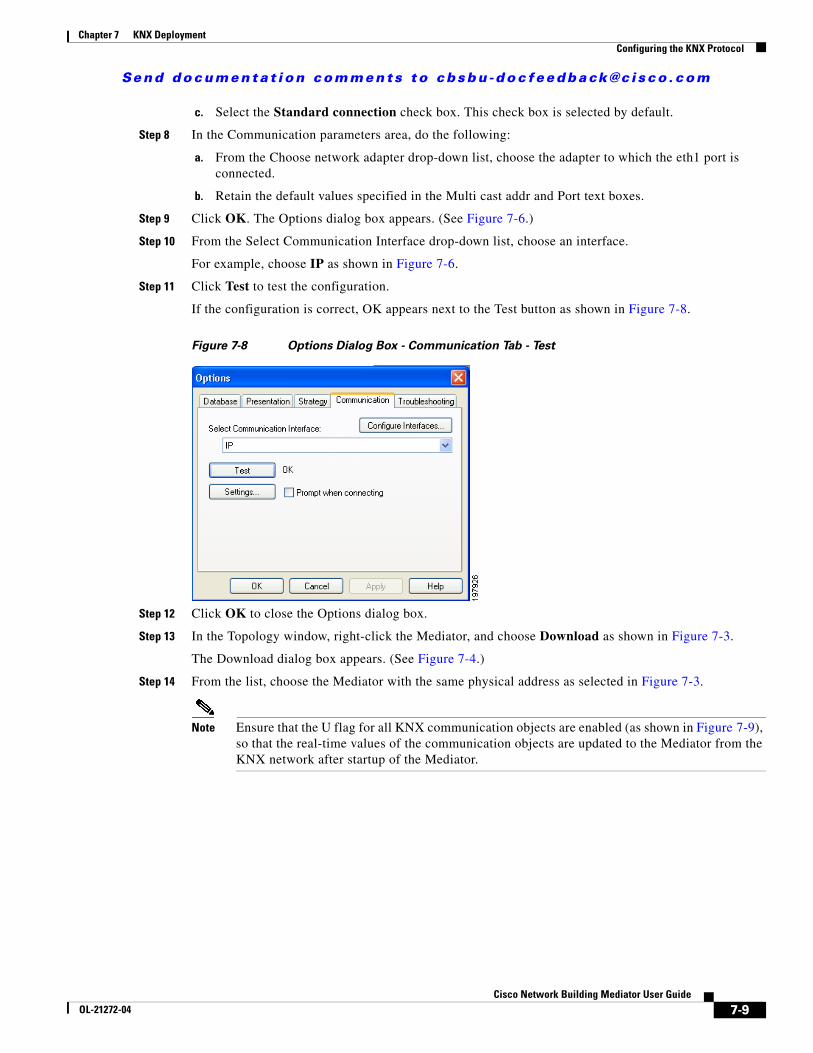
Step 11 Click Test to test the configuration.
If the configuration is correct, OK appears next to the Test button as shown in Figure 7-8.
Figure 7-8 Options Dialog Box - Communication Tab - Test
Step 12 Click OK to close the Options dialog box.
Step 13 In the Topology window, right-click the Mediator, and choose Download as shown in Figure 7-3.
The Download dialog box appears. (See Figure 7-4.)
Step 14 From the list, choose the Mediator with the same physical address as selected in Figure 7-3.
Note Ensure that the U flag for all KNX communication objects are enabled (as shown in Figure 7-9), so that the real-time values of the communication objects are updated to the Mediator from the KNX network after startup of the Mediator.
7-9Cisco Network Building Mediator User Guide
OL-21272-04
Send documenta t i on comments to cbsbu -doc feedback@c i sco . com
Chapter 7 KNX Deployment Configuring the KNX Protocol
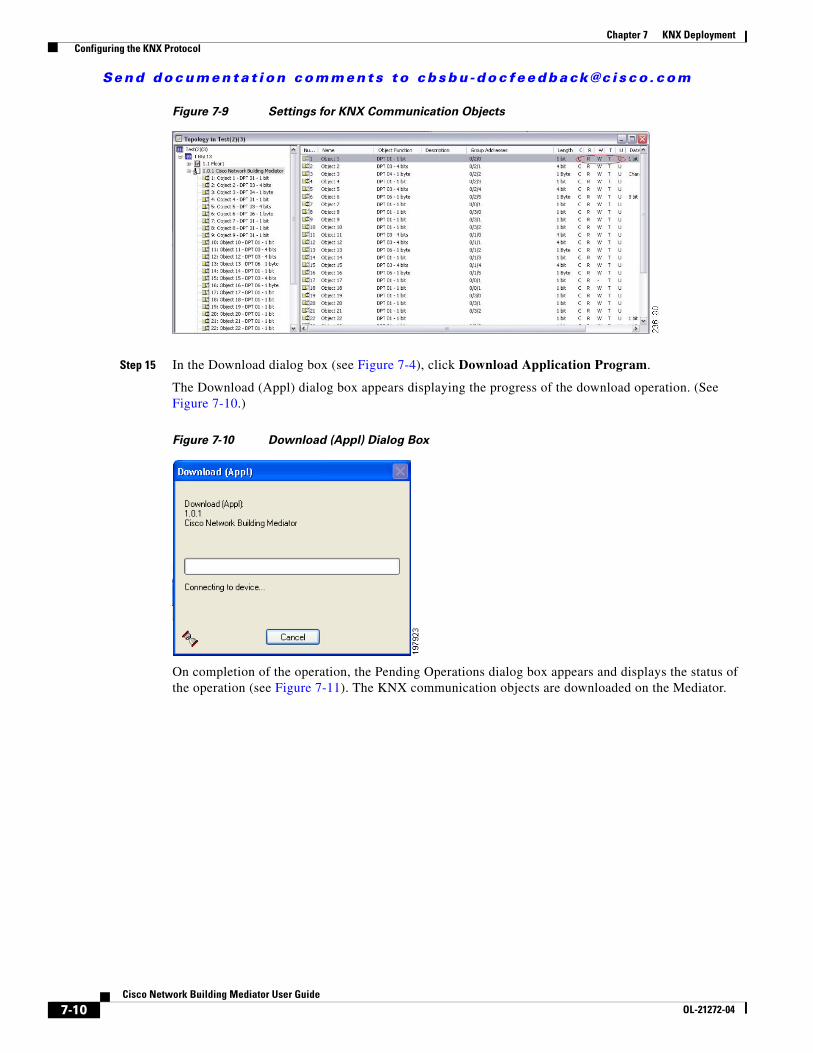
Figure 7-9 Settings for KNX Communication Objects
Step 15 In the Download dialog box (see Figure 7-4), click Download Application Program.
The Download (Appl) dialog box appears displaying the progress of the download operation. (See Figure 7-10.)
Figure 7-10 Download (Appl) Dialog Box
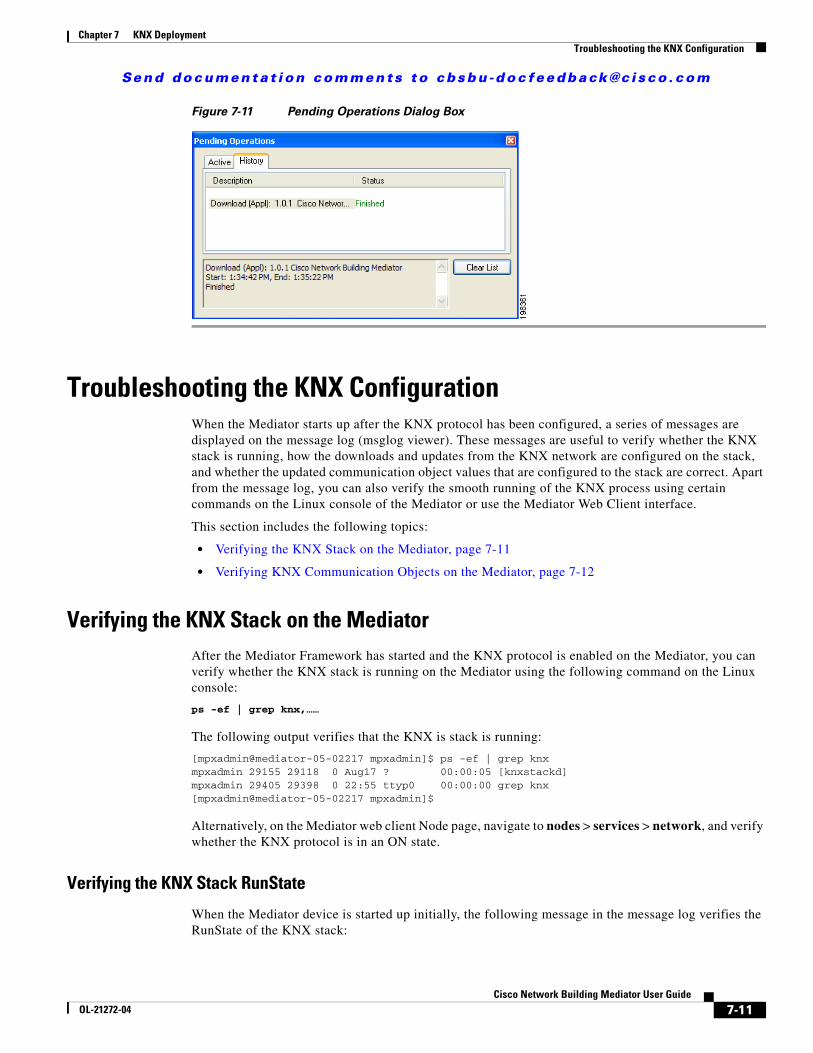
On completion of the operation, the Pending Operations dialog box appears and displays the status of the operation (see Figure 7-11). The KNX communication objects are downloaded on the Mediator.
7-10Cisco Network Building Mediator User Guide
OL-21272-04
Send documenta t i on comments to cbsbu -doc feedback@c i sco . com
Chapter 7 KNX Deployment Troubleshooting the KNX Configuration
Figure 7-11 Pending Operations Dialog Box
Troubleshooting the KNX ConfigurationWhen the Mediator starts up after the KNX protocol has been configured, a series of messages are displayed on the message log (msglog viewer). These messages are useful to verify whether the KNX stack is running, how the downloads and updates from the KNX network are configured on the stack, and whether the updated communication object values that are configured to the stack are correct. Apart from the message log, you can also verify the smooth running of the KNX process using certain commands on the Linux console of the Mediator or use the Mediator Web Client interface.
This section includes the following topics:
• Verifying the KNX Stack on the Mediator, page 7-11
• Verifying KNX Communication Objects on the Mediator, page 7-12
Verifying the KNX Stack on the MediatorAfter the Mediator Framework has started and the KNX protocol is enabled on the Mediator, you can verify whether the KNX stack is running on the Mediator using the following command on the Linux console:
ps -ef | grep knx,……
The following output verifies that the KNX is stack is running:
Alternatively, on the Mediator web client Node page, navigate to nodes > services > network, and verify whether the KNX protocol is in an ON state.
Verifying the KNX Stack RunState
When the Mediator device is started up initially, the following message in the message log verifies the RunState of the KNX stack:
7-11Cisco Network Building Mediator User Guide
OL-21272-04
Send documenta t i on comments to cbsbu -doc feedback@c i sco . com
Chapter 7 KNX Deployment Troubleshooting the KNX Configuration
KNX RunState after initializing knx stack is 1
Explanation The RunState of 1 indicates that the KNX stack is active and running.
Recommended Action If you do not see this message in the message log, wait for a certain period of time till the stack becomes active. However, if the message does not appear for a long time, restart the Mediator Framework.
Verifying Persistent Data on the KNX Stack
The Mediator verifies whether persistent data exists on the KNX node tree database in the /var/mpx/config/persistent/knxconfig.bin directory.
Before KNX data has been downloaded from the ETS tool to the Mediator, no persistent data exists, hence the Mediator moves onto the next action.
After KNX data has been downloaded from the ETS tool to the Mediator, the Mediator programs the KNX stack with the available persistent data. The following message in the message log verifies this action:
KNX stack programmed with configuration data successfully 1
Explanation 1 indicates that the KNX stack configuration was successful.
Verifying KNX Communication Objects on the MediatorWhen the KNX stack is ready to discover the KNX communication objects, the following message appears in the message log:
KNX stack is ready discovering all objects
When KNX communication objects are not downloaded on the Mediator, the Mediator waits for the download to occur.
When KNX communication objects are downloaded on the Mediator, the Mediator discovers all existing KNX communication objects from the available persistent data. The following message in the message log verifies this action:
KNX configured objects count: 30
Explanation 30 indicates the number of communication objects existing on the KNX network.
After the successful download of the KNX communication object database from the ETS tool to the Mediator, the following messages appear in the message log:
7-12Cisco Network Building Mediator User Guide
OL-21272-04
Send documenta t i on comments to cbsbu -doc feedback@c i sco . com
Chapter 7 KNX Deployment Troubleshooting the KNX Configuration
KNX processindication RESET_IND 4
Explanation This message notifies you that the Mediator has received a RESET indication from the ETS tool, and has received the downloaded KNX database.
KNX stack programmed successfully and saved in persistent data 1
Explanation This message notifies you that the downloaded database is successfully configured.
KNX configured objects count: 30
Explanation This message notifies you about the number of KNX communication objects that are available on the KNX network.
When changing or setting KNX communication objects from the ETS tool to the Mediator, the Mediator reflects this change to the KNX network by multicasting the telegrams.
Similarly, when a change occurs in the KNX network for a particular communication object, the following message appears in the message log:
broadway Object Number 1, changed to 1.
Note This message appears only if debugging is enabled. To enable debugging, in the configTOOL node tree pane, expand the node tree, and choose services > network > KnxProtocol as shown in Figure 7-12. Then, select the Debug check box.
Figure 7-12 configTOOL - KNX Protocol
7-13Cisco Network Building Mediator User Guide
OL-21272-04
Send documenta t i on comments to cbsbu -doc feedback@c i sco . com
Chapter 7 KNX Deployment Troubleshooting the KNX Configuration


![Energy Efficiency with KNX - KNX Association [Official website]](https://static.documents.pub/doc/80x56/613d232b736caf36b759c1df/energy-efficiency-with-knx-knx-association-official-website.jpg)
