WebSphere Version to Version Migration Workshop Lab 3: Migrating Applications from WebSphere Application Server ND V6.1 to WebSphere Application Server ND V8.5 What this Lab Exercise is about This lab exercise describes how to migrate two different applications from WebSphere Application Server ND V6.1 to WebSphere Application Server ND V8.5 Assumptions It is assumed that you are using the WebSphere Version to Version Migration Workshop VMWare image that has been pre-installed with a WebSphere Application Server ND V6.1 standalone server profile containing the PlantsByWebSphere and StockQuote applications. It is also assumed that you have completed Lab1: Installing WebSphere Application Server ND V8.5 Introduction This exercise will illustrate how to use the Application Migration Tool to help with Application Migration from one version of WebSphere Application Server to another. You will migrate two applications (Plants by WebSphere and Stock Quote) from WebSphere Application Server V6.1 to WebSphere Application Server V8.5. Plants by WebSphere The Plants by WebSphere application is an application that is available with the WebSphere Application Server samples gallery. As the name suggests, the application demonstrates several JEE functions using an online store that specializes in selling plants, trees, and accessories. Using the Plants by WebSphere storefront, customers can open accounts, browse for items to purchase, view product details, and place orders. The Plants by WebSphere application uses container-managed persistence (CMP), container-managed relationships (CMR), stateless session beans, a stateful session bean, JSP pages, and servlets. This application is only intended to showcase the capabilities of WebSphere Application Server itself. Nevertheless, it is useful in many testing and development scenarios. The source code of Plants by WebSphere is distributed with WebSphere Application Server, and, as such, you can modify it freely as you wish. “Plants by WebSphere” is included with WebSphere Application Server in all versions greater than 5.0. The Plants by WebSphere Sample incorporates the following technologies: • Container-managed persistence (CMP) entity beans • Bean-managed persistence (BMP) entity beans • Stateless session beans • Stateful session beans • Servlets • JavaServer Pages (JSP) files and HTML • Container-managed relationships (CMR) • Java 2 platform, enterprise edition (J2EE) security Lab 3 – Migrating Applications from WAS ND 6.1 to WAS ND 8.5 Page 1
Transcript
WebSphere Version to Version Migration Workshop
Lab 3: Migrating Applications from WebSphere Application Server ND V6.1 to WebSphere Application Server ND V8.5
What this Lab Exercise is aboutThis lab exercise describes how to migrate two different applications from WebSphere Application Server ND V6.1 to WebSphere Application Server ND V8.5
AssumptionsIt is assumed that you are using the WebSphere Version to Version Migration Workshop VMWare image that has been pre-installed with a WebSphere Application Server ND V6.1 standalone server profile containing the PlantsByWebSphere and StockQuote applications. It is also assumed that you have completed Lab1: Installing WebSphere Application Server ND V8.5
IntroductionThis exercise will illustrate how to use the Application Migration Tool to help with Application Migration from one version of WebSphere Application Server to another. You will migrate two applications (Plants by WebSphere and Stock Quote) from WebSphere Application Server V6.1 to WebSphere Application Server V8.5.
Plants by WebSphereThe Plants by WebSphere application is an application that is available with the WebSphere Application Server samples gallery. As the name suggests, the application demonstrates several JEE functions using an online store that specializes in selling plants, trees, and accessories. Using the Plants by WebSphere storefront, customers can open accounts, browse for items to purchase, view product details, and place orders. The Plants by WebSphere application uses container-managed persistence (CMP), container-managed relationships (CMR), stateless session beans, a stateful session bean, JSP pages, and servlets. This application is only intended to showcase the capabilities of WebSphere Application Server itself. Nevertheless, it is useful in many testing and development scenarios. The source code of Plants by WebSphere is distributed with WebSphere Application Server, and, as such, you can modify it freely as you wish. “Plants by WebSphere” is included with WebSphere Application Server in all versions greater than 5.0.
The Plants by WebSphere Sample incorporates the following technologies:• Container-managed persistence (CMP) entity beans• Bean-managed persistence (BMP) entity beans• Stateless session beans• Stateful session beans• Servlets• JavaServer Pages (JSP) files and HTML• Container-managed relationships (CMR)• Java 2 platform, enterprise edition (J2EE) security
Lab 3 – Migrating Applications from WAS ND 6.1 to WAS ND 8.5 Page 1
WebSphere Version to Version Migration Workshop
• Java API for XML-based remote procedure call (JAX-RPC)
The Plants by WebSphere application is supported through a series of JSP pages and HTML pages. These pages communicate with the following servlets: AccountServlet, ShoppingServlet, ImageServlet, and AdminServlet. The servlets use the various enterprise bean business methods, which in turn, access data from the database as needed. In general, stateless session beans are used to interface with the entity beans, in order to reduce the number of transactions. The high level architecture of the application is shown below.
Stock QuoteThe Stock Quote application is a Web Services application based on the Axis 2 Web Services engine. Web services are a technology that allows applications to be invoked using internet standards and protocols. The applications are divided into multiple tiers, typically at least two: client and server. These two pieces communicate using XML messages defined by the SOAP 1.1 or 1.2 protocols.WebSphere Application Server version 6.1 provides support for using the JAX-RPC and JAX-WS protocols and provides additional features such as a UDDI registry and extensions to the SOAP protocol known as WSIF.The WebSphere Application Server also supports several additional protocols that build on top of the basic web services protocol such as WS-Notification and WS-ReliableMessaging. All of these functions are provided by the web services engine provided by the application server. However in some circumstances you need to use a third party web services engine, such as Axis 2. For example if you wish to deploy applications that use a single runtime across various application servers such as WebSphere Application Server, JBoss, and WebLogic you would use such a third party engine.Note, however, that even though IBM supports the enablement of third party JAX-WS runtimes to run on WebSphere Application Server, and ensures the successful deployment of applications that use such runtimes, IBM does not provide support for resolving JAR file conflict problems, or any problem that a stack trace indicates is in the third party code. In addition using a third party web services engine will prevent the application server from recognizing that web services
Lab 3 – Migrating Applications from WAS ND 6.1 to WAS ND 8.5 Page 2
WebSphere Version to Version Migration Workshop
provided by the third party engine are, in fact, web services and hence prevents the use of application level policy sets such as WS-Security, WS-RM, and WS-Transactions policy sets and also prevents the use of WSDM or the use of JNDI lookups to retrieve JAX-WS Services or Port Instances
The Stock Quote application is an example of an application that uses a third party web services engine, specifically the Axis2 web services engine. The application is extremely simple (in fact, it provides just two web services), but demonstrates the potential problems of migrating such an application.
The application provides a stock quote service that a client can use to discover stock prices by providing the symbol of the required stock price as input. The Axis Object Model (AXIOM) is used to allow arbitrary pieces of XML to be passed and returned in the body of the web services messages. In this example, of course, a simple Plain Old Java Object (POJO) could have been used as the implementation of the web service together with a suitable definition of the web service. The developer of this particular application chose to use the AXIOM style for the web service.
Lab 3 – Migrating Applications from WAS ND 6.1 to WAS ND 8.5 Page 3
WebSphere Version to Version Migration Workshop
Exercise Instructions
Part 1 – Execute PlantsByWebSphere on WAS ND 6.11. Start the WAS ND 6.1 standalone server:
a. Open a Command Promptb. Navigate to C:\IBM\WebSphere\AppServer61\profiles\AppSrv02\binc. Issue the command startServer.bat server1
2. Open a Browser and navigate to http://127.0.0.1:9081/PlantsByWebSphere
3. Register a new Account:a. Click Login
b. Click the link to register for your own account herec. Enter the required information (you will need the E-mail address and password later on) and click Register
Lab 3 – Migrating Applications from WAS ND 6.1 to WAS ND 8.5 Page 4
WebSphere Version to Version Migration Workshop
4. Login and make a purchase:a. Click Login again, enter your E-mail address and Password and click sign-inb. Click the Bonsai Tree special
c. Change the Quantity to 3 and click Add to cart
d. Click Checkout nowe. Complete the Shipping Information and Payment Information and then click Continue
Lab 3 – Migrating Applications from WAS ND 6.1 to WAS ND 8.5 Page 5
WebSphere Version to Version Migration Workshop
f. On the “Review your order” page, click Submit Order
g. After a short while your order will complete and the page shown below will appear
Lab 3 – Migrating Applications from WAS ND 6.1 to WAS ND 8.5 Page 6
WebSphere Version to Version Migration Workshop
5. Review the SystemOut.log for any errorsa. Open the C:\IBM\WebSphere\AppServer61\profiles\AppSrv02\logs\server1\SystemOut.log fileb. Scroll to the end of the file and check that no errors have been thrown
6. Close the Browser and SystemOut.log file
Part 2 – Install EclipseThe Migration Toolkit can be installed in to either Rational Application Developer or Eclipse. For this exercise we are going to use Eclipse (Indigo) which has been downloaded for you.
1. Unzip Indigoa. Open a Windows Explorer and navigate to C:\Workshop\Binaries\Eclipseb. Right-click on eclipse-jee-indigo-SR2-win32.zip and select 7-Zip Extract Files…
Lab 3 – Migrating Applications from WAS ND 6.1 to WAS ND 8.5 Page 7
WebSphere Version to Version Migration Workshop
c. Change the Extract to: directory to C:\ and click OK
2. Install the IBM Java 6.0 JREa. Open a Windows Explorer and navigate to C:\WORKSHOP\Binaries\Javab. Double-click on ibm-java-jre-60-win-i386.exec. Click OK on the Language Dialog to accept United States (English)d. When the “Welcome” screen appears, click Nexte. When the “License Agreement” screen appears, click Yesf. When the “Choose Destination” screen appears, change the Destination Folder to C:\IBM\Java60 and click Next
Lab 3 – Migrating Applications from WAS ND 6.1 to WAS ND 8.5 Page 8
WebSphere Version to Version Migration Workshop
g. Answer Yes to the “Install this Java Runtime Environment as the System JVM?” question
h. When the “Start Copying Files” dialog is displayed, click Nexti. When the “Browser Registration” dialog is displayed, click Next j. When the “Installation Wizard complete” dialog is displayed, click Finish
3. Install the WebSphere Developer Tools prerequisitesa. Open a Windows Explorer and navigate to C:\Workshop\Binaries\Eclipseb. Right-click on emf-transaction-runtime-1.5.0.zip and select 7-Zip Extract Files…c. Change the Extract to: directory to C:\ and change the Overwrite mode: to Overwrite without prompt click OK
d. Repeat steps a-c for emf-validation-runtime-1.5.0.zipe. Repeat steps a-c for gmf-runtime-1.6.0.zip
4. Install the WebSphere Developer Toolsa. Open a Command Prompt and navigate to C:\Eclipseb. Issue the following command: eclipse –clean
c. When the Workspace Launcher is displayed, change the Workspace to C:\workspace\PlantsMigration and click OK
Lab 3 – Migrating Applications from WAS ND 6.1 to WAS ND 8.5 Page 9
WebSphere Version to Version Migration Workshop
d. Click the Workbench icon to close the Welcome Screen.
e. Click Help Install New Softwaref. Click Add…
g. Click Archive…
h. Navigate to C:\WORKSHOP\Binaries\Eclipse\wdt-update-site_8.5.0.WDT85iFix1-I20120801_1708.zip and click Openi. When you are returned to the Add Repository dialog, click OKj. Select the WebSphere Application Server Developer Tools for Eclipse V8.5 and click Next
Lab 3 – Migrating Applications from WAS ND 6.1 to WAS ND 8.5 Page 10
WebSphere Version to Version Migration Workshop
k. When the Install Details screen is displayed, click Nextl. When the Review Licenses screen is displayed, accept the Licenses and click Finishm. When the Security Warning is displayed, click OK
n. When the installation completes the Software Updates screen will be displayed. Click Restart Now
Part 3 – Import the PlantsByWebSphere Application1. Start Eclipse (if it isn’t already running from the previous step)
a. Open a Windows Explorer and navigate to C:\eclipseb. Double-click on eclipse.exec. When the Workspace Launcher is displayed, change the Workspace to C:\workspace\PlantsMigration and click OK
Lab 3 – Migrating Applications from WAS ND 6.1 to WAS ND 8.5 Page 11
WebSphere Version to Version Migration Workshop
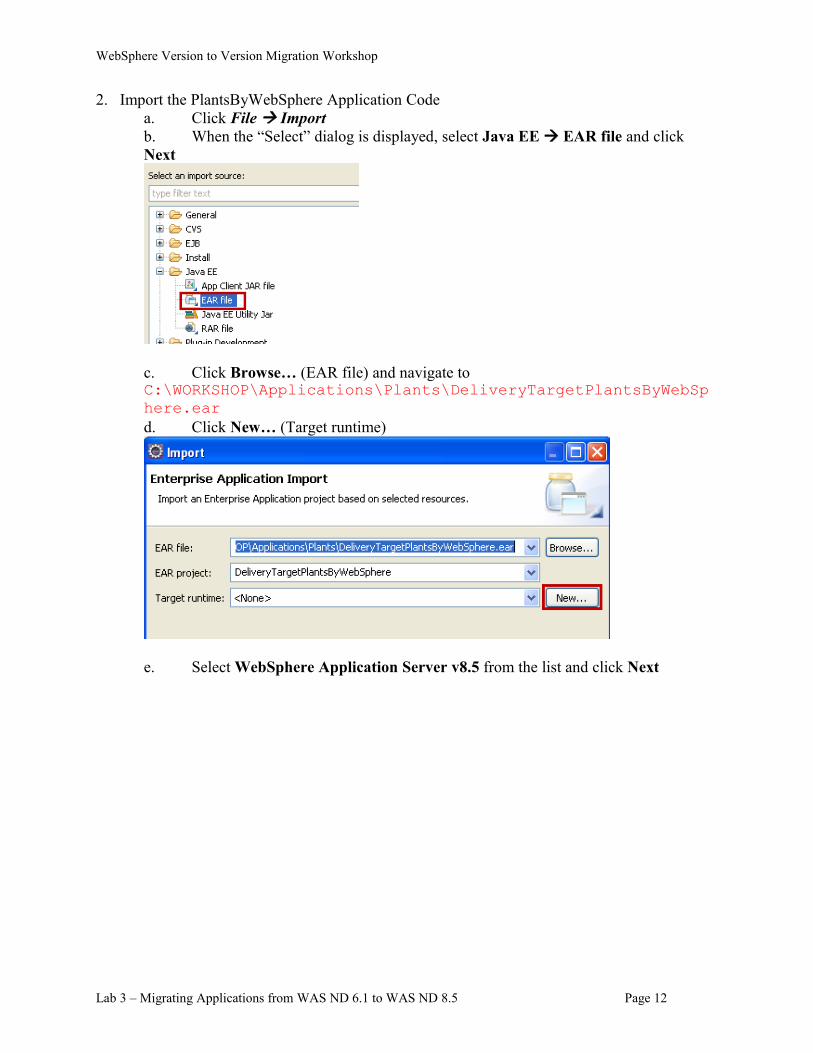
2. Import the PlantsByWebSphere Application Codea. Click File Importb. When the “Select” dialog is displayed, select Java EE EAR file and click Next
c. Click Browse… (EAR file) and navigate to C:\WORKSHOP\Applications\Plants\DeliveryTargetPlantsByWebSphere.eard. Click New… (Target runtime)
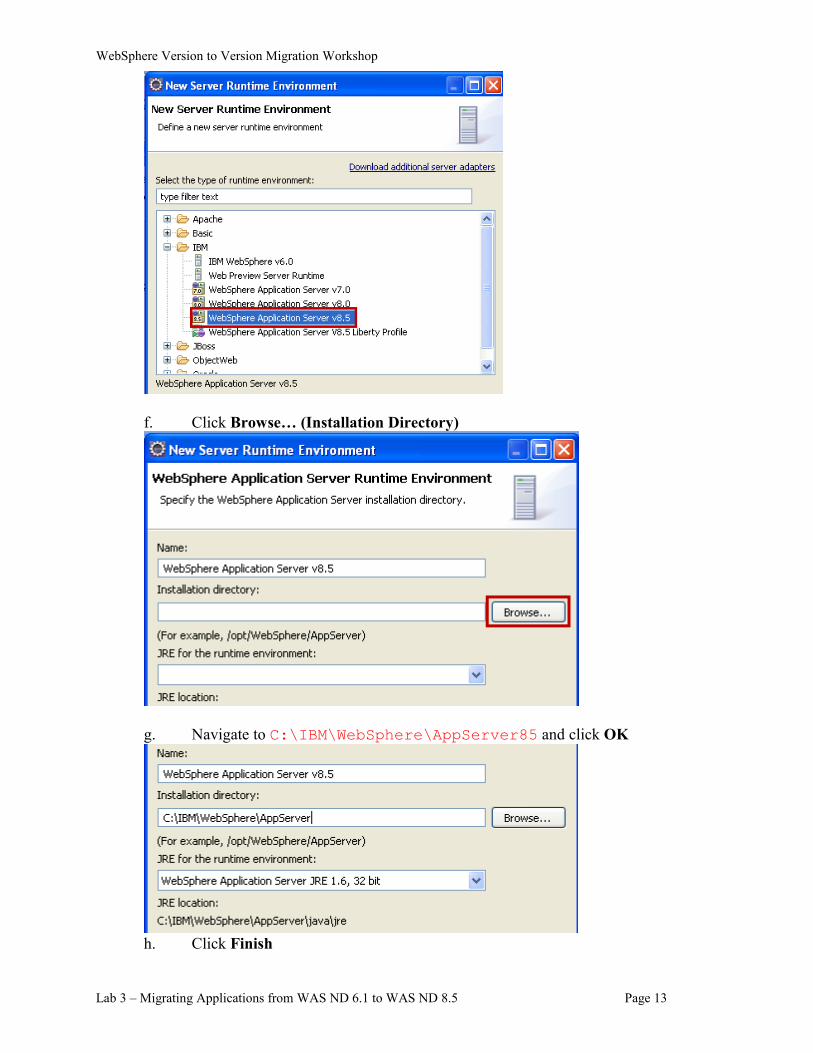
e. Select WebSphere Application Server v8.5 from the list and click Next
Lab 3 – Migrating Applications from WAS ND 6.1 to WAS ND 8.5 Page 12
WebSphere Version to Version Migration Workshop
f. Click Browse… (Installation Directory)
g. Navigate to C:\IBM\WebSphere\AppServer85 and click OK
h. Click Finish
Lab 3 – Migrating Applications from WAS ND 6.1 to WAS ND 8.5 Page 13
WebSphere Version to Version Migration Workshop
i. When you are returned to the Enterprise Application Import dialog, click Next
j. On the Utility JARs and web libraries dialog, click Next
k. On the EAR modules and Utility JAR projects dialog, click Finish
Part 4 – Install and Configure the Application Migration ToolkitThe Application Migration Toolkit is a downloadable plugin to Eclipse. It has already been downloaded for you and can be installed in to Eclipse using the following steps.
1. Install the ApplicationMigration Toolkita. Eclipse should already be running and open in the PlantsMigration workspace from the previous step. If it is not already open, use the steps from Part 3 to open it.b. Click Help Install New Softwarec. Click Add…
d. Click Archive…
Lab 3 – Migrating Applications from WAS ND 6.1 to WAS ND 8.5 Page 14
WebSphere Version to Version Migration Workshop
e. Navigate to C:\WORKSHOP\Binaries\Toolkit\Application_Migration_Tool_WebSphere_Version_to_Version_v3.5.0.zip and click Openf. When you are returned to the Add Repository dialog, click OKg. Select Application Migration Tools from the Available Software list and click Next
h. When the Install Details screen is displayed, click Nexti. When the Review Licenses screen is displayed, accept the Licenses and click Finishj. When the installation completes the Software Updates screen will be displayed. Click Restart Now
2. Configure the Application Migration Toolkita. Right-click on PlantsByWebSphere in the Enterprise Explorer and select Software Analyzer Software Analyzer Configurations…
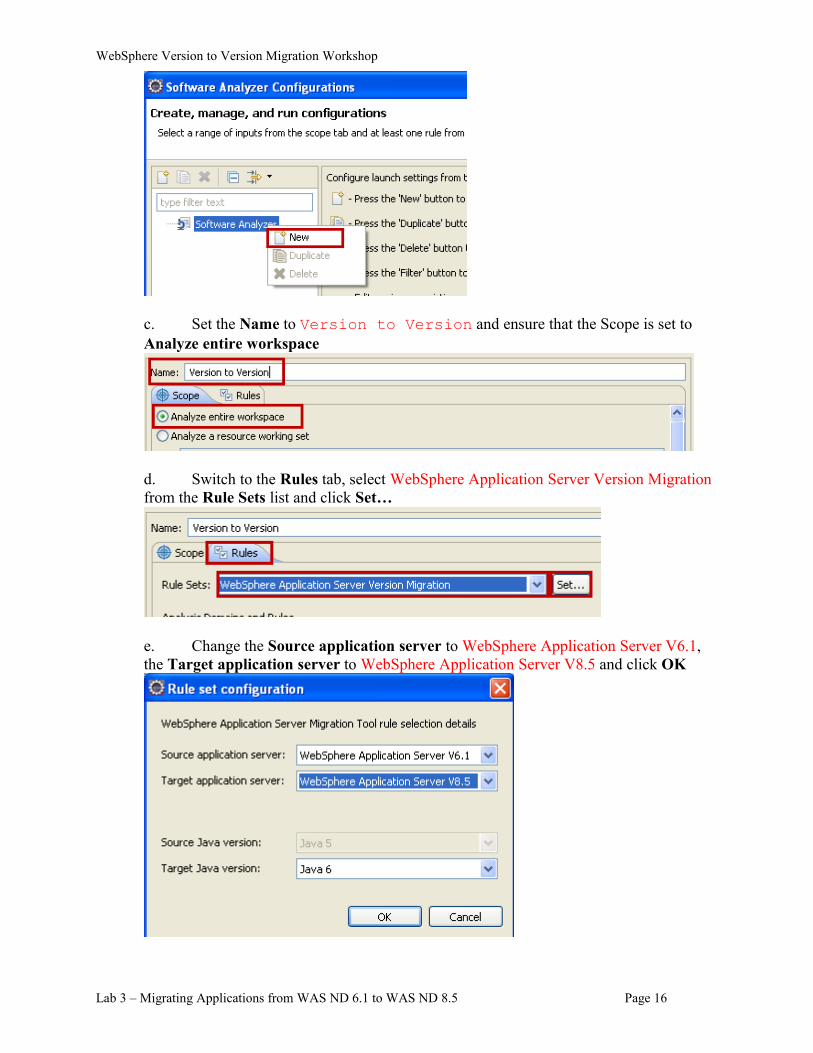
b. Right-click on Software Analyzer and select New
Lab 3 – Migrating Applications from WAS ND 6.1 to WAS ND 8.5 Page 15
WebSphere Version to Version Migration Workshop
c. Set the Name to Version to Version and ensure that the Scope is set to Analyze entire workspace
d. Switch to the Rules tab, select WebSphere Application Server Version Migration from the Rule Sets list and click Set…
e. Change the Source application server to WebSphere Application Server V6.1, the Target application server to WebSphere Application Server V8.5 and click OK
Lab 3 – Migrating Applications from WAS ND 6.1 to WAS ND 8.5 Page 16
WebSphere Version to Version Migration Workshop
f. On the Software Analyzer Configurations dialog, click Apply and then click Close
Part 4 – Analyze and Migrate the PlantsByWebSphere Application1. Run the Application Migration Toolkit
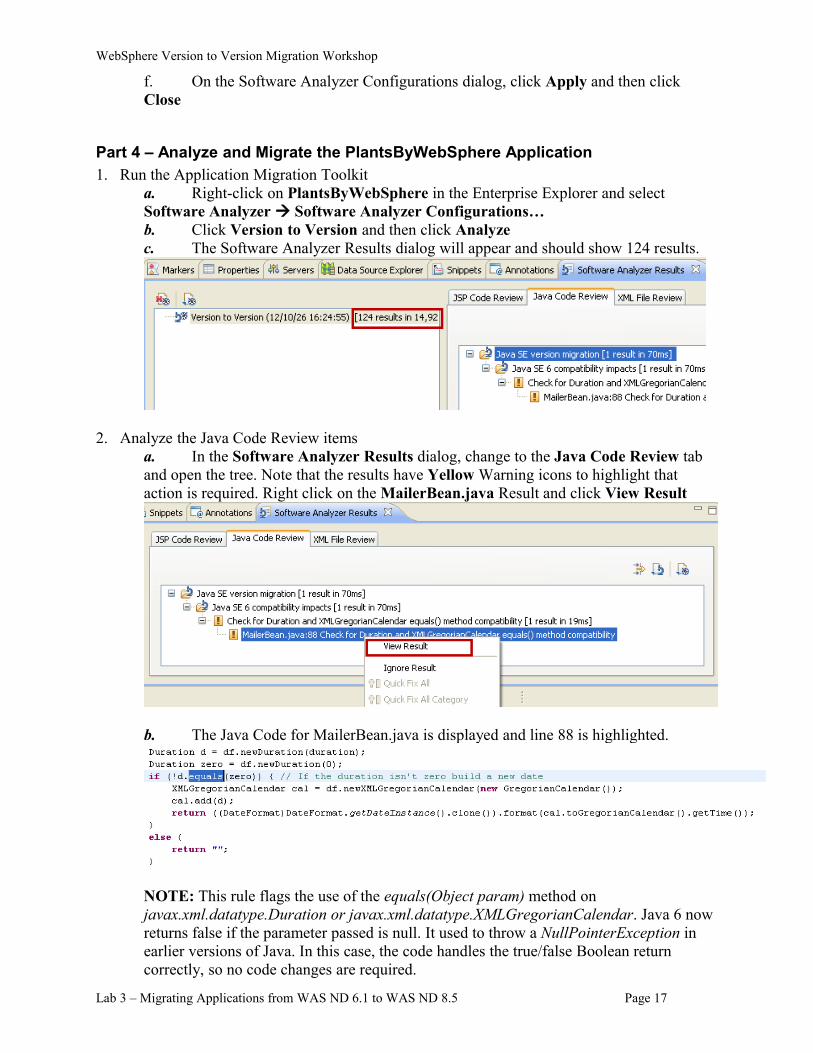
a. Right-click on PlantsByWebSphere in the Enterprise Explorer and select Software Analyzer Software Analyzer Configurations…b. Click Version to Version and then click Analyzec. The Software Analyzer Results dialog will appear and should show 124 results.
2. Analyze the Java Code Review itemsa. In the Software Analyzer Results dialog, change to the Java Code Review tab and open the tree. Note that the results have Yellow Warning icons to highlight that action is required. Right click on the MailerBean.java Result and click View Result
b. The Java Code for MailerBean.java is displayed and line 88 is highlighted.
NOTE: This rule flags the use of the equals(Object param) method on javax.xml.datatype.Duration or javax.xml.datatype.XMLGregorianCalendar. Java 6 now returns false if the parameter passed is null. It used to throw a NullPointerException in earlier versions of Java. In this case, the code handles the true/false Boolean return correctly, so no code changes are required.
Lab 3 – Migrating Applications from WAS ND 6.1 to WAS ND 8.5 Page 17
WebSphere Version to Version Migration Workshop
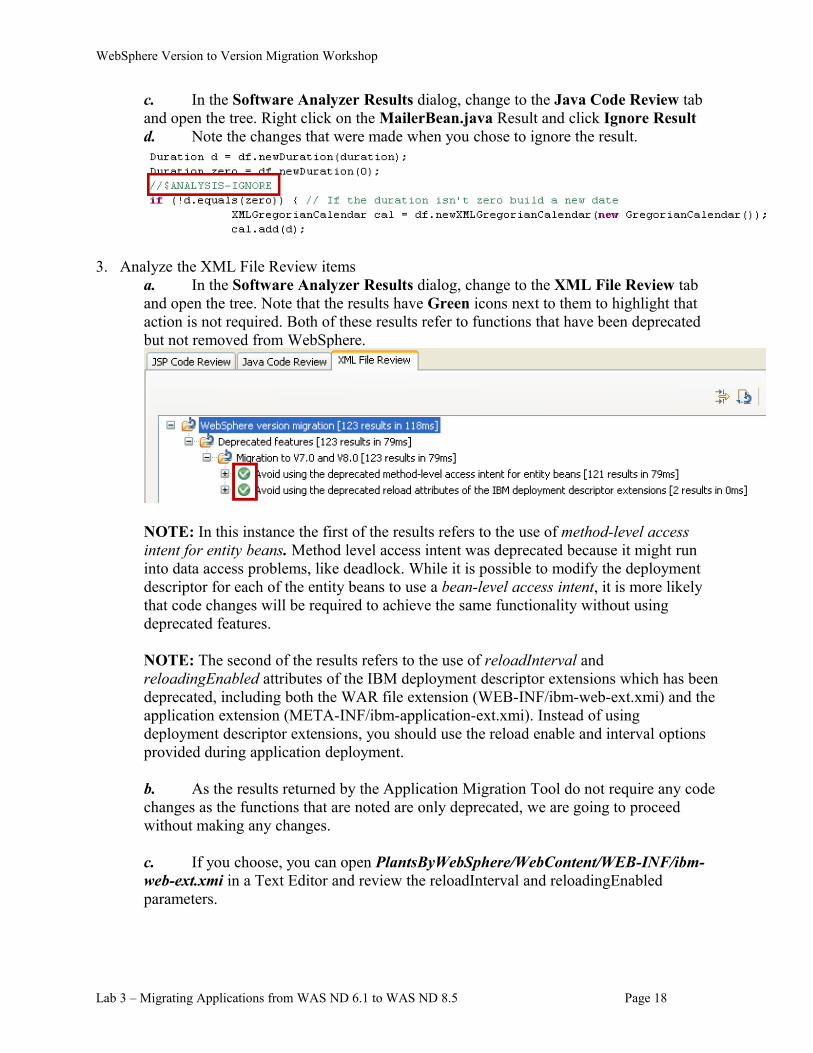
c. In the Software Analyzer Results dialog, change to the Java Code Review tab and open the tree. Right click on the MailerBean.java Result and click Ignore Resultd. Note the changes that were made when you chose to ignore the result.
3. Analyze the XML File Review itemsa. In the Software Analyzer Results dialog, change to the XML File Review tab and open the tree. Note that the results have Green icons next to them to highlight that action is not required. Both of these results refer to functions that have been deprecated but not removed from WebSphere.
NOTE: In this instance the first of the results refers to the use of method-level access intent for entity beans. Method level access intent was deprecated because it might run into data access problems, like deadlock. While it is possible to modify the deployment descriptor for each of the entity beans to use a bean-level access intent, it is more likely that code changes will be required to achieve the same functionality without using deprecated features.
NOTE: The second of the results refers to the use of reloadInterval and reloadingEnabled attributes of the IBM deployment descriptor extensions which has been deprecated, including both the WAR file extension (WEB-INF/ibm-web-ext.xmi) and the application extension (META-INF/ibm-application-ext.xmi). Instead of using deployment descriptor extensions, you should use the reload enable and interval options provided during application deployment.
b. As the results returned by the Application Migration Tool do not require any code changes as the functions that are noted are only deprecated, we are going to proceed without making any changes.
c. If you choose, you can open PlantsByWebSphere/WebContent/WEB-INF/ibm-web-ext.xmi in a Text Editor and review the reloadInterval and reloadingEnabled parameters.
Lab 3 – Migrating Applications from WAS ND 6.1 to WAS ND 8.5 Page 18
WebSphere Version to Version Migration Workshop
4. Analyze the problems that were not discovered by the Application Migration Toolkit.While the Application Migration Tool detects many migration problems, there are a few classes of migration problems that are currently not detected by the tools:
• Migration problems in applications originally written for versions of WebSphere Application Server prior to version 5.1
• Migration problems in Java code included as snippets inside of JSPs.• Migration problems in Java code where the migration problem is hidden by the use of
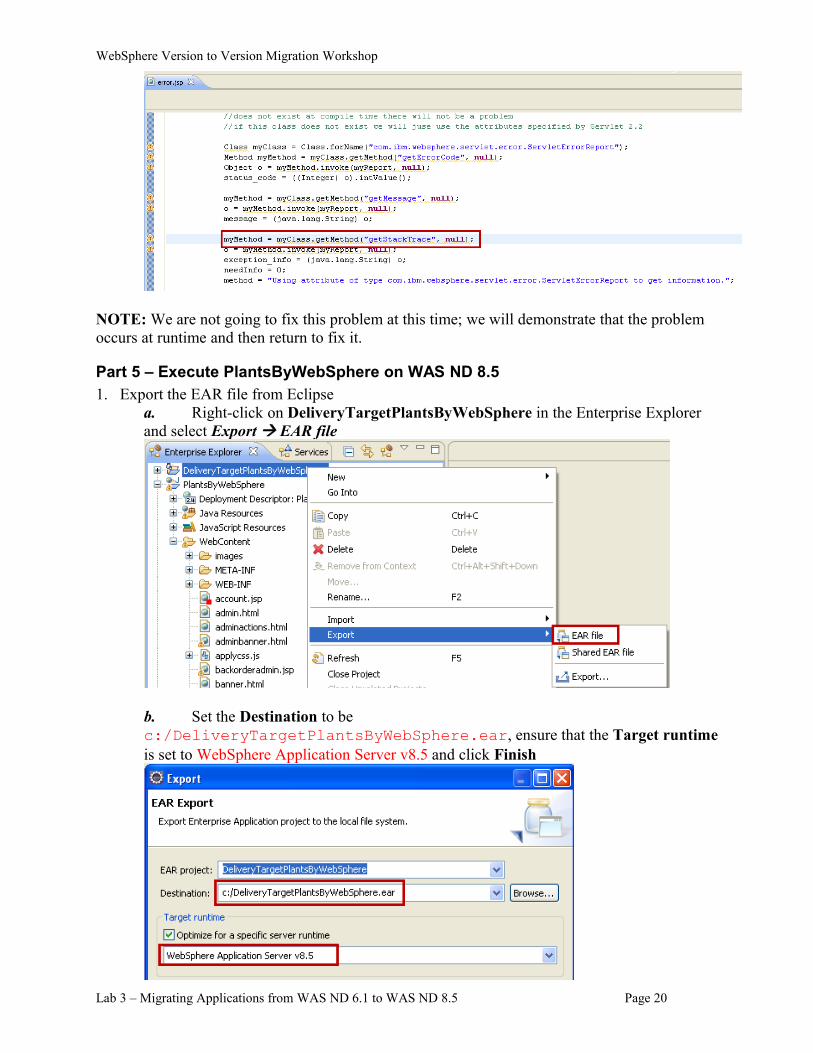
java reflection.If you suspect that an application being migrated has code that falls into any of these categories, you will need to put in place a plan to manage the risks of undetected migration problems, for example, by putting in place a manual code review plan for the affected application or application parts.As it happens the PlantsByWebSphere application actually has such a problem in one of its JSP files. The error.jsp file has a section of Java code, as shown below, that uses java reflection to invoke the getStackTrace method on the ServletErrorReport class provided by the WebSphere Application Server. This method was modified in WebSphere 5.1 to avoid a conflict caused by a change in Java 1.4 to the Throwable class. This particular change thus falls into all three of the categories of potential application migration problems that are not detected by the application migration tools.
a. Open PlantsByWebSphere/WebContent/error.jsp in a Text Editor and navigate to line 68 to view the use of getStackTrace
Lab 3 – Migrating Applications from WAS ND 6.1 to WAS ND 8.5 Page 19
WebSphere Version to Version Migration Workshop
NOTE: We are not going to fix this problem at this time; we will demonstrate that the problem occurs at runtime and then return to fix it.
Part 5 – Execute PlantsByWebSphere on WAS ND 8.51. Export the EAR file from Eclipse
a. Right-click on DeliveryTargetPlantsByWebSphere in the Enterprise Explorer and select Export EAR file
b. Set the Destination to be c:/DeliveryTargetPlantsByWebSphere.ear, ensure that the Target runtime is set to WebSphere Application Server v8.5 and click Finish
Lab 3 – Migrating Applications from WAS ND 6.1 to WAS ND 8.5 Page 20
WebSphere Version to Version Migration Workshop
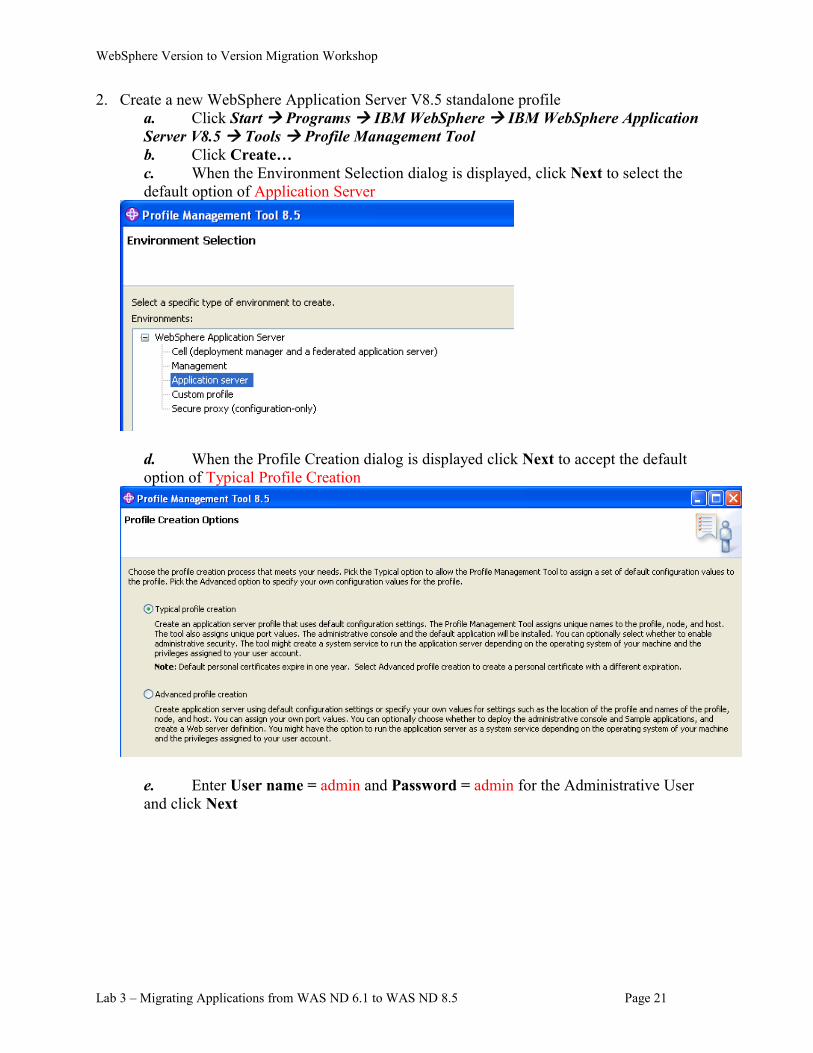
2. Create a new WebSphere Application Server V8.5 standalone profilea. Click Start Programs IBM WebSphere IBM WebSphere Application Server V8.5 Tools Profile Management Toolb. Click Create…c. When the Environment Selection dialog is displayed, click Next to select the default option of Application Server
d. When the Profile Creation dialog is displayed click Next to accept the default option of Typical Profile Creation
e. Enter User name = admin and Password = admin for the Administrative User and click Next
Lab 3 – Migrating Applications from WAS ND 6.1 to WAS ND 8.5 Page 21
WebSphere Version to Version Migration Workshop
f. When the Review dialog is displayed, click Createg. When the Profile Creation Complete dialog is displayed, uncheck the Launch the First Steps Console and click Finish
3. Start the WebSphere Application Server V8.5 standalone servera. Open a Command Promptb. Navigate to C:\IBM\WebSphere\AppServer85\profiles\AppSrv02\binc. Issue the command startServer.bat server1
4. Create the JDBC Providera. Click Start Programs IBM WebSphere IBM WebSphere Application Server V8.5 Profiles AppSrv02 Administrative Consoleb. Log in as User name = admin Password = adminc. Navigate to Resources JDBC JDBC Providersd. Set the Scope to Node=ibm-ff14964ad3eNode03, Server=server1 and click New
e. Select Derby from the Database listf. Select Derby JDBC Provider 40 from the Provider Type list
Lab 3 – Migrating Applications from WAS ND 6.1 to WAS ND 8.5 Page 22
WebSphere Version to Version Migration Workshop
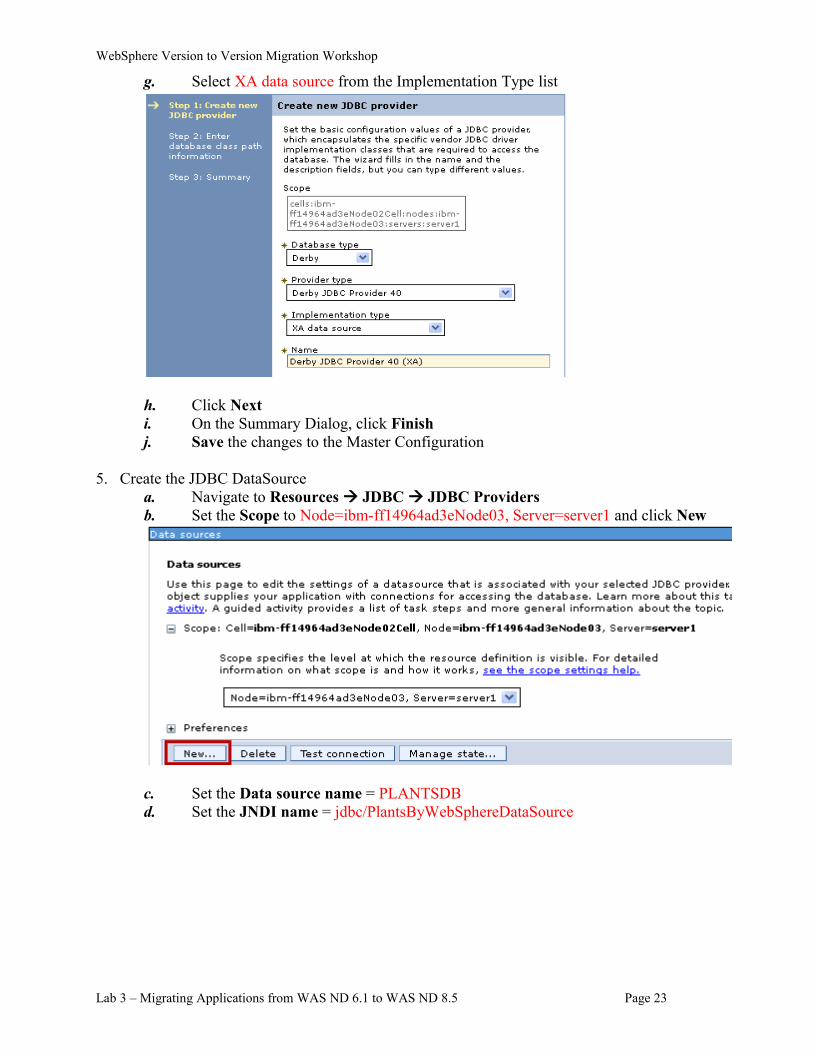
g. Select XA data source from the Implementation Type list
h. Click Nexti. On the Summary Dialog, click Finishj. Save the changes to the Master Configuration
5. Create the JDBC DataSourcea. Navigate to Resources JDBC JDBC Providersb. Set the Scope to Node=ibm-ff14964ad3eNode03, Server=server1 and click New
c. Set the Data source name = PLANTSDBd. Set the JNDI name = jdbc/PlantsByWebSphereDataSource
Lab 3 – Migrating Applications from WAS ND 6.1 to WAS ND 8.5 Page 23
WebSphere Version to Version Migration Workshop
e. Click Nextf. Select Derby JDBC Provider 40 (XA) from the Existing JDBC Provider list
g. Click Nexth. Set Database Name = ${APP_INSTALL_ROOT}/${CELL}/PlantsByWebSphere.ear/Database/PLANTSDB
Lab 3 – Migrating Applications from WAS ND 6.1 to WAS ND 8.5 Page 24
WebSphere Version to Version Migration Workshop
i. Click Nextj. On the Security Aliases dialog, click Nextk. On the Summary dialog, click Finishl. Save the changes to the Master Configuration
6. Deploy the PlantsByWebSphere applicationa. Navigate to Applications Application Types WebSphere enterprise applicationsb. Click Installc. Click Browse… d. Navigate to C:\DeliveryTargetPlantsByWebSphere.eare. Click Nextf. On the “How do you want to install the application?” dialog, click Nextg. On the “Select installation options” dialog, click Nexth. On the “Map modules to servers” dialog, click Nexti. On the “Map virtual hosts for Web modules” dialog, click Nextj. On the “Summary” dialog, click Finishk. Save the changes to the Master Configurationl. Navigate to Applications Application Types Enterprise Applicationsm. Select PlantsByWebSphere and click Start
Lab 3 – Migrating Applications from WAS ND 6.1 to WAS ND 8.5 Page 25
WebSphere Version to Version Migration Workshop
7. Open a Browser and navigate to http://127.0.0.1:9082/PlantsByWebSphere
8. Register a new Account:a. Click Login
b. Click the link to register for your own account herec. Enter the required information (you will need the E-mail address and password later on) and click Register
9. Login and make a purchase:
Lab 3 – Migrating Applications from WAS ND 6.1 to WAS ND 8.5 Page 26
WebSphere Version to Version Migration Workshop
a. Click Login again, enter your E-mail address and Password and click sign-inb. Click the Bonsai Tree special
c. Change the Quantity to 3 and click Add to cart
d. Click Checkout nowe. Complete the Shipping Information and Payment Information and then click Continue
Lab 3 – Migrating Applications from WAS ND 6.1 to WAS ND 8.5 Page 27
WebSphere Version to Version Migration Workshop
f. On the “Review your order” page, click Submit Order
g. After a short while your order will complete and the page shown below will appear
Lab 3 – Migrating Applications from WAS ND 6.1 to WAS ND 8.5 Page 28
WebSphere Version to Version Migration Workshop
10. Review the SystemOut.log for any errorsa. Open the C:\IBM\WebSphere\AppServer85\profiles\AppSrv02\logs\server1\SystemOut.log fileb. Scroll to the end of the file and check that no errors have been thrown
11. You have now migrated and tested the PlantsByWebSphere application. Close the Browser and SystemOut.log file
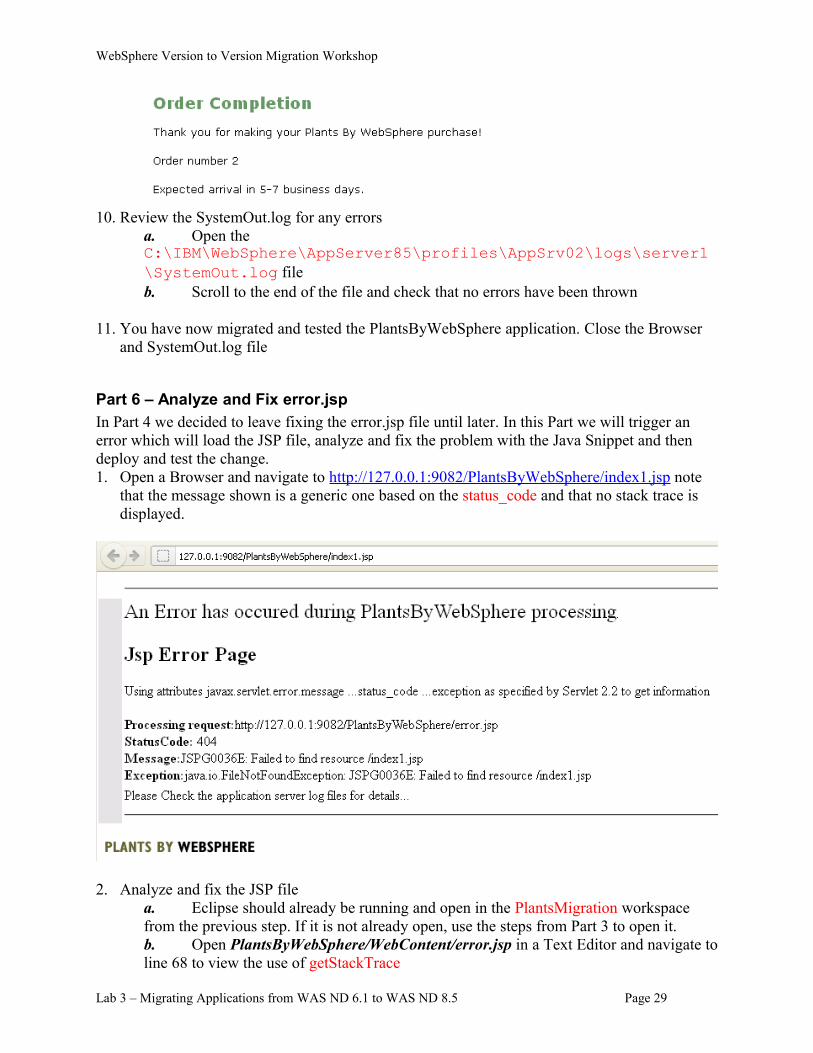
Part 6 – Analyze and Fix error.jspIn Part 4 we decided to leave fixing the error.jsp file until later. In this Part we will trigger an error which will load the JSP file, analyze and fix the problem with the Java Snippet and then deploy and test the change.1. Open a Browser and navigate to http://127.0.0.1:9082/PlantsByWebSphere/index1.jsp note
that the message shown is a generic one based on the status_code and that no stack trace is displayed.
2. Analyze and fix the JSP filea. Eclipse should already be running and open in the PlantsMigration workspace from the previous step. If it is not already open, use the steps from Part 3 to open it.b. Open PlantsByWebSphere/WebContent/error.jsp in a Text Editor and navigate to line 68 to view the use of getStackTrace
Lab 3 – Migrating Applications from WAS ND 6.1 to WAS ND 8.5 Page 29
c. As mentioned in Part 4, getStackTrace was used in WebSphere 5.1 to work around a problem with Java 1.4 and the Throwable class. It isn’t detected by the Application Migration Toolkit because it is a reflection (not a direct use of the class) and is in a Java Snippet in a JSP file. The fix is to use the getStackTraceAsString method instead.d. Modify the JSP file, replacing getStackTrace with getStackTraceAsString as shown below
e. Save the change.
3. Export the new EAR filea. Right-click on DeliveryTargetPlantsByWebSphere in the Enterprise Explorer and select Export EAR file
b. Set the Destination to be c:/DeliveryTargetPlantsByWebSphere.ear, ensure that the Target runtime is set to WebSphere Application Server v8.5 and that Overwrite existing file is selected, then click Finish
Lab 3 – Migrating Applications from WAS ND 6.1 to WAS ND 8.5 Page 30
WebSphere Version to Version Migration Workshop
4. Update the running PlantsByWebSphere EAR filea. Click Start Programs IBM WebSphere IBM WebSphere Application Server V8.5 Profiles AppSrv01 Administrative Consoleb. Log in as User name = admin Password = adminc. Navigate to Applications Application Types WebSphere enterprise applicationsd. Select PlantsByWebSphere and click Update
e. Click Browse…
f. Navigate to C:\DeliveryTargetPlantsByWebSphere.earg. Click Nexth. On the “How do you want to install the application?” dialog, click Nexti. On the “Select installation options” dialog, click Nextj. On the “Map modules to servers” dialog, click Next
Lab 3 – Migrating Applications from WAS ND 6.1 to WAS ND 8.5 Page 31
WebSphere Version to Version Migration Workshop
k. On the “Summary” dialog, click Finishl. Save the changes to the Master Configuration
5. Test the change to error.jspa. Open a Browser and navigate to http://127.0.0.1:9082/PlantsByWebSphere/index1.jsp not that message shown is a now a specific one and now includes a stack trace.
You have now fixed Error.jsp to run correctly on WebSphere Application Server V8.5
Part 7 – Execute StockQuote on WAS ND 6.1The StockQuote application is already installed on WAS ND 6.1 but it is necessary to import the Client application in to Indigo in order to test it.1. Open Eclipse with a new Workspace
a. Open a Windows Explorer and navigate to C:\eclipseb. Double-click on eclipse.exec. When the Workspace Launcher is displayed, change the Workspace to C:\workspace\StockQuoteMigration and click OK
2. Import the stockquoteclient.zip project into the Workspacea. Click File Importb. When the “Select” dialog is displayed, select General Existing Projects into Workspace and click Next
Lab 3 – Migrating Applications from WAS ND 6.1 to WAS ND 8.5 Page 32
c. Click Select archive filed. Click Browse… and navigate to C:\WORKSHOP\Applications\StockQuote\stockquoteclient.zip
e. Click Finish
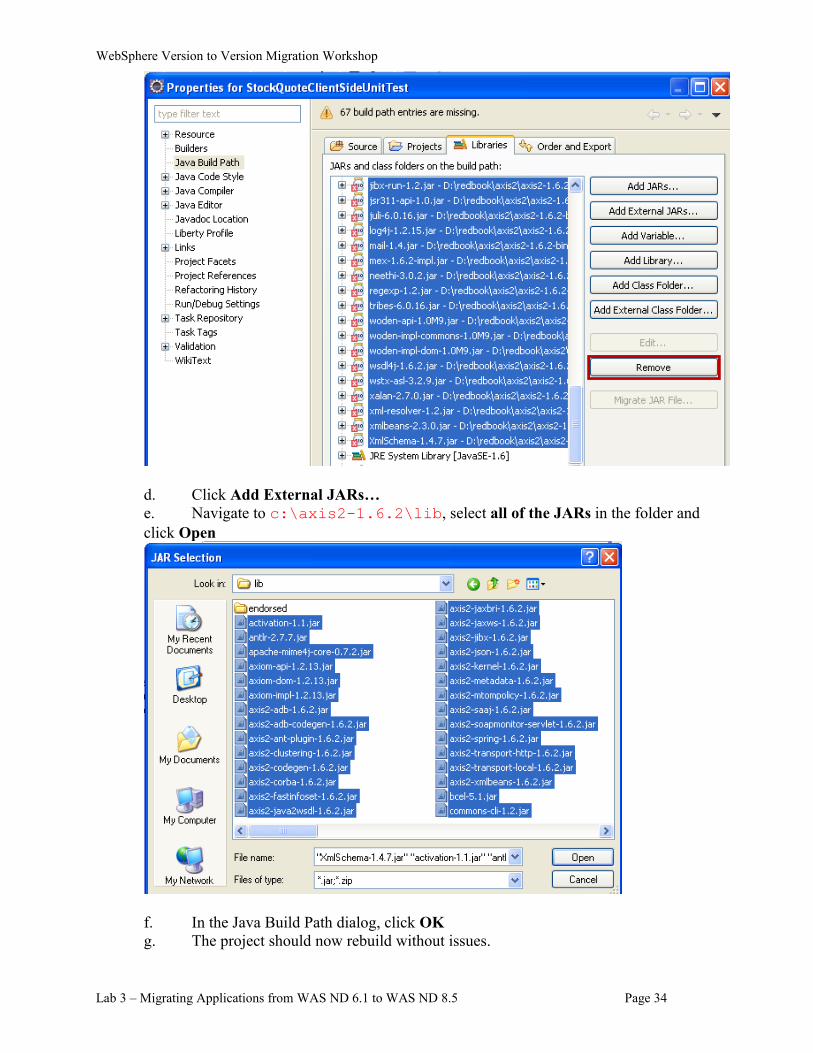
3. Fix the Java Build Problems.a. Right-click on StockQuoteClientSideUnitTest in the Enterprise Explorer and select Build Path Configure Build Pathb. Change to the Libraries tabc. Select all of the jar files that have a red x icon next to them and click Remove
Lab 3 – Migrating Applications from WAS ND 6.1 to WAS ND 8.5 Page 33
WebSphere Version to Version Migration Workshop
d. Click Add External JARs…e. Navigate to c:\axis2-1.6.2\lib, select all of the JARs in the folder and click Open
f. In the Java Build Path dialog, click OKg. The project should now rebuild without issues.
Lab 3 – Migrating Applications from WAS ND 6.1 to WAS ND 8.5 Page 34
WebSphere Version to Version Migration Workshop
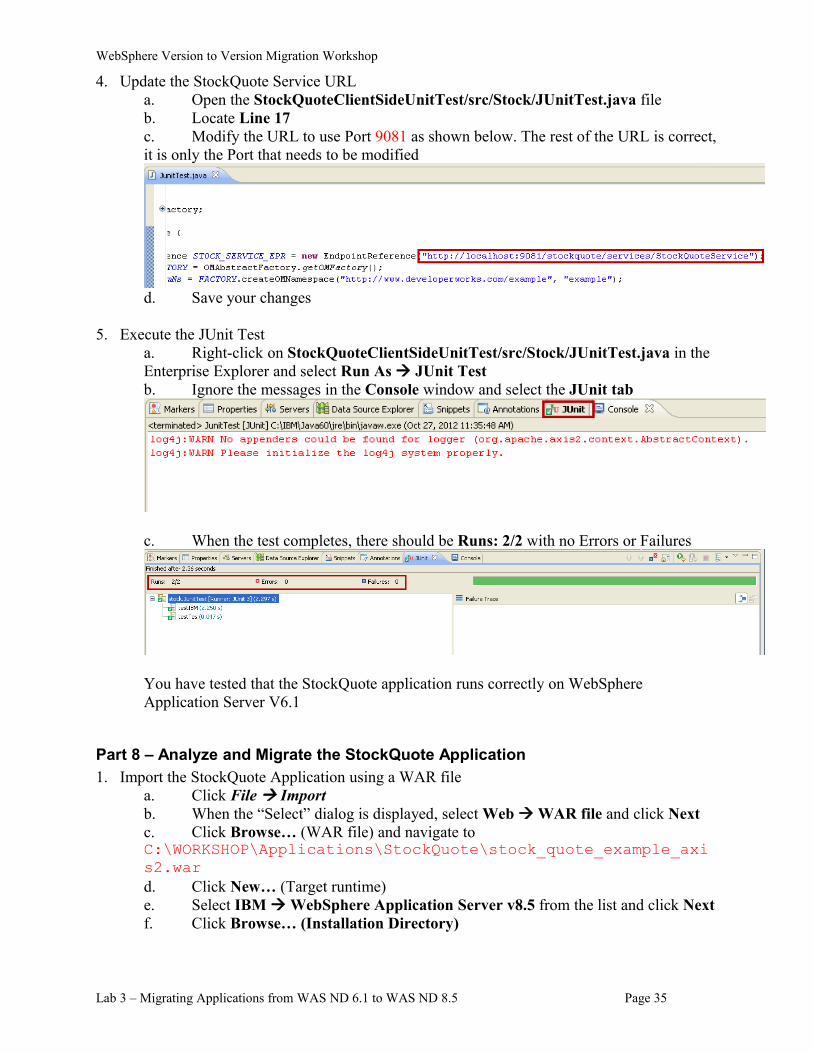
4. Update the StockQuote Service URLa. Open the StockQuoteClientSideUnitTest/src/Stock/JUnitTest.java fileb. Locate Line 17c. Modify the URL to use Port 9081 as shown below. The rest of the URL is correct, it is only the Port that needs to be modified
d. Save your changes
5. Execute the JUnit Testa. Right-click on StockQuoteClientSideUnitTest/src/Stock/JUnitTest.java in the Enterprise Explorer and select Run As JUnit Testb. Ignore the messages in the Console window and select the JUnit tab
c. When the test completes, there should be Runs: 2/2 with no Errors or Failures
You have tested that the StockQuote application runs correctly on WebSphere Application Server V6.1
Part 8 – Analyze and Migrate the StockQuote Application1. Import the StockQuote Application using a WAR file
a. Click File Importb. When the “Select” dialog is displayed, select Web WAR file and click Nextc. Click Browse… (WAR file) and navigate to C:\WORKSHOP\Applications\StockQuote\stock_quote_example_axis2.ward. Click New… (Target runtime)e. Select IBM WebSphere Application Server v8.5 from the list and click Nextf. Click Browse… (Installation Directory)
Lab 3 – Migrating Applications from WAS ND 6.1 to WAS ND 8.5 Page 35
WebSphere Version to Version Migration Workshop
g. Navigate to C:\IBM\WebSphere\AppServer85 and click OK h. Click Finishi. When you are returned to the Enterprise Application Import dialog, click Finish
2. Configure the Application Migration Toolkita. Right-click on stock_quote_example_axis2 in the Enterprise Explorer and select Software Analyzer Software Analyzer Configurations…
b. Right-click on Software Analyzer and select New
c. Set the Name to Version to Version and ensure that the Scope is set to Analyze entire workspace
Lab 3 – Migrating Applications from WAS ND 6.1 to WAS ND 8.5 Page 36
WebSphere Version to Version Migration Workshop
d. Switch to the Rules tab, select WebSphere Application Server Version Migration from the Rule Sets list and click Set…
e. Change the Source application server to WebSphere Application Server V6.1, the Target application server to WebSphere Application Server V8.5 and click OK
f. On the Software Analyzer Configurations dialog, click Apply and then click Close
3. Run the Application Migration Toolkita. Right-click on stock_quote_example_axis2 in the Enterprise Explorer and select Software Analyzer Software Analyzer Configurations…b. Click Version to Version and then click Analyzec. The Software Analyzer Results dialog will appear and should show 0 results.
NOTE: The analysis reports no problems were detected. However version 3.5 of the Migration Toolkit does not check for the use of third party web services engines such as axis2 and hence does not report that some small changes are needed to the configuration of that engine in order to successfully run the application in WebSphere Application Server v8.5.
4. Update the axis2.xml file to specify EnableChildFirstClassLoadingStarting with version 1.5.5 of the axis2 web services engine, a new parameter was added to the axis2 configuration. This parameter controls how class loaders created by the axis2 web service
Lab 3 – Migrating Applications from WAS ND 6.1 to WAS ND 8.5 Page 37
WebSphere Version to Version Migration Workshop
engine behave. In order to operate correctly in WebSphere Application Server v8.5, this parameter needs to be changed from the default of false to true.
a. Open the stock_quote_exercise_axis2/WebContent/WEB-INF/conf/axis2.xml file in a text editorb. Locate Line 34c. Modify the value of the EnableChildFirstClassLoading parameter to be true
d. Save your changes and close axis2.xml
5. Disable web services annotation scanning for the applicationBy default the WebSphere application server will perform annotation scanning for all installed applications to determine what web services are provided by those applications. When using a third party web services engine this is unnecessary and can cause problems. To disable the annotation scanning for this application we update the MANIFEST.MF file for the application’s war file to add DisableIBMJAXWSEngine
a. Open the stock_quote_exercise_axis2/WebContent/META-INF/MAINFEST.MF file in a text editorb. Add DisableIBMJAXWSEngine: true to the file as shown below
c. Save your changes and close MAINFEST.MF
Part 9 – Execute StockQuote on WAS ND 8.51. Export the WAR file from Eclipse
a. Right-click on stock_quote_exercise_axis2 in the Enterprise Explorer and select Export WAR fileb. Set the Destination to be C:/stock_quote_example_axis2.war, ensure that the Target runtime is set to WebSphere Application Server v8.5 and click Finish
Lab 3 – Migrating Applications from WAS ND 6.1 to WAS ND 8.5 Page 38
WebSphere Version to Version Migration Workshop
2. Import the WAR into WebSphere Application Server V8.5a. Click Start Programs IBM WebSphere IBM WebSphere Application Server V8.5 Profiles AppSrv02 Administrative Consoleb. Log in as User name = admin Password = adminc. Navigate to Applications Application Types WebSphere enterprise applicationsd. Click Installe. Click Browse… f. Navigate to C:\stock_quote_exercise_axis2.warg. Click Nexth. On the “How do you want to install the application?” dialog, click Nexti. On the “Select installation options” dialog, click Nextj. On the “Map modules to servers” dialog, click Nextk. On the “Map virtual hosts for Web modules” dialog, click Nextl. On the “Map context roots for Web modules” enter stockquote for the Apache-Axis2 Context Root and then click Next
m. On the “Summary” dialog, click Finishn. Save the changes to the Master Configuration
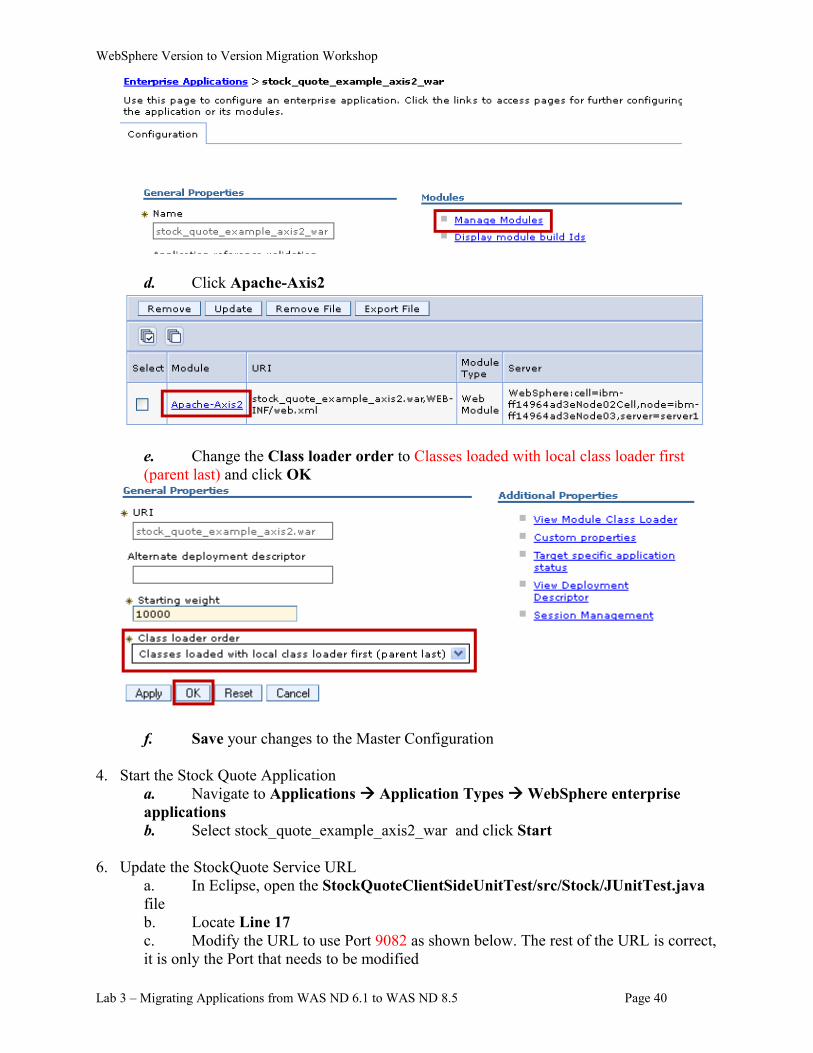
3. Update the Class Loader for the Stock Quote applicationa. Navigate to Applications Application Types WebSphere enterprise applicationsb. Click stock_quote_example_axis2_war c. Click Manage Modules
Lab 3 – Migrating Applications from WAS ND 6.1 to WAS ND 8.5 Page 39
WebSphere Version to Version Migration Workshop
d. Click Apache-Axis2
e. Change the Class loader order to Classes loaded with local class loader first (parent last) and click OK
f. Save your changes to the Master Configuration
4. Start the Stock Quote Applicationa. Navigate to Applications Application Types WebSphere enterprise applicationsb. Select stock_quote_example_axis2_war and click Start
6. Update the StockQuote Service URLa. In Eclipse, open the StockQuoteClientSideUnitTest/src/Stock/JUnitTest.java fileb. Locate Line 17c. Modify the URL to use Port 9082 as shown below. The rest of the URL is correct, it is only the Port that needs to be modified
Lab 3 – Migrating Applications from WAS ND 6.1 to WAS ND 8.5 Page 40
WebSphere Version to Version Migration Workshop
d. Save your changes
7. Execute the JUnit Testa. Right-click on StockQuoteClientSideUnitTest/src/Stock/JUnitTest.java in the Enterprise Explorer and select Run As JUnit Testb. Ignore the messages in the Console window and select the JUnit tab
c. When the test completes, there should be Runs: 2/2 with no Errors or Failures
You have tested that the StockQuote application runs correctly on WebSphere Application Server V8.5
Lab 3 – Migrating Applications from WAS ND 6.1 to WAS ND 8.5 Page 41