• Configure basic router global settings – router name, users, and login passwords – using Cisco SDM Express.
• Configure LAN and Internet connections on a Cisco ISR using Cisco SDM Express.
Background / Preparation
Cisco Router and Security Device Manager (SDM) is a Java-based web application and a device-management tool for Cisco IOS Software-based routers. The Cisco SDM simplifies router and security configuration through the use of smart wizards, which allows you to deploy, configure, and monitor a Cisco router without requiring knowledge of the command-line interface (CLI). The Cisco SDM is supported on a wide range of Cisco routers and Cisco IOS Software releases. Many newer Cisco routers come with SDM preinstalled. If you are using an 1841 router, SDM (and SDM Express) is pre-installed.
This lab assumes the use of a Cisco 1841 router. You can use another router model as long as it is capable of supporting SDM. If you are using a supported router that does not have SDM installed, you can download the latest version free of charge from the following location: http://www.cisco.com/pcgi-bin/tablebuild.pl/sdm
From the URL shown above, view or download the document “Downloading and Installing Cisco Router and Security Device Manager.” This document provides instructions for installing SDM on your router. It lists specific model numbers and IOS versions that can support SDM, and the amount of memory required.
Cisco SDM Express is a component of SDM. SDM Express automatically runs a GUI wizard that allows you to perform an initial basic configuration of a Cisco router using a browser and the web interface of the router. SDM Express will only be activated when the router is in its factory-default state. In this lab, you will use Cisco SDM Express to configure LAN and Internet connections on a Cisco ISR.
The following resources are required:
• Cisco 1841 ISR router with SDM version 2.4 installed (critical – see Note 2 in Step 1)
CCNA Discovery Working at a Small-to-Medium Business or ISP
• Cisco 1841 ISR router configured with factory default settings and with a serial port add-in module
(critical – see Notes 1 and 3 in Step 1)
• (Optional) Other Cisco router model with SDM installed
• Windows XP computer with Internet Explorer 5.5 or higher and SUN Java Runtime Environment (JRE) version 1.4.2_05 or later (or Java Virtual Machine (JVM) 5.0.0.3810). (See Note 3 in Step 1)
• Straight-through or crossover category 5 Ethernet cable
• Access to PC network TCP/IP configuration
Step 1: Configure the PC to connect to the router and then launch Cisco SDM
a. Power up the router.
b. Power up the PC.
c. Disable any popup blocker programs. Popup blockers prevent SDM Express windows from displaying.
d. Connect the PC NIC to the FastEthernet 0/0 port on the Cisco 1841 ISR router with the Ethernet cable.
NOTE: An SDM router other than the 1841 may require connection to different port in order to access SDM.
e. Configure the IP address of the PC to be 10.10.10.2 with a subnet mask of 255.255.255.248.
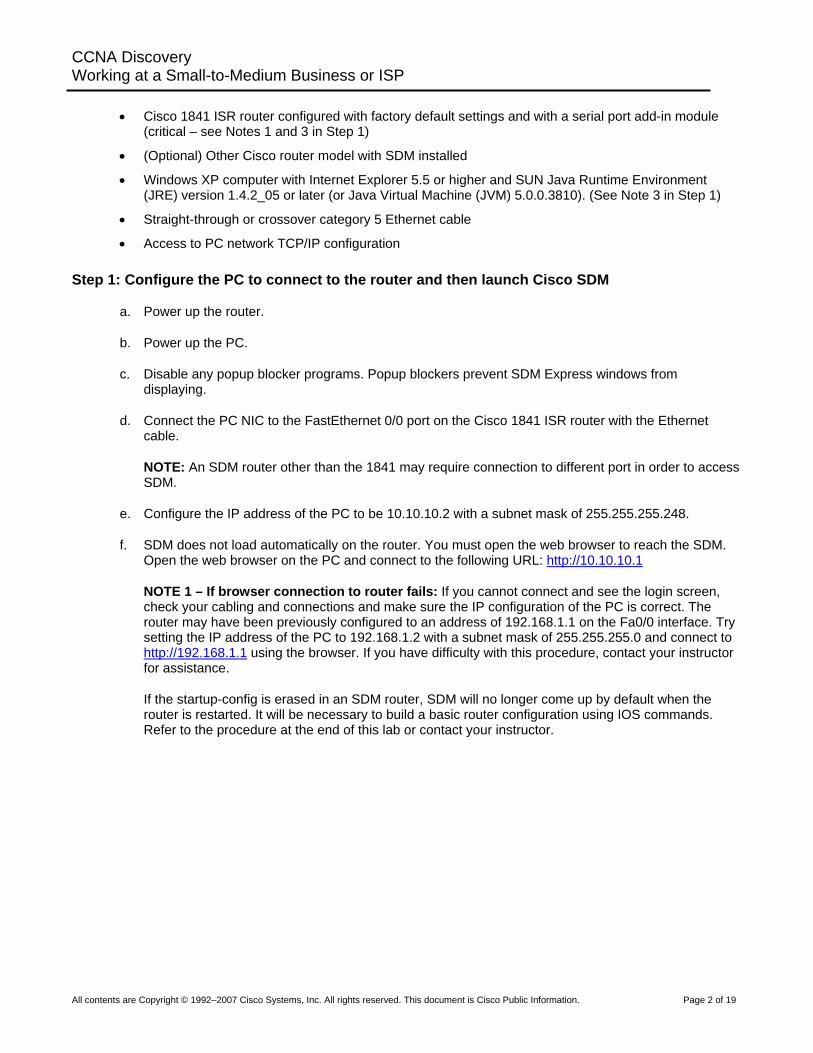
f. SDM does not load automatically on the router. You must open the web browser to reach the SDM. Open the web browser on the PC and connect to the following URL: http://10.10.10.1
NOTE 1 – If browser connection to router fails: If you cannot connect and see the login screen, check your cabling and connections and make sure the IP configuration of the PC is correct. The router may have been previously configured to an address of 192.168.1.1 on the Fa0/0 interface. Try setting the IP address of the PC to 192.168.1.2 with a subnet mask of 255.255.255.0 and connect to http://192.168.1.1 using the browser. If you have difficulty with this procedure, contact your instructor for assistance.
If the startup-config is erased in an SDM router, SDM will no longer come up by default when the router is restarted. It will be necessary to build a basic router configuration using IOS commands. Refer to the procedure at the end of this lab or contact your instructor.
CCNA Discovery Working at a Small-to-Medium Business or ISP
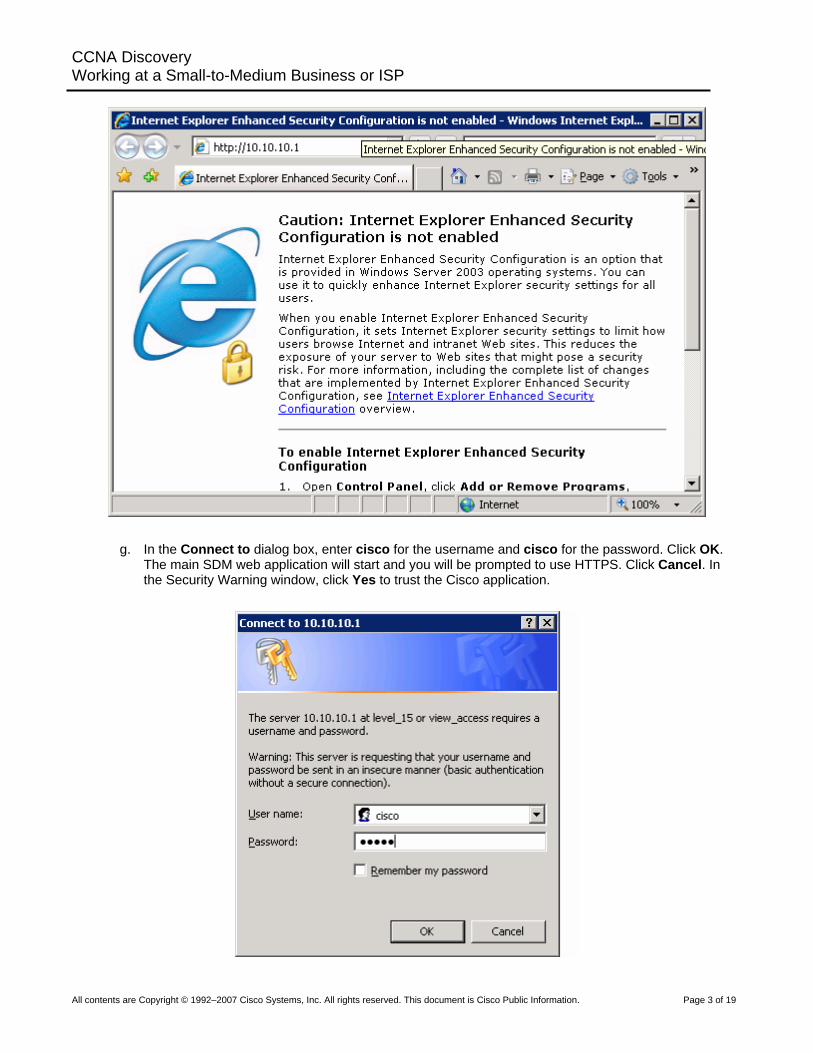
g. In the Connect to dialog box, enter cisco for the username and cisco for the password. Click OK. The main SDM web application will start and you will be prompted to use HTTPS. Click Cancel. In the Security Warning window, click Yes to trust the Cisco application.
CCNA Discovery Working at a Small-to-Medium Business or ISP
h. In the Welcome to the Cisco SDM Express Wizard window, read the message and then click Next.
i. Verify that you are using the latest version of SDM. The initial SDM screen that displays immediately after the login shows the current version number. It is also displayed on the main SDM screen shown below, along with IOS version.
NOTE 2: If the current version is not 2.4 or higher, notify your instructor before continuing with this lab. You will need to download the latest zip file from the URL listed above and save it to the PC. From the Tools menu of the SDM GUI, use the Update SDM option to specify the location of the zip file and start the update.
NOTE 3 – If SDM Express Wizard fails to start: If you connect to the router and SDM Express starts but the SDM Express Setup Wizard shown above does not start automatically, the router may be partially configured and needs to be reset to its factory defaults. If the SDM Express main screen is displayed, choose the Reset to Factory Defaults option, repeat Steps 1a through 1e, and log in again. If the full SDM application starts (not SMD Express), choose the Reset to Factory Defaults option from the File menu on the main SDM screen, repeat Steps 1a through 1e, and log in again. If you have difficulty with this procedure, contact your instructor for assistance.
Also note that the Windows XP computer you are using must have Internet Explorer 5.5 or higher and SUN Java Runtime Environment (JRE) version 1.4.2_05 or later (or Java Virtual Machine (JVM) 5.0.0.3810). If it does not, SDM will not start. You will need to download and install JRE on the PC before continuing with the lab.
CCNA Discovery Working at a Small-to-Medium Business or ISP
Step 2: Perform initial basic configuration
a. In the Basic Configuration window, enter the following information. When you complete the basic configuration, click Next to continue.
• In the Host Name field, enter CustomerRouter.
• In the Domain Name field, enter the domain name customer.com.
• Enter the username admin and the password cisco123 for SDM Express users and Telnet users. This password gives access to SDM locally, through the console connection, or remotely using Telnet.
• Enter the enable secret password of cisco123. This entry creates an encrypted password that prevents casual users from entering privileged mode and modifying the configuration of the router using the CLI.
CCNA Discovery Working at a Small-to-Medium Business or ISP
Step 3: Configure the LAN IP address
In the LAN Interface Configuration window, choose FastEthernet0/0 from the Interface list. For interface FastEthernet 0/0, enter the IP address of 192.168.1.1 and subnet mask of 255.255.255.0. You can also enter the subnet mask information in a different format: entering a count of the number of binary digits or bits in the subnet mask, such as 255.255.255.0 or 24 subnet bits.
CCNA Discovery Working at a Small-to-Medium Business or ISP
Step 4: De-select DHCP server
At this point, do not enable the DHCP server. This procedure is covered in a later section of this course. In the DHCP server configuration window, ensure that the Enable DHCP server on the LAN interface check box is cleared before proceeding. Click Next to continue.
CCNA Discovery Working at a Small-to-Medium Business or ISP
Step 5: Configure the WAN interface
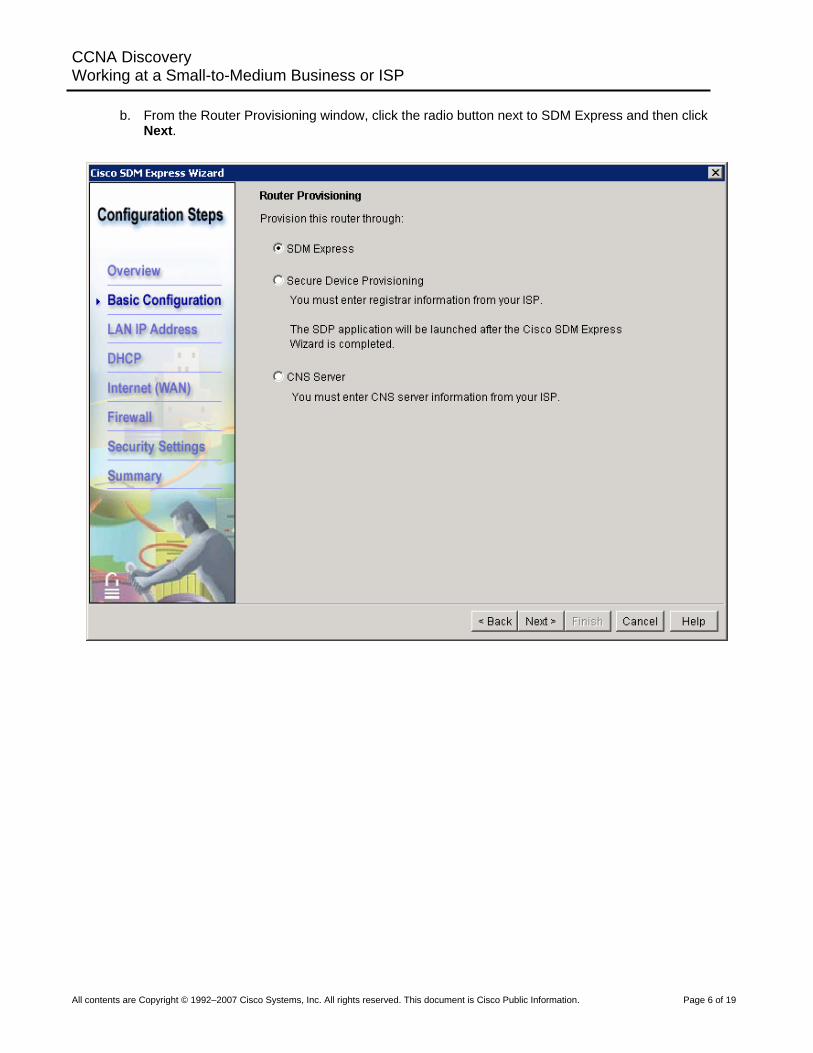
a. In the WAN Configuration window, choose Serial0/0/0 interface from the list and click the Add Connection button. The Add Connection window appears.
NOTE: With the 1841 router, the serial interface is designated by 3 digits – C/S/P, where C=Controller#, S=Slot# and P=Port#. The 1841 has two modular slots. The designation Serial0/0/0 indicates that the serial interface module is on controller 0, in slot 0, and that the interface to be used is the first one (0). The second interface is Serial0/0/1. The serial module is normally installed in slot 0 but may be may be installed in slot 1. If this is the case, the designation for the first serial interface on the module would be Serial0/1/0 and the second would be Serial0/1/1.
CCNA Discovery Working at a Small-to-Medium Business or ISP
b. From the Add Serial0/0/0 Connection dialog box, choose PPP from the Encapsulation list. From the
Address Type list, choose Static IP Address. Enter 209.165.200.225 for the IP address and 255.255.255.224 for the Subnet mask. Click OK to continue. Notice that this subnet mask translates to a /27, or 27 bits for the mask.
CCNA Discovery Working at a Small-to-Medium Business or ISP
Step 6: Enable the firewall and security settings
a. Depending on the router IOS version, the next step may be Firewall Configuration. In the Firewall Configuration window, click the radio button that enables the firewall and then click Next. The Security Configuration window appears.
CCNA Discovery Working at a Small-to-Medium Business or ISP
Step 7: Review and complete the configuration
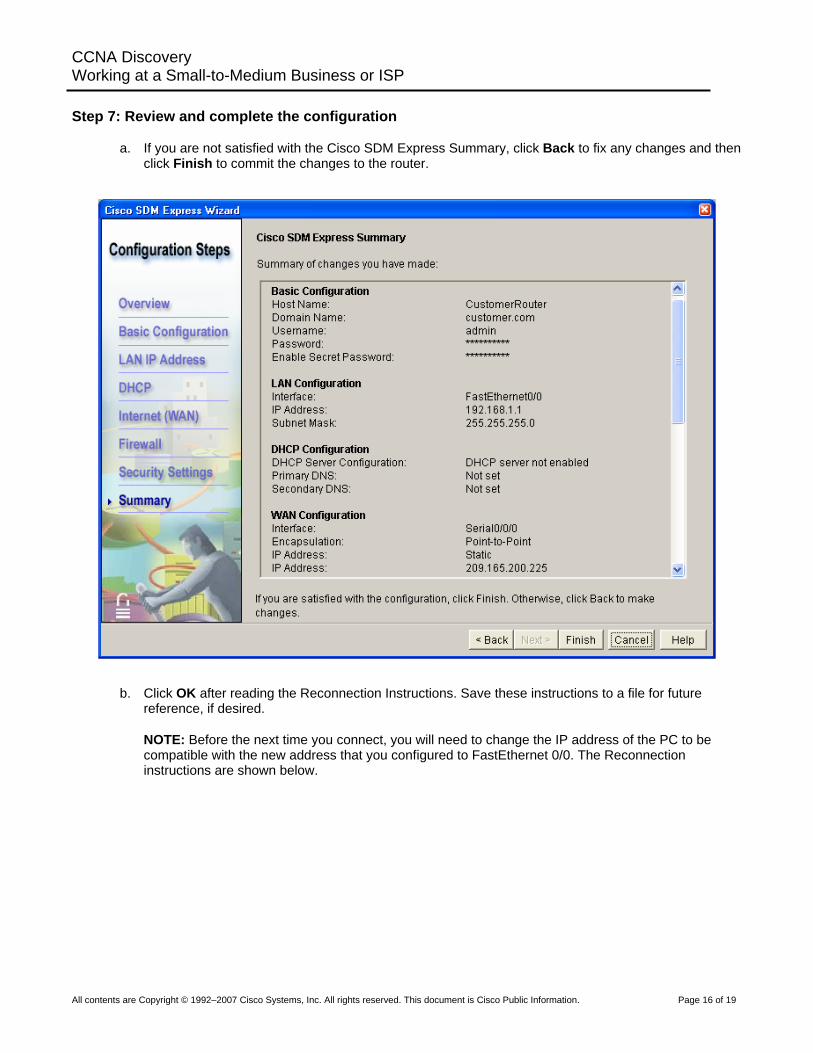
a. If you are not satisfied with the Cisco SDM Express Summary, click Back to fix any changes and then click Finish to commit the changes to the router.
b. Click OK after reading the Reconnection Instructions. Save these instructions to a file for future reference, if desired.
NOTE: Before the next time you connect, you will need to change the IP address of the PC to be compatible with the new address that you configured to FastEthernet 0/0. The Reconnection instructions are shown below.
CCNA Discovery Working at a Small-to-Medium Business or ISP
Step 8: Reflection
a. What feature makes configuring the router easy? _____________________________________ _______________________________________________________________________
b. Summarize the steps that are configured by the Cisco SDM Express _______________________________________________________________________ _______________________________________________________________________ _______________________________________________________________________ _______________________________________________________________________ _______________________________________________________________________ ______________________________________________________________________
SDM router basic IOS configuration to bring up SDM
If the startup-config is erased in an SDM router, SDM will no longer come up by default when the router is restarted. It will be necessary to build a basic config as follows. Further details regarding the setup and use of SDM are can be found in the SDM Quick Start Guide:
1) Set the router Fa0/0 IP address (This is the interface that a PC will connect to using a browser to bring up SDM. The PC IP address should be set to 10.10.10.2 255.255.255.248)
NOTE: An SDM router other than the 1841 may require connection to different port in order to access SDM.
Router(config)# interface Fa0/0 Router(config-if)# ip address 10.10.10.1 255.255.255.248 Router(config-if)# no shutdown
2) Enable the HTTP/HTTPS server of the router, using the following Cisco IOS commands:
Router(config)#ip http server Router(config)#ip http secure-server Router(config)#ip http authentication local
3) Create a user account with privilege level 15 (enable privileges).
Router(config)# username <username> privilege 15 password 0 <password> Replace <username> and <password> with the username and password that you want to configure.


![[XLS]minsvyaz.ruminsvyaz.ru/common/upload/docs/2007061917193vq.xls · Web viewINTRALINK IDR-38 INTRALINK ISR-71 INTRALINK ISR-81 INTRALINK ISR-13 INTRALINK ISR-15 INTRALINK ISR-18](https://static.documents.pub/doc/80x56/5b1d3ffb7f8b9acf678b6c15/xls-web-viewintralink-idr-38-intralink-isr-71-intralink-isr-81-intralink-isr-13.jpg)


