13
Lab Handout 2 Jan 8, 2013

Lab Handout 2 Jan 8, 2013

Lab Handout 2 Jan 8, 2013
SECTION 1: Services
1. What is a Service?
a. A service is a component that runs in the background to perform long-running
operations or to perform work for remote processes. A service does not provide a
user interface.
b. A service is implemented as a subclass of Service and you can learn more about it in
the Services developer guide.
2. We will create a Service called MP3Service to play music in the background of an Activity.
a. Go to the day 2 folder in my Public here:
http://web.mit.edu/psaylor/Public/6.570%20day%202/ and download
theme_song.mp3
b. In your Android project, create a new folder inside the res/ folder called “raw”
c. Drag and drop theme_song.mp3 into the res/raw folder to copy it to that location.
The mp3 file can now be accessed in your Android project with the id
R.raw.theme_song.
d. The skeleton of our MP3 Service.
e. We will need to modify the onStartCommand and onDestroy callback methods
i. onStartCommand should create a MediaPlayer, give it the MP3 to play, and
set the player to loop, and start the music. Don’t modify the return
statement!
ii. onDestroy should stop the MediaPlayer and release the resources associated
with the MediaPlayer object
iii. The API on the MediaPlayer can be found here:
http://developer.android.com/reference/android/media/MediaPlayer.html
public class MP3Service extends Service {
private MediaPlayer m;
@Override
public IBinder onBind(Intent arg0) {
return null;
}
@Override
public void onCreate() {
super.onCreate();
}
@Override
public void onDestroy() {
super.onDestroy();
}
@Override
public int onStartCommand(Intent intent, int flags, int startId) {
return super.onStartCommand(intent, flags, startId);
}
}

Lab Handout 2 Jan 8, 2013
f. The MP3Service will be used on MP3Activity. Create a new Activity called
MP3Activity, the corresponding layout file activity_mp3, and don’t forget to declare
your MP3Activity in the Manifest
i. For the layout, you can download the activity_mp3.xml file from my Public
and just copy it into your own activity_mp3 layout file (No need to create
Buttons from scratch every time once you know how)
ii. You can use the skeleton above for the Activity class. All that’s left to do is
starting and stopping the MP3Service with Intents inside the corresponding
helper methods. It’s one or two lines of code, and you can look up how to
do it here: http://developer.android.com/guide/components/services.html
g. Don’t forget to declare your service in your Manifest
public class MP3Activity extends Activity {
private Button startButton;
private Button stopButton;
@Override
public void onCreate(Bundle savedInstanceState) {
super.onCreate(savedInstanceState);
setContentView(R.layout.activity_mp3);
startButton = (Button)
findViewById(R.id.start_music_button);
startButton.setOnClickListener(new OnClickListener() {
@Override
public void onClick(View v) {
startService();
}
});
stopButton = (Button)
findViewById(R.id.stop_music_button);
stopButton.setOnClickListener(new OnClickListener() {
@Override
public void onClick(View v) {
stopService();
}
});
}
public void startService() {
/* Implement this. It should start your service */
}
public void stopService() {
/* Implement this. It should stop your service */
}
@Override
protected void onPause() {
super.onPause();
stopService();
}
<service android:name=".MP3Service" >
</service>

Lab Handout 2 Jan 8, 2013
3. The solutions are in the “service solutions” folder and are summarized here
a. Starting a Service
b. Stopping a Service
c. onStartCommand and onDestroy
Intent i = new Intent(this, MP3Service.class);
startService(i);
stopService(new Intent(this, MP3Service.class));
@Override
public void onDestroy() {
super.onDestroy();
Toast.makeText(this, "Service Stopped", Toast.LENGTH_SHORT).show();
m.stop();
m.release();
}
@Override
public int onStartCommand(Intent intent, int flags, int startId) {
Toast.makeText(this, "Service Started", Toast.LENGTH_SHORT).show();
if (m != null) {
m.stop();
}
m = MediaPlayer.create(this, R.raw.theme_song);
m.setLooping(true);
m.start();
return super.onStartCommand(intent, flags, startId);
}

Lab Handout 2 Jan 8, 2013
SECTION 2: Accessing Media Content and Custom Views
1. Our goal here is to open the phone’s Gallery on a button click, let the user select an image,
and then turn that image into a holiday card.
2. Create a new Activity called CardMakerActivity and the corresponding layout
activity_cardmaker.xml. Declare it in the Manifest.
3. Download from the day 2 folder…
a. activity_cardmaker.xml file which you can use as a starting point for your layout
b. CardMakerActivity.java which has skeleton code to get you started and instructions
in the comments
c. CardView.java which is a fully implemented custom ImageView
4. In activity_cardmaker.xml, we want to add our CardView to the layout
a. Since it is a custom View, the xml tag is a little different. Instead of the
<ImageView /> tag, you need to specify the location of the class that defines your
custom View, which would be something like your.packagename.here.CardView
b. Specify the CardView’s attributes like layout_height, etc, and be sure to give it a new
id. You might find in order for the view to inflate properly you need to specify xmlns:android="http://schemas.android.com/apk/res/android"
5. Implement the onClick method in onClickOpenGallery in CardMakerActivity
a. Create a new Intent
b. Set the Action of the Intent to Intent.ACTION_GET_CONTENT
c. Set the type of the intent to "image/*"
d. Use startActivityForResult instead of startActivity
i. so when the user has selected an image, info about the one they selected will
be sent to us in onActivityResult
ii. Use RESULT_IMAGE, an integer constant, for the integer request code
6. Implement onActivityResult in CardMakerActivity
a. Get the Uri of the selected image from the data Intent
b. Save the image's Uri to mSelectedImageUri
c. find your CardView i.e. CardView card = (CardView)
findViewById(R.id.your_id_for_the_cardview_here);
d. set the card's imageUri to the selected image's uri
e. invalidate the card to force it to be redrawn with the new image
<com.example.holidaycards.CardView />

Lab Handout 2 Jan 8, 2013
7. Solutions:
a. onClick
b. onActivityResult
@Override
public void onClick(View v) {
/* Create a new Intent */
Intent intent = new Intent();
/* Set the Action of the Intent to Intent.ACTION_GET_CONTENT */
intent.setAction(Intent.ACTION_GET_CONTENT);
/* Set the type of the intent to "image/*" */
intent.setType("image/*");
/*
* use startActivityForResult instead of startActivity so when the
* user has selected an image, info about the one they selected will
* be sent to us in onActivityResult (below); Use RESULT_IMAGE for
* the integer request code
*/
/*
* To let the user conveniently select how to view their pictures,
* try using the Intent.createChooser method
*/
startActivityForResult(
Intent.createChooser(intent, "Select Picture"),
RESULT_IMAGE);
}
@Override
protected void onActivityResult(int requestCode, int resultCode, Intent data) {
super.onActivityResult(requestCode, resultCode, data);
if (requestCode == RESULT_IMAGE && resultCode == RESULT_OK
&& null != data) {
/* Get the Uri of the selected image from the data Intent */
Uri selectedImageUri = data.getData();
/* Save the image's Uri to mSelectedImageUri */
mSelectedImageUri = selectedImageUri;
/*
* find your CardView i.e. CardView card = (CardView)
* findViewById(R.id.imageview_pic);
*/
CardView card = (CardView) findViewById(R.id.imageview_pic);
/* set the card's imageUri to the selected image's uri */
card.setImageURI(mSelectedImageUri);
/* invalidate the card to force it to be redrawn with the new image */
card.invalidate();
}
}

Lab Handout 2 Jan 8, 2013
c. CardView in the xml
<com.example.holidaycards.CardView
xmlns:android="http://schemas.android.com/apk/res/android"
android:id="@+id/imageview_pic"
android:layout_width="match_parent"
android:layout_height="wrap_content"
android:layout_margin="5dp"
android:layout_weight="1" />

Lab Handout 2 Jan 8, 2013
SECTION 3: AsyncTask
1. Our goal here is to learn about how AsyncTasks work. One potential use for an AsyncTask
is to download something in the background and periodically update the UI with the
progress updates for the download. We will look at a simple example usage where the
background work is just making the system sleep for a little while instead and periodically
update the progress bar so that the UI remains responsive.
2. Create a new Activity called AsyncActivity. The simplest way to do this is to use the New
Android Activity Wizard which I will illustrate below
a. Right click on your
project folder,
HolidayCards. Go to
New→Other…
b. In the popup window, open the
Android folder and select “Android
Activity”

Lab Handout 2 Jan 8, 2013
c. In the Android Activity Wizard,
change the Activity Name to the
name of the Activity you want to
create, in this case
“AsyncActivity”. The wizard will
automatically update the layout
name.
d. Click “Finish”. The wizard will create the Activity in the src folder and will create the
Activity’s xml layout file in the layout folder. The Activity’s onCreate method will be
populated with a call to super.onCreate and setContentView(R.layout.your_activity-
_layout_here). Additionally, the wizard will declare your new Activity in the
AndroidManifest for you.
3. Go to your xml layout file. Copy and paste the code below to get started:
<?xml version="1.0" encoding="utf-8"?>
<LinearLayout
xmlns:android="http://schemas.android.com/apk/res/android"
android:layout_width="match_parent"
android:layout_height="match_parent"
android:orientation="vertical" >
<Button
android:id="@+id/button_show"
android:layout_width="match_parent"
android:layout_height="wrap_content"
android:layout_margin="10dp"
android:text="Show Progress" >
</Button>
<!-- Add a ProgressBar here -->
<Button
android:id="@+id/button_cancel"
android:layout_width="match_parent"
android:layout_height="wrap_content"
android:layout_margin="10dp"
android:text="Cancel" >
</Button>
<Button
android:id="@+id/button_async_toast"
android:layout_width="match_parent"
android:layout_height="wrap_content"
android:layout_margin="10dp"
android:text="Toast" />
</LinearLayout>

Lab Handout 2 Jan 8, 2013
public class ProgressTask extends AsyncTask<Integer, Integer, Void> {
/* The first method called in the AsyncTask, called on the UI thread */
@Override
protected void onPreExecute() {
// TODO: initialize the progress bar: set maximum progress to 100.
}
/*
* the method that executes the time consuming tasks and publish the
* task progress, executed in background thread.
*/
@Override
protected Void doInBackground(Integer... params) {
// get the value to increment by each time
int incr = params[0];
// increment the progress by incr while we have not reached the
// maximum progress
for (int i = 0; i <= 100; i += incr) {
try {
// TODO: check if the AsyncTask was cancelled
// TODO: if async task was not cancelled, update the
// progress by the appropriate increment and tell the
// SystemClock to sleep for 1000 ms
} catch (Exception e) {
Log.e("Error", e.toString());
}
}
// we specified our return type as Void so return null here
return null;
}
/*
* method that updates the progress of the AsyncTask, run on the UI
* thread; this method is triggered by calls to publishProgress
*/
@Override
protected void onProgressUpdate(Integer... values) {
// note: the values parameter is an array of Integers
// TODO: increment progress bar by progress value which will be the
// first
// value in the values array
}
/*
* the final method that gets called after doInBackground finishes, here
* we can update the UI with the results of the AsyncTask
*/
@Override
protected void onPostExecute(Void result) {
// the async task is now finished
// TODO: send a Toast notifying the user that the task has finished
}
/*
* gets called if the AsyncTask.cancel() methods is called, terminating
* the execution of the AsyncTask
*/
@Override
protected void onCancelled() {
// TODO: stop the progress by setting the max progress to 0
}
}
Lab Handout 2 Jan 8, 2013
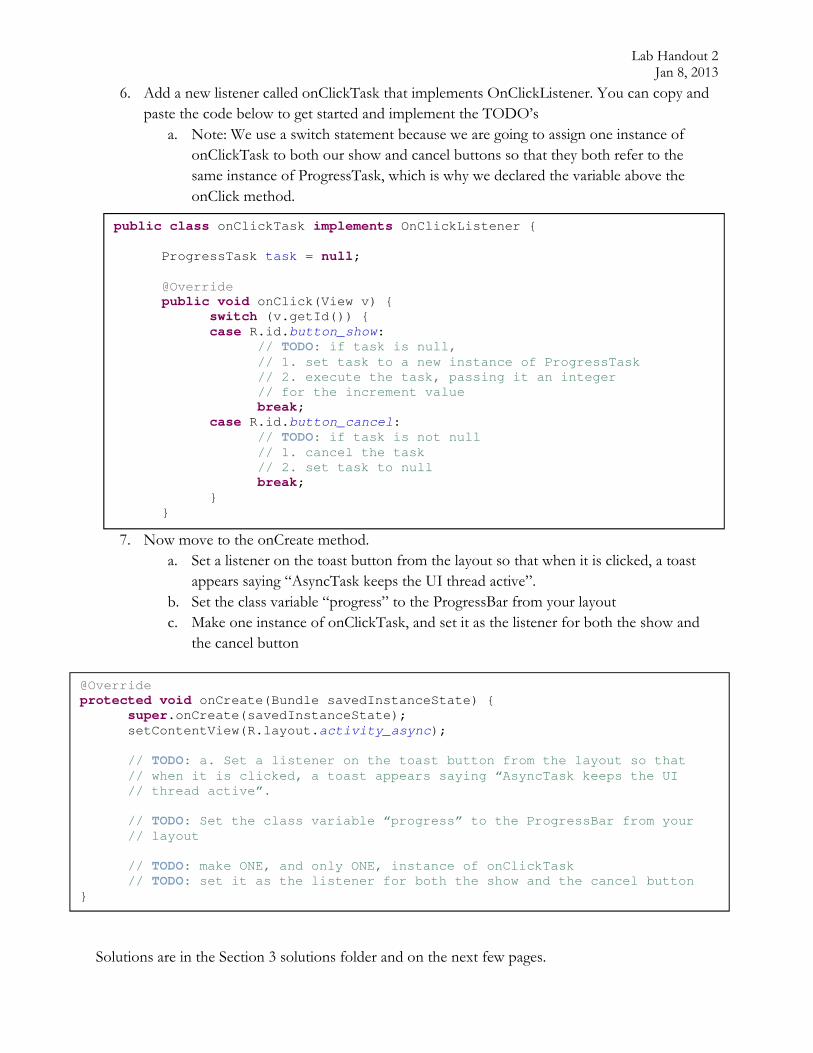
6. Add a new listener called onClickTask that implements OnClickListener. You can copy and
paste the code below to get started and implement the TODO’s
a. Note: We use a switch statement because we are going to assign one instance of
onClickTask to both our show and cancel buttons so that they both refer to the
same instance of ProgressTask, which is why we declared the variable above the
onClick method.
7. Now move to the onCreate method.
a. Set a listener on the toast button from the layout so that when it is clicked, a toast
appears saying “AsyncTask keeps the UI thread active”.
b. Set the class variable “progress” to the ProgressBar from your layout
c. Make one instance of onClickTask, and set it as the listener for both the show and
the cancel button
Solutions are in the Section 3 solutions folder and on the next few pages.
public class onClickTask implements OnClickListener {
ProgressTask task = null;
@Override
public void onClick(View v) {
switch (v.getId()) {
case R.id.button_show:
// TODO: if task is null,
// 1. set task to a new instance of ProgressTask
// 2. execute the task, passing it an integer
// for the increment value
break;
case R.id.button_cancel:
// TODO: if task is not null
// 1. cancel the task
// 2. set task to null
break;
}
}
@Override
protected void onCreate(Bundle savedInstanceState) {
super.onCreate(savedInstanceState);
setContentView(R.layout.activity_async);
// TODO: a. Set a listener on the toast button from the layout so that
// when it is clicked, a toast appears saying “AsyncTask keeps the UI
// thread active”.
// TODO: Set the class variable “progress” to the ProgressBar from your
// layout
// TODO: make ONE, and only ONE, instance of onClickTask
// TODO: set it as the listener for both the show and the cancel button
}

public class AsyncActivity extends Activity {
private static ProgressBar progress;
private Context context = this;
public class ProgressTask extends AsyncTask<Integer, Integer, Void> {
/* The first method called in the AsyncTask, called on the UI thread */
@Override
protected void onPreExecute() {
// TODO: initialize the progress bar: set maximum progress to 100.
progress.setMax(100);
}
/*
* the method that executes the time consuming tasks and publish the
* task progress, executed in background thread.
*/
@Override
protected Void doInBackground(Integer... params) {
// get the value to increment by each time
int incr = params[0];
// increment the progress by incr while we have not reached the
// maximum progress
for (int i = 0; i <= 100; i += incr) {
try {
// TODO: check if the AsyncTask was cancelled
boolean cancelled = isCancelled();
// TODO: if async task was not cancelled, update the
// progress by the appropriate increment and tell the
// SystemClock to sleep for 1000 ms
if (!cancelled) {
publishProgress(i);
SystemClock.sleep(1000);
}
} catch (Exception e) {
Log.e("Error", e.toString());
}
}
// we specified our return type as Void so return null here
return null;
}
/*
* method that updates the progress of the AsyncTask, run on the UI
* thread; this method is triggered by calls to publishProgress
*/
@Override
protected void onProgressUpdate(Integer... values) {
// note: the values parameter is an array of Integers
// TODO: increment progress bar by progress value which will be the
// first value in the values array
progress.setProgress(values[0]);
}
/*
* the final method that gets called after doInBackground finishes, here
* we can update the UI with the results of the AsyncTask
*/
@Override
protected void onPostExecute(Void result) {
// the async task is now finished
// TODO: send a Toast notifying the user that the task has finished
// note: in order to get a context here, we made a class variable in
// the outer class called context initliazed to "this"
Toast.makeText(context, "Task finished", Toast.LENGTH_SHORT).show();
}
/*
* gets called if the AsyncTask.cancel() methods is called, terminating
* the execution of the AsyncTask
*/
@Override
protected void onCancelled() {
// TODO: stop the progress by setting the max progress to 0
progress.setMax(0);
}
}
public class onClickTask implements OnClickListener {
ProgressTask task = null;
@Override
public void onClick(View v) {
switch (v.getId()) {
case R.id.button_show:
// TODO: if task is null,
// 1. set task to a new instance of ProgressTask
// 2. execute the task, passing it an integer
// for the increment value
if (task == null) {
task = new ProgressTask();
task.execute(10);
}

break;
case R.id.button_cancel:
// TODO: if task is not null
// 1. cancel the task
// 2. set task to null
if (task != null) {
task.cancel(true);
task = null;
}
break;
}
}
}
@Override
protected void onCreate(Bundle savedInstanceState) {
super.onCreate(savedInstanceState);
setContentView(R.layout.activity_async);
// TODO: a. Set a listener on the toast button from the layout so that
// when it is clicked, a toast appears saying “AsyncTask keeps the UI
// thread active”.
Button toast = (Button) findViewById(R.id.button_async_toast);
toast.setOnClickListener(new OnClickListener() {
@Override
public void onClick(View v) {
Toast.makeText(v.getContext(), "UI thread is still active",
Toast.LENGTH_SHORT).show();
}
});
// TODO: Set the class variable “progress” to the ProgressBar from your
// layout
progress = (ProgressBar) findViewById(R.id.progress);
// TODO: make ONE, and only ONE, instance of onClickTask
onClickTask onclick = new onClickTask();
// TODO: set it as the listener for both the show and the cancel button
Button show = (Button) findViewById(R.id.button_show);
show.setOnClickListener(onclick);
Button cancel = (Button) findViewById(R.id.button_cancel);
cancel.setOnClickListener(onclick);
}
}
<?xml version="1.0" encoding="utf-8"?>
<LinearLayout xmlns:android="http://schemas.android.com/apk/res/android"
android:layout_width="match_parent"
android:layout_height="match_parent"
android:orientation="vertical" >
<Button
android:id="@+id/button_show"
android:layout_width="match_parent"
android:layout_height="wrap_content"
android:layout_margin="10dp"
android:text="Show Progress" >
</Button>
<!-- Add a ProgressBar here -->
<ProgressBar
android:id="@+id/progress"
style="?android:attr/progressBarStyleHorizontal"
android:layout_width="match_parent"
android:layout_height="wrap_content"
android:layout_margin="10dp" >
</ProgressBar>
<Button
android:id="@+id/button_cancel"
android:layout_width="match_parent"
android:layout_height="wrap_content"
android:layout_margin="10dp"
android:text="Cancel" >
</Button>
<Button
android:id="@+id/button_async_toast"
android:layout_width="match_parent"
android:layout_height="wrap_content"
android:layout_margin="10dp"
android:text="Toast" />
</LinearLayout>


