121
Notices LAGAN Enterprise – Business Configuration Exercise Book

Notices
LAGAN Enterprise – Business Configuration Exercise Book
Page 2 Business Configuration
© KANA Software, Inc. 2013
All contents of this documentation are the property of KANA Software, Inc. ("KANA")
(and if relevant its third-party licensors) and protected by United States and
international copyright laws. All Rights Reserved.
Information contained in this document is subject to change without notice and does not
represent a commitment on the part of KANA. No part of this document may be
reproduced or transmitted in any form or by any means, electronic or mechanical,
including photocopying and recording, for any purpose other than the purchaser's
personal use without the written permission of KANA.
Unless specifically noted, all addresses, data, characters and persons referenced herein,
and all examples involving names of companies and products are fictitious examples
designed solely to illustrate the use of KANA and it components.
If you find errors or problems with this documentation, please notify KANA's Education
Services [email protected]. KANA does not guarantee that this document is error
free.
KANA Software, Inc.
840 W California Avenue, Suite 100
Sunnyvale, CA 94086

Business Configuration Page 3
Contents
Contents ................................................................................................. 3
Conventions............................................................................................ 6
Exercise Book Legend ............................................................................. 6
Reader Feedback .................................................................................... 7
Errata ..................................................................................................... 7
Introduction ........................................................................................... 8
Courseware Components ........................................................................ 8
Introducing LAGAN Enterprise ................................................................ 9
LAGAN Applications ............................................................................................ 9
Introducing the LAGAN Configuration Studio ....................................................... 10
Interface Components ...................................................................................... 10
Your LAGAN Installation ....................................................................... 11
Users and Groups ................................................................................. 12
Objectives ....................................................................................................... 12
Users and Groups ............................................................................................ 12
Exercises 1 – 4: Creating Groups and Users ........................................................ 14
Exercise 1: Creating a Front Office Group ........................................................... 14
Exercise 2: Creating a Back Office Group ............................................................ 19
Exercise 3: Creating a Business Administrator Group ............................................ 21
Exercise 4: Creating a Supervisor Group ............................................................. 23
Work Queues ........................................................................................ 25
Objectives ....................................................................................................... 25
What is a work queue? ..................................................................................... 25
Exercises 5 - 6: Creating Work Queues ............................................................... 26
Exercise 5: Creating a Case Work Queue ............................................................ 26
Exercise 6: Creating a Case Work Queue ............................................................ 33
Case Receiver Group ............................................................................. 36
Objectives ....................................................................................................... 36
What is the Case Receiver Group? ...................................................................... 36
Exercise 7: Creating a Case Receiver Group ........................................................ 37

Page 4 Business Configuration
Inquiry Classifications ......................................................................... 39
Objectives ....................................................................................................... 39
Classifications .................................................................................................. 39
Exercise 8: Creating Classifications .................................................................... 40
Configuring Case Attributes ................................................................. 44
Objectives ....................................................................................................... 44
Defining Case Attributes ................................................................................... 44
Exercise 9: Creating a Process Definition ............................................................ 46
Tasks and Task Lists ............................................................................ 55
Objectives ....................................................................................................... 55
What’s a Task? ................................................................................................ 55
Exercise 10: Creating Tasks .............................................................................. 57
Escalation Rules ................................................................................... 61
Objectives ....................................................................................................... 61
Why Use Escalation Rules? ................................................................................ 61
Exercises 11 – 13: Creating Escalation Rules ....................................................... 61
Exercise 11: Creating an Escalation Rule (Task) ................................................... 62
Exercise 12: Creating an Escalation Rule (Task) ................................................... 66
Exercise 13: Creating an Escalation Rule (Queue) ................................................ 67
Review ................................................................................................. 69
Objectives ....................................................................................................... 69
Exercises 14 - 21: Additional Practice ................................................................. 70
Exercise 14: Dead Animals Process Definition ...................................................... 71
Exercise 15: Abandoned Vehicle Process Definition............................................... 72
Exercise 16: Flooding – Fresh Water Process Definition ......................................... 72
Exercise 17: Faulty Street Light Process Definition ............................................... 74
Exercise 18: Pothole Process Definition ............................................................... 75
Exercise 19: Taxi Driver/Vehicle License Process Definition ................................... 76
Exercise 20: Blue Badge Process Definition ......................................................... 77
Exercise 21: Residents Parking Permit Process Definition ...................................... 78
Client Notifications ............................................................................... 79
Objectives ....................................................................................................... 79
What is a Client Notification? ............................................................................. 79
Exercise 22: Configuring a Client Notification ...................................................... 80
Letter and Email Templates .................................................................. 82
Objectives ....................................................................................................... 82
Correspondence Templates ............................................................................... 82
Exercise 23: Creating Letter Templates .............................................................. 82
Business Configuration Page 5
Demonstration: Importing Email Contacts ........................................................... 92
Case Study............................................................................................ 96
Background ..................................................................................................... 96
Requirements .................................................................................................. 97
Appendix ............................................................................................ 103
Appendix A: If you have More Time… ............................................................... 103
Exercise 24: Additional Practice ....................................................................... 103
Appendix B: LAGAN Group Permissions ............................................................. 111

Page 6 Business Configuration
Conventions
In this exercise manual you will find a number of styles of text that distinguish between
different kinds of information. Here are some examples of these styles, and an
explanation of their meaning.
Words that you see on the screen, in menus or dialog boxes for example, appear
in our text like this:
“Click the Next button to move to next page”.
Text that appears in italics like in the example below is text that should be
entered into a dialog box or at the screen prompt:
“Enter xx_Missed Bin as the process definition name”
Exercise Book Legend
Standard icons are used throughout this exercise book to illustrate various phases of
each exercise.
Exercise / Practice
Hint
Information
Question
Stop
Warning

Business Configuration Page 7
Reader Feedback
Feedback on the course exercise book and/or PowerPoint presentation is always
welcome. Let us know what you think about this manual, what you liked or may have
disliked. Reader feedback is important for us to develop materials that you really get the
most out of.
Feedback can be given in the course evaluation form provided at the end of the session
or you can send us general feedback by simply dropping an email to [email protected]
making sure you mention the title of the manual in the message.
Errata
Although we have taken every care to ensure the accuracy of our contents, mistakes do
happen. If you find a mistake in one of our books – maybe a mistake in text or code –
we would be grateful if you would report this to us. By doing this you can save other
readers from frustration, and help to improve subsequent versions of this manual. If you
find any errata, report them by sending an email to [email protected] making sure
you mention the title of the manual in the message and the page on which the mistake
is found.

Page 8 Business Configuration
Introduction
The Business Configuration course is designed to provide delegates with the skills and
knowledge to configure LAGAN according to their organization’s requirements.
No previous experience of the application is required, but delegates should be confident
using a PC.
Courseware Components
Each of our courseware components is carefully designed to ensure the most effective
learning experience both in the classroom and on the job. The courseware consists of:
Exercise Book
The Exercise Book has been designed as both an in-class and after class reference
tool. It provides delegates with example scenarios to construct during the class as
well as detailed instructions on how to complete these that can be referenced after
the class.
Presentations
The PowerPoint Presentations used by the instructor during the course are available
in read only format; these materials contain diagrams and information and therefore
act as a reference tool for after the class.
Other Resources
This consists of files for use during the class as well as exercise solutions and screen
cams.

Business Configuration Page 9
Introducing LAGAN Enterprise
LAGAN provides a consistent set of professional tools to multiple case management
communities within a complex enterprise, freely supporting multiple definitions of
“case.” It enables:
A single, up-to-date, detailed view of the customer
Co-ordination between the Contact Center (Front Office) and other departments in
the organization (Back Office)
Improved customer service
Management of end-to-end processes to serve customers
Promotion of a customer-oriented philosophy
LAGAN Applications
LAGAN consists of three core applications (see Figure 1):
LAGAN Configuration Studio
LAGAN Desktop Light
LAGAN Agent Desktop
Figure 1 Who Uses What?
Page 10 Business Configuration
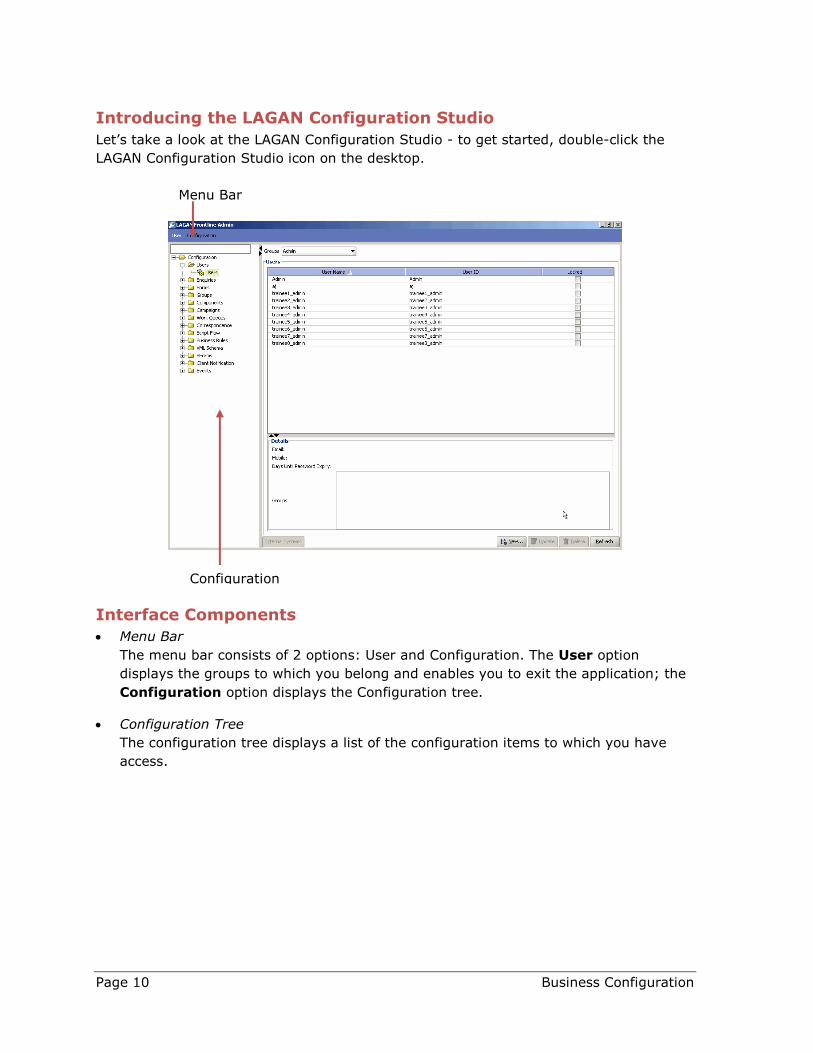
Introducing the LAGAN Configuration Studio
Let’s take a look at the LAGAN Configuration Studio - to get started, double-click the
LAGAN Configuration Studio icon on the desktop.
Interface Components
Menu Bar
The menu bar consists of 2 options: User and Configuration. The User option
displays the groups to which you belong and enables you to exit the application; the
Configuration option displays the Configuration tree.
Configuration Tree
The configuration tree displays a list of the configuration items to which you have
access.
Configuration
Menu Bar

Business Configuration Page 11
Your LAGAN Installation
Complete the table below, with the help of the instructor, with the details of the LAGAN
system you’ll be using during this training session; you’ll need to refer to this
information during the practice scenarios.
LAGAN Configuration Studio URL ______________________________
Username for the LAGAN Configuration
Studio
______________________________
Password for the LAGAN Configuration Studio ______________________________
LAGAN Agent Desktop URL ______________________________
Username for the LAGAN Agent Desktop ______________________________
Password for the LAGAN Agent Desktop ______________________________

Page 12 Business Configuration
Users and Groups
Objectives
After completing this chapter, you will be able to:
Explain the purpose of groups and users
Identify the various components and features within LAGAN
Use the LAGAN Configuration Studio to configuration new groups and users
Assign users to a group
Users and Groups
Individuals who require access to LAGAN Configuration Studio, the LAGAN Agent
Desktop and/or the LAGAN Desktop Light applications must have a user account that
contains, at the minimum, the following properties (as illustrated in Figure 2):
User name
A friendly name for the account
User ID
This must be unique; the user will need this to log onto the application
Password
The password must have at least four characters but not more than twenty
Group(s)
The group provides them with the functions / activities they will be able to perform
when logged onto LAGAN
Roles
Although optional, the roles determine the data that is available to the user. All front
office, back office and supervisor roles should have the allaccess and CSR roles
assigned by default. If data is missing in the Agent Desktop, ensure the user account
has these roles assigned.

Business Configuration Page 13
Figure 2 Groups & Users
Each user account can also have an email and/or SMS address assigned to it; this will
enable the individual to receive escalation notifications via these channels, for example
when a case or task exceeds its SLA.

Page 14 Business Configuration
Exercises 1 – 4: Creating Groups and Users
The following scenarios provide practice in configuring groups and creating new user
accounts. Specifically you’ll configure a group for:
Front Office Staff i.e. Contact Center Agents
Back Office staff
Business administrators
Supervisors
In Appendix B of this manual you’ll find a list of permissions; you’ll need this list
to complete scenarios 2, 3 and 4.
Exercise 1: Creating a Front Office Group
In this exercise you’ll create a LAGAN group that will provide front office workers (i.e.
Contact Center agents) with the functionality they need to handle customer interactions
and inquiries. You will then create a user and assign them to this group.
Part A: Creating a new group
Perform the following steps
1
Log on to the LAGAN Configuration Studio using the username and
password provided by the instructor.
You made a note of the username and password at the start of this
exercise book.
2 In the configuration tree, click Groups and Security | Groups.
3 Click the New button; the New Group dialog is displayed.
4
Enter xx_Front Office Group in the name text box, where xx should be
replaced with your trainee number, i.e. if you logged on as
trainee01_admin then replace xx with 01.

Business Configuration Page 15
Perform the following steps
5 From the Work Type drop-down box, select No Work (see Figure 3)
Figure 3 Group Configuration
The group is set as No Work as it will just contain the functions (or components)
a front office worker (i.e. a contact center agent) will require to perform their job
role.
Perform the following steps
6 Enter Front Office Group (training) in the Description text area.
7 Click the Permissions tab to select the actions / privileges that users
belonging to this group will have.
8 Enable the permissions as defined in Figure 4 for your group.
9 Click the OK button to create the group.
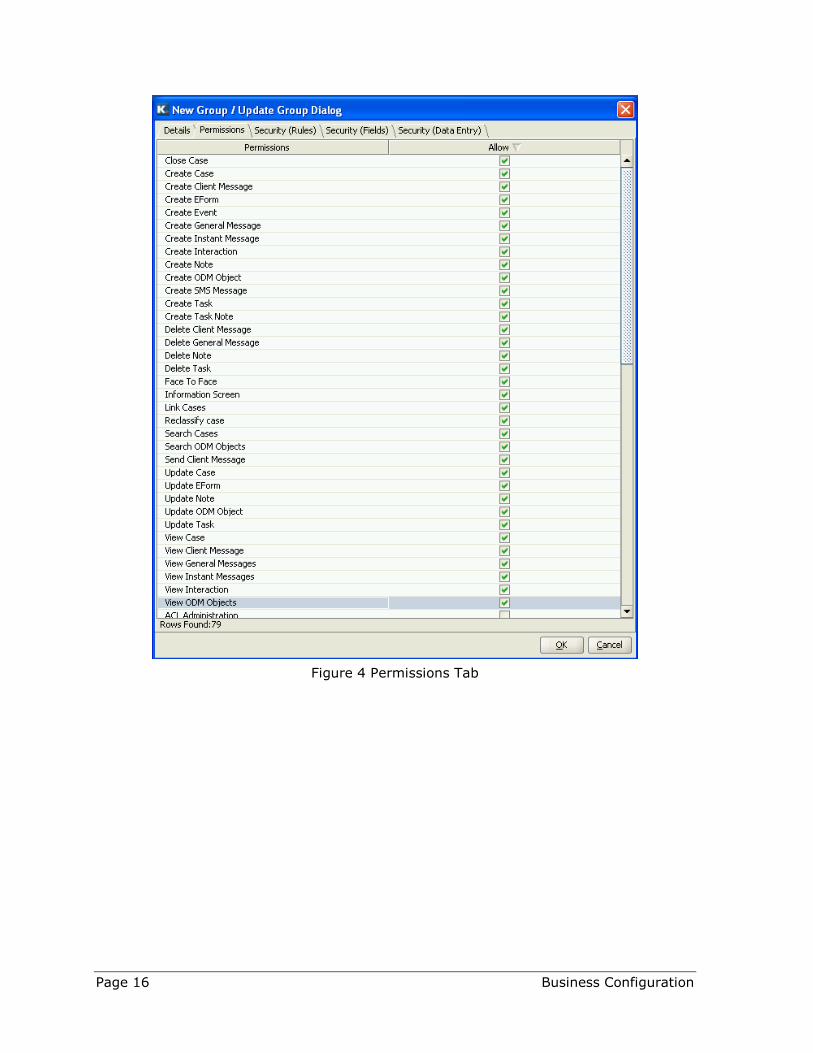
Page 16 Business Configuration
Figure 4 Permissions Tab

Business Configuration Page 17
Part B: Creating a new user
Perform the following steps
1 In the configuration tree, click Users | Users.
2 Click the New button. The New User(s) / Update User dialog is
displayed.
3
Enter xx_FrontofficeUser (where xx should be replaced with your trainee
number, i.e. if you logged on as trainee01_admin then replace xx with 01)
as the username for the account.
4
Enter xx_FrontofficeUser (where xx should be replaced with your trainee
number) as the user ID; this is the name they will use to log onto the
LAGAN Agent Desktop.
5
Enter 1111 as the password.
A password must have a minimum of 4 characters and a
maximum of 20. When this user first logs on to a LAGAN
application, they will be prompted to change their password.
6
Enter an email address and mobile number for the user.
These are optional fields. This information is used to send a
message to the user to inform them that a case or task is about to
or has exceeded its SLA.
More user accounts may be added by pressing the Add button.
Page 18 Business Configuration
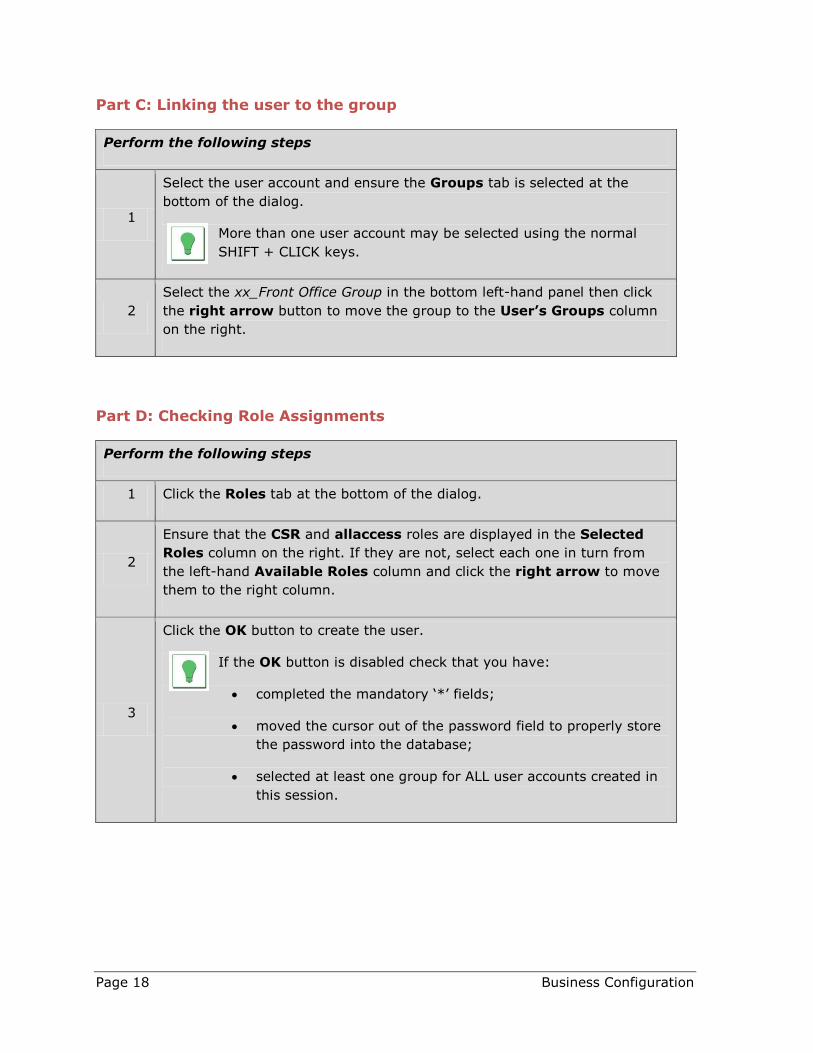
Part C: Linking the user to the group
Perform the following steps
1
Select the user account and ensure the Groups tab is selected at the
bottom of the dialog.
More than one user account may be selected using the normal
SHIFT + CLICK keys.
2
Select the xx_Front Office Group in the bottom left-hand panel then click
the right arrow button to move the group to the User’s Groups column
on the right.
Part D: Checking Role Assignments
Perform the following steps
1 Click the Roles tab at the bottom of the dialog.
2
Ensure that the CSR and allaccess roles are displayed in the Selected
Roles column on the right. If they are not, select each one in turn from
the left-hand Available Roles column and click the right arrow to move
them to the right column.
3
Click the OK button to create the user.
If the OK button is disabled check that you have:
completed the mandatory ‘*’ fields;
moved the cursor out of the password field to properly store
the password into the database;
selected at least one group for ALL user accounts created in
this session.

Business Configuration Page 19
Exercise 2: Creating a Back Office Group
In this exercise you’ll need a group that contains the permissions i.e. functionality a
back office worker will require to process cases (i.e. service requests). You will also
create a user and assign them to this group.
You should name the group xx_ Back Office Group and the user
xx_BackOfficeUser (where xx should be replaced by your trainee number).
Ensure the group work type is set as No Work.
Only brief steps are provided to help you complete this exercise; should you require
assistance refer back to the previous exercise or ask the instructor.
Part A: Creating a New Group
Perform the following steps
1 Create a new group; name this group xx_BackOfficeGroup (where xx
should be replaced by your trainee number).
2 Ensure the group Work Type is set as No Work.
3
Configure the group to enable any workers assigned to it to perform the
following functions – see Figure 5 below.
The Permissions List in Appendix B of this exercise book
provides a description of each item.

Page 20 Business Configuration
Figure 5 Permissions for a Back Office Group
Part B: Creating a New User
Perform the following steps
1
Create a worker named xx_BackOfficeUser, where xx should be replaced
by your trainee number, and assign them to this group, ensuring that they
have same role assignments as for the front office user.
2
Log on to the LAGAN Agent Desktop as xx_BackOfficeUser; view the menu
and toolbar options that are available - can the user perform all the
functions listed above?

Business Configuration Page 21
Exercise 3: Creating a Business Administrator Group
In this exercise you’ll create a group that contains the permissions (i.e. functionality) a
business administrator of the LAGAN system might require. You will also create a user
and assign them to this group.
You should name the group xx_ Admin and the user xx_BusAdmin (where xx
should be replaced by your trainee number). Ensure the group work type is set
as No Work.
Only brief steps are provided to help you complete this exercise; should you require
assistance refer back to the previous exercise or ask the instructor.
Part A: Creating a New Group
Perform the following steps
1 Create a new group named XX_Admin, where XX should be replaced by
your trainee number.
2 Ensure the Work Type is set to No Work.
3
Configure the group so that its members can perform the following
functions:
Use the Permissions List in Appendix B of this exercise book to
select the correct components for the group
Set-up new groups
Create new users
Configure process definition (Inquiry Configuration)
Configure classifications (Inquiry Configuration)
Configure tasks and task lists (Inquiry Configuration)
Create new Script Flows
Set up new work queues

Page 22 Business Configuration
Part B: Creating a New User
Perform the following steps
1
Create a user, named xx_BusAdmin (where xx should be replaced by your
trainee number) and assign them to xx_Admin group. Note that admin
users do not need the role assignments that are necessary for front office,
back office and supervisor users.
2 Log on to the LAGAN Configuration Studio as this user. View the options
that are available - can you perform all the functions listed above?

Business Configuration Page 23
Exercise 4: Creating a Supervisor Group
In this exercise you’ll create a group that contains the permissions (i.e. functionality) a
supervisor might require; you will also create a user and assign them to this group.
Name the group xx_ Supervisor Group and the user xx_ Supervisor (where xx
should be replaced by your trainee number). Ensure the group work type is set
as No Work.
Only brief steps are provided to help you complete this exercise; should you require
assistance refer back to the previous exercise or ask the instructor.
Part A: Creating a New Group
Perform the following steps
1 Create a new group called XX_Supervisor Group, where XX should be
replaced by your trainee number.
2 Ensure the Work Type is set to No Work.
3
Configure the group so that its members can perform the following
functions:
View, reopen and delete cases
Create, view and delete client messages
Create, view and delete general messages
Create and view instant messages
Monitor the performance of users (Real Time Monitor)
Page 24 Business Configuration
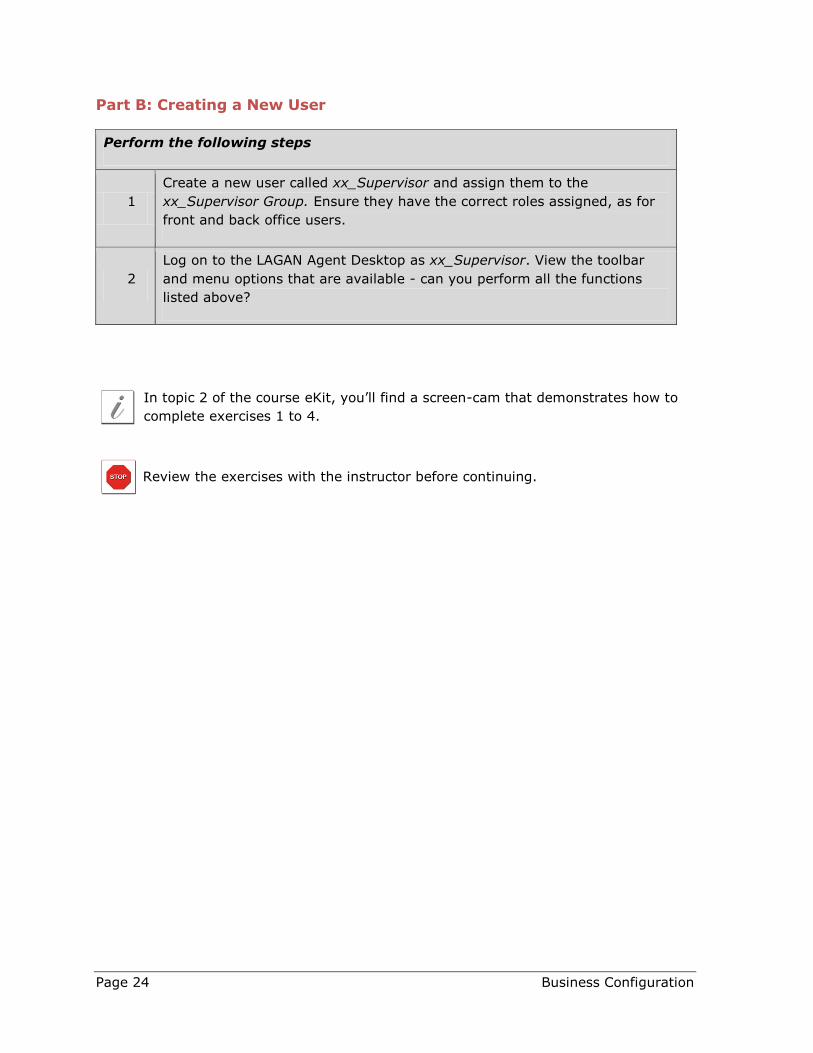
Part B: Creating a New User
Perform the following steps
1
Create a new user called xx_Supervisor and assign them to the
xx_Supervisor Group. Ensure they have the correct roles assigned, as for
front and back office users.
2
Log on to the LAGAN Agent Desktop as xx_Supervisor. View the toolbar
and menu options that are available - can you perform all the functions
listed above?
In topic 2 of the course eKit, you’ll find a screen-cam that demonstrates how to
complete exercises 1 to 4.
Review the exercises with the instructor before continuing.

Business Configuration Page 25
Work Queues
Objectives
After completing this section, you will be able to:
Describe the purpose of work queues
Create a new work queue
Assign a group to a work queue
What is a work queue?
A work queue is essentially a ‘container’ or ‘bucket’ that holds work items until a user is
available to process them. It is likely that you will have multiple work queues within your
system, for example you may have a transportation case work queue to hold any cases
relating to transportation i.e. potholes and a public works case work queue to hold any
cases relating to public works, such as snow removal and new traffic sign requests.
Typically a back office worker will need access to at least one case work queue; this is
done by making the worker a member of a group that is linked to the work queue. This
configuration is illustrated in Figure 6.
Figure 6 User, Group & Queue Configuration

Page 26 Business Configuration
Exercises 5 - 6: Creating Work Queues
The following exercises provide practice in creating a case work queue, associating a
group with the work queue, and then assigning an individual to the group.
Exercise 5: Creating a Case Work Queue
This exercise illustrates how to create a case work queue to hold cases for the Transport
and Streets department. You’ll also configure a user to handle cases in pull mode from
this queue.
Part A: Creating a group to link to the work queue
Perform the following steps
1 Log on to the LAGAN Configuration Studio, if you have not already done
so.
2 In the configuration tree, click Groups and Security | Groups.
3 Create a new group; enter xx_Transport and Streets in the Name text box
(where xx should be replaced by your trainee number).
4
From the Work Type drop-down box, select No Work; later we’ll change
this setting to specify Case and then associate it with the appropriate work
queue (see Figure 7).

Business Configuration Page 27
Figure 7 Group Details
This group will ultimately be associated with a work queue; however as the work
queue has not yet been configured the work type should be set to ‘No Work’ and
then later amended.
Perform the following steps
5 Enter Back office group for Transport and Streets in the Description text
area.
6 Click the OK button.
7
Restart the LAGAN Configuration Studio. This is required to ensure that the
group you created is available for the queue you will create in the next
section.
Part B: Creating the case work queue
Perform the following steps
1 From the configuration tree, click Work Queues | Case.
2 Click the New button.
3 Enter xx_Transport and Streets in the Name text box, where xx should be
replaced by your trainee number.

Page 28 Business Configuration
Perform the following steps
It’s possible to configure notifications to inform back office workers
when case(s) are added to this queue; to do this:
4 In the Notification tab, select email from the Method drop-down box.
5
Select instantly from the Trigger drop-down box; this indicates that each
time a new case is added to the queue an email will be automatically sent
to notify users that work is available.
6
Enter Case Available in the Subject text box.
This text box is only available if email is selected as the
notification method.
7
Enter Cases are available on the queue <queuename> in the Message
text area.
<queuename> is dynamic text and will be replaced with the actual
queue name when the message is sent; to insert this dynamic
data, click the Insert button, expand the Queue folder then
double-click the queuename item.
8 Click the Recipients tab then select the option Send to groups. This will
bring up a list of all groups on the system.
9
Double-click the xx_Transport and Streets group in the Users/Groups
column to move it to the right-hand column. Any users that belong to this
group will receive the work notifications (see Figure 8).

Business Configuration Page 29
Figure 8 Configuring Notifications
Selecting the group to receive case notifications, as opposed to individual users,
ensures that any users added to the group at a later stage will automatically
receive these notifications without making any configuration changes.
You can also send the notification to individual users by clicking on the Send to
users option. By default there will be no users displayed; you will need to search
for a user and click on the Search User button (see Figure 9).
Figure 9 Configuring Notifications
Page 30 Business Configuration
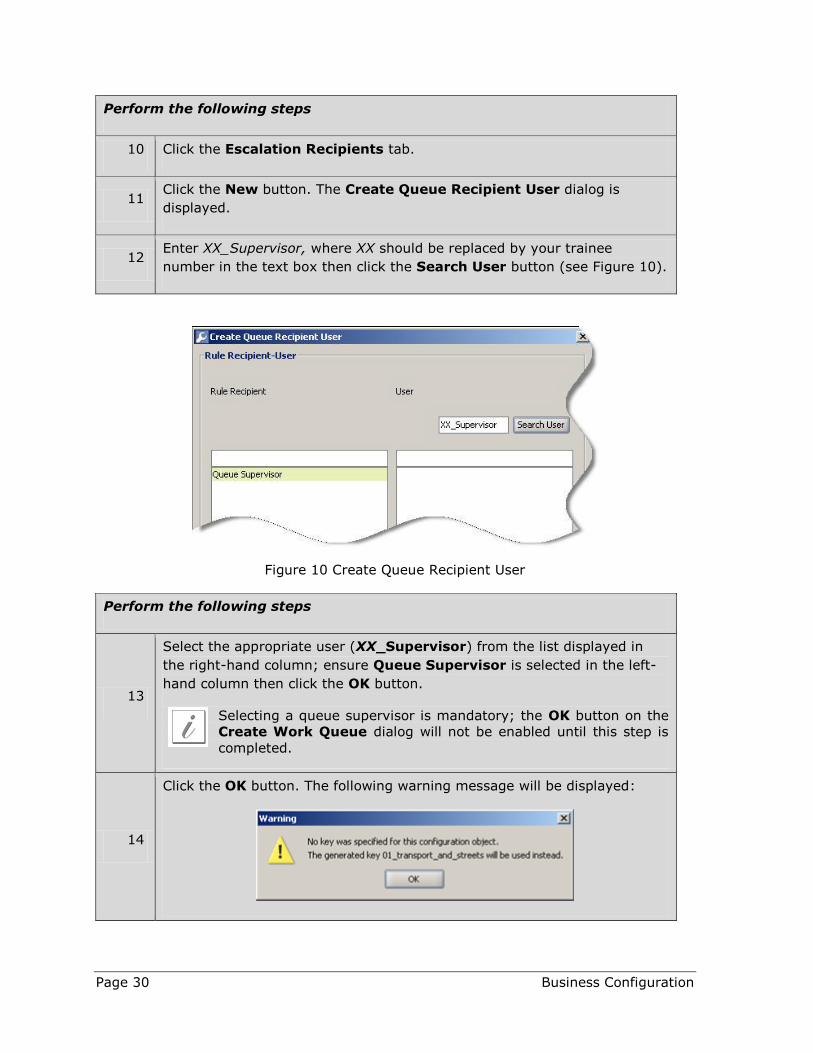
Perform the following steps
10 Click the Escalation Recipients tab.
11 Click the New button. The Create Queue Recipient User dialog is
displayed.
12 Enter XX_Supervisor, where XX should be replaced by your trainee
number in the text box then click the Search User button (see Figure 10).
Figure 10 Create Queue Recipient User
Perform the following steps
13
Select the appropriate user (XX_Supervisor) from the list displayed in
the right-hand column; ensure Queue Supervisor is selected in the left-
hand column then click the OK button.
Selecting a queue supervisor is mandatory; the OK button on the
Create Work Queue dialog will not be enabled until this step is
completed.
14
Click the OK button. The following warning message will be displayed:

Business Configuration Page 31
Perform the following steps
15
Click OK to acknowledge the warning.
The purpose of the key is to generate a unique and database
independent ID for areas such as Classifications, Groups and
Queues. These are much more portable than database ID's
because they are not derived from an automatic database
sequence and therefore do not change between different instances
of LAGAN, e.g. TEST and LIVE.
16 Click OK to create the Work Queue.
Part C: Associating the Group with the Work Queue
Next we’ll associate the xx_Transport and Streets group to the xx_Transport and Streets
work queue. This will enable members of the xx_Transport and Streets group to receive
and process any cases added to the xx_Transport and Streets work queue.
Perform the following steps
1 Click Groups and Security | Groups in the Configuration tree.
2 Open the xx_Transport and Streets group (where xx should be replaced
with your trainee number).
3 Select Case from the work type drop-down box and then select
xx_Transport and Streets from the Work Queue drop-down box.
4
Set the mode to Pull Mode as in Figure 11.
Any users that then belong to this group will be able to pull cases
from this work queue i.e. they will be able to select the cases they
wish to work on.
5 Click the OK button.

Page 32 Business Configuration
Figure 11 Pull Mode
Part D: Assigning a user to the group
Next, we’ll create a user and assign them to the xx_BackOffice group (that you created
in a previous exercise) and the xx_Transport and Streets group. Membership of the
former group ensures they have access to the functionality they require within the
LAGAN system; membership of xx_Transport and Streets group ensures they will receive
case items held on the xx_Transport and Streets queue.
Only brief steps on how to complete this part of the exercise are provided; if you
require assistance refer back to exercise 1 or ask the instructor.
Perform the following steps
1
Create a new user, xx_JonJones, where XX should be replaced by your
trainee number, and assign them to the xx_BackOffice group and to the
xx_Transport and Streets group.
In topic 3 of the course eKit, you’ll find a screen-cam that demonstrates how to
complete this exercise.
Review the exercise with the instructor before continuing.
Business Configuration Page 33
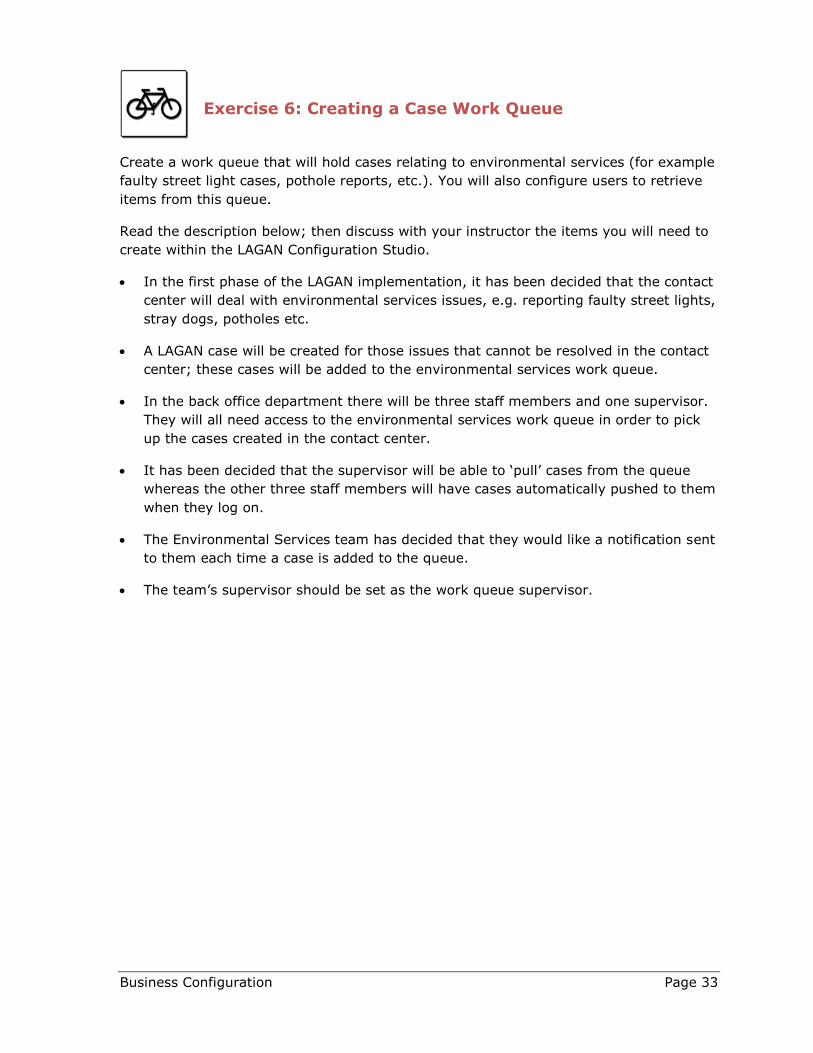
Exercise 6: Creating a Case Work Queue
Create a work queue that will hold cases relating to environmental services (for example
faulty street light cases, pothole reports, etc.). You will also configure users to retrieve
items from this queue.
Read the description below; then discuss with your instructor the items you will need to
create within the LAGAN Configuration Studio.
In the first phase of the LAGAN implementation, it has been decided that the contact
center will deal with environmental services issues, e.g. reporting faulty street lights,
stray dogs, potholes etc.
A LAGAN case will be created for those issues that cannot be resolved in the contact
center; these cases will be added to the environmental services work queue.
In the back office department there will be three staff members and one supervisor.
They will all need access to the environmental services work queue in order to pick
up the cases created in the contact center.
It has been decided that the supervisor will be able to ‘pull’ cases from the queue
whereas the other three staff members will have cases automatically pushed to them
when they log on.
The Environmental Services team has decided that they would like a notification sent
to them each time a case is added to the queue.
The team’s supervisor should be set as the work queue supervisor.
Page 34 Business Configuration
Try and answer the following questions before commencing the configuration
within the application.
How many groups will need to be configured?
_________________________________________________________________
_________________________________________________________________
_________________________________________________________________
______
How many work queues are required?
_________________________________________________________________
_________________________________________________________________
_________________________________________________________________
______
How many users will need to be required?
_________________________________________________________________
_________________________________________________________________
_________________________________________________________________
______

Business Configuration Page 35
In the space below draw a representation of how the LAGAN system should be
configured. You should then create the appropriate items in the system remembering to
prefix each item with your trainee number.
Use the following naming conventions: name the work queue xx_Environmental
Services Queue; the group that links to this queue xx_Environmental Services
Group and the users <Your_Name>n where n represents the user number, for
example Jon_Jones1, Jon_Jones2, etc.
Review the exercise with the instructor before continuing.

Page 36 Business Configuration
Case Receiver Group
Objectives
After completing this section, you will be able to:
Describe the purpose of the case receiver group
Create a new case receiver group
Assign users to the case receiver group
What is the Case Receiver Group?
In the previous chapter we created work queues to hold cases; users could then handle
these cases if they belonged to the group that was linked to the queue. However, it is
also possible to configure the system so that cases are assigned to specific individuals
(as opposed to a generic work queue).
To enable this functionality, a case receiver group must be created and then users
assigned to it. As a result of their membership of this group, these users can have cases
allocated to them directly as illustrated in Figure 12.
Figure 12 Case Receiver Group
By belonging to the case receiver group, these three users have essentially got their
own personal work queue to which cases can be assigned.

Business Configuration Page 37
Exercise 7: Creating a Case Receiver Group
Create a case receiver group and assign the user xx_BackOfficeUser to this group. This
will enable contact center staff to assign cases directly to him/her.
Part A: Creating the Case Receiver Group
Perform the following steps
1 Log on to the LAGAN Configuration Studio, if you have not done so
already.
2 In the configuration tree, click Groups and Security | Groups.
3 Click the New button.
4 Enter xx_Case Receiver in the Name text box, where xx should be
replaced by your trainee number.
5 Select Case from the Work Type drop-down box.
6 Enable the Case Receiver? checkbox as illustrated in Figure 13.
7 Enter Case Receiver Group in the Description text area.
8 Click the OK button.
Figure 13 Case Receiver Group

Page 38 Business Configuration
Part B: Assigning a User to the Case Receiver Group
Perform the following steps
1
Select the group, xx_Case Receiver, then click the Select Users button at
the bottom of the screen. The Select/Deselect Users for a Group dialog
box is displayed.
By default there will be no users displayed in either column; you
will need to search for a specific user.
2
Enter XX, where XX should be replaced your trainee number, in the text
box then click the Search User button (see Figure 14).
The left-hand column will now display the list of users whose
username commences with XX, where XX should be replaced by
your trainee number.
3
Select the user, xx_BackOfficeUser; then click the > button to move the
user to the right-hand column.
Those users listed in the right-hand column are now members of
the XX_Case Receiver Group.
You can also assign users to the XX_Case Receiver group via the
Users screen.
Figure 14 Case Receiver Group
In topic 3 of the course eKit, you’ll find a screen-cam that demonstrates how to
complete this exercise.
Review the exercise with the instructor before continuing.

Business Configuration Page 39
Inquiry Classifications
Objectives
After completing this section, you will be able to:
Explain the purpose of Inquiry classifications
Create new classification structures
Classifications
It’s possible to record the reason why the customer has contacted your organization
thereby enabling you to produce reports that illustrate the volume of queries of a
particular nature handled over a specific period of time.
To gather these statistics it is necessary to classify each interaction (or contact) a
customer makes to a three tier structure; the levels of which are referred to as subject,
reason, type.
The subject may be a city directorate, e.g. ‘Public Works’; the reason subdivides the
subject into smaller areas e.g. ‘Roads, Highways & Pavements’; the type then breaks the
reason into a further set of sub categories, e.g. ‘Dangerous Pavements’, ‘Abandoned
Vehicles’, ‘Potholes’.

Page 40 Business Configuration
Exercise 8: Creating Classifications
In this exercise you’ll add the following classifications to the LAGAN system:
Detailed steps on how to complete this exercise are provided below the table.
Subject Reason Type
xx_Transport and
Streets
Street care and Cleaning Graffiti - Reporting and
Removal
Animals – Dead
Abandoned Vehicles
Flooding – Fresh Water
Flooding – Sewer Water –
Provide Information
Roads, Highways and
Pavements
Lighting – Street Lights
Potholes
Application Forms Taxi Driver/Vehicle License
Blue Badge
Residents Parking Permit
Part A: Adding a Subject, Reason and Type
Perform the following steps
1 Log on to the LAGAN Configuration Studio if you have not already done so.
2 In the configuration tree, click Inquiries | Classification.
3
Click the Edit button.
Only one individual at a time can update the classification tree; if
you attempt to modify the tree when it is being currently edited a
dialog will be displayed with two options – Discard Changes and
Try Later. Be aware that clicking the Discard Changes button will

Business Configuration Page 41
Perform the following steps
lose all the classifications the other individual has entered.
4 Select the All Inquiries folder at the top of the classification tree then and
click the Add button; the New Subject dialog is displayed.
5
Enter xx_Transport and Streets in the Subject text box (where XX should
be replaced by your trainee number) and then click the OK button.
The following information message will be displayed:
6
Click OK to acknowledge the message
The purpose of the key is to generate a unique and database
independent ID for areas such as Classifications, Groups and
Queues. These are much more portable than database ID's
because they are not derived from an automatic database
sequence and therefore do not change between different instances
of LAGAN, e.g. TEST and LIVE.
7
Select the subject, XX_Transport and Streets, then click the Add button.
The Add button adds a new level under the selected node, so for
example selecting a subject and the clicking the Add button
inserts a new reason underneath the selected subject. The New
button adds a new node at the same level that you have selected,
so for example selecting a reason and then clicking the New
button adds an additional reason to the tree.
8 Enter Streetcare and Cleaning in the Reason text box then click the OK
button.
9 Select the reason, Streetcare and Cleaning, and click the Add button.
10
Enter Graffiti – Reporting and Removal in the Type text box; then click the
OK button; a confirmation dialog (see Figure 15) will be displayed, click
the Yes button.
Page 42 Business Configuration
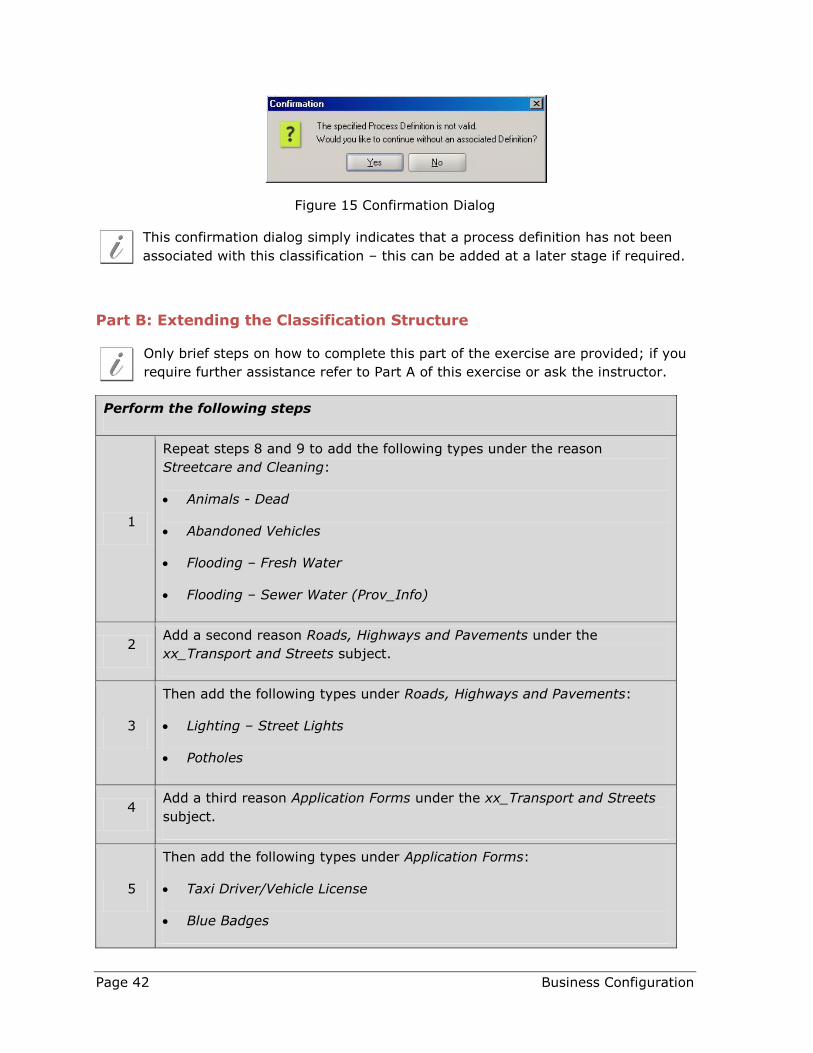
Figure 15 Confirmation Dialog
This confirmation dialog simply indicates that a process definition has not been
associated with this classification – this can be added at a later stage if required.
Part B: Extending the Classification Structure
Only brief steps on how to complete this part of the exercise are provided; if you
require further assistance refer to Part A of this exercise or ask the instructor.
Perform the following steps
1
Repeat steps 8 and 9 to add the following types under the reason
Streetcare and Cleaning:
Animals - Dead
Abandoned Vehicles
Flooding – Fresh Water
Flooding – Sewer Water (Prov_Info)
2 Add a second reason Roads, Highways and Pavements under the
xx_Transport and Streets subject.
3
Then add the following types under Roads, Highways and Pavements:
Lighting – Street Lights
Potholes
4 Add a third reason Application Forms under the xx_Transport and Streets
subject.
5
Then add the following types under Application Forms:
Taxi Driver/Vehicle License
Blue Badges
Business Configuration Page 43
Perform the following steps
Residents Parking Permit
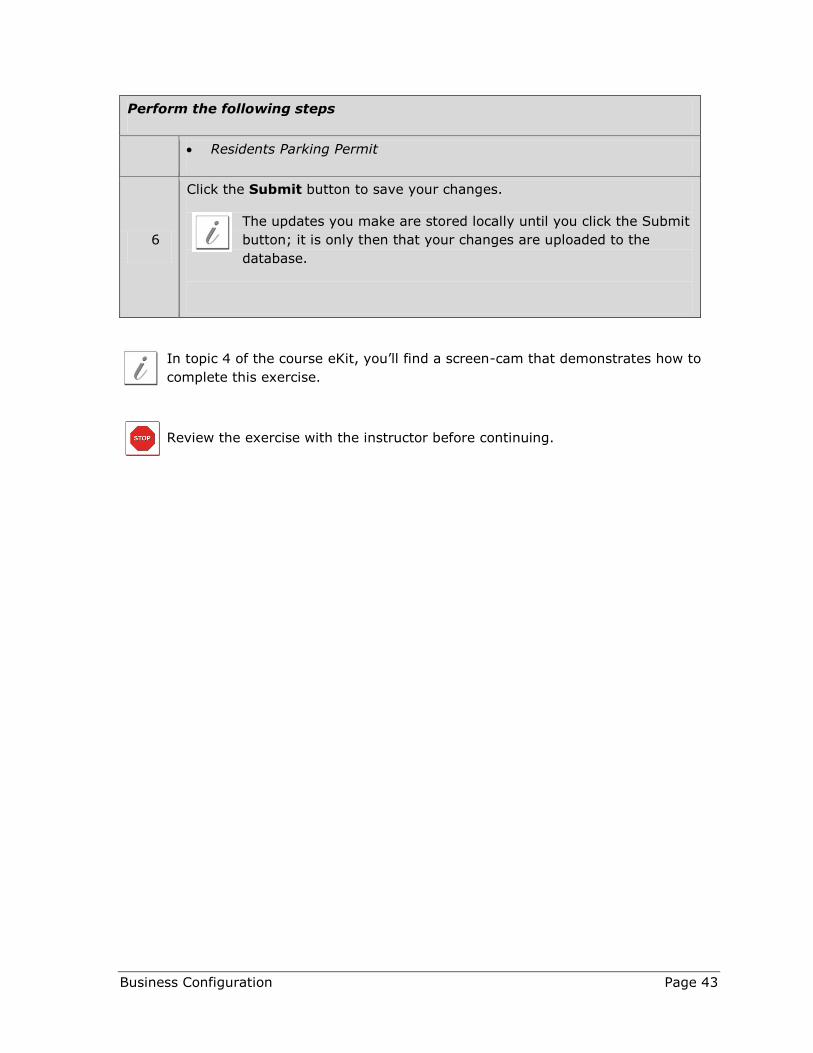
6
Click the Submit button to save your changes.
The updates you make are stored locally until you click the Submit
button; it is only then that your changes are uploaded to the
database.
In topic 4 of the course eKit, you’ll find a screen-cam that demonstrates how to
complete this exercise.
Review the exercise with the instructor before continuing.

Page 44 Business Configuration
Configuring Case Attributes
Objectives
After completing this section, you will be able to:
Describe the purpose of a process definition
Create a code book and then use it within a case form
Create a new case form
Create and configure a new process definition
Associate a form and work queue with a process definition
Defining Case Attributes
Depending on the nature of the customer’s inquiry, it may be necessary to create a
case. For example if the customer was reporting a faulty street light, the contact center
agent would capture the information about the fault within a case; this might include
details such as the fault type, exact position and pole reference number. The case would
then be added to the relevant work queue.
The details of the case are defined in what is known as a Process Definition; the latter is
then linked to an appropriate classification so that any interactions that are classified to
that Subject > Reason > Type will generate a case with the properties that are defined
within the associated Process Definition.
A process definition can have the following attributes:
SLA
This is the time in which the case should be resolved.
Severity
This can range from 0 to 5, with 0 being the highest severity and 5 the lowest.
Priority
This can range from 0 to 5, with 0 being the highest priority and 5 the lowest.
Work Queue
The case work queue to which the case will be added. If this is not specified at
design time, then the front office worker will have to select the work queue to which
the case will be added.
Form (or eForm)
The form (or eForm) is used to capture the information, from the customer, that the

Business Configuration Page 45
back office will require in order to resolve the case. For example, the form for a
faulty street light process definition may contain the following fields:
o Pole reference
o Exact position
o Problem Description
o Are there Multiple Lights Out?
The form is developed as a separate component and then linked to the process
definition; however it must first be marked as ‘available’. The diagram in Figure 16
illustrates how these items link together.
Figure 16 Process Definitions

Page 46 Business Configuration
Exercise 9: Creating a Process Definition
In this exercise, you’ll create a process definition and then associate it with the
classification type Graffiti – Reporting and Removal.
Detailed steps on how to complete this exercise are provided below the table.
Classification: XX_Transport and Streets >> Street Care and
Cleaning >> Graffiti - Reporting and Removal
Name: xx_Graffiti - Reporting and Removal
Queue: xx_Transport and Streets
Severity: 2
Priority: 2
Form: The form should contain the following fields:
Exact Position
Edit field, length 100, mandatory
Type of graffiti
Combo box with 4 choices: Public property – offensive;
Public property – inoffensive; Private property –
offensive; Private property – inoffensive. Mandatory, no
default
Surface Material
Code book with 4 options: Brick, Concrete, Metal and
Glass
Is the paint metallic?
Check box, mandatory
Further details
Text area, optional
Events: Three events should be added:
Work to be assessed
Contractor arranged
Contractor work complete
SLA: T20 Working days

Business Configuration Page 47
Classification: XX_Transport and Streets >> Street Care and
Cleaning >> Graffiti - Reporting and Removal
Part A: Create a Code Book
Notice that the form field ‘Surface Material’ is a code book. As such this needs to be
developed first and then associated with the form.
Code books are reusable drop-down lists that can be imported into multiple forms
(or eForms). A good use of code books is for commonly used combo lists such as
country (i.e. England, Ireland, Scotland, Wales, etc.) or title (i.e. Mr., Mrs., etc.).
Perform the following steps
1 Log on to the LAGAN Configuration Studio, if you have not done so
already.
2 In the configuration tree, click Forms | Code Book.
3 Click the Create button.
4 Enter xx_SurfaceType in the Name text box, where xx should be replaced
by your trainee number.
5 Enter A selection of different surface types in the Description text area.
6 Select today’s date in the Start Date field; the code book will be available
from this date.
We now need to create the different surface type options (codes) for the new code
book.
Perform the following steps
7 Click the New button; the New Code dialog will be displayed.
8 Enter Brick in the Code text box.

Page 48 Business Configuration
Perform the following steps
9
Enter Brick in the Value text box.
The value in the Code text box will be stored in the database;
whereas the value in the Value text box will be displayed to users.
10 Enter Brick Surface in the Description text area.
11 Click the OK button.
12
Repeat steps 7 to 11 to add the following codes:
Metal
Glass
Concrete
13 Click the OK button to create the code book.
14
Ensure the code book is selected then click the Publish button.
Publishing a code book indicates that it is complete and can be
used within case forms and/or eForms.
Part B: Creating a Case Form
The next step is to define the form that will collect data from the customer; we’ll include
the code book we previously developed as a field within this form.
Perform the following steps
1 In the configuration tree, click Forms | Forms.
2 Click the New button.
3
Enter xx_Graffiti in the Name text box (where xx should be replaced by
your trainee number).
Form and field names should not exceed twenty characters and
cannot contain spaces.

Business Configuration Page 49
Perform the following steps
4
Click the New button to add a field to the form. The following field types
can be added:
Edit Field
Date Chooser
Number Spinner
Combo Box
Code Books
Check Box
Text Area
5
Add the following fields to the form:
An Edit Field:
Name: TxtLocation, Label: Location, Length: 100, set as
Mandatory, no default.
A Combo Box:
Name: CboGraffitiType, Label: Graffiti Type, with the following
Values:
Public property – offensive
Public property – inoffensive
Private property – offensive
Private property – inoffensive
It should be set as Mandatory with no default.
A Code Book:
Name: CodSurfaceType, Label: Surface Type, set as NOT
Mandatory, no default.
Code Book: Use the xx_SurfaceType code book developed in the
previous exercise.
A Check Box:
Name: CbxMetallic, Label: Is the paint metallic?, set as
Mandatory, no default.
A Text Area:
Name: TxtFurtherDetails, Label: Further Details, set as NOT
Mandatory, no default.

Page 50 Business Configuration
Perform the following steps
6 Click the Test Form button to check the appearance of the form (see
Figure 17).
7 Click the OK button.
8 Click the OK button to create the form.
Figure 17 Test Form Button

Business Configuration Page 51
Part C: Completing the form
To assign the form to the process definition, the form (like a code book) must be
published.
Perform the following steps
1 Ensure the Latest Versions radio button is selected at the top of the
Forms screen.
2 Select the form xx_Graffiti then click the Complete button.
3
Click Yes at the prompt to automatically create a mapping for the form.
This will create a new database table that will store all case information
entered into the form by the end users.
A tick should appear in the checkbox next to the form name.
Part D: Creating the process definition
Perform the following steps
1 From the configuration tree, click Inquiries | Cases | Process
Definitions.
2 Click the New button.
3 Enter xx_Graffiti - reporting and removal (where xx should be replaced by
your trainee number) in the Name text box.
4 Select High from the Priority drop-down box; priority can range from
Very High to Very Low.
5 Select High from the Severity drop-down box; this also ranges from Very
High to Very Low.
6
Click the button next to the Queue text box; the Select Case
Allocation dialog is displayed. Select xx_Transport and Streets (where xx
should be replaced by your trainee number) then click the OK button.

Page 52 Business Configuration
Perform the following steps
7
Click the button next to the Form text box; the Select Form dialog is
displayed. Locate and select the xx_Graffiti form created in part B of this
exercise then click the OK button.
8
Click the Events tab.
In this tab, you’ll create custom events that a back office worker
can add as they progress the case.
9 Select the first row and enter the text Work to be Assessed.
10
Press the TAB or ENTER keys to add the following events:
Contractor arranged
Contractor work complete
11
Click the SLAs tab.
Here you specify the time in which the case should be resolved. In
this example that’s 20 working days.
12 Click the New button.
13 Enter 20 in the Target completion Time field; select Days from the
drop-down box then enable the Working Time check box (see Figure 18).
14 Click the OK button twice.
Figure 18 Service Level Agreement
It is possible to configure a different SLA for an organization and an individual. To
do this, select Organization from the Client Type drop-down box then enter the

Business Configuration Page 53
desired SLA. Repeat the above step selecting Individual from the Client Type
drop-down box as opposed to Organization.
Part E: Assign the process definition to the classification
Perform the following steps
1 Choose Inquiries | Classification from the Configuration tree.
2 Click the Edit button.
3 Select the classification Graffiti - Reporting and Removal found under
xx_Transport and Streets then Street Care and Cleaning.
4 Click the Update button; the Update Type dialog is displayed (see Figure
19).
Figure 19 Classification
Perform the following steps
5 Click the Details tab.
6
Click the button next to the Process Definition text box, select the
process definition xx_Graffiti - Reporting and Removal (where xx should be
replaced by your trainee number).
7
For the Default Title, enter Graffiti Report. This will ensure that every
time an agent selects this classification, there will be a default title pulled
across. The user may change this title if need be.

Page 54 Business Configuration
Perform the following steps
8 Click the OK button.
9 Click the Submit button. You’ll notice that the name of the process
definition is now displayed, in blue, next to the type.
Part F: Testing the process definition
Perform the following steps
1
Start the LAGAN Agent Desktop application; log on as a front office
worker.
Use the username and password of the XX_frontoffice worker you
created in exercise 1.
2 Choose File | New | Case from the menu or click the New Case button
on the toolbar. The New Case dialog is displayed.
3 Click the button next to the Classification text box; the Select
Classification dialog is displayed.
4
Select the classification xx_Transport and Streets >> Street Care and
Cleaning >> Graffiti - Reporting and Removal.
The dialog will now be populated with the relevant form fields, the default
title, the case SLA, severity and queue.
In topic 5 of the course eKit, you’ll find a screen-cam that demonstrates how to
complete this exercise.
Review the exercise with the instructor before continuing.
Business Configuration Page 55
Tasks and Task Lists
Objectives
After completing this section, you will be able to:
Describe the purpose of tasks and task lists
Create and configure new tasks
Create new task lists
Add tasks to a task list
Associate a task list with a process definition
What’s a Task?
Tasks are activities a back office worker may perform in order to resolve a case i.e. they
can be regarded as a ‘To Do’ List.
The purpose of tasks is two-fold; firstly they help ensure the back office worker
completes the necessary steps to resolve the case; secondly they enable the contact
center staff to inform the customer exactly what has happened and what will happen in
order to progress their case.
A task, like a case, can have an SLA associated with it; however it should be noted that
the task SLA will start to count from when the case is created. For example, if a case
has two tasks each of which take 5 days to complete; the second task should actually be
configured to have an SLA of 10 days. If not then the system will set the due date for
both tasks to 5 days after the case is created.
Each task is created as a separate item; multiple tasks can then be grouped together to
form a task list. The individual task and/or the task list must then be assigned to the
relevant process definition. Any cases that are now created using that process definition
will have that set of tasks assigned to it. This configuration is illustrated in Figure 20
below:

Page 56 Business Configuration
Figure 20 Tasks and Task Lists
Business Configuration Page 57
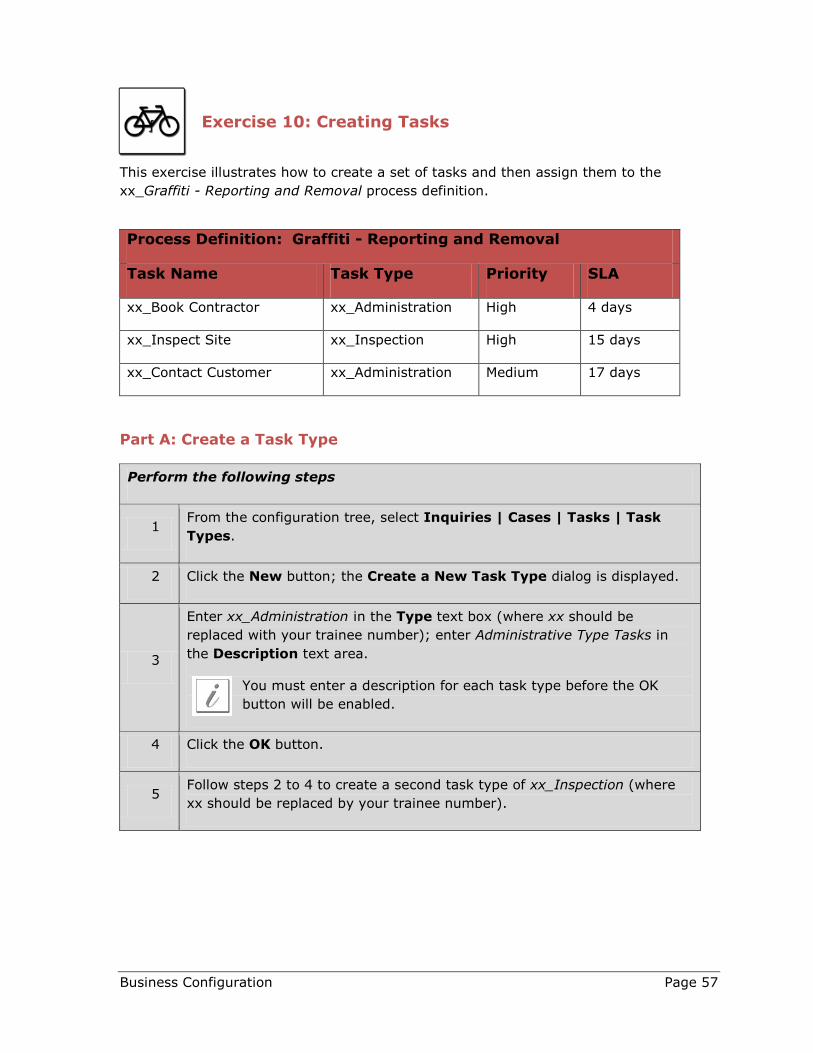
Exercise 10: Creating Tasks
This exercise illustrates how to create a set of tasks and then assign them to the
xx_Graffiti - Reporting and Removal process definition.
Process Definition: Graffiti - Reporting and Removal
Task Name Task Type Priority SLA
xx_Book Contractor xx_Administration High 4 days
xx_Inspect Site xx_Inspection High 15 days
xx_Contact Customer xx_Administration Medium 17 days
Part A: Create a Task Type
Perform the following steps
1 From the configuration tree, select Inquiries | Cases | Tasks | Task
Types.
2 Click the New button; the Create a New Task Type dialog is displayed.
3
Enter xx_Administration in the Type text box (where xx should be
replaced with your trainee number); enter Administrative Type Tasks in
the Description text area.
You must enter a description for each task type before the OK
button will be enabled.
4 Click the OK button.
5 Follow steps 2 to 4 to create a second task type of xx_Inspection (where
xx should be replaced by your trainee number).
Page 58 Business Configuration
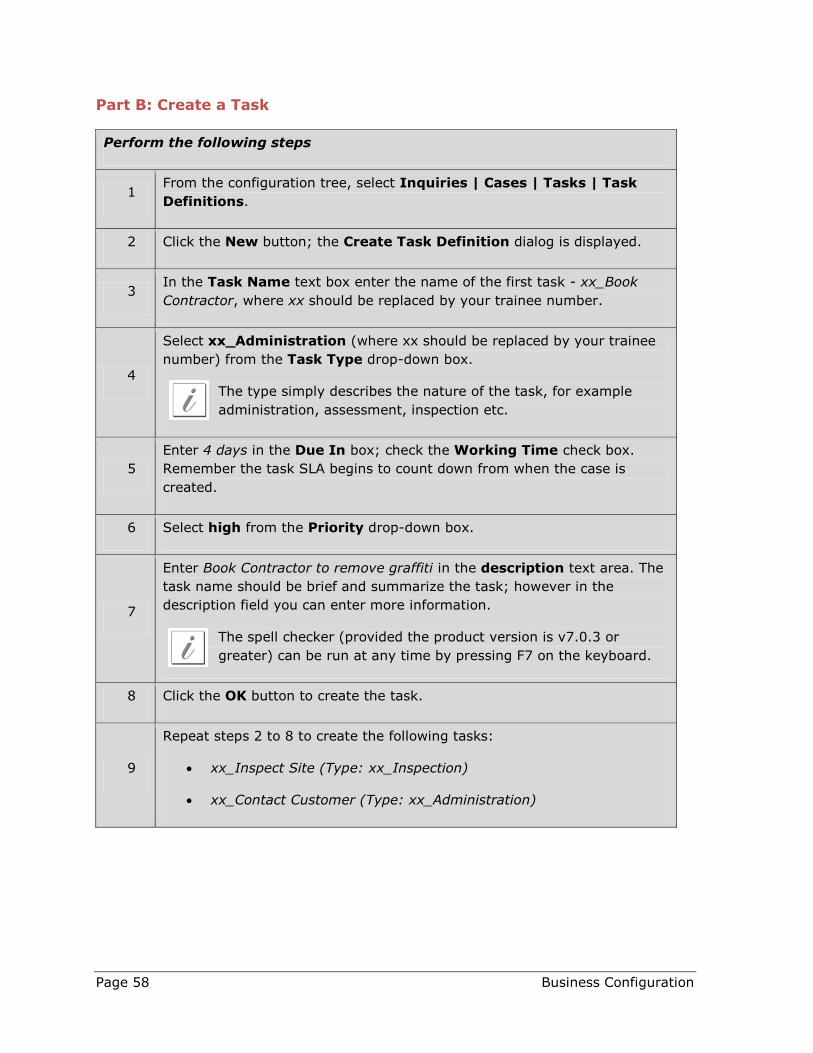
Part B: Create a Task
Perform the following steps
1 From the configuration tree, select Inquiries | Cases | Tasks | Task
Definitions.
2 Click the New button; the Create Task Definition dialog is displayed.
3 In the Task Name text box enter the name of the first task - xx_Book
Contractor, where xx should be replaced by your trainee number.
4
Select xx_Administration (where xx should be replaced by your trainee
number) from the Task Type drop-down box.
The type simply describes the nature of the task, for example
administration, assessment, inspection etc.
5
Enter 4 days in the Due In box; check the Working Time check box.
Remember the task SLA begins to count down from when the case is
created.
6 Select high from the Priority drop-down box.
7
Enter Book Contractor to remove graffiti in the description text area. The
task name should be brief and summarize the task; however in the
description field you can enter more information.
The spell checker (provided the product version is v7.0.3 or
greater) can be run at any time by pressing F7 on the keyboard.
8 Click the OK button to create the task.
9
Repeat steps 2 to 8 to create the following tasks:
xx_Inspect Site (Type: xx_Inspection)
xx_Contact Customer (Type: xx_Administration)

Business Configuration Page 59
Part C: Creating a Task List
Perform the following steps
1 From the configuration tree, click Inquiries | Cases | Tasks | Task
Lists.
2 Click the New button; the Create Task List dialog is displayed.
3 Enter xx_Graffiti Tasks in the Name field, where xx should be replaced by
your trainee number.
4
Enter tasks for the graffiti removal process definition in the Description
text area.
You must enter a description for a task list before it can be
created.
The spell checker (provided the product version is v7.0.3 or
greater) can be run at any time by pressing F7 on the keyboard.
5 In the left-hand column you’ll see the three tasks you previously created,
use the arrow button to move these tasks to the right-hand column.
6 Click the OK button.
Part D: Assign the Task List to a Process Definition
Perform the following steps
1 From the configuration tree, choose Inquiries | Cases | Process
Definitions.
2 Select the process definition, xx_Graffiti - Reporting and Removal.
3 Click the Update button.
4 Click the Task Lists tab.
5 Select the task list xx_Graffiti Tasks in the left-hand column then use the
arrow button to move it to the right-hand column.
Page 60 Business Configuration
Perform the following steps
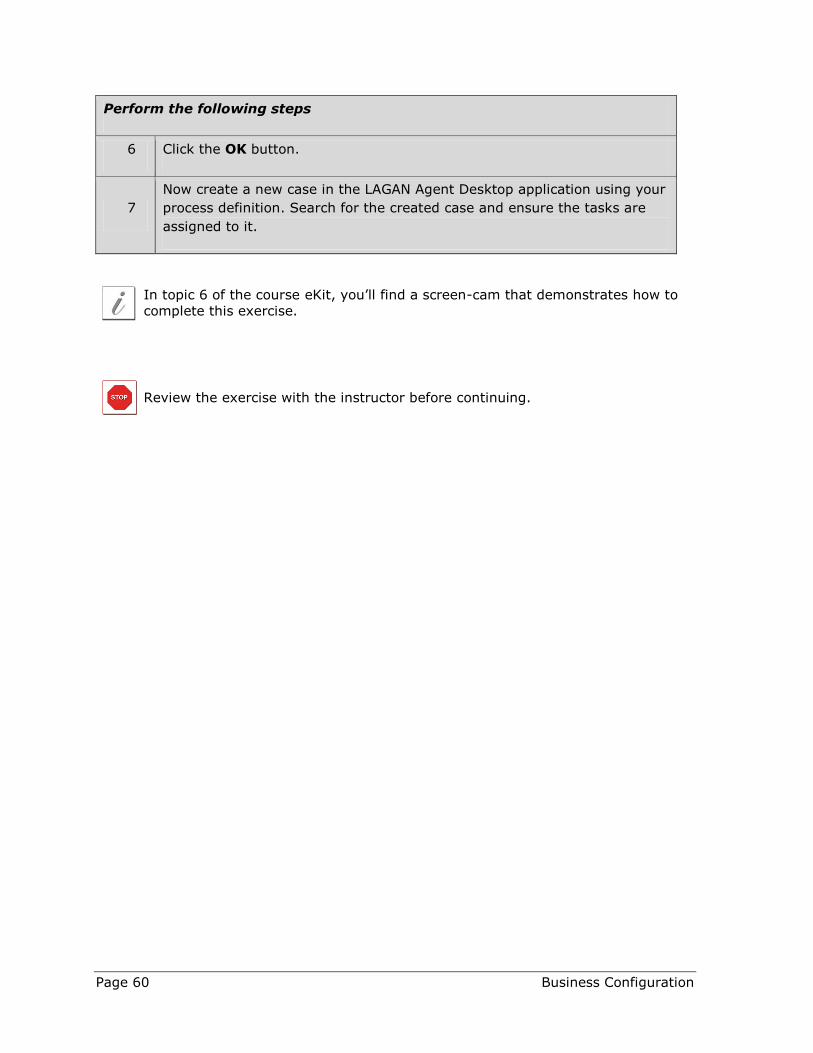
6 Click the OK button.
7
Now create a new case in the LAGAN Agent Desktop application using your
process definition. Search for the created case and ensure the tasks are
assigned to it.
In topic 6 of the course eKit, you’ll find a screen-cam that demonstrates how to
complete this exercise.
Review the exercise with the instructor before continuing.

Business Configuration Page 61
Escalation Rules
Objectives
After completing this section, you will be able to:
Describe the purpose of escalation rules
Create and configure escalation rules
Associate escalation rules with tasks and work queues
Why Use Escalation Rules?
Escalation rules help to ensure that tasks or cases are completed within their assigned
SLA; should a task or case SLA be about to exceed or has exceeded then a supervisor
can be notified via email or SMS. Escalation rules are configurable in that you can
specify when the email or SMS will fire off in relation to the SLA, for example 5 hours
before the SLA exceeds, 1 day before the SLA exceeds or 1 minute after the SLA has
been reached.
Each escalation rule is configured as a separate item and then associated with a task (to
monitor the SLA of that task) or a case work queue (to monitor the SLA of all cases on
that queue). Figure 21 illustrates this configuration.
Figure 21 SLAs and Process Definitions
Exercises 11 – 13: Creating Escalation Rules

Page 62 Business Configuration
The following exercises provide practice in creating escalation rules and then assigning
them to a task or a case work queue.
Exercise 11: Creating an Escalation Rule (Task)
In this exercise you’ll create an escalation rule that dispatches an email to
the line manager when a task is due in 2 hours’ time. The final message
should read like the following example:
5th October 2013 14.00. Inspect Repair for case 101000000035 is due for
completion by 5th October 2013 16.00.
Part A: Create the new Rule Recipient
First, we need to create the new recipient of ‘Line Manager’. Remember by default there
are only 4 default recipients – case creator, queue supervisor, case reporter and case
worker.
Perform the following steps
1 Log on to the LAGAN Configuration Studio, if you have not done so
already.
2 From the configuration tree, click Inquiries | Cases | Tasks | Rule
Recipients.
3 Click the New button.
4 Enter xx_Line Manager in the Name and Description text boxes, where
xx should be replaced by your trainee number.
5 Click the OK button.

Business Configuration Page 63
Part B: Identifying the Line Manager
Next we need to identify which LAGAN user performs the job of line manager.
Perform the following steps
1 From the configuration tree, click Work Queues | Case.
2 Select the queue xx_Transport and Streets (where xx represents your
trainee number).
3 Click the Update button.
4 Click the Escalation Recipients tab.
5 Click the New button.
6 Enter xx_BackOfficeUser, where XX should be replaced by your trainee
number, in the text box then click the Search User button.
7
Select the appropriate user from the right-hand column then ensure
xx_Line Manager is selected in the left-hand column and click the OK
button.
8 Click the OK button.
Part C: Create the Escalation Rule
Now we can configure the escalation rule; this should be set up to send an email to the
xx_Line Manager 2 hours before the task SLA due date.
Perform the following steps
1 From the configuration tree, click Inquiries | Cases | Tasks | Rules.
2 Click the New button.
3
Enter XX_Task -2 Hours in the Name text box, where XX should be
replaced by your trainee number.
It’s good practice to indicate in the name text box when the rule
will fire off in relation to the task or case SLA; only the rule name
is displayed when assigning it to either a task or case work queue.
Page 64 Business Configuration
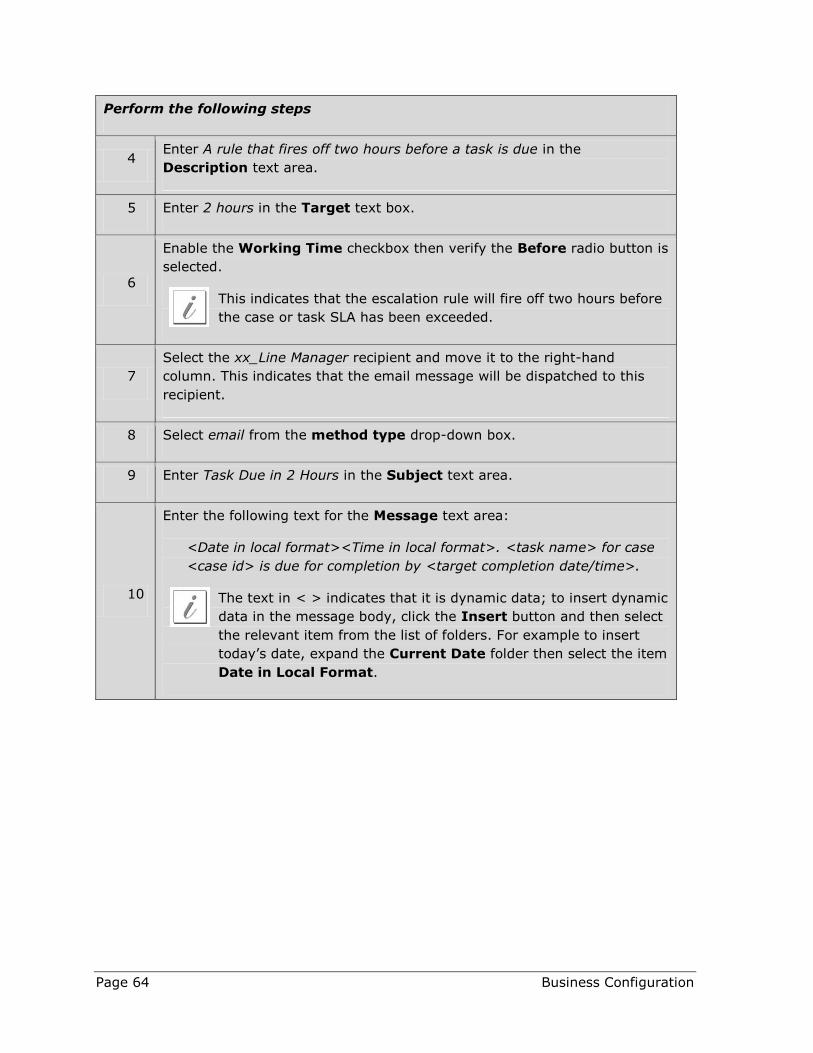
Perform the following steps
4 Enter A rule that fires off two hours before a task is due in the
Description text area.
5 Enter 2 hours in the Target text box.
6
Enable the Working Time checkbox then verify the Before radio button is
selected.
This indicates that the escalation rule will fire off two hours before
the case or task SLA has been exceeded.
7
Select the xx_Line Manager recipient and move it to the right-hand
column. This indicates that the email message will be dispatched to this
recipient.
8 Select email from the method type drop-down box.
9 Enter Task Due in 2 Hours in the Subject text area.
10
Enter the following text for the Message text area:
<Date in local format><Time in local format>. <task name> for case
<case id> is due for completion by <target completion date/time>.
The text in < > indicates that it is dynamic data; to insert dynamic
data in the message body, click the Insert button and then select
the relevant item from the list of folders. For example to insert
today’s date, expand the Current Date folder then select the item
Date in Local Format.
Business Configuration Page 65
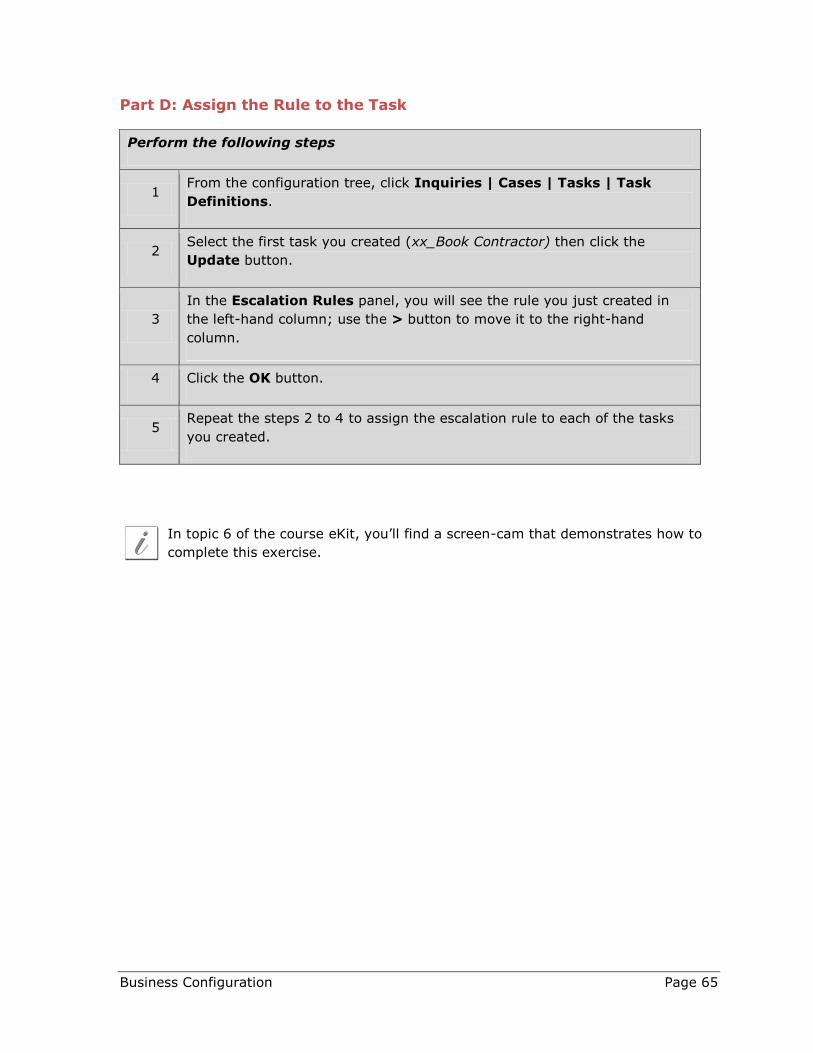
Part D: Assign the Rule to the Task
Perform the following steps
1 From the configuration tree, click Inquiries | Cases | Tasks | Task
Definitions.
2 Select the first task you created (xx_Book Contractor) then click the
Update button.
3
In the Escalation Rules panel, you will see the rule you just created in
the left-hand column; use the > button to move it to the right-hand
column.
4 Click the OK button.
5 Repeat the steps 2 to 4 to assign the escalation rule to each of the tasks
you created.
In topic 6 of the course eKit, you’ll find a screen-cam that demonstrates how to
complete this exercise.
Page 66 Business Configuration
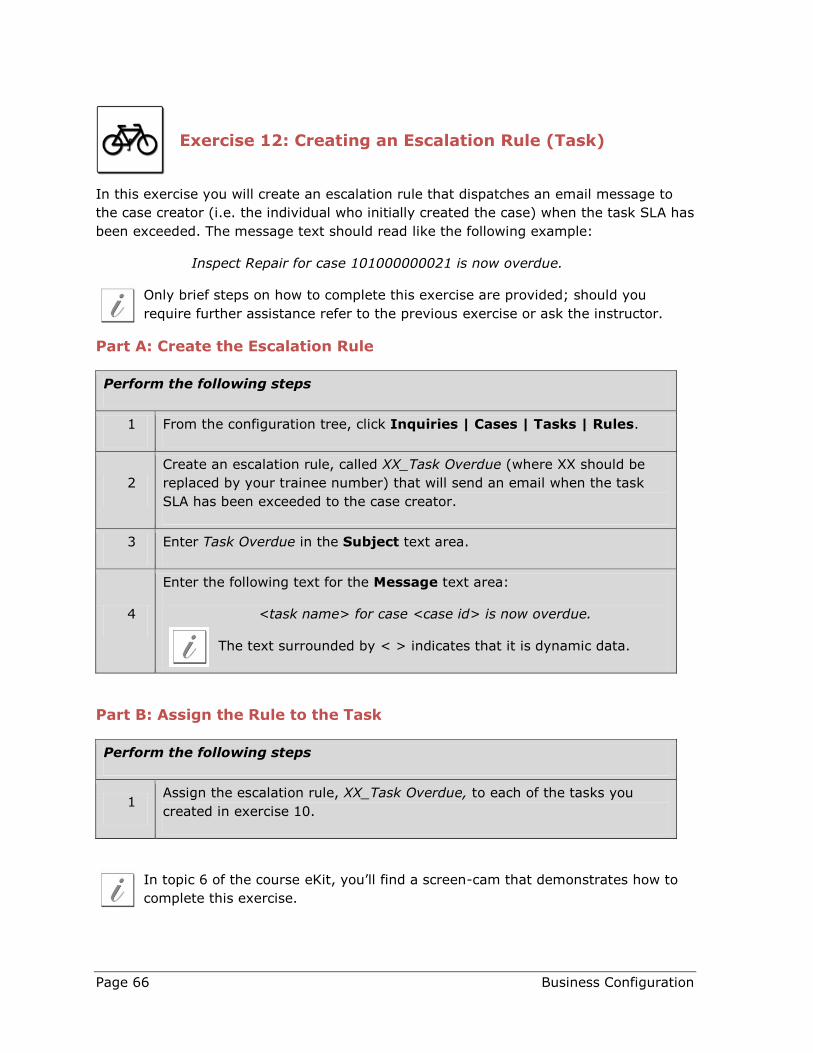
Exercise 12: Creating an Escalation Rule (Task)
In this exercise you will create an escalation rule that dispatches an email message to
the case creator (i.e. the individual who initially created the case) when the task SLA has
been exceeded. The message text should read like the following example:
Inspect Repair for case 101000000021 is now overdue.
Only brief steps on how to complete this exercise are provided; should you
require further assistance refer to the previous exercise or ask the instructor.
Part A: Create the Escalation Rule
Perform the following steps
1 From the configuration tree, click Inquiries | Cases | Tasks | Rules.
2
Create an escalation rule, called XX_Task Overdue (where XX should be
replaced by your trainee number) that will send an email when the task
SLA has been exceeded to the case creator.
3 Enter Task Overdue in the Subject text area.
4
Enter the following text for the Message text area:
<task name> for case <case id> is now overdue.
The text surrounded by < > indicates that it is dynamic data.
Part B: Assign the Rule to the Task
Perform the following steps
1 Assign the escalation rule, XX_Task Overdue, to each of the tasks you
created in exercise 10.
In topic 6 of the course eKit, you’ll find a screen-cam that demonstrates how to
complete this exercise.

Business Configuration Page 67
Exercise 13: Creating an Escalation Rule (Queue)
In this exercise you’ll create an escalation rule that will warn the queue supervisor, via
email, when cases on the xx_Transport and Streets queue (where xx represents your
trainee number) are due in 2 days’ time. The message text should read like the following
example:
Case 101000000092 on the 00_Transport and Street queue has an SLA set that
is due in 2 days’ time; please take appropriate action to ensure this SLA is met.
Only brief steps on to how complete this exercise are provided; should you
require further assistance refer to exercise 11 or ask the instructor.
Part A: Create the Escalation Rule
Perform the following steps
1 From the configuration tree, click Inquiries | Cases | Tasks | Rules.
2
Create an escalation rule, called XX_Case -2 days, where XX should be
replaced by your trainee number, that will send an email to the queue
supervisor should a case SLA be due in 2 days’ time.
3 Enter Case Due in 2 Days in the Subject text area.
4
Enter the following text for the Message text area:
Case <case id> on the xx_Transport and Street queue has an SLA
set that is due in 2 days’ time; please take appropriate action to
ensure this SLA is met.
The text surrounded by < > indicates that it is dynamic data.

Page 68 Business Configuration
Part B: Assign the Rule to a Work Queue
Perform the following steps
1 Assign the escalation rule, XX_Case -2 days, to the XX_Transport and
Streets work queue, where XX should be replaced your trainee number.
In topic 6 of the course eKit, you’ll find a screen-cam that demonstrates how to
complete this exercise.
Review the exercises with the instructor before continuing.
Business Configuration Page 69
Review
Objectives
In this section you’ll get additional practice in configuring:
Process definitions
Case forms
Tasks / Task Lists
Escalation rules

Page 70 Business Configuration
Exercises 14 - 21: Additional Practice
The following exercises provide additional practice in configuring process definitions,
forms, tasks and escalation.
In exercise 8 of this manual, you added the following classifications:
Subject Reason Type
xx_Transport and
Streets
Streetcare and
Cleaning
Graffiti - Reporting and
Removal
Animals – Dead
Abandoned Vehicles
Flooding – Fresh Water
Flooding – Sewer Water –
Provide Information
Roads, Highways and
Pavements
Lighting – Street Lights
Potholes
Application Forms Taxi Driver/Vehicle License
Blue Badge
Residents Parking Permit
So far, we’ve only configured the process definition, form, tasks, and escalation rules
required for the classification, Graffiti – Reporting and Removal; hence in this exercise,
we’ll configure these items for the following classifications:
Animals - Dead Potholes
Abandoned Vehicles Taxi Driver / Vehicle License
Flooding – Fresh Water Blue Badge
Lighting – Street Lights Residents Parking Permit
Only brief steps on to how complete exercises 14 to 21 are provided; should you
require further assistance refer back to the previous exercises or ask the
instructor.
Business Configuration Page 71
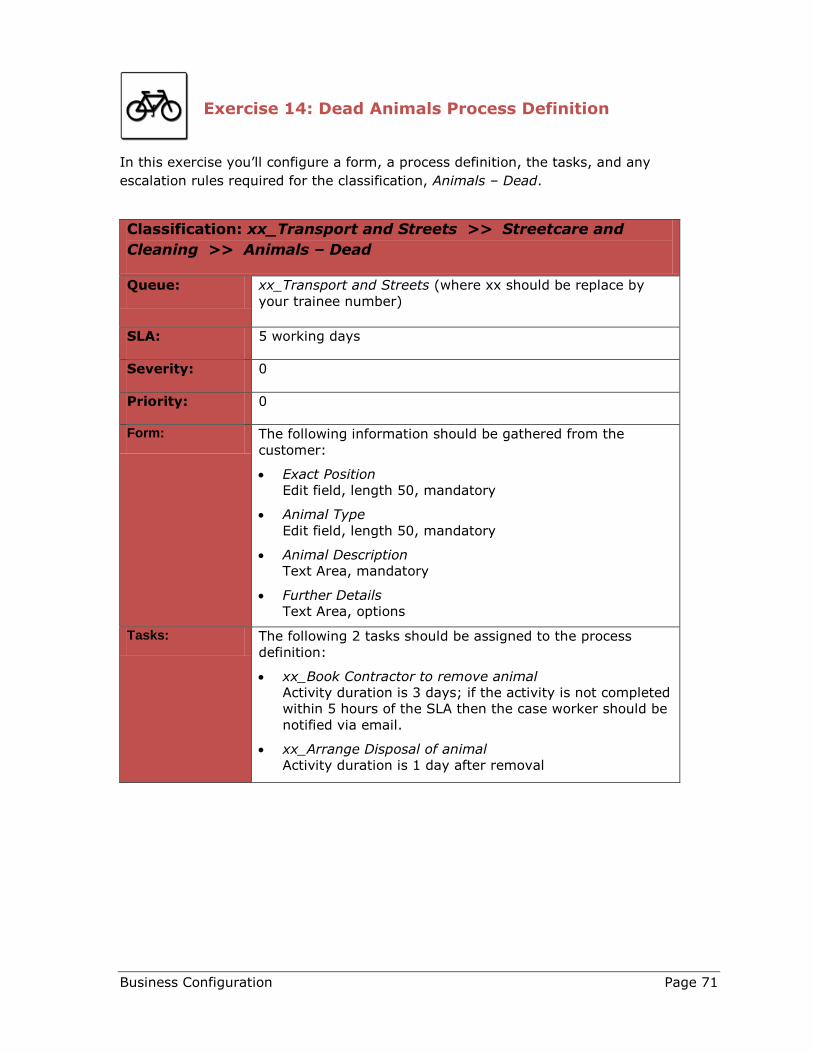
Exercise 14: Dead Animals Process Definition
In this exercise you’ll configure a form, a process definition, the tasks, and any
escalation rules required for the classification, Animals – Dead.
Classification: xx_Transport and Streets >> Streetcare and
Cleaning >> Animals – Dead
Queue: xx_Transport and Streets (where xx should be replace by
your trainee number)
SLA: 5 working days
Severity: 0
Priority: 0
Form: The following information should be gathered from the
customer:
Exact Position
Edit field, length 50, mandatory
Animal Type
Edit field, length 50, mandatory
Animal Description
Text Area, mandatory
Further Details
Text Area, options
Tasks: The following 2 tasks should be assigned to the process
definition:
xx_Book Contractor to remove animal
Activity duration is 3 days; if the activity is not completed
within 5 hours of the SLA then the case worker should be
notified via email.
xx_Arrange Disposal of animal
Activity duration is 1 day after removal
Page 72 Business Configuration
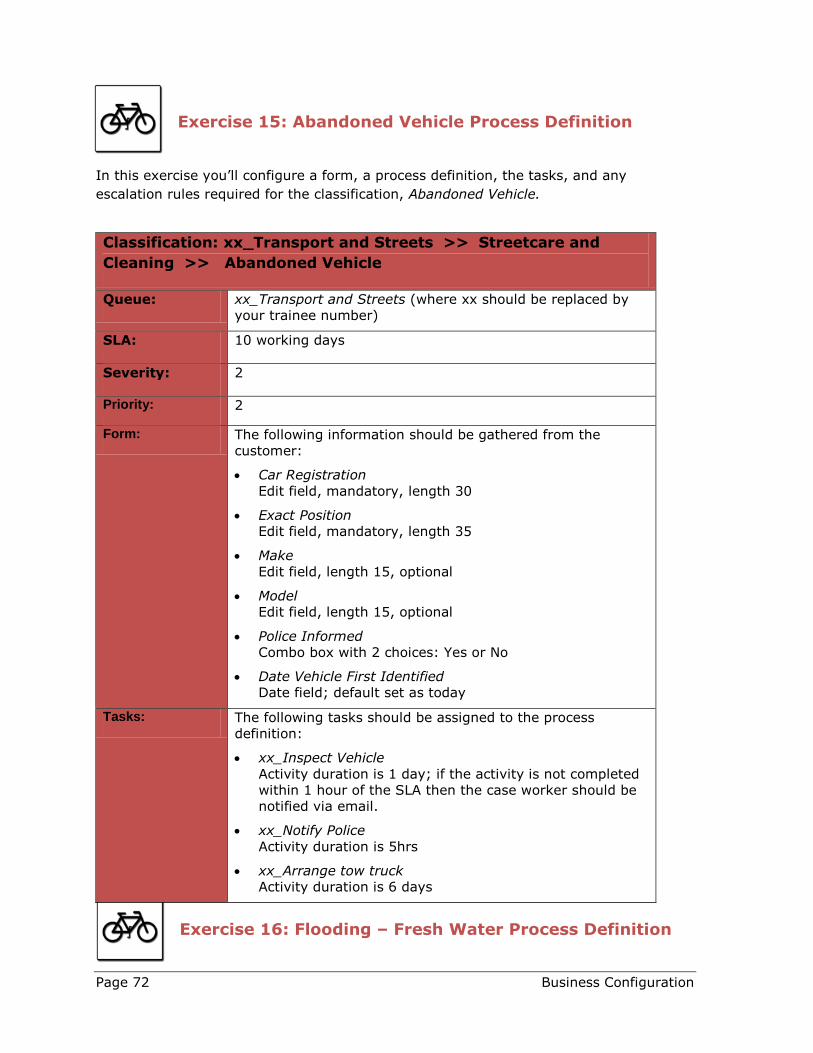
Exercise 15: Abandoned Vehicle Process Definition
In this exercise you’ll configure a form, a process definition, the tasks, and any
escalation rules required for the classification, Abandoned Vehicle.
Classification: xx_Transport and Streets >> Streetcare and
Cleaning >> Abandoned Vehicle
Queue: xx_Transport and Streets (where xx should be replaced by
your trainee number)
SLA: 10 working days
Severity: 2
Priority: 2
Form: The following information should be gathered from the
customer:
Car Registration
Edit field, mandatory, length 30
Exact Position
Edit field, mandatory, length 35
Make
Edit field, length 15, optional
Model
Edit field, length 15, optional
Police Informed
Combo box with 2 choices: Yes or No
Date Vehicle First Identified
Date field; default set as today
Tasks: The following tasks should be assigned to the process
definition:
xx_Inspect Vehicle
Activity duration is 1 day; if the activity is not completed
within 1 hour of the SLA then the case worker should be
notified via email.
xx_Notify Police
Activity duration is 5hrs
xx_Arrange tow truck
Activity duration is 6 days
Exercise 16: Flooding – Fresh Water Process Definition

Business Configuration Page 73
In this exercise you’ll configure a form, a process definition, the tasks, and any
escalation rules required for the classification, Flooding – Fresh Water.
Classification: xx_Transport and Streets >> Streetcare and Cleaning
>> Flooding – Fresh Water
Queue: xx_Transport and Streets (where xx should be replaced by
your trainee number)
SLA: 11 working days
Severity: 0
Priority: 0
Form: The following information should be gathered from the
customer:
Exact Position
Edit field, length 50, mandatory
Sandbag Required
Combo box with 2 choices: Yes or No, Mandatory
Further Details
Text Area, optional
Tasks: The following tasks should be completed:
xx_Book Contractor
Activity duration is 3 days; if the activity is not completed
within 5 hours of the SLA then the case worker should be
notified via email)
xx_Inspect Site
Activity duration is 4 days
xx_Call Customer
Activity duration is 4 days

Page 74 Business Configuration
Exercise 17: Faulty Street Light Process Definition
In this exercise you’ll configure a form, a process definition, the tasks, and any
escalation rules required for the classification, Lighting – Street Lights.
Classification: xx_Transport and Streets >> Roads, Highways &
Pavements >> Lighting – Street Lights
Queue: xx_Transport and Streets (where xx should be replaced by
your trainee number)
SLA: 24 working days for an organization; 30 working days for an
individual
Severity: 1
Priority: 1
Form: The following information should be gathered from the
customer:
Exact Position
Edit field, length 50, mandatory
Size
Edit field, length 50, optional
Type
Edit field, length 50, optional
Further Details
Text Area, optional
Tasks: The following tasks should be assigned to the process
definition:
xx_Book Contractor
Activity duration is 4 days
xx_Inspect Site
Activity duration is 8 days
xx_Call Customer
Activity duration is 12 days
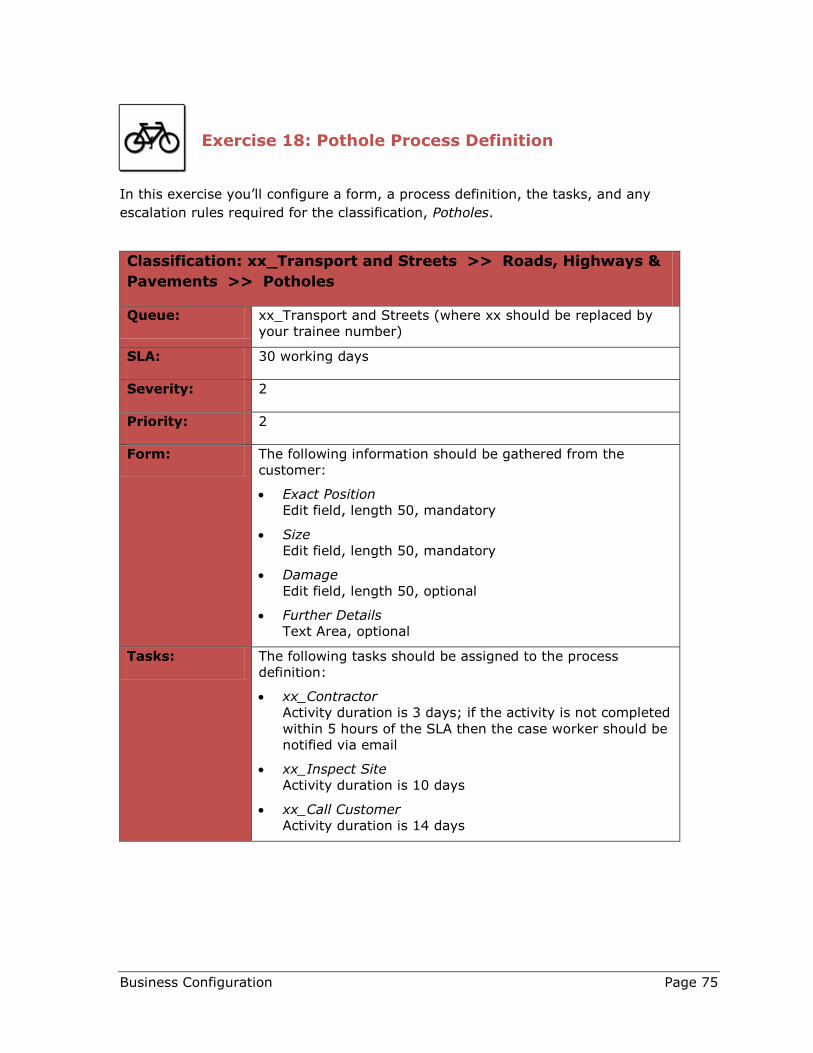
Business Configuration Page 75
Exercise 18: Pothole Process Definition
In this exercise you’ll configure a form, a process definition, the tasks, and any
escalation rules required for the classification, Potholes.
Classification: xx_Transport and Streets >> Roads, Highways &
Pavements >> Potholes
Queue: xx_Transport and Streets (where xx should be replaced by
your trainee number)
SLA: 30 working days
Severity: 2
Priority: 2
Form: The following information should be gathered from the
customer:
Exact Position
Edit field, length 50, mandatory
Size
Edit field, length 50, mandatory
Damage
Edit field, length 50, optional
Further Details
Text Area, optional
Tasks: The following tasks should be assigned to the process
definition:
xx_Contractor
Activity duration is 3 days; if the activity is not completed
within 5 hours of the SLA then the case worker should be
notified via email
xx_Inspect Site
Activity duration is 10 days
xx_Call Customer
Activity duration is 14 days

Page 76 Business Configuration
Exercise 19: Taxi Driver/Vehicle License Process Definition
In this exercise you’ll configure a form and a process definition for the classification, Taxi
Driver/Vehicle License.
Classification: xx_Transport and Streets >> Application Forms
>> Taxi Driver/Vehicle License
Queue: xx_Transport and Streets (where xx should be replaced by
your trainee number)
SLA: 10 working days
Severity: 3
Priority: 3
Form: The following information should be gathered from the
customer:
Make
Edit field, length 25, mandatory
Model
Edit field, length 25, mandatory
Car Reg
Edit field, length 10, mandatory
Start Date
Date field, optional
Tasks: No tasks

Business Configuration Page 77
Exercise 20: Blue Badge Process Definition
In this exercise you’ll configure a form and a process definition required for the
classification, Blue Badge.
Classification: xx_Transport and Streets >> Roads, Highways &
Pavements >> Blue Badge
Queue: xx_Transport and Streets (where xx should be replaced by
your trainee number)
SLA: 15 working days
Severity: 2
Priority: 2
Form: The following information should be gathered from the
customer:
Application Type
Combo box, New or Renewal, mandatory
Further Details
Text Area, optional
Tasks: No tasks

Page 78 Business Configuration
Exercise 21: Residents Parking Permit Process Definition
In this exercise you’ll configure a form and a process definition required for the
classification, Residents Parking Permit.
Classification: xx_Transport and Streets >> Roads, Highways &
Pavements >> Residents Parking Permit
Queue: xx_Transport and Streets (where xx should be replaced by
your trainee number)
SLA: 20 working days
Severity: 2
Priority: 2
Form: No Form
Tasks: No tasks
Review the exercises with the instructor before continuing.
Business Configuration Page 79
Client Notifications
Objectives
After completing this section, you will be able to:
Describe the purpose of client notifications
Compose a message to be sent when a case is opened or closed
Turn on / off client notifications
What is a Client Notification?
A client notification enables the customer to be alerted, via email, when a case is opened
or closed. The email content can be customized depending on the nature of the case i.e.
the message dispatched when a pothole case is closed can differ from that of a benefits
case. The email is sent automatically, by the system, to the customers preferred email
address.
If the customer does not have an email address defined in their profile then the
client notification cannot be sent.
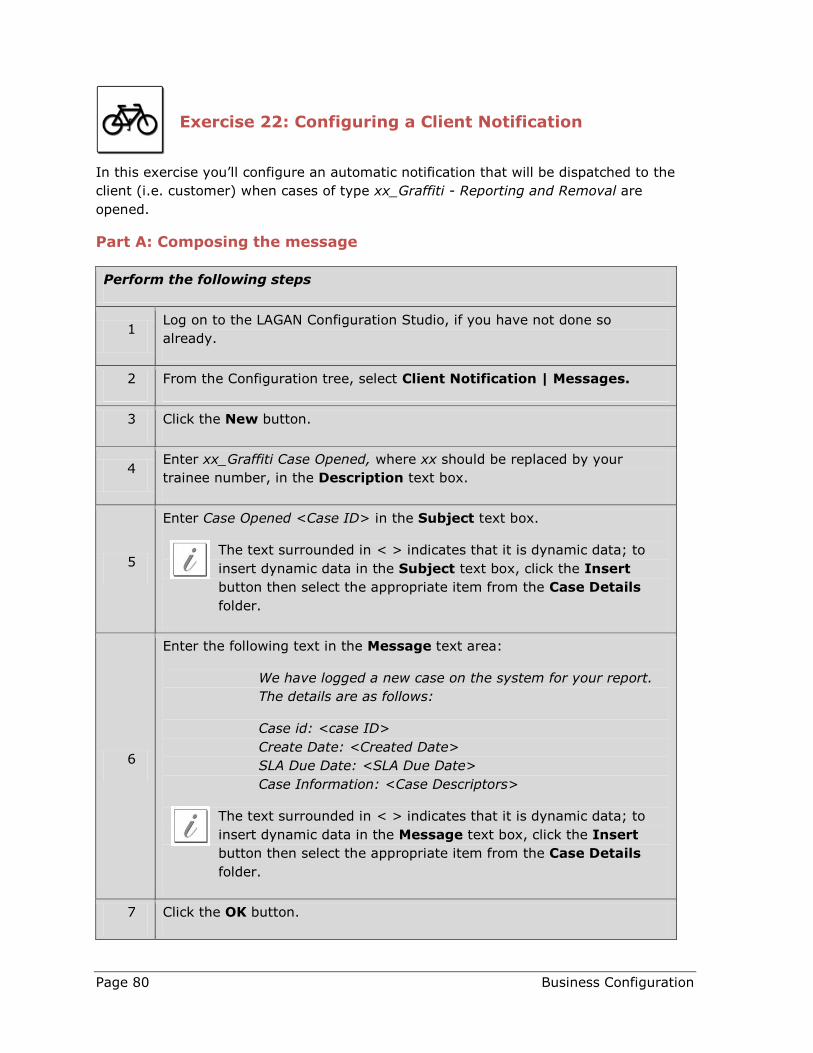
Page 80 Business Configuration
Exercise 22: Configuring a Client Notification
In this exercise you’ll configure an automatic notification that will be dispatched to the
client (i.e. customer) when cases of type xx_Graffiti - Reporting and Removal are
opened.
Part A: Composing the message
Perform the following steps
1 Log on to the LAGAN Configuration Studio, if you have not done so
already.
2 From the Configuration tree, select Client Notification | Messages.
3 Click the New button.
4 Enter xx_Graffiti Case Opened, where xx should be replaced by your
trainee number, in the Description text box.
5
Enter Case Opened <Case ID> in the Subject text box.
The text surrounded in < > indicates that it is dynamic data; to
insert dynamic data in the Subject text box, click the Insert
button then select the appropriate item from the Case Details
folder.
6
Enter the following text in the Message text area:
We have logged a new case on the system for your report.
The details are as follows:
Case id: <case ID>
Create Date: <Created Date>
SLA Due Date: <SLA Due Date>
Case Information: <Case Descriptors>
The text surrounded in < > indicates that it is dynamic data; to
insert dynamic data in the Message text box, click the Insert
button then select the appropriate item from the Case Details
folder.
7 Click the OK button.

Business Configuration Page 81
Part B: Associating the message with a classification
Perform the following steps
1 From the configuration tree, select Client Notification | Classification
Associations.
2 Click the New button.
3 Select Case:Create from the Trigger drop-down box.
4 Click the Select Message button; the Notification Message Selection
dialog is displayed.
5 Select the message xx_Graffiti Case Opened then click the OK button.
6
Locate the classification xx_Transport and Streets >> Street Care and
Cleaning >> Graffiti - Reporting and Removal in the left-hand column,
then use the arrow button to move it the right-hand column.
7 Click the OK button.
Part C: Turning on the Client Notifications
Next, we need to ensure the client notification functionality is turned on.
Perform the following steps
1 From the configuration tree, click Client Notifications.
2 Select Case:Create and then click the Update button.
3 From the Notify drop-down box, select Based on Classification then
click the OK button.
In topic 7 of the course eKit, you’ll find a screen-cam that demonstrates how to
complete this exercise.
Review the exercise with the instructor before continuing.

Page 82 Business Configuration
Letter and Email Templates
Objectives
After completing this section, you will be able to:
Describe the purpose of correspondence templates
Create and configure correspondence templates for letters and emails
Correspondence Templates
Standard correspondence templates can be built through the LAGAN Configuration
Studio to enable agents to quickly and easily create company approved outbound emails
and/or letters. These templates can contain dynamic data i.e. data that is inserted at
runtime such customer name and address and static data i.e. data that will never
change irrespective of when or who the letter is being sent to.
Exercise 23: Creating Letter Templates
In this exercise you’ll create a standard template that can be used to create outbound
letters (or emails) to customers.
Whereas email templates are completely defined within LAGAN, letter templates consist
of two parts:
Presentation (document) template, which will often be a letter template
in the company corporate style. This document template contains bookmarks
(placeholders) showing where the dynamic LAGAN data will be positioned.
The presentation template is created in the standard corporate word-
processing program, such as Microsoft Word or OpenOffice Writer.
Content (LAGAN) template, which enables dynamic data to be defined for
one or more bookmarks.
The steps in part A are not required if you are creating a template for outbound
email.
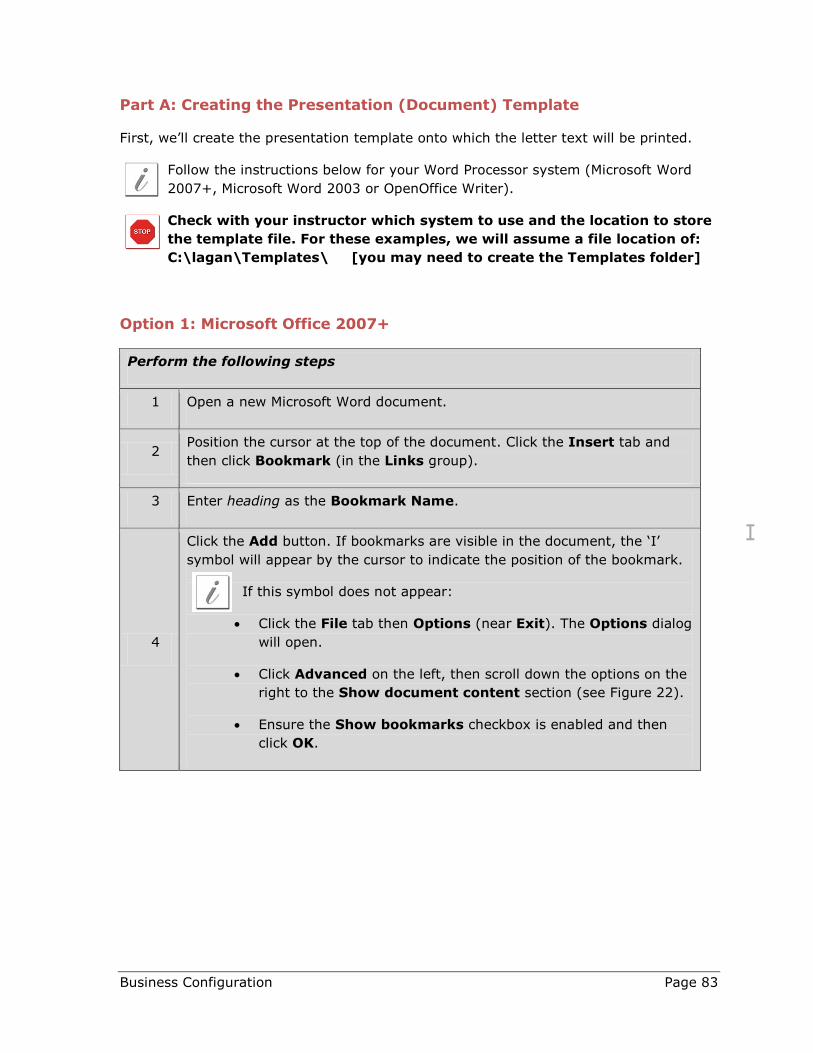
Business Configuration Page 83
Part A: Creating the Presentation (Document) Template
First, we’ll create the presentation template onto which the letter text will be printed.
Follow the instructions below for your Word Processor system (Microsoft Word
2007+, Microsoft Word 2003 or OpenOffice Writer).
Check with your instructor which system to use and the location to store
the template file. For these examples, we will assume a file location of:
C:\lagan\Templates\ [you may need to create the Templates folder]
Option 1: Microsoft Office 2007+
Perform the following steps
1 Open a new Microsoft Word document.
2 Position the cursor at the top of the document. Click the Insert tab and
then click Bookmark (in the Links group).
3 Enter heading as the Bookmark Name.
4
Click the Add button. If bookmarks are visible in the document, the ‘I’
symbol will appear by the cursor to indicate the position of the bookmark.
If this symbol does not appear:
Click the File tab then Options (near Exit). The Options dialog
will open.
Click Advanced on the left, then scroll down the options on the
right to the Show document content section (see Figure 22).
Ensure the Show bookmarks checkbox is enabled and then
click OK.

Page 84 Business Configuration
Figure 22 Word 2007+ Options Dialog
Perform the following steps
5 Click the File tab and then Save As to open the document save dialog.
6
Navigate to the save location specified by your instructor (e.g.
C:\lagan\Templates) and enter lagan as the File name. Select Word 97-
2003 Template (.dot) from the Save as type drop down list and click
Save.
7 Close the Microsoft Word template.
Option 2: Microsoft Office 2003
Perform the following steps
1 Open a new Microsoft Word document.
2
Position the cursor at the top of the document and click Insert |
Bookmark from the menu bar and enter heading as the Bookmark
Name.
3 Click the Add button. If bookmarks are visible in the document, the ‘I’
symbol will appear to indicate the position of the bookmark.

Business Configuration Page 85
Perform the following steps
If this symbol does not appear, choose Tools | Options from the
toolbar. The Options dialog will open. Ensure the Bookmarks
checkbox is enabled in the View tab.
4 Choose File | Save As from the menu bar to open the document save
dialog.
5
Navigate to the save location specified by your instructor (e.g.
C:\lagan\Templates) and enter lagan as the File name. Select Document
Template (.dot) from the Save as type drop down list and click Save.
6 Close the Microsoft Word template.
Option 3: OpenOffice Writer
Perform the following steps
1 Open a new OpenOffice Writer document.
2
Position the cursor at the top of the document and click Insert |
Bookmark from the menu bar and enter heading as the bookmark name.
Click OK.
Bookmarks are not normally visible in Writer 3.x documents, but
you can confirm that the bookmark exists. Right-click on the Page
1/1 information area at the bottom left of the Writer window. A
list of bookmarks will appear; clicking on one will go to the
position of that bookmark.
3 Choose File | Save As from the menu bar to open the document save
dialog.
4
Navigate to the save location specified by your instructor (e.g.
C:\lagan\Templates) and enter lagan as the File name. Select ODF Text
Document Template (.ott) from the Save as type drop down list and
click Save.
5 Close the OpenOffice Writer template.
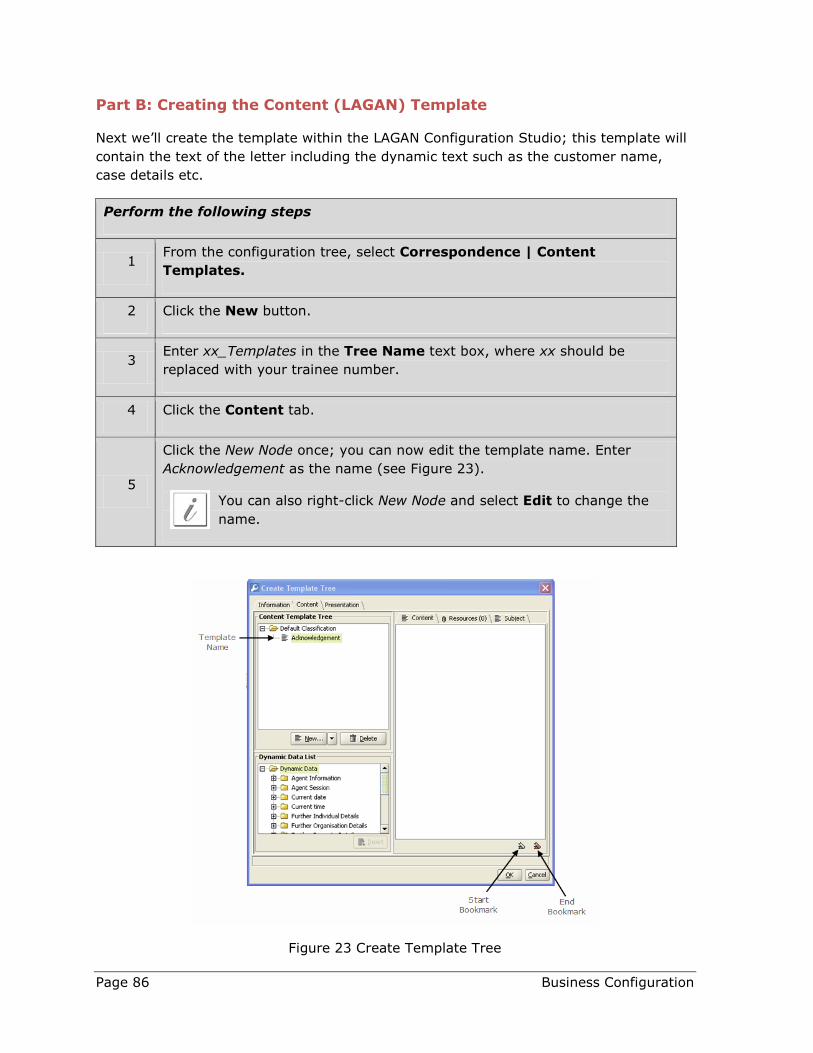
Page 86 Business Configuration
Part B: Creating the Content (LAGAN) Template
Next we’ll create the template within the LAGAN Configuration Studio; this template will
contain the text of the letter including the dynamic text such as the customer name,
case details etc.
Perform the following steps
1 From the configuration tree, select Correspondence | Content
Templates.
2 Click the New button.
3 Enter xx_Templates in the Tree Name text box, where xx should be
replaced with your trainee number.
4 Click the Content tab.
5
Click the New Node once; you can now edit the template name. Enter
Acknowledgement as the name (see Figure 23).
You can also right-click New Node and select Edit to change the
name.
Figure 23 Create Template Tree
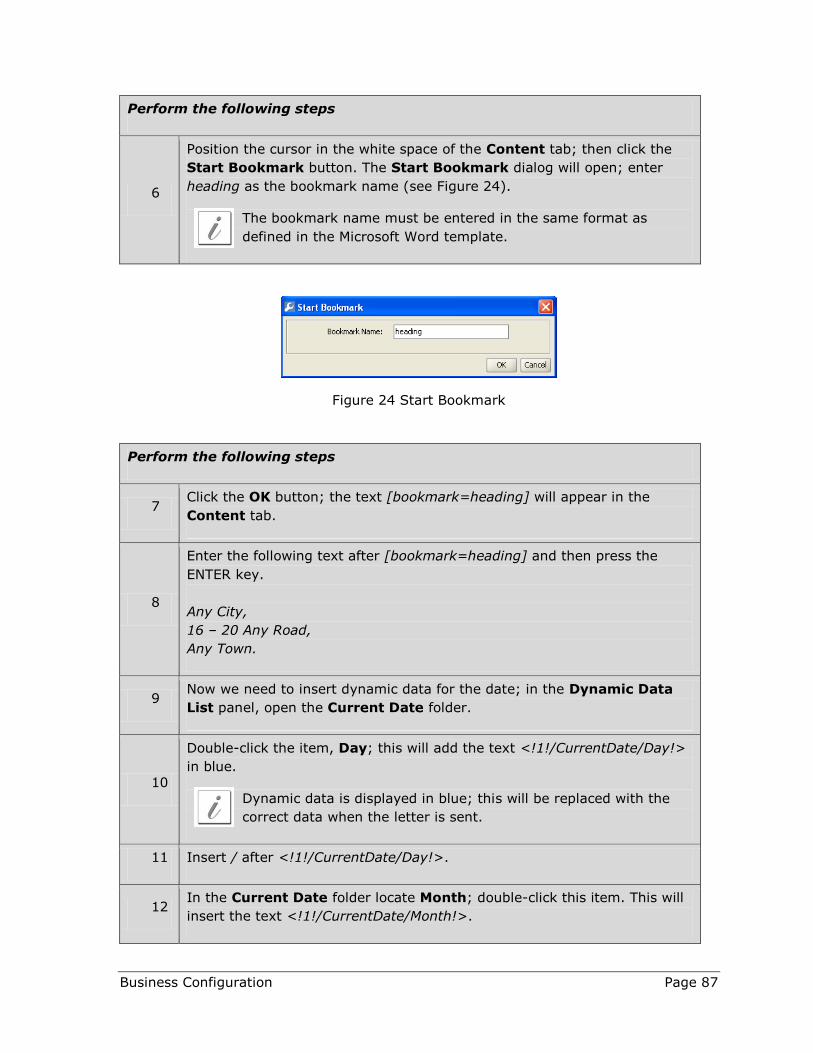
Business Configuration Page 87
Perform the following steps
6
Position the cursor in the white space of the Content tab; then click the
Start Bookmark button. The Start Bookmark dialog will open; enter
heading as the bookmark name (see Figure 24).
The bookmark name must be entered in the same format as
defined in the Microsoft Word template.
Figure 24 Start Bookmark
Perform the following steps
7 Click the OK button; the text [bookmark=heading] will appear in the
Content tab.
8
Enter the following text after [bookmark=heading] and then press the
ENTER key.
Any City,
16 – 20 Any Road,
Any Town.
9 Now we need to insert dynamic data for the date; in the Dynamic Data
List panel, open the Current Date folder.
10
Double-click the item, Day; this will add the text <!1!/CurrentDate/Day!>
in blue.
Dynamic data is displayed in blue; this will be replaced with the
correct data when the letter is sent.
11 Insert / after <!1!/CurrentDate/Day!>.
12 In the Current Date folder locate Month; double-click this item. This will
insert the text <!1!/CurrentDate/Month!>.

Page 88 Business Configuration
Perform the following steps
13 Insert / after <!1!/CurrentDate/Month!>.
14 In the Current Date folder locate the Year item; double-click on this. This
will add the text <!1!/CurrentDate/Year!>.
15 Press the ENTER key twice.
16
Insert the word Dear followed by the <Interaction Client Name> (use the
Dynamic Data List and choose the Interaction folder and select
Interaction Client Name) and finally insert a comma.
17
Press the ENTER key then enter the remaining content of the letter:
Thank-you for contacting the city. Your inquiry has been sent to the
relevant department to be dealt with. If you need to contact us please
quote your unique reference number: <Case Ref Nos>
[use the Dynamic Data List and choose the Agent Session folder and
select Last Created CaseID].
Yours Sincerely,
<AgentName>
To insert the agent name, use the Dynamic Data List. Select the
Agent Information folder then double-click Name.
18
As the body of the letter is now complete, click the End Bookmark
button.
The Subject tab of the Create Template Tree dialog enables us
to define a subject for the template; however this is only relevant
if the template is to be used for emails. Our template is specifically
a letter template as such we’ll not set a subject.
19 Click the Presentation tab. Here, you’ll register the presentation template
you created earlier.
20 Click the New button.
21 Enter Acknowledgment Template in the Name field.
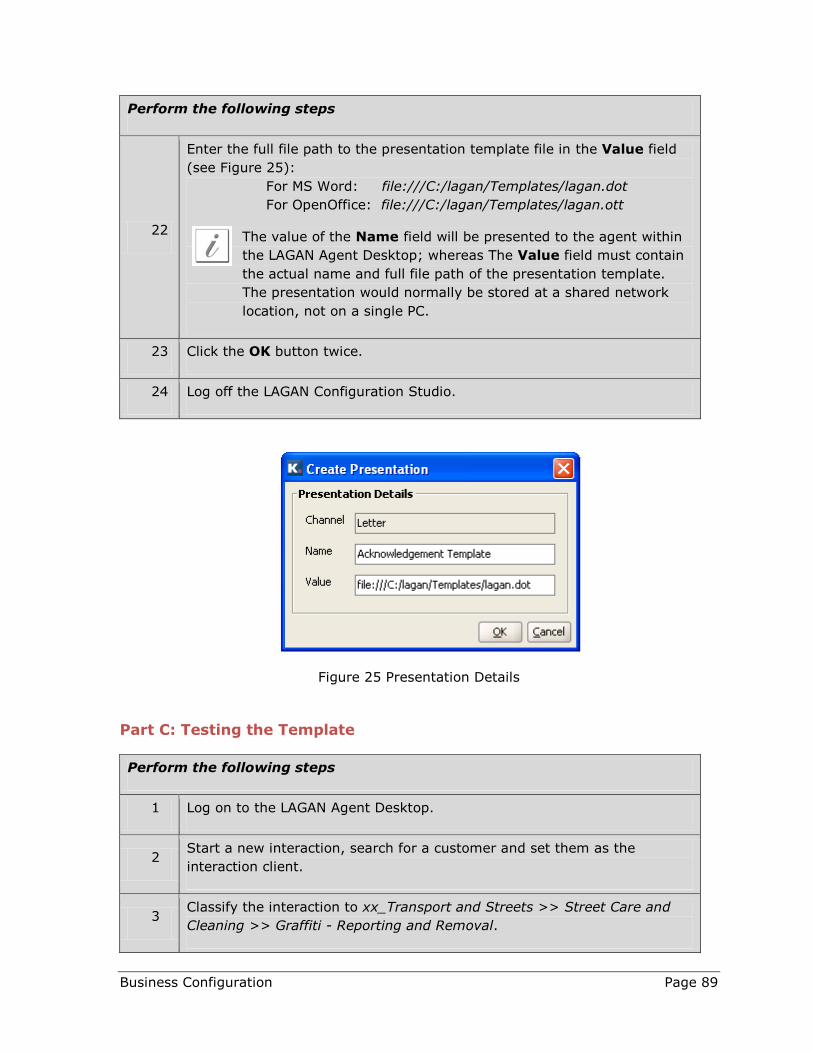
Business Configuration Page 89
Perform the following steps
22
Enter the full file path to the presentation template file in the Value field
(see Figure 25):
For MS Word: file:///C:/lagan/Templates/lagan.dot
For OpenOffice: file:///C:/lagan/Templates/lagan.ott
The value of the Name field will be presented to the agent within
the LAGAN Agent Desktop; whereas The Value field must contain
the actual name and full file path of the presentation template.
The presentation would normally be stored at a shared network
location, not on a single PC.
23 Click the OK button twice.
24 Log off the LAGAN Configuration Studio.
Figure 25 Presentation Details
Part C: Testing the Template
Perform the following steps
1 Log on to the LAGAN Agent Desktop.
2 Start a new interaction, search for a customer and set them as the
interaction client.
3 Classify the interaction to xx_Transport and Streets >> Street Care and
Cleaning >> Graffiti - Reporting and Removal.

Page 90 Business Configuration
Perform the following steps
4 Complete the case dialog with the required information then click the OK
button.
5 Click the Contact History button; locate the case you just created and
right-click.
6 Choose Create Letter from the popup menu.
7
From the drop-down box in the top left-hand corner, locate your tree
name; this will be xx_templates where xx represents your trainee
number.
8 Double-click the Acknowledgement template to display its content.
9 Click the Resolve button; the blue text will be replaced with the current
date, the customer name, the case number and the agent name.
10
Click the Send button. The system will retrieve the Microsoft Word
template and then insert into it the text of the LAGAN template (see Figure
26).
Figure 26 Create Letter
Business Configuration Page 91
In topic 8 of the course eKit, you’ll find a screen-cam that demonstrates how to
complete this exercise.
Review the exercise with the instructor before continuing.

Page 92 Business Configuration
Demonstration: Importing Email Contacts
The following steps illustrate how to import external email contacts into LAGAN thereby
enabling users to send or forward emails to these addresses from an address book. The
addresses may be internal employees that as yet do not have access to LAGAN or to 3rd
party contractors that perform specific work for the organization. It is therefore assumed
that the number of addresses will be in the tens or hundreds, not thousands.
An example of the import file can be found on the course eKit within the folder
External Email Contacts.
Part A: Importing the Addresses
Perform the following steps
1
Navigate to Correspondence | External Email Contacts in the
configuration tree.
This screen provides guidance on the format of the rows within the CSV;
each row must contain two columns: full name and email. These can be
separated with a comma, tab or vertical line.
2 Click the Import button. The Select a Separator dialog is displayed.
3 Enable the Comma radio button – this is because the example file
provided with this course used a comma as the separator.
4 Click the Select button. A Select a File dialog is displayed.
5
Navigate and select the appropriate file then click the Open button.
By default the file type on the Select a File dialog is set to CSV;
if the import file is a .txt file then select All Files from the Files of
Types drop-down box.
6 A dialog will be displayed informing you if the import has been successful.
Click the OK button.
7
The External Email Contacts screen will be updated to display a status,
for example in the screenshot below (see Figure 27) the status indicated
that six contacts were imported by the user gillian.

Business Configuration Page 93
Figure 27 External Email Contacts
Part B: Using the External Email Contacts
These steps illustrate how an end-user can forward or send an email to an address on
the external email contacts list.
Perform the following steps
1
Log on to the LAGAN Agent Desktop with an appropriate username and
password.
The user must either be set to receive inbound email
correspondence or have the permission to create and send
outbound email correspondence.
2 Choose File | New | Email from the menu bar. The Create Email dialog
pops open (see Figure 28).
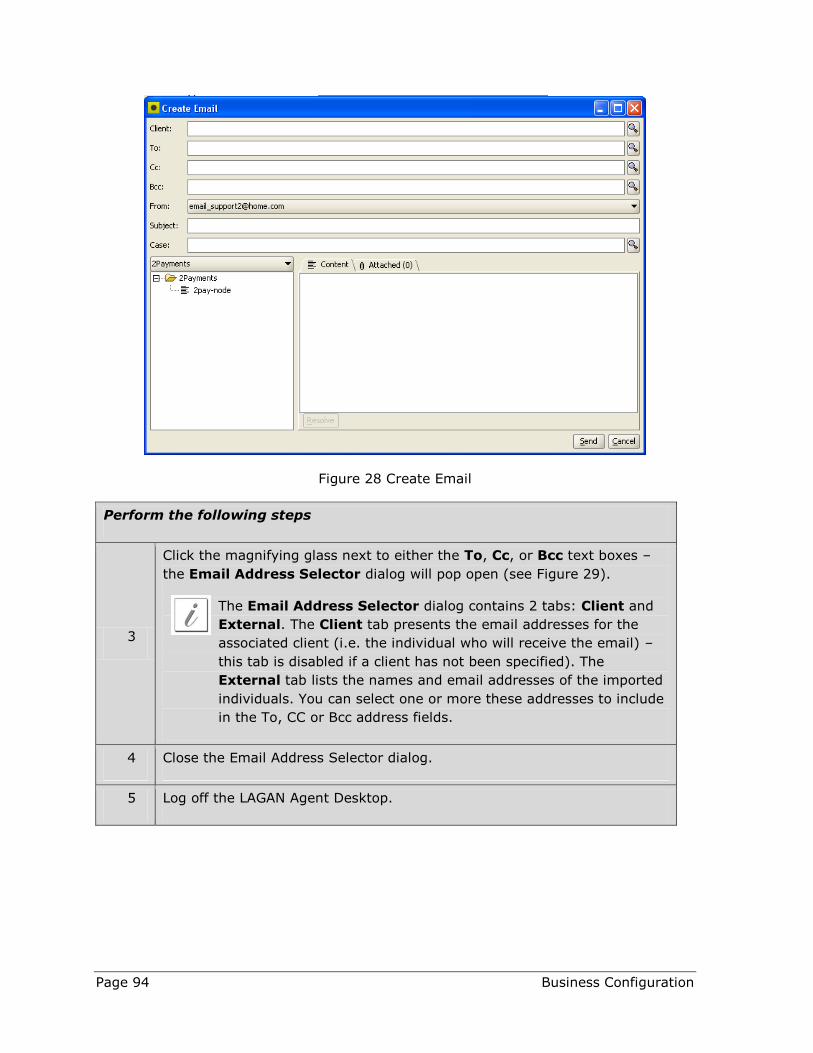
Page 94 Business Configuration
Figure 28 Create Email
Perform the following steps
3
Click the magnifying glass next to either the To, Cc, or Bcc text boxes –
the Email Address Selector dialog will pop open (see Figure 29).
The Email Address Selector dialog contains 2 tabs: Client and
External. The Client tab presents the email addresses for the
associated client (i.e. the individual who will receive the email) –
this tab is disabled if a client has not been specified). The
External tab lists the names and email addresses of the imported
individuals. You can select one or more these addresses to include
in the To, CC or Bcc address fields.
4 Close the Email Address Selector dialog.
5 Log off the LAGAN Agent Desktop.

Business Configuration Page 95
Figure 29 Email Address Selector

Page 96 Business Configuration
Case Study
Background
Acme City is undertaking a two year long citizen access project to transform the way it
interacts with the public.
At present service requests are dealt with directly by each department; however there
are in fact over 250 different phone numbers for the city departments and 7 small
offices in towns each of which provide a particular service. A survey carried out by the
city to examine how their citizens were contacting them revealed that over 70% of
residents go to the wrong place for help. In addition the lack of integration between
systems has meant that citizens are left trying to contact a department without success,
and when they do get through, it is often to the wrong department or they then have to
speak to several different departments to deal with one simple issue.
The new program aims to improve service provision and service accessibility by
implementing a ‘one-stop’ shop approach using LAGAN Enterprise. The end vision is to
offer all services including education, leisure and social care from many different contact
points – face to face, call center, email, Internet and kiosks. It is recognized that this
will be a major cultural change within the organization; it is not just a process change
but also a mindset change so that employees see things from the point of view of the
customer experience.
Acme City is at present involved in the redesign of the ground floor of their offices to
incorporate a contact center with the potential to hold 30 staff. The latter will have
access to the LAGAN Agent Desktop and will ultimately handle all service requests and
inquiries made to the City however so as not to overburden the contact center it has
been decided that in the first phase only “Environmental & Planning” Services processes
will be implemented.
A LAGAN business consultant has conducted a set of workshops with Acme City. They
discovered all the information required to configure the LAGAN system to the specific
requirements of the City; these are detailed in the following pages. Your task as a
LAGAN Configuration Specialist is to take these requirements and transfer them into the
LAGAN system.

Business Configuration Page 97
Requirements
Front Office (Contact Center)
In the contact center, there will be 4 agents and 1 supervisor; all of which should be
configure to perform the following functions in the LAGAN system:
Complete the table by identifying which LAGAN permission will provide the
required functionality.
Required Functionality LAGAN Permission
View a customer’s previous inquiries and
interactions
Compose and send letters
Compose and send emails
View the brief details of the current object and
its associated relationships
Search for previous cases based on a case
reference number, date, classification etc.
Use the scripting
Search for objects (organizations, properties,
streets and/or individuals)
View the complete details of an object
View the messaging board
Create manual voice-in and email-in interactions

Page 98 Business Configuration
In addition to the above functions the supervisor should be able to:
As before complete the table by identifying which LAGAN permission will provide
the required functionality.
Required Functionality LAGAN Component
Create and delete client messages.
Create and delete general messages
Create instant messages
Reopen cases
Monitor staff performance, work queue lengths,
and case SLAs
The first phase of the implementation will focus on Environmental & Planning issues; 3
processes are to be configured – Tree Issues, Clinical Waste and Missed Bin Collections.
All of these processes will result in the creation of a service request. A fourth process will
also be implemented which is simply a request for information on household waste. In
order to gauge the volumes of these types of inquiries the following U4 classifications
need to be added (xx should be replaced with your trainee number):
Subject Reason Type
xx_Environment &
Planning
Parks and Open
Spaces
Tree Issues
Recycling, Rubbish
and Waste
Household Waste – Clinical
Waste
Missed Collection
Household Waste (Prov_Info)

Business Configuration Page 99
Tree Issues Service Request
Classification: xx_Environment & Planning >> Parks and Open Spaces
>> Tree Issues
Name: xx_Tree Issue (where xx should be replaced by your trainee
number)
Queue: xx_ESG Inquiries
A notification should be sent to the queue supervisor, via
email, if any cases on this queue are in danger of exceeding
their SLA in 1 day time. The notification should include the
case id and queue name.
Severity: 4
Priority: 4
Form: Two fields should be added:
Exact Position
Edit field, length 50, mandatory
Further Details
Text Area, optional
SLA: 5 Working days
Activities: The following activities must be completed by the back office
in order to resolve the service request:
Arrange a site visit to the premises
Activity duration of 2 days; if this SLA exceeds the case
worker should be notified via email.
Compile report
Activity duration is 3 days; if the activity is not completed
within 5 hours of the SLA then the case worker and
Supervisor should be notified via email.

Page 100 Business Configuration
Clinical Waste Service Request
Classification: xx_Environment & Planning >> Recycling, Rubbish and
Waste >> Clinical Waste Service
Queue: xx_ESG Inquiries (where xx should be replaced by your trainee
number)
Severity: 0
Priority: 0
SLA: 7 days
Form: The following information needs to be collected from the
customer:
Exact Position
Edit field, length 50, optional
Type of Waste
Edit field, length 50, mandatory
Contact Method
Combo Field with 3 choices: Letter, Email & Phone No
Further Details
Text Area, optional
Activities: The following activities must be completed by the back office in
order to resolve the service request:
Arrange a site visit to the premises
Activity duration of 2 days; if this SLA exceeds the case
worker should be notified via email
Book Contractor
Activity duration is 2 days; if the activity is not completed
within 5 hours of the SLA then the case worker should be
notified via email
Call Customer
Activity duration is 1 days
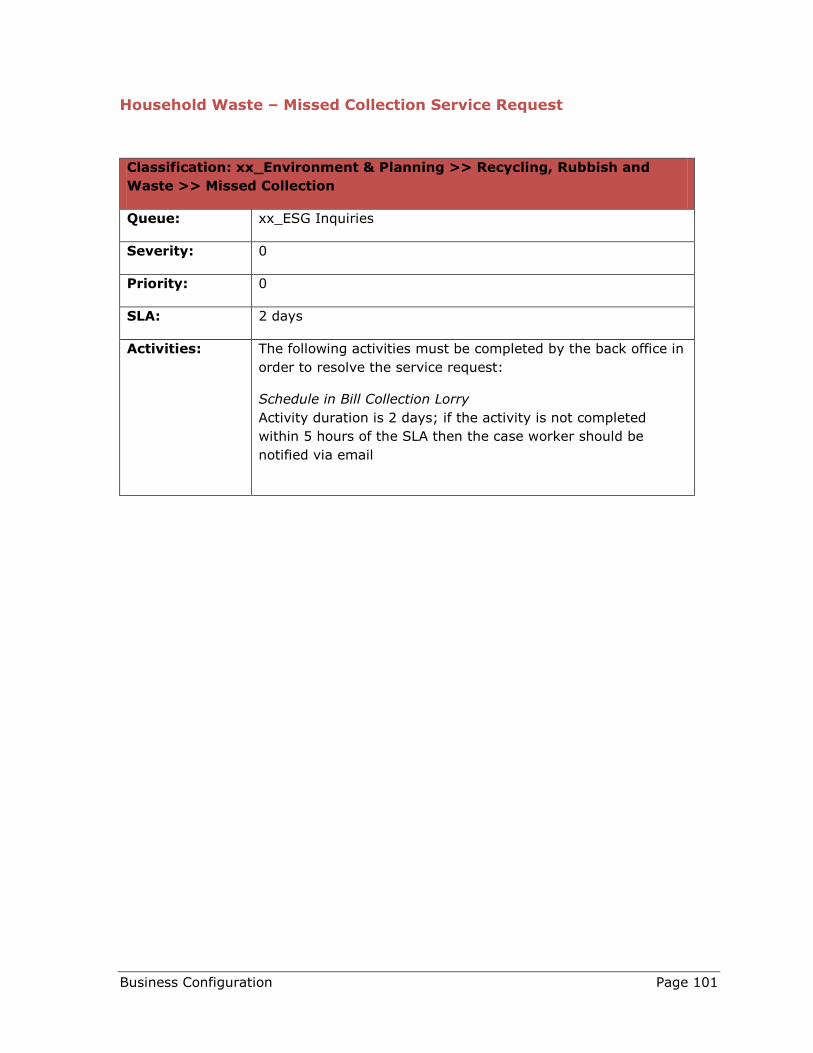
Business Configuration Page 101
Household Waste – Missed Collection Service Request
Classification: xx_Environment & Planning >> Recycling, Rubbish and
Waste >> Missed Collection
Queue: xx_ESG Inquiries
Severity: 0
Priority: 0
SLA: 2 days
Activities: The following activities must be completed by the back office in
order to resolve the service request:
Schedule in Bill Collection Lorry
Activity duration is 2 days; if the activity is not completed
within 5 hours of the SLA then the case worker should be
notified via email

Page 102 Business Configuration
Back Office
Two back office users will process all service requests within the xx_ESG Inquiries
work queue; they should be configured to have access to the following LAGAN functions:
As before complete the table by identifying which LAGAN permission will provide
the required functionality.
Required Functionality LAGAN Permission
View previous inquiries and interactions
Compose and send letters
View the brief details of the current object and
its associated relationships
Search for previous inquiries based on a case
reference number, date, classification etc.
Update the SLA and severity of a case
Search for objects (organizations, properties,
streets and/or individuals)
View the complete details of an object. (Current
Object Details View)
Create manual voice-in, email-in, and mail-in
interactions

Business Configuration Page 103
Appendix
Appendix A: If you have More Time…
The following scenarios should be attempted if time permits; they provide additional
practice in configuring:
Classifications
Process Definitions
Forms
Tasks / Task Lists
Case Work Queues
Escalation Rules
Exercise 24: Additional Practice
For each process definition, you will be provided with the details of the classification to
which it should be linked, the queue onto which the cases should be placed, and details
of any associated form and/or tasks. You should create each of these items and then
test your configuration by logging onto the LAGAN Agent Desktop and creating a case of
that type.
Remember to prefix any items you create with your trainee number.

Page 104 Business Configuration
Part A: Publicity Grant
Here you’ll configure a form, a process definition, the tasks, and any escalation rules
required for the classification, Publicity Grant (App_Serv).
Classification: xx_Arts and Leisure >> Tourism >> Publicity Grant
(App_serv)
Name: xx_Application for a Publicity Grant
Queue: xx_Tourism and Leisure
Severity: 5
Priority: 5
Form: The form should contain the following fields:
Attraction
Edit field, length 50, mandatory
Grant For
Combo box with 2 choices: publicity leaflets and event
Mandatory, No Default.
Amount Requested
Edit field, length 40, mandatory
Events: Three events should be added:
Approval Denied
Approval Granted
Inform customer of decision
SLA: 30 days
Tasks: Four tasks should be added:
xx_Review Application Form
xx_Arrange Interview/Site Inspection
xx_Interview/Inspection Complete
xx_Approve/Deny Grant
Part B: Garden Maintenance

Business Configuration Page 105
Here, you’ll configure a form, a process definition, the tasks, and any escalation rules
required for the classification, Garden Maintenance.
Classification: xx_Housing >> Improvements, repairs and
regenerations >> Garden Maintenance
Name: xx_Garden Maintenance
Queue: xx_Housing
Severity: 3
Priority: 3
Form: The form should contain the following fields:
Work to be done
Combo box with 2 choices: Grass cutting or Hedges cut.
Mandatory; no default
Reason
Combo box with 2 choices: Disabled or Elderly. Mandatory;
No default.
SLA: 40 days
Tasks: Four tasks should be added:
xx_Assess Work
xx_Arrange Contractor
xx_Contractor Work Complete Milestone
xx_Site Inspection

Page 106 Business Configuration
Part C: Electoral Register
Next, you’ll configure a form, a process definition, the tasks, and any escalation rules
required for the classification, Electoral Register (App_Serv).
Classification: xx_Miscellaneous >> Democracy >> elections –
Electoral Register (App_Serv)
Name: xx_Electoral Register
Queue: xx_Miscellaneous
Severity: 0
Priority: 0
Form: The form should contain one field:
Local Authority
Edit field, length 30
SLA: 40 days
Tasks: Four tasks should be added:
xx_Dispatch application form
xx_Receive completed form
xx_Review Form
xx_Arrange Interview

Business Configuration Page 107
Part D: Tax Exemptions
Here, you’ll configure a form, a process definition, the tasks, and any escalation rules
required for the classification, Tax Exemptions
Classification: xx_Revenues and Benefits/Finance >> Council Tax
>> Exemptions (App_Serv)
Name: xx_Council Tax Exemption
Queue: xx_Benefits
Severity: 4
Priority: 4
Form: One fields should be added:
Reason
Combo box with 5 choices: Owned by Charity; Under repair;
Empty and unfurnished; Halls of residence; Owned by
students. Mandatory
SLA: 35 days
Tasks: Two tasks should be added:
xx_Arrange Interview
xx_Application denied

Page 108 Business Configuration
Part E: Equipment & Adaptations to Home
Here, you’ll configure a form, a process definition, the tasks, and any escalation rules
required for the classification, Equipment and Adaptations to Home (App_Serv).
Classification: xx_Social Services >> Help at Home >> Equipment
and Adaptations to Home (App_Serv)
Name: xx_Application for Equipment Adaptation
Queue: xx_Social Services
Severity 3
Priority: 3
Form: One field should be added:
Adaptation required
Edit field. mandatory
SLA: 30 Days

Business Configuration Page 109
Part F: Sixth Form Access Fund
Finally, you’ll configure a form, a process definition, the tasks, and any escalation rules
required for the classification, Sixth Form Access Fund.
Classification: xx_Education >> Schools >> Sixth Form Access
Fund (App_Serv)
Name: xx_Application for Sixth Form Access Fund
Queue: xx_Education
Severity: 1
Priority: 1
Form: Four fields should be added:
School
Edit field. mandatory
Age of pupil
Edit field, mandatory
Date of birth of pupil
Date field, mandatory
Family income
Edit field, mandatory
Events: Six events should be added:
Visit arranged
Visit taken place
Application denied
Application approved
Financial form sent
Financial form received back
SLA: 60 Days
Tasks: Three tasks should be added:
Review Completed Form

Page 110 Business Configuration
Classification: xx_Education >> Schools >> Sixth Form Access
Fund (App_Serv)
Arrange Interview
Interview Milestone Complete
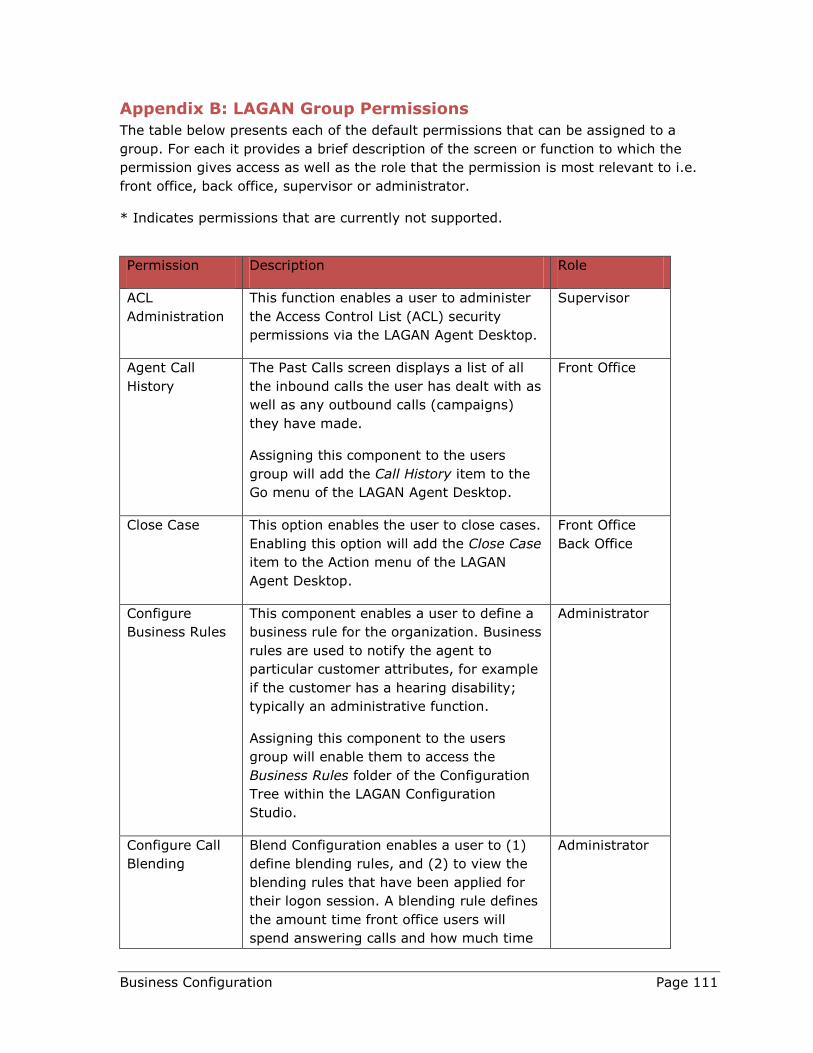
Business Configuration Page 111
Appendix B: LAGAN Group Permissions
The table below presents each of the default permissions that can be assigned to a
group. For each it provides a brief description of the screen or function to which the
permission gives access as well as the role that the permission is most relevant to i.e.
front office, back office, supervisor or administrator.
* Indicates permissions that are currently not supported.
Permission Description Role
ACL
Administration
This function enables a user to administer
the Access Control List (ACL) security
permissions via the LAGAN Agent Desktop.
Supervisor
Agent Call
History
The Past Calls screen displays a list of all
the inbound calls the user has dealt with as
well as any outbound calls (campaigns)
they have made.
Assigning this component to the users
group will add the Call History item to the
Go menu of the LAGAN Agent Desktop.
Front Office
Close Case This option enables the user to close cases.
Enabling this option will add the Close Case
item to the Action menu of the LAGAN
Agent Desktop.
Front Office
Back Office
Configure
Business Rules
This component enables a user to define a
business rule for the organization. Business
rules are used to notify the agent to
particular customer attributes, for example
if the customer has a hearing disability;
typically an administrative function.
Assigning this component to the users
group will enable them to access the
Business Rules folder of the Configuration
Tree within the LAGAN Configuration
Studio.
Administrator
Configure Call
Blending
Blend Configuration enables a user to (1)
define blending rules, and (2) to view the
blending rules that have been applied for
their logon session. A blending rule defines
the amount time front office users will
spend answering calls and how much time
Administrator
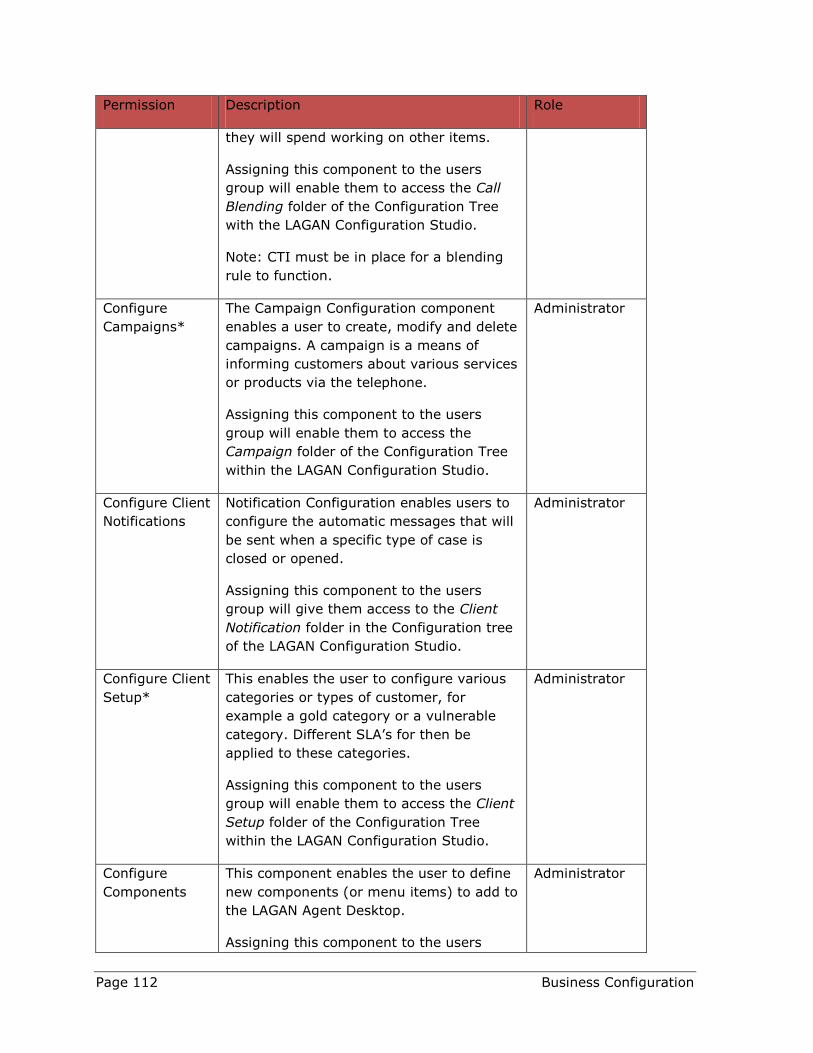
Page 112 Business Configuration
Permission Description Role
they will spend working on other items.
Assigning this component to the users
group will enable them to access the Call
Blending folder of the Configuration Tree
with the LAGAN Configuration Studio.
Note: CTI must be in place for a blending
rule to function.
Configure
Campaigns*
The Campaign Configuration component
enables a user to create, modify and delete
campaigns. A campaign is a means of
informing customers about various services
or products via the telephone.
Assigning this component to the users
group will enable them to access the
Campaign folder of the Configuration Tree
within the LAGAN Configuration Studio.
Administrator
Configure Client
Notifications
Notification Configuration enables users to
configure the automatic messages that will
be sent when a specific type of case is
closed or opened.
Assigning this component to the users
group will give them access to the Client
Notification folder in the Configuration tree
of the LAGAN Configuration Studio.
Administrator
Configure Client
Setup*
This enables the user to configure various
categories or types of customer, for
example a gold category or a vulnerable
category. Different SLA’s for then be
applied to these categories.
Assigning this component to the users
group will enable them to access the Client
Setup folder of the Configuration Tree
within the LAGAN Configuration Studio.
Administrator
Configure
Components
This component enables the user to define
new components (or menu items) to add to
the LAGAN Agent Desktop.
Assigning this component to the users
Administrator

Business Configuration Page 113
Permission Description Role
group will enable them to access the
Components folder of the Configuration
Tree within the LAGAN Configuration
Studio.
Configure
Correspondence
This component enables the user to
configure standard templates and
attachments that can be used by agents to
build letters and emails.
Assigning this component will give the user
access to the Correspondence folder in the
Configuration Tree.
Administrator
Configure
eForms
This component enables the user to create,
modify and delete eForms.
Assigning this component will give access
to the eForm folder in the Configuration
Tree.
Administrator
Configure
Inquiries
The Inquiry Configuration component
enables the user to (1) create, modify and
delete classifications; (2) create, modify
and delete process definitions; (3) create,
modify and delete tasks and task lists.
Assigning this component will give the user
access to the Inquiries folder of the
Configuration Tree as well as its sub-
folders (Cases and Tasks)
Administrator
Configure
Events
This component enables the user to create
custom events – these are then associated
with a classification.
Administrator
Configure
Groups
This component enables the user to create,
modify and delete groups. Groups are what
determine the functionality and work type
users will handle.
Assigning this component will give the user
access to the Groups folder in the
configuration tree.
Administrator

Page 114 Business Configuration
Permission Description Role
Configure Script
Flows
This Script Flow Configuration component
enables the user to create, modify and
delete scripts flow. Script flows are used by
front office workers to help them deal
efficiently and effectively with a customer
contact.
Assigning this component to the users
group will give them access to the Script
Flow folder in the Configuration tree of the
LAGAN Configuration Studio.
Administrator
Configure Users Enables the user to create, modify and
delete LAGAN users.
Assigning this component to the users
group will give them access to the User
folder in the configuration tree of the
LAGAN Configuration Studio.
Administrator
Configure Work
Queues
This enables the user to configure queues
that will hold case items and inbound
correspondence items (e.g. emails, faxes,
letters, etc.).
Assigning this component to the users
group will give them access to the Work
Queues folder in the Configuration Tree of
the LAGAN Configuration Studio.
Administrator
Configure XML
Schemas
This component enables the user to set up
connections to external databases and to
define SELECT statements that will retrieve
specific information from these databases.
Assigning this component to the users
group will give them access to the XML
schema folder in the Configuration Tree of
the LAGAN Configuration Studio.
Administrator
Create Case The Create Case component enables the
user to create a case without being in an
interaction; typically a front office function.
Assigning this component to the users
group will add the New Case item to the
Front Office
Back Office

Business Configuration Page 115
Permission Description Role
File menu of the LAGAN Agent Desktop.
Create Client
Message
Enabling this feature will give users the
ability to create client messages. These are
messages that relate to a specific individual
or organization.
Front Office
Create eForm Enables the user to add an eForm to a
case. This feature will add the Add eForm
item to the Action menu of the LAGAN
Agent Desktop.
Front Office
Back Office
Create Event This option enables the user to add an
event to the case. Events can be used to
specify what the user has done to progress
the case. Enabling this feature will add the
Add Event item to the Action menu of the
LAGAN Agent Desktop.
Front Office
Back Office
Create General
Message
Provides users with the ability to create
general messages.
Front Office
Supervisor
Create Instant
Message
Enabling this feature will give users the
ability to create and send instant
messages.
Supervisor
Create
Interaction
This component enables the agent to
manually log interactions; the channels on
which these can be logged are dependent
upon the features enabled for this
component.
Assigning this option to the users group will
add the Log Incoming item to the File
menu of the LAGAN Agent Desktop.
Front Office
Back Office
Create Note This case action enables the user to add a
note to case. This note will be visible to all
other front office and back office workers.
Enabling this feature will add the following
item to the Action menu of the LAGAN
Agent Desktop; Add Case Note.
Front Office
Back Office
Create ODM
Object
This permission allows a user to create a
new individual and organization; typically a
front and back office function.
Front Office

Page 116 Business Configuration
Permission Description Role
Assigning this component will add the New,
Individual/Organization item to the File
menu of the LAGAN Agent Desktop.
Create Process
By assigning this component, the user will
be able to create specific processes that
follow a defined workflow.
Note: This component is only relevant if
you have purchased LAGAN BPM.
Front Office
Back Office
Create SMS
Message
Gives users the ability to create SMS (text)
messages. SMS messages can be sent to
any user in the LAGAN system that has a
cell (mobile) phone number specified in
their user profile.
Front Office
Supervisor
Create Task Enables the user to add a task or task list
to the case. The user can select a
predefined task or task list or they can
create a new task to assign to the case.
This feature will add the Add Task item to
the Action menu of the LAGAN Agent
Desktop.
Front Office
Back Office
Create Task
Note
This feature enables the user to add notes
to a task. To access this option the user
must select the task, right-click and then
choose Task Notes from the popup menu.
Front Office
Back Office
End Interaction
On Answer (CTI
Light Only)
If enabled the system will automatically
end the current interaction when a new call
is answered. This is only relevant if LAGAN
is integrated with a telephony system.
Front Office
Delete Case This feature enables the user to delete a
case. A case can only be deleted if it has
been closed. Enabling this feature will add
the Delete Case item to the Action of the
LAGAN Agent Desktop.
Supervisor
Delete Client
Message
Gives users the ability to delete client
messages.
Front Office
Supervisor
Delete General
Message
Gives users the ability to delete general
messages.
Supervisor

Business Configuration Page 117
Permission Description Role
Delete Note This case action enables the user to delete
notes from cases. To access this option the
user must select the note, right-click and
then choose Delete from the popup menu.
Front Office
Back Office
Supervisor
Delete ODM
Object
This component enables a user to delete a
new individual and organization and
displays the ‘Actions, Delete Current
Object’ menu option.
Supervisor
Delete Task This case action enables the user to delete
tasks assigned to a case. Note: Only
manual tasks can be deleted. To access
this function the user must the select the
task, right-click and then choose Delete
from the popup menu.
Front Office
Back Office
Supervisor
Face To Face This screen is used to handle face-to-face
interactions if LAGAN has been integrated
with Q-Matic. Assigning this component to
the users group will add the Face To Face
item to the Go menu in the LAGAN Agent
Desktop.
Front Office
Information
Screen
The Information component provides
access to a web site/page; the actual page
is determined by the system configuration.
Assigning this component to the users
group will add the Information item to the
Go menu of the LAGAN Agent Desktop.
Front Office
Link Cases Enables users to link or connect two cases.
If enables the Link Case To Case option will
be available in the Actions menu of the
LAGAN Agent Desktop.
Front Office
Back Office
Old Contact
History
The (Old) Detailed Contact History screen
provides a list of all the interactions made
by a customer as well as all the inquiries
and cases they have raised.
This component will add the Detailed
Contact History item to the Go menu.
Front Office
Optionally If enabled, the user can end an email Front Office.

Page 118 Business Configuration
Permission Description Role
Classify Email
In Interactions
interaction without assigning it a
classification. If not enabled, then each
email interaction must be assigned a
classification, else the user will not be able
to finish it.
Optionally
Classify Face to
Face
Interactions
If enabled, the user can end a manual face
to face interaction without assigning it a
classification. If not enabled, then each
face to face interaction must be assigned a
classification, else the user will not be able
to finish it.
Front Office
Optionally
Classify Fax In
Interactions
If enabled, the user can end a manual fax
interaction without assigning it a
classification. If not enabled, then each
manual fax interaction must be assigned a
classification, else the user will not be able
to finish it.
Front Office
Optionally
Classify Mail In
Interactions
If enabled, the user can end a manual
mail/letter interaction without assigning it a
classification. If not enabled, then each
manual mail/letter interaction must be
assigned a classification, else the user will
not be able to finish it.
Front Office
Optionally
Classify SMS In
Interactions
If enabled, the user can end a manual SMS
interaction without assigning it a
classification. If not enabled, then each
manual SMS interaction must be assigned
a classification, else the user will not be
able to finish it.
Front Office
Optionally
Classify Voice
In Interactions
If enabled, the user can end a manual
voice in interaction without assigning it a
classification. If not enabled, then each
manual voice in interaction must be
assigned a classification, else the user will
not be able to finish it.
Front Office
Override Lock
Case
This option enables the user to override
any changes another user is making at the
same time on a case, i.e. their changes
override those made by the other user.
Supervisor

Business Configuration Page 119
Permission Description Role
Override Lock
Correspondence
This option enables the user to override
any changes to a correspondence template
that another user is making at the same
time.
Administrator
Override Lock
Script Flow
This permission allows a user to override
the lock on a particular Script Flow held by
another user. If a user overrides a lock on
another user, then the other user’s
changes to the script will be lost.
Administrator
Real Time
Monitor
The Real Time Monitor screen is used to
monitor the performance of agents, cases
and queues.
Assigning this component to the users
group will add the Real Time Monitor item
to the Go menu of the LAGAN Agent
Desktop.
Supervisor
Reclassify Case This case action enables the user to assign
a different classification to an open case.
Enabling this feature will add the Reclassify
Case item to the Action menu of the LAGAN
Agent Desktop.
Reopen Case This case action enables the user to reopen
a case. Enabling this feature will add the
Reopen Case item to the Action -> More
actions menu of the LAGAN Agent Desktop.
Front Office
Back Office
Supervisor
Search Cases This enables the user to search for cases
based on various criteria such as case ref,
case title classification, status etc.
Assigning this component to the users
group will add the Case Search item to the
Go menu in the LAGAN Agent Desktop.
Front Office
Back Office
Search ODM
Objects
This component enables the user to search
the details associated with an individual,
street, property and organization, any
other custom-added ODM object. This also
enables the Go, Search menu item.
Front Office
Back Office
Search Script The Flow Search feature enables the user Front Office

Page 120 Business Configuration
Permission Description Role
flows to search for a specific script flow.
Send Client
Message
Enabling this feature will give users the
ability to create client messages. These are
messages that relate to a specific individual
or organization.
Front Office
SLA Suspend
Case
This case action enables the user to
suspend the case SLA i.e. stop the SLA
counting.
Enabling this feature will add the Suspend
SLA item to the Action menu of the LAGAN
Agent Desktop.
Front Office
Back Office
Supervisor
Telephony Info If LAGAN has been integrated with a 3rd
party telephony system, then enabling this
feature will display a wallboard in the
LAGAN Agent Desktop. The wallboard
provides information on how many calls are
waiting, how many agents are logged on,
etc.
Front Office
Supervisor
Unlink Cases If enabled the user will be able to unlink
two cases.
Front Office
Back Office
Update Case This feature enables the user to update the
case details including who or what the case
is associated with, its severity, its priority
and SLA. Enabling this feature will add the
Update Case item to the Action menu of
the LAGAN Agent Desktop.
Front Office
Back Office
Update eForm Enables the user to edit an eForm. To
access this option the user must the select
eForm, right-click and then choose Edit
eForm from the popup menu.
Front Office
Back Office
Update Note Enables the user to edit the content of case
notes. To access this option the user must
select the note, right-click and then choose
Edit from the popup menu.
Front Office
Back Office
Update ODM
Object
This component enables a user to edit an
individual or organization record and
displays the ‘Go, Current Details’ menu
Front Office
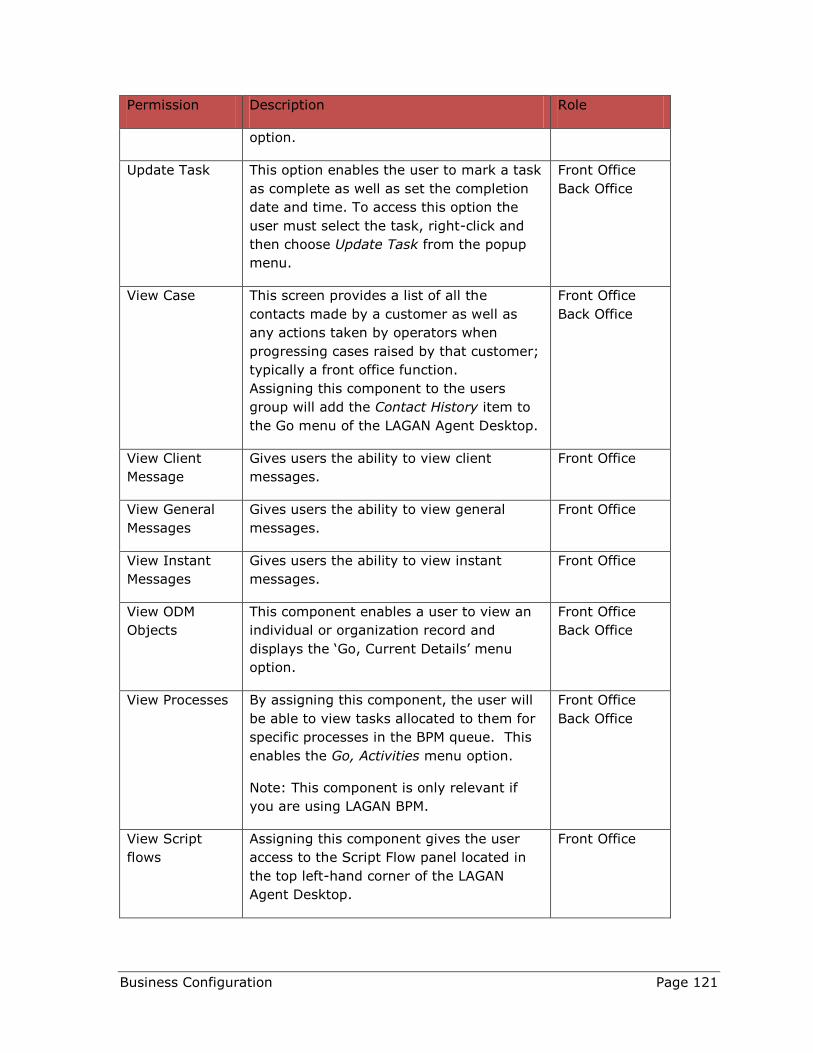
Business Configuration Page 121
Permission Description Role
option.
Update Task This option enables the user to mark a task
as complete as well as set the completion
date and time. To access this option the
user must select the task, right-click and
then choose Update Task from the popup
menu.
Front Office
Back Office
View Case This screen provides a list of all the
contacts made by a customer as well as
any actions taken by operators when
progressing cases raised by that customer;
typically a front office function.
Assigning this component to the users
group will add the Contact History item to
the Go menu of the LAGAN Agent Desktop.
Front Office
Back Office
View Client
Message
Gives users the ability to view client
messages.
Front Office
View General
Messages
Gives users the ability to view general
messages.
Front Office
View Instant
Messages
Gives users the ability to view instant
messages.
Front Office
View ODM
Objects
This component enables a user to view an
individual or organization record and
displays the ‘Go, Current Details’ menu
option.
Front Office
Back Office
View Processes By assigning this component, the user will
be able to view tasks allocated to them for
specific processes in the BPM queue. This
enables the Go, Activities menu option.
Note: This component is only relevant if
you are using LAGAN BPM.
Front Office
Back Office
View Script
flows
Assigning this component gives the user
access to the Script Flow panel located in
the top left-hand corner of the LAGAN
Agent Desktop.
Front Office


