Landslide Virtual Machine Installation Instructions PN 71-008013 Rev A 1 Landslide Virtual Machine Installation Instructions 1 Virtualization Platform The choice and installation of virtualization platform and manager is left to the user. 2 Landslide Virtual Images Currently Landslide provides Virtual Images in the Virtual Machine Disk (.vmdk) and QEMU Copy on Write 2 (qcow2) formats. It is recommended that the user downloads and installs the Landslide 15.0 Virtual Machine image rather than upgrading an existing VM. This will ensure that the underlying Virtual Machine operating system will support the latest VM features and fixes. 3 Hypervisor specific requirements for upgrading (or installing) Landslide Virtual Machines In 15.0, some changes were made that require hypervisor considerations. Please look for Required for 15.0 in the steps below in order to ensure Landslide VMs will work on your hypervisor. Landslide 15.0 also added DPDK support to the Landslide virtual images. DPDK enables Landslide’s User Mode which allows for Port Reservation, VLAN tagging, better performance, user space controlled routing, etc. However, DPDK does require additional non- hyper-threaded cores and specific hardware and hypervisor configuration to support. Please look for Required for DPDK in the steps below to configure your hypervisor to work with DPDK. cpu_mode must be set in KVM and Openstack for Landslide to operate correctly. Hyper-threading should be disabled to support DPDK. Host Machine CPUs must support HugePages (CPU flag – pdpe1gb) to support DPDK. 3.1 VMware 1. Enable HugePages (Required for DPDK) a. In Advanced Configuration featMask.vm.cpuid.pdpe1gb = “Val:1” 2. Pin CPUs (Required for 15.0) - Can be found in <Machine Name> -> Edit Settings -> Resources a. Reserve CPUs by adding them to scheduling affinity in advanced CPU and setting HT to none b. Do not use the reserved CPUs from the previous step for any other VM c. Set CPU Shares to 0, Reservation to 100%
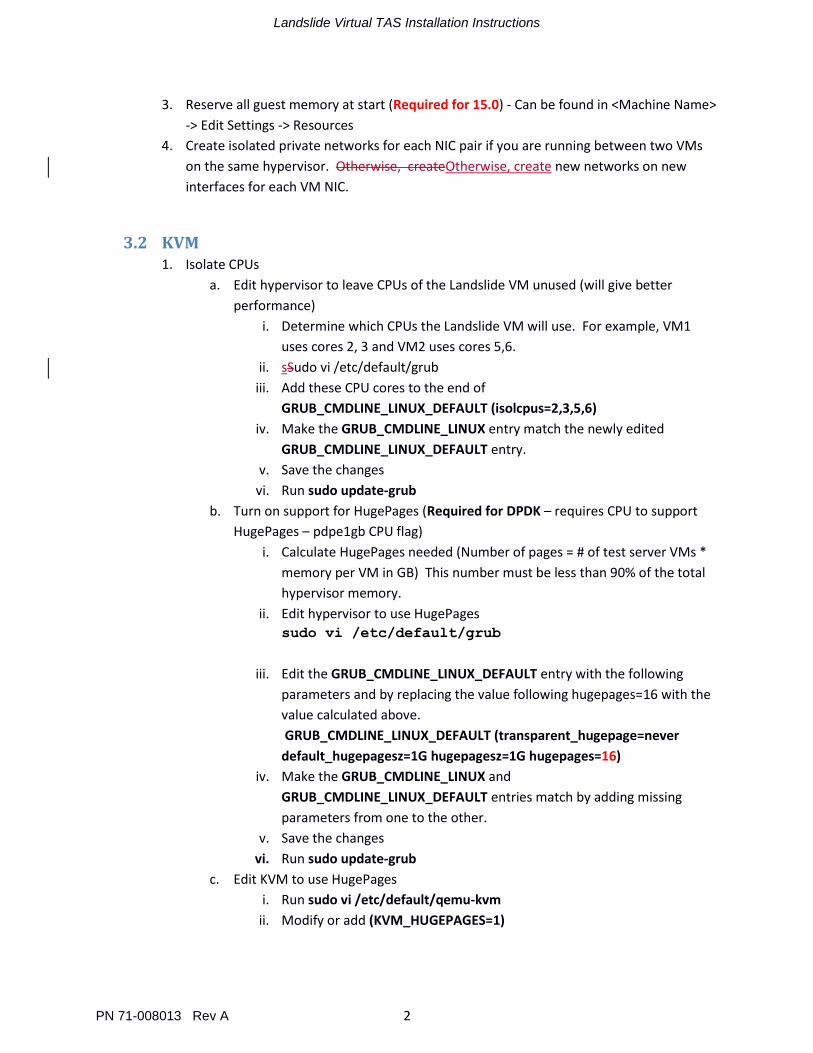
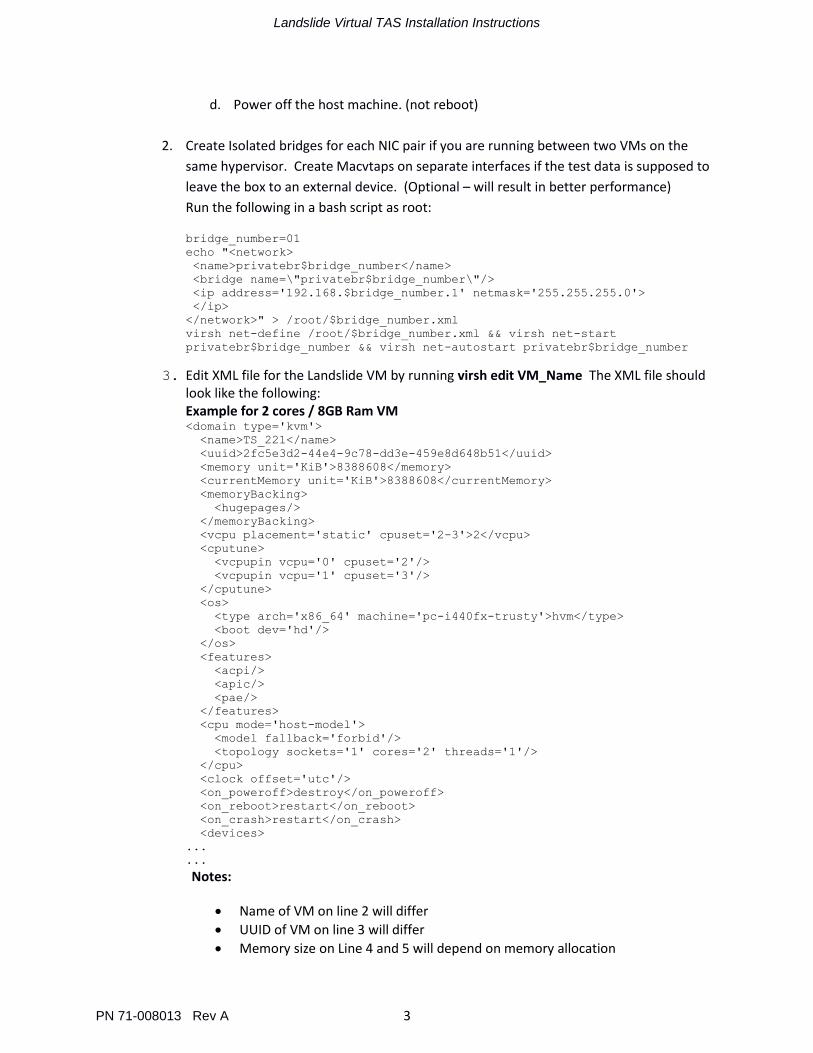
3. Edit XML file for the Landslide VM by running virsh edit VM_Name The XML file should look like the following: Example for 2 cores / 8GB Ram VM <domain type='kvm'>
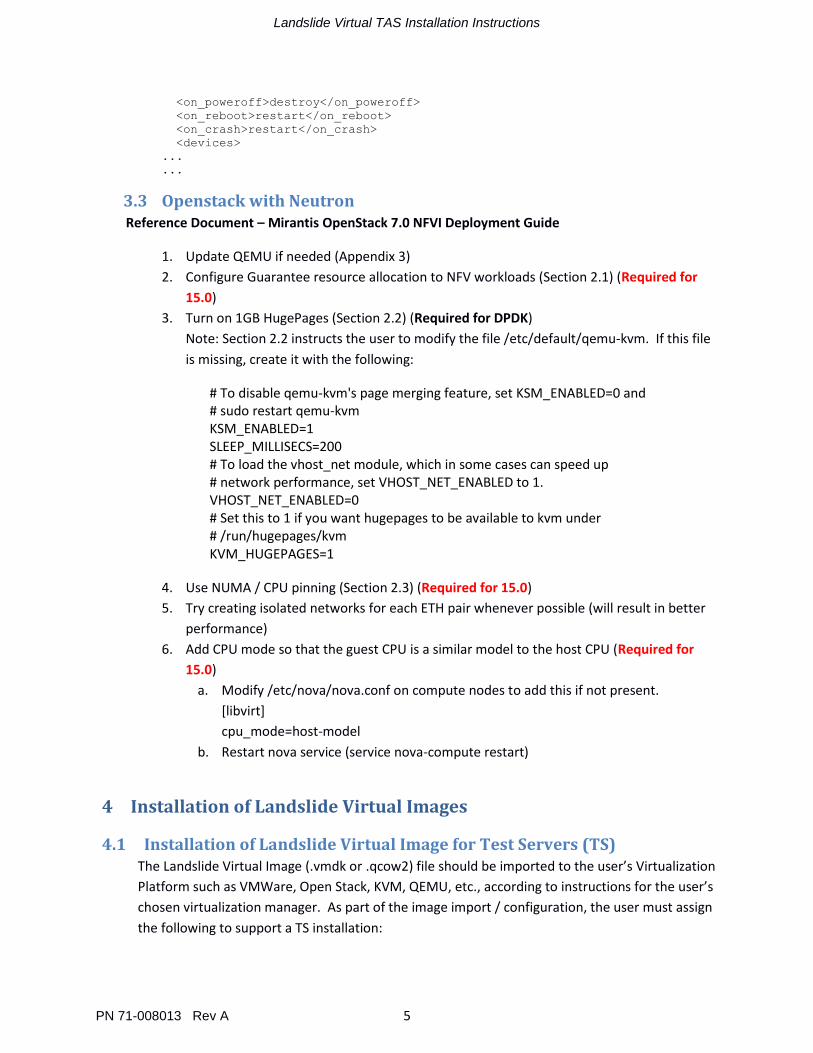
2. Configure Guarantee resource allocation to NFV workloads (Section 2.1) (Required for
15.0)
3. Turn on 1GB HugePages (Section 2.2) (Required for DPDK)
Note: Section 2.2 instructs the user to modify the file /etc/default/qemu-kvm. If this file
is missing, create it with the following:
# To disable qemu-kvm's page merging feature, set KSM_ENABLED=0 and # sudo restart qemu-kvm KSM_ENABLED=1 SLEEP_MILLISECS=200 # To load the vhost_net module, which in some cases can speed up # network performance, set VHOST_NET_ENABLED to 1. VHOST_NET_ENABLED=0 # Set this to 1 if you want hugepages to be available to kvm under # /run/hugepages/kvm KVM_HUGEPAGES=1
4. Use NUMA / CPU pinning (Section 2.3) (Required for 15.0)
5. Try creating isolated networks for each ETH pair whenever possible (will result in better
performance)
6. Add CPU mode so that the guest CPU is a similar model to the host CPU (Required for
15.0)
a. Modify /etc/nova/nova.conf on compute nodes to add this if not present.
[libvirt]
cpu_mode=host-model
b. Restart nova service (service nova-compute restart)
4 Installation of Landslide Virtual Images
4.1 Installation of Landslide Virtual Image for Test Servers (TS) The Landslide Virtual Image (.vmdk or .qcow2) file should be imported to the user’s Virtualization
Platform such as VMWare, Open Stack, KVM, QEMU, etc., according to instructions for the user’s
chosen virtualization manager. As part of the image import / configuration, the user must assign
2 or more network interfaces - 1 for management (first port assigned) and 1 – n test ports
A minimum of 20GB Hard Drive space
4.2 Installation of Landslide Virtual Image for a Test Administration Server
(TAS) The Landslide Virtual Image (.vmdk or .qcow2) file should be imported to the user’s Virtualization
Platform such as VMWare, Open Stack, KVM, QEMU, etc. according to instructions for the user’s
chosen virtualization manager. As part of the image import / configuration, the user will must
assign the following to support a TAS installation:
A minimum of 4 cores
A minimum of 24GB of memory
1 network interface for management
A minimum of 20GB Hard Drive space
4.3 Installation of Landslide Virtual Image for an EDGE system The Landslide Virtual Image (.vmdk or .qcow2) file should be imported to the user’s Virtualization
Platform such as VMWare, Open Stack, KVM, QEMU, etc. according to instructions for the user’s
chosen virtualization manager. As part of the image import / configuration, the user must assign
the following to support a Virtual EDGE installation:
2 or more network interfaces. 1 for management (first port assigned) and 1 – n test ports.
A minimum of 20GB Hard Drive space.
Landslide Virtual TAS Installation Instructions
PN 71-008013 Rev A 7
5 CloudInit for Heat Orchestration The first time the Landslide Virtual Machine is started, CloudInit will attempt to contact a metadata
server and bootstrap the virtual machine with desired configurations. This process takes about 5
minutes to complete. If this process is unsuccessful, CloudInit will be removed and the Virtual
Machine will boot normally in subsequent startups.
6 Virtual Machine and Management Port Configuration Follow instructions in the applicable sections below to configure the virtual machine and it’sits
management port information for the Virtual Test Server, Virtual TAS or Virtual EDGE system.
6.1 Virtual Test Server Note: The IP addresses and masks included in these instructions are for example only. The user
will use IP addressing, etc., that is consistent with their management network.
After the Landslide Virtual Image has been imported and configured with a processor, memory
and network interfaces, the user must use the chosen virtualization manager to open a console
to the newly added test server, and then configure the management port, netmask, default
gateway, etc.
1. Use the cfguser account to login to the Landslide Virtual platform.
The default password is the same as the user name.
login: cfguser
password: cfguser
The first time the cfguser user logs in to the Landslide server, you are prompted to define the
initial network configuration.
2. Enter y to define the configuration
Note: If you are not prompted with the initial configuration question, enter "ipcfg" at the
command prompt.
Caution:
Do not abort this script when it is executed for the first time on a new platform.
Background processes configure the services that should automatically start on
boot. If the script is aborted, some services, including telnet, will not start if the
platform is power-cycled or rebooted.
Do not use Arrow keys or the Delete key to correct data entry errors; use only the
backspacethe backspace key. If errors are detected after data has already been
entered, at the end of the script, answer “no” to the reboot question and rerun the
ipcfg command.
Landslide Virtual TAS Installation Instructions
PN 71-008013 Rev A 8
3. You are prompted to identify the port to be used as the management port. You must
select the recommended and default port number as the management port (eth0).
NOTE - Preferred management port is eth0
Designate management port (eth0-eth13) [eth0]:
4. Use sub-steps 5a - 5e to answer the configuration prompts.
The script cycles through a set of configuration prompts for the management port. The port
name is shown in the prompt, and is enclosed in angle brackets: <eth0>. The Landslide
Manager is equivalent to the TAS.
<eth0> IP Address [192.168.0.100]:
<eth0> Network Mask [255.255.255.0]:
<eth0> Auto Negotiate? (yes/no) [yes]:
<eth0> IP Gateway [192.168.0.254]:
<eth0> Host Name [Coast49]:
5. Answer the configuration prompts.
a. <port> IP Address [ 192.168.0.100] : (Enter a unique IPv4 address for the
port.)
b. <port> Network Mask [255.255.255.0]: (Enter the IPv4 network mask.)
c. Auto Negotiate? (yes/no) [yes]: (Accept the default to enable speed and
duplex negotiation for the port.)
d. <port> IP Gateway [192.168.0.254]: (Enter the address for the IPv4 gate-
way in your network.)
e. <port> Host Name [Spirent]: (Enter the host name, without blank spaces, for
the Landslide platform.)
Note: Confirm the IP address assigned to the management port. Failure to use the
proper IP address will prevent communication with the platform.
Enter the IP address for the Landslide Manager.
(This message only appears on Test Servers)
TAS IP Address [192.168.0.100]:
Note: If the Landslide Manager’s IP address is changed after completing the Landslide
installations, the Landslide Test Server configurations must be modified to restore
communication between the platforms
6. A time server is defined for every platform. Enter the IP address of the time server in your
network.
NTP Server IP [192.168.0.100]:
Landslide Virtual TAS Installation Instructions
PN 71-008013 Rev A 9
Note: One option for NTP configuration is to point the Manager at the NTP source and then
point all of the Test Servers at the Manager. Then, if an NTP change is required, only the
Manager configuration will have to be changed.
The initial configuration is complete at this point.
7. Reboot the system.
System must be rebooted for these changes to take effect... Reboot now?
(yes/no) [yes]: yes
Note: If errors are detected in any of the data entered above, answer "no" to the
reboot question and rerun the ipcfg command.
8. The Landslide Virtual TS should now behave in the same manner as other Landslide TS
platforms. It can be added to and managed by a TAS. Please refer to Chapter 3 of the
Landslide Test System Installation Guide for instructions on how to add test servers to the
TAS.
6.2 Virtual TAS Note: The IP addresses and masks included in these instructions are for example only. The user
will use IP addressing, etc., that is consistent with their management network.
After the Landslide Virtual Image has been imported and configured with a processor, memory
and network interface, the user will must use the chosen virtualization manager to open a
console to the newly added test server and configure the TAS functionality, management port,
netmask, default gateway, etc.
1. Use the cfguser account to login to the Landslide Virtual platform.
The default password is the same as the user name.
login: cfguser
password: cfguser
The first time the cfguser user logs in to the Landslide server, you are prompted to define the
initial network configuration. You should decline this option at this time
2. Enter n to decline the configuration if prompted.
3. Enter “disable-ts”. You should see the following.
Disable Test Server
### Killing Test Server
Test Server now disabled!!
Landslide Virtual TAS Installation Instructions
PN 71-008013 Rev A 10
4. Enter “enable-tas”. You should see several messages print to the screen ending with the
following.
.
.
.
Test Admin Server processes enabled!!
Start the TAS manually or reboot
5. Enter "ipcfg" at the command prompt.
Caution:
Do not abort this script when it is executed for the first time on a new platform. Background processes configure the services that should automatically start on boot. If the script is aborted, someaborted, some services, including telnet, will not start if the platform is power-cycled or rebooted.
Do not use Arrow keys or the Delete key to correct data entry errors; instead, use only the BackSpaceBackspace key. If errors are detected after data has already been entered, at the end of the script, answer “no” to the reboot question and rerun the ipcfg command.
6. You are prompted to identify the port to be used as the management port. You must
select the recommended and default port number as the management port (eth0).
NOTE - Preferred management port is eth0
Designate management port (eth0-eth13) [eth0]:
7. Use sub-steps 8a - 8f to answer the configuration prompts.
8. The script cycles through a set of configuration prompts for the management port. The port
name is shown in the prompt, and is enclosed in angle brackets: <eth0>. The Landslide
Manager is equivalent to the TAS.
<eth0> IP Address [192.168.0.100]:
<eth0> Network Mask [255.255.255.0]:
<eth0> Auto Negotiate? (yes/no) [yes]:
<eth0> IP Gateway [192.168.0.254]:
<eth0> Host Name [Coast49]:
Enable DNS? (yes/no) [no]:
<optional> Primary DNS Server Address [192.168.0.254]:
<optional> Secondary DNS Server Address [192.168.1.254]:
9. Answer the configuration prompts.
Landslide Virtual TAS Installation Instructions
PN 71-008013 Rev A 11
a. <port> IP Address [ 192.168.0.100] : (Enter a unique IPv4 address for the
port.)
b. <port> Network Mask [255.255.255.0]: (Enter the IPv4 network mask.)
c. Auto Negotiate? (yes/no) [yes]: (Accept the default to enable speed and
duplex negotiation for the port.)
d. <port> IP Gateway [192.168.0.254]: (Enter the address for the IPv4 gate-
way in your network.)
e. <port> Host Name [Spirent]: (Enter the host name, without blank spaces, for
the Landslide platform.)
f. Enable DNS? (yes/no) [no]:
<optional> Primary DNS Server Address [192.168.0.254]:
<optional> Secondary DNS Server Address [192.168.1.254]:
Configure system to support DNS or not and populate the Primary and Secondary DNS
servers.
Note: Confirm the IP address assigned to the management port. Failure to use the
proper IP address will prevent communication with the platform
10. A time server is defined for every platform. Enter the IP address of the time server in your
network.
NTP Server IP [192.168.0.100]:
Note: One option for NTP configuration is to point the Manager at the NTP source and then
point all of the Test Servers at the Manager. Then, if an NTP change is required, only the
Manager configuration will have to be changed.
The initial configuration is complete at this point.
11. Reboot the system.
System must be rebooted for these changes to take effect... Reboot now?
(yes/no) [yes]: yes
Note: If errors are detected in any of the data entered above, answer "no" to the
reboot question and rerun the ipcfg command.
12. The Landslide Virtual TAS should now behave in the same manner as other Landslide TAS
platforms. It can now be used to manage test servers and run tests after a few more
configuration steps. Please refer to Chapter 3 of the Landslide Test System Installation Guide
for instructions on how to log in and continue the system configuration.
Landslide Virtual TAS Installation Instructions
PN 71-008013 Rev A 12
6.3 Virtual EDGE Note: The IP addresses and masks included in these instructions are for example only. The user
will use IP addressing, etc., that is consistent with their management network.
Once the Landslide Virtual Image has been imported and configured with a processor, memory
and network interface, the user must use the chosen virtualization manager to open a console to
the newly added test server and configure the TAS functionality, management port, netmask,
default gateway, etc.
1. Use the cfguser account to login to the Landslide Virtual platform.
The default password is the same as the user name.
login: cfguser
password: cfguser
The first time the cfguser user logs in to the Landslide server, you are prompted to define the
initial network configuration. You should decline this option at this time
2. Enter n to decline the configuration if prompted.
3. Enter “enable-tas”. You should see several messages print to the screen ending with the
following.
.
.
.
Test Admin Server processes enabled!!
Start the TAS manually or reboot
4. Enter "ipcfg" at the command prompt.
Caution:
Do not abort this script when it is executed for the first time on a new
platform. Background processes configure the services that should automatically start
on boot. If the script is aborted, some services, including telnet, will not start if the
platform is power-cycled or rebooted.
Do not use Arrow keys or the Delete key to correct data entry errors; instead, use only
the Backspace key. If errors are detected after data has already been entered, at the end
of the script, answer “no” to the reboot question and rerun the ipcfg command.
5. You are prompted to identify the port to be used as the management port. You must
select the recommended and default port number as the management port (eth0).
NOTE - Preferred management port is eth0
Designate management port (eth0-eth13) [eth0]:
Landslide Virtual TAS Installation Instructions
PN 71-008013 Rev A 13
6. Use sub-steps 8a - 8f to answer the configuration prompts.
The script cycles through a set of configuration prompts for the management port. The port
name is shown in the prompt, and is enclosed in angle brackets: <eth0>. The Landslide
Manager is equivalent to the TAS.
<eth0> IP Address [192.168.0.100]:
<eth0> Network Mask [255.255.255.0]:
<eth0> Auto Negotiate? (yes/no) [yes]:
<eth0> IP Gateway [192.168.0.254]:
<eth0> Host Name [Coast49]:
Enable DNS? (yes/no) [no]:
<optional> Primary DNS Server Address [192.168.0.254]:
<optional> Secondary DNS Server Address [192.168.1.254]:
7. Answer the configuration prompts.
a. <port> IP Address [ 192.168.0.100] : (Enter a unique IPv4 address for the
port.)
b. <port> Network Mask [255.255.255.0]: (Enter the IPv4 network mask.)
c. Auto Negotiate? (yes/no) [yes]: (Accept the default to enable speed and
duplex negotiation for the port.)
d. <port> IP Gateway [192.168.0.254]: (Enter the address for the IPv4 gate-
way in your network.)
e. <port> Host Name [Spirent]: (Enter the host name, without blank spaces, for
the Landslide platform.)
f. Enable DNS? (yes/no) [no]:
<optional> Primary DNS Server Address [192.168.0.254]:
<optional> Secondary DNS Server Address [192.168.1.254]:
Configure system to support DNS or not and populate the Primary and Secondary DNS
servers.
Note: Confirm the IP address assigned to the management port. Failure to use the
proper IP address will prevent communication with the platform
8. A time server is defined for every platform. Enter the IP address of the time server in your
network.
NTP Server IP [192.168.0.100]:
Note: One option for NTP configuration is to point the Manager at the NTP source and then
point all of the Test Servers at the Manager. Then, if an NTP change is required, only the
Manager configuration will have to be changed.
The initial configuration is complete at this point.
Landslide Virtual TAS Installation Instructions
PN 71-008013 Rev A 14
9. Reboot the system.
System must be rebooted for these changes to take effect... Reboot now?
(yes/no) [yes]: yes
Note: If errors are detected in any of the data entered above, answer "no" to the
reboot question and rerun the ipcfg command.
10. The Landslide Virtual EDGE TAS should now behave in the same manner as other Landslide
TAS platforms. It can now be used to manage the EDGE test server and run tests after a few
more configuration steps. Please refer to Chapter 3 of the Landslide Test System Installation
Guide for instructions on how to log in and continue the system configuration.
7 Enabling DPDK In 15.0, Landslide added DPDK support to the Landslide virtual images. DPDK enables Landslide’s
User Mode which allows for Port Reservation, VLAN tagging, better performance, user space
controlled routing, etc. However, DPDK does require additional non-hyper-threaded cores and
specific hardware / configuration to support. By default, the virtual machine images will be
configured to run in Kernel mode. Refer to section 3 to ensure proper configuration of the
hypervisor and then follow these instructions to enable DPDK on the Landslide Virtual Machine.
1. After VM installation, telnet or console to the test server and login as cfguser with the
password of cfguser.
2. Run sudo .dpdk_config_by_ipcfg.sh enable (requires that the user did the HugePages
configuration in section 3).
3. Run ipcfg command (can press enter to accept previously configured values) and allow
ipcfg to reboot the VM.
Landslide Virtual TAS Installation Instructions
PN 71-008013 Rev A 15
How to Contact Us
To obtain technical support for any Spirent Communications product, please contact our Support
Services department using any of the following methods: