18
Laser LAR 120 G Operating instructions en

Laser LAR 120 GOperating instructionsen

A
2
3
7
6
12
11
1
13
8
5a
4a 4b
10
5c
4c
14
15
5b
9

F
CB
ED
G

H
I K
L M
s
17ft 34ft
~ 17ft

SP1: vertical beam emission apertureSP2: rotation beam emission apertureON/OFF switch
Permanent adjustment On/Off selector switch
Selector switch for bending the laser beam in one axis
LEDs for displaying: Red LED: battery voltage and overheat
Shock protection
5/8“ threaded connector for tripod
Fine-tuning clampHeight-adjustment finger hold
Safety and guide clip
Eye for hanging up
Battery compartment cover
0049 / 63 46 / 3 09 - 0
Automatic levelling On/Off selector switch
Main components
The STABILA LAR 120 G rotation laser is an easy to operate rotation laser for horizontal and vertical levelling and plumb lines. It is self-levelling in a range of ± 5°. The laser beam can be received at distances of up to 150 m with the use of a receiver, even when it is no longer visible to the naked eye.We have endeavoured to explain the unit‘s handling and functioning in as clear and comprehensible manner as possible. If, however, you still have any unanswered questions, we should be pleased to provide advice over the telephone at any time on the following telephone number:
Operating instructions
Splitter pentaprism SP:
(4a)(4b) (4c)
Feet for vertical levellingTargeting marks
(1)
(3) (2)
(5a)(5b)(5c) (6) (7) (8) (9)(10)(11)(12)(13)(14)(15)
A
4 markings to create a plumb-line laser function
Green LED: Operating mode ON or READY / OK
en

Before initial start-up :
The warning notice in your language must be clearly affixed on the laser instrument at the position indicated. The appropriate stickers are enclosed.
Familiarise yourself with the laser equipment and all accessories of the class 3R laser instrument.Further information can be found at www.stabila.de .....
Read the Operating Manual carefully.Observe the safety measures.
This sticker with the warning notice written in the usual language must be affixed here in place of the English text !

Safety measures which must be observed
Observe the appropriate country-specific safety measures for users of laser class 3R equipment.Laser class 3R laser equipment is potentially hazardous to eyes.
Use of operating and adjustment equipment and procedures other than those indicated here can lead to dangerous exposure to radiation. Modification of the laser equipment is not permitted. This Operating Manual must be retained and passed to the next owner of the laser equipment.
Personal safety precautionsThis laser equipment may only be used by properly trained persons. Do not aim the laser beam at people.If the laser beam falls directly on your eye, consciously close your eyes and move your head out of the beam immediately. Do not look into the direct or reflected beam.Persons under 18 years of age must not use this equipment.
Safety measures to be applied in areas where the equipment is used: Ensure that no-one can look directly into the laser beam:- Mark out the area where this laser equipment is used by means of barriers and warning signs etc.- Avoid accidental reflections, for example by covering or removing reflective surfaces in the vicinity of the laser equipment.- Position / align the laser beam well away from eye height- Restrict the laser beam to the area where it is to be used, for example by screening with non-reflective surfaces- When not in use, store the laser equipment so that it cannot be accessed by unauthorised persons
THIS PRODUCT COMPLIES WITHTHE APPLICABLE REQUIREMENTS OF
21 CFR PARTS 1040.10 AND 1040.11.
LASER RADIATION
CLASS III A LASER PRODUCT
MAXIMUM OUTPUT POWER

(16)
-> Reduce rotation speed
-> Selector switch: Rotation function - Scan function
-> Increase rotation speed
(19)
(20)
Rotation function:
-> The laser dot moves to the left
-> The laser dot moves to the right
(17)
(18)
-> The scanning line moves to the left
-> The scanning line moves to the right
(17)
(18)
Scan function:
Remote control:
Rotation speed = 0
Adjusting and aligning the laser beam
19
17
18
20
16
-> The scanning line is longer
-> The scanning line is shorter
Scan funktion:
(19)
(20)
When working with the remote control, this must be oriented to the laser‘s operating field.

Commissioning - Automatic mode with height of tool alert function ( Y LED )For safety reasons, the rotation laser always switches itself off all when it is switched on in this operating mode!The unit can be switched on by briefly tapping button (3). Automatic levelling starts immediately. The green LED (5c) lights up and the Y LED flashes. The splitter pentaprism begins to rotate and the laser beam comes on. After automatic levelling, you have approximately 30 seconds in which to set the laser unit in the desired position, e.g. to adjust its height, set it on a tripod, etc.
Operating modes:
Main applications:LevellingSet the unit on a firm base or a tripod.Tip: It is useful to set up the rotation laser centrally to the subsequent measurement points.
The rotation speed (buttons 19, 20) and the scan func-tion (button 16) can be set by remote control. Buttons (17) and (18) are used to move the scanning line and/or the laser dot to the right or to the left.
Pressing the button (3), switches the rotation laser ON and it starts to level itself automatically. Once levelling is complete, the laser begins to rotate. Depending on the brightness of the ambient light, you can either use the laser beam, if easily visible, for marking directly (always ensure that you mark the centre of the laser beam) or the beam can be received via the receiver.
Integral height adjustmentTo adjust the laser dot easily to the desired height, the laser‘s casing can be moved vertically by around 80 mm.To do this, loosen the clamping screw (12) and move the laser‘s casing upwards on the guide (see illustration). Once the laser dot has been aligned to the desired height, retighten the clamping screw (12).
D
C
3
D
3
19
20
16
17
18
Please note that the centre of laser dot is marked!
B
A
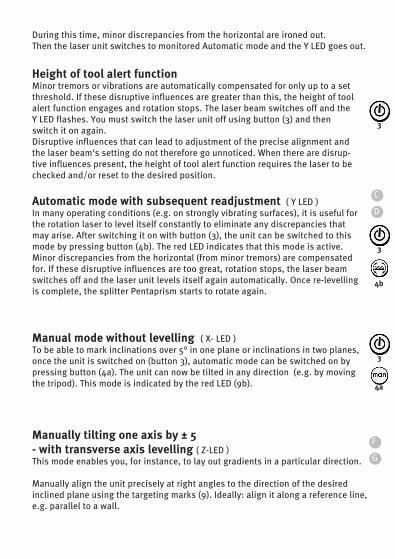
Automatic mode with subsequent readjustment ( Y LED )In many operating conditions (e.g. on strongly vibrating surfaces), it is useful for the rotation laser to level itself constantly to eliminate any discrepancies that may arise. After switching it on with button (3), the unit can be switched to this mode by pressing button (4b). The red LED indicates that this mode is active.Minor discrepancies from the horizontal (from minor tremors) are compensated for. If these disruptive influences are too great, rotation stops, the laser beam switches off and the laser unit levels itself again automatically. Once re-levelling is complete, the splitter Pentaprism starts to rotate again.
Manual mode without levelling ( X- LED )To be able to mark inclinations over 5° in one plane or inclinations in two planes, once the unit is switched on (button 3), automatic mode can be switched on by pressing button (4a). The unit can now be tilted in any direction (e.g. by moving the tripod). This mode is indicated by the red LED (9b).
Manually tilting one axis by ± 5 - with transverse axis levelling ( Z-LED )This mode enables you, for instance, to lay out gradients in a particular direction.
Manually align the unit precisely at right angles to the direction of the desired inclined plane using the targeting marks (9). Ideally: align it along a reference line, e.g. parallel to a wall.
During this time, minor discrepancies from the horizontal are ironed out. Then the laser unit switches to monitored Automatic mode and the Y LED goes out.
D
C
4b
3
3
Height of tool alert functionMinor tremors or vibrations are automatically compensated for only up to a set threshold. If these disruptive influences are greater than this, the height of tool alert function engages and rotation stops. The laser beam switches off and the Y LED flashes. You must switch the laser unit off using button (3) and then switch it on again.Disruptive influences that can lead to adjustment of the precise alignment and the laser beam‘s setting do not therefore go unnoticed. When there are disrup-tive influences present, the height of tool alert function requires the laser to be checked and/or reset to the desired position.
4a
3
F
G

After switching on (via button 3), press button (4c) until the Z LED lights.The unit is now in height of tool alert function mode.Buttons (17) and (18) on the remote control can now be used to incline this laser plane at right angles to the line from the targeting marks. The inclined plane is automatically levelled horizontally in this line‘s direction. 4c
3
C Marking out vertical areas (vertical levelling) Set the rotation laser on its side feet for vertical levelling (10). Align the unit manually so that the direction of the vertical laser plane described by the lens is approximately parallel or at right angles to a reference line (e.g. a wall or a corner). Press button (3) briefly to switch the unit on. It is now in Height of Tool Alert function mode.You can use the remote control to set the rotation speed (17, 18) or to switch over between point and line function (16). The vertical laser plane described by the rotating deflected laser beam can only be adjusted in Point mode, by ± 5°, using buttons (17) and (18). In this way, the laser plane can be aligned precisely parallel or at right angles to the reference line.
3
17
18
16
Use as a Plumb-line Laser The laser can be aligned precisely on a marked cross using the 4 markings (15) on the base to transfer a plumbline from the floor marking to the ceiling. The point where the cross intersects corresponds to the SP1 vertical laser emitter.A correct result can only be obtained in Automatic mode with the unit set on a level surface!
E
-> The laser plane tilts
-> The laser plane tilts in the opposite direction
(17)
(18)

C
Generating parallel planes:
Creating vertical reference areas, e.g. measuring dividing walls.
2 basic methods of vertical levelling
Swivelling until S1 = S2
Continuous beam
Divertedbeam
Measuring tiles, panels, parquet (floors, ceilings, walls), measuring right angles simply by swivelling the unit.
At right angles to the wall:Swivelling until S1 = S2
Continuous beam
-> The laser plane moves to the left
-> The laser plane moves to the right
(17)
(18)
Vertical levelling
Adjusting only in point mode(only using the Rotation and not the Scan function)
Diverted beam

Horizontal checking
1.
2.
3.
7.
4.
5.
6.
If the difference between the 4 control points is less than 1mm at 5m ( 1/8“ at 17ft ) distance and 2 mm at 10m ( 1/4“ at 34ft ) distance the permissible tolerance of ± 0.1 mm/m ( ± 1/8“ over 100ft ) is being maintained. Points 1 and 3 on the unit‘s y-axis and points 2 and 4 on the unit‘s x-axis now correspond.
Repeat steps 4 and 5 to obtain Points 3 and 4.
Mark the position of the visible laser dot on the wall (Point 2).
Mark the position of the visible laser dot on the wall - Measurement 1 (Point 1). Because the diameter of the beam depends on the distance, you must always only use the centre of the dot!
Switch the unit on (button 3) and wait for it to level automatically. The laser dot is turned in the direction of the wall (button 17, 18). It is also possible to work with a receiver.
Set up the rotation laser on a smooth, level surface or on a tripod 5 or 10m (25 ft or 50ft) from a wall with the front facing the wall.
Turn the complete unit 90° without altering the height of the laser (i.e. the tri-pod must not be altered). Let the unit level automatically again. Then turn SP2 in the direction of the wall in the area of measurement point 1.
Please keep as closely as possible to the alignment shown in (H) because this simplifies any re-adjustment that may be required
The LAR 120 G rotation laser has been designed for building site use and leaves our factory perfectly calibrated. As with any precision instrument, however, its calibration must be regularly checked. The unit should be checked before starting any new tasks, particularly when the unit has been exposed to strong vibrations. After an impact, the unit should be checked throughout its whole self-levelling range.
Checking the calibration
18
H
H1
3
17
18
17
H2
H4H3

Set the laser with this axis (x-axis) facing the wall. Switch the unit off. To go to Adjustment mode, hold down button (4a) first. Additionally press button (3). as soon as the Y LED illuminates, release button (4a). The X LED now flashes rapidly
The laser is correctly adjusted when the laser dot is precisely centred between Points 2 and 4. Adjust the dot‘s height using buttons (17) and (18) on the remote control until it is precisely between Points 2 and 4. Now turn the laser 90° until the y-axis is facing the wall. Now turn SP2 prism until the laser dot is facing the markings.If the centre of the laser dot does not correspond to the centre of the dot when the x-axis was adjusted, switch to Adjustment mode using button (20) on the remote control. The Y LED now flashes rapidly. Adjust the height of the laser dot using buttons (17) and (18) until it is precisely at the height of the centre mark for the x-axis.
The laser is now adjusted again. Pressing button (19) on the remote control saves the settings. If you do not wish to save the setting, exit Adjustment mode without saving by pressing the button (3) on the laser. The old setting is then kept unchanged.
Saving the adjustment
19
3
If the readings are determined as being outside the tolerance limits during the horizontal check, the laser can be adjusted as follows. The decisive factor is the distance between the opposing measurement points, i.e. points 1 + 3 and 2 + 4.Points 1 and 3 on the unit‘s y-axis and points 2 and 4 on the unit‘s x-axis now correspond.For example, if the distance between points 2 + 4 is outside the tolerance limit of 0.1 mm/m, the laser must be adjusted along this axis!
Adjustment - Horizontal
3
4a
20
17
18
Batteries must be new or fully charged when using the adjustment function !

6. Let the unit level itself again or switch it on again.
Mark the centre of the laser dot visible on wall B (Point 2).7.Now move the unit directly in front of wall B8.Direct the laser beam on wall B.9.
Let the unit level itself again or switch it on again.10.
Set the unit‘s height (ideally on a cranking tripod) so that the laser dot‘s height matches that of Point 2. Wait for the laser to level again.
11.
Turn the laser unit 180° without altering the laser‘s height. The tripod must not be altered.
Mark the centre of the laser dot visible on wall A (Point 3).
When the unit is 10m away from walls A and B , the distance between Points 1 and 3 should not be more than 2mm (50ft / 1/8” ).
12.
Let the unit level itself again or switch it on again.13.
14.
15.
5. Turn the complete unit 180° without altering the height of the laser. The tripod must not be altered.
4. Mark the position of the visible laser dot on wall A (Point 1).
P1 P3 2s
0,1 mm m >
1.
Vertical checking (The unit is tilted 90° to the side foot).
For vertical levelling, the rotation laser is set directly in front of wall A either on its side feet or mounted on a tripod.
Two parallel wall surfaces at least 10m ( or 50 ft) apart are required for the vertical check.
2. Switch the unit on and let it level automatically - Button (3)
3. Align the laser beam against wall A.
I
L
L
M
K
I
3
inch ft
1/8“ over 100ft or 1/816

If a tolerance has been exceeded when performing the vertical check, the laser can be re-adjusted as follows. Switch the laser off. To go to Adjustment mode, hold down button (4a) first. Additionally press button (3). as soon as the y LED illuminates, release button (4a).The Z LED now flashes rapidly.The laser can now be adjusted in the Z-axis.The laser is correctly adjusted when the laser dot is precisely centred between Points 1 and 3 for the vertical check. Adjust the dot‘s height using buttons (17) and (18) on the remote control until it is precisely between Points 1 and 3.
Adjustment - Vertical
The laser is now adjusted again. Pressing button (14) on the remote control saves the settings. If you do not wish to save the setting, exit Adjustment mode without saving by pressing the button (3) on the laser. The old setting is then kept unchanged.
Saving the adjustment
Slide the laser‘s casing upwards (-> Integral height adjustment). Unfasten the catch on the battery compartment cover: remove the cover and the batteries. Insert new batteries following the instructions in the battery compartment. Only use 1.5V mono cells (size D)!
Replacing the batteries
Remote control
3
3
4a
17
18
19
MignonAA
LR6
Rotation laser
Batteries must be new or fully charged when using the adjustment function !
Mono D
LR20
7
1.
2.3.
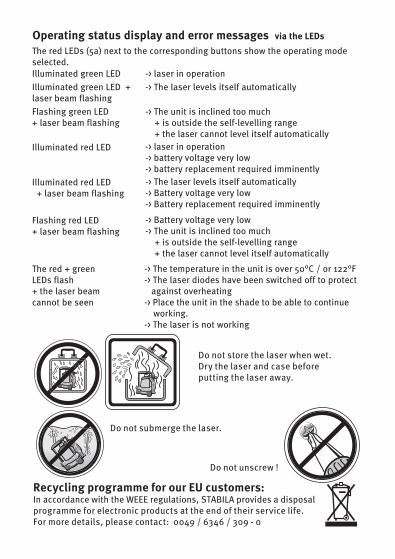
Operating status display and error messages via the LEDs
Illuminated green LED-> The laser levels itself automatically-> laser in operation
-> laser in operation-> battery voltage very low-> battery replacement required imminently
The red LEDs (5a) next to the corresponding buttons show the operating mode selected.
-> Battery voltage very low-> The unit is inclined too much + is outside the self-levelling range + the laser cannot level itself automatically
Illuminated green LED + laser beam flashing
Illuminated red LED
Flashing red LED + laser beam flashing
-> The temperature in the unit is over 50°C / or 122°F-> The laser diodes have been switched off to protect against overheating-> Place the unit in the shade to be able to continue working.-> The laser is not working
The red + green LEDs flash + the laser beam cannot be seen
-> The unit is inclined too much + is outside the self-levelling range + the laser cannot level itself automatically
Flashing green LED + laser beam flashing
-> The laser levels itself automatically-> Battery voltage very low -> Battery replacement required imminently
Illuminated red LED + laser beam flashing
Recycling programme for our EU customers:In accordance with the WEEE regulations, STABILA provides a disposal programme for electronic products at the end of their service life.For more details, please contact: 0049 / 6346 / 309 - 0
Do not store the laser when wet. Dry the laser and case before putting the laser away.
Do not submerge the laser.
Do not unscrew !

Subject to technical modifications.
Laser type:
Technical data
Self-levelling range:
Output:
Levelling accuracy:
Batteries:Operating life:
Operating temperature range:
Storage temperature range:
Green laser, wavelength 532 nm
< 1 mW, Laser Class 3Rto EN 660825-1: 2008 - 05
ca. ± 5°
± 0,1 mm/m
2 x 1,5 V Mono cells Alkaline, Size D, LR20Approx. 120 hours
0°C to +40°C / or 32°F to +104°FAt temperatures > 50° C, the unit begins to regulate automatically.
-20 °C to +60 °C / or -4°F to +140°F
• Dirty lens glass on the beam emitter detracts from the quality of the beam. It should be cleaned with a soft cloth.• Clean the laser unit with a damp cloth. Do not spray or immerse the unit! Do not use solvents or thinners!
Care and maintenance
The LAR 120 G rotation laser must be handled carefully, in the same way as any precision optical instrument.
Stabila provides a guarantee against deficiencies and faults in the assured characteristics because of material or manufacturing faults for a period of 24 months from date of purchase. Any faults will be eliminated at Stabila‘s own discretion either by repairing or replacing the unit. Stabila accepts no wider claims. No liability is accepted for any faults due to inappropriate treatment (e.g. damage caused by the unit falling, operation with the wrong voltage or type of current, use of unsuitable current supply sources) or for any autonomous changes made to the unit by the purchaser or a third party. Also no claims under guarantee are accepted for natural wear and tear or any small faults that do not significantly affect the unit‘s operation.Any guarantee claims must be made via the dealer on the duly completed guarantee form (see last page) to be returned with the unit.
Guarantee terms and conditions


