28
Colony PCR Student Guide

Colony PCR
Student Guide
Amgen Biotech Experience—Colony PCR Student Guide
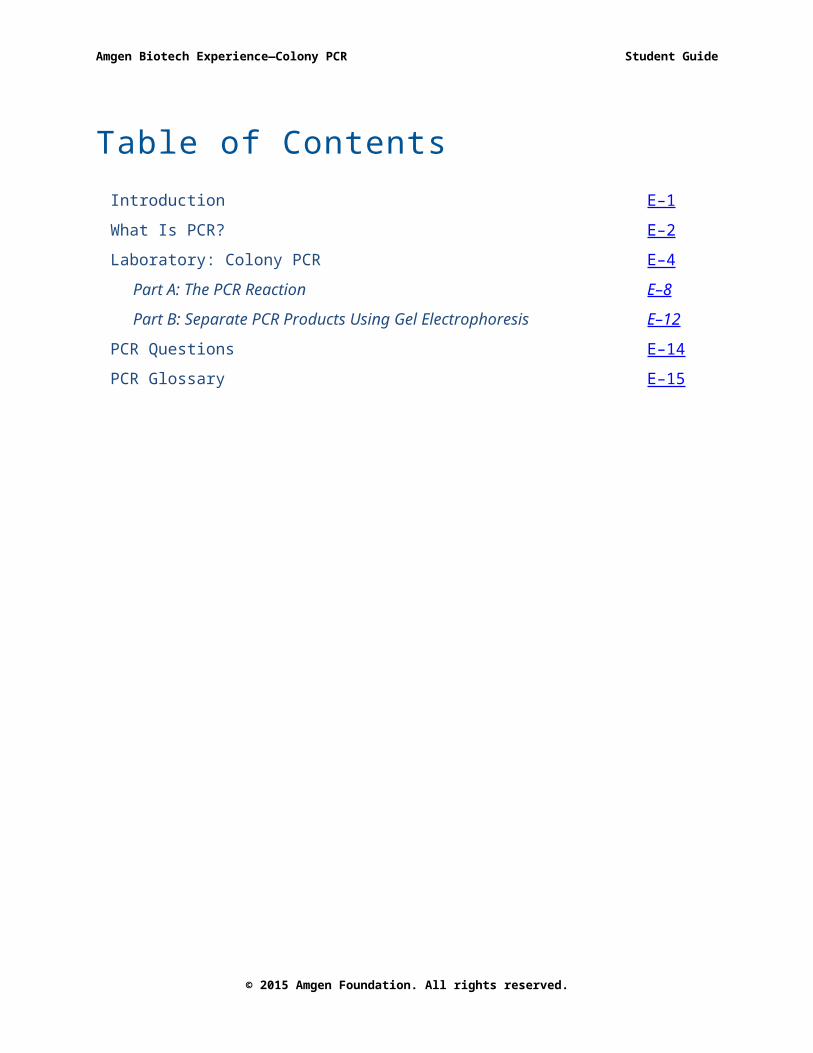
Table of ContentsIntroduction E–1
What Is PCR? E–2
Laboratory: Colony PCR E–4
Part A: The PCR Reaction E–8
Part B: Separate PCR Products Using Gel Electrophoresis E–12
PCR Questions E–14
PCR Glossary E–15
© 2015 Amgen Foundation. All rights reserved.

Amgen Biotech Experience—Colony PCR Student Guide
INTRODUCTIONThe most widely used method in biotechnology is the polymerase chain reaction, called PCR. PCR provides a way to quickly and accurately identify a specific DNA sequence and then make multiple copies of that sequence. PCR uses an enzyme—DNA polymerase—which in cells replicates, or copies, DNA. This method has had a profound impact on biotechnology and has been applied to such areas as genetic engineering, prenatal diagnosis, forensics, medicine, cancer detection, diagnosis of infectious disease, and basic research.
In this chapter, you’ll learn about the multiple uses of PCR and then carry out the PCR method in the laboratory. The PCR you will carry out is a colony PCR—a quick procedure to identify which, if any, transformed bacterial colonies carry the gene of interest, rfp. This work will give you knowledge of and skill in the important method of PCR.
GoalsBy the end of this extension, you will be able to do the following: Carry out PCR Describe applications of PCR Explain the role of DNA polymerase and DNA primers in PCR
What Do You Already Know? Discuss the following questions with your partner and write your ideas in your notebook. Be prepared to discuss your responses with the class. Don’t worry if you don’t know all the answers; discussing these questions will help you think about what you already know about gene cloning and PCR.
1. Under what circumstances might it be important to copy DNA quickly using PCR?
2. Gene cloning can be carried out in vivo by adding genes to recombinant plasmids and ensuring that they are replicated inside bacterial cells. Gene cloning can also be carried out in vitro by using PCR. (The phrase in vivo refers to a process that takes place inside a living organism, whereas in vitro refers to a process that takes place outside a living organism, for example, in a test tube.) What might be some advantages of using PCR to make many copies of a gene?
© 2015 Amgen Foundation. All rights reserved. E-1

Amgen Biotech Experience—Colony PCR Student Guide
WHAT IS PCR?Using an enzymatic reaction, PCR allows for the amplification of a specific region of DNA by successive rounds of gene replication. This results in the rapid synthesis of billions of copies of the specific region of DNA. Prior to the development of PCR, the only way to make multiple copies of a specific sequence of DNA was through biological amplification in bacteria, a technique that is materials-, labor-, and time-intensive due to the complex extraction techniques needed to purify the DNA. In contrast, DNA amplified by PCR is easy to purify, and the technique requires significantly less labor and fewer materials than biological amplification in bacteria.
Table E.1 on the next page shows some of the many uses of PCR. For example, in determining the treatment for acute myeloid leukemia, PCR is used to identify the nature of the cancer-causing mutation. Knowing the specific kind of mutation enables the disease to be treated with a specific drug that results in a good prognosis in patients with this mutation. PCR can also be used in prenatal diagnoses for chromosomal abnormalities, such as trisomy 21, which results in Down syndrome. PCR provides a noninvasive diagnostic by analyzing fetal cells in the mother’s blood. The results are obtained far more quickly than with karyotype analysis, which requires culturing fetal cells obtained from the amniotic fluid that surrounds a fetus.
Like other biotechnology methods, PCR is based on basic science discoveries. These discoveries, which are related to DNA replication, are as follows:
DNA becomes single-stranded at high temperatures because its two strands separate (denature).
Short DNA single-stranded primers (15 to 30 nucleotides in length) can stick, or anneal, to specific sequences in single-stranded DNA and provide the 3′ end of DNA required for replication. Annealing can occur only when the strands have complementary base pairs.
One specific kind of DNA polymerase, Taq DNA polymerase, can function at temperatures higher than most polymerases. (This enzyme was isolated from thermophilic bacteria.)
The discovery of the Taq DNA polymerase and its ability to operate at high temperatures was a vital step in developing PCR because high temperatures are required to denature the DNA and make the nucleotides accessible for annealing. The denaturation step provides an opportunity—the physical space—for primers to bind. The annealing temperature ensures that only primers with the exact sequences will anneal and allow replication at the desired site.
© 2015 Amgen Foundation. All rights reserved. E-2

Amgen Biotech Experience—Colony PCR Student Guide
Table E.1: PCR Applications and ExamplesMedical Example
Genetic testing (pre- and post-natal)
Mutations leading to genetic disease (such as sickle cell anemia, cystic fibrosis, Huntington’s chorea, and Tay-Sachs)
Chromosomal aberrations (such as duplications or deletions)Tissue typing Prior to organ transplantation to avoid immune rejectionCancer detection and therapy
Diagnosing cancers (such as breast and pancreatic) Determining the origins of cancer during metastasis Predicting response, resistance, or toxicity to therapy
Detection and identification of pathogenic organisms
Diagnostic for viruses (such as HIV, HPV, and Ebola), bacteria (such as those causing tuberculosis or strep throat), and parasites (such as those causing malaria or trichinosis)
Determining drug sensitivities of infectious agents Epidemiological studies mapping the spread of infectious diseases
Forensics ExampleIdentification of bodies Victims of crimes and natural disasters (such as earthquakes and
tornadoes)Identification of suspects of crime
DNA from blood, semen, skin, and cigarette butts or other evidence left at crime scenes
Family relationship testing
Identifying family relationships, such as the father of a child
Origins Determining family lineages, such as descent from Genghis KhanBasic Research Example
Drug discovery Examining the effect of a trial drug by measuring the impact on target gene expression and production of enzymes in the body that facilitate distribution or disposal of the drug
Genetic engineering Creating transgenic organismsMolecular anthropology, archaeology, and evolution
Investigating evolutionary links between ancient and modern humans Bringing back extinct species, for example, the woolly mammoth Identifying common ancestry among organisms
Patterns of gene expression
Investigating mechanisms and regulation of embryogenesis Cell differentiation Initiation of cancers Molecular responses to environmental factors Embryonic and induced pluripotent stem cells (which can differentiate
into many cell types)Genetic mapping Determining the physical position of genes within chromosomes; the genetic
map produced by the Human Genome Project has helped medical researchers connect genetic diseases with specific gene mutations
© 2015 Amgen Foundation. All rights reserved. E-3

Amgen Biotech Experience—Colony PCR Student Guide
LABORATORY E: USING PCR TO AMPLIFY THE RFP GENEIn this laboratory, you will use PCR and gel electrophoresis to examine the DNA from the colonies produced in Laboratory 5/5A/5B and confirm that the cells producing red fluorescent protein have been transformed with the plasmid carrying the rfp gene, pARA-R. The sizes of the DNA fragments can be determined by comparing them to a DNA ladder—a mixture of DNA fragments with known sizes. (When the DNA ladder is run on gel electrophoresis and stained, the bands that show the fragments look like the rungs of a ladder.) The DNA ladder is loaded adjacent to other DNA samples, which makes it easy to compare the bands in the samples with the bands in the ladder. The results from the gel electrophoresis will provide evidence that the transformed bacterial colonies carry the gene of interest.
PCR StepsPCR is an important method used to amplify DNA by multiple rounds of replication. The steps in carrying out PCR are as follows (see Figure E.1):
1. Denaturation phase: The DNA sample containing the sequences to be amplified is denatured at 95°C, making it single-stranded.
2. Hybridization phase: Single-stranded DNA primers are annealed to the denatured single-stranded DNA at 53°C.
3. Extension phase: Taq polymerase replicates the region of interest at 68°C, the optimal temperature for this enzyme, by adding nucleotides to the 3′ end of the primers.
Figure E.1: Three Steps of the PCR Reaction
PCR is carried out in an instrument called a thermocycler, which controls the temperature at each step of the reaction. The three steps constitute one synthesis cycle, which takes about three minutes, during which the number of copies of the region of interest doubles. A reaction that runs for 30 cycles can result in more than 1 billion copies (see Figure E.2).
© 2015 Amgen Foundation. All rights reserved. E-4

Amgen Biotech Experience—Colony PCR Student Guide
Figure E.2: DNA Amplification in PCR
The success of the reaction is then determined by using gel electrophoresis to analyze the products (see Figure E.3). The purpose of running an analytic gel is to ensure that a product has been made, the product is the expected length, and only one product band has been synthesized.
Figure E.3: Verification of PCR Reaction Product
© 2015 Amgen Foundation. All rights reserved. E-5

Amgen Biotech Experience—Colony PCR Student Guide
The DNA ladder allows for verification of the product size. Lane 1 shows a PCR product of about 1,850 base pairs; 2 and 4 represent a PCR product of about 800 base pairs. Lanes 3 and 5 show a PCR failure. (In 3, no product was formed, and in 5, multiple bands indicate a lack of sequence specificity in the primers).
Colony PCRThe traditional way to determine whether transformed bacterial colonies carry the gene of interest was by sub-culturing colonies growing on a Petri plate. Plasmids purified from these overnight cultures were then digested, and the resulting fragments were run on gels—a process that took several days. Colony PCR, on the other hand, allows the researcher to take samples of transformed cells and, in just a few hours, identify which colonies carry the gene of interest.
This lab uses cells from red and white (non-red) colonies taken from a transformation plate. Because the cell samples are taken from an ampicillin plate, any cells growing on the plate must carry the ampicillin resistance gene (ampR) and therefore carry the large pARA restriction fragment (4,495 bp). This restriction fragment has been ligated to another restriction fragment with BamHI/HindIII sticky ends. Since there are only three other restriction fragments—377 bp (from the undigested pARA), 807 bp (the rfp gene from pKAN-R), and 4,075 bp (from pKAN-R)—the large pARA fragment is most likely to be carrying one of these, unless there are two large pARA fragments in the transforming plasmid. The latter combination is unlikely to have transformed any cells, as its size (~9,000 bp) is too large for efficient transformation.
To obtain plasmid samples, you will use a pipette tip to transfer cells from a red colony growing in a Petri dish to a PCR microfuge tube. The microfuge tube will contain a “cocktail” of reagents, called a master mix, which contains all the reagents necessary for DNA replication, including DNA nucleotides (dNTP’s) and a DNA polymerase (enzyme) capable of working at high temperatures.
The master mix also contains short DNA primers (22 nucleotides in length) that selectively target and flank the plasmid locus targeted for amplification. The sequences of the two primers used in this lab are shown in Table E.2. The sequence of each is unique to the large restriction fragment of pARA and is found nowhere else in the plasmid or genome of E. coli.
Table E.2: Primers for ABE PCR
Forward primer 5’-TGTAACAAAGCGGGACCAAAGC-3’
Reverse primer 5’-GCGTTTCACTTCTGAGTTCGGC-3’
You will also sample cells from a colony not producing red fluorescent protein and will set up control tubes carrying the two known plasmids: pARA and pARA-R. See Figure E.4 for the important components on the pARA and pARA-R plasmids, including where the DNA primers will bind. PCR replicates the length of DNA between the two primers.
© 2015 Amgen Foundation. All rights reserved. E-6

Amgen Biotech Experience—Colony PCR Student Guide
Figure E.4: pARA and pARA-R Plasmid Components
BEFORE THE LAB Respond to the following questions with your group, and be prepared to share your answers with the class.
1. In this lab you will sample both red and white colonies from a plate with transformed cells. What is the most likely plasmid construct carried by each type of cell?
2. Though you can see the red fluorescent protein, why would it be convenient to be able to distinguish which cells growing on the Petri dish carry the gene of interest from cells carrying other DNA fragments? (For example, what if the gene of interest were human insulin?)
3. Read through the Methods sections for Part A (on pages E-8–E-11) and for Part B (on pages E-12 and E-13), and briefly outline the steps for Part A and Part B, using words and a flowchart.
© 2015 Amgen Foundation. All rights reserved. E-7

Amgen Biotech Experience—Colony PCR Student Guide
PART A: THE PCR REACTION MATERIALS Reagents PCR master mix 0.025ng/µl pARA-R 0.025ng/µl pARA
NOTE: The three PCR tubes must be kept on ice at all times.
Equipment and Supplies Cup with wet ice 4 empty PCR tubes and caps Fine-tip permanent marker Empty tip box to use as PCR tube rack P-20 micropipette (measures 2.0–20.0 μL) Tip box of disposable pipette tips Waste container (will be shared among groups) 1 LB/amp/ara plate with transformed colonies (plate can be shared by 3–4 groups) Microcentrifuge with PCR tube adaptor (will be shared among groups) Thermocycler (will be shared among groups)
SAFETY: Use all appropriate safety precautions and attire required for a science laboratory, including safety goggles. Please refer to your teacher’s instructions.
SAFETY: This procedure involves opening agar plates containing genetically modified bacteria. It is not good practice to open agar plates after incubation that contain unknown microbes, so uncontaminated agar plates (containing only the expected red and white E. coli colonies) should be used. All material that comes into contact with microbiological material will be autoclaved to heat-sterilize it before disposal.
SAFETY: Use caution when handling E. coli bacteria and use aseptic technique—procedures that ensure the protection of the lab worker and of a bacterial sample, which are both necessary for the experiment to be successful. Specifically: Do not touch anything that has been or will be in contact with E. coli bacteria. Wear
gloves if handling equipment that comes into contact with bacteria. Try to avoid spills or contamination of surfaces with anything that has been in contact with
E. coli bacteria. Immediately inform your teacher if a spill or contamination occurs. When you have finished using microfuge tubes, pipette tips, and gloves, place them
immediately into the biohazard bag or waste container, as directed by your teacher. Once you are finished, return your Petri dishes to the original sleeves and place them in the
biohazard bag. After completing the lab, wash your hands well with soap.
© 2015 Amgen Foundation. All rights reserved. E-8

Amgen Biotech Experience—Colony PCR Student Guide
METHODS1. Obtain a tube of PCR master mix and two tubes of control plasmids (pARA-R and pARA) in
a cup of wet ice.
LAB TECHNIQUE: The reagents in this lab must be kept cold—be sure to pick up tubes only by the upper rim to avoid warming the cells.
2. Label the four empty PCR tubes 1 through 4, as you will be setting up four 25 µl PCR reactions: one using cells from a red colony, one using cells from a white colony, and two with plasmid controls. Place the tubes in the empty tip rack.
LAB TECHNIQUE: Be sure to label the PCR tubes on the side because the ink can come off the top of the tube in the thermocycler (PCR machine). Be certain to label each tube so you know which contains white cells and which contains red cells, and so you can identify your own tubes.
3. Review Table E.3, which summarizes the reagents you will add to the PCR tubes in steps 4–8. Assume that each cell sample is approximately 2 µl.
Table E.3: Addition of Reagents to the PCR Tubes1 2 3 4
Step 4: PCR master mix 23 µl 23 µl 23 µl 23 µlStep 5: Red colony 2 µlStep 6: White colony 2 µlStep 7: pARA-R 2 µlStep 8: pARA 2 µlTotal Volume 25 l 25 l 25 l 25 l
NOTE: The PCR master mix contains the buffer, magnesium chloride, dNTP’s, forward and reverse primers, and Taq DNA polymerase.
4. Set the P-20 pipette to 11.5 l and carefully dispense 23 µl (2 × 11.5 l) of master mix into each of the four tubes. Place each tube on ice as soon as you add the master mix.
5. Place a fresh pipette tip on a P-20 micropipette and set the pipette to 10 µl.
LAB TECHNIQUE: Be sure to use good aseptic technique and a new micropipette tip for each reagent to avoid contamination.
a. Locate a red colony that is isolated from other colonies. b. Use the pipette tip to carefully remove cells from a red colony. Do not pick up any
agar. Examine the pipette tip: You should be able to see cells from the colony. Lower it into the PCR tube pre-labeled for red cells (1).
LAB TECHNIQUE: Open the Petri dish like a clamshell and lightly touch the pipette to a single colony. Make sure that you don’t touch anything else with the micropipette tip. Close the dish and immerse the end of the tip into the PCR tube (1) and swirl gently. Dispose of the tip after use.
© 2015 Amgen Foundation. All rights reserved. E-9

Amgen Biotech Experience—Colony PCR Student Guide
c. Transfer the bacteria into the PCR mixture by slowly pipetting the PCR mixture up and down about 7–10 times. Do this without creating bubbles. Eject the tip into the biohazard waste container. Return the PCR tube to the ice.
6. Place a fresh pipette tip on a P-20 micropipette and repeat steps 5a–c, but this time transfer cells from an isolated white colony into the second PCR tube (2).
LAB TECHNIQUE: Be sure to use good aseptic technique and a new micropipette tip for each reagent to avoid contamination.
LAB TECHNIQUE: Open the Petri dish like a clamshell and lightly touch the pipette to a single colony. Close the dish and immerse the end of the tip into the PCR tube (2) and swirl gently. Dispose of the tip after use and return the Petri dish to your teacher.
7. Set up the positive control by carefully pipetting 2 µl of pARA-R into your labeled PCR tube (3). Pipette in and out several times to mix. Avoid splashing the reagents. Return the PCR tube to the ice.
LAB TECHNIQUE: Be sure to use a new micropipette tip for each reagent to avoid contamination.
8. Repeat step 7 to set up the pARA control plasmid (4), using a fresh tip. Return the PCR tube to the ice.
LAB TECHNIQUE: Be sure to use a new micropipette tip for each reagent to avoid contamination.
9. If there are any bubbles or reagents splashed on the sides of the tubes, gently tap the bottoms of the PCR tubes on a tabletop. If large bubbles are present, have your teacher help you centrifuge your PCR tubes. Return the PCR tubes to the ice.
10. Take the ice cup with your PCR tubes to your teacher.
NOTE: Once your teacher has collected all the tubes, they will be placed in a thermocycler that has been pre-programmed for this reaction. The PCR program you will use is shown in Table E.4.
Table E.4: PCR Thermocyler Program for ABE Temperature (°C) Time (sec)
Initial hold 4 IndefiniteInitial denaturation 95 270
30 cycles [ Denaturation Annealing Extension
955368
303060
Final extension 68 300Hold 4 Indefinite
STOP AND THINK: Why are multiple cycles of denaturation, annealing, and extension required?
© 2015 Amgen Foundation. All rights reserved. E-10
Amgen Biotech Experience—Colony PCR Student Guide
11. When your teacher tells you, transfer your PCR tubes from the ice into the thermocycler to start the reaction.
NOTE: The amplification will take approximately two hours to complete. When it is finished, the thermocycler will hold the temperature of the PCR tubes at 4°C until your samples can be transferred to the refrigerator (4°C), where they will be stored until you can perform the agarose gel electrophoresis.
STOP AND THINK: The recombinant plasmids used to transform the colonies in this lab were made in Labs 2 and 3 of the ABE Complete Genetic Engineering sequence. The initial plasmid restriction digest resulted in the formation of four different fragments, each with a BamHI and a HindIII sticky end. How many different two-fragment recombinant plasmids would you expect to have formed in Lab 3?
STOP AND THINK: Of the two-fragment recombinant plasmids that could form during Lab 3 (ligation lab), which would you expect could be carried by the cells growing on the LB/amp/ara plates used in this lab? Hint: The large pARA and large pKAN-R fragment combination is unlikely because of its large size and multiple origins of replication.
What single restriction fragment would each plasmid need to be present in all the cells?
Of the most likely plasmids, what would be the size of the amplification product from a red colony? _____________________ bp
From a white colony? _______________ bp
© 2015 Amgen Foundation. All rights reserved. E-11

Amgen Biotech Experience—Colony PCR Student Guide
PART B: SEPARATE THE PCR PRODUCTS USING GEL ELECTROPHORESISMATERIALSReagents 4 PCR tubes with amplification products (from Part A) in rack Microfuge tube of loading dye (marked “LD”) Microfuge tube of DNA ladder (marked “M”)
Equipment and Supplies Plastic microfuge tube rack P-20 micropipette Tip box of disposable pipette tips Electrophoresis box loaded with 0.8% agarose gel (will be shared among groups) 50-mL flask containing 1x SB buffer (will be shared among groups) Waste container for used tips and microfuge tubes (will be shared among groups) DNA Ladder Diagram (RM E) (1 for each group member)
SAFETY: Use all appropriate safety precautions and attire required for a science laboratory,
including safety goggles. Please refer to your teacher’s instructions. Wash your hands well with soap after completing the lab.
METHODS1. Obtain your PCR tubes from Part A and check your rack to make sure that you have the
reagents listed.2. Add 2 l of loading dye (“LD”) to each of the four PCR tubes and to the tube with the DNA
ladder (“M”). Gently pump each tube to mix the loading dye with the DNA without creating bubbles.LAB TECHNIQUE: Be sure to use a new micropipette tip for each tube to avoid contamination.
STOP AND THINK: The DNA is not visible as it moves through the gel. Why is it useful to use the loading dye in this laboratory?
3. Make sure that the wells in your gel electrophoresis unit are located near the negative (black) electrode.
4. Fill the box with 1x SB to a level that just covers the entire surface of the gel.
LAB TECHNIQUE: If there are “dimples,” add very small amounts of buffer to the electrophoresis box. The gel needs to be completely under the buffer.
5. Make a drawing in your notebook that shows the location of the wells in the electrophoresis box. The order of the samples in each well is as follows:
a. DNA ladder (M)b. Red colony (1)
© 2015 Amgen Foundation. All rights reserved. E-12

Amgen Biotech Experience—Colony PCR Student Guide
c. White colony (2)d. pARA-R (3)e. pARA (4)
6. Using a fresh pipette tip for each sample, dispense 10.0 μL of each sample and of the DNA ladder with loading dye into their designated wells. For each sample, do the following:a. Place your elbow on the table to steady your pipette hand. If needed, also use your other
hand to support your pipette hand. b. Lower the pipette tip until it is under the buffer but just above the well.
LAB TECHNIQUE: Do not puncture the gel, or it will become unusable. Gently press the plunger to slowly dispense the sample. To avoid getting air into the buffer, do not go past the first stop. The sample will sink into the well.
7. When you have loaded all the samples, close the cover tightly over the electrophoresis box. 8. Connect the electrical leads to the power supply. Connect both leads to the same channel,
with cathode to cathode (black to black) and anode to anode (red to red). See Figure E.4.
Figure E.4: Leads from Electrophoresis Box Connected to Correct Channel in Power Supply
9. Turn on the power supply and set the voltage to 125–130 V.10. After two or three minutes, check to see if the loading dye is moving toward the positive
(red) electrode. If it’s moving in the other direction—toward the negative (black) electrode—check the electrical leads to see whether they are plugged in to the power supply correctly.
STOP AND THINK: The DNA ladder serves as a standard because it contains a mixture of DNA molecules of known sizes. By running your samples and the DNA ladder side by side in your gel, you can estimate the actual size in base pairs of unknown molecules. The DNA Ladder Diagram (RM E) shows 10 DNA bands of known sizes. Using this information, can you predict the positions of DNA bands produced by the PCR procedure by indicating their position on the DNA Ladder Diagram?
STOP AND THINK: The DNA samples and the DNA ladder are not visible on the gel. How will the DNA be made visible once the gel electrophoresis is complete?
11. Let your gel run until the yellow dye is approximately halfway down the gel. Your teacher will explain what to do with your gel once it is finished running.
© 2015 Amgen Foundation. All rights reserved. E-13
Amgen Biotech Experience—Colony PCR Student Guide
PCR QUESTIONS1. Why is it important to examine the PCR products?
2. Study your gels from Laboratory E. How did your actual gel results compare to your gel predictions?
3. Do you see any bands that were not expected? What could explain the origin of these unexpected bands?
4. Does the gel photograph show that your PCR was successful? Describe the evidence you used to make this assessment.
5. In this laboratory you used two controls. Can you think of any additional controls this laboratory might have included? Explain.
6. Why is denaturing of DNA needed to carry out PCR?
7. What are the roles of DNA polymerase and DNA primers in the PCR method?
8. Choose three examples of PCR applications from the second column of Table E.1 (page E-4). Why is PCR needed for each of them?
9. You use PCR to amplify a DNA sample, but no DNA is made. You also carried out a positive control, so you know there are no problems with the reagents or equipment. What is the likely cause for the lack of product?
DID YOU KNOW?Some Like It HotThe discovery of the Taq DNA polymerase, which can function at higher temperatures, was a key prerequisite for PCR. Most living organisms have a temperature comfort zone of between 25°C and 37°C. Normal enzymes and DNA are stable at these temperatures; at higher temperatures, most proteins will denature, and DNA will unzip, meaning that the two strands will separate. However, in the 1960s, a new kind of microorganism was discovered that grows at much higher temperatures, ranging from 55°C to a sizzling 121°C (much higher than the temperature of boiling water). Strains of these thermophiles can be found anywhere it is warm, from compost piles to thermal vents in the ocean floor to the boiling hot springs in Yellowstone National Park. Originally all thermophiles were considered bacteria, but some earned recognition as a new domain of life, the Archaea, because they are so different from bacteria in their genetic and biochemical makeup.
How do thermophiles keep it together at temperatures that would fry most other organisms? The proteins found in thermophiles contain certain amino acids that can form stabilizing bonds, and these bonds cause the protein to fold in ways that are more resistant to denaturation by heat. DNA in some thermophiles is supercoiled, a form that is more heat-stable. In addition, high levels of potassium and magnesium in the cells prevent breakdown of the phosphodiester backbone of the DNA. The proteins and DNA of thermophiles not only survive but actually function optimally at higher temperatures.
© 2015 Amgen Foundation. All rights reserved. E-14

Amgen Biotech Experience—Colony PCR Student Guide
PCR GLOSSARY 3′ end: The end of a DNA or RNA strand that has a hydroxyl group (–OH) connected to the third carbon of the sugar molecule, which is deoxyribose or ribose. (The carbon number refers to the position of the carbon in the sugar molecule.)
Anneal: In molecular biology, the binding of two complementary DNA sequences by hydrogen bonding; usually one sequence is a short DNA sequence, such as a primer. In order for annealing to occur, the two sequences must be complementary.
Base pair: Two complementary nitrogen-containing molecules paired in double-stranded DNA by weak bonds.
Basic research: Research that seeks to study and understand natural phenomena.
Biotechnology: A major industry that develops products by using biological components and processes.
Complementary base pair: Nitrogen-containing bases that are found opposite each other in a double-stranded DNA molecule. Complementarity is the result of the size and shape of the base and the number of hydrogen bonds between the adjacent bases in the pair (A and T form two hydrogen bonds, G and C form three). Adenine is complementary to thymine, and guanine is complementary to cytosine.
Denature: To change the shape of a biomolecule and subsequently impact its function, which is often achieved by heating. Denaturation of DNA causes its two strands to separate.
DNA ladder: A set of known DNA fragments with different sizes in base pairs (bp) or kilo bases (kb). These DNA fragments are separated and visualized as DNA bands on a gel. Together, the separated DNA bands look like a ladder. DNA ladders are used in gel electrophoresis to determine the size and quantity of DNA fragments. DNA ladders are also called DNA markers.
DNA polymerase: An enzyme used to replicate DNA molecules.
Enzyme: A protein that catalyzes (increases the rate of) a chemical reaction.
Forensics: The use of scientific tests or techniques in crime investigation.
Gel electrophoresis: The movement of charged molecules toward an electrode of the opposite charge; used to separate nucleic acids and proteins. When used to separate DNA fragments, electrophoresis will separate the fragments by size, with smaller fragments moving faster than larger fragments.
Genetic engineering: A branch of biotechnology that uses specific procedures and techniques to change an organism’s DNA.
In vivo: Taking place inside a living organism.
In vitro: Taking place outside a living organism, such as in a test tube.
Mutation: Change or damage occurring in a section of DNA that alters the products or processes associated with that section.
Nucleotide: A set of molecules that link together to form DNA or RNA. DNA and RNA each contain four types of nucleotides. A nucleotide has three chemical components: a sugar, a
© 2015 Amgen Foundation. All rights reserved. E-15

Amgen Biotech Experience—Colony PCR Student Guide
phosphate group, and a nitrogenous base.
Polymerase chain reaction (PCR): A technique for amplifying DNA sequences—it can amplify a specific sequence of DNA by as many as 1 billion times.
Positive control: An experimental sample with a known response that is compared to experimental samples with unknown responses.Primers: Short stretches of DNA that bind to a complementary DNA sequence during the annealing step, allowing DNA polymerase to extend a specific region of the DNA.
Replicate: To make an identical copy of a section of DNA using biological processes. The double helix is unwound, and each strand of the original molecule serves as a template for the production of the complementary strand.
Sequence: A set of related events, movements, or items (such as nucleotides) that follow one another in a particular order.
Sickle cell anemia: A genetic blood disorder that is characterized by abnormally shaped red blood cells.
Taq DNA polymerase: A DNA polymerase used in PCR. It is found in the thermophilic bacterium Thermus aquaticus, and it functions at high temperatures.
Thermocycler: A laboratory device that can change temperature rapidly and accurately and is used in the PCR method to carry out successive cycles of DNA amplification.
© 2015 Amgen Foundation. All rights reserved. E-16


