Contemporary Geometric Beadwork, Volume II by Kate McKinnon Contemporary Geometric Beadwork, Volume II by Kate McKinnon 220 221 Contemporary Geometric Beadwork, Volume II by Kate McKinnon Contemporary Geometric Beadwork, Volume II by Kate McKinnon 220 221 Layered Rick-Rack Bangle Original Rick-Rack sample by Ann Rishell (opposite page) Xadded to by Kate McKinnonX ere is always room for well-made beadwork to grow and evolve. You can stop beading at any point, wear a piece for a while, and add to it later by weaving in a new thread. For Volume I, Ann Rishell made a Double Rick-Rack bangle sample for us that was reversible, easy to wear, and perfect for photography. For Volume II, we thought it would be fun to take her sample further. Kate added a third layer of work on the other side of the Zigged MRAW Band (which is something that beaders oſten forget is an option) and a pretty sky- blue Underskirt, built on an Elegant Guide Round. is is a terrific learning piece for both the Rick-Rack Stitch and the Elegant Guide Round on a Zigged Band. 11° Miyuku Delicas 310 matte black 324 rainbow dark green 372 matte blue-green 376 rainbow patriot blue 377 matte dark violet 654 opaque brick red 682 silver-lined orange 795 matte coral 1530 white opaque luster 11° Toho Treasures 710 matte avocado iris read: white and brown Nymo B, 3 oz. cone Sizing: 10-15 points, 6 beads per side “...the hills were higher X...the trees were tallerX when you were young” - Bryan FerryX
Transcript
Contemporary Geometric Beadwork, Volume II by Kate McKinnon Contemporary Geometric Beadwork, Volume II by Kate McKinnon220 221Contemporary Geometric Beadwork, Volume II by Kate McKinnon Contemporary Geometric Beadwork, Volume II by Kate McKinnon220 221
Layered Rick-Rack BangleOriginal Rick-Rack sample by
Ann Rishell (opposite page) Xadded to by Kate McKinnonX
There is always room for well-made beadwork to grow and evolve. You can stop beading at any point, wear a piece for a while, and add to
it later by weaving in a new thread.
For Volume I, Ann Rishell made a Double Rick-Rack bangle sample for us that was reversible, easy to wear,
and perfect for photography.
For Volume II, we thought it would be fun to take her sample further.
Kate added a third layer of work on the other side of the Zigged MRAW Band (which is something that beaders often
forget is an option) and a pretty sky-blue Underskirt, built on an Elegant
Guide Round.
This is a terrific learning piece for both the Rick-Rack Stitch and the Elegant
Guide Round on a Zigged Band.
11° Miyuku Delicas 310 matte black 324 rainbow dark green 372 matte blue-green 376 rainbow patriot blue 377 matte dark violet 654 opaque brick red 682 silver-lined orange 795 matte coral1530 white opaque luster
11° Toho Treasures710 matte avocado iris
Thread: white and brown Nymo B, 3 oz. cone
Sizing: 10-15 points, 6 beads per side
“...the hills were higher
X...the trees were tallerX when you were young”
- Bryan FerryX
Contemporary Geometric Beadwork, Volume II by Kate McKinnon Contemporary Geometric Beadwork, Volume II by Kate McKinnon222 223
Use a Bangle Sizer (below) to determine the measurement you need to go over your hand. If you follow our pattern exactly, each point is 3/4” (19 mm) wide as measured on a ruler.
Curved space needs more beads than a straight line, though, so don’t use a flat measurement to plan the fit of a round thing.
If you use different beads, or a different bead count, the size will change.
Please refer to the Rick-Rack Sizing Chart that Cath Thomas put together for the online Pattern Library to see how changing the count changes the counting. You can also print out some of our Bead Colouring Paper if you’d like to play with colour and pattern.
Our finished ten-pointed bangle is actually a smaller fit than our starting sample. It isn’t so much that the beadwork is smaller, but that there is less room to distort the piece to get your hand through.
The sizing math for the pattern shown goes like this: 1. Measure what your hand can wiggle into on the bangle sizer. 2. Assume that each bangle point in the round, is .65” (16.5 mm). 3. Divide the round measurement you need by .65” (16.5 mm).
Sizing and Starting
Your hand can wiggle into an 8.5” (21.6 cm) setting on the bangle sizer.
8.5” / .65” = a minimum of 13 points.For a looser fit, add one point.
Example
Bead choices and working tension strongly affect the finished size and feel of the piece.
Ideally, your tension for Rick-Rack Stitch will be snug, with no loose threads or gaps, but not overly tight.
Be careful not to accidentally loop your thread around a point, or allow a side bead to twist, each of which will leave you with a loop of thread. These loops are tricky to fix without leaving evidence of fixing.
These instructions assume that you understand how we are counting beads per side and beads per Point (see pages xx and xx-xx) and are comfortable making a Zigged MRAW Band. It’s best to master the Zigged Band before you begin a bangle. If you are just learning it, why not make a few swatches, and whip up a pair of earrings like the Lightning Bolts on page xx?
At any rate, you don’t want to start a bangle like this on a loose or badly made Band, because that would be like building a tiny palace on cinder blocks instead of on a real foundation. You’ll enjoy the process more (and make better quality work) with a solid start.
Contemporary Geometric Beadwork, Volume II by Kate McKinnon Contemporary Geometric Beadwork, Volume II by Kate McKinnon224 225
Step 1 The Zigged Band
Using 11° cylinder beads, make an MRAW Zigged Band with betweeen 10-15
points, depending on your hand or wrist size.
This illustration shows the completed and joined MRAW start for a 10-point bangle
(which will be a small finished size).
You can substitute other beads, of course, but the sizing will change.
For detailed instructions on learning the MRAW Band threadpaths, Straight, Zigged, Jigged and others we haven’t thought of yet (but surely will) please see the Basics sections from CGB Volumes I or II, our YouTube channel, or
the online Pattern Library, where you will find free diagrams, examples, and video tutorials to help you master the paths.
The first spacer round in the MRAW Band acts as Round 1 of 10 peyote rounds on the black and white side. This illustration shows the piece after a total of 2 rounds on that side - the MRAW start (with its spacer round) and one black and white round.
It’s a good idea to alternate work on each side of the Band. We tend to use (and highly recommend) only manageable lengths of thread (about a meter at a time) and so ending a thread is always a good excuse to stop and stretch, and then add a couple of rounds to another area of our piece in progress.
Step 2 The Core Bangle
Using Rick-Rack Stitch, bead a total of 10 rounds of black and white on one
side of the Band, and 6 rounds of green on the other.
Finish each edge with an orange round, for a total of 11 rounds
on the black and white side, and 7 rounds on the green side.
Contemporary Geometric Beadwork, Volume II by Kate McKinnon Contemporary Geometric Beadwork, Volume II by Kate McKinnon226 227
This is the bangle after Step 2 is complete. If your tension isn’t too tight, the piece should still be able to reverse for two different looks.
Step 2 XThe Core Bangle: ChartsX
Contemporary Geometric Beadwork, Volume II by Kate McKinnon Contemporary Geometric Beadwork, Volume II by Kate McKinnon228 229
Step 3Add A Third Layer Under The Band
Needle into the Band at the bottom of the black and white side of the bangle, and add 5 new rounds of mixed blues and greens.
Notice the boxy quality of the Zigged MRAW Band, standing out in shiny orange 3-D against the blue round. This piece is utterly different from each side - it was a tough choice deciding which face to have permanently out, and, because the original bangle was two-layered, and the Step 3 layer is on the black and white side of the piece, the sizing is different, depending on whether the green layer will be in or out. If it’s inside, as we chose, the interior fit will be smaller, because the green layer will take up space. This worked well for our tailoring and fitting.
Depending almost exclusively on your tension, there will come a point at which your bangle will not be able to turn inside out without risking damage to the thread. This was the point in our sample where that happened.
Check in with your beadwork on this - at some point, you may have to choose which side is in, and which is out. When you do reverse the piece (especially if it’s getting dicey) try to do it in a wave, instead of all at once.
Placing a layer or layers like this will affect every aspect of the look, behavior, and fit of a piece, and will also box in your Band, making it hard to reach to add further layers. If you want extension on both faces of the beadwork, start and work both new layers at once. We just did one new layer, on the black and white side, for a total of three layers on the Band.
Step 3, completed
Contemporary Geometric Beadwork, Volume II by Kate McKinnon Contemporary Geometric Beadwork, Volume II by Kate McKinnon230 231
Step 4x Add A Red Layer x
Needle into the top of the black and white section, and add 6 rounds of red and coral on top of the shiny orange round.
Layer, mix or scatter the colours in these rounds as you like, or follow our chart (next page). The photo below shows the piece after 3 of the 6 red and orange rounds are on, and the illustration (next page) shows all 6 rounds.
Step 4, in process
In natural and in low light, the differences between the violet, the blue and the blue-green in the bottom layer are so subtle as to almost disappear.
If you find it hard to place colour randomly, you might try this trick - choose colours of similar tone, but different hue, and mix them into a pile. Then put their rounds on with only lamplight, preferably while also watch-ing a movie or chatting with a friend. That way, you can distract the art critic in your brain, and get a good random scatter.
An easy way to find out which colours share a tonal range is to put them under bad lighting and find the ones that all look the same. For fun, examine a tray of bead soup under different lights - you might be surprised by how different colours pop, depending on the light. Fashion designers and photographers must consider the effect of lighting on colour when planning for the runway vs. the photo studio, TV screen, or the street.
Colour Scatter
Contemporary Geometric Beadwork, Volume II by Kate McKinnon Contemporary Geometric Beadwork, Volume II by Kate McKinnon232 233
The Elegant Guide Round is a two-rounds-in-one method for either add-ing two flat rounds at once or a Guide Round, which places a round on top of the beadwork, to neatly begin a new layer, hold embellishment, or thread memory wire.
A traditional way to set a new layer is to use a technique called “Stitching In The Ditch”, which involves sewing into existing beadwork to place a round on top of the fabric. The Elegant Guide Round has a strong advantage; it doesn’t pull the beadwork out of alignment to add the round, nor is it difficult to get into the beadwork, as it is worked in the current round. The EGR does not weaken a piece, or risk broken beads; instead, it strengthens an area in which you plan to set multiple excitements.
You should be warned that this simple method is so reinforcing that it is very difficult to back out if using Nymo, or other fiber thread. Proceed mindfully!
The Elegant Guide Round is really very simple - it alternates regular peyote with square stitch in the same round, so that you get two rounds in one: one round of beads ends up in the next peyote layer, and the other will be stacked exactly on top of the last round added. Please watch our video in the Pattern Library if possible; seeing it done will show you how simple it is.
Because this is a Zigged Band, we had to decide how to handle the valleys. Instead of adding square stitched beads on top (which is fine too) we took the decrease stitch that we would have taken in a normal round of Rick-Rack Stitch. We did this because we wanted the smoothest possible top layer. Please see the next page for a close-up photo and illustration of this area.
One interesting thing to note about the EGR is that what you bead NEXT has a huge impact - if we add peyote rounds to the blue round next, the blue inner layer will be perfectly smooth. If instead, we make the next round a red and orange one, and come back to the blue after that, the blue Underskirt will have a little ridge where it begins. It’s subtle, but worth noting. For our sample, Kate did the blue Underskirt first, because the bangle no longer willingly reversed.
The Elegant Guide Round alternates one peyote stitch (in this case a sky-blue bead)
and one square stitch (in this case the same colour as the bead from the previous
round it’s siting directly on top of).
Right: the Elegant Guide Round, on top of
the built Underskirt Step 5
Add an Elegant Guide Round to your Rick-Rack
Contemporary Geometric Beadwork, Volume II by Kate McKinnon Contemporary Geometric Beadwork, Volume II by Kate McKinnon234 235
Kate used the tactic shown at left (skipping the valleys) to add the Elegant Guide Round to her Rick-Rack Bangle.
The method below (adding beads at the valleys) gives a ridgier Guide Round on a Zigged Band, and one that matches the bead count of the round below it. This only matters if it does. To this bangle, it meant a smoother transition from one round to two.
Whichever works best for you is fine. The EGR is fun to play with. Remember that you can choose any type of bead you like as the square-stitched element in an EGR, even beads that are much larger than the beads of the main struc-ture, because as the EGR is only placing every other bead, there is a lot of elbow room for the newly added beads.
Choices at the Decreases: Adding Beads at the Valleys
The valley adds are shown in shiny gold in the photo above. You can see that they were simply skipped, as in regular Rick-Rack Stitch, in the photo opposite.
Add an Elegant Guide Round to your Rick-Rack Step 5 (continued)
Choices at the Decreases: Skipping the Valleys
Contemporary Geometric Beadwork, Volume II by Kate McKinnon Contemporary Geometric Beadwork, Volume II by Kate McKinnon236 237
You saw how we did the valley decrease on the previous pages, and noted that it is also an option to add square stitched beads at the crotch (instead of mirroring the normal decrease) for a boxier look.
Now let’s look at how to add the increase beads at the tips of the Points.
Please note that all of the peyote adds in our Elegant Guide Round are blue beads, and all of the square stitched adds correspond to the colour they are being stacked on top of.
After the EGR is finished, you’ll have two completed rounds of beadwork, each with their own set of increase beads at the Points.
After adding the blue peyote bead just before the increase, your working thread will be exiting the center of the previous round’s increase.
You can see previously completed Points (with
increases) all around the bottom of the bangle, as the increase we are showing is the last one
of the round.
To follow our pattern, square stitch 1 green bead on top of the first green increase bead from the previous round (1). Your thread will once again be exiting the center of the increase beads from the previous round.
Adding the Point Increases (continued)
Place a normal two-bead increase in the blue round and pass, as usual, up through the second increase bead from the previous round (2).
1
2
Add an Elegant Guide Round to your Rick-Rack Step 5 (continued)
Adding the Point IncreasesX
Contemporary Geometric Beadwork, Volume II by Kate McKinnon Contemporary Geometric Beadwork, Volume II by Kate McKinnon238 239
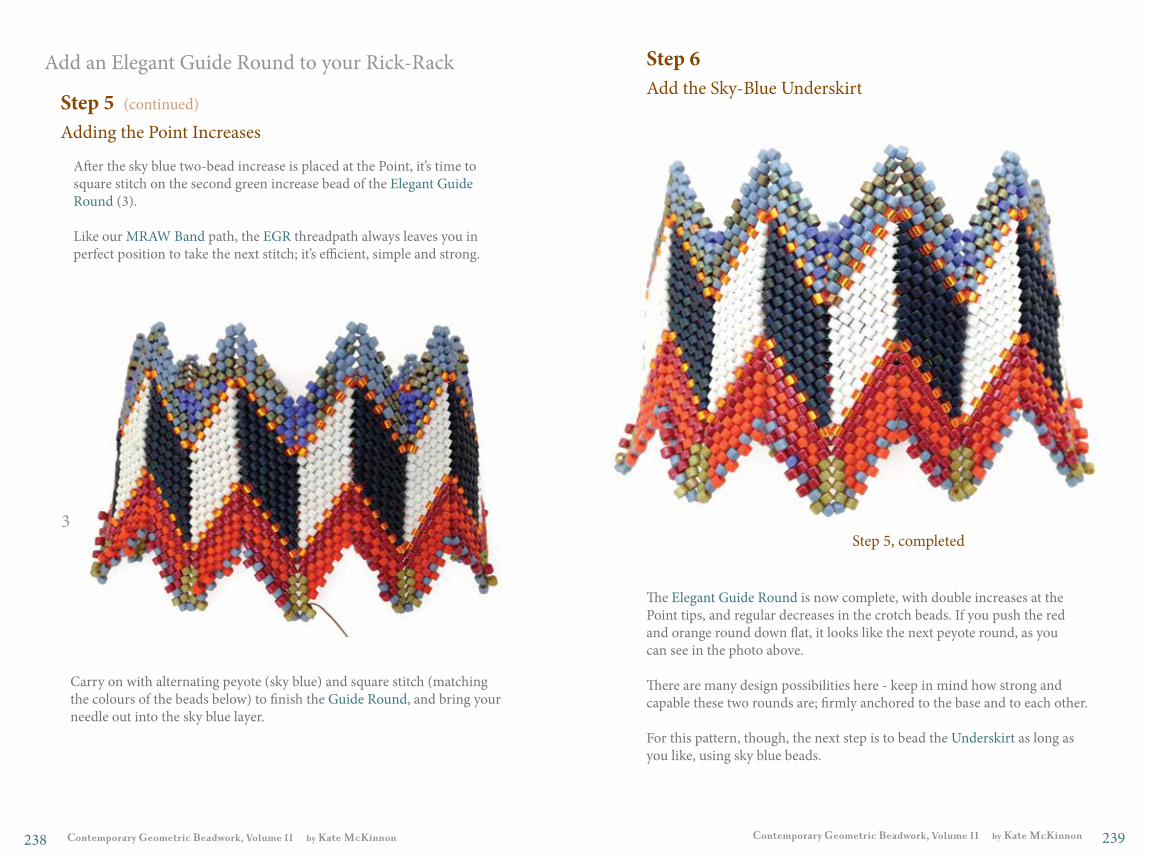
The Elegant Guide Round is now complete, with double increases at the Point tips, and regular decreases in the crotch beads. If you push the red and orange round down flat, it looks like the next peyote round, as you can see in the photo above.
There are many design possibilities here - keep in mind how strong and capable these two rounds are; firmly anchored to the base and to each other.
For this pattern, though, the next step is to bead the Underskirt as long as you like, using sky blue beads.
Step 6Add the Sky-Blue UnderskirtX
After the sky blue two-bead increase is placed at the Point, it’s time to square stitch on the second green increase bead of the Elegant Guide Round (3).
Like our MRAW Band path, the EGR threadpath always leaves you in perfect position to take the next stitch; it’s efficient, simple and strong.
3
Carry on with alternating peyote (sky blue) and square stitch (matching the colours of the beads below) to finish the Guide Round, and bring your needle out into the sky blue layer.
Step 5, completed
Add an Elegant Guide Round to your Rick-Rack Step 5 (continued)
Adding the Point IncreasesX
Contemporary Geometric Beadwork, Volume II by Kate McKinnon Contemporary Geometric Beadwork, Volume II by Kate McKinnon240 241
Needle securely into the orange and red base (using a fresh thread is always a good idea in circumstances like the beginning of a new layer) and begin normal Rick Rack Stitch on the red and orange section. We added a further four rounds, but of course both this layer and that of the Underskirt could be built with as many rounds as desired.
There is sometimes a peek of the Underskirt through the Elegant Guide Round (this actually depends on choices you make while developing the round; which layer you work on first will determine which layer gives a peek of the other).
The flash of an underlayer can be used to your advantage, as in the blue flashes through the black, white and grey field of Kate’s Pagoda Bangle (pages xx-xx).
Step 7Add To The Guide RoundX
Using Rick-Rack Stitch, add as many rounds of sky-blue beads as you like to build an Underskirt. Kate built a total of nine rounds, including the one set down during the Elegant Guide Round.
Step 6Build the Sky-Blue UnderskirtX
Life is pretty simple: You do some stuff. Most fails. Some works. You do more of what works.
- Leonardo da Vinci
Contemporary Geometric Beadwork, Volume II by Kate McKinnon Contemporary Geometric Beadwork, Volume II by Kate McKinnon242 243
You have a great deal of control about how dramatic the physical and the visual transition is at the Guide Round. As two layers of beadwork occupy the same space between two beads, in the interstitial space where one layer turns into two layers, those two layers can slide a bit in that space. One can be clearly on top, or they can each be just a little offset from the main layer.
Factors that affect this lie of the beads are: your intention, your tension, and which round you begin beading after the Guide Round. Experiment! We ourselves feel that we have only begun to think about the possibilities of the exquisite Elegant Guide Round, and the mysteries of the Zigged Band.
For now....
Where We Stopped
Beadwork in this sample by Ann Rishell and Kate McKinnon.Illustrations by Karen Beningfield.
This pattern (and the ideas contained within it) is our gift, and is copyright-free. Please feel free to use the concepts in your own work,
to teach from it, or include it in your own handouts. Links back to our project are always appreciated, of course:
www.ContemporaryGeometricBeadwork.com
A good pattern for one of these complex pieces takes 20 pages, which is why we keep them in the Pattern Library
and not the book. We want the book to show hundreds of pieces, not just a handful, and we want to show your work as well as our own.
The reason that our patterns are free is because while we want you to “get” the work (and patterns can be so helpful for this) they are essentially unimportant; technique is everything. CGB can’t be itself and also be
a Pattern Book, because there isn’t enough room in the pages.We made the Pattern Library instead, with love.