76
TF CHASSIS / TELEVISION TF CHASSIS / TELEVISION SERVICE MANUAL_V1 1 February 11
| Date post: | 31-Oct-2014 |
| Category: |
Documents |
| Upload: | roger-martinez-bermudez |
| View: | 674 times |
| Download: | 34 times |

TF CHASSIS / TELEVISION
TF CHASSIS / TELEVISION
SERVICE MANUAL_V1
1 February 11

CONTENTS
TF CHASSIS / TELEVISION
CONTENTS.............................................................................. .................................................. 2
1.REVISION LIST.................................................................................................. .................... 4
2.SAFETY WARNINGS ............................................................................................................ 5
3.PRODUCT SPECIFICATIONS............................................................................................... 6
3.1.Technical Specifications................................................................................................... 6
3.2.Functional Features......................................................................................... .................... 7
3.3.Special Features ................................................................................................................. 8
3.3.1. Next-Generation Digital Terrestrial Broadcasting (DVB-T2)
............................................................................................................... ................................ 8
3.3.2.Single Chassis Feature In All Screen Sizes (19”-46”) ............................................... 9
3.3.3.USB Recording (USB-PVR) ....................................................................................... 9
3.3.4.DIGI LINK and HDMI CEC Features ........................................................................ 9
3.3.5.Operation With Common Interface (CI+)................................................................. 10
4.PRODUCT INSTALLATION................................................................................................. 11
4.1.Product Installation............................................................................................................ 11
4.2.Input/Output Connections............................................................................... .................. 13
4.3.Remote Control .............................................................................................. ................... 15
4.3.1.Arçelik/BEKO Remote Control (YB1) ...................................................................... 15
4.3.2.GRUNDIG Remote Control (TP3) ............................................................................ 16
4.3.3.Grundig/Beko/Arçelik Remote Control (19”-22”/YD1)........................................... 17
5.USING NEW PRODUCT FEATURES ................................................................................. 18
5.1.DivX VOD ....................................................................................................................... 18
5.2.DIGILINK & CEC .......................................................................................................... 18
5.3.USB Recording (USB PVR) ............................................................................................ 19
5.4.USB Mode............................................................................................. .......................... 19
6.EXTERNAL EQUIPMENT CONNECTION........................................................................ 21
7. GENERAL OPERATING PRINCIPLES OF TV................................................................ 24
7.1.Chassis General Operating Principle............................................................................... 25
7.2.DC Power Stage............................................................................................................... 26
8.OPERATING PRINCIPLES OF CIRCUIT COMPONENTS.............................................. 28
8.1.Circuit components on the chassis................................................................................. 28
9.SERVICE MENU SETTINGS............................................................................................. 37
10.CUSTOMER SETTINGS.................................................................................................... 46
11.FAILURE/ERROR CODES................................................................................................ 50
11.1.Sound but no picture, and backlight illuminated......................................................... 50
11.2.Sound but no picture, and backlight not illuminated................................................... 51
2 February 11

TF CHASSIS / TELEVISION
11.3.No Sound ........................................................................................................................ 51
12.FAILURE/TROUBLESHOOTING DIAGRAMS................................................................ 53
12.1.Sound but no picture, and backlight illuminated........................................................... 53
12.2.Sound but no picture, and backlight not illuminated..................................................... 54
12.3.No Sound ........................................................................................................................ 55
13.CHASSIS DIAGRAMS ....................................................................................................... 56
14.SOFTWARE UPDATE......................................................................................................... 66
14.1.Updating TV Software By Using USB Memory........................................................... 66
14.2. BOOT Code Installation From Service Menu by using USB Memory................................. 67
14.3.MBOOT Installation by means of DEBUG TOOL....................................................... 68
15.SUPPORTED RESOLUTIONS....................................................................... ..................... 73
15.1.PC-DVI Resolution Info..................................................................... ........................... 73
15.2.HDMI-H PC Resolution Info........................................................................................ 73
15.3.HDMI-H YPbPr Resolution Info.................................................................................. 74
16.HOTEL TV INSTALLATION ............................................................................................ 75
3 February 11

1.REVISION LIST
TF CHASSIS / TELEVISION
Revision List Item No Version Revision Date Responsible
1 0 SEK first draft issued 06/01/2011 TV Design Application 2 1 Hotel TV visual and menu updated 18/07/2011 TV Design Application 3
4
5
6
7
8
9
10
11
12
13
14
15
16
17
18
19
20
21
22
23
24
25
26
27
28
29
30
31
32
33
34
35
36
37
38
39
40
41
42
43
44
45
46
4 February 11

2. SAFETY WARNINGS
TF CHASSIS / TELEVISION
Panels used in LCD and LED panel televisions are quite sensitive in electrical and physical aspects. Therefore, the following warnings should be observed.
1. Panel surface is quite sensitive and can be damaged easily. Take care to avoid scratches on the panel surface. When you need to lay down the panel, place it on a floor, which will not cause damages. Besides, do not use rough materials when touching or wiping the panel clean.
2. Keep panel surface clean. Put on rubber gloves when touching panel surface. To clean the surface, use a mild cleaning agent that does not get electrified.
3. Keep LCD and LED module away from water. Spilling water in or on the panel causes electrical damage. It should be wiped dry, if needed.
4. Avoid sudden temperature and humidity changes. Sudden changes of temperature and humidity may harm the panel.
5. High temperature and humidity shortens product life. LCD and LED panels are not suitable for use under high temperature and humidity conditions. The user should observe the stated values of temperature and humidity.
6. Keep it away from harmful (corrosive) gases. Corrosive gases damage chemical and electronic structure of LCD and LED panel.
7. Static electricity flow may damage the panel. LCD and LED module contain materials sensitive to static electricity such as CMOS and etc. The body should be grounded before touching the panel. Also, you must not touch connector areas with bare hands.
8. The same image should not stay on the screen for prolonged times. Keeping the same image on the screen for a long time may lead image retention and the panel may get damaged. Therefore, TV should be turned off when not in use and the image should be changed within certain intervals when displaying still images.
5 February 11

3. PRODUCT SPECIFICATIONS
3.1.Technical Specifications
TF CHASSIS / TELEVISION
Screen size 19”/22”/26”/32”/37”/42” LCD; 19”/22”/26”/32”/40”/46”LED Sound output 19”/22”:3W ; 26”/32” LOW:5W ; 26”:7W ; <=32”:10W
Standby power consumption 0.5W Rosh Limits Pb (Lead) / Hg (mercury) Pb complies with RoHS directive / 0
mg Scart input Standard (Except products with LOW)
Audio/Video RCA input Standard (Except products with LOW) S-Video input Standard (Except products with LOW) HDMI input 1-2-3-4 Optional
YPBPR input Standard (Except products with LOW) VGA input Standard (Except products with LOW) PC audio input Standard (Except products with LOW)
Line Out Standard (Except products with LOW) Headphone output Standard (Except products with LOW) USB input Standard (Except products with LOW)
CI Slot input Standard (Except products with LOW) Optical Out Standard (26”-46”) DVB T/C Standard
DVB T2 Optional HDMI CEC Standard CI+ Standard (Except products with LOW)
MPEG4 Standard SRS TruSurround HD MEGA DCR Optional
MEMC 100 Hz products are standard USB PVR Optional HOTEL TV 22”/26”/32” Optional
DVD COMBO 22” Optional 12V DC External Power Supply 19”/22” Optional Power input (V/Hz.) 220-240V ~ 50-60 Hz
Digital Program memory TV/Radio 1000 (Cable-DVBC) / 100 (analog) /1000 (Terrestrial-DVBT/T2) / 100 (analog)
Sound systems Mono / Stereo / Nicam
Picture systems Analog: Depends on the country/region selection: B/G, D/K, I, L Digital :DVB-T/T2, DVB-C
Antenna / Cable UHF / VHF / 75 ohm Reception range
USB Film formats
Cable : Full band 110MHz 862MHz Modulation:16QAM, 32QAM,64QAM, 128QAM and 256QAM Symbol rate: 4.0Msym/s to 7.0Msym/s Terrestrial : VHF/UHF Band width 7 MHz and 8 MHz COFDM modes: 2k and 8k Set: 16QAM, 64QAM, QPSK 8k Set: 16QAM, 64QAM, QPSK Analog: C02 ... C80, special channels S01 ... S41 “.avi”, “mkv”, “.mp4”, “.ts”, “.mov”, “.mpg”, “.dat”. In addition to video data, these files also contain audio data compressed and "packaged" by using MP3, AAC or Dolby Digital©.
USB Subtitle formats SRT, SSA, ASS, SMI
USB Image formats JPG, BMP, PNG
6 February 11

3.2.Functional Features
TF CHASSIS / TELEVISION
TF-chassis products are intended to drive all screen sizes between 19" and 46" over a single chassis unlike SU and T5-chassis products. The project will support LCD and LED panels. In small screens (19”, 22”), DVD Combo feature will be provided and DVB-T2 features will be included in the product range. Hotel TV with Timer (with Swan and Klein cabinet) aims to provide Hotel TVs with the feature of cloning via USB; and USB PVR feature will be supported for all screen sizes. Besides, MPEG4 low cost products with 1 HDMI will be offered with this chassis (26”-32” LCD).
Our televisions with TF chassis support both analog and digital broadcasts. As is known, digital broadcasts are divided in three as terrestrial digital broadcasting (DVB-T/DVB-T2: Digital video Broadcasting Terrestrial), cable digital broadcasting (DVB-C: Digital video broadcasting cable) and digital satellite broadcasting (DVB-S: Digital video broadcasting satellite). Our TF-chassis televisions support DVB-T/C and DVB-T2 (optional) broadcasting. Digital receiver unit of the product processes signals coming from digital transmitters and convert them into audio and video of superior quality. It enables you to access video, music and photo file and play those media.
In our country, DVB-T (Digital Terrestrial Broadcasting) has been tested by TRT in three metropolitan cities, but private broadcasting companies have not started DVB-T broadcasting yet. DVB-C (Digital Cable Broadcasting) has been started over the cable TV network called Teledünya. In DVB-T broadcasting, MPEG2 and MPEG4 standards are currently supported. MPEG defines compression algorithms used in digital terrestrial broadcasting. Our TF-chassis products support MPEG2 and MPEG4 broadcasting. In today's digital broadcasting, emergence of high definition digital broadcasts (HD) has brought the use of MPEG4 standard, which is more productive.
Supporting all systems of analog broadcasting (multisystem), TF chassis has image improvement algorithms such as 3D comb filter, 3D deinterlacer, DLTI and DCTI features. DNR (digital noise reduction) and MPEGNR (MPEG noise reduction) improvements are used. Moreover, it features sound improvement algorithm SRS TS HD; supports AC3 (Dolby digital), AC3+ (Dolby digital plus), AAC and HE-AAC coded audio broadcasts in digital broadcasting.
To summarize, TF-chassis products support the following features.
• HDMI-CEC • DVB-T/T2/C • USB-PVR • DVD-COMBO • CI+ • Full HD (100Hz) • HD-Ready • HDCP • Playing picture, music and film from USB
• Recording with USB HDD in digital mode
7 February 11

TF CHASSIS / TELEVISION
• MPEG-2 MP@HL • MPEG-4 AVC / H.264 [email protected] • Dolby Digital Plus, High Efficiency Advanced Audio Codec • 4 HDMI connection input • CI Slot input • 8-day EPG (Electronic Programme Guide) • 4 lists of favorite channels in digital and analog mode. • Performing Digital and Analog processes by a single menu thanks to the advanced
menu system. • Updating all system software through on-air broadcasting • SRS TruSurround HD sound • Wide angle of vision • SCART / S-Video / RCA connection inputs • PC connection • AVL (Automatic Volume Limiting) • Programmable on / off • Teletext • Graphic equalizer • Crisp clear picture with a Digital Comb Filter • Sharpness in Colour Transitions (CTI) • Sharpness in black&white transitions and picture resolution (LTI) • Fine tuning • Child Lock • Panel lock • Picture freezing and zoom • Viewing NTSC broadcasts via Scart input • 4:3, 16:9, 14:9 Letterbox, Subtitle and Panorama and Auto picture formats
3.3.Special Features
3.3.1. Next-Generation Digital Terrestrial Broadcasting (DVB-T2)
DVB-T stands for Digital Video Broadcasting-Terrestrial. The frequencies used for DVB-T are UHF and VHF channels that we are familiar from analog broadcasting. Thanks to digital broadcasting, those channels are used more productively compared to analog technique. A single frequency contains many television channels. COFDM modulation divides the band width among thousands of individual carriers. Each carrier is encoded with defined QPSK, 16-QAM or 64-QAM modulation technique. Data rate per channel is approximately 12 and 20 Mbit/s depending on the set parameters. Data rate of a frequency can be divided to maximum four programs. Each divided program has averagely 3 and 5 Mbit/s rate. (COFDM)
Operating much more productively than currently used DVB-T technology, DVB-T2 offers the most appropriate environment for HD broadcasts by using MPEG4 compression technique. Started to be used in the UK, DVB-T2 technology will also be put into practice by Finland and Serbia soon. Besides, DVB-T2 is expected to be deployed in many European countries, primarily Italy and Spain.
8 February 11

TF CHASSIS / TELEVISION
In our country, TRT has started DVB-T2 test broadcasting in Dikmen, Ankara.
3.3.2.Single Chassis Feature In All Screen Sizes (19”-46”)
In LCD and LED panel products with 19”-46” screen sizes that contain HD Ready, Full HD and Full HD 100Hz features, TF chassis will be used as a single chassis and provide great advantages in manufacture and service use.
LCD LED
HD Ready
Full HD
FHD 100 Hz
HD Ready Full HD
FHD 100 Hz
19" x x
22" x x x
26" x x x
32" x x x x x x
37" x x x
40" x x
42" x x
46" x
3.3.3.USB Recording (USB-PVR)
This feature allows you to record digital television channels (DVB-T /T2, DVB-C) on an external USB disk and later play these records over the disk. Recording programmes to view them later can only be done with digital television stations (DVB-T/T2 and DVB-C). You can record and playback digital television stations (DVB-T and DVB-C) according to broadcasting station. Recording and playing programmes, as well as TimeShift function can only be carried out by using an external data medium (hard drive or USB stick). The data medium must have a capacity of at least 2 GB.
3.3.4.DIGI LINK and HDMI CEC Features
Our products with TF chassis are equipped with HDMI CEC feature. This feature utilizes CEC (Consumer Electronics Control) protocol. CEC allows you to make an HDMI connection between your TV and DVD player or video recorder and control such equipments with the remote control of the television.
9 February 11

TF CHASSIS / TELEVISION
This feature must be supported by the device you connect as well. You television supports the following functions.
Your television is equipped with DIGI LINK feature. This feature utilizes CEC (Consumer Electronics Control) protocol. CEC allows
you to make an HDMI connection between your TV and DVD player,
STB or video recorder and control such equipments with the remote
control of the television. This feature must be supported by the device you connect as well.
3.3.5.Operation with Common Interface (CI+)
Common Interface (CI) is used in DVB receivers. Scrambled channels can only be
viewed with a CA module suitable for the encoding system and the corresponding smart card. The television set is equipped with a Common Interface slot into which CA modules from
various providers can be inserted. You can insert the service provider’s smart card into the CA
module in order to enable the scrambled channels you want to view.
10 February 11

4. PRODUCT INSTALLATION
4.1.Product Installation
TF CHASSIS / TELEVISION
Only the AC power cable and AC/DC adaptor (if any) supplied with the product should be used. Connect the product to only supply lines between 220-240 V ~ 50-60 Hz voltage/supply range. SCART, HDMI, VGA and RCA cables are not supplied with the device.
It is important to observe the following precautions during installation.
11 February 11

TF CHASSIS / TELEVISION
To ensure adequate ventilation, please leave a clearance of at least 10 cm at all sides of the product. Do not place the product on surfaces such as beds, couches, pillows, etc. and do not block the ventilation openings.
Do not leave the product under direct sunlight or near a heat source. Avoid using the product under ambient temperatures out of 0°C - 40°C range. Do not use it in areas close to bathtub, sink, pool and in humid circumstances such as basements or directly under rain.
The product should be connected to a grounded socket which is being protected by a fuse complying with the values indicated in the "Technical specifications" table. Our company shall not be liable for the damages that may arise when the product is used before ensuring that the grounding complies with local regulations.
The connection must be in compliance with national regulations. The power cable plug must be easily accessible after installation. Voltage rating and allowable fuse protection are specified in the “Technical Specifications” section. The specified voltage must be equal to your mains voltage. A damaged power cable must be replaced by Authorized Service. Damaged product must not be operated before repair! There is danger of electric shock!
12 February 11

4.2. Input/Output Connections
TF CHASSIS / TELEVISION
AV/S-VHS Euro/AV socket (CVBS signal, RGB signal); video signal input for S-Video camera (with Scart-S-VHS converter).
Optical Out Audio output sockets (appliqué) for PCM/AC3 signals. For connecting to a digital multi-channel audio/video amplifier or AV receiver.
COMPONENT Y/CVBS Pb Pr
Video signal input (YUV signal). PC Audio Audio signal input for PC.
PC-IN VGA socket, video signal input for PC.
L R Audio signal input (YUV signal). Audio signal input for camera.
ANT IN Antenna socket.
Y/CVBS Video signal input for camera.
13 February 11

TF CHASSIS / TELEVISION
DC IN Adapter cable input. (12V/4,5 A ; 2,5mm jack) Y/AV2 Video signal input for camera.
AC IN Power cable input. Audio Audio signal input for PC.
AV1 / S-VHS Euro/AV socket (CVBS signal, RGB signal); video signal input for S-Video camera (with Scart-S-VHS converter).
PC-IN VGA socket, video signal input for PC.
ANT IN Antenna socket.
COMPONENT Pb Pr Y/AV2
Video signal input (YUV signal). Audio signal input (YUV signal).
HDMI2 HDMI socket, audio/video signal input (HDMI).
Headphone connection (3.5 mm jack); External audio output.
L R Audio signal input for camera.
14 February 11

4.3.Remote Control
4.3.1.Arçelik/BEKO Remote Control (YB1)
TF CHASSIS / TELEVISION
15 February 11
- Temporary sound mute button
- Temporary on/off button
- Numeric buttons
- Favorites channel list selection button
- EPG menu button (D) - Teletext question / answer button
- Audio language selection button (D) - Teletext update button
- Subtitle selection button (D)
- List of recording in PVR mode with USB
inserted
- With no USB inserted, ECO feature
on/off button
- Picture format selection button - Picture and teletext (PAT) button
- Switching back to the last viewed channel button - Teletext sub page (Sub) button
- In USB and PVR mode, repeat mode
selection button
- Button to enter and exit menu
- Source menu button
- Programme forward / backward buttons
- Volume Down / Up buttons
- Menu up / down navigation buttons
- Menu right / left navigation buttons
- Menu confirmation button - Channel list button
- TV / Teletext selection button
- Return to previous menu button
• (Red) / - Red Teletext button
- In USB and PVR mode, start and stop
playing button
- In PVR mode, play recorded
programme button

4.3.2.GRUNDIG Remote Control (TP3)
TF CHASSIS / TELEVISION
16 February 11
Switches on the television set (stand-by).
Opens the pre-selection menu for AV channels and the USB input. Select
with or buttons and press to confirm.
Sound on/off (mute).
Opens the menu.
Switches on the television set from stand-by mode;
Adjusts the volume
Opens the electronic TV guide
Opens the selection menu to switch between picture formats,
Select with button and press
to confirm.
Switches on the television from standby mode; selects channels directly.
Switches on the television from standby; selects stations step by step
Switches between teletext and TV modes.
Recording, playing, pausing and stopping while the external data media is connected (only for digital channels).
Opens the PVRnP menu.
Zap function; switches the menus one level back.
Selects the channel list (»All Channels«, » FAV1« to »FAV4«).
Cursor Control
Moves the cursor up and down in the menus.
Moves the cursor left/right in menus.
Opens the channel list;
activates various functions.

TF CHASSIS / TELEVISION
4.3.3.Grundig/Beko/Arçelik Remote Control (19”-22”/YD1)
17 February 11
Sound on/off (mute).
Switches on and off the
television set (stand-by).
Zap function; switches the
menus one level back. Switches on the television from standby mode; selects
channels directly.
Opens the selection menu to switch between picture formats. Select with
; buttons and
press to confirm.
Opens the pre-selection menu for AV channels and the USB input.
Select with or
buttons and press
»OK« to confirm.
Adjusts the volume.
Turns on and off the menu. Switches on the television from standby; selects
stations step by step
Switches between teletext and
TV modes.

5.USING NEW PRODUCT FEATURES
5.1.DivX VOD
TF CHASSIS / TELEVISION
DivX® is a digital picture format created by DivX, Inc. This is a DivX Certified® device that plays DivX video. For more information to convert your files to DivX image files and for software tools, please visit divx.com. DIVX VIDEO ON DEMAND, To play DivX Video-on-Demand
(VOD) films that you purchase, you should have this DivX Certified® device registered. To receive your registration code, navigate to your device’s USB settings menu and DivX VOD section. For more details about registration, please visit the address vod.divx.com.
5.2.DIGILINK & CEC
Your television is equipped with DIGI LINK feature. This feature utilizes CEC (Consumer Electronics Control) protocol. CEC allows you to make an HDMI connection between your TV and DVD player STB or video recorder and control such equipments with the remote control of the television. This feature must be supported by the device you connect as well.
Switching on the external device from standby mode: When you switch on your external device (e.g. DVD player) from standby mode, your television will also be turned on from standby mode and switch to HDMI source that the external device is connected to.
Selecting HDMI source from the television: When you switch on your external device (e.g. DVD player), your television will switch to the HDMI source that the external device is connected to. (your television must be on).
Selecting menu language When you select menu language on your TV, menu language of the external device will change as well. (If your DVD player supports)
Switching off the device from standby mode After switching your television to standby, your external device (e.g. DVD player) will also switch to standby if it is on.
18 February 11

5.3.USB Recording (USB PVR)
TF CHASSIS / TELEVISION
This feature allows you to record digital television channels on an external USB disk and later play these records over the disk. Recording programmes to view them later can only be done with digital television stations (DVB-T/T2 and DVB-C). You can record and playback digital television stations (DVB-T/T2 and DVB-C) according to broadcasting station. As well as recording and playing programmes, TimeShift function can only be carried out by using an external data medium (hard drive or USB stick). Hard disk or USB memory should have at least 2 GB capacity. When you record a programme into an external USB storage device, you can watch this programme only on your TV. You will not be able to watch this programme on any other device. If you send your television to be repaired and hardware components need to be replaced, you might not be able to play the recordings again on the repaired television. Recording can be done with many USB storage devices available on the market. However, it cannot be guaranteed that it is functional with all USB storage devices. The broadcasting organisation can prevent a programme to be recorded in USB device. If you record a programme on the archive of an USB storage device, playback can be restricted. The broadcaster can allow you to see this programme one or more times but could also just make it available for a certain period of time. The stations, from which children are protected, immediately require a PIN number before recording starts. If this authorisation is not given, the recording will not start. Copying a programme from a digital television station onto a video or DVD recorder using the SCART socket (analog picture/sound signal) can also be restricted by the broadcaster. In order to do this, your device must support the copying function.
5.4.USB Mode This feature allows you to play film, image and music files in your USB storage device. Video compression / decompression (codec) of supported video data is intended for decreasing the storage area without compromising the picture quality. Your television can playback video data compressed in DIVX, XVID, H.264/MPEG-4 AVC(L4.1, Ref. Frames:4), MPEG-4, MPEG-2, MPEG-1, MJPEG, MOV standards.
19 February 11

TF CHASSIS / TELEVISION
File extensions supported by the device: “.avi”, “mkv”, “.mp4”, “.ts”, “.mov”, “.mpg”, “.dat”. In addition to video data, these files also contain audio data compressed and "packaged" by using MP3, AAC or Dolby Digital©.
There are 2 USB inputs on your television, namely »USB1« and »USB2«. »USB1« input is intended for USB devices that require additional power (e.g. external hard disk).
»USB2« interface of the television supports 500mA current according to the USB standard. Devices such as external hard disk and etc. that consume more power can only be connected to the »USB1« interface of the television.
Supported audio data:
You television can play audio data coded with MP3, AAC and WMA standards. MP3 stands for MPEG-1 Volume Level 3 and is based on the MPEG-1 standard developed by MPEG (Motion Picture Expert Group). AAC stands for Advanced Audio Coding developed by MPEG. AAC provides higher audio quality with the same data rate (bit rate). WMA (Windows Media Audio) is a compression standard developed by Microsoft for audio data. These formats enable audio files to be saved on storage devices with a sound quality similar to that of a CD. File extensions supported by the device: “.mp3”, “.mp2”, “.wma”, “.m4a”, “.aac” MP3 files can be organized in a similar way with the folders and subfolders in PC.
Supported picture data:
Your television can display picture data in JPEG, PNG and BMP formats. JPEG stands for Joint Picture Experts Group. This process is intended to compress picture files. PNG and BMP standards are intended to compress picture data without loss Picture files can be saved in a data storage medium together with other file types. Such files can be organised in folders and subfolders.
20 February 11

6.EXTERNAL EQUIPMENT CONNECTION
TF CHASSIS / TELEVISION
21 February 11
Connecting external equipment via SCART socket R
ear vi
ew
of pro
duct
ar vi
ew
of p
roduct
view
of p
roduct
w o
f pro
duct
of p
roduct
pro
duct
duct
ct
SATELLITE
RECEIVER
or
or
GAME CONSOLE
CAMERA
SATELLITE RECEIVER
Sid
e v
iew
of
vie
w o
f
of
pro
duct
pro
duct
uct
Connecting external equipment via S-Video socket
Connecting external equipment via AV sockets
Side view of product CAMERA
GAME CONSOLE
SATELLITE RECEIVER
GAME CONSOLE

TF CHASSIS / TELEVISION
Connecting external equipment via YPBPR sockets
Rear view of product
Audio connection
Video connection D V D
Connecting external equipment via HDMI socket
DVD
SATELLITE RECEIVER
GAME CONSOLE
Rear and side view of product
Connecting digital amplifier / AV receiver via Optical Out or SPDIF socket
Optical Connection
DIGITAL AMPLIFIER
SPDIF Amplifier
Rear and side view of product
22 February 11

TF CHASSIS / TELEVISION
23 February 11
Connecting AV receiver via Audio Out L/R
Audio Connection AV RECEIVER
Rear view of product
PC connection
Rear view of product
Audio connection
Video connection
Inserting CI (Common Interface) card
Sid
e v
iew
of p
roduct
e v
iew
of p
roduct
view
of p
roduct
w o
f pro
duct
of p
roduct
pro
duct
duct
ct

7. GENERAL OPERATING PRINCIPLES OF TV
TF CHASSIS / TELEVISION
24 February 11

7.1.Chassis General Operating Principle
TF CHASSIS / TELEVISION
As it is also seen in block diagram, system structure is quite simple and clear. This is owing to the fact that digital and analog controls can be performed with a single integrated circuit used in TF chassis. Besides, modulator and demodulator are located in the main IC. In short, all sources provide input to the main integrated circuit; after the video has been processed, it is sent to the panel from the integrated circuit via LVDS lines. Likewise, the sound is sent to the sound amplifier after being processed. DDR is used for main IC and MEMC circuit's processes.
While performing these processes, the main integrated circuit reads software installed on flash and EEPROM data installed on EEPROMs. RAMs are used for the processes performed within the integrated circuit.
25 February 11

TF CHASSIS / TELEVISION
Surely, the system should be supplied power in 5V, 3.3V, 1.8V, 1.05V, 2.5V and 1.2V, which is required for these processes.
7.2.DC Power Stage
Chassis and supply unit are connected via S606 connector. In TF-chassis products with large size (26”-46”), only 5V is fed from the supply unit (PSU) when the product is in Stand-By. 12V and 24V supplies are switched on by the control of main integrated circuit when television is going out of Stand-By.
26 February 11

TF CHASSIS / TELEVISION
In TF-chassis products with smaller size, 12V and 5V will be supplied from supply unit (LIPS) in Stand By mode.
On this connector (S606), 3 main control signals are sent to the power supply as well. The first signal is “POWER_SW”; it is sent to the power source from 8th pin. It switches on 12V and 24V voltages in the "ON" status. The second signal is “BL_CTRL”; it switches panel's backlights on or off. This signal is sent from 5th pin to the power supply. In cases where 5th leg is high (3.3V), backlights are switched on. The third signal is “BRI_ADJ”; it determines the illumination level of backlights depending on the value set in the user menu. It can be a square wave or a DC value according to the panels using PWM dimming and DC dimming.
In Stand-By mode, only VCC3.3V-ST output and IC600 integrated circuit are on among the regulators on the chassis. Integrated circuits and regulators are kept off in Stand-By mode as long as possible to ensure lower power consumption. In TF chassis, Stand-By power consumption is 0.5W.
After power supply is turned on with “POWER_SW” signal, IC601 generates 1.05V and thus, when POWER GOOD (PG) signal steps in, 1.8V and 2.5V are generated by IC606 and IC605, respectively. VCC3.3V signal is switched with IC603 and VCC5V signal is switched with IC604 (turns on).
In our smaller size (19”-22”) products with TF-chassis, Panel T-CON supply voltage (12V) is directly switched as VCC PANEL signal by T607 Mosfet over S606 DC power connector, and then sent to the panel as PANEL VCC.
In the large size products, Panel T-CON supply voltage is generated by means of L608.
In 100Hz products, Panel T-CON supply voltage is generated by means of L609.
27 February 11

8.OPERATING PRINCIPLES OF CIRCUIT COMPONENTS
8.1.Circuit components on the chassis IC402, MSD3819TX Main Integrated Circuit:
TF CHASSIS / TELEVISION
IC402, which is our main IC, has the following features: Digital (DVB-T/T2/C) and analog broadcasting demodulator, USB recording feature, Broadcast and A/V decoder (NTSC/PAL/SECAM, DVB, Full HDTV, DVD, MPEG-2 and MPEG-4), 32-Bit Linux based processor, Audio processor and interface, 2 USB, 4 HDMI, 2 DDR ram input
This integrated circuit collects and processes data coming from all inputs and sends audio and video output to the speaker over amplifier and to the panel over LVDS line. This integrated circuit has more than 500 legs. Special equipment is required for installation and removal. Therefore, these integrated circuits are designed with very low error ratios. If you suspect an error with main IC on TV, firstly supplies of this IC should be checked. There are 4 input supplies as 3.3V, 2.5V, 1.8V and 1.05V. Extremely low or high ratings of these supplies might cause image freezing, some sources' not functioning or losing the picture completely. Besides, the problem might be originated in software, EEPROM, flash, crystal or RAM. If there is a problem, we cannot be sure that it is originated in IC before checking it out.
28 February 11

TF CHASSIS / TELEVISION
While turning the TV on, main IC switches the system on by reading the flash and turns the power supply on by switching the “POWER SW” signal to high. Then, panel signals “BRI_DJ (Sets backlight brightness), “TCON_ON” (turns on Panel TCON board, panel supply) and “BL_CTRL” (turns on the backlight) switches on the panel backlights and the image appears on TV.
IC200, IC201, W9751G6JB-25, DDR Ram:
29 February 11

TF CHASSIS / TELEVISION
RAM is the place where main integrated circuit performs the processes such as decoding, encoding, image and video resolution in all applications. Similar to a calculator, it constantly carries out the processes to ensure the operation of TV. RAM supplies should be carefully checked. Fluctuations in RAM supplies may cause errors. Sudden rise or fall of RAM supply might freeze the television and cause picture lagging.
IC101, TC58NVG0S3EBAI4LR0, NAND Flash Memory:
Flash memory is where the system operating software is installed. It can be inserted into IC101 and IC102 positions on the circuit. However, only 1GBit flash is being used on IC101 position.
System software starts to operate as soon as TV is turned on. All TV functions are controlled by software installed in this flash.
If any problem occurs in the flash memory, the chassis will not function as the software in the chassis is not functioning. As soon as the chassis is energized, LED located on the front panel will start flashing. This means that main integrated circuit has read and started to operate the software. IF LED is constantly illuminated but not flashing, and the chassis is not turned on even though the chassis is energized, this means either software was not read due to a problem in flash memory or it could not be started due to a problem in main integrated circuit.
IC501,TAS5707PHPR, Audio Amplifier:
30 February 11

TF CHASSIS / TELEVISION
The integrated circuit of audio amplifier amplifies audio data coming from main IC to the desired level and sends it out. There is not any dedicated IC502 amplifier for headphone socket. After the output has been filtered on main IC, it is sent to headphone socket through IC502 (MAX9728AETC+).
IC1002, MSB1231, DVBT2 Demodulator
DVBT2 demodulator enables the reception and modulation of next generation digital terrestrial broadcasting (DVBT2), and the creation of audio and video. For DVBT2 modulated broadcasts to be received by TF-chassis product, DVBT2 should be selected ON from service menu in addition to lineup of DVBT2 modulator and peripheral components on the chassis.
31 February 11

TF CHASSIS / TELEVISION
TU300, TDAG8-D11A, Tuner:
TF chassis utilizes hybrid tuner. Receiving both analog and digital broadcasts from the cable, the tuner obtains analog and digital IF (inter frequency signals) of the broadcasts. This ALPS brand tuner uses 5V power as antenna feed for active antennas. This selection can be made from user menu and controlled by 5V_TA signal from the chassis (Leg 1). When the signal of analog broadcast is low depending on the RFAGC signal coming from main IC, signal levels are strengthened by the coefficient of amplification that is calculated by main IC (Leg 2). Tuner is locked to the desired channel by communicating with main board and main IC, depending on the selected source, through I2CT2_SCL and I2CT2_SDA lines. It filters other frequencies and selects the desired frequency and transforms the signal as to enter main IC. This chassis does not have a separate demodulator IC. Demodulation is performed in main IC. Here, I2C protocol is used for the purpose of communication (Leg 7 and 8). Leg 6 sends 4MHz signal of 33V as reference. We leave this leg empty. Tuner's own power supply is 5V (Leg 3).
32 February 11

TF CHASSIS / TELEVISION
Leg 9 gives analog IF output while Leg 11 and Leg 12 give digital IF output. Leg 10 sends IF AGC value used in digital broadcasting, from the digital demodulator.
IC103, M24C32, Panel EEPROM:
Panel EEPROM contains resolution info of the panel that is obtained after panel adaptation as well as the white settings of the panel. Panel EEPROM file is named as “Panel.bin”. This EEPROM’s power supply is 3.3V. If TV panel does not respond to software update, it should be changed.
IC700, IC701, IC702, IC704, CAT24C02TDI, HDMI EEPROM
33 February 11

TF CHASSIS / TELEVISION
EEPROMs contain information related to the ports which are used to input video and audio inputs. For instance, they may contain resolution information of the system. Eeproms used in the positions of IC700, IC701, IC702 and IC704 are also used for the inputs of HDMI1, 2, 3 and HDMI4. EEPROM contains HDMI resolution info and protection password for HDCP, or HD broadcast copy. If it has a failure, copy protected HD broadcasts cannot be received.
34 February 11

IC901, M24C32, CAT24C02TDI, VGA EEPROM
TF CHASSIS / TELEVISION
When VGA cable of the computer is connected to TF chassis, VGA EEPROM at position IC901 contains the information about the supported picture format. The broadcasts other than this resolution (for example 720P) may not be shown. Besides, IC901 contains EDID DATA information where resolution data of TV and PC which is connected from VGA input are compared.
IC1005, IC608 STMPS2151/2171; USB Power Supply IC:
It is the integrated circuit that switches USB voltage and limits USB current. Data lines in USB socket are directly connected to main integrated circuit.
35 February 11
TF CHASSIS / TELEVISION
In the products whose USB option has been turned off from the service menu, the socket has "service only" label and it is used for only software update. IC608 is a 1A integrated circuit and can support hard disks (Side USB).
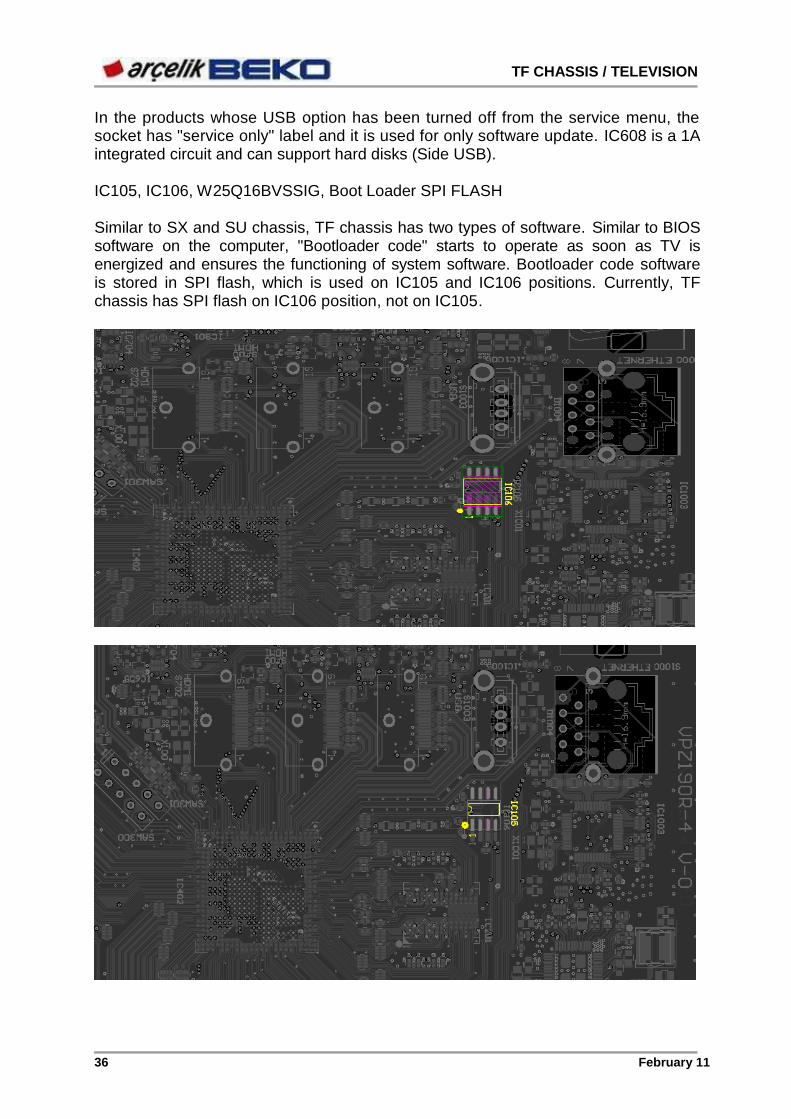
IC105, IC106, W25Q16BVSSIG, Boot Loader SPI FLASH
Similar to SX and SU chassis, TF chassis has two types of software. Similar to BIOS software on the computer, "Bootloader code" starts to operate as soon as TV is energized and ensures the functioning of system software. Bootloader code software is stored in SPI flash, which is used on IC105 and IC106 positions. Currently, TF chassis has SPI flash on IC106 position, not on IC105.
36 February 11

9.SERVICE MENU SETTINGS
TF CHASSIS / TELEVISION
To enter service menu, just like in the previously launched products, we press menu button of the remote control and enter 9, 3, 0, 1 in sequence for BEKO/ARÇELİK brand TVs. For GRUNDIG brand we enter 8, 5, 0, 0.
As the chassis improvement and development works go on throughout the production, service menu items may vary according to the software version. The following explanations are service menu settings of the current version.
System Configuration:
37 February 11

This menu contains general settings of the system.
TF CHASSIS / TELEVISION
TV MODE tab contains "Factory" and "Customer" options. It is used to perform factory controls and settings more efficiently and faster. On the TVs delivered to the customer, this setting is absolutely selected as "Customer." Otherwise, it will lead to customer complaints such as "TV automatically turns on after power failures" or "different functions operate from the remote control".
HDCP VERIFY: It must be checked if HDCP key is loaded or not during factory controls. HDCP key stands for ““High Bandwidth Content Protection Key”. This key is used to prevent copying of data on digital sources such as DVD or blue-ray. With HDCP, video data is transmitted from the source to the receiver as encrypted. Therefore, to watch HDCP encrypted DVDs or blue-ray, HDCP key should have been loaded on TV. On the products with HDCP installed, SUCCESS message is included.
DEBUG MODE is a feature, which is used to track software modifications made on TV during R&D stage. This setting must be "Off" on TVs delivered to the customer.
PLUG PLAY (Demo Mode): A navigation key is pressed after having completed all settings and checks in the factory. Later, "Please wait" message appears; and when you see the message "DONE", the device should be unplugged and plugged again. With this process, television will be set to its initial values before delivery. It will be proper to set Plug&Play tab after servicing. After pressing right key on the tab, EEPROMs will be loaded with factory defaults. TV can be shipped to the customer after this setting. Please note that any warning is not displayed or you do not have to exit the menu while Plug&Play is getting activated. You should be careful not to take the device into Plug&Play mode by mistake.
ATS (Automatic Tuning System) tab ensures that the channels are arranged in order after automatic search. However, there is a broadcast support to order the channels. It is active when “On” is selected. “On” should be selected in TF-chassis products.
SRS (Virtual multi-channel sound system) turns on and off SRS Tru-Surround XT HD feature. SRS Tru-Surround XT® creates a sound experience surrounding the user similar to 5+1 sound systems, thanks to multi-channel audio by using two loudspeakers produced by SRS company. SRS is an optional feature that can be selected upon the customer’s request.
BLUE BACK enables us to determine background when there is no picture on the screen. When "On" is selected, background will be blue; and when "Off" is selected background will be black or snowing. “On” should be selected in GRUNDIG brand products and “Off” in other products.
HOTEL tab should be set to "On" on hotel TVs, and it should be set to "Off" in other products. When the hotel model is "On", certain features designed for the hotel use are activated; the user cannot change the channels set by the service, for example, or the volume cannot be increased more than a certain level.
38 February 11

TF CHASSIS / TELEVISION
CI KEY VERIFY indicates if CI Key has been installed or not. This menu cannot be changed. This option should appear as “Pass” in the products with CI Plus feature. CI Key is the keyword on the card which is inserted to decrypt the broadcasting. This menu is a control indicator and changes automatically. This keyword is installed during TV production and it becomes a kind of ID for your TV when watching encrypted channels. TF-chassis products support CI+ feature. Launched in 2008, it is a new encryption standard developed with the collaboration of consumer electronics and scrambled digital broadcasting companies. So far, it was possible to copy the programmes after decoding process; however, now they cannot be copied thanks to that main IC coming with the CI Plus has a key. In this system, broadcasting is initially decoded on CI card. The broadcasting transmitted to the main IC from the CI card is also encrypted and it is decoded with CI Key, which is a factory setting and different for each TV. Thus, there will be no free encrypted broadcasting on the bare line and encrypted broadcasting cannot be copied. C+ feature is standard in all the products with TF chassis.
SOURCE Configuration:
The settings under source configuration tab determine which sources will be on and which ones will be off depending on customer demands. In the small size products, HDMI3 and HDMI4 are off in standard (NAVAIL); and the sources of DVD and USB can be adjusted optionally. In large size products, DVD will be off in standard. In the products with LOW feature, USB, HDMI2, HDMI3, HDMI4, AV2, COMPONENT and DVD sources will be selected off.
TV Configuration:
39 February 11

TF CHASSIS / TELEVISION
This menu contains configuration settings of TV. We may select amongst the menus that are being used and to be used on TV. These settings differ from the "System Configuration". This menu contains the changes which the user can directly observe.
To enter this menu, you should go to "TV configuration" from the service menu and enter the numbers 2, 3, 5, 6 in sequence.
TUNER menu contains the tuner types that can be used on TV. TF chassis currently works with “Alps” branded tuners.
DVBT2 (Next generation digital terrestrial broadcasting modulation) can be selected as ON/OFF depending on the customer preference, in the countries that support DVBT2 digital terrestrial broadcasting. DVBT2 is selected OFF in the products to be used in the country. In our country, TRT makes DVBT2 test broadcasting in Ankara.
OSD Selection menu has "Grundig", "Beko", "Arçelik" and "OEM" selections. For Grundig products, “Grundig” is selected. This selection adds Grundig sign next to the user menu and remote control selection is “TP3”. TV brand should be selected in Beko and Arçelik products. This selection is automatically “YB1187R” in the remote control and several brand-specific menus are also added. For other brands, OEM should be selected. If the product is "Grundig", you can enter service menu by pressing "menu 8 5 0 0" keys. If "Beko", "Arçelik" or "OEM" is selected, you can use "menu and 9 3 0 1" keys.
Note: In the smaller size (19”-22”) products with TF chassis, when Arçelik, Beko or Grundig is selected under OSD selection tab, different remote control options will be displayed compared to large size products.
40 February 11

TF CHASSIS / TELEVISION
USB RECORDING menu indicates the television's status of USB recording. It may be selected On/Off according to customer demand.
REMOTE CONTROL menu displays remote control selections for BEKO, ARÇELİK and GRUNDIG as stated in OSD Selection above. For example, GRUNDIG OSD can support several different models of remote controls and all those models can be seen under the menu. Selection of remote control may vary according to the customer demand.
KEYPAD enables you to select which keypad will be used depending on the mechanical structure of the product. 4-Key, 6-key, single-key and “Joystick” options can be selected. If selected wrong, the keys will work in different functions. 6+1 (or joystick depending on option) can be selected for large size products whereas 4+1 is selected for smaller size products and single-key pad module is used for the products with LOW feature.
L (SECAM L sound system) tab enables you to select "L" sound system, and it should be "On."
MEMC stands for "Motion Estimation Motion Compensation." "On" should be selected for the products that use only 100Hz panel.
7 SEGMENT DISPLAY should be selected "On" in the products with the indicators, which mechanically display the hour on the front panel. (Not TVs with LED backlight panel!!!) Generally, this feature is used on hotel TVs.
ECO TV option: When "On" is selected , eco standards-compliant power consumption is ensured by turning down the backlight a bit. ECO TV option should be selected ON for all products with TF chassis.
LINE OUT (LEFT/RIGHT Audio output): If the product has line out feature, it should be selected “On”. Large and small size products with TF chassis will have LINE OUT feature in standard.
HEADPHONE tab should be selected "On" if TV has a headphone socket. Large and small size products have headphone sockets in standard.
SHOP MODE is used in the first installation at the dealers for purposes of display (Shop Mode and Home Mode screens appear). When Shop Mode is selected, the logos of various features such as CI+, SRS etc., which are supported on TV, appear on top of screen with certain intervals. SHOP MODE should be selected ON for all products. However, when the product is delivered to the customer, TV is switched back to factory settings via PLUG PLAY; and HOME MODE is selected during the first installation at the customer’s place. During the first installation, SHOP MODE is only selected at the dealers for the purpose of display.
3D TV (3 Dimensional TV Technology) is not supported in the products with TF chassis.
41 February 11

TF CHASSIS / TELEVISION
CEC allows you to make an HDMI connection between your TV and DVD player or video recorder and control such equipments with the remote control of the television. The products with TF chassis have CEC feature in standard.
OUTPUT POWER is used to select audio output power. Small size products with TF chassis have 3W audio output.
CABIN OPTION feature is used to create best audio performance of the cabin. Bass/treble settings vary depending on options in the existing cabins; the options have been adjusted to prevent cabin resonance and ensure best audio quality. Depending on the cabins, the list of cabin options that may take value from 1 to 7 is constantly updated.
HIDEV MONO (improvement of high audio deviation), is a feature developed to prevent imbalances that may occur on sound carrier signals due to high audio deviation in the country. It is ON for domestic products and OFF for the products sold abroad.
OPTIC OUT (Digital Audio Output) feature is generally used to input digital audio to devices such as amplifier, DVD and etc. OPTIC OUT will be available on large size products with TF chassis and not available on small size products and the products with LOW feature.
Cloner Configuration:
This menu is used to copy your selections, channel lists, user options, satellite settings and service menu settings on TV and move them to another TV. Particularly, when installing TV at the user's home, this feature will save us time as we will not have to tune satellite channels anew.
42 February 11

TF CHASSIS / TELEVISION
Cloning can be done from any TV with the same chassis. To enter this menu, you should navigate to "Cloner configuration" from the service menu and enter the numbers 4, 6, 5, 8 in sequence.
Copy selects what and to where we want to copy. TV to USB copies the configuration on TV to the USB. USB to TV transfers previously prepared channel list, user and satellite settings to TV.
Copy item is the name of configuration to be copied. Channel/Video Set selection enables us to transfer channels, frequencies and favourite lists that were already set. Service Set enables us to transfer service menu settings. When installing at the user’s place, this option should NOT be cloned. User Set enables us to transfer user settings (sound, brightness, TV language and etc.).
Start Cloning option starts the cloning process. Whereas TV to USB takes little time, USB to TV causes a short interruption of TV imaging. When TV automatically restarts after installation, its means cloning is completed.
NOTES: When cloning, you should ensure that both product codes are the same. During both TV to USB cloning and USB to TV cloning, “ALL" should be selected as Copy item. When cloning between different product codes, only “Channel/Video Set” should be copied. After copying, picture settings of TV may show some differences. TV should be delivered to the customer after those settings are checked. From user menu, navigate to “Source settings” => “Program Table” (don’t select) and press 4, 6, 5, 8 keys to display cloning menu.
Bootcode Code Configuration
43 February 11

TF CHASSIS / TELEVISION
In the products with TF-chassis, Boot code should be updated before software
updating. Boot code update is performed through the steps below.
Step 1: Please copy mboot.bin file into USB memory. (If the memory contains more than one partition, copy the file into the first partition.)
Step 2: Insert USB memory to the USB socket on the side of TV.
Step 3: Wait for 10 seconds for USB memory to be automatically mounted.
Step 4: Open service menu (MENU+8500 (Grundig)).
Step 5: In Service menu, select Boot Code Configuration and press OK.
Step 6: If there is no problem, TV will automatically turn off and restart with new bootloader. If there is a problem, TV will not automatically restart.
Software Version
All versions of software and hardware can be seen under software version tab.
“URSA version” tab shows the 100Hz software version installed on 100Hz TVs.
44 February 11

TF CHASSIS / TELEVISION
This menu is for information only, it cannot be changed.
Other Menus: Other menus are closed to authorized services as they are used for R&D studies in the factory.
45 February 11

10.CUSTOMER SETTINGS
TF CHASSIS / TELEVISION
The products with TF chassis are divided in three including LARGE size (26”-46”), SMALL size (19”-22”) and LOW (low-priced) products. Customer settings are different for each group as stated in the tables below. In the tables, blue coloured features are optional whereas other features are written on the flash IC of the related group’s products in standard via factory automation command. Thus, features other than the blue highlighted come with the values identified on software in standard.
The values of each feature are shown in the next column of the table. The values of optional features are stated in VTF (Version Demand Form) depending on the customer’s demand.
!! If flash IC is required to be changed in TF-chassis products for any reason at the service centre, relevant settings should be performed in service menu by re-checking the tables below and VTF of the product before delivery to the customer because the values in the tables below will take default values on software in accordance with the product size (screen) and features!!
46 February 11

TF CHASSIS / TELEVISION
FEATURES TF_LARGE(26-46)
TV MODE Not to be set (Customer) HDCP VERIFY Not to be set (Success) DEBUG MODE Not to be set (OFF) PLUG PLAY Not to be set (OFF) ATS Not to be set (ON) SRS To be set (VTF) BLUEBACK To be set (VTF) (GRUNDIG:ON; OTHER:OFF) HOTEL To be set (VTF) CI KEY VERIFY Not to be set (Success) ATV Not to be set (AVAIL) A WEN Not to be set (AVAIL) CABLE Not to be set (AVAIL) USB To be set (VTF) (AVAIL[Multimedia]-NAVAIL[Service]) PC Not to be set (AVAIL) HDMI1 Not to be set (AVAIL) HDMI2 Not to be set (AVAIL) HDMI3 To be set (VTF) HDMI4 To be set (VTF) AV1 Not to be set (AVAIL) AV2 Not to be set (AVAIL) COMPONENT Not to be set (AVAIL) S-VHS Not to be set (AVAIL) DVD Not to be set (NAVAIL) TUNER = Not to be set (ALPS) DVBT2 To be set (VTF) OS D SELECTION To be set (VTF) USB RECORDING To be set (VTF) REMOTE CONTROL To be set (VTF) KEYPAD To be set (VTF) (6 BUTTON+1 STD or JOYSTICK) L Not to be set (ON) MEMC To be set (VTF) (100Hz PRODUCTS: ON) 7SEGMENT To be set (VTF) ECO TV Not to be set (ON) LINE OUT Not to be set (ON) HEADPHONE Not to be set (ON) SHOP MODE Not to be set (ON) 3D TV Not to be set (OFF) CEC Not to be set (ON) OUTPUT POWER To be set (26":7W; 32": 10W) CABIN OPTION To be set (Cabin Option Table) HIDEV MONO To be set (VTF)(Domestic products:ON; Other: OFF) GAMMA Not to be set ((Panel Adap)100Hz:FRC Scaler,50 Hz:Main Scaler, OFF) MIRROR Not to be set ((Panel Adap)(LED panels)irjrjHz:FRC Scaler,50 Hz:Main
Scaler, OFF) MEGA DCR (under Panel Inverter)
Not to be set
OPTIC OUT Not to be set
47 February 11

TF CHASSIS / TELEVISION
FEATURES TF_SMALL( 19-22)
TV MODE Not to be set (Customer) HDCP VERIFY Not to be set (Success) DEBUG MODE Not to be set (OFF) PLUG PLAY Not to be set (OFF) ATS Not to be set (ON) SRS To be set (VTF) BLUEBACK To be set (VTF) (GRUNDIG:ON; OTHER:OFF) HOTEL To be set (VTF) CI KEY VERIFY Not to be set (Success) ATV Not to be set (AVAIL) ANTEN Not to be set (AVAIL) CABLE Not to be set (AVAIL) USB To be set (VTF) (AVAIL[Multimedia]-NAVAIL[Service])
PC Not to be set (AVAIL) HDMI1 Not to be set (AVAIL) HDMI2 Not to be set (AVAIL) HDMI3 Not to be set (NAVAIL) HDMI4 Not to be set (NAVAIL) AVI Not to be set (AVAIL) AV2(COMPOSITE) Not to be set (AVAIL) COMPONENT Not to be set (AVAIL) S-VHS(over SCART) Not to be set (AVAIL) DVD To be set (VTF) TUNER Not to be set (ALPS) DVBT2 To be set (VTF) OSD SELECTION To be set (VTF) USB RECORDING To be set (VTF) REMOTE CONTROL To be set (VTF) KEYPAD Not to be set (3 BUTTON-+1 STD) L Not to be set (ON) MEMC Not to be set (OFF) 7 SEGMENT To be set (VTF) ECO TV Not to be set (ON) LINE OUT Not to be set (ON) HEADPHONE Not to be set (ON) SHOP MODE Not to be set (ON) 3D TV Not to be set (OFF) CEC Not to be set (ON) OUTPUT POWER Not to be set (3W) CABIN OPTION To be set (Cabin Option Table) HIDEVMONO To be set (VTF)(Domestic products:ON; Other: OFF) GAMMA Not to be set ((Panel Adap)100Hz:FRC Scalerp50 Hz:Main Scaler, OFF) MIRROR Not to be set ((Panel Adap)(LED panels)100Hz:FRC Scaler,50 Hz:Main
Scaler, OFF MEGA DCR Not to be set (OFF) OPTIC OUT Not to be set
48 February 11

TF CHASSIS / TELEVISION
FEATURES TF_LOW(26-32)
TV MODE Not to be set (Customer) HDCP VERIFY Not to be set (Success) DEBUG MODE Not to be set (OFF) PLUG PLAY Not to be set (OFF) ATS Not to be set (ON) SRS Not to be set (OFF) BLUEBACK To be set (VTF) (GRUNDIG:ON; OTHER:OFF) HOTEL Not to be set (OFF) CI KEY VERIFY Not to be set (Success) ATV Not to be set (AVAIL) ANTEN Not to be set (AVAIL) CABLE Not to be set (AVAIL) USB Not to be set (NAVAIL(SERVICE)) PC Not to be set (AVAIL) HDMI1 Not to be set (AVAIL) HDMI2 Not to be set (NAVAIL) HDMI3 Not to be set (NAVAIL) HDMI4 Not to be set (NAVAIL) AV1 Not to be set (AVAIL) AV2 Not to be set (NAVAIL) COMPONENT Not to be set (NAVAIL) S-VHS(over Scart) Not to be set (NAVAIL) DVD Not to be set (NAVAIL) TUNER Not to be set (ALPS) DVBT2 Not to be set (OFF) OSD SELECTION To be set (VTF) USB RECORDING Not to be set (OFF) REMOTE CONTROL Not to be set (YD1) KEYPAD Not to be set (1 STD) L Not to be set (ON) MEMC Not to be set (OFF) 7 SEGMENT Not to be set (OFF) ECO TV Not to be set (ON) LINE OUT Not to be set (OFF) HEADPHONE Not to be set (OFF) SHOP MODE Not to be set (ON) 3D TV Not to be set (OFF) CEC Not to be set (ON) OUTPUT POWER Not to be set (5W) CABIN OPTION To be set (Cabin Option Table) HIDEV MONO To be set (VTF)(Domestic products:ON; Other: OFF) GAMMA Not to be set ((Panel Adap)100Hz:FRC Scaler,50 Hz:Main Scaler,
OFF MIRROR Not to be set (OFF) MEGA DCR Not to be set (OFF) OPTIC OUT Not to be set
49 February 11

11.FAILURE/ERROR CODES
11.1.Sound but no picture, and backlight illuminated
TF CHASSIS / TELEVISION
In this section, we will basically explain where we need to check if there is "no picture on TV" even though there are not any problems in the panel inverter. Here, we are assuming that chassis is generally in good condition as we obtain sound output from TV. When you cannot determine if the backlight is working or not due to the illumination level in the environment, you are recommended to tap on the TV's front panel lightly; if the backlight is working, you will notice a slight glowing.
Before starting controls and repairs, it is crucial to analyse and comprehend the problem exactly. In this problem, you must make sure if it is originated from the utilized source, if it is a cable connection error or if utilized devices have any problems or not.
Then, particularly LVDS cable on the chassis should be checked for any disconnections, loose parts, dislocations, breaks or ruptures. Likewise, it will be proper to check cable connections of the panel.
Later, the panel power supply (PANEL-VCC), which is transferred to T-CON board through LVDS cable, should be checked on L609 for 100Hz products and on T607 MOSFET Leg 3 for other products. Panel supply for the products with TF chassis is 12V.
If this value of power supply does not exist, the root cause is detected by tracking back from this supply.
Panel power supply is switched with T607 MOSFET (except the products with 100Hz panel). Initially, the input - that is L607 coil - is checked for 12V. If not found in L607, L608 should also be checked. If you cannot detect 12V supply here as well, then the problem is on the power supply side. For the products with 100Hz, L608 coil is checked for 12V. If not, then the problem is on the power supply.
If 12V exists at the input, check the voltage on T607 FET legs. When TV is “ON”, 3.8V voltage occurs on Leg 1 of FET as to be higher than 0V, and supply voltage on Leg 2 is transferred to Leg 3. If Leg 1 does not have voltage, check "TCON_ON" signal on Leg 8 of R654 resistance. Here, if the voltage is High, it means that panel supply has not been turned on from the main integrated circuit or software. This signal remains High while the TV is going out of Stand-By and gets down to 0V, 1 seconds before the picture appears on the screen.
If the panel is supplied voltage over LVDS, it is most likely that picture information is transmitted as well. Even it is not a precise control method to be used during information flow over data lines, the measuring tool detects voltage around 1.2V DC. In this case, it is likely that panel side has an error; if possible, it can be checked by using a different panel or using the same panel with a different chassis.
50 February 11

TF CHASSIS / TELEVISION
Besides, you can also consider problems including that LVDS data is not being transmitted to the panel properly, wrong panel EEPROM or software error. You can solve the problem by installing correct software.
11.2.Sound but no picture, and backlight not illuminated Even though LVDS data is printed on the screen, the picture cannot be seen because the backlight is not illuminated. First, cable connections, particularly inverter and supply cables and connectors should be checked.
24V power supply should be checked over inverter cable when TV is ON. When this power needs to be supplied to the inverter unit of the panel, the backlight will not be illuminated if there is not 24V supply. 24V and 12V supplies are switched on by POWER_SW signal coming from the main integrated circuit when TV is ON. In this case, if there is 12V output but no 24V output, then the problem rests in the power supply.
If 24V supply exists on the system; on the Leg 5 of S606 connector, a voltage over 3V DC should be transmitted to the panel. This voltage gives “switch on” command to the panel inverter. This control is provided with “BL_CTRL” and T608 and peripheral materials.
Besides, voltage level that determines brightness of panel lights through Pin 6 of connector S606 should be higher than 3V. Brightness control may vary according to the panel, however, it operates dimly around 0V and completely on around 3.3V. Brightness control is done by “BRI_ADJ” signal coming from the main integrated circuit.
When the "backlighting" tab is dimmed in the user menu, the voltage in the Pin 6 of the connector decreases slowly.
If no problem appears in the checks performed at the chassis, you should consider that the problem might be arising from panel inverter module or the lights.
11.3.No Sound It should be checked that if other sources, cables and devices have any problems. You need to make sure that volume has not been turned down from television settings or mute button is not pressed.
If there is not any problems, check the loudspeaker cables and loudspeakers on the chassis; fix the problem, if any.
Check if there is sound on the headphones socket. As an amplifier is used, the headphones output is obtained by amplifying EAR_OUT_R, and EAR_OUT_L signals which are sent directly by main integrated circuit through IC502. If you cannot receive audio from headphones socket, those signals are checked from R505 resistor’s pin 1 and 7. If no signal is observed, then there is a problem on the main integrated circuit. If signals are detected, you should check IC502 and peripheral components against problems, and check IC502 supply and whether MUTE is pressed on.
51 February 11

TF CHASSIS / TELEVISION
Besides, scart output of TV should be checked for sound. If there is no sound in scart output, power supply of the integrated circuit at position IC800 and peripheral components should be checked at IC800 input to detect AU_DAC0_L and AU_DAC0_R signals which are sent by main integrated circuit. If you cannot detect AU_DAC0_L and AU_DAC0_R signals at the IC800 input, it means no sound signal comes out of the main IC. If the scart output has sound, the problem might be arising from the sound amplifier or peripheral materials.
When there is no sound, the pins 2-3 or 34-35 of sound amplifier on IC501 position or L504 is checked for 12V or 24V (Amplifier is supplied with 12V in small size products and 24V in large size products). If you cannot detect power, power supply should be checked against problems.
If the amplifier is being supplied with power, Leg 19 should be checked for 3.3V DC voltage. We should suspect about main integrated circuit if there is no 3.3V. This voltage drops down to 0V and ensures switching the amplifier off in Stand-By mode (AMP_STB signal and main integrated circuit performs the control).
Sound amplifier has I2C communication lines to communicate with the main integrated circuit. Roughly, the voltage level should be below 3.3V and variable at the Pins 23 and 24. Here, the fixed 3.3V gets lower when data is being transmitted, and thus, sound amplifier and main integrated circuit communicate. If this value is constantly 0V, short circuit possibility should be checked where I2C line is connected. Current version of the software should be installed against software problems.
Pin 25 is the reset pin of the sound amplifier. This pin should be high (3.3V) during the time when TV is on. This value might be measured from C544 condenser. If this value is low (0V), RESET_OUT signal should be checked. If this signal, which can be checked from R539 resistance, is low, you may suspect that the problem rests in software or main integrated circuit.
If all these inspections don't give any results, you may suspect that amplifier
integrated circuit has failure.
52 February 11

12.FAILURE FLOW/TROUBLESHOOTING DIAGRAMS
12.1.Sound but no picture, and backlight illuminated
TF CHASSIS / TELEVISION
Sound but no
picture on TV
(Backlight
illuminated)
Check LVDS cable and
other power cables
Check if there is picture in all
other sources.
No picture on any source
No image in one source
Inspect
connections and
supplies of the
relevant source
Check Panel_VCC value (12V)
on T607 Leg 3.
Check legs of T607. Leg 2 and
Leg 3 should be 12V whereas
Leg 1 should be 4V.
Fail
Possible SW or IC
problem. If not
solved after
installing updated
software, the
chassis should be
replaced.
Leg 1 fails
Check TCON_ON value on
R654 Leg 8 and VCC3V3-
ST value on Leg 5.
TCON_ON is high
Inspect IC900 and
peripheral
components
If VCC3.3V-ST fails
Replace T607
Leg 1 and Leg 2 are correct
Leg 3 is faulty
Pass
If any, make sure FFC connector is inserted
on the top part of panel T-CON and check T-
CON’s top part against visible burns and etc.
Make sure that correct
panel software is
installed. Update
software.
Supplies pass
Re-connect the
cables Replace T-CON if you
have the same model
panel; if not, replace the
panel
Check 3.3V, 2,5V, 1.8V
and 1.05V supplies;
follow the faulty one
and replace relevant
part
Software passes
53 February 11

12.2.Sound but no picture, and backlight not illuminated
TF CHASSIS / TELEVISION
Sound but no
picture. Backlight
not functioning.
Over inverter cable, check
for 24V.
24V does not exist
Check POWER_SW
voltage. S606,
Pin 8
High (>0V) (OK)
After checking the
cable again,
replace PSU.
Low (Fails)
Over C650, check
+5V2_ST voltage.Fail
OK
Over R646 Leg 8,
check for
POWER_SW signal
Low
. Possible software problem. Re-
install software, if not solved,
replace the chassis.
Normal (High)
24V exits
Over R645 Leg 6-8
check for BL_CTRL signal. For
testing purposes, apply 3.3V to
the pin 5 of Chassis PSU
connector (S606).
0V(Normal)
Check Chassis PSU cable’s pin 6 on
the chassis side (S606 connector). For
testing purposes, connect 3.3V to that
pin from chassis side. Is TV working?
Check the supplies of
main integrated circuit
(3.3V, 1.05V, 1.8V,
2.5V)
Normal
Fail
Check rectifier
circuit of relevant
supply.
No
Inverter or lamp problem. If
you have sufficient
material, firstly replace
inverter, then the panel.
Yes
IF TV works, increase the backlight to the
maximum and return the cable to previous
condition, install a different version of software
and try again. To make sure that system works,
turn backlight down to the lowest level and
check. If no problem occurs, submit TV.
Possible software
or IC problem.
High (Fails)
Check inverter and PSU
cable pins and
connections.
54 February 11

12.3.No Sound
TF CHASSIS / TELEVISION
No sound at TV
Check the cables
physically, fix
detected
problems.
No physical problems
Try to replace
loudspeakers.
No problem in loudspeakers
Does sound exist in
scart output?
Check if there is sound output
with different sources and
devices (USB, HDMI Scart
etc) or in headphone output.
Check if TV is muted.
Not present in other sources either; TV is not muted
Possible software or main IC
problem. If software does not operate
after installing and testing, check
main IC supplies. If you cannot
detect any problem, replace the
chassis.
No sound in scart either
Check C508 capacitor for
12V or 24V.
Sound comes to scart socket
As this line directly
comes for PSU, it is a
problem originating
from PSU or PSU
cable.
Voltage not read
L504 coil must be connected.
Complete if material is lacking
No material deficiency
Over C516 capacitor, check
for VCC3.3V supply.
Supply exists
3.3V does not exist
Check inputs and
outputs of IC603
regulator. If problem
persists, check IC600
and peripheral elements.
3.3V exits
When you change sound settings in
the pins 23 and 24, do you read
variable voltage values lower than
3.3V, such as I2C data?
Inputs 0V
A short circuit should be
suspected on I2C. Tracking
I2C line, replace faulty part.Over C544 capacitor,
check for the value of
RESET_OUT signal.
Inputs normal
Fail (0V)
Software or main IC
problem. Reinstall software
and check main IC supplies
and outputs.
Visibly check the sound
card and peripheral
elements. Check the part
which is likely to be
faulty.
Normal (3.3V)
Over R506, check for
AMP_STB signal.Normal (>2.7V)
Fail (<2.7V)
Remove R539 resistance and detect if
the error
results from RESET_OUT or “pop
sound” circuit.
RESET_OUT
Check T502 and
peripheral components.
Pop-sound circuit
If we still detect a fixed value, when
we turn the volume up or down or
change the settings, the problem
rests in software or main IC.
Inputs 3.3V fixed
55 February 11

13.CHASSIS DIAGRAMS
TF CHASSIS / TELEVISION
56 February 11

TF CHASSIS / TELEVISION
57 February 11

TF CHASSIS / TELEVISION
58 February 11

TF CHASSIS / TELEVISION
59 February 11

TF CHASSIS / TELEVISION
60 February 11

TF CHASSIS / TELEVISION
61 February 11
KEYPAD
HEADPHONE

TF CHASSIS / TELEVISION
62 February 11

TF CHASSIS / TELEVISION
63 February 11

TF CHASSIS / TELEVISION
64 February 11

TF CHASSIS / TELEVISION
65 February 11

14.SOFTWARE UPDATE
14.1.Updating TV Software By Using USB Memory
TF CHASSIS / TELEVISION
To update TV software by means of USB memory, we will use Target folder available in the system according to product code.
Firstly, copy Target folder to USB main directory. Before starting installation, you should check script and panel files in the Target folder which will be installed.
The content of Target folder to be transferred to USB disk main directory should be as shown below.
The content of BEKO_BIN_FILES folder should be as shown below.
66 February 11

TF CHASSIS / TELEVISION
Panel and panel_4k folders contain panel software. You may control panel code from the file in these folders. Mboot contains boot software and the next step explains how to install boot code. Ursa folder is only included in 100Hz panels and contains 100 Hz software.
There are not any critical control elements for other folders.
Shut down TV before inserting USB to TV for software update. (Disconnect the power)
Then, insert USB to TV; press any key of the keypad on TV and plug the TV.
Hold down any key of the keypad on TV until you see that code installation has started.
USB update logo will be shown on the screen during software download from USB.
If code installation has been successfully completed, TV will automatically turn on.
Shut down TV to remove the USB.
14.2. BOOT Code Installation From Service Menu by Using USB Memory
Boot code update can be performed on TV's factory or customer mode.
Boot code to be installed should be listed under “Target/MBoot/” in USB memory's main directory with the name “mboot.bin”. Ensure that software that you downloaded from the system has this folder and “mboot.bin” file.
67 February 11

TF CHASSIS / TELEVISION
USB memory is inserted to TV and TV turns on (without pressing any key), service menu is opened from the TV. (After entering the menu, type 8500 for GRUNDIG brand products and 9301 for others)
In Service menu, go to "Boot Code Configuration" menu. (Press green button in service menu or OK on Boot Code Configuration tab)
In “Boot Code Configuration” menu's “Start Loading” option, boot code update is started from left or right key.
If TV's boot code is not updated, "Fail" message appears next to "Start Loading" menu item. If update is successful, TV automatically restart.
TV should never be shut down during code loading. If TV is shut down, boot code should be installed by using Debug tool.
14.3.MBOOT Installation by means of DEBUG TOOL This feature should be used when you encounter an error while loading boot code from USB.
MBoot program of the TV is installed by means of Debug Tool over VGA via MStar company's ISP TOOL program.
BOOT.TF.-.-.-.-.V01.018.00.bin : Standard boot code
MBoot software can be loaded on TV by using the adapter which had been previously used in MStar concept projects.
68 February 11

TF CHASSIS / TELEVISION
MBoot can be loaded over VGA Input. USB port is used for PC connection. To load MBoot on TV, VGA cable is connected to VGA connector that is in the opposite of USB connector. Software installation adapter has a key. This key enables you to select the pin configuration (pin: 11,4), the key should be positioned on the USB connector side.
69 February 11

TF CHASSIS / TELEVISION
To be able to use ISP Utility program, MStar Debug Tool's driver should have been loaded on the PC. ISP Utility can be copied anywhere on the computer and ISP_Tool v4.4.9.9.exe application is executed.
When executed for the first time, the program is opened as shown below. Settings should be selected as in the figure.
Under “Read”, pressing “Read” button shows the location of software to be installed.
70 February 11

TF CHASSIS / TELEVISION
After selecting software (*.bin) to be installed, press AUTO button. In standard use, the following options are recommended.
After completing the settings, please press "Dis Con" button of the program interface, then turn TV Power Off/On, press "Connect" button within 1-2 seconds. In this way, TV goes to ISP mode. Here, a message indicates that Device type has been recognized. If not connected, root cause of problem should be inspected.
After indicating the location of software correctly from READ section, press "Run" button to start installation. “Erase” process may take 45 seconds. If this process takes too short after pressing "Run", it might be suspected that there is a problem.
“Verify” process is a must. If there is an error in writing process, most probably this will be shown within the first 4-5 seconds; you may press "Stop" button before waiting for the completion of Verify process.
If the installation is successful, "Pass" message appears.
After completing software installation, service menu settings (Eco Mode, Blue Back, OSD selection, Keypad and TV inputs) depending on TV's features and Plug Play should be performed before delivering TV to the customer. Plug Play is located in System Configuration under Factory Settings (Service Menu).
If the programme does not run successfully, it might be resulting from the following conditions:
There might be a problem in cables, converter or tool. Probably, TV does not support USB memory that we are using. We should format USB memory with FAT32 system and re-install software. If this does not work, we should try to install software using another USB memory.
71 February 11

TF CHASSIS / TELEVISION
On the chassis, there might be a problem arising from components or soldering. On the PC, there might be problem arising from USB hardware or driver.
The latest version of ISP Utility should be used. MStar Debug Tool driver should be installed. In “Config”, I2C Speed should have the correct value. In “Device”, “WP Pin pull to high during ISP” should be selected. If not selected, the software may not be updated even though it seems to be installed. If Device type is not recognized even after you perform the steps above, turn off/on TV from the mains.
!!! IMPORTANT NOTE
Before software installation, TV's service menu settings, user (customer) settings, channel list and satellite settings should be stored in an external USB memory device by means of USB cloning feature (USB cloning-TV to USB); and these settings should be re-loaded on the relevant TV after software installation (USB-cloning USB to TV)!
To enter this menu, you should go to "Cloner configuration" from the service menu and enter the numbers 2, 3, 5, 6 in sequence. Examine Cloner Configuration section in Service menu for detailed information.
72 February 11

15. SUPPORTED RESOLUTIONS
15.1. PC-DVI Resolution Info Resolutions that can be used with computer connection:
TF CHASSIS / TELEVISION
15.2. HDMI-H PC Resolution Info
73 February 11

15.3.HDMI-H YPbPr Resolution Info
Resolutions
480i 60Hz
480p 60Hz
576i 50Hz
576p 50Hz
720p 50Hz
720p 60Hz
1080i 50Hz
1080i 60Hz
1080p 24fps
1080p 25fps
1080p 30fps 1080p 50Hz
1080p 60Hz
TF CHASSIS / TELEVISION
74 February 11

16.HOTEL TV INSTALLATION
TF CHASSIS / TELEVISION
Under Factory Settings – System Configuration, “Hotel TV” selection should be “On” to ensure hotel usage.
Hotel TV is intended to prevent hotel guests from changing TV’s channel settings and turning volume up to disturbing levels for the environment. Therefore, “Source Settings” tab is not shown in user menu.
We should open “Hotel Admin” menu to make source settings and determine the highest volume that the user is allowed.
75 February 11

TF CHASSIS / TELEVISION
Cloner Menu will be displayed by using password “4,6,5,8” on "Menu/Source Setup/Program Table". These authorizations enable you to perform channel settings (Source Settings menu), maximum-minimum volume settings and whether TV will remain on Stand-By or directly turn on (Hotel TV Settings menu). This feature turns off after TV is switched to Stand-By.
The channels are tuned and favourite list is determined over source settings. In customer mode, TV is turned on at the channel and source where it was turned off at admin mode. This feature should be used to set TV’s opening channel. As an opening channel, you may set the hotel's own advertisement channel with hotel's videos or a channel advertising paid broadcasts. In customer mode, it is not an error that TV is turned on at the same source and channel whichever channel or source was open when turning off the TV. You should consider this issue before switching TV to Stand-By in Admin mode.
When setting up hotel TV, the easiest and most convenient way is to perform all settings on a single TV and copy the same configuration to other TVs by means of cloning feature. Here, you should make sure that TV is turned off at the intended channel after completing installation at the admin mode.
76 February 11


![Akai Cmo Lcd Tv Service Manual[1]](https://static.documents.pub/doc/80x56/547f410bb47959ac508b4e3c/akai-cmo-lcd-tv-service-manual1.jpg)
![Lg 37lc2d Lcd Tv Service Manual[1]](https://static.documents.pub/doc/80x56/5438efa4afaf9fb62e8b4ba0/lg-37lc2d-lcd-tv-service-manual1.jpg)


