The LDB-1 “Little Drummer Boy” is a modern recreation of the classic analog drum machines of the 80's, like the Roland TR-606 and TR-808. Our goal was to recreate the warm sounds of the classics, using all analog circuitry - not samples. The brain of the LDB-1 is a powerful digital microcontroller that triggers the analog drum sounds and provides the sequencer, programmability and connectivity features. The LDB-1 has all of the features of a classic analog drum machine in a small, affordable package.
Features
Eight Analog Drum Sounds o Bass Drum o Low Tom o High Tom o Snare Drum o Wood Block o Hand Clap o Closed Hi-hat o Open Hi-hat
Eight Voice Polyphony o All drums can be played simultaneously,
Including the open and closed hi-hats for a super punchy cymbal
Play Modes o Individual Drums o Patterns, Including Chaining up to 8 Patterns o Songs with Pattern Fills
Programmability o 32 User Patterns – plus 32 Built-in Patterns o 16 Songs of up to 24 patterns each o Configuration Options (MIDI channel, trigger modes, etc) o All data is retained without battery power
Connectivity o Powered by built-in 9V battery, or standard pedal power supply o MIDI Input for playing individual drums or for MIDI clock/start/stop o DIN Sync Input for both clock and gate (start/stop) o Analog Clock Input o Analog Gate (start/stop) Input o Analog Trigger Output on selected steps and/or instruments
LDB-1 User Manual 3
Quick Start
This manual gives you all the information you need to use every one of the many features of the LDB-1 Drum Machine. But, before diving into the details, here is a quick start so you can begin playing rhythms right away.
Power Up
1. Insert a 9V battery, or plug in an AC adapter (AKA wall wart). The power jack on the LDB-1 is a center-negative, type-M power jack. You can use just about any standard 9 to 10 volt pedal power supply.
2. Insert a mono 1/8" (3.5mm) plug into the Audio output jack and plug the other end of the cable into your amplifier or mixer.
3. Press the red button on the back to turn on the LDB-1.
Play Drums
4. It starts up in the “Play Drums” mode. 5. Press the selector buttons along the bottom of the LDB-1 to play individual drum sounds.
Play Patterns
6. Press and hold the Mode button while pressing button #2 (which is labeled 2 / 10 / Low Tom). 7. You are now in the “Play Patterns” mode. 8. Press the Run button to start the pattern playing. 9. Rotate the Tempo knob to change the speed of the pattern. 10. Press any of the buttons along the bottom to play a different pattern. 11. Press and hold the Ctrl button while pressing any of the Selector buttons to switch to a different
bank of patterns (there are 8 banks with 8 patterns each). 12. After selecting a pattern, press any selector button to play a different pattern. 13. Press multiple selector buttons simultaneously to chain patterns.
Read the Manual
14. Now that you have that out of your system, read the rest of the manual to get the most out of your LDB-1 Drum Machine!
LDB-1 User Manual 4
Drum Machine Basics
The LDB-1 has a very simple interface for playing and editing rhythms. If you have used one of the classic drum machines such as the TR-606, TR-808, or TR-909, then the LDB-1 will be very familiar to you. If this is your first drum machine, then the information below will help you get started.
First, let’s define a couple of drum machine terms: Step, Pattern, and Song. A step is one beat, typically a sixteenth note. A pattern is a sequence of beats. A song is a sequence of patterns.
Drum Tabs
Take a look at the diagram below. It represents one of the most famous drum beats of all time, the Amen Break. The diagram is in a format called drum tablature or, more commonly, a drum tab. Drum notation can also be written in musical note form, but tabs are much easier to visualize.
Drum tabs are laid out in a grid with the drums (usually abbreviated) running vertically along the left side and the steps horizontally. The tab above is four measures of 16 beats each. In drum machine terminology, that is one song consisting of four patterns of 16 steps each. Each pattern can be at most 16 steps, however a pattern can have fewer steps. For example, songs in ¾ time typically have 12 steps.
To play the above tab, a drummer would hit the bass drum (BD) and closed hi-hat (CH) simultaneously on the 1st and 3rd beats, the snare drum (SD) and closed hi-hat simultaneously on the 5th beat, the closed hi-hat alone on the 7th beat, the snare drum alone on the 8th beat, and so on.
There are many websites that give the drum tabs for popular songs. You will get millions of results if you search for “drum tabs”.
LDB-1 Instruments
Instrument Abbreviation Open hi-hat cymbal OH, sometimes H or HH with an O Closed hi-hat cymbal CH, sometimes H or HH with an X Hand Clap CP Wood Block WB Snare Drum SD or S High Tom-tom Drum HT, T, T1, T2, or TT Low Tom-tom Drum LT, F or FT (floor tom) Bass (or Kick) Drum BD, B, B1, B2, or BA
Instrument Substitutions
If you have a drum tab that uses instruments not contained in the LDB-1, you can substitute. For exam-ple, you can use wood block in place of claves (CL) or rim shot (RS) and the open hi-hat can stand in for other cymbals (C/CY), crash cymbal (CC), ride cymbal (RC) or splash cymbal (SC).
LDB-1 User Manual 5
Drum Machine Basics (continued)
Accents
In drumming, an accent is when a drum or cymbal is hit a little harder and louder. In drum tabs, an accented instrument can be indicated with a capital X or O whereas the unaccented drum will be indi-cated with a lowercase letter. Drum tabs written specifically for drum machines sometimes show the accent as a separate instrument. In that case, when there is an X or O in the accent row, it means that all instruments on that beat should be louder.
The LDB-1 does not have a built-in accent feature; however, accents can be simulated quite effectively. For accented bass or snare drums, you can play the low tom on the same beat to get a louder, fuller sound. For an accented cymbal, you can play the open and closed hi-hat simultaneously which sounds very much like hitting the open hi-hat harder.
LDB-1 User Manual 6
Controls
Tempo Knob →
Run Button & Run LED →
Mode Button & Mode LED →
Ctrl Button →
Alt Button & Alt LED →
Measure Indicator LED →
Selector (Drum or Step) Buttons & LEDs
Quick Reference Grid
The grid on the control panel is a quick reference that shows the modes and what the Ctrl (control) and Alt buttons do in each of the modes. For example, in “Play Patterns” mode, the Ctrl button is used to select the pattern bank, and the Alt button is used to switch between playing patterns and playing individual drums.
Tempo Knob
The Tempo knob sets the tempo of the currently playing pattern or song. The numbers around the Tempo knob on the control panel show the beats per minute (BPM). The position of the Tempo knob is ignored if you are using an external clock source.
Run Button
The Run button starts or stops the currently running pattern or song. The Run LED is illuminated when a pattern/song is playing. When a pattern/song is not playing, pressing the Run button will start it at the beginning. When a pattern/song is playing, pressing the Run button will stop it at the end of the current pattern. The Run LED will blink to indicate that it is about to stop.
Holding hold down the Alt button while pressing the Run button changes its behavior. When a pat-tern/song is playing, pressing Alt + Run will stop it immediately, as opposed to at the end of the pattern. When a pattern/song is not playing, pressing Alt + Run will continue playing at the point at which it was stopped, as opposed to at the beginning of the pattern/song.
LDB-1 User Manual 7
Controls (continued)
Mode Button
The Mode button changes the basic mode of operation of the drum machine. You can press the Mode button at any time to see what the current mode is. When you press the Mode button only one of the Selector LEDs will be illuminated, indicating the current mode. Release the Mode button to stay in the current mode, or hold down the Mode button while pressing one of the eight Selector buttons to switch to a different mode. The Mode LED indicates the current mode by its blink patterns, which are de-scribed in the Modes section of this manual.
The top row of the quick reference grid shows the mode that is associated with each of the Selector buttons. The details of each mode are described in the Modes section of this manual.
Ctrl and Alt Buttons
The Ctrl and Alt buttons function differently depending on the current mode. In general, when the quick reference grid shows two options separated by a line, the Ctrl or Alt button toggles between two func-tions. That is, pressing the button switches from one function to the other. When the Alt button is used to toggle a function, the Alt LED is illuminated to indicate the lower, alternate, function. The mode-specific purpose of the Ctrl and Alt buttons is described in detail in the description of each of the modes.
Measure Indicator
The measure indicator is an important concept in the operation of the LDB-1. In order to keep the machine compact, there are only eight step buttons and LEDs, even though a pattern can have up to 16 steps. The measure indicator shows which half of the measure is currently playing. The LED is off when steps 1 through 8 are playing, and it is illuminated when steps 9 through 16 are playing.
Selector (Drum or Step) Buttons
The eight buttons and LEDs across the bottom represent either the eight drum sounds or the 16 steps in a pattern, depending on the current mode. For simplicity, they are always referred to in this manual as the Selector buttons and Selector LEDs.
LDB-1 User Manual 8
Play Drums Mode
When you turn on the LDB-1, it starts in Play Drums mode.
Sel Drums: Pressing the Selector buttons will play the corresponding instrument.
Alt As Hit / In Time: Pressing the Alt button toggles between the As Hit and In Time behaviors. The Alt
LED will be illuminated when the In Time behavior is selected.
As Hit means that the instrument will play when you press the Selector button. To play the same in-strument again, you must release and re-press the button.
In Time means that the instruments will play in time with the tempo. Holding down a Selector button will repeatedly play the instrument. You can hold down one or more Selector buttons while pressing and releasing other Selector buttons.
LDB-1 User Manual 9
Play Patterns Mode
There are 64 patterns organized into eight banks of eight patterns each.
Sel Patterns: Pressing one of the eight Selector buttons selects the pattern to play within the current
pattern bank. The LED corresponding to the currently playing pattern is illuminated. If a pattern is playing when a different pattern is selected, the new pattern will not start playing until the current pattern finishes. The LED corresponding to the new pattern will blink letting you know that it will play next.
Run Start / Stop: The run button starts or stops playing the selected pattern. While running, the
selected pattern will repeat continuously. A pattern can be selected while not running and that pattern will play when the Run button is pressed.
Ctrl Select Pattern Bank: When you press and hold the Ctrl button, one of the eight Selector LEDs will
be illuminated, indicating the current pattern bank. To leave the pattern bank unchanged, release the Ctrl button. To change the pattern bank, hold down the Ctrl button while pressing one of the eight Selector buttons.
Alt Patterns / Drums: Pressing the Alt button toggles between Patterns and Drums behaviors. Pat-
terns behavior is as described above.
Drums behavior allows you to play individual drums over top of a currently running pattern by pressing the Selector buttons. The Alt LED will be illuminated when the Drums behavior is selected.
Chaining Patterns
Chaining refers to playing a repeating sequence of patterns. To chain patterns, hold down a Selector button to select the first pattern. While still holding down the first button, press one or more additional buttons.
The selected chain of patterns will begin playing when you release all of the buttons and after the cur-rently playing pattern is complete. If there is no pattern running, the chain will begin when you press the Run button.
For example, press and hold Selector button 1. While still holding down Selector button 1, press Selec-tor button 2, then press Selector button 3. When you release all of the buttons, the LDB-1 will begin playing pattern 1. When pattern 1 is complete, it will play pattern 2, then pattern 3. Then it will repeat, starting back at pattern 1.
You do not have to hold all of the Selector buttons simultaneously. As long as one Selector button remains pressed, you are creating a chain.
The chained patterns do not have to be contiguous. For example, you could chain patterns 1, 3 and 5.
The chained patterns do not have to be sequential. For example, you could chain patterns 1, then 5, then 3. The chain runs in the order that you press the buttons.
You can chain up to eight patterns within a single pattern bank.
The Drums behavior works with chained patterns as well. After selecting a chain, press the Alt button. The chain will continue to play and you will be able to play individual drums over top of the currently running chain of patterns.
LDB-1 User Manual 10
Play Songs Mode
A song is a sequence of patterns. There are 16 songs, organized into two banks of eight songs. Each song can be up to 24 patterns long.
Unlike pattern chains, a song can contain patterns from multiple pattern banks, and can repeat patterns. For example, a song could play pattern 1 twice, then pattern 2, then pattern 1 twice, then pattern 48, etc. This is explained in more detail in the description of the Edit Song mode.
Sel Songs: Pressing one of the eight Selector buttons selects the song to play within the current song
bank. The LED corresponding to the currently playing song is illuminated. If a song is playing when a different song is selected, the new song will not start playing until the current measure finishes. The LED corresponding to the new song will blink letting you know that it will play next.
Run Start / Stop: The run button starts or stops playing the selected song. While running, the select-
ed song will repeat continuously. A song can be selected while not running and that song will play when the Run button is pressed.
Ctrl Select Song Bank: When you press and hold the Ctrl button, Selector LED 1 or LED 2 will be illumi-
nated, indicating the current song bank. To leave the bank unchanged, release the Ctrl button. To change the bank, hold down the Ctrl button while pressing Selector button 1 or 2.
Alt Songs / Fills: Pressing the Alt button toggles between Songs and Fills behaviors. Songs behavior is
as described above.
Fills behavior allows you to play a pattern in the middle of a song, which is called a fill. When the Fills behavior is activated, pressing a Selector button will select a fill pattern. After the currently playing song measure finishes, the fill pattern will be played, then the song will continue with the next pattern.
A fill pattern can also be selected when the song is stopped. When the Run button is pressed, the fill pattern will be played one time, and then the song will begin. This is called an intro pattern.
The Alt LED will be illuminated when the Fills behavior is selected.
When the Fills behavior is active, The Ctrl button is used to select the pattern bank, as opposed to the song bank.
LDB-1 User Manual 11
Edit Pattern Mode
This is one of two modes in which you create and edit rhythm patterns. In the Edit Pattern mode you select a drum and set the steps on which that drum will play. In the Write Pattern mode, you go through each step sequentially, and select the drums that will play on that step.
If a pattern is currently playing when you select the Edit Pattern mode, then the LDB-1 will assume that you want to edit the current pattern, and it will not ask you which pattern you want to edit. You are now editing the currently playing pattern.
If no pattern is currently playing when you select the Edit Pattern mode, then the LDB-1 will ask you which pattern you want to edit. The Selector LEDs will flash in a chaser pattern from right to left indicat-ing that you should select the pattern bank. When you press a Selector button to select the bank, the LDB-1 will ask you which pattern you want to edit within that bank. The Selector LEDs will flash in a chaser pattern from left to right indicating that you should select the pattern. When you press a Selec-tor button to select the pattern, you are now editing that pattern.
If you are in Edit Pattern mode and want to edit a different pattern, re-select the Edit Pattern mode by holding the Mode button and pressing Selector button 4. The LDB-1 will then ask you which pattern you want to edit as described in the above paragraph.
Run Start / Stop: The Run button starts or stops playing the selected pattern. While running, the
selected pattern will repeat continuously. You can edit a pattern while it is playing. You can switch between Edit Pattern and Play Patterns mode with no interruption of the playing pattern.
Ctrl Select Drum: When you press and hold the Ctrl button, one of the eight Selector LEDs will be
illuminated, indicating the current drum. To leave the drum unchanged, release the Ctrl button. To change the drum, hold down the Ctrl button while pressing one of the eight Selector buttons. The bass drum is selected by default when you first enter the Edit Pattern mode.
Alt 1-8 / 9-16: Pressing the Alt button toggles between editing the first and second half of the meas-
ure (steps 1-8 versus steps 9-16). This is necessary because there are only eight Selector buttons, but there are up to 16 steps in a pattern. The Alt LED will be illuminated when you are editing the second half of the measure. The Measure Indicator LED always shows which half of the measure is playing, not which half is being edited.
Sel Steps: In Edit Pattern mode, the Selector buttons and LEDs represent the steps in the pattern.
Pressing a Selector button toggles the current drum on or off for that step. The Selector LEDs are illumi-nated for the steps on which the selected drum will play. Since there are only 8 LEDs, the LDB-1 uses a novel method to show the status of all 16 steps at once. That is, the LED will blink briefly to indicate that it is “on” in the other half of the measure.
LDB-1 User Manual 12
Edit Pattern Mode (continued)
Selector LEDs
For example, let us just consider the first Selector LED, which represents step 1 and step 9. If the drum is off in both step 1 and step 9, then the first Selector LED will be off regardless of which half of the measure you are editing. The chart below describes the state of the Selector LED for each scenario.
Editing For Step 1, For Step 9, Steps: Drum is: Drum is: First Selector LED will be:
1-8 ON off ON 1-8 off ON off, but will blink ON briefly 1-8 ON ON ON, but will blink off briefly
9-16 ON off off, but will blink ON briefly 9-16 off ON ON 9-16 ON ON ON, but will blink off briefly
Edit Pattern Example
1. Turn on the LDB-1. It starts in Play Drums mode.
2. Press and hold the Mode button, then press Selector button 4 to enter the Edit Pattern mode.
3. The Selector LEDs will flash right to left indicating that you must select a pattern bank. Press Selec-tor button 1 to select bank 1.
4. The Selector LEDs will now flash left to right indicating that you must select a pattern number. Press Selector button 1 to select pattern 1.
5. Press the Play button to start the pattern playing. Adjust the Tempo knob to your desired speed.
6. The Selector LEDs will be illuminated for those steps on which the bass drum will play. Toggle the bass drum on or off for different steps by pressing the Selector buttons.
7. Hear the effect of your changes as the pattern plays.
8. Press the Alt button to switch to the second half of the measure, then toggle the bass drum on or off for different steps.
9. Press and hold the Ctrl button and press snare drum Selector button to select the snare drum.
10. Toggle the snare drum on or off on different steps and hear the effect as the pattern plays.
11. Press and hold the Mode button, then press Selector button 2 to enter the Play Pattern mode. The pattern will continue to play, and the changes you made to the pattern will be saved.
LDB-1 User Manual 13
Edit Pattern Mode (continued)
Advanced Edit Pattern Functions
Several advanced functions are available in the Edit Pattern and Step-Write Pattern modes that are not shown on the control panel quick reference grid.
Ctrl + Alt Set Pattern Length: When you press and hold both the Ctrl and Alt buttons simultaneous-
ly, one of the eight Selector LEDs will be illuminated, indicating the current pattern length. To leave the pattern length unchanged, release both buttons. To change the pattern length, hold down both the Ctrl and Alt buttons button while pressing one of the eight Selector buttons.
For example, if you want to set the pattern length to 12 steps: First, make sure you are editing the second half of the measure (the Alt LED should be illuminated). Then, press and hold both the Ctrl and Alt buttons and press Selector button 12. Release all buttons, and the pattern length is now 12 steps.
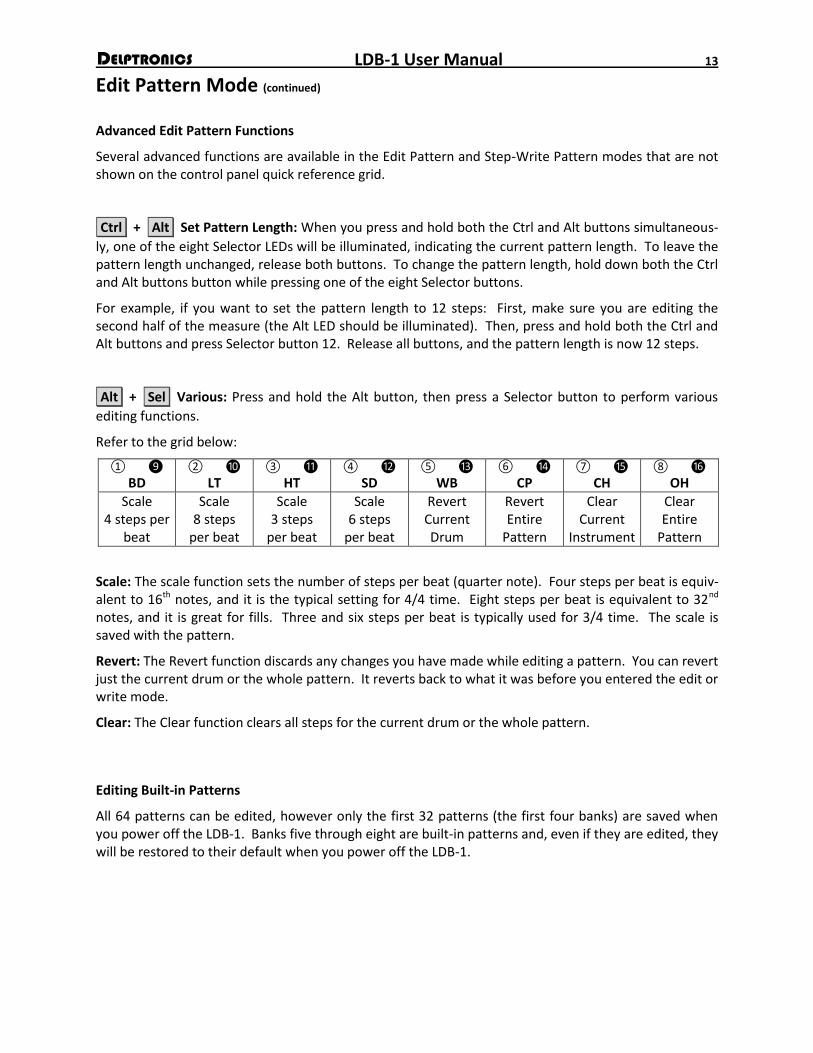
Alt + Sel Various: Press and hold the Alt button, then press a Selector button to perform various
editing functions.
Refer to the grid below:
① ❾
BD ② ❿
LT ③ ⓫
HT ④ ⓬
SD ⑤ ⓭
WB ⑥ ⓮
CP ⑦ ⓯
CH ⑧ ⓰
OH
Scale 4 steps per
beat
Scale 8 steps
per beat
Scale 3 steps
per beat
Scale 6 steps
per beat
Revert Current Drum
Revert Entire
Pattern
Clear Current
Instrument
Clear Entire
Pattern
Scale: The scale function sets the number of steps per beat (quarter note). Four steps per beat is equiv-alent to 16th notes, and it is the typical setting for 4/4 time. Eight steps per beat is equivalent to 32nd notes, and it is great for fills. Three and six steps per beat is typically used for 3/4 time. The scale is saved with the pattern.
Revert: The Revert function discards any changes you have made while editing a pattern. You can revert just the current drum or the whole pattern. It reverts back to what it was before you entered the edit or write mode.
Clear: The Clear function clears all steps for the current drum or the whole pattern.
Editing Built-in Patterns
All 64 patterns can be edited, however only the first 32 patterns (the first four banks) are saved when you power off the LDB-1. Banks five through eight are built-in patterns and, even if they are edited, they will be restored to their default when you power off the LDB-1.
LDB-1 User Manual 14
Write Pattern Mode
This is one of two modes in which you create and edit rhythm patterns. In the Edit Pattern mode you select a drum and set the steps on which that drum will play. In the Write Pattern mode, you go through each step sequentially, and select the drums that will play on that step.
Selecting which pattern to write works the same as in Edit Pattern mode. Please see the first four para-graphs of that section.
Sel Instruments: In Write Pattern mode, the Selector buttons and LEDs represent the instruments.
This is true whether or not the pattern is playing.
Run Start / Stop: The Run button starts or stops playing the selected pattern. While running, the
selected pattern will repeat continuously. The Write Pattern mode behaves differently depending on whether the pattern is playing (Tap-Write) or the pattern is not playing (Step-Write). You can press the Run button at any time to switch between the two behaviors.
Tap-Write
If the pattern is playing while you are in Write Pattern mode, this is referred to as Tap-Write mode. Tap-Write mode will be familiar to users of vintage drum machines. In tap Tap-Write mode, the pattern plays continuously. If there are no instruments set on the currently playing step, then a metronome tick will be heard for that step. Pressing a Selector button turns on the selected drum on the step that is currently playing. You probably want to choose a slow tempo in Tap-Write mode.
The Ctrl and Alt buttons have no effect in Tap-Write mode.
Step-Write
If the pattern is not playing while you are in Write Pattern mode, this is referred to as Step-Write mode. In Step-Write mode, you turn on or off the instruments for one step at a time. The Selector LEDs indi-cate which instruments are on for the current step. Since the pattern is not running, you can take your time turning on or off the instruments.
Ctrl Previous Step: While the Ctrl button is pressed, the Selector LEDs indicate the current step of the
pattern which is being written. Releasing the Ctrl button goes to the previous step.
Alt Next Step: While the Alt button is pressed, the Selector LEDs indicate the current step of the
pattern which is being written. Releasing the Alt button advances to the next step.
See the Advanced Edit Pattern Functions topic in the Edit Pattern Mode section for more functions available in Step-Write mode.
LDB-1 User Manual 15
Edit Song Mode
This is the mode in which you compose songs by specifying a list of patterns. There are 16 songs (two banks of 8) with up to 24 patterns (or measures) per song.
If a song is currently playing when you select the Edit Song mode, then the LDB-1 will assume that you want to edit the current song, and it will not ask you which song you want to edit. The song will stop playing, and you are now editing it.
If no song is currently playing when you select the Edit Song mode, then the LDB-1 will ask you which song you want to edit. The first two Selector LEDs will flash indicating that you should select the song bank. When you press a Selector button to select the bank, the LDB-1 will ask you which song you want to edit within that bank. The Selector LEDs will flash in a chaser pattern from left to right indicating that you should select the song. When you press a Selector button to select the song, you are now editing that song.
If you are in Edit Song mode and want to edit a different song, re-select the Edit Song mode by holding the Mode button and pressing Selector button 6. The LDB-1 will then ask you which song you want to edit as described in the above paragraph.
Sel Patterns: In Edit Song mode, Selector buttons and LEDs represent patterns within the currently
selected pattern bank. When you press a Selector button to choose the pattern for the current meas-ure, the pattern will play through once.
Run Start / Stop: The Run button plays the current song all the way through one time. You can press
the Run button while the song is playing to stop it.
Ctrl Select Pattern Bank: When you press and hold the Ctrl button, one of the eight Selector LEDs will
be illuminated, indicating the current pattern bank. To leave the pattern bank unchanged, release the Ctrl button. To change the pattern bank, hold down the Ctrl button while pressing one of the eight Selector buttons.
Alt Write / Navigate: Press and release the Alt button to write the currently selected pattern and
advance to the next measure. While the Alt button is held down, the Selector LEDs indicate the current measure number. You will hear a click if you attempt to write more than the maximum of 24 measures.
Navigate: Press and hold the Alt button while pressing a Selector button to navigate through the song and perform various editing functions. All of the navigation functions are relative to the current meas-ure. Refer to the grid below:
① ❾
BD ② ❿
LT ③ ⓫
HT ④ ⓬
SD ⑤ ⓭
WB ⑥ ⓮
CP ⑦ ⓯
CH ⑧ ⓰
OH
First Previous Next Last Insert Delete N/A Clear to End
LDB-1 User Manual 16
Edit Triggers Mode
The LDB-1 can send trigger signals to a modular synthesizer connected to the Trigger Out jack. Triggers can be sent on any steps and/or instruments that you specify.
See the Connectivity section of this manual for the electrical characteristics of the Trigger Out jack.
Run Start / Stop: The Run button starts or stops playing the current pattern or song (depending what
was playing when you entered the Edit Triggers Mode). Changes to the Step or Drum triggers take effect immediately. Therefore, the Edit Triggers mode can be a powerful performance mode as well.
Ctrl Steps / Drums: Pressing the Ctrl button toggles between editing Drum (instrument) Triggers and
editing Step Triggers. The Alt LED will blink when editing Drum Triggers.
Step Triggers
Sel Steps: When editing Step Triggers, the Selector buttons and LEDs represent the steps. Pressing a
Selector button toggles the trigger on or off for that step. The Selector LED will be illuminated to indi-cate that the trigger is on for that step. The LED will blink briefly to indicate that the trigger is on for that step in the other half of the measure.
For example, you could send a trigger signal on every step or every other step. In that way, the Trigger Out acts like a clock out to synchronize the LDB-1 clock with other drum machines or sequencers. Alter-nately, you could trigger a synthesizer voice only on certain steps; such as 1, 3 and 9, or 5 and 13, or any combination.
Alt 1-8 / 9-16: Pressing the Alt button toggles between editing triggers for the first and second half of
the measure (steps 1-8 versus steps 9-16).
The Alt LED will be illuminated when you are editing triggers for the second half of the measure. The Measure Indicator LED always shows which half of the measure is playing, not which half is being edited.
Drum Triggers
Sel Steps: When editing Drum Triggers, the Selector buttons and LEDs represent the instruments.
Pressing a Selector button repeatedly toggles the Selector LED for each instrument between these three states: Off, on, or on/mute (LED blinking).
For example, if you turn on the trigger for wood block, then every time a pattern specifies the wood block, a trigger signal will be sent. If the trigger is on/mute, then every time a pattern specifies the wood block, a trigger signal will be sent, but the woodblock itself will not be played.
The Alt button has no effect while editing Drum Triggers.
LDB-1 User Manual 17
Setup Mode
Sel On / Off: The Selector buttons and LEDs represent the state of the various options. Pressing a
Selector button toggles the Selector LED on or off. The meaning of each LED is described below along with easy to read quick reference grids.
Alt Options / MIDI: Pressing the Alt button toggles between Options setup and MIDI setup. The Alt
LED will be illuminated when you are editing MIDI setup.
Options Setup
① ❾
BD ② ❿
LT ③ ⓫
HT ④ ⓬
SD ⑤ ⓭
WB ⑥ ⓮
CP ⑦ ⓯
CH ⑧ ⓰
OH
Indicator Mode
Swing Trigger Length
Trigger Polarity
Gate In Enable
Clock In Enable
Clock In 24ppqn
Steps Drums
Off On
10 ms ½ Step ¾ Step Full Step
V+ 0V
Off On
Off On
Off On
Indicator Mode: This option defines the behavior of the Selector LEDs when a pattern or song is run-ning. In Steps mode, the LED for the current step is briefly illuminated
Swing: In Swing mode (sometimes referred to as Shuffle), every other step is slightly delayed. Swing adds subtle groove to any rhythm. It is particularly effective in jazz music.
Trigger Length: This option sets the length of the trigger output. The ½ step and ¾ step lengths are useful if you are using the LDB-1 trigger output as a note on/off (rather than a true trigger). If the full step length is selected, and two triggers are on adjacent steps, then there is no trigger “off” time be-tween the steps.
Trigger Polarity: The definition of the trigger “on” or “off” conditions can be reversed so that a trigger on means positive voltage and a trigger off means zero volts, or vice versa.
Gate In Enable: When Gate In is disabled, any incoming Gate In, or DINsync gate signals are ignored.
Clock In Enable: When Clock In is disabled, any incoming Clock In, or DINsync clock signals are ignored.
Clock In 24ppqn: Like the classic drum machines, the LDB-1 expects the external clock signal to be 24ppqn (24 pulses per quarter note). DINsync, the MIDI clock, and the LDB-1’s internal clock all run at 24ppqn. If your external clock is not 24ppqn, then turn this option off.
If the 24ppqn option is off while using an external clock then:
Each pulse of the external clock is treated as one step.
The ½ step and ¾ step trigger lengths generate a 10 ms trigger.
The swing setting has no effect.
The pattern scale has no effect.
LDB-1 User Manual 18
Setup Mode (continued)
MIDI Setup
① ❾
BD ② ❿
LT ③ ⓫
HT ④ ⓬
SD ⑤ ⓭
WB ⑥ ⓮
CP ⑦ ⓯
CH ⑧ ⓰
OH
Clock Enable
Map Mode All
Channels MIDI Channel
On Off
All Drums Specific Notes Octaves
On Off
1 9 2 10 3 11 4 12 5 13 6 14 7 15 8 16
MIDI Clock: When the MIDI clock is disabled, any MIDI clock signals are ignored. This is useful when you want the LDB-1 to run at a different tempo than other MIDI devices.
Map Mode: This option defines how the LDB-1 instruments are mapped to MIDI notes.
In All Drums map mode, the LDB-1 will respond to all MIDI percussion notes and play the closest match-ing instrument.
In Specific Drums map mode, the LDB-1 will respond only to MIDI notes that directly correspond to LDB-1 instruments. MIDI notes 36, 38, 39, 42, 43, 46, 50, and 76 are mapped to BD, SD, CP, CH, LT, OH, HT and WB, respectively.
In Notes map mode, each note in every octave will trigger an instrument. Notes C, D, E, F, G, A, and B are mapped to BD, LT, HT, SD, WB, CP, and OH, respectively. All sharps and flats are mapped to CH. This mode is useful for split-able keyboards where one octave can be used to control the LDB-1 while the rest of the keyboard controls your synthesizer.
In Octaves map mode, every note in each octave will trigger an instrument. Octaves -1 through 9 are mapped to BD, BD, BD, LT, HT, SD, WB, CP, CH, OH, and CH+OH respectively.
All Channels: When All Channels is on, the LDB-1 will respond to MIDI “note on” commands on any MIDI channel.
Channel: When All Channels is off, the LDB-1 will respond to MIDI “note on” commands only on the specified MIDI channel. MIDI channel 10 is reserved for percussion instruments.
Also see the Connectivity section for more information on the LDB-1’s MIDI implementation.
LDB-1 User Manual 19
Connectivity
Power
The LDB-1 runs on 9 to 10 volts. You can connect a 9 volt battery, and/or an AC adapter (AKA wall wart). The power jack on the LDB-1 is a center-negative, type-M power jack. You can use just about any stand-ard 9 to 10 volt pedal power supply.
Do not use a center-positive power plug, or a power supply that exceeds 10 volts, or you could perma-nently damage the circuitry of the LDB-1.
At Delptronics, we are partial to the “Danelectro DA-1 9.6V No Hum AC Adapter” which you can get online for about $9.
Audio Out
The audio output is a mono 1/8" (3.5mm) jack. If you insert a stereo plug, it will still work, but you will only get sound out of the left channel.
If your amp or mixer has 1/4" inputs, as most do, it is preferable to use a 1/8" to 1/4" cable, rather than a 1/8" to 1/4" adapter with a 1/4" to 1/4" cable.
Analog Synthesizer Connectors
The Trigger Out, Clock In, and Gate In jacks are mono 1/8" (3.5mm) jacks. They are used for connecting your LDB-1 to a modular synthesizer.
Trigger Out
The trigger output voltage is half the power supply voltage, which is 4.5 volts with a 9 volt power supply. Keep in mind that both batteries and AC power adapters rated at 9 volts could be supplying slightly more or less than 9 volts. The LDB-1 will still work fine, but the trigger output will be slightly higher or lower. That should not affect most modular synthesizers.
Clock In
The Clock In jack accepts a standard 5 volt signal typical of modular synthesizers and sequencers. So, you can control the tempo of the LDB-1 from another device, or use a master clock module to control multiple devices, including the LDB-1.
Gate In
The Gate In jack accepts a standard 5 volt signal typical of modular synthesizers and sequencers. The Gate In signal provides the same function as the Run button. That is, it starts or stops the pattern or song.
LDB-1 User Manual 20
Connectivity (continued)
DINsync
DINsync is a standard used by older drum machines, primarily from Roland. DINsync provides a clock signal and a gate (on/off) signal. The DINsync jack and the MIDI jack are one and the same, so you cannot use them both at the same time.
The clock input pin on the DINsync jack, and the signal pin on the Clock In jack are connected. Likewise, the gate input pin on the DINsync jack, and the signal pin on the Gate In jack are connected. Therefore, you cannot use them both for input at the same time. However, since they are connected, you could use one set for input and the other for output. For example, if you connect another drum machine to the DINsync jack, then you can use the LDB-1 Clock and Gate jacks as outputs to your modular synthe-sizer. Alternately, if you connect your modular synthesizer to the LDB-1 Clock and Gate jacks, then you can use the DINsync jack as an output to control another drum machine.
MIDI
Notes: In Play Drums mode, the LDB-1 will respond to MIDI note on messages. See the MIDI Setup section for details on how MIDI notes are mapped to LDB-1 instruments.
Real-Time Messages: In any mode in which a song or pattern can play (Play Songs, Play/Edit/Write Patterns, Edit Triggers, or Setup), the LDB-1 will respond to the following MIDI system real-time messag-es:
Clock: Overrides the tempo knob.
Stop: Stops the currently playing song or pattern immediately.
Start: Starts playing the current song or pattern at the beginning.
Continue: Starts playing the current song or pattern at the point at which it stopped.
Song Position Zero: Sets the song position to the beginning of the song, so that a Continue message will start it playing from the beginning. This message is handled because some MIDI implementations only send one Start message and subsequent messages consist of a Song Position Zero message then a Con-tinue message. Messages that attempt to set the song position to a point other than zero are ignored.
Memory
The LDB-1 contains non-volatile memory. That is, it remembers things even with no power.
When you edit or write patterns, songs, triggers, or setup parameters, the LDB-1 saves your changes to non-volatile memory when you exit the mode (by switching to a different mode).
If you power off the LDB-1 while still in the Edit or Write mode, any changes you made will be lost. For example, if you are editing a pattern and you want your changes to be saved, switch to a different mode (such as Play Patterns) before you power off.
In addition to the patterns, songs, triggers, and parameters that you explicitly change, the LDB-1 also remembers the current pattern bank and song bank. When you change the pattern or song bank in any mode, it is immediately saved to non-volatile memory.