Etruscan Square Stitch Bracelet file:///C|/MyWorkadayDocuments/learntobead/kits/beadweave/stitch/etruscan-vine/LTB-BW2-NT-01-EtruscanVineNecklace-purple.htm[11/9/2012 2:17:35 PM] Learn To Bead and Make Jewelry LEARN TO BEAD . NET The Design Approach To Learning BEAD WEAVING Etruscan Vine Necklace Instructor: Warren Feld Impress with this Tuscany-inspired necklace! Combine Bead Stringing and Netting techniques to make this fun, classy piece. Palette 1: Purple Wine BEAD WEAVING ETRUSCAN VINE NECKLACE BW2-NT-01-Netting, Bead Stringing, Combining Techniques This set of instructions is organized as a series of Jewelry Design Choices: I. Planning Your Project IA. Conceptualizing Your Piece IB. Measurements IC. Selecting Materials ID. Sketching a Pattern or Graph
This set of instructions is organized as a series ofJewelry Design Choices:I. Planning Your ProjectIA. Conceptualizing Your PieceIB. MeasurementsIC. Selecting MaterialsID. Sketching a Pattern or Graph
IE. Identifying Potential Areas of Weakness within Your PieceIF. Visualizing Your ProcessIG. Organizing Your Work Space
II. Begining Your ProjectIIA. Basic StepsIIB. Dealing with ContingenciesIIC. Finishing Touches
III. Summary of Learning Objectives You Have MetAfter Accomplishing This Project
IV. Next StepsIVA. Suggested Readings
What YouWill Learn:- Beginning toreview issues andprospects forcombining twodifferent kinds oftechniques- Creating a designplan for a beadstrung/beadwoven necklace- Preparing astrung row ofbeads so that wecan bead-weaveoff of it- Measuring adrop-downnecklace so that itsits correctlyaround the neckand upon the chest- Attaching achoker claspassembly
Prerequisites:- Orientation ToBeads & JewelryFindings- Some comfortusing needle andthread
These Instructions are written from what is called The DesignPerspective.
They first guide you through the kinds of choices to be made,when designing this particular piece. This gives you a sense ofhow the artist thought through the development of the project.This provides you with a better understanding and someinsights about what kinds of things you would need toconsider, when designing a similar piece, or adding personaltouches to this project.
Then step-by-step, easy-to-follow instructions for completingthis project are presented.
Finally, the skills learned by doing this project aresummarized.
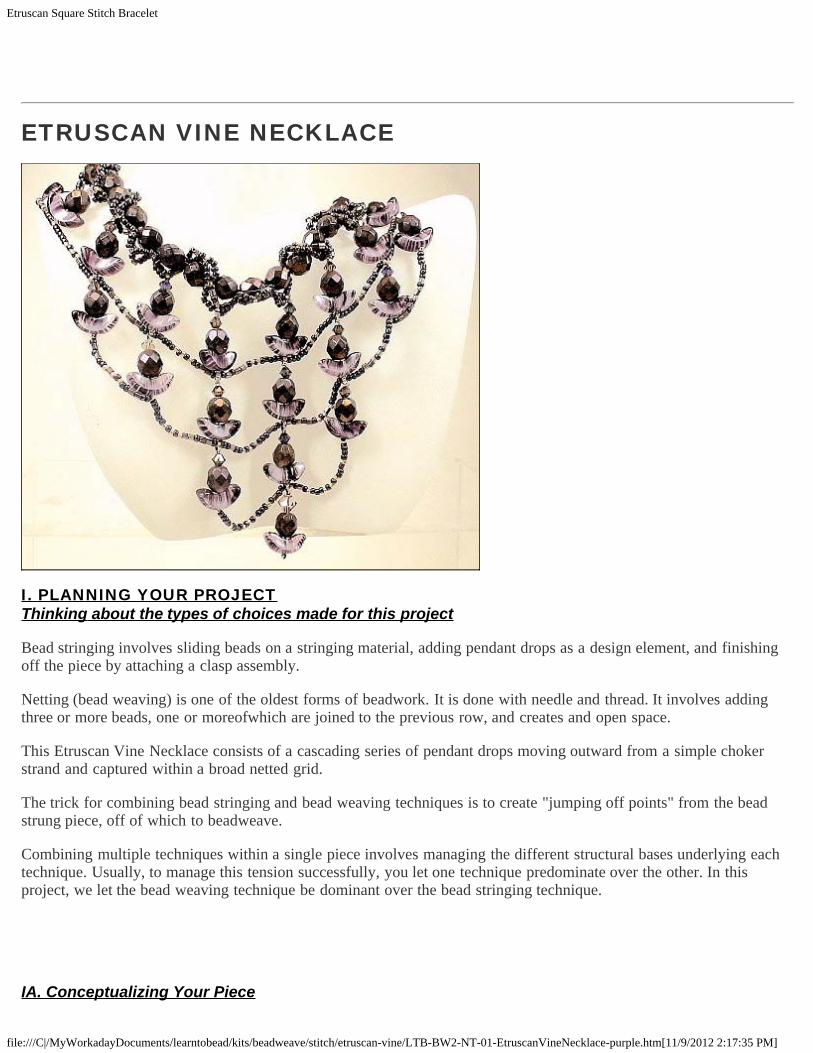
The Etruscan Vine Necklace is a necklace that is a funbeginner/intermediate project that combines both beadstringing and bead weaving (netting) techniques. The patternwas influenced by pottery patterns from the Tuscany region ofItaly around 300 B.C. thru 500 A.D.
In the Etruscan Vine Necklace, I combine some bead stringing with somebead-woven netting techniques. The beads used include Czech glass angelwings and fire polish beads, Austrian crystal bicone beads (Series 5301), goldfilled beads, and Japanese Miyuki glass seed beads and delica beads,including some 24KT delica beads. The piece is strung on FireLine. Thenecklace is meant to be worn as a choker, and has an adjustable hook andeye clasp, allowing the length to vary between 15" and 17 1/2".
(not included in kit) Bees Wax or Microcrystalline Wax Bead BoardSide cutters or flush cuttersChain nose pliersRound nose pliersBead stoppers or clampsScissors, Ruler, Work surfaceBic lighter or thread zapper
I. PLANNING YOUR PROJECTThinking about the types of choices made for this project
Bead stringing involves sliding beads on a stringing material, adding pendant drops as a design element, and finishingoff the piece by attaching a clasp assembly.
Netting (bead weaving) is one of the oldest forms of beadwork. It is done with needle and thread. It involves addingthree or more beads, one or moreofwhich are joined to the previous row, and creates and open space.
This Etruscan Vine Necklace consists of a cascading series of pendant drops moving outward from a simple chokerstrand and captured within a broad netted grid.
The trick for combining bead stringing and bead weaving techniques is to create "jumping off points" from the beadstrung piece, off of which to beadweave.
Combining multiple techniques within a single piece involves managing the different structural bases underlying eachtechnique. Usually, to manage this tension successfully, you let one technique predominate over the other. In thisproject, we let the bead weaving technique be dominant over the bead stringing technique.
Ask yourself these questions:Purpose? Is this to be for a Woman (15 1/2 - 18 1/2") or man (16 1/2 - 19 1/2")?What is the Context/Setting the necklace might be worn in?
Sizing?Size of neck? How loosely should it fit -- how far down from the neck should it hang?How much of the chest should the bead-woven netting cover?
Materials?What types and materials of beads do I want to use? glass, gemstone, metal, mix? What size(s) or shape(s) of beads do I want to use?What kinds of stringing materials do I want to use, and do I want to wax the cord?
Design and Color Issues?How long do I want, (that is, how many rows of), each "captured-bead-drop" to be?Do I want to graduate the wiedth of each droppped row, or keep them all of equal width?Does the pendant drop, because of the length, require any special strategies for articulation and jointednessto allow freer movement?Do I want to use the same beads for each drop, or do I want to create a pattern?Do I want to use the same beads along the length of my necklace, or do I want to create a pattern?What colors do I want to use? Metal colors? Glass bead colors?What would be considered Etruscan colors, or colors more typical of theTuscany region of Italy?Can I anticipate any situation(s) within the piece, where I will need to delineate either an "odd" number ofbeads, or an "even" number of beads?Where (what spacing) should I locate the jumping off points along the bead-strung strand?At what point should I begin the "vine" effect -- beginning of the bead-strand, a little bit in from the ends of thebead strand, or at the point where I begin the captured-bead-drop rows?What size/shape open spaces do I want within the captured-bead-drop netting? Therefore, my bead-dropshave to be how long?As I continue down from the neck, what should my bead-count be for each beadwoven row, and betweeneach bead-drop within that row, to accommodate the graduation of the size between the wearer's neck andas the necklace continues down the chest? What will the clasp assembly look like, and where and how will I attach the clasp?
Wearability?How easily will the woven beads, once the project is finished, conform to and feelcomfortable around the neck and upon the chest?
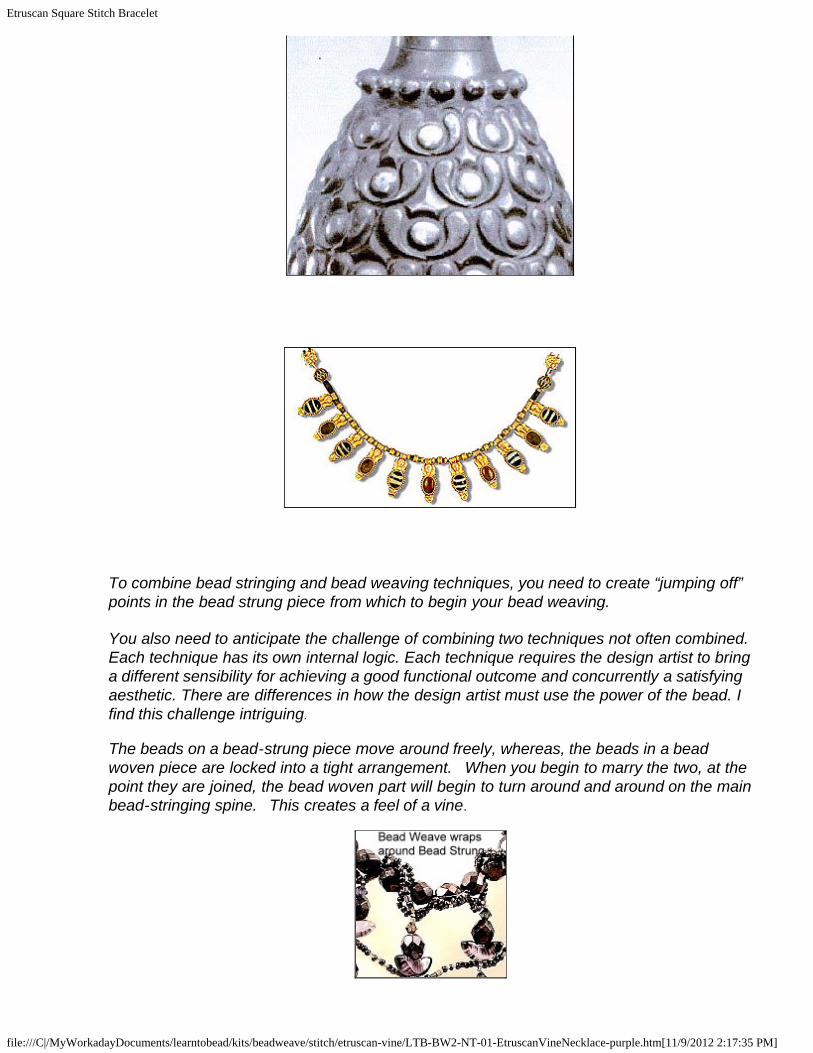
In this project, I wanted to create a bead strung piece, with some feel of dimensionality,something elegant, and something that combined bead stringing with bead weavingtechniques. I was inspired by two ancient Etruscan pieces, one, the design motif on a piece of pottery,and two, the general bead-drop design of a very famous Etruscan necklace on display atthe Metropolitan Museum of Art in New York City.
To combine bead stringing and bead weaving techniques, you need to create “jumping off”points in the bead strung piece from which to begin your bead weaving. You also need to anticipate the challenge of combining two techniques not often combined.Each technique has its own internal logic. Each technique requires the design artist to bringa different sensibility for achieving a good functional outcome and concurrently a satisfyingaesthetic. There are differences in how the design artist must use the power of the bead. Ifind this challenge intriguing. The beads on a bead-strung piece move around freely, whereas, the beads in a beadwoven piece are locked into a tight arrangement. When you begin to marry the two, at thepoint they are joined, the bead woven part will begin to turn around and around on the mainbead-stringing spine. This creates a feel of a vine.
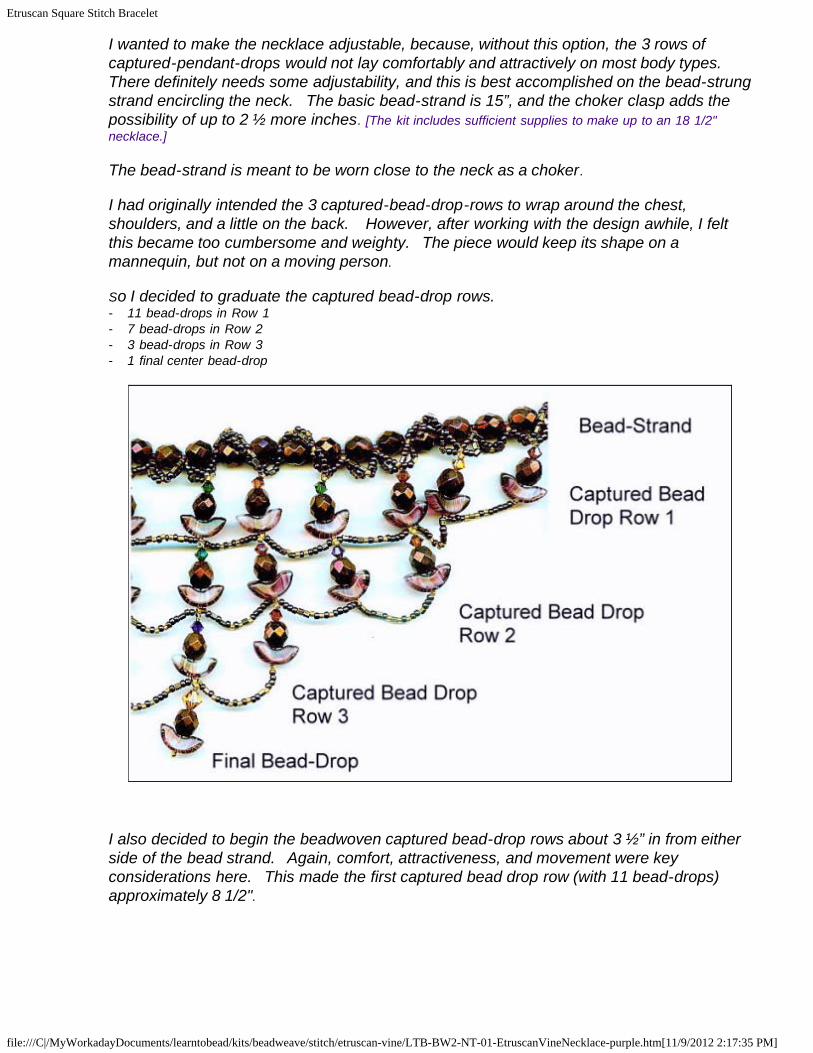
I wanted to make the necklace adjustable, because, without this option, the 3 rows ofcaptured-pendant-drops would not lay comfortably and attractively on most body types. There definitely needs some adjustability, and this is best accomplished on the bead-strungstrand encircling the neck. The basic bead-strand is 15”, and the choker clasp adds thepossibility of up to 2 ½ more inches. [The kit includes sufficient supplies to make up to an 18 1/2"necklace.] The bead-strand is meant to be worn close to the neck as a choker. I had originally intended the 3 captured-bead-drop-rows to wrap around the chest,shoulders, and a little on the back. However, after working with the design awhile, I feltthis became too cumbersome and weighty. The piece would keep its shape on amannequin, but not on a moving person. So I decided to graduate the captured bead-drop rows.- 11 bead-drops in Row 1- 7 bead-drops in Row 2- 3 bead-drops in Row 3- 1 final center bead-drop
I also decided to begin the beadwoven captured bead-drop rows about 3 ½” in from eitherside of the bead strand. Again, comfort, attractiveness, and movement were keyconsiderations here. This made the first captured bead drop row (with 11 bead-drops)approximately 8 1/2".
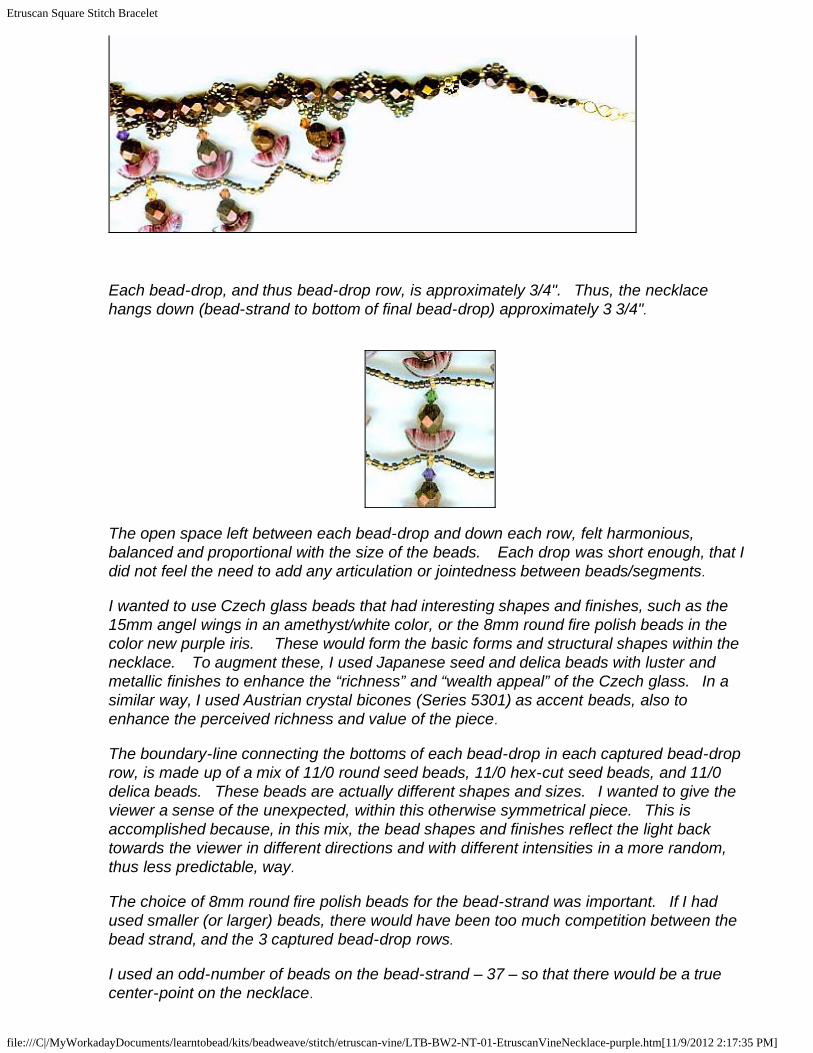
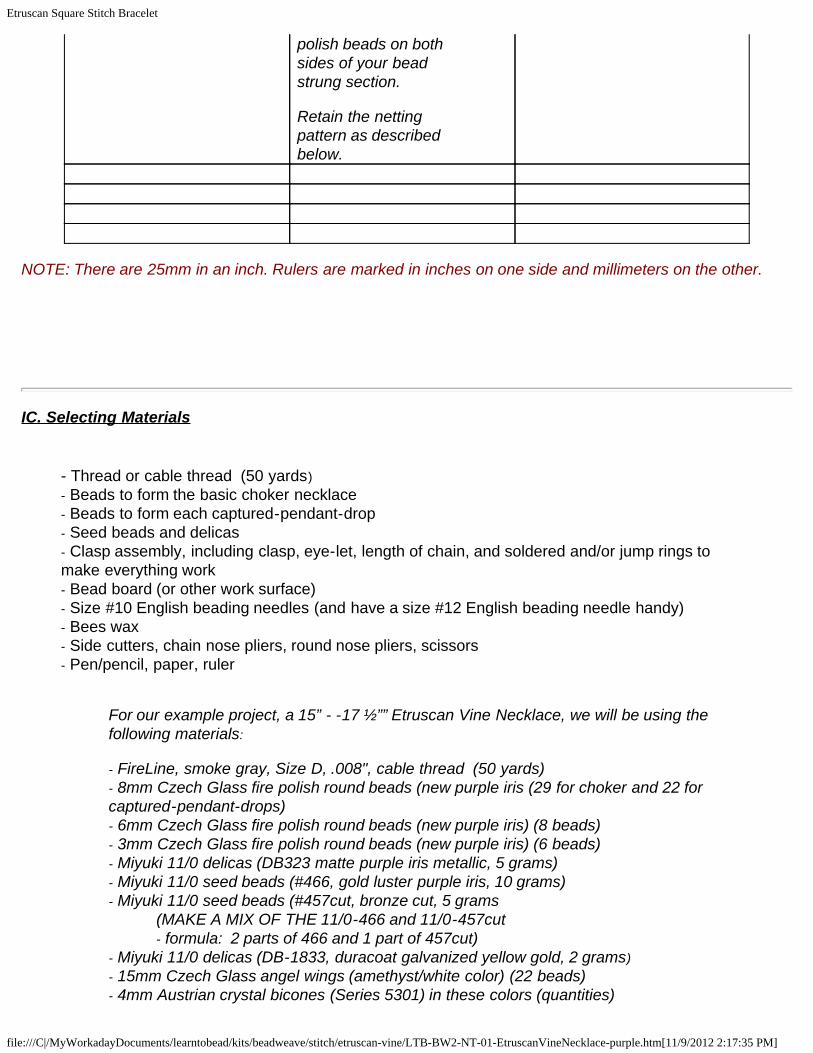
Each bead-drop, and thus bead-drop row, is approximately 3/4". Thus, the necklacehangs down (bead-strand to bottom of final bead-drop) approximately 3 3/4".
The open space left between each bead-drop and down each row, felt harmonious,balanced and proportional with the size of the beads. Each drop was short enough, that Idid not feel the need to add any articulation or jointedness between beads/segments. I wanted to use Czech glass beads that had interesting shapes and finishes, such as the15mm angel wings in an amethyst/white color, or the 8mm round fire polish beads in thecolor new purple iris. These would form the basic forms and structural shapes within thenecklace. To augment these, I used Japanese seed and delica beads with luster andmetallic finishes to enhance the “richness” and “wealth appeal” of the Czech glass. In asimilar way, I used Austrian crystal bicones (Series 5301) as accent beads, also toenhance the perceived richness and value of the piece. The boundary-line connecting the bottoms of each bead-drop in each captured bead-droprow, is made up of a mix of 11/0 round seed beads, 11/0 hex-cut seed beads, and 11/0delica beads. These beads are actually different shapes and sizes. I wanted to give theviewer a sense of the unexpected, within this otherwise symmetrical piece. This isaccomplished because, in this mix, the bead shapes and finishes reflect the light backtowards the viewer in different directions and with different intensities in a more random,thus less predictable, way. The choice of 8mm round fire polish beads for the bead-strand was important. If I hadused smaller (or larger) beads, there would have been too much competition between thebead strand, and the 3 captured bead-drop rows. I used an odd-number of beads on the bead-strand – 37 – so that there would be a truecenter-point on the necklace.
I strung and wove using FireLine cable thread. I felt the FireLine could hold the weightwithout stretching, and would still provide a nice drapery and flow. I have a personal preference for simple hook and eye clasps. These are user-friendly. They don’t compete with the beadwork. They seem a natural part of the necklace circle. It is easy to make them adjustable with the addition of a short piece of chain. My color palette is rich and monochromatic, with a lot of variation in intensity (bright todull). Austrian crystal beads and gold metallic delicas and bronze cut seed beads addsubtle points of light that both compete for and enhance the focus on the piece as a whole,without distraction. The Etruscan and indigineous Tuscany colors tend to be rich, yetmuted, with softer tones. [The design, however, would work just as well with a multi-color palette. I can picture the same piece donewith flower cups or bell flowers, petals and leaves, varying all the colors of the rainbow or using a multi-colorspring palette within the same piece.] There is both a symmetry as well as an asymmetry in the use of color and pattern. TheCzech glass is arranged in a tightly ordered symmetry. However, the seed beads anddelicas appear randomly as a mix. At the point the bead woven elements join the beadstrung part, the boundary-lines of seed and delica beads curl around the fire polish beadsin an unplanned, very naturalistic, way. I pictured this piece worn in a more formal setting. I assumed that the unusual shapes andresulting shadows they would create, the open netting spaces, and the sparkles of Austriancrystal and gold, would allow the piece to be noticed from across the room, no matter whatthe lighting.
IB. Measurements
Ask yourself these questions:What length around the neck do I want the necklace to be?What width coming down from the neck and across the chest do I want the necklace to be?What width do I want each row of cascading captured-bead-drops to be?How much length will my clasp assembly add to my piece?
For this project, I wanted to make a necklace approximately 15 1/2 - 17 1/2" long, which includesthe clasp. In this case, the clasp allows the necklace to adjust about 2 - 2 1/2".
MEASUREMENTSCriteria This Project Your Project VariationNecklace lengthw/clasp
polish beads on bothsides of your beadstrung section.
Retain the nettingpattern as describedbelow.
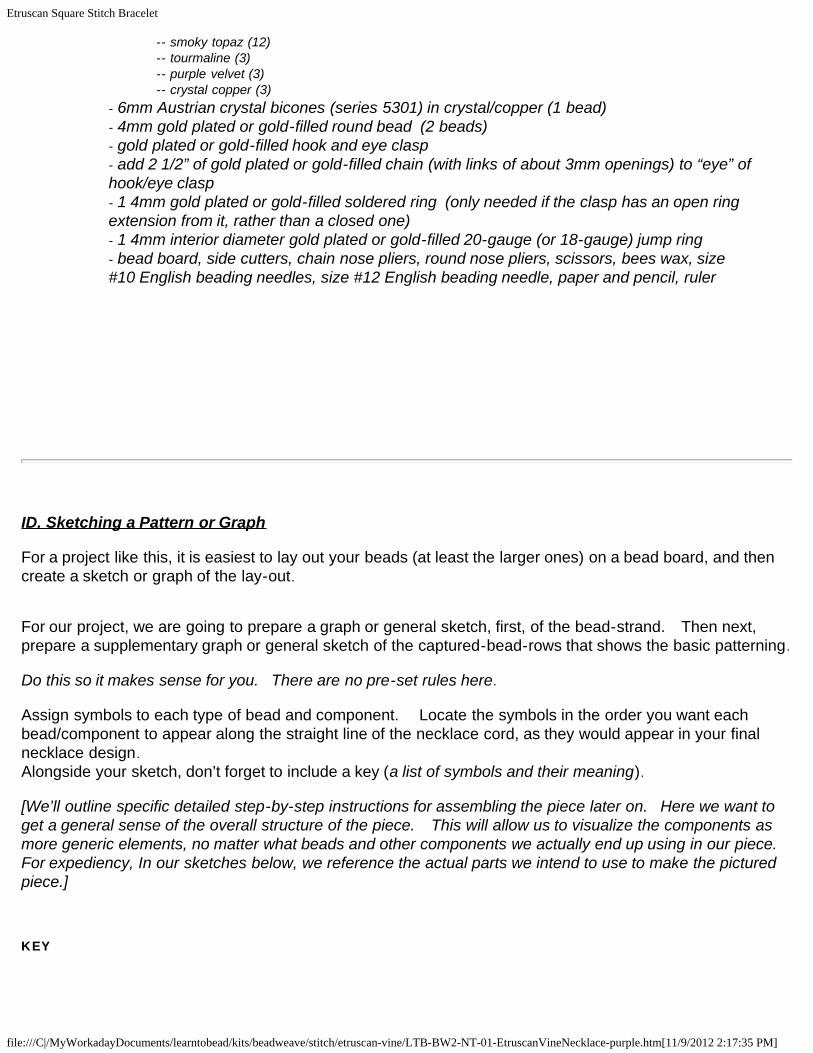
NOTE: There are 25mm in an inch. Rulers are marked in inches on one side and millimeters on the other.
IC. Selecting Materials
- Thread or cable thread (50 yards)- Beads to form the basic choker necklace- Beads to form each captured-pendant-drop- Seed beads and delicas- Clasp assembly, including clasp, eye-let, length of chain, and soldered and/or jump rings tomake everything work- Bead board (or other work surface)- Size #10 English beading needles (and have a size #12 English beading needle handy)- Bees wax- Side cutters, chain nose pliers, round nose pliers, scissors- Pen/pencil, paper, ruler
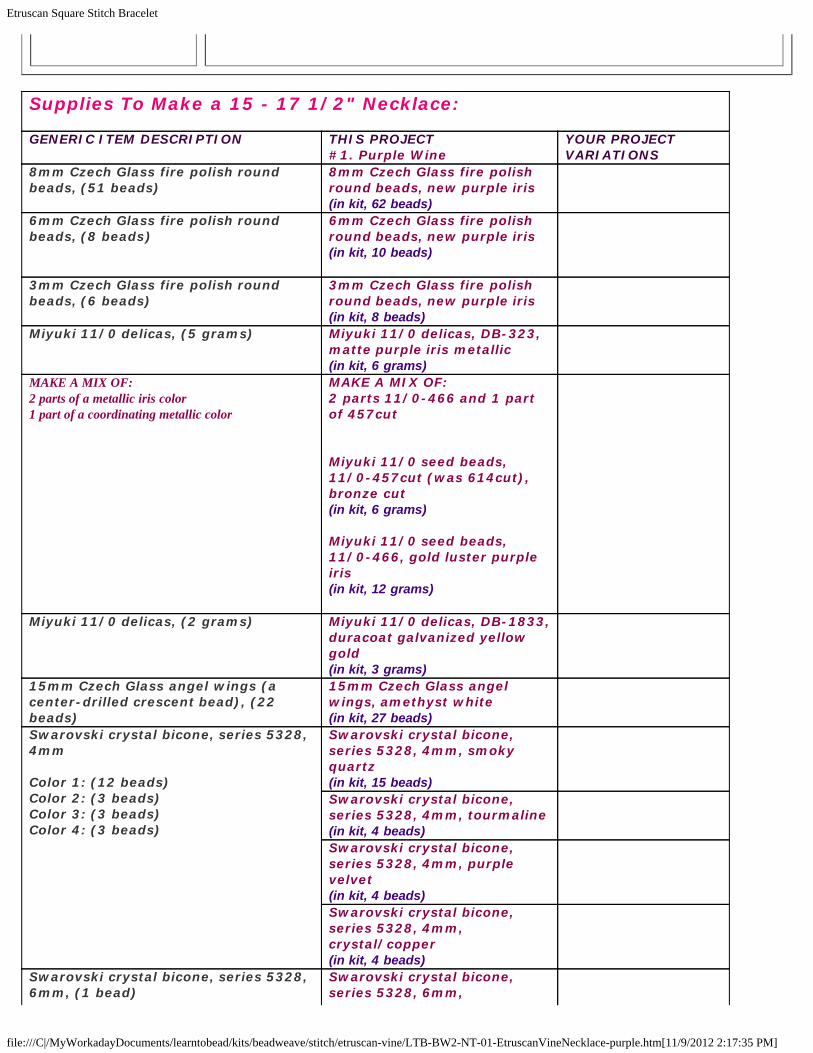
For our example project, a 15” - -17 ½”” Etruscan Vine Necklace, we will be using thefollowing materials: - FireLine, smoke gray, Size D, .008", cable thread (50 yards)- 8mm Czech Glass fire polish round beads (new purple iris (29 for choker and 22 forcaptured-pendant-drops)- 6mm Czech Glass fire polish round beads (new purple iris) (8 beads)- 3mm Czech Glass fire polish round beads (new purple iris) (6 beads)- Miyuki 11/0 delicas (DB323 matte purple iris metallic, 5 grams)- Miyuki 11/0 seed beads (#466, gold luster purple iris, 10 grams)- Miyuki 11/0 seed beads (#457cut, bronze cut, 5 grams
(MAKE A MIX OF THE 11/0-466 and 11/0-457cut- formula: 2 parts of 466 and 1 part of 457cut)
-- smoky topaz (12) -- tourmaline (3) -- purple velvet (3) -- crystal copper (3)- 6mm Austrian crystal bicones (series 5301) in crystal/copper (1 bead)- 4mm gold plated or gold-filled round bead (2 beads)- gold plated or gold-filled hook and eye clasp- add 2 1/2” of gold plated or gold-filled chain (with links of about 3mm openings) to “eye” ofhook/eye clasp- 1 4mm gold plated or gold-filled soldered ring (only needed if the clasp has an open ringextension from it, rather than a closed one)- 1 4mm interior diameter gold plated or gold-filled 20-gauge (or 18-gauge) jump ring- bead board, side cutters, chain nose pliers, round nose pliers, scissors, bees wax, size#10 English beading needles, size #12 English beading needle, paper and pencil, ruler
ID. Sketching a Pattern or Graph
For a project like this, it is easiest to lay out your beads (at least the larger ones) on a bead board, and thencreate a sketch or graph of the lay-out.
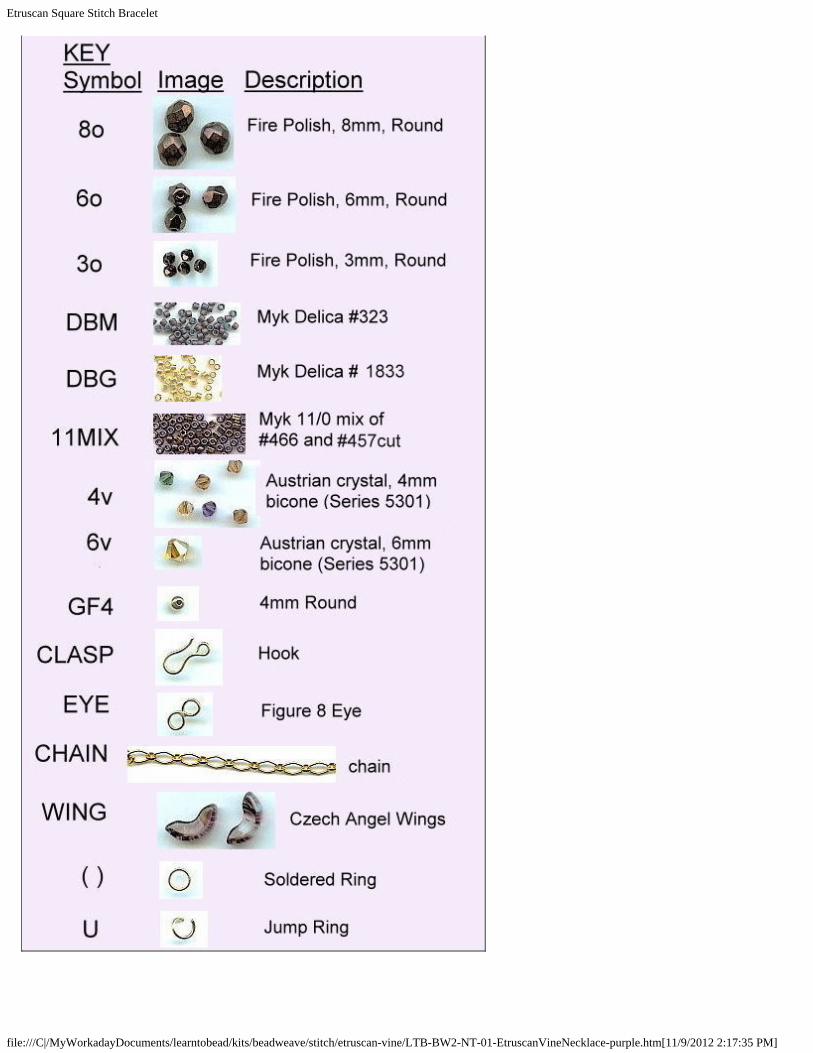
For our project, we are going to prepare a graph or general sketch, first, of the bead-strand. Then next,prepare a supplementary graph or general sketch of the captured-bead-rows that shows the basic patterning. Do this so it makes sense for you. There are no pre-set rules here. Assign symbols to each type of bead and component. Locate the symbols in the order you want eachbead/component to appear along the straight line of the necklace cord, as they would appear in your finalnecklace design. Alongside your sketch, don’t forget to include a key (a list of symbols and their meaning). [We’ll outline specific detailed step-by-step instructions for assembling the piece later on. Here we want toget a general sense of the overall structure of the piece. This will allow us to visualize the components asmore generic elements, no matter what beads and other components we actually end up using in our piece. For expediency, In our sketches below, we reference the actual parts we intend to use to make the picturedpiece.] KEY
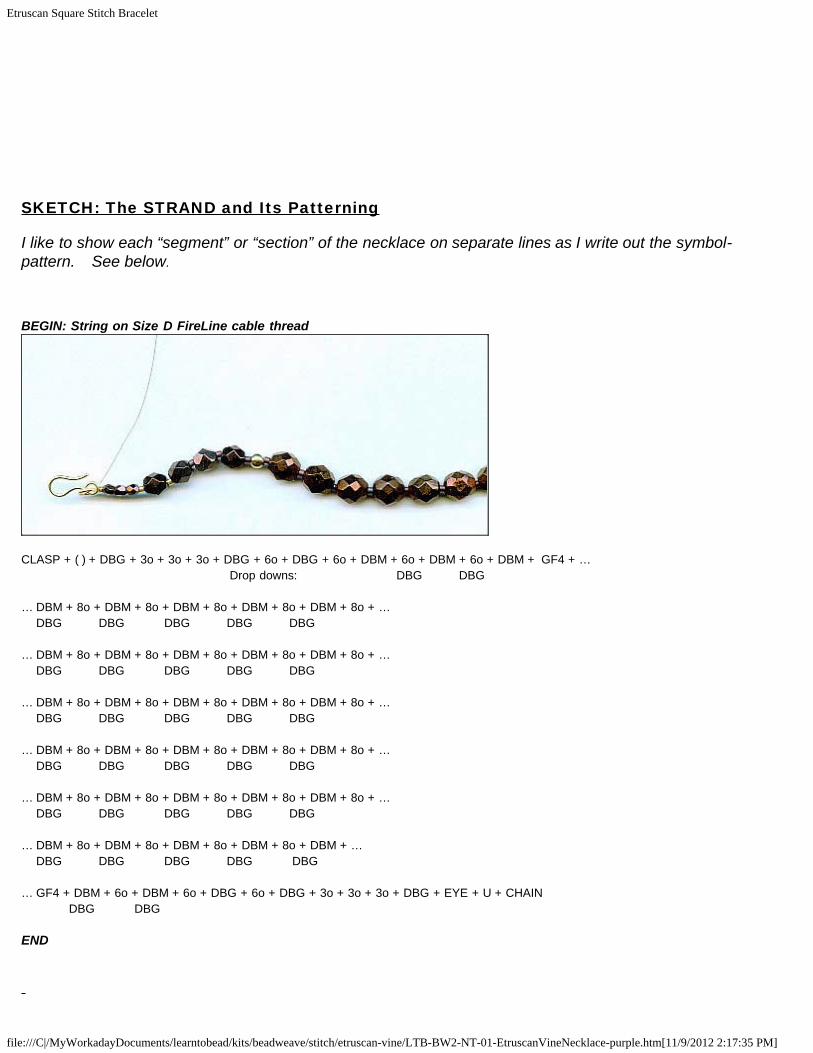
SKETCH: The STRAND and Its Patterning I like to show each “segment” or “section” of the necklace on separate lines as I write out the symbol-pattern. See below. BEGIN: String on Size D FireLine cable thread
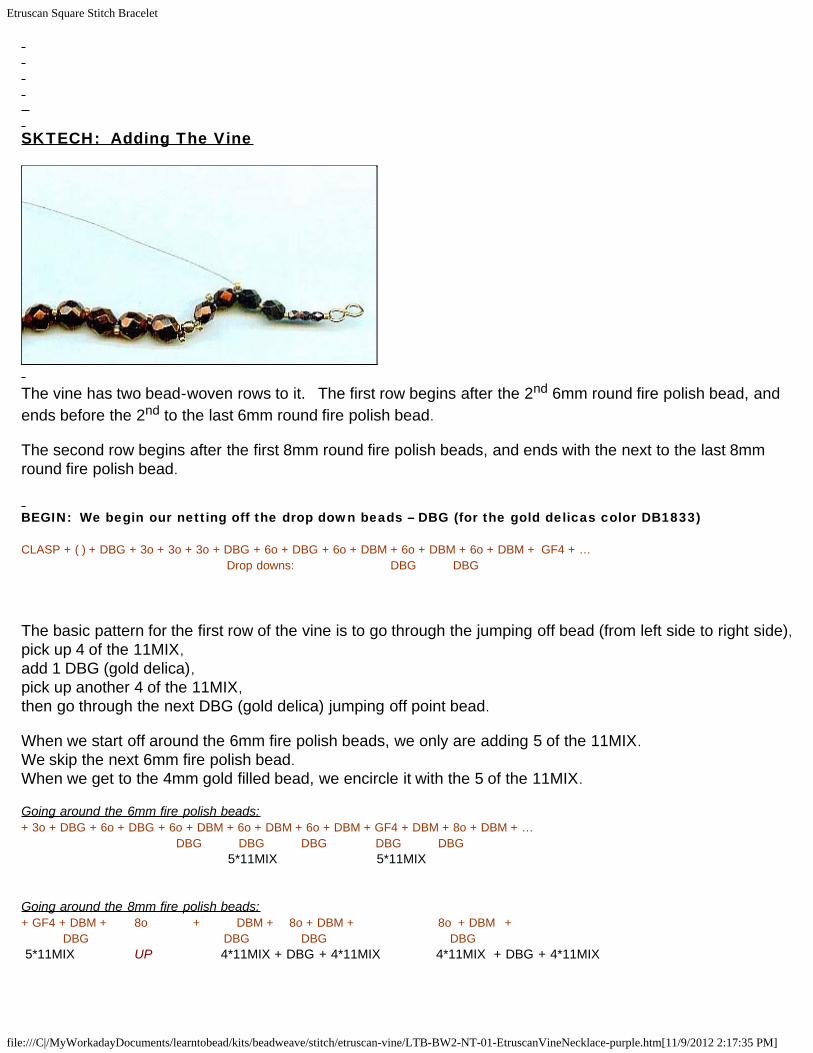
The vine has two bead-woven rows to it. The first row begins after the 2nd 6mm round fire polish bead, andends before the 2nd to the last 6mm round fire polish bead. The second row begins after the first 8mm round fire polish beads, and ends with the next to the last 8mmround fire polish bead. BEGIN: We begin our netting off the drop down beads – DBG (for the gold delicas color DB1833) CLASP + ( ) + DBG + 3o + 3o + 3o + DBG + 6o + DBG + 6o + DBM + 6o + DBM + 6o + DBM + GF4 + … Drop downs: DBG DBG The basic pattern for the first row of the vine is to go through the jumping off bead (from left side to right side),pick up 4 of the 11MIX,add 1 DBG (gold delica),pick up another 4 of the 11MIX,then go through the next DBG (gold delica) jumping off point bead. When we start off around the 6mm fire polish beads, we only are adding 5 of the 11MIX.We skip the next 6mm fire polish bead.When we get to the 4mm gold filled bead, we encircle it with the 5 of the 11MIX. Going around the 6mm fire polish beads:+ 3o + DBG + 6o + DBG + 6o + DBM + 6o + DBM + 6o + DBM + GF4 + DBM + 8o + DBM + … DBG DBG DBG DBG DBG 5*11MIX 5*11MIX Going around the 8mm fire polish beads:+ GF4 + DBM + 8o + DBM + 8o + DBM + 8o + DBM + DBG DBG DBG DBG 5*11MIX UP 4*11MIX + DBG + 4*11MIX 4*11MIX + DBG + 4*11MIX
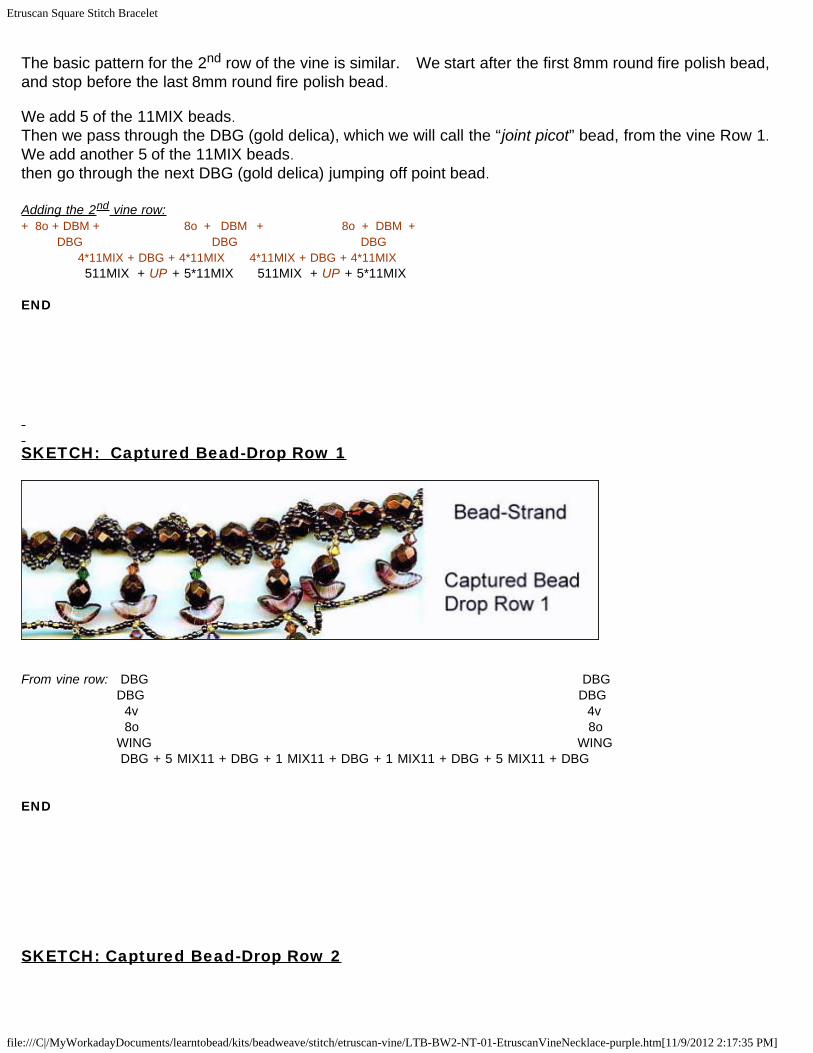
The basic pattern for the 2nd row of the vine is similar. We start after the first 8mm round fire polish bead,and stop before the last 8mm round fire polish bead. We add 5 of the 11MIX beads.Then we pass through the DBG (gold delica), which we will call the “joint picot” bead, from the vine Row 1.We add another 5 of the 11MIX beads.then go through the next DBG (gold delica) jumping off point bead. Adding the 2nd vine row:+ 8o + DBM + 8o + DBM + 8o + DBM + DBG DBG DBG 4*11MIX + DBG + 4*11MIX 4*11MIX + DBG + 4*11MIX 511MIX + UP + 5*11MIX 511MIX + UP + 5*11MIX END
E. Identifying Potential Areas of Weakness within Your Piece
Identify points of potential weakness, that will need reinforcing. In this necklace, points of potentialweakness include:
The two ends of the cord or stringing material.Each connection between the top of the pendant drop and the jumping off point it is connectedto.
Identify how you want to secure the clasp.
In this piece, since I use FireLine, I tie double-knots to each side of the clasp, and extendthe short piece of chain, using a 20 gauge thick jump ring (18-ga would also work wellhere).
IF. Visualizing Your Process
Holding the piece. I like to use the bead board to organize my piece and keep the beads and othercomponents separated in compartments. As I work on the Bead-Strand part of the piece, I try to keep all thecomponents lined up on the board. When I pick up the piece to work on it, I like to work close to the boarditself, so I can keep things aligned. I frequently return it to the bead board to be sure things remain alignedcorrectly.
As I am bead weaving, I will have to lift the piece up a bit off the bead board. Here, I work each section closeon top of my forefingers and pinch with my thumb. This gives me control.
Points of weakness. These are areas of your piece that will need reinforcement. The clasp assembly willbe the weakest link on this piece. Another weak link will be the points at which the top of the pendant dropattached to the jumping off points from the previous row or section. In which direction do you want to work. I like to work from the left side of the piece to the right side. As Iget to one end, I usually flip it over, so I keep working from left to right. Staging:In this necklace, I am going to stage the assembly in this order:1. Attach the left side of the clasp assembly2. Create the Bead-Strand, with jumping off points3. Attach the right side of the clasp assembly 4. Finish bead stringing tasks5. Add the wrap around vine6. Create Captured Bead-Drop Row 17. Create Captured Bead-Drop Row 28. Create Captured Bead-Drop Row 39. Add final Bead-Drop10. Add length of gold-filled chain
IG. Organizing Your Work Space
Get your beads, stringing materials, bead board, tools, work surface, handy pen and paper, ruler, and thelike, altogether in one place. Lay out your beads on the bead board according to your sketches above.
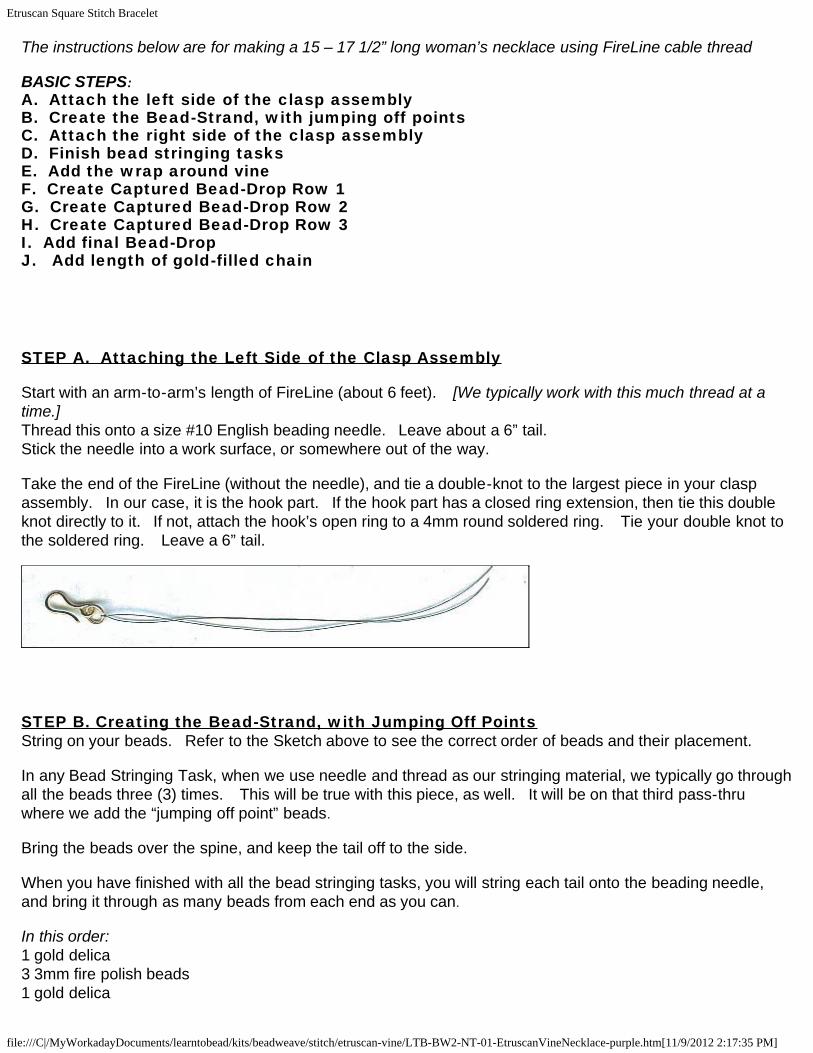
The instructions below are for making a 15 – 17 1/2” long woman’s necklace using FireLine cable thread BASIC STEPS:A. Attach the left side of the clasp assemblyB. Create the Bead-Strand, with jumping off pointsC. Attach the right side of the clasp assembly D. Finish bead stringing tasksE. Add the wrap around vineF. Create Captured Bead-Drop Row 1G. Create Captured Bead-Drop Row 2H. Create Captured Bead-Drop Row 3I. Add final Bead-DropJ. Add length of gold-filled chain STEP A. Attaching the Left Side of the Clasp Assembly Start with an arm-to-arm’s length of FireLine (about 6 feet). [We typically work with this much thread at atime.]Thread this onto a size #10 English beading needle. Leave about a 6” tail.Stick the needle into a work surface, or somewhere out of the way. Take the end of the FireLine (without the needle), and tie a double-knot to the largest piece in your claspassembly. In our case, it is the hook part. If the hook part has a closed ring extension, then tie this doubleknot directly to it. If not, attach the hook’s open ring to a 4mm round soldered ring. Tie your double knot tothe soldered ring. Leave a 6” tail.
STEP B. Creating the Bead-Strand, with Jumping Off PointsString on your beads. Refer to the Sketch above to see the correct order of beads and their placement. In any Bead Stringing Task, when we use needle and thread as our stringing material, we typically go throughall the beads three (3) times. This will be true with this piece, as well. It will be on that third pass-thruwhere we add the “jumping off point” beads. Bring the beads over the spine, and keep the tail off to the side. When you have finished with all the bead stringing tasks, you will string each tail onto the beading needle,and bring it through as many beads from each end as you can. In this order:1 gold delica3 3mm fire polish beads1 gold delica
1 6mm fire polish bead1 gold delica1 6mm fire polish bead1 delica #3231 6mm fire polish bead1 delica #3231 6mm fire polish bead1 delica #3231 4mm gold filled bead1 delica #3231 8mm fire polish bead1 delica #323
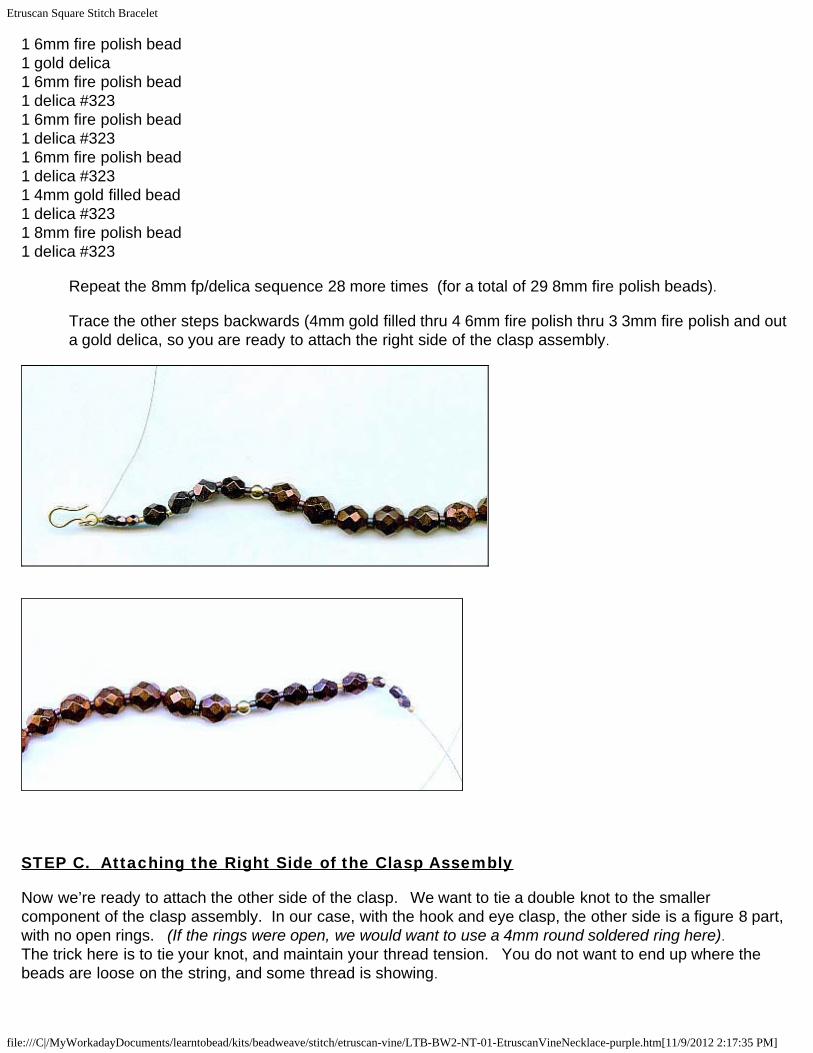
Repeat the 8mm fp/delica sequence 28 more times (for a total of 29 8mm fire polish beads). Trace the other steps backwards (4mm gold filled thru 4 6mm fire polish thru 3 3mm fire polish and outa gold delica, so you are ready to attach the right side of the clasp assembly.
STEP C. Attaching the Right Side of the Clasp Assembly Now we’re ready to attach the other side of the clasp. We want to tie a double knot to the smallercomponent of the clasp assembly. In our case, with the hook and eye clasp, the other side is a figure 8 part,with no open rings. (If the rings were open, we would want to use a 4mm round soldered ring here).The trick here is to tie your knot, and maintain your thread tension. You do not want to end up where thebeads are loose on the string, and some thread is showing.
So,Slip your soldered ring or figure 8 onto the thread, and bring it all the way down to your last bead.Pull on the thread to make sure there is no slack on the thread.Tie the first half of your double knot – basically, you go over and under and pull.Pull tight. At this point, your knot is a slip knot, and you can maneuver your ring/figure 8 so it butts againstthe last bead, and there is no slack in your thread.Keep your beadwork on your work surface. Don’t pull it up in the air. Pulling it up in the air makes it harderto maintain your thread tension.Tie the second part of your double-knot – again, basically, you go over and under and pull. Give your threada tug.
STEP D. Finishing the Bead Stringing Tasks Now you are going to take your needle/thread and work your way all the way back to the other side (hookside), coming out between the gold delica bead and the soldered ring connected to the open ring of the hookpart (largest part) of your clasp. As you work your way back, it’s best to keep you strand of beads laying down on your work surface, and onlylifting up that short area through which you are threading your needle. As you work your way back, you will be threading the needle through about 1-2” of beads, and then pullingthe needle out. And then threading the needle through the next 1-2” of beads, and so forth, until you comeout the end. EACH TIME you pull the needle/thread out, you want to give a tug on the thread, so that youleave no slack. You don't want the thread to bunch up inside the bead-holes.
Be careful not to skip a bead, while you are working your way back.
Pull the needle/thread fully out between the gold delica bead and soldered ring (connected to the open ring ofthe hook). Give a tug on the thread to get it tight and pull out any slack. Tie a double knot to the ring – basically over and under and pull, doing this twice. Be sure to line up yournew knot to the existing knot on the ring from our initial step above.
ABOUT ADDING THREAD When it looks like there is about 12” of thread left, I start to plan to tie it off and begin another thread. To tie off the old thread, I snag a thread-loop (the thread between any two beads) and tie a simpleoverhand knot. I then , work my way backwards towards the direction I had come from through a fewbeads, snag another thread-loop and tie another knot, continuing to work backwards a little bit more,and then trim the thread as close to the exiting hole of the bead as possible. To add a new thread, I start back a few beads. I snag a thread-loop, tie an overhand knot whileleaving a 6” tail, and work my way up to where I want the thread to come out, and continue where I leftoff. This is called Anchoring: After you snag the thread-loop, you tie an overhand knot around thethread, in order to anchor your main thread to the piece. When I am finished with the project, I put a needle on the tail, and work my way back through somebeads, before cutting off the tail.
STEP E. Adding Wrap-Around Vine Bring your needle and thread back through for the third pass towards the ring/figure 8 side. This time, however, we are only going to go through the first short segment of beads. We will pull ourneedle/thread out of the delica color #323 which is comes after the 2nd 6mm fire polish bead. Notice this isthe first other-color delica after the gold delicas in the pattern. Give a tug on the thread so there’s no slack. Be careful that you don’t snag the tail that is coming out near the hook. We’ll deal with the tail later. Rightnow it’s just one of those things that wants to get in the way.
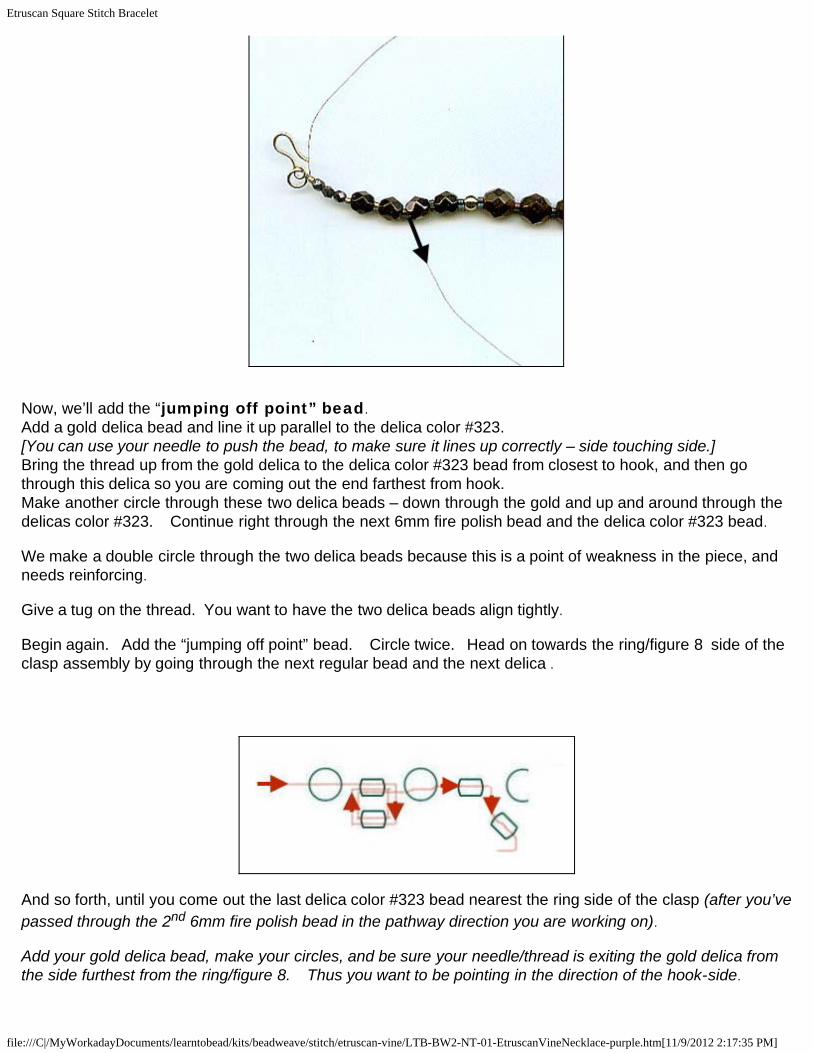
Now, we’ll add the “jumping off point” bead. Add a gold delica bead and line it up parallel to the delica color #323. [You can use your needle to push the bead, to make sure it lines up correctly – side touching side.]Bring the thread up from the gold delica to the delica color #323 bead from closest to hook, and then gothrough this delica so you are coming out the end farthest from hook.Make another circle through these two delica beads – down through the gold and up and around through thedelicas color #323. Continue right through the next 6mm fire polish bead and the delica color #323 bead. We make a double circle through the two delica beads because this is a point of weakness in the piece, andneeds reinforcing.
Give a tug on the thread. You want to have the two delica beads align tightly. Begin again. Add the “jumping off point” bead. Circle twice. Head on towards the ring/figure 8 side of theclasp assembly by going through the next regular bead and the next delica .
And so forth, until you come out the last delica color #323 bead nearest the ring side of the clasp (after you’vepassed through the 2nd 6mm fire polish bead in the pathway direction you are working on). Add your gold delica bead, make your circles, and be sure your needle/thread is exiting the gold delica fromthe side furthest from the ring/figure 8. Thus you want to be pointing in the direction of the hook-side.
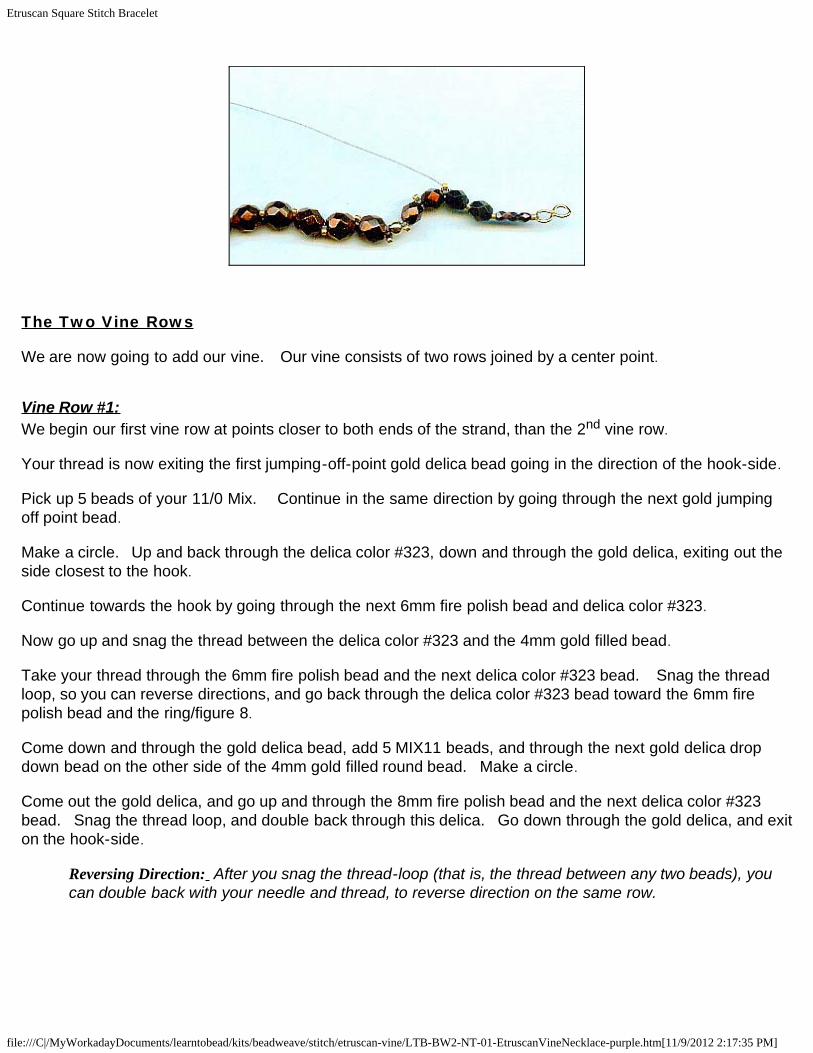
The Two Vine Rows We are now going to add our vine. Our vine consists of two rows joined by a center point. Vine Row #1:We begin our first vine row at points closer to both ends of the strand, than the 2nd vine row. Your thread is now exiting the first jumping-off-point gold delica bead going in the direction of the hook-side. Pick up 5 beads of your 11/0 Mix. Continue in the same direction by going through the next gold jumpingoff point bead. Make a circle. Up and back through the delica color #323, down and through the gold delica, exiting out theside closest to the hook. Continue towards the hook by going through the next 6mm fire polish bead and delica color #323. Now go up and snag the thread between the delica color #323 and the 4mm gold filled bead. Take your thread through the 6mm fire polish bead and the next delica color #323 bead. Snag the threadloop, so you can reverse directions, and go back through the delica color #323 bead toward the 6mm firepolish bead and the ring/figure 8. Come down and through the gold delica bead, add 5 MIX11 beads, and through the next gold delica dropdown bead on the other side of the 4mm gold filled round bead. Make a circle. Come out the gold delica, and go up and through the 8mm fire polish bead and the next delica color #323bead. Snag the thread loop, and double back through this delica. Go down through the gold delica, and exiton the hook-side.
Reversing Direction: After you snag the thread-loop (that is, the thread between any two beads), youcan double back with your needle and thread, to reverse direction on the same row.
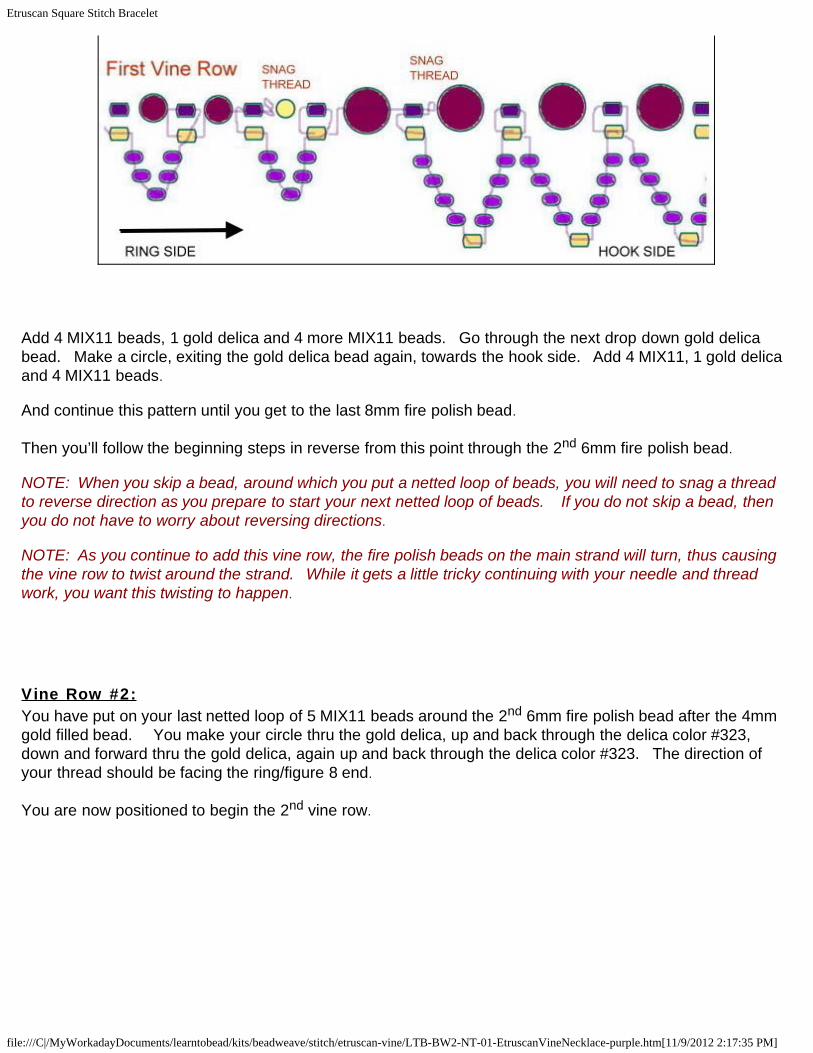
Add 4 MIX11 beads, 1 gold delica and 4 more MIX11 beads. Go through the next drop down gold delicabead. Make a circle, exiting the gold delica bead again, towards the hook side. Add 4 MIX11, 1 gold delicaand 4 MIX11 beads. And continue this pattern until you get to the last 8mm fire polish bead.
Then you’ll follow the beginning steps in reverse from this point through the 2nd 6mm fire polish bead. NOTE: When you skip a bead, around which you put a netted loop of beads, you will need to snag a threadto reverse direction as you prepare to start your next netted loop of beads. If you do not skip a bead, thenyou do not have to worry about reversing directions. NOTE: As you continue to add this vine row, the fire polish beads on the main strand will turn, thus causingthe vine row to twist around the strand. While it gets a little tricky continuing with your needle and threadwork, you want this twisting to happen.
Vine Row #2:You have put on your last netted loop of 5 MIX11 beads around the 2nd 6mm fire polish bead after the 4mmgold filled bead. You make your circle thru the gold delica, up and back through the delica color #323,down and forward thru the gold delica, again up and back through the delica color #323. The direction ofyour thread should be facing the ring/figure 8 end.
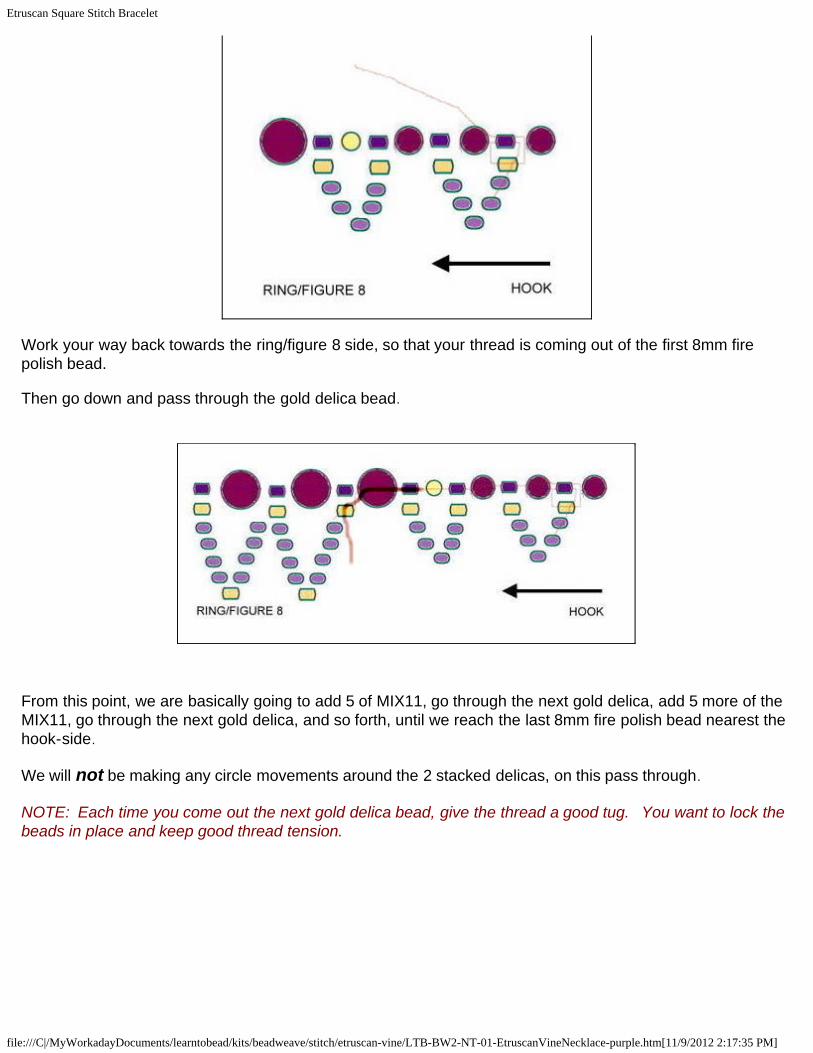
Work your way back towards the ring/figure 8 side, so that your thread is coming out of the first 8mm firepolish bead. Then go down and pass through the gold delica bead.
From this point, we are basically going to add 5 of MIX11, go through the next gold delica, add 5 more of theMIX11, go through the next gold delica, and so forth, until we reach the last 8mm fire polish bead nearest thehook-side. We will not be making any circle movements around the 2 stacked delicas, on this pass through. NOTE: Each time you come out the next gold delica bead, give the thread a good tug. You want to lock thebeads in place and keep good thread tension.
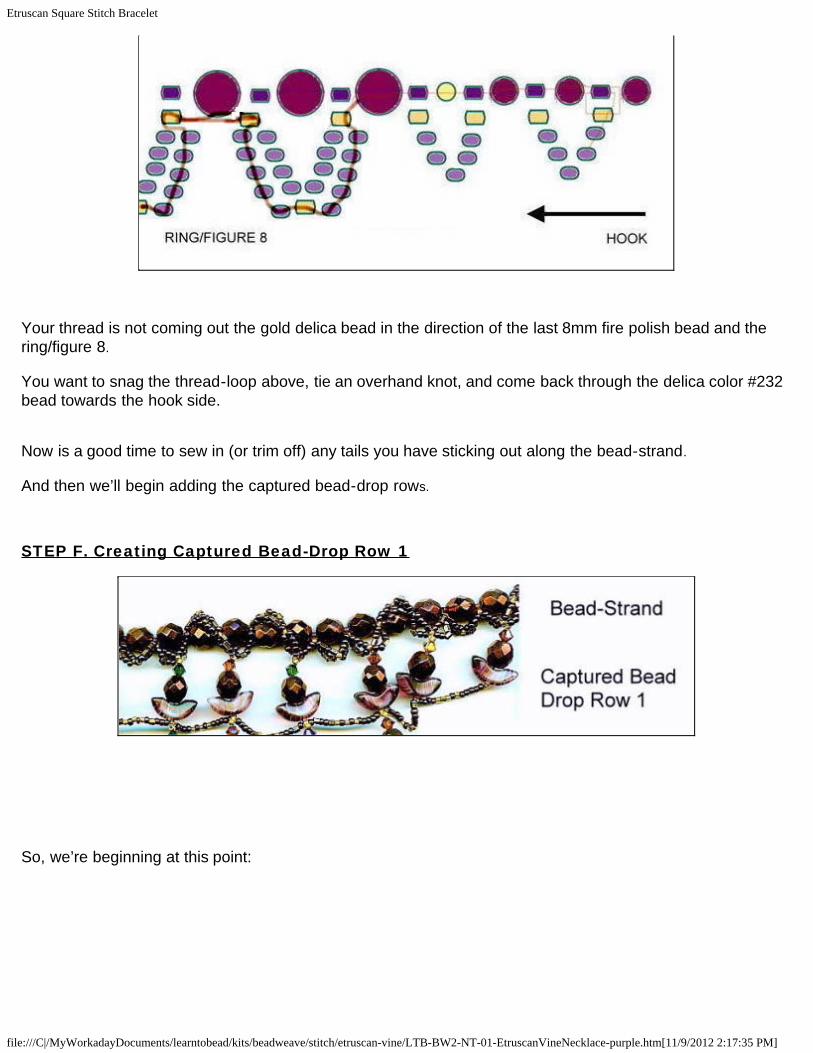
Your thread is not coming out the gold delica bead in the direction of the last 8mm fire polish bead and thering/figure 8. You want to snag the thread-loop above, tie an overhand knot, and come back through the delica color #232bead towards the hook side. Now is a good time to sew in (or trim off) any tails you have sticking out along the bead-strand. And then we’ll begin adding the captured bead-drop rows. STEP F. Creating Captured Bead-Drop Row 1
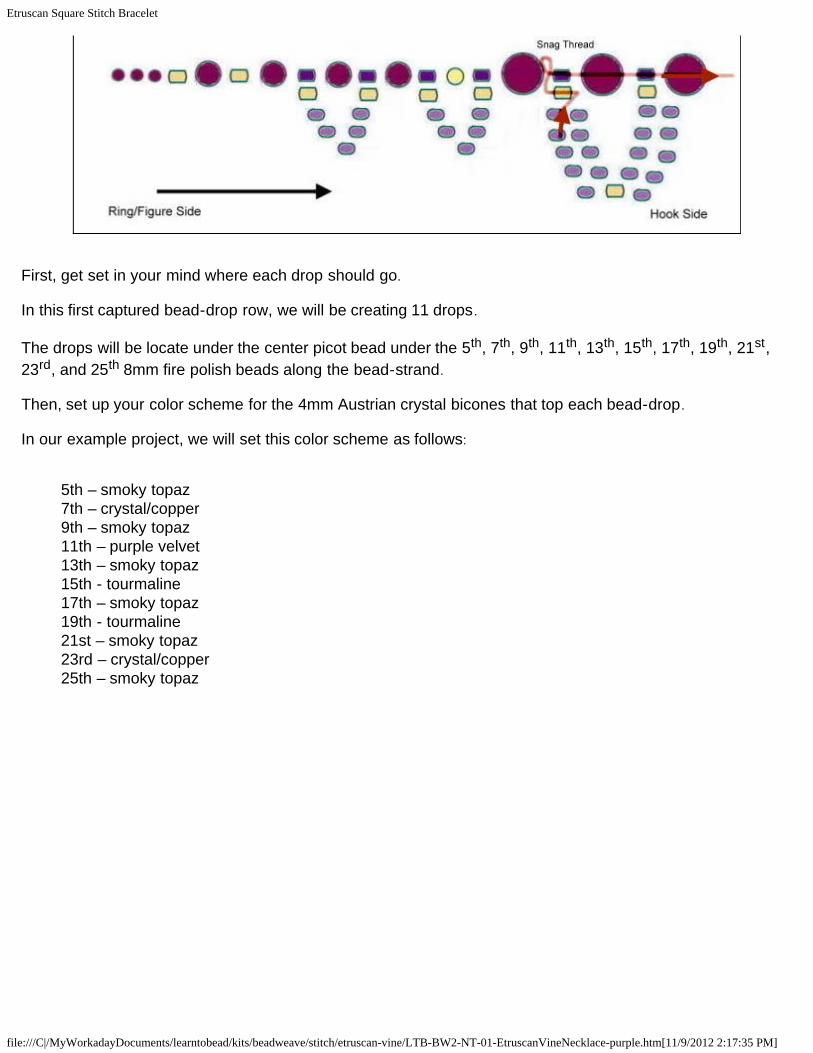
First, get set in your mind where each drop should go. In this first captured bead-drop row, we will be creating 11 drops.
The drops will be locate under the center picot bead under the 5th, 7th, 9th, 11th, 13th, 15th, 17th, 19th, 21st,23rd, and 25th 8mm fire polish beads along the bead-strand. Then, set up your color scheme for the 4mm Austrian crystal bicones that top each bead-drop. In our example project, we will set this color scheme as follows:
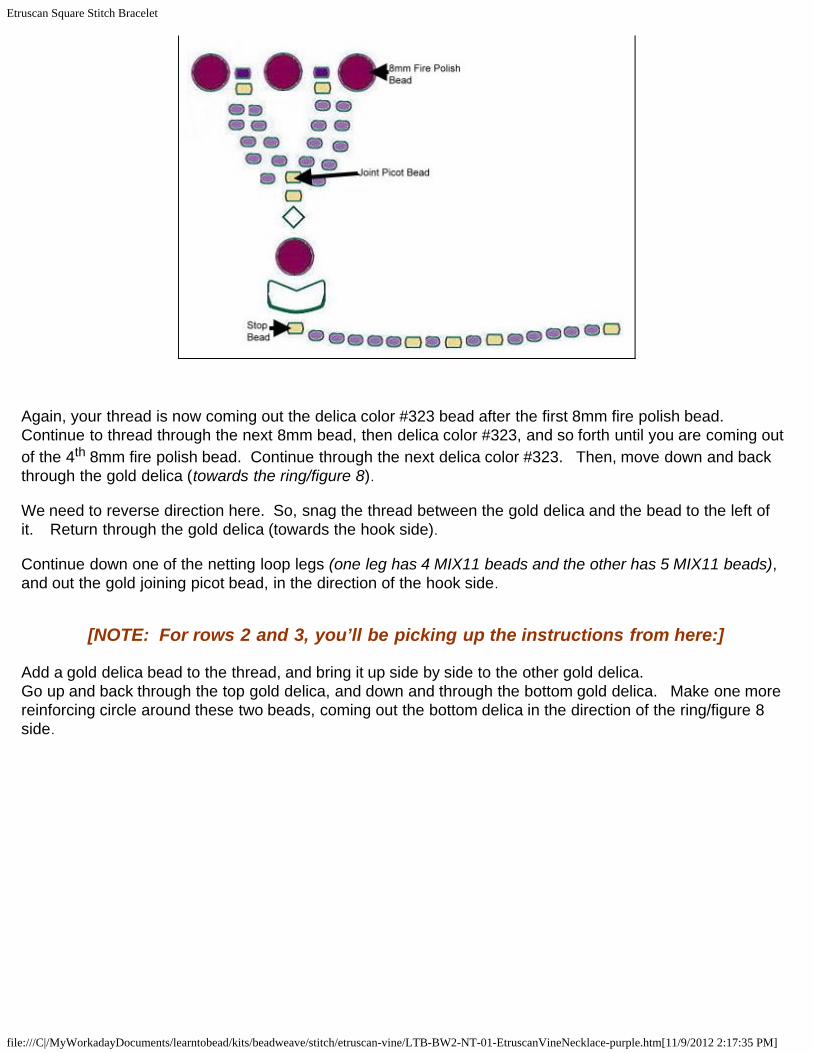
Again, your thread is now coming out the delica color #323 bead after the first 8mm fire polish bead. Continue to thread through the next 8mm bead, then delica color #323, and so forth until you are coming outof the 4th 8mm fire polish bead. Continue through the next delica color #323. Then, move down and backthrough the gold delica (towards the ring/figure 8). We need to reverse direction here. So, snag the thread between the gold delica and the bead to the left ofit. Return through the gold delica (towards the hook side). Continue down one of the netting loop legs (one leg has 4 MIX11 beads and the other has 5 MIX11 beads),and out the gold joining picot bead, in the direction of the hook side.
[NOTE: For rows 2 and 3, you’ll be picking up the instructions from here:] Add a gold delica bead to the thread, and bring it up side by side to the other gold delica.Go up and back through the top gold delica, and down and through the bottom gold delica. Make one morereinforcing circle around these two beads, coming out the bottom delica in the direction of the ring/figure 8side.
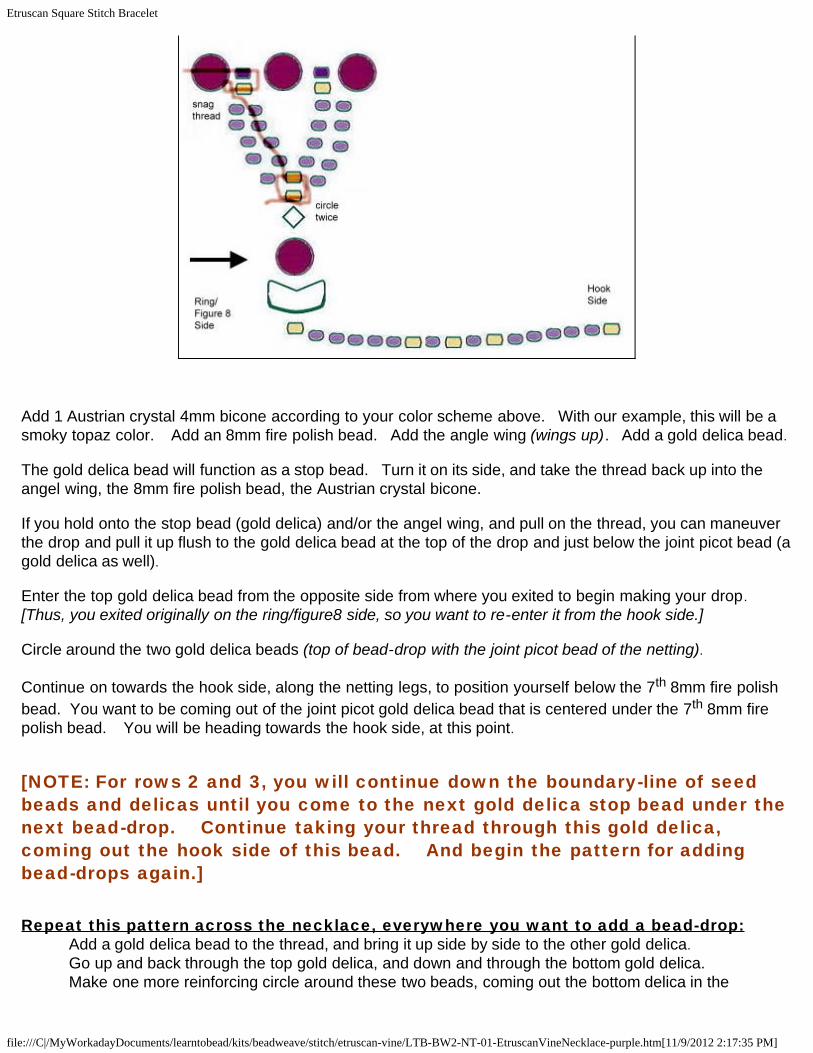
Add 1 Austrian crystal 4mm bicone according to your color scheme above. With our example, this will be asmoky topaz color. Add an 8mm fire polish bead. Add the angle wing (wings up). Add a gold delica bead. The gold delica bead will function as a stop bead. Turn it on its side, and take the thread back up into theangel wing, the 8mm fire polish bead, the Austrian crystal bicone. If you hold onto the stop bead (gold delica) and/or the angel wing, and pull on the thread, you can maneuverthe drop and pull it up flush to the gold delica bead at the top of the drop and just below the joint picot bead (agold delica as well). Enter the top gold delica bead from the opposite side from where you exited to begin making your drop. [Thus, you exited originally on the ring/figure8 side, so you want to re-enter it from the hook side.] Circle around the two gold delica beads (top of bead-drop with the joint picot bead of the netting).
Continue on towards the hook side, along the netting legs, to position yourself below the 7th 8mm fire polishbead. You want to be coming out of the joint picot gold delica bead that is centered under the 7th 8mm firepolish bead. You will be heading towards the hook side, at this point. [NOTE: For rows 2 and 3, you will continue down the boundary-line of seedbeads and delicas until you come to the next gold delica stop bead under thenext bead-drop. Continue taking your thread through this gold delica,coming out the hook side of this bead. And begin the pattern for addingbead-drops again.] Repeat this pattern across the necklace, everywhere you want to add a bead-drop:
Add a gold delica bead to the thread, and bring it up side by side to the other gold delica.Go up and back through the top gold delica, and down and through the bottom gold delica. Make one more reinforcing circle around these two beads, coming out the bottom delica in the
direction of the ring/figure 8 side.Add 1 Austrian crystal 4mm bicone according to your color scheme above. With our example,this will be a smoky topaz color. Add an 8mm fire polish bead. Add the angle wing (wingsup). Add a gold delica bead. The gold delica bead will function as a stop bead. Turn it on its side, and take the thread backup into the angel wing, the 8mm fire polish bead, the Austrian crystal bicone If you hold onto the stop bead (gold delica) and pull on the thread, you can maneuver the dropand pull it up flush to the gold delica bead at the top of the drop and just below the joint picotbead (a gold delica as well). Enter the top gold delica bead from the opposite side from where you exited to begin makingyour drop. [Thus, you exited originally on the ring/figure8 side, so you want to re-enter it fromthe hook side.] Circle around the two gold delica beads (top of bead-drop with the joint picot bead of thenetting). Continue on towards the hook side, along the netting legs, (or for rows 2 and 3, alongthe boundary-line of seedbeads and delicas), position yourself below the 7th 8mmfire polish bead. You want to be coming out of the joint picot gold delica bead that is centeredunder the 7th 8mm fire polish bead. You will be heading towards the hook side, at this point.
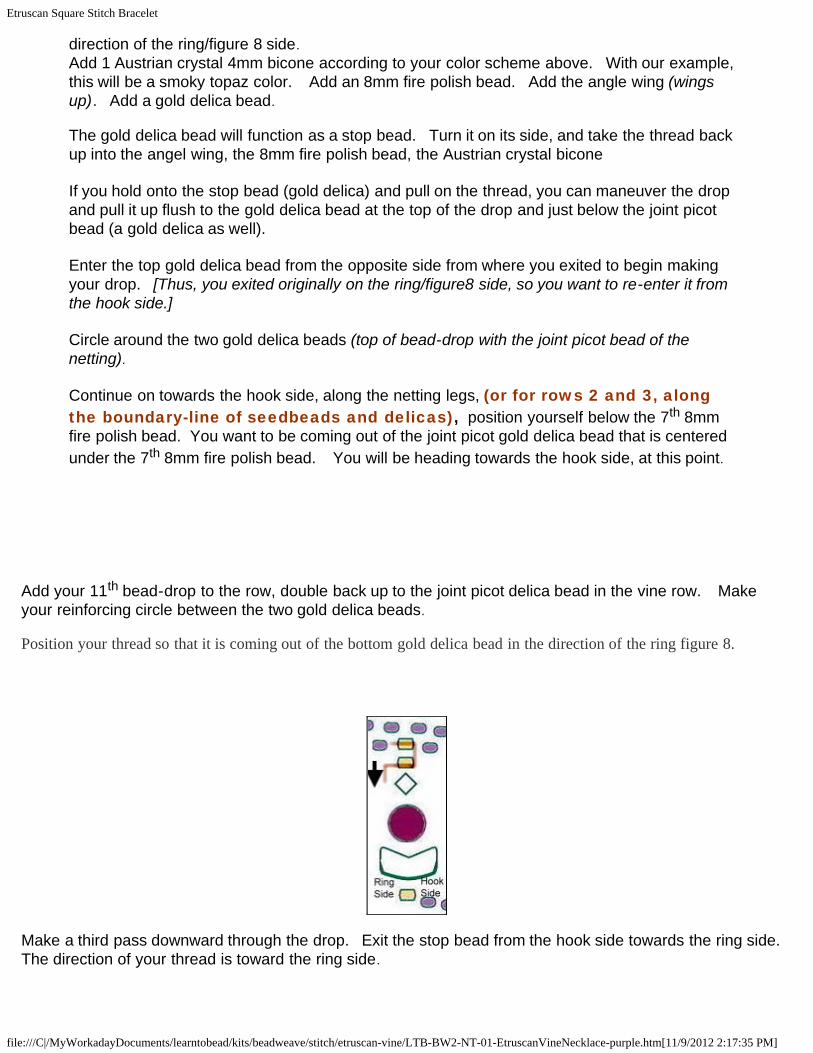
Add your 11th bead-drop to the row, double back up to the joint picot delica bead in the vine row. Makeyour reinforcing circle between the two gold delica beads.
Position your thread so that it is coming out of the bottom gold delica bead in the direction of the ring figure 8.
Make a third pass downward through the drop. Exit the stop bead from the hook side towards the ring side. The direction of your thread is toward the ring side.
We are now going to create the boundary-line of seedbeads and delicas.
[When you are ready to create the boundary-line of seed beads and delicasfor rows 2 or 3, follow the row 2 or 3 pattern, rather than the row 1 pattern,for this boundary-line of seed beads and delicas.] Add 5 MIX11 beads.Add 1 gold delica.Add 1 MIX11 beadAdd 1 gold delicaAdd 1 MIX 11 beadAdd 1 gold delicaAdd 5 MIX11 beads. Take your thread through the next gold delica stop bead (from hook side towards ring/figure 8 side). Giveyour thread a nice tug. And begin the pattern above again, until you’ve taken your thread through the last stop bead in this capturedbead-drop row #1. At this point, we’re going to finish off this row and execute a turn-around. Your needle/thread is coming out of the ring/figure 8 side of the gold delica at the bottom of your drop. Takeyour thread up the drop, going through the angel wing, the 8mm fire polish bead, and the 4mm Austriancrystal bead. Pull the thread tight so that you don’t have any slack on the boundary-line (with the horizontalrow of seed beads and delicas). Snag the thread between the 4mm Austrian crystal bead and the top gold delica, and tie an overhand knot. Then bring your thread back down through the 4mm Austrian crystal, the 8mm fire polish, and the angel wingbead. Bring your needle/thread into the gold delica at the bottom of your drop, towards the direction you want to gonext. In this case, we are going from the ring/figure 8 side towards the hook side.
Our second captured bead-drop row begins under the 9th 8mm fire polish bead (or third bead-drop in). Take your needle/thread to that point, coming out the hook-side of the bottom gold delica of the third bead-drop. STEP G. Creating Captured Bead-Drop Row 2 First, get set in your mind where each drop should go. In this second captured bead-drop row, we will be creating 7 drops.
The drops will be locate under the center picot bead under the 9th, 11th, 13th, 15th, 17th, 19th, and 21st 8mmfire polish beads along the bead-strand.
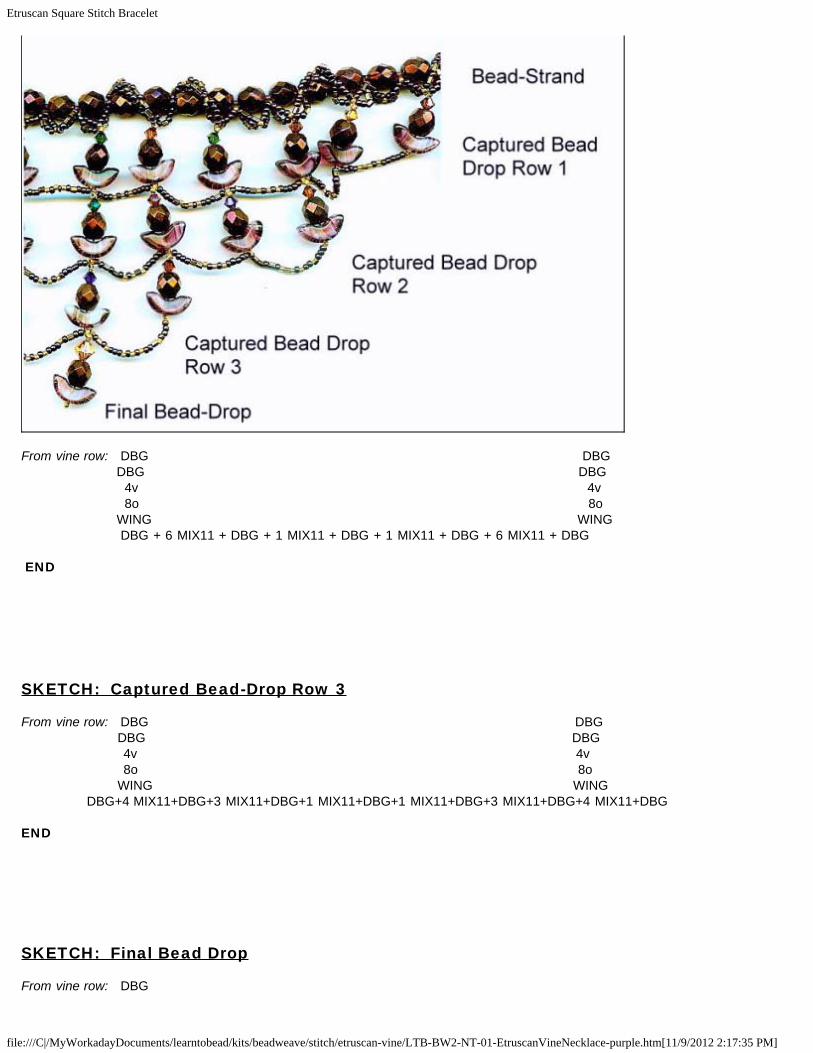
Then, set up your color scheme for the 4mm Austrian crystal bicones that top each bead-drop. In our example project, we will set this color scheme as follows: 9th – smoky topaz11th – crystal/copper13th – smoky topaz15th - tourmaline17th – smoky topaz19th – purple velvet21st – smoky topaz Notice that the boundary-line of beads connecting the bottoms of all the bead-drops in this row consists ofthis pattern: 6 MIX11 + 1 gold delica + 1 MIX11 + 1 gold delica + 1 MIX11 + 1 gold delica + 6 MIX11 for a total of 17 beads. Follow the same construction steps (STEP F.) as you did for the captured bead-drop row1 above. Your directional cues – towards the ring/figure 8 side and towards the hook side – willchange. When you are ready to create the boundary-line of seed beads and delicas, follow therow 2 pattern, rather than the row 1 pattern, for these beads.
STEP H. Creating Captured Bead-Drop Row 3 First, get set in your mind where each drop should go. In this third captured bead-drop row, we will be creating 3 drops.
The drops will be locate under the center picot bead under the 13th, 15th and 17th 8mm fire polish beadsalong the bead-strand. Then, set up your color scheme for the 4mm Austrian crystal bicones that top each bead-drop. In our example project, we will set this color scheme as follows: 13th – smoky topaz15th – purple velvet
17th – smoky topaz Notice that the boundary-line of beads connecting the bottoms of all the bead-drops in this row consists ofthis pattern: 4 MIX11 + 1 gold delica + 3 MIX11 + 1 gold delica + 1 MIX11 + 1 gold delica +1 MIX11 +1 gold delica +3 MIX11 +1 gold delica +4 MIX11 for a total of 21 beads.
Follow the same construction steps (STEP F.) as you did for the captured bead-drop row 1 above.
Your directional cues – towards the ring/figure 8 side and towards the hook side – willremain the same as row 1. When you are ready to create the boundary-line of seed beads and delicas, follow therow 3 pattern, rather than the row 1 pattern, for these beads.
STEP I. Adding Final Bead-Drop First, get set in your mind where this final beade-drop should go.This final drop will be located under the center picot bead under the 15th 8mm fire polish beads along thebead-strand. Instead of a 4mm Austrian crystal bead, we will use a larger 6mm Austrian crystal bicone in this bead-drop. In our example project, we will set the color of this Austrian Crystal bicone as crystal/copper. Your thread should be coming out the bottom gold delica stop bead of the last bead-drop in row 3. Be sureyour needle/thread is facing in the direction towards the middle of the necklace. If not, snag a thread, andmaneuver your needle/thread accordingly.
Bring your thread out to the gold delica stop bead on the bottom of the middle-point bead (under the 15th
8mm fire polish bead). Create another bead drop. Go down, Come back up. Snag a thread between the 6mm Austrian crystal
bicone and the gold delica bead. Tie a double knot. Bring your thread up through the next gold delicaabove it. Make a couple of circles. Bring your thread up through the bead-drop in row 3. Snag the threadbetween the 4mm Austrian crystal and the gold delica above it. Tie a knot. Bring the thread back downthrough the 4mm Austrian crystal and the 8mm fire polish bead. Trim the thread at this point.
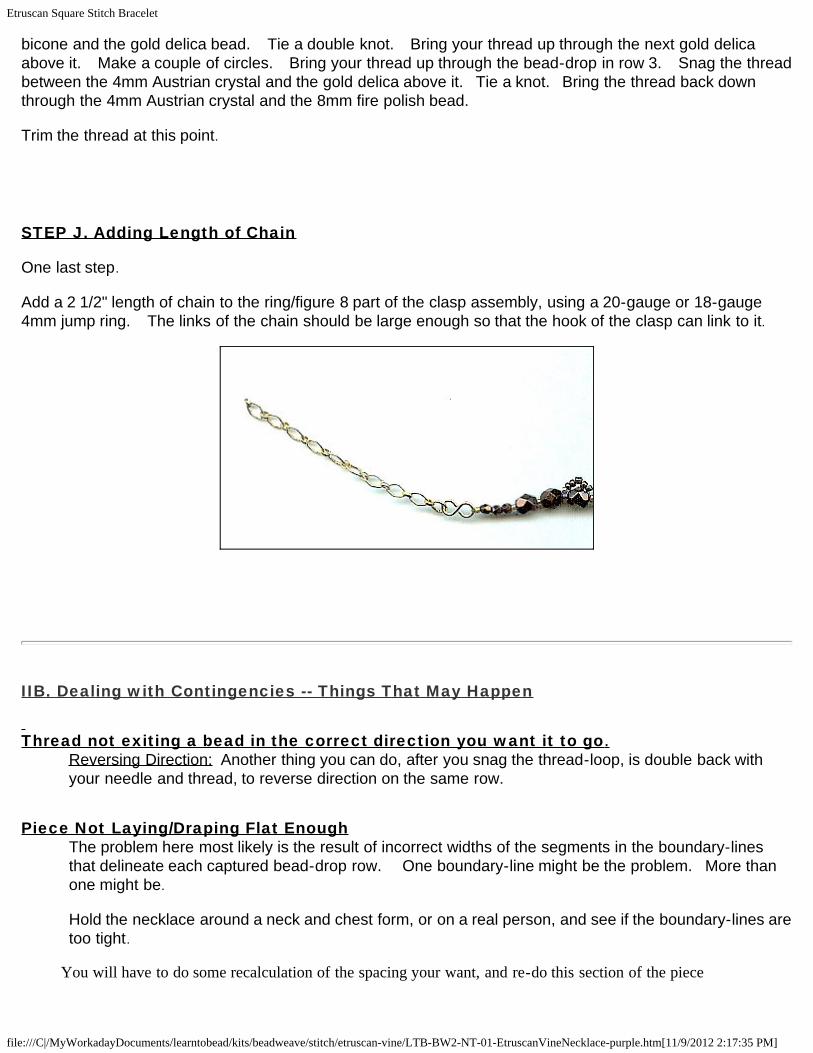
STEP J. Adding Length of Chain
One last step. Add a 2 1/2" length of chain to the ring/figure 8 part of the clasp assembly, using a 20-gauge or 18-gauge4mm jump ring. The links of the chain should be large enough so that the hook of the clasp can link to it.
IIB. Dealing with Contingencies -- Things That May Happen
Thread not exiting a bead in the correct direction you want it to go.
Reversing Direction: Another thing you can do, after you snag the thread-loop, is double back withyour needle and thread, to reverse direction on the same row.
Piece Not Laying/Draping Flat Enough
The problem here most likely is the result of incorrect widths of the segments in the boundary-linesthat delineate each captured bead-drop row. One boundary-line might be the problem. More thanone might be. Hold the necklace around a neck and chest form, or on a real person, and see if the boundary-lines aretoo tight.
You will have to do some recalculation of the spacing your want, and re-do this section of the piece
Since you have gone back and forth through the bead-strand section of the piece so many times, it’sunlikely there will be slack. But if there is, anchor and then run another thread all the way across, andtie it off on the other end.
Slack on Thread with Netting Boundary-Line of seed beads and delicas under eachcaptured bead row
If you catch this at the point where you are about to start the next captured bead-drop row down, thenyou can take your needle and thread across this whole boundary-line of beads. Go all the waythrough the last gold delica bead, snag your thread, and reverse direction. Go all the way back to thebeginning of this row, go up through the drop and through the 4mm Austrian crystal bead, give a pullon the thread to make sure there is no slack, snag the thread between this 4mm crystal bead and thegold delica above it, tie a knot, return down through the drop, and enter the bottom gold delica headingin the direction you want to go next. If the “old” thread bunches up between two beads, while you do this, then you can cut this off, or use abic lighter and melt it off. If you catch this problem when you are all done, you can anchor a new thread at one end of theboundary-line, and follow the instructions above.
You Crack a Bead
If you are having difficulty pushing your needle through the bead, particularly the small delica or seedbeads, then switch to the thinner size #12 English beading needle. If a delica or seed bead cracks on you, you can either ignore it, cut up your work back to that point andstart again, or sew in another one, anchoring it tightly to the beads around it so that it looks like it wasnot sewn in.
Length of Necklace Too Short or Too Long Too Long: There’s not a great fix here. One less-than-perfect thing you can do is to anchor a thread back afew inches from the end of the bead strand, and bring it to the point of the strand where you would like tohave had the hook part of the clasp located. Tie off a hook here. Remove the original hook.Too Short: Add longer length of chain
IC. Finishing Touches IC.1. Signature bead or embellishmentI think it is always a good idea to use a signature bead in your projects. This might be a unique bead addednear the beginning or end of the piece, or an engraved tag added as part of the clasp assembly. You wantyour signature bead to identify the piece as your own, but you don’t want your signature bead to compete withor detract from your piece.
The general structure of this Etruscan Vine Necklace has been created by Warren Feld. However, when your personalize thispattern in any way – choice of beads, choice of patterns, choice of lay-out, choice of stringing material, choice of clasp, choice ofcolor scheme – you add your own touches, and the piece deserves your signature.
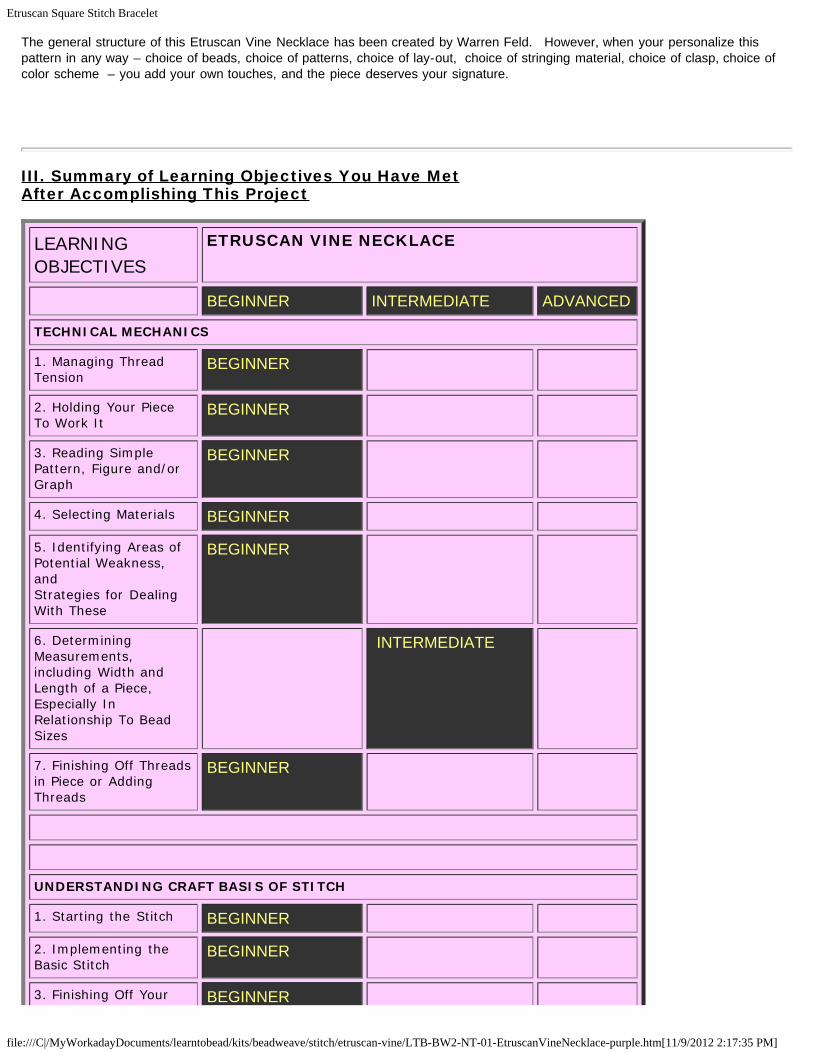
III. Summary of Learning Objectives You Have MetAfter Accomplishing This Project
LEARNINGOBJECTIVES
ETRUSCAN VINE NECKLACE
BEGINNER INTERMEDIATE ADVANCED
TECHNICAL MECHANICS
1. Managing ThreadTension
BEGINNER
2. Holding Your PieceTo Work It
BEGINNER
3. Reading SimplePattern, Figure and/orGraph
BEGINNER
4. Selecting Materials BEGINNER
5. Identifying Areas ofPotential Weakness,and Strategies for DealingWith These
BEGINNER
6. DeterminingMeasurements,including Width andLength of a Piece,Especially InRelationship To BeadSizes