40
For more information:[email protected] 714-887-7052 http://www.paulkoeniggames.com/
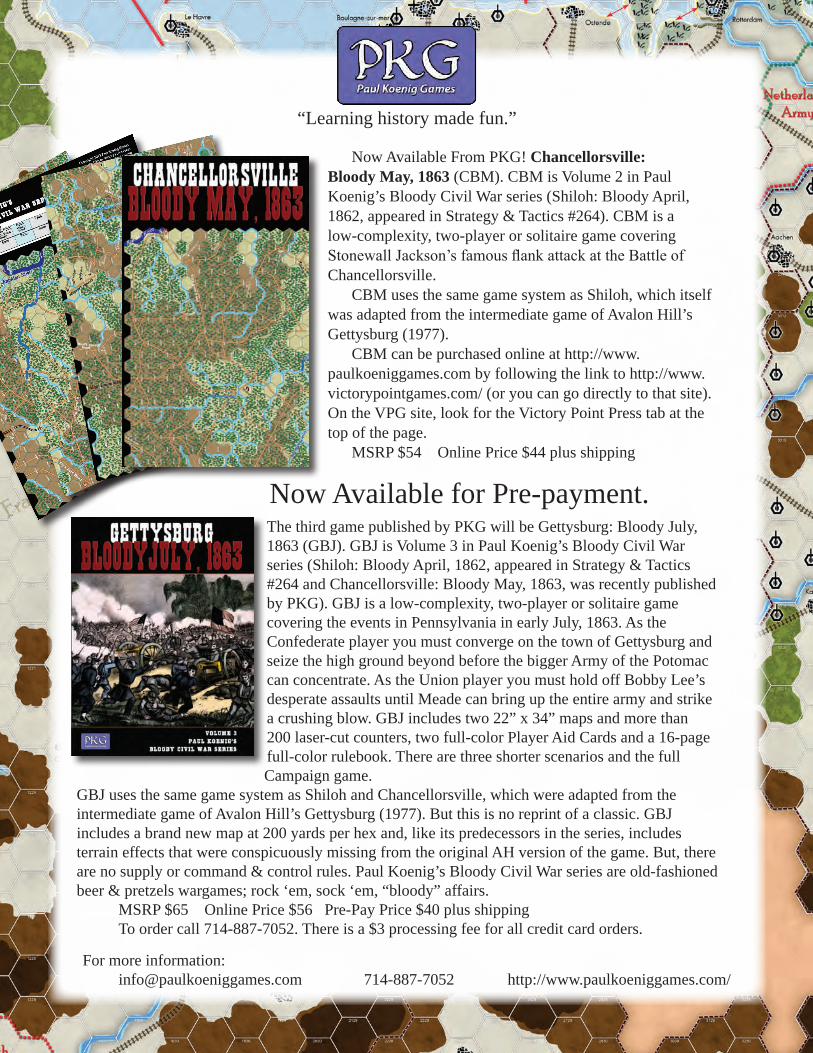
Now Available From PKG! Chancellorsville: Bloody May, 1863 (CBM). CBM is Volume 2 in Paul Koenig’s Bloody Civil War series (Shiloh: Bloody April, 1862, appeared in Strategy & Tactics #264). CBM is a low-complexity, two-player or solitaire game covering Stonewall Jackson’s famous flank attack at the Battle of Chancellorsville.
CBM uses the same game system as Shiloh, which itself was adapted from the intermediate game of Avalon Hill’s Gettysburg (1977).
CBM can be purchased online at http://www.paulkoeniggames.com by following the link to http://www.victorypointgames.com/ (or you can go directly to that site). On the VPG site, look for the Victory Point Press tab at the top of the page.
MSRP $54 Online Price $44 plus shipping
The third game published by PKG will be Gettysburg: Bloody July,1863 (GBJ). GBJ is Volume 3 in Paul Koenig’s Bloody Civil War series (Shiloh: Bloody April, 1862, appeared in Strategy & Tactics #264 and Chancellorsville: Bloody May, 1863, was recently published by PKG). GBJ is a low-complexity, two-player or solitaire game covering the events in Pennsylvania in early July, 1863. As the Confederate player you must converge on the town of Gettysburg and seize the high ground beyond before the bigger Army of the Potomac can concentrate. As the Union player you must hold off Bobby Lee’s desperate assaults until Meade can bring up the entire army and strike a crushing blow. GBJ includes two 22” x 34” maps and more than 200 laser-cut counters, two full-color Player Aid Cards and a 16-page full-color rulebook. There are three shorter scenarios and the full Campaign game.
GBJ uses the same game system as Shiloh and Chancellorsville, which were adapted from the intermediate game of Avalon Hill’s Gettysburg (1977). But this is no reprint of a classic. GBJ includes a brand new map at 200 yards per hex and, like its predecessors in the series, includes terrain effects that were conspicuously missing from the original AH version of the game. But, there are no supply or command & control rules. Paul Koenig’s Bloody Civil War series are old-fashioned beer & pretzels wargames; rock ‘em, sock ‘em, “bloody” affairs.
MSRP $65 Online Price $56 Pre-Pay Price $40 plus shippingTo order call 714-887-7052. There is a $3 processing fee for all credit card orders.
“Learning history made fun.”
Now Available for Pre-payment.
1
PAUL KOENIG’SFORTRESS EUROPE
Table of ConTenTs 1. Introduction. . . . . . . . . . . . . . . . . . . . . . . . . . . . . . . . . Pg 12. Game Equipment . . . . . . . . . . . . . . . . . . . . . . . . . . . . 13. Setting Up the Game. . . . . . . . . . . . . . . . . . . . . . . . . . 34. Sequence of Play . . . . . . . . . . . . . . . . . . . . . . . . . . . . . 45. Movement . . . . . . . . . . . . . . . . . . . . . . . . . . . . . . . . . . 46. Stacking . . . . . . . . . . . . . . . . . . . . . . . . . . . . . . . . . . . . 57. Zones of Control . . . . . . . . . . . . . . . . . . . . . . . . . . . . . 58. Movement Restrictions. . . . . . . . . . . . . . . . . . . . . . . . 59. Military Districts. . . . . . . . . . . . . . . . . . . . . . . . . . . . . 6
10. Rail Movement . . . . . . . . . . . . . . . . . . . . . . . . . . . . . . 611. Sea Movement. . . . . . . . . . . . . . . . . . . . . . . . . . . . . . . 712. Invasions . . . . . . . . . . . . . . . . . . . . . . . . . . . . . . . . . . . 713. Headquarters. . . . . . . . . . . . . . . . . . . . . . . . . . . . . . . . 814. Combat. . . . . . . . . . . . . . . . . . . . . . . . . . . . . . . . . . . . . 915. Battle Resolution. . . . . . . . . . . . . . . . . . . . . . . . . . . . . 916. Terrain Effects on Combat. . . . . . . . . . . . . . . . . . . . . 1017. Air Missions. . . . . . . . . . . . . . . . . . . . . . . . . . . . . . . . . 1118. Supply. . . . . . . . . . . . . . . . . . . . . . . . . . . . . . . . . . . . . . 1219. Naval Units . . . . . . . . . . . . . . . . . . . . . . . . . . . . . . . . . 1420. Paratroopers . . . . . . . . . . . . . . . . . . . . . . . . . . . . . . . . 1421. Commandos and Rangers . . . . . . . . . . . . . . . . . . . . . 1522. Coastal Defense Units. . . . . . . . . . . . . . . . . . . . . . . . . 1623. Training Divisions. . . . . . . . . . . . . . . . . . . . . . . . . . . . 1624. Partisans . . . . . . . . . . . . . . . . . . . . . . . . . . . . . . . . . . . 1625. Volkssturm. . . . . . . . . . . . . . . . . . . . . . . . . . . . . . . . . . 1626. V1 Site Garrison Units. . . . . . . . . . . . . . . . . . . . . . . . 1627. Reinforcements . . . . . . . . . . . . . . . . . . . . . . . . . . . . . . 1628. Replacements. . . . . . . . . . . . . . . . . . . . . . . . . . . . . . . . 1729. Panzer Reserve . . . . . . . . . . . . . . . . . . . . . . . . . . . . . . 1830. Mulberry and Intrinsic Beachhead Supply . . . . . . . 1831. Weather . . . . . . . . . . . . . . . . . . . . . . . . . . . . . . . . . . . . 1832. Victory Conditions . . . . . . . . . . . . . . . . . . . . . . . . . . . 1933. Optional Rules. . . . . . . . . . . . . . . . . . . . . . . . . . . . . . . 1934. Sudden Death Victory Conditions. . . . . . . . . . . . . . . 2435. Scenarios . . . . . . . . . . . . . . . . . . . . . . . . . . . . . . . . . . . 24
Dedication . . . . . . . . . . . . . . . . . . . . . . . . . . . . . . . . . . 26
Game Credits. . . . . . . . . . . . . . . . . . . . . . . . . . . . . . . . 26
Desinger’s Notes . . . . . . . . . . . . . . . . . . . . . . . . . . . . . 26
Extended Example of Play. . . . . . . . . . . . . . . . . . . . . 27
Battle of the Bulge Scenario Setup . . . . . . . . . . . . . . 35
[0.0] Using These RUlesNew gaming terms, when they are initially defined, appear in dark red lettering for quick referencing.The instructions for this game are organized into major “Rules” sec-
tions as shown in large green Caps font, and represented by the num-ber to the left of the decimal point (e.g., rule 4.0 is the fourth rule). These rules generally explain the game’s subject matter, its compo-nents, the procedures for play, the game’s core systems and mechan-ics, how to set it up, and how to win.With each Rule, there can be “Cases” that further explain a rule’s general concept or basic procedure. Cases might also restrict the ap-plication of a rule by denoting exceptions to it. Cases (and Subcases) are an extension of a Rule shown in the way that they are numbered. For example, Rule 4.1 is the first Case of the fourth Rule; and Rule 4.1.2 is the second Subcase of the first Case of the fourth Rule.Important information is in red text.References to examples of a Rule or Case are in blue text and this font.Text in shaded boxes, like this, provides the voice of the game’s de-signer, who is addressing you to explain an idea or concept that is not, itself, a Rule or a Case.
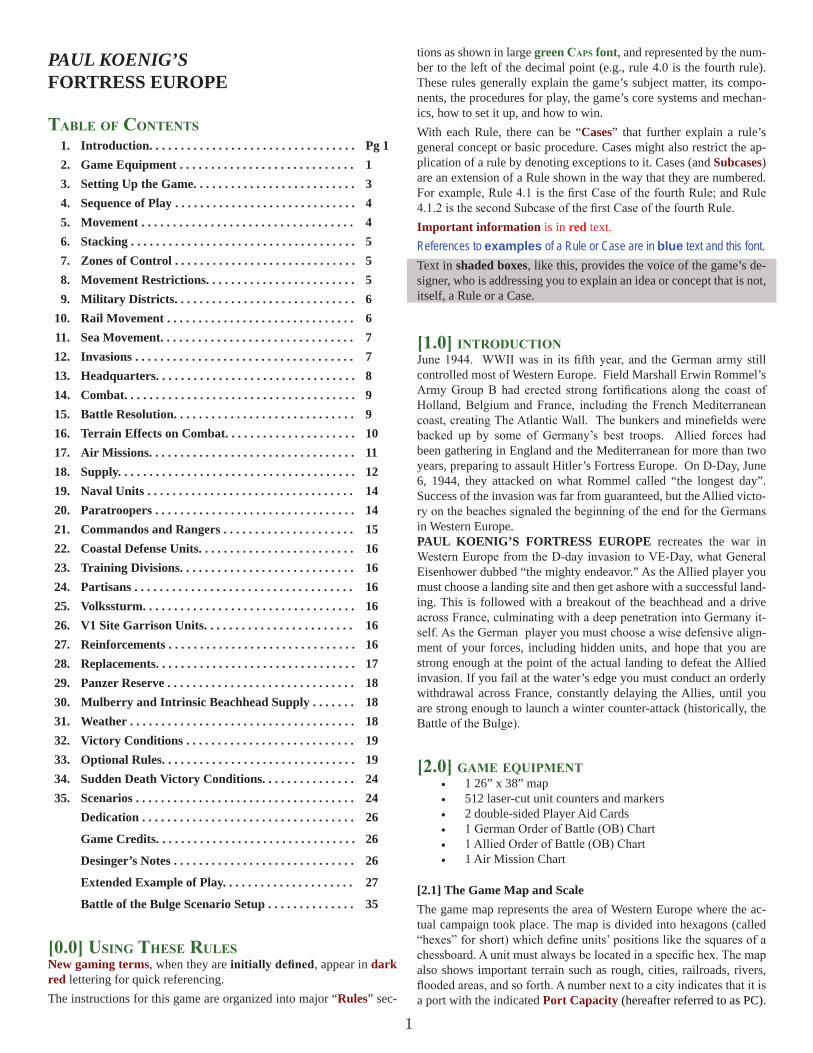
[1.0] inTRodUCTionJune 1944. WWII was in its fifth year, and the German army still controlled most of Western Europe. Field Marshall Erwin Rommel’s Army Group B had erected strong fortifications along the coast of Holland, Belgium and France, including the French Mediterranean coast, creating The Atlantic Wall. The bunkers and minefields were backed up by some of Germany’s best troops. Allied forces had been gathering in England and the Mediterranean for more than two years, preparing to assault Hitler’s Fortress Europe. On D-Day, June 6, 1944, they attacked on what Rommel called “the longest day”. Success of the invasion was far from guaranteed, but the Allied victo-ry on the beaches signaled the beginning of the end for the Germans in Western Europe.PAUL KOENIG’S FORTRESS EUROPE recreates the war in Western Europe from the D-day invasion to VE-Day, what General Eisenhower dubbed “the mighty endeavor.” As the Allied player you must choose a landing site and then get ashore with a successful land-ing. This is followed with a breakout of the beachhead and a drive across France, culminating with a deep penetration into Germany it-self. As the German player you must choose a wise defensive align-ment of your forces, including hidden units, and hope that you are strong enough at the point of the actual landing to defeat the Allied invasion. If you fail at the water’s edge you must conduct an orderly withdrawal across France, constantly delaying the Allies, until you are strong enough to launch a winter counter-attack (historically, the Battle of the Bulge).
[2.0] game eqUipmenT• 1 26” x 38” map• 512 laser-cut unit counters and markers• 2 double-sided Player Aid Cards• 1 German Order of Battle (OB) Chart• 1 Allied Order of Battle (OB) Chart• 1 Air Mission Chart
[2.1] The Game Map and ScaleThe game map represents the area of Western Europe where the ac-tual campaign took place. The map is divided into hexagons (called “hexes” for short) which define units’ positions like the squares of a chessboard. A unit must always be located in a specific hex. The map also shows important terrain such as rough, cities, railroads, rivers, flooded areas, and so forth. A number next to a city indicates that it is a port with the indicated Port Capacity (hereafter referred to as PC).
2
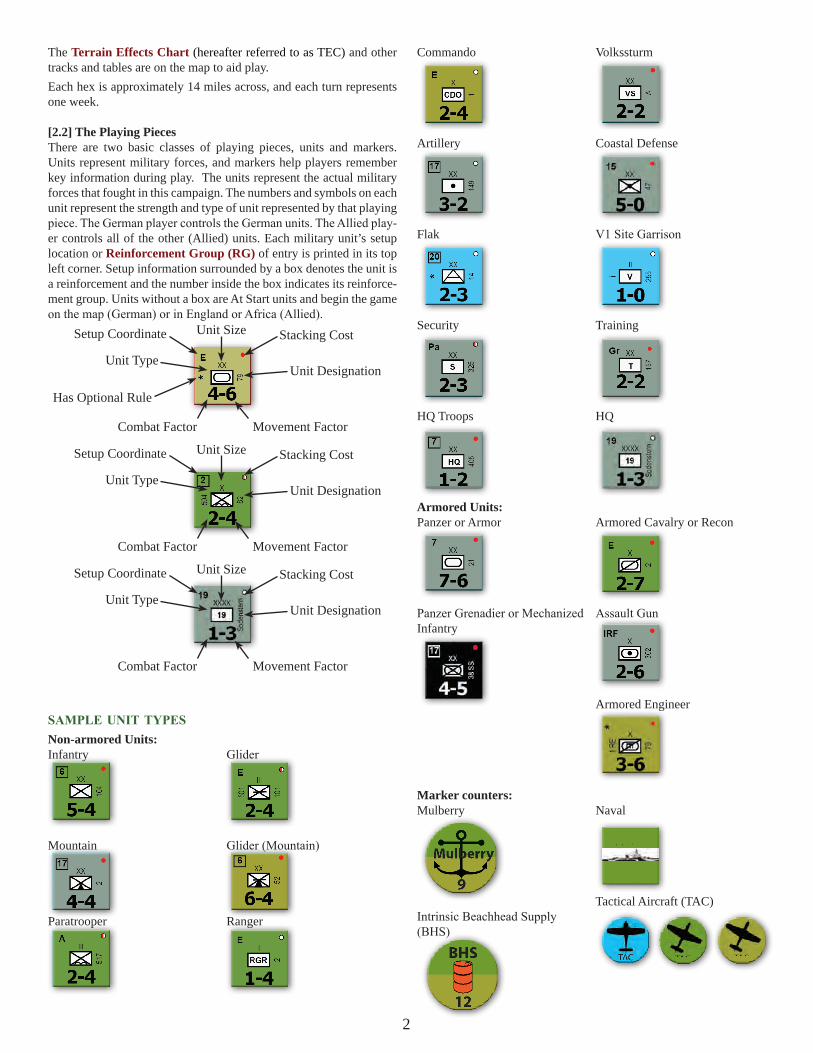
The Terrain Effects Chart (hereafter referred to as TEC) and other tracks and tables are on the map to aid play.Each hex is approximately 14 miles across, and each turn represents one week. [2.2] The Playing PiecesThere are two basic classes of playing pieces, units and markers. Units represent military forces, and markers help players remember key information during play. The units represent the actual military forces that fought in this campaign. The numbers and symbols on each unit represent the strength and type of unit represented by that playing piece. The German player controls the German units. The Allied play-er controls all of the other (Allied) units. Each military unit’s setup location or Reinforcement Group (RG) of entry is printed in its top left corner. Setup information surrounded by a box denotes the unit is a reinforcement and the number inside the box indicates its reinforce-ment group. Units without a box are At Start units and begin the game on the map (German) or in England or Africa (Allied).
sample UniT TypesNon-armored Units:Infantry
Mountain
Paratrooper
Glider
Glider (Mountain)
Ranger
Commando
Artillery
Flak
Security
HQ Troops
Volkssturm
Coastal Defense
V1 Site Garrison
Training
HQ
Armored Units:Panzer or Armor
Panzer Grenadier or Mechanized Infantry
Armored Cavalry or Recon
Assault Gun
Armored Engineer
Marker counters:Mulberry
Intrinsic Beachhead Supply (BHS)
Naval
Tactical Aircraft (TAC)
Setup Coordinate
Setup Coordinate
Setup Coordinate
Unit Type
Unit Type
Unit Type
Has Optional Rule
Combat Factor
Combat Factor
Combat Factor
Movement Factor
Movement Factor
Movement Factor
Unit Designation
Unit Designation
Unit Designation
Stacking Cost
Stacking Cost
Stacking Cost
Unit Size
Unit Size
Unit Size
TAC TAC TAC
NAVAL
2-2
12
BHS
3
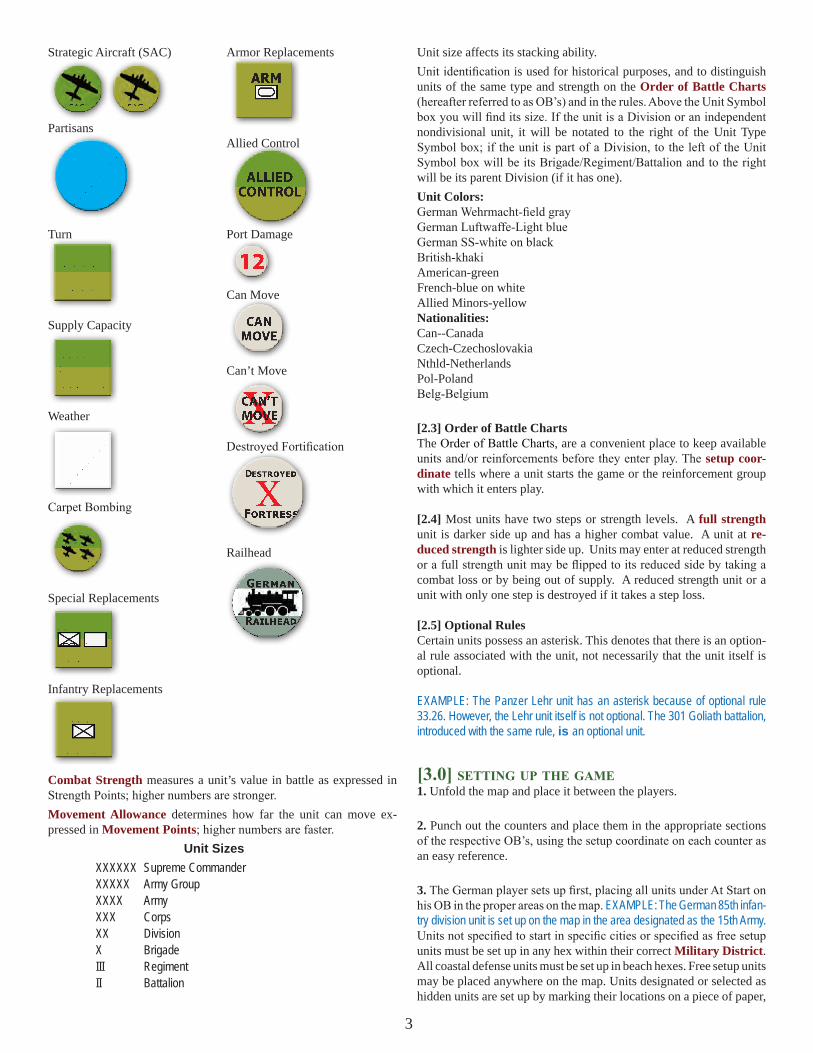
Strategic Aircraft (SAC)
Partisans
Turn
Supply Capacity
Weather
Carpet Bombing
Special Replacements
Infantry Replacements
Armor Replacements
Allied Control
Port Damage
Can Move
Can’t Move
Destroyed Fortification
Railhead
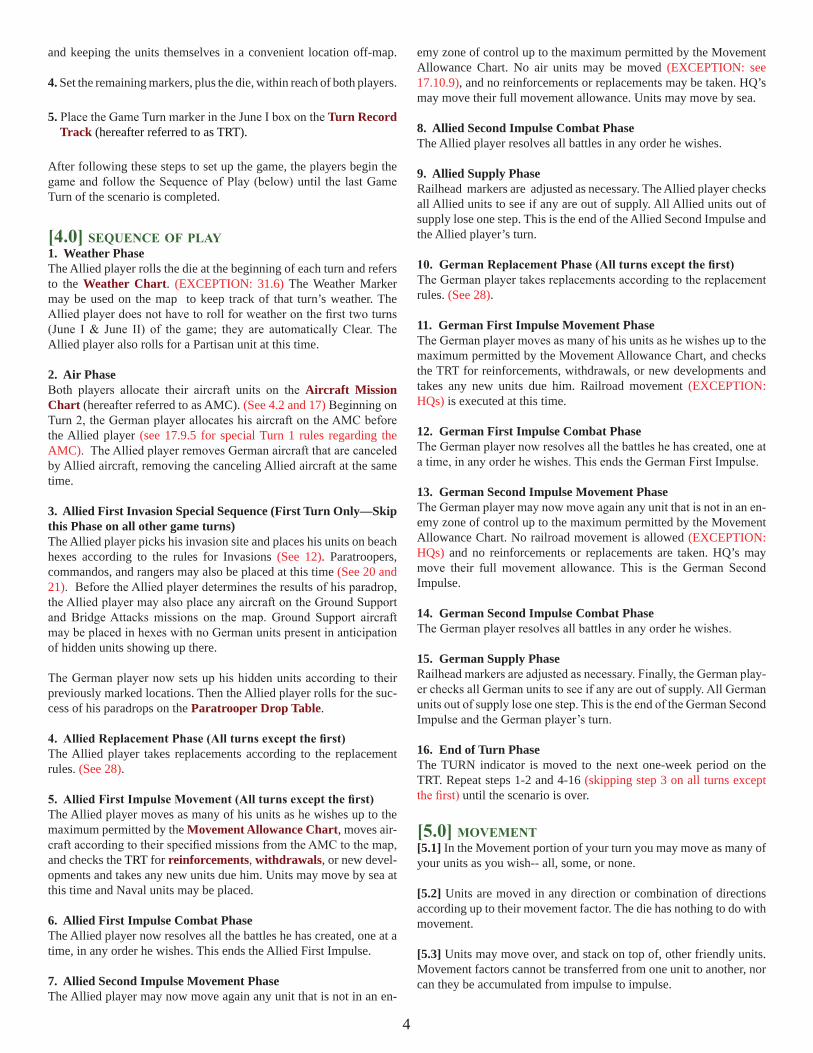
Combat Strength measures a unit’s value in battle as expressed in Strength Points; higher numbers are stronger.Movement Allowance determines how far the unit can move ex-pressed in Movement Points; higher numbers are faster.
Unit Sizes XXXXXX Supreme Commander XXXXX Army Group XXXX Army XXX Corps XX Division X Brigade III Regiment II Battalion
Unit size affects its stacking ability.Unit identification is used for historical purposes, and to distinguish units of the same type and strength on the Order of Battle Charts (hereafter referred to as OB’s) and in the rules. Above the Unit Symbol box you will find its size. If the unit is a Division or an independent nondivisional unit, it will be notated to the right of the Unit Type Symbol box; if the unit is part of a Division, to the left of the Unit Symbol box will be its Brigade/Regiment/Battalion and to the right will be its parent Division (if it has one).Unit Colors:German Wehrmacht-field grayGerman Luftwaffe-Light blue German SS-white on blackBritish-khakiAmerican-greenFrench-blue on white Allied Minors-yellowNationalities:Can--CanadaCzech-CzechoslovakiaNthld-NetherlandsPol-PolandBelg-Belgium
[2.3] Order of Battle ChartsThe Order of Battle Charts, are a convenient place to keep available units and/or reinforcements before they enter play. The setup coor-dinate tells where a unit starts the game or the reinforcement group with which it enters play.
[2.4] Most units have two steps or strength levels. A full strength unit is darker side up and has a higher combat value. A unit at re-duced strength is lighter side up. Units may enter at reduced strength or a full strength unit may be flipped to its reduced side by taking a combat loss or by being out of supply. A reduced strength unit or a unit with only one step is destroyed if it takes a step loss.
[2.5] Optional RulesCertain units possess an asterisk. This denotes that there is an option-al rule associated with the unit, not necessarily that the unit itself is optional.
EXAMPLE: The Panzer Lehr unit has an asterisk because of optional rule 33.26. However, the Lehr unit itself is not optional. The 301 Goliath battalion, introduced with the same rule, is an optional unit.
[3.0] seTTing Up The game 1. Unfold the map and place it between the players.
2. Punch out the counters and place them in the appropriate sections of the respective OB’s, using the setup coordinate on each counter as an easy reference.
3. The German player sets up first, placing all units under At Start on his OB in the proper areas on the map. EXAMPLE: The German 85th infan-try division unit is set up on the map in the area designated as the 15th Army. Units not specified to start in specific cities or specified as free setup units must be set up in any hex within their correct Military District. All coastal defense units must be set up in beach hexes. Free setup units may be placed anywhere on the map. Units designated or selected as hidden units are set up by marking their locations on a piece of paper,
SAC SAC
Carpet
GAME
TURN
SUPPLY
CAPACITY
+1/2
WEA
THER
CDOSPECIAL
REPL
INF
REPL
REPL
PARTISANS
ALLIEDCONTROL
12
CANMOVE
XCAN’TMOVE
Fortress
Destroyed
X
4
and keeping the units themselves in a convenient location off-map.
4. Set the remaining markers, plus the die, within reach of both players.
5. Place the Game Turn marker in the June I box on the Turn Record Track (hereafter referred to as TRT).
After following these steps to set up the game, the players begin the game and follow the Sequence of Play (below) until the last Game Turn of the scenario is completed.
[4.0] seqUenCe of play1. Weather PhaseThe Allied player rolls the die at the beginning of each turn and refers to the Weather Chart. (EXCEPTION: 31.6) The Weather Marker may be used on the map to keep track of that turn’s weather. The Allied player does not have to roll for weather on the first two turns (June I & June II) of the game; they are automatically Clear. The Allied player also rolls for a Partisan unit at this time.
2. Air PhaseBoth players allocate their aircraft units on the Aircraft Mission Chart (hereafter referred to as AMC). (See 4.2 and 17) Beginning on Turn 2, the German player allocates his aircraft on the AMC before the Allied player (see 17.9.5 for special Turn 1 rules regarding the AMC). The Allied player removes German aircraft that are canceled by Allied aircraft, removing the canceling Allied aircraft at the same time.
3. Allied First Invasion Special Sequence (First Turn Only—Skip this Phase on all other game turns)The Allied player picks his invasion site and places his units on beach hexes according to the rules for Invasions (See 12). Paratroopers, commandos, and rangers may also be placed at this time (See 20 and 21). Before the Allied player determines the results of his paradrop, the Allied player may also place any aircraft on the Ground Support and Bridge Attacks missions on the map. Ground Support aircraft may be placed in hexes with no German units present in anticipation of hidden units showing up there.
The German player now sets up his hidden units according to their previously marked locations. Then the Allied player rolls for the suc-cess of his paradrops on the Paratrooper Drop Table.
4. Allied Replacement Phase (All turns except the first)The Allied player takes replacements according to the replacement rules. (See 28).
5. Allied First Impulse Movement (All turns except the first)The Allied player moves as many of his units as he wishes up to the maximum permitted by the Movement Allowance Chart, moves air-craft according to their specified missions from the AMC to the map, and checks the TRT for reinforcements, withdrawals, or new devel-opments and takes any new units due him. Units may move by sea at this time and Naval units may be placed.
6. Allied First Impulse Combat Phase The Allied player now resolves all the battles he has created, one at a time, in any order he wishes. This ends the Allied First Impulse.
7. Allied Second Impulse Movement PhaseThe Allied player may now move again any unit that is not in an en-
emy zone of control up to the maximum permitted by the Movement Allowance Chart. No air units may be moved (EXCEPTION: see 17.10.9), and no reinforcements or replacements may be taken. HQ’s may move their full movement allowance. Units may move by sea.
8. Allied Second Impulse Combat PhaseThe Allied player resolves all battles in any order he wishes. 9. Allied Supply PhaseRailhead markers are adjusted as necessary. The Allied player checks all Allied units to see if any are out of supply. All Allied units out of supply lose one step. This is the end of the Allied Second Impulse and the Allied player’s turn.
10. German Replacement Phase (All turns except the first)The German player takes replacements according to the replacement rules. (See 28).
11. German First Impulse Movement PhaseThe German player moves as many of his units as he wishes up to the maximum permitted by the Movement Allowance Chart, and checks the TRT for reinforcements, withdrawals, or new developments and takes any new units due him. Railroad movement (EXCEPTION: HQs) is executed at this time.
12. German First Impulse Combat PhaseThe German player now resolves all the battles he has created, one at a time, in any order he wishes. This ends the German First Impulse.
13. German Second Impulse Movement PhaseThe German player may now move again any unit that is not in an en-emy zone of control up to the maximum permitted by the Movement Allowance Chart. No railroad movement is allowed (EXCEPTION: HQs) and no reinforcements or replacements are taken. HQ’s may move their full movement allowance. This is the German Second Impulse.
14. German Second Impulse Combat PhaseThe German player resolves all battles in any order he wishes.
15. German Supply PhaseRailhead markers are adjusted as necessary. Finally, the German play-er checks all German units to see if any are out of supply. All German units out of supply lose one step. This is the end of the German Second Impulse and the German player’s turn.
16. End of Turn PhaseThe TURN indicator is moved to the next one-week period on the TRT. Repeat steps 1-2 and 4-16 (skipping step 3 on all turns except the first) until the scenario is over.
[5.0] movemenT [5.1] In the Movement portion of your turn you may move as many of your units as you wish-- all, some, or none.
[5.2] Units are moved in any direction or combination of directions according up to their movement factor. The die has nothing to do with movement.
[5.3] Units may move over, and stack on top of, other friendly units. Movement factors cannot be transferred from one unit to another, nor can they be accumulated from impulse to impulse.
5
[5.4] The Movement Allowance Chart indicates how far different units of different types and different nationalities can move on their first and second impulses in different kinds of weather. Generally, a unit moving its full movement allowance can move a number of hexes equal to its movement factor; Example: a unit that has a movement factor of 4 can move four hexes. Units may never move more hexes than their movement factor, even if allowed by the Movement Allowance Chart.
[5.5] In addition, units can have their movement curtailed by air mis-sions (see 17.10.1, 17.10.3 and 17.10.4), terrain (see 8) or enemy units (see 7), and units may also use special movement, such as rail (see 10), sea (see 11), Invasions (see 12), paradrops and airlifts (see 20), and raids (see 21).
[5.6] A unit which can move in an impulse can always move a min-imum of one hex, no matter how many times its movement is halved or otherwise restricted by terrain or weather, but cannot enter a hex containing a terrain type prohibited to that unit. (EXCEPTIONS: See 8.2 and 8.10)
[5.7] A unit may not enter an enemy-occupied hex. (EXCEPTIONS: Paratroops during a paradrop, invading units, and on the first impulse of the game raiding units may land on top of hidden units.)
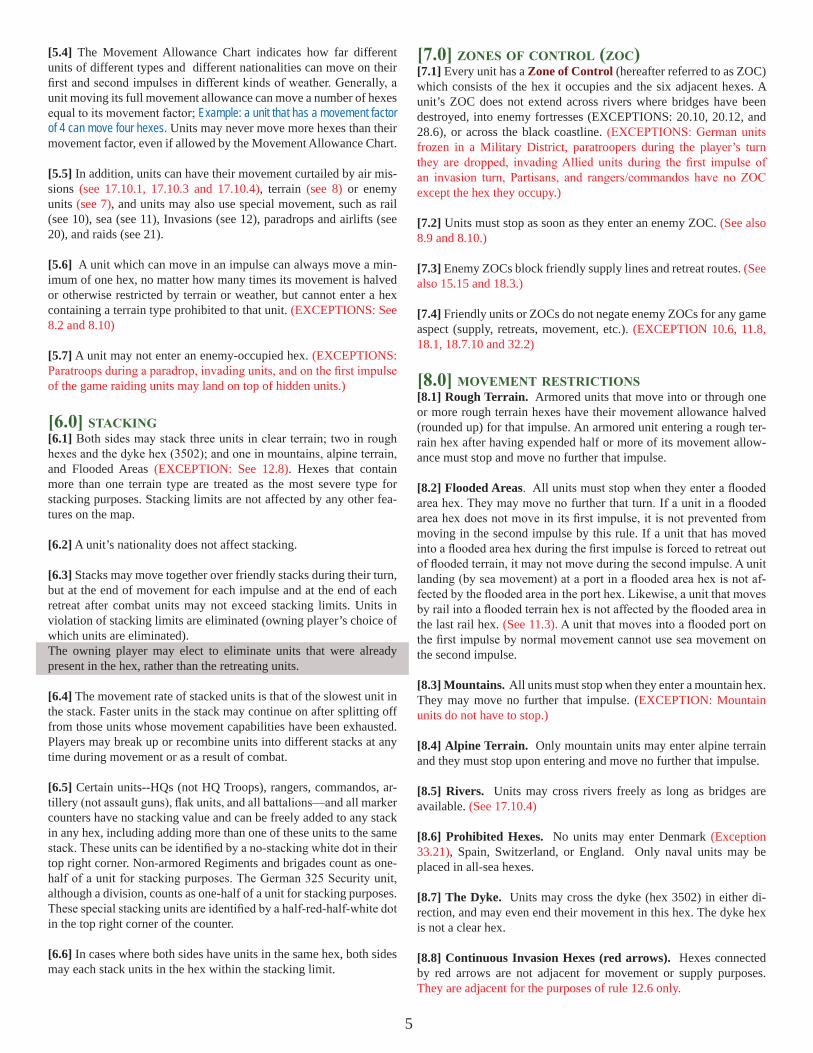
[6.0] sTaCking [6.1] Both sides may stack three units in clear terrain; two in rough hexes and the dyke hex (3502); and one in mountains, alpine terrain, and Flooded Areas (EXCEPTION: See 12.8). Hexes that contain more than one terrain type are treated as the most severe type for stacking purposes. Stacking limits are not affected by any other fea-tures on the map.
[6.2] A unit’s nationality does not affect stacking.
[6.3] Stacks may move together over friendly stacks during their turn, but at the end of movement for each impulse and at the end of each retreat after combat units may not exceed stacking limits. Units in violation of stacking limits are eliminated (owning player’s choice of which units are eliminated).The owning player may elect to eliminate units that were already present in the hex, rather than the retreating units.
[6.4] The movement rate of stacked units is that of the slowest unit in the stack. Faster units in the stack may continue on after splitting off from those units whose movement capabilities have been exhausted. Players may break up or recombine units into different stacks at any time during movement or as a result of combat.
[6.5] Certain units--HQs (not HQ Troops), rangers, commandos, ar-tillery (not assault guns), flak units, and all battalions—and all marker counters have no stacking value and can be freely added to any stack in any hex, including adding more than one of these units to the same stack. These units can be identified by a no-stacking white dot in their top right corner. Non-armored Regiments and brigades count as one-half of a unit for stacking purposes. The German 325 Security unit, although a division, counts as one-half of a unit for stacking purposes. These special stacking units are identified by a half-red-half-white dot in the top right corner of the counter.
[6.6] In cases where both sides have units in the same hex, both sides may each stack units in the hex within the stacking limit.
[7.0] zones of ConTRol (zoC)[7.1] Every unit has a Zone of Control (hereafter referred to as ZOC) which consists of the hex it occupies and the six adjacent hexes. A unit’s ZOC does not extend across rivers where bridges have been destroyed, into enemy fortresses (EXCEPTIONS: 20.10, 20.12, and 28.6), or across the black coastline. (EXCEPTIONS: German units frozen in a Military District, paratroopers during the player’s turn they are dropped, invading Allied units during the first impulse of an invasion turn, Partisans, and rangers/commandos have no ZOC except the hex they occupy.)
[7.2] Units must stop as soon as they enter an enemy ZOC. (See also 8.9 and 8.10.)
[7.3] Enemy ZOCs block friendly supply lines and retreat routes. (See also 15.15 and 18.3.)
[7.4] Friendly units or ZOCs do not negate enemy ZOCs for any game aspect (supply, retreats, movement, etc.). (EXCEPTION 10.6, 11.8, 18.1, 18.7.10 and 32.2)
[8.0] movemenT ResTRiCTions[8.1] Rough Terrain. Armored units that move into or through one or more rough terrain hexes have their movement allowance halved (rounded up) for that impulse. An armored unit entering a rough ter-rain hex after having expended half or more of its movement allow-ance must stop and move no further that impulse.
[8.2] Flooded Areas. All units must stop when they enter a flooded area hex. They may move no further that turn. If a unit in a flooded area hex does not move in its first impulse, it is not prevented from moving in the second impulse by this rule. If a unit that has moved into a flooded area hex during the first impulse is forced to retreat out of flooded terrain, it may not move during the second impulse. A unit landing (by sea movement) at a port in a flooded area hex is not af-fected by the flooded area in the port hex. Likewise, a unit that moves by rail into a flooded terrain hex is not affected by the flooded area in the last rail hex. (See 11.3). A unit that moves into a flooded port on the first impulse by normal movement cannot use sea movement on the second impulse.
[8.3] Mountains. All units must stop when they enter a mountain hex. They may move no further that impulse. (EXCEPTION: Mountain units do not have to stop.)
[8.4] Alpine Terrain. Only mountain units may enter alpine terrain and they must stop upon entering and move no further that impulse.
[8.5] Rivers. Units may cross rivers freely as long as bridges are available. (See 17.10.4)
[8.6] Prohibited Hexes. No units may enter Denmark (Exception 33.21), Spain, Switzerland, or England. Only naval units may be placed in all-sea hexes.
[8.7] The Dyke. Units may cross the dyke (hex 3502) in either di-rection, and may even end their movement in this hex. The dyke hex is not a clear hex.
[8.8] Continuous Invasion Hexes (red arrows). Hexes connected by red arrows are not adjacent for movement or supply purposes. They are adjacent for the purposes of rule 12.6 only.

6
[8.9] Units in the ZOC of enemy units at the start of the second im-pulse may not move that impulse, although other units which can move may move into these hexes to help attack adjacent enemy units. Units adjacent to enemy units, but not in an enemy ZOC, may move normally.
[8.10] Units may not move directly from one enemy ZOC to another. Instead, they must withdraw into a hex free of all enemy ZOC and then reenter.
[8.11] The Movement Allowance Chart restricts the movement of var-ious unit types and nationalities depending on the weather in effect for that turn.
[8.12] Only hexes with grid coordinates are playable hexes. (EXCEPTION: see 19.7.)
[8.13] No unit which entered hex 4502 or 4503 from the west can exit from the east (and vice versa). In other words, they have to “go around.”
[9.0] miliTaRy disTRiCTs[9.1] Each German unit that starts the game as part of one of the five Military Districts (Netherlands, 15th, 7th, 1st, and 19th) may not move until it is released by one of the following conditions:A) The Allies invade in that unit’s district.B) The July IV turn.C) The unit’s place is taken by some other unit (even a unit of a dif-ferent size and/or type) that can move freely. Units can be exchanged in this manner over and over as long as the number and location of units in each district remains at its At Start level. The unit that can move must enter and stop in the frozen unit’s hex before the frozen unit can move.D) The Allies move units out of the district that was invaded into any other part of the map; including another district, the interior of France, or any part of Italy outside the 19th Military District (such as hex 2334). This would release all German units.E) The Allies at any time, including during an invasion, move into either the Netherlands or 15th districts. This would release all German units. (EXCEPTION: See 9.9.)F) Allied units attack frozen German units in a Military District oth-er than the district that was invaded. This would release all German units. (EXCEPTION: See 9.9.)G) The Allies invade in more than one district. This would release all German units.H) The Allies raid or paradrop into a district. This would release only the units in that district. See 9.9.
After a unit is released, it never again becomes frozen, (unless it takes the place of a frozen unit) even if the conditions that released it no longer apply.
[9.2] Units designated as free setup units are not frozen and can move freely, even if they start the game in a Military District. If it becomes confusing as to which units may move and which are frozen, Can Move markers may be placed on top of units that may move freely.
[9.3] Units beginning the game in specified cities may move without restriction. (EXCEPTION: The two German units which start the game in Turin and Genoa may not leave Italy until an Allied unit enters Italy. They may always move within Italy. After an Allied unit enters any hex in
Italy, these two units may move freely about the map.)
[9.4] Units designated or selected as hidden units are not restrict-ed by this rule, even if they start the game in a Military District. EXCEPTION: The two units, one in the 15th district and one in the 7th district which may be hidden, are frozen under this rule.)
[9.5] Frozen units have no ZOC except the hex they occupy.
[9.6] Frozen units are not released by an involuntary action on the Allied player’s part. (See 15.9.)
[9.7] Frozen units gain and exert a normal ZOC (See 7.1) at the mo-ment their release is triggered and they become unfrozen (even during the Allied player’s turn).
[9.8] If Allied units attack a German unit frozen in a Military District (thus releasing all German units), all German units with Allied units in their ZOC must be attacked. (EXCEPTION: See 20.9).
[9.9] Raiding or paradropping units release only the units in the dis-trict(s) they land in. The released units must end each turn within their district until released for another reason. Raids or paradrops outside all military districts (i.e. in Germany, Italy, or the interior of France) release all German units.
[9.10] If Allied units attack a German unit that can move freely which is inside a Military District where units are frozen, this does not re-lease frozen units. If a German unit that can move freely is stacked with a German unit that is frozen in a Military District, Allied units can attack the unit that can move freely while ignoring the frozen unit (the frozen unit does have to be attacked); this is an exception to rule 14.7.
[10.0] Rail movemenT [10.1] The German player may move up to six units by rail per turn. Units moving by rail go from rail hex to adjacent rail hex through hexsides crossed by the railroad symbol. Weather does not affect rail movement.
[10.2] All reinforcements may be moved by rail, entering on any east edge rail hex. They count towards the six units that can move by rail each turn.
[10.3] Rail movement takes place during the first impulse only (EXCEPTION: See 10.10) and may convey a unit an unlimited num-ber of hexes. [10.4] Units moving by rail must start and finish their impulse on a rail line, and must be at all times during the move out of enemy ZOC’s. Units moving by rail may not move normally during that impulse.
[10.5] Units moving by rail are not impeded by terrain of any type that may also occupy the rail hex. Conversely, units moving normally may not use rail lines to negate the movement effects of terrain as if the rail line were an open highway.
[10.6] A unit can use rail movement only if it can trace a path free of enemy ZOC back along the rail line to a city under friendly control. The city can be in an enemy ZOC and support rail movement, but the rail line from the city to the unit cannot pass through an enemy ZOC nor an enemy-controlled city.
[10.7] Railroads must be possessed prior to the turn of use. Both play-
7
ers use the railhead markers to identify rail hexes still under German control; all rail hexes beyond the markers cannot be used by the German player. Each player adjusts the railhead markers at the end of his second impulse (after combat). The Allied player moves each railhead back to the hex just beyond the farthest RR hex occupied or passed through by an Allied unit that turn--PROVIDED that at the moment of occupation a path free of German ZOC can be traced from that hex along the railroad back to an Allied-controlled city. When the German player moves he takes control of the farthest RR hex during that German turn--PROVIDED that at the moment of occupation a path free of Allied ZOC (and Allied-controlled cities) can be traced back to a German-controlled city or the east edge of the map. A player can never lose possession of RR hexes on his own turn.
[10.8] Off-map rail movement between hexes containing rail lines exiting the east edge of the map is permitted. Off-map movement be-tween the rail leading off the east edge from 4929 and lines leading off the south edge from 3729, 2735, 2831 and 2832 is permitted.
[10.9] Partisans and Air Missions may block rail movement along certain lines or over certain rivers, and may reduce the number of German units that can use rail movement on a particular turn.
[10.10] In addition to normal rail movement, the German player is allowed to move one HQ by rail per month during the second impulse of any turn. If the German player does not use this special movement, it may not be accumulated or transferred.
[10.11] All non-armored units of less than division size and armored battalions count as ½ for rail movement purposes. Armored divisions count as 1½. All units not specified as counting ½ or 1½ for rail move-ment purposes, count as one.
[10.12] The Allied player may not use rail movement (but see 33.9).
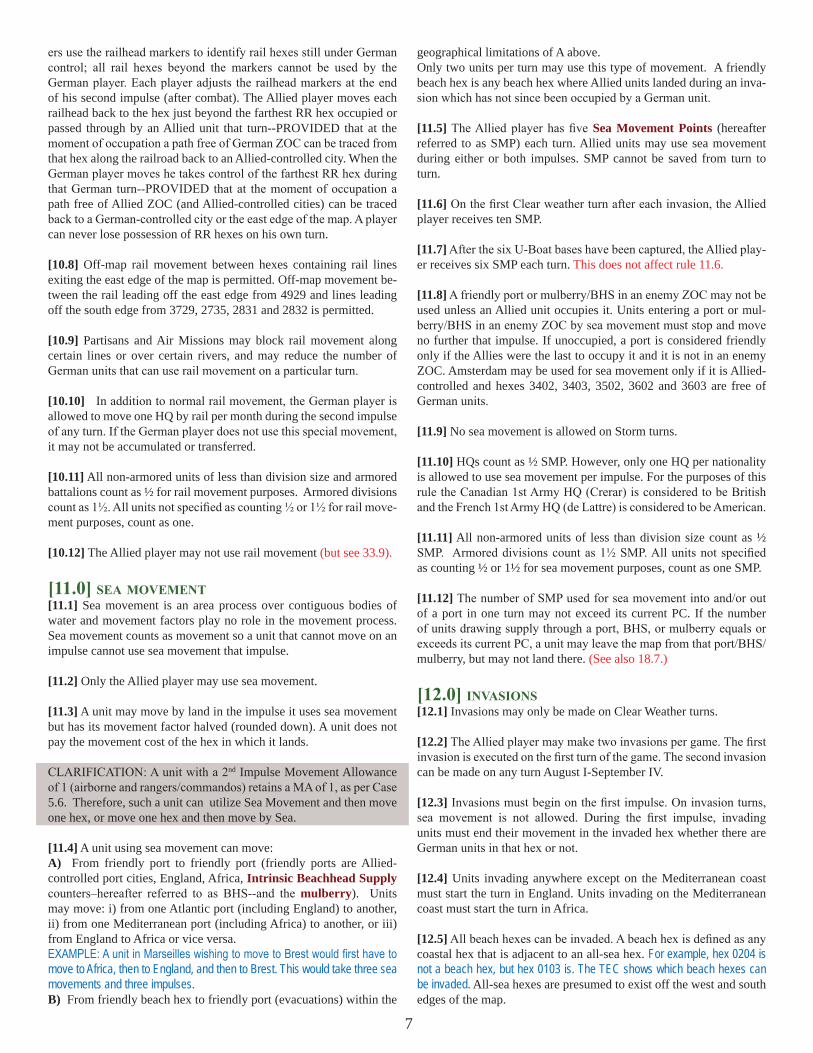
[11.0] sea movemenT[11.1] Sea movement is an area process over contiguous bodies of water and movement factors play no role in the movement process. Sea movement counts as movement so a unit that cannot move on an impulse cannot use sea movement that impulse.
[11.2] Only the Allied player may use sea movement.
[11.3] A unit may move by land in the impulse it uses sea movement but has its movement factor halved (rounded down). A unit does not pay the movement cost of the hex in which it lands.
CLARIFICATION: A unit with a 2nd Impulse Movement Allowance of 1 (airborne and rangers/commandos) retains a MA of 1, as per Case 5.6. Therefore, such a unit can utilize Sea Movement and then move one hex, or move one hex and then move by Sea.
[11.4] A unit using sea movement can move:A) From friendly port to friendly port (friendly ports are Allied-controlled port cities, England, Africa, Intrinsic Beachhead Supply counters–hereafter referred to as BHS--and the mulberry). Units may move: i) from one Atlantic port (including England) to another, ii) from one Mediterranean port (including Africa) to another, or iii) from England to Africa or vice versa. EXAMPLE: A unit in Marseilles wishing to move to Brest would first have to move to Africa, then to England, and then to Brest. This would take three sea movements and three impulses.B) From friendly beach hex to friendly port (evacuations) within the
geographical limitations of A above.Only two units per turn may use this type of movement. A friendly beach hex is any beach hex where Allied units landed during an inva-sion which has not since been occupied by a German unit.
[11.5] The Allied player has five Sea Movement Points (hereafter referred to as SMP) each turn. Allied units may use sea movement during either or both impulses. SMP cannot be saved from turn to turn.
[11.6] On the first Clear weather turn after each invasion, the Allied player receives ten SMP.
[11.7] After the six U-Boat bases have been captured, the Allied play-er receives six SMP each turn. This does not affect rule 11.6.
[11.8] A friendly port or mulberry/BHS in an enemy ZOC may not be used unless an Allied unit occupies it. Units entering a port or mul-berry/BHS in an enemy ZOC by sea movement must stop and move no further that impulse. If unoccupied, a port is considered friendly only if the Allies were the last to occupy it and it is not in an enemy ZOC. Amsterdam may be used for sea movement only if it is Allied-controlled and hexes 3402, 3403, 3502, 3602 and 3603 are free of German units.
[11.9] No sea movement is allowed on Storm turns.
[11.10] HQs count as ½ SMP. However, only one HQ per nationality is allowed to use sea movement per impulse. For the purposes of this rule the Canadian 1st Army HQ (Crerar) is considered to be British and the French 1st Army HQ (de Lattre) is considered to be American.
[11.11] All non-armored units of less than division size count as ½ SMP. Armored divisions count as 1½ SMP. All units not specified as counting ½ or 1½ for sea movement purposes, count as one SMP.
[11.12] The number of SMP used for sea movement into and/or out of a port in one turn may not exceed its current PC. If the number of units drawing supply through a port, BHS, or mulberry equals or exceeds its current PC, a unit may leave the map from that port/BHS/mulberry, but may not land there. (See also 18.7.)
[12.0] invasions[12.1] Invasions may only be made on Clear Weather turns.
[12.2] The Allied player may make two invasions per game. The first invasion is executed on the first turn of the game. The second invasion can be made on any turn August I-September IV.
[12.3] Invasions must begin on the first impulse. On invasion turns, sea movement is not allowed. During the first impulse, invading units must end their movement in the invaded hex whether there are German units in that hex or not.
[12.4] Units invading anywhere except on the Mediterranean coast must start the turn in England. Units invading on the Mediterranean coast must start the turn in Africa.
[12.5] All beach hexes can be invaded. A beach hex is defined as any coastal hex that is adjacent to an all-sea hex. For example, hex 0204 is not a beach hex, but hex 0103 is. The TEC shows which beach hexes can be invaded. All-sea hexes are presumed to exist off the west and south edges of the map.
8
(EXCEPTIONS : Beach hexes north of and including hex 3602 (in-cluding the water “hexes” inland of the dyke) cannot be invaded. Hexes 1005, 2106, 2806 2905, 3005, 3105, and Rotterdam may be invaded. A port (except Rotterdam) may not be invaded unless it is adjacent to an all-sea hex. All hexes up rivers and estuaries are non-invadable hexes. However, they can be the target of a raid. See 21.2.)
[12.6] The invasion site must be a single hex or a continuous line of adjacent hexes. To be considered adjacent for this rule, the hexes must be connected by red arrows or share a hexside that is partly land. The following hexes would be considered part of a continuous line of hexes for invasion purposes (shown on the map by red arrows): 0102-0103, 0103-0104, 0116-0216, 0309-0310, 1605-1606, 2805-2904, 2805-2905, 2806-2905, 2904-3004, 3005-3104.
[12.7] Inland ports cannot be invaded. However, they can be the site of a raid by commandos/rangers. (See 21.2.)
[12.8] The stacking limit on beach hexes is the same as the other ter-rain in the hex. The British 79th armor unit may stack free during the first impulse of the first invasion. If German units are present in invaded hexes, Allied units are placed on top of them.
[12.9] During the first impulse, Allied units must attack German units in the invaded hex. They cannot attack German units in other hexes instead, or as well, even if there are no German units in the invaded hex. Allied units have no ZOC except the hex they occupy during the first impulse. During the second invasion, the preceding applies only to invading units. During the second impulse, Allied units must attack all adjacent enemy units whose ZOC they are in.
[12.10] During the first impulse of both invasions, invading Allied units may not retreat. If forced to do so, they are eliminated instead. Allied units still on top of German units after the first impulse are also eliminated.
[12.11] Different beaches have different invasion capacities as shown on the map. If an invasion overlaps into two different areas, the lower area capacity is used.
[12.12] Units that land on the second impulse must land at hexes that were invaded during the first impulse and are free of enemy units (the hexes may be in enemy ZOC). Units that land during the second impulse of an invasion turn have their movement allowance halved (rounded down). The hex the unit lands in does not count against its movement allowance. Units which landed during the first impulse move according to the Movement Allowance Chart during the second impulse of an invasion turn.
[12.13] After all second impulse combat, a BHS must be placed on any invaded hex free of enemy units (it may be placed in a friend-ly-occupied hex in enemy ZOC).
[12.14] Any non-armored units (except HQs) may land on the first impulse. These units are considered infantry for invasion capacity purposes. The only armored division allowed to invade (first and/or second invasion) is the British 79th which begins the game at reduced strength. This unit may stack free and adds two to the die roll of any combat it participates in during the first impulse of the first invasion. It does count as a unit (as Infantry Factors) for invasion capacity pur-poses.
[12.15] Armored brigades/regiments can invade if stacked with an in-fantry unit. They do count as units (as Infantry Factors) for invasion capacity purposes.
[12.16] The site of the second invasion may be the same as the first in-vasion, or it may be any other continuous line of adjacent hexes. The second invasion may not be launched on a turn in which the Allied Supply Capacity (SC) is zero or less at the beginning of the turn.
[12.17] If the first invasion fails (all Allied units are eliminated from the map), the game continues; it does not proceed directly to the sec-ond invasion. Aircraft are placed on the AMC and fly their missions, the Allied player may make paradrops and raids, the German player may move his units normally, the Allied player may use sea move-ment between England and Africa, both players receive reinforce-ments and replacements, etc. If the second invasion fails also (all Allied units are eliminated from the map), the game ends and the German player is the winner.
[12.18] If the first invasion is on the Atlantic coast (i.e., against any German Military District except the 19th), both American and British units must land on the first impulse.
[13.0] headqUaRTeRs[13.1] Headquarters are used to facilitate supply and to determine the TAC radius for aircraft and paradrops. Headquarters units on both sides may move only during the second impulse. Unlike other units, they may move their full movement factor at this time and are not restricted by bad weather. They are restricted by terrain, however, and may not use rail movement. (EXCEPTION: See 10.10)
[13.2] Most German HQ units have two sides. Some of these are inverted according to the OB Chart. Others are inverted only if the original side takes a step loss. If the original side is lost before a scheduled inversion on the OB Chart, the scheduled inversion is ig-nored. Inverted HQs may never be reinverted to their original side; if they take a step loss they are destroyed. On the turn HQs are in-verted because of a step loss, they are removed from the map. On the next Game Turn they re-enter as a normal reinforcement. Two-step German HQs which suffer an eliminated combat result are still inverted and return as a reinforcement on the following Game Turn. On the turn HQs are inverted according to the OB Chart, the counter is simply flipped over and remains on the map. (EXCEPTION: The German HQ Reinhard, and the HQ Student that it inverts to, are sep-arate counters. Otherwise, an HQ that has already been inverted will be lighter side up.) CLARIFICATION: Inverted HQs return on the next Game Turn, not necessarily the next German Player Turn. If the unit were destroyed on the Allied Player Turn, it would return two German Player Turns into the future. If the HQ is already on its inverted side when it takes a step loss, it is permanently removed from the game.
[13.3] Most Allied HQs have two sides. The inverted side may appear in one of two ways: step loss or promotion. If the original side takes a step loss, it is removed from the map. On the next Game Turn the inverted side is available as a reinforcement and is placed in either England or Africa. Sometimes an HQ taking a step loss has a name on the inverted side that is the same as the name on the original side of a different HQ counter. This causes an inversion by promotion. The HQ that did not take the step loss must also be inverted in place so that no two HQs have the same commander. This may cause yet another HQ to invert. An HQ may be inverted before it arrives as a reinforcement due to an inversion by promotion. Inverted HQs may
9
never be re-inverted to their original side; if they take a step loss they are permanently removed from the game. A generic 1-2 HQ unit be-comes available the next turn as a reinforcement. Unlike the number of German HQs, the number of Allied HQs may never be permanently decreased. EXAMPLE: If HQ Bradley takes a step loss it is inverted to reveal HQ Patton. The original HQ Patton must then be inverted to HQ Gerow. In addition, if the original HQ Gerow is already on the map, it too becomes inverted to HQ Huebner. If the original HQ Gerow has not yet been received as a reinforce-ment, when it does arrive it will already be inverted to HQ Huebner. If any in-verted Allied HQ then takes a step loss it is replaced by a generic 1-2 HQ unit.
CLARIFICATION: If an Allied HQ flips because of a promotion, only the original HQ which took the step loss (which caused the chain reaction of promotions) is sent to the TRT as a reinforcement. All HQs which merely promote their commanders flip and stay on the map in their original hex.
[13.4] Headquarters count ½ against the Allied Supply Capacity and for sea movement.
[13.5] HQ Troops units are not considered HQ units for any game purpose.
[14.0] CombaT[14.1] Units ending their impulse in an enemy ZOC must make an attack during combat. (EXCEPTIONS: Units in fortresses do not have to attack adjacent units. Units across rivers where bridges have been destroyed or across a black coastline cannot attack adjacent units. In addition, Allied units adjacent to German units frozen in a Military District do not have to attack those units.)
[14.2] The player moving his forces is the attacker; his opponent is the defender for that player turn.
[14.3] Before resolving combat, all movement for that impulse must be finished. The attacker may make as many different attacks as he wishes, resolving them one at a time in any order he wishes. (EXCEPTION: See 20.9)
[14.4] A unit’s combat factor can never be less than halved, no matter how many terrain detractions it has. A unit’s combat factor, whether attacking of defending, may be modified by terrain or by defending against an invasion or raid. See 16.
[14.5] When more than one unit participates in a single attack, add their factors to give one combined attack factor. Similarly, when more than one unit defends in a single combat, add their factors to give one combined defense factor.
[14.6] When several units attack several defending units the attacker has the choice of how to divide combat provided:A) He attacks every defending unit whose ZOC he is in.B) All his units in enemy ZOC attack some enemy unit. (EXCEPTION: See 14.12)C) Each attacking unit is adjacent to the specific defending unit it is attacking.
[14.7] The attacker may not divide combat against defending units stacked in the same hex, but must attack them as one combined de-fense factor. (EXCEPTION: See 9.10) Attacking units stacked in the same hex, however, may divide their stack to have separate attacks vs.
defending units in separate hexes. The combat factor of an individual unit may never be split so as to apply it to more than one battle.
[14.8] The attacker may deliberately attack with one or more units at unfavorable odds in order to gain more favorable odds over other defending units. This tactic is called soaking-off and cannot be done at odds worse than 1-6.
[14.9] No unit, attacking or defending, may fight more than one battle in any one impulse. If it finds itself still in enemy ZOC at the end of the first impulse, it must attack again in the second impulse. If in ene-my ZOC at the end of the second impulse, it simply remains in place.
[14.10] Sometimes a unit will find itself in a position where it cannot attack at legal odds (1-7 or worse). If a player cannot (or does not wish to) bring up enough units to make a legal attack, the unit is re-moved from the map after movement is completed but before combat is resolved. The removed unit can have no effect on combat, neither soaking-off nor blocking enemy retreat lines. Aircraft on the Ground Support Mission may not be used to raise the odds of an illegal attack (1-7 or worse) up to legal attack odds (1-6 or better). Units removed for failure to make a legal attack do not capture a city in their hex nor destroy a fortress, U-boat base, V1 site, BHS, or mulberry in the hex.
[14.11] Different Allied nationalities cannot attack together (combine their combat factors in one attack). They may stack and defend to-gether. British and Allied Minor units are considered the same nation-ality for this rule and may attack together. Similarly, American and French units are considered the same nationality for this rule.
[14.12] Sometimes the situation will arise where Allied units of different nationalities (units that cannot attack together) will be left adjacent to only one stack of enemy units. In this case, only the units of one nationality (Allied player’s choice) can attack. The units of the other nationality take no part in the attack and do nothing instead This is an exception to rule 14.6B. If attacking units suffer a step loss, must retreat, or are eliminated (whether from AE, A1, AR, EX or E2), the non-attacking units in the hex must retreat. A retreat is the only ad-verse result that non-attacking units suffer though (unless eliminated for inability to make a legal retreat); they may never be used or forced to take step losses suffered by the attacking units.
[14.13] Attacks at odds of more than 7-1 are treated as 7-1.
[14.14] German units do not have to attack out of fortresses, but if they do they must attack all adjacent units.
[15.0] baTTle ResolUTion
[15.1] The odds of each battle must be reduced to the simplest ratio as expressed on the Combat Results Table (hereafter referred to as CRT). To accomplish this, divide the smaller combat factor both into itself, and into the larger combat factor. The resulting two numbers (one of which is 1) are expressed as odds, placing the number which represents the attacker first in the ratio. Fractions of any size are con-verted either up or down to the whole number most favorable to the defender.
EXAMPLES: 4 to 9 becomes 1-3, 19 to 10 becomes 1-1, 24 to 5 becomes 4-1.
[15.2] The attacker rolls the die and resolves the battle according to the result corresponding with that die roll under the proper odds col-
10
umn of the CRT. Modified die rolls greater than ‘6’ are treated as ‘6’ results.
[15.3] The results of combat are interpreted as follows:AE -Attacker eliminated. All attacking units are removed from play.A2 -The attacker takes two step losses of his choice and retreats all of his surviving units one or two hexes.Al -The attacker takes one step loss of his choice and retreats all of his surviving units one or two hexes.AR -The attacker retreats all of his units one or two hexes.E2 -Exchange. The attacker takes two step losses of his choice and the defender takes one step loss of his choice. Then the attacker retreats all surviving defending units one hex.EX -Exchange. Both sides take one step loss of their choice. Then the attacker retreats all surviving defending units two hexes.DR -The attacker retreats all defending units two hexes.Dl -The defender takes one step loss of his choice. Then the attacker retreats all surviving defending units two hexes.DE -Defender eliminated. All defending units are removed from play.
[15.4] The attacker always moves retreating units, but may not designate a retreat route for the defender which would result in its elimination if an alternate, unblocked retreat route is available. (EXCEPTION: The defender moves his own units in situations where he elects to retreat though not required to do so. See 16.5) Stacked units may be split up and retreated to different hexes.
[15.5] Units with no alternate source of retreat other than into or through enemy ZOC, off the map, into Spain or Switzerland, into Denmark unless playing with Optional Rule 33.21, through alpine terrain (EXCEPTION: mountain units may retreat through alpine ter-rain), across a river where bridges have been destroyed, or across the coastline are eliminated.
[15.6] Units may retreat through land terrain types disregarding nor-mal costs.
[15.7] Units may end their retreat in violation of stacking limits, but the owning player must then immediately eliminate sufficient units to make a legal stack. (See 6.3.)
[15.8] An attack may be made at lower odds than actually exist at the option of the attacking player, but the attacker must specify the lower odds before rolling the die.
[15.9] Allied units may not be retreated into a Military District where German units are frozen unless no other retreat route is available. If an Allied unit is forced to retreat into such a district, German units are not released because of it. The Allied unit must leave the district on the next turn if possible and each succeeding turn if unsuccessful. If an Allied unit is forced to retreat into a Military District as per the above procedure, the Allied player may choose to have this trigger the release of frozen German units. However, the Allied player may not choose to retreat a unit into a Military District where German units are frozen if another retreat route is available, even if he would choose to trigger the release of the frozen units. (See 9.6 and 9.7)
[15.10] If a unit is retreated into a hex occupied by one or more other units, and this hex is then attacked, the retreated unit takes no part in the combat. However, should the units involved in the combat be eliminated or forced to retreat, the previously retreated unit would have to retreat.
[16.0] TeRRain effeCTs on CombaT
[16.1] Units in mountains, alpine terrain, or cities have their combat factors doubled on defense.
[16.2] Defending units being attacked solely through river hexsides have their combat factors doubled.
[16.3] German units in fortresses have their combat factors doubled on defense. If an Allied unit occupies a fortress hex, the hex is marked with a “destroyed fortress” marker and the fortress has no effect for the rest of the game. (EXCEPTION: See 14.10.) Fortresses never benefit Allied units.
[16.4] German units attacked from the sea during an invasion or raid are at least doubled. Units which would have been doubled under nor-mal combat circumstances (whether in a city, fortress, or because of terrain) are tripled if attacked from the sea.
[16.5] Units defending in or attacking from rough terrain and fortress-es do not have to retreat (i.e., a DR or AR may be ignored, and surviving units in EX, E2, Al, A2, and D1 results do not have to retreat). Units may choose to retreat and in this case the defending player moves his own units. Units may not retreat voluntarily if the CRT does not list a re-treat.
[16.6] Armored units have their attack factors halved if any defending unit occupies a city or rough hex. Units’ attack factors are rounded up individually, then totaled.
[16.7] Armored units defending in rough and city hexes have their de-fense factors halved. Units’ defense factors are rounded up individu-ally, then totaled. All effects that double defense (see 16.1, 16.2, 16.3, and 16.4) also apply. If the number of doubling effects and halving effects is equal (e.g. in a city), the unit uses its normal defense factor. If the number of halving effects is greater, its defense factor is halved. If the number of doubling effects is greater, its defense factor is dou-bled. There are two exceptions: 1) A unit cannot be doubled for both being in a city and being in a fortress, so an armor unit in a fortress city uses its normal defense factor. 2) If the unit is in a fortress that is not a city and is attacked from the sea, its defense factor is tripled.
[16.8] Any unit may attack an alpine hex, but only a mountain unit could defend in such a hex or enter such a hex during movement or a retreat.
[16.9] Units defending on the dyke hex (3502) or defending against an attack solely from this hex have their combat factors doubled. In addition, units defending on the dyke hex may ignore all retreat re-sults (though they may retreat at their option as per rule 16.5), when all attacking units are on hex 3402.
[16.10] If a combat involves defending units that occupy two or more different terrain types, the combat factors are figured separately for each hex of defending units and then totaled. If the defending units receive a retreat result, units in fortresses and rough terrain do not have to retreat, while all others do; some units might have to retreat while others might not.
[17.0] aiR missions
[17.1] There are two types of aircraft; Strategic bombers (British Bomber Command and US 8th) hereafter called SAC, and Tactical
11
[17.9.2] The Allied player then allocates his aircraft on the AMC. The Allied player may allocate aircraft to any mission that the German player has not allocated aircraft to. If the Allied player wishes to al-locate aircraft to a mission which the German player has allocated CAP to, he must first cancel all the German aircraft flying CAP for this mission on a one for one basis. The Allied player removes his canceling Allied aircraft, removing the canceled German aircraft at the same time. The Allied player decides which of his aircraft units are removed (SAC or TAC). Remaining Allied aircraft may then be allocated on the AMC to these missions. Note that the Counter Air Mission merely cancels German Ground Support. Aircraft assigned to this mission perform no other function.
EXAMPLE: The German player allocates two TAC to fly CAP on the Strafing mission. The Allied player allocates three TAC to this mission. Two Allied air-craft cancel the two German TAC flying CAP for this mission. All four units are removed from the AMC. The third Allied TAC remains on the AMC to perform the Strafing mission.
[17.9.3] German aircraft still on the AMC after the placement of Allied air units remain on the AMC for the rest of the turn. Some may become available for the German Ground Support mission in accor-dance with 17.10.1, 17.10.2, and 17.10.4. Unused German aircraft remain on the German TAC Availability Chart. They may be used at the beginning of the next turn.
[17.9.4] Except for the Ground Support, Carpet Bombing, and Bridge Attacks Missions, the actual aircraft units are left on the AMC throughout the turn.
[17.9.5] On the first turn of the game (only), the Allied player places his air units on the AMC first. The German player then can-cels Allied aircraft. The German player can only cancel Allied aircraft and cannot allocate CAP to any mission where an Allied air unit is not also allocated (except German Ground Support). German TAC can be allocated to the German Ground Support mission after all Allied aircraft (if any) in the Counter-Air box have been cancelled. Attacking German Replacements, U-Boat Attack, V-1 Site Attack, and the Carpet Bombing mission are not allowed on the first turn.
[17.10] Types of Aircraft Missions[17.10.1] Strafing--TAC only. Procedure: The German player
may assign up to three units to fly CAP for this mission each turn. Effect: Every German unit that moves more than three hexes (includ-ing by rail movement) and is at any time in TAC range during the first impulse is subject to strafing. The die must be rolled for each unit attempting to move more than three hexes. If the result is greater than the number of strafing aircraft the unit moves normally. If the die roll is equal to or less than the number of strafing aircraft, the unit takes one step loss and ends its movement in the third hex it entered, or the first hex in TAC range over three hexes it entered, whichever came first. If the Allied player does not cancel all German aircraft flying CAP for this mission, one German aircraft becomes available to fly German Ground Support during the current turn (regardless of how many German TAC actually remain).
[17.10.2] Ground Support--TAC only. Procedure: The German player may assign any number of available aircraft to fly CAP for this mission each turn. During the first impulse, before the die is rolled for each separate combat resolution, aircraft may be assigned to Ground Support for that combat. No more than three aircraft can support the same combat. Each aircraft can only be used once. Aircraft on the
bombers (all others including all German aircraft) hereafter called TAC.
[17.2] The Allied player has eleven aircraft available each Clear weather turn--four SAC and seven TAC.
[17.3] The German player has aircraft available each month accord-ing to the German TAC Availability Chart. The first number is the total number of aircraft available for the entire month. The second number is the maximum number of aircraft that can be used in one turn during the month. German aircraft used offensively can only be used for Ground Support Missions. Each month, available German aircraft should be placed in the available column on the German TAC Availability Chart. When used, the aircraft are moved to the used column. Aircraft not available for that month should be kept aside. German TAC cannot be accumulated from month to month.
[17.4] All available aircraft can fly on Clear weather turns. Fewer air-craft may be available on Overcast or Rain turns. On an Overcast or Rain turn which follows a Clear turn, the Allied player receives six aircraft of his choosing. However, no more than four may be SAC. The German player receives one-half of his monthly allotment, rounded up. The number of planes the German player can use in one Overcast or Rain turn (not the month) is identical to the German TAC Availability Chart (assuming that many are still available). No air-craft are available to either player on Storm turns or if an Overcast or Rain turn follows another Overcast or Rain turn. (EXCEPTION: On Storm turns or consecutive Overcast or Rain turns from June III to September IV, the Allied player has two SAC aircraft available. No other aircraft units, Allied or German, may be used.)
EXAMPLE: The German’s TAC for the month is 14(6). Six have already been used, leaving available 8(6). The current turn is OV, reducing the air available to 4(4).
[17.5] SAC have unlimited range and may attack anywhere on the map.
[17.6] Allied TAC may attack anywhere within the radius marked on the map or operate within 8 hexes of any Allied headquarters. TAC range may not be traced through Switzerland, but may be traced through all-sea hexes (and non-existent hexes inside the dyke count-ing as if hexes did exist there for this purpose). Note: the dyke hex is outside the TAC radius.
[17.7] German TAC may operate within Germany or within 8 hexes of any German headquarters. This applies only to German aircraft on the Ground Support Mission. German aircraft may cancel Allied aircraft on the AMC regardless of range.
[17.8] Any number of TAC aircraft can take its range from the same headquarters unit.
[17.9] Aircraft Mission Procedure:
[17.9.1] The German player places any aircraft he chooses to use this turn on the AMC within the rules of 17.5 and 17.7 during each Clear Weather turn or qualified Overcast or Rain turn. These German air units are considered to be flying Combat Air Patrol (hereafter referred to as CAP) for that specific mission. German aircraft that will fly the German Ground Support mission are placed in the German Ground Support box of the AMC. They will be able to fly this mission if they are not canceled by Allied aircraft.
12
Ground Support Mission are an exception to rule 14.11. Any TAC aircraft unit can support a combat involving units of any nationality. If the Allied player does not cancel German aircraft flying CAP for this mission, half of those German aircraft become available to fly German Ground Support during the current turn, rounded down with a minimum of one (i.e. one remains one, two becomes one, three be-comes one, etc.). Effect: Each aircraft assigned to a combat raises the odds by one column.
EXAMPLE: One aircraft supporting a combat on the 1-6 column would mean the combat is resolved on the 1-3/1-4 column instead.
[17.10.3] Railway Attacks--SAC only or SAC and TAC togeth-er (TAC may not be used by itself). The German player may assign up to two units to fly CAP for this mission each turn. Effect: Each Allied aircraft unit reduces the German rail movement capacity by two. German rail movement is increased by two for each uncanceled German aircraft flying CAP for this mission.
[17.10.4] Bridge Attacks--SAC or TAC. Procedure: The German player may assign any number of available aircraft to fly CAP for this mission each turn. Before any Allied first impulse movement, each aircraft is placed on a river and all bridges over that section of the river are destroyed for that complete turn (a section of a river is any stretch of river between two river junctions or between one river junction and the sea or the end of the river). This affects both Allied and German movement and the aircraft counter is not removed until after German second impulse combat. If the aircraft is TAC, at least one hex of all such river hexsides must be within TAC range. If the Allied player does not cancel German aircraft flying CAP for this mission, half of those German aircraft become available to fly German Ground Support during the current turn, rounded down with a minimum of one. Effect: ZOC do not extend across attacked river hexsides, and combat across such hexsides is not allowed. No rail movement is allowed across sections of rivers attacked. During both impulses, all non-armored units must stop on the first hex across the river. During both impulses, armored units wishing to cross attacked rivers must stop on the hex before crossing the river and roll on the River Crossing Chart. Units which roll a 6 on the River Crossing Chart (may not cross but may continue movement) lose one move-ment point for failing to cross the river. If an armored unit may not cross but can continue moving, it may attempt to cross the same river again, but only at a hexside other than the one it failed to cross.
[17.10.5] Attacking German Replacements--SAC only. Procedure: The German player may assign up to four available air-craft to fly CAP for this mission each turn. Effect: Each Allied aircraft reduces the German replacement rate by one, with armored replace-ments being the first factors lost. The German replacement rate is in-creased by one for each uncanceled German aircraft flying CAP for this mission (this can be an armored replacement).
EXAMPLE: The German replacement rate is 2(2) and after canceling one German CAP, two Allied aircraft are on this mission. The Germans get a re-placement rate of 2(0). If the German CAP were not canceled, the Germans would get a replacement rate of 2(3) or 3(2).
[17.10.6] U-Boat Attack--SAC only. Procedure: Only one unit may be assigned to fly CAP for this mission each turn. Effect: If the Allied player does not allocate SAC to this mission, the Americans lose their armored replacement factor for that turn. If the Allied player does not cancel a German aircraft flying CAP for this mission, the Americans lose an additional infantry replacement factor for that turn.
If an Allied unit occupies a U-boat hex, the hex is marked with a “de-stroyed fortress” marker and the U-boat base has no effect for the rest of the game. (EXCEPTION: See 14.10.) When all six U-Boat bases have been captured, no aircraft of either side may be allocated to this mission and no replacements are lost.
EXAMPLE: The American replacement rate is 2(1). If a German aircraft fly-ing CAP is canceled and no other SAC is left to perform the mission, the replacement rate becomes 2(0). If the German CAP is not canceled, the rate becomes 1(0).
[17.10.7] V1 Site Attack--SAC or TAC. Procedure: Only one unit may be assigned to fly CAP for this mission each turn. Effect: If the Allied player does not allocate aircraft to this mission, the British replacement rate for that turn becomes 1(0). If the Allied player does not cancel a German aircraft flying CAP for this mission, the British replacement rate for that turn becomes 0(0). If an Allied unit occupies a V1 Site hex, the hex is marked with a “destroyed fortress” marker and the V1 Site has no effect for the rest of the game. (EXCEPTION: See 14.10.) When all six V1 Sites have been captured, no aircraft of either side may be allocated to this mission and no replacements are lost.
[17.10.8] Counter-Air Mission--TAC only. Procedure: The German player may assign any number of aircraft to this mission (this being the German Ground Support mission) by placing the units on the AMC. Effect: Each Allied unit flying this mission cancels one German unit flying this mission. Uncanceled German units flying this mission may be used for Ground Support as per 17.10.2 during German first impulse combat. Furthermore, uncanceled German air-craft flying CAP for the Strafing, Allied Ground Support, and Bridge Attacks missions can be used for German Ground Support as per 17.10.1, 17.10.2, and 17.10.4 respectively.
[17.10.9] Carpet Bombing--SAC only. Procedure: One attack a month maximum. German aircraft may not be assigned to fly CAP for the Carpet Bombing Mission. Carpet Bombing may not be used during an invasion turn. Carpet Bombing may not be used in the same attack as the Ground Support Mission. Aircraft on the Carpet Bombing Mission are an exception to rule 14.11. Any SAC may be used for this mission involving units of any nationality. If a SAC unit is allocated to Carpet Bombing but the Allied player doesn’t use it, the Allied player may still allocate a SAC to Carpet Bombing later that month. In essence, the scheduled attack was canceled and such a cancella-tion does not utilize the resources available for such an enterprise. Effect: The Allied player may add two to the combat die roll in any one attack at odds of 2-1 or lower on either impulse.
[18.0] sUpply
[18.1] Each Allied unit must be able to trace a line of supply no longer than five hexes to an Allied headquarters unit. The headquarters unit may be in an enemy ZOC but the supply line between the unit and the headquarters may not pass through enemy ZOC (nor through an ene-my city). In turn, each Allied headquarters unit supplying other units must be able to trace a supply line over controlled hexes (of unlimited length) back to a friendly port or mulberry/BHS. The port or mulber-ry/BHS may be in enemy ZOC if occupied by an Allied unit, but the supply line between the headquarters unit and the port or mulberry/BHS may not pass through enemy ZOC (nor through an enemy city). Each unit that is not able to trace such a line of supply at the end of the second impulse loses one step. CLARIFICATION: Controlled hexes are those that were last occu-

13
pied by a friendly unit. In instances where this is not obvious, a side controls a hex if one of his units would be in supply there while an enemy unit would not.
[18.2] A port or mulberry/BHS can only supply a number of units equal to its current PC. A headquarters unit must be able to trace a supply line to a specific port or mulberry/BHS for each unit it is sup-plying. The maximum number of units that may trace a line of supply to a headquarters unit is equal to the total supply capacity of all ports and mulberry/BHS the headquarters can trace its supply line to. Note that each type of Allied unit has a separate Supply Capacity Cost, and that some units do not count against the SC at all (rangers/comman-dos, and paratroopers on the turn they paradrop onto the map). These costs are summarized on the Unit Cost Chart.
[18.3] Each German unit must be able to trace a line of supply no lon-ger than five hexes to a German headquarters unit. The headquarters unit may be in enemy ZOC but the supply line between the unit and the headquarters may not pass through enemy ZOC (nor through an enemy city). In turn, each German headquarters unit supplying other units must be able to trace a supply line over controlled hexes (of unlimited length) back to a friendly city in Germany or Italy. The city may be in enemy ZOC but the supply line between the headquarters unit and the city may not pass through enemy ZOC (nor through an enemy city). Each unit that is not able to trace such a line of supply at the end of the second impulse loses one step.
[18.4] Units (both Allied and German) in cities and fortresses are al-ways in supply. (EXCEPTION: Allied units are never automatically in supply in cities in Greater Germany or Italy.) However, Allied units that are “in supply” because they are in a city hex, still count against the SC (see 18.7).
[18.5] German units in Germany or Italy are always in supply. German units are in supply anywhere on the map at game’s start. Frozen German units are always in supply.
[18.6] German units more than five hexes from any enemy units are always in supply if they can trace a supply line (of unlimited length) to a German-controlled city in Greater Germany.
[18.7] In addition to the restrictions and requirements of rules 18.1 and 18.2, the Allies are also limited by the number of units that can be supplied on the map shown by the current level of SC, as shown on the Supply Capacity Chart.
Note: If the SC is over 40, players can flip the SC counter over to its +40 side.
[18.7.1] During an invasion turn, all invading Allied units are con-sidered in supply for the whole turn. At the end of the Allied player’s second impulse on the turn of the first invasion the SC is set by add-ing the total value of the BHS and any ports captured during the first turn and subtracting the total Supply Capacity Cost of all Allied units remaining on the map.
[18.7.2] The SC is increased each time a port is captured by the Allies (EXCEPTIONS: 20.16 and 21.4), a BHS or mulberry is placed, a damaged port is repaired, an Allied unit leaves the map by sea movement or airlift, or an Allied unit is eliminated. The SC is reduced if a port, BHS or mulberry is captured by the Germans, an unoccupied Allied port, BHS or mulberry is put in a German ZOC, a mulberry is damaged by weather, or an Allied unit lands on the map.
[18.7.3] The SC can be checked at any time by adding the current PC of the mulberry and BHS and all controlled ports and subtracting the Supply Capacity Cost of all Allied units on the map. If there is any discrepancy, alter the SC immediately.
[18.7.4] Adjustments to the SC are made immediately. For in-stance, if an Allied unit is destroyed in the first impulse raising the SC to 1, another Allied unit could land in the second impulse to replace the lost unit. Similarly, as soon as a port is captured, this increased SC can be used to bring units on to the map that impulse. (EXCEPTIONS: See 20.16 and 21.4)
[18.7.5] The Allied player may never intentionally lower the SC below zero.
[18.7.6] If a port or mulberry/BHS is captured by the Germans or a mulberry is damaged by bad weather, dropping the SC below zero, the Allied player must remove enough units from the map (by sea movement or airlift) to bring the SC back to zero or higher on the next turn or lose one step per unit over the SC each turn (Allied play-er’s choice as to which units are reduced). Allied units may be Out of Supply even if they can trace a supply line to an HQ and then to a port/mulberry/BHS and the SC is >0.
EXAMPLE: The Allies control the 12 BHS and Lorient but no supply line can be traced between them. Seven infantry divisions and an HQ are tracing supply to each. The SC is 3 (12+6-7.5-7.5) but two of the units tracing supply to Lorient are out of supply (unless placed in the Lorient hex) since Lorient’s PC of 6 is insufficient to supply them all.
[18.7.7] If the SC is at zero at the beginning of the Allied player’s turn before placing the mulberry (if applicable), he cannot land any units on the map unless he moves other units of sufficient Supply Capacity Cost off the map first by airlift and/or Sea Movement the same impulse. If the SC is raised above zero during the first impulse other units could land in the second impulse. Raids, but not paradrops, are exempt from this restriction. If the SC is zero or less at the begin-ning of a turn, the second invasion may not be made during that turn. [18.7.8] If the SC is below zero at the beginning of the Allied player’s turn, he cannot land units on the map that turn, even if he removes units, has units eliminated, or captures ports to bring the SC back above zero. Raids, but not paradrops, are exempt from this re-striction.
[18.7.9] Each time an Allied player captures a port he must roll the die to see if the port has been damaged by the Germans before capture. A roll of ‘5’ or ‘6’ reduces the PC of the port by half (rounded down; for example, 3 becomes 1). This damage can be repaired at the rate of one point per turn beginning the turn after capture if the port is occupied by an Allied Infantry unit. Mulberry damage cannot be repaired. These repaired PC points should be added into the SC at the end of the Allied player’s second impulse, before checking to see if units are out of supply. Use a damage marker to show the amount of remaining damage at a port. Note: a port with a port capacity of 1 that is damaged becomes a 0, but may be repaired at the end of the next turn.
[18.7.10] A port is considered captured when a friendly unit occu-pies it. (EXCEPTION: See 14.10.) It may be used on the impulse it is taken. (EXCEPTIONS: See 20.16 and 21.4) An unoccupied Allied port or mulberry/BHS in enemy ZOC cannot be used for supply. If
14
a vacant Allied-controlled port is placed in a German ZOC, the SC is immediately reduced by the current PC of the port or mulberry/BHS. However. the Germans have not captured the port or mulberry/BHS until a German unit occupies it. Should the Allies reoccupy the port or mulberry/BHS before the Germans capture it, they immediately regain the lost SC.
[18.8] If the Allies recapture a port that was captured by the Germans, the procedure outlined in 18.7.9 must be followed again, except that a roll of ‘3-6’ (instead of just ‘5-6’) reduces the PC of the port to half (rounded down) of its current value. A roll of 1-2 leaves the current PC unchanged.
[18.9] Inland ports can only be used for supply purposes or sea move-ment if passage inland to such a hex is not blocked by an enemy ZOC.
EXAMPLES: 1) Amsterdam can be used for supply if it is Allied controlled and hexes 3402, 3403, 3502, 3602, and 3603 are free of German units. 2) Bremen could not be used for supply purposes if any of the following hexes were German occupied: 4203, 4204, 4302, 4303, and, of course, 4304.
[18.10] Aircraft Missions, terrain, and weather do not affect supply lines.
[19.0] naval UniTs
[19.1] Each Allied naval unit may be placed in any all-sea hex during first impulse movement on each turn. They may not be used on turns when the weather is a Storm. Naval units may not be placed north of hex 3301, where all-sea hexes do not exist. Naval units may be placed in hypothetical all-sea hexes off the west and south edges of the map that are adjacent to invadeable beach hexes.
EXAMPLE: A naval unit could be placed in an imaginary off map hex adjacent to hexes 0102, 0103 and in a hypothetical hex “1736”.
[19.2] Naval units have no stacking restrictions.
[19.3] Each naval unit can add two attack (or defense) factors to any attack in range. Each unit can only support one attack (or defense) per Game turn (on either impulse of either Player’s turn) but more than one unit can be added into the same attack (or defense).
[19.4] Naval units which did not fire during the Allied First Impulse may move two hexes during the Second Impulse. Naval units may not move during the German Player turn.
[19.5] Naval units have a range of two hexes. The range includes the target hex but not the hex the naval unit is in. When naval units are being used in a combat against German units (attacking or defending) which occupy more than one hex, all such hexes must be within the range of the naval units. The target hex is always that which is occu-pied by German units.
EXAMPLE: A naval unit in 2005 could attack any of the following hexes: 1806, 1906, 2006, 2007, 2105, 2106, 2205, and 2206.
[19.6] Naval units never take losses, even voluntarily. They may not attack alone or be attacked in any manner.
[19.7] Naval units are permanently withdrawn at the beginning of the August III turn if the second invasion was made August I. Otherwise
they are withdrawn at the beginning of the September I turn.
[19.8] Combat support by naval units is an exception to rule 14.11. Any naval unit may support a combat involving units of any nation-ality.
[20.0] paRaTRoops
[20.1] Paratroopers can only drop on Clear Weather turns. Paratroopers drop before all other movement.
[20.2] Glider units function as paratrooper units in all respects (EXCEPTION: 28.9). The British 52nd glider unit is also a mountain unit. (See also 28.11.)
[20.3] Allied paratroopers that are to drop must start the turn in England or Africa. Paratroopers in Africa can drop within TAC range of any HQ that is tracing its supply across controlled hexes to any port on the Mediterranean coast, or within three hexes of any inva-dable hex on the Mediterranean coast. Paratroopers in England can drop within TAC range of any HQ that is tracing its supply across controlled hexes to any port other than ports on the Mediterranean coast, anywhere within the TAC radius, or within three hexes of any invadable hex other than invadable hexes on the Mediterranean coast.
NOTE: During the Allied turn of the first invasion, paratroopers can only drop within TAC radius or within three hexes of any invadable hex, within the above geographical limitations.
[20.4] German paratroopers that are to drop must start the turn in a city in Germany. Their range is the same as TAC range (See 17.7).
[20.5] The Allies can drop paratroopers five times during the game. They may drop up to five units in a single paradrop, but no more than three divisions (brigades and regiments count as one-half of a division for the purposes of this rule). Individual units can drop no more than three hexes apart (maximum spread of seven hexes). More than one paratrooper may drop in the same hex, up to stacking limits. Even if only one paratrooper drops, this would count as one paradrop towards the Allied maximum of five drops per game. The Allied player may not make more than one paradrop per turn.
[20.6] The Germans can drop paratroopers twice per game, but only one unit (regardless of size) each time. The German player may not make more than one paradrop per turn. No German paratroop unit that has ever taken replacements may paradrop. It may airlift. Two eligible reduced paratroop units (or a reduced paratroop division and a one-step paratroop unit) may amalgamate into one full strength unit and may paradrop.
[20.7] During the player’s turn they are dropped, paratroopers have no ZOC except the hex they occupy, and are automatically in supply.
[20.8] Paratroopers must be dropped during the first impulse and can-not move that impulse except as a result of combat. They can move on the second impulse. They can combine to attack with invading units. (EXCEPTION: See 20.9)
[20.9] Paratroopers can even drop on top of enemy units, but must fight those enemy units. In this case they cannot fight any units in adjacent hexes; this is an exception to rule 14.6. When they land on enemy units, both players may have a legal stack of units in the hex. If enemy units in the drop hex are not eliminated or retreated, the para-
15
troopers are eliminated instead; they may not retreat. In cases where paratroopers do land on enemy units, this combat must be resolved before any other combat is resolved. Paratroopers do not control the hex they land in (and do not capture the city and do not destroy the fortress, mulberry, BHS, V1 site, or U-boat base) until all defenders have been removed from the hex.
[20.10] All paratroopers conducting a Paradrop must roll on the Paratrooper Drop Table, after all paratroopers have landed. German paratroopers must roll twice on the Paratrooper Drop Table; losses are cumulative. Allied paratroopers landing in Germany use the Non-Clear Terrain* column of the Paratrooper Drop Table, regardless of the actual terrain in the drop hex. A German paratrooper landing in an unoccupied fortress adjacent to an Allied unit is considered to be landing in enemy ZOC, even though if the unit survives it does not have to attack any Allied units because of the fortress rules. Cities and the dyke are considered Non-Clear Terrain for the purposes of the Paratrooper Drop Table.
[20.11] The Allied player can airlift one paratrooper unit (regardless of size) per turn during Clear Weather from any controlled city (in-cluding England and Africa) to any other controlled city on the map. A unit may not be airlifted to or from a city in enemy ZOC. An airlift can be performed in either impulse, but the unit may not move in any other way that turn. The Allied player can paradrop up to three units and airlift another on the same turn. If more than three units paradrop, no unit may airlift that turn.
[20.12] The German player can airlift using the same procedure as in 20.11, except he can only do this twice per game, and may not make an airlift and a paradrop on the same turn. The German player may only airlift one step units, including two step units that are reduced. The 91st Airlanding Division (if reduced) can airlift, but cannot para-drop. He may not airlift to or from a fortress city adjacent to an Allied unit that has a ZOC.
[20.13] Paratroopers do trigger the release of German units frozen in a Military District as per rule 9.9. A paradrop made adjacent to a fro-zen unit counts as being made into an enemy ZOC if doing so would release the frozen unit.
[20.14] Paratrooper units can function as normal infantry units. Paratroopers landing adjacent to invading units during an invasion must be specified as invading units or airdropped units. If they are airdropped units, this would count as one of the five Allied airdrops. Paratroopers may not be airdropped onto hexes that contain other in-vading units during an invasion turn.
[20.15] Paratroopers do not count against the Supply Capacity on the turn they are airdropped. They count against the SC at the beginning of the turn after the drop. If the mulberry is placed that turn, the mul-berry is placed before counting the paratroops against the SC. If land-ed as normal units (or airlifted), they count against the SC on the turn they land as well as the invasion capacity (if applicable). Paratroopers that are airdropped never count against the invasion capacity limits.
[20.16] If Allied paratroopers capture a port, other units may not land there until the next turn. This is an exception to 18.9.2 and 18.9.11. The Allied player cannot use such a port’s PC until the turn after its capture.
[20.17] Paratroopers can be airlifted to a city in the same impulse in which it is captured if the city is captured by infantry or armored
units. However, if the city is captured by paratroops or rangers/com-mandos, other units may not airlift there until the next turn.
[21.0] Commandos and RangeRs
[21.1] Commandos and rangers are never out of supply and never count against the Allied SC.
[21.2] Commandos and rangers that are to raid must start the turn in England or Africa. These units can raid on any turn, either impulse as a group or singly. However, only two such raids are allowed per game. If in a group, all units must land in the same or adjacent hexes, though the hexes need not be connected by an arrow or a common land hex-side. Inland ports can be considered part of a continuous line of beach hexes if one or both of the hexes at the mouth of the river or estuary leading to the inland port (and the port itself) is being raided by com-mandos/rangers. Raiding units may land in any invadable hex; beach hexes north of 3602 (inclusive); a coastal hex that isn’t a beach hex (such as 0204); inland ports (i.e. any port on a river); or a river/estuary hex leading to an inland port. Note that the TEC shows which hexes can be raided. Raids do not count against sea movement or invasion capac-ities. Commandos and rangers cannot move on the impulse they land. CLARIFICATION: The dyke can neither be raided nor invaded. [21.3] Inland ports and/or river/estuary hexes leading to an inland port can only be raided if passage inland to such a hex is not blocked by an enemy ZOC. An enemy ZOC blocks a raid only if the unit exerting it is adjacent to the river/estuary. EXAMPLE: A German unit at St. Nazaire would prevent a raid landing in 0410, 0411, or Nantes, but a raid could still land in 0310. A German unit in 0411 would prevent a raid on Nantes, but a raid could still land in St. Nazaire, 0310, and/or 0410. German units in both 0409 and 0311 would not prevent any raids in the estuary. [21.4] Commandos and rangers can attack together. This is an excep-tion to rule 14.11 and even applies when commandos and rangers are attacking in conjunction with other type units.
[21.5] If these units capture a port, other units may not land there until the next turn. This is an exception to rules 18.9.2 and 18.9.11. The Allied player cannot use such a port’s PC until the turn after its capture.
[21.6] Commandos and rangers by themselves do trigger the release of German units frozen in a Military District as per rule 9.9.
[21.7] Commandos and rangers have no ZOC except the hex they occupy. German units never have to attack commandos and rangers that are alone in a hex because they have no ZOC. They stack free.
[21.8] Commandos and rangers can function as normal infantry units. Commandos and rangers landing adjacent to (or in the same hex as) invading units during an invasion must be specified as invading units or raiding units. If they are invading, they count against the invasion capacity (and stack free), but do not count against the two raid per game limit. If raiding, they are an exception to rule 12.8.
[21.9] Units raiding the Atlantic coast must start the turn in England. Units raiding the Mediterranean coast must start the turn in Africa.
[21.10] Commandos and rangers must attack all adjacent enemy units
16
whose ZOC they are in, even on the impulse they land. Units de-fending against a raid are at least doubled on the first impulse. See also 16.4 & 16.7. Raiding units can combine to attack with invading units. Commandos and rangers cannot land in enemy occupied hexes. (EXCEPTION: See 21.12)
[21.11] Raids may not be made when the weather is a Storm.
[21.12] If raiding units landing during the first invasion land on hid-den German units, they must fight those units. In this case, however, they do not, and cannot, fight any units in adjacent hexes. If enemy units in the raided hex are not eliminated or retreated, the raiding units are eliminated instead; they may not retreat. If a raid up a river/estu-ary is found to be blocked by a hidden unit, place the raiding units in the hex of the first blocking unit(s) encountered. As above, they fight only that unit(s) and may not retreat.
[21.13] For each stack containing a ranger/commando unit attacking a doubled or tripled defender, the attacker may add +1 to the die roll (up to a maximum +2 DRM).
[21.14] If rangers/commandos participate in an attack, these units must take losses before all other units. If the ranger/commando used its +1 DRM versus a doubled or tripled defender, the ranger/comman-do is eliminated unless the defender is eliminated.
[22.0] CoasTal defense UniTs
[22.1] Coastal defense units start the game with a movement factor of zero and must be set up in invadable beach hexes.
[22.2] If the German player moves such units, he inverts them and they become normal infantry units. A unit that is inverted may be moved on the same impulse (even by rail). Once inverted, they can never be reinverted to their coastal defense side (even by taking re-placements). The infantry side can be replaced if destroyed, whether or not the unit was inverted before being lost.
[22.3] If a coastal defense unit is forced to retreat, it inverts to its in-fantry side automatically. If a coastal defense unit takes a combat loss, it is eliminated (coastal defense units are one step units and cannot invert to their infantry sides to satisfy a step loss).
[23.0] TRaining divisions[23.1] German training divisions are permanently eliminated if they take a step loss. They invert to one step non-training divisions when directed by the OB.
EXAMPLE: On the September 1 turn (6), the German 159 training division is inverted to become the 159 infantry division.
[23.2] Training divisions that have been destroyed before inverting cannot be replaced or inverted. If destroyed after inverting, the invert-ed side may be replaced.
[24.0] paRTisans
[24.1] The Allied player rolls one die at the beginning of each turn. On a roll of ‘5-6’, he has one French partisan counter available, which can be used to cut railways and inhibit German movement and supply.
[24.2] The partisan unit must be placed in a non-city rail hex not in Germany or Italy, not in an enemy ZOC, and not within five hexes of an SS or security unit. The unit is placed immediately after all Allied second impulse combat is resolved.
[24.3] Partisans have no ZOC except the hex they occupy. Units trav-eling by rail may not enter a partisan hex and supply may not be traced through such a hex. Units must stop movement upon entering this hex and cannot retreat into or through it.
[24.4] Partisans cannot be permanently eliminated. At the end of the German second impulse, the partisan is removed from the map.
[25.0] volkssTURm
[25.1] A Volkssturm unit automatically and immediately (during Allied movement) appears in a city in Germany as soon as an Allied unit moves, raids, or paradrops within three hexes of that city. Each city can generate only one Volkssturm unit per game.
[25.2] Only 12 Volkssturm units may be in play at one time. If a city is eligible to generate a Volkssturm unit and one is available, it must appear, even if this would violate stacking restrictions. Any over-stacking must be removed by movement or unit elimination by the end of movement on the next German impulse. If a city was eligible to generate a Volkssturm unit but none was available, it must appear as soon as a unit is available, if the city is still German-controlled and within three hexes of an Allied unit.
[25.3] If a paradrop triggers the appearance of a Volkssturm unit, the Volkssturm unit exerts a ZOC for purposes of the paratrooper drop table.
[26.0] v1 siTe gaRRison UniTs
[26.1] The German player has six V1 Site Garrison units, one for each V1 Site on the map. Before play begins one unit is placed on each V1 Site.
[26.2] These units cannot move and have a Combat Factor of one. If they take a step loss or are forced to retreat they are permanently removed from play and cannot be rebuilt.
[26.3] These units stack free.
[27.0] ReinfoRCemenTs
[27.1] Both players check the TRT to determine whether they receive reinforcements or special instructions that turn. If their box on the TRT for that turn contains a reference number, they check their OB Chart at the appropriate reference number.
[27.2] Reinforcements may be placed on the map at any time during first impulse movement.
CLARIFICATION: Since movement comes after replacements, a re-inforcement arriving at reduced strength may not take replacements on its turn of arrival.
[27.3] Allied reinforcements are placed in England or Africa and German reinforcements are placed in any German-controlled city
17
in Germany not in enemy ZOC. The initial placement hex does not count against the movement allowance of the entering unit and the unit may move its full movement allowance. Allied reinforcements may use sea movement.
[27.4] Units designated as part of the German Invasion Reaction Force enter the game on the first turn.
[27.5] The three French units designated as the Paris Garrison must enter the game the first turn after Paris is occupied by Allied units and there is sufficient SC to supply them, but never before the August I turn. They appear in Paris and may move on the turn they enter. They do count against the Allied SC.
[27.6] The entry of reinforcements onto the map may be delayed (the units are held off-map) for as long as the owning player wishes. However, Allied units (except the Paris Garrison) must be placed in England or Africa on their turn of arrival. They may not be (intention-ally) left on the OB card.
[27.7] When the OB calls for units to be withdrawn, remove the indicated units from the map (but see 27.8). See 29 for units that enter the Panzer Reserve. Excluding these Panzer Reserve units, units that are with-drawn never reenter the game and cannot be rebuilt with replacements.
[27.8] If a unit to be withdrawn is at reduced strength, it is withdrawn as such. If a unit to be withdrawn is out of supply or destroyed, a substitute unit is removed instead. This substitute must be on the map (or in England or Africa), in supply, and as close in nationality, combat factor, and type (in that order of priority) as possible to the unit to be withdrawn. The substitute is removed from the game and may never reenter or be rebuilt. The unit that was to be withdrawn remains in play.
[27.9] Units that are withdrawn should be kept on the OB Chart, and separate from units that are destroyed. If a unit is withdrawn at re-duced strength, and it is brought back by the OB, it is brought back at reduced strength.
[27.10] If units to be withdrawn are in the Panzer Reserve and the Reserve is still off-map, they are removed anyway.
[28.0] ReplaCemenTs
[28.1] Replacements are used to rebuild destroyed units and build up reduced units to full strength. There are three kinds of replacements: Infantry, Armor, and Special. Only the Allied player gets Special Replacements, and only one is available per month, on June II and the first turn of every later month. Both players receive both Infantry and Armor Replacements each turn, given on the Replacement Chart. The first number is the number of Infantry Replacements, and the second number is the number of Armor Replacements available on each turn of the month.
[28.2] Allied paratrooper, Ranger, and Commando units may be re-built only by Special Replacements. Armored units may only be re-built with Armor Replacements. Infantry and mountain units may be rebuilt with Armor or Infantry Replacements. German paratroop-er units and the British 52nd division may be rebuilt with Armor or Infantry Replacements, but doing so removes their paradrop (but not airlift) capability.
[28.3] Unused replacements may be accumulated for use on later turns. Use the replacement markers on the Game Record Track to record these.
[28.4] Replacements for both sides can be reduced by Air Missions. (See 17.10.5, 17.10.6, and 17.10.7.) When replacements are lost, Armor Replacements are the first lost. Accumulated replacements cannot be lost. [28.5] Replacements do not count against rail or sea movement capacities. Weather does not affect the ability of either player to re-ceive or use replacements.
[28.6] Units that take replacements may not be in an enemy ZOC (or a fortress with an enemy unit adjacent to it), out of supply, or move that turn. A reduced division that is rebuilt to full strength with a re-placement inverts in place. Players may use a Can’t Move marker to delineate a unit that has received replacements.
[28.7] Replacements are basically steps, not combat factors. Restoring a reduced division to full strength requires one replacement regardless of the combat factors. Rebuilding a battalion, brigade or regiment requires one replacement (Exception: Rangers and Commandos units require two Special Replacements each). Destroyed divisions re-quire two replacements to restore to reduced strength and three re-placements to rebuild from destroyed to full strength. A destroyed division can be rebuilt to full strength in one turn.
[28.8] Destroyed units that are rebuilt are placed the same way as arriving reinforcements (27.3) except they may not move on the turn they are rebuilt. Mark with Can’t Move counters.
[28.9] The following units may never be rebuilt with replacements: Flak, security, artillery, glider, coastal defense units, headquarters, headquarters troops, Volkssturm units, and training divisions may never be replaced. The infantry sides of coastal defense units and training divisions can be replaced at the cost of two replacement fac-tors.
[28.10] The Americans have three overstrength infantry divisions be-fore play begins (1st, 2nd, & 4th). Three other infantry divisions are at reduced strength before play begins (35th, 83rd, and 90th). The Americans can build six additional overstrength infantry divisions (A-F) during the course of the game. By adding an armor replacement factor to a 6-4 infantry division, the unit becomes an 8-4. It can then take two step losses and still not be destroyed. Put the 8-4 counter on the map and the 6-4 counter in the appropriate box on the OB. An 8-4 must take a step loss before regular units whether attacking or defending (but after a mandatory step loss to rangers, commandos, or the “funnies”). If the 8-4 takes a combat loss, substitute the 6-4. Once a numbered (1, 2 & 4) overstrength division takes a step loss, it can never be created again (the 8-4 counter is permanently removed from the game). The lettered overstrength divisions can be recreated if they take a step loss. No more than six overstrength lettered divisions may be in play at any one time. The numbered 8-4s are not affected by this.
[28.11] The German player has eight Headquarters Troops units. By using a replacement factor of the appropriate type (either Infantry for an infantry unit or Armor for an armored unit) and one of these units, he can replace a destroyed unit at full strength. Remove the Headquarters Troops unit and the replacement factor and place the new unit on the map where the HQ Troops unit was (the unit may not move that turn). Any unit (EXCEPTION: 28.9) may be replaced in this manner as long as the HQ Troops unit is not in enemy ZOC, is in
18
supply, and does not move that turn. If the 136 HQ Troops division, which is frozen in the 15th district, is used to replace a destroyed unit, the replaced unit is frozen.
[28.12] American replacement factors can be used to replace American and French units. British replacement factors can be used to replace British and Allied Minor units.
[29.0] panzeR ReseRve
[29.1] At the beginning of the German first impulse on the November I turn (before anything else), the German player must remove the sev-en panzer divisions shown on the OB. They are simply lifted off the map and placed in the Panzer Reserve Holding Box on the OB. They can be removed if in enemy ZOC but not if out of supply. A substi-tute can be removed (at the German player’s option) if a unit to be withdrawn is destroyed or out of supply. A substitute unit must be an armored unit with the closest (and highest) combat value; it may not be a non-armored unit.
[29.2] While off-map, these units may receive replacements as nor-mal.
[29.3] On the first impulse of the December I turn, the German player may either:A) Bring all units in the Panzer Reserve up to full strength and add all destroyed armor divisions (not all armored units) and any SS armored units of any size to the Reserve at full strength, and then forfeit his armored replacements for the rest of the game.
EXAMPLE: A replacement rate of 2(2) would become 4(0).
OR
B) Continue to replace units in the normal manner, keeping his Reserve units as they are.
[29.4] Regardless of which option he chooses, the German player may bring all units of the Panzer Reserve back into the game during any turn (either impulse) in December, January, or February. They may be placed in any east edge map hex more than two hexes from any Allied unit or any German-controlled city or cities in Germany as long as they are not out of supply or in an enemy ZOC. They can move nor-mally once placed. They may exceed the stacking limits when placed but must conform at the end of movement for that impulse.
[29.5] If the OB calls for a unit to be withdrawn and that unit is in the Panzer Reserve, the withdrawal occurs normally.
[30.0] mUlbeRRy and inTRinsiC beaChhead sUpply[30.1] The Allied player has one mulberry counter with a value of 9 and two Intrinsic Beachhead Supply (BHS) counters; one with a value of 12 and one with a value of 6.
[30.2] The 12 BHS must be placed on the map after all second impulse combat of the first invasion. Likewise, the 6 BHS must be placed on the map after all second impulse combat of the second invasion. If there is only one invasion, only one is used. A BHS must be placed on any invaded hex free of enemy units (it may be placed in a hex in enemy ZOC if occupied by an Allied unit).
[30.3] The mulberry is only available if the Allies invade the 7th, 15th, or Netherlands Military Districts (i.e. along the English Channel coast). The mulberry must be placed on the map before the Allied First Impulse Movement on the first Clear Weather turn following an invasion if one of those districts is invaded. The mulberry may not be placed on the same hex as a BHS. The placement of the mulberry must be on a friendly beach hex captured by invasion. A raid (without an invasion) into one of those districts does not allow for the mul-berry. If the Allies invade the 1st or 19th Military Districts, only the Intrinsic Beachhead Supply is available.
[30.4] If a German unit moves into or through a mulberry/BHS hex, the mulberry/BHS is destroyed (EXCEPTION 14.10) and may not be replaced. The Allied SC is automatically and immediately reduced by the current PC of the mulberry/BHS. BHS counters (not mulberry) can only be destroyed if captured.
[30.5] On any Storm turn, a mulberry (not BHS) may be damaged. Roll one die before the Allied first impulse movement if the mulberry is on the map. A roll of 6 halves the mulberry’s current Port Capacity (9 rounds to 4, 1 to 0). This damage is permanent and may not be re-paired. Subsequent Storms may further damage the mulberry.
[30.6] A mulberry/BHS does not have an attack or defense factor.
[31.0] weaTheR
[31.1] At the beginning of each turn the Allied player rolls the die and refers to the Weather Chart. The Weather marker may be used on the map to keep track of that turn’s weather. Beginning with turn 3, a +1 die roll modifier (DRM) is added each turn to the weather roll until a Storm is finally rolled. After the first Storm is rolled, the DRM is discarded. (EXCEPTION: the Weather on the first two turns of the game is automatically Clear. There is no weather die roll until turn 3.)
[31.2] Clear Weather has no effect on movement, combat, naval units, or air units. All units are at maximum efficiency.
[31.3] Overcast Weather has no effect on movement, combat or naval units. Limited air missions can be allowed on Overcast turns. (See 31.5.)
[31.4] Rain Weather hinders movement during second impulse (only). See the Movement Allowance Chart for details. Rain has no effect on combat or naval units. Limited air missions can be allowed on Rain turns. (See 31.5.)
[31.5] When an Overcast or Rain Weather turn follows a Clear Weather turn, limited air is available. During an eligible Overcast or Rain Weather turn the Allied player receives six aircraft of his choos-ing. However, no more than four may be SAC. The German player receives one-half of his monthly allotment, rounded up. The number of planes the German player can use in one Overcast or Rain Weather turn (not the month) is identical to the German TAC Availability Chart (assuming that many are still available). No air missions are allowed on second (or subsequent) consecutive Overcast or Rain Weather turns. (EXCEPTION: 17.4)
EXAMPLE: The German’s TAC for the month is 14(6). Six have already been used, leaving available 8(6). The current turn is Rain, reducing the air avail-able to 4(4).
[31.6] Storm Weather reduces first impulse movement by one-half.
19
Second impulse movement is further curtailed. See the Movement Allowance Chart for details. Storm Weather has no effect on combat. No sea movement or invasions are allowed on Storm turns. No na-val units are allowed on Storm turns. No air missions are allowed on Storm turns. (EXCEPTION: 17.4) The first turn after a Storm turn is automatically Clear (there is no weather roll necessary).
[31.7] The Allied player must roll a die for mulberry damage on Storm turns. (See 30.5.)
[32.0] viCToRy CondiTions
[32.1] The Allied player, to win, must control Paris and Brussels, plus either seven of the eight major cities (cities with red stars) in Germany or 21 cities in Germany (Genoa and Turin can be included in this total). The game ends at the end of the German player turn in which these conditions have been met if the German player fails to retake sufficient cities to prevent Allied victory. The Allied player wins im-mediately if he captures Berlin. The German player wins by avoiding the Allied victory conditions till game’s end and holding three major cities in Greater Germany. Any other result is a draw. The last turn of the game is May I.
[32.2] The Allies control a city if an Allied unit was the last to occupy or pass through that city. If the city is in an enemy ZOC, the city is controlled only if an Allied unit occupies the city. Paratroopers that land in an enemy occupied hex must eliminate or retreat all enemy units to control, destroy, or capture that hex (and at least one para-trooper unit must survive). Control of hexes is determined in the same manner as control of cities.
[33.0] opTional RUlesAfter extensive play, some players may feel that the game is unbal-anced in favor of one side or the other. One possible solution, if op-ponents agree, is to use one or more or the following optional rules. It should be remembered though, that optional rules are just that. The game has been playtested and balanced without them. Their use may actually unbalance more than balance.A far better way to employ optional rules is to use them to add a little variety to the game from time to time, or to help balance the game when opponents are of vastly different playing caliber or experience. Optional rules are also appropriate for those players wishing to add more realism and willing to give up some playability and balance in exchange. On the other hand, players desiring maximum playability will find the cost of optional rules too high.Each optional rule contains a rating to aid players in their use. Al means the rule slightly favors the Allied player. A2 means the rule strongly favors the Allied player. G1 means the rule slightly favors the German player. G2 means the rule strongly favors the German player. NE means the rule has no significant effect on play balance.
[33.1] SS Units (A1)SS units were always built back up to full strength no matter how severe their losses. To reflect this, if possible (see 28.7), all destroyed SS units and SS units at reduced strength must be replaced before any other German units can receive any replacements.
[33.2] Luftwaffe Replacements (NE)German TAC units may be disbanded to form replacement units. The German player may disband any TAC units that are still available for that month. This can be done at the beginning of any turn, before the Allied player places his air units on the AMC. For each TAC unit dis-
banded, the German player receives one infantry replacement. Each month thereafter, the number of available TAC units is reduced by the total number of TAC units disbanded.
EXAMPLE: If the German disbands one TAC on any July turn, he gets one extra infantry replacement that turn, and the August TAC available would be 13(6) instead of 14(6). If he disbands another TAC on any August turn, he gets one extra infantry replacement that turn, and the September TAC avail-able would be 6(4) instead of 8(4).
[33.3] Attacking Accumulated German Replacements (A1)Accumulated replacements can be reduced by Air Missions. Allied aircraft on the Attacking German Replacements Mission still reduce German replacements for that turn first. After all German replace-ments for that turn have been eliminated though, any additional air-craft assigned to this mission reduce accumulated German replace-ments. Accumulated armor replacements are the first factors lost. Accumulated replacements are reduced at the rate of one per aircraft.
[33.4] DECOY Counters (NE)All German units in Germany and Italy may be covered by decoy counters (use large counters like Allied Control or Railhead), to pre-vent identification and disguise their type and strength. Units covered by decoy counters must remove the decoy counter when they move out of Germany or Italy or when an Allied unit moves within five hexes of them.In addition to covering actual units, the German player may have ten dummy counters covered by decoy counters. They may enter the game on any turn like normal reinforcements or be present at start. They move at the rate of seven hexes per turn or less. They may not leave Germany and Italy or move within five hexes of an Allied unit. If an Allied unit comes within five hexes of them, they are revealed and permanently removed from the game.
[33.5] DECOY Counters As Hidden Units (G1)German units are no longer hidden as per rules 3.3 and 9.4, and the OB. Decoy counters are used instead (use large counters like Allied Control or Railhead).During the initial setup (See 3.3), the German player has ten dum-my counters and twenty decoy counters available. The ten dummy counters are placed anywhere on the map and covered with ten decoy counters. The remaining ten decoy counters are placed on any ten actual units anywhere on the map. After the Allied player has placed his units on beach hexes, all twenty decoy counters are removed as are the ten dummy counters.
[33.6] Limited German Free Setup (G1)The German player must set up a unit in each At Start box on the OB Chart. The number of units in each Military District, specific city, and the free setup section must be the same, but not the unit types or exact units. Any unit may occupy any box. For instance, the German player could set up five armored units in the Netherlands Military District instead of the five units listed to start there on the OB. Units are still frozen per rule 9, and must abide by all other rules pertaining to Military Districts.
[33.7] Armor Release (A1)All German armored units cannot automatically move on the first turn of the game. The German player must roll a die for each armored unit that he wishes to move on the first turn of the game (See 9.). On a roll of 1, the unit cannot move for the whole turn. On a roll of 2 or 3, the unit cannot move (even by rail) during the first impulse, but can move normally during the second impulse. On a roll of 4-6, the unit has its movement halved (rounded up) during the first impulse, but can move
20
normally by rail first impulse and during the second impulse.
[33.8] Rommel (NE)The Rommel HQ unit may be considered a free setup unit and does not have to be set up in Paris.
[33.9] Allied Rail Movement (A1)The Allies may use rail movement along all non-German controlled rail lines. They may move one unit by rail per turn. An Allied unit may not move in any other way the impulse it moves by rail. Rules 10.2-10.7, 10.11 and 10.12 apply.
[33.10] Flooded Terrain (NE)At the start of the game, flooded area hexes on the map are considered to be clear terrain for all purposes. At the beginning of either player’s turn, the German player may decide to flood all flooded area hex-es. The German player cannot selectively flood some hexes and not others. Once flooded, the hexes are considered flooded areas for the rest of the game. Units overstacked in flooded areas are immediately eliminated, owning player’s choice of units.
[33.11] Lowlands Defense & Movement (G1)Hexes 2805, 3004, 3103, 3203, 3302, and 3402 are all considered to contain fortresses. Non-armored units (of both sides) may move between hexes 2805 and 2904, 2806 and 2905, and 2904 and 3004 as long as such a move is not into enemy ZOC. Such a move expends the unit’s entire MA for that impulse.
[33.12] The Isle Of Jersey (NE)The Isle of Jersey exists in hex 0904. The land part of the hex is clear terrain.
[33.12.1] The Isle is considered part of the 7th Military District. German units can be set up in this hex. The Allies may consider this hex part of a continuous line of hexes for invasion purposes if any of the following hexes is also invaded; 0705, 0806, 0906, 1005, 1006, 1004, or 1103.
[33.12.2] German units may move from 0806, 1005, or 1004 to the Isle of Jersey and vice versa. However, units that perform this move may not otherwise move that impulse. Allied units may not move onto the Isle except during an invasion, a raid, or a paradrop. Allied units on the Isle must use sea movement (this counts against their sea movement capacity) to leave the Isle. The Isle is considered a friendly port for this purpose. Once the Isle is Allied-controlled, German units may not move onto the Isle for the rest of the game.
[33.12.3] The Allies may not place the Mulberry or BHS within two hexes of the Isle of Jersey if it is German-controlled.
[33.12.4] During combat, units that are forced to retreat from the Isle are eliminated instead.
[33.13] Pre-Invasion Accumulated Allied Replacements (A2)At the beginning of the game, before the first turn, the Allied player may place on the Replacement Chart the following accumulated re-placement factors: American 8(4), British 4(4), Special 1. The Allied player may use American replacements from this reserve to build overstrength infantry divisions before the first invasion.
[33.14] British Unit Disbandment (A1)The Allied player may voluntarily withdraw British units to create replacements. The Allied player would receive British replacement
factors equal to the number of steps the withdrawn unit possesses at the time of its withdrawal. Follow case 27.8 for withdrawal. If this rule is in effect, the Allied player would receive British replacement factors when the British 50th and 59th infantry divisions are with-drawn as per the OB Chart.
EXAMPLE: A full strength infantry division would yield three infantry replace-ment factors, while a reduced infantry division would yield only two.
[33.15] American 1st Special Service Force (NE)The American 1SSF unit, besides being a ranger unit, is also con-sidered to be a paratrooper and mountain unit and may use all rules pertaining to those types of units.
[33.16] Panzer Reserve Surprise (G2)The German player may bring all units of the Panzer Reserve back into the game during any turn (either impulse) November II - November IV; rule 29.4 is disregarded. In addition, on the turn the Reserve is brought back all attacks involving any reserve unit add + 1 to the die roll. The German player still has the option to keep the Reserve off-map until December I, and then follows the normal rules; rule 29.4 would apply and there would be no die roll modifications.
[33.17] Skorzeny’s Commandos--Operation Greif (NE)The German 150 armor brigade has no ZOC except the hex it occu-pies. It may also disregard any and all enemy ZOCs during movement and combat. If it attacks, it may attack hexes selectively, ignoring all enemy ZOCs of units it is not attacking. However, if it attacks a hex, it must attack every defender in that hex.
[33.18] German Supply Restrictions (A1)German units in cities/fortresses that cannot trace a supply line (of any length) back to a German controlled city in Germany or Italy cannot move (though they are in supply). Units in this situation may not take replacements or be withdrawn according to the OB. Training divisions and headquarters may invert. In addition, rail lines that do not connect to either a city in Germany or an east edge hex may not be used, even if they are otherwise usable.
[33.19] Allied Fuel Restrictions (G1)The Allies cannot automatically move armored units during the sec-ond impulse. They can only move a number of armored units equal to the excess amount of SC they have. Non-armored units are not affected.
[33.20] Ports (G2)The Allies may not use Bremen or Hamburg as a port for either sea movement or supply purposes. Rouen is an inland port with a supply capacity of 2. If after extensive play, it seems that the Allied player is consistently able to raise his SC too easily, certain port supply capac-ity numbers should be reduced as follows: Marseilles (10), Bordeaux (8), Lorient (3), Brest (9), Cherbourg (5), Le Havre (4), Boulogne (3), Calais (3), Antwerp (12), Rotterdarm (7), Amsterdam (7).
[33.21] Exiting Allied Units (A2)The Allied player may exit armored and infantry units (that are in supply) off the north edge of the map into Denmark. For each armored unit so exited, an infantry unit may also be exited. The Allied player may never exit more infantry than armored units off the north edge into Denmark. They may not exit from hexes in an enemy ZOC. [33.21.1] Exited units may not return or be used as replacements nor withdrawn for replacements if rule 33.14 is used.

21
[33.21.2] If Optional Rule 33.28 is in effect, exited units count double against the SC unless an HQ is also exited. With either supply rule, an HQ must be within five hexes of the north edge of the map in order to supply exited units. This is not required if an HQ is exited. However, the Allied player must be able to trace a supply line leading off the north edge of the map for each exited unit when the units are exited and at all times after the units are exited. [33.21.3] For each step the Allied player exits off the map, the German player must remove one step from the game (may be any type of unit). These units may not be used as replacements. If a German unit removed to match exited Allied units must be withdrawn from the game or to the Panzer Reserve, a substitute unit is removed in-stead (see 27.8 and 29.1). [33.21.4] If at any time after exiting units, the Allied player no lon-ger has a supply line (leading off the north edge into Denmark) or the SC for exited units, all exited units out of supply lose one step (these lost steps or units may not be replaced or be used as replacements). When the number of exited Allied steps is reduced in this manner, the German player may bring back steps he has removed to match exited Allied steps that are now in excess of his required removals. These units may enter the game like normal reinforcements on the following German turn.
[33.21.5] The Allied player may exit a total of 15 steps off the north edge into Denmark.
[33.22] The Funnies--the British 79th Armor Division (A1)The following rules apply to the 79th substitute counters; the 79th 1RE (1st Royal Engineers) Brigade, 1st Brigade, and 30th Brigade.
[33.22.1] If any one of these units is in a river hex on a section of river where bridges have been destroyed, Allied units may cross the river normally at this hex. The substitute unit would not be considered to be in the ZOC of an enemy unit across the river during this oper-ation or during combat. The substitute unit could move in the same impulse, before or after aiding units in this movement. Units could also retreat across a substitute unit in the same manner.
[33.22.2] If any one of these units is participating in an attack across a river where the defender is doubled for the river, all attacking units (including the 79th substitute unit/s) in the same hex have their combat factor doubled.
[33.22.3] If any one of the units is participating in an attack on a city or fortification, the Allied player may add one to the die roll.
[33.22.4] If any one of the units participate in an attack in which they use any of their special attributes, these units must take losses before all other units. If the funnies unit used its +1 DRM versus a fortress or city, the funnies unit is eliminated unless the defender is eliminated.
[33.22.5] If Optional Rule 33.13 is in effect the 79th may be brought up to full strength at the beginning of the game by spend-ing the accumulated Special replacement point. The 79th may then break down into its substitute counters. The 79th, although an armor division, requires Special replacements in order to benefit from the rules governing the “funnies.” If built up to full strength using one Special replacement, it can then break down into three separate units as shown on the OB. They may recombine again if they are in the
same hex at the beginning of a turn, in supply, and not in enemy ZOC. The reconstructed 79th may not move on the turn of reconstruction. If when broken down, one of the substitute units is eliminated, it can be rebuilt at the cost of two Special replacement points. The 79th can be rebuilt using armor replacements. However, once it takes an armor replacement it loses all attributes of the funnies and can never again break down into the separate funnies units. The 79th can only break down if there is enough excess SC to accommodate all the substitute units; when broken down, each substitute unit is counted as one unit against the SC.
[33.22.6] All of the above special attributes also apply to the 79th armor division (so long as it has never received an armor replace-ment during the course of the game). Furthermore, if the 79th is at full strength, the DRM for attacking a fortress or city is +2. If the 79th is at reduced strength, the modifier remains only +1.
[33.23] German V2 Rocket Attacks (G1)Beginning with the September II game turn, add the following Air Mission to the Aircraft Mission Chart:
[17.10.10] Attacking V2 Bases--SAC only. Procedure: Only one unit may be assigned to fly CAP for this mission each turn. Effect: If the Allied player controls Antwerp, the Allied player loses Antwerp’s whole current PC that turn if an uncancelled German TAC is on this mission. Antwerp’s current PC is halved if no aircraft of either side are on this mission. There is no effect if (only) an Allied SAC is on this mission. If the Allied player doesn’t control Antwerp, and the Allied player does not allocate aircraft to this mission, the British replacement rate for that turn becomes 1(0). If the Allied player does not cancel a German aircraft flying CAP for this mission, the British replacement rate for that turn becomes 0(0). If one replacement is lost to both the V1 and V2 missions, the British replacement rate is 0(0) for that turn.
[33.24] Advanced Air System (NE)The following rules replace the corresponding rules in the rulebook.
[17.1] Aircraft can only fly on Clear Weather turns. (EXCEPTION: On turns when the weather is not Clear, from June III to September IV, the Allied player has 3 SAC aircraft available and the German player has 2 NF--Night Fighters, players must make their own count-ers--available. Beginning with the October I turn, no aircraft are available on non-Clear turns.)
[17.6] The Allied player has twelve aircraft available each turn--five SAC and seven TAC. The German player has seven aircraft available each turn from June I to September IV--five TAC and two NF. The German player has eight aircraft available each turn from October 1 to May I--five TAC and three NF. However, each German aircraft uses one fuel each turn it flies and aircraft may only fly when fuel is available.
[17.7] The German player has two Fuel Tracks (and a marker for each, players must make their own counters)--the Production Track and the Reserves Track. At the beginning of the game, the Production Track marker is set at 7 and the Reserves Track marker is set at 30. The maximums for Production and Reserves are 20 and 40 respectively.
[17.7.1] At the beginning of each month, the German player increas-es his Reserves Track marker by a number equal to the Production Track marker’s current level.
22
[17.7.2] Each turn non-canceled Allied aircraft are flying the Attack German Fuel Mission, the German Production Track marker is re-duced by one (it is never reduced by more than one regardless of how many non-canceled Allied planes there are). Each turn Allied planes are not flying the Attack German Fuel Mission or all Allied aircraft flying this mission are canceled, the German Production Track marker is increased by one. [17.7.3] The German Reserves Track marker is reduced by one for each German aircraft that flies each turn.
[17.9.1] At the start of each month, the German player allocates his aircraft to either the Western Front box or the Germany box. German aircraft may only be switched between the Western Front box and the Germany box at the beginning of the first turn of each month. NFs must always be placed in the Germany box.
[17.9.2] The Allied player allocates his aircraft on the AMC using each unit during each Clear weather turn. The German player then allocates any aircraft he chooses to fly (if he has fuel remaining) this turn on the AMC within the rules of 17.7. German aircraft assigned to the Western Front may fly any mission except the Attacking German Replacements mission or the Attacking German Fuel Mission. Aircraft assigned to Germany can only fly the Attacking German Replacements Mission or the Attacking German Fuel Mission.
[33.25] French Commandos (A1)French commandos protected the flanks of the Anvil-Dragoon inva-sion. This optional rule adds those two 1-4 battalions to the Allied At Start OB in Africa.
[33.26] Goliath Tanks (G1)Recent research has found that Goliath tanks were present at Normandy. Three companies formed the 301 battalion and a fourth company was permanently attached to Panzer Lehr. These unique units were used with success when counter-attacking in the bocage. The following optional rule reflects this German capability:When attacking into a rough hex in the 7th Army District (the bo-cage), the Panzer Lehr Division is no longer halved but retains its full strength. Lehr would still be halved if defending in such a hex, however. Furthermore, if stacked with a panzer unit, the 301 Goliath battalion negates the halving of that unit when attacking a rough hex in the 7th Army District. In other words, both the panzer unit and the Goliath battalion retain their full strength. They would be halved if defending in such a hex, however.The 301 Goliath battalion (1-6) is an optional Invasion Reaction Force unit, and is available only if this optional rule is in effect.
[33.27] Emergency Resupply (NE)At the end of the Allied second impulse, one Out of Supply Allied unit may receive Emergency Resupply by air if all of the following are true: 1) The unit is within TAC range. 2) The unit is not in Germany.3) It did not move or attack that turn.4) The weather is Clear.5) No Allied paradrop was made that turn.A unit supplied in this manner does not lose a step and does not count against the SC for the current turn.
[33.28] Optional Supply Rules (NE)For a more realistic game, at the expense of ease of game play, players may wish to use the following supply rules. These rules replace the
existing section 18 in its entirety.
[18.0] sUpply
[18.1] A unit can obtain supplies in one of five ways. All units unable to satisfy any of these conditions are Out of Supply. Each unit (includ-ing HQs) that is Out of Supply at the end of the second impulse los-es one step. (EXCEPTIONS: Rangers, Commandos, invading units on the invasion turn, and paratroopers on the player’s turn they are dropped.)
A) It can trace a line of supply no longer than five controlled hexes to a friendly HQ and the HQ can trace a supply line over controlled hexes to a supply source. Allied supply sources are Allied-controlled ports, BHS and mulberry, and can supply a limited number of units. German supply sources are German-controlled cities in Germany or Italy and can supply an unlimited number of units. The unit being supplied, the HQ unit and the supply source may be in enemy ZOC but the supply lines between the unit and the HQ and between the HQ and the supply source may not pass through enemy ZOC, or an enemy city/BHS/mulberry. B) No enemy unit is within five hexes and it can trace a supply line of unlimited length over controlled hexes to a supply source. Allied units using this method count double against the Port Capacity of the port supplying it.C) It occupies a city or fortress. (EXCEPTION: Allied units in Germany or Italy cannot get supply this way.)D) An Allied unit occupies a port, mulberry, or BHS of sufficient ca-pacity. E) A German unit occupies a hex in Germany or Italy or is frozen in a Military District.
CLARIFICATION: Controlled hexes are those that were last occu-pied by a friendly unit. In instances where this is not obvious, a side controls a hex if one if his units would be in supply there while an enemy unit would not.
[18.2] To obtain supply by method 18.1A, each Allied unit must trace supply to one or more ports/BHS/mulberry of sufficient Port Capacity (PC) to supply all units tracing supply to those ports/BHS/mulberry. The overall Allied supply limitation is kept track of as the Supply Capacity (SC).
[18.2.1] During an invasion turn, all invading Allied units are con-sidered in supply for the whole turn. At the end of the Allied player’s second impulse on the turn of the first invasion the SC is set by adding the total current PC of the BHS and any ports captured during the first turn and subtracting the total Supply Capacity Cost of all Allied units on the map. Note that each type of Allied unit has a separate Supply Capacity Cost, and that some units do not count against the SC at all (rangers/commandos, and paratroopers on the turn they paradrop onto the map). These costs are summarized on the Unit Cost Chart.
[18.2.2] If the SC is negative, excess Allied units are out of supply, and will lose one step if the SC is negative at the end of the Allied second impulse. The Allied player chooses which units lose a step. (EXCEPTION: Allied units in cities count for the SC but not for los-ing steps due to a negative SC.)
EXAMPLE: At the end of the Allied second impulse the SC is -3 (minus 3) and two Allied units are in cities. One step must be lost for lack of supply.
23
damaged by weather, an Allied unit lands on the map, or an Allied unit moves to change a unit from counting normal to counting double for the SC. If the SC is over 40, players can flip the SC counter over to its +40 side.
[18.2.5] Adjustments to the SC are made immediately. For in-stance, if an Allied unit is destroyed in the first impulse raising the SC to 1, another Allied unit could land in the second impulse to replace the lost unit. Similarly, as soon as a port is captured, this increased SC can be used to bring units onto the map that impulse. (EXCEPTIONS: See 20.16 and 21.4)
[18.2.6] The SC can be checked at any time by adding the current PC of the mulberry and BHS and all controlled ports and subtracting the Supply Capacity Cost of all Allied units on the map, counting some units double if appropriate. If there is any discrepancy, alter the SC immediately.
[18.2.7] The Allied player may never intentionally lower the SC below zero.
[18.2.8] If the SC is at zero at the beginning of the Allied player’s turn, before placing the mulberry (if applicable), he cannot land any units on the map on the first impulse unless he moves other units of equal or greater Supply Capacity Cost off the map by airlift and/or Sea Movement the same impulse. If the SC is raised above zero during the first impulse, units could land normally in the second im-pulse. Raids, but not paradrops, are exempt from this restriction. If the SC is zero or less at the beginning of a turn, the second invasion may not be made during that turn.
[18.2.9] If the SC is below zero at the beginning of the Allied player’s turn, he cannot land units on the map that turn, even if he brings the SC back above zero. Raids, but not paradrops, are exempt from this restriction.
[18.3] Each time an Allied player captures a port he must roll the die to see if the port has been damaged by the Germans before capture. A roll of ‘5’ or ‘6’ reduces the PC of the port by half (rounded down, e.g. a PC of 3 becomes 1). This damage can be repaired at the rate of one point per turn beginning the turn after capture if the port is occupied by an Allied Infantry unit. These repaired PC points should be added into the SC at the end of the Allied player’s second impulse, before check-ing to see if units are out of supply. Use a damage marker to show the amount of damage at a port. Mulberry damage cannot be repaired.
[18.4] If the Allies recapture a port that was captured by the Germans, the procedure outlined in 18.3 must be followed again, except that a roll of ‘3-6’ (instead of just ‘5-6’) reduces the PC of the port to half (rounded down) of its current value. A roll of 1-2 leaves the current PC unchanged.
[18.5] A port is considered captured when a friendly unit occupies it. (EXCEPTION: See 14.10.) It may be used on the impulse it is taken. (EXCEPTIONS: See 20.16 and 21.4) If an unoccupied Allied-controlled port/mulberry/BHS is put in a German ZOC, its PC is im-mediately unusable. Should the Allies reoccupy the port or mulberry/BHS before the Germans capture it, they immediately regain the lost PC.
[18.6] Inland ports whose passage to the sea is blocked by an enemy ZOC lose their PC until no longer blocked by ZOC(s).
Allied units may be Out of Supply even if they can trace a supply line to a supply source and the SC is greater than 0.
EXAMPLE: The Allies control the 12 BHS and Lorient but no supply line can be traced between them. Seven infantry divisions and an HQ are tracing supply to each. The SC is 3 (12+6-7.5-7.5) but two of the units tracing supply to Lorient are out of supply (unless placed in the Lorient hex) since Lorient’s PC of 6 is insufficient to supply them all.
[18.2.3] An Allied unit counts double for the SC under any of the following conditions: 1) It uses method 18.1B or C to obtain supply. 2) It is out of supply. 3) The supply line from the HQ to the port/BHS/mulberry supplying the unit is greater than 10 hexes unless a chain of HQs 10 or fewer hexes apart can be traced all the way to the supply source ports/BHS/mulberry.
EXAMPLE 1: The Allied player controls Brest and an HQ is in Rennes, eight hexes away. Eight infantry divisions are within five hexes of the HQ and draw supply from Brest using method ‘A’ from 18.1. An Armored division is in hex 1310, six hexes from the nearest HQ at Rennes. If German units are within five hexes of 1310, the armored division would be Out of Supply. If there are no German units within five hexes, this unit would draw supply from Brest using method ‘B’ from 18.1. Regardless of the presence of enemy units, this unit would count double (3 instead of 1½ ) against the Port Capacity of Brest as Out of Supply units still count against the SC. Brest would currently be using 11½ of its 12 Port Capacity factors to supply these units (8 for the infantry; 3 for the armored unit; and ½ for the HQ). Thus, the Allies could not land another division there. On the second impulse, the Allied player moves the HQ from Rennes to hex 0808, putting it within five hexes of the armored unit and eight hexes from Brest. Now Brest is using only 10 of its capacity, since the armored division no longer counts double. The Allied player now lands an infantry division and moves it to hex 0303. This division is neither in the port (which would satisfy method ‘D’ from 18.1) nor within five hexes of the HQ (which would satisfy method ‘A’), so it counts double against the Port Capacity of Brest. Brest is now using all 12 of its Port Capacity factors and no more units may land at that port, though units on the map may use sea movement to leave Brest for another port. Alternatively, if the infantry division remained at Brest (i.e. it did not move to 0303), it would not cost double and an additional infantry division could land (and stay) there.
EXAMPLE 2 : The Allies control Bordeaux, La Rochelle and the 12 BHS in hex 0413 and have HQ Patton in hex 1416. Eight infantry divisions and eight armored divisions are tracing supply to Patton and thence to the ports. Patton is within 10 hexes of all but Bordeaux. The eight armored divisions and three infantry divisions (total cost 8 x 1½ +3=15) can trace supply normally to La Rochelle and the BHS (total PC 3+12=15). Patton and five infantry divisions trace supply to Bordeaux but count double (cost 5½ x2 = 11) since Patton isn’t within 10 hexes of Bordeaux. Bordeaux’s PC of 10 can’t supply them all, so one Allied unit is out of supply. If HQ Gerow were in hex 0622, none of the units would count double since Patton is 10 hexes or fewer from Gerow, and Gerow is 10 hexes or fewer from Bordeaux. Bordeaux’s PC of 10 is enough to supply two HQs and five infantry divisions with three left over, so up to three more infantry divisions could land as long as they stayed in a port/BHS or within 5 hexes of either HQ. If HQ Patch were in hex 1129, all these units could also draw supply from any 19th District port without counting double.
[18.2.4] The SC is increased each time a port is captured by the Allies, a BHS or mulberry is placed, a damaged port is repaired, an Allied unit is eliminated, an Allied unit moves off the map by sea movement or airlift, or an Allied unit is moved to change a unit from counting double to counting normal for the SC. The SC is reduced if a port, BHS or mulberry is captured by the Germans, an unoccupied Allied port, BHS or mulberry is put in a German ZOC, a mulberry is
24
EXAMPLES: 1) Amsterdam can be used for supply if it is Allied controlled and hexes 3402, 3403, 3502, 3602 and 3603 are free of German units. 2) Bremen could not be used for supply purposes if any of the following hexes were German occupied: 4203, 4204, 4302, 4303, and, of course, 4304.
[18.7] Aircraft Missions, terrain, and weather do not affect supply lines.
[18.8] Only units satisfying conditions A, B, D or E in 18.1 at the start of that Player Turn may take replacements.
[33.29] FLAK Units (G1) [33.29.1] Each FLAK unit negates one Allied aircraft in its hex and all adjacent hexsides. For example, if a hex containing a FLAK unit were attacked with three TAC on ground support, the Allies would only receive two column shifts as one aircraft is negated by the FLAK unit. [33.29.2] A hex containing a FLAK unit cannot be the target of a carpet bombing mission. [33.29.3] Bridge Attacks do not destroy the bridges bordering a FLAK unit’s hex. [33.29.4] If strafing occurs in a hex containing a FLAK unit, the moving unit receives a +1 DRM. This occurs if the FLAK hex is the third hex entered or the first hex in TAC range over three hexes it entered, whichever came first.
[33.30] Non-Divisional Armored Units (NE)Armored brigades/regiments cost ½, rather than 1, for stacking.
[34.0] sUdden deaTh viCToRy CondiTionsThese Sudden Death Victory Conditions are provided as an optional rule; they are not part of the basic game.
[34.1] Before the start of the game, each player must secretly write down his objectives for September I and January I. At the beginning of each of these turns, each player must reveal his objectives before anything else is done for that turn.
[34.2] If one player has met all of his objectives for that turn and his opponent has not met all of his objectives for that turn, he is the winner. If one player has met two (or more) more of his objectives than his opponent has for that turn, he is the winner. In both cases, the game ends immediately.
[34.3] If neither player wins by the Sudden Death Victory Conditions in September I or January I, the game continues and the normal Victory Conditions apply. Alternately, by agreement of the players, the game can be ended on either of these turns, with the player who has fulfilled more of his objectives as the winner (ties to be considered draws).
[34.4] Control and capture are defined as per rules 32.2 and 14.10.
[34.5] Each player must choose seven of the twelve objectives listed below for his September I objectives.Allies1. Control Marseilles2. Control Bordeaux or Brest3. Have had no headquarters eliminated4. Control Cherbourg or Le Havre5. Control Antwerp6. Control Brussels
7. Have capture at least four V1 sites8. Have destroyed two or more fortresses in Germany9. Have made two or fewer paradrops10. Have an SC of 10 or more11. Have not made a second invasion12. Have accumulated at least five American and five British replace-ments
Germans1. Control Genoa, Turin, and at least one other port on the Mediterranean coast2. Control Brussels3. Control Antwerp4. Control Belfort5. Control Metz6. Have at least nine full strength armored divisions on the map7. Control the dyke hex (3502), Rotterdam, and Amsterdam8. Have not made a paradrop9. Control two or more U-Boat bases10. Control three or more V1 sites11. Have no destroyed fortresses in Germany and no Allied units in Germany12. Have accumulated at least five replacements
[34.6] Each player must choose five of the nine objectives listed be-low for his January I objectives:Allies1. Control Munich, Innsbruck, or Salzburg2. Control twelve or more cities in Germany3. Control Bremen and Erfurt4. Have at least two paradrops remaining5. Control every port on the map.6. Have an SC of 30 or more7. Have accumulated at least ten American replacements and five British replacements8. Have at least twelve full strength armor divisions on the map9. Have at least seven headquarters units on the map
Germans.1. Control Frankfurt2. Control Nuremberg3. Control Hanover4. Control Munich5. Have six headquarters units on the map6. Have at least twelve full strength infantry divisions on the map7. Control two or more ports8. Have not brought back the Panzer Reserve9. Have accumulated at least ten replacements
[35.0] sCenaRiosAll regular game rules apply unless specifically changed.[35.1] “TO THE WEST WALL”
[35.1.1] The setup is the same as the regular game.
[35.1.2] Before the start of the game, players must pick September I objectives as per rule 34.5.
[35.1.3] The game is twelve turns long; June 1-August IV.
[35.1.4] At the end of the game, players reveal their objectives. The player who met the most objectives is the winner. If both players have met the same number of objectives, the game is a draw.
25
[35.2] “BREACHING THE WEST WALL”
[35.2.1] The setup is the same as the regular game.
[35.2.2] Before the start of the game, players must pick both September I and January I objectives as per rule 34.5 and 34.6.
[35.2.3] The game is twenty-eight turns long; June I-December IV. [35.2.4] At the end of the August IV turn, both players check their September I objectives. If one player has met all his objectives, and the other player has not, the game is over. Otherwise, play continues until the end of the December IV turn. At the end of the game, play-ers reveal their January I objectives. The player who met the most objectives is the winner. If both players have met the same number of objectives, the game is a draw.
[35.3] “INVASION” (The Tournament Scenario)
[35.3.1] The setup is the same as the regular game.
[35.3.2] The game is seven turns long; June I-July III.
[35.3.3] The Allied player has to meet one of his victory conditions to win. There is a separate set of victory conditions for each of the five Military Districts. The Allied player must use the victory conditions for the Military District he invades in. If the invasion overlaps into more than one district, the Allied player only has to meet one victory condition, and it can be from either district. If the Allied player does not meet one victory condition, the German player wins. In addition, the Allied player must have a SC of at least 1. However, the mulberry or BHS need not be intact for the Allied player to win.
[35.3.4] After the first Storm is rolled, all subsequent Storms are treated as Overcast. Because of this, the turn following a second (or subsequent) Storm-turned-Overcast is not automatically Clear. It is possible to have consecutive Overcast turns if consecutive Storms are actually rolled.
[35.3.5] The Allied player receives one French Partisan counter on turn 1. Beginning on turn 2, the Allied player rolls for Partisans in the normal manner.
[35.3.6] The Allied player may make two paradrops during the course of the game. He may also conduct two raids.
[35.3.7] The German player does not have a paradrop capability in this scenario. He may make one airlift during the course of the game.
[35.3.8] Military District Victory Conditions:
Netherlands Military District1. Control any one of the following: Bremen, Hannover, Erfurt, Hamburg, Leipzig, Berlin.2. Control Paris3. Control any three of the following: Amsterdam, Rotterdam, Antwerp, Brussels.4. Control six or more cities.
15th Military District1. Control any two of the following: Paris, Le Havre, Brussels, Antwerp.
2. Control six or more cities.
7th Military District1. Control Caen and Paris.2. Control five or more cities in the 7th Military District. One of these must be Cherbourg or Brest.
1st Military District1. Control six or more cities.2. Control Bordeaux and either Brest, Paris, or Cherbourg.
19th Military District1. Control Marseilles and either Toulouse or Lyon.2. Control Marseilles plus seven or more other cities. At least four of the seven must be within the 19th Military District.
EXAMPLE: The Allied player controls Marseilles and four other cities in the 19th Military District. Three additional cities are controlled in the 7th Military District. Since four cities--not counting Marseilles-- are controlled within the 19th Military District and three without, the Allied Player wins.
[35.4] “BATTLE OF THE BULGE”
[35.4.1] The game is four turns long; December III - January II, but there is no Allied player December III turn. The game begins with the German player December III turn.
[35.4.2] Use the “Battle Of The Bulge” OB.
[35.4.3] Reinforcements and withdrawals are per the regular OB. There are no replacements in this game. The German player may make one paradrop during the game but only the Heydte unit may be used. The Allies may not make a paradrop or a raid. The SC is 16. Volkssturm units have already appeared in the follow-ing cities: Essen, Dusseldorf, Aachen, Cologne, Bonn, Saarbrucken, Karlsruhe, Stuttgart, and Freiburg. The following fortresses have been destroyed: 0116, 0203, 0206, 0309, 0414, 0806, 1102, 1605, 1606, 2105, 2205, 2304, 2504, 2915, 3217, 3309, 3310, 3312, 3409, and 3507.
[35.4.4] Weather for the December III turn is automatically Rain. Players may roll for weather for the other three game turns or use the following historical weather: December IV-Clear, January I-Storm, January II-Overcast.
[35.4.5] The German player has 3(3) TAC aircraft available for the December IV turn, and 7(7) for the month of January.
[35.4.6] Optional rules 33.17 and 33.22 are in effect.
[35.4.7] On the December III turn, all German attacks involving units within five hexes of HQ Dietrich get a + 1 to the die roll. (Count from Dietrich to the hex the attacking units are in but not Dietrich’s hex.) In addition, German units within five hexes of HQ Dietrich on the December III turn may selectively ignore Allied ZOCs during combat, and attack some units they are adjacent to and not others at the German player’s discretion. However, if an enemy-occupied hex is attacked, all units within that hex must be attacked.
[35.4.8] All ports are Allied controlled except the following: Bremen, Hamburg, Amsterdam, Rotterdam, Dunkirk, and Genoa. The 12 BHS is at 1305; the 6 BHS is at 1735; and the 9 Mulberry (damaged with a current value of 4) is at 1205.
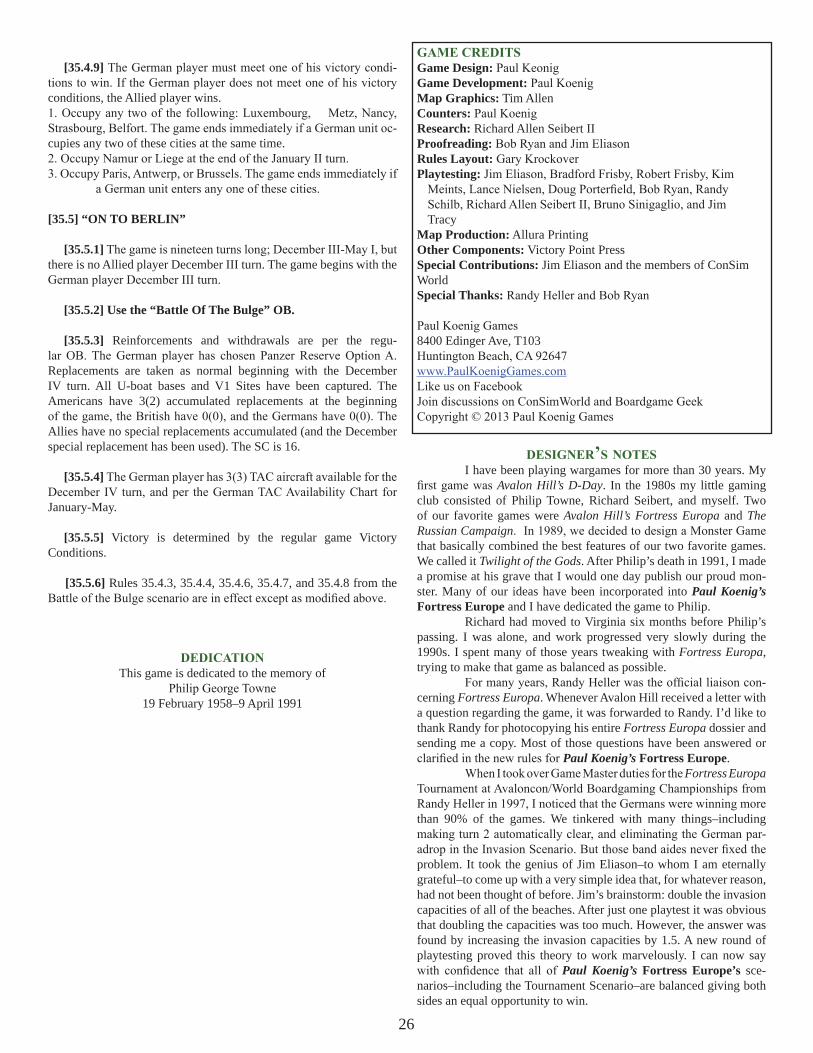
26
[35.4.9] The German player must meet one of his victory condi-tions to win. If the German player does not meet one of his victory conditions, the Allied player wins.1. Occupy any two of the following: Luxembourg, Metz, Nancy, Strasbourg, Belfort. The game ends immediately if a German unit oc-cupies any two of these cities at the same time.2. Occupy Namur or Liege at the end of the January II turn.3. Occupy Paris, Antwerp, or Brussels. The game ends immediately if
a German unit enters any one of these cities.
[35.5] “ON TO BERLIN”
[35.5.1] The game is nineteen turns long; December III-May I, but there is no Allied player December III turn. The game begins with the German player December III turn.
[35.5.2] Use the “Battle Of The Bulge” OB.
[35.5.3] Reinforcements and withdrawals are per the regu-lar OB. The German player has chosen Panzer Reserve Option A. Replacements are taken as normal beginning with the December IV turn. All U-boat bases and V1 Sites have been captured. The Americans have 3(2) accumulated replacements at the beginning of the game, the British have 0(0), and the Germans have 0(0). The Allies have no special replacements accumulated (and the December special replacement has been used). The SC is 16.
[35.5.4] The German player has 3(3) TAC aircraft available for the December IV turn, and per the German TAC Availability Chart for January-May.
[35.5.5] Victory is determined by the regular game Victory Conditions.
[35.5.6] Rules 35.4.3, 35.4.4, 35.4.6, 35.4.7, and 35.4.8 from the Battle of the Bulge scenario are in effect except as modified above.
dediCaTionThis game is dedicated to the memory of
Philip George Towne19 February 1958–9 April 1991
game CRediTs Game Design: Paul Keonig Game Development: Paul Koenig Map Graphics: Tim Allen Counters: Paul KoenigResearch: Richard Allen Seibert II Proofreading: Bob Ryan and Jim EliasonRules Layout: Gary KrockoverPlaytesting: Jim Eliason, Bradford Frisby, Robert Frisby, Kim
Meints, Lance Nielsen, Doug Porterfield, Bob Ryan, Randy Schilb, Richard Allen Seibert II, Bruno Sinigaglio, and Jim Tracy
Map Production: Allura Printing Other Components: Victory Point Press Special Contributions: Jim Eliason and the members of ConSim WorldSpecial Thanks: Randy Heller and Bob Ryan
Paul Koenig Games8400 Edinger Ave, T103Huntington Beach, CA 92647www.PaulKoenigGames.comLike us on FacebookJoin discussions on ConSimWorld and Boardgame GeekCopyright © 2013 Paul Koenig Games
designeR’s noTes I have been playing wargames for more than 30 years. My first game was Avalon Hill’s D-Day. In the 1980s my little gaming club consisted of Philip Towne, Richard Seibert, and myself. Two of our favorite games were Avalon Hill’s Fortress Europa and The Russian Campaign. In 1989, we decided to design a Monster Game that basically combined the best features of our two favorite games. We called it Twilight of the Gods. After Philip’s death in 1991, I made a promise at his grave that I would one day publish our proud mon-ster. Many of our ideas have been incorporated into Paul Koenig’s Fortress Europe and I have dedicated the game to Philip. Richard had moved to Virginia six months before Philip’s passing. I was alone, and work progressed very slowly during the 1990s. I spent many of those years tweaking with Fortress Europa, trying to make that game as balanced as possible. For many years, Randy Heller was the official liaison con-cerning Fortress Europa. Whenever Avalon Hill received a letter with a question regarding the game, it was forwarded to Randy. I’d like to thank Randy for photocopying his entire Fortress Europa dossier and sending me a copy. Most of those questions have been answered or clarified in the new rules for Paul Koenig’s Fortress Europe. When I took over Game Master duties for the Fortress Europa Tournament at Avaloncon/World Boardgaming Championships from Randy Heller in 1997, I noticed that the Germans were winning more than 90% of the games. We tinkered with many things–including making turn 2 automatically clear, and eliminating the German par-adrop in the Invasion Scenario. But those band aides never fixed the problem. It took the genius of Jim Eliason–to whom I am eternally grateful–to come up with a very simple idea that, for whatever reason, had not been thought of before. Jim’s brainstorm: double the invasion capacities of all of the beaches. After just one playtest it was obvious that doubling the capacities was too much. However, the answer was found by increasing the invasion capacities by 1.5. A new round of playtesting proved this theory to work marvelously. I can now say with confidence that all of Paul Koenig’s Fortress Europe’s sce-narios–including the Tournament Scenario–are balanced giving both sides an equal opportunity to win.
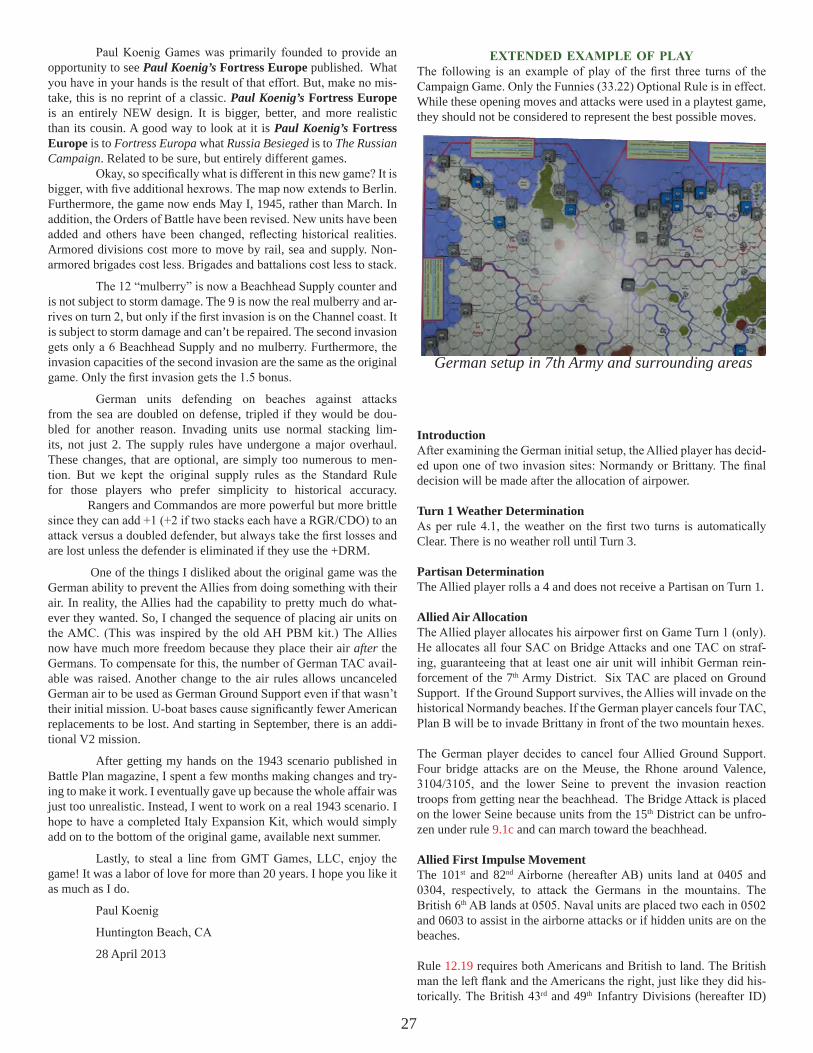
27
Paul Koenig Games was primarily founded to provide an opportunity to see Paul Koenig’s Fortress Europe published. What you have in your hands is the result of that effort. But, make no mis-take, this is no reprint of a classic. Paul Koenig’s Fortress Europe is an entirely NEW design. It is bigger, better, and more realistic than its cousin. A good way to look at it is Paul Koenig’s Fortress Europe is to Fortress Europa what Russia Besieged is to The Russian Campaign. Related to be sure, but entirely different games. Okay, so specifically what is different in this new game? It is bigger, with five additional hexrows. The map now extends to Berlin. Furthermore, the game now ends May I, 1945, rather than March. In addition, the Orders of Battle have been revised. New units have been added and others have been changed, reflecting historical realities. Armored divisions cost more to move by rail, sea and supply. Non-armored brigades cost less. Brigades and battalions cost less to stack.
The 12 “mulberry” is now a Beachhead Supply counter and is not subject to storm damage. The 9 is now the real mulberry and ar-rives on turn 2, but only if the first invasion is on the Channel coast. It is subject to storm damage and can’t be repaired. The second invasion gets only a 6 Beachhead Supply and no mulberry. Furthermore, the invasion capacities of the second invasion are the same as the original game. Only the first invasion gets the 1.5 bonus.
German units defending on beaches against attacks from the sea are doubled on defense, tripled if they would be dou-bled for another reason. Invading units use normal stacking lim-its, not just 2. The supply rules have undergone a major overhaul. These changes, that are optional, are simply too numerous to men-tion. But we kept the original supply rules as the Standard Rule for those players who prefer simplicity to historical accuracy. Rangers and Commandos are more powerful but more brittle since they can add +1 (+2 if two stacks each have a RGR/CDO) to an attack versus a doubled defender, but always take the first losses and are lost unless the defender is eliminated if they use the +DRM.
One of the things I disliked about the original game was the German ability to prevent the Allies from doing something with their air. In reality, the Allies had the capability to pretty much do what-ever they wanted. So, I changed the sequence of placing air units on the AMC. (This was inspired by the old AH PBM kit.) The Allies now have much more freedom because they place their air after the Germans. To compensate for this, the number of German TAC avail-able was raised. Another change to the air rules allows uncanceled German air to be used as German Ground Support even if that wasn’t their initial mission. U-boat bases cause significantly fewer American replacements to be lost. And starting in September, there is an addi-tional V2 mission.
After getting my hands on the 1943 scenario published in Battle Plan magazine, I spent a few months making changes and try-ing to make it work. I eventually gave up because the whole affair was just too unrealistic. Instead, I went to work on a real 1943 scenario. I hope to have a completed Italy Expansion Kit, which would simply add on to the bottom of the original game, available next summer.
Lastly, to steal a line from GMT Games, LLC, enjoy the game! It was a labor of love for more than 20 years. I hope you like it as much as I do.
Paul Koenig
Huntington Beach, CA
28 April 2013
exTended example of playThe following is an example of play of the first three turns of the Campaign Game. Only the Funnies (33.22) Optional Rule is in effect. While these opening moves and attacks were used in a playtest game, they should not be considered to represent the best possible moves.
IntroductionAfter examining the German initial setup, the Allied player has decid-ed upon one of two invasion sites: Normandy or Brittany. The final decision will be made after the allocation of airpower.
Turn 1 Weather DeterminationAs per rule 4.1, the weather on the first two turns is automatically Clear. There is no weather roll until Turn 3.
Partisan DeterminationThe Allied player rolls a 4 and does not receive a Partisan on Turn 1.
Allied Air AllocationThe Allied player allocates his airpower first on Game Turn 1 (only). He allocates all four SAC on Bridge Attacks and one TAC on straf-ing, guaranteeing that at least one air unit will inhibit German rein-forcement of the 7th Army District. Six TAC are placed on Ground Support. If the Ground Support survives, the Allies will invade on the historical Normandy beaches. If the German player cancels four TAC, Plan B will be to invade Brittany in front of the two mountain hexes.
The German player decides to cancel four Allied Ground Support. Four bridge attacks are on the Meuse, the Rhone around Valence, 3104/3105, and the lower Seine to prevent the invasion reaction troops from getting near the beachhead. The Bridge Attack is placed on the lower Seine because units from the 15th District can be unfro-zen under rule 9.1c and can march toward the beachhead.
Allied First Impulse MovementThe 101st and 82nd Airborne (hereafter AB) units land at 0405 and 0304, respectively, to attack the Germans in the mountains. The British 6th AB lands at 0505. Naval units are placed two each in 0502 and 0603 to assist in the airborne attacks or if hidden units are on the beaches.
Rule 12.19 requires both Americans and British to land. The British man the left flank and the Americans the right, just like they did his-torically. The British 43rd and 49th Infantry Divisions (hereafter ID)
German setup in 7th Army and surrounding areas
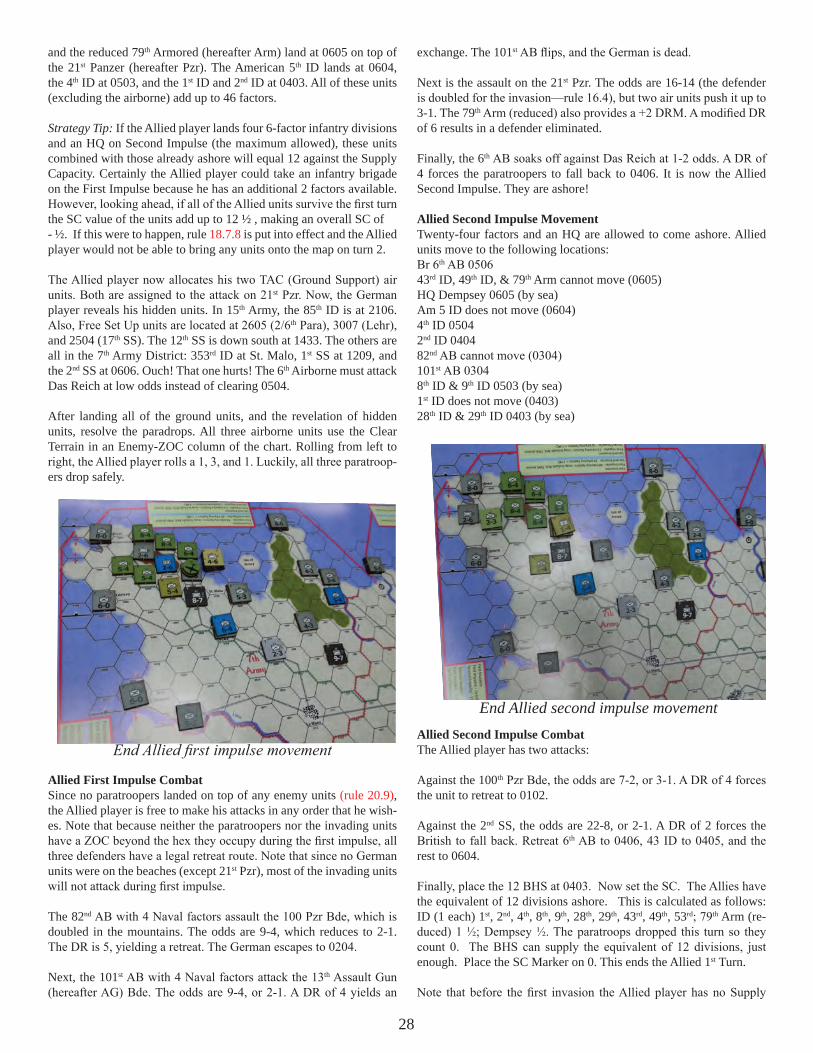
28
and the reduced 79th Armored (hereafter Arm) land at 0605 on top of the 21st Panzer (hereafter Pzr). The American 5th ID lands at 0604, the 4th ID at 0503, and the 1st ID and 2nd ID at 0403. All of these units (excluding the airborne) add up to 46 factors.
Strategy Tip: If the Allied player lands four 6-factor infantry divisions and an HQ on Second Impulse (the maximum allowed), these units combined with those already ashore will equal 12 against the Supply Capacity. Certainly the Allied player could take an infantry brigade on the First Impulse because he has an additional 2 factors available. However, looking ahead, if all of the Allied units survive the first turn the SC value of the units add up to 12 ½ , making an overall SC of - ½. If this were to happen, rule 18.7.8 is put into effect and the Allied player would not be able to bring any units onto the map on turn 2. The Allied player now allocates his two TAC (Ground Support) air units. Both are assigned to the attack on 21st Pzr. Now, the German player reveals his hidden units. In 15th Army, the 85th ID is at 2106. Also, Free Set Up units are located at 2605 (2/6th Para), 3007 (Lehr), and 2504 (17th SS). The 12th SS is down south at 1433. The others are all in the 7th Army District: 353rd ID at St. Malo, 1st SS at 1209, and the 2nd SS at 0606. Ouch! That one hurts! The 6th Airborne must attack Das Reich at low odds instead of clearing 0504.
After landing all of the ground units, and the revelation of hidden units, resolve the paradrops. All three airborne units use the Clear Terrain in an Enemy-ZOC column of the chart. Rolling from left to right, the Allied player rolls a 1, 3, and 1. Luckily, all three paratroop-ers drop safely.
Allied First Impulse CombatSince no paratroopers landed on top of any enemy units (rule 20.9), the Allied player is free to make his attacks in any order that he wish-es. Note that because neither the paratroopers nor the invading units have a ZOC beyond the hex they occupy during the first impulse, all three defenders have a legal retreat route. Note that since no German units were on the beaches (except 21st Pzr), most of the invading units will not attack during first impulse.
The 82nd AB with 4 Naval factors assault the 100 Pzr Bde, which is doubled in the mountains. The odds are 9-4, which reduces to 2-1. The DR is 5, yielding a retreat. The German escapes to 0204.
Next, the 101st AB with 4 Naval factors attack the 13th Assault Gun (hereafter AG) Bde. The odds are 9-4, or 2-1. A DR of 4 yields an
exchange. The 101st AB flips, and the German is dead.
Next is the assault on the 21st Pzr. The odds are 16-14 (the defender is doubled for the invasion—rule 16.4), but two air units push it up to 3-1. The 79th Arm (reduced) also provides a +2 DRM. A modified DR of 6 results in a defender eliminated.
Finally, the 6th AB soaks off against Das Reich at 1-2 odds. A DR of 4 forces the paratroopers to fall back to 0406. It is now the Allied Second Impulse. They are ashore!
Allied Second Impulse MovementTwenty-four factors and an HQ are allowed to come ashore. Allied units move to the following locations:Br 6th AB 050643rd ID, 49th ID, & 79th Arm cannot move (0605)HQ Dempsey 0605 (by sea)Am 5 ID does not move (0604) 4th ID 05042nd ID 040482nd AB cannot move (0304)101st AB 03048th ID & 9th ID 0503 (by sea)1st ID does not move (0403)28th ID & 29th ID 0403 (by sea)
Allied Second Impulse CombatThe Allied player has two attacks:
Against the 100th Pzr Bde, the odds are 7-2, or 3-1. A DR of 4 forces the unit to retreat to 0102.
Against the 2nd SS, the odds are 22-8, or 2-1. A DR of 2 forces the British to fall back. Retreat 6th AB to 0406, 43 ID to 0405, and the rest to 0604.
Finally, place the 12 BHS at 0403. Now set the SC. The Allies have the equivalent of 12 divisions ashore. This is calculated as follows: ID (1 each) 1st, 2nd, 4th, 8th, 9th, 28th, 29th, 43rd, 49th, 53rd; 79th Arm (re-duced) 1 ½; Dempsey ½. The paratroops dropped this turn so they count 0. The BHS can supply the equivalent of 12 divisions, just enough. Place the SC Marker on 0. This ends the Allied 1st Turn.
Note that before the first invasion the Allied player has no Supply
End Allied first impulse movement
End Allied second impulse movement
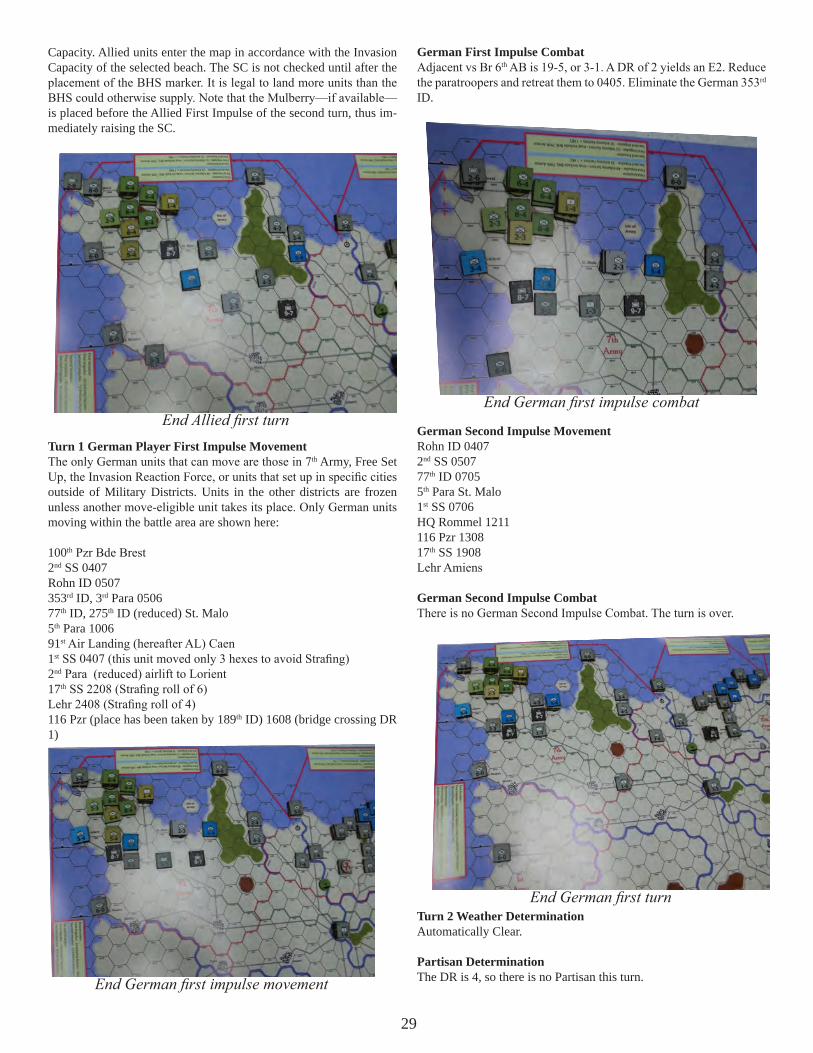
29
Capacity. Allied units enter the map in accordance with the Invasion Capacity of the selected beach. The SC is not checked until after the placement of the BHS marker. It is legal to land more units than the BHS could otherwise supply. Note that the Mulberry—if available—is placed before the Allied First Impulse of the second turn, thus im-mediately raising the SC.
Turn 1 German Player First Impulse MovementThe only German units that can move are those in 7th Army, Free Set Up, the Invasion Reaction Force, or units that set up in specific cities outside of Military Districts. Units in the other districts are frozen unless another move-eligible unit takes its place. Only German units moving within the battle area are shown here:
100th Pzr Bde Brest2nd SS 0407Rohn ID 0507353rd ID, 3rd Para 050677th ID, 275th ID (reduced) St. Malo5th Para 100691st Air Landing (hereafter AL) Caen1st SS 0407 (this unit moved only 3 hexes to avoid Strafing)2nd Para (reduced) airlift to Lorient17th SS 2208 (Strafing roll of 6)Lehr 2408 (Strafing roll of 4)116 Pzr (place has been taken by 189th ID) 1608 (bridge crossing DR 1)
German First Impulse CombatAdjacent vs Br 6th AB is 19-5, or 3-1. A DR of 2 yields an E2. Reduce the paratroopers and retreat them to 0405. Eliminate the German 353rd ID.
German Second Impulse MovementRohn ID 04072nd SS 050777th ID 07055th Para St. Malo1st SS 0706HQ Rommel 1211116 Pzr 130817th SS 1908Lehr Amiens
German Second Impulse CombatThere is no German Second Impulse Combat. The turn is over.
Turn 2 Weather DeterminationAutomatically Clear.
Partisan DeterminationThe DR is 4, so there is no Partisan this turn.
End Allied first turn
End German first impulse movement
End German first impulse combat
End German first turn
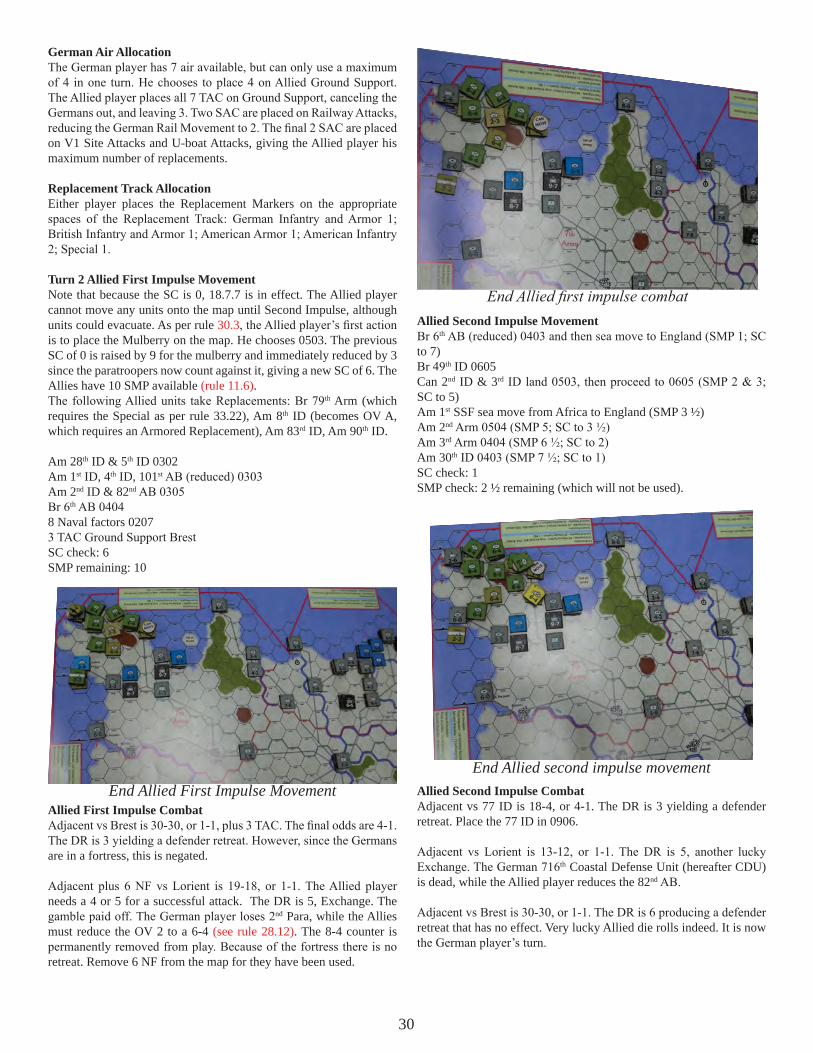
30
German Air AllocationThe German player has 7 air available, but can only use a maximum of 4 in one turn. He chooses to place 4 on Allied Ground Support. The Allied player places all 7 TAC on Ground Support, canceling the Germans out, and leaving 3. Two SAC are placed on Railway Attacks, reducing the German Rail Movement to 2. The final 2 SAC are placed on V1 Site Attacks and U-boat Attacks, giving the Allied player his maximum number of replacements.
Replacement Track AllocationEither player places the Replacement Markers on the appropriate spaces of the Replacement Track: German Infantry and Armor 1; British Infantry and Armor 1; American Armor 1; American Infantry 2; Special 1.
Turn 2 Allied First Impulse MovementNote that because the SC is 0, 18.7.7 is in effect. The Allied player cannot move any units onto the map until Second Impulse, although units could evacuate. As per rule 30.3, the Allied player’s first action is to place the Mulberry on the map. He chooses 0503. The previous SC of 0 is raised by 9 for the mulberry and immediately reduced by 3 since the paratroopers now count against it, giving a new SC of 6. The Allies have 10 SMP available (rule 11.6).The following Allied units take Replacements: Br 79th Arm (which requires the Special as per rule 33.22), Am 8th ID (becomes OV A, which requires an Armored Replacement), Am 83rd ID, Am 90th ID.
Am 28th ID & 5th ID 0302Am 1st ID, 4th ID, 101st AB (reduced) 0303Am 2nd ID & 82nd AB 0305Br 6th AB 04048 Naval factors 02073 TAC Ground Support BrestSC check: 6SMP remaining: 10
Allied First Impulse CombatAdjacent vs Brest is 30-30, or 1-1, plus 3 TAC. The final odds are 4-1. The DR is 3 yielding a defender retreat. However, since the Germans are in a fortress, this is negated.
Adjacent plus 6 NF vs Lorient is 19-18, or 1-1. The Allied player needs a 4 or 5 for a successful attack. The DR is 5, Exchange. The gamble paid off. The German player loses 2nd Para, while the Allies must reduce the OV 2 to a 6-4 (see rule 28.12). The 8-4 counter is permanently removed from play. Because of the fortress there is no retreat. Remove 6 NF from the map for they have been used.
Allied Second Impulse MovementBr 6th AB (reduced) 0403 and then sea move to England (SMP 1; SC to 7)Br 49th ID 0605Can 2nd ID & 3rd ID land 0503, then proceed to 0605 (SMP 2 & 3; SC to 5)Am 1st SSF sea move from Africa to England (SMP 3 ½)Am 2nd Arm 0504 (SMP 5; SC to 3 ½)Am 3rd Arm 0404 (SMP 6 ½; SC to 2)Am 30th ID 0403 (SMP 7 ½; SC to 1)SC check: 1SMP check: 2 ½ remaining (which will not be used).
Allied Second Impulse CombatAdjacent vs 77 ID is 18-4, or 4-1. The DR is 3 yielding a defender retreat. Place the 77 ID in 0906.
Adjacent vs Lorient is 13-12, or 1-1. The DR is 5, another lucky Exchange. The German 716th Coastal Defense Unit (hereafter CDU) is dead, while the Allied player reduces the 82nd AB.
Adjacent vs Brest is 30-30, or 1-1. The DR is 6 producing a defender retreat that has no effect. Very lucky Allied die rolls indeed. It is now the German player’s turn.
End Allied First Impulse Movement
End Allied first impulse combat
End Allied second impulse movement
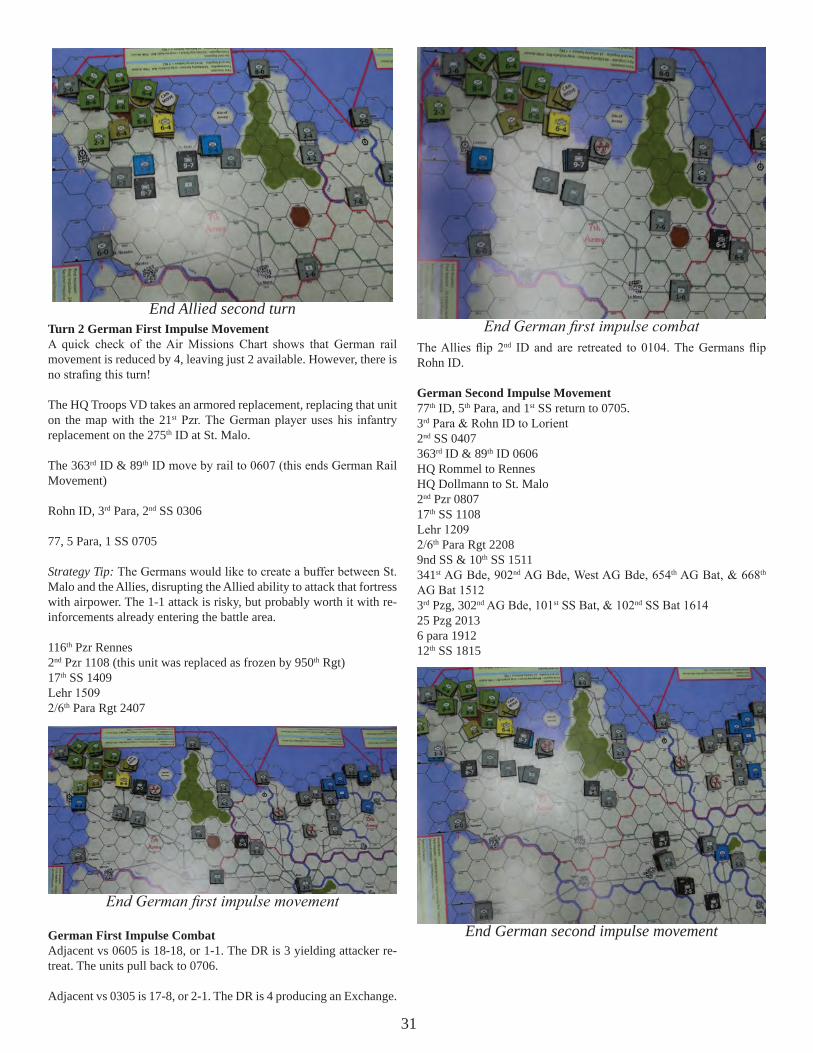
31
Turn 2 German First Impulse MovementA quick check of the Air Missions Chart shows that German rail movement is reduced by 4, leaving just 2 available. However, there is no strafing this turn!
The HQ Troops VD takes an armored replacement, replacing that unit on the map with the 21st Pzr. The German player uses his infantry replacement on the 275th ID at St. Malo.
The 363rd ID & 89th ID move by rail to 0607 (this ends German Rail Movement)
Rohn ID, 3rd Para, 2nd SS 0306
77, 5 Para, 1 SS 0705
Strategy Tip: The Germans would like to create a buffer between St. Malo and the Allies, disrupting the Allied ability to attack that fortress with airpower. The 1-1 attack is risky, but probably worth it with re-inforcements already entering the battle area.
116th Pzr Rennes2nd Pzr 1108 (this unit was replaced as frozen by 950th Rgt)17th SS 1409Lehr 15092/6th Para Rgt 2407
German First Impulse CombatAdjacent vs 0605 is 18-18, or 1-1. The DR is 3 yielding attacker re-treat. The units pull back to 0706.
Adjacent vs 0305 is 17-8, or 2-1. The DR is 4 producing an Exchange.
The Allies flip 2nd ID and are retreated to 0104. The Germans flip Rohn ID.
German Second Impulse Movement77th ID, 5th Para, and 1st SS return to 0705.3rd Para & Rohn ID to Lorient2nd SS 0407363rd ID & 89th ID 0606HQ Rommel to RennesHQ Dollmann to St. Malo2nd Pzr 080717th SS 1108Lehr 12092/6th Para Rgt 22089nd SS & 10th SS 1511341st AG Bde, 902nd AG Bde, West AG Bde, 654th AG Bat, & 668th AG Bat 15123rd Pzg, 302nd AG Bde, 101st SS Bat, & 102nd SS Bat 161425 Pzg 20136 para 191212th SS 1815
End Allied second turn
End German first impulse movement
End German first impulse combat
End German second impulse movement
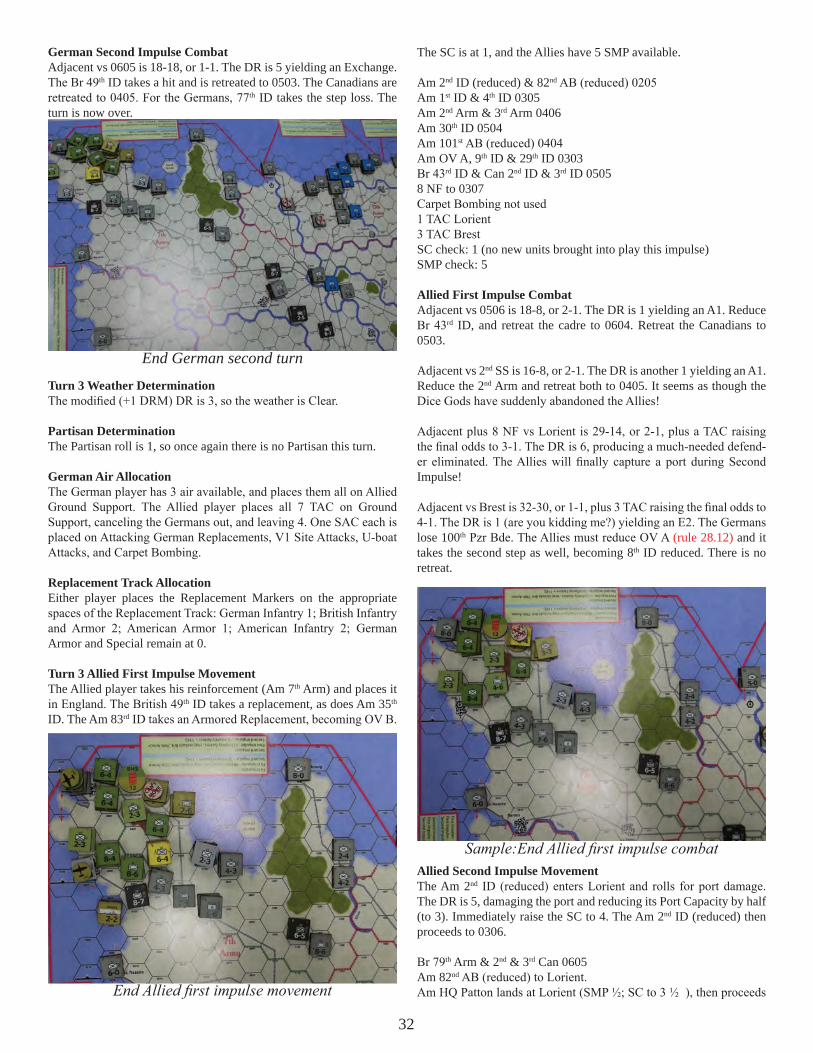
32
German Second Impulse CombatAdjacent vs 0605 is 18-18, or 1-1. The DR is 5 yielding an Exchange. The Br 49th ID takes a hit and is retreated to 0503. The Canadians are retreated to 0405. For the Germans, 77th ID takes the step loss. The turn is now over.
Turn 3 Weather DeterminationThe modified (+1 DRM) DR is 3, so the weather is Clear.
Partisan DeterminationThe Partisan roll is 1, so once again there is no Partisan this turn.
German Air AllocationThe German player has 3 air available, and places them all on Allied Ground Support. The Allied player places all 7 TAC on Ground Support, canceling the Germans out, and leaving 4. One SAC each is placed on Attacking German Replacements, V1 Site Attacks, U-boat Attacks, and Carpet Bombing.
Replacement Track AllocationEither player places the Replacement Markers on the appropriate spaces of the Replacement Track: German Infantry 1; British Infantry and Armor 2; American Armor 1; American Infantry 2; German Armor and Special remain at 0.
Turn 3 Allied First Impulse MovementThe Allied player takes his reinforcement (Am 7th Arm) and places it in England. The British 49th ID takes a replacement, as does Am 35th ID. The Am 83rd ID takes an Armored Replacement, becoming OV B.
The SC is at 1, and the Allies have 5 SMP available.
Am 2nd ID (reduced) & 82nd AB (reduced) 0205Am 1st ID & 4th ID 0305Am 2nd Arm & 3rd Arm 0406Am 30th ID 0504Am 101st AB (reduced) 0404Am OV A, 9th ID & 29th ID 0303Br 43rd ID & Can 2nd ID & 3rd ID 05058 NF to 0307Carpet Bombing not used1 TAC Lorient 3 TAC BrestSC check: 1 (no new units brought into play this impulse)SMP check: 5
Allied First Impulse CombatAdjacent vs 0506 is 18-8, or 2-1. The DR is 1 yielding an A1. Reduce Br 43rd ID, and retreat the cadre to 0604. Retreat the Canadians to 0503.
Adjacent vs 2nd SS is 16-8, or 2-1. The DR is another 1 yielding an A1. Reduce the 2nd Arm and retreat both to 0405. It seems as though the Dice Gods have suddenly abandoned the Allies!
Adjacent plus 8 NF vs Lorient is 29-14, or 2-1, plus a TAC raising the final odds to 3-1. The DR is 6, producing a much-needed defend-er eliminated. The Allies will finally capture a port during Second Impulse!
Adjacent vs Brest is 32-30, or 1-1, plus 3 TAC raising the final odds to 4-1. The DR is 1 (are you kidding me?) yielding an E2. The Germans lose 100th Pzr Bde. The Allies must reduce OV A (rule 28.12) and it takes the second step as well, becoming 8th ID reduced. There is no retreat.
Allied Second Impulse MovementThe Am 2nd ID (reduced) enters Lorient and rolls for port damage. The DR is 5, damaging the port and reducing its Port Capacity by half (to 3). Immediately raise the SC to 4. The Am 2nd ID (reduced) then proceeds to 0306.
Br 79th Arm & 2nd & 3rd Can 0605Am 82nd AB (reduced) to Lorient.Am HQ Patton lands at Lorient (SMP ½; SC to 3 ½ ), then proceeds
End German second turn
End Allied first impulse movement
Sample:End Allied first impulse combat
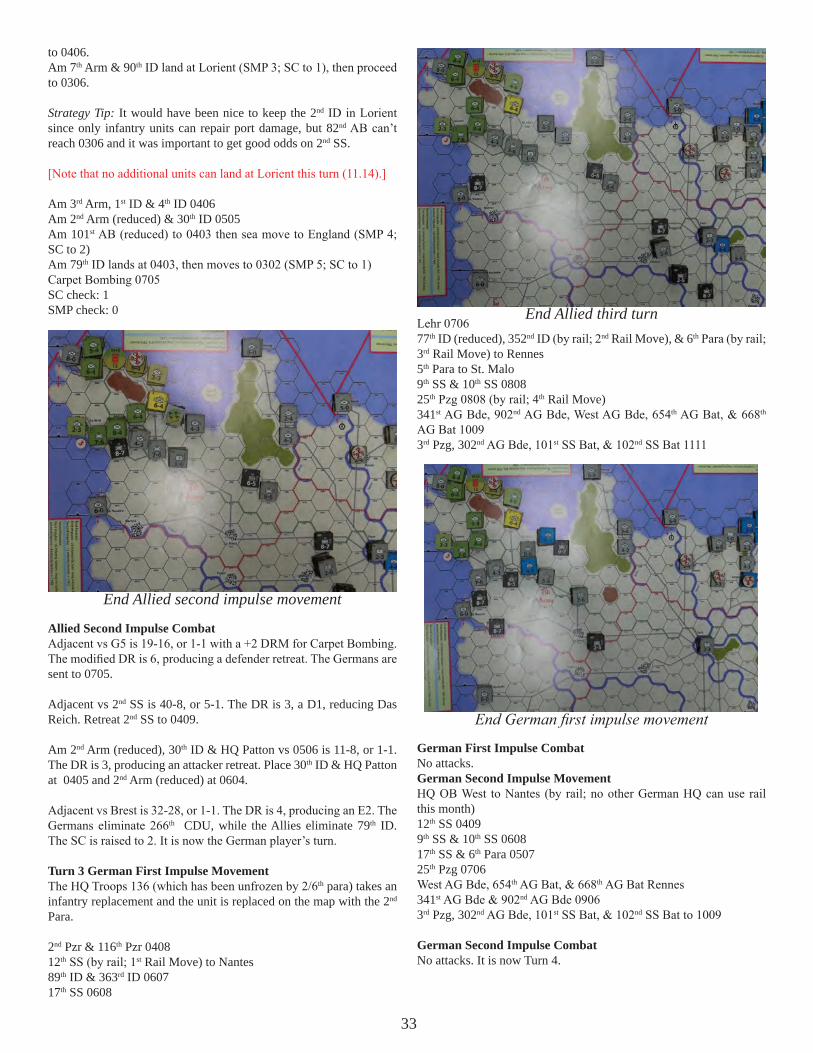
33
to 0406.Am 7th Arm & 90th ID land at Lorient (SMP 3; SC to 1), then proceed to 0306.
Strategy Tip: It would have been nice to keep the 2nd ID in Lorient since only infantry units can repair port damage, but 82nd AB can’t reach 0306 and it was important to get good odds on 2nd SS.
[Note that no additional units can land at Lorient this turn (11.14).]
Am 3rd Arm, 1st ID & 4th ID 0406Am 2nd Arm (reduced) & 30th ID 0505Am 101st AB (reduced) to 0403 then sea move to England (SMP 4; SC to 2)Am 79th ID lands at 0403, then moves to 0302 (SMP 5; SC to 1)Carpet Bombing 0705SC check: 1SMP check: 0
Allied Second Impulse CombatAdjacent vs G5 is 19-16, or 1-1 with a +2 DRM for Carpet Bombing. The modified DR is 6, producing a defender retreat. The Germans are sent to 0705.
Adjacent vs 2nd SS is 40-8, or 5-1. The DR is 3, a D1, reducing Das Reich. Retreat 2nd SS to 0409.
Am 2nd Arm (reduced), 30th ID & HQ Patton vs 0506 is 11-8, or 1-1. The DR is 3, producing an attacker retreat. Place 30th ID & HQ Patton at 0405 and 2nd Arm (reduced) at 0604.
Adjacent vs Brest is 32-28, or 1-1. The DR is 4, producing an E2. The Germans eliminate 266th CDU, while the Allies eliminate 79th ID. The SC is raised to 2. It is now the German player’s turn.
Turn 3 German First Impulse MovementThe HQ Troops 136 (which has been unfrozen by 2/6th para) takes an infantry replacement and the unit is replaced on the map with the 2nd Para.
2nd Pzr & 116th Pzr 040812th SS (by rail; 1st Rail Move) to Nantes89th ID & 363rd ID 060717th SS 0608
Lehr 070677th ID (reduced), 352nd ID (by rail; 2nd Rail Move), & 6th Para (by rail; 3rd Rail Move) to Rennes5th Para to St. Malo9th SS & 10th SS 080825th Pzg 0808 (by rail; 4th Rail Move)341st AG Bde, 902nd AG Bde, West AG Bde, 654th AG Bat, & 668th AG Bat 10093rd Pzg, 302nd AG Bde, 101st SS Bat, & 102nd SS Bat 1111
German First Impulse CombatNo attacks.German Second Impulse MovementHQ OB West to Nantes (by rail; no other German HQ can use rail this month)12th SS 04099th SS & 10th SS 060817th SS & 6th Para 050725th Pzg 0706West AG Bde, 654th AG Bat, & 668th AG Bat Rennes341st AG Bde & 902nd AG Bde 09063rd Pzg, 302nd AG Bde, 101st SS Bat, & 102nd SS Bat to 1009
German Second Impulse CombatNo attacks. It is now Turn 4.
End Allied second impulse movement
End Allied third turn
End German first impulse movement

34
SummaryRecapping the first three turns, the Allies are ashore to stay. They are in pretty good shape, even if the next turn is a storm (there is a +2 DRM making the likelihood 50-50). The SC is low, but Brest is finally reduced and should fall soon. At this point the game favors the Allies because they have lost but one unit. However, for three weeks of fighting the Germans have also taken relatively few casualties. It remains to be seen how long the Germans can hold out in Brittany. The longer they stay, the better their chances are of overall victory. However, stay too long and take too many casualties and the result will be just as it was historically. Knowing when to cut and run is often the key to German victory.
GERMAN SET UP
Netherlands19th Pzr (reduced) 3502 (dyke)719th CDU Amsterdam347th CDU, HQ Rotterdam16th LW CDU 3103
15th
HQ Antwerp182nd Training Division (hereafter TD), 19th LW ID 2806331st ID 2805344th CDU Ostende245th CDU 250447th CDU, 346th CDU Dunkirk712th CDU, 165th TD, 1/1255th V1 Site Garrison Unit (hereafter V1) Calais18th LW CDU, 2/1255th V1 Boulogne3/1255th V1 220617th LW CDU, 326th CDU 21051/155th V1 210684th ID 2107136th HQ Troops (hereafter HQT) Amiens2/155th V1 2006348th CDU, 711th CDU, 3/155th V1 Dieppe116th Pzr 19082nd Pzr Rouen48th CDU, 49th CDU Le Havre85th ID hidden
7th 5th Para Caen
91st AL 1205265th CDU, 709th CDU Cherbourg77th ID 1107275th ID (reduced) 0906343rd CDU St. Malo3rd Para, HQ Rennes21st Pzr 0605243rd CDU St. Nazaire716th CDU Lorient266th CDU, 319th CDU Brest353rd ID hidden
1st 708th CDU, HQ La Rochelle158th TD 0216159th TD 011611th Pzr 0220276th ID (reduced) Bordeaux
19th 244th CDU, 338th CDU, 277th ID (reduced) Marseilles242nd ID, 271st ID Toulon9th Pzr, HQ 1834148th TD Cannes272nd ID (reduced) Nice
Free11th LW AG 340212th LW AG 2405189th ID 2006950th Rgt 160630th Bde 130513th LW AG 0504100th Pzr Bde 0404Rohn ID NantesVD HQT 1430
HiddenLehr 3006352nd ID Antwerp2/6th Para Rgt 280517th SS 250485th ID (15) 21061st SS 1209353rd ID (7) St. Malo2nd SS 060612th SS 1433
End German third turn
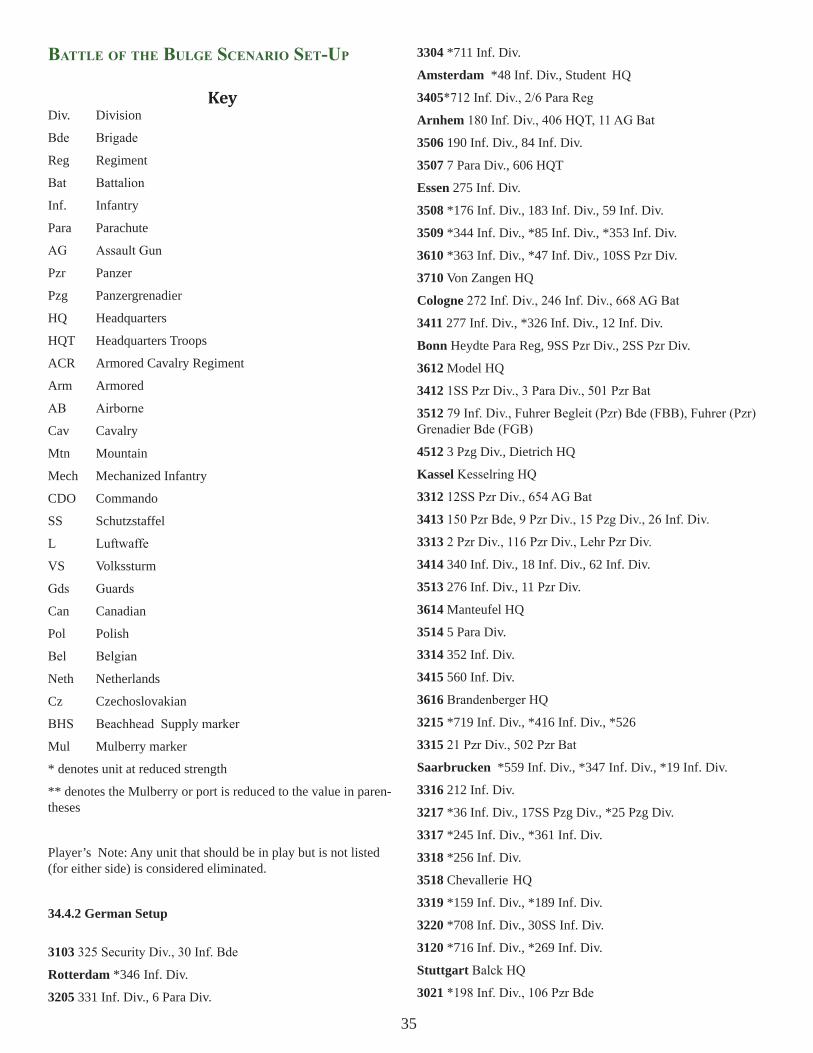
35
baTTle of The bUlge sCenaRio seT-Up
KeyDiv. Division
Bde Brigade
Reg Regiment
Bat Battalion
Inf. Infantry
Para Parachute
AG Assault Gun
Pzr Panzer
Pzg Panzergrenadier
HQ Headquarters
HQT Headquarters Troops
ACR Armored Cavalry Regiment
Arm Armored
AB Airborne
Cav Cavalry
Mtn Mountain
Mech Mechanized Infantry
CDO Commando
SS Schutzstaffel
L Luftwaffe
VS Volkssturm
Gds Guards
Can Canadian
Pol Polish
Bel Belgian
Neth Netherlands
Cz Czechoslovakian
BHS Beachhead Supply marker
Mul Mulberry marker
* denotes unit at reduced strength
** denotes the Mulberry or port is reduced to the value in paren-theses
Player’s Note: Any unit that should be in play but is not listed (for either side) is considered eliminated.
34.4.2 German Setup
3103 325 Security Div., 30 Inf. Bde
Rotterdam *346 Inf. Div.
3205 331 Inf. Div., 6 Para Div.
3304 *711 Inf. Div.
Amsterdam *48 Inf. Div., Student HQ
3405*712 Inf. Div., 2/6 Para Reg
Arnhem 180 Inf. Div., 406 HQT, 11 AG Bat
3506 190 Inf. Div., 84 Inf. Div.
3507 7 Para Div., 606 HQT
Essen 275 Inf. Div.
3508 *176 Inf. Div., 183 Inf. Div., 59 Inf. Div.
3509 *344 Inf. Div., *85 Inf. Div., *353 Inf. Div.
3610 *363 Inf. Div., *47 Inf. Div., 10SS Pzr Div.
3710 Von Zangen HQ
Cologne 272 Inf. Div., 246 Inf. Div., 668 AG Bat
3411 277 Inf. Div., *326 Inf. Div., 12 Inf. Div.
Bonn Heydte Para Reg, 9SS Pzr Div., 2SS Pzr Div.
3612 Model HQ
3412 1SS Pzr Div., 3 Para Div., 501 Pzr Bat
3512 79 Inf. Div., Fuhrer Begleit (Pzr) Bde (FBB), Fuhrer (Pzr) Grenadier Bde (FGB)
4512 3 Pzg Div., Dietrich HQ
Kassel Kesselring HQ
3312 12SS Pzr Div., 654 AG Bat
3413 150 Pzr Bde, 9 Pzr Div., 15 Pzg Div., 26 Inf. Div.
3313 2 Pzr Div., 116 Pzr Div., Lehr Pzr Div.
3414 340 Inf. Div., 18 Inf. Div., 62 Inf. Div.
3513 276 Inf. Div., 11 Pzr Div.
3614 Manteufel HQ
3514 5 Para Div.
3314 352 Inf. Div.
3415 560 Inf. Div.
3616 Brandenberger HQ
3215 *719 Inf. Div., *416 Inf. Div., *526
3315 21 Pzr Div., 502 Pzr Bat
Saarbrucken *559 Inf. Div., *347 Inf. Div., *19 Inf. Div.
3316 212 Inf. Div.
3217 *36 Inf. Div., 17SS Pzg Div., *25 Pzg Div.
3317 *245 Inf. Div., *361 Inf. Div.
3318 *256 Inf. Div.
3518 Chevallerie HQ
3319 *159 Inf. Div., *189 Inf. Div.
3220 *708 Inf. Div., 30SS Inf. Div.
3120 *716 Inf. Div., *269 Inf. Div.
Stuttgart Balck HQ
3021 *198 Inf. Div., 106 Pzr Bde
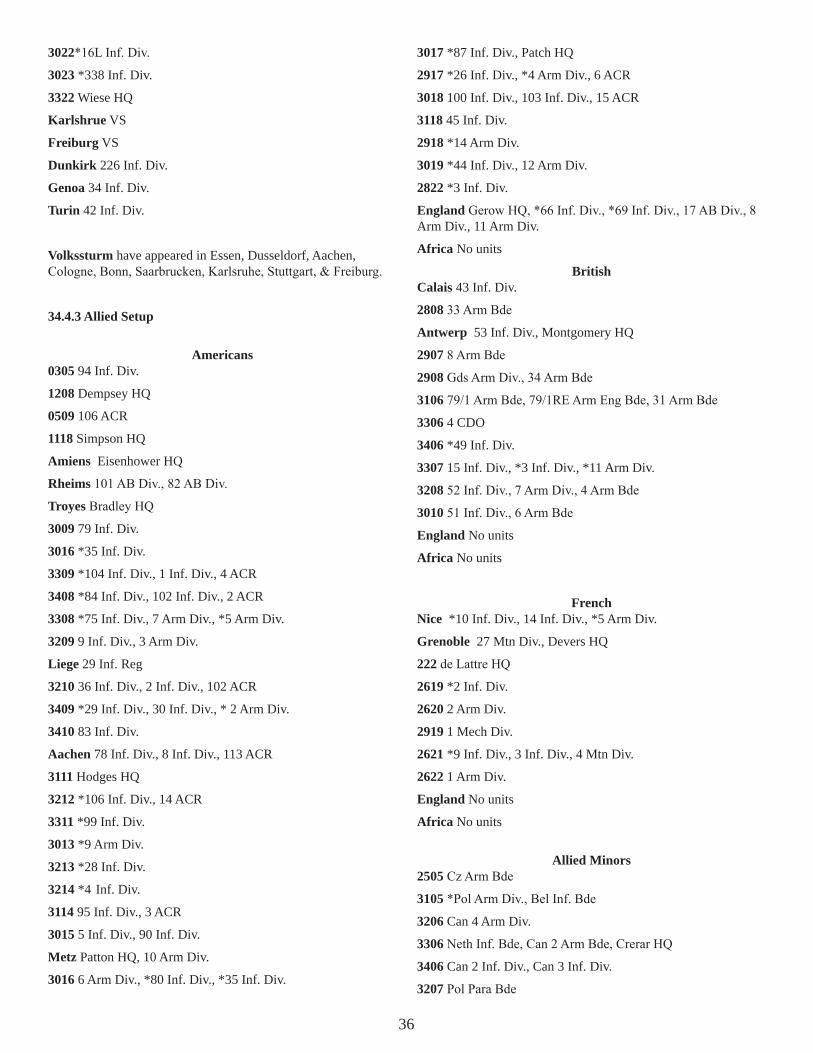
36
3022*16L Inf. Div.
3023 *338 Inf. Div.
3322 Wiese HQ
Karlshrue VS
Freiburg VS
Dunkirk 226 Inf. Div.
Genoa 34 Inf. Div.
Turin 42 Inf. Div.
Volkssturm have appeared in Essen, Dusseldorf, Aachen, Cologne, Bonn, Saarbrucken, Karlsruhe, Stuttgart, & Freiburg.
34.4.3 Allied Setup
Americans0305 94 Inf. Div.
1208 Dempsey HQ
0509 106 ACR
1118 Simpson HQ
Amiens Eisenhower HQ
Rheims 101 AB Div., 82 AB Div.
Troyes Bradley HQ
3009 79 Inf. Div.
3016 *35 Inf. Div.
3309 *104 Inf. Div., 1 Inf. Div., 4 ACR
3408 *84 Inf. Div., 102 Inf. Div., 2 ACR
3308 *75 Inf. Div., 7 Arm Div., *5 Arm Div.
3209 9 Inf. Div., 3 Arm Div.
Liege 29 Inf. Reg
3210 36 Inf. Div., 2 Inf. Div., 102 ACR
3409 *29 Inf. Div., 30 Inf. Div., * 2 Arm Div.
3410 83 Inf. Div.
Aachen 78 Inf. Div., 8 Inf. Div., 113 ACR
3111 Hodges HQ
3212 *106 Inf. Div., 14 ACR
3311 *99 Inf. Div.
3013 *9 Arm Div.
3213 *28 Inf. Div.
3214 *4 Inf. Div.
3114 95 Inf. Div., 3 ACR
3015 5 Inf. Div., 90 Inf. Div.
Metz Patton HQ, 10 Arm Div.
3016 6 Arm Div., *80 Inf. Div., *35 Inf. Div.
3017 *87 Inf. Div., Patch HQ
2917 *26 Inf. Div., *4 Arm Div., 6 ACR
3018 100 Inf. Div., 103 Inf. Div., 15 ACR
3118 45 Inf. Div.
2918 *14 Arm Div.
3019 *44 Inf. Div., 12 Arm Div.
2822 *3 Inf. Div.
England Gerow HQ, *66 Inf. Div., *69 Inf. Div., 17 AB Div., 8 Arm Div., 11 Arm Div.
Africa No units
BritishCalais 43 Inf. Div.
2808 33 Arm Bde
Antwerp 53 Inf. Div., Montgomery HQ
2907 8 Arm Bde
2908 Gds Arm Div., 34 Arm Bde
3106 79/1 Arm Bde, 79/1RE Arm Eng Bde, 31 Arm Bde
3306 4 CDO
3406 *49 Inf. Div.
3307 15 Inf. Div., *3 Inf. Div., *11 Arm Div.
3208 52 Inf. Div., 7 Arm Div., 4 Arm Bde
3010 51 Inf. Div., 6 Arm Bde
England No units
Africa No units
FrenchNice *10 Inf. Div., 14 Inf. Div., *5 Arm Div.
Grenoble 27 Mtn Div., Devers HQ
222 de Lattre HQ
2619 *2 Inf. Div.
2620 2 Arm Div.
2919 1 Mech Div.
2621 *9 Inf. Div., 3 Inf. Div., 4 Mtn Div.
2622 1 Arm Div.
England No units
Africa No units
Allied Minors2505 Cz Arm Bde
3105 *Pol Arm Div., Bel Inf. Bde
3206 Can 4 Arm Div.
3306 Neth Inf. Bde, Can 2 Arm Bde, Crerar HQ
3406 Can 2 Inf. Div., Can 3 Inf. Div.
3207 Pol Para Bde
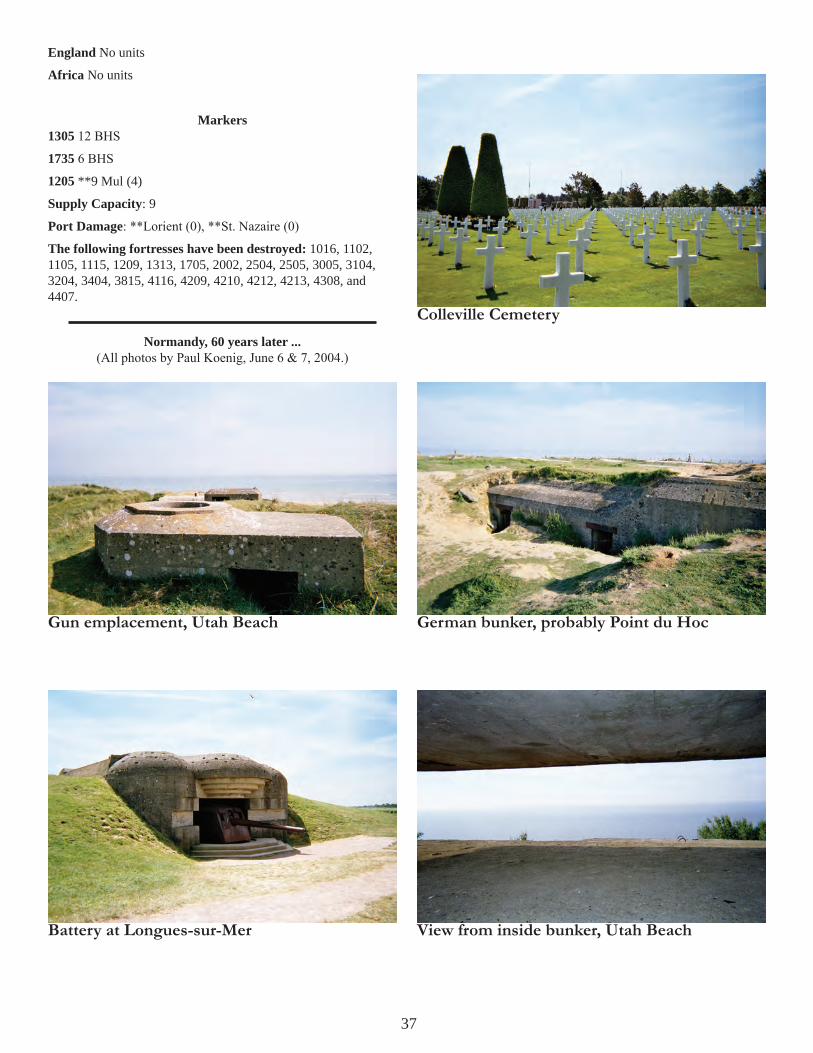
37
England No units
Africa No units
Markers1305 12 BHS
1735 6 BHS
1205 **9 Mul (4)
Supply Capacity: 9
Port Damage: **Lorient (0), **St. Nazaire (0)
The following fortresses have been destroyed: 1016, 1102, 1105, 1115, 1209, 1313, 1705, 2002, 2504, 2505, 3005, 3104, 3204, 3404, 3815, 4116, 4209, 4210, 4212, 4213, 4308, and 4407.
Normandy, 60 years later ...(All photos by Paul Koenig, June 6 & 7, 2004.)
Colleville Cemetery
Gun emplacement, Utah Beach
Battery at Longues-sur-Mer
German bunker, probably Point du Hoc
View from inside bunker, Utah Beach
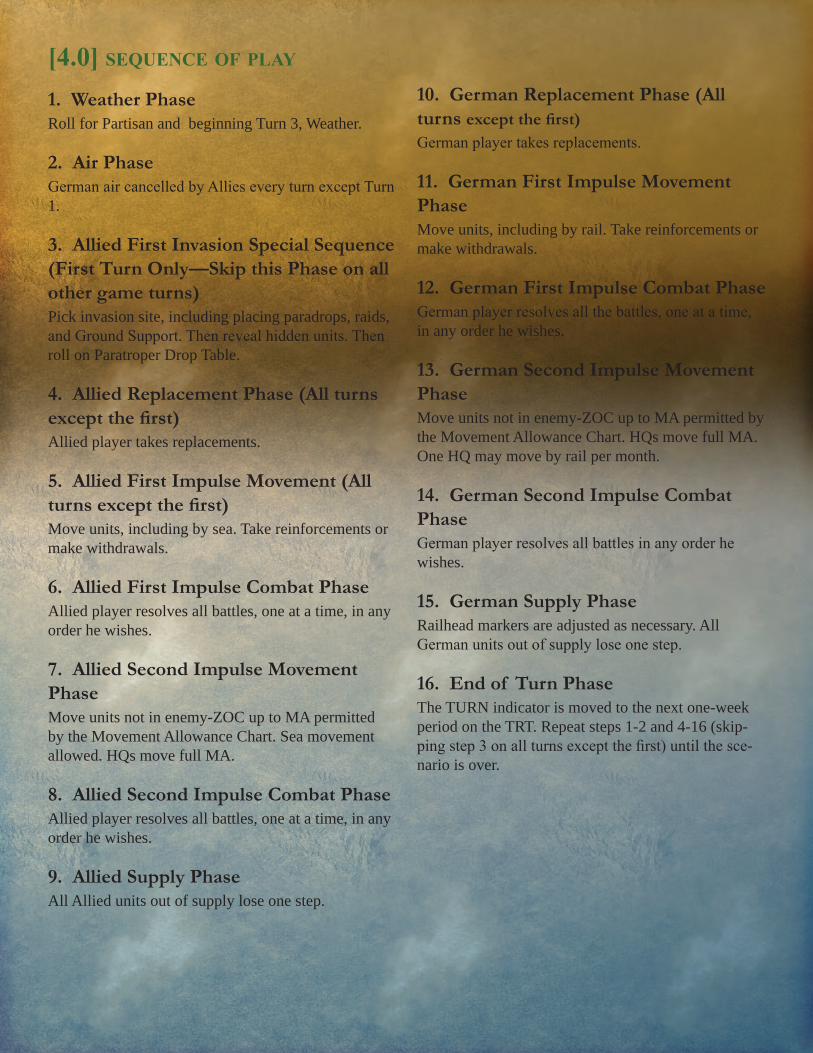
[4.0] seqUenCe of play
1. Weather PhaseRoll for Partisan and beginning Turn 3, Weather.
2. Air PhaseGerman air cancelled by Allies every turn except Turn 1.
3. Allied First Invasion Special Sequence (First Turn Only—Skip this Phase on all other game turns)Pick invasion site, including placing paradrops, raids, and Ground Support. Then reveal hidden units. Then roll on Paratroper Drop Table.
4. Allied Replacement Phase (All turns except the first)Allied player takes replacements.
5. Allied First Impulse Movement (All turns except the first)Move units, including by sea. Take reinforcements or make withdrawals.
6. Allied First Impulse Combat Phase Allied player resolves all battles, one at a time, in any order he wishes.
7. Allied Second Impulse Movement PhaseMove units not in enemy-ZOC up to MA permitted by the Movement Allowance Chart. Sea movement allowed. HQs move full MA.
8. Allied Second Impulse Combat PhaseAllied player resolves all battles, one at a time, in any order he wishes.
9. Allied Supply PhaseAll Allied units out of supply lose one step.
10. German Replacement Phase (All turns except the first)German player takes replacements.
11. German First Impulse Movement PhaseMove units, including by rail. Take reinforcements or make withdrawals.
12. German First Impulse Combat PhaseGerman player resolves all the battles, one at a time, in any order he wishes.
13. German Second Impulse Movement PhaseMove units not in enemy-ZOC up to MA permitted by the Movement Allowance Chart. HQs move full MA. One HQ may move by rail per month.
14. German Second Impulse Combat PhaseGerman player resolves all battles in any order he wishes.
15. German Supply PhaseRailhead markers are adjusted as necessary. All German units out of supply lose one step.
16. End of Turn PhaseThe TURN indicator is moved to the next one-week period on the TRT. Repeat steps 1-2 and 4-16 (skip-ping step 3 on all turns except the first) until the sce-nario is over.


![[] Hill’s Atlas of Veterinary Clinical Anatomy](https://static.documents.pub/doc/80x56/56d6bcd31a28ab30168ba0c3/-hills-atlas-of-veterinary-clinical-anatomy.jpg)