Real-World Problems: Taming the Mighty Red River of the North with AutoCAD® Civil 3D® Bill Neuhauser, P.E Managed Design, Inc. – Edina, MN Speaker Casey Bekkerus Ulteig Engineering, Inc. – Fargo, ND Co-Presenter The cities of Fargo, ND and Moorhead, MN are divided by the Red River of the North because of major yearly flooding. To address this, a new six-mile earthen levee system that includes five separate interior drainage systems, five 100-year regional storm water retention basins, and five 5,000 GPM storm water pumping stations was designed. Due to the large scale of the project and the issues that arose, Ulteig Engineers asked for the assistance of their current reseller, Managed Design. The issues pertaining to this project were file size, slow drawings, and issues around being able to have more team members help with the project. Managed Design was hired to come in during the project to help identify bottlenecks in the process. What will be shown and discussed are the results and the final product of implementing both composite surfaces and data shortcuts into their design process. You will be able to ask your questions to both the prime civil tech designer on the project and the corresponding application engineer from Managed Design. Class Code: CL2455 Learning Objectives At the end of this class, you will be able to: Learn the advantages of separating projects into separate drawings based on content. Learn how to name Civil 3D objects for better project recognition. Understand the concept and process of using data shortcuts to both simplify and share your data.
Transcript
Real-World Problems: Taming the Mighty Red River of the North with AutoCAD® Civil 3D®
Bill Neuhauser, P.EManaged Design, Inc. – Edina, MNSpeaker
Casey BekkerusUlteig Engineering, Inc. – Fargo, NDCo-Presenter
The cities of Fargo, ND and Moorhead, MN are divided by the Red River of the North because of major yearly flooding. To address this, a new six-mile earthen levee system that includes five separate interior drainage systems, five 100-year regional storm water retention basins, and five 5,000 GPM storm water pumping stations was designed. Due to the large scale of the project and the issues that arose, Ulteig Engineers asked for the assistance of their current reseller, Managed Design. The issues pertaining to this project were file size, slow drawings, and issues around being able to have more team members help with the project. Managed Design was hired to come in during the project to help identify bottlenecks in the process. What will be shown and discussed are the results and the final product of implementing both composite surfaces and data shortcuts into their design process. You will be able to ask your questions to both the prime civil tech designer on the project and the corresponding application engineer from Managed Design.
Class Code: CL2455
Learning ObjectivesAt the end of this class, you will be able to:
Learn the advantages of separating projects into separate drawings based on content. Learn how to name Civil 3D objects for better project recognition. Understand the concept and process of using data shortcuts to both simplify and share your data. Learn how composite surfaces are used to link each phase together to ultimately create one total
site surface for machine control.
Real-World Problems: Taming the Mighty Red River of the North with AutoCAD® Civil 3D®
About the SpeakersWilliam Neuhauser, PE, has been a civil applications engineer for Managed Design, Inc. out of Minneapolis, Minnesota, since the summer of 2005. Prior to this, he taught civil techs at Minnesota State Community and Technical College, and prior to that he worked for a few North Dakota civil consultant firms for about 10 years as an engineer, CADD guy, CADD manager, and supervisor (better known as a jack-of-all-trades). He was also one of the first AutoCAD® Civil 3D® ICE certified experts. At one time, he figured out that he had spent approximately 25,000 hours using DCA, Softdesk®, LDT, and now C3D.
Casey Bekkerus is an Engineering Technician with 7 years of experience. His background includes projects from highway and municipal street and utility to permanent flood control projects. Experience includes C3D drafting and design, preparation of plans and specifications, construction observation, monthly pay estimates, and record drawings. He is also MN DOT certified in the following areas; Aggregate Production, Bituminous Street I & II, Concrete Field I & II, Grading& Base I & II.
Real-World Problems: Taming the Mighty Red River of the North with AutoCAD® Civil 3D®
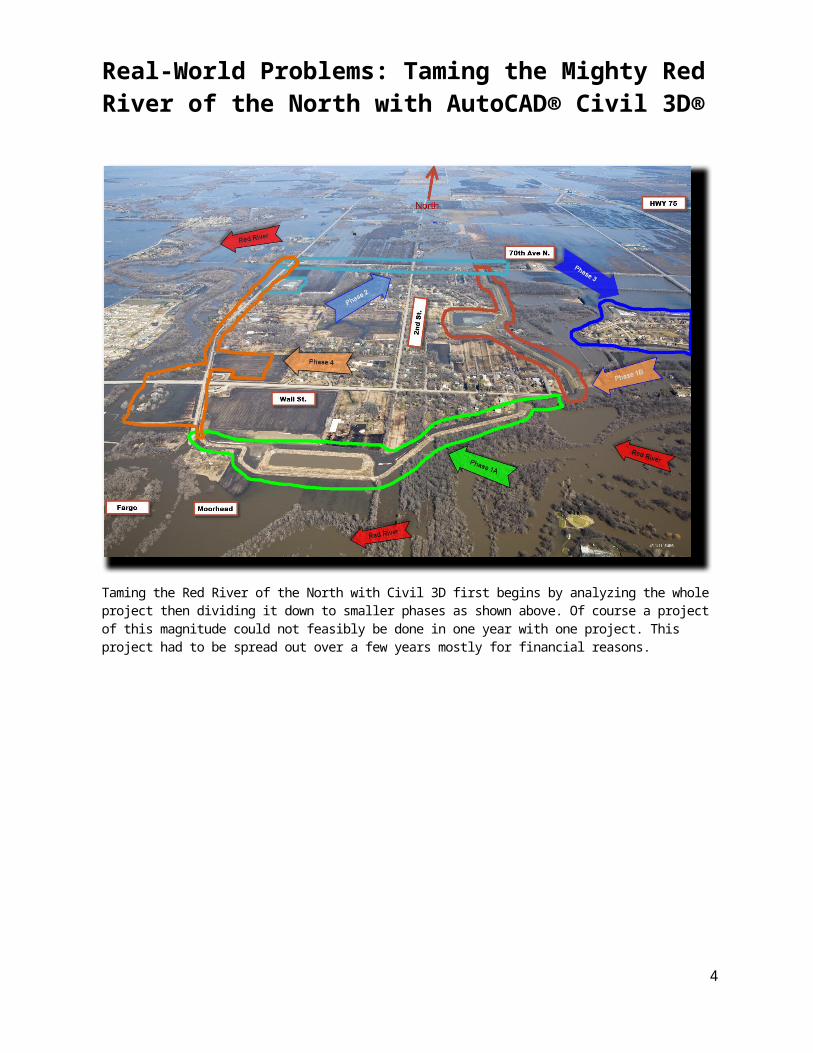
Taming the Red River of the North with Civil 3D first begins by analyzing the whole project then dividing it down to smaller phases as shown above. Of course a project of this magnitude could not feasibly be done in one year with one project. This project had to be spread out over a few years mostly for financial reasons.
3
Real-World Problems: Taming the Mighty Red River of the North with AutoCAD® Civil 3D®
When this project was first conceived, Ulteig Engineering Inc. (UEI) was in the process of moving from Autodesk Land Development Desktop to Civil 3D 2009. It was decided at that time to use this project as their pilot project for Civil 3D.The phasing that is shown above is not in chronicle order. Due to financial and political constraints, phase 2 was the first designed and phase 1a was the first to use the method of which we are about to talk.
Phase 2 was a fairly straightforward project with only a few intersections added to the corridor and no additional ponds or access roads. The project, as you can see above, was only about 1.5 miles long.
4
Real-World Problems: Taming the Mighty Red River of the North with AutoCAD® Civil 3D®
This was completed in one drawing with one corridor and only a few side alignments were necessary for the intersections seen above.
Phase 1A seen above was the first really complex phase that started to stress Civil 3D 2009. Ulteig Engineering, Inc. (UEI) first started this project with full intent of using the same process as was used in phase 2. During this time, UEI started to design the main dike/access road, lift station and the large pond. What was discovered fairly early in the design process was that the drawing was becoming slow, unstable and cumbersome. For computers, UEI was still using Windows XP 32 bit and 4 gigs of ram, even though Windows 7 64 bit had just come out and Civil 3D would not be a full 64 bit version until the 2011 version, there was no time frame yet established to move to Windows 7 64 bit. So processing, out-of-memory and fatal errors became a big issue that was bogging down design.At this time, UEI called Managed Design, Inc. (MD) for their input on their process. Our first suggestion was to buy new faster computers with Windows 7 64 bit with at least 8 gigs of ram. Managed Design had been testing Windows 7 64 since its beta stages with both Civil 3d 2008 and 2009 and found that even though Civil 3D was still only a 32 bit software and at this time was no official compliance of either versions of Civil 3D running on Windows 7 64 bit, the stability of Windows 7 64 bit far outweighed any negatives at this time. Next step was to look at their design process within Civil 3D that they were using at this time. With data shortcuts being redesigned in or near the 2009 version and since the IT department had refused using Autodesk Vault due to the additional hardware and costs involved, it was decided that data shortcuts was the only option. With the addition of data shortcuts to their work process, this would allow UEI to divide the project up into smaller drawings that would better work within their hardware.Now the next question was what was to be shared and the naming of Civil 3D objects to better help keep track. The remainder of this paper will better define this. We will first discuss drawing naming, alignment names, surface names and then project folder structure.
5
Real-World Problems: Taming the Mighty Red River of the North with AutoCAD® Civil 3D®
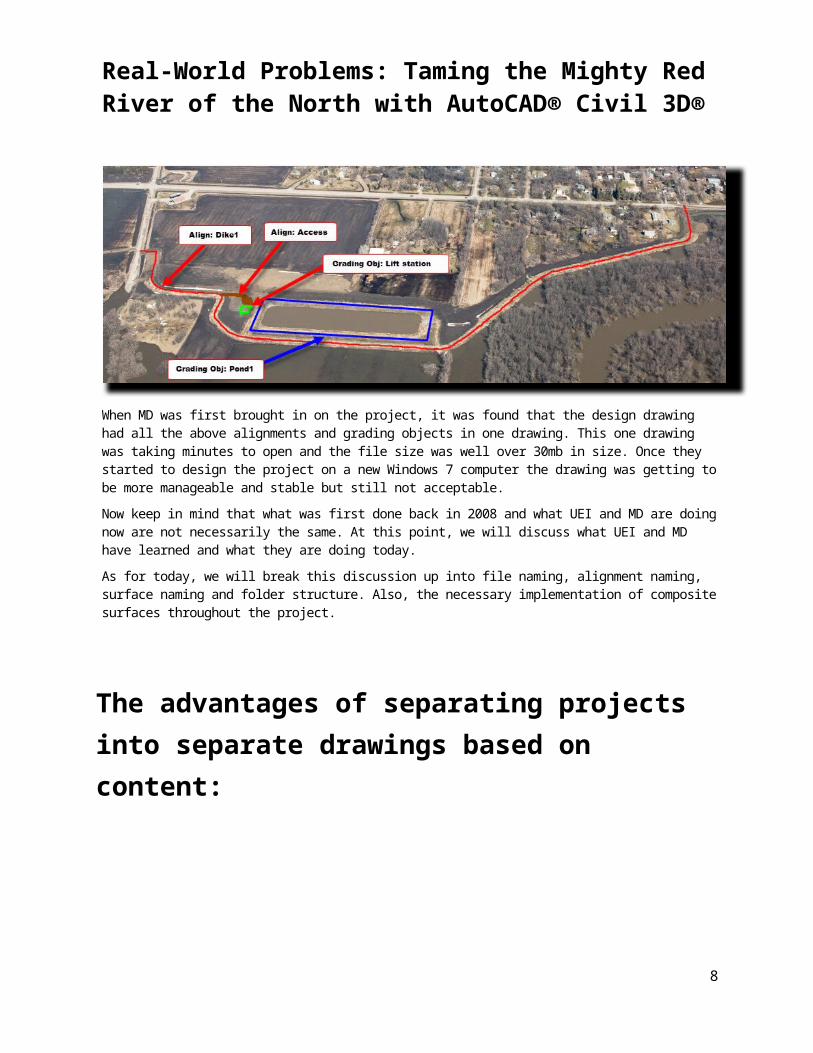
When MD was first brought in on the project, it was found that the design drawing had all the above alignments and grading objects in one drawing. This one drawing was taking minutes to open and the file size was well over 30mb in size. Once they started to design the project on a new Windows 7 computer the drawing was getting to be more manageable and stable but still not acceptable.Now keep in mind that what was first done back in 2008 and what UEI and MD are doing now are not necessarily the same. At this point, we will discuss what UEI and MD have learned and what they are doing today.As for today, we will break this discussion up into file naming, alignment naming, surface naming and folder structure. Also, the necessary implementation of composite surfaces throughout the project.
The advantages of separating projects into separate drawings based on content:Now is the time to start thinking about separating your drawings into one of three categories: Topo drawing, Design files and Sheet files
Category one: Topo DrawingsThis category should include anything existing, i.e. existing surveys, topos, aerials, plat maps, ROW drawings, etc.
Category two: Design DrawingsThis category is where we do our designing; this is where we build our 3D models, i.e. corridors, ponds, grading objects, pipe networks, etc.
Category Three: Sheet filesThis category includes the files we get paid for; the set of plans, the cover sheet, general layout, typical sections, plan and profiles, details, cross-section sheets, etc.
6
Real-World Problems: Taming the Mighty Red River of the North with AutoCAD® Civil 3D®
File naming:We will first add the project number to each file and then the category and finally a simple description of the content.
PROJ#_CAT_DESC
PROJ# : 1204-128
Project number of course is company dependent. This can and will vary from company to company. So use whatever your company uses.
CAT: DESIGN
Category will be from one of the above three: TOPO, DESIGN or SHT
DESC: Corridor_Main_Ave-corridor
This is open, but should be kept short and to the point. There are consequences to having too long of a file name. Later when we talk about data shortcuts, we will discuss this.
Naming civil 3D objects for better project recognition:Naming of your Civil 3D object needs to be short and simple, but descriptive enough to easily find and sort. As in the file naming keeping, the name of the object fairly short is also important. The length of the object name adds to the total character length within your data shortcuts. There is a total amount of characters we must be aware of 256 characters is that limit.
Surfaces:
7
Real-World Problems: Taming the Mighty Red River of the North with AutoCAD® Civil 3D®
Topo surfaces:
EG1, EG2,
Finished Ground Surfaces:
FG1, FG2, POND1, PRKLT1 etc
Alignments:
Primary Roads CL:
Main_Ave-CL, 2ND_ST-CL, Dike1-CL, Access_Rd-CL
Side or Secondary Roads CL:
2nd_ST_Side-CL
Offset and Curb Return:
CR_main_ave_2nd_st-SE
Corridors:
Corridor Names:
Corridor1, Phase1, Phase 2, Dike1, etc.
Corridor Surface:
[corridor_name]_Top , [corridor_name]_Datum
Composite Surfaces:
C1_EG1 with Dike1_Top
C2_C1 with Pond1
C3_C2 with Access_Road_TOP
8
Real-World Problems: Taming the Mighty Red River of the North with AutoCAD® Civil 3D®
Understand the concept and process of using data shortcuts to both simplify and share your data:The idea here is that in order to share data, we must start building an overall picture of our design while we are working on the smaller parts. How can you really design the pond without knowing where the road is? Or know where the pond goes and at what elevation without the location of the road? Iteration by iteration we design and adjust our design; with Civil 3D this iteration by iteration process now can take seconds to do while in the past this took hours if not days. We need to see the end results of our design in almost real time for this to be true. This is where data shortcuts and composite surfaces come into play. With multiple data shortcuts (DS) between drawing and with composite surfaces being linked from drawing to drawing, we can achieve this.
Two keys notes here; one is that by keeping all of your design and sheet files in one folder using the data shortcuts editor included with Civil 3D it is much easier to use. If one must move or rename or move this folder structure of one’s project, then you will need to use the DS editor to update the DS with the new folder structure. If most of the drawings reside in the same folders this is a much easier process. For some companies, this can be a daily or weekly need; I’ve experienced companies that allow their users to take a project either home or on the road with them to work on, therefore needing to constantly move project data to and from their network drives to their laptop drives.
The other is to never the label the original design surface, i.e. corridor top surfaces, but instead the composite surfaces, reason is that if for some reason you need to erase, or in the case of a corridor surface just toggling off its creation for a moment or two, all the labels will be lost. This would not be the case if you had pasted your original surface onto a composite surface and labeled it instead.
9
Real-World Problems: Taming the Mighty Red River of the North with AutoCAD® Civil 3D®
So for this phase of our project, we now have the following drawings with the following objects in each. (note which object/objects in each drawing are DS in from other drawings. If they are not (DS), but (o) then that means they originate in that drawing):
Sample Project - File, Folder and Surface naming
Drawing Name TypeObject Type Object Name
(DS) Folder
1001_Topo_Ex_survey.dwg TOPO TOPO
Surface EG1
Plat_Map.dwg XREF XREF
1001_DESGN_Dike1.dwgDESIG
NDESIG
N
Alignment DIKE_CL-1 (o)
Alignment ACCESS_RD-CL(DS
)
Corridor Dike1 (o)
Surface EG1(DS
)
Surface Dike1-TOP (o)
Surface C1 - EG1 with Dike1-TOP (o)
C2 - C1 with POND1(DS
)
C3 - C2 with ACCESS_RD-TOP(DS
)
1001_DESIGN_Pond1.dwgDESIG
NDESIG
N
Alignment ACCESS_RD-CL(DS
)
Alignment DIKE_CL-1(DS
)
Surface C1 - EG1 with Dike1_TOP(DS
)
Surface POND1_TOP (o)
Surface C2 - C1 with POND1 (o)
Surface C3 - C2 with ACCESS_RD-TOP(DS
)DESIG
N
1001_DESIGN_ACCESS_RD.dwgDESIG
N
Alignment DIKE_CL-1(DS
)
Alignment ACCESS_RD-CL (o)
Corridor ACCESS_RD (o)
Surface C2 - C1 with POND1(DS
)
Surface ACCESS_RD-TOP (o)
Surface C3 - C2 with ACCESS_RD-TOP (o)DESIG
N
10
Real-World Problems: Taming the Mighty Red River of the North with AutoCAD® Civil 3D®
1001_SHT_PLAN-PROF-STORM.dwg SHEETDESIG
N
1001_SHT_COVER_SHT1.dwg SHEETDESIG
N
1001_SHT_GENLAYOUT.dwg SHEETDESIG
N
1001_SHT_CROSSSEC.dwg SHEETDESIG
N
*(DS)Data shortcut into this drawing
*(o) Originated in this drawing
Composite surfaces are used to link each phase together to ultimately create one total site surface for machine control.
First let’s make sure we all know just what a composite surface is and how we create them. What we first must have is at least two previously created surfaces ie. EG and FG. Then what we do is just create a third new surface and within this surface you will first paste the EG1 surface and then the FG surface. Turn rebuild automatic on and set the surface display style to what you want. Now at this time, I would DS out this surface into your project to be used by all other drawings.
As one can see, data shortcuts allow us to start a series of composite surfaces in drawing 1 and progressively add to it in drawing 2 and 3, etc. and then eventually send it back into drawing 1. The key here is that one must remember the order and the origination of each composite surface. We are creating a timeline where we are just showing the results of our end game in the first drawing, we cannot then go and have any of the original Civil 3d objects, then Target these newer composite surfaces in these older drawings. This would cause a circular reference and the world would cease to exist……well not quit, but Civil 3D won’t like it and it will tell you so! What you can do is label these composite surfaces with slope and spot elevations to maybe
11
Real-World Problems: Taming the Mighty Red River of the North with AutoCAD® Civil 3D®
better help you design. Now we are set for the iteration by iteration design with almost real-time results. Keeping track of your drawing and objects and keeping it simple is what will really make this a speedy process!
At time of design, it may be quickest to have all the surfaces of your timeline open in Civil 3D. This way if you make a change in one and you want the final composite surface to quickly show the results, you can go from drawing to drawing and updating your data shortcuts and saving as you go. This will then bring you back to your starting drawing, the final results of your changes you have made. Depending on size of drawings and how many there are, this may be a few seconds or a minute or two: it is still faster than anything we have yet to experience.This final composite surface now can be exported as your final design surface of your whole project. This can now be sent to the contractor and used along with your alignments for machine control and general site staking. The time it takes to go from one simple change of your design and out to the data collector has now been reduced to a few minutes at best!
Final Conclusion:Simplifying your process and being consistent in both your naming of Civil 3D objects and drawing files will pay off huge when it comes to crunch time of your project. The increased speed of your drawings and the increase in your design iterations will allow for a better, more efficient and accurate project from which both you and your client will benefit.